kiama woodcraft group inc · 2020-05-26 · kiama woodcraft group may 2020 ray white has provided a...
TRANSCRIPT
Page 1
Kiama Woodcraft Group May 2020
Kiama Woodcraft
Group Inc
WWW.kiamawoodcraft.org Box 572 Kiama 2533 [email protected]
May 2020 Newsletter Committee
President: Ted Batty:-97478426 Vice President: Darren Keen:- 0415 155 200
Secretary: Darren Collins :-42361466 Treasurer: Tony Walsh:-0416 151 380
Newsletter Editor: Tom Loosz:- 0411 112 041 Co-ordinator: Vacant Contributors to this Newsletter include Ray White, John Daniel, Mal MacRae, Tony Walsh, David Bywater and the Editor (me).
Meetings at 7 pm 4th Wednesday of each month at Kiama High School:-Next Meeting TBA
RRRooolll lll iiinnnggg EEEvvveeennntttsss CCCaaallleeennndddaaarrr
KWG Fire Old Station Sales Sept/Oct TBA
GGGuuueeesssttt SSSpppeeeaaakkkeeerrrsss •
Shed Lockdown News Social restrictions resulting from the Covid-19 virus seems to be slowly easing and life is getting back to some semblance of normality. This is particularly evident in our supermarkets, it’s nice to see the shelves stocked again with the basics and the anxiety of acquiring some loo paper has now faded off into the distance. Hopefully we might be able to have the AGM in July if restrictions are further eased, however this might be still too soon. Judging by the recent articles submitted to me from the members it’s also been a very productive period for most of us in the shed. So keep them coming please, the variety of articles are impressive. I’ve been green turning a stack of jacaranda slabs and making a great mess in the shed, but the bowls will have to sit for a few months before I can get into them. I usually find it hard to get rid of the huge amounts of wood shavings created during these sessions, our garden and compost heap can take only so much before I have to look for alternative options. However on this occasion a friend of ours was very grateful for the shavings which she used for her garden and pending chook house. Perhaps there is a market for wood shavings for all the new chook houses that are springing up during the Corona virus pandemic?? Expo Update. David Bywater I have booked the Masonic Hall for next year’s EXPO:- 6th and 7th of March 2021. Stan thought I was crazy, but we do need to plan. More on that next month as other things get organised/settled. TREASURY REPORT FOR APRIL. Tony WalshMinimal expenses during April, only
stationary and postage. Sadly no income (only 01 cent bank interest) no cause for concern though our finances are sound.
Although I suspect the committee will need to meet soon to review recommendations regarding our upcoming A.G.M.,
clubs annual subscriptions, next Fire Station Exhibition, monthly meetings venue and other stuff. Our public Liability
Insurance premium is due this month (May) a phone call to the C.W.C.s Allison Dews for an update revealed that the
insurance broker is looking at a possible reduced premium for the next financial year……….fingers crossed………due to the
recent less risk/non activity of the woodworking clubs generally.

Page 2
Kiama Woodcraft Group May 2020
Ray White has provided a summary of the method he uses to carve his palm birds.
Finished carving.
Using templates, mark out both sides of block of wood. Cut out on band saw.
Rough out on a belt sander.
Final shaping with a Dremel.
Hand sand with Abranet.
Finish with 6 coats of Shellac
Some more information on carved birds. I use various types of wood to give a variety of colours (see picture). I use a made up shellac for finishing. I first apply a (50% methylated spirit + 50% shellac solution) as a sealing coat. Then apply up to 6 coats of shellac solution with light sanding using 150 grit between coats until a satisfactory finish is achieved. I have included instructions of how to make up the shellac solution, also details on De-Waxed Blond Shellac Flakes supplier Ray hard at work creating his carved birds.
DEWAXED BLOND SHELLAC WOOD FINISH

Page 3
Kiama Woodcraft Group May 2020
Materials:
- 125g Dewaxed Blond Shellac Flakes (Keep In Fridge 5 degrees C.)
Crystals need to be refrigerated to extend shelf life or they may not dissolve.
Supplier: Shines Pty Ltd
7 Whiting Street,
Regents Park
NSW 2143
Ph: 0418 883551
Email: [email protected]
- 500ml methylated spirits
Method:
- Add 125g flakes to large glass jar.
- Add 500ml methylated spirits, stir well every 15-20 minutes until flakes are fully dissolved (takes between 3 - 4
hours)
- Strain approximately 100ml mixture into Mastercraft Jars (250ml) through panty-hose filter (makes 5 jars)
- Top up with metho to make 200ml total
- Cover top of jars with Glad Wrap and screw tops on tight.
- Label and store in cool place - Will last well over 12 months.

Page 4
Kiama Woodcraft Group May 2020
John Daniel:- presents his techniques for making little clocks With a bit of time on my hands, I decide to mass-produce a few little clocks… thought I’d better take a few photos to share.
1. Bandsaw Jig for both position and depth of cut
2. First cut
3. Second cut
Page 5
Kiama Woodcraft Group May 2020
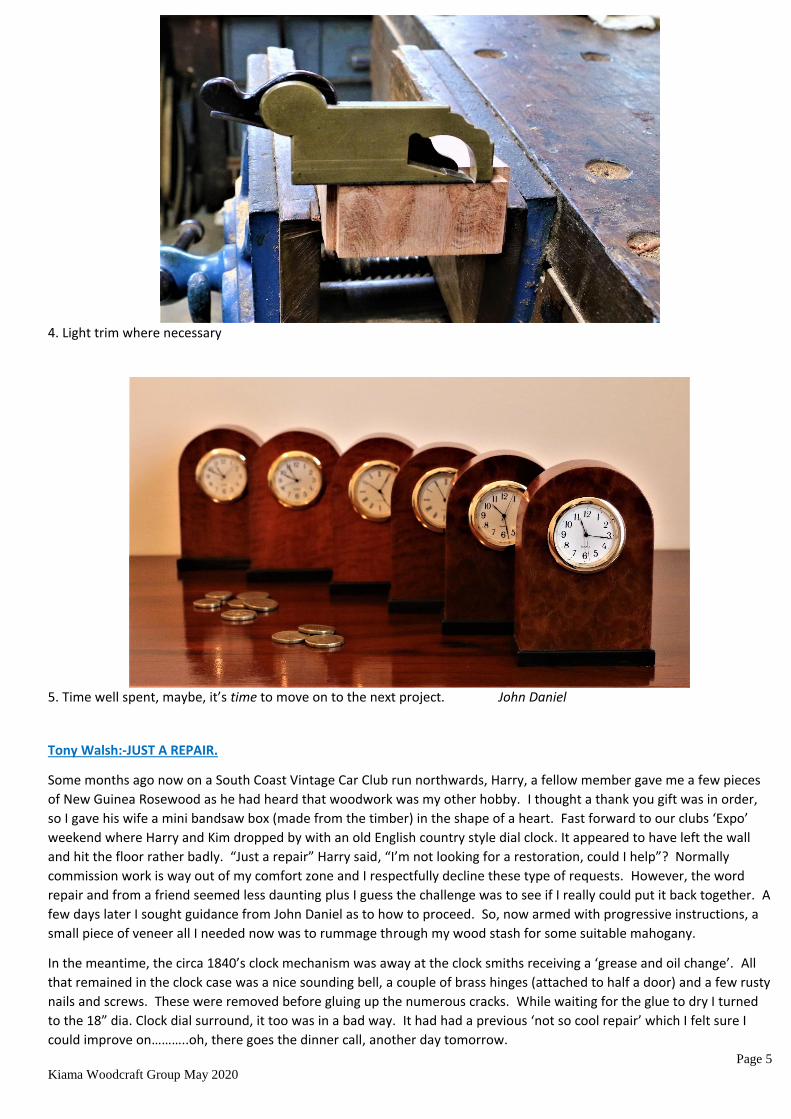
4. Light trim where necessary
5. Time well spent, maybe, it’s time to move on to the next project. John Daniel Tony Walsh:-JUST A REPAIR.
Some months ago now on a South Coast Vintage Car Club run northwards, Harry, a fellow member gave me a few pieces
of New Guinea Rosewood as he had heard that woodwork was my other hobby. I thought a thank you gift was in order,
so I gave his wife a mini bandsaw box (made from the timber) in the shape of a heart. Fast forward to our clubs ‘Expo’
weekend where Harry and Kim dropped by with an old English country style dial clock. It appeared to have left the wall
and hit the floor rather badly. “Just a repair” Harry said, “I’m not looking for a restoration, could I help”? Normally
commission work is way out of my comfort zone and I respectfully decline these type of requests. However, the word
repair and from a friend seemed less daunting plus I guess the challenge was to see if I really could put it back together. A
few days later I sought guidance from John Daniel as to how to proceed. So, now armed with progressive instructions, a
small piece of veneer all I needed now was to rummage through my wood stash for some suitable mahogany.
In the meantime, the circa 1840’s clock mechanism was away at the clock smiths receiving a ‘grease and oil change’. All
that remained in the clock case was a nice sounding bell, a couple of brass hinges (attached to half a door) and a few rusty
nails and screws. These were removed before gluing up the numerous cracks. While waiting for the glue to dry I turned
to the 18” dia. Clock dial surround, it too was in a bad way. It had had a previous ‘not so cool repair’ which I felt sure I
could improve on………..oh, there goes the dinner call, another day tomorrow.

Page 6
Kiama Woodcraft Group May 2020
With the clock dial surround now glued back into shape it was time to make some replacement parts, remove the old
veneer and make a new curved (three part) pendulum access door for the case bottom. A dust panel door would also be
required for the case top. The dial surround had been held on to the case by a pair of side bars and four removable pegs.
These were missing so were needed to be made from scratch. The bars were straight forward, the pegs were a guess. I
decided to keep it simple nothing fancy just a dowel with a tapered square pull on the exposed end.
The veneering of the curved case bottom and its curved door was very much a new experience for me and I found it
difficult to keep the veneer flat during drying. Unfortunately it has bubbled up slightly, although I have been told that this
can happen over time anyway. Finally it was time to apply a little stain to some parts and many coats of shellac. A light
buffing with ‘oooo’ steel wool between coats plus a rub with wax has brought the project to a close I’m pleased with the
result, I hope Harry will be too………………after all it was …………just a repair.
Tony Walsh.

Page 7
Kiama Woodcraft Group May 2020
Page 8
Kiama Woodcraft Group May 2020
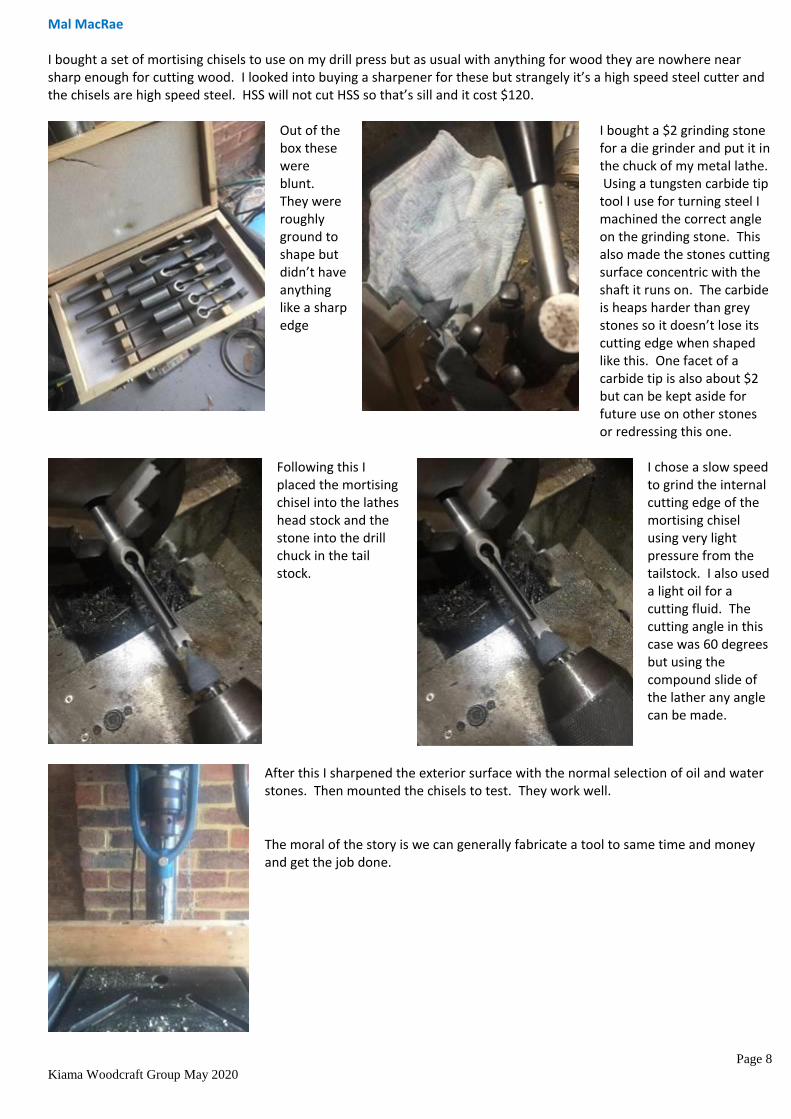
Mal MacRae I bought a set of mortising chisels to use on my drill press but as usual with anything for wood they are nowhere near sharp enough for cutting wood. I looked into buying a sharpener for these but strangely it’s a high speed steel cutter and the chisels are high speed steel. HSS will not cut HSS so that’s sill and it cost $120.
Out of the box these were blunt. They were roughly ground to shape but didn’t have anything like a sharp edge
I bought a $2 grinding stone for a die grinder and put it in the chuck of my metal lathe. Using a tungsten carbide tip tool I use for turning steel I machined the correct angle on the grinding stone. This also made the stones cutting surface concentric with the shaft it runs on. The carbide is heaps harder than grey stones so it doesn’t lose its cutting edge when shaped like this. One facet of a carbide tip is also about $2 but can be kept aside for future use on other stones or redressing this one.
Following this I placed the mortising chisel into the lathes head stock and the stone into the drill chuck in the tail stock.
I chose a slow speed to grind the internal cutting edge of the mortising chisel using very light pressure from the tailstock. I also used a light oil for a cutting fluid. The cutting angle in this case was 60 degrees but using the compound slide of the lather any angle can be made.
After this I sharpened the exterior surface with the normal selection of oil and water stones. Then mounted the chisels to test. They work well.
The moral of the story is we can generally fabricate a tool to same time and money and get the job done.

Page 9
Kiama Woodcraft Group May 2020
TWO CARRIAGE TOY TRAIN
Another grandchild’s birthday. What to give them? What have I already given them? What have I
given to the other grandchildren? I knew I should have kept a list.
I have made a few of these trains for our sales, but as yet have not given one to any of the
grandchildren (I think), so, let’s get making.
Because of the offset turning for the engine, it is
easier to make a pair. In this case I have made two
pair, so I will have some in stock for another gift or
sale.
The centre marks are cut away when the cabin
shape is cut on the bandsaw so no need to allow
for waste on the ends. I started with a 230x60x60
piece of Pink Flooded Gum.
Mark the length and drill the 15mm holes for the
funnel before mounting on the lathe. I also wrap
the cabin section with packing tape which helps prevent the corners from chipping during turning.
The centre is offset towards the bottom by 10mm.
This allows for the cabin to be higher than the boiler and a flat to be left at the base for gluing to the
chassis.
My approach to turning these is to use the long point of a
skew to delineate the front of the cabin on both ends. A
spindle gouge then makes short work reducing the boilers to
50mm diameter. Tell yourself that turning air for half the
time is fun! Mark and burn the banding, and then back to the
long point of the skew to cut the front of the boilers. Take
this down to around 7mm and leave enough room to make a
saw cut to separate them later.
Sand the boilers and front of the
cabin but be aware of your knuckles
and the sharp edges of the cabin that
are rotating.
Over to the bandsaw to cut the cabin
shape and separate the two. Sand the
cabin.

Page 10
Kiama Woodcraft Group May 2020
The funnel is next. A nice
piece of Merbau will give a
contrast to the Flooded
Gum.
Start with a 30mm square
section in a scroll chuck and
drill the smoke hole with a
forstener bit. Shape the
funnel and have a slight
taper coming down to
15mm to have a press fit
into the boiler hole. Once
sanded, cut off the waste
on the bandsaw and test fit.
The Chassis pieces are made from Blackbutt. Cut these to length and mark out the pivot holes and
the shaping on the ends. I made up a template for this so they would be consistent. The sloping
faces on the cow catcher were cut on a compound mitre saw.
Off to the drill press to drill all the holes. 9.5mm
for the fixed dowels and 11mm for the carriage
linking holes.
The rebates, top or bottom, depending which end of the
chassis you are working on, were cut using a dado set on the
table saw.
Use a short fence to set the position of cut and use the
mitre to keep them at right angles.
Page 11
Kiama Woodcraft Group May 2020
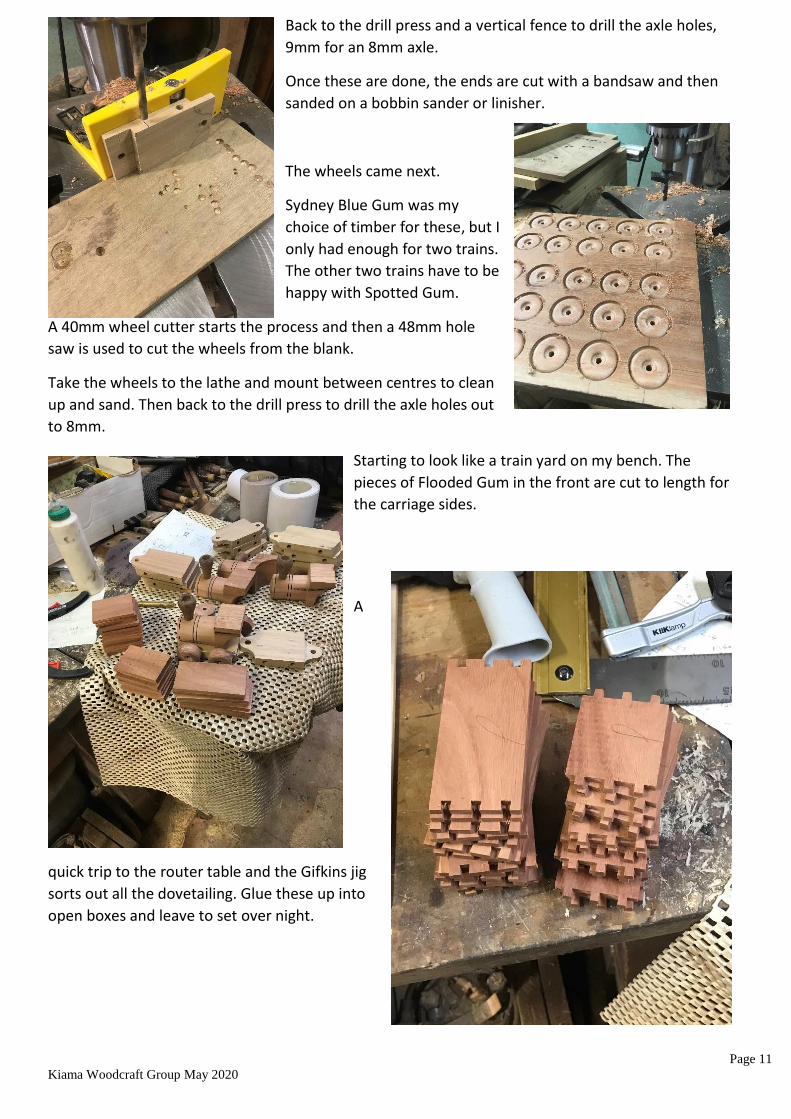
Back to the drill press and a vertical fence to drill the axle holes,
9mm for an 8mm axle.
Once these are done, the ends are cut with a bandsaw and then
sanded on a bobbin sander or linisher.
The wheels came next.
Sydney Blue Gum was my
choice of timber for these, but I
only had enough for two trains.
The other two trains have to be
happy with Spotted Gum.
A 40mm wheel cutter starts the process and then a 48mm hole
saw is used to cut the wheels from the blank.
Take the wheels to the lathe and mount between centres to clean
up and sand. Then back to the drill press to drill the axle holes out
to 8mm.
Starting to look like a train yard on my bench. The
pieces of Flooded Gum in the front are cut to length for
the carriage sides.
A
quick trip to the router table and the Gifkins jig
sorts out all the dovetailing. Glue these up into
open boxes and leave to set over night.

Page 12
Kiama Woodcraft Group May 2020
A forest of clamps brings all the pieces together
for final assembly.
Glue dry? Sand all the sides, arris all the edges, cut
the dowel for the axles and the little train is ready
to accept the finish.
I haven’t done this yet, but I will be using two
coats of Rustin’s Danish Oil followed by some
Mirowax.
Here is a picture of the little cutie waiting for the finish to be applied.
Page 13
Kiama Woodcraft Group May 2020
Ask the Expert
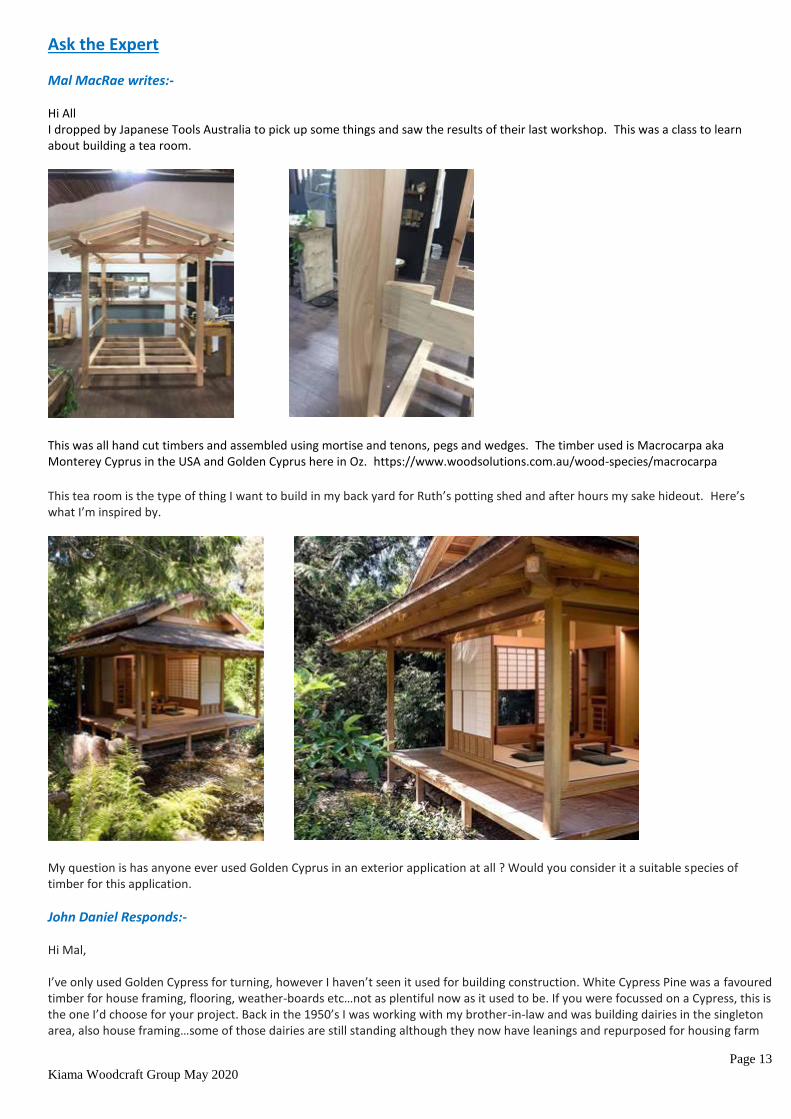
Mal MacRae writes:- Hi All I dropped by Japanese Tools Australia to pick up some things and saw the results of their last workshop. This was a class to learn about building a tea room.
This was all hand cut timbers and assembled using mortise and tenons, pegs and wedges. The timber used is Macrocarpa aka Monterey Cyprus in the USA and Golden Cyprus here in Oz. https://www.woodsolutions.com.au/wood-species/macrocarpa
This tea room is the type of thing I want to build in my back yard for Ruth’s potting shed and after hours my sake hideout. Here’s what I’m inspired by.
My question is has anyone ever used Golden Cyprus in an exterior application at all ? Would you consider it a suitable species of timber for this application.
John Daniel Responds:- Hi Mal, I’ve only used Golden Cypress for turning, however I haven’t seen it used for building construction. White Cypress Pine was a favoured timber for house framing, flooring, weather-boards etc…not as plentiful now as it used to be. If you were focussed on a Cypress, this is the one I’d choose for your project. Back in the 1950’s I was working with my brother-in-law and was building dairies in the singleton area, also house framing…some of those dairies are still standing although they now have leanings and repurposed for housing farm

Page 14
Kiama Woodcraft Group May 2020
junk. The Black Cypress is durable, good to work with (back in those days we cut everything out by hand. Memories…back then I always volunteered for ‘billy boy’, just loved aroma of the cypress offcuts burning. Look forward to the seeing the build.
Mal MacRae writes:- Hi John Bunnings has a listing for White Cyprus posts available in 125 x 125 and 100 x 100. They have class two durability and F7 stress grade. These might be a go. There’s also a trick the Japanese carpenters use to surface treat their timber called Shousugiban. Basically this is using a flame torch or an iron to burn the surface. Originally they did it to make the wood fire retardant but also noticed it became termite, water and mould resistant. I think it tends to drag the oils to the surface of the timber. Worth an experimental piece I think.
Some western companies do this technique but tend to put a polyurethane or oil on it. I think originally it was simply burned and brushed.
Tony Walsh found this interesting use of an old office chair in Australian Woodsmith.
STOOL TO WORKSHOP
CART CONVERSION
I recently replaced an ageing desk chair that had several
tears in the seat fabric. Since the wheeled pedestal of
the chair was still in perfect
working condition, I decided to repurpose it and create
this mobile workshop cart. Depending on the style of
chair used, construction will vary. I shaped a couple of
pieces of plywood to match the chair mounting bracket.
A few strips of Masonite around the top perimeter
keeps
items from rolling off. This rollaround workshop cart is
the perfect place for tools, supplies and project
components.