lab skills practice: pipetting small volumesjweller2/pages/summercamp2016/... · pipetter types...
TRANSCRIPT

Lab Skills
Practice:
Pipetting Small
Volumes
6/10/2016
B3 Summer Science Camp at Olympic High School 2016
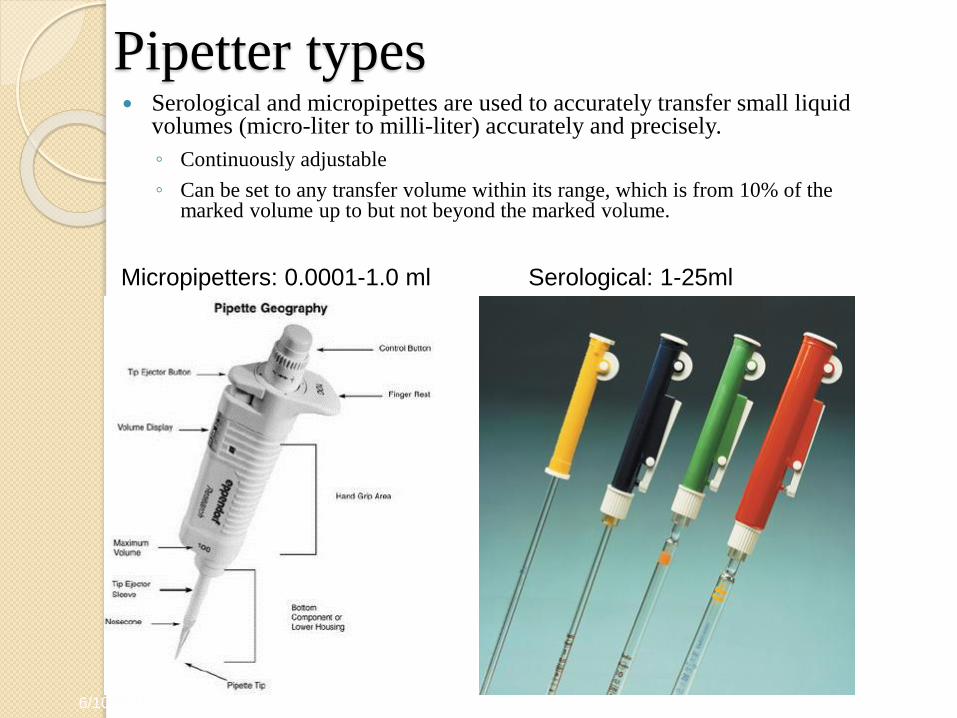
Pipetter types Serological and micropipettes are used to accurately transfer small liquid
volumes (micro-liter to milli-liter) accurately and precisely.
◦ Continuously adjustable
◦ Can be set to any transfer volume within its range, which is from 10% of the marked volume up to but not beyond the marked volume.
6/10/2016
Serological: 1-25mlMicropipetters: 0.0001-1.0 ml

6/10/2016 Weller UNCC
Serological pipettes
6/10/2016
Manual Pump Pipetter Electronic Pump
Meniscus Watch: eye level, lowest part – estimate volumes between lines

The MicroPipetter - 1
Select the proper micropipetter to transfer a specified volume of
sample
◦ volume needed must be inside the range of the device, the lowest volume is
1/10th of the maximum volume, which is how the pipette is labeled.
Set a specified volume on the pipette volume indicator using the
volume adjustment knob
◦ Volume is read on the side window
◦ Adjustment knob is either the top plunger itself or just below the plunger
Read the volume setting in correct units
◦ For most of the micropipetters the unit is a microliter (ul), one millionth of a
liter.
◦ The 1ml micropipetter (this is 1000ul) shows tens of microliters (20 means
200ul or 0.200ml, with the final amount estimated with a division between 20
and 21 that is really between 200 and 210.
Make sure you know how to
6/10/2016

The MicroPipetter - 2
Select the correct tips and properly seat them (tap
lightly holding the device vertically)
To use: pipetter is held vertically, plunger is
depressed, tip end is placed a little below the
liquid surface, liquid is drawn up slowly, tip is
withdrawn from the liquid, moved to target
container, plunger is depressed slowly, tip is
dragged up along side of container.
Properly eject the tip into a waste container.
Make sure you know how to
6/10/2016

Parts of the Micropipetter
Pipette tips
6/10/2016

Volume Adjustment Knob:
Digital Volume Indicator:
Pipettors – 3 Volumes:
Step 1: Select the correct pipetter and set the volume
Operating the Micropipette
6/10/2016

How to Read the Volume Indicator:
(a): P-20 Model
6.86 m l = 0.00686
or 6.86 x 10⁻³ ml
(b): P-200 Model
132.4 m l = 0.1324
or 1.324 x 10⁻¹ ml
(c): P-1000 Model
262 m l= 0.262
or 2.62 x 10⁻¹ ml
Operating the Micropipette
Step 2: Read the volume
6/10/2016
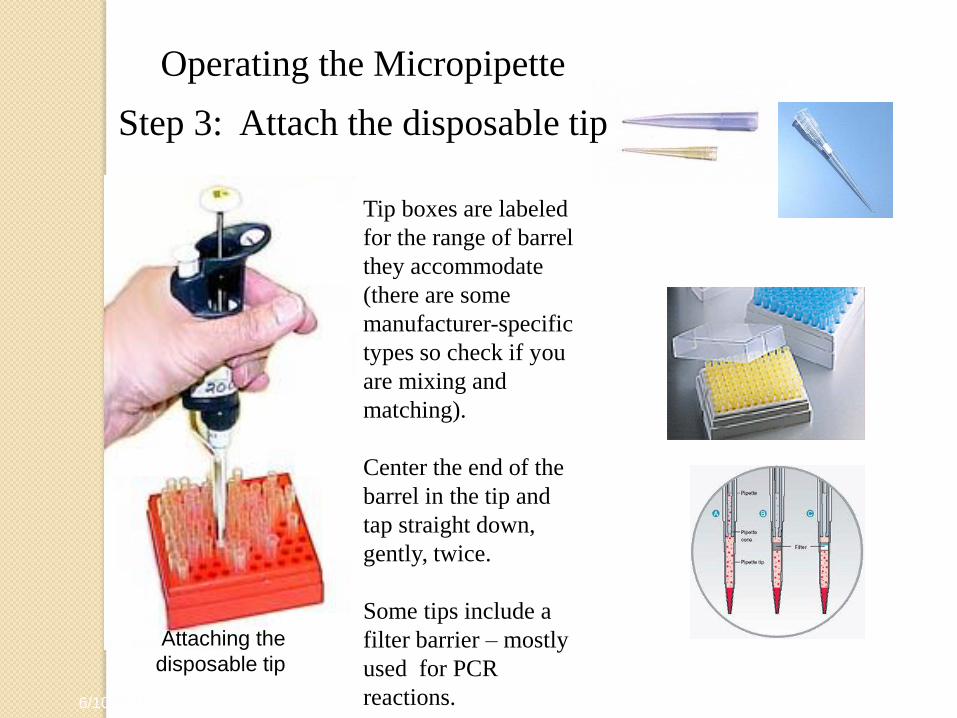
Attaching the
disposable tip
Operating the Micropipette
Step 3: Attach the disposable tip
Tip boxes are labeled
for the range of barrel
they accommodate
(there are some
manufacturer-specific
types so check if you
are mixing and
matching).
Center the end of the
barrel in the tip and
tap straight down,
gently, twice.
Some tips include a
filter barrier – mostly
used for PCR
reactions. 6/10/2016

Step 4: Depress the Plunger to the First Stop
Step 6: Pause
The tip must be below the surface of the liquid throughout the process of pulling up the liquid.
Ideally the pipette is held vertically.
To aspirate the sample into the tip, allow the pushbutton to return slowly and smoothly to the fully extended starting position.
NEVER LET THE PLUNGER SNAP UP!
Leave the tip in the solution for 1-2 sec (longer for a viscous solution), then slowly withdraw.
Step 5: Immerse Tip in Sample
Operating the Micropipette
Depress the plunger first: don’t put the tip in the liquid and then depress the plunger (the pressure is different).
6/10/2016

Withdraw the pipet from the receiving vessel carefully, touching or sliding the tip along the wall of the vessel.
Operating the Micropipette
Step 6: Withdraw the tip from the solution
6/10/2016
Note – you should be wearing gloves – no bare hands!

Step 7: Withdraw the Tip
Remove the tip from the sample liquid. There should not be liquid on the outside of the tip if you have used it correctly – generally we do NOT touch the tip with anything. Some reagent containers may not allow ideal practice – in that case wipe away any droplets on the outside of the tip with a lint-free tissue, such as KIMWIPES. Don’t touch the tip opening or you will wick away some of the sample. Note on the left that the volume is not correct (air at bottom).
Proper Droplet Removal WRONG Droplet Removal
Operating the Micropipette
Note – you should be wearing gloves – no bare hands!
6/10/2016
Air bubble = bad
No Gloves = bad
Kimwipe not recommended
usually.

a) Touch the tip end to the bottom or side wall of the receiving vessel
b) Depress the plunger slowly to the FIRST STOP.
c) Pause for at least one second, longer for larger volumes or viscous liquids.
d) Press the plunger to the SECOND STOP (the second point, of greater resistance, at the
bottom of the stroke) to expel any residual liquid in the tip – an air bubble should force out the
last drop of liquid.
(a) Start
Dispensing
(b) 1st Stop =
Dispense
(c) 2nd Stop =
Expel
Operating the Micropipette
Step 8: Dispensing the solution to a tube
6/10/2016

Operating the Micropipette
Step 9: Use the ejector button to eject the tip into a waste container (use a Biohazard can if you are directed, otherwise an empty tip box works pretty well).
6/10/2016

First Lab: Pipetting Skills
A set of pipette pumps. Serological pipettes, micropipetters and tips
Several capped solution containers (colored water – why?, then glycerol – why?)
Parafilm squares and small weigh boats
Mass balances (2 levels – why?)
6/10/2016
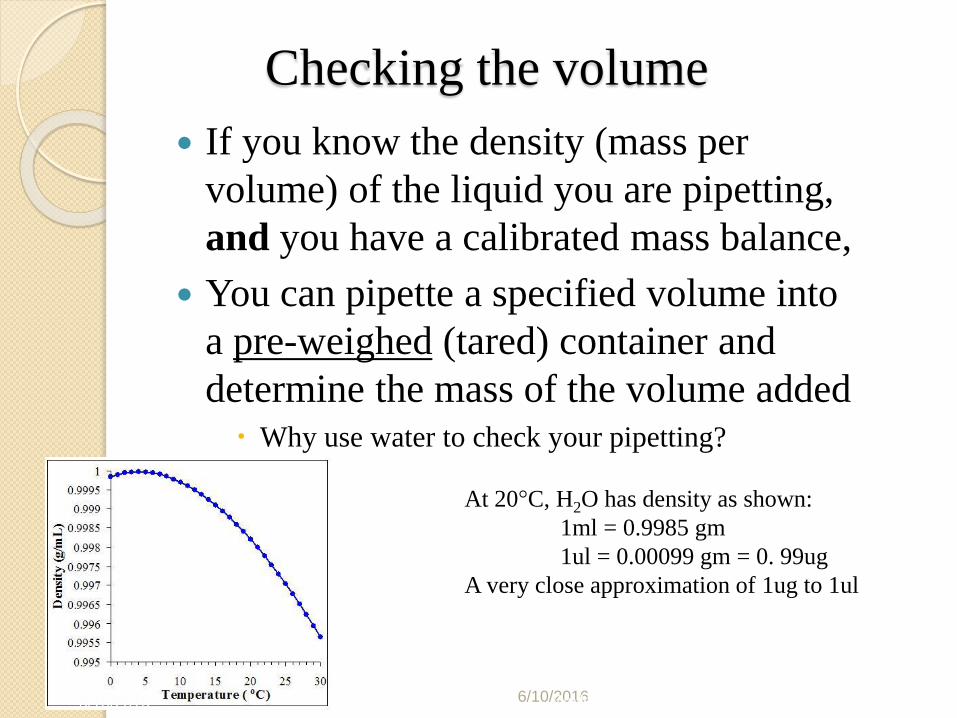
Checking the volume
If you know the density (mass per
volume) of the liquid you are pipetting,
and you have a calibrated mass balance,
You can pipette a specified volume into
a pre-weighed (tared) container and
determine the mass of the volume added Why use water to check your pipetting?
6/10/2016Weller UNCC
At 20°C, H2O has density as shown:
1ml = 0.9985 gm
1ul = 0.00099 gm = 0. 99ug
A very close approximation of 1ug to 1ul
6/10/2016

Using the Balance
Pick the right
balance: does it go to
a small enough
amount (you need
micrograms for most
of the lab)?
Close the glass
doors: Air currents
can change the
reading on a very
sensitive balance.
Make sure you know
where the Tare
(Zero) control is.
6/10/2016

Using Parafilm or weigh boats
Aqueous solutions bead up on Parafilm –
you can leave the backing paper on, but
pipette solution onto the waxy side not the
paper side.
After weighing the volume, blot it up from
the Parafilm with a Kimwipe, re-tare and
repeat the pipetting.
6/10/2016
Parafilm for volumes < 1ml
Use a weigh boat for volumes > 1ml

Accuracy and Precision
Accuracy means the closeness with which the dispensed volume approximates the volume set on the pipette
The level of accuracy is specified as mean error, the average deviation of replicate measurements from what is expected from the volume you set.
Precision is the "scatter" or variance of individual measurements obtained from the same volume setting.
Precision can also be expressed as standard deviation (variance divided by the mean).
6/10/2016

Accuracy and Precision (Continued)
Device capabilities: relative accuracies are generally about 1% or less for micropipetters within range◦ These micropipettors have recently been calibrated.
Precision error is less than 0.5 % except when transferring the smallest recommended volume for a given pipette model◦ Using the pipettes to transfer volumes which are below
the recommended range will introduce larger errors
6/10/2016

Lab Practice with Pipettes
Practice setting a few volumes
Practice reading the digits of set volumes
Practice seating the tip, drawing up and dispensing samples of water and of a glycerol solution (glycerol is denser and more viscous).
Get the "feel" of the 1st (set volume to pull up ) and 2nd (blow-out for delivery) stops
Practice using the pipette and record how well measurements match settings (indirectly, your skill).
6/10/2016