lab exercise · web viewthe five pushbuttons and eight slide switches are provided for circuit...
TRANSCRIPT

Simulation Lab 2Introduction to VHDL and Operation of Full Adder/SubtractorUsing Xilinx ISE Project Navigator and Nexys2 FPGA Development Board
NationalScienceFoundation
Funded in part, by a grant from the National Science FoundationDUE 1003736 and 1068182
AcknowledgementsDeveloped by Craig Kief, Alonzo Vera, Alexandria Haddad, and Quinlan Cao, at the Configurable Space Microsystems Innovations & Applications Center (COSMIAC). Based on original tutorial developed by Bassam Matar, Engineering Faculty at Chandler-Gilbert Community College, Chandler, Arizona. Funded by the National Science Foundation (NSF).
IntroductionA widening gap exists between what is taught in schools and the skills currently needed and utilized by the workforce. The jobs of the future are brain intensive. Technicians and engineers no longer wire circuits or assemble a chip from scratch; they use software to run modern equipment.
A Field Programmable Gate Array (FPGA) design minimizes the amount of electrical wiring and eliminates the use of complicated test equipment. This new technology provides students the ability to concentrate on digital principles instead of the electrical wiring, providing an opportunity to focus on larger and more complex projects. In general, a FPGA is an integrated circuit that can be reconfigured with any design, and it can be reconfigured multiple times. Thus, if you make a mistake in your design, you don’t need to replace wires or chips. Instead, you simply reconfigure the FPGA with the updated design.
Lab SummaryBecome familiar with digital technology using Xilinx ISE® to interface with a FPGA circuit board. Combinational Logic Circuits are used to make decisions based on a series of true statements that can be laid out in a truth table.
Lab GoalsUsing the Design process discussed in Lab 1, we will:
1. Use Xilinx ISE® Project Navigator to draw a Full Adder schematic. 2. Implement the same design using VHDL programming (VHSIC Hardware Descriptive Language). 3. Create a test bench. 4. Create the UCF. 5. Program the Full Adder to the FPGA device. 6. Apply your understanding of VHDL to implement a 4-bit Adder/Subtractor with the FPGA.
Learning Objectives1. FPGA board overview.
Design 2. Design the Full Adder using the Schematic Editor.3. Design the Full Adder using the VHDL editor.
Design Synthesis 4. Create a Test Bench to test the results of the code.Design Implementation 5. Develop a User Constraint File (UCF) and map I/O signals to the FPGA.Device Programming 6. Program the Full Adder into the FPGA.
7. Test your understanding by applying what you learned programming a 4-bit Adder/Subtractor.

Grading CriteriaYour grade is determined by your instructor.
Time Required4 - 5 hours
Special Safety RequirementsWhen working with electronic components, such as the Xilinx FPGA board, there is potential of Electrostatic Discharge (ESD) hazards. Static electricity can damage the FPGA devices used in this lab. Use appropriate ESD methods to protect the devices. No serious hazards are involved in this laboratory experiment, but be careful to connect the components with the proper polarity to avoid damage.
Lab Preparation Review your PLD lecture from your class.
Review Lab 1 – Introduction to Xilinx previous lab.
Print out the laboratory experiment procedure that follows.
Acquire required hardware components/equipment.
Read Lab Procedure 1 and work the Full Adder schematic from Lab Procedure 2 as a pre-lab assignment.
Equipment and MaterialsStudents should work in teams of two or three. Each team of students will need the following supplies:
Supplies Quantity
1. ISE® Design Suite (or WebPACK™ ) software from the Xilinx website, www.xilinx.com, if you don’t already have it installed. Your classroom should have a full working version of Xilinx ISE® Design Suite.
2. FPGA kit including download and power cable(s).
3. Free Digilent Adept software (instructions for download and installation are included at the beginning of this lab): http://www.digilentinc.com/Products/Detail.cfm?NavPath=2,66,828&Prod=ADEPT2
1
Additional References The FPGA reference manual, data sheet, and any other supporting documents that may be of use.
ISE Design Suite User Guide : http://www.xilinx.com/support/index.htm#nav=sd-nav-link-106173&tab=tab-dt
Digilent Adept User Guide: http://www.digilentinc.com/Data/Software/Adept/Adept%20Users%20Manual.pdf
2

Lab Procedure (optional): Download and install Digilent Adept SoftwareIn this lab, you download and install Digilent Adept which allows you to communicate with the Digilent FPGA boards that we use in lab. If Adept is already installed on your system, you can skip this Lab Procedure.
Step 1:
Navigate your browser to http://www.digilentinc.com/Products/Detail.cfm?Prod=ADEPT2.
Step 2:
Click the Download button for Adept 2.9.4 System, 32/64-bit Windows (or latest version) and click Save file when prompted. The installation .exe file will download to your computer.
Step 3:
When the download is complete, run the .exe file and install Adept onto your computer.
3

Lab Procedure 1: FPGA OverviewNOTE: We used the Digilent Nexys-3 Xilinx® Spartan 6 XC6LX16-CS324 board. Your board may be a
different version or from a different vendor. However, most of the components are similar. If you have a different board, review your board’s documentation.
The Nexys-3 is a powerful digital system design platform built around a Xilinx Spartan 6 FPGA. The advantage of this board is that it is programmed and powered through a USB port. A list of the key features and their location on the board is listed below:
4
Power
Power good LED
Power Select Jumper
Power Switch
Adept USB Port
10/100 Ethernet
VGA Port
USB HID Host Port
8 Slide switches8 LEDs Push buttons
USB UART
7-Segment Display
VHDC Connector
Reset Button
MODE Jumper
JTAG Header
Done LED Pmod Connectors

User I/OThe Nexys-3 board includes several input and output devices, and data ports allowing many implementation designs without the need for any other components. We will focus on the following inputs [slide switches, push buttons, and reset button] and outputs [LEDs, and 7-segment display].
The five pushbuttons and eight slide switches are provided for circuit inputs. There is also a reset button. Pushbuttons normally generate a low output when at rest, driven high when the pushbutton is pressed. Slide switches generate constant high or low inputs depending on their position. Pushbutton and slide switch inputs use a series resistor for protection against short circuits (a short circuit would occur if an FPGA pin assigned to a pushbutton or slide switch was inadvertently defined as an output).
Original image from the Nexys3™ Board Reference Manual
Please refer the reference manual for any additional information:
http://www.digilentinc.com/Data/Products/NEXYS3/Nexys3_rm.pdf
5

Lab Procedure 2: Design a Full AdderStep 1: Design Full Adder using the Schematic Editor 1. Open Xilinx ISE Design Tool
Project Navigator.
Your system might have slightly different Start Menu options.
2. The ISE Project Navigator window opens, with the Tip of the Day displayed. Click OK to close the Tip of the Day.
6

3. Start a new project by selecting File New Project from the menu. The New Project Wizard starts.
a. Type FULL_ADDER_SCH in the Name text box.
b. Select a location on your computer to save your project files by clicking the ellipsis (…) button to the right of the Location text box.
c. Under Top-level source type, select HDL.
d. Click Next.
The Project Settings dialog box opens.
NOTE: File names must start with a letter. Use underscores ( _ ) for readability. Do not use hyphens (-); although the file name will work, the entity name will not. More on this later.
4. Select Spartan-6 SP601 Evaluation Platform from the Evaluation Development Board drop down menu.
The Product Category, Family, Device, Package, and Speed should all automatically populate (top half of the screen). You will need to set some options in the lower half of the dialog box.
Select VHDL from the Preferred Language drop down menu.
The Project Settings should resemble the figure to the right.
7
FULL_ADDER_SCH

5. Click Next.
NOTE: The options specified are for the Spartan 6 LX FPGA. Your board might be different than the board used for these instructions. Chip specifications are printed on the FPGA chip in the middle of the board. The board information is also listed on the box it came in.
6. Verify the file type and name are correct in the Project Summary then click Finish to complete the New Project creation process.
7. Right-click in the Hierarchy pane and select New Source from the shortcut menu (or select ProjectNew Source from the menu). The New Source Wizard opens.
8. Select Schematic from the source list, enter a file name for the schematic, and press Next. Click Finish to close the summary and create a blank schematic.
9. Create the Full Adder circuit as shown on the right. Please refer to Lab 1 for details about creating the schematic.
10. Attach input and output pins to the circuit and label them as shown.
8
FULL_ADDER_SCHC:\YourName\Optional_subfolder\FULL_ADDER_SCH
C:\YourName\Optional_subfolder\FULL_ADDER_SCH

9

Step 2: Create Design Full Adder with VHDL EditorNOTE: VHDL is an acronym inside of an acronym. The ‘V’ stands for Very High Speed Integrated Circuit
(VHSIC) and ‘HDL’ stands for Hardware Descriptive Language. VHDL is a powerful language with numerous language constructs that are capable of describing very complex behavior needed for today’s programmable devices.
1. Click the panel tab’s left triangle button to display the Design tab.
2. Right-click in the Hierarchy Panel and Click New Source… from the shortcut menu (or select ProjectNew Source from the menu). The New Source Wizard displays.
3. Select VHDL Module from the source type list.
4. Type Full_Adder as the file name.
5. Click the Next button. The Define Module dialog displays.
6. Type the port names and select the direction of each port as shown in the figure to the right.
7. Click the Next button. The Summary dialog displays.
8. Click the Finish button to accept the New Source Wizards options.
10

9. ISE will generate source code for you and it will display in the workspace area.
NOTE: There are several schools of thought about coding style. The VHDL Language Reference Manual (LRM), suggests typing keywords (library, use, entity, end, begin) in lowercase. There is no LRM suggestion for user-defined terms. There is another school of thought that writes code the exact opposite (keywords capitalized, user-defined terms lower-case).
Bottom line; write code so that it is easy to understand by anyone on your team. Your employer probably has a style guide or coding guidelines. You should become intimately familiar with this guide.
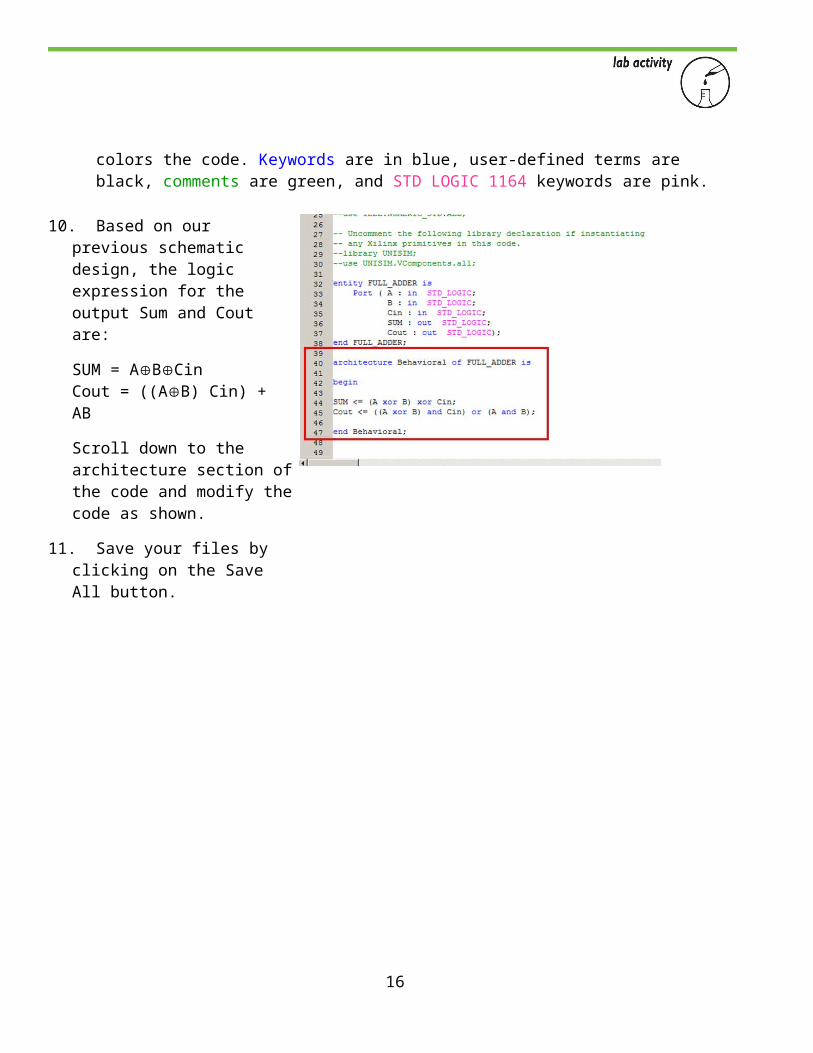
The code for this Lab capitalizes at least the first letter of the user-defined term, and ISE writes the rest in lowercase. ISE also colors the code. Keywords are in blue, user-defined terms are black, comments are green, and STD LOGIC 1164 keywords are pink.
10. Based on our previous schematic design, the logic expression for the output Sum and Cout are:
SUM = ABCinCout = ((AB) Cin) + AB
Scroll down to the architecture section of the code and modify the code as shown.
11. Save your files by clicking on the Save All button.
11

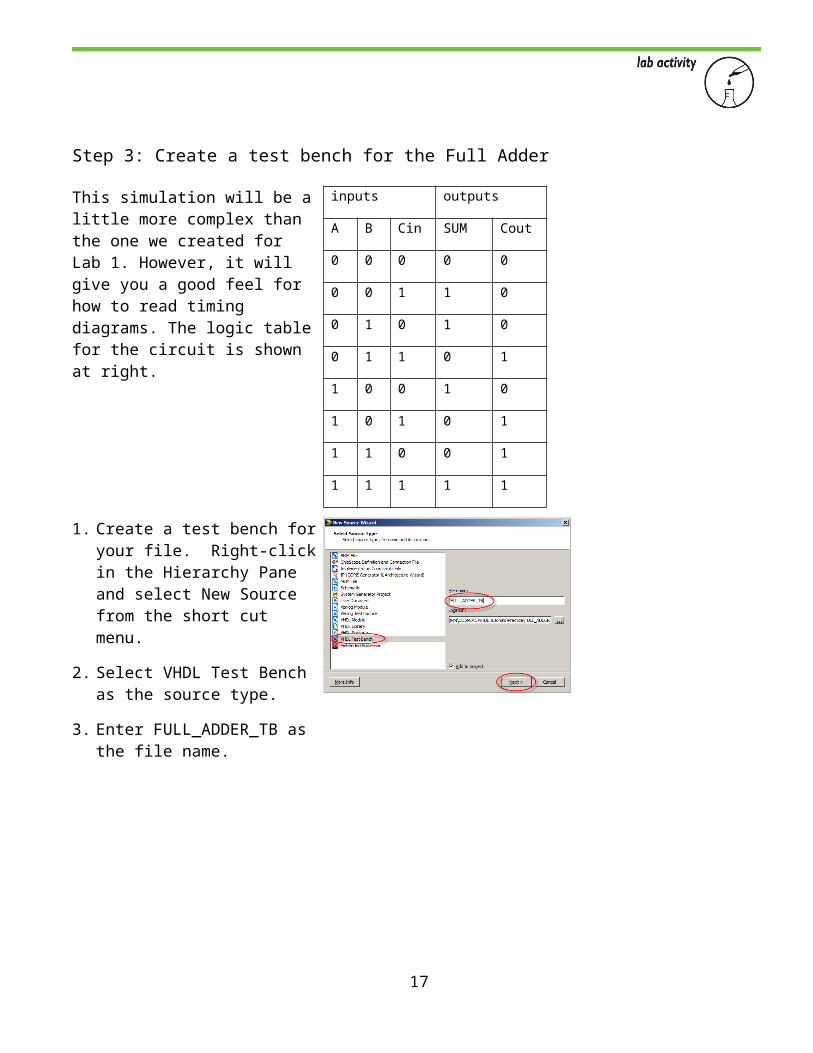
Step 3: Create a test bench for the Full Adder
This simulation will be a little more complex than the one we created for Lab 1. However, it will give you a good feel for how to read timing diagrams. The logic table for the circuit is shown at right.
inputs outputs
A B Cin SUM Cout
0 0 0 0 0
0 0 1 1 0
0 1 0 1 0
0 1 1 0 1
1 0 0 1 0
1 0 1 0 1
1 1 0 0 1
1 1 1 1 1
1. Create a test bench for your file. Right-click in the Hierarchy Pane and select New Source from the short cut menu.
2. Select VHDL Test Bench as the source type.
3. Enter FULL_ADDER_TB as the file name.
4. Click the Next button. The Associate Source dialog box opens. Select FULL_ADDER and click the Next Button.
5. The New Source Summary dialog box displays. Click the Finish button.
12

6. The test bench file will display in the workspace.
7. Starting around line 71, make the changes highlighted on the right. Delete strikeout text and add highlighted on the right.
8. Click the Save All button on the toolbar.
-- No clocks detected in port list. Replace <clock> below with -- appropriate port name constant <clock>_period : time := 10 ns;BEGIN
-- Instantiate the Unit Under Test (UUT) uut: FULL_ADDER PORT MAP ( A => A, B => B, Cin => Cin, SUM => SUM, Cout => Cout );-- Clock process definitions <clock>_process :process begin <clock> <= '0'; wait for <clock>_period/2; <clock> <= '1'; wait for <clock>_period/2; end process; -- Stimulus processstim_proc: process begin -- hold reset state for 100 ns. wait for 100 ns; wait for <clock>_period*10; -- insert stimulus here wait; end process;
13

A_proc: processbegin
A <= not A;wait for 25 ns;
end process;
B_proc: processbeginB <= not B;wait for 50 ns;
end process;
Cin_proc: processbeginCin <= not Cin;wait for 100 ns;
end process;END;
9. On the View Pane, select Simulation. The Simulation Hierarchy and Process options display.
10. Expand the ISim Simulator tool if it isn’t already expanded.
11. Double-click the Simulate Behavioral Model tool. Click Yes to save any changes if prompted.
14

12. The Simulation Elaboration will begin to run. When it is finished the ISim window will open displaying the simulation.
Use the Zoom to Full View and the Zoom In buttons to display the simulation waveform clearer.
Review the waveform to ensure the .vhd file is working as designed.
When you are finished close the ISim application and return to ISE.
13. When you have returned to the ISE Project Manager window, click the Save all button to save your work.
15
Step 4: Create the User Constraint File (UCF) and map I/O to the FPGA boardThe last step before we actually program our code into the FPGA is to create a UCF file. This file assigns the I/O pins of the FPGA to the I/O ports of our code.
1. Switch to Implementation View by clicking the Implementation option in the View Panel.
2. To write the UCF code you need to know what pins you are using. This tutorial was written for the Digilent® Nexys 3™ Spartan 6 XC6LX16-CS324 board.
Refer to the previous section, Lab Procedure 1: FPGA Overview, User I/O for pin label identification for the Spartan 6.
If you are using a different board, either look at the board or read the board’s reference manual. Make a note of the pin labels for SW0, SW1, SW2, LED0, and LED1.
NOTE: The Digilent® Spartan 3 boards are available in two speeds, 500k and 1200k.
Both boards are labeled the same, however the 1200k board has different pin assignments for LD4-7 as follows:
LD4 E16LD5 P16LD E4LD7 P4
16
SW0SW1SW2
LD0LD1
3. Right-click in the Hierarchy Pane and select New Source from the short cut menu.
4. Select Implementation Constraints File as the source type.
5. Type FULL_ADDER as the file name.
6. Click the Next button to view the Summary screen, and then click the Finish button.
7. A new, blank file is added to your project.
NOTE: Notice the hierarchy of the files in your project. The project FULL_ADDER is at the top. The .vhd and .sch file are sub-files (children) of the project. Under the .vhd file is another sub-file, FULL_ADDER.ucf, which is the file we just created.
The hierarchy of the project will become very important when you are creating bigger and more complex projects.
8. Type the pin assignments as shown on the right.
NOTE: UCF files use the pound sign (#) to comment compared to VHDL files which use dash dash (--) for comments.
9. Click the Save All button to save your work.
#Inputs
NET "A" LOC = "T10"; # Switch 0 (SW0)NET "B" LOC = "T9"; # Switch 1 (SW1)NET "Cin" LOC = "V9"; # Switch 2 (SW2)
# Outputs
NET "SUM" LOC = "U16"; # LED 0 for SUMNET "COUT" LOC = "V16"; # LED 1 for Cout
17

Step 5: Program Full Adder to the FPGA boardTask A: Synthesize, Implement, Map, Place and Route, Generate Bitstream1. Insert the small end of the USB
cable into the Adept USB Port on the FPGA board. Insert the USB end into your computer.
2. Turn on the FPGA board.
NOTE: The display may alternately flash PASS and 128 if the board’s ROM hasn’t been overwritten from the factory.
3. In the Processes Panel, double-click Generate Programming File.
As the program is going through the compile process the compiling the process status icon spins and displays the current process that is running.
The Console Panel also displays textually what is happening.
4. Once the process has stopped running, and there are no errors or warnings, there will be three green checkmarks next to the Synthesize, Implement Design, and Generate Programming File processes.
18

NOTE: If you have errors or warnings you will need to find and fix the errors. You may or may not need to fix warnings. After fixing any errors, re-generate the programming file.
Click the Errors (and/or Warnings) Panel tab to display a list of all errors (and/or warnings) (1).
Clicking the hyperlink (2) of a particular Error (or Warning) will take you to the file and line (3) of the Error (or Warning). Note in the example the semicolon is missing at the end of line 37.
Clicking the hyperlink word Error (4) (or Warning) will display context sensitive information about the particular error/warning.
To re-generate the programming file, right-click on Generate Programming File and select Rerun All.
19

Task B: Implement design to FPGA boardBecause the FPGAs we are working with use a single USB cable for power and PC connection we need to use Digilent Adept to transfer the .bit code to the board.
1. Open Digilent Adept by selecting Start All Programs Digilent Adept Adept.
NOTE: Your system might have slightly different Start Menu options.
2. Choose Nexys3 from the Connect Product drop down menu.
NOTE: If you do not see Nexys3 as an option, check the USB connection to ensure the board is connected to the computer.
3. Click the Browse button. The Open dialog box displays.
4. Navigate to the folder of the Full_Adder project and select the full_adder.bit file.
5. Click the Open button. The file is displayed in the dropdown list next to the FPGA icon.
20

6. Click the Program button. The bit file is programmed to the FPGA board. The green status bar at the bottom of the Adept screen displays the status as the chip is programmed.
7. The program gets downloaded to the FPGA board.
8. Test the FPGA by sliding the programmed switches ON (up toward the middle of the board) and OFF (down toward the edge of the board). The LED lights 0 and 1 should light according to the truth table.
SW(0) (A)G18
SW(1) (B)H18
SW(2) (Cin)K18
LD0 (SUM)J14
LD1 (Cout)J15
0 0 0 OFF OFF
0 0 1 ON OFF
0 1 0 ON OFF
0 1 1 OFF ON
1 0 0 ON OFF
1 0 1 OFF ON
1 1 0 OFF ON
1 1 1 ON ON
9. When all three Switches are ON, both outputs are High (SUM and Cout).
10. Close Adept and close the FULL_ADDER project.
21

As you can see with this approach, you do not need to replace wires and ICs if you make mistake as you might have done in Labs 1 and 2 with TTL. Instead, you will have to reconfigure the FPGA with the updated design.
This type of technology allows you to concentrate on digital principles and not on the electrical wiring. Larger and more complex projects can be undertaken now that the tedious manual procedures are automated. Lab Procedure 3 of this lab demonstrates the design of a large design.
Lab Procedure 3: Test your KnowledgeImplement the following 4-bit adder/subtractor schematic using Xilinx ISE tools for Nexys3 FPGA board. Also, implement the circuit with VHDL.
1. Create the following schematic by choosing ADD4 symbol from Xilinx library of devices
NOTE: You can rotate a symbol by selecting it and pressing CTRL+R, or select the symbol, click on the right key mouseselect symbolrotate.
2. Add inputs and output ports
3. Simulate your design.
4. Develop a UCF that maps the input (A3..0, B3..0 and ADD/SUB) and output signals (S3..0, Cout and OFL) to your FPGA.
5. Program your design to your FPGA.
6. Demo your design to your instructor and complete the following truth table:
22

ADD/SUBTRACT B3 B2 B1 B0 A3 A2 A1 A0 S3 S2 S1 S0 OFL (yes/no) Cout
1 0 1 0 1 1 0 0 1
0 0 1 0 1 1 0 0 1
Here is one version of the VHDL and UCF files:
23

NOTE: Since inputs A and B are declared as vectors in the VHDL code, you need to have the location of each input (0-3) in parenthesis as shown above. This is not necessary for bit vectors such as inputs A and B in the FULL_ADDER program used previously.
24