lars acl™ - delivering fresh insights » corin group | versatility | recovery l a rs a cl lars is...
TRANSCRIPT

ACL Augmentation and ReinforcementSurgical technique
LARS ACL™

Contents
LARS™ overview 4
LARS™ ACL indications 4
Importance of stump preservation 4
Pre-operative planning 4
Operative set-up 5
Best practice guidelines 5
LARS™ for ACL traditional technique 5
LARS™ traditional technique summary 6
LARS™ traditional technique 7
A1. Placement of the femoral K-wire 7
A2. Drilling the K-wire into the tibia 8
A3. Drilling the tunnels 8
A4. Suturing of ruptured ligament 9
A5. Inserting the LARS™ ligament 10
A6. Femoral fixation 11
A7. Tibial fixation 11
A8. Trimming the ligament 11
Independent AM portal technique 12
B1. Femoral tunnel drilling 12
B2. Tibial tunnel drilling 12
Short ligament technique 13
LARS™ for ACL short ligament technique 13
C1. Tunnel positioning 13
C2. Tunnel drilling 13
C3. LARS™ ligament fixation 13
Suspensory fixation technique 14
LARS™ for ACL suspensory fixation technique 14
D1. Drilling the tunnels 14
D2. Graft insertion 15
D3. Femoral fixation 15
D4. Tibial fixation 15
LARS™ ACL augmentation 16
LARS™ for ACL augmentation technique 16
LARS™ augmentation with cortical interference screw fixation 16
LARS™ augmentation with suspensory femoral fixation 17
LARS™ augmentation with aperture femoral fixation 17
Post-operative rehabilitation 18
References 18
Ordering information 19
2

Stability | Versatility | RecoveryLARS ACL™
LARS™ is a range of synthetic ligament augmentation and reconstruction devices, suitable for a wide range of applications from anterior cruciate ligament (ACL) and posterior cruciate ligament (PCL), to knee extensor mechanism, ankle ligament and shoulder and hip tendon repairs and reinforcements.
LARS™ ligaments are intended for the intra or extra-articular reconstruction of ruptured ligaments. They are designed to mimic the normal anatomic ligament fibres. The intra-articular longitudinal fibres resist fatigue and allow fibroblastic ingrowth, whilst the extra-articular woven fibres provide strength and resistance to elongation.
As a synthetic scaffold designed to provide initial stability, LARS™ facilitates the potential for the original ligament to heal whilst eliminating post-operative elongation. LARS™ can be used in conjunction with the remnants of the ruptured ligament, or as reinforcement of an autologous reconstruction.
Mechanical in vitro tests for resistance, fatigue and creep have shown that LARS™ ligaments are highly effective ligament reconstruction and augmentation devices and long-term clinical results are excellent.
LARS™
3 |Responsible Innovation
LARS™ overview
LARS™ ACL indicationsIn the context of ACL repair, LARS™ should be utilised only after non-synthetic alternatives (autografts and allografts) have been considered as possible treatment options by the treating clinician and patient.
LARS™ ACL repair should only be used in the presence of viable tissue remnants. In the absence of viable tissue remnants, LARS™ should be used as an augmentation or reinforcement alongside an autograft or allograft.
Regardless of treatment method, acute phase post ACL injuries should be treated with caution.
Importance of stump preservationLARS™ ligaments are indicated for use in cases of a primary ACL rupture, where a good and well vascularised femoral and tibial ACL stump can be detected intra-operatively1,2,3. The aim of this recommendation is to initiate a faster healing process of the native ACL and to permit early restoration of proprioception.
In his animal in vivo model, Li4 demonstrated that ACL reconstruction with remnants and remaining bundle preservation is beneficial both for the early revascularisation and fibroblastic ingrowth into the graft. The presence of vital ACL stumps might lead to a shortened period of necrosis and regeneration. With the help of histology techniques, Murray found that like cells in the medial collateral ligament (MCL), cells in both the intact and ruptured ACL were found to migrate easily into the simulated wound site, demonstrating cellular proliferation and revascularisation5,6,7,8. Thus, the ruptured human ACL has the potential to heal, and effectively to regrow.
Altered neuromuscular function secondary to diminished proprioception and kinesthesia from the injured ACL is thought to be a key factor in functional instability after ACL injuries. Studies demonstrate that early proprioception might result in a reduced tibial drawer and might also enhance muscle activity to stabilise and protect the knee joint in the initial wound healing phase9. Normal mechanoreceptors and proprioceptive fibres have been observed in a majority of stumps, especially in acute cases with PCL adherence9,10,11,12. Therefore, to avoid a complete loss of proprioception, LARS™ recommends preservation of residual ACL stumps as these may be a source of re-innervation of the implanted ACL graft.
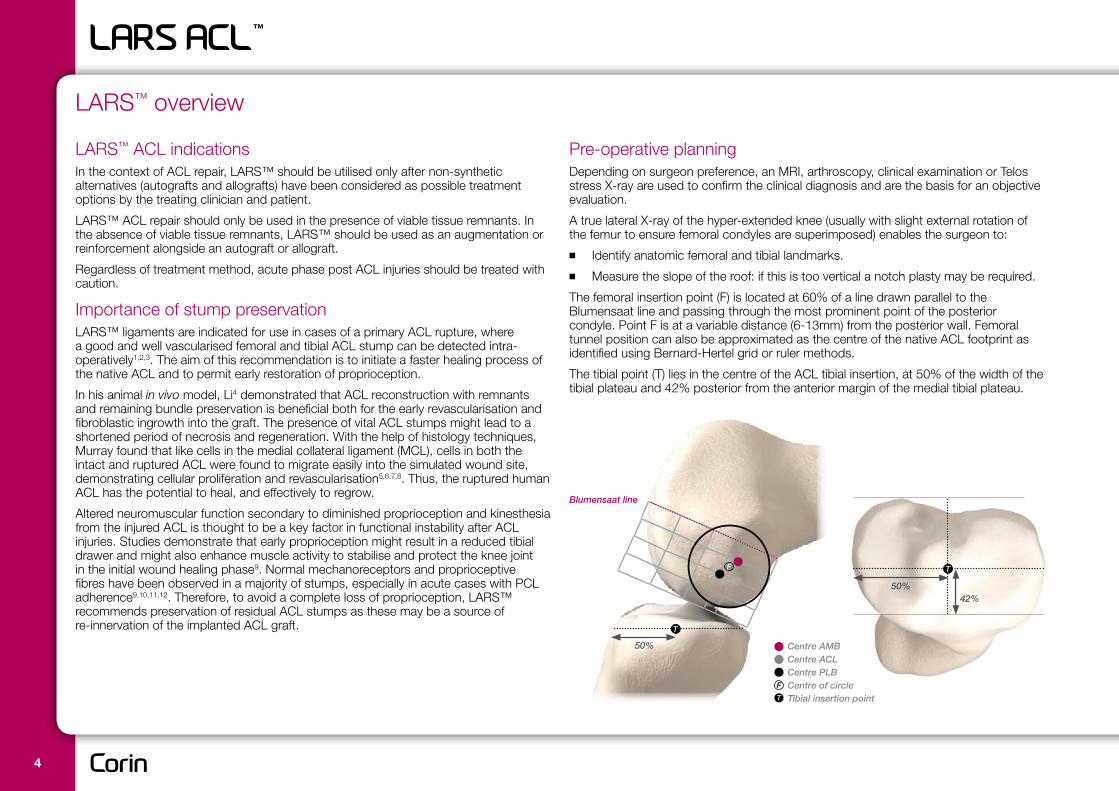
Pre-operative planningDepending on surgeon preference, an MRI, arthroscopy, clinical examination or Telos stress X-ray are used to confirm the clinical diagnosis and are the basis for an objective evaluation.
A true lateral X-ray of the hyper-extended knee (usually with slight external rotation of the femur to ensure femoral condyles are superimposed) enables the surgeon to:
■■ Identify anatomic femoral and tibial landmarks.
■■ Measure the slope of the roof: if this is too vertical a notch plasty may be required.
The femoral insertion point (F) is located at 60% of a line drawn parallel to the Blumensaat line and passing through the most prominent point of the posterior condyle. Point F is at a variable distance (6-13mm) from the posterior wall. Femoral tunnel position can also be approximated as the centre of the native ACL footprint as identified using Bernard-Hertel grid or ruler methods.
The tibial point (T) lies in the centre of the ACL tibial insertion, at 50% of the width of the tibial plateau and 42% posterior from the anterior margin of the medial tibial plateau.
Blumensaat line
T
50%
50%42%
TF
Centre AMBCentre ACLCentre PLBCentre of circleTibial insertion point
F
T
4

LARS™ ligaments for traditional LARS™ technique Four sizes are available:
■■ The LARS™ AC80 can withstand forces up to 3500N
■■ The LARS™ AC100 can withstand forces up to 4000N
■■ The LARS™ AC120 can withstand forces up to 4500N
■■ The LARS™ AC160 can withstand forces up to 5000N
The intra-articular part of a LARS™ ligament consists of longitudinal free fibres in two bundles orientated clockwise or anti-clockwise for right and left knees to mimic the natural ligament. Orientation of the free fibres helps to minimise effects of fatigue during flexion and extension of the knee and provides for fibroblastic ingrowth.
The intra-osseous part of a LARS™ ligament consists of inverse warp knitted fibres to provide resistance to weave loosening and elongation if single fibres become ruptured. This pattern is non-deforming and resistant to stretching.
Operative set-upAn image intensifier (C-arm) can be used to check the placement of the tibial jig and to confirm the precise position for the femoral tunnel.
Place the patient supine with the tourniquet as proximal as possible. The knee must be able to be positioned in full extension and 100-110° of flexion.
LARS™ provides many options for ACL reconstructions. Irrespective of the surgical technique adopted, LARS™ recommends certain crucial best practice guidelines to ensure safe and effective use of the device.
intra-osseous sectionintra-articular section
Best practice guidelinesDrill tunnels outside-in to preserve remaining stump fibres and avoid total loss of proprioception. Suturing and tensioning of the stump fibres independently of the LARS™ ligament may provide a source of re-innervation of the graft.
Bony tunnel diameters must correspond to the specific reference for each ligament. Using the smallest tunnels possible will minimise ligament micromotion and ingress of synovial fluid to encourage bony ingrowth.
1-2mm of the woven section of the LARS™ ligament should be visible outside of the femoral tunnel when in place to minimise wear of the fibres on the sharp tunnel entrance.
LARS™ ACL ligaments tolerate a maximum stretch of 9% so to avoid over-tensioning of the ligament it must be fixed at its longest length. For an ACL this will usually be with the leg flexed 0-10°.
Ligaments must be fixed with non-resorbable LARS™ blunt threaded interference screws at least 1mm larger than the tunnel diameter and the longest length permissable, depending on tunnel length. Secondary fixation with a staple or an additional interference screw is recommended for the tibia.
5 |Responsible Innovation

LARS™ traditional technique summary
a. Femoral K-wire insertion b. Drilling K-wire c. Drilling tunnels d. Inserting long cannula
e. Inserting wire loops f. Inserting LARS™ ligament g. Femoral fixation h. Tibial fixation
6

A1. Placement of the femoral K-wireCreate an anterolateral portal for viewing. Make an anteromedial portal located almost next to the medial border of the patellar tendon and low at the level of the tibial plateau, avoiding injury to the medial meniscus.
Introduce a sharp, double-ended K-wire through the medial portal.
With the knee flexed to 90° the K-wire should form an angle of approximately 25º with the tibial plateau and the tip should point towards the intercondylar wall of the lateral condyle at the point F, established on pre- and/or intra-operative X-rays (see page 4). Should an intra-operative X-ray be used, a true lateral view (with femoral condyles superimposed) is required to determine point F.
Note: For a 6.0mm drill use a 2.5mm K-wire, for 7.0mm and 7.5mm drills use a 3.0mm K-wire.
Drill the K-wire through the femur and allow the K-wire to exit over the thigh.
Place the drill onto the femoral end of the K-wire and pull the wire back up into the intercondylar notch until it is flush with the lateral wall.
LARS™ traditional technique
25°
F
7 |Responsible Innovation
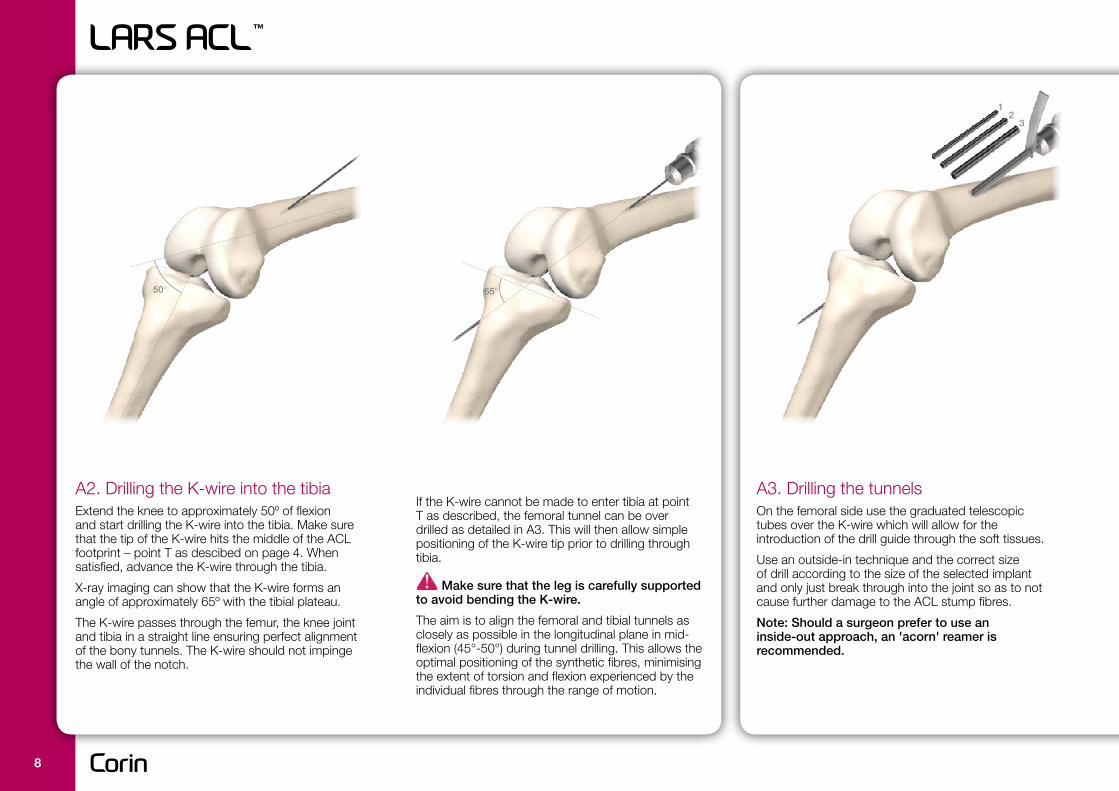
A2. Drilling the K-wire into the tibiaExtend the knee to approximately 50º of flexion and start drilling the K-wire into the tibia. Make sure that the tip of the K-wire hits the middle of the ACL footprint – point T as descibed on page 4. When satisfied, advance the K-wire through the tibia.
X-ray imaging can show that the K-wire forms an angle of approximately 65º with the tibial plateau.
The K-wire passes through the femur, the knee joint and tibia in a straight line ensuring perfect alignment of the bony tunnels. The K-wire should not impinge the wall of the notch.
If the K-wire cannot be made to enter tibia at point T as described, the femoral tunnel can be over drilled as detailed in A3. This will then allow simple positioning of the K-wire tip prior to drilling through tibia.
Make sure that the leg is carefully supported to avoid bending the K-wire.
The aim is to align the femoral and tibial tunnels as closely as possible in the longitudinal plane in mid-flexion (45°-50°) during tunnel drilling. This allows the optimal positioning of the synthetic fibres, minimising the extent of torsion and flexion experienced by the individual fibres through the range of motion.
A3. Drilling the tunnelsOn the femoral side use the graduated telescopic tubes over the K-wire which will allow for the introduction of the drill guide through the soft tissues.
Use an outside-in technique and the correct size of drill according to the size of the selected implant and only just break through into the joint so as to not cause further damage to the ACL stump fibres.
Note: Should a surgeon prefer to use an inside-out approach, an 'acorn' reamer is recommended.
50° 65°
12
3
8
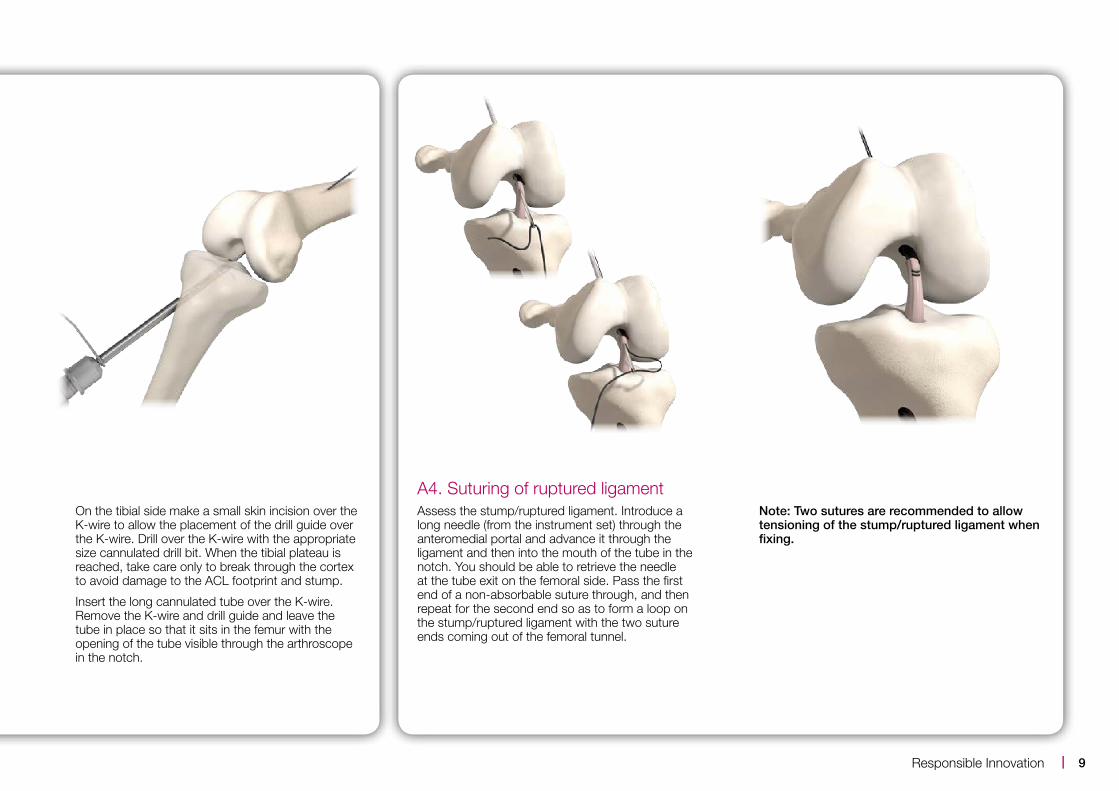
On the tibial side make a small skin incision over the K-wire to allow the placement of the drill guide over the K-wire. Drill over the K-wire with the appropriate size cannulated drill bit. When the tibial plateau is reached, take care only to break through the cortex to avoid damage to the ACL footprint and stump.
Insert the long cannulated tube over the K-wire. Remove the K-wire and drill guide and leave the tube in place so that it sits in the femur with the opening of the tube visible through the arthroscope in the notch.
A4. Suturing of ruptured ligament Assess the stump/ruptured ligament. Introduce a long needle (from the instrument set) through the anteromedial portal and advance it through the ligament and then into the mouth of the tube in the notch. You should be able to retrieve the needle at the tube exit on the femoral side. Pass the first end of a non-absorbable suture through, and then repeat for the second end so as to form a loop on the stump/ruptured ligament with the two suture ends coming out of the femoral tunnel.
Note: Two sutures are recommended to allow tensioning of the stump/ruptured ligament when fixing.
9 |Responsible Innovation

A5. Inserting the LARS™ ligamentAdvance the long cannulated tube through the femoral and tibial tunnels until it exits over the proximal tibia.
Through the tube, introduce a flexible wire (wire loop) from the femoral side as well as the 2mm blunt screw guide wire.
Remove the long cannulated tube from the femoral side ensuring that the flexible wire and the guide wire stay in place by holding them with an instrument. Pull back the screw guide wire so that it sits only in the femoral tunnel.
Pass the leaders of the LARS™ ligament through the wire loop. Pull on the femoral end of the wire loop to pull through the ligament leader thread. Pulling on the ligament leader threads gradually introduces the ligament into the tunnel. Prevent the screw guide wire from backing up the femoral tunnel.
If the ACL has ruptured at the tibial insertion, the wire loop may be reversed and the LARS™ pulled into the joint from femoral side to aid tensioning of ACL stump.
Pull the ligament through whilst observing through the arthroscope.
Note: When the LARS™ ligament is in place, 1-2mm of the woven section of the ligament must be visible outside of the femoral tunnel in the joint space.
10

A6. Femoral fixationIntroduce graduated soft tissue expanders to allow the placement of the drill guide over the guide wire. Choose a LARS™ screw at least 1mm larger in diameter than the size of the tunnel.
Note: If you have retensioned or repaired the ACL stump, tension the sutures through the stump whilst introducing the screw.
Insert the screw outside-in through the drill guide until the driver handle is flush with the drill guide to ensure that the screw is level with the cortex.
A7. Tibial fixationBefore securing the tibial end of the LARS™ ligament, put the knee through a full range of motion several times. Observe the ligament through the arthroscope. If the correct position has been achieved there should be little movement of the ligament.
A notchplasty/wallplasty should be conducted if risk of impingement is noticed during surgery.
The LARS™ ligament must be fixed using the blunt threaded, non-resorbable LARS™ interference screws to avoid damage to the ligament. Use a screw at least 1mm larger in diameter than the tunnel with the longest length possible and introduce over a blunt 2mm screw guide wire.
Secondary fixation with a staple or additional screw is recommended for the tibia.
Fix the LARS™ ligament at its longest length to avoid over-tensioning and restricting range of movement. Usually this will be with the knee flexed 0-10°.
A8. Trimming the ligamentOnce fixation of the LARS™ ligament is completed, the two extremities of the ligament are cut flush with the fixation using a scalpel to avoid soft tissue irritation.
screwdriver shaft length = drill guide length
11 |Responsible Innovation

B1. Femoral tunnel drillingShould the surgeon want to use an anteromedial portal technique, the femoral tunnel can be drilled inside-out independently at insertion point F as described previously.
A LARS™ femoral aimer can be used to position the K-wire and drill outside-in if required.
B2. Tibial tunnel drillingA tibial aimer is included for tibial tunnel positioning at the point T previously described.
The remaining steps in the previous technique should be followed for suturing of the stump, insertion of the LARS™ ligament and fixation.
Fix the LARS™ ligament at its longest length to avoid over-tensioning, usually with the knee flexed 0-10°.
Independent AM portal technique
12

LARS™ for ACL short ligament technique
C2. Tunnel drillingIf the femoral tunnel is drilled inside-out, use a 7.5mm drill bit over a beath pin to a depth of no more than 40mm. After drilling the tibial tunnel the remaining steps in the LARS™ traditional technique should be used for suturing of the ACL stump and inserting the LARS™ ligament, ensuring that 2mm of the woven section of the LARS™ ligament sits outside of the femoral tunnel in the joint
If the femoral tunnel is drilled from inside to out, care must be taken not to damage the existing ACL stump.
C3. LARS™ ligament fixationFemoral fixation should be completed using LARS™ interference screws 1mm larger in diameter than the tunnel, and longest length possible.
Use a 9mm LARS™ interference screw of the longest length possible for the tibia. Secondary fixation is recommended for the tibia
Fix the LARS™ ligament at its longest length to avoid over-tensioning, usually with the knee flexed 0-10°.
Short ligament technique
40mm
7.5mm Ø
C1. Tunnel positioningThe operative technique should be followed as previously described for the traditional LARS™ technique to create femoral and tibial tunnels using a 7.5mm cannulated drill over a K-wire. The ACL insertion points on the femur and tibia should equate to the positions F and T highlighted in the previous LARS™ traditional surgical technique.
* If an 8mm tunnel is required then a standard cannulated 8mm drill can be used.
The short ligament is designed to reduce damage to the quadriceps muscles and reduce bleeding by not requiring the LARS™ ligament to be pulled through the femoral tunnel into the soft tissue.
■■ The LARS™ AC100 Short can withstand forces up to 3000N
13 |Responsible Innovation

D1. Drilling the tunnels Tibial and femoral tunnels should be drilled at points T and F over a K-wire/beath as previously described. Use the correct sized cannulated drill as recommended for each LARS™ ligament. The femoral tunnel can be drilled either through the anteromedial portal or through the tibal tunnel.
For suspensory femoral fixations, total femoral tunnel length should not exceed 30mm plus that required for the fixation device used. The surgical technique for the specific suspensory fixation should be followed for calculating tunnel lengths to ensure that 1-2mm of the woven section of the LARS™ ligament remains outside of the femoral tunnel in the joint space when the ligament is in place.
Steps for suturing the ruptured ACL stump should be followed as previously described.
Suspensory fixation technique
LARS™ for ACL suspensory fixation technique As an alternative to interference screw fixation, LARS™ DB ligaments have been specially designed to be used with endobutton and cross-pin type suspensory femoral fixations.
The LARS™ DB ligaments are composed of:
■■ 2 x woven (intra-osseous tibial) ends
■■ 2 x (intra-articular) free fibre sections of 30mm length
■■ 1 x central woven (intra-osseous – femoral) section of 70mm length
These ligaments are available in three sizes:
■■ AC30DB with 60 fibres which can withstand forces up to 2700N
■■ AC40DB with 80 fibres which can withstand forces up to 3700N
■■ AC50DB with 100 fibres which can withstand forces up to 4720N
intra-osseous tibial woven section
intra-osseous tibial woven section
intra-articular free-fibre section
intra-articular free-fibre section
intra-osseous femoral woven section
14

D2. Graft insertionPass the two tail ends of a looped nylon suture through the femoral tunnel using the beath pin. Retrieve the looped end of the suture through the tibial tunnel.
Pass the LARS™ ligament through the fixation loop so that the two free fibre sections line up.
Use the looped nylon suture to pull the fixation leader sutures through the tibia and femur.
Pull the LARS™ ligament through the tibia and into the femur.
D3. Femoral fixationFollow the technique for the suspension fixation device to ensure femoral fixation is secure.
Note: When the LARS™ ligament is in place, 1-2mm of the woven section of the ligament must be visible outside of the femoral tunnel in the joint space.
Confirm that the patient has full flexion and extension of the knee and no lateral wall or notch impingement.
D4. Tibial fixationTibial fixation should be completed with a LARS™ interference screw at least 1mm larger in diameter than the tunnel and the longest length possible.
Fix the LARS™ ligament at its longest length to avoid over-tensioning, usually with the knee flexed 0-10°.
15 |Responsible Innovation
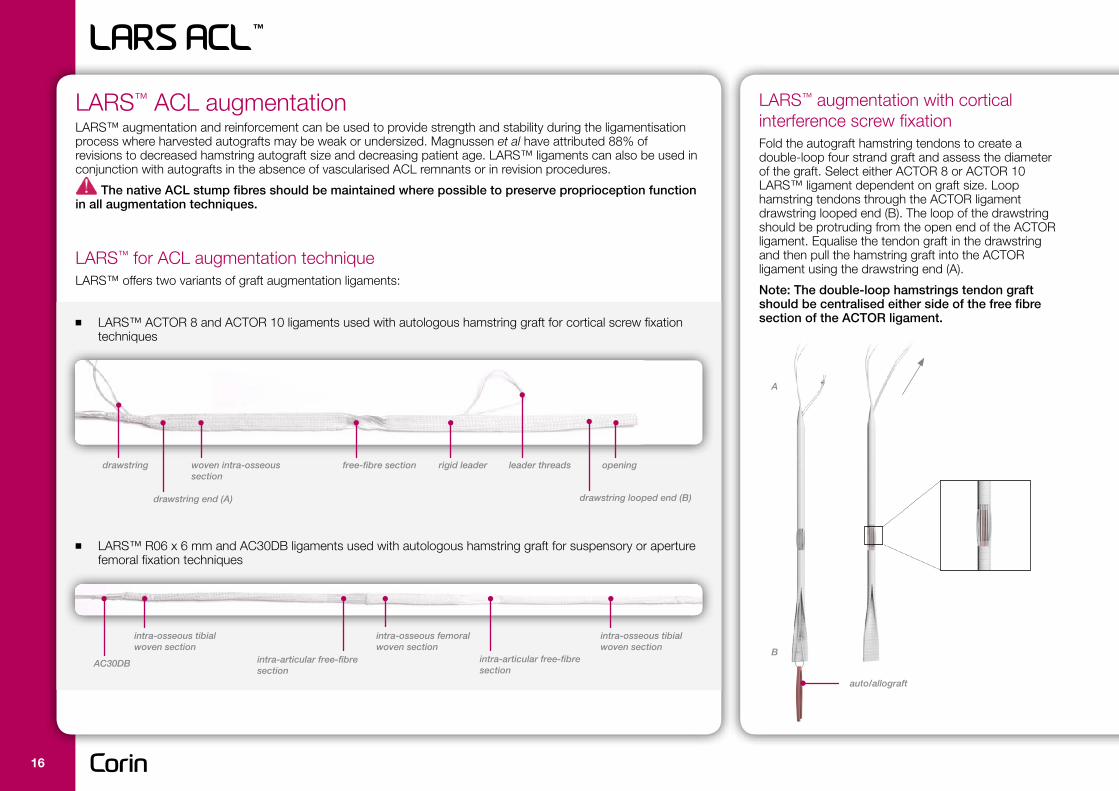
LARS™ augmentation with cortical interference screw fixation Fold the autograft hamstring tendons to create a double-loop four strand graft and assess the diameter of the graft. Select either ACTOR 8 or ACTOR 10 LARS™ ligament dependent on graft size. Loop hamstring tendons through the ACTOR ligament drawstring looped end (B). The loop of the drawstring should be protruding from the open end of the ACTOR ligament. Equalise the tendon graft in the drawstring and then pull the hamstring graft into the ACTOR ligament using the drawstring end (A).
Note: The double-loop hamstrings tendon graft should be centralised either side of the free fibre section of the ACTOR ligament.
LARS™ ACL augmentationLARS™ augmentation and reinforcement can be used to provide strength and stability during the ligamentisation process where harvested autografts may be weak or undersized. Magnussen et al have attributed 88% of revisions to decreased hamstring autograft size and decreasing patient age. LARS™ ligaments can also be used in conjunction with autografts in the absence of vascularised ACL remnants or in revision procedures.
The native ACL stump fibres should be maintained where possible to preserve proprioception function in all augmentation techniques.
LARS™ for ACL augmentation techniqueLARS™ offers two variants of graft augmentation ligaments:
■■ LARS™ ACTOR 8 and ACTOR 10 ligaments used with autologous hamstring graft for cortical screw fixation techniques
■■ LARS™ R06 x 6 mm and AC30DB ligaments used with autologous hamstring graft for suspensory or aperture femoral fixation techniques
leader threads
intra-osseous tibial woven section
intra-osseous tibial woven section
intra-articular free-fibre section
intra-articular free-fibre section
intra-osseous femoral woven section
rigid leaderwoven intra-osseous section
free-fibre section openingdrawstring
auto/allograft
B
A
drawstring end (A) drawstring looped end (B)
AC30DB
16

Suture the graft above the free fibre section only to securely hold the graft construct in place. The drawstring can then be removed by cutting one strand and pulling the other.
The graft below the free fibre section should not be sutured to allow independent tensioning of the hamstring autograft and the LARS™ ACTOR ligament.
Femoral and tibial tunnels should be drilled as previously described. Tunnel diameters should be as small as possible, for ACTOR 8 – 7.5-8.0mm and for ACTOR 10 – 9.0-10.0mm.
Once the graft is in place, 1-2mm of the woven intra-osseous section of the LARS™ ACTOR ligament should be visible outside of the femoral tunnel in the joint space.
Femoral fixation should be completed using LARS™ interference screws as previously described. Once femoral tunnel fixation is complete, put the knee through full range of motion several times to ensure that the graft does not impinge.
Tibial fixation should be completed using LARS™ interference screws as previously described. The autograft should be tensioned appropriately whilst the ACTOR ligament should not be over-tensioned.
LARS™ augmentation with suspensory femoral fixation An R06 X 6mm or AC30DB LARS™ ligament can be used to augment a single strand looped hamstring tendon graft for use with suspensory fixation. Harvest a single hamstring tendon (usually semitendinosus tendon) and loop through the suspensory fixation loop alongside the recommended LARS™ ligament. If using the AC30DB ligament ensure that the two free fibre sections of the LARS™ line up and the graft can then be sutured close to the fixation loop to prevent slipping.
Distal ends of the graft should not be sutured to allow for independent tensioning of the autograft and LARS™ ligament.
Femoral and tibial tunnels should be drilled using the recommended suspensory fixation technique described previously, ensuring that when the graft is in place 1-2mm of the woven intra-osseous section of the LARS™ ligament is visible outside of the femoral tunnel in the joint space.
Tibial fixation should be completed as described in previous augmentation technique.
LARS™ augmentation with aperture femoral fixationFor surgeons who prefer aperture fixation with interference screws, the previous suspensory fixation technique can also be used with inside-out Ti screw fixation on the femoral side. Should this latter technique be used, care should be taken whilst inserting the screw to avoid graft laceration at the femoral insertion site.
Loop the tendon and the LARS™ ligament over a strong lead suture to create a four strand graft. If using the AC30DB ligament, ensure that the two free fibre sections of the LARS™ ligament line up and the tendon is centralised (see diagram of looped tendon and AC30DB). Follow the recommended LARS™ aperture fixation technique as previously described. When the graft is in place, 1-2mm of the woven intra-osseous section of the LARS™ ligament should be visible outside of the femoral tunnel in the joint space.
Femoral and tibial fixation should be completed with LARS™ interference screws as previously described.
1-2mm of ligament woven section outside of tunnel
17 |Responsible Innovation

18
References1. Laboureau JP. LARS design. The concept of S.T.I.F. Various indications in knees, shoulder, ankle and
others. Sydney, 31 April, 2009.
2. Gao K, Chen S, Wang L, Zhang W, Kang Y, Dong Q, Zhou H, Li L. Anterior cruciate ligament reconstruction with LARS artificial ligament: A multicenter study with 3- to 5-Year Follow-up. Arthroscopy. The Journal of Arthroscopic and Related Surgery, Vol 26, No 4 (April), 2010: pp 515-523.
3. Papadopoulos G, Darmanis S, Kiatos D. Long term results in the treatment of ACL ruptures using the LARS artificial ligament: 9-year experience of an all arthroscopic technique. Data on file, Corin UK.
4. Li Z, Liu Y, Shi B, Wu X, Zhu J, Wang Z, Li Z. An experimental study on anterior cruciate ligament reconstruction with remnants and remaining bundle preservation. Zhongguo Xiu Fu Chong Jian Wai Ke Za Zhi. 2009 Mar;23(3):282-6.
5. Woo SL, Vogrin TM, Abramowitch SD. Healing and repair of ligament injuries in the knee. Journal of the American Academy of Orthopaedic Surgeons 2000;8:364–372.
6. Murray MM, Spector M. Fibroblast distribution in the anteromedial bundle of the human anterior cruciate ligament: the presence of alpha-smooth muscle actin- positive cells. Journal of Orthopaedic Research 1999;17:18–27.
7. Murray MM, Martin SD, Spector M. Migration of cells from human anterior cruciate ligament explants into collagen-glycosaminoglycan scaffolds. Journal of Orthopaedic Research 2000.
8. Murray MM, Spector M. The migration of cells from the ruptured human anterior cruciate ligament into collagen-glycosaminoglycan regeneration templates in vitro. Biomaterials 2001;22:2393–2402.
9. Dhillon MS, Bali K, Vasistha RK. Immunohistological evaluation of proprioceptive potential of the residual stump of injured anterior cruciate ligaments (ACL). International Orthopaedics. 2010 Jun;34(5):737-41. Epub 2010 Feb 5.
10. Denti M, Monteleone M, Berardi A, Panni AS. Anterior cruciate ligament mechanoreceptors. Clinical Orthopaedics and Related Research 1994, 308: 29-33.
11. Georgoulis AD, Pappa L, Moebius U, Malamo-Mitsi V, Pappa S, Papageorgiou CO, Agnantis NJ, Soucacos PN. The presence of proprioceptive mechanoreceptors in the remnants of ruptured ACL as possible source for reinnervation of ACL autograft. American Journal of Sports Medicine 2001, 25(3). 336-340.
12. Ochi M, Iwasa J, Uchio Y, Adachi N, Sumen Y. The presence of sensory neurons in the reconstruction of the anterior cruciate ligament. Journal of Bone & Joint Surgery [Br] 1999, 81(5): 902-906.
Post-operative rehabilitationFollowing ACL reconstruction with LARS™, patients can often tolerate more exercise earlier than with autograft procedures. The pace of rehabilitation is individual to the patient and should be tailored to their demands, response to therapy and their wound healing. Return to full sporting activity should only be recommended when both objective and subjective outcomes are satisfactory.
Recommended post-operative care and physiotherapy following ACL reconstruction with LARS™:
■■ No post-op bracing or immobilisation.
■■ Full weight bearing with mobilisation and isometric quadriceps exercises to be started the day after surgery to recover full extension.
■■ 90° of flexion should be obtained after 7-10 days.
■■ Return to driving should be at the patient’s and surgeon’s discretion.
■■ Return to work will depend on the type of work and the individual patient’s recovery time.
■■ A patient can usually commence jogging 6-9 weeks post-surgery.
■■ Participation in competitive sport is dependent on the patient’s individual recovery and should only be recommended once the patient has regained full proprioception. Generally this is possible after 3-4 months.
LARS™ ligaments are strong immediately after implantation, therefore there is a temptation for a patient to be less diligent with physiotherapy. Tissue integration may take some time leaving the LARS™ ligament more susceptible to wear if aggressive rehabilitation is undertaken.

Ordering informationLARS™ anterior cruciate ligaments
104.105 AC 80 (Left)
104.106 AC 80 (Right)
104.100 AC 100 2BL (Left)
104.101 AC 100 2BR (Right)
104.090 AC 100 2BL/S (Left) - 100 short femoral insert
104.091 AC 100 2BR/S (Right) - 100 short femoral insert
104.112 AC 120 2BL (Left)
104.111 AC 120 2BR (Right)
104.114 AC 160 2BL (Left)
104.113 AC 160 2BR (Right)
104.141 AC 30 DB - For suspensory fixation with free fibres
104.137 AC 40 DB - For suspensory fixation with free fibres
L020505 AC 50 DB - For suspensory fixation with free fibres
104.133 RO6 x 400/6mm - For suspensory fixations
104.108 Actor 8 - ACL and PCL tube for augmentation
104.110 Actor 10 - ACL and PCL tube for augmentation
LARS™ blunt threaded interference screws and staples
104.630 6 x 30mm
104.725 7 x 25mm
104.730 7 x 30mm
104.825 8 x 25mm
104.830 8 x 30mm
104.925 9 x 25mm
104.930 9 x 30mm
408.130 10 x 30mm
104.001 LARS™ ligament staple 8 x 20mm
LARS™ ACL instrument set
204.043 Adjustable guide - AVM01
204.075 8mm Cannulated drill - U01157
204.076 9mm Cannulated drill - U01155
204.002 Cannulated drill bit O/D 6mm I/D 2.7mm - U01152
204.019 Cannulated drill bit O/D 7mm I/D 3.2mm - U01153
204.003 Cannulated drill bit O/D 7.5mm I/D 3.2mm - U01154
204.038 Canula for needle - U01351
204.044 Femoral guide - C26001
204.046 K-wire guide - O/D 7.4mm I/D 3.2mm - C26003
104.205 K-wire Ø2mm x 330mm - blunt ends - U01018
104.251 K-wire Ø2.5mm x 330mm - trocar ends - U01020
104.301 K-wire Ø3mm x 330mm - trocar ends - U01009
204.020 Ligament cutter
204.014 Ligament traction - U02456
204.033 Needle - Ø1.5 x 330mm (x2) - U01453
204.001 Screwdriver
204.013 Telescopic tube - 140mm long retractor - U01304
204.039 Telescopic tube - 150mm long - U01256
204.040 Telescopic tube - 160mm long - U01253
204.041 Telescopic tube - 180mm long - U01252
204.042 Telescopic tube - 300mm long - U01254
204.045 Tibial guide - C26002
204.008 Wire loop - U014011 x5
204.901 Outer box
204.913A Tray - D26001
204.913B Tray - D26002
19 |Responsible Innovation

The Corinium CentreCirencester, GL7 1YJ, UKt: +44 (0)1285 659 866f: +44 (0)1285 658 960e: [email protected]
©2013 Corin P No I931 Rev1 09/2013 ECR 12809
Printed on Cocoon 100 which contains 100% total recycled fibre and is produced at a mill which folds the ISO 14001 for Environmental Management Systems. The pulp is bleached using Elemental Chlorine Free processes.
100%