latex and miktex
TRANSCRIPT

LATEX and MiKTEX
Introduction Part 2
http://www.win.tue.nl/∼jknopper/latex/intro/
December 11, 2012 Jan Willem Knopper ([email protected])

2/57
/w December 11, 2012
Tables 3
Including programming statements 15
WinEdt - Working with a main file 18
Page Numbering 22
Multicolumn Text 24
Footnotes 25
Fonts 26
Non-standard headers and footers 28
Exercise 30
Mathematical formulas 31
Floats 42
Creating a master index 50
Slide shows and posters 52
Contents

3/57
/w December 11, 2012
The environments array and tabular create tables and matrices. The usage ofarray is the same as for tabular, but it can only be used in math mode.
\begin{array}[pos]{cols}rows
\end{array}
\begin{tabular}[pos]{cols}rows
\end{tabular}
The pos argument defines the vertical positioning for the table: t or b (top orbottom)
Tables

4/57
/w December 11, 2012
The cols argument defines the column formatting. The possible formattingsymbols are:
l the column contents are left justified
r the column contents are right justified
c the column contents are centered
p{width } the text in this column is set in a paragraph box of the specifiedwidth.
| draws a vertical line
|| draws a double vertical line
Tables

5/57
/w December 11, 2012
The rows contain the actual entries. Each row is terminated with the \\ com-mand. The column entries are separated by a & symbol.
The command \hline draws a horizontal line over the full width.The command \cline{m-n} draws a horizontal line from the left of columnm to the right of column n.
The command \multicolumn{n}{col}{text} creates a table cell thatextends n columns. The column formatting for this cell is defined by col.
Tables

6/57
/w December 11, 2012
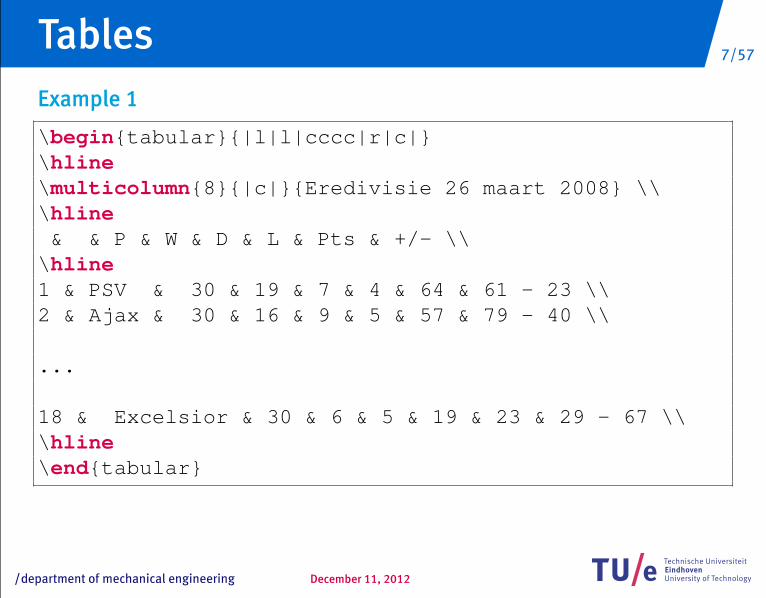
Example 1Stand Eredivisie 26 maart 2008
P W D L Pts +/-1 PSV 30 19 7 4 64 61 - 232 Ajax 30 16 9 5 57 79 - 403 sc Heerenveen 30 16 6 8 54 76 - 384 Feyenoord 30 16 6 8 54 56 - 345 NAC Breda 30 16 6 8 54 41 - 356 FC Twente 30 14 10 6 52 47 - 317 FC Groningen 30 15 5 10 50 50 - 488 Roda JC 30 11 10 9 43 51 - 499 FC Utrecht 30 12 6 12 42 56 - 5010 Vitesse 30 11 7 12 40 42 - 5111 NEC 30 11 6 13 39 43 - 4912 AZ 30 8 9 13 33 41 - 4913 Heracles Almelo 30 8 7 15 31 33 - 5614 Sparta Rotterdam 30 8 6 16 30 46 - 6815 De Graafschap 30 7 7 16 28 30 - 5516 Willem II 30 7 6 17 27 33 - 4117 VVV-Venlo 30 6 8 16 26 37 - 6718 Excelsior 30 6 5 19 23 29 - 67
Tables
7/57
/w December 11, 2012
Example 1
\begin{tabular}{|l|l|cccc|r|c|}\hline\multicolumn{8}{|c|}{Eredivisie 26 maart 2008} \\\hline& & P & W & D & L & Pts & +/- \\
\hline1 & PSV & 30 & 19 & 7 & 4 & 64 & 61 - 23 \\2 & Ajax & 30 & 16 & 9 & 5 & 57 & 79 - 40 \\
...
18 & Excelsior & 30 & 6 & 5 & 19 & 23 & 29 - 67 \\\hline\end{tabular}
Tables
8/57
/w December 11, 2012
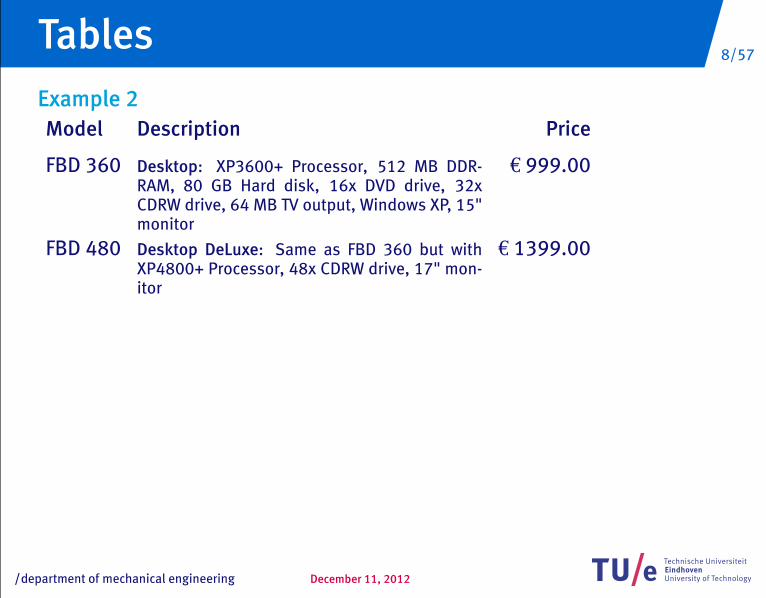
Example 2Model Description Price
FBD 360 Desktop: XP3600+ Processor, 512 MB DDR-RAM, 80 GB Hard disk, 16x DVD drive, 32xCDRW drive, 64 MB TV output, Windows XP, 15"monitor
€ 999.00
FBD 480 Desktop DeLuxe: Same as FBD 360 but withXP4800+ Processor, 48x CDRW drive, 17" mon-itor
€ 1399.00
Tables

9/57
/w December 11, 2012
Example 2
\begin{tabular}{lp{0.5\textwidth}r}\bfseries Model & \bfseries Description &\bfseries Price \\[1ex]
FBD 360 & \small \textbf{Desktop}: XP3600+Processor, 512~MB DDR-RAM, 80~GB Hard disk,16x DVD drive, 32x CDRW drive, 64~MB TV output,Windows~XP, 15" monitor & \EUR{} 999.00 \\
FBD 480 & \small \textbf{Desktop DeLuxe}: Sameas FBD 360 but with XP4800+ Processor, 48x CDRWdrive, 17" monitor & \EUR{} 1399.00 \\\end{tabular}
Tables

10/57
/w December 11, 2012
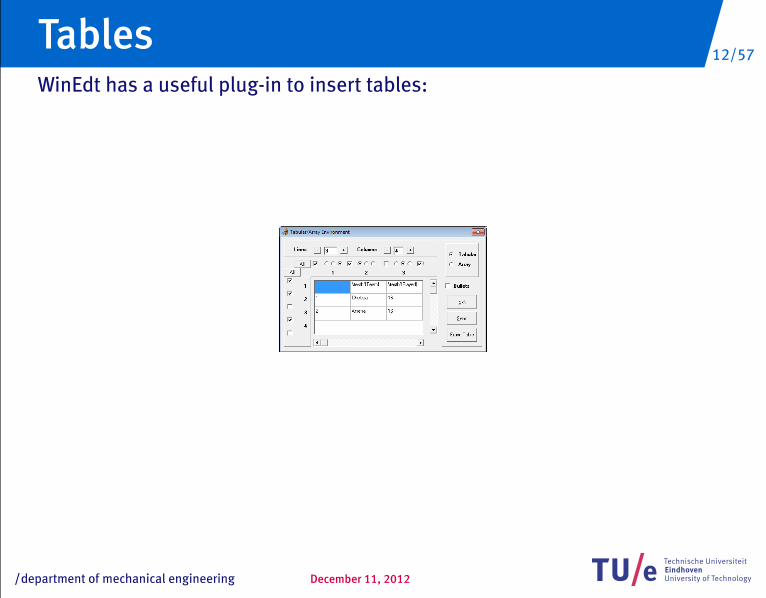
WinEdt has a useful plug-in to insert tables:
Tables

11/57
/w December 11, 2012
WinEdt has a useful plug-in to insert tables:
Tables
12/57
/w December 11, 2012
WinEdt has a useful plug-in to insert tables:
Tables

13/57
/w December 11, 2012
WinEdt has a useful plug-in to insert tables:
Tables

14/57
/w December 11, 2012
Excel to LATEX Add-In1. download the Excel macro: Excel2LaTeX.xla
2. Start Excel and install the Add-in:
• Click on the Office button (in the upper left corner)
• Excel Options
• Add-Ins
• Go...
• Browse...
• Browse for the Add-In and click Ok
3. Restart Excel
4. A button has been added to the Add-Ins tab:
5. Create a table in Excel, select the table and press this button.
6. Copy-paste to WinEdt
Tables
15/57
/w December 11, 2012
The package listings formats listings. It defines the following commands:
• \lstlisting{...} for inline programming statements.
• \begin{lstlisting} ... \end{lstlisting} for multi-line list-ings.
• \lstinputlisting{filename} imports a complete source file
Including programming statements

16/57
/w December 11, 2012
Customizing listingsUsing the command \lstset you can customize the language and appear-ance of the listing:
\lstset{language=Java,basicstyle=\color{black}\ttfamily,commentstyle=\color{green}\itshape\ttfamily,keywordstyle=\color{blue}\bfseries\ttfamily,showstringspaces=false,frame=single, % boxed listingsbackgroundcolor=\color{white}
}
Supported languages: too many to mention. Included are Basic, C, C++, Del-phi, Fortran, HTML, Java, Mathematica, Matlab, Pascal, Perl, PHP, SAS, SQL,TeX, VBScript, XML.
Including programming statements

17/57
/w December 11, 2012
Customizing listingsAlternatively, you can specify options like this:
\definecolor{myyellow}{rgb}{1.00,1.00,0.50}\begin{lstlisting}[language=Pascal,
backgroundcolor=\color{myyellow}]readln(N);for i := 1 to N dobeginwriteln(random)
end\end{lstlisting}
readln(N);for i := 1 to N dobeginwriteln(random)
end
Including programming statements

18/57
/w December 11, 2012
In bigger documents one often has one main file which includes several sub-documents: \input chapter1 etc.. WinEdt has special functionality todeal with this document structure:
declares the current file as main file. This means that the programslatex, yap, dvips, gsview, pdflatex operate on this mainfile, even if another document is opened in WinEdt.
does not consider the current file as main file anymore. The file that iscurrently open will be LATEXed.
displays the project tree (main file, input files, table of contents, bibliog-raphy and labels. You can click on files in this tree to open them.
WinEdt - Working with a main file

19/57
/w December 11, 2012
WinEdt - Working with a main file

20/57
/w December 11, 2012
!
WinEdt - Working with a main file

21/57
/w December 11, 2012
The table of contents is generated and printed with the command\tableofcontents (normally after title page and abstract).All entries are created automatically, based on the sectioning commands. Youhave to run latex twice to get all references right! It is recommended to usethe texify command.
To create additional entries manually, use the command:\addcontentsline{toc}{section type}{entry text}
\appendix\addcontentsline{toc}{chapter}{\noindent Appendix}\chapter{Source code}
Depth of TOC entries (do not include subsubsections):
\setcounter{tocdepth}{2}
Table of Contents

22/57
/w December 11, 2012
You can set the page number manually:
\setcounter{page}{14}
You can also control the style of the page numbering:
\pagenumbering{style}
The allowed styles are:
arabic normal (Arabic) numerals: 1, 2, 3, 4
roman lowercase Roman numerals: i, i i, i i i, iv
Roman uppercase Roman numerals: I, I I, I I I, I V
alph for lowercase letters: a, b, c, d
Alph for uppercase letters: A, B, C, D
Page Numbering

23/57
/w December 11, 2012
To simplify the structuring of the book, use the commands:
\frontmatter\mainmatter\backmatter
Front matter: preface, table of contentsMain matter: main body of textBack matter: bibliography, index
Front matter has Roman page numbering and suppresses the numbering ofchapters. Back matter also has unnumbered chapters. The page number isreset for the main matter.
Book Structure

24/57
/w December 11, 2012
• The document class option twocolumn sets the entire document in twocolumns per page
• Individual pages may be output in one or two columns:
\onecolumn\twocolumn[header text]
Please note that these commands start a new page.
• To select a different number of columns within one page, use the multicolsenvironment which is defined in the package multicol:
\usepackage{multicol}...\begin{multicols}{3}[header text]Text set in 3 columns.\end{multicols}
Multicolumn Text

25/57
/w December 11, 2012
Footnotes are generated with the command \footnote{text}.Example:
This section is about footnotes.\footnote{Thestandard footnote marker is a small, raised number.}
This section is about footnotes.1
1The standard footnote marker is a small, raised number.
Footnotes

26/57
/w December 11, 2012
TU/e FontsIn preamble:
\usepackage[T1]{fontenc}
To change the font defaults:
\renewcommand{\sfdefault}{zmb}\renewcommand{\rmdefault}{zmb}\renewcommand{\ttdefault}{pcr}\fontfamily{\rmdefault}\selectfont
Note: the deprecated serif font “TU/e Scala” can be loaded using:
\renewcommand{\rmdefault}{zsc}
Fonts

27/57
/w December 11, 2012
Fonts• Mathtime
\usepackage[T1]{fontenc}\usepackage{mathtime}
This is an italic or bold test
• Helvetica (looks like Arial)
\renewcommand{\sfdefault}{phv}\renewcommand{\rmdefault}{phv}
This is an italic or bold test

28/57
/w December 11, 2012
The package fancyhdr (previously known as fancyheadings) defines com-mands that let you control headers and footers:
\lhead{...} \chead{...} \rhead{...}
\lfoot{...} \cfoot{...} \rfoot{...}
If you want to distinguish between odd and even pages, it becomes slightlymore complicated:
\fancyhead[RO, LE]{...}
\fancyfoot[C]{...}
L = Left, C = left, R = right, O = odd, E = even.
You have to specify that pagestyle should be fancy (instead of plain or empty).
Non-standard headers and footers

29/57
/w December 11, 2012
fancyhdr - Example
\pagestyle{fancy}\fancyhf{}\fancyhead[CE]{\sffamily\leftmark}\fancyhead[CO]{\sffamily\rightmark}\fancyfoot[RO]{\thepage\ of \pageref{LastPage}}\fancyfoot[LE]{\thepage\ of \pageref{LastPage}}
\renewcommand\chaptermark[1]{%\markboth{\chaptername\ \thechapter\ #1}{}}
\renewcommand\sectionmark[1]{%\markright{\thesection\ #1}}
\renewcommand\headrulewidth{0.4pt}
Please note that the LastPage reference is only available if you load the pack-age lastpage. You have to LATEX your document twice before it works.

30/57
/w December 11, 2012
1. Include the image snowwhite.jpg on the title page. Make sure thatyour document runs with latex and pdflatex!
2. Change the page numbering to uppercase Roman numbering.
3. Find the second line in chapter 4.2 (They were seven dwarfs . . . ) and createa footnote at this place. It should say: Walt Disney was the first one to givenames to the dwarfs: Dopey, Grumpy, Doc, Happy, Bashful, Sneezy andSleepy.
4. Change the default fonts of the document to TU/e fonts.
5. Create headers and footers just like in the fancyhdr example.
Exercise

31/57
/w December 11, 2012
In a text:For a rectangular triangle, we know from Pythagoras’ theoremthat a2
+ b2= c2 where a and b are the length of two sides
adjoining the straight angle while c is the length of the sideopposite the straight angle.
Compare this with:
For a rectangular triangle, we know from Pythagoras’ theoremthat a2+b2=c2 where a and b are the length of two sides adjoin-ing the straight angle while c is the length of the side oppositethe straight angle.
Mathematical formulas

32/57
/w December 11, 2012
Mathematical formulas are created as follows:
We get: $a^2+b^2=c^2$, $a^{13}$, $b_3$ or $b_13$
results in
We get: a2+ b2
= c2, a13, b3 or b13
Mathematical formulas

33/57
/w December 11, 2012
Mathematical formulas are created as follows:
We get\[a^2+b^2=c^2, a^{13}, b_3 \mbox{ or } b_13
\]
results inWe get
a2+ b2
= c2, a13, b3 or b13
Mathematical formulas

34/57
/w December 11, 2012
We can also number our equations:
We get\begin{equation} \label{one}
a^2+b^2=c^2, a^{13}, b_3 \mbox{ or } b_13\end{equation}
results inWe get
a2+ b2
= c2, a13, b3 or b13 (1)
Mathematical formulas

35/57
/w December 11, 2012
We can also have multiple equations:
\begin{eqnarray}x & = & r\sin \varphi \label{11} \\y & = & r\cos \varphi \nonumber \\z & = & z \label{33}
\end{eqnarray}
x = r sin ϕ (2)y = r cos ϕ
z = z (3)
Mathematical formulas

36/57
/w December 11, 2012
or without numbers:
\begin{eqnarray*}x & = & r\sin \varphi \\[-0.2cm]y & = & r\cos \varphi \\z & = & z
\end{eqnarray*}
x = r sin ϕy = r cos ϕ
z = z
Mathematical formulas

37/57
/w December 11, 2012
Obviously we can do more:
$\frac{n}{n+p^2} \int_0^\infty\sqrt[n]{x^n-\sin y} \textrm{d}x$
nn+p2
∫∞
0n√
xn − sin ydx
Mathematical formulas

38/57
/w December 11, 2012
On the other hand:
\[\frac{n}{n+p^2} \int_0^\infty\sqrt[n]{x^n-\sin y}\, \textrm{d}x\]
nn + p2
∫∞
0
n√
xn − sin y dx
Mathematical formulas

39/57
/w December 11, 2012
and finally:
$\displaystyle \frac{n}{n+p^2} \int_0^\infty\sqrt[n]{x^n-\sin y}\; \textrm{d}x$
nn + p2
∫∞
0
n√
xn − sin y dx
Mathematical formulas

40/57
/w December 11, 2012
Functions
$\sin x,\; sin x, \; \mbox{sin} x$
sin x, sinx, sinx
Mathematical formulas

41/57
/w December 11, 2012
Brackets
$\displaystyle (\frac{n}{\frac{n}{n+p}+1})+ \left( \frac{n}{\tfrac{n}{n+p}+1} \right)$
(n
nn+p + 1
)+
(n
nn+p + 1
)
Mathematical formulas

42/57
/w December 11, 2012
Inline floatsThe package wrapfig makes it possible to place text next to floats:
\begin{wrapfigure}{placement}[overhang]{width}\includegraphics[width=\linewidth]{image}\end{wrapfigure}
placement horizontal placement: l (left) or r (right). For two-sided docu-ments: i (inside edge) or o (outside edge).
overhang overhang of the float into the margin (default: 0pt).
width width of the figure or table (use wraptable for tables).
Floats
43/57
/w December 11, 2012
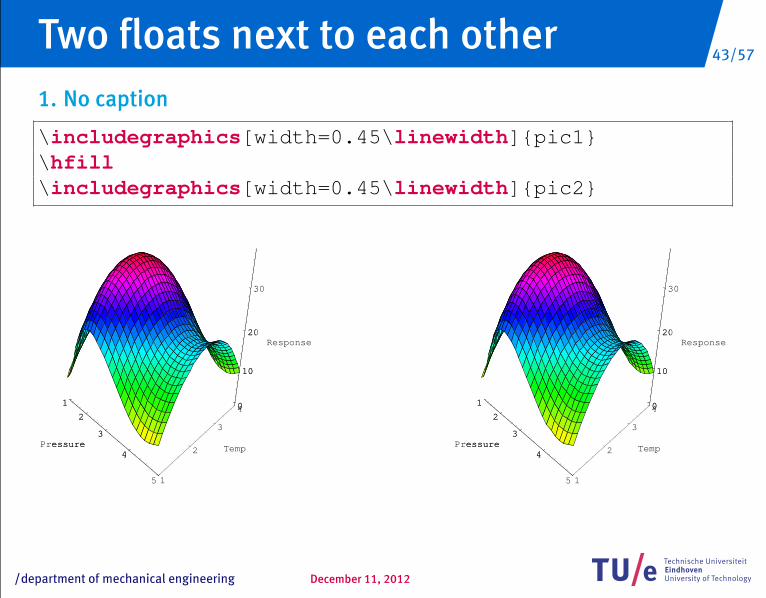
1. No caption
\includegraphics[width=0.45\linewidth]{pic1}\hfill\includegraphics[width=0.45\linewidth]{pic2}
1
2
3
4
5
Pressure
1
2
3
4
Temp
0
10
20
30
Response
1
2
3
4Pressure
0
10
20
30
1
2
3
4
5
Pressure
1
2
3
4
Temp
0
10
20
30
Response
1
2
3
4Pressure
0
10
20
30
Two floats next to each other

44/57
/w December 11, 2012
2. One caption
\begin{figure}[ht]\includegraphics[width=0.45\linewidth]{pic1}\hfill\includegraphics[width=0.45\linewidth]{pic2}\caption{a response surface.}\label{fig:surface}\end{figure}
Two floats next to each other

45/57
/w December 11, 2012
3. Two captionsNow we need the package caption. This package has very extensive function-ality to change the appearance of captions. In this case we are only going touse the new command \captionof.
\parbox[t]{0.45\textwidth}{\includegraphics[width=\linewidth]{pic1}\captionof{figure}{the first figure}
}\hfill\parbox[t]{0.45\textwidth}{
\includegraphics[width=\linewidth]{pic2}\captionof{figure}{the second figure}
}
For tables, just repace figure by table.
Two floats next to each other

46/57
/w December 11, 2012
1
2
3
4
5
Pressure
1
2
3
4
Temp
0
10
20
30
Response
1
2
3
4Pressure
0
10
20
30
Figure 2: the first figure
1
2
3
4
5
Pressure
1
2
3
4
Temp
0
10
20
30
Response
1
2
3
4Pressure
0
10
20
30
Figure 3: the second figure
Two floats next to each other

47/57
/w December 11, 2012
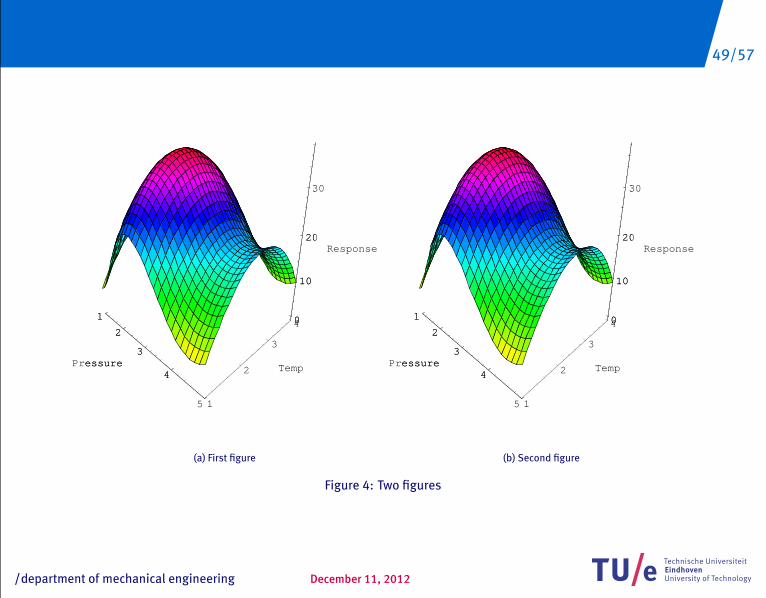
4. Sub-captionsNow we need the package subfig:
\begin{figure}[ht]\begin{center}\subfloat[First figure]{
\includegraphics[width=0.45\textwidth]{pic1}}\subfloat[Second figure]{
\includegraphics[width=0.45\textwidth]{pic2}}\caption{Two figures}\end{center}\end{figure}

48/57
/w December 11, 2012
1
2
3
4
5
Pressure
1
2
3
4
Temp
0
10
20
30
Response
1
2
3
4Pressure
0
10
20
30
1
2
3
4
5
Pressure
1
2
3
4
Temp
0
10
20
30
Response
1
2
3
4Pressure
0
10
20
30
Figure 1: a response surface.
49/57
/w December 11, 2012
1
2
3
4
5
Pressure
1
2
3
4
Temp
0
10
20
30
Response
1
2
3
4Pressure
0
10
20
30
(a) First figure
1
2
3
4
5
Pressure
1
2
3
4
Temp
0
10
20
30
Response
1
2
3
4Pressure
0
10
20
30
(b) Second figure
Figure 4: Two figures

50/57
/w December 11, 2012
To create a master index, just follow these steps:
1. include the package makeidx.
2. add the command \makeindex before \begin{document}
3. add words to the index with the command \index{word}. Please notethat this command does not display the word. It might be useful to definea command:
\newcommand{\idx}[1]{#1\index{#1}}
4. put the following commands at the location where you want the index:
\newpage\cleardoublepage\printindex
This makes sure that the index will start on an odd page.
5. run LATEX twice, then run makeindex and run LATEX again.
Creating a master index

51/57
/w December 11, 2012
Special index formatsUse this to point to another word:
\index{looking-glass|see{mirror}}
Use this to make the page number bold:
\index{forest|textbf}
Use this to make sub categories:
\index{plan!first}\index{plan!second}
Use this to span multiple pages:
\index{Snow white|(}\index{Snow white|)}
Creating a master index

52/57
/w December 11, 2012
The package pdfscreen was written for PDF slide show presentations. Unfor-tunately this package contained some bugs, so another package was written:tuepdfscreen2008This package can be used to create PDF slide shows. The default appearanceis in the TU/e style (colours, fonts) but this can be modified. In fact, any Pow-erpoint style can be converted to PDF which makes it suitable for TU/ePDF-Screen.
Detailed information about TU/ePDFScreen (and TU/e posters, reports, let-ters, faxes) can be found in the MiKTeX 2.8/Documentation start menu group.
Slide shows and posters

53/57
/w December 11, 2012
Converting your LATEX document to a slide show
1. make sure that your document runs with (LATEX and) PDFLATEX.
2. include the line
\usepackage[wtbuk]{tuepdfscreen2008}
3. use the slide or slidetop environments to divide your text into differentslides.
4. if want pages to appear in multiple steps, use the \pause command todefine breaks.
5. run PDFLATEX on the file.
6. if you used the \pause command, run the program AddPause that can befound in the MiKTEX Start Menu program group.
Slide shows and posters

54/57
/w December 11, 2012
Converting your LATEX document to a slide show
\documentclass[a4paper]{article}
\begin{document}
\section*{An example}
\begin{eqnarray*}\lim_{x \rightarrow 0} \frac{\sin x}{x} &=& 1\\
\sum_{k=0}^\infty x^k &=& \frac{1}{1-x} (|x| < 1)\end{eqnarray*}
\end{document}
Slide shows and posters

55/57
/w December 11, 2012
Converting your LATEX document to a slide show
\documentclass[a4paper]{article}\usepackage[wtbuk,themeblue]{tuepdfscreen2008}
\begin{document}\begin{slidetop}\slidetitle{Mathematics}\section*{An example}
\begin{eqnarray*}\lim_{x \rightarrow 0} \frac{\sin x}{x} &=& 1\\\pause\sum_{k=0}^\infty x^k &=& \frac{1}{1-x} (|x| < 1)\end{eqnarray*}\end{slidetop}%\end{document}
Slide shows and posters

56/57
/w
An example
limx→0
sin xx= 1
∞∑k=0
xk=
11− x
(|x | < 1)
Mathematics
57/57
/w
• The LaTeX manual, written by Piet van Oostrum. This is available at thesales point of TU/e syllabi. PDF version already on your laptop!
•
A Guide to LaTeX, by Helmut Kopka.ISBN 0-321-17385-6.
•
The LaTeX Companion Second Edition, by Mittelbachand Goossens. ISBN 0-201-36299-6.
• TU/e LaTeX FAQ: http://www.win.tue.nl/latex
• information about a package: Start Menu, MiKTeX group, Documentation,LaTeX Packages Help.
I want to know more about LATEX!!!