lawn bowling green practices and pace
TRANSCRIPT

Lawn Bowling Green Practices and Pace
Compiled by M. Comba, for the Maple Leaf (Port Charlotte, Fl) and Milton (Milton, On) Lawn
Bowling Clubs.
March 2013

Acknowledgements:
I am grateful to the following persons for their enthusiasm, knowledge and
insight.
Nancy Miller, Superintendent Maple Leaf Golf and Country Club Port
Charlotte Florida and Vice-President Florida Golf Course Superintendent
Association, Inc.
Lloyd Woods, Greens Advisor and Consultant to Lawn Bowls Canada.
John Parker, Superintendent, Scenic Woods Golf Course, Binbrook, Ontario
and President, G3 Lawn Consultants, Burlington, Ontario.
Patrick Collins, US Lawn Bowls Greens Committee member, SWD,
California.
Susan Macpherson, friend and educator.

Lawn Bowling Green Practices and Pace
Introduction
This document was prepared to assist novice greens personnel, club executive
members, most lawn bowlers, turf managers and public employees involved in
caring for a lawn bowling green, who like most, are unfamiliar with lawn bowling
green requirements. It provides information about factors that determine the
pace or speed of a green. Most other agronomical factors associated with growing
healthy turf can be found elsewhere.
Green Speed
A lawn bowling green should be fast, consistent and smooth so bowlers can
play with self-confidence and finesse. Unlike a golf green, a bowling green must
be very firm and level if bowls are to run true. The ideal bowling green should be
level within 3 mm (1/8˝) over its entire area. In reality, this degree of uniformity
can rarely be achieved. The tolerance of uniformity in Britain is ± 6mm (1/4˝) and
in Australia is ± 5mm (3/8˝).
The speed or ‘pace’ for a bowling green is a measurement, stated in seconds
for the time it takes a bowl to roll from its delivery until it comes to rest (see
Judson table) at a point 27 meters (approximately 90 feet) up the green. Because of
the weight differences between a golf ball (approx. 2.5 oz) and a bowl (up to 3 lb 8
oz), a stimpmeter reading cannot be used to give a meaningful measure of pace.
The common manner to determine pace is to use a stopwatch and to average the
results of 3 to 5 bowls. Nine seconds is slow, 12 seconds is acceptable and 14
seconds is considered good. The width of the draw (the amount that the bowl
curves during its travel) is related to pace. As the pace increases, draws become
wider - up to 10 feet in the case of a 14 second green. Acceptable tournament

speeds in Australia are 14-15 seconds for bermudagrasses during dormancy (many
major tournaments in Australia are cancelled if the green pace is not greater than
13 seconds); speeds in New Zealand are 12-14 seconds for bentgrass and 15-19
seconds for cotula and starweed species. Bentgrasses in Britain are acceptable at
10-12 seconds depending on the season and in North America are 11-12 seconds
for bentgrasses and 12-14 seconds for bermudagrasses.
JUDSON TABLE
Required Delivery Speed (kph)
Head Distance (m) Green Pace (sec)
10 12 14 16 18
21 17.1 14.3 12.2 10.7 9.5
24 18.3 15.3 13.1 11.5 10.2
27 19.4 16.2 13.9 12.2 10.8
31 20.8 17.4 14.9 13.0 11.6
36 22.4 18.7 16.0 14.0 12.5
Bolded text indicates the speed of a bowl to achieve a pace of 12 seconds.
Mowing
Mowing is important in conjunction with light polishing as the length of
grass is one of the factors that affects green pace. The frequency of mowing may
be determined by local conditions, the weather and the wear and tear on the green.
Greens should be mowed four or five times per week and double cut on
tournament days. Increased mowing frequency improves the turf surface -- the
trade off being that mowers do cause some foliar damage. Cutting heights in
Australia are 1.5 mm (1/16˝) for bermudagrass and 2-3 mm (1/16˝- 1/8˝) for bent-
grass. Bentgrasses in North America and Britain range from 3-6 mm (1/8˝- 1/4˝)
depending upon season and generally are 3.5 mm (5/32˝) in South Africa. New

Zealand cuts bentgrass in the range of 2-3 mm (1/16˝- 1/8˝) and the other grasses at
<2mm. Newer ultradwarf bermuda varieties are becoming available in North
America that can be cut to 2 mm (less than 1/8˝). Current turf practices now
recommend that mowing heights be raised to promote turf health and that growth
regulators, polishing, grooming techniques and additional mowing be used instead
to maintain pace objectives.
For properly cut greens it is essential to maintain a sharp mower and to
ensure a smooth bed knife face. Back lapping or sharpening should be done weekly
to maintain that edge. The mowing pattern should consist of mowing corner to
corner (450
angle), changing the direction of the pattern each time you mow (i.e.,
south/east to north/west, followed by north/east to south/west). No matter the
direction, a 50 per cent overlap should be done on each pass of the greens mowed.
The green apron should be mowed in a direction that is parallel to the playing
ditch, to a size of around three mower widths. Cutting the green in a vertical
pattern is beneficial for turf smoothness, but mentally detrimental to bowlers. If the
opportunity presents itself (jitney bowling) the green can be cut 900
to the play or
on occasion, the rinks can be cut in one direction. Some bowlers enjoy this
approach as the rink boundaries become evident.
Polishing Polishing the turf with a greensiron should increase the pace of a green by at
least one second. A green with proper sand specifications can be polished up to
five times a week without compaction. Polishing should be performed in the same
direction as the cut as this will enhance the pace. The use of weighted rollers to
polish turf can result in compaction and is discouraged. Compaction and excessive
wear of turf close to the plinths is often a result of poor head management
techniques, such as moving rink centers and changing playing direction.
Compaction Although not a direct factor in determining pace, compaction causes other
problems such as preventing thatch breakdown, something which does reduce
pace. Frequent treatments with a solid spike or slit aerator will help remedy the
compaction by getting the water and the oxygen to the root zone. Another method
to reduce compaction is pencil tining. These aeration methods have very little
impact on green smoothness so greens generally can be played upon immediately.
If you use large aerators with wide turf tires some ruts (runs) may be produced and
when you play next, your bowl may follow these ruts if you have aerated in the
direction of play. If you hire a contractor, explain why you want them to aerate
from corner to corner. My own experience suggests disease vigilance may be
required when using slit tining deeper than 4˝ depending upon soil composition.
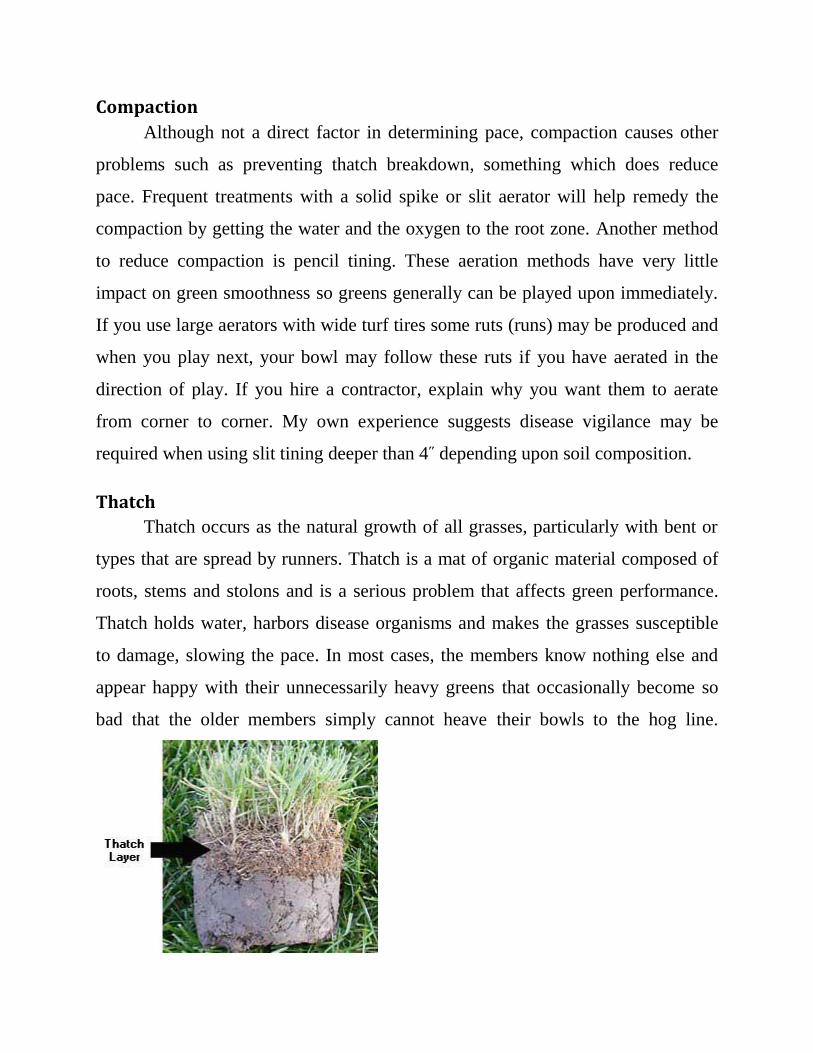
Thatch
Thatch occurs as the natural growth of all grasses, particularly with bent or
types that are spread by runners. Thatch is a mat of organic material composed of
roots, stems and stolons and is a serious problem that affects green performance.
Thatch holds water, harbors disease organisms and makes the grasses susceptible
to damage, slowing the pace. In most cases, the members know nothing else and
appear happy with their unnecessarily heavy greens that occasionally become so
bad that the older members simply cannot heave their bowls to the hog line.

There are four main practices that are used to control thatch: mechanical
dethatching (verticutting), hollow tine aeration (physically removing a piece of
thatch), topdressing with sand and increasing the microbial activity in the soil. The
latter method increases the activity of the good bacteria and fungi which allows the
thatch to decompose at a faster rate, particularly as soil temperatures rise.
Verticutting
There are different degrees of verticutting. Green performance and thatch
prevention can be enhanced by setting the blades so they cut into the top 2-3 mm
(1/16˝- 1/8˝) of the surface. This practice will improve the fineness of the grass and
greens can be bowled on within one day. This process can be done weekly during
high growth periods and monthly during slow growth periods. Aggressive
dethatching (scarification) is typically done near the end of the season. Most often
the green is not usable for periods of 1-2 weeks. For this procedure the top 13 mm
(1/2˝) of soil should be dry. Ideally, the blades should be spaced 3⁄4˝apart and set
to a depth not greater than 9 mm (3/8˝) for the first pass. It is better to repeat the
process than to be unduly drastic the first time over. Later, the blades can be
lowered to a depth such that the majority of thatch is being cut and brought to the
surface, but not so deep that the main disturbance is to the soil. Be careful and aim
to leave a green lawn behind as these machines are powerful enough to destroy
your green. There should be at least 75% of your original lawn left and all the
detritus should be removed from the green when finished.
Aeration Hollow tine aeration is a less drastic method of removing thatch. In many
cases, hollow tine aeration can remove thatch layers as deep as four inches. The
proper way to aerate is from corner to corner. It will take longer to do it this way
but it is better. Aeration can be done using a walk behind corer with 3/4˝ or 5/8˝

hollow tines. Remove all plugs from the greens. You can use a wide mouth
(plastic) snow shovel to pick up the cores if you do not have a core harvester. All
cores should be discarded.
Top Dressing
Top dressing with sand is best applied through a drop or spin spreader.
Shovel spreading with a wheelbarrow is okay as long as you try to spread it as
evenly as possible to start with. You should have completed scarification and
hollow tining before top dressing although positive benefits are still achieved from
top dressing straight onto a lawn (it improves fertility and will help in the reduction
of thatch). As with all treatments prolonged use without variation generally causes
problems. Currently the beneficial values of top dressing with sand are being
questioned and linked to a fine turf “circle of decline”. The reason given is that the
soil becomes inert and unable to support microbes, contributing to poor root
growth. Consequently, it may be prudent to do continuous soil testing to determine
if there is a problem. It is not recommended to top dress with products containing
loam, soil or clay, as they represent varied grain sizes. These products may also
include weed seeds that if applied to your turf will cause headaches later. Top
dressing products should be composed of sterile compost and double washed golf
grade sand. The recommended maximum percentage of compost is around 10
percent. The addition of compost materials is proposed when the green becomes
enriched with pure sand or becomes too acidic. The continued use of the same
“sized” sands thought to be present in the green is recommended as drainage
problems may occur if large variations in grain size are applied. A grit size of 60 is
popular.
You must ensure that the crown (growing point) of the grass is not covered
with top dressing. You must work the top dressing in until you can hardly see it.

Application rates of 6-7 kg per square metre are about the most that should be
applied. One green may take up to 5 tons of sand to fill all the holes. More may be
required if you have deeply hollow tined at close intervals. It is best to choose a
reasonably dry, breezy day to apply the top dressing as it will run and spread more
easily.
One of the keys to top dressing is the levelling and working in. You really
should invest in either a lute or a dragmat. The lute is harder work (manual) but
provides more level results. The dragmat is easier to use as it can be towed behind
a ride on mower or golf cart. My experience is that the dragmat does the best job
with minimal turf damage (we use a Bannerman model), and we did not experience
turf damage as described by others. It is important to fill all the holes, if holes are
not filled they will collapse and cause low spots, especially along the plinth.
Soil Testing
At a minimum annual soil testing should be performed to determine nutrient
levels. Every greens person should own a small hand held soil sampler and conduct
bi-weekly sampling to examine the soil for the existence of thatch, root growth
density, disease symptoms, grubs and drainage patterns.
Irrigation Irrigation management is undoubtedly one of the important factors in
determining pace and maintenance of a quality lawn bowling green. The timing of
irrigation has a large impact on green pace. A major problem faced by turf
managers is the requirement to produce fast paced, consistent surfaces, while at the
same time keeping the turf in a healthy condition. Many greens personnel cross
their fingers when providing dry fast greens, on hot summer days, hoping the turf
will survive until watering. Overwatering reduces pace and the amount of

irrigation required will vary for different grass types. (i.e. bermudagrasses require
a lot less water than bentgrasses, particularly during the dormant phase). Some
important factors of any irrigation program involve:
Deep and infrequent applications of water (watering to field capacity)
Minimization of light frequent hand watering
Syringing during times of stress (ensuring it's a very fine spray)
Knowing your irrigation system and how much it applies
Avoiding hydrophobic conditions
Knowing your water quality by having it analyzed
Using wetting agents

Addendum To my knowledge, there are no published standards for synthetic or natural
surfaces, outside of Britain. Presently, Australia and the United States are
thought to be in the process of developing standards.
With respect to the measuring of green pace, some South African clubs are
currently constructing and testing bowls’ ramps for this purpose.
Patrick Collins with a bowls’ ramp.
GOOD LUCK AND SPEEDY GREENS
And remember...always be willing to learn.

Reference Materials:
Maintenance of the Lawn Bowling Green, 1984. Edgar R. Haley, 4th Edition.
The Construction of the Lawn Bowling Green.1981. Edgar R. Haley, 4th Edition
International Turf Management Handbook. David Aldous, University of
Melbourne, Australia Editor. September 27, 1999 by CRC Press - 368 Pages.
Lawn Bowl Dynamics. Rob Judson, 11 pages.
All Leisure Turf and Landscape Limited. July 2002Copyright. Flat C-2, 1/F, Nam
Wing Building, 49-51 Sing Woo Road, Happy Valley, Hong Kong
All About Bowls: The History, Construction and Maintenance of Bowling Greens.
Edited by Jeff Perris. 2008. STRI Publications, England, 224 pages..
Bowling Green Maintenance and Management. 1999. Lloyd Woods, OLBA and
Canadian National Greens Advisor, 60 pages.
US Lawn Bowls. Greens Committee US-SWD, November 2012. Winter Green Care
and Plan. Working Paper 4, 26 pages.
Amador Martinez and Patrick Collins. US Lawn Bowls. Greens Committee US-
SWD, August 2012. Soil management, 6 pages.
Amador Martinez and Patrick Collins. US Lawn Bowls. Greens Committee US-
SWD, August 2012. Mowing Management, 9 pages.
David, L. Wienecke, USGA Green Section, Putting Greens: Speed Kills. 2012.