lcd tv hd-tv - sears parts directf! _ i i ¸ i i the model and serial numbers are located at the...
TRANSCRIPT

2-593-962-11 (3)
LCD Projection TVHD-TV
Operating instructions
WEGA ENGINE_M
© 2005 Sony Corporation

f! _ i i ¸ i i
The model and serial numbers are located at the rear of
the TV, below the Sony logo, on the sticker, and also on
the TV box (white label). Record these numbers in the
spaces provided below. Refer to them whenever you call
upon your Sony dealer regarding this product.
Model No.
Serial No.
If, after reading the following instructions, you have
additional questions related to the use of your Sony _")TV,
please call one of the following numbers.
Customers in the continental United States contact the
Direct Response Center at:
1-800-222-SONY (7669)
or visit http://www.sonystyle.com/tv/
Customers in Canada contact the Customer Relations
Center at:
1-877-899-SONY (7669)
k,,_r visit http://www.sonystyle.ca/tv/ J

To reduce the risk of fire or electric
shock, do not expose this appratus torain or moisture.
Tht', ',.'. llll',ol L_ Llltellded tt_ ,tlet't the tL',et tt> tile
_, ple_,elke t>f umn,,ul,tted "'tl,tllget,_tt _, _,,dt,t_ze'"
' _ , ',_.ithtn tile pmdut't", ellt. h_xtlle that ma.k be of
",tl[-fLclent llld_L1 ltllde t, _ C, Hl',tlttlte d I i',k, _[-
elet'ttlC ',hock to pet``on',
TILL', ``3 ml',,d l-, ltltellded tt_ ,tlefft the tb.et to tile
i ple_,eLlt'e t>f llllp,_Lt,tllt t_peL,ttlllff ,triLl
nldlLltelldnee i ,,el\ ICIII_2 } ln,,tlUCtltln,, ILl tile
htet,ttlue dCt't_lllpdL13 ILl_ tile al'_phdnt'e
The apput,ttu-, ql,l[[ not be exptr, ed to dnppul_z ot
",p[d',hlLl_-_ and Lltl oblect', filled x_ Ith hquld',. ",uch ,r, x ,t',e',.
-,h,tll be placed on the upp,u,ttu``
Thi`` eqinpnlent [l,t,, been tea, ted ,tlld [-Otilld tt_ t.,nnplx x_ ith
the hnnt-, fi_l ,t C[,e, _, B di,_;itul dex lt.e. pui-,uant tl> Pdlt 15
_f the FCC Rtlle_ The_e lunlt`` ,lie de_l_ned to piox ide
ted',Oll,tble pt,lteutlt_ll ,tg,Llll,,t hdllll[-ll[ tlltetfetellCe Ill ,l
iestdelltla[ tn',talhttlt>n Till,, equlpnlellt _2eneiate',. ip, e,,
illltl CiLII tudL,tte t,tdLt_ fleqllenc.,, enetff3 ,tllt.l. It" Llt_t
lIlstalled dlld tl,,ed i11 dt.t.tllt-Llllt.e to the ILI',tLtlCtLoLI_,, Illd_
Cdll_e hal lllfll[ lllteL fel eLlt.e h t Ldab t C_ IllllllllL1 It. utl_ ILl``
Ho_AeXel, tllele l', llO ffUdhtLltee thdt illtel[-elellde ',_.lll Rot
t>t.CUl tll d p,tlttt.lt[dl ttl``t,t[[utIon If tilL', eqlttpnletlt doe,,
Cdtl``e hdtLnful llltelfelellt.e to htt-ho t_l telex lMt_n
teCel-_ttotl. ,,_.lilt. 11,2dn I'.e detel milled b.,, tul lllng the
equlplllent off dnd till. tile tl``et i`` ellCOtlhtffed tt> tlX tt_
cottet't tile interference b} t)ne Ol lllt)le ,if the f, dlox_ LLlg
ille,l_,ille _,
RetlLlellt ill lelOc,tte tile Lecelx II1_ dlltelllld``
ILlt.led``e tile ``epdldtlt_L1 I-,etx,.een tile eqtllplllent ,tllt-I
Iedel\ el
('Olltlect tile eqUll-_lllent into ,Ill outlet oil ,t CllClllt
different fltllll tll,tt tt> ",_.tllctl tile _et.e_xet i``
t. _ inllet, ted
('otl``ll[t tile dedlel ot all expetLent.ed tadlt_/TV
tet.hnlc_,ul fi_t help
Yoll ,tle t.dUtLtlned th,tt ,ILl} t.ll,tLl_es tll
Ilh_dlflCdttOll`` llt_t e\ple,,,,l 3 apptoxed Ill
till`` Illdlllld[ Ctltlld \tlld \Olll _Adlldllt\
To plexent electric ``hock. do riot ti``e till`` polauzed _("
phl_z 'd. lth ,Ill ektenMoL1 t.Old, let.eptdt.le Ol tlthel o[itlet
unle',', tile blude', can be full_ ]tl``eited to ptexent I',l,tde
ekpOMile
When IIMllg TV _2,tllle',. ct>Lnpute_``. ,uld MIIlIIdL plodikt _,
_. Ith x Ol.lI pltqet'tlOll T\: keep tile bll2htne,,,, dllt-[ Colltlu``t
[-Ullt'tlon-, ,tt lm_ ``etttll_2`` [f ,t [l\ed Illt_n-lllt_x tllff} pattern
L`` left on the ``t'leell fOl h_ll'2 peLLod`` of tLllle ,It ,Lhl'2h
I'q lglltlle_, _,tll ,2tlntld``t ``ettlll_2. the inld_2e t.dll I_e
pelllldllent[} llllpllnted t_lltt_ tile ``Cleell Colltlllllt_tl``l}
_.dtt.lllLl_2 tile ",dllle plO_Zldlll ,2,111C,IIl``e tile llllpllLlt t_f
``tdtltln Itl_Ztl`` ,lllt, I the TV ``t.leell The',e t'. pc', tit- llllpllnt``
,lle llt_t t.OXeled b_ XO/lI XAdlldntx I',et.,tu,,e the\ ,tie tile
te',ult of llll-,[i-,e
Till`` telex IMOLIiet.ei\ el plOXLde', dL``pld} t_t-telex LMOL1
clo``ed t.,_pt_.nlll_ m ut.t.md,ulce x__tll _ 15 1 19 of tile FCC
role,
Tile TV ``llt_tild I',e in``t,tlled nedl ,in edM[X act.e_,``lble
pm_.el outlet
OpeLute tile TV ,,nh ,,n ]21} V X("
Tile pluff L` d̀e,,igned, fi>l ``ufet 3 pin pa,,e,,, t. fit illttl
tile _,LII t_utlet onlx t_ne 'Au', If xolt ate tln,Lble tt_
ul``ert tile plltg fldh into tile outlet, contdt.t xt_ltlde,tlel
If un 3 liquid ,It ``olld oblect ``tlotlld [-d[[ tll``lde tile
t.,Ll',met. ULlphLg tile TV nnnledLttel 3 dnd h,t\e Lt
t.hecked b 3 quahfied ``etx ice pel``t+llllel I',et-,_le
,_peLutlnff LtftLltheL
If 3 tltl "_.LIIn, It I',e tN ll_ztile TV fi_L``exel ul ddX ``.
dl``ct>nllet.t the po_el by pullln_Z tile plug _t``elt-
Nexet pull t_ll tile cold
For det,ul`` t.,_tlt.elnlllff ``,fret.,, plec,ltltltln``. ``ee
'IlllpOltdtlt Sdfet\ Ill``ttllt.tlt_ll``'" t_ll pu_e 3
Tile TV qlotLM I',e ILl``t,tlled Lledl ,LLIedM[X dCt.eS_,lble
pm_.el outlet
T,, pLexent mteLnul he,tt buildup, do llOt blot.k tile
_,entllutl, _tl, _penLll_Z_,

D_ not m,t,dl tile TV m a h_,t ,,_ hlllllld pl,lue. Ill Ill ,1
plaue ,ublect h> exue_me dll,t ill llleu h,llllu,d
' lt4l ,ltll Ill
Axold ,_peldtlng the TV at tempehtttue beloxx 41 F
_5 CI
If the TV 1, thul,p,,rted dueutl.', fi_>nl ,t uold h> a
XXdllll [oudthlll. Ill If tile lllOlll tenlpelatllle Chdll_2e,
",[lllllell[,,. tile plCtUle Ina', be Muned ol _,ll,_x p,_ol
¢1_[Ol Ill till, Cd'e. plea,e xx,ut a i_exxholll, to let the
lllOl,tllle e,,,q_Oldte befole tllllllll_2 Oil tile TV
Tl_ obtdul tile be_.t pluttlle, dl_ lll_t ekp_,e tile ,Cleell
t_ dnect illllmllldtlon i_l dnect ,lln[l_Z[lt It 1,
IeuOllllllelluled to ii,e ,p_t ll_zhtlll_ dlleuted dmx II
flOlll tile ¢elllll_Z Ol hi ¢mel tile xx lllkhlxx, tll<lt [-due
the ,uleen tx lt[l _p,Nue dlapeLx It ], de,nable to
ul,tMl tile IV m a llIOlll XXhell tile fl_Ol and tx all,
die ,lit Ilfd iefleutlXe nldtelld[
See pdge 12 & 13 fol mole infi_nn,m,_n on the
lll',tdlldtll_n
Till, dlgltdl tell,, l,l_>n 1, edp,tl_le of lecelx lnEzall,tl_g
I",d,lC. dl_ltd[ b,t',lu ,lIlul dlgltdl piemltlm cdl",le telex ],l_ll
pltl_l,llllllllll_ b_ dlleut cllnlleutllln hi d udble ,_ ,telll
plllX Idlll_2 ,uch plO_-_ldlllllllll_-_ \ _,eculltX Cdld pro,, lded
1",,, x t)ui cable t)pehth)l L, ieqlllled tl) x leXX ell¢l_ pted
thgltal l'tlO_Zldlllllllllg Celtdlll ddxdllCed dllul intehtutlxe
ull_21tdl u,tble ,el,, lue _, *,tlt_'ll d _, x ldetl-Oll-dellldlld, d u,tble
_pel,th _i", enhanced plt _iZl,till guide dllk[ d,tta-enhanu eul
telex l,l_ll ,el,, lue`` llldX leuluue tile tr, e ,_t-a ,et-top t',_\
Fol lllOle Ill[-Olllld[IOll udll ,,Olll Ioedl cdble opehtt_l
Till', tell,, l,htll d[,o inchtulex d QAM ulemtldllldtol XX[lluh
,h,)uhl alh)xx ,,_)tI t,) leCel,,e un,cidnlbled dl_zital cable
telex Non plO_-_Idlllllllll_ X hi ,llb,ulll'_tlon ,el, lee hi ,t
c,tb[e ',el, lue plm lulel kXdl[dblht.', of digit,t[ cdble
telex I,l_n plO_-_ldlllllllll_ Ill _ OIIl dled depellul, oil tile t} pe
tlf plO_hmllllln,_ _ dnul "l'2ndl plOX ]tied b,, ,,_tu cable
,el,, lue plox ldel
BBE and BBE S,, lnb,_l ,ue t_adenlalk, _f BBE S,_und.
Ill,.: ,tnul ,lle hcen,ed b,, BBE Sound. Ilk undei U S
Pdtent N_ 4.63S.258 dlld 4.482.8t_6
D_@ Tht, TV t, m,mt,f, tuttued tuMetllcetl',e fBIlll [)_l[b,, Ld',,qdtOlle',
o i G i T A k D, db,, and tile d,_ul',le-D ,}lllb, tl ,tIe
thldellldlk', ot'D_lb,, Ldbohtt_llle _,
Till, TV tncotp,,t,tte'. H@l-[)e[lllltl_lll I\[llltlllleuhd [lltel[-due
rM
_HDMI t techn,d,_g 5 HDMI. tile HDMI h_go dlld Hk_-'h-[)efmlthm Multmleuha [ntel[-dCe ,t_e thtdenldik', _I
leg_,teled thtdenlaik, _f HDMI L]_.ell,nlg LLC
WEG k. Gland WE(i k. WEG k G kTE. Stead), S,,untl.
[)]glt,tl Re,tilt.', Cle,tt],_n. ('meMiit]lln. Pl,tx StatlOll. dlld
BN Sllloot[lel ,Ill thtdemalk, of S_ll) C_llp, lhtthtll
[ke the f,,ll,_xx]ng S_ll 5 apphanuel,l onl.,, xxlth tile
f, dl,_xxmg TV STkND U,e xxith _tllei TV STAND ma,,
cau,e in,t,tl_]ht,, dlld _e'.ult m p,_,.,.d',le inllll}
SONY APPLIANCE MODEL NO:
KDF-E55A20
KDF-E6OA20
SONY TV STAND MODEL NO.
SU-GWI2
See page 4 undel -Sel,, lee'"
See page 76 fi_l lepl,tuement ldnlp
. . , ,i,
t, ,Ill ENERG5 ST\R P,utnei. S_>n5
el II pI II dth I11 hd" cletel lllllled t[ldt thl, pl __dllc t
meet, the ENERGY ST\R' guldehne, fol
ene_g.x e ffiu lenu.',
ENER(;'_ ST\R' ], ,t U S leg],teled mdlk
('al'qe(" kRD 'r_ ], ,t tiadenl.uk ,ff ('able Tele,, ],ion
Lab,_i ah _Ile``. hlc
TltlSllllOtllld XT. SRS dlld tile i _1: ,.,, nll'.id die
tiadenl,nk _,ofSRS k,tb,, lnc TiuSuu_und XT
teu[llhtlog} I`` lllCtllpOldted iinulel lluenxe [llllll SRS Lab',.
[Dt_
2
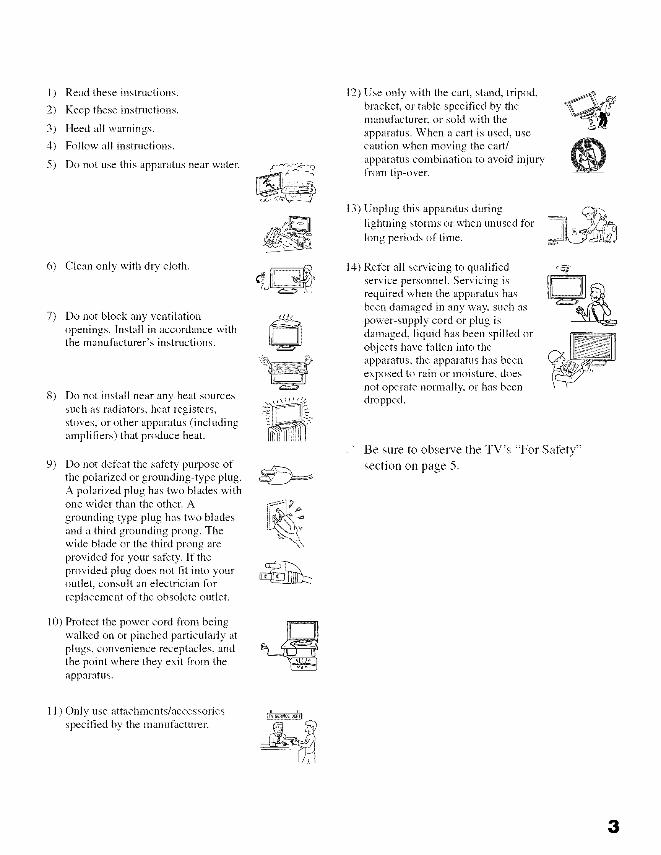
l) Read these instructions.
2) Keep these instructions.
3) Heed all warnings.
4) Follow all instructions.
5) Do not use this apparatus near water.
12) Use only with the cart, stand, tripod,
bracket, or table specified by the
manufacturer, or sold with the
apparatus. When a cart is used, usecaution when moving the cart/
apparatus combination to avoid injury
from tip-over.
6) Clean only with dry cloth.
7) Do not block any ventilation
openings. Install in accordance withthe manufacturer's instructions.
8) Do not install near any heat sources
such as radiators, heat registers,
stoves, or other apparatus (includingamplifiers) that produce heat.
9) Do not defeat the safety purpose of
the polarized or grounding-type plug.
A polarized plug has two blades withone wider than the other. A
grounding type plug has two blades
and a third grounding prong. The
wide blade or the third prong are
provided for your safety. If the
provided plug does not fit into youroutlet, consult an electrician for
replacement of the obsolete outlet.
10) Protect the power cord from being
walked on or pinched particularly at
plugs, convenience receptacles, and
the point where they exit from the
apparatus.
]3)
14)
Unplug this apparatus during
lightning storms or when unused for
long periods of time.
Refer all servicing to qualifedservice personnel. Servicing isrequired when the apparatus hasbeen damaged in any way, such aspower-supply cord or plug isdamaged, liquid has been spilled orobjects have fallen into theapparatus, the apparatus has beenexposed to rain or moisture, doesnot operate normally, or has beendropped.
Be sure to observe the TV's "For Safety"section on page 5.
11) Only use attachments/accessoriesspecified by the manufacturer.
3

Antennas
If an outdoor antenna is installed, follow the precautions
below. An outdoor antenna system should not be located
in the vicinity of overhead power lines or other electriclight or power circuits, or where it can come in contact
with such power lines or circuits.
WHEN INSTALLING AN OUTDOOR ANTENNA
SYSTEM, EXTREME CARE SHOULD BE TAKEN TO
KEEP FROM CONTACTING SUCH POWER LINES
OR CIRCUITS AS CONTACT WITH THEM IS
ALMOST INVARIABLY FATAL.
Be sure the antenna system is grounded so as to provide
some protection against voltage surges and built-up static
charges.
Section 810 of the National Electrical Code (NEC) inUSA and Section 54 of the Canadian Electrical Code in
Canada provides information with respect to propergrounding of the mast and supporting structure,
grounding of the lead-in wire to an antenna discharge
unit, size of grounding conductors, location of antennadischarge unit, connection to grounding electrodes, and
requirements for the grounding electrode.
Refer to section 54-300 of Canadian Electrical Code for
Antenna Grounding.
Antenna lead-in wire
Ground cla_5_
_-_ _ __ "*) Antenna lead-in wire
] Electrica_ -- _ / (NEC Section 810-20)service / ,
] eau pment _, /_ Grounding conductors....... ._[]_j/_ (NEC section 810-21)
_ Ground clamps-"_ _I - Power service grounding
electrode system (NECArt250 Part H)NEC: National
Electrical Code
Cleaning
Clean the rear cover area of the TV reguhMy. Dust
in the rear cover area may cause a problem with the
cooling system of the TV set.
Clean the cabinet of the TV with a
dry screen,S°ftcloth. To remove dust from /_,_ /,_2tile wipe it gently with a soft _?_ _'_r_/)cloth. Stubborn stains may be _/removed with a cloth slightly
dampened with solution of mild soap and warmwater. Never use strong solvents such as thinner or
benzine for cleaning. If the picture becomes dark
alter using the TV for a long period of time, it maybe necessary to clean the inside of the TV. Consult
qualified service personnel.
Unplug the AC power cord when cleaning this unit.
Cleaning this unit with a plugged AC power cord
may result in electric shock.
The screen surfuce has a special coating to reduce
reflections. To prevent screen damage, clean the screen asfollows:
Clean the screen with a soft cloth.
To remove hard contamination, use a cloth
moistened with a solution of mild detergent andwater. Do not spray cleaning solution directly onto
the TV. It should only be sprayed to moisten the
cleaning cloth.
Do not use any type of abrasive pad, alkaline
cleaner, acid cleaner, scouring powder, chemicalcloth, or solvent such as alcohol, benzene or thinner.
as these may scratch the screen's coating.
Service
ii! !i i
Do not attempt to service the set by yourself
since opening the cabinet may expose you to
dangerous voltage or other hazards.
Unplug the set from the wall outlet and refer
servicing to qualified service personnel.
When replacement parts are required, be sure the service
technician certifies in writing that he has usedreplacement parts specified by the manufacturer that have
the same characteristics as the original parts.
Unauthorized substitutions may result in fire, electricshock or other hazards.
See "Replacing the Lamp" on page 76.
4
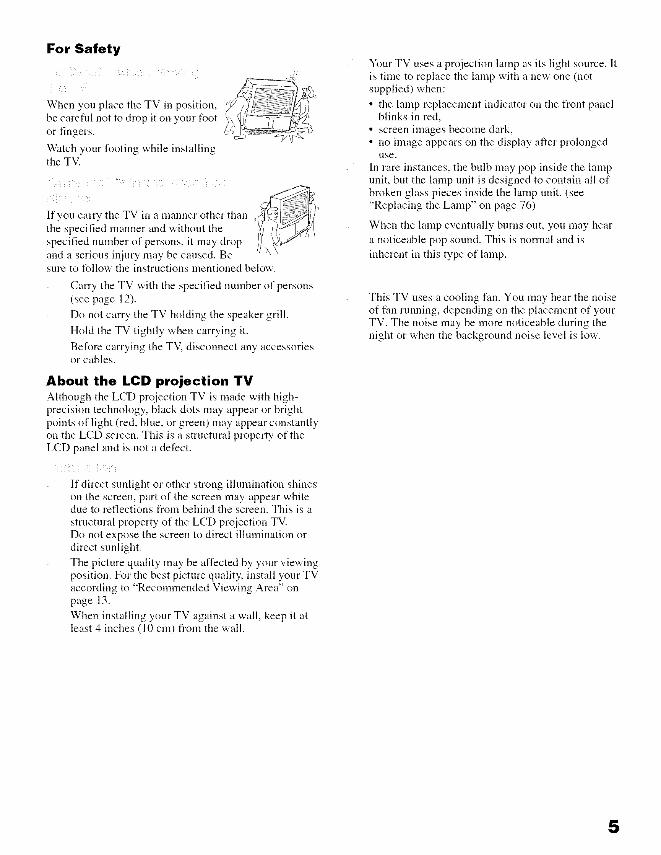
For Safety
When you place the TV in position,be carefld not to drop it on your tUot
or fingers.
Watch your footing while installingthe TV.
i ! i i i i i i i
i i i i i ¸ _i
If you carry the TV ill a manner other than
the specified manner and without thespecified number of persons, it may drop
and a serious injury may be caused. Besure to follow the instructions mentioned below.
Carry the TV with the specified number of persons
(see page 12).
Do not carry the TV holding the speaker grill.
Hold the TV tightly when carrying it.
Before carrying the TV. disconnect any accessoriesor cables.
About the LCD projection TV
Although the LCD projection TV is made with high-
precision technology, black dots may appear or bright
points of light (red, blue, or green) may appear constantlyon the LCD screen. This is a structural property of the
LCD panel and is not a defect.
!!i i
If direct sunlight or other strong illumination shines
on the screen, part of the screen may appear whitedue to reflections from behind the screen. This is a
structural property of the LCD proiection TV.Do not expose the screen to direct illumination or
direct sunlight.
The picture quality may be affected by your viewing
position. For the best picture qnality, install your TVaccording to "Recommended Viewing Area" on
page 13.
When installing your TV against a wall, keep it atleast 4 inches (10 cm) from the wall.
Your TV uses a proiection lamp as its light source. Itis time to replace the lamp with a new one (not
supplied) when:
• the lamp replacement indicator on the front panelblinks in red,
• screen images become clark,
• no image appears on the display aller prolongedrise.
In rare instances, the bulb may pop inside the lampunit, but the lamp unit is designed to contain all of
broken glass pieces inside the lamp nnit. (see"Replacing the Lamp" on page 76)
When the lamp eventually burns out, you may hear
a noticeable pop sound. This is normal and is
inherent in this type of lamp.
This TV uses a cooling fan. You may hear the noise
of fan running, depending on the placement of yourTV. The noise may be more noticeable during the
night or when the background noise level is low.
5

Presenting the Sony TV ........................................... 8Package Contents ............................................. 8Features ............................................................ 8
Enjoying Your TV ................................................. 10Notes on the TV ............................................. 10Screen ............................................................. 10Indicators ....................................................... 11
Proiection Lamp ............................................. 11Installing the TV .................................................... 12
Carrying Your TV .......................................... 12Take Precaution during Installation ............... 13To Prevent the TV from Falling .................... 13When Installing Your TV Against a Wall ..... 13
Recommended Viewing Area ........................ 13TV Front Panel and Connectors ............................. 14
Front Panel ..................................................... 14Front and Rear Panel Connectors .................. 15
Overview ................................................................ 17
Making Video and Audio Connections ......... 17Abom Using S VIDEO .................................. 18About Using HDMI to DVI Adapter ............. 18
Basic Connections .................................................. 19
Cable System or VHF/UHF ........................... 20Cable Box and Antenna ................................. 21Cable Box ...................................................... 22Satellite Receiver ........................................... 23
Digital Cable BoxOr Digital Satellite Receiver .......................... 24
Using CableCARD TM Device ................................ 25About Using CableCARD TM Device ............. 25
Activating CableCARD Service .................... 25Removing the CableCARD TM Device ........... 26Equipment with HDMI Connection ............... 27
Equipment with DVI Connection .................. 28Equipment with Digital Audio (Optical) ....... 29
Setting Up the TV Channel List ............................ 30
Using Initial Setup ......................................... 30Connecting Optional Equipment ........................... 31
VCR and Cable .............................................. 32VCR and Cable Box ...................................... 33
Two VCRs for Tape Editing .......................... 35
6
DVD Player with ComponentVideo Connectors .......................................... 36
DVD Player with
S VIDEO and Audio Connectors ................... 37
Camcorder or PlayStation .............................. 38Audio Receiver .............................................. 39
Overview ................................................................ 41
Inserting Batteries into the Remote Control .......... 41
Button Descriptions ............................................... 42
Programming the Remote Control ......................... 44
Manufacturer's Codes ............................................ 45
Using Other Equipment with Your Remote
Control ........................................................... 46
Special Buttons on the Remote Control ................. 48
Using the GUIDE Button ............................... 48
Using the WIDE Button ................................. 50
Using the FREEZE Button ............................ 51
Using the JUMP Button ................................. 51
: :i _%: _ _i¸¸ _ii i _i if!
Overview of WEGA GATE ................................... 52
Using Favorites in WEGA GATE ......................... 54
Using Cable in WEGA GATE ............................... 54
Using Antenna in WEGA GATE .......................... 55Using External Inputs in WEGA GATE ............... 55
Using Settings in WEGA GATE ........................... 55
Overview ................................................................ 56
Accessing the Video Settings ................................ 58
Selecting Video Options ................................ 58
Accessing the Audio Settings ................................ 60
Selecting Audio Options ................................ 60
Accessing the Screen Settings ............................... 62
Selecting Screen Options ............................... 62
Accessing the Channel Settings ............................. 64
Selecting Channel Options ............................ 64
Accessing the Parental Lock Settings .................... 66
Selecting Parental Lock Options ................... 66
Viewing Blocked Programs ........................... 67
Selecting Custom Rating Options .................. 68

AccessingtheSetupSettings.................................70SelectingSetupOptions.................................70ProgrammingCaptionVision........................72
AccessingtheApplicationsSettings......................73SelectingApplicationsOptions.....................73
Overview................................................................75ContactingSony.....................................................75ReplacingtheLamp...............................................76
HowtoReplacetheLamp.............................76Troubleshooting.....................................................80
RemoteControl..............................................80CableCARDTM Device .................................. 80
Video .............................................................. 81
Audio ............................................................. 82
Channels ......................................................... 82
General ........................................................... 83
Specifications ......................................................... 84
Optional Accessories ............................................. 85
71
Index ...................................................................... 87
7

-!! i!! ¸ i
Thank you for purchasing this Sony's HD LCD Projection TV.This manual is for models KDF-E55A20 and KDF-E60A20.
Instructions in this manual are written for the remote control. Similarcontrols are also found on the TV console.
Package Contents
Features
Along with your new TV, the packing box contains a remote control and twoAA (R6) batteries. These items are all you need to set up and use the TV.Also included in the box are this operating manual and a Quick Setup Guideposter.
Some of the features that you will enjoy with your new TV include:
WEGA GATE_X_: WEGA GATE is a new feature that allows you to
easily navigate to the most convenient TV functions: favorite channels,cable channels, antenna channels, external input list or settings.
WEGA Engine: Delivers superb picture quality from any video sourceby minimizing the signal deterioration caused by digital-to-analogconversion and stabilizing the signal processing. This engine featuresunique Sony technology, including:
The first step in the digital processing system, CompositeComponent Processor (CCP-X), which enhances input signal-to-noise ratio by chroma decoder digital processing.
DRC ® (Digital Reality Creation)-MF Vl: Unlike conventional
line doublers, the DRC Multifunction feature replaces the signal'sNTSC waveform with the near-HD equivalent by digital mappingprocessing. The DRC Palette option lets you customize the level ofdetail (Reality) and smoothness (Clarity) to create up to threecustom palettes.
Integrated HDTV: You can watch digital television programs andenjoy the improved audio/video quality offered by these programs.
CableCARD TMslot: Provides cable subscribers with access to digitallyencrypted cable channels -- without the need for a set-top box -- thatwill enable you to receive not only standard definition but also highdefinition television. The CableCARD device, which is provided byyour cable TV company, is inserted into the TV's rear panelCableCARD slot. After the service is actiw_ted with your cable TVcompany, the card replaces the need for a separate set-top box. (Checkwith your cable TV company about CableCARD service details,limitations, pricing, and availability. For more information aboutCableCARD device in this manual, see page 25.)
8

HDMI (High-Definition Multimedia Interface): Provides an
uncompressed, all-digital audio/video interface between this TV and
any HDMl-equipped audio/video component, such as a set-top box,
DVD player, and A/V receiver. HDMI supports enhanced, or high-
definition video, plus multi-channel digital audio.
Component Video Inputs: Offer the best video quality for DVD (480p,
480i) and digital set-top box (1080i, 720p, 480p, 480i) connections.
S VIDEO Inputs: Provide a high-quality image from connected
equipment.
CineMotion®: Using the reverse 3-2 pull down technology, the
CineMotion feature provides smoother picture movement when playingback movies or other video sources on film.
Steady Sound°: Equalizes volume levels so there is consistent output
between programs and commercials.
Wide Screen Mode: Allows you to watch 4:3 normal broadcasts in
wide screen mode (16:9 aspect ratio).
Favorite Channels: Allows you to navigate a list of up to sixteen
favorite channels without leaving the current channel.
Parental Control: V-Chip technology allows parents to blockunsuitable programming fiom younger viewers.
9

To enjoy your TV for years to come and maintain its original picture quality,
you should perform periodic maintenance.
Notes on the TVPrevent sunlight or other light sources fiom shining directly on to thescreen.
Tile screen surface is easily scratched. Do not rub, touch, or tap it with
sharp or abrasive objects (see "Cleaning" on page 4).
i ! i ii i ¸¸¸¸ i i i i ii
Unplug tile AC power cord fi'om tile outlet if you anticipate not usingthe TV for more than a week.
The cooling fan will continue to operate for about two minutes. Allow
several minutes before unplugging from the outlet or switching thebreaker off.
If your TV is moved directly from a cold to a warm location or is placed
in a humid room, or if the room temperature changes suddenly, the
picture may blur or show poor color. This is caused by moisturecondensation on the lenses inside. Wait a few hours to let the moisture
evaporate before turning on the TV. When the condensation has
evaporated, the picture will return to normal.
Screen To minimize reflection, tile screen surface has a special coating.
Inappropriate cleaning methods could damage the screen surface. Special
care is required.
Dust and dirt on the screen can affect the picture quality. To dust off the
screen use a soft cloth. Be sure to follow the cleaning instruction on page 4for stubborn stains and dirt.
t0

Projection lamp Indicators
Indicators Tile indicators show tile current status of your TV. If there is a change in tilecondition or a problem with the TV, the indicators will flash or light up in
the manner described below to let you know that it requires your attention.
The lalnp for the light source is preparing to turn on. Whenit is ready, it turns on.
.......................................................................The lamp cover is not securely attached. The red indicator: will continue to flash in intervals of 3 blinks at a tilne until
the lalnp cover is placed correctly. When the lalnp cover issecurely attached the TV will turn on with green indicator.
When one of the timer is set, the indicator will remain lit(will not flash) even when the TV is turned off.
The proiection lalnp has burned out. Replace it with a newone (see page 14).
Projection Lamp
Howto replacethe lamp,seepage76.
Your TV uses a projection lamp as its light source. As with any lamp, it haslifespan and needs to be replaced when the Lamp indicator flashes or the
screen becomes darker. The projection lamp is located under the Control
Panel cover as shown in the diagram above. Note the following:
After turning on your TV, it may take a while (1 minute or less) before
the picture appears.
When the projection lamp wears out, the screen goes dark. Replace thelamp with a new Sony XL-2200 replacement lamp (not supplied).
/,_ The light emitted from the lamp is quite bright when your TV is in use.Toavoid eye discomfort or injury, do not look into the light housing whenthe power is on.
11

Carrying Your TV Carrying tile TV requires at least two people. Do not hold by tile pedestal or
the front panel of the TV. Doing so may cause these parts to break off.
Do not grasp the pedestalor the front panel of theTV.
When moving tile TV, place one hand in tile hole on tile lower portion of tile
TV while grasping the top with the other hand, as shown in the illustrationbelow.
If you have connected cables and cords, be sure to unplug theln beforemoving the TV.
t2

Take Precaution
during Installation
To Prevent the TV
from Falling
When usingthe SU-GW12stand for your TV, you
must use the support belt.
To ensure tile safety of children and tile TV, keep children away flom tile TV
during installation. Climbing on or pushing the TV or its stand may cause it
to fall and damage the TV.
As a protective measure, secure the TV as follows.
Sony strongly recommends using the TV stand SU-GWI 2 with a
support belt designed for your TV.
(
When Installing YourTV Against a Wall
Keep your TV at least 4 inches (10 cm) away from tile wall to provide properventilation.
Recommended
Viewing AreaYour viewing position may affect tile picture quality.
For the best picture quality, install your TV within the areas shown below.
Model Viewing distance
KDF-E55A20 rain. 6.8 ft. (approx. 2.1 m)
KDF-E60A20 min. 7 ft. (approx. 2.2 m)
f_}J
t3

Front Panel
The
button has a tactile dot.Use the dot as areference when
operating the TV.
Press to turn on/off the TV.
Lights np in green when the TV set is turned on. The LED
light does not light up when the main power is turned off.
If the LED blinks continuously, this may indicate the
display unit needs servicing (see "Contacting Sony" on
page 75)..... ..................... ) ...................
When lit, indicates one of the timers is set. When the
timer is set, this LED will remain lit even if the TV set is
turned off. For details, see page 73.
Lights up in red when the lamp for the light source has burned
out. For details, see "Replacing the Lamp" on page 76.
Receives IR signals from the remote control. Do not put
anything near the sensor, as its function may be affected.
Press to scan through channels. To scan quickly through
channels, press and hold either CHANNEL.
.....................................................................................................Press to adjust the volume.
: Press to select among the TV's tuner and other video
equipment inputs.
14

Front and RearPanel Connectors
S .......................
ii ii
Connects to the S VIDEO OUT jack of your VCR or other
S VIDEO-equipped video component. Provides betterpicture quality than the Video IN jack.
Connects to the audio and video OUT jacks on your VCR
or other video component. A fourth video inpnt (VIDEO 2)is located on the front panel of the TV.
Connects to your DVD player's or digital set-top box's
component video (YPbPr) and audio (L/R) jacks.
Connects to the left and right audio inputs of your audio or
video component.
/'_ AUDIOOUTjacks are operableonly when the TV'sSpeakeris set to Off.
(Continued)
15

......................... i,iii_!i_i,,
1 ........... isl
• _ c_t,l,,c^_D ¸
AUD 0 ] ....i DIGITAL HI::=;I I ! j AUDIO
EJEc, L OUT
,I @i
CableCARD device provides cable subscribers with access
to secure, digitally encrypted cable channels - without the
need for a set-top box - that will enable you to receive not
only standard definition but also high definition television.
For more information, see page 25.
Connects to the optical audio input of a digital audio
component that is PCM/Dolby Digital compatible.
C0nnects to your VHF/UHF al_tennal
Connects to your cable signal. This CABLE input jack, in
cor_iunction with the VHF/UHF input jack, lets you set up
your TV to switch between scrambled channels (coming
throngh a cable box) and unscrambled cable channels.
...................... HDMI iHigh-Definition IVlultin_edia Interface) prok_ides ;m
uncompressed, all-digital audio/video interface between
this TV and any HDMI-equipped audio/video component,
such as a set-top box, DVD player, and A/V receiver.
HDMI supports enhanced, or high-definition video, plus
two-channel digital audio.
* Manufactured under license t}om Dolby Laboratories.
"Dolby" and the double-D symbol are trademarks of Dolby Laboratories.
t6

Your new LCD Projection TV can receive both analog and digital
broadcasting signals from antenna, satellite and cable TV.
To display clear crisp pictures, you must connect your TV correctly and
choose the correct display format (see Wide button on page 50). [t is stronglyrecommended to connect the antenna using a 75-ohm coaxial cable to
receive optimum picture quality signal. A 300-ohm twin lead cable can be
easily affected by radio noise and the like, resulting in signal deterioration.If you use a 300-ohm twin lead cable, keep it as far away as possible fromthe TV.
Making Video andAudio Connections
The signals that enter your TV and connected devices will need to output in
the correct format using the suitable connections. Below are different types
of video connectors available these days. Your TV comes with all types of
connectors with the exception of the DVI connector but your cable box or
satellite receiver may be equipped with this type. When connecting your TV,
use the inputs that are available on your devices that provide the best video
performance, as described below.
BesIVideo
Perlolmmlce Connector Type
HDM[ (High-Definition NoMultimedia Interface)
o_ DVI (Digital Visual:Interface) *
Component0000 s V DEO
@ Composite
Separate Audioconnectionrequired
RF/Coaxial
Yes
(not supplied)
No
_'_An adapter is necessary when connecting DVI equipped device to this TV,
see page 18.
t7

About UsingS VIDEO @ If the optional equipment you are connecting has an S VIDEO jack
(shown at left), you can use an S VIDEO cable for improved picture
quality (compared to an A/V cable). Because S VIDEO canies only
the video signal, you also need to connect audio cables for sound, asshown below.
i / i ¸ < i
LINE OUT
AUDIOR L S VIDEO
S VIDEOcable
Audio cable
ilii
Cables are oftencolor-codedto connectors.Connect red to red,
white to white, etc.
About Using HDMIto DVI Adapter
If you are connecting equipment with DVI connector with this TV. you will
need to use an adaptel: You can use an HDMI to DVI cable or an HDMI
adapter (not supplied). Both are available at your local electronics store.
When you use the adaptel, you will also need to use separate audio cables for
sound as DVI connector is for video signals only.
HDMI to DVI Cable
HDMI adapter Audio cable
18

Tile way in which you connect your TV will vary, depending on how your
home receives a signal (antenna and satellite, cable, cable box) and whetheror not you plan to connect a VCR.
Cable System or VHF/UHF 20No cable box or VCR
Cable Box and Antenna 21
Cable box unscrambles only some channels(usually prelnium channels)No VCR
Cable Box 22Cable box unscrambles all channelsNo VCR
Satellite Receiver 23
Digital Cable Box or Digital Satellite 24Receiver
See the connections described on pages 32 and 33.
19

Cable System orVHF/UHF Have a cable and/or an antenna.
(This is convenient if you are using a separate rooftop antenna to receiveadditional channels that are not provided by your cable TV company.)
Do not have a cable box or VCR. (If you have a cable box, see pages 21to 22. If you have a VCR, see pages 32 and 33.)
Cable Type Connect As Shown
Cable TV
(CATV) and
Antenna
IAntenna cable w_uH_ C_,SLE CATV cable [
Switch the TV's input between Press to switch back and forth between the
the cable and antenna TV's VHF/UHF and CABLE inputs.
/_3 Do not use an indoor antenna,which is especially susceptible to radionoise.
20

Cable Box andAntenna
Before connecting a
cable bo_ see "Using
CableCARD Device" on
page 25.
Your cable company scrambles some channels, such as premium
channels (which requires you to use a cable box), but does not scrambleall channels.
You do not have a VCR. (If you have a VCR, see pages 32 and 33.)
Use the TV's remote control to change channels coming through the
cable box to the TV's cable input. (You must first program the remote
control for your specific cable box; see "Programming the Remote
Control" on page 44.)
Use the TV's remote control to change channels coming directly into
the TV's VHIF/UHF input jack.
CATV cable
cable VHF/UHF ¢_ble
Use the cable box Tune the TV to the channel the cable box is set to (usually channel 3
or 4) and then use the cable box to switch channels.
Set up the TV remote control to operate the cable Prograln the remote control. See "Programming the Remote
box Control" on page 44.
Activate the remote control to operate the cable Press once, and the
box indicator lights up.
Prevent the accidental switching of TV channels When using the cable box, ensure that the TV remains tuned to the
channel that the cable box is set to (usually channel 3 or 4).
Switch the TV's input between the cable box and Press to switch back and forth between the TV's VHF/UHF
antenna (scrambled chalmels) and CABLE (unscrambled) inputs.
21

Cable Box
Before connecting a
cable box, see "Using
CableCARD Device" on
page 25.
Your cable company scrambles all channels, which requires you to use acable box.
You do not have a VCR. (If you have a VCR, see pages 32 and 33.)
i i ili! i
Use tile TV's remote control to change channels coming through tile
cable box to the TV's VHF/UHFjack. (You must first program the
remote control for your specific cable box.)
Connect the CATV cable to the cable box's input jack.
Use a coaxial cable to connect the cable box's output jack to the TV's
VHF/UHF jack.
Run Auto Program, as described in "Setting Up the TV Channel List"
on pages 30.
CATV cable Coaxial cableVHF/UHF
IN
Use the cable box Tune the TV to the channel the cable box is set to (usually channel 3
or 4) and then use the cable box to switch channels.
Set up the TV remote control to operate the cable Program the remote control. See "Programming the Remote
box Control" on page 44.
Activate the remote control to operate the cable Press once, and the
box indicator lights up.
Prevent the accidental switching of TV channels When using the cable box, ensure that the TV remains tuned to the
channel that the cable box is set to (usually channel 3 or 4).
22

Satelfite Receiver
S VIDEO
Cables are often
color-coded to connectors.
Connect red to red,
white to white, etc.
ik i i ¸ ! i i ii ! i i i
Connect tile satellite antenna cable to the satellite receiver's
SATELLITE [N jack.
Use A/V and S VIDEO cables to connect the satellite receiver's AUDIO
and S VIDEO OUT jacks to the TV's AUDIO and S VIDEO IN jacks.
Use a coaxial cable to connect your cable to the TV's CABLE jack, or
your antenna to the TV's VHF/UHF jack.
S VIDEO
VBF'UHF (_ (_ CABLECoaxial cable
_ VIDEO (yellow)AUDIO-L (white)
7
AUDIO-R (red)
A/V cable (not supplied)
S VIDEO cable (not supplied)
Y_3If your satellite receiver is not equippedwith SVlDEO,use aVlDEOcable(yellow) instead of the S VIDEOcable.
23

Digital Cable BoxOr
Digital SatelliteReceiver
i i ¸ ! i i ii ! i l ) i l
Connect the RF coaxial cable [lOln tile CATV or Satellite dish to the
INPUT of the digital cable box or digital satellite receiver
i ¸ ii
vmEo
,x2 .... P
RF coaxial cable
Component video cable
(not supplied)
(white)AUDIO-R
(red)
Audio cable
(not supplied)
Cables are often
color-coded to connectors.
Connect red to red,
white to white, etc.
Use a component video cable to connect tile YPBPR jacks of your digital
cable box or digital satellite receiver to the TV's component jacks.
/,_ Component video (YPBPR)connection is necessaryto view digitalbroadcastings in 1080i, 720p, 480i and 480p. This TV displays all formattypes of picture in a resolution of 1,368 dots x 768 lines.
Use an audio cable to connect tile AUDIO OUT jack of the digital cable
box or digital satellite receiver to the TV's AUDIO IN jacks.
_ The component Jacks (YPBPR)do not provide audio, so audio cablesmust be connected to provide sound.
24

Tile CableCARD device provides cable subscribers with access to digitally
encrypted cable channels -- without the need for a set-top box -- that willenable you to receive not only standard definition but also high definition
television. The CableCARD device, which is provided by your cable TV
company, is inserted into the TV's rear panel CableCARD slot. After theservice is activated with your cable TV company, the card replaces the need
for a separate set-top box.
A bout UsingCableCA RD De vice
If you are planning to use a separate cable box for digital cable TV services,you may be able to receive programming using this TV with theCableCARD device instead -- except in the following circumstances:
Your cable TV company does not provide CableCARD service in yourviewing area.
You want to access your cable TV company's interactive or advancedfeatures (such as video-on-demand or, in some cases, pay-per-view). Atthis time, these services require a bidirectional link, which are onlyavailable through the use of a separate set-top box. CableCARD device iscurrently a unidirectional device only, and cannot provide these advancedservices.
Check with your cable TV company for CableCARD service details,limitations, pricing, and availability, all of which are determined by yourcable TV company -- not Sony.
A ctivatingCableCARD Service
Before you can use CableCARD service, you need to insert the CableCARD
device (supplied by your cable TV company) and activate the service, asdescribed below:
Insert the CableCARD device into the TV's CableCARD slot.
_/:_CAUTION:Inserting the CableCARDdevice incorrectly may result inpermanent damageto the card andthe TV.
(Continued)
25
You can also access
information about yourCableCARD device in
the Applications Menu(see page 74).
Gently push tile card into tile slot until it locks into place.
Ariel 1-2 minutes, tile CableCARD device setup screen is automatically
displayed. This screen includes information your cable TV companywill request before they can activate your service.
Follow the displayed instructions: Phone your cable TV company. Arepresentative will guide you through the activation process.
After your CableCARD device is activated, your cable TV company
will download the service information, including the channel list, to the
CableCARD device. After the CableCARD device has acquiredchannels from your cable TV company, the TV tunes to the lowestavailable channel.
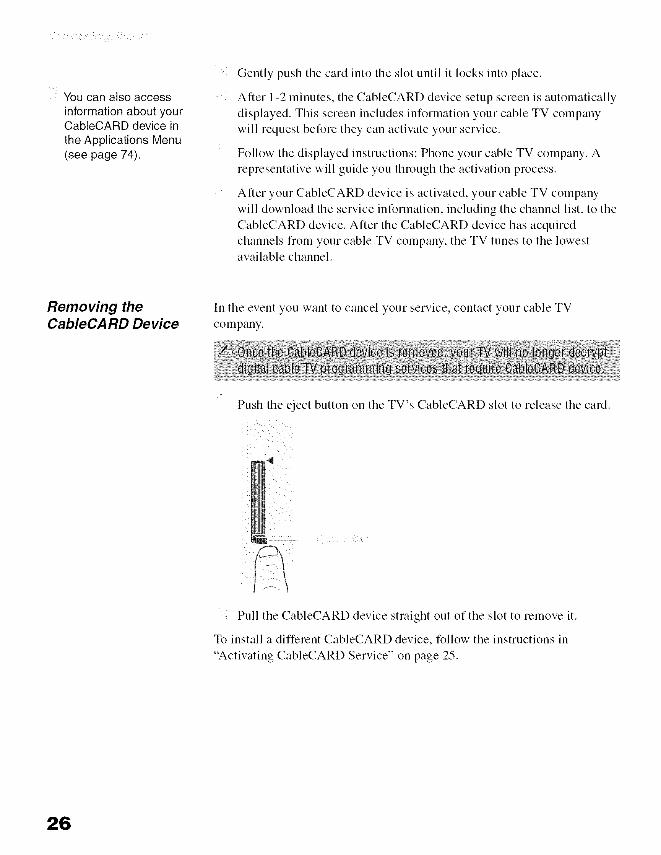
Removing theCableCA RD De vice
In tile event you want to cancel your service, contact your cable TVcompany.
Push the eject button on tile TV's CableCARD slot to release tile card.
Pull tile CableCARD device straight out of the slot to remove it.
To install a different CableCARD device, follow the instructions in
"Activating CableCARD Service" on page 25.
26

Equipment withHDMI Connection
Use this hookup if:
Your equipment has a High-Definition Multimedia Interface (HDMI).
Use an HDMI cable (not supplied) to connect tile equipment's HDMI OUT
jack to the TV's HDMI IN jack.
Use the HDMI IN 6 input connection.
The HDMI jack
provides both videoand audio signals, so itis not necessary toconnect the audiocable.
HDMI cable (not supplied)
27

Equipment with DVIConnection
If you are connecting with DVI-HDTV output, you can connect to tile TV's
HDMI IN jack by using an HDMI-to-DVI cable or an adaptor (both not
supplied).
Audio cable(not supplied)
HDMI-to-DVI adapter orcable (not supplied)
AUDIO-R (red)
AUDIO-L (white)
28

Equipment withDigital A udio(Optical)
You can use the TV's DIGITAL AUDIO _OPTICAL) OUT jack to connect a
digital audio device that is PCM/Dolby Digital compatible, such as an audio
amplifier.
Use an optical audio cable to connect the device's OPTICAL IN jack to the
TV's DIGITAL AUDIO OPTICAL) OUT jack.
The DIGITALAUDIO
(OPTICAL)OUTjack isavailable only when adigital TV channel is
received.
Optical audio cable (not supplied)
OPTICAL
29

After you finish connecting the TV. you can run the Initial Setup to create a
list of available analog and digital channels. The Initial Setup screen appears
when you turn on the TV for the first time after hooking it up. If you choose
to set up the channels at a later time select the Auto Program option in the
Channel menu to scan available channels (see below).
Using Initial Setup ii !i iii i i ! i iii !i ¸ i i
UPress to turn on the TV.
The Initial Setup screen appears.
Press 4"or ,!, to highlight the on-screen
display language. Then press @. Themessage "First please connect cable/
antenna" appears. This may require 50+
minutes for completion and "Start auto program now'?" appears.
• ' " S"Press 4"or ,!, to h@ahght Ye.' then press @.
Auto Program performed through Initial Setup will automatically create alist of receivable channels from both VHF/UHF antenna and cable TV
channels if both sources are connected.
Select Settings in WEGA GATE, and then go to Channel settings.
Select Auto Program then select Start.
30

You can connect variety of optinal equipment to your TV. This section
provides some of the individual connections you can have. For multiple
connections please refer to the Quick Setup Guide.
VCR and Cable 32
VCR and Cable Box 33
Two VCRs for Tape Editing 35
DVD Player with Component Video Connectors 36
DVD Player with S VIDEO and Audio Connectors 37
Camcorder or PlayStation 38
Audio Receiver 39
3t

VCR and Cable Use this hookup if:
You have cable TV that does not require a cable box.
i ii _! ! i i
Connect the CATV cable to the single (input) jack of the splitter.
Use a coaxial cable to connect one of the output jack of the splitter to the
TV's CABLE jack.
Use a coaxial cable to connect the splitter's other output jack to the
VCR's input jack.
Use A/V and S VIDEO cables to connect the VCR's AUDIO and
S VIDEO OUT jacks to the TV's AUDIO and S VIDEO IN jacks.
Coaxial cable
S VIDEO VIDEO (yellow)
.... AUDIO-L (white)
.... AUDIO-R (red)
AUDUOR AUDIO L VIDEO S VIDEO OUT
OUT IN
r[[[ :;:
AN ab,e(not supplied)
Coaxial cable
S VIDEO cable (not supplied)
/-_ If your VCR is not equipped with S VIDEO, use a VIDEO cable (yellow)instead of the S VIDEO cable.
32

VCR and Cable Box
Before connecting a
cable box, see "Using
CableCARD Device" on
page 25.
Use this hookup if:
Your cable TV company scrambles some channels, but not all of them
(pay channels vs. regular cable channels) and you need to use a cablebox.
With this setup you can:
Use the TV's remote control to change channels on your cable box
when the signal is scrambled. To program your Sony remote control to
operate your cable box, see "Programming the Remote Control" on
page 44.
Use the TV's remote control to change channels on your TV when the
signal is not scrambled. Your TV's tuner provides a better picture
quality than the output of your cable box.
i i i ¸ ! i i ii ! i i i
Connect tile CATV cable to the single (input) jack of tile splitter.
Use a coaxial cable to connect one of the splitter's two output jacks tothe TV's CABLE jack.
Use a coaxial cable to connect the splitter's other output jack to thecable box's input jack.
Use a coaxial cable to connect the cable box's output jack to the VCR's
RF input jack.
Use an A/V cable to connect the cable box's A/V output jacks to the
TV's A/V input jacks.
Use an A/V and S VIDE() cables to connect the VCR's AUDIO and
S VIDEO OUT jacks to the TV's AUDIO and S VIDEO IN input
jacks.
Run Auto Program, a. de. cl bed n Setting Up tile TV Channel List"
on page 30.
_a Toview scrambled channels, tune the TVto the channel the cable box isset to (usually channel 3 or 4) andthen use the cable box to switchchannels.
(Continued)
33

Cables are often
color-coded to connectors.
Connect red to red,
white to white, etc.
Coaxial I
cable
cable 3oaxial
If you are connecting adigital cable box, you will
need a special bi-directional splitter
designed to work withyour cable box.
....... /'_-, cable
? ...... A/V cable _
(not supplied) ? ? _
m:
/,_ If your VCRis not equipped with S VIDEO,use a VIDEOcable (yellow)instead of the S VIDEOcable.
34

Two VCRs for TapeEditing
UsingS VIDEO jacks?
See page 18.
If you connect two VCRs, you can record fiom one VCR to tile other while
using your TV to monitor what is being recorded.
_i_ _ _ii!_ ii_ i _ i_i _! _i_!_ _i _ _ _ !_i_!_ii<!_i!i i ii!i_ i!ii_
Use A/V cables to connect tile playback VCR's AUDIO and VIDEOOUT jacks to the recording VCR's AUDIO and VIDEO IN jacks.
Use A/V cables to connect the recording VCR's AUDIO and VIDEOOUT jacks to the TV's AUDIO and VIDEO IN jacks.
Cables are often
coloPcoded to connectors.
Connect red to red,
white to white, etc.
LUNgOUT
°°eluN
LINEIN
LUNEOUT
ooT[Ol
AUDIO-L (white) ..........
VIDEO (yellow) ................................)v
A/V cable (not supplied) A/V cable (not supplied)
I._ To perform tape editing, set the TV to the video input intended forplayback by pressing TV/VIDEOon the remote control.
J_ Youmay needto change the video input on your VCR. Consult yourVCR'soperating manual for instructions.
Y'_ If your VCRs haveS VIDEOjacks: For best picture quality, use anS VIDEOconnection instead of the yellow video cable on your combinedAN cable.Usean S VIDEOcable to connect the playback VCR'sS VIDEOOUTjackto the recording VCR'sS VIDEOINjack. S VIDEOdoes not provide audio,so audio cables must be connectedto provide sound.
J_ Youcannot record signals from equipment connectedto the YPBPRinput.
35

DVD Player withComponentVideo Connectors
Cables are often
color-coded to connectors.
Connect red to red,
white to white, etc.
Use this hookup if:
Your DVD player has component (Y, B-Y, R-Y) jacks.
Use a component video cable to connect tile DVD player's Y. B-Y and
R-Y jacks to the TV's YPBPR jacks. Use the HD/DVD IN 4 or 5connections.
¢'-_TheY, B-Y and R-Yjacks on your DVDplayer aresometimes labeledY, CBand CR,or YPbPr.If so, connect the cablesto like colors.
Use an audio cable to connect tile DVD player's AUDIO OUT jacks to
the TV's AUDIO IN jacks. Be sure to use the same row of inputs that
you used for the video connection (HD/DVD IN 4 or 5).
Component video cable(not supplied)
¸¸¸¸¸5¸¸
Audio cable (not supplied)
AUDIO-R (red)
AUDIO-L (white)
Y_ Totake advantageof the Wide Mode feature on your TV,set the DVDplayer's aspect ratio to 16:9. Fordetails, refer to the operatinginstructions supplied with your DVDplayer.
36

D VD Player withS VIDEO andAudioConnectors
Cables are often
color-coded to connectors.
Connect red to red,
white to white, etc.
Use this hookup if:
Your DVD player does not have component (Y, B-Y, R-Y) jacks.
)i i i ¸ i / i ii i ¸ i i ! i
Use an audio cable to connect the DVD player's AUDIO OUT jacks to
the TV's AUDIO IN jacks.
Use a S VIDEO cable to connect the DVD player's S VIDEO jack to theTV's S VIDEO jack.
S VIDEO
S VIDEO ......cable
i
Audio cable (not supplied)
(red) _ (yellow)AUDIO-L _ V g
(white)
S_ If your DVDplayer is not equipped with S VIDEO,usea VIDEOcable(yellow) instead of the S VIDEOcable.
/_ Towatch a DVD,press W/VIDEO repeatedlyto select the DVDinput(VIDEO1 in the illustration). If you havea non-Sony DVDplayer,andwant to set up the TV remote control to operatethe DVDplayer youmust program the remote control. See"Programming the RemoteControl" on page44.
/_ Tocontrol DVDfunctions with the TV remote control, see "Operatinga DVD Playeror DVDChanger" on page46.
/-_ LabelVideo inputs to easily identify equipment connectedto the TV.Seethe instructions for setting up Video Labels on page 70.
37

Camcorder or
PlayStation
i i i ¸ ! i i ii ! i i i
For easy connection to a camcorder or PlayStation, the TV has front audio
and video inputs (shown below).
Use A/V and S VIDEO cables to connect the camcorder or PlayStation's
AUDIO and S VIDEO OUT jacks to the TV's AUDIO and S VIDEO IN
jacks.
_a If your camcorder is not equipped with S VIDEO,use a VIDEOcable(yellow) instead of the S VIDEOcable.
iiiiiiii
VIDEO (yellow)
S VIDEO
To NV output
A]V cable(not supplied)
S VIDEO cable(not supplied)
To S VIDEO
output
38

Audio Receiver For improved sound quality, you may want to play the TV's audio throughyour stereo system (see page 61).
i i
Use A/V cables to connect the TV's AUDIO OUT, VAR/FIX) jacks to theaudio receiver's audio LINE IN jacks.
_ AUDIO OUTjacks are operableonly when the TV's Speakeris set to Off.
Cables are often
color-coded to connectors.
Connect red to red,
white to white, etc.
AUDIO-R (red) _
A/V cable(not supplied)
AUDIO-L (white)
39


Tile table on tile next page describes tile buttons on tile remote control.
Inserting Batteries into the Relnote Control 41
Bntton Descriptions 42
Progrmnming the Remote Control 44
Manufacturer's Codes 45
Using Other Equipment with Your Remote Control 46
Using Special Buttons 48
Insert two size AA (R6) batteries (supplied) by matching tile 0 and • onthe batteries to the diagram inside the battery colnpartment.
1 ..... SS' 2
,,_i !ii!i!iii!!iii!!!!!!
/'_ Toavoid possible damage from battery leakage,removethe batteries ifyou anticipate the remotecontrol will not be usedfor anextended period.
/_ Handlethe remote control with care.Avoid dropping it, getting it wet, orplacing it in direct sunlight, near a heater,or in high humidity.
/_ Your remote control can be programmed to operate most videoequipment. (See"Programming the Remote Control" on page44.)
41

_iiiii!!i_i}......
ii4 ii.....
® ®
.......ii@i Press k_ inure the sound. Pres_ again iir press to unnlH|e.
Press to cycle through the video equipnaent COllnecled Io your TV'svideo inputs.
The button indicator lighls up inomeillarily whenpressed to show which external equipmelll the relYiOle control is
operating. When Ihe remote conlrol is set Io operate the exleri/al
equipment Ihese bultoils will operate tile equipmenl you choose. YouII]I1M firsl press one of these bullons to operate the
corresponding equiplllenl. See page 44 for "Program//ling the Relllote
Con/rol".
©
Press to select a channel: tile channel changes after 2 seconds.Press to change channels immediately.
Use (_ with and buttons to select digital channels (forexample, 2.1 ). For details on selecting digital channels, see page 48.
Press to jump back and forth between two channels. The TV alternatesbetween tile current channel and the last channel that was selected.
Press to chmlge be/weell the VHF/UHF input and file CABLE input.
Press to cycle through different sound settings: forenhanced treble and bass, for spoken dialog andfor flal selling.
Press repeatedly to cycle through the axailable video picture modes:• . . The video picture mode _,can be also
accw, sed in the Video metal For details, see -Selecting VideoOp/ions" on pace 58.
Press lo display/he TV's program guide.
Press to re/tlrn to norlllal viewing.
When is switched on or . these buttons
operate the xideo equipinen/you have programmed inlo the reino/econtroh For de/ails, see "'Using Other Equipmem with Your Reino/eCon/rol" on page 46.
: Press to replay the current program froin theprevious Chapter Mark (if any) or froin the beginning of lhe lixe TVcache.
: Press to replay/he current prograin for a set period oftime.
: Press to adxance forward a set period of time whei/playing back a recorded program.
: Press to adxance forward to the next Chaplet Mark (ifany) or to live TV when playing back a recorded program.
: Press to play a program in fast rewind inode.: Press to play a program at a normal speed.
: Press to play a program in fast forward mode.
: Press to pause playback.: Press to slop the playback of a recorded prograin.
To be used only with your connected external equipment with
visual search function. (Non-operable button for TV)
Press to adjust the volume.
42

The button,button, buttonand button have a
tactile dot. Use the dot
as a reference when
operating the TV.
: Press Io record. By pressing this bulton akme ',.,,'ill start file
recording.
: Press Io pause the recording.
: Press to stop file recording.
Press Io display Ihe disc menu from your connected DVD player.
Press to display the menu of your connected DVD player.
Press to cycle through and Io benefil II_epowerconsmnption. For additional benefits see page 71.
Press to turn on/off the external equipmenl selected from thebutton .
Press to turn on/off the TV.
) ) irPress repealedly t< cycle thr( u_,h he Mul l-ehalmel TV Sound (MTS/oplions: (Second Audio Progranl ), ,'-tnd .
The MTS setting can be also accessed in the Audio menu. For moredetails, see "Selecting Audio Options" on page 60.
Press Io freeze the current picture. Press again to restore the picture.For delails, see "Using the FREEZE Button" on page 51.
: Press SUR (Surround Sound) repeatedly to step through theavailable audio effect models: . .
While in , press Io switchbelween the satellite receiver and antenna.
Press repeatedly to step through the Wide Screen Mode setting:• and . The Wide Screen Mode setting can
be also accessed in the Screen menu. For delails, see "Using theWIDE Button" on page 50.
Press once to display channel number, label, current lime and otherinformation. Press again to turn Display off. See page 73 for details onsetting the time.
i/l!,/,l,/,*, @ Press t/l!,/*/,_, lo move tile oT'>screen cursor. To select an item, press.................................................................... " ................................................................
To be used only v,'ill'_your connected external equipment that supports
this function. (This button does not operate for the TV.)
Press Io acess Ihe following through Ihe WEGA GATE menu:
Watch TV (see pages 54 and 55)
Select channels from the Favorite Channels you stored (see page 54)View signals from external equipment such as DVD, VCR and others/see page 55).
Adjust or euslomize TV seltings (see Using Ihe Seltings on page 56Ihrough 74).
Press to scan through ehalmels. To scan quickly through channels,press and hold down either CH button.
Press to select the function of connecled componenls. For details, see"lJsing Other Equipment wilh Your Remote Conlrol" on page 46.
Press to select the function of c(n'lnecled componenls. For details, see"Using Other Equipment with Your Remote Control" on page 46.
43

The remote control is preset to operate Sony brand video equipment.
DVR 772
DVD!VCR 601 (Sony Dream System)
SAT/Cable 801 (Sony Satellite Receiver)
Follow tile steps below to program your TV's remote control to operate theother video equipment.
Find the three-digit code for your equipment from the Manufacturer .'Codes" listed on page 45. If more than one code number is listed, tryentering fiom the code listed first.
Press and hold the _, _ or _ ,. button you want to
program on the remote control and press the __ button simultaneously.The selected button (DVR, DVD/VCR or SAT/CABLE)will flash.
Enter the three-digit manufacturer's code number using the (_) - (_)buttons while the button is lit. If code is not entered within 10 seconds,you must perform the step 1 again.
Press @ button.When programmed conectly, the selected button will flashtwice, and when not, it flashes five times.
To check if the code works
Aim your TV's remote control at the equipment, and press the green
button. If the equipment turns on and off, the programming is completed. Ifnot, try the next code listed.
J_ If no code is input within the abovespecified time, or an invalid orincorrect code number is input, the remote control automatically goesbackto the previous setting.
/_ In some cases,you may not be ableto program your remotecontrol tooperate other equipment. In such cases, usethe equipment's ownremote control.
_",3Removing the batteries or using dead batteries may causetheprogrammed codes to be lost and revert backto the factory setting.Reprogramming the codes may benecessary.
44

_.grt/!Tb'N'/!7"/_ r_al'g__.grt/!Tb'N'/!7"/_ ['_;l'g/_
Sony 751General Electric 755
Hitachi 758
JVC 756
Magn'_ox 757Mitsubishi 761
Pauaslmic 753
Philip,, 757
Pioneer 752. 778
RCA/PROSCAN 755
Smnsung 758Toshiba 754
Zcuilh 'Trot
Sony 765
paua_,uuic ,v/. ,:_b"/'t/!Tb"NOT"/_ fqUgYd
Souy 767
Broks;ouic ,v,_,:
JVC 775
paua_,uuic ---
Smnsung 77A.
Toshiba 773
Zcui/h 'vt._
Sony 772. 770.771
|
Sony DAV) 001. 602. 603.6t)4
Sony 764
_b'J"t/!Tb'N/!7"/_ ['_;l'gYd
301.3(P 303S0!!Y............................................_-,- _.....Admiral 327(M. Ward)
Aiwa _ 338. 344
Audio Dynamic 314. 337Broksonic 319, 317
Cmlon 3!_)9,308
Cilizeu 332
c211_ig.............................._i_5_i_ ................................Curtis Mathes 304, 338, 309
Daewoo 341, 312, 309
DBX 314, 336, 337Dilnensia 304
318, 341
Fisher 330, 335
Funai 338
General Electric 329. 304, 309
1%Vi_; ........................................._i 3_ 346..............Guldslar 332
Hi{:,ci_i............. 36625iiL3o5;_i3gInstant Replay 309. 31)8
JC Penney 309. 305. 304. 330.314, 336. 337
JVC 314. 336. 337. 345.
346. 347
Kenwoud 314. 336. 332. 337
LG 332
LXI (SEARS) 332. 305. 330. 335.338
Magnavox 308, 309_ 310
Mar:mtz 314. 336. 337
Maria 332
Memurex 309. 335
Minolta 305, 304
Milsubishi/MGA 323, 324, 325, 326
Multitech 325, 338, 321
NEC 314. 336. 337
6iyii>i_....... 5{i936s ....Optimus 327Oriun 317
p:,,ii{;iiiii_,.... __iis36913661367Pentax 305, 304
Philco 308, 309
Philips 308, 309, 310
Pioneer 308
Quasar 308. 31)9. 31)6
RCA/PROSCAN 304. 305. 308. 309.311.312.313.310.329
Realistic 309. 330. 328. 335_
324. 338
Sm_sui 314
S:l!ns_t!ng 322" 3! 3:321Sanyu 330. 335
Scutt 312. 313. 321. 335.
323, 324, 325. 326
Sharp 327. 328
Signature 20(X) 338. 327(M. Ward)
SV20(X) 338
Syl'_:!}nia.... 3!!8, 31.)9,338, 31!)......Symphonic 338Tashiro 332
Va!un_ .............................................._i_ 336, 337
Teac 314, 336, 338, 337
Technics 31.)9.308
_u;i_ig,......................£i_ £ii...............................Wards 327. 328. 335. 331.
332
"_-:d_iii_, 3i_i336336337Zenith 331
i
Suny 230
Hamliu/Regal 222, 223, 224,225,226
Jerrold/ 201. 202. 203.
General Inst./ 204. 205. 206.
Motorola 207, 208, 218. 222
Oak 227. 228. 229p,,fii_;;iii_............ _i912262_i .......Pioneer 211. 214. 215
Scientific Atlaula 209. 210. 211
Tocom 216.217
Zenith 212. 213
i iiii
Sony 801Disi_Neiwiirk..... Si{_............................................Echostar 810
General Eleclric 81)2
Hitachi 81)5
n"ghe_......................s!)4 .........................Milsubishi 809
Panasonic 803
Philips 811
RCA/PROSCAN 802, 808
Tushiba 806, 807
Smnsung 812
: If an Aiwa VCR does nut work evenIhuugh yuu euler the code fur Aiwa.enter the cude fur Suny iuslead.
45

To operate other connected equipment with your TV, first turn to page 44
and program the necessary code. For operating video equipment, pressrepeatedly until you see the video input on the screen for your
connected equipment. Remote control operation tips are provided below.
Operating a Cable Box
Activate the remote control to SAT/CABLE Select a channel 0-9, ENT
operate the cable box (FUNCTION) Change channels ............ CH +l-
Turn on/off POWER Back to previous channel JUMP
Operating a Satellite Receiver
Activate tile remote control to SAT/CABLE Display channel number DISPLAY
operate the satellite receiver (FUNCTION) Display SAT Guide ................................GUIDE ................................................
Turn on/off POWER Display SAT Menu MENU
Select a channel 0-9, ENT Move highlight (cursor) It, I_ I, ,*,
Change channels ...... CH +/- Select item @Back to previous channel JUMP
Operating a VCR
Acti'_.ate tile remote control to DVD/VCR
operate the VCR (FUNCTION)
Fast forward I_
Rewind the tape
Turn on/off POWER Pause n (press again to resmne
Change channels CH +/- normal playback)
Record • Search the picture forward or _ or _ during
Play 12>
Stop •
Operating a DVD Player or DVD Changer
Activate tile remote control to DVDNCR
operate the DVD (FUNCTION)
backward playback
(release to resume normal
playback)
Step through different _ to filst forward or
tracks of the disc _ to filst reverse
Turn on/off POWER Step through different I_1_| to step forward or
If yon havea DVD changer, .....................................................................................chapters of the disc |'_l_l to step backward
to skip disk Select a track directly 0-9, ENT
Play 12> Display the disc menu MENU
Stop • Display the Top menu TOP MENU
Pause II (press again to resume Operate the DVD menu t1" 'I" I, ,_, _,_-)
normal playback)
46

Operating a 5.1ch DVD AV System (Sony DAV)
Activate the remote control to DVDNCR Play D >
operate the DVD (FUNCTION) Stop ...... • .................
Turn on/off POWER Pause II
Select other equipment F1 Search the picture forward or _ or _ during
connected to the DAV backward playback
Skip a disc F2 Move highlight (cursor) i' i, I, ,_
Display the Top menu TOP MENU Select item @
Display the disc menu MENU Master Vohnne VOL+/-, MUTING
Operating a DVD/VCR Combo Unit
Activate tile remote control to DVD/VCRoperate the DVD/VCR (FUNCTION)
Turn on/off POWER
Pause II
Search the picture forward or _ or _ during
backward playback
If you have a DVD/VCR combo compouent, Replay
Select the DVD F1 Advance "
Select the VCR F2 Move highlight (cursor) t, i, I, ,_
and select (DVD) @
Display the Top menu TOP MENU Record (VCR) •
disc menu MENUDisplay the Cbaiige chaniieis iVCRi CH +/_ or 6"91 ENT
Play D:> (using tuner)
Stop • Adjust tracking (VCR) CH +1- (during tape
playback)
Operating an AV Receiver
Activate the remote control to DVD/VCR
operate the AV Receiver (FUNCTION)Turn ou/off POWER
Select other equipment F1connected to the AV Receiver
47

This TV comes with convenient features that can be accessed directly by
pressing their buttons on your remote control.
Using the GUIDEButton
This TV is equipped to show program information if it is available from tile
station. The Program Guide lets you review prograln information, and select
both analog and digital channels.
ii ;i ¸ i i !il
Tune your TV to a channel by using tile , C), and buttons.
Press on the TV's remote control. The Prograln Guide will
appeal with the currently selected program showing in the background.
Channelnumber,callletters,etc.
Programtitleanddescription,programduration,timeremaining,ratinginformation,closed-captionavailability,etc.
Selectablechannellist.
Z_ Program information in the guide is provided by the broadcasters. As aresult, it maysometimes include only the channel number, without aprogram title or description.
48

The Program Guide allows you to select the channels from a drop down list.The Guide also provides information about the cunent program being shownon each channel.
/_ Subchannelsare additional channels of programming broadcastsimultaneously. For example,channel 4 might include three subchannels(4.1,4.2, 4.3) that are showing programs at the same time.
The Prograln Options menu allows you to customize the program settings on
the currently tuned channel.
Each program has a main video stream (the video that you see whenthe channel is first tuned), and may have alternate video streams. This
(When option allows yon to switch among these alternate video streams.
available)
Each program has a main audio stream (the audio you hear when thechannel is first tuned). This option allows you to switch among these
(When alternate audio strealns (e.g., for different langnages).
available)
49

Using the WIDEButton
When the TV receives
a 720p or 1080i signalthat is in 4:3 aspectratio picture with ablack bar at each side,
Full returns the pictureto its original size.
You can also access
the settingsfrom the Screen menu.
For details, see page62.
Wide screen mode lets you watch 4:3 normal broadcasts in several wide
screen modes (16:9 aspect ratio).
4:3 Original source 16:9 Original source(Standard definition) (High definition)
WIDE
/_ When the TV receives a 720p 0r 10801 signal, Normal cannot beselected.
Changing the wide screen mude
4:3 Original suurceStaJldN-dde_'inifion
Wide Zoom
Nurmali
FuH
Zourll
16:9 Original sourceHighdefinition
This mode is nol available
50

Using the FREEZEButton
Tile button allows you to telnporarily capture a program's picture.
You can use this feature to write down information such as phone numbers,
recipes, etc.
FREEZE
FREEZETo cancel for normal viewing, press again.
Using the JUMPButton
Tile button allows you to jump back and forth between the cunTentchannel and the last channel that was selected.
JUMP JUMP
5t

A push of a button on your remote control provides a whole new experience
of TV viewing. It enables you to perform a variety of tasks intuitively with acontrol panel on the screen rather than using complicated remote control
button presses.
When you press the _ button, you can select from basic TV function:
watching TV, selecting fiom Favorite Channels, viewing external equipment
signals or adjusting or adjusting TV settings.
Press _ on tile remote.
iiiiiiiiiiiiiiiiiiiiiii_::i
control panel appears.
Press l,/,l, to lliglllight tile item.
Press @ to select.
Press G_ to exit.
52

The WEGA (;ATE screen gives you access to the lk_llowing items:
The Favorites feature lets you select programs from a list of
up to 16 favorite channels that you specify. For details, see
page 54.
Favorites
The Cable feature takes you to the most recently viewed
channel on the cable input. When tuned to the channel, the
Program Banner and Chanuel number will be displayed.
Cable
The Antenna feature takes you to the most recently viewed
channel on the antenna input. When tuned to the channel, the
....................................................................Program Banner and Channel number will be displayed.
Antenna
The External Inputs feature lets you select equipment that is
connected to your TV. such as a DVD player. You can assign
a label to the equipment. For details, see page 55.
External Inputs
.................. The Seiiings feature iets you adjust the Video AudioScreen, Channel, Parental Control, Setup and
Applications menus. For details, see page 55.
Settings
53

Using Favorites in WEGA GATEThe Favorites feature lets you select programs fi'oln a list of up to 16
favorite channels that you specify, You can create a list using the Add toFavorites option,
1 Select Favorites from the WEGA GATE control panel and press _).
The Favorite Channels list appears, Make your selection.
iiii_iiiiiiiiiiiiiiiiiiiiiiiiiiiiiiiiiiiiiiiiiiiiiiiiiiiiiiiiiiiiiiiiiiiiiiiiiiiiiiiiiiiiiiiiiiiiiiiii_!_!_!_!_ii!i
iii{iii_iii_i!ii!iiiiiii_iiii_ii_i_i!iiii_iii!ii!iiiii!iiiiiii_i!ii!iii_i_iiii_iii
!!,!iiiii!i
Press t/'_, to highlight the desired channel and press @.
• To add the current channel to the list of Favorite Channels, highlight
Add to Favorites and press @.
• When the Favorite Channel list is full, select Edit Favorites to
remove a channel from the list or go to the Channel settings andselect Favorites Channels then edit the channel.
Using Cable in WEGA GATE
The Cable feature takes you to the most recently viewed channel on the cableinput. When tuned to the channel, the Program Banner and Channel number
will be displayed.
Select Cable from the WEGA GATE control panel and press @.
54

Using Antenna in WEGA GATE
The Antenna feature takes you to the most recently viewed channel on the
antenna input. When tuned to the channel, the Program Banner and Channelnumber will be displayed.
Select Antenna from the WEGA GATE control panel and press @.
_ If you have not completed the initial channel setup (see page64) bothCableand Antennawill tune to the lowest channel number.To run AutoProgram see page64.
Using External Inputs in WEGA GATE
The External Inputs feature lets you view from a selected external inputconnected to your TV. You can assign a label or skip over unused inputs byselecting Edit Video Labels. Input label assignment can also be done bygoing to Setup settings and select Label Video Inputs (see page 70).
1 Select External Inputs fiom the WEGA GATE control panel and press
Tile External Inputs list appears. Make your selection.
2 Press _/_, to highlight the desired external input and press @.
_iiiiiiiiii_iiliiiiiiiiiiiiiiiii_
_llllllllllllllllllllllllllllll_
Using Settings in WEGA GATE
The Settings feature lets you enter to the menu screen where most ofadvanced settings and adjustments are performed (see page 56).
55

i ¸ ! i ¸¸ ii i ili ii i i
i !i !iii_i _ ill _i_i_? _ _ _ _ _!_iiii _il I iii_ii ilii _ _i_ _
Video Picture Mode (page 58) DRC Mode (page 59)
Reset (page 58) DRC Palette (page 59)
Picture (page 58) Advanced Video (page 59)
Brightness (page 58)
Color (page 58)
Hue (page 58)
Color Temp. (page 58)
Sharpness (page 58)
Noise Reduction (page 59)
Audio Sound Mode (page 60) BBE (page 61)
Reset (page 60) MTS (page 61 )
Treble (page 60) Speaker (page 61)
Midrange (page 60) Audio Out (page 61 )
Bass (page 60) AN Sync (page 61 )
Balance (page 60)
Steady Sound (page 60)
Volume Offset (page 60)
Effect (page 60)
Screen Wide Mode (page 62)
Game Picture (page 62)
4:3 Default (page 63)
Display Area (page 63)
Vertical Center (page 63)
Vertical Size (page 63)
56

Channel Favorite Channels (page 64)Auto Program (page 64)Digital Channels (page 64)Show/Hide Channels (page 64)Label Channels (page 65)
Parental Lock
Setup
Applications
Parental Lock (page 66)Change Password (page 67)Select Country (page 67)
Caption Vision (page 70)Info Banner (page 70)Label Video Inputs (page 70)
Language (page 71 )Menu Color (page 71)Power Saving (page 71 )Image Shift (page 71)High Altitude (page? 1)CineMotion (page 71)
Clock/Timers (page 73)
Diagnostics (page 74)
CableCARD (page 74)
57

_i_i _ ..... _i i _ _ iiii _ii i_,i_i_ i.
1. Press .......
2. Select ..............
3. Highlight ......................
4. Press to select ............... @
To highlight an option and to change settings, press It, 4 I. *.
Press @ to confirm the selection.
To exit the Video, press _.
Selecting VideoOptions
To quickly and easily
change from oneto
another, use PICTUREon the remote control.
Tile Video settings include tile following options:
Select for enhanced picture contrast and sharpness.
Select for standard picture settings. Recommended
Customized for home entertainment.
picture Select to display a picture with minimum
_iewing enhancements.
%ucanaitei{he ....etc.) for each PictureModeand each videoinput.
/,_ Youmayset upa PictureMode(Vivid,Standard, Custom)independentlyfor each Videoinput (Video]-Vide06,includingthe Antennainput).Your Picture Modesettingsare automaticallysavedafter each selection.Thisallowsyou to customize the Picture Modesetting for eachtype ofsignal source.
Select OK to reset all settings al:ld adjnstments to tile default setting
for each (Vivid, Standard, Cl.lStoln) (except for the
options grayed out).
Adjust to increase picture contrast and deepen the color or decrease
picture contrast and soften the color.
Adjnst to brighten or darken the pictnre.
Adjust to increase or decrease color intensity.
Adjnst to increase or decrease the green tones.
..... Choose from three color temperatures:
White ........................Seiec{ {o gi',;e {he ; i{i{e color; a bi{ie iinil ............intensity ..............................................ag{jus'tnwnt Select to give the wlaite colors a neutral tint.
zgi_ e the white colors a red tint.
58

Adjust to sharpen or soften the picture.
Select to reduce the noise level of signal from
connected equipment and froln the VHF/UHF jack.
Select to turn off
Creates a high-resolution picture with 4 x density, for
high quality sources (i.e., DVD player, satellite
receiver).
Recommended for moving pictures.
Z_ DRC Mode is not availablewhen using the Freezefeature;also not availablewhen watching 480p, 720p or 1080isources.
.... Allows you to customize the level of detail (Reality)
and smoothness (Clarity) for up to three input
sources. FOr example, you can create one Custom
setting to optimize your cable input's picture, andcreate another to optimize your DVD player's picture.
You can switch among the three Custom settings.
Press the arrow buttons to highlight
then press @).
The DRC palette appears.
CustomPress@ to exit
Re_aNty[
Clarity(1) ¢
Press the arrow buttons to adjust the position of
the marker (O). As you move the • higher
along the Reality axis, the picture becomes more
detailed. As you move the • to the right along
the Clarity axis, the picture becomes smoother.
To save the setting, press @.
feature; also not availablewhen watching 480p, 720p or1080i sources.
Select to choose among the options:Gamma (High/Medium/Low/Off), Clear White (On/
Available in Off), Color Corrector (High/Low/Off).
"Cu.s'tom Select Black Corrector to enhance the black colors to
Picture give the picture strong contrast (High/Medium) or
Moth," lesser coutrast (Low/Off).
O
$9
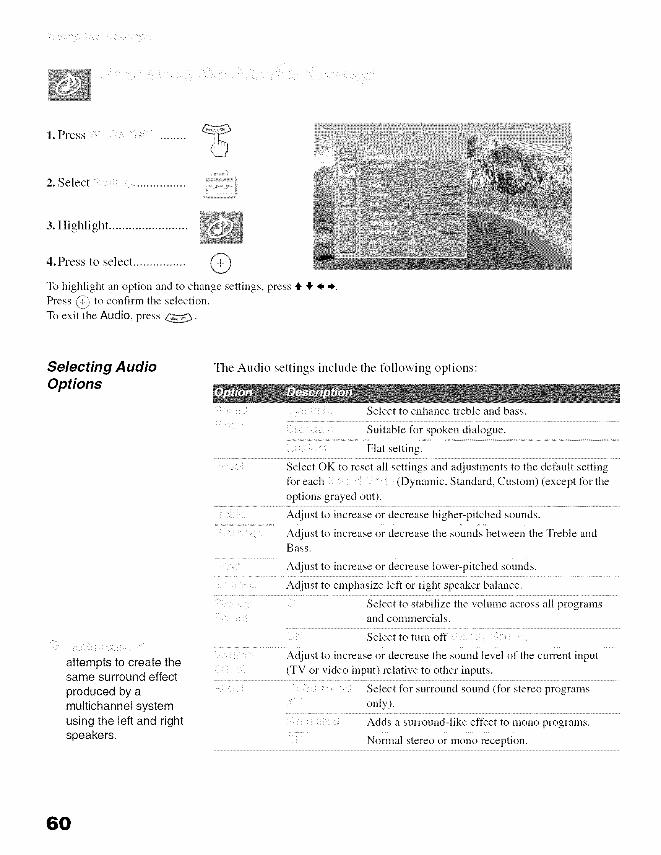
_i _i _ _ _ '_i i i_i_ i__ _i__ iiI ,i i_, _ _ i_
1. Press ........
2. Select .................
3. Highlight ........................
©4.Press to select ................
To highlight an option and to change settings, press tl, 4 I. *.
Press @ to confirm the selection.
To exit the Audio, press _.
Selecting A udioOptions
attempts to create thesame surround effect
produced by amultichannel systemusing the left and rightspeakers.
Tile Audio settings include tile following options:
Select to enhance treble and bass.
Suitable for spoken dialogue.
Flat setting.
Select OK to reset all settings and adjustments to the default setting
t%r each (Dynamic, Standard, Custom) (except for the
options grayed out).
Adjust to increase or decrease higher-pitched sounds.
Adjust to increase or decrease the sounds between the Treble and
Bass.
.... Adjust to increase or decrease lower-pitched sounds.
Adjnst to emphasize left or right speaker balance.
................. .....................................................................................Select to stabilize the vohnne across all progralns
and commercials.
Select to turn off .
Adjust to increase or decrease the sound level of the current input
:..... (TV or video inpnt) relative to other inputs.
Select for surround sonnd (for stereo programs
only).
Acids a surround-like effect to mono programs.
Normal stereo or mono reception.
60

Select to give sound more impact by compensating
for phase effects in speakers.
Select for normal stereo or mono reception.
Select for stereo reception when viewing a program
Et!joy s'tereo, broadcast in stereo.
biling*¢aland Select to automatically switch to second audio
mono programs when a signal is received. (If no SAP
programs signal is present, the TV remains in Stereo mode.)
Select for mono reception. (Use to reduce noise
during weak stereo broadcasts.)
/-a MTS is available only for analog programs........................... ........
Select to turn on the TV speakers.
Select to turn off the TV speakers and listen to the
TV's sound only through your external audio
system speakers.
_,_ The MUTINGbutton on your remote control becomesnonfunctional when the Speakeris set to Off.
This option can be set only when the optionis set to .
Eas'y control The TV's speakers are tnrned off, but the audio
qfvohune output from your audio system can still be
ad/_¢s'tments controlled by the TV's remote control.
The TV's speakers are turned off and the andio
output of the TV is fixed. Use your audio receiver's
volume control to adjust the volume (and other
settings) through your audio system.
Use this option to make adjustments to audio and
video synchronization when you have external
equipment connected to DIGITAL AUDIO
(OPTICAL)OUT of the TV. Select Off (factory
default setting) to make no adjustments. Select 1, 2
or 3 to adjust so that the video and audio from your
connected external equipment are synchronized.
6t

1. Press ........
2. Select ...............
3. Highlight .......................
4.Press to select ................ @
To highlight an option and to change settings, press tl, 4 I. *.
Press @ to confirm the selection.
To exit the Screen. press _.
Selecting ScreenOptions
iS
unavailable while in
Freeze (page 51 ).
Tile Screen settings include tile following options:
Select to enlarge the 4:3 picture, to fill the 16:9
Select a screen screen, keeping the original image as much as
mode to us'e ibr possible.
4.'3 solu'ces. Select to return the 4:3 pictnre to its original
size and aspect ratio.
_ Normal is not availablewhen watching 720p or 1080isources.
Select to enlarge the 4:3 pictnre horizontally
only, to fill the wide screen.
Select to proportionally enlarge 1080i and
720p sources. For 480p and 480i sources,
will vertically stretch the image to fill
the screen.
_a Tochange from one setting to another, use WIDE buttonon the remote control (see page50).
Allows you to move the position of the picture left and right in
the window. (This feature also allows you to adjust the picture
from any connected equipment.) Select while watching the
picture to be adjnsted. The TV stores the position in memory
for each input. Press _, or * and press @ to choose acorrection between +5 and-5.
/'_ Not available in and mode when sources are in720p or 1080i.
62

If is set to
anything but, the
setting
changes only for thecurrent channel. When
you change channels
(or inputs),
is automatically
replaced with the
setting. Toretain the current
setting as
channels and inputs
are changed, setto .
Select to enlarge the 4:3 picture, to fill the 16:9
Select the chSault screen, keeping the original image as much as
_creen mode to possible.
usejbr 4:3 ...... Select to return the 4:3 picture to normal
sources, mode.
: Select to enlarge the 4:3 picture horizontally
only, to fill the wide screen.
Select to enlarge the 4:3 picture horizontally
and vertically to an equal aspect ratio that fills
the wide screen.
Select to continue using the current screen
mode setting when the channel or input is
changed.
Select to return to the default Display Area. Select
or to keep the edge of the picture out of screen.
Allows you to move the position of the picture
up and down in the window. (Available only in
and modes.)
Press ,1, or ,I, and press @ to choose acorrection between +5 and -5.
Allows you to adjust the vertical size of the
picture. (Available only in and
lnodes.)
Press tl, or ,I, and press @ to choose acorrection between +5 and -5.
ZI
63

1. Press ........
2. Select ...............
3. Highlight .......................
2.................;/
4,Press to select ................ @
To highlight an option and to change settings, press tl, 4 I, *.
Press @ to confirm the selection.
To exit the Channel, press _.
Selecting ChannelOptions
Channels that you set
to Hidden can only beaccessed with thebuttons.
Tile Channel settings include tile following options:
Lets you set up a list of your favorite channels. For details, see
"Using Favorites in WEGA GATE" on page 54.
Select to add digital channels.
Automatically sets up the channel list on the TV for all
receivable channels for the current input (VHF/UHF or
CABLE). Select to start the Auto Program.
¢'-_AutoProgram maytake upto 20 to 50 minutes tocomplete. A progress bar will display the approximateprogress of the Auto Program and Digital Channels/Add sequences.
Allows you to show or hide channels that appear in tile Prograln
Guide (page 48) and when you use the buttons to channel
surf. Channels that are set to Hidden do not appear in the
Program Guide or when you use the buttons.
Press tl, or tf, to highlight the channel that you want to show
or hide.
To move between the M_tior and Digital snbchannel lists,
press I, or *.
To change a channel's setting to or ,press
To show or hide more channels, repeat steps 1 and 2.
64

/',_ If you select to hideor show a major digital channel,all the sub-channelsare automatically hidden or shown. To show or hidean individual sub-channel within a digital channel,you must individually select that sub-channel to show or hide.
/',_ If you hide all sub-channels of a major digital channel, that digitalchannel is automatically set to Hidden.
Allows you to assign labels (such as station call letters) to
channel numbers.
Press tl, or !),to scroll through the channel numbers. Then
press @ to select the channel number that you want to
assign a label.
Press tl, or 4 to scroll through the label characters (A-Z, 0-
9, etc.). Then press @ to select the highlighted character.
Repeat to add characters to the label.
Press (, to return to the Channel menn, or press i i
to exit the menus.
65

1. Press ........
2. Select ..............
3. Highlight .......................
4.Press to select ................ @
To highlight an option and to change settings, press t_ 4 I. *.
Press @ to confirm the selection.
To exit the Parental Lock, press _.
/,_ You needyour password for any future access into the ParentalLockmenu. If you lose your password, see "Lost password" on page83.
Selecting ParentalLock Options
Tile Parental Lock settings include tile following options:
Turn Parental Lock off. No programs are
Turn ratings on/qff cmd blocked from viewing.
select a rating system Maximum ratings permitted are:
US: TV-Y, TV-G, G
Canada: C, G, TV-Y
Maximum ratings permitted are:
US: TV-PG, PG
Canada: C8+, PG, 8 ans+, TV-PG
Maximum ratings pennitted are:
US: TV-14, PG-13
Canada: 14+, 13 ans+, TV-14
Select to set ratings manually.
US: See page 68 for details.
Canada: See page 69 for details.
66

J
If you are not familiarwith the Parental
Guideline ratingsystem, you shouldselect , , or
to help simplifythe rating selection. Toset more restrictive
ratings, select .
For descriptions of, and
ratings, seepage 66.
Viewing BlockedPrograms
Select to change your password.
Select to use Canadian ratings (see page 69).
Set to when in tile Parent menu,
[n the Parent menu. use the anow buttons to highlight
• and press _ to select it.
Enter a new four-digit password using the buttons.
Confirm the new password by entering it again.
Press to exit the menu screen,
You can view a blocked program by entering the password.
Press when tuned to a blocked program.
Enter your password using the buttons.
Parental Lock will be canceled temporarily until you turn your TV off.
ZI
(Continued)
67

Selecting CustomRating Options
To ensure maximum
blocking capability, theage-based ratingsshould be blocked.
i
If you selected U.S.A. as the country of residence on page 67, the CustomRating menu includes the following options. (If you selected Canada, see
page 69.)
All children and general audiences.
Parental guidance suggested.
Parental guidance for children under 13.
Restricted viewing, parental guidance is suggestedfor children under 17.
No one 17 and under.
If you select , be
aware that the followingprograms may beblocked: news, sports,weather, emergencybroadcasts, politicalprograms, publicservice
announcements, andreligious programs.
Block Fogra,,,s Aii children.
by their rating, .......Directed to children age 7 and older.
eontent or both ...................................................................................................................General audience.
Parental guidance suggested.
Parents strongly cautioned.
Mature audience only.
Content-Based Options
Fantasy violence.
Suggestive dialog.
Strong language...............................................................................................................Sexual sitnations.
Violence.
Allows programs and movies that are broadcast
Block programs without a rating.
ormovies thatare Blocks all programs and movies that are broadcast
broadcas't without without a rating.
a rating
_a Thecontentratingswill increasedependingonthe levelof the age-basedrating.Forexample,a programwith aTV-PG V (Violence)ratingmaycontainmoderateviolence,whileaTV-14 V (Violence)ratingmaycontainmoreintenseviolence.
68

If you selected Canada as the country of residence on page 67. the Custom
Rating menu includes the following options. (If you selected U.S.A., see
page 68.)
All children.
Children 8 years and older.
General programming.
Parental guidance.
Viewers 14 and older.
Adult programming.
General programming.
Not recommended for ages under 8.
Not recommended for ages under 13.
Not recommended for ages under 16.
Programming restricted to adults.
See "" " on page 68 for details.
69

1. Press ........
2. Select ..............
3. Highlight .......................
4.Press to select ................ QTo highlight an option and to change settings, press tl, 4 I, *.
Press @ to confirm the selection.
To exit the Setup, press _.
SelectingSetup Options
The Setup settings include the following options:
Allows you to select from four closed caption modes (for
programs that are broadcast with closed captioning).
Caption Vision is turned on.
Caption Vision is turned off.
Allows you to set basic and advanced
Caption Vision options. See
"Programming Caption Vision" on
page 72.
Setto or. Select On to display the program name, time
remaining and other information (if the broadcaster offers this
service). Also displays when the channel is changed or the
button is pressed.
Allows you to label the audio/video equipment you have
.... connected to the TV so you can identify them when using
• When in this menu:
Press tl_or I!,to highlight an input to label, then
press @ to select it.
Use the arrow buttons to scroll through the labels.
Press @ to select the equipment you connected toeach of the input jacks on the back of your TV.
Select if you do not have any equipmentconnected to a particular input.
70

i ¸ i i ¸
i__ _ _iil ill _i _ _ _ii i_i
/-_ If you select Skip, your TVskips the selectedconnection when you press TV/VlDEO.
Select to display all on-screen menus in your langnage of
choice:
Enables you to select a specific color for the on-screen menus.
Select to view picture w,ithout the
benefit of
Select to view picture with reduced
poser consumption. The picture
becomes darker, but also enhances the
black level.
Corrects the image on your TV.
Before adjusting After adjusting
(Factory setting) Automatically
corrects double images.
Select a level from 1-4 to align the
images and improve the pictnre.
Select to use the TV at an altitude of 5.000 feet (1,500 m) or
higher. Select to use the TV at normal altitude.
Select to optimize the screen display automatically
detecting fihn content and applying a reverse 3-2 pulldown
process. Moving picture will appear clearer and more natural
looking. Select will disabling the detection.
(Continued)
71

ProgrammingCaption Vision
If you selected the option under (see page 70), you
can change the following settings:
Allows you to select basic anMog (EIA-608) closed caption options.
Displays a printed version of the dialog or sound
effects of a program. (Should be set to for most
programs.)
Displays network/station information presented using
either half or the whole screen (if available).
Allows you to select advanced digital (EIA-708) closed caption
options. Select from the available options.
Allows you to set digital closed captioning to (digital EIA-608)
or (digital EIA-708 ,.
Allows you to make additional settings for digital (EIA-708) closed
caption options.
Allows you to customize the following settings:
72

1. Press ........
2. Select ...............
3. Highlight ........................
4.Press to select ................ @
To highlight an option and to change settings, press i. 4 <. *.
Press @ to confirm the selection.To exit the Applications, press _.
SelectingAppficationsOptions
Tile Applications settings include tile following options:
Select to set the clock and to prograln your TV to turn on andoff at two scheduled viewing times.
Allows you to select the alnount oftime(, , ,
OF
) that you want the TV toremain on before shutting oft"automatically.
.... You can use the Timers to prograln theTV to turn on and oft"and tune to aspecific channel at two scheduledviewing times.
and cannot be set until you set the
Press i. or !_ to highlight or . To set thetimer, press ,_.
/',_ To go directly to programming Timer 1 or 2, press
@ instead of pressing ..
ZI
(Continued)
73

Press tF or 4 to highlight one of the following options, then
press @.
Select to set the Timer by day, tilne,
duration, and channel.
Select to turn offthe Timer. (Your
previous settings are saved.)
If you selected ..... in step 2, press i. and 4 to set the
day(s), hour, lninute, duration, and channel number. Press
@ or press * to confirm each setting and move to the next
setting.
Press I. to go back to the previous setting.
Press to exit the menu screen. An LED on
the front panel will light, indicating the Timer has been set.
Yon can set the current time.
Press @ to select
Press tF and tf, to set the current time (clay, hour, minute,
and AM/PM). Press @ (or press *) to confirm each
setting and move to the next setting. Press I. to go back the
previous setting.
Press : to exit the menu screen.
:7 ..... Dispiay ciiagnostics information abo_lt the TV. This can be
usefld in providing information to an authorized technician or
repair person.
...... This list _¢fseiecigieCabieCARr)options wiiiw,ry,depenciing.....
on your cable service provider.
74

This chapter includes the following topics:
Contacting Sony 75
Reph_cing the Lamp 76
Troubleshooting 80
Specifications 84
Optional Accessories 85
Index 87
If. after reading these operating instructions, you have additional questions
related to the use of your Sony television, please call our CustomerInformation Services Center.
For US residents: 1-800-222-SONY (7669)
or visit: http://www.sonystyle.com/tv/For Canadian residents: 1-877-899-SONY (7669)
or visit: http://www.sonystyle.caAv/
Before calling Sony customer support, please write down the model and
serial numbers of your TV. You'll find this information on the fiont cover ofthis manual.
"/5

The projection lamp, which illuminates the picture, has a limited life.
If the screen becomes dark, the color looks unusual, or the LAMP indicator
on the front of the TV flashes, it is time to replace the lamp with a new one
(not supplied).
Electric appliances can cause fire or high temperature, resulting in injuryor death. Be sure to follow the instructions below.
Use a Sony XL-2200 replacement lamp (not supplied) for replacement.
Use of any other lamp may damage the TV.
Do not remove the lamp for any purpose other than replacement. Doing
so may cause injury or fire.
Do not put flammable materials and metal objects inside the lamp
receptacle of the TV after removing the lamp. Doing so may cause fire
or electrical shock. Do not touch the lamp receptable once the lamp hasbeen removed.
When the lamp eventually burns out, you may hear a noticeable pop
sound. This is normal and it is inherent to this type of lamp.
In rare instances, the bulb may pop inside the lamp unit, but the lamp
unit is designed to contain all of broken glass pieces inside the lampunit.
The lamps contain mercury, for proper disposal of the used lamps follow
and observe the local ordinances. See page 79.
How to Replacethe Lamp
Turn off the power on the main unit. W_dt several minutes, then unplugthe power cord.(The cooling fan will continue to operate for about two minutes after
turning the power off.)
W_dt at least 30 minutes after unplugging the power cord to allow the
lamp to cool down before replacing it. To avoid being burned, do not
touch the lamp receptable once the lamp has been removed.
Take the new lamp out of the box.
Do not touch the glass portion of the new lamp.
!_ Do not shakethe lamp. Vibration can damagethe lamp or shortenits life.
/_ Avoid touching the front glass of a new lamp or the glass of thelamp receptacle.This may reduce picture quality or lamp life.
76

Loosen tile screws on tile rear side panel.
Remove the fiont panel.
Pull out the lalnp.
Loosen the right screw on the cover with a coin or similar object.
Remove the screw froln the lamp cover. Pull down the cover toward you.
Unscrew the lamp and pull out the lamp horizontally.
(Continued)
77

/_ The lamp is very hot immediately after use.Never touch the glassportion of the lamp or the surrounding parts.
/_ After it has cooled, place the used lamp into the empty box of thereplacement lamp. Neverput the used lamp into a plastic bag.
Place the new lamp into its place, then tighten the screw.Mount the new lamp securely. Failure to mount correctly may cause a
fire or the screen to go dark.
Push the cover back on. Make sure that the hole on the cover aligns with
the hole on the unit. Reattach the lamp cover by tightening the screw.
/_ If the lamp cover screw is inserted incorrectly, the lamp may notoperate properly. In such a case, removethe screw, insert itcorrectly and then tighten the screw completely (see"indicators" onpage 11).
/_ If the lamp cover is not reattachedsecurely,the self-diagnosticfunction may betriggered and the POWERindicator flashes threetimes (seepage 11).
Reattach the front panel securely.
78

Tightly screw tile side panel in its place.
\
/_ Consult your Sony dealer for a Sony XL-2200 replacement lamp.
/_ Takegreat care when replacingthe lamp or plugging in/unpluggingthe connecting cords. Rough handling maycausethe TV to fall,damaging the TV,the TV stand and/or the floor.
i i
For customers in the United States:
This product contains mercury. Disposal of this product may be regulated if
sold in the United States. For disposal or recycling information, please
contact your local authorities or the Electronics Industries Alliance
(http://www.eiae.org).
Do not leave the used lamp near flammable materials or within the reachof children.
Do not pour water onto the used lamp or put any object inside the lamp.
Doing so may cause the lamp to burst.
I For replacement lamp information visit: IU.S. residents: http://www.sonystyle.com/tv/ I
Canadian residents: http://www.sonystyle.ca/tv/I
79

Remote Control
Remote control does not The batteries could be weak. Replace the batteries.
operate Check the orientation of the batteries.
Press once, and the TV indicator lights up. You may have
inadvertently pressed , which changes the remote
control to SAT or CABLE mode.
Make sure this unit's power cord is connected securely to the wall outlet.
Locate the unit at least 3-4 feet away from fluorescent lights.
Cannot change channels with If you are using the TV to change channels, first press once,
the remote control and the TV indicator lights up.
If you are using another device to change channels, be sure you have not
inadvertently switched your TV from the channel 3 or 4 setting.
If you are using another device to change channels, be sure to press
for that device. For example, if you are using your cable box to change channels,
be sure to press once, and the SAT/CABLE indicator
lights up.
Remote control does not If you replaced the batteries to the remote recently, the code numbers for the video
operate non-Sony video equipment may need to be reset.
equipment There may be more than one code for the equipment that you are attempting to
operate.
There is a possibility that some non-Sony equipment cannot be operated by your
Sony TV remote. You may need to use the equipment's original remote control.
CableCARD Device
Problems using CableCARD Check that the CableCARD device is inserted properly (see pages 25-26).
device or CableCARD services The CableCARD device must be activated by your local cable TV provider before
you can receive digital cable TV services. See the activation instructions on pages
25-26.
Check the and menu options (see page 74). (This can
be useful in providing information to an authorized technician or repair person.)
Contact yonr cable TV provider.
80

Video
No picture (screen not lit), no If your TV does not turn on, and a red light keeps flashing, your TV may need
sound service. Call your local Sony Service Center.
Make sure the power cord is plugged in.Press on the front of the TV.
Press to cycle through the connected video sources•
Try another channel; it could be station trouble•
Dark, poor or no picture Adjust the option in the Video menu (see page 58).
(screen lit), good sound Adjnst the option in the Video menu (see page 58).
Check the antenna/cable connections•
No color/dark picture/color is ........ Adjust the option in the Video menu isee page 58 i.
not correct
Only snow and noise appear on Check the antenna/cable connections•
the screen Try another channel; it could be station trouble.
Press to change the input mode (see page 42).
Dotted lines or stripes Adjust the antenna•
Move the TV away from noise sources such as cars, neon signs, or hair-dryers.
Double images Using a highly directional outdoor antenna or a cable may solve the problem.
Set the to an appropriate value. The default setting is .If
doubled images appear with , select the best value l¥om to (see page 71).
"Black box" on screen You have selected a text option in the Setup menu and no text is available. (See
page 70 to reset Setup selections.) To turn off this feature, set the
option to . If you were trying to select closed captioning, select instead of
Black bands appear at the top Some wide-screen programs are fihned in aspect ratios that are greater than 16:9
and bottom of the screen (this is especially common with theatrical releases)• Your TV will show these
programs with black bands at the top and bottom of the screen. For more details,
check the documentation that came with your DVD (or contact your program
provider).
Certain programs on DVD or The compression used by certain digital broadcasts and DVDs may cause your
other digital sources display a TV's screen to display less detail than usual, or cause artifacts (small blocks or
loss of detail, especially during dots, pixelations) to appear on your screen. This is due to your TV's large screen
fast-motion or clark scenes and ability to show very fine detail, and is normal for certain digitally recorded
programs. Adjust the reality/clarity in the DRC Palette menu (see page 59) to
optimize the picture while viewing these sources.
81

Auto
Good picture, no sound Press so that disappears from the screen (see page 42).
Make sure the option is set to in the Audio menu (see page 61).
Make sure the option is set to or (see page 61 ).
Audio noise Communication problems may occur if infrared communication equipment (e.g.,
infrared cordless headphones) is used near the TV. Please use headphones other
than infrared cordless headphones. Also, if you use infrared communication
equipment other than infrared cordless headphones, move the infrared transceiver
away from the TV until the noise is eliminated, or move the transmitter and
receiver of the infrared communication equipment closer together.
Cannot gain enough vohune Increase the volume of the cable box using the cable box's remote control. Then
when using a cable box press once, and the TV indicator lights up and adjust the TV'svolume.
Sound seems weak or The TV's audio might be set to or , when it might be better set to
insufficient In the Audio menu (see page 61 ), set the setting to If
already set to , switch to (which may reduce background noise
during weak stereo broadcasts).
Cannot raise the volume on If the option is set to and the option is set to (in
external speakers order to output the sound to your audio system) use your audio receiver to adjust
the sound (see page 61 ). Or, to use the TV remote control, set the
option to
To turn on the TV speakers, set the option to (see page 61).
Channels
Cannot receive upper channels Press to select the VHF/UHF input (see page 42).
(UHF) when using an antenna Use in the Channel menu to add receivable channels that are not
presently in the TV's memory (see page 64).
Cannot receive any channels Use in the Channel menu to add receivable channels that are not
when using cable TV presently in the TV's memory (see page 64).
Press to select the CABLE input (see page 42).
Cannot receive or select Use in the Channel menu to add receivable TV channels that are
channels not presently in TV memory (see page 64).
Some digital cable channels are Certain cable companies have limitations on the broadcast of digital cable
not being displayed channels. Check with your cable company for more int_rmation.
The digital cable channel may be set to in the Channel settings menu (see
page 64).
82

General
How to restore the TV to Tnrn on the TV. While holding clown the tl. button on the remote control, press thefactory settings button on the TV. (The TV will turn iteself off, then back on again.)
Release tl. button.
WARNING: The Factory Reset will clear all of your customized settingsincluding setting.
How to restore Video settings Select menu option while in the Video menu (see page 58).to factory settings
How to restore Audio settings Press menu option while in the Audio menu (see page 60).to factory settings
Cannot cycle through the other Be sure the option is not set to (see page 70).video equipment connected tothe TV
Cannot operate Menu If a menu option appears in gray, this indicates that the menu option is notavail able.
Lost password In the password screen (see page 66), enter the following master password: .The master password clears your previous password; it cannot be used totemporarily unblock channels.
TIMER is set The LED will remain lit even when the TV is turned oft'. To rest the timer or
cancel the timer, see page 73. If the LED (red) blinks continuously, this mayindicate the TV needs service.
Digital cable box does not work If you are connecting a VCR and digital cable box using a splitter, as described onpage .34, you must use a special bi-directional splitter that is designed to workwith your digital cable box. Contact your cable provider for details.
Cannot record digital channels Only analog channels can be recorded to your VCR.to VCR
The replacement lamp does not The screw of the lamp cover may be slanted. Take out the screw, insert it straightlight up into the screw hole, and then tighten it completely (see page 76 for both
KDF-E55A20 and KDF-E60A20).
TV cabinet creaks When the TV is in use, there is a natural rise in temperature, causing the cabinet toexpand or contract and may be accompanied by a slight creaking noise. This is nota malflmction.
83

Projection System 3 LCD Panels, 1 lens projection system
LCD Panel 0.87 inch TFT LCD panel Approx. 3.28 million clots ( 1,042,168 pixels)
Projection.............................Lens High 0erfor_l_ancel i;{rge cii;{_i{e{er i{ybrid iei_s F214...................................................................................................................................
Antenna 75 ohm external terminal for VHF/UHF
Lamp 132W, XL-2200
Television System NTSC American TV Standard
ATSC (8VSB terrestrial) ATSC compliant 8VSB
QAM on cable ANSI/SCTE 07 2000
Visible Screen Size KDF-E55A20:55 inches
(Pictnre measured diagonally) KDF-E60A20:60 inches
Channel Coverage Terrestrial (analog) 2-69
Cable TV (analog) 1- 125
Terrestrial (digital) 2-69
Cable TV (digital) 1- 135
Power.................................................Requirements i20V, 60 Hz ............................................................................................................................................
Number of lnputs/Outputs
HDMI IN Video..................................................................i6s6i;726p;a86p;as6i ...............................
Audio %;o chani{ei iinear PCM 441 i and 4AKHz
16, 20 and 24 bit
Video (IN) 3 total (1 on t¥ont panel) 1 Vp-p, 75 ohms unbalanced, sync negative
S Video (IN) 3 total ( 1 on front panel) Y: 1 Vp-p, 75 ohms unbalanced, sync
negative
C: 0.286 Vp-p (Burst signal), 75 ohms
Audio (IN) 6 total (1 on front panel) 500 mVrms (100% modulation)
hnpedance: 47 kilohms
Component Video Input 2 (YP_PR) Y: 1.0 Vp-p, 75 ohms unbalanced, sync
negative
Pm 0.7 Vp-p, 75 ohms
Pm 0.7 Vp-p, 75 ohms
AUDIO (VAR/FIX) OUT 1 500 mVnns at the maximnnl volume setting
(Variable)
500 mVrms (Fixed)
hnpedance (output): 2 kilohms
/'_ AUDIOOUT jacks are operable only when the
TV's Speaker is set to Off.
RF Inputs 2
Digital Audio Optical Output 1 Optical Rectangular ( 1)
(PCM/Dolby Digital)
CableCARD Slot PCMCIA Type I/II
Speaker Output 12 W (L), 12 W (R)
84

5!
Power Consumption
In Use 265 W
In Standby Less than 15 W
Dilnensions.....................................................(W x H x D) KDF[E-@A26i i57 3/; x 37 i/4 x i9 ;/i ]nchesi il_i_i
KDF-E60A20:(62 x 39 5/s x 20 _/2 inches) (1,574 x 1,005 x 518 nnn)
Mass KDF-E55A20:92.5 lb (42 kg)
KDF-E60A20:101.5 lb (46.1 kg)
Supplied Accessories
Remote Control RM-YD002
AA (R6) Batteries 2 supplied for remote control
Design and specifications are subject to change without notice.
Non-metric weights and measures are approximate.
HDMI cable
Component video cable
S VIDEO cable
A/V cable
Audio cable
Optical cable
TV Stand: SU-GWI2
Lamp: XL-2200
85


Adding channels to the channel list64
Adjusting audio, Steady Sound 60Advanced Video 59
Alternate Audio 49
Altemate Video 49ANT button 42
Applications Menu 73Audio Menu 60
Audio receiver, connecting 39
Audio setting 56
Balance. adjusting 60
Bass, adjusting 60Batteries, inserting in remote 41
Bilingu_d audio 61
Brightness, adjusting 58
Cable
with VCR, connecting 32Cable box
connecting with VCR 33cable box
using with remote control 46CableCARD TM Device 25
Camcorder, connecting 38
Caption Vision 79Channel Menu 64
Channel setting 57Channel Show Hide 64Channels
Auto Program 64creating labels 65setting up 30
Clock/Timers 73
closed caption modes 70
Color temperature, adjusting 58
Color, adjusting 58
ConnectingAudio receiver 39Cable box 33
Camcorder or PlayStation 38
DVD player 36VCR 32--35
Digit;d subchannels 49DISPLAY button 42
Display unitcontrols 14
Display, turning off 42DVD 5.1Channel using with
remote control 47
DVD playerusing with remote control 46with A/V connectors,
connecting 37
with component videoconnectors,connecting 36
ENT button 42
Favorite Channel
setting up 64Features 8
FREEZE button 43, 51
FUNCTION button 42
Game Picture 62
GUIDE button 42, 48Guide menu 49
Hue, adjusting 58
Inputs, labeling 70
Inst_dlation of the projection TV19-39
JUMP button 42, 51
Label
Channels 30, 65video inputs 70
Lalnp, replacing 76--79
MENU button 43
MenusParent 66Screen 62
Setup 70Mode
Custom 58Standard 58Vivid 58
MTS/SAP 43, 61MUTING button 42
Noise Reduction 59
Parental control, described 9
Parental Lock Settings 66
Password, changing 67PICTURE button 42
Picture contrast, adjusting 58POWER LED indicator 14
problems, troubleshooting 80-83
Program Guide 48
Program Options menu 49
Ratingssetting 68viewing blocked programs 67
(Continued)
87

Rein panel controls andconnections 16
Remote control
inserting batteries 41programming 44--45
Removing channels fiom thechannel list 64
Satellite Receiver 23
satellite receiver, using with remotecontrol 46
Screen Menu 62
Screen setting 58
setting up channels 30Settings
Application 57Audio 58Channel 57Parental Lock 57Screen 56
Setup 57Video 56
Setup menu 70
Setup setting 57
Sharpness, adjusting 58Specifications 84-85
Steady Soundadjusting 60
Sunound sound 60, 61
Video setting 58VOL +/- button 42
WEGA GATE 43, 52-55WIDE button 43, 50
Timerset current 74
TIMER indicator 11, 14
Timer setting 73
Treble, adjusting 80, 82
troubleshooting 80-83TV FUNCTION button 42
TV POWER button 43
TV/VIDEO button 43
VCR
using with remote control 46with cable box, connecting 33
with cable, connecting 32
Video inputs, labeling 70
Video Modes, selecting 58
88

2593962113
http ://www. sony. net/
Printed in U,S,A,