learn to use the laser cutter! - wordpress.com to know before you cut welcome to the laser cutter!...
TRANSCRIPT

Laser Cutter Tutorial
learn to use the Laser Cutter!

what to know before you cut1.
Welcome to the laser cutter!
Here at UVA we have two laser cutters - one 25 watt and one 50 watt. The larger one is the more powerful one.
The bed sizes are different, so make sure that you coordinate your stock size with whichever laser cutter you are working on (so it will fit!)
The large laser cutter, AKA the X-660 is 18’’X32’’
The small laser cutter, AKA the M-300 is 12’’x24’’

what to know before you cut_22.
What you can cut:Plexi (ONLY BROWN COATING)BasswoodChipboardHoneycomb boardCardboardPaperPainted metal
What you cannot cut:MetalFoamFake plexi (any color coating besides brown)VinylCorrugated plasticStyrene
IF YOU ARE AT ALL CONFUSED IF YOUR MATERIAL IS OK, PLEASE ASK MELISSA OR A TA!

turning on the machine3.
Turn on the machine:There is an orange button on the right side of each machine. Press it to power on the machine.
Initializing.... Ready!

checking the Z4.
Z the machine!Place your stock in the bed and line it up with the top left corner. Press Z. The laser will move over to the top left corner.
Use the measuring stick and line up the lip of the stick with the bottom of the laser.
Press the up and down arrows to move the bed in increments of a tenth of an inch. Press select to change the degree to hundreths of an inch. THIS STEP IS CRUCIAL!!!

can I print this?5.If your file is in one of these programs, you can print it on the laser cutter!
raster/vector raster raster/vector raster/vector
Vector vs. Raster - what’s the difference?6.
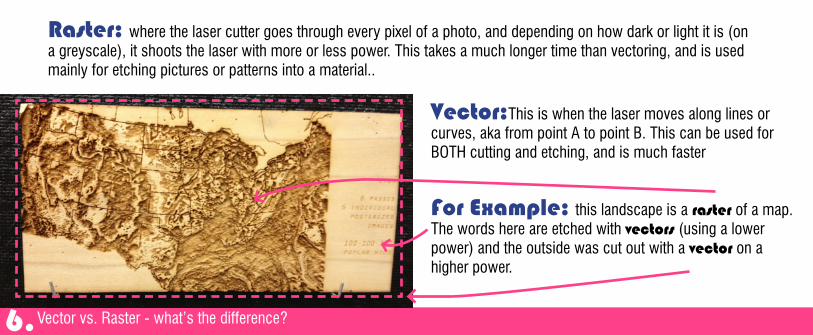
Raster: where the laser cutter goes through every pixel of a photo, and depending on how dark or light it is (on a greyscale), it shoots the laser with more or less power. This takes a much longer time than vectoring, and is used mainly for etching pictures or patterns into a material..
Vector:This is when the laser moves along lines or curves, aka from point A to point B. This can be used for BOTH cutting and etching, and is much faster
For Example: this landscape is a raster of a map. The words here are etched with vectors (using a lower power) and the outside was cut out with a vector on a higher power.

Printing from Autocad7.
Printing from Autocad:Make sure the raster, vector, and etching layers are separated by a solid color.
This must be one of the preset colors like true black, red, green, yellow, blue, magenta, cyan or orange.
This is very important, because these are the colors the laser cutter recognizes.
You can also organize your etching lines on one layer, and cutting lines on another to speed up the process.
Now that you know the difference between raster and vector, it’s time to print!
*
press print!

Printing from Autocad_28.
* select the X-660 or M-300
select Custom Properties
check out the wall of materials
find yours
this is a good template, but remember it is only a guideline and not necessarlily a perfect setting
Printing from Autocad_39.
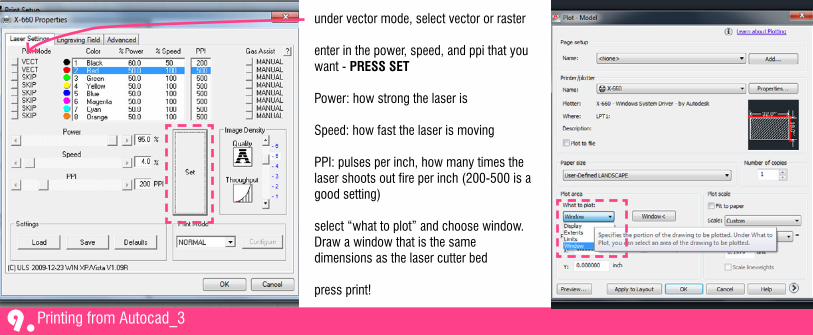
under vector mode, select vector or raster
enter in the power, speed, and ppi that you want - PRESS SET
Power: how strong the laser is
Speed: how fast the laser is moving
PPI: pulses per inch, how many times the laser shoots out fire per inch (200-500 is a good setting)
select “what to plot” and choose window. Draw a window that is the samedimensions as the laser cutter bed
press print!

Printing from Photoshop10.
open your photo in photoshop
In photoshop, you can raster but not vector
under image --> adjustments --> choose black and white
this will make the raster have more contrast
Printing from Photoshop:

Printing from Photoshop_211.
under Image--> Adjustments --> Hue/saturation, turn the saturation down
under Image --> Adjustments --> Brightness/Contrast, turn the contrast up
press print!
*

Printing from Photoshop_312.
select the X-660 or M-300
select raster, and enter in your power, speed, and PPI settings
press set!

Printing from Photoshop_413.
make sure the photo is the correct size and has correct placement in relation to the bed
press print!*

Printing from Illustrator_214.
In Illustrator, you can print both raster and vector, as long as you categorize it by layer.
One of the most important differences between printing from illustrator and other programs is that line weight must be .01 or lower. This is the thickness of the laser and if it is not lower that .01, it won’t cut anything.
Printing from Illustrator:

Printing from Illustrator_315.
when printing from Illustrator, the main difference is that it is automatically in CMYK.
Under file--> Document Color Mode, you can change it to RGB
choose the laser cutter as a printer
*
Printing from Illustrator_416.
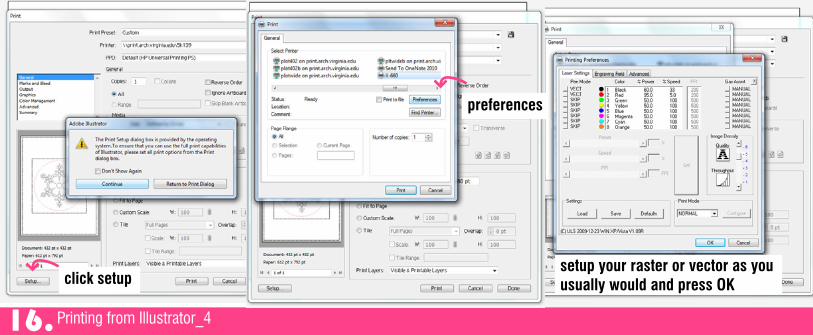
click setup
preferences
setup your raster or vector as you usually would and press OK

Printing from Illustrator_517.
make sure the photo is the correct size and has correct placement in relation to the bed
press print!
*

Printing from Rhino18.
File --> Print
*
select the laser cutter as your printer and click on properties
Printing from Rhino
Printing from Rhino_219.
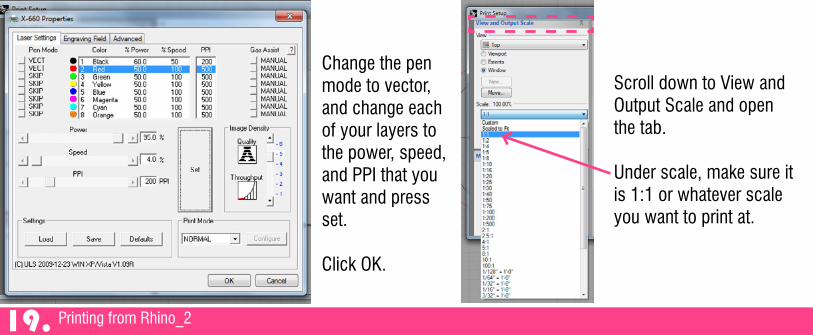
Change the pen mode to vector, and change each of your layers to the power, speed, and PPI that you want and press set.
Click OK.
Scroll down to View and Output Scale and open the tab.
Under scale, make sure it is 1:1 or whatever scale you want to print at.

Printing from Rhino_320.
Under View - make sure that it is in TOP VIEW and click on window.
A greyed out box will show up.
Click to place it wherever you want it in relation to what you are cutting.

Printing from Rhino_421.
Move the box so that your artwork is in the top-left corner so it can line up with the rulers on the laser cutter bed.
make sure everything looks good and press print!
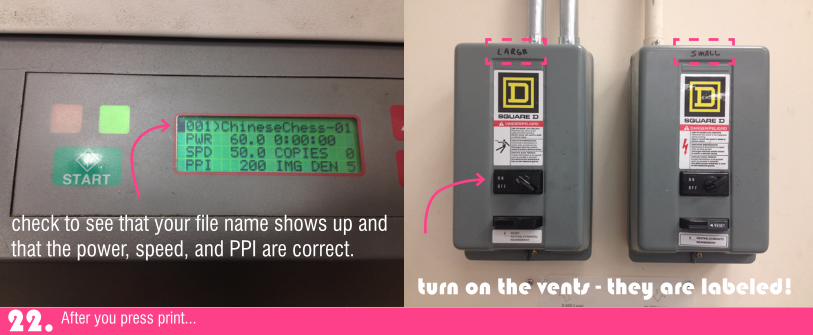
After you press print...22.
check to see that your file name shows up and that the power, speed, and PPI are correct.
turn on the vents - they are labeled!

GO!23.
Protip: if you only want to preview, you can press start and leave the lid up. The laser will trace the path without cutting
Press START!make sure your material is lined up and the Z is correct
*
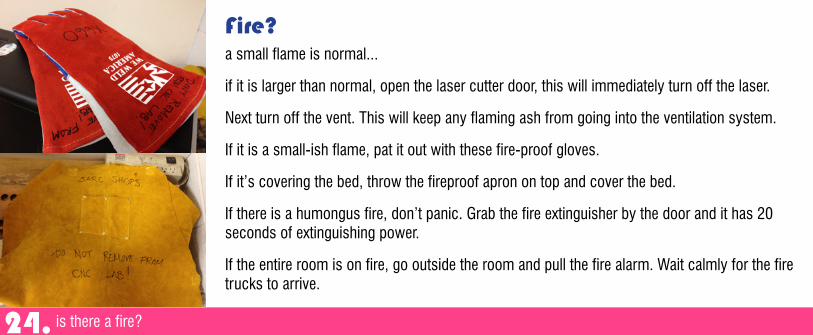
is there a fire?24.
a small flame is normal...
if it is larger than normal, open the laser cutter door, this will immediately turn off the laser.
Next turn off the vent. This will keep any flaming ash from going into the ventilation system.
If it is a small-ish flame, pat it out with these fire-proof gloves.
If it’s covering the bed, throw the fireproof apron on top and cover the bed.
If there is a humongus fire, don’t panic. Grab the fire extinguisher by the door and it has 20 seconds of extinguishing power.
If the entire room is on fire, go outside the room and pull the fire alarm. Wait calmly for the fire trucks to arrive.
Fire?
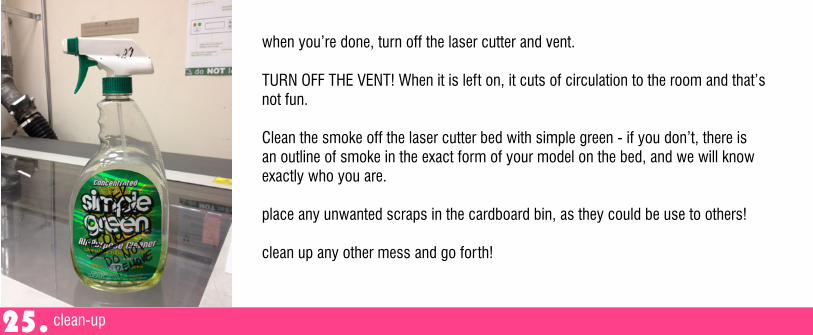
clean-up25.
when you’re done, turn off the laser cutter and vent.
TURN OFF THE VENT! When it is left on, it cuts of circulation to the room and that’s not fun.
Clean the smoke off the laser cutter bed with simple green - if you don’t, there is an outline of smoke in the exact form of your model on the bed, and we will know exactly who you are.
place any unwanted scraps in the cardboard bin, as they could be use to others!
clean up any other mess and go forth!