learning maya artisan
TRANSCRIPT

Alias|Wavefront
❚
210 King Street East
❚
Toronto, Canada M5A 1J7
Learning Maya Artisan
Version 1.0
January 1998, Alias|Wavefront, a division of Silicon Graphics Limited.Printed in U S A, All rights reserved.
Assist Publishing Group:
Don Chong, Bob Gundu, Robert Magee
Assist Team:
Lincoln Holme
Special thanks to:
Jill Jacob, Susan Park, Desiree Sy
The following are trademarks of Alias|Wavefront, a division of Silicon Graphics Limited:
The following are trademarks of Alias|Wavefront, Inc.:
Graph Layout Toolkit Copyright
1992-1996 Tom Sawyer Software, Berkeley, California, All Rights Reserved.
All other product names mentioned are trademarks or registered trademarks of their respective holders.
This document contains proprietary and conÞdential information of Alias|Wavefront, a division of Silicon Graphics Limited, and is protected by Federal copyright law. The contents of this document may not be disclosed to third parties, translated, copied, or duplicated in any form, in whole or in part, without the express written permission of Alias|Wavefront, a division of Silicon Graphics Limited.
The information contained in this document is subject to change without notice. Neither Alias|Wavefront, a division of Silicon Graphics Limited, nor its employees shall be responsible for incidental or consequential damages resulting from the use of this material or liable for technical or editorial omissions made herein.
Alias
MEL
Alias PowerTracer
Alias RayTracing
Maya
Alias Metamorph
Alias QuickRender
Alias SDL
Maya Artisan
OpenAlias
Alias QuickShade
Alias ShapeShifter
Maya F/X
Alias OpenModel
Alias QuickWire
Alias StudioPaint
Maya PowerModeler
Alias OpenRender
Alias RayCasting
ZaPiT!
Advanced Visualizer
Explore
MediaStudio
3Design
Wavefront Composer
Wavefront IPR
MultiFlip
Dynamation
Kinemation
VizPaint2D
Learning Maya
1
C o n t e n t s
Introduction: Learning Maya Artisan ......... 3
The Maya Artisan tools . . . . . . . . . . . . . . . . . . . . . 4 The Artisan settings . . . . . . . . . . . . . . . . . . . . . . . . 4 Maximum displacement . . . . . . . . . . . . . . . . . . . . 5 Opacity . . . . . . . . . . . . . . . . . . . . . . . . . . . . . . . . . . . 5 The brush stamp radius . . . . . . . . . . . . . . . . . . . . . 5 Brush shape . . . . . . . . . . . . . . . . . . . . . . . . . . . . . . . 6 Sculpt operations . . . . . . . . . . . . . . . . . . . . . . . . . . . 6 Reflect painting . . . . . . . . . . . . . . . . . . . . . . . . . . . . 6 The reference surface . . . . . . . . . . . . . . . . . . . . . . . 7 The Erase surface . . . . . . . . . . . . . . . . . . . . . . . . . . 7 Installing tutorial files . . . . . . . . . . . . . . . . . . . . . . 7 Conclusion . . . . . . . . . . . . . . . . . . . . . . . . . . . . . . . . 7
Lesson 1: Sculpting a Mask ....................... 9
Setting up Artisan . . . . . . . . . . . . . . . . . . . . . . . . . 10 Getting started . . . . . . . . . . . . . . . . . . . . . . . . . . . . 10 Start sculpting the surface . . . . . . . . . . . . . . . . . . 11 Creating a new shading group . . . . . . . . . . . . . . 12 The sculpting tools . . . . . . . . . . . . . . . . . . . . . . . . 13 Updating the reference surface . . . . . . . . . . . . . . 14 Sculpting the nose . . . . . . . . . . . . . . . . . . . . . . . . . 15 Sculpting the eyes . . . . . . . . . . . . . . . . . . . . . . . . . 17 Sculpting the mouth . . . . . . . . . . . . . . . . . . . . . . . 18 Duplicate the face . . . . . . . . . . . . . . . . . . . . . . . . . 19 Selecting CVs . . . . . . . . . . . . . . . . . . . . . . . . . . . . . 20 Masking selected CVs . . . . . . . . . . . . . . . . . . . . . . 21 Sculpting another face . . . . . . . . . . . . . . . . . . . . . 22 Other poses . . . . . . . . . . . . . . . . . . . . . . . . . . . . . . 23 ANIMATING THE FACE . . . . . . . . . . . . . . . . . . 23Blend Shape between faces . . . . . . . . . . . . . . . . . 24 Blend Shape history . . . . . . . . . . . . . . . . . . . . . . . 26 Painting cluster weights . . . . . . . . . . . . . . . . . . . . 26 Animate the cluster . . . . . . . . . . . . . . . . . . . . . . . . 27

2
Learning Maya
Conclusion . . . . . . . . . . . . . . . . . . . . . . . . . . . . . . . 29
Lesson 2: Detailing a Head .....................31
Initial set-up . . . . . . . . . . . . . . . . . . . . . . . . . . . . . 32 Defining Artisan hotkeys . . . . . . . . . . . . . . . . . . 32 Sculpting facial details . . . . . . . . . . . . . . . . . . . . . 33 Sculpting across surfaces . . . . . . . . . . . . . . . . . . 34 Painting geometry . . . . . . . . . . . . . . . . . . . . . . . . 34 Conclusion . . . . . . . . . . . . . . . . . . . . . . . . . . . . . . . 38
Lesson 3: Animating a Cape .....................39
Initial set-up . . . . . . . . . . . . . . . . . . . . . . . . . . . . . 40 Creating the cape . . . . . . . . . . . . . . . . . . . . . . . . . 40 Sculpt the cape . . . . . . . . . . . . . . . . . . . . . . . . . . . 41 Apply soft body dynamics . . . . . . . . . . . . . . . . . 42 Paint the goal weights . . . . . . . . . . . . . . . . . . . . . 44 Finishing touches . . . . . . . . . . . . . . . . . . . . . . . . . 46 Conclusion . . . . . . . . . . . . . . . . . . . . . . . . . . . . . . . 46
Index .............................................................47
Introductio
n
Introductio
n
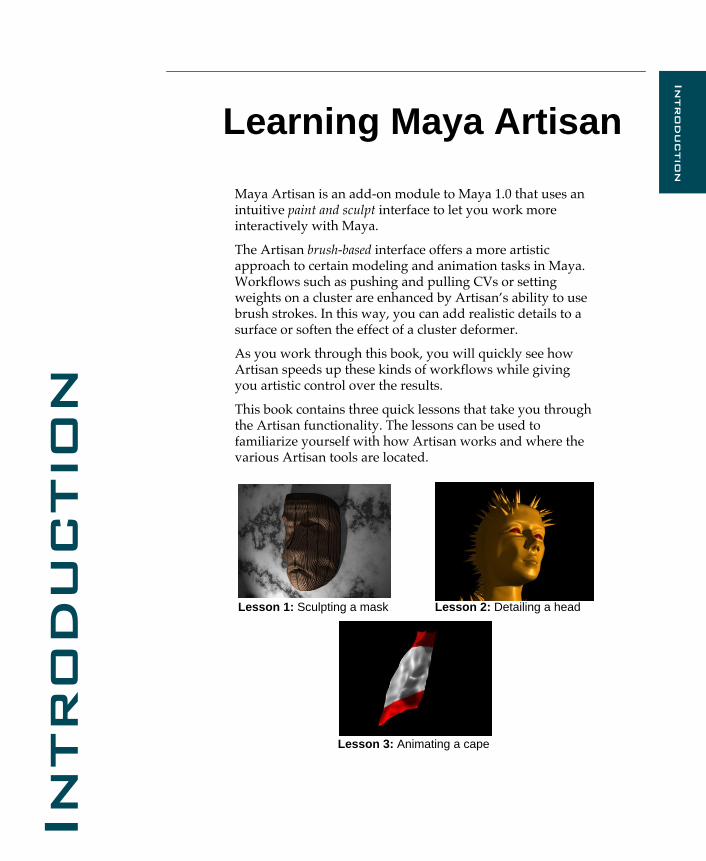
Learning Maya Artisan
Maya Artisan is an add-on module to Maya 1.0 that uses an intuitive
paint and sculpt
interface to let you work more interactively with Maya.
The Artisan
brush-based
interface offers a more artistic approach to certain modeling and animation tasks in Maya. Workflows such as pushing and pulling CVs or setting weights on a cluster are enhanced by ArtisanÕs ability to use brush strokes. In this way, you can add realistic details to a surface or soften the effect of a cluster deformer.
As you work through this book, you will quickly see how Artisan speeds up these kinds of workflows while giving you artistic control over the results.
This book contains three quick lessons that take you through the Artisan functionality. The lessons can be used to familiarize yourself with how Artisan works and where the various Artisan tools are located.
Lesson 1: Sculpting a mask Lesson 2: Detailing a head
Lesson 3: Animating a cape
4
Learning Maya Artisan
Introduction
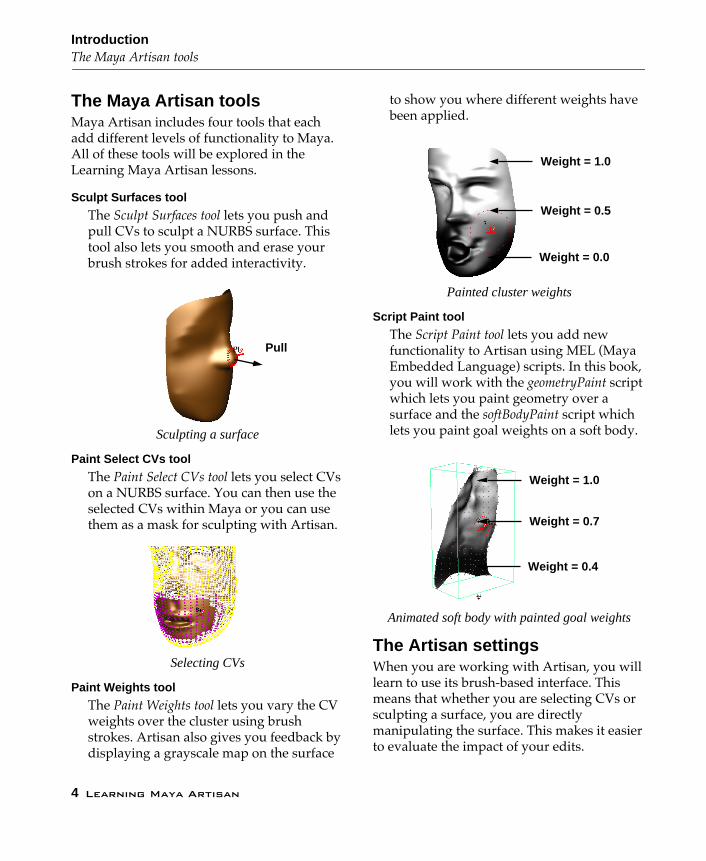
The Maya Artisan tools
The Maya Artisan tools
Maya Artisan includes four tools that each add different levels of functionality to Maya. All of these tools will be explored in the Learning Maya Artisan lessons.
Sculpt Surfaces tool
The
Sculpt Surfaces tool
lets you push and pull CVs to sculpt a NURBS surface. This tool also lets you smooth and erase your brush strokes for added interactivity.
Sculpting a surface
Paint Select CVs tool
The
Paint Select CVs tool
lets you select CVs on a NURBS surface. You can then use the selected CVs within Maya or you can use them as a mask for sculpting with Artisan.
Selecting CVs
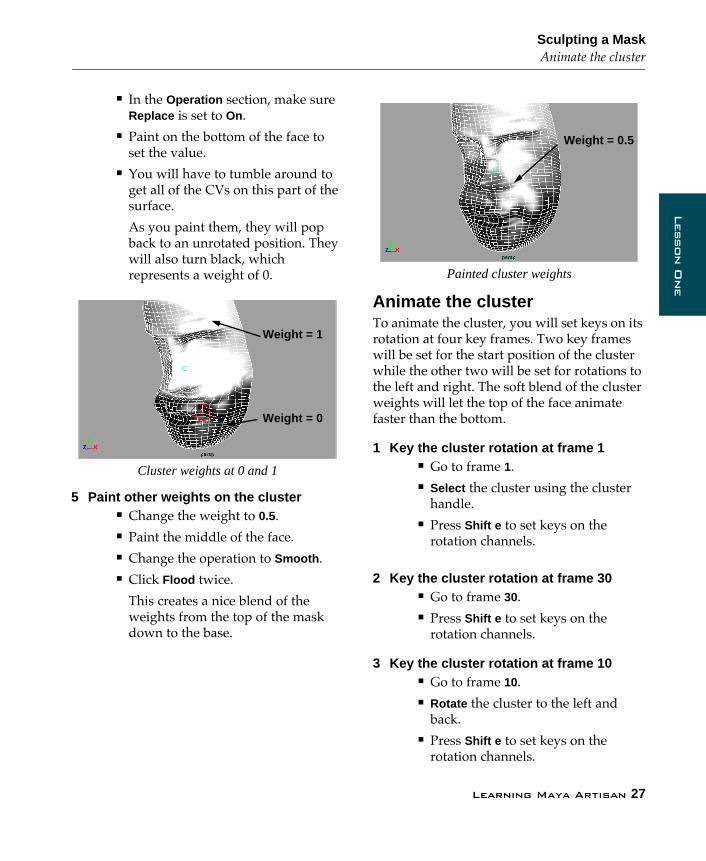
Paint Weights tool
The
Paint Weights
tool
lets you vary the CV weights over the cluster using brush strokes. Artisan also gives you feedback by displaying a grayscale map on the surface
to show you where different weights have been applied.
Painted cluster weights
Script Paint tool
The
Script Paint
tool
lets you add new functionality to Artisan using MEL (Maya Embedded Language) scripts. In this book, you will work with the
geometryPaint
script which lets you paint geometry over a surface and the
softBodyPaint
script which lets you paint goal weights on a soft body.
Animated soft body with painted goal weights
The Artisan settings
When you are working with Artisan, you will learn to use its brush-based interface. This means that whether you are selecting CVs or sculpting a surface, you are directly manipulating the surface. This makes it easier to evaluate the impact of your edits.
Pull
Weight = 0.0
Weight = 0.5
Weight = 1.0
Weight = 0.4
Weight = 0.7
Weight = 1.0
Learning Maya Artisan
5
Learning Maya Artisan
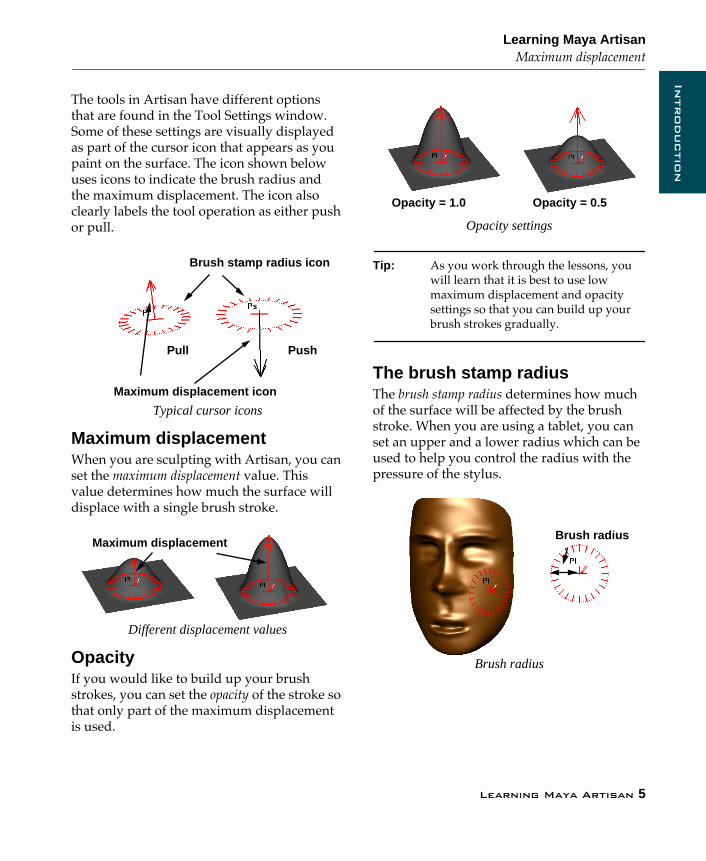
Maximum displacement
Introductio
n
The tools in Artisan have different options that are found in the Tool Settings window. Some of these settings are visually displayed as part of the cursor icon that appears as you paint on the surface. The icon shown below uses icons to indicate the brush radius and the maximum displacement. The icon also clearly labels the tool operation as either push or pull.
Typical cursor icons
Maximum displacement
When you are sculpting with Artisan, you can set the
maximum displacement
value. This value determines how much the surface will displace with a single brush stroke.
Different displacement values
Opacity
If you would like to build up your brush strokes, you can set the
opacity
of the stroke so that only part of the maximum displacement is used.
Opacity settings
Tip:
As you work through the lessons, you will learn that it is best to use low maximum displacement and opacity settings so that you can build up your
brush strokes gradually.
The brush stamp radius
The
brush stamp radius
determines how much of the surface will be affected by the brush stroke. When you are using a tablet, you can set an upper and a lower radius which can be used to help you control the radius with the pressure of the stylus.
Brush radius
Brush stamp radius icon
Maximum displacement icon
Pull Push
Maximum displacement
Opacity = 1.0 Opacity = 0.5
Brush radius
6
Learning Maya Artisan
Introduction
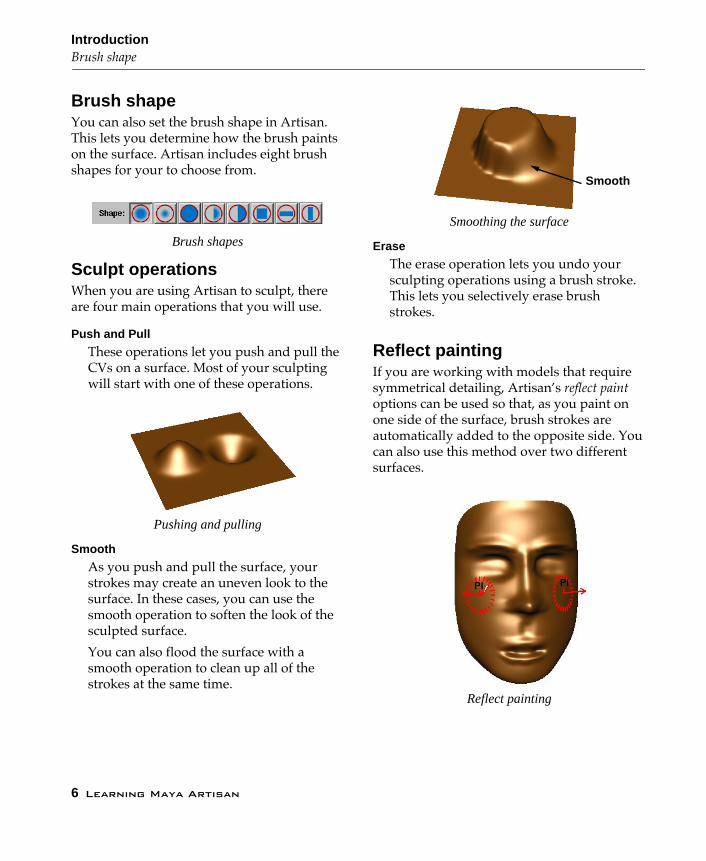
Brush shape
Brush shape
You can also set the brush shape in Artisan. This lets you determine how the brush paints on the surface. Artisan includes eight brush shapes for your to choose from.
Brush shapes
Sculpt operations
When you are using Artisan to sculpt, there are four main operations that you will use.
Push and Pull
These operations let you push and pull the CVs on a surface. Most of your sculpting will start with one of these operations.
Pushing and pulling
Smooth
As you push and pull the surface, your strokes may create an uneven look to the surface. In these cases, you can use the smooth operation to soften the look of the sculpted surface.
You can also flood the surface with a smooth operation to clean up all of the strokes at the same time.
Smoothing the surface
Erase
The erase operation lets you undo your sculpting operations using a brush stroke. This lets you selectively erase brush strokes.
Reflect painting
If you are working with models that require symmetrical detailing, ArtisanÕs
reflect paint
options can be used so that, as you paint on one side of the surface, brush strokes are automatically added to the opposite side. You can also use this method over two different surfaces.
Reflect painting
Smooth
Learning Maya Artisan
7
Learning Maya Artisan
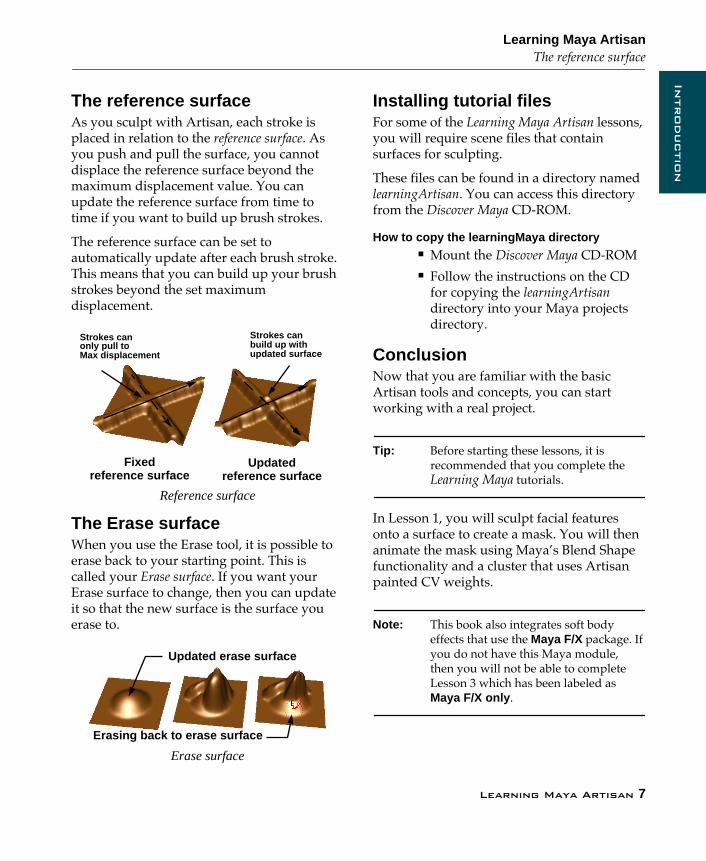
The reference surface
Introductio
n
The reference surface
As you sculpt with Artisan, each stroke is placed in relation to the
reference surface
. As you push and pull the surface, you cannot displace the reference surface beyond the maximum displacement value. You can update the reference surface from time to time if you want to build up brush strokes.
The reference surface can be set to automatically update after each brush stroke. This means that you can build up your brush strokes beyond the set maximum displacement.
Reference surface
The Erase surface
When you use the Erase tool, it is possible to erase back to your starting point. This is called your
Erase surface
. If you want your Erase surface to change, then you can update it so that the new surface is the surface you erase to.
Erase surface
Installing tutorial files
For some of the
Learning Maya Artisan
lessons, you will require scene files that contain surfaces for sculpting.
These files can be found in a directory named
learningArtisan
. You can access this directory from the
Discover Maya
CD-ROM.
How to copy the learningMaya directory
■
Mount the
Discover Maya
CD-ROM
■
Follow the instructions on the CD for copying the
learningArtisan
directory into your Maya projects directory.
Conclusion
Now that you are familiar with the basic Artisan tools and concepts, you can start working with a real project.
Tip:
Before starting these lessons, it is recommended that you complete the
Learning Maya
tutorials.
In Lesson 1, you will sculpt facial features onto a surface to create a mask. You will then animate the mask using MayaÕs Blend Shape functionality and a cluster that uses Artisan painted CV weights.
Note:
This book also integrates soft body effects that use the
Maya F/X
package. If you do not have this Maya module, then you will not be able to complete Lesson 3 which has been labeled as
Maya F/X only
.
Updatedreference surface
Fixedreference surface
Strokes canonly pull toMax displacement
Strokes canbuild up withupdated surface
Updated erase surface
Erasing back to erase surface

8
Learning Maya Artisan
Introduction
Conclusion
Lesson 1
Lesson O
ne
1
Sculpting a Mask
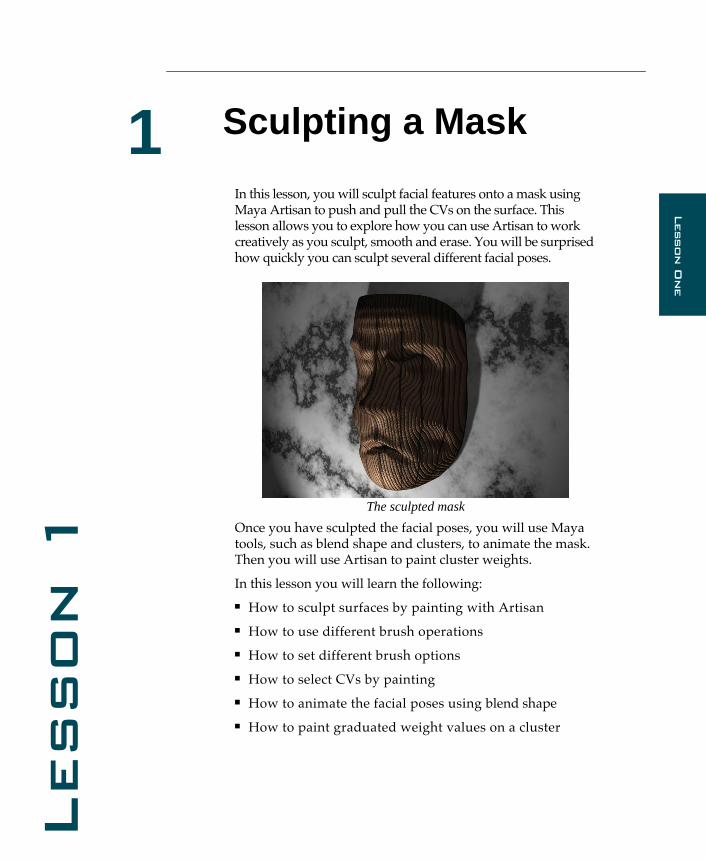
In this lesson, you will sculpt facial features onto a mask using Maya Artisan to push and pull the CVs on the surface. This lesson allows you to explore how you can use Artisan to work creatively as you sculpt, smooth and erase. You will be surprised how quickly you can sculpt several different facial poses.
The sculpted mask
Once you have sculpted the facial poses, you will use Maya tools, such as blend shape and clusters, to animate the mask. Then you will use Artisan to paint cluster weights.
In this lesson you will learn the following:
■
How to sculpt surfaces by painting with Artisan
■
How to use different brush operations
■
How to set different brush options
■
How to select CVs by painting
■
How to animate the facial poses using blend shape
■
How to paint graduated weight values on a cluster

10
Learning Maya Artisan
Lesson 1
Setting up Artisan
Setting up Artisan
Maya Artisan is an add-on module to the base Maya package. When you first load Maya, you must set it to recognize the Artisan functionality.
1 Launch Maya
■
Double-click on the Maya icon.
Or
■
Enter
maya
in a shell window.
2 Activate Maya Artisan
■
Select
Options
→
General Preferences
.
■
Click on the hidden tabs at the far right and choose
Packages
from the list.
■
Under
Load on Startup
, set
Maya Artisan
to
On
.
■
Click
Save
.
3 Relaunch Maya
Quit Maya and relaunch to make use of the new settings.
■
Select
File
→
Quit
.
■
Relaunch Maya.
Getting started
You will now use the
learningArtisan
project. See the introduction to find out how to copy this directory into your
maya/projects
directory.
1 Set the courseware project
To manage your files, you can set a project directory that contains sub-directories for different types of files that relate to your project.
■
Go to the
File
menu and select
Project
→
Set...
A window opens to show you a list of the current projects.
■
Click on the
learningArtisan
directory.
■
Click on
Set Project
.
Now you are working with this project directory structure as you open and save your files.
2 Open an existing scene
■
Select
File
→
Open Scene
.
■
Click on the
mask.mb
file.
■
Click on
Open
.
A single surface appears. This is the starting point of a mask model that you will now develop in Artisan.
Mask surface
3 Increase the surface smoothness
■
Select
the surface.
■
Press the
3
key to set the surface smoothness.
This makes the surface look more dense. You have increased the display smoothness without making the surface more complex.
Learning Maya Artisan
11
Sculpting a Mask
Start sculpting the surface
Lesson O
ne
4 Turn on smooth shading
■
Press the
5
key to turn on hardware smooth shading.
5 Change your view
■
Use the
Alt
key to tumble, track and dolly in the view. You can use the following mouse combinations:
Alt
+
LMB
to tumble;
Alt
+
MMB
to track;
Alt
+
LMB
&
MMB
to dolly.
You will be changing views frequently while using Artisan as you begin working around the object in three dimensions.
■
Set up a view where the mask surface is at the left side of the view panel to make room for the Tool Settings window.
Start sculpting the surface
You will now sculpt the surface of the mask by painting on it using the Artisan Sculpt Surfaces tool. At first, you will just test the tools to get a feel for them. Later, you will erase these brush strokes so that you can paint real facial features.
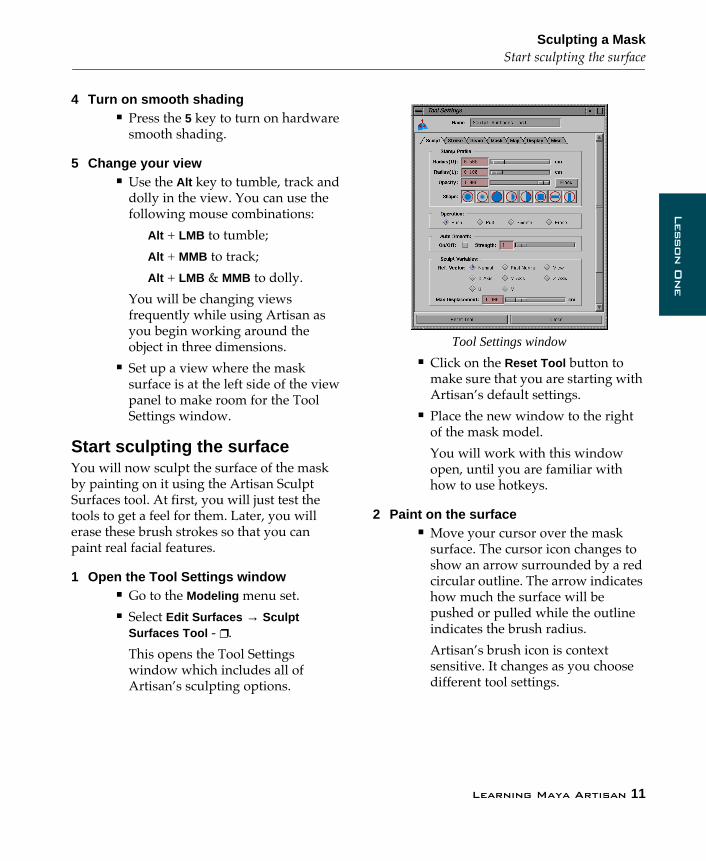
1 Open the Tool Settings window
■
Go to the
Modeling
menu set.
■
Select
Edit Surfaces
→
Sculpt Surfaces Tool
-
❐
.
This opens the Tool Settings window which includes all of ArtisanÕs sculpting options.
Tool Settings window
■
Click on the
Reset Tool
button to make sure that you are starting with ArtisanÕs default settings.
■
Place the new window to the right of the mask model.
You will work with this window open, until you are familiar with how to use hotkeys.
2 Paint on the surface
■
Move your cursor over the mask surface. The cursor icon changes to show an arrow surrounded by a red circular outline. The arrow indicates how much the surface will be pushed or pulled while the outline indicates the brush radius.
ArtisanÕs brush icon is context sensitive. It changes as you choose different tool settings.
12
Learning Maya Artisan
Lesson 1
Creating a new shading group
■
Click-drag on the surface. You are now
painting
on the surface to sculpt it.
You can either click-drag using a mouse, or preferably, draw directly with a stylus.
Tip:
Artisan works more intuitively with a tablet and stylus, since the input device
mimics the use of an actual paintbrush.
This brush stroke pushes in the surface. The brush stroke is sculpting the surface.
First brush stroke
3 Change the Artisan display
■
Click the
Display
tab in the Tool Settings window.
■
Click on
Show Active Lines
to turn this option off.
Now you can focus on the surface without displaying isoparm lines.
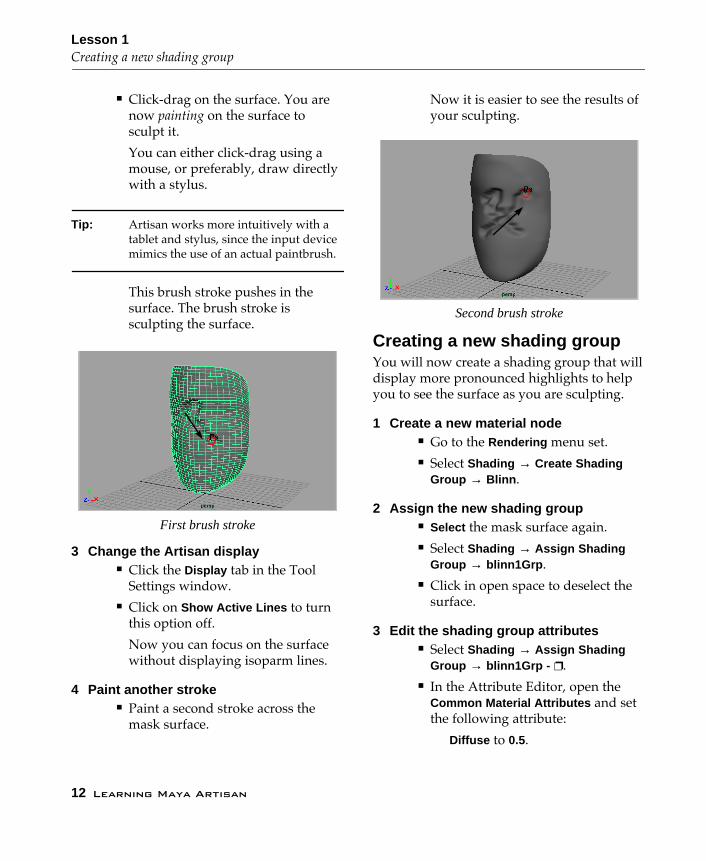
4 Paint another stroke
■
Paint a second stroke across the mask surface.
Now it is easier to see the results of your sculpting.
Second brush stroke
Creating a new shading group
You will now create a shading group that will display more pronounced highlights to help you to see the surface as you are sculpting.
1 Create a new material node
■
Go to the
Rendering
menu set.
■
Select
Shading
→
Create Shading Group
→ Blinn .
2 Assign the new shading group■ Select the mask surface again.■ Select Shading → Assign Shading
Group → blinn1Grp .■ Click in open space to deselect the
surface.
3 Edit the shading group attributes■ Select Shading → Assign Shading
Group → blinn1Grp - ❐.■ In the Attribute Editor, open the
Common Material Attributes and set the following attribute:
Diffuse to 0.5.

Learning Maya Artisan 13
Sculpting a MaskThe sculpting tools
Lesson O
ne
■ Click on the swatch next to Color and set it to any color you like. This lesson uses an orange color.
■ Under Specular Shading , click on the color swatch next to Specular Color and in the Color Chooser , set:
Value to 0.8.
New shading group assigned
The sculpting toolsYou will now explore some of the Artisan sculpting operations to see how they work. So far, you have been pushing on the surface. Now you will learn how to pull, smooth and erase.
1 Pull on the surface■ Select the mask surface.■ Go back to the Modeling menu set.■ Select Edit Surfaces → Sculpt
Surfaces Tool - ❐.■ In the Tool Settings window, click
on the Sculpt tab.■ Under Operation , click on Pull .■ Tumble around to the other side of
the model.■ Paint on the surface to create a few
strokes that pull out.
Pulling the surface with several brush strokes
2 Smooth out the results■ Under Operation , click on Smooth .■ Under Stamp Profile , change the
Radius (U) to 1.0.
This increases the size of your brush. You can see that the red outline has increased in size. This is the brush feedback icon.
■ Paint all of the strokes to smooth the details. If you stroke over an area more than once, the smoothing becomes more evident.
Smoothing the brush strokes
3 Erase some of the brush strokes■ Under Operation , click on the Erase
option.
14 Learning Maya Artisan
Lesson 1Updating the reference surface
■ Paint along the surface to begin erasing the existing sculpt edits. DonÕt erase all the edits.
Erasing the brush strokes
4 Flood erase the surface■ In the Stamp Profile section, click on
the Flood button next to Opacity .
This uses the current operation and applies it to the whole surface using the current opacity setting.
Fully erased surface
Updating the reference surfaceWhen you paint in Artisan, you paint in relation to a reference surface. By default, the reference surface updates after every stroke so that you can build your strokes on top of each other. You can also keep the reference
surface untouched until you decide to update it manually.
1 Change the brush operation and radius■ Under Operation , click on Pull .■ Under Stamp Profile , change the
Radius(U) to 0.5.
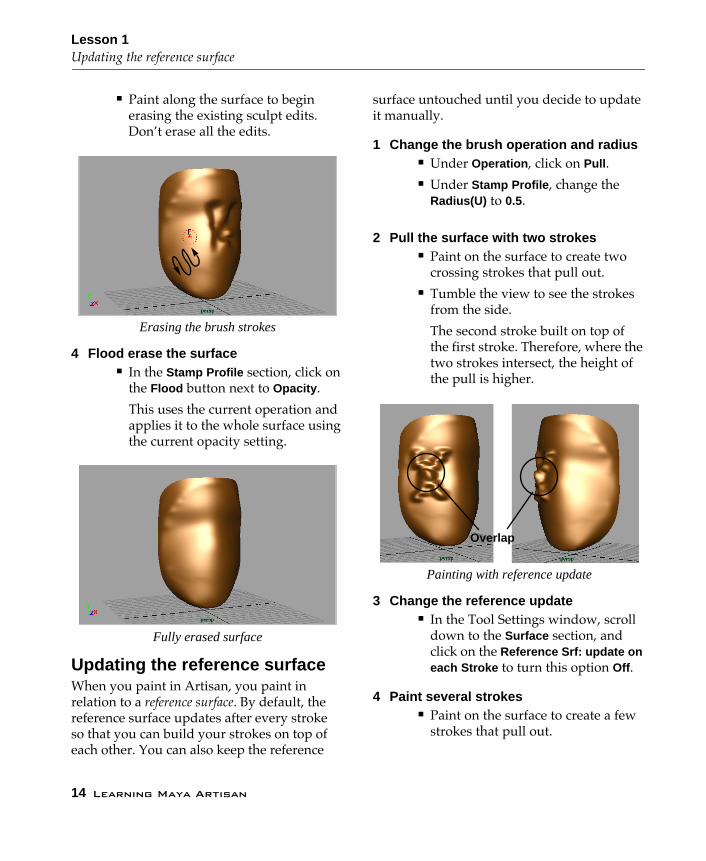
2 Pull the surface with two strokes■ Paint on the surface to create two
crossing strokes that pull out.■ Tumble the view to see the strokes
from the side.
The second stroke built on top of the first stroke. Therefore, where the two strokes intersect, the height of the pull is higher.
Painting with reference update
3 Change the reference update■ In the Tool Settings window, scroll
down to the Surface section, and click on the Reference Srf: update on each Stroke to turn this option Off .
4 Paint several strokes■ Paint on the surface to create a few
strokes that pull out.
Overlap

Learning Maya Artisan 15
Sculpting a MaskSculpting the nose
Lesson O
ne
■ Tumble the view to see the strokes from the side.
This time, the strokes do not overlap.
The reference surface does not update, therefore the strokes can only displace to the Maximum Displacement value as defined in the Tool Settings window. You cannot displace beyond that value until you update the reference surface.
Painting with no reference update
5 Update the reference layer■ In the Surface section, click on the
Update button next to Reference Srf .
6 Paint on the surface ■ Paint another two strokes over the
last set of strokes.
The overlapping strokes are again building on top of each other.
Painting on updated reference layer
7 Flood erase the surface■ Under Operation , click on the Erase
option.■ Click on the Flood button.
Sculpting the noseNow that your surface is clean again, you can sculpt a real face beginning with the nose. This gives you the chance to gain more control over the Artisan tools.
1 Turn reference updating back on■ In the Surface section, click on the
Reference Srf: update on each Stroke to turn this option to On.
This will let you build up the facial details as the reference surface updates.
2 Change your stylus pressure settingIf you are working with a tablet and a stylus, you can set up your stylus to create more subtle results.
■ Click on the Stroke tab.■ Under Stylus Pressure , click on
Radius .
No overlap
16 Learning Maya Artisan
Lesson 1Sculpting the nose
This means that the harder you press, the larger the radius of the brush stroke. You can now set the upper radius (Radius (U) ) and lower radius (Radius (L) ) sizes that will be used by the stylus.
As you work through this lesson, explore the various stylus settings to see how they can help you paint.
3 Change your Stamp Profile settings■ Click on the Sculpt tab.■ Change the Radius(U) to 1.0.■ Change the Radius(L) to 0.25.
This means that the lowest your stroke will go is 0.25 and the largest will be 1.0.
■ Change the Opacity to 0.2.
This means that each stroke will only have 0.2 of the effect. This lets you use softer strokes to build up a shape.
■ Change your stamp setting to the second icon, which has more feathering at the brushÕs edge.
New brush shape
4 Paint the length of the nose■ Press the u key and click to bring up
the Artisan marking menu.
This marking menu is context sensitive and changes depending on which Artisan tool you are using.
■ Select Pull from the marking menu.
This is an alternative method for changing the tool operation without using the Tool Settings window.
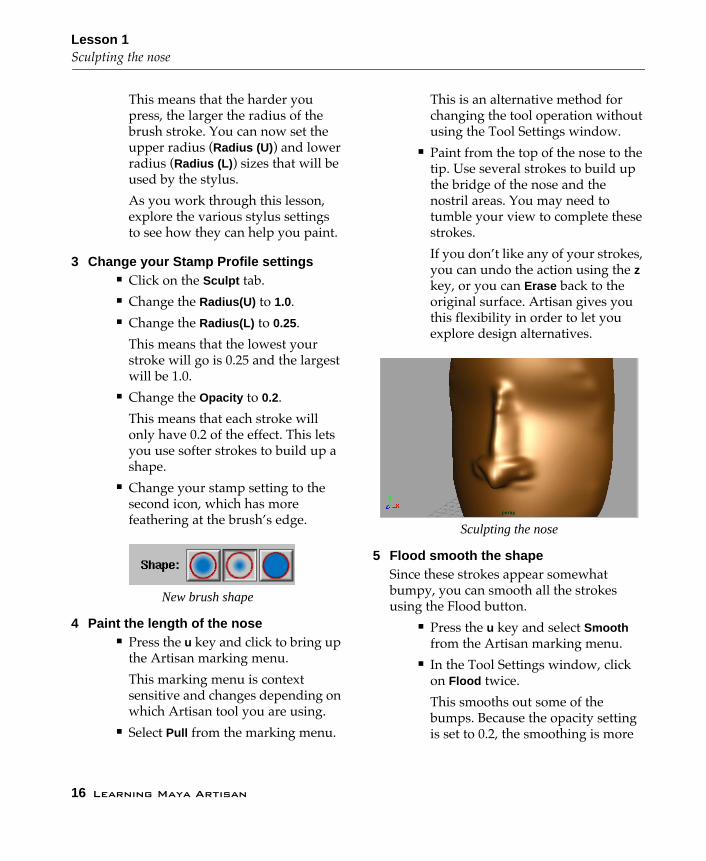
■ Paint from the top of the nose to the tip. Use several strokes to build up the bridge of the nose and the nostril areas. You may need to tumble your view to complete these strokes.
If you donÕt like any of your strokes, you can undo the action using the z key, or you can Erase back to the original surface. Artisan gives you this flexibility in order to let you explore design alternatives.
Sculpting the nose
5 Flood smooth the shapeSince these strokes appear somewhat bumpy, you can smooth all the strokes using the Flood button.
■ Press the u key and select Smooth from the Artisan marking menu.
■ In the Tool Settings window, click on Flood twice.
This smooths out some of the bumps. Because the opacity setting is set to 0.2, the smoothing is more

Learning Maya Artisan 17
Sculpting a MaskSculpting the eyes
Lesson O
ne
subtle. It is a good idea to smooth your shape regularly to clean up your strokes.
6 Pull out the tip of the nose■ In the Sculpt Variables section,
change the Ref. Vector to Z-Axis .
This means that now you will pull out along the Z-axis instead of normal to the surface.
■ Press the u key and select Pull from the Artisan marking menu.
■ Paint the tip of the nose to pull it out.
Pulling the tip of the nose along the Z-axis
7 Save your work■ Select File → Save Scene As...
■ Enter the name my_mask and Save.
Sculpting the eyesYou now want to sculpt two eye sockets. Ideally, you want the strokes you apply to the left eye to be mirrored on the right eye. Artisan makes painting symmetrical strokes very simple.
1 Turn Reflection on■ Press the y key to re-select the
Sculpt Surfaces Tool .■ Click on the Stroke tab.■ Under Reflect Paint , set Reflection to
On.
By default, it is set to reflect around the U-axis.
■ Move your cursor over the surface. You can see that the reflection is going the wrong way.
Reflecting in U■ Click on V Isoparm for reflecting.
2 Push the eye sockets in■ Press the u key and select Push from
the Artisan marking menu.■ Paint one of the eye socket areas to
push it in. The other socket is pulled by the reflection.
18 Learning Maya Artisan
Lesson 1Sculpting the mouth
Pushing in eye sockets
3 Pull the eyebrows out■ In the Sculpt Variables section,
change the Ref. Vector to Normal .■ Press the u key and select Pull from
the Artisan marking menu.■ Paint the eyebrow areas to pull
them out.
Pulling out eyebrows
4 Flood smooth the surface■ Press the u key and select Smooth
from the Artisan marking menu.■ Click on the Flood button two times.
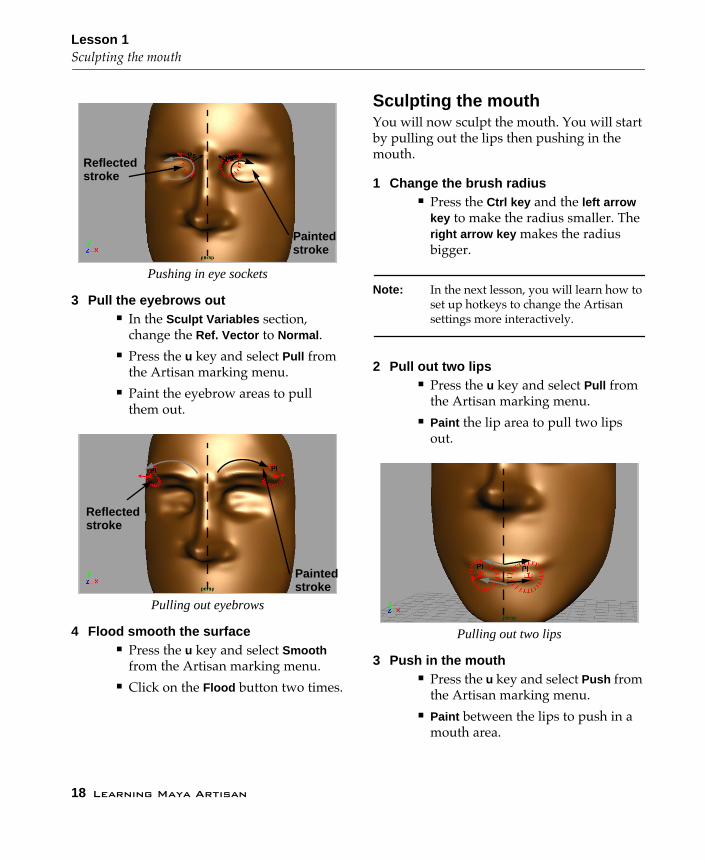
Sculpting the mouthYou will now sculpt the mouth. You will start by pulling out the lips then pushing in the mouth.
1 Change the brush radius■ Press the Ctrl key and the left arrow
key to make the radius smaller. The right arrow key makes the radius bigger.
Note: In the next lesson, you will learn how to set up hotkeys to change the Artisan settings more interactively.
2 Pull out two lips■ Press the u key and select Pull from
the Artisan marking menu.■ Paint the lip area to pull two lips
out.
Pulling out two lips
3 Push in the mouth■ Press the u key and select Push from
the Artisan marking menu.■ Paint between the lips to push in a
mouth area.
Reflectedstroke
Paintedstroke
Reflectedstroke
Paintedstroke

Learning Maya Artisan 19
Sculpting a MaskDuplicate the face
Lesson O
ne
■ Change to a Smooth operation and smooth the mouth brush strokes.
Pushing in mouth
4 Add the upper lip detail■ Press the u key and select Push from
the Artisan marking menu.■ Paint the area above the upper lip to
push it in.
Pushing in the upper lip
5 Save your work
Duplicate the faceYou will now update the Erase surface then duplicate the face. This lets you sculpt a second face with a different facial pose. By updating the Erase surface, any brush strokes used to create the second facial pose can be
erased Ð not to the plain mask, but rather to the more detailed pose you have already sculpted.
1 Update the Erase surface■ Select the mask surface.■ In the Surface section of the Sculpt
tab, click on the Update button next to Erase Srf .
Now, you can no longer erase to the original surface. You should update the Erase surface any time you are pleased with how the surface looks.
Tip: Make sure that you save a backup of the old surface in another file.
■ Press the u key and select Erase from the Artisan marking menu.
■ Paint the face to see if you can erase any of the strokes. You wonÕt be able to.
The updated Erase surface means that you cannot erase any more on this surface until you start painting again.
2 Duplicate the face and move it■ With the mask selected, select Edit
→ Duplicate .■ Move the new surface along the X-
axis until it is beside the original surface.
20 Learning Maya Artisan
Lesson 1Selecting CVs
The duplicated surface
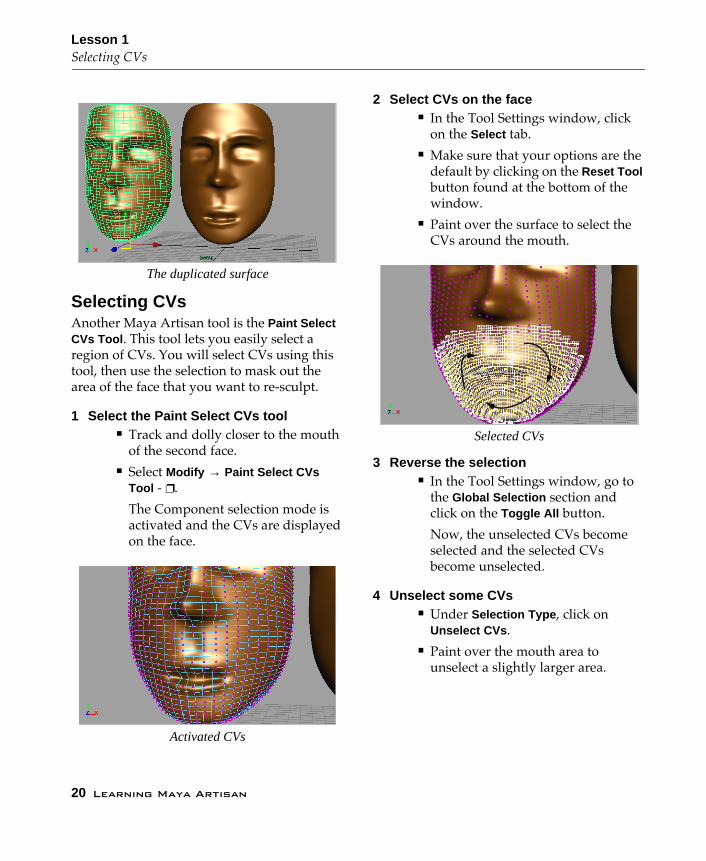
Selecting CVsAnother Maya Artisan tool is the Paint Select CVs Tool . This tool lets you easily select a region of CVs. You will select CVs using this tool, then use the selection to mask out the area of the face that you want to re-sculpt.
1 Select the Paint Select CVs tool■ Track and dolly closer to the mouth
of the second face.■ Select Modify → Paint Select CVs
Tool - ❐.
The Component selection mode is activated and the CVs are displayed on the face.
Activated CVs
2 Select CVs on the face■ In the Tool Settings window, click
on the Select tab.■ Make sure that your options are the
default by clicking on the Reset Tool button found at the bottom of the window.
■ Paint over the surface to select the CVs around the mouth.
Selected CVs
3 Reverse the selection■ In the Tool Settings window, go to
the Global Selection section and click on the Toggle All button.
Now, the unselected CVs become selected and the selected CVs become unselected.
4 Unselect some CVs■ Under Selection Type , click on
Unselect CVs .■ Paint over the mouth area to
unselect a slightly larger area.
Learning Maya Artisan 21
Sculpting a MaskMasking selected CVs
Lesson O
ne
Reversed selection
5 Save an image of the selection■ Click on the Map tab in the Tool
Settings window.■ In the Export Attribute Map section,
type mouthSelect and press the Enter key.
Selection map export
6 View the saved image■ Scroll up to the Import Attribute Map
section.■ Click on the Browse button.■ Click on mouthSelect then click on
the See Image button.
This is what your painted region looks like as a map. You will reuse this map later in the lesson.
Saved selection map
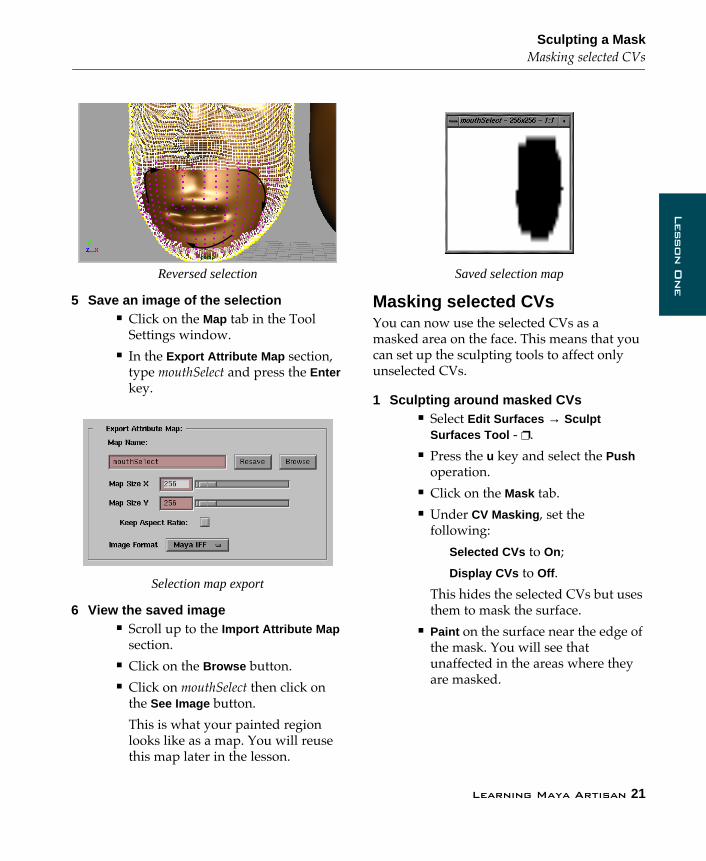
Masking selected CVsYou can now use the selected CVs as a masked area on the face. This means that you can set up the sculpting tools to affect only unselected CVs.
1 Sculpting around masked CVs■ Select Edit Surfaces → Sculpt
Surfaces Tool - ❐.■ Press the u key and select the Push
operation.■ Click on the Mask tab.■ Under CV Masking , set the
following:
Selected CVs to On;
Display CVs to Off .
This hides the selected CVs but uses them to mask the surface.
■ Paint on the surface near the edge of the mask. You will see that unaffected in the areas where they are masked.
22 Learning Maya Artisan
Lesson 1Sculpting another face
Painting near the mask
2 Flood erase the surface■ Set the Opacity to 1.0.■ Choose the Erase operation.■ Click on the Flood button.
3 Paint a smiling mouth■ Set the Opacity to 0.2.
Tip: Remember that it is better to use a low opacity setting to build up your work.
■ Press the u key and select the Push operation.
■ Click on the Stroke tab and turn Reflection to On. Make sure that V Isoparm is being used.
■ Paint the corners of the mouth to create a smile.
You may decide to change the radius, brush type or any other settings to draw the smile that you want. Remember, that you can erase if you donÕt like what you paint or use the Undo command by pressing the z key.
Painted smile
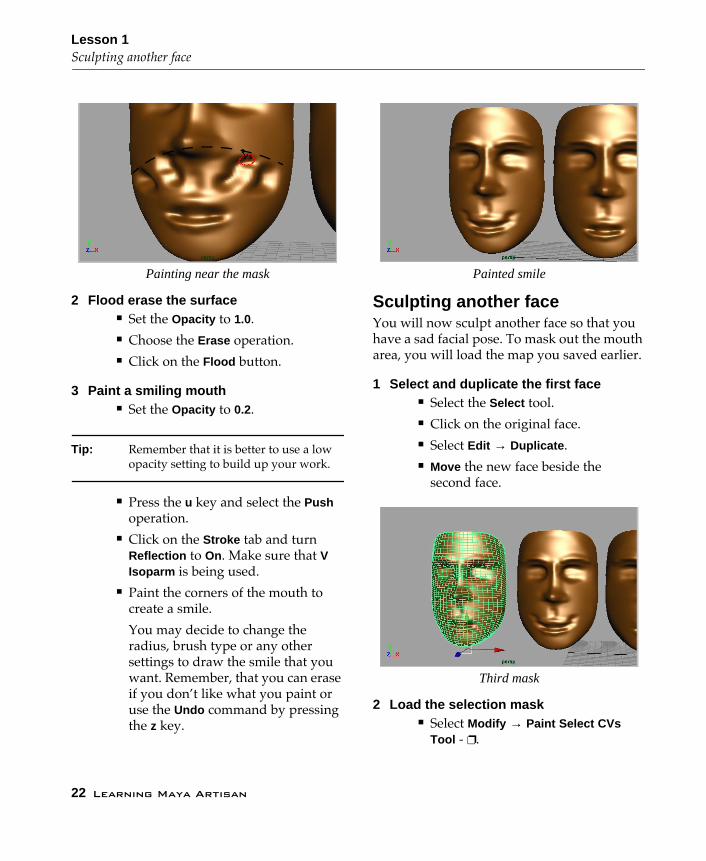
Sculpting another faceYou will now sculpt another face so that you have a sad facial pose. To mask out the mouth area, you will load the map you saved earlier.
1 Select and duplicate the first face■ Select the Select tool.■ Click on the original face.■ Select Edit → Duplicate .■ Move the new face beside the
second face.
Third mask
2 Load the selection mask■ Select Modify → Paint Select CVs
Tool - ❐.
Learning Maya Artisan 23
Sculpting a MaskOther poses
Lesson O
ne
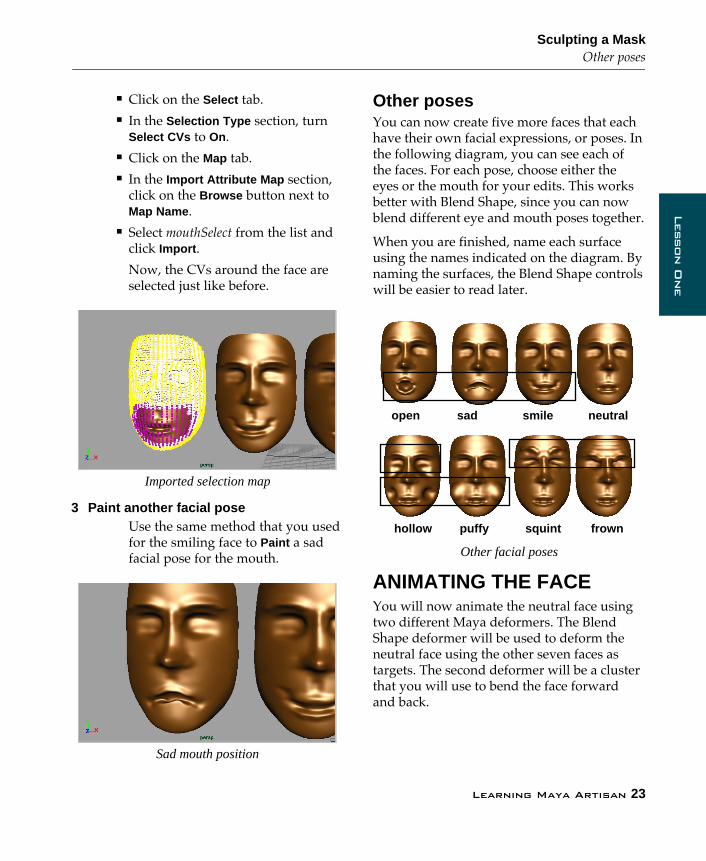
■ Click on the Select tab. ■ In the Selection Type section, turn
Select CVs to On.■ Click on the Map tab.■ In the Import Attribute Map section,
click on the Browse button next to Map Name .
■ Select mouthSelect from the list and click Import .
Now, the CVs around the face are selected just like before.
Imported selection map
3 Paint another facial poseUse the same method that you used for the smiling face to Paint a sad facial pose for the mouth.
Sad mouth position
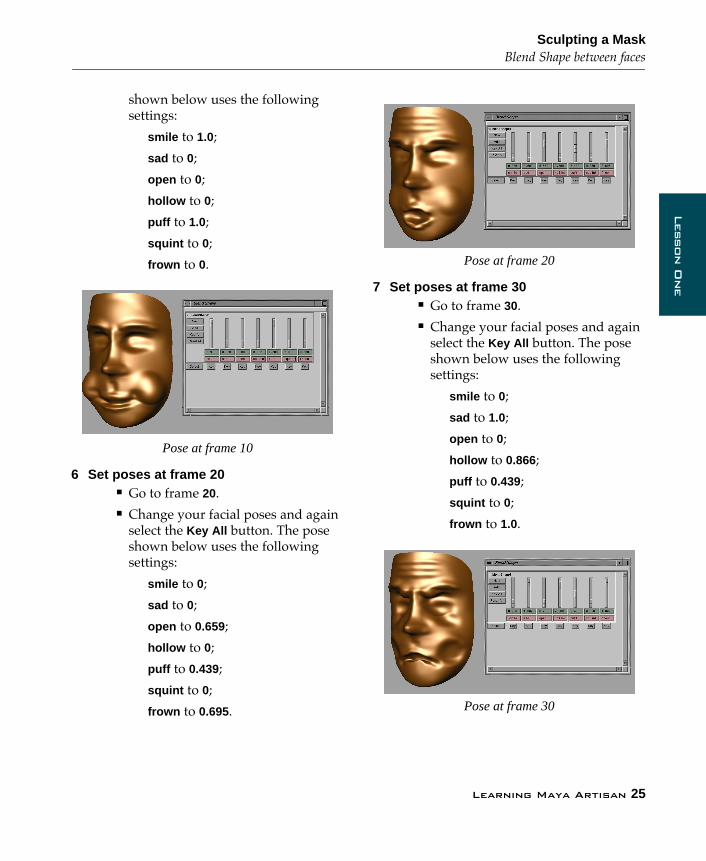
Other posesYou can now create five more faces that each have their own facial expressions, or poses. In the following diagram, you can see each of the faces. For each pose, choose either the eyes or the mouth for your edits. This works better with Blend Shape, since you can now blend different eye and mouth poses together.
When you are finished, name each surface using the names indicated on the diagram. By naming the surfaces, the Blend Shape controls will be easier to read later.
Other facial poses
ANIMATING THE FACEYou will now animate the neutral face using two different Maya deformers. The Blend Shape deformer will be used to deform the neutral face using the other seven faces as targets. The second deformer will be a cluster that you will use to bend the face forward and back.
open sad smile neutral
hollow puffy squint frown
24 Learning Maya Artisan
Lesson 1Blend Shape between faces
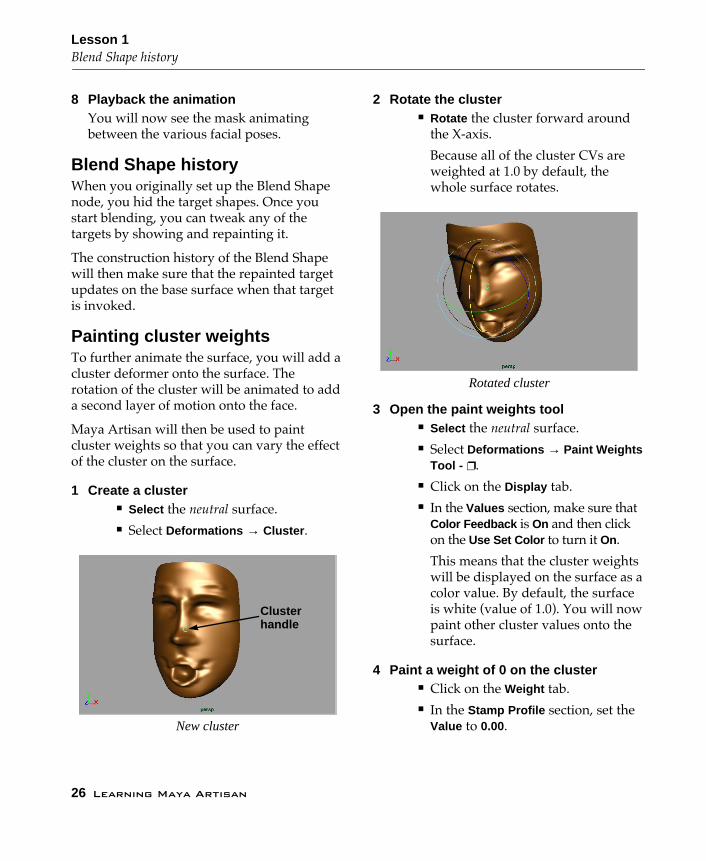
Blend Shape between facesYou will start by blending between the various facial poses. The neutral face will be used as the base shape.
1 Apply the Blend Shape deformer■ Select the eight faces. Be sure to
select the neutral face last. This can be verified by the neutral face being highlighted in green. The neutral face is the base shape.
■ Go to the Animation menu set.■ Select Deformations → Blend Shape .
The Blend Shape node is added to the neutral surface. You can see it in the Channel box in the Input node section.
2 Hide the target shapes■ Select all of the faces except for the
base shape.■ Press Ctrl h to hide them.
3 Open the Blend Shape window■ Select Window → Animation Editors
→ Blend Shape...
■ You can now click-drag on the various sliders to set up combined versions of the target poses.
The pose shown below uses following settings:
smile to 1.0;
sad to 0;
open to 1.0;
hollow to 0;
puff to 0;
squint to 0.329;
frown to 0.
Pose at frame 1
Tip: If you want to exaggerate one of the poses, you can set the blend shape value to more than 1.0.
4 Set a key for the first pose■ Go to frame 1.■ In the Blend Shape window, click
on the Key All button.
5 Set poses at frame 10■ Go to frame 10.■ Change your facial poses and again
select the Key All button. The pose
Learning Maya Artisan 25
Sculpting a MaskBlend Shape between faces
Lesson O
ne
shown below uses the following settings:
smile to 1.0;
sad to 0;
open to 0;
hollow to 0;
puff to 1.0;
squint to 0;
frown to 0.
Pose at frame 10
6 Set poses at frame 20■ Go to frame 20.■ Change your facial poses and again
select the Key All button. The pose shown below uses the following settings:
smile to 0;
sad to 0;
open to 0.659;
hollow to 0;
puff to 0.439;
squint to 0;
frown to 0.695.
Pose at frame 20
7 Set poses at frame 30■ Go to frame 30.■ Change your facial poses and again
select the Key All button. The pose shown below uses the following settings:
smile to 0;
sad to 1.0;
open to 0;
hollow to 0.866;
puff to 0.439;
squint to 0;
frown to 1.0.
Pose at frame 30
26 Learning Maya Artisan
Lesson 1Blend Shape history
8 Playback the animationYou will now see the mask animating between the various facial poses.
Blend Shape historyWhen you originally set up the Blend Shape node, you hid the target shapes. Once you start blending, you can tweak any of the targets by showing and repainting it.
The construction history of the Blend Shape will then make sure that the repainted target updates on the base surface when that target is invoked.
Painting cluster weightsTo further animate the surface, you will add a cluster deformer onto the surface. The rotation of the cluster will be animated to add a second layer of motion onto the face.
Maya Artisan will then be used to paint cluster weights so that you can vary the effect of the cluster on the surface.
1 Create a cluster■ Select the neutral surface.■ Select Deformations → Cluster .
New cluster
2 Rotate the cluster■ Rotate the cluster forward around
the X-axis.
Because all of the cluster CVs are weighted at 1.0 by default, the whole surface rotates.
Rotated cluster
3 Open the paint weights tool■ Select the neutral surface.■ Select Deformations → Paint Weights
Tool - ❐.■ Click on the Display tab.■ In the Values section, make sure that
Color Feedback is On and then click on the Use Set Color to turn it On.
This means that the cluster weights will be displayed on the surface as a color value. By default, the surface is white (value of 1.0). You will now paint other cluster values onto the surface.
4 Paint a weight of 0 on the cluster■ Click on the Weight tab.■ In the Stamp Profile section, set the
Value to 0.00.
Clusterhandle
Learning Maya Artisan 27
Sculpting a MaskAnimate the cluster
Lesson O
ne
■ In the Operation section, make sure Replace is set to On.
■ Paint on the bottom of the face to set the value.
■ You will have to tumble around to get all of the CVs on this part of the surface.
As you paint them, they will pop back to an unrotated position. They will also turn black, which represents a weight of 0.
Cluster weights at 0 and 1
5 Paint other weights on the cluster■ Change the weight to 0.5.■ Paint the middle of the face.■ Change the operation to Smooth .■ Click Flood twice.
This creates a nice blend of the weights from the top of the mask down to the base.
Painted cluster weights
Animate the clusterTo animate the cluster, you will set keys on its rotation at four key frames. Two key frames will be set for the start position of the cluster while the other two will be set for rotations to the left and right. The soft blend of the cluster weights will let the top of the face animate faster than the bottom.
1 Key the cluster rotation at frame 1■ Go to frame 1.■ Select the cluster using the cluster
handle.■ Press Shift e to set keys on the
rotation channels.
2 Key the cluster rotation at frame 30■ Go to frame 30.■ Press Shift e to set keys on the
rotation channels.
3 Key the cluster rotation at frame 10■ Go to frame 10.■ Rotate the cluster to the left and
back.■ Press Shift e to set keys on the
rotation channels.
Weight = 1
Weight = 0
Weight = 0.5
28 Learning Maya Artisan
Lesson 1Animate the cluster
Rotated cluster at frame 10
4 Key the cluster rotation at frame 20■ Go to frame 20.■ Rotate the cluster to the right.■ Press Shift e to set keys on the
rotation channels.
You may notice some kinking at the side of the mask. You can use Artisan to fix this by smoothing the weights at these points as shown below.
Rotated cluster at frame 20
5 Use Artisan to smooth the weights■ Select the neutral surface.■ Select Deformations → Paint Weights
Tool - ❐.
■ Press the u key and select Smooth from the marking menu.
■ Paint the kinked area of the surface to smooth the deformation.
Scroll through the animation to see if other frames show this kind of kinking. You can then smooth the cluster weights there, too.
Corrected weights
6 Playblast the results■ Select Window → Playblast... to
preview the animation.
Playblast of animation
Kinkedsurface

Learning Maya Artisan 29
Sculpting a MaskConclusion
Lesson O
ne
7 Save your work
ConclusionIf you like, you can now set up a set and some textures just like the cover image of this lesson. Use your knowledge of creating and applying shading groups to complete the scene.
You can now see how Maya Artisan can be used to accomplish many tasks in Maya mor easily than standard methods. You can push and pull CVs, select CVs and paint cluster weights as you model and animate your models. It is important to note how Artisan can be used to help you set up models for animation.
In the next lesson, you will explore the use of Artisan on a more complex head model.

30 Learning Maya Artisan
Lesson 1Conclusion
Lesson 2
Lesson T
wo
2
Detailing a Head
In this lesson, you will take an existing model of a head and add detail using several Maya Artisan tools. You will start by sculpting the cheek and jaw areas. Because the head is built out of two half surfaces, you will need to
reflect paint
across the two surfaces and paint across the seam that separates the two halves of the surface.
The sculpted head
Once you have the details painted, you will use the Script Paint tool to paint spiked cones directly onto the head surface. You will then use a special script called the
geometry paint script
to complete the painting of the cones.
In this lesson you will learn the following:
■
How to sculpt multiple surfaces
■
How to sculpt across a seam
■
How to use the Script Paint tool
■
How to use the geometry paint script
32
Learning Maya Artisan
Lesson 2
Initial set-up
Initial set-up
You are going to complete this lesson using a model of a head that has already been created using MayaÕs surfacing tools. In general, Artisan is best suited for refining models at the later stages of the modeling process rather than building complex models from scratch.
To start this lesson it is
very important
that you place the
geometryPaint.mel
script into your
maya/scripts
directory. See your Maya Artisan installation instructions for details.
1 Open an existing scene
■
Select
File
→
Open Scene
.
■
Click on the
head.mb
file.
■
Click on
Open
.
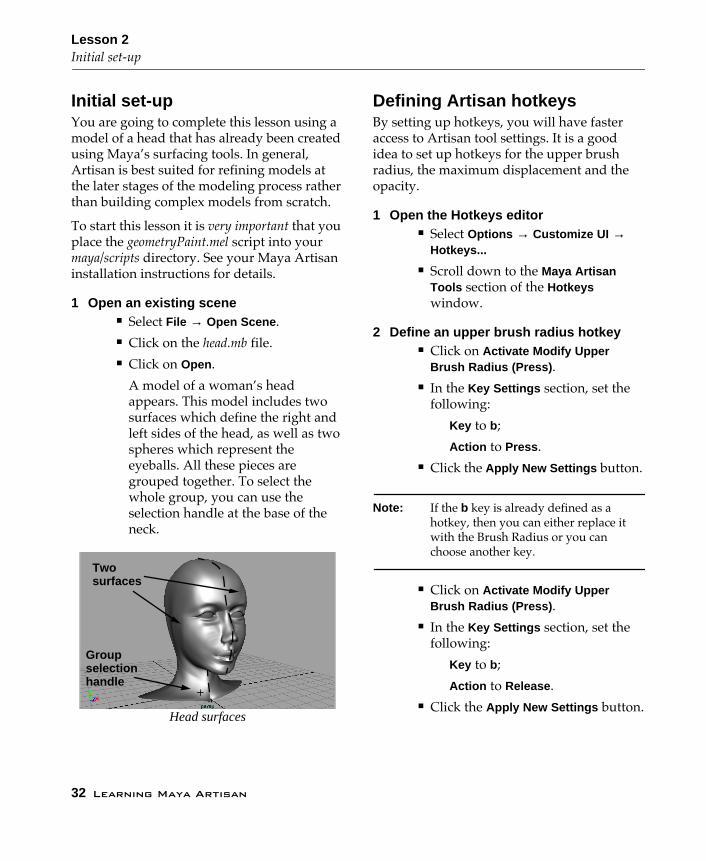
A model of a womanÕs head appears. This model includes two surfaces which define the right and left sides of the head, as well as two spheres which represent the eyeballs. All these pieces are grouped together. To select the whole group, you can use the selection handle at the base of the neck.
Head surfaces
Defining Artisan hotkeys
By setting up hotkeys, you will have faster access to Artisan tool settings. It is a good idea to set up hotkeys for the upper brush radius, the maximum displacement and the opacity.
1 Open the Hotkeys editor
■
Select
Options
→
Customize UI
→
Hotkeys...
■
Scroll down to the
Maya Artisan Tools
section of the
Hotkeys
window.
2 Define an upper brush radius hotkey
■
Click on
Activate Modify Upper Brush Radius (Press)
.
■
In the
Key Settings
section, set the following:
Key
to
b
;
Action
to
Press
.
■
Click the
Apply New Settings
button.
Note:
If the
b
key is already defined as a hotkey, then you can either replace it with the Brush Radius or you can
choose another key.
■
Click on
Activate Modify Upper Brush Radius (Press)
.
■
In the
Key Settings
section, set the following:
Key
to
b
;
Action
to
Release
.
■
Click the
Apply New Settings
button.
Twosurfaces
Groupselectionhandle
Learning Maya Artisan
33
Detailing a Head
Sculpting facial details
Lesson T
wo
Later, when you are working with the Artisan tools, you can see how this hotkey works.
3 Define other hotkeys for Artisan
■
Use the technique outlined above to set the
n
key for the activation and deactivation of
Maximum Displacement
modification.
■
Use the techniques outlined in step 2 to use the
m
key for the activation and deactivation of
Opacity
modification.
■
If desired, map other Artisan attributes to hotkeys.
■
Click
Save
then
Close
.
These settings are now available when you start working on the head surfaces.
Sculpting facial details
To start, you will paint some facial details onto the two surfaces. In the last lesson, you were able to reflect paint on the same surface. You will use a similar technique to reflect paint across two surfaces.
1 Paint on both the surfaces
■
Go to the
Modeling
menu set.
■
Select
both of the head surfaces.
■
Select
Edit Surfaces
→
Sculpt Surfaces
Tool
-
❐
.
■
Click on the
Display
tab and set
Show Active Lines
to
Off
.
■
Click on the
Stroke
tab and, under
Reflect Paint,
set
Reflection
and
Multiple Surf
to
On
.
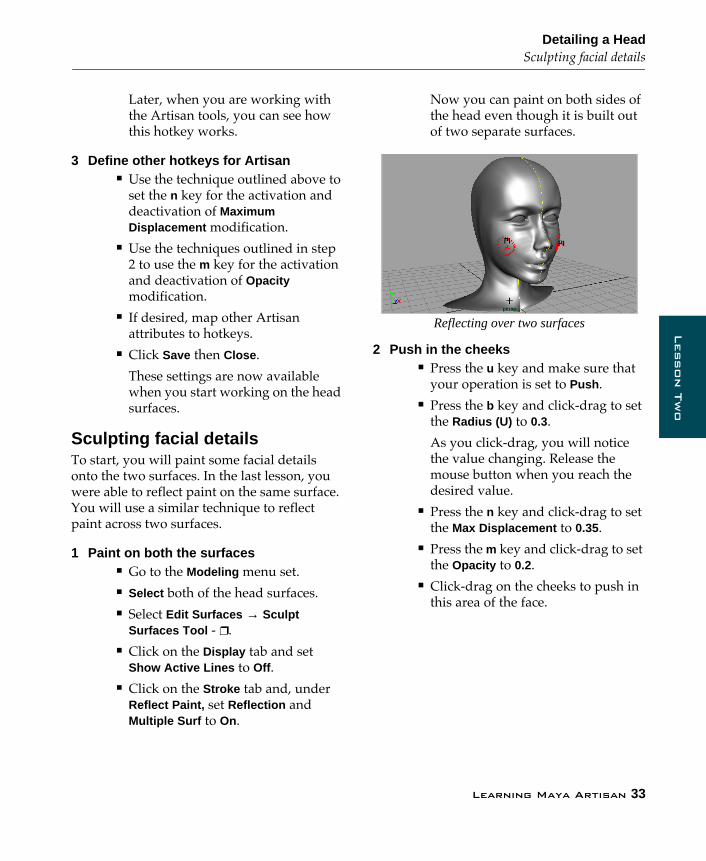
Now you can paint on both sides of the head even though it is built out of two separate surfaces.
Reflecting over two surfaces
2 Push in the cheeks
■
Press the
u
key and make sure that your operation is set to
Push
.
■
Press the
b
key and click-drag to set the
Radius (U)
to
0.3
.
As you click-drag, you will notice the value changing. Release the mouse button when you reach the desired value.
■
Press the
n
key and click-drag to set the
Max Displacement
to
0.35
.
■
Press the
m
key and click-drag to set the
Opacity
to
0.2
.
■
Click-drag on the cheeks to push in this area of the face.
34
Learning Maya Artisan
Lesson 2
Sculpting across surfaces
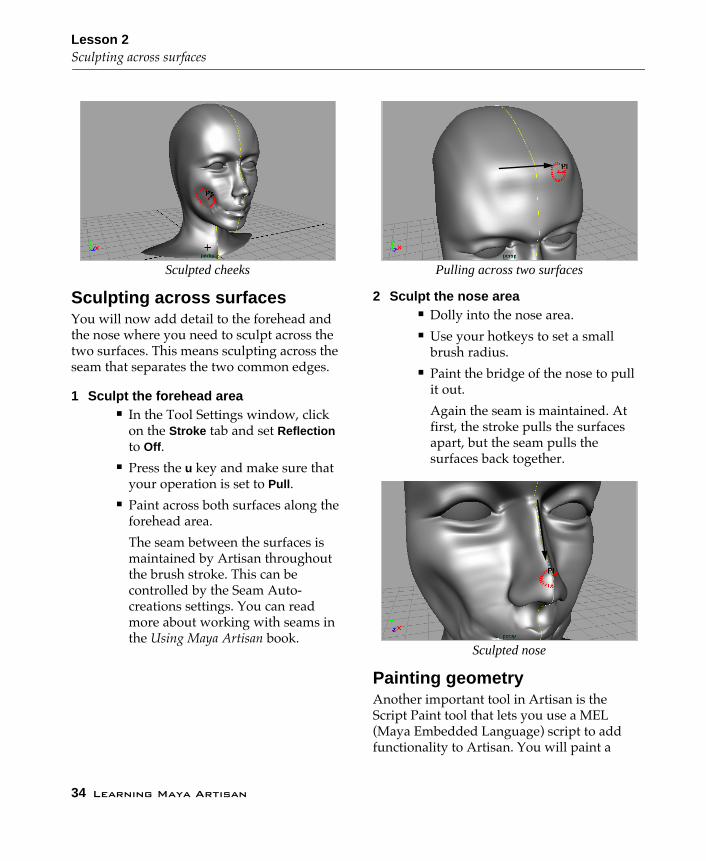
Sculpted cheeks
Sculpting across surfacesYou will now add detail to the forehead and the nose where you need to sculpt across the two surfaces. This means sculpting across the seam that separates the two common edges.
1 Sculpt the forehead area■ In the Tool Settings window, click
on the Stroke tab and set Reflection to Off .
■ Press the u key and make sure that your operation is set to Pull .
■ Paint across both surfaces along the forehead area.
The seam between the surfaces is maintained by Artisan throughout the brush stroke. This can be controlled by the Seam Auto-creations settings. You can read more about working with seams in the Using Maya Artisan book.
Pulling across two surfaces
2 Sculpt the nose area■ Dolly into the nose area.■ Use your hotkeys to set a small
brush radius.■ Paint the bridge of the nose to pull
it out.
Again the seam is maintained. At first, the stroke pulls the surfaces apart, but the seam pulls the surfaces back together.
Sculpted nose
Painting geometryAnother important tool in Artisan is the Script Paint tool that lets you use a MEL (Maya Embedded Language) script to add functionality to Artisan. You will paint a

Learning Maya Artisan 35
Detailing a HeadPainting geometry
Lesson T
wo
spiked hairstyle of primitive cones onto the head using the reflect option.
1 Move the head backYou will move the head back to give yourself room to build the cone.
■ Dolly out to see all of the head.■ Select the head group using the
selection handle at the base of the neck. This selects all of the pieces of the head.
■ Move the head back along the Z-axis.
Moved surface
2 Build a primitive cone■ Select Primitives → Create NURBS →
Cone .■ Scale the cone around the origin to
make it smaller, and then Scale it along the Y-axis to make it taller.
New primitive cone■ Select Edit → Delete by Type →
History .
You deleted history because, when you later paint multiple copies of the cone onto the head, you do not want to also make copies of the history nodes.
■ Select Modify → Freeze Transformations .
This function lets you keep the current shape of the cone while returning its transform values back to default values.
3 Rename and hide the cone■ In the Channel box, rename the
cone to spike.■ Select Display → Hide → Hide
Selection .
The geometry does not have to be visible for you to use the geometry painting.
4 Load the build rotation node plug-inTo use the geometry paint scriptÕs align option, you need the buildRotationNode plug-in. The script uses this node type to
36 Learning Maya Artisan
Lesson 2Painting geometry
create and maintain the alignment of the geometry to the surface.
■ Select Window → General Editors → Plug-in Manager...
■ Click on the loaded button next to buildRotationNode.so .
If you want to use this function on a regular basis, click on the auto load button.
■ Close this window.
5 Set up the Script Paint toolYou will now load the geometry paint script into the Script Paint tool so that you can use the added functionality.
■ Select the two main surfaces of the head.
■ Select Modify → Script Paint Tool - ❐. ■ Click on the end of the tabs and
choose the Setup tab.■ In the Tool Setup Cmd: field, type
the following:
geometryPaint■ Press the Tab key to accept this
entry.
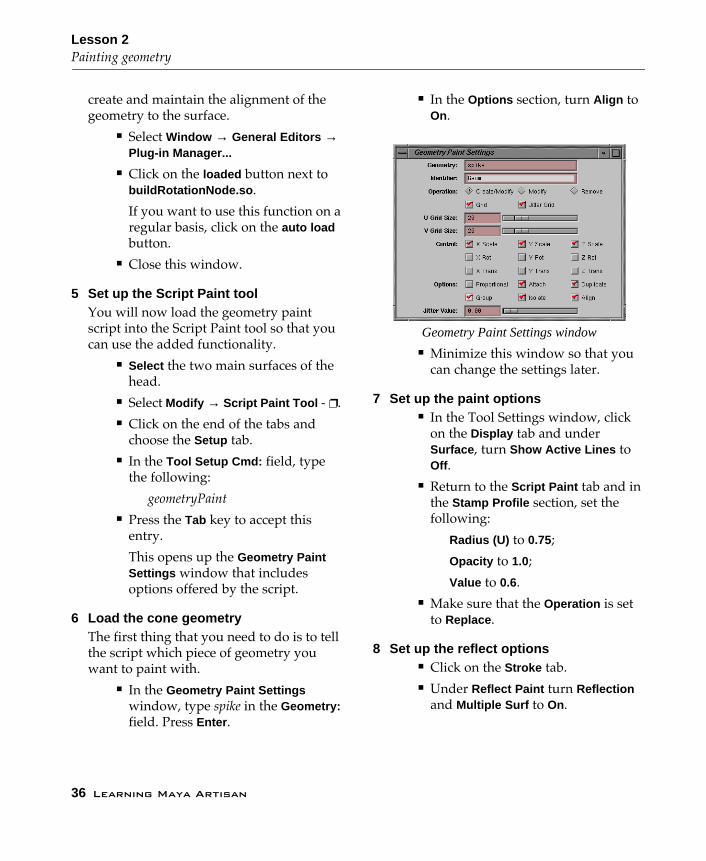
This opens up the Geometry Paint Settings window that includes options offered by the script.
6 Load the cone geometryThe first thing that you need to do is to tell the script which piece of geometry you want to paint with.
■ In the Geometry Paint Settings window, type spike in the Geometry: field. Press Enter .
■ In the Options section, turn Align to On.
Geometry Paint Settings window■ Minimize this window so that you
can change the settings later.
7 Set up the paint options■ In the Tool Settings window, click
on the Display tab and under Surface , turn Show Active Lines to Off .
■ Return to the Script Paint tab and in the Stamp Profile section, set the following:
Radius (U) to 0.75;
Opacity to 1.0;
Value to 0.6.■ Make sure that the Operation is set
to Replace .
8 Set up the reflect options■ Click on the Stroke tab.■ Under Reflect Paint turn Reflection
and Multiple Surf to On.
Learning Maya Artisan 37
Detailing a HeadPainting geometry
Lesson T
wo
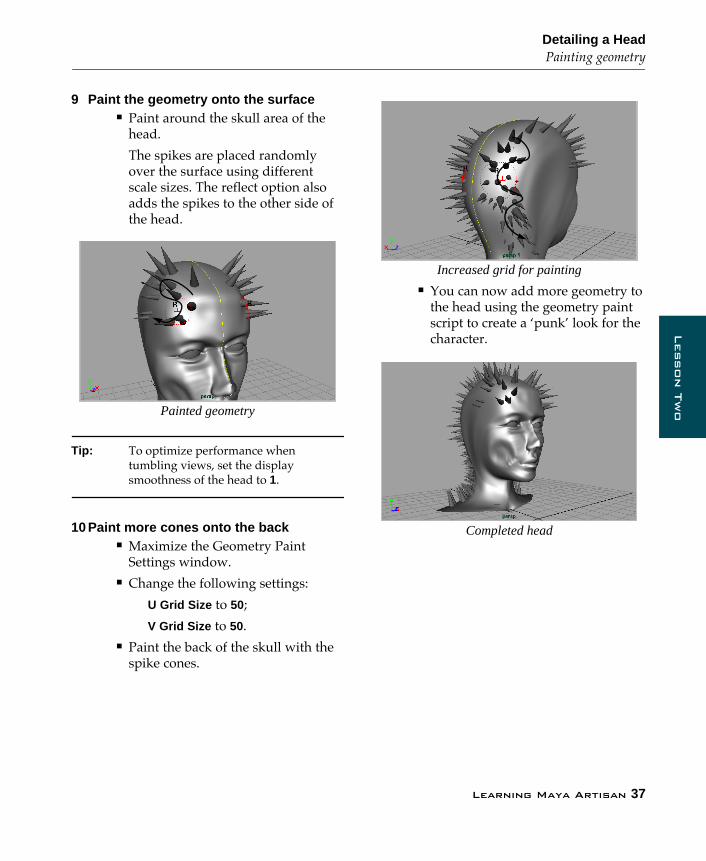
9 Paint the geometry onto the surface■ Paint around the skull area of the
head.
The spikes are placed randomly over the surface using different scale sizes. The reflect option also adds the spikes to the other side of the head.
Painted geometry
Tip: To optimize performance when tumbling views, set the display smoothness of the head to 1.
10 Paint more cones onto the back■ Maximize the Geometry Paint
Settings window.■ Change the following settings:
U Grid Size to 50;
V Grid Size to 50.■ Paint the back of the skull with the
spike cones.
Increased grid for painting■ You can now add more geometry to
the head using the geometry paint script to create a ÔpunkÕ look for the character.
Completed head

38 Learning Maya Artisan
Lesson 2Conclusion
ConclusionIn Maya Artisan, you can sculpt on multiple surfaces. Using common edge detection, you are able to paint over the seams separating the surfaces so that they appear as if there is no break.
The Script Paint tool offers another level of functionality in Maya Artisan where a MEL script can be used to offer new uses for the Artisan brush stamps.
In the next lesson, you will explore another MEL script that lets you paint goal weights on a dynamic soft body object.
Lesson 3
Lesson T
hree
3
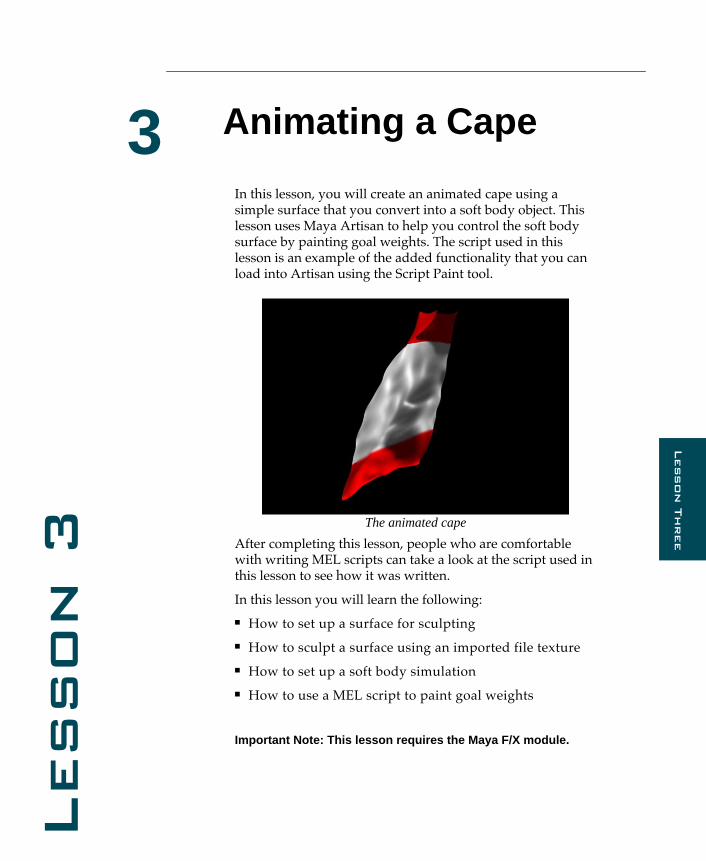
Animating a Cape
In this lesson, you will create an animated cape using a simple surface that you convert into a soft body object. This lesson uses Maya Artisan to help you control the soft body surface by painting goal weights. The script used in this lesson is an example of the added functionality that you can load into Artisan using the Script Paint tool.
The animated cape
After completing this lesson, people who are comfortable with writing MEL scripts can take a look at the script used in this lesson to see how it was written.
In this lesson you will learn the following:
■
How to set up a surface for sculpting
■
How to sculpt a surface using an imported file texture
■
How to set up a soft body simulation
■
How to use a MEL script to paint goal weights
Important Note: This lesson requires the Maya F/X module.
40
Learning Maya Artisan
Lesson 3
Initial set-up
Initial set-up
To start this lesson it is
very important
that you place the
softBodyPaint.mel
script into your
maya/scripts
directory. See your Maya Artisan installation instructions for details.
1 Create a new file
■
Select
File
→
New Scene
.
You will be building and animating the cape from scratch.
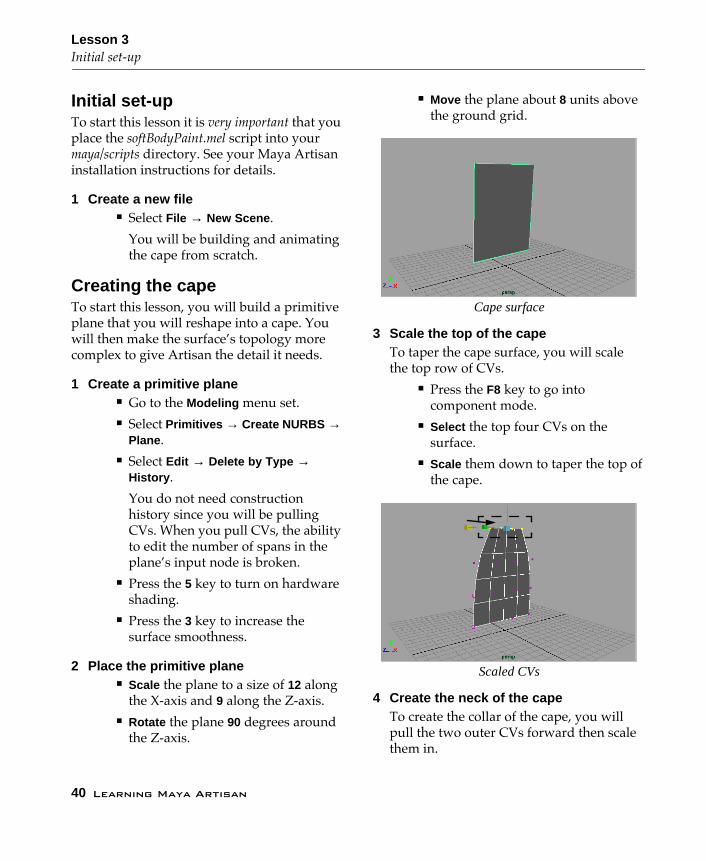
Creating the cape
To start this lesson, you will build a primitive plane that you will reshape into a cape. You will then make the surfaceÕs topology more complex to give Artisan the detail it needs.
1 Create a primitive plane
■
Go to the
Modeling
menu set.
■
Select
Primitives
→
Create NURBS
→
Plane
.
■
Select
Edit
→
Delete by Type
→
History
.
You do not need construction history since you will be pulling CVs. When you pull CVs, the ability to edit the number of spans in the planeÕs input node is broken.
■
Press the
5
key to turn on hardware shading.
■
Press the
3
key to increase the surface smoothness.
2 Place the primitive plane
■
Scale
the plane to a size of
12
along the X-axis and
9
along the Z-axis.
■
Rotate
the plane
90
degrees around the Z-axis.
■
Move
the plane about
8
units above the ground grid.
Cape surface
3 Scale the top of the cape
To taper the cape surface, you will scale the top row of CVs.
■
Press the
F8
key to go into component mode.
■
Select
the top four CVs on the surface.
■
Scale
them down to taper the top of the cape.
Scaled CVs
4 Create the neck of the cape
To create the collar of the cape, you will pull the two outer CVs forward then scale them in.

Learning Maya Artisan
41
Animating a Cape
Sculpt the cape
Lesson T
hree
■
Select
the two outer CVs at the top of the cape.
■
Move
them forward along the X-axis.
Moved CVs
■
Scale
them in along the Z-axis.
Scaled CVs
5 Rebuild the surface complexity
To add more CVs to the surface so that Artisan can sculpt more easily, you will need to rebuild the surface so that it has more spans along the U and V directions.
■
Press
F8
to return to object selection mode.
■
Select
Edit Surfaces
→
Rebuild Surfaces
-
❐
.
■
In the option window, set the following:
Number of Spans U
to
20
;
Number of Spans V
to
10
.
■
Click
Rebuild
then
Close
.
Sculpt the cape
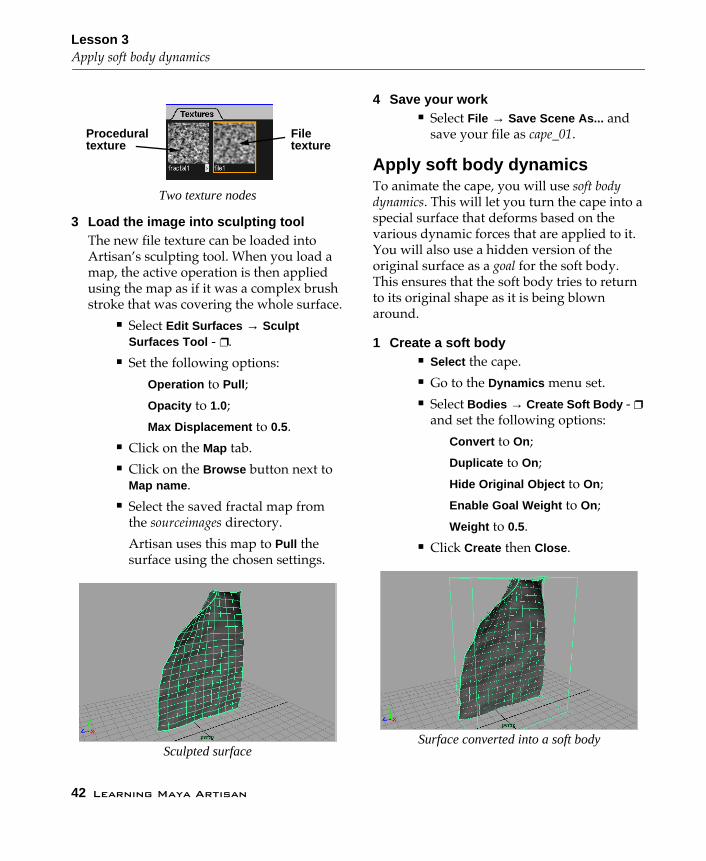
You will now use Maya Artisan to sculpt some detail into the cape. To give it a random look, you should apply a fractal map to one of the sculpting operations.
1 Create a fractal map
You will start by creating a procedural 2D texture.
■
Select
Window
→
Multilister...
■
In the Multilister, select
Edit
→
Create...
■
Click on the
Textures
tab then click on the
Fractal
button under
2D Textures
.
2 Convert the map into an image
Since Artisan needs a file texture to map a sculpting operation, you will convert the procedural texture.
■
In the Textures section of the Multilister, click on the
fractal1
map.
■
In the view panel,
Select
the cape surface.
■
In the Multilister, select
Edit
→
Convert Solid Texture.
This creates a file texture in the Multilister that works with the cape surface. The actual texture is saved in the
sourceimages
directory.
42
Learning Maya Artisan
Lesson 3
Apply soft body dynamics
Two texture nodes
3 Load the image into sculpting tool
The new file texture can be loaded into ArtisanÕs sculpting tool. When you load a map, the active operation is then applied using the map as if it was a complex brush stroke that was covering the whole surface.
■
Select
Edit Surfaces
→
Sculpt Surfaces
Tool
-
❐
.
■
Set the following options:
Operation to Pull ;
Opacity to 1.0;
Max Displacement to 0.5.■ Click on the Map tab.■ Click on the Browse button next to
Map name .■ Select the saved fractal map from
the sourceimages directory.
Artisan uses this map to Pull the surface using the chosen settings.
Sculpted surface
4 Save your work■ Select File → Save Scene As... and
save your file as cape_01.
Apply soft body dynamicsTo animate the cape, you will use soft body dynamics. This will let you turn the cape into a special surface that deforms based on the various dynamic forces that are applied to it. You will also use a hidden version of the original surface as a goal for the soft body. This ensures that the soft body tries to return to its original shape as it is being blown around.
1 Create a soft body■ Select the cape.■ Go to the Dynamics menu set.■ Select Bodies → Create Soft Body - ❐
and set the following options:
Convert to On;
Duplicate to On;
Hide Original Object to On;
Enable Goal Weight to On;
Weight to 0.5.■ Click Create then Close .
Surface converted into a soft body
Filetexture
Proceduraltexture
Learning Maya Artisan 43
Animating a CapeApply soft body dynamics
Lesson T
hree
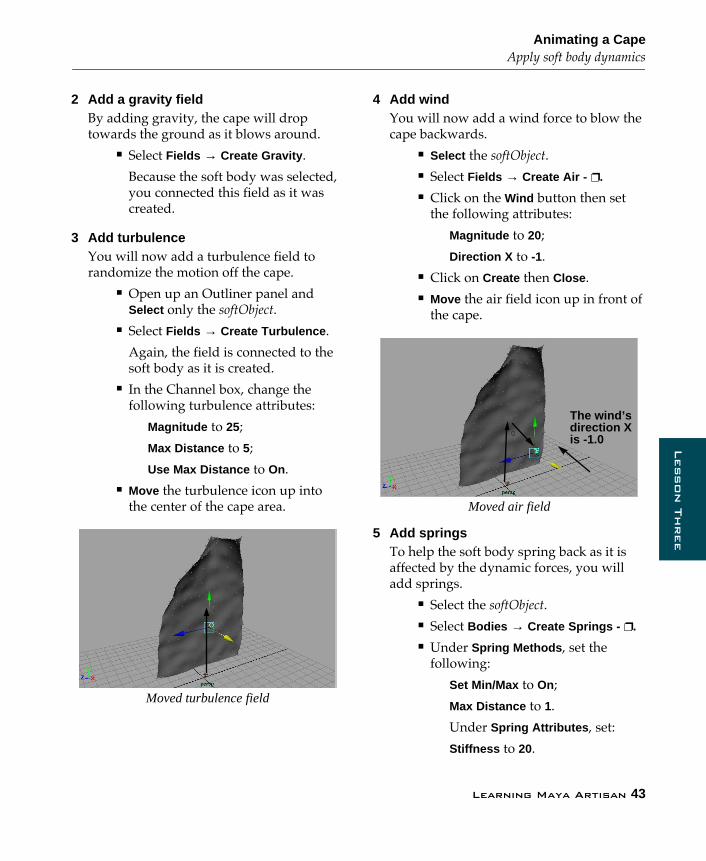
2 Add a gravity fieldBy adding gravity, the cape will drop towards the ground as it blows around.
■ Select Fields → Create Gravity .
Because the soft body was selected, you connected this field as it was created.
3 Add turbulenceYou will now add a turbulence field to randomize the motion off the cape.
■ Open up an Outliner panel and Select only the softObject.
■ Select Fields → Create Turbulence .
Again, the field is connected to the soft body as it is created.
■ In the Channel box, change the following turbulence attributes:
Magnitude to 25;
Max Distance to 5;
Use Max Distance to On.■ Move the turbulence icon up into
the center of the cape area.
Moved turbulence field
4 Add windYou will now add a wind force to blow the cape backwards.
■ Select the softObject.■ Select Fields → Create Air - ❐.
■ Click on the Wind button then set the following attributes:
Magnitude to 20;
Direction X to -1.■ Click on Create then Close .■ Move the air field icon up in front of
the cape.
Moved air field
5 Add springsTo help the soft body spring back as it is affected by the dynamic forces, you will add springs.
■ Select the softObject.■ Select Bodies → Create Springs - ❐.
■ Under Spring Methods , set the following:
Set Min/Max to On;
Max Distance to 1.
Under Spring Attributes , set:
Stiffness to 20.
The wind’s
is -1.0direction X
44 Learning Maya Artisan
Lesson 3Paint the goal weights
■ Click on Create then Close .
This creates a mesh that strings together the particles on the soft body. You can hide the springs since they do not need to be visible to be part of the simulation.
Springs■ Select Display → Hide → Hide
Selection .
By hiding the springs, you will speed up the simulation.
6 Playback the simulationTo see the effect of all these forces, you can playback the scene to view the simulation.
■ Set your playback range from 1 to 200 frames.
■ Playback the simulation.
Not much is happening. The particles only move a little as they hang off of their original goal. A constant goal weight of 0.5 is too limiting for this simulation.
Paint the goal weightsTo increase the action in the simulation, you need to vary the goal weights across the soft body. You could pick the soft body particles
one at a time and apply the weights that way. Maya ArtisanÕs Script Paint tool lets you use a more intuitive method.
1 Set up the Script Paint tool■ Go to frame 1.■ Select the softObject.■ Select Modify → Script Paint Tool - ❐. ■ Click on the Setup tab and in the
Tool Setup Cmd: field enter:
softBodyPaint goalPP■ Press the Tab key to accept this
entry.■ Click on the Display tab and under
Surface , turn Show Active Lines to Off .
■ Return to the Script Paint tab and, under Stamp Profile , set the following:
Value to 1.0.■ Click on the Flood button.
Now the whole surface uses a goal weight of 1.0. This gives you a good starting point.
2 Paint the cape with goal weights■ Under Stamp Profile , set the
following:
Value to 0.3.■ Paint the bottom of the cape.
This script lets you visualize the painting of the value by actually painting a grayscale value onto the surface.
Learning Maya Artisan 45
Animating a CapePaint the goal weights
Lesson T
hree
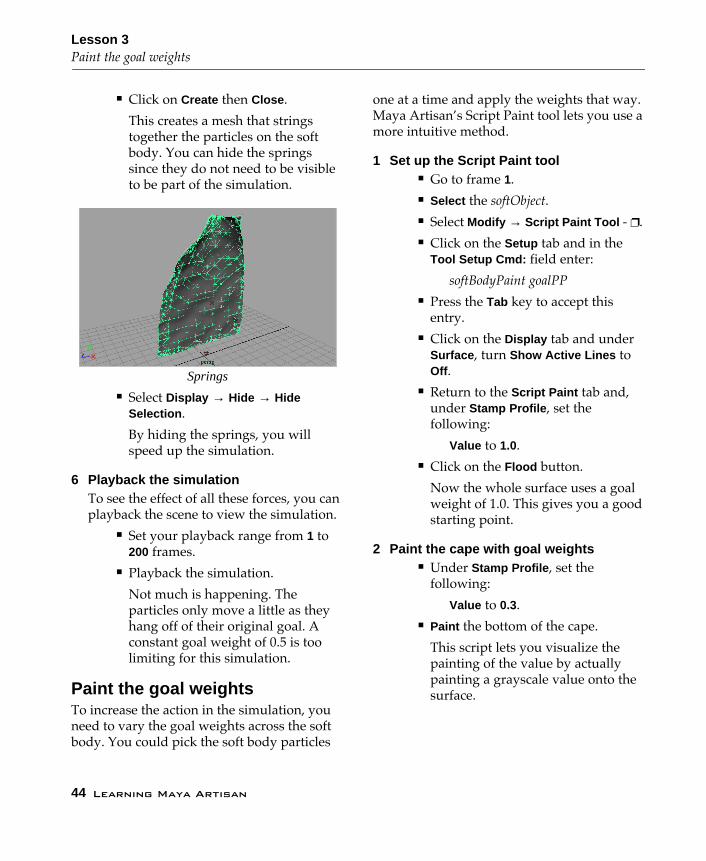
Painted weights■ Playback the simulation.
Now the cape is beginning to flow with the various forces being applied to it. It looks like 0.3 is a little too loose.
Animated soft body surface
3 Repaint the cape■ Go to frame 1.■ Change the Stamp Profile Value to
0.4.■ Repaint the bottom of the cape using
this value.■ Change the Stamp Profile Value to
0.7.■ Paint the middle area of the cape.
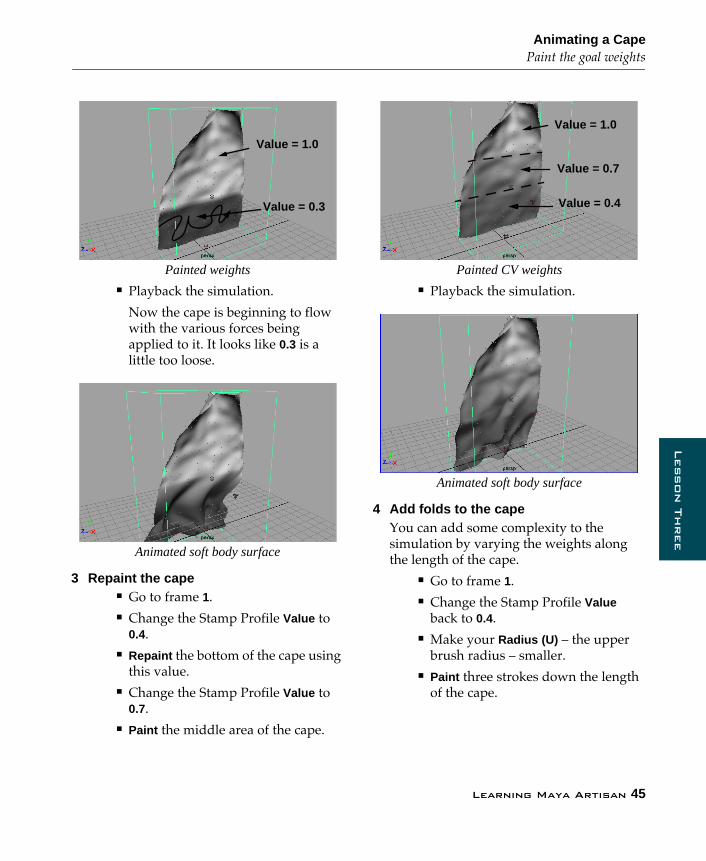
Painted CV weights■ Playback the simulation.
Animated soft body surface
4 Add folds to the capeYou can add some complexity to the simulation by varying the weights along the length of the cape.
■ Go to frame 1.■ Change the Stamp Profile Value
back to 0.4.■ Make your Radius (U) Ð the upper
brush radius Ð smaller.■ Paint three strokes down the length
of the cape.
Value = 0.3
Value = 1.0
Value = 0.4
Value = 0.7
Value = 1.0
46 Learning Maya Artisan
Lesson 3Finishing touches
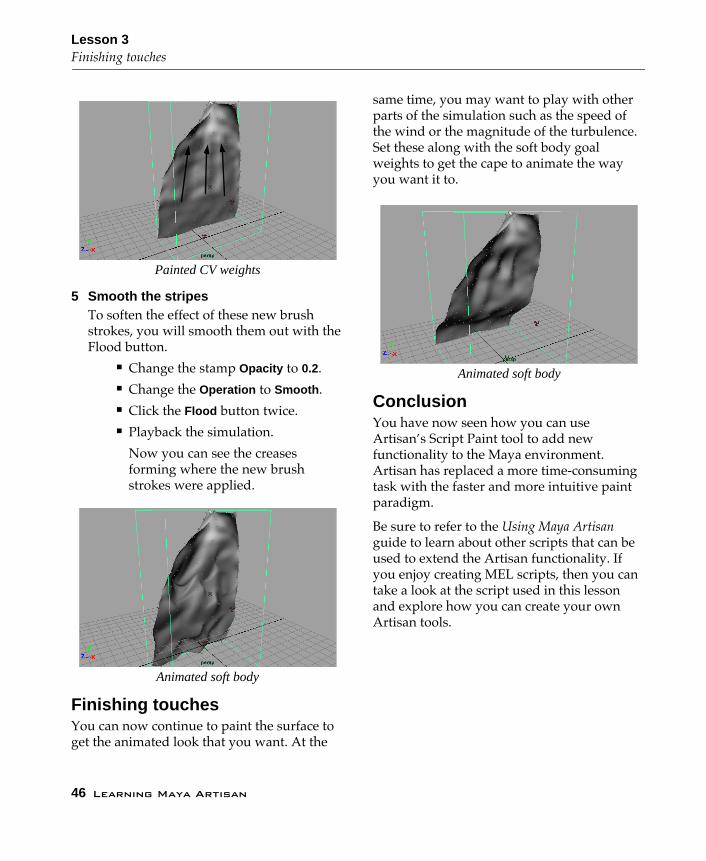
Painted CV weights
5 Smooth the stripesTo soften the effect of these new brush strokes, you will smooth them out with the Flood button.
■ Change the stamp Opacity to 0.2.■ Change the Operation to Smooth .■ Click the Flood button twice.■ Playback the simulation.
Now you can see the creases forming where the new brush strokes were applied.
Animated soft body
Finishing touchesYou can now continue to paint the surface to get the animated look that you want. At the
same time, you may want to play with other parts of the simulation such as the speed of the wind or the magnitude of the turbulence. Set these along with the soft body goal weights to get the cape to animate the way you want it to.
Animated soft body
ConclusionYou have now seen how you can use ArtisanÕs Script Paint tool to add new functionality to the Maya environment. Artisan has replaced a more time-consuming task with the faster and more intuitive paint paradigm.
Be sure to refer to the Using Maya Artisan guide to learn about other scripts that can be used to extend the Artisan functionality. If you enjoy creating MEL scripts, then you can take a look at the script used in this lesson and explore how you can create your own Artisan tools.

Index
48
Learning Maya
Index
A
air fields, see windanimating 23
clusters 27goal weights 46key all 24playback 26set key 24soft body surfaces 46surfaces 26testing results 28
Attribute Editor 12attributes
shading groups 12
B
Blend Shape 7, 23, 24brush 11, 38
opacity 16radius 5, 13, 16, 18, 22, 32shape 6, 16size 13stroke 12
brush-based interface 4
C
clusters 26animating 27cluster weights 26color feedback 26paint weights tool 26rotating 26smoothing weights 28stamp profile 26
color 13cluster weights 26color feedback 26use set color 26value 26
common edge detection 38construction history 35, 40control vertices (CVs) 20
goal weights 44masking 21
pulling 40scaling 40selection 20
CVs, see control vertices (CVs)
D
deformations 23, 26Blend Shape 24clusters 26paint weights tool 26
displacementmaximum displacement 5, 15
display smoothness 10dollying views 11duplicate 19, 22dynamics 43
goal weights 46soft body dynamics 42
E
Erase surface 7, 19erasing 6, 7, 13, 15, 16, 22
F
facial poses 19, 23file management 10
opening files 10saving files 10
flood 6, 16, 44, 46flood erase 14, 15, 22fractal maps 41freeze transformations 35
G
geometry 34, 37geometry paint script 37Geometry Paint Settings 36, 37
goal weights 4, 42, 44, 45, 46gravity 43groups 32
H
hardware shading 11, 40hide 24, 35, 42, 44highlights 12history, see construction historyhotkeys 11, 18, 32
customizing 32maximum displacement 33opacity 33upper brush radius 32
I
input devicesmouse 12stylus 5, 12, 15, 16tablet 5, 12, 15
intersecting strokes 14
L
launching Artisan 10launching Maya 10layers 14Learning Maya tutorials 7
M
maps 42marking menu 16masking 4, 22
CVs 21maximum displacement 5, 7, 32Maya Embedded Language
(MEL) 4, 34, 38, 46Maya F/X module 7, 39MEL, see Maya Embedded
Languagemodeling 32move 22, 35Multilister 41
Learning Maya
49
N
naming surfaces 23non-uniform rational b-splines
(NURBS) 4, 35, 40NURBS, see non-uniform rational
b-splines
O
opacity 5, 32operations 6, 19
erase 6, 13, 15, 22pull 5, 6, 13, 14, 34, 42push 5, 13, 33replace 36smooth 6, 13, 46
overlap 14
P
paint select CVs tool 4, 20paint weights tool 4, 26painting 11, 12, 18
brushes 11geometry 34, 36, 37goal weights 45masking 21paint 12, 16reflection 6, 17sculpting 12symmetry 17
particles, see dynamicsplayback 26, 44Playblast 28Plug-in Manager 35poses 23
set pose 24target poses 24
previews 28primitives 40
cones 35projects
set project 10pulling 13, 14, 16, 18pushing 18
R
randomizing 43reference surfaces 7, 14, 15reflect paint 6, 31, 33, 36reflection 17rendering 12rotate 26
S
saving files 17scaling 35, 40scenes 10script paint tool 4, 36, 38, 44, 46scripts, see Maya Embedded Lan-
guage (MEL)sculpt surfaces tool 4, 42sculpt variables
reference vectors 17sculpting 11, 13
across seams 34facial details 15painting 12surface complexity 41
seams 31, 34selection 20, 22
component mode 40export attribute map 21import attribute map 21, 23selection maps 21
selection handles 32selection masks 21, 22set key 24set pose 24shading groups 12
attributes 12materials 12specular shading 13
shapesbase shapes 24target shapes 24
smooth 19smoothing 13, 16, 19soft body dynamics 4, 42spans 41springs 43stamp profile 38, 44
opacity 14, 16, 46radius 5, 13, 14, 16, 18, 22shape 16upper brush radius 45
surfacesanimating 26complexity 41displacement 5duplicating 19Erase surface 19highlights 12kinking 28moving 19naming 23neutral surfaces 24operations 13pushing 12rebuild surfaces 41reference surfaces 7, 14, 15reflection 17sculpting 13seams 34show active lines 36, 44smoothing 4, 16, 28smoothness 10tapering 40updating 7, 15
symmetry 6, 17
T
testing results 28textures
convert solid texture 41file textures 41, 42fractal maps 41procedural textures 41
Tool Settings window 5, 11Display 12global selection 20Map 21reset tool 20Sculpt 13, 16
tracking views 11tumbling views 11, 27turbulence 43
50
Learning Maya
Index
U
undo 6, 16, 22user interface 5
V
viewschanging views 11, 27
W
weights 7smoothing 28
wind 43windows
maximizing 37minimizing 36