learning to fly: the wright brothers adventure...
TRANSCRIPT
39Learning to Fly: The Wright Brothers’ Adventure EG–2002–12–007–GRC
40Learning to Fly: The Wright Brothers’ Adventure EG–2002–12–007–GRC
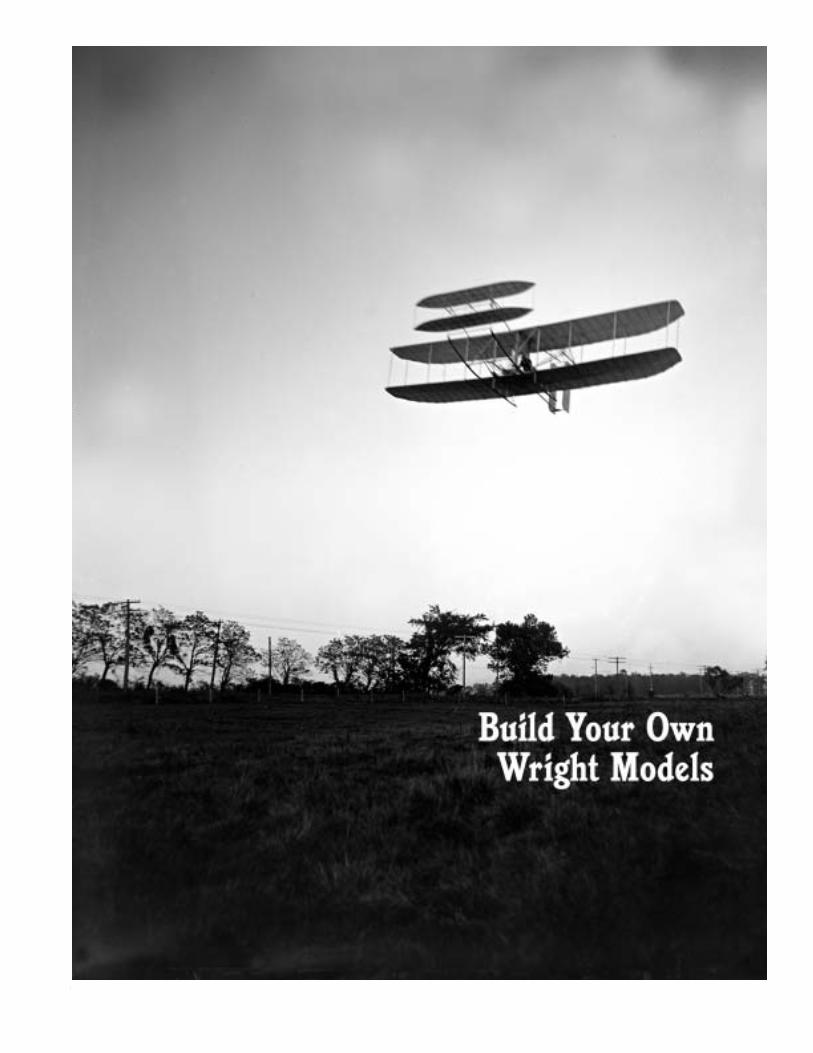
The Wright Brothers’ 1900 aircraft was flown repeatedly at Kitty Hawk, North Carolina, during the fall of 1900,mostly as a kite but also as a piloted glider.
The brothers’ main concern at this time was to learn how to control the forces on an aircraft. Others who hadthought it was more important to fly first and figure out control later had died in crashes. The Wright Brothersused this aircraft to learn the fundamentals of aerodynamics.
The brothers had observed soaring birds twist their wings to change direction and had successfully done thesame thing, which they called “wing-warping,” in 1899 by twisting the wings of a small kite. In 1900, the broth-ers decided to test wing-warping on an aircraft that was large enough to carry a person. The pilot could controlthe roll of the aircraft by using a foot pedal. The pedal was connected to wires that pulled on the wing tips andwarped (or twisted) the wing, producing unequal forces on the wings, which would roll the aircraft.
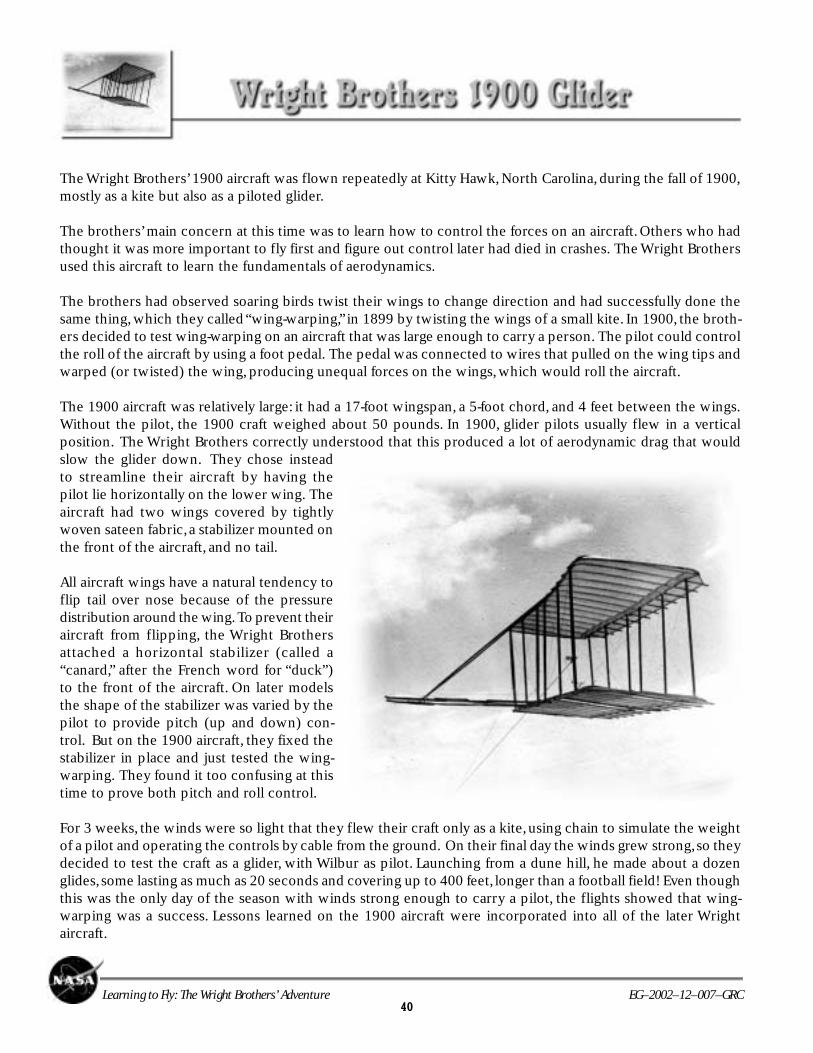
The 1900 aircraft was relatively large: it had a 17-foot wingspan, a 5-foot chord, and 4 feet between the wings.Without the pilot, the 1900 craft weighed about 50 pounds. In 1900, glider pilots usually flew in a verticalposition. The Wright Brothers correctly understood that this produced a lot of aerodynamic drag that wouldslow the glider down. They chose insteadto streamline their aircraft by having thepilot lie horizontally on the lower wing. Theaircraft had two wings covered by tightlywoven sateen fabric, a stabilizer mounted onthe front of the aircraft, and no tail.
All aircraft wings have a natural tendency toflip tail over nose because of the pressuredistribution around the wing. To prevent theiraircraft from flipping, the Wright Brothersattached a horizontal stabilizer (called a“canard,” after the French word for “duck”)to the front of the aircraft. On later modelsthe shape of the stabilizer was varied by thepilot to provide pitch (up and down) con-trol. But on the 1900 aircraft, they fixed thestabilizer in place and just tested the wing-warping. They found it too confusing at thistime to prove both pitch and roll control.
For 3 weeks, the winds were so light that they flew their craft only as a kite, using chain to simulate the weightof a pilot and operating the controls by cable from the ground. On their final day the winds grew strong, so theydecided to test the craft as a glider, with Wilbur as pilot. Launching from a dune hill, he made about a dozenglides, some lasting as much as 20 seconds and covering up to 400 feet, longer than a football field! Even thoughthis was the only day of the season with winds strong enough to carry a pilot, the flights showed that wing-warping was a success. Lessons learned on the 1900 aircraft were incorporated into all of the later Wrightaircraft.

41Learning to Fly: The Wright Brothers’ Adventure EG–2002–12–007–GRC
Designed byRoger Storm, NASA Glenn Research Center
Materials• One or two clean Styrofoam meat trays, at least 8.5 inches (21.5 centimeters) by 5.5 inches
(14 centimeters), preferably white• 30 to 35 toothpicks• Low-temperature glue gun• Scissors• Hobby knife, razor utility knife, or single-edge razor blade (adult help here)• Cardboard or board to cut on• Ultrafine-tip black marker• Ruler• Emery board• Manila file folder• Small plastic toy army soldiers, about 2 inches (5 centimeters) tall (optional)
General Instructions• Use scissors to cut out all three templates on the heavy lines of the 1900 Glider template (found in
the back of this book).• Do all hobby knife or razor blade cutting on the board or cardboard to protect your working surface.• The finished model is for display only; it is not meant to fly.
Procedure1.Carefully trace the wing and elevator shapes
on the inside of the Styrofoam tray as shown.Be sure the front edges of the wings go abouttwo-thirds of the way up the curved sides of thetray. Check the bottom of the tray and avoid anylogo found there. You may need two trays. Cutout the wings and elevator with the hobby knifeor scissors. Use the emery board to smooth thecut edges and sand off the pen lines.
1.

42Learning to Fly: The Wright Brothers’ Adventure EG–2002–12–007–GRC
2. Using the templates as a guide, mark the locationsof the rib lines on the tops and bottoms of thewing and elevator sections with the ultrafine-tipblack marker. Make two sets of marks, one oneach edge. Connect the marks to make the riblines. Make a rib template from a manila folderto draw the rib lines (so the end of the templatecan be bent to conform to the rounded shapeof the Styrofoam).
3. Cut out the center of the lower wing only asshown by the dotted lines on that template.Cut a toothpick in half and sharpen the cutends. Dip the ends in glue and stick them inthe cut edges to join the lower wing halves,leaving a .6-inch (1.5-centimeter) gap betweenthe halves. (If the Styrofoam is thin, glue thetoothpicks to the underside of the winginstead.)
3.
2.
43Learning to Fly: The Wright Brothers’ Adventure EG–2002–12–007–GRC
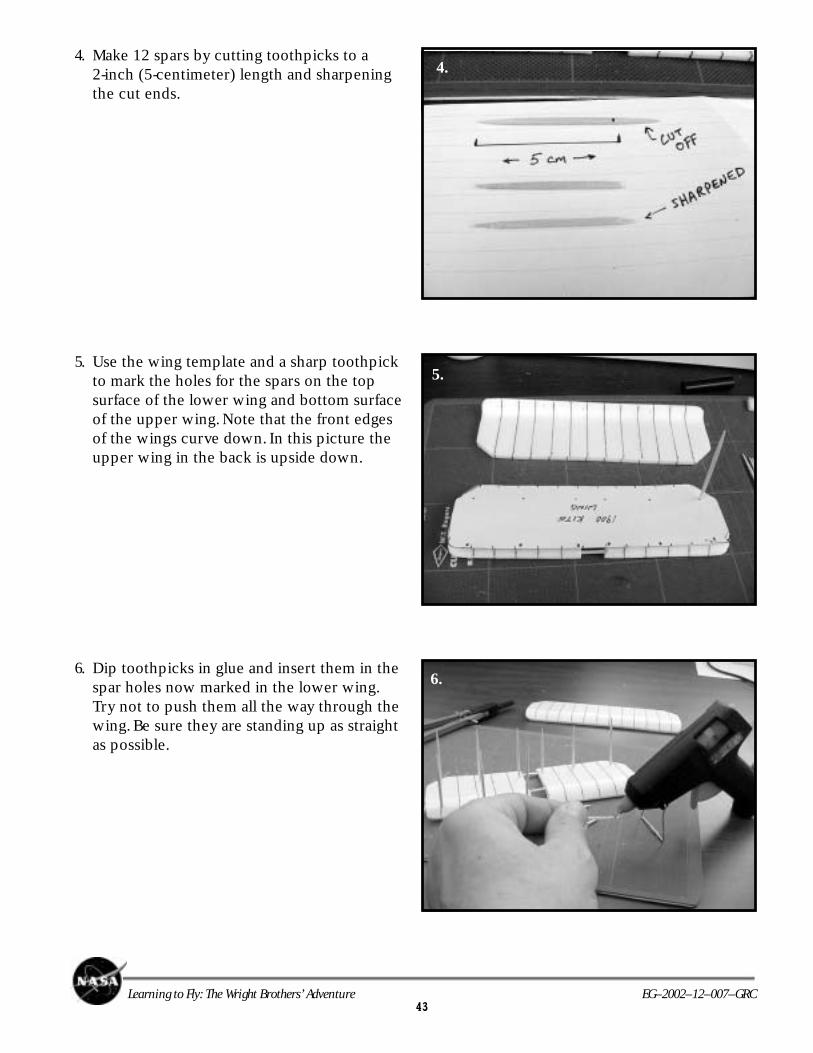
4. Make 12 spars by cutting toothpicks to a2-inch (5-centimeter) length and sharpeningthe cut ends.
5. Use the wing template and a sharp toothpickto mark the holes for the spars on the topsurface of the lower wing and bottom surfaceof the upper wing. Note that the front edgesof the wings curve down. In this picture theupper wing in the back is upside down.
6. Dip toothpicks in glue and insert them in thespar holes now marked in the lower wing.Try not to push them all the way through thewing. Be sure they are standing up as straightas possible.
5.
4.
6.
44Learning to Fly: The Wright Brothers’ Adventure EG–2002–12–007–GRC
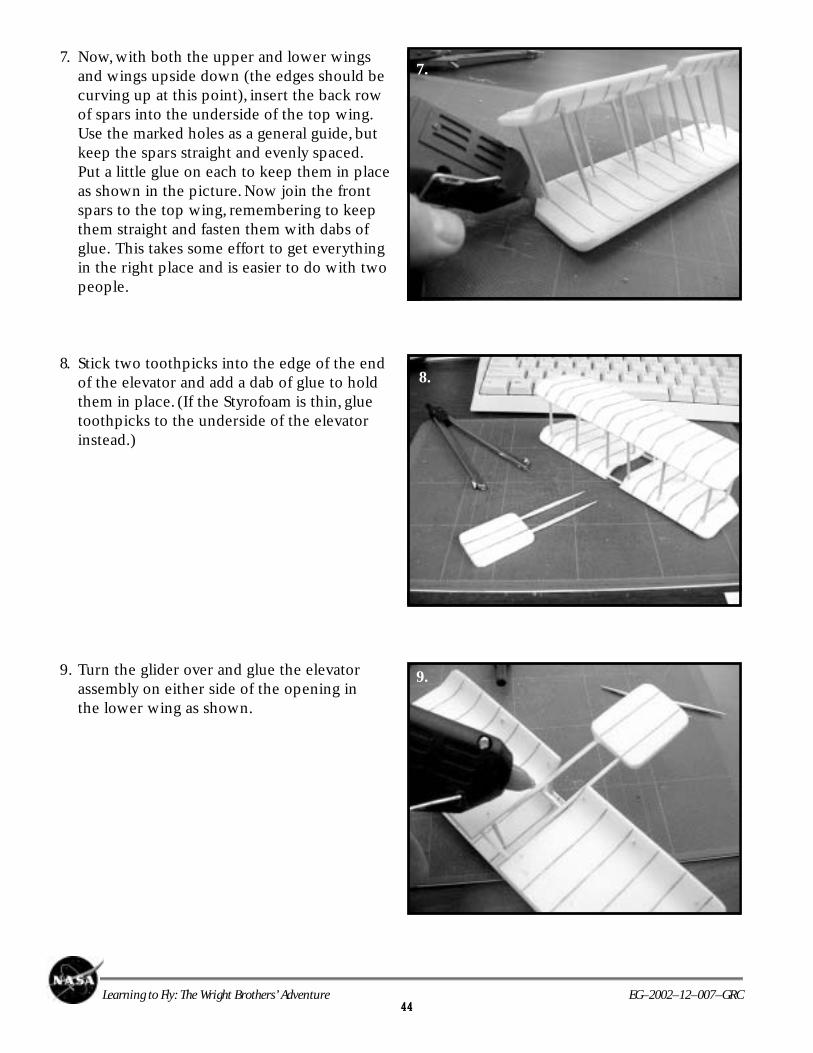
7. Now, with both the upper and lower wingsand wings upside down (the edges should becurving up at this point), insert the back rowof spars into the underside of the top wing.Use the marked holes as a general guide, butkeep the spars straight and evenly spaced.Put a little glue on each to keep them in placeas shown in the picture. Now join the frontspars to the top wing, remembering to keepthem straight and fasten them with dabs ofglue. This takes some effort to get everythingin the right place and is easier to do with twopeople.
8. Stick two toothpicks into the edge of the endof the elevator and add a dab of glue to holdthem in place. (If the Styrofoam is thin, gluetoothpicks to the underside of the elevatorinstead.)
9. Turn the glider over and glue the elevatorassembly on either side of the opening inthe lower wing as shown.
7.
8.
9.

45Learning to Fly: The Wright Brothers’ Adventure EG–2002–12–007–GRC
10. Turn the glider over again and insert a tooth-pick in the center of the left rib line as shownand add a bit of glue. Then insert the otherend of the toothpick into the front edge of theupper wing and glue. Add another toothpickin the same way to the right rib line. (If theStyrofoam is thin, glue these to the undersideof the upper wing instead.)
11. (Optional) Cut enough .6-inch (1.5-centimeter)toothpick pieces to stick into the back edge ofeach wing on the lines to simulate the ribs.
12. For display, the kite can be hung on a threadand strings can be added to be held by kneel-ing plastic toy soldiers. ADULTS: You may addfigures by cutting, swapping, and gluing partsof plastic army soldiers. To obtain the desiredposes, arms and legs can be removed andsome from other soldiers glued in their place.Guns and helmets should be trimmed awayusing a hobby knife and the figure arms andlegs can be shaped, swapped, or repositionedto fit and glued on. Five-minute epoxy worksbest for this. See steps 12 of the 1901 Gliderinstructions (pages 52 and 53) for moredetailed illustrations.
10.
11.
12.

46Learning to Fly: The Wright Brothers’ Adventure EG–2002–12–007–GRC
The 1901 Glider was the second unpowered aircraft built by the brothers. The aircraft was flownrepeatedly at Kitty Hawk during 1901 as a piloted glider and as a kite. The Wright Brothers learnedmore about the fundamentals of aerodynamics using this aircraft, which they began building in 1900.
The 1901 aircraft was larger than the 1900 aircraft, but of the same basic design: it had two wings, notail, and an elevator-stabilizer mounted in the front of the aircraft. The wingspan was increased from17.5 to 22 feet, and the chord (front edge of the wing to the back edge) was changed from 5 to 7 feet,increasing the overall wing area from 165 to 290 square feet. The brothers wanted to provide more liftso they could pilot their glider in winds of less velocity. Without the pilot, the 1901 craft weighedabout 100 pounds. The pilot would lie on the bottom wing and control the roll of the aircraft with afoot pedal. The pedal was connected to wires that pulled on the wing tips and warped (or twisted) thewing, producing unequal forces on the wings, which would roll the aircraft. On the 1901 aircraft, thepilot could also change the shape of the elevator to control the up or down position of the nose, orpitch, of the aircraft.
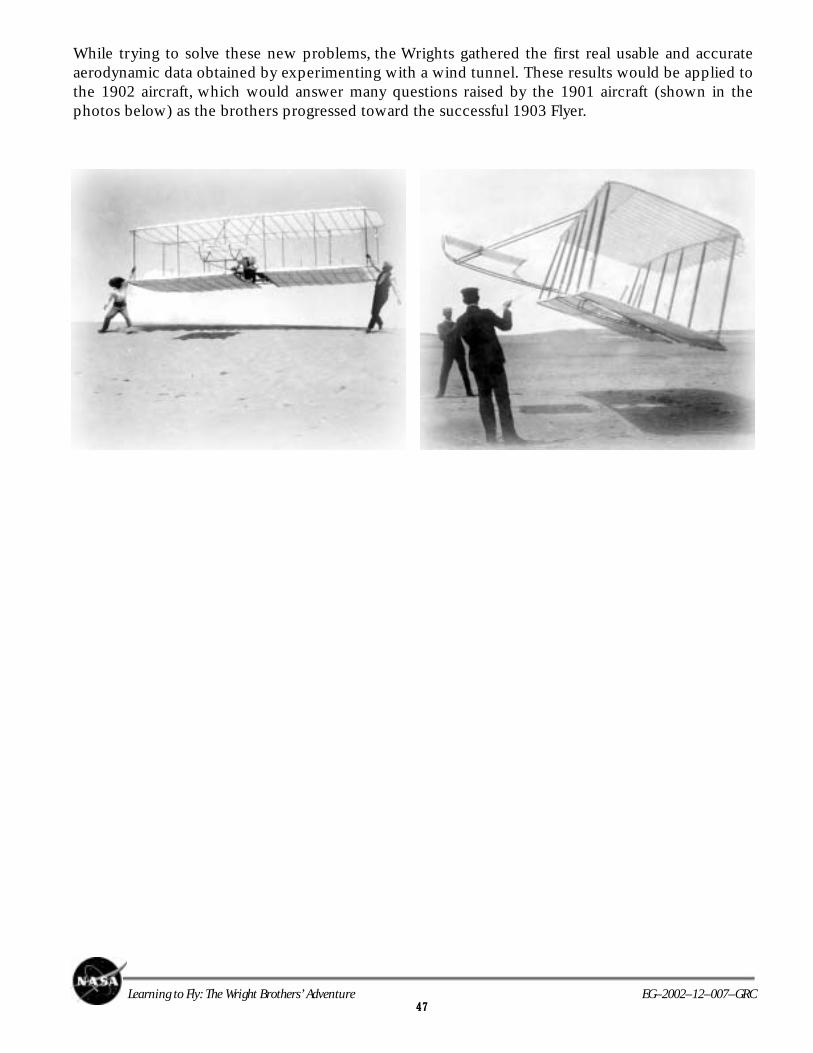
The aircraft was flown frequently up to 300 feet in a single glide, but did not perform as well asthe brothers had expected. To improve the flying characteristics, they installed additional struts(structural pieces added to providesupport and designed to resist pressurein the direction of their lengths) on thelower wing to alter the camber (orcurve) of the aircraft wing. The phototo the right shows the aircraft immedi-ately after landing, and you can see theadditional struts between the wings atthe center.
During their test flights the brothersencountered an effect known as “ad-verse yaw.” Sometimes when the wingswere warped to produce roll, whichshould have resulted in a curving flighttoward the lower wing, the increaseddrag on the upper wing twisting in theopposite direction caused the air speedto decrease, and the aircraft would turninto the ground. Wilbur Wright testing his flying position in the 1901 Glider.
47Learning to Fly: The Wright Brothers’ Adventure EG–2002–12–007–GRC
While trying to solve these new problems, the Wrights gathered the first real usable and accurateaerodynamic data obtained by experimenting with a wind tunnel. These results would be applied tothe 1902 aircraft, which would answer many questions raised by the 1901 aircraft (shown in thephotos below) as the brothers progressed toward the successful 1903 Flyer.
48Learning to Fly: The Wright Brothers’ Adventure EG–2002–12–007–GRC
Designed byRoger Storm, NASA Glenn Research Center
Materials• One or two clean Styrofoam meat trays, at least 9 inches (23 centimeters) by 11 inches
(28 centimeters), preferably white• 30 to 35 toothpicks• Low-temperature glue gun• Scissors• Hobby knife, razor utility knife, or single-edge razor blade (adult help here)• Cardboard or board to cut on• Ultrafine-tip black marker• Ruler• Emery board• Manila file folder• Small plastic toy army soldiers, about 2 inches (5 centimeters) tall (optional)
General Instructions• Use scissors to cut out all three templates on the heavy lines of the 1901 Glider template (found
in the back of this book).• Do all razor knife or razor blade cutting on the board or cardboard to protect your working
surface.• The finished model is for display only; it is not meant to fly.
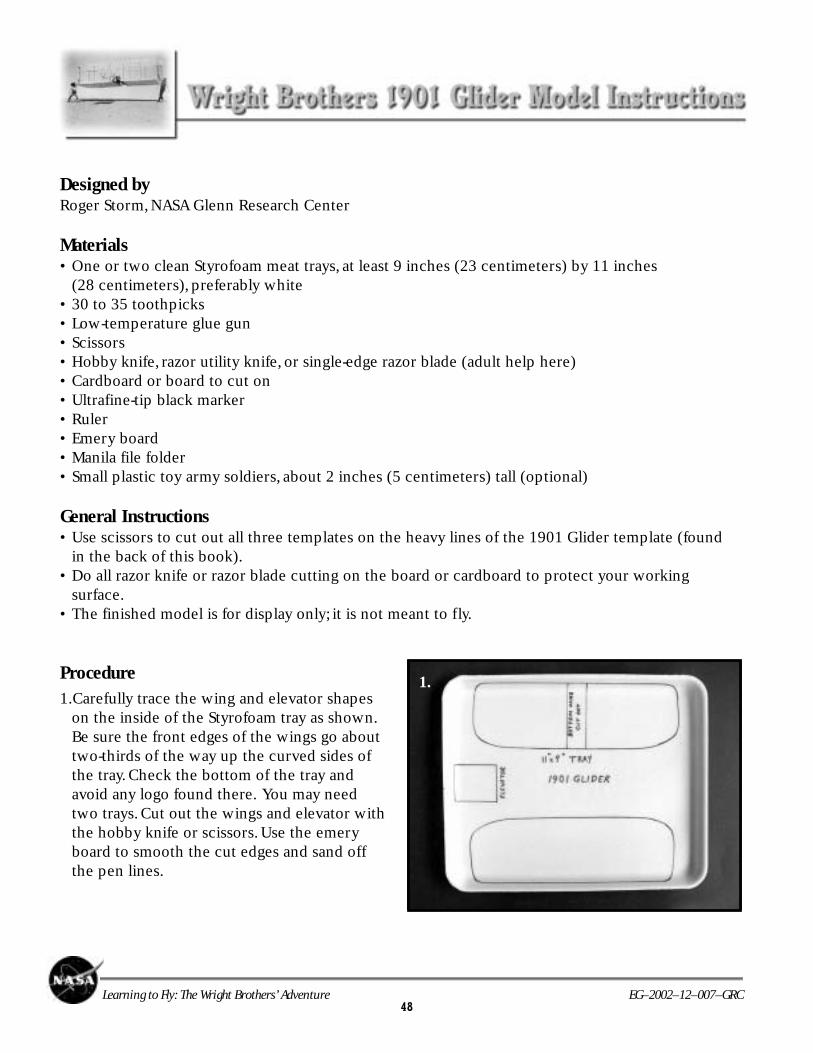
Procedure1.Carefully trace the wing and elevator shapes
on the inside of the Styrofoam tray as shown.Be sure the front edges of the wings go abouttwo-thirds of the way up the curved sides ofthe tray. Check the bottom of the tray andavoid any logo found there. You may needtwo trays. Cut out the wings and elevator withthe hobby knife or scissors. Use the emeryboard to smooth the cut edges and sand offthe pen lines.
1..

49Learning to Fly: The Wright Brothers’ Adventure EG–2002–12–007–GRC
2. Using the templates as a guide, mark thelocations of the rib lines on the tops andbottoms of the wing and elevator sectionswith the ultrafine-tip black marker. Maketwo sets of marks, one on each edge. Connectthe marks to make the rib lines. Make a ribtemplate from a manila folder to draw the riblines (so the end of the template can be bentto conformto the rounded shape of theStyrofoam).
3. Cut out the center of the lower wing (only ofthe lower wing) as shown by the dotted lineson the template. Cut two toothpicks in half andsharpen the cut ends of three of them. Dip theends in glue and stick them in the cut edges tojoin the lower wing halves, leaving a .6-inch(1.5-centimeter) gap between the halves. (Ifthe Styrofoam is thin, glue the toothpicks tothe underside of the wing instead.)
3.
3.
2.

50Learning to Fly: The Wright Brothers’ Adventure EG–2002–12–007–GRC
4. Use the wing template and a sharp toothpickto mark the holes for the spars on the topsurface of the lower wing and the bottomsurface of the upper wing. Note that thefront edges of the wings curve down. In thispicture the upper wing in the backgroundneeds to be turned upside down.
5. Dip toothpicks in glue and insert them in thespar holes now marked in the lower wing.Try not to push them all the way through thewing. Be sure they are standing up as straightas possible. The upper wing in the foregroundof this picture is upside down (the curved edgeis curving up).
6. Now, with both the upper and lower wingsupside down (the edges should be curvingup at this point), insert the back row of sparsinto the underside of the top wing. Use themarked holes as a general guide, but keep thespars straight and evenly spaced. Put a littleglue on each to keep them in place as shownin the picture. Now join the front spars to thetop wing, remembering to keep them straight,and fasten them with dabs of glue. This takessome effort to get everything in the right placeand is easier to do with two people.
4.
5.
6..
51Learning to Fly: The Wright Brothers’ Adventure EG–2002–12–007–GRC
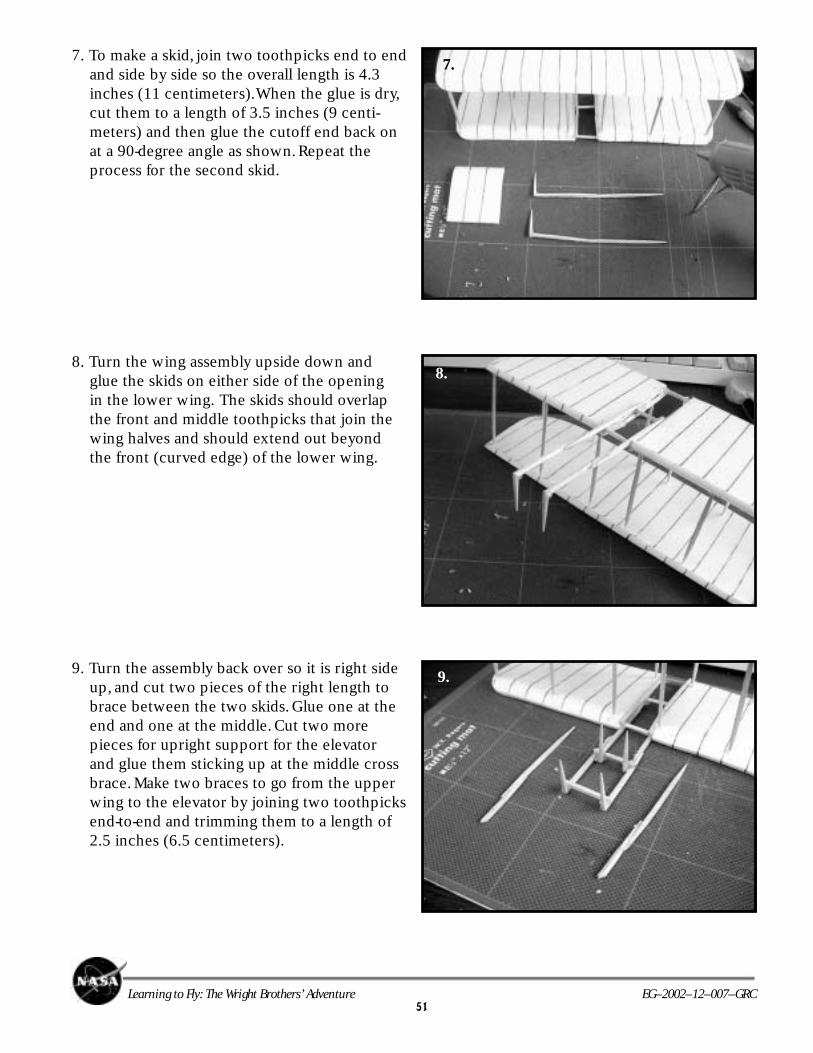
7. To make a skid, join two toothpicks end to endand side by side so the overall length is 4.3inches (11 centimeters). When the glue is dry,cut them to a length of 3.5 inches (9 centi-meters) and then glue the cutoff end back onat a 90-degree angle as shown. Repeat theprocess for the second skid.
8. Turn the wing assembly upside down andglue the skids on either side of the openingin the lower wing. The skids should overlapthe front and middle toothpicks that join thewing halves and should extend out beyondthe front (curved edge) of the lower wing.
9. Turn the assembly back over so it is right sideup, and cut two pieces of the right length tobrace between the two skids. Glue one at theend and one at the middle. Cut two morepieces for upright support for the elevatorand glue them sticking up at the middle crossbrace. Make two braces to go from the upperwing to the elevator by joining two toothpicksend-to-end and trimming them to a length of2.5 inches (6.5 centimeters).
8.
9.
7.

52Learning to Fly: The Wright Brothers’ Adventure EG–2002–12–007–GRC
10. Place glue on the ends of the four uprightsupports and push them into the elevator.Also put glue on both ends of the upper bracesand push them first into the center of the topof the elevator along the rib lines, and theninto the front edge of the upper wing, asshown. (If the Styrofoam is thin, glue thebraces to the underside of the upper winginstead.)
11. (Optional) You can make the figures ofWilbur and Orville Wright by swapping andgluing parts of plastic army soldiers. To obtainthe desired poses, arms and legs can be re-moved and some from other soldiers gluedin their place. Guns and helmets should betrimmed away using a hobby knife and thefigure arms and legs can be shaped, swapped,or repositioned to fit and glued on. Five-minuteepoxy works best for this. The dark soldiers inthe photograph are the original shapes and thelight soldiers are the final shapes.
12. The original soldiers on the left weretransformed into the figures of Wilburand Orville Wright on the right.
10.
11.
12.

53Learning to Fly: The Wright Brothers’ Adventure EG–2002–12–007–GRC

54Learning to Fly: The Wright Brothers’ Adventure EG–2002–12–007–GRC
The Wright Brothers’ 1902 Glider was their third unpowered aircraft. It was flown repeatedly at Kitty Hawkduring 1902 as a kite and as a piloted glider. The brothers used this aircraft to solve some of the problemsencountered with the 1901 Glider. They also used it to develop their piloting skills, because this was the firstaircraft in the world that had active controls for all three axes: roll, pitch, and yaw.
The 1902 aircraft had two wings and an elevator-stabilizer mounted in the front, like the 1901 aircraft. It had a32-foot wingspan, a 5-foot chord, and 5 feet between the wings. Without the pilot, it weighed about 120 pounds.As before, the pilot lies on the bottom wing and controls the roll of the aircraft by warping the wing shape. Onthe 1902 aircraft, however, and on all flyers through 1905, the warping was controlled by a control device calleda “hip cradle,” instead of the pedals that were used on the 1900 and 1901 aircraft.
There were other major differences between this aircraft and its predecessors as well. Data from the 1901 windtunnel experiments showed that a longer, thinner wing gave less drag and a better lift-to-drag (L/D) ratio, so theaspect ratio (ratio of wingspan to wing chord or width) was changed from 3:1 on the 1901 aircraft to 6:1 on the1902 aircraft. To try to solve the problem of adverse yaw from the 1901 Glider, two 6-foot rudders were addedto the rear of the craft.
Test flights went better than in 1901, but occasionally,the glider would spin out of control on recovering froma turn at low speed. Lying awake one night, Orvilleconcluded that the rudder was acting like a verticalwing, in which turning generated an angle of attack,and thus, an unwanted force in the wrong direction.To correct this, a single, movable rudder was attachedat the rear and connected to the wing-warping.
Now perfected, the glider worked beautifully, keepingthe nose of the aircraft pointed into the curved flightpath. On the 1902 aircraft, the pilot could also changethe angle of the elevator to control the up and downposition, or pitch, of the nose of the aircraft. For thefirst time in history, a craft could be controlled inthree dimensions. With this new aircraft, the brotherscompleted gliding flights of over 650 feet.
At the end of 1902, all that remained for the firstsuccessful airplane was the development of the pro-pulsion system. During the following winter and spring,the brothers built their own small engine from scratchand perfected their own propeller design for the 1903flyer.
55Learning to Fly: The Wright Brothers’ Adventure EG–2002–12–007–GRC
Designed byRoger Storm, NASA Glenn Research Center
Materials• One or two clean Styrofoam meat trays, at least 9 inches (23 centimeters) by 11 inches
(28 centimeters), preferably white• 30 to 35 toothpicks• Low-temperature glue gun• Scissors• Hobby knife, razor utility knife, or single-edge razor blade (adult help here)• Cardboard or board to cut on• Ultrafine-tip black marker• Ruler• Emery board• Manila file folder• Small plastic toy army soldiers, about 2 inches (5 centimeters) tall (optional)
General Instructions• Use scissors to cut out all three templates on the heavy lines of the 1902 Glider template (found
in the back of this book).• Do all hobby knife or razor blade cutting on the board or cardboard to protect your working surface.• The finished model is for display only; it is not meant to fly.
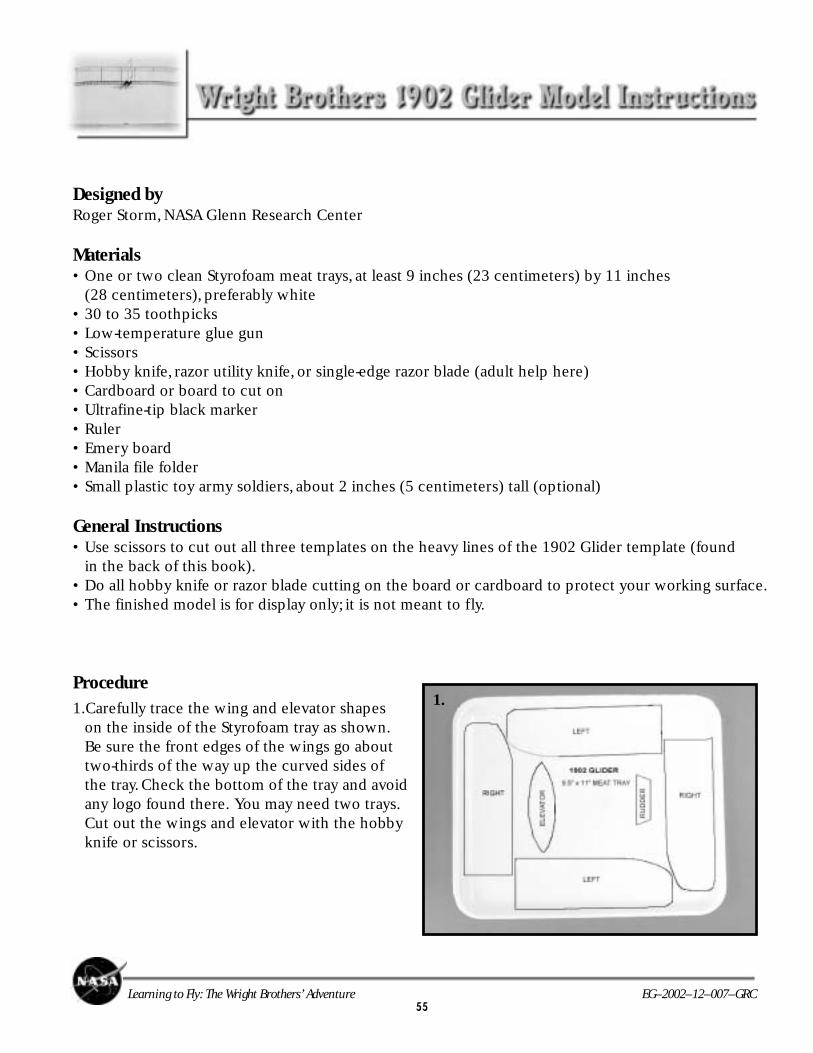
Procedure1.Carefully trace the wing and elevator shapes
on the inside of the Styrofoam tray as shown.Be sure the front edges of the wings go abouttwo-thirds of the way up the curved sides ofthe tray. Check the bottom of the tray and avoidany logo found there. You may need two trays.Cut out the wings and elevator with the hobbyknife or scissors.
1.
56Learning to Fly: The Wright Brothers’ Adventure EG–2002–12–007–GRC
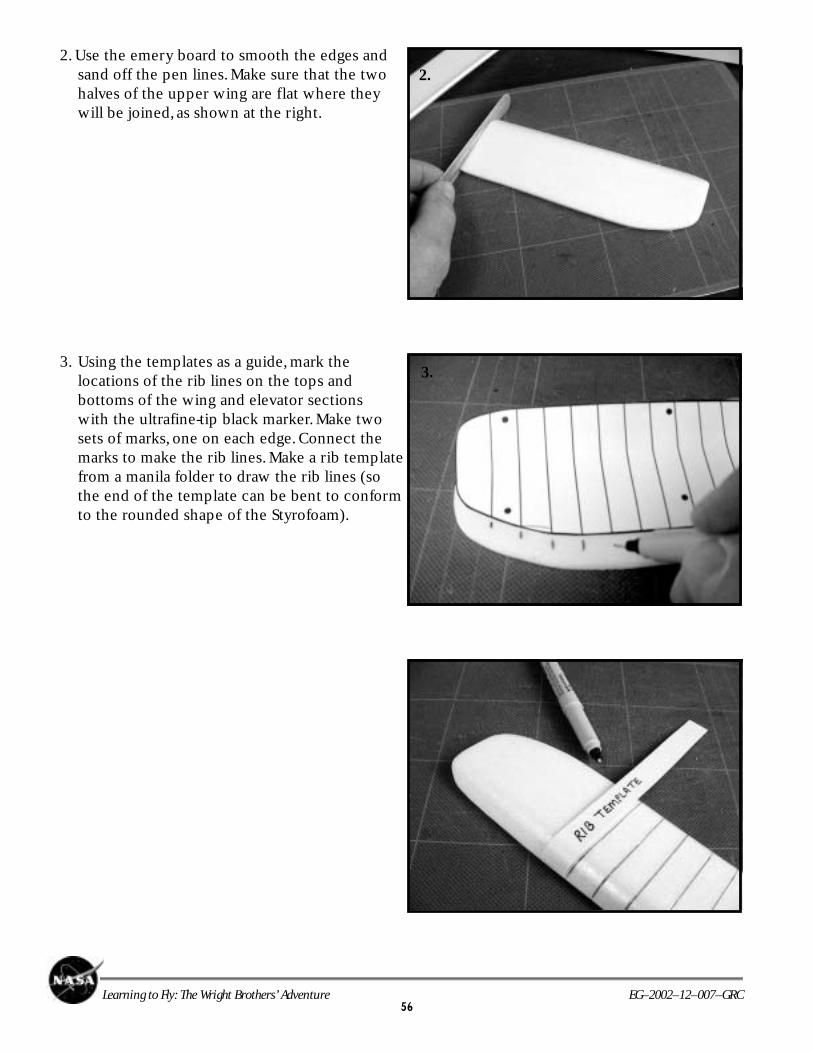
2. Use the emery board to smooth the edges andsand off the pen lines. Make sure that the twohalves of the upper wing are flat where theywill be joined, as shown at the right.
3. Using the templates as a guide, mark thelocations of the rib lines on the tops andbottoms of the wing and elevator sectionswith the ultrafine-tip black marker. Make twosets of marks, one on each edge. Connect themarks to make the rib lines. Make a rib templatefrom a manila folder to draw the rib lines (sothe end of the template can be bent to conformto the rounded shape of the Styrofoam).
3.
3.
2.

57Learning to Fly: The Wright Brothers’ Adventure EG–2002–12–007–GRC
4. Place glue on the flat edge of the upper winghalves and join them as shown.
5. Cut off the parts of the lower left and rightwing only as shown by the dotted line onthe template. Cut a toothpick in half andsharpen the cut ends. Dip the ends in glueand stick them in the cut edges to join thelower wing halves, leaving a .6-inch (1.5-centimeter) gap between the halves. (If theStyrofoam is thin, glue the toothpicks to theunderside of the wing instead.)
6. Use the wing template and a sharp toothpickto mark the holes for the spars on the topsurface of the lower wing (the front edgeshould curve down as shown) and the bottomsurface of the upper wing.
5.
6.
4.

58Learning to Fly: The Wright Brothers’ Adventure EG–2002–12–007–GRC
7. Dip toothpicks in glue and insert them in thespar holes now marked in the lower wing.Try not to push them all the way throughthe wing. Be sure they are standing up asstraight as possible.
8. Now, with both the upper and lower wingsupside down (the edges should be curvingup at this point), insert the back row of sparsinto the underside of the top wing. Use themarked holes as a general guide, but keep thespars straight and evenly spaced. Put a littleglue on each to keep them in place as shownin the picture. Now join the front spars to thetop wing, remembering to keep them straightand fasten them with dabs of glue. This takessome effort to get everything in the right placeand is easier to do with two people.
9. To make each of the two skids join two tooth-picks end to end. When the glue is dry, trimthem to a length of 3 inches (7.5 centimeters)and then glue the cutoff end back on at a30-degree angle.
7.
8.
9.
59Learning to Fly: The Wright Brothers’ Adventure EG–2002–12–007–GRC
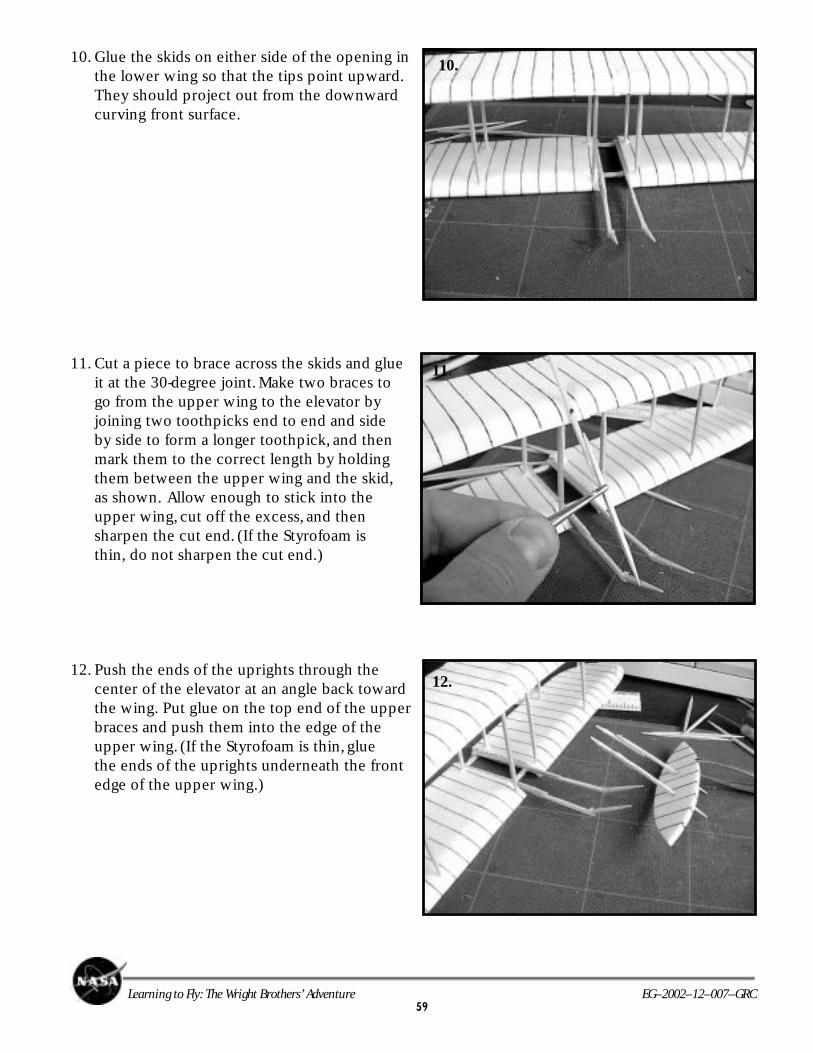
10. Glue the skids on either side of the opening inthe lower wing so that the tips point upward.They should project out from the downwardcurving front surface.
11. Cut a piece to brace across the skids and glueit at the 30-degree joint. Make two braces togo from the upper wing to the elevator byjoining two toothpicks end to end and sideby side to form a longer toothpick, and thenmark them to the correct length by holdingthem between the upper wing and the skid,as shown. Allow enough to stick into theupper wing, cut off the excess, and thensharpen the cut end. (If the Styrofoam isthin, do not sharpen the cut end.)
12. Push the ends of the uprights through thecenter of the elevator at an angle back towardthe wing. Put glue on the top end of the upperbraces and push them into the edge of theupper wing. (If the Styrofoam is thin, gluethe ends of the uprights underneath the frontedge of the upper wing.)
12.
10.
11.
60Learning to Fly: The Wright Brothers’ Adventure EG–2002–12–007–GRC
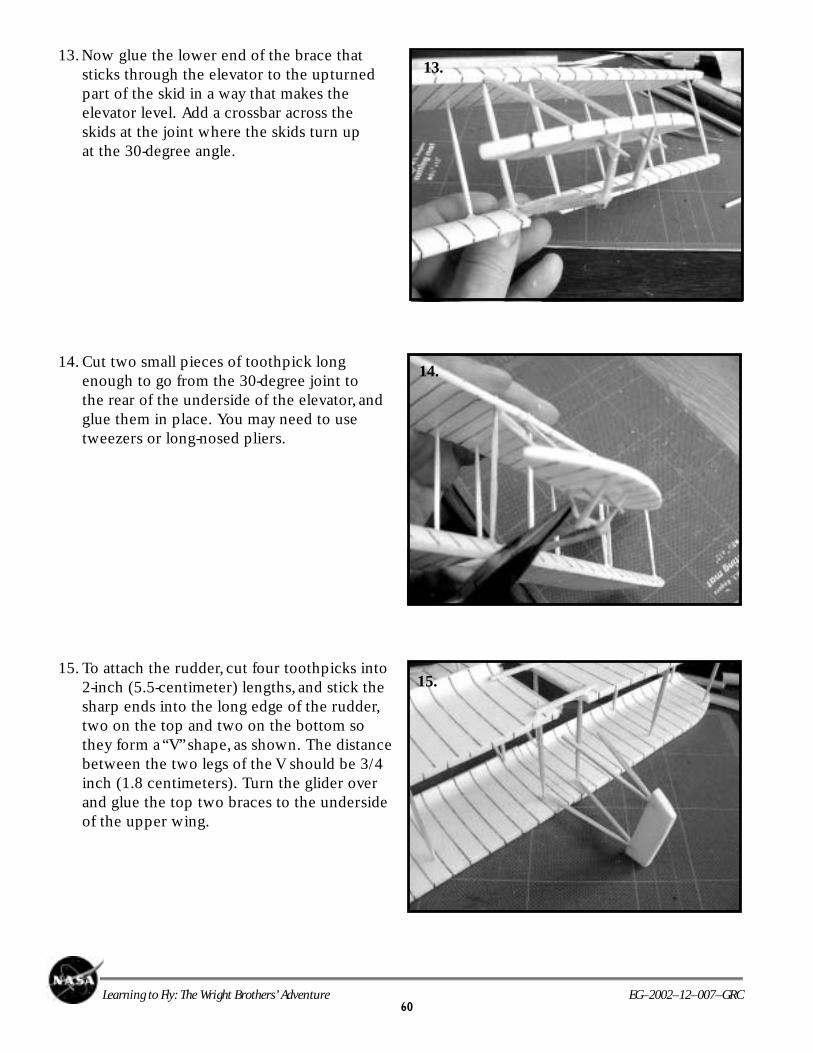
13. Now glue the lower end of the brace thatsticks through the elevator to the upturnedpart of the skid in a way that makes theelevator level. Add a crossbar across theskids at the joint where the skids turn upat the 30-degree angle.
14. Cut two small pieces of toothpick longenough to go from the 30-degree joint tothe rear of the underside of the elevator, andglue them in place. You may need to usetweezers or long-nosed pliers.
15. To attach the rudder, cut four toothpicks into2-inch (5.5-centimeter) lengths, and stick thesharp ends into the long edge of the rudder,two on the top and two on the bottom sothey form a “V” shape, as shown. The distancebetween the two legs of the V should be 3/4inch (1.8 centimeters). Turn the glider overand glue the top two braces to the undersideof the upper wing.
13.
14.
15.

61Learning to Fly: The Wright Brothers’ Adventure EG–2002–12–007–GRC
16. Turn the glider right side up and glue thebottom two rudder braces to either side ofthe opening in the lower wing. This finishesthe glider.
17. (Optional) You can make the figures ofWilbur and Orville Wright by swapping andgluing parts of plastic army soldiers. To obtainthe desired poses, arms and legs can beremoved and some from other soldiers gluedin their place. Guns and helmets should betrimmed away using a hobby knife and thefigure arms and legs can be shaped, swapped,or repositioned to fit and glued on. Five-minuteepoxy works best for this. The picture to theright shows how to make a pilot lay on thewing. The original soldiers on the left weretransformed into the figures of Wilbur andOrville Wright on the right.
16.
17.

62Learning to Fly: The Wright Brothers’ Adventure EG–2002–12–007–GRC
The Wright Brothers’ 1903 aircraft was the first heavier-than-air, self-propelled, maneuverable, piloted aircraft.It was, in short, the first airplane.
The forces acting on this aircraft were identical to the forces that act on any modern aircraft. The various partsof the aircraft were designed and perfected by 3 years of flight testing of unpowered kites and gliders and fromwind tunnel testing. The Wrights used a moving elevator at the front of the aircraft to control pitch (an up ordown movement of the nose). From the glider flights of 1901, the brothers identified the need for a rudder atthe rear of the aircraft to control yaw (a side-to-side movement of the nose) and to allow coordinated turns.Control of roll (an up-and-down movement of the wing tips) was provided by wing-warping, which meanttwisting the wing tips to increase or decrease lift on the outer sections of the wing.
The brothers began large-scale testing of their ideas with a combination kite and glider in 1900. The ideas testedon this aircraft were further refined on the glider of 1901, verified by the Wrights’ wind tunnel data, and finallyconfirmed on the very successful 1902 Glider.
The 1903 aircraft (shown below) was similar to the 1902 craft, but now with a longer 40-foot wingspan, a 6-footchord, 5 feet between the wings, and twin rudders and elevators. The biggest difference between the 1902 and1903 aircraft was the addition of the propulsion system. The 1903 aircraft used twin pusher propellers locatedbehind the wings. They were made to rotate in opposite directions, so that the rotational forces would canceleach other out. The Wright Brothers used gasoline to turn the propellers. Since no one could provide them witha lightweight motor of adequate horsepower, they built their own 4-cylinder, 12-horsepower motor. To put thisinto perspective, the motor of a modern lawn mower can easily achieve 6 horsepower.
The motor was placed on the lower wing next to the pilot and connected to the propellers with bicycle chains.A small gasoline tank was mounted on one of the wing struts. With the pilot and motor, the 1903 craft weigheda little over 700 pounds. This aircraft was first successfully flown on December 17, 1903, at Kitty Hawk, NC, onfour flights from about 100 to over 800 feet.
Each of the four flights was marked byan instability in pitch; the nose, andconsequently the entire aircraft, wouldslowly bounce up and down. On thelast f light, hard contact with theground broke the front elevator sup-port, damaged the engine, and endedthe season’s flying. The brothers wereencouraged, but realized that there wasstill more work to do before a truly op-erational aircraft could be developed.They continued to perfect their designthrough 1904 and 1905.

63Learning to Fly: The Wright Brothers’ Adventure EG–2002–12–007–GRC
Designed byRoger Storm, NASA Glenn Research Center
Materials• Two to three clean Styrofoam meat trays, at least 9 inches (23 centimeters) by 11 inches
(28 centimeters), preferably white• 40 to 50 toothpicks• 30-inch piece of 1/8- by 1/8-inch (.3 centimeter) piece of balsa wood• Two craft sticks or wooden ice cream sticks• Low-temperature glue gun• Scissors• Hobby knife, razor utility knife, or single-edge razor blade (adult help here)• Cardboard or board to cut on• Ultrafine-tip black marker• Ruler• Emery board• Manila file folder• Clear plastic sheet, such as a transparency sheet for an overhead projector• Small plastic toy army soldiers, about 2 inches (5 centimeters) tall (optional)
General Instructions• Use scissors to cut out all three templates on the heavy lines of the 1903 Flyer template (found in
the back of this book).• Do all hobby knife or razor blade cutting on the board or cardboard to protect your working surface.
• The finished model is for display only; it is not meant to fly.
Procedure1. Carefully trace the wing and elevator shapes
on the inside of the two Styrofoam trays asshown. Be sure the front edges of the wingsgo about two-thirds of the way up the curvedsides of the tray. Check the bottom of the trayand avoid any logo found there. Cut out thewings and elevator with the hobby knife orscissors. Use the emery board to smooth thecut edges and sand off the pen lines.
1.
64Learning to Fly: The Wright Brothers’ Adventure EG–2002–12–007–GRC
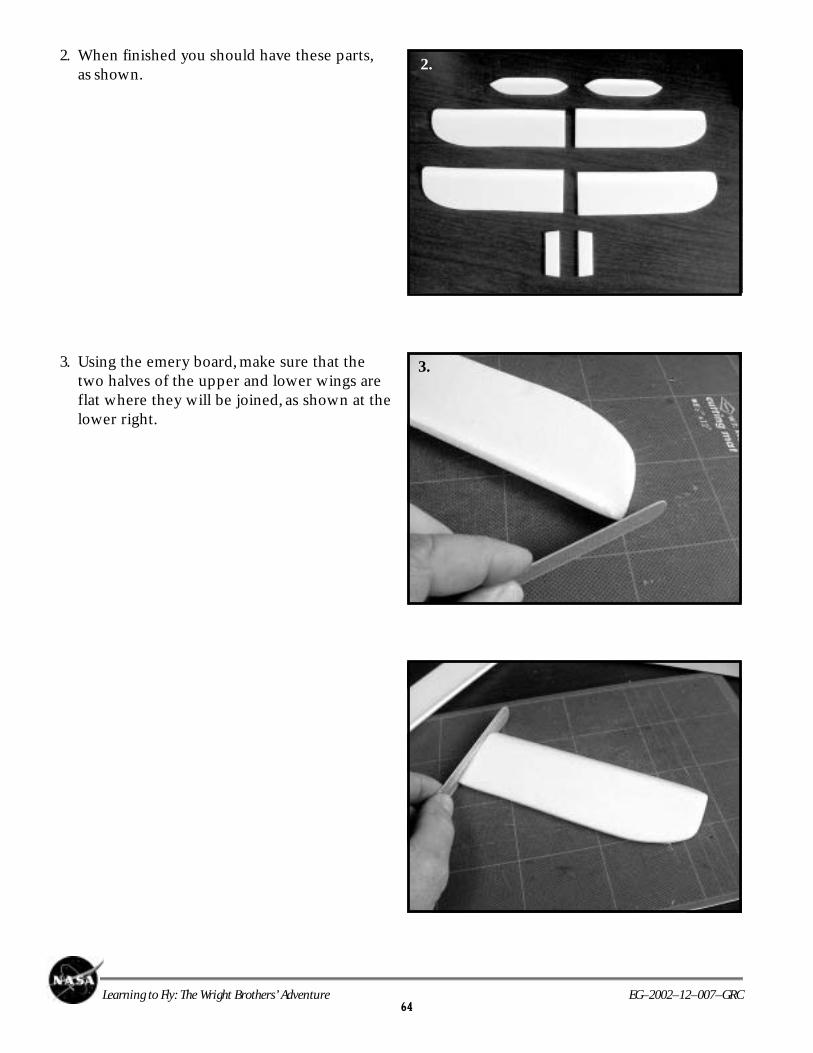
2. When finished you should have these parts,as shown.
3. Using the emery board, make sure that thetwo halves of the upper and lower wings areflat where they will be joined, as shown at thelower right.
3.
2.

65Learning to Fly: The Wright Brothers’ Adventure EG–2002–12–007–GRC
4. Using the templates as a guide, mark thelocations of the rib lines on the tops andbottoms of the wind and elevator sectionswith the ultra-fine tip black marker. Make twosets of marks, one on each edge. Connectthe marks to make the rib lines. Make a ribtemplate from a manila folder to draw the riblines (so the end of the template can be bentto conform to the rounded shape of theStyrofoam).
5. Place glue on the flat edge of the upper andlower wing halves and join each wing asshown.
5..
4.

66Learning to Fly: The Wright Brothers’ Adventure EG–2002–12–007–GRC
6. Use the wing template and a sharp toothpickto mark the holes for the spars on the topsurface of the lower wing. Note that the frontedges of the wings curve down. Dip toothpicksinto glue and set them upright in the lowerwing. Try not to push them all the way throughthe wing. Be sure they are straight and let themdry.
7. Now turn the lower wing upside down andinsert the spars into the underside of theupper wing, doing the back row (away fromthe curved edge) first. Be sure each is verticaland add a little glue to hold each in place. Nowtip the wing forward and insert the front rowof spars, working from one end to the other.Again, try not to push them all the way throughthe wing. It takes some effort to get each in theright place and vertical. Add a dab of glue atthe top of each spar to help secure it to theupper wing.
7.
6.

67Learning to Fly: The Wright Brothers’ Adventure EG–2002–12–007–GRC
8. For spars for the elevator, cut eight toothpicksections, each 1 inch (2.5 centimeters) inlength, and sharpen the cut ends. Mark thelocations for these spars on the upper surfaceof the lower elevator using the template, justas you did with the wings.
9. Set the eight short spars into the top surfaceof the lower elevator and add a bit of glue toeach at the base, as shown.
10. Turn the lower elevator assembly over andinsert the spars into the underside of theupper elevator, doing the back row first andthen the front, trying not to go all the waythrough the Styrofoam. Anchor with glue.
9.
10.
8.
68Learning to Fly: The Wright Brothers’ Adventure EG–2002–12–007–GRC
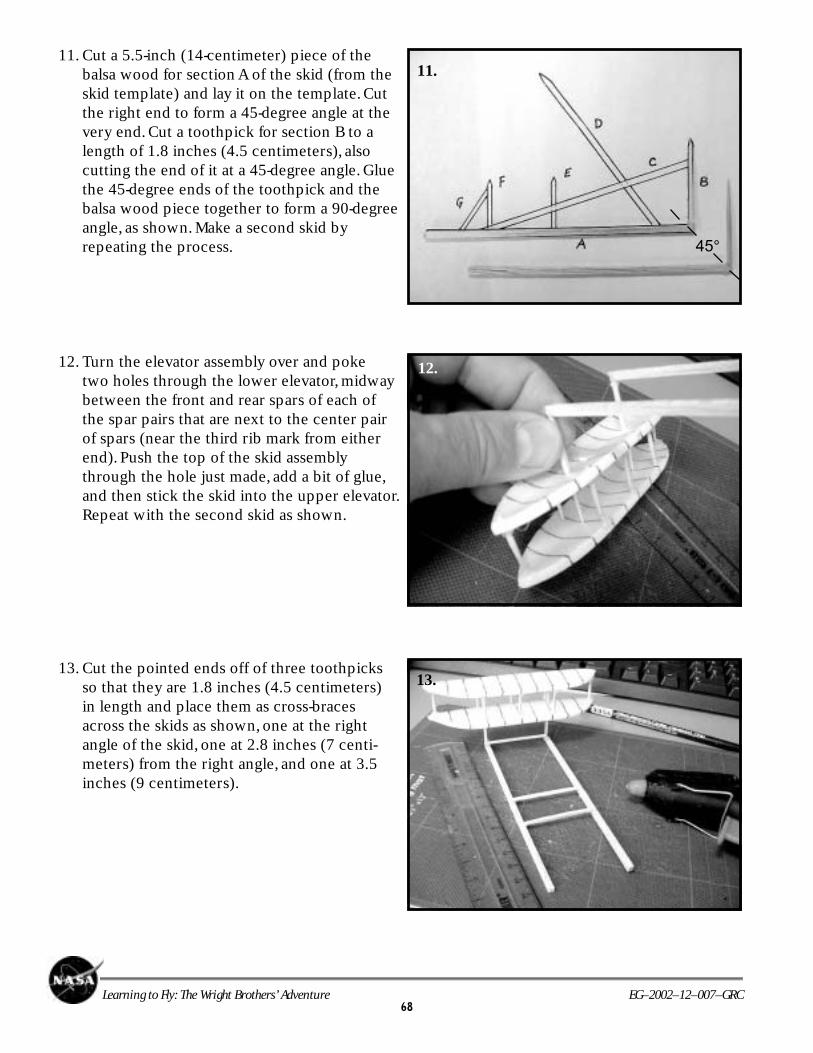
11. Cut a 5.5-inch (14-centimeter) piece of thebalsa wood for section A of the skid (from theskid template) and lay it on the template. Cutthe right end to form a 45-degree angle at thevery end. Cut a toothpick for section B to alength of 1.8 inches (4.5 centimeters), alsocutting the end of it at a 45-degree angle. Gluethe 45-degree ends of the toothpick and thebalsa wood piece together to form a 90-degreeangle, as shown. Make a second skid byrepeating the process.
12. Turn the elevator assembly over and poketwo holes through the lower elevator, midwaybetween the front and rear spars of each ofthe spar pairs that are next to the center pairof spars (near the third rib mark from eitherend). Push the top of the skid assemblythrough the hole just made, add a bit of glue,and then stick the skid into the upper elevator.Repeat with the second skid as shown.
13. Cut the pointed ends off of three toothpicksso that they are 1.8 inches (4.5 centimeters)in length and place them as cross-bracesacross the skids as shown, one at the rightangle of the skid, one at 2.8 inches (7 centi-meters) from the right angle, and one at 3.5inches (9 centimeters).
12.
13.
11.
45°

69Learning to Fly: The Wright Brothers’ Adventure EG–2002–12–007–GRC
14. Cut two toothpicks to a 1.2-inch (3-centimeter)length. Glue them to the skid as shown on thetemplate at points E and F, pointed ends up.Now measure and cut another toothpick asthe rear brace (section G) and glue it in place.Repeat for the second skid.
15. Now cut two balsa braces (section C) to gofrom the rear skid support up to the elevatorsupport. Glue them in place as shown.
16. Turn the wing assembly over and press theskid assembly into the center of the lowerwing as shown. Be sure the elevator projectsout from the curved edge of the wing. Try tokeep the toothpicks from going through theStyrofoam. Add some glue to each support.
.
15.
16.
14.

70Learning to Fly: The Wright Brothers’ Adventure EG–2002–12–007–GRC
17. Cut two 4-inch (10-centimeter) pieces of balsafor section D and sharpen one end of each.Glue one end under the leading edge of theupper wing between the center and next-to-center spar, and then glue the other end tothe bottom skid. Repeat on the other sideof the skid.
18. Six .8-inch (2-centimeter) rudder braces areneeded. Cut them from three toothpicks asshown and sharpen the cut ends.
19. Dip the braces in glue, insert them into therudder as shown here, and then turn theassembly over and insert the braces into theother rudder. Add more glue for support. Toattach the rudder to the flyer, make two setsof V-shaped braces by gluing together twotoothpicks as shown. The distance betweenthe two legs of the V should be 1.5 inches(3.8 centimeters).
18.
19.
17.

71Learning to Fly: The Wright Brothers’ Adventure EG–2002–12–007–GRC
20. Glue the V-shaped braces to the rudders asshown. Once the glue is set, turn the rudderassembly over and glue on the other brace.
21. Stick the upper brace ends into the rear edgeof the upper wing as shown and add a spotof glue. (If the wing is thin, glue the braceunder the wing.) Now glue the ends of thelower brace to the rear of the skid so thatthe rudder is vertical.
22. To make the propeller supports, use thetemplate to mark and cut five toothpicks foreach. Try to keep the assembly flat as it isglued.
22.
21.
20.
72Learning to Fly: The Wright Brothers’ Adventure EG–2002–12–007–GRC
23. When dry, glue each propeller support to thelower wing 2.2 inches (5.5 centimeters) fromthe center, in line with the back struts. Turnthe flyer over and glue to the top wing sothat the support is vertical. Extra glue maybe added to fill in any gap.
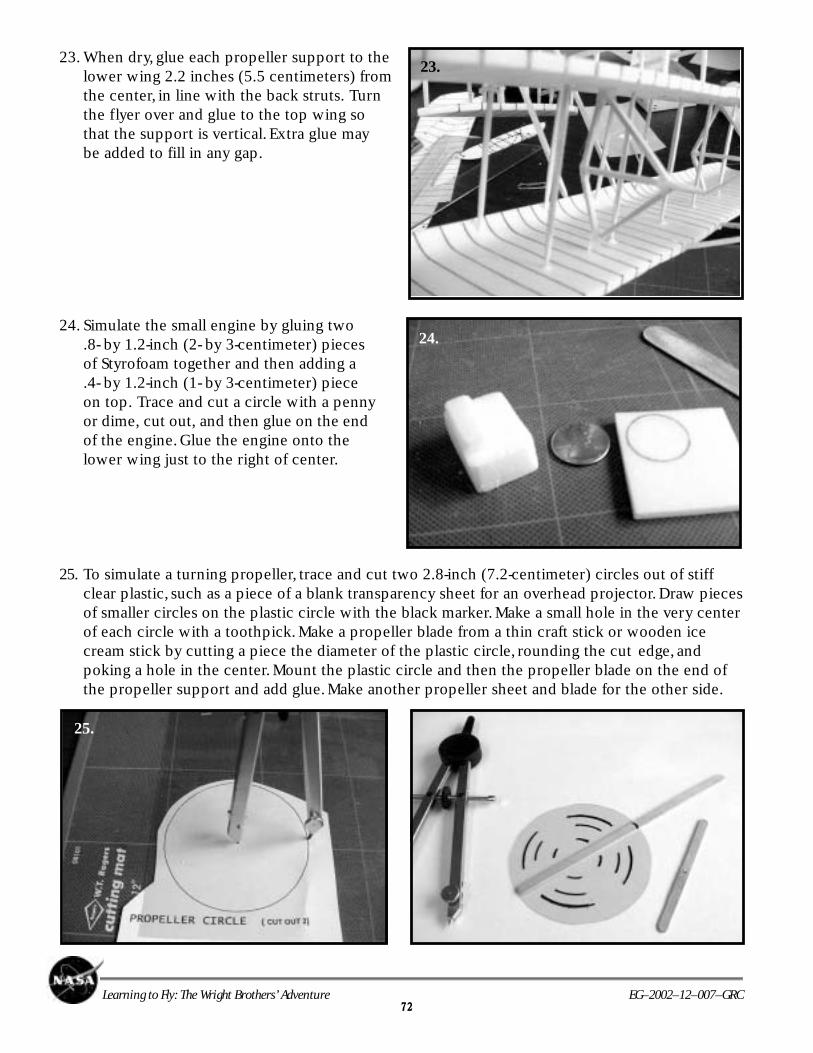
24. Simulate the small engine by gluing two.8- by 1.2-inch (2- by 3-centimeter) piecesof Styrofoam together and then adding a.4- by 1.2-inch (1- by 3-centimeter) pieceon top. Trace and cut a circle with a pennyor dime, cut out, and then glue on the endof the engine. Glue the engine onto thelower wing just to the right of center.
25. To simulate a turning propeller, trace and cut two 2.8-inch (7.2-centimeter) circles out of stiffclear plastic, such as a piece of a blank transparency sheet for an overhead projector. Draw piecesof smaller circles on the plastic circle with the black marker. Make a small hole in the very centerof each circle with a toothpick. Make a propeller blade from a thin craft stick or wooden icecream stick by cutting a piece the diameter of the plastic circle, rounding the cut edge, andpoking a hole in the center. Mount the plastic circle and then the propeller blade on the end ofthe propeller support and add glue. Make another propeller sheet and blade for the other side.
23.
24.
25.

73Learning to Fly: The Wright Brothers’ Adventure EG–2002–12–007–GRC
26. (Optional) You can make the figures ofWilbur and Orville Wright by swappingand gluing parts of plastic army soldiers. Toobtain the desired poses, arms and legs canbe removed and some from other soldiersglued in their place. Guns and helmets shouldbe trimmed away using a hobby knife and thefigure arms and legs can be shaped, swapped,or repositioned to fit and glued on. Five-minuteepoxy works best for this. The picture to theright shows how to make a pilot to lay on thewing. The original soldiers on the left weretransformed into the figures of Wilbur andOrville Wright on the right.
26.