leave request system - commissioned corps management ... leave...leave request system commissioned...
TRANSCRIPT

Commissioned Corps of the U.S. Public Health Service Electronic Commissioned Officer Resources Processing System (eCORPS)
Leave Request System
Commissioned Corps Officer
This document is proprietary and confidential. No part of this document may be disclosed in any manner to a third party without the prior written consent from the Commissioned Corps of the U.S. Public Health Service.

Table of Contents Overview 3
Login Screen 3
First Time User | I Forgot My Password 4
Elements of the User Interface 8
Drawers / Home Screen Buttons 8
Portfolios / Tabs 8
Analytics 9
Gadgets 10
Navigation Bar 11
Interaction Bar 11
Global Bar 13
Workflow Engine 13
Review Existing Leave Balance 13
Leave Balance 14
Pending and Future Leave Requests / Leave Activity 15
Leave Activity 16
Requesting Leave 17
Initiating the Request 17
Leave Request Experience 18
Changing a Pending Leave Request 20
Correcting a Rejected Leave Request 23
Confirming Leave Requested 24
Workflow Activities 25
Leave Certification 26
Respond to a Leave Certification Request 26
Glossary 27
2 This document is proprietary and confidential. No part of this document may be disclosed in any manner to a third party without the prior
written consent from the Commissioned Corps of the U.S. Public Health Service.

Overview
Login Screen eCORPS can be accessed at https://phsleave.lyceum.com. Before logging into eCORPS, you must read and accept the Rules of Behavior.:
After clicking accept you will arrive at the following screen requesting your login credentials.
3 This document is proprietary and confidential. No part of this document may be disclosed in any manner to a third party without the prior
written consent from the Commissioned Corps of the U.S. Public Health Service.

Username: For officers, usernames are posted on the Officer Secure Area (OSA) dashboard on the Commissioned Corps Management Information System (CCMIS) website. Commissioned Corps Agency Liaisons and civilian users should receive usernames by email. For more information on obtaining your eCORPS username and who to contact if you have trouble accessing eCORPS for the first time, visit the CCMIS the eCORPS website at https://dcp.psc .gov/ccmis/eCORPS_m.aspx . Client ID: You will not have to enter your client ID every time. The Client ID for the Commissioned Corps of the U.S. Public Health Service (Corps) is 1003. Password: If you have never logged-in to eCORPS, select the “I forgot my password, or first time user” link. If the information you provide on the next screen matches what is in eCORPS you will be able to reset your password. Later, If you forget your password, select “I forgot my password or first time user” again to reset your password. For security reasons, passwords must be updated every 90 days. Forgot Password | First Time User: This link is for first time users to acquire a password, or for users who forgot their passwords and need to create a new one.
First Time User | I Forgot My Password If you are a First Time User or you forgot your password* eCORPS provides a secure means to reset your password. To utilize this feature, first click on the following link.
4 This document is proprietary and confidential. No part of this document may be disclosed in any manner to a third party without the prior
written consent from the Commissioned Corps of the U.S. Public Health Service.

Clicking “I forgot my password or first-time user” will change the login screen to the image below. The information requested must be entered correctly to proceed with obtaining or recovering a password.
1. Username Officer Usernames are available on the Officer Secure Area (OSA) dashboard. Civilian employees and Commissioned Corps Agency Liaisons should check the eCORPS website for updates on obtaining usernames at:https://dcp.psc.gov/ccmis/eCORPS_m.aspx .
2. ClientID The Corps clientID is 1003.
3. Email Address The email address on record should be the email displayed on your Officer Secure Area (OSA) dashboard. Civilian employees should check the eCORPS website for information on confirming the email address on record at: https://dcp.psc.gov/ccmis/eCORPS_m.aspx
4. Security Words This mechanism is aimed at preventing automated attempts to login from unauthorized parties. Simply type in the words displayed in an image. If the image is difficult to read, click on “Try another” image to change the image, and try again.
* Liaison may also reset officer user passwords for their respective agencies. Administrators may reset the passwords for Liaison and for each other.
5 This document is proprietary and confidential. No part of this document may be disclosed in any manner to a third party without the prior
written consent from the Commissioned Corps of the U.S. Public Health Service.

After entering the information above, correctly. You will be prompted to enter the zip code of your registered address:
If the information is incorrect, the process must be restarted and the correct home address zip code must be entered. If unsure, contact the Commissioned Corps Helpdesk at: [email protected] to verify this information.
If successful, click next and you will receive confirmation that a temporary password was sent to the primary email on record:
Click continue again to complete the recovery process, and check your email inbox.
6 This document is proprietary and confidential. No part of this document may be disclosed in any manner to a third party without the prior
written consent from the Commissioned Corps of the U.S. Public Health Service.

With the temporary password from the received email in hand, return to the login screen, and enter the username along with the temporary password provided by email.
You will be prompted to enter a new password.
If the new password conforms with the minimum requirements, access to the system is granted. If the password doesn’t conform with the requirements, an error message will display with information about the problem and a prompt to try again.
7 This document is proprietary and confidential. No part of this document may be disclosed in any manner to a third party without the prior
written consent from the Commissioned Corps of the U.S. Public Health Service.

Elements of the User Interface The elements on the graphic user interface of eCORPS are designed to help users navigate through their
information efficiently. These elements are as follows:
Drawers / Home Screen Buttons
The buttons in the Home Screen contain information about users or the company which are functionally
grouped together. For example, My Profile will contain portfolios (tabs) and data related the user’s
self-service profile, from payment information, tax, personal information and demographic data.
Portfolios / Tabs
Clicking most buttons on the Home Screen will take the user to a new screen that may look like the
example below. The Portfolios are navigated by clicking on the tabs highlighted. In some cases, there
may not be any tabs if the section only has a single portfolio. Examples are because the Home Screen
button (Drawer) led to a single Portfolio, or most of the cases when drilling down on ‘drillable’
information.
8 This document is proprietary and confidential. No part of this document may be disclosed in any manner to a third party without the prior
written consent from the Commissioned Corps of the U.S. Public Health Service.
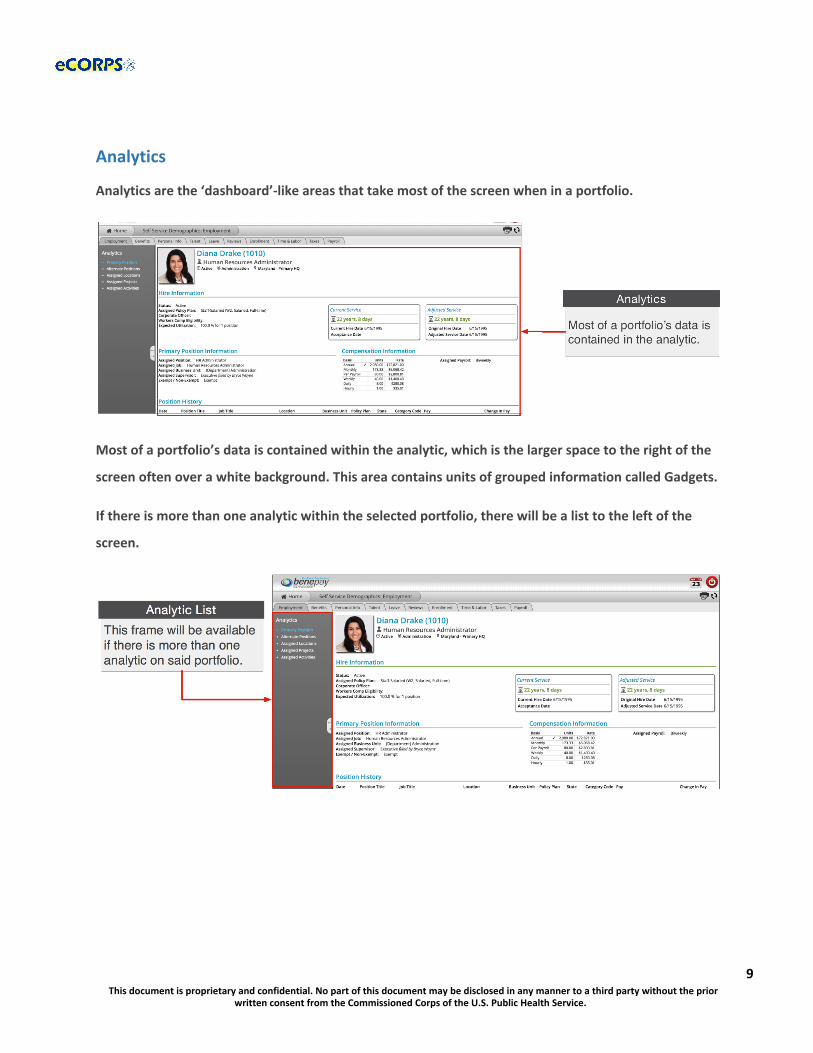
Analytics
Analytics are the ‘dashboard’-like areas that take most of the screen when in a portfolio.
Most of a portfolio’s data is contained within the analytic, which is the larger space to the right of the
screen often over a white background. This area contains units of grouped information called Gadgets.
If there is more than one analytic within the selected portfolio , there will be a list to the left of the
screen.
9 This document is proprietary and confidential. No part of this document may be disclosed in any manner to a third party without the prior
written consent from the Commissioned Corps of the U.S. Public Health Service.

Gadgets
Data within an analytic is often grouped in clusters called Gadgets. These gadgets are often closely
related, such as Hire Information, or Primary Position Information. They often have a header, but not
necessarily always. Sometimes gadgets can be a single item under a header, but usually, a gadget is
everything within a section with a header.
‘Gadgets’ is a term used to describe units of information that are tightly related. Think of it as “buckets”
of data. Another reason to group these elements of data into a unit is how eCORPS allows for the
modification of this data.
These buckets of data, or gadgets may or may not be editable by the user viewing them. For example,
although users are able to view their Hire Information on their self-service account , they will not be
able to make any changes to it. However, an admin user can make changes.
When in edit mode, editable gadgets will be marked by a yellow overlay. Clicking on these “editable
gadgets” will allow the user to modify the content in place, or initiate an “experience.” More on that in
the sections below.
10 This document is proprietary and confidential. No part of this document may be disclosed in any manner to a third party without the prior
written consent from the Commissioned Corps of the U.S. Public Health Service.

Navigation Bar
The Navigation Bar is always at the top of the screen in eCORPS. This bar lets the user know where in
eCORPS you are, such as Home -> Human Resource: Workforce -> (Name of user): (Portfolio).
As the user drills down into sections, the new section will be displayed last in this path or Navigation Bar.
The HOME tab is always on the far left. You can return to the Home Screen, or any of the screens
visited, by selecting the corresponding tab.
Interaction Bar
Now that you understand what most elements of the Graphic User Interface are, let’s view how to
interact with them.
11 This document is proprietary and confidential. No part of this document may be disclosed in any manner to a third party without the prior
written consent from the Commissioned Corps of the U.S. Public Health Service.

The interaction bar has 3 icons:
The lock icon.
When the user can modify information, this icon will display. Clicking on it will unlock ( ) the data
and enable a yellow overlay (“glass”) on those gadgets that can be edited. You can only update
information and send leave requests when you click on the lock icon and it displays as unlocked.
The icon will be available only when there is information that can be modified. This will depend
on factors such as user authority and the type of information. Some information may be edited in
some gadgets but not in others. As an example, the personal profile gadget may be edited in the
Personal Info portfolio analytic, but not anywhere else.
The Print icon .
This will allow the user to print specific gadgets or sections of the analytic.
The Refresh icon.
Clicking on the refresh icon will refresh the analytic. This is useful when the user is expecting a
change to happen in the data contained in the analytic. For example, the user might be waiting for a
background process to finish before information is reflected in the analytic. Clicking refresh will
display that change once it is finished.
12 This document is proprietary and confidential. No part of this document may be disclosed in any manner to a third party without the prior
written consent from the Commissioned Corps of the U.S. Public Health Service.

Global Bar
This section is comprised of 2 icons. One of them is a calendar and the other one is the Logout
button .
This icon is only for payroll and Commissioned Corps Headquarters (CCHQ) administrative use.
This icon logs the user out of the system. Part of the security of eCORPS is to automatically log-out
the user after several minutes of idle time. However, if the user needs to manually log out immediately,
he or she can click on this icon to make it so.
Workflow Engine Transactions in eCORPS, such as leave requests and approvals, are implemented as a workflow
transaction between users, such as requesters and their approvers. This allows for task distribution
efficiently, while keeping track of responsible parties, due dates, and completion.
Review Existing Leave Balance
Clicking the My Profile button will take the user to their Leave ‘Portfolio’ where they will be able to
review their leave information.
13 This document is proprietary and confidential. No part of this document may be disclosed in any manner to a third party without the prior
written consent from the Commissioned Corps of the U.S. Public Health Service.

1. Leave Balance
The Leave Balance Gadget will provide valuable information about the status of the user’s leave balance. This table is comprised of 4 columns of information:
2. Leave Type Current Leave Types available are:
a. Administrative b. Annual c. COT (Consecutive Overseas Tour) d. Emergency e. Maternity f. Paternal g. Permisive h. Respite i. SIck j. Station
3. Beginning Balance The beginning balance is the unused leave balance carried over from the previous year.
4. Current Period Activity These are changes in the balance for the current period. These are any accrual, forfeiture, or leave approved and taken during the current period.
5. Anticipated Leave Balance This number reflects the calculation of the beginning balance subtracting any current period activity. This balance includes pending requests for the current period, days accrued and days forfeited).
14 This document is proprietary and confidential. No part of this document may be disclosed in any manner to a third party without the prior
written consent from the Commissioned Corps of the U.S. Public Health Service.

Clicking on a Leave Type in the Leave Balance gadget will provide the user with a more detailed page about that specific leave type, including the beginning balance, adjustments, accrued, taken, forfeited amount, and the ending balance as seen below.
Pending and Future Leave Requests / Leave Activity
This section will provide a list of future and past Leave activity. The Pending and Future Leave Requests reflects the Leave Type, approval, Start Date, End Date and Days Taken that are still pending, or scheduled for a future Date.
Expanding the Pending and Future Leave Request gadget will show additional information about that specific request, such as emergency contact information.
15 This document is proprietary and confidential. No part of this document may be disclosed in any manner to a third party without the prior
written consent from the Commissioned Corps of the U.S. Public Health Service.

Leave Activity Displays a historical list of all the leave approved and already taken by the user during the monthly pay and leave period.
● Leave Type These are the Leave types available.
● Approval A viewable PDF leave form. This form provides details about the leave request and its approval.
● Start Date
Leave Start Date. ● End Date
Leave End Date. ● Days Planned
These are the day/units originally requested by the officer. ● Days Taken
These are the days/units approved for the office, by the Leave Approver. ● Confirmed
This column specifies how many days/units from this request have been confirmed via the confirmation process. The confirmation process is initiated by the leave administrator with the purpose of confirming that a leave that was requested, and approved was in fact taken the by the officer.
16 This document is proprietary and confidential. No part of this document may be disclosed in any manner to a third party without the prior
written consent from the Commissioned Corps of the U.S. Public Health Service.

Requesting Leave
Initiating the Request
Clicking on the button to the left of the user home screen, is a quick shortcut for the user to quickly request Leave.
Another way to request leave is on the Leave Portfolio (described in the section above). When the user
unlocks the Analytic within the Leave Portfolio by clicking the icon, then clicking over the yellow overlay (glass) over the Leave Balance.
17 This document is proprietary and confidential. No part of this document may be disclosed in any manner to a third party without the prior
written consent from the Commissioned Corps of the U.S. Public Health Service.

Leave Request Experience The Leave Request Experience, is a simple 2-step process that allows the user to quickly select the type of leave from the following buttoned list [1]:
and then click on the day they would like the leave to be applied to by clicking on the desired day in the calendar [3].
To the left of the calendar the user will have a list of the Upcoming Balance to the Leave Balance. This will allow her to keep track of future changes while scheduling new Leave.
A typical Leave Request would be as simple as:
Clicking the Leave Type Button. The pointer will become a Plus sign, then click on the day and done!
18 This document is proprietary and confidential. No part of this document may be disclosed in any manner to a third party without the prior
written consent from the Commissioned Corps of the U.S. Public Health Service.

Clicking Next after having selected the Leave Type and days requested, will take the user to the following screen:
The Summary of Requested Leave will provide a summary of the Leave requested. The
Relevant Information will provide fields for emergency contact information where the Leave Requestor will be staying during his or her leave. This also includes remarks specific to this leave request.
19 This document is proprietary and confidential. No part of this document may be disclosed in any manner to a third party without the prior
written consent from the Commissioned Corps of the U.S. Public Health Service.

Changing a Pending Leave Request It is possible for the user to change a Leave Request that is being processed and has a pending status. In order to do so the user must access the Leave Portfolio in My Profile [2] or access the Leave Experience directly [1] via the shortcut on the left.
My Profile Route
This route will take the user to the Leave Portfolio for a full overview of both leave taken and leave
pending. Clicking the icon will allow the user to modify the contact information for the leave, or jump to the Leave Experience to make modification on either the type of leave or days taken.
20 This document is proprietary and confidential. No part of this document may be disclosed in any manner to a third party without the prior
written consent from the Commissioned Corps of the U.S. Public Health Service.

Click on the Pending and Future Leave Request right after unlocking the analytic ( ) to view the contact information for leave in pending request:
The pencil icon will allow for the user to change the contact information of the leave.
Or instead, click on the Leave Balance gadget above to enter the experience and make changes directly to the type and days requested.
21 This document is proprietary and confidential. No part of this document may be disclosed in any manner to a third party without the prior
written consent from the Commissioned Corps of the U.S. Public Health Service.
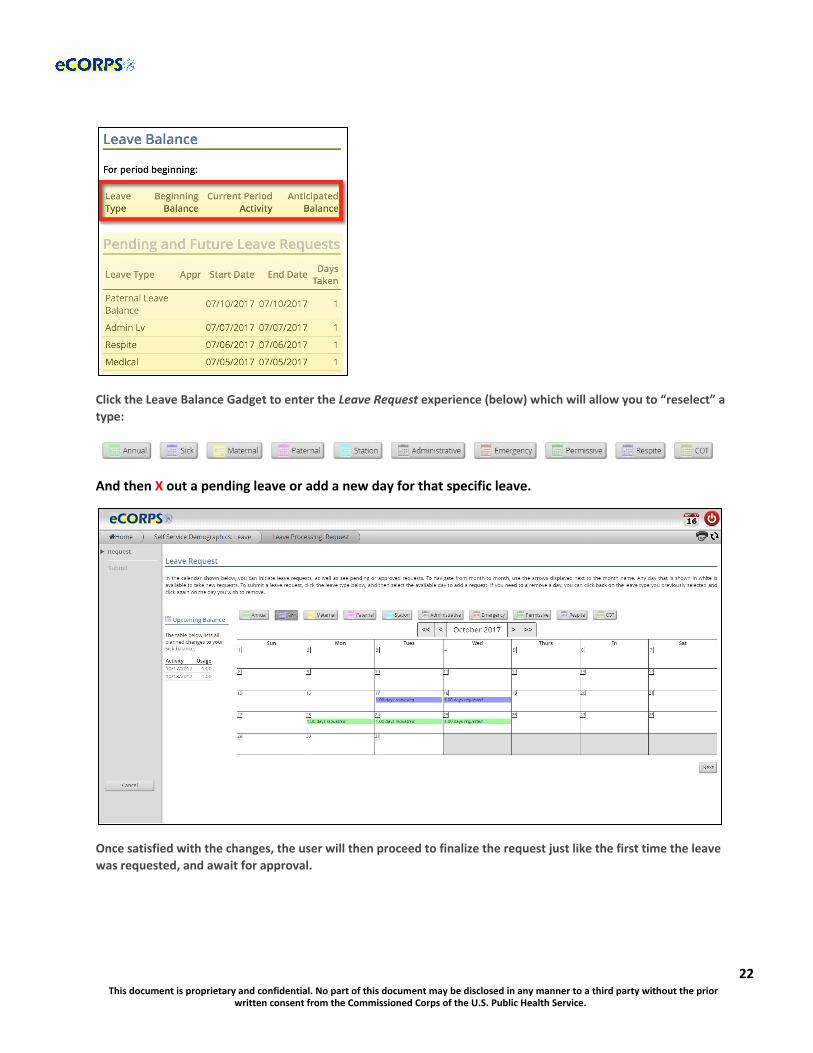
Click the Leave Balance Gadget to enter the Leave Request experience (below) which will allow you to “reselect” a type:
And then X out a pending leave or add a new day for that specific leave.
Once satisfied with the changes, the user will then proceed to finalize the request just like the first time the leave was requested, and await for approval.
22 This document is proprietary and confidential. No part of this document may be disclosed in any manner to a third party without the prior
written consent from the Commissioned Corps of the U.S. Public Health Service.

Correcting a Rejected Leave Request If an individual has submitted a leave request, the approver will see the request in both “Tasks” and “My Responsibilities.”
In “My Responsibilities,” the requests will appear as Leave Approval Subjects and will be listed here.
In “Tasks,” the requests appear here.
The approver has the ability to either approve or reject the submitted request.
If a request was rejected, the request will go back to the individual so that they may make any necessary changes. The rejected request workflow will appear in the subject’s “Tasks.”
After modifying your request, the leave must be re-submitted to the approver (as with the original request). The approver must then re-approve the re-submitted request.
23 This document is proprietary and confidential. No part of this document may be disclosed in any manner to a third party without the prior
written consent from the Commissioned Corps of the U.S. Public Health Service.

Confirming Leave Requested A nightly background scan will check approved leave for which the requested and approved dates are in the past. The leave confirmation scan will then generate tasks that are assigned to leave requesters to confirm that the approved leave had been taken.
leave
A separate leave confirmation task is generated for each approved leave request for which the leave period has passed.
The confirmation task will remain in the requestor’s task list until all days in the request have been confirmed. If there are any dates in the task that need modification the confirmation task will create a new request that is sent for approval. Any unconfirmed dates associated with that request will remain open until they have been confirmed.
24 This document is proprietary and confidential. No part of this document may be disclosed in any manner to a third party without the prior
written consent from the Commissioned Corps of the U.S. Public Health Service.
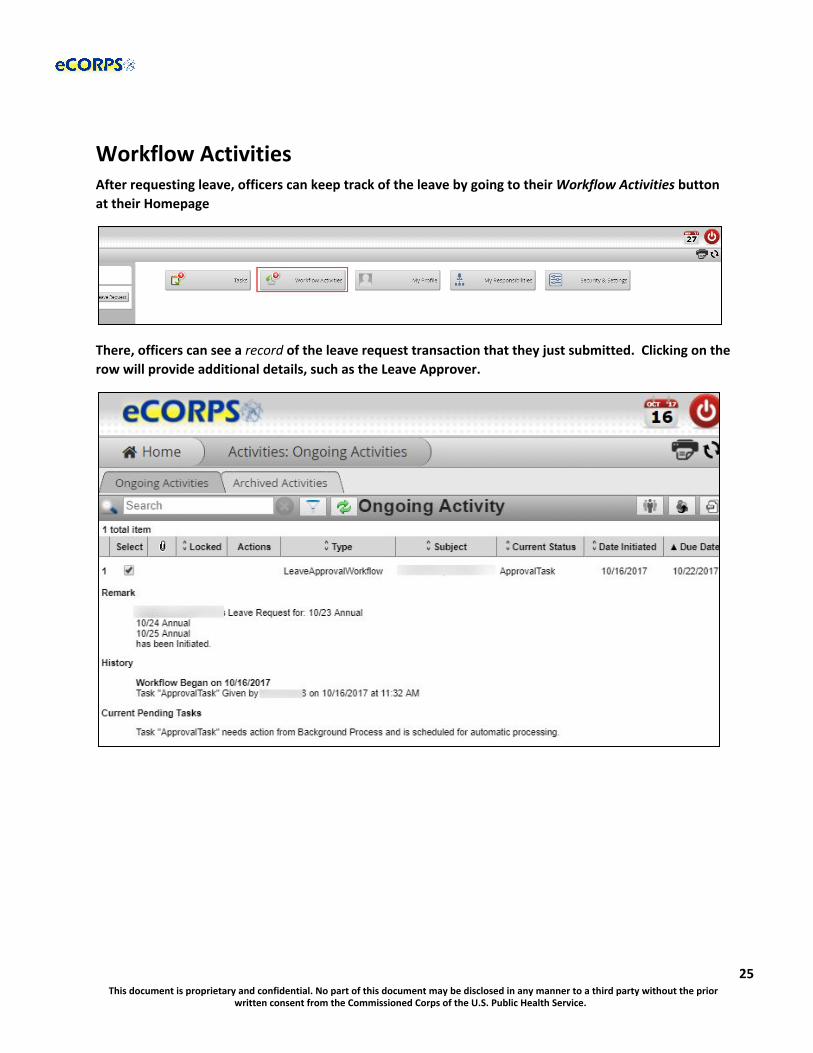
Workflow Activities After requesting leave, officers can keep track of the leave by going to their Workflow Activities button at their Homepage
There, officers can see a record of the leave request transaction that they just submitted. Clicking on the row will provide additional details, such as the Leave Approver.
25 This document is proprietary and confidential. No part of this document may be disclosed in any manner to a third party without the prior
written consent from the Commissioned Corps of the U.S. Public Health Service.

Leave Certification
Respond to a Leave Certification Request Officers are required to certify their leave balance annually. this usually happens at the end of the leave year. The user will receive a task to complete the certification.
A list of the leave balance and leave taken will be displayed on the next screen. Review the list, and if satisfied that the request leave is correct, then click on Certify Leave.
26 This document is proprietary and confidential. No part of this document may be disclosed in any manner to a third party without the prior
written consent from the Commissioned Corps of the U.S. Public Health Service.

Glossary Analytic list: Found on the left-hand side of a portfolio when more than one analytic is contained there.
Analytics: The dashboard-like areas that take most of the screen when in a portfolio; usually a large space over a white background where most of a portfolio’s data is contained.
Anticipated leave balance: The calculation that reflects the beginning balance minus any current period activity (including pending requests).
Beginning balance: The leave balance at the beginning of the period (these cycles are month to month).
Client ID: A unique set of numbers specific to your organization to identify it within our system.
Current period activity: Changes in the balance for the current period; any accrual, forfeiture, or leave taken that has been approved in the current period.
Drawers: The rectangular buttons you see on the Home Page containing information about users or the company which are functionally grouped together. Examples: Tasks, Notifications, Workflow Activites
Gadget(s): Data within an analytic that is grouped in clusters and closely related. Examples: Hire Information, Primary Position Information
Glass: The yellow overlay that appears over modifiable data.
Global bar: A two-icon section comprised of a calendar and a logout action button.
Interaction bar: A three-icon bar located in the upper right corner of the screen that allows the user to modify editable data, print gadgets, or reload the analytic.
Leave balance gadget: Provides information about the status of the user’s leave balance
Leave certification: An action capturing an officer or leave requestor’s agreement to a period of leave taken.
Leave type: Types of available leave. Examples: Admin leave, Annual leave, Maternity leave
Navigation bar: Found at the top of the screen in the eCORP system; displays to the user their exact location in the system. Example: HomeàHuman Resource: Workforceà(Name of user): (Portfolio)
Officer Secure Area (OSA) : A section of the dashboard only accessible to officers; civilian employees prohibited
Portfolio: A tab or tabs within a drawer that contain related data. Example: My Profile: Payment Information, Personal Information, Demographic data
Read-only gadget: A gadget that is not modifiable, depending on the authority of the user.
Rules of Behavior: An outline of acceptable terms and consenting conditions in order to access the portal.
Transaction: An action that relates to a real work event. Examples: leave requests, leave approvals
27 This document is proprietary and confidential. No part of this document may be disclosed in any manner to a third party without the prior
written consent from the Commissioned Corps of the U.S. Public Health Service.