lecture 2 - the first game - catch the clown
TRANSCRIPT

Lecture 2 - The first game - Catch the Clown
Written by Carl Gustafsson, heavily based on tutorial by Mark Overmars
Goal of the lecture
After finishing the exercises in this lecture, the reader should know how to create a simple, mouse-controlled game in Game Maker. The concept of a Game Design Document should be clear, and the main parts of most games understood.
This lecture was revised for round 2 of the Game Maker programming course at www.gameuniv.net. Changes to the original document are shown with slightly greenish background. If you read this document for the first time, just ignore those markings and read it as if nothing was marked.
This lecture was also revised for round 3 of the Game Maker programming course at www.gameuniv.net. Changes to the previous revision of the document are shown with slightly blueish background. People reading this document for the first time could ignore the different background colors. Most screenshots are revised, but the change is very little, so they are not marked.
Introduction
Welcome back! This is the second lecture in the Game Maker course on www.gameuniv.net.
This lecture is based upon a tutorial written by Mark Overmars. The original tutorial can be found on Game Maker's official web page, www.gamemaker.nl. In this lecture we will learn how to place instances in a room and make the instances interact with each other. We will also see how to implement a mouse-controlled interface. Even though that may sound complex, it is really very simple. It is just a matter of "getting the hang of it".
There are some external files required to follow this lecture. They can be found here. Unzip the file to find the resources for this lecture.
Game idea
It is important, before starting to code anything, to know as much as possible about what the idea of the game is. What kind of game is it? What is the goal of the game? How will the goal be reached? What are the challenges that the player will encounter?
This game will not be anything spectacular, because it is the first game we are going to write. The following text is the "Game idea" of Catch the Clown:
Catch the ClownCatch the Clown is a little action game. In this game a clown moves around in a playing field. The goal of the player is to catch the clown by clicking with the mouse on him. If the player progresses through the game the clown starts moving faster and it becomes more difficult to catch him. For each catch the score is raised and the goal is to get the highest possible score. Expected playing time is just a few minutes.
Design document
Now that the game idea is stated, a more detailed "Design document" is needed. This document describes all the objects that are in the game and how they interact. It also describes how the player controls the game and the "flow" of the game (start, play, win situation, lose situation, levels, end).
Here is the design document for the Catch the Clown game:
Catch the Clown - design document
Game objectsThere will be just two game objects: the clown and the wall. The wall object has a square like image. The wall surrounding the playing area is made out of these objects. The wall object does nothing. It just sits there to stop the clown from moving out of the area. The clown object has the image of a clown face. It moves with a fixed speed. Whenever it hits a wall object it bounces. When the player clicks on the clown by the mouse the score is raised with 10 points. The clown jumps to a random place and the speed is increased by a small amount.

SoundsWe will use two sounds in this game. A bounce sound that is used when the clown hits a wall, and a click sound that is used when the player manages to click with the mouse on the clown.
ControlsThe only control the player has is the mouse. Clicking with the left mouse button on the clown will catch it.
Game flowAt the start of the game the score is set to 0. The room with the moving clown is shown. The game immediately begins. When the player presses the <Esc> key the game ends.
LevelsThere is just one level. The difficulty of the game increases because the speed of the clown increases after each successful catch.
Right. That is a good start. We will, later in this lecture, make it a little bit more advanced, but let us first put the above design to work.
Sprites and sounds
SpritesStart up Game Maker, or, if Game Maker is already running, select File -> New from the menu to start editing a new game.
The first thing we will do is to add some sprites to the game. If you remember the previous lecture, you know that sprites are basically images or animations with a few extra properties. The images for the sprites can either be created directly in Game Maker, or loaded from an external image file. In this lecture we will use images that were bundled with the installation of Game Maker.
If you are looking for good images for your games, try looking at the resources and links at www.gamemaker.nl, or search the Internet. There are lots of images available. Just make sure you do not use copyrighted material without permission from the copyright holder.
Add a new sprite to the game (see previous lecture if you have forgotten how). The Sprite Properties window should appear.
In order to load an image from an external file, click the Load Sprite button:
This brings up an image selection file dialog. Find the place where the files from the resources zip file were stored. Select the file clown.bmp and open it. Now, give the sprite the name sprClown. Another naming convention could be to name the sprite spr_clown. Use whichever you like, I will probably stick to the first one, so, in order to not make this course too hard, try naming all the sprites in the same way I do. Leave all the other settings of the sprite as they are, it should look like this:
Note that the Transparent checkbox is marked. This means that the rectangle around the clown will be transparent, showing only the clown. If Transparent were not marked, the clown sprite would be

surrounded by a very dark color all the time. This would not look nice. Therefore we want transparency to be enabled for the sprite. Almost all sprites I have used have had transparency enabled.
Now you can click OK to close the Sprite Properties window.
Add another sprite. Name it sprWall. This sprite will represent the walls in the game. Since the same sprite can be used in matrny places in the room, it is only necessary to add one wall sprite to the game. Click the Load Sprite button. Select the file wall.bmp that is located in the same folder as the clown image.
Click OK to close the Sprite Properties window.
Now you can find the two new sprites in the Resource Explorer. We will now look at a new feature of the Resource Explorer. Just as with the common File Explorer in Windows, it is possible to add folders to the resource tree. These folders are called groups and can be very convenient when you have a large number of entities in the tree and have a hard time finding what you are looking for.
In order to try this, right-click on the Sprites folder in the Resource Explorer. Select Add Group. This brings up a dialog asking for a name for the folder. Enter Environment and click OK. A new group is added to the Sprites folder in the Resource Explorer. We now want the sprWall sprite to be put in the new group. In order to do this, click and drag the sprite sprWall from the Sprites folder and into the Environment group. Done!
The Resource Explorer should now look like the image on the left.
The placement of an entity in a group has a meaning only for the user of Game Maker, not for Game Maker itself. Entities placed in groups are not handled differently from any other entities. It is only for the convenience of the game developer. Trust me, it is a good idea to from the beginning get used to naming all entities good and placing them in good groups.
It is also possible to place groups within groups to form large hierarchies of entities. This makes it all easier to find what you are looking for and keep a good order of your development environment.
However, the feature of placing entities in different groups does not relieve the developer from coming up with unique names for each entity. It is forbidden to use the same name for two entities, especially when we start delving into GML (Game Maker Language).
As a little exercise, make a new group in the Sprites folder and place the sprClown sprite in that group. Groups can be expanded and contracted, just like folders in the common file explorer.
SoundsIt is now time to add the sound effects to the game. This is very straightforward.
Add two new sounds to the game. Name the first sound sndBounce and the second sound sndClick. In the sound sndBounce, load the sound file bounce.wav, and in the sound sndClick, load the sound file click.wav. This is all that is needed for the sounds. You can listen to them if you want to, just to check that they sound as expected, then click the OK button in the two sound windows to accept the changes made and close them.
Of course it is possible to add groups also to the sound entities, but we will not bother with that here; it works in the same way as with sprites, and, in fact, as will all types of entities.
It is now time to save the game. Choose a good name, like CatchTheClown or Catch_The_Clown or something like that.
Objects and actions
Up to now, in this lecture, we have only added sprites and sounds. They, in themselves, do not make a game. Nothing yet happens in the game, all we have is some resources. Time to change that.
Here comes an object <-> instance explanation, cut-and-pasted from Mark's tutorial:
Before we will do this you will have to understand the basic way in which Game Maker and most other game design systems operate. As we have indicated before, in a game we have a number of different game objects. During the running of the game one or more instances of these game objects will be present on the screen or, more general, in the game world. Note that there can be multiple instances of the same game object. So for example, in our Catch the Clown game there will be a large number of instances of the wall object, which surround the playing field. There will be just one instance of a clown object.
Instances of game objects don’t do anything unless you tell them to do something. You do this by indicating how the instances of the object must react to events that happen. There are many different events that can happen. The first important event is when the instance is created. This is the Creation Event. Probably some reaction is required here. For example we must tell instances of the clown object that they should start moving in a particular direction. Other events happen when two instances collide with each other; a so-called Collision Event. For example, when the instance of the clown object collides with an instance of the wall object, the clown instance must react and change its direction of motion. Again, other events happen when the player presses a key on the keyboard or clicks with the mouse on an instance. For the clown object we will use a Mouse Event to make it react to a press of the mouse on it.
To indicate what must happen in the case of an event, you specify actions. There are many useful actions for you to choose from. For example, there in an action that sets the instance in motion in a particular direction, there is an action to change the score, and there is an action to play sounds. So defining a game object consists of a few aspects: we can give the game object a sprite as an image, we can set some properties, and we can indicate to which events instances of the object must react and what actions they must perform.
Note that I make a distinction between objects, and instances of those objects. An object defines a particular game object with its behavior (that is, reaction to events). Of this object there can be one or more instances in the game. These instances will act according to the behavior. Stated differently, an object is an abstract thing. Like in normal life, we can talk about a chair as an abstract object that you can sit on, but we can also talk about a particular chair, that is an instance of the chair object, which actually exists in our home.
Now that we know about objects and instances, it is time to add the first object to this game. There are to be only two objects in this game (at least initially), of which the wall object will be very simple and not have any behaviour at all. (Note the difference between no behaviour, which will be how the wall works, and bad behaviour, which is what lots of kids have, at least in the eyes of elderly people :) :) ).
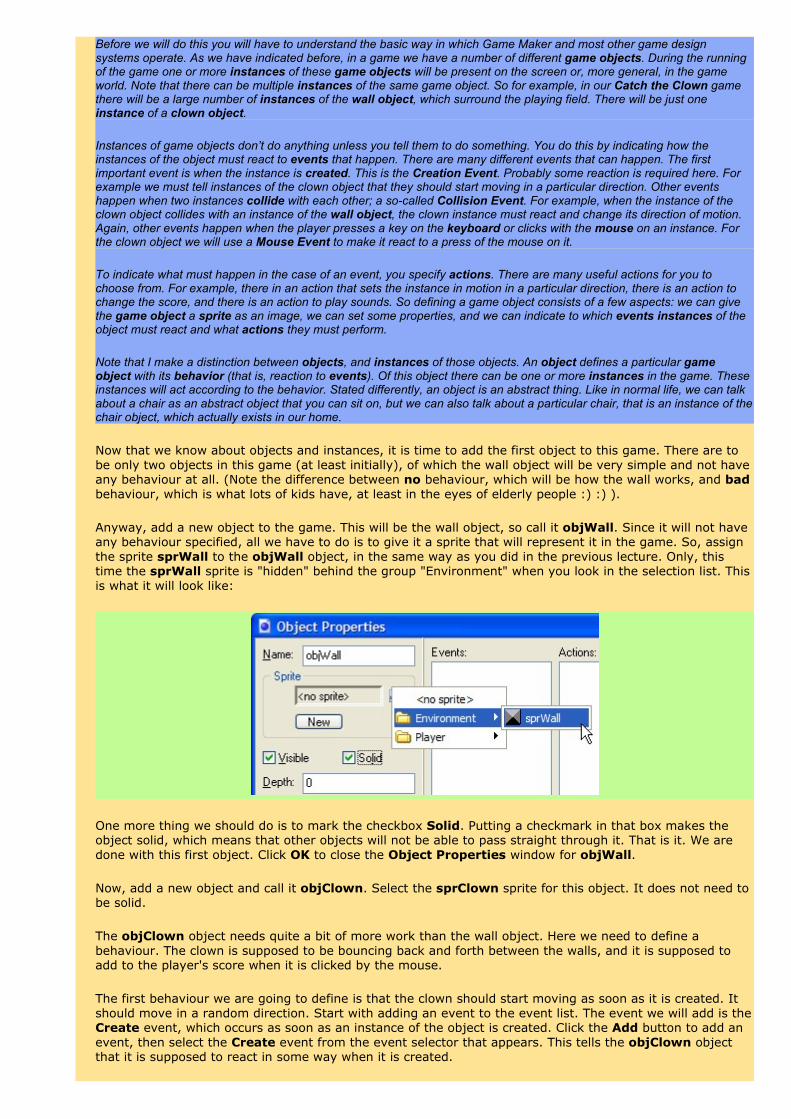
Anyway, add a new object to the game. This will be the wall object, so call it objWall. Since it will not have any behaviour specified, all we have to do is to give it a sprite that will represent it in the game. So, assign the sprite sprWall to the objWall object, in the same way as you did in the previous lecture. Only, this time the sprWall sprite is "hidden" behind the group "Environment" when you look in the selection list. This is what it will look like:
One more thing we should do is to mark the checkbox Solid. Putting a checkmark in that box makes the object solid, which means that other objects will not be able to pass straight through it. That is it. We are done with this first object. Click OK to close the Object Properties window for objWall.
Now, add a new object and call it objClown. Select the sprClown sprite for this object. It does not need to be solid.
The objClown object needs quite a bit of more work than the wall object. Here we need to define a behaviour. The clown is supposed to be bouncing back and forth between the walls, and it is supposed to add to the player's score when it is clicked by the mouse.
The first behaviour we are going to define is that the clown should start moving as soon as it is created. It should move in a random direction. Start with adding an event to the event list. The event we will add is the Create event, which occurs as soon as an instance of the object is created. Click the Add button to add an event, then select the Create event from the event selector that appears. This tells the objClown object that it is supposed to react in some way when it is created.

Now, make sure that the move tab is selected in the actions panel (to the far right in the Object Properties window). In this panel, locate the icon for the Start Moving in a Direction action. It looks like
this:
Drag that action into the empty Actions list. This brings up the properties for the action. Here we can select in which direction the object should start moving. Since we want the object to start moving in any of the eight directions, select all of them (except the square in the middle, which is used to stop an object). This makes Game Maker pick one of the directions at random. In the Speed textbox, enter 4. That will be fine for a starting speed. The form should now look like this:
Click OK to store the changes. We have now defined what an instance of the clown object should do once it is created.
Now, add a new event and select the Collision event. This brings up a list of objects, for which the collision event occurs. Select the objWall object there. When the clown collides with the wall, we want it to bounce away from the wall, so, here we add the action Bounce against objects. It is the last action on the move tab, and looks like this: . Drag it to the Actions list. Accept the default values in the properties window
for this action.
In addition to bouncing from the wall, a sound should be played; the bouncing sound. So, with the Collision event with the objWall still selected ( ), select the tab main1 and drag the Play a
sound action ( ) to the action list. In the properties window for the sound, click the list selector for
sound and select the sound sndBounce from the list that appears. The loop property should be left at false, since we only want to hear the sound once every time the clown bounces against a wall. Click OK to store the changes.
Great. We have now told the clown object to bounce against instances of the wall object and make a sound when bouncing. The Object Properties window for the object objClown should now look like this:

If you make any mistake and need to remove an action from the Actions list, just select that action and press DELETE on the keyboard, or right-click the action and select Delete from the pop-up menu.
You can edit the properties of an action through double-clicking on it in the Actions list or right-clicking and selecting Edit Values.
Now for the most tricky behaviour - the actions that should happen if the player manages to click on the clown in the game.
Add a new event to the event list. Select the mouse events. In the list of mouse events that appear, select the one called Left pressed. Note that there are more than one kind of event for the left mouse button here. The Left pressed event occurs once every time the player clicks with the left mouse button on an instance of this object. Other left mouse button events occur all the time when the mouse button is being held down, or when the mouse button is released, etc. It is important to find the event that best fits the purpose it is supposed to have in the game.
The first action that we add to this event is to increase the player's score. Game Maker has a built-in score feature that can easily be changed and displayed on screen. Select the tab score in the actions panel. There you will find an action called Set the score. It is the first action and looks like this:
Drag the Set the score action to the actions list. In the window that appears with properties for the Set the score action, enter 10 as new score. This will however only set the score to 10. What we need is to add 10 to the existing score value. That is done through marking the checkbox called Relative. Marking a Relative checkbox in any actions properties window will cause any number there to be added to the existing value of that number rather than just set to that number. When done, the properties window for the Set the score action should look like this:

If your window looks like this, click OK to close it.
Now, when the player clicks the clown, a sound also should be played; the click sound (sndClick). Add the action to play a sound, just like we did in the previous event, but this time choose the sndClick to be played.
Another thing that should happen when the clown is clicked is that it should jump to a random location on the screen and continue moving from there. On the move tab there is an action called Jump to a random position. Looks like this:
Add that action to the actions list. Accept the default settings and click OK when the action properties window appears. This action will make the clown instantly move ("jump") to a random location on the screen.
One action remains. We want the clown to change direction and to add a little speed to make it harder to
click on. Drag the action Start moving in a direction ( )to the Actions list. Click on all the arrows in
the properties window for this action again to let it move in any of the eight directions. Set the speed to 0.5 and mark the Relative checkbox. This will make the speed increase with 0.5 every time the action is executed.
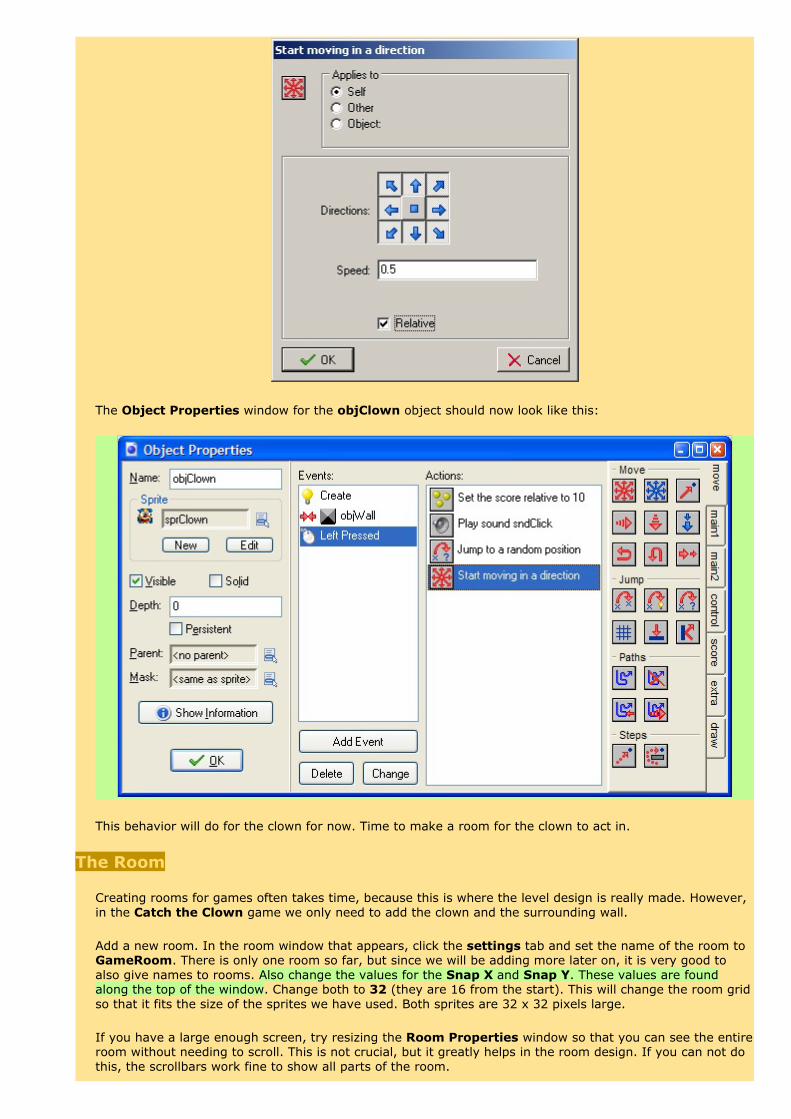
The Object Properties window for the objClown object should now look like this:
This behavior will do for the clown for now. Time to make a room for the clown to act in.
The Room
Creating rooms for games often takes time, because this is where the level design is really made. However, in the Catch the Clown game we only need to add the clown and the surrounding wall.
Add a new room. In the room window that appears, click the settings tab and set the name of the room to GameRoom. There is only one room so far, but since we will be adding more later on, it is very good to also give names to rooms. Also change the values for the Snap X and Snap Y. These values are found along the top of the window. Change both to 32 (they are 16 from the start). This will change the room grid so that it fits the size of the sprites we have used. Both sprites are 32 x 32 pixels large.
If you have a large enough screen, try resizing the Room Properties window so that you can see the entire room without needing to scroll. This is not crucial, but it greatly helps in the room design. If you can not do this, the scrollbars work fine to show all parts of the room.

Now it is time to add some instances to the room. Go to the objects tab. Under the Object to add with left mouse: label there is a list selector. Click it to bring up a list with all objects that are available in the game. We will now add the wall that surrounds the playing area. Select the object objWall. Click with the left mouse button in all squares that are along the edges of the room. This will place an instance of the objWall object there. When you are done, it should look like this:
Alright, time to add the final object. Use the same object selector to select the objClown object instead. Place an instance of the clown object in the middle of the room. Ta-daa! Our game is now ready to be tested.
Saving and testing
SAVE the game! This is very important. There is a possibility that something might happen that makes the computer freeze or something when you are testing the game. If you then have not saved, your blood pressure might reach dangerous levels.
Game Maker files are saved with the extension gm6.
Then, press F5 to run the game. First the loading screen will appear, then the first (and only) room appears with the clown bouncing around in it. Clicking the clown with the mouse makes it jump to a random location on the screen and change direction. It also adds 10 to the score count, which is displayed in the window caption (The (usually) blue bar at the top of all standard windows). To end the game, press ESC on the keyboard.
It is now time to really test the game and see that it works according to the design document, and according to how we want the game to work. It is also important to have someone else test the game. Since you, yourself, already know how the game is constructed and is supposed to work. No one is as good at finding bugs as other people. This is often referred to as beta testing.
Now it is time to tune the game. You should ask yourself for example the following questions:
• Is the initial speed correct?
• Is the increase in speed correct?
• Is the room size correct?
• Did we pick effective sprites and sounds for the game?

If you are not happy, change these aspects in the game and test again. Remember that you should let someone else also test the game. Because you designed the game it might be easier for you than for other people.
Now, when you are satisfied with everything (well, almost everything. I don't think game designers are ever satisfied with everything in their games) you have the possibility to make a stand-alone version of it. This makes it possible for everyone to play the game, not only those that have access to Game Maker. A Stand-alone file is created through selecting File -> Create Executable ... in the menu. The stand-alone file will be a normal exe file.
Finishing touches
There are always things that can be improved in games. This, our very first game, will be improved with the following things:
• Background music
• A nicer background graphic
• Random clown movement
• Help text
Background musicFor background music, it is very common to use the MIDI file format. That is because a piece of music is usually quite long compared to sound effects, and the WAV file format that is the most common for sound effects is not effective when it comes to storing long sounds. Especially for music MIDI is a good format. Another good format is MP3, but that might not be supported on all systems.
Add a new sound entity and call it sndBackground. Load the sound music.mid to this sound entity. Note how Game Maker automatically sets the Kind "Background Music" for this sound when it discovers that it is a MIDI sound file. Now we also need something that starts the music. The Create event of the objClown object would be a good place to start the music. To do that, add a Play a sound action to the Create event of the objClown object and choose the sndBackground to be the sound that is played by this action. This time, set the Loop setting to true to make Game Maker loop the music file endlessly.
Background graphicTo add some background graphic to the game, instead of the grey background that is the default, add a new background entity and load the image background.bmp into it. Name the background bgrBrown. The Transparent setting for backgrounds is off by default. This is OK. Click OK to close the window.
Open the Room Properties for the first room (double-click on the GameRoom room). Select the backgrounds tab. Uncheck the property Draw background color. It is only used for the grey background color, and is not needed after adding the new background image. Click on the list selector to the right of the words "<no image>". Select the new background we just added (bgrBrown). The background should now be a kind of brownish relief (okay, maybe it is red, then, but I am using an old laptop and the colors are a bit so-so). Note that the properties Tile Hor. and Tile Vert. are marked. That means that the background image is tiled so that it covers the entire background.
Random clown movementYou might have noticed that it is pretty easy to hit the clown, because it is easy to anticipate where it will be in a little time because it is bouncing according to a "pattern". We will now add a little bit of randomness to this to make the clown harder to hit. The plan is that after a little time, the clown should change to a random direction. This can be implemented using the alarms feature of the objects.
The alarm clocks work like timers. They are set to a starting value, and then they start to tick down. When they reach 0, they trigger an alarm event. The speed at which the alarm clocks tick down is the same as the room speed, which can be set in the Room Properties window. The default room speed is 30, which means that the game works at 30 steps (or "ticks" or "frames") per second. So, say that we set an alarm clock to 50 steps. It would then trigger after a little bit more than 1.5 seconds.
Open up the Object Properties window for the objClown object. Select the event Create. Drag the action Set an alarm clock ( ) to the action list. It can be found in the main2 tab. In the action properties
window that appears, set number of steps to 50. The in alarm no setting could be left at Alarm 0. There are eight independent alarm clocks available for each object.

The next thing to do is to add the Alarm 0 event to the list of events that this object should react to. Click the Add Event button to add a new event. Select the Alarm events and, in the list that appears, select Alarm 0. We can now add actions to the Alarm 0 event.
Add a Start moving in a direction action (you know by now, the eight red arrows icon) and click down on all the arrows in the action properties window. Let the Speed be left at 0 and put a check mark in the checkbox Relative. This means that the direction is set to one of the eight directions at random, but the speed is not changed (actually, 0 is "added" to the speed value, which means that nothing happens to the speed).
Also, in order to make this happen more than once in the game, we need to set the alarm clock again. Every time an alarm triggers, the clock is disabled, so for an event to occur at even intervals throughout the game, the alarm clock will have to be re-set every time. Add a new Set an alarm clock action and set Alarm 0 to 50 steps again, just like in the Create event.
The clown will now change its direction at random with about 1.5 seconds interval. This makes it harder to hit with the mouse.
Help textGame Maker includes a feature to add a text document to the game. The document can be edited in an internal Rich Text editor, which means that it can be given a look similar to an MS Word document. It is important to give the player instructions about the game so that he (or she) knows how to play it. It is also a good idea to show the credits, which means displaying the names of you and everyone who has contributed to the game in some way (e.g. developers, graphics artists, musicians, level designers, beta testers, your mom, etc). (Side note: Actually, a friend of mine used to, when he was completely stuck in a programming problem, show his code to his mom and try to explain how it works. His mom usually does not understand a single thing, but in the process of explaining, my friend used to realize the problem with the code and be able to correct it. Quite ingenious, don't you think? :) )
To add the help text, also known as Game Information, double-click on the Game Information document in the Resource Explorer (next to the last node). This brings up the Game Information editor. You can now add all the information about the game that you figure the player needs. Perhaps something like this:

This help text is displayed anytime the player presses F1 on the keyboard. F1 is the standard help key in Windows. Of course it is possible to change this to any key you like, but F1 will be fine for now.
Ending words
Congratulations! You have now written your first complete game. We have gone through the process of implementing a Game Design Document using sprites, sounds and objects. You now know that objects are usually represented by sprites in the game, and that there can be multiple instances of the same object in a game (the walls). The interaction between objects is a very important part of any game.
You can now go on to the assignments for this lesson.
Good luck!
Carl
Assignments
Assignment 2 - Add features to Catch The Clown
Due date: Thursday, 2 June 2005, 08:00 AM (29 days 22 hours)Maximum grade: 100
In this assignment you will add a couple of features to the Catch the Clown game that is developed in lecture 2. Add the following features, zip the gm6 file and upload it for grading:
- Add an additional clown that has the same behaviour as the first clown (Hint: One object can have multiple instances...).
- Add a "dark clown" that, when clicked, decreases the score by 20 points. A new sprite image is needed for this, as well as a new object. Also, don't forget to add information about the "dark clown" in the Game Information document.
- Make different wall objects for the vertical and horizontal parts of the wall, and make corners for the walls. This requires adding more sprites. Either make your own images or search the net. There are great resources at Game Maker's web page (http://www.gamemaker.nl).Note that it is not important how good they look, just that they look different from the other objects and kind of "fit in". This is not a drawing skills course. Do not forget to add collision events with these new wall objects to the clown object(s).
Good luck!
Carl
Read part of the GM manual
Due date: Thursday, 2 June 2005, 08:00 AM (29 days 22 hours)
Read the following sections of the Game Maker 6.0 manual:(don't submit anything)- EVENTS- ACTIONS- CREATING ROOMS- DISTRIBUTING YOUR GAME
Carl