lego.star.wars.iii.the.clone.wars.official.game.guide.xbox360.ps3.wii.nds
DESCRIPTION
Lego.Star.Wars.III.The.Clone.Wars.Official.Game.Guide.XBOX360.PS3.Wii.NDSTRANSCRIPT

Co
nten
ts
Prima Official Game Guide
www.primagames.com
1
Contents
How to Use tHis eGUide
introdUCtion
Cast
Padawan traininG
waLKtHroUGH
seCrets and extras
CHeCKLists
nintendo ds
Protected by copyright. Unauthorized or unlawful copying or downloading expressly prohibited. by Curtiz
Download from www.chipper.pl

Contents
Co
nten
ts
Prima Official Game Guide
www.primagames.com
IntrodUctIon ..........................4How to Use tHIs Book ................................4
Cast .....................................................4
Padawan training ..............................4
walkthrough ......................................5
seCrets and extras ............................5
CheCklists ...........................................5
cast ..........................................6UnlockIng cHaracters .............................6
CharaCter Classes and abilities ......6cHaracters.................................................7UnlockIng sHIPs and VeHIcles ..............15
shiP and VehiCle abilities ................ 16PUBlIc sHIPs ............................................16seParatIst sHIPs .....................................17rePUBlIc VeHIcles ...................................18seParatIst VeHIcles ................................19
Padawan traInIng ...............20Flow oF tHe game ....................................20
story Mode ...................................... 20
Free Play Mode................................. 20adVentUroUs actIons.............................21
Fighting............................................. 21
breaking stuFF ................................. 21
building stuFF .................................. 21
aCtiVating Panels ............................ 21
using the ForCe ............................... 21
lightsaber Play ............................... 22sPace comBat ..........................................22
landing Pads .................................... 23
boost rings ...................................... 23
torPedoes ........................................ 23groUnd assaUlts ....................................23
the MiniMaP ...................................... 23
attaCking bases ............................... 24
base building ................................... 24tantalIzIng treasUres ...........................26
studs ................................................ 26
Minikits ............................................. 26
gold briCks ...................................... 26
red Power briCks ............................ 27
PrologUe ................................28geonosIan arena ....................................28
objeCtiVe 1: esCaPe ConFineMent ... 29
objeCtiVe 2: deFeat the nexu .......... 30
objeCtiVe 3: deFeat the aCklay ....... 30
objeCtiVe 4: deFeat jango Fett ....... 31
objeCtiVe 5: esCaPe! ......................... 31
coUnt dookU ..........................34cHaPter I: Battle oF geonosIs................34
objeCtiVe: destroy the Power Cores .................................... 35
coUnt dookU ..........................39cHaPter II: gUngan general ..................39
objeCtiVe 1: steal a tank ................ 40
objeCtiVe 2: destroy the Power towers ............................................. 41
coUnt dookU ..........................44cHaPter III: JedI crasH ...........................44
objeCtiVe 1: aCtiVate the water sPouts ................................... 45
objeCtiVe 2: Free the Cruiser ......... 49
objeCtiVe 3: esCaPe! ......................... 50
coUnt dookU ..........................52cHaPter IV: deFenders oF Peace .............52
objeCtiVe 1: establish a base ......... 53
objeCtiVe 2: esCaPe the Crash site 54
objeCtiVe 3: establish a Foothold . 55
objeCtiVe 4: destroy the deFoliator ........................................ 55
coUnt dookU ..........................58cHaPter V: weaPons Factory .................58
objeCtiVe 1: breaCh their deFenses ................................. 59
objeCtiVe 2: breaCh their deFenses—again! ................... 60
objeCtiVe 3: breaCh their deFenses—For real! .............. 61
objeCtiVe 4: inFiltrate the weaPons FaCtory ............................ 62
objeCtiVe 5: disable the weaPons FaCtory ............................ 64
coUnt dookU ..........................66cHaPter VI: legacy oF terror .................66
objeCtiVe 1: enter the tunnels ...... 67
objeCtiVe 2: naVigate the tunnel ... 69
objeCtiVe 3: Find luMinara ............. 71
objeCtiVe 4: resCue luMinara ........ 73
objeCtiVe 5: esCaPe! ......................... 74
general grIeVoUs .................75cHaPter I: dUel oF tHe droIds ................75
objeCtiVe 1: PlaCe the exPlosiVe Charges ............................................ 76
objeCtiVe 2: deFeat general grieVous ............................ 80
objeCtiVe 3: detonate the Charges 82
objeCtiVe 4: esCaPe! ......................... 83
general grIeVoUs .................86cHaPter II: sHadow oF maleVolence .....86
objeCtiVe 1: aCquire torPedoes ..... 87
objeCtiVe 2: torPedo the targets .. 88
objeCtiVe 3: destroy the ion Cannon ....................................... 90
general grIeVoUs .................92cHaPter III: destroy maleVolence ........92
objeCtiVe 1: resCue PadMé and C-3Po .............................. 93
objeCtiVe 2: esCaPe ConFineMent ... 97
objeCtiVe 3: extend the bridge ...... 98
objeCtiVe 4: deFeat general grieVous ............................ 99
objeCtiVe 5: reaCh the shiP’s bridge ...................................100
objeCtiVe 6: destroy the MaleVolenCe ..................................101
general grIeVoUs ...............102cHaPter IV: laIr oF grIeVoUs ...............102
objeCtiVe 1: enter the CoMPound 103
objeCtiVe 2: searCh For gunray ...105
objeCtiVe 3: deFeat general grieVous ..........................107
objeCtiVe 4: CatCh general grieVous ..........................108
objeCtiVe 5: deFeat the gor ..........109
objeCtiVe 6: esCaPe! .......................109
general grIeVoUs ...............111cHaPter V: rookIes ...............................111
objeCtiVe 1: Flee the landing site 112
objeCtiVe 2: deFeat the worM ......113
objeCtiVe 3: enter the station .....114
objeCtiVe 4: Purge the station .....116
general grIeVoUs ...............119cHaPter VI: grIeVoUs IntrIgUe ............119
objeCtiVe 1: deFeat general grieVous .........................................120
objeCtiVe 2: byPass the ForCe Fields ..............................................121
objeCtiVe 3: resCue eeth koth ......123
objeCtiVe 4: deFeat general grieVous—again! ...........................124
objeCtiVe 4: deFeat general grieVous—For real! ......................125
objeCtiVe 5: assist obi-wan ..........125
objeCtiVe 6: esCaPe! .......................126
asaJJ Ventress ...................128cHaPter I: tHe HIdden enemy ..............128
objeCtiVe 1: regrouP with obi-wan...........................................129
objeCtiVe 2: reaCh the rooF .........130
objeCtiVe 3: land the laat ............131
objeCtiVe 4: ConFront asajj Ventress .........................................132
objeCtiVe 5: deFeat asajj Ventress .........................................134
objeCtiVe 6: deFeat the tri-droid .136
objeCtiVe 7: deFeat asajj Ventress—For real! ......................137
asaJJ Ventress ...................138cHaPter II: amBUsH! .............................138
objeCtiVe 1: bloCk the droid arMies .............................................139
objeCtiVe 2: destroy the Coral bloCker ...............................141
objeCtiVe 3: destroy the eneMy tanks ...................................142
objeCtiVe 4: take out droidekas .......................................145
2Protected by copyright. Unauthorized or unlawful copying or downloading expressly prohibited.
Contents
How to Use tHis eGUide
introdUCtion
Cast
Padawan traininG
waLKtHroUGH
seCrets and extras
CHeCKLists
nintendo ds
Download from www.chipper.pl

Co
nten
ts
Prima Official Game Guide
www.primagames.com
asaJJ Ventress ...................146cHaPter III: BlUe sHadow VIrUs ..........146
objeCtiVe 1: inFiltrate the eneMy base ..............................147
objeCtiVe 2: byPass the droidekas .......................................149
objeCtiVe 3: resCue jar jar and PadMé ......................................150
objeCtiVe 4: deFeat dr. Vindi .........152
objeCtiVe 5: deFeat the leP droid 153
objeCtiVe 6: deFeat dr. Vindi—For real! .............................154
asaJJ Ventress ...................155cHaPter IV: storm oVer rylotH ..........155
objeCtiVe 1: destroy the First eneMy warshiP ..............................156
objeCtiVe 2: destroy the seCond eneMy warshiP ..............................158
objeCtiVe 3: Visit the bridge .........159
objeCtiVe 4: destroy the Final warshiPs...............................161
asaJJ Ventress ...................163cHaPter V: Innocents oF rylotH.........163
objeCtiVe 1: tear down the wall 164
objeCtiVe 2: obtain a walker .......165
objeCtiVe 3: oPen the Plaza gate .166
objeCtiVe 4: Pass through the jail ...........................................167
objeCtiVe 5: destroy the eneMy Cannons ..............................168
asaJJ Ventress ...................170lIBerty on rylotH ................................170
objeCtiVe 1: enter eneMy territory ........................................171
objeCtiVe 2: CriPPle the eneMy bases ...................................173
objeCtiVe 3: restore the bridge...175
ePIlogUe ...............................176tHe zIllo Beast .....................................176
objeCtiVe 1: CriPPle the eneMy bases ...................................177
objeCtiVe 2: dePloy the boMb.......180
objeCtiVe 3: deFeat the zillo beast .....................................181
HUB areas ............................182BattlesHIP resolUte ............................182
unloCking the Resolute ..........183
area 1: bridge ................................183
area 2: reaCtor ChaMber .............184
area 3: brig ....................................186
area 4: suPerkit bay ......................187
area 5: turbo laser bay ................188
area 6: MediCal bay .......................189
area 7: Minikit bay .........................189
area 8: hangar oVerlook .............191
area 9: hangar ..............................191
area 10: ground assault staging area ..................................193
HUB areas ............................194tHe InVIsIBle Hand ...............................194
unloCking the inVisible hand .....195
area 1: hangar ..............................195
area 2: ziro’s ChaMber .................196
area 3: bridge ................................198
area 4: ground assault staging area ..................................198
area 5: wizard’s rooM ..................199
seParatIst mIssIons ..........200cHaPter I: Hostage crIsIs ....................200
objeCtiVe 1: Clear the landing site ....................................201
objeCtiVe 2: storM the senate building ..........................................203
seParatIst mIssIons ..........206cHaPter II: castle oF doom .................206
objeCtiVe 1: leaVe jabba’s PalaCe 207
objeCtiVe 2: rePair the VehiCle ....209
objeCtiVe 3: esCaPe the basin .......210
objeCtiVe 4: deFeat anakin and ahsoka ....................................212
secrets and extras ............213sPace comBat .......................................213groUnd assaUlt ...................................214
Mission objeCtiVes ........................215BoUnty HUnter mIssIons ....................216cHeat codes ..........................................217
cHecklIsts ...........................218cHaracters...........................................218sHIPs .....................................................223VeHIcles ................................................224mInIkIts................................................225red Power BrIcks ................................232gold BrIcks ..........................................233acHIeVements and troPHIes ...............233
nIntendo ds game BasIcs ..234tHe HUB ..................................................234
bridge .............................................234
reC rooM ........................................234
Med bay ...........................................234
hallway ..........................................234
Minikit storage ..............................235game modes .........................................235
story ..............................................235
Free Play .........................................235game Progress ....................................235cHaracter aBIlItIes .............................235
CharaCter Classes ........................235
seCondary traits ..........................237cHaracters...........................................239sHIPs .....................................................243
amBUsH ................................244act 1 ......................................................244act 2 ......................................................249act 3 ......................................................251
destroy maleVolence .........253act 1 ......................................................253act 2 ......................................................256act 3 ......................................................258
rookIes ................................260act 1 ......................................................260act 2 ......................................................262act 3 ......................................................264
dUel oF tHe droIds ..............266act 1 ......................................................267act 2 ......................................................268act 3 ......................................................271
laIr oF grIeVoUs ..................273act 1 ......................................................273act 2 ......................................................275act 3 ......................................................277
gUngan general .................279act 1 ......................................................279act 2 ......................................................281act 3 ......................................................282
JedI crasH ...........................284act 1 ......................................................285act 2 ......................................................285act 3 ......................................................286
HIdden enemy ......................289act 1 ......................................................289act 2 ......................................................292act 3 ......................................................293
BlUe sHadow VIrUs .............295act 1 ......................................................295act 2 ......................................................297act 3 ......................................................299
storm oVer rylotH .............302act 1 ......................................................302act 2 ......................................................303act 3 ......................................................305
lIBerty on rylotH ...............308act 1 ......................................................308act 2 ......................................................310act 3 ......................................................312
weaPons Factory ................314act 1 ......................................................314act 2 ......................................................316act 3 ......................................................318
legacy oF terror .................320act 1 ......................................................320act 2 ......................................................322act 3 ......................................................324
nIntendo ds cHecklIsts .....326mInIkIts................................................326red BrIcks ............................................332
3Protected by copyright. Unauthorized or unlawful copying or downloading expressly prohibited.
Contents
How to Use tHis eGUide
introdUCtion
Cast
Padawan traininG
waLKtHroUGH
seCrets and extras
CHeCKLists
nintendo ds
Download from www.chipper.pl

intr
od
uc
tio
n
Prima Official Game Guide
www.primagames.com
Protected by copyright. Unauthorized or unlawful copying or downloading expressly prohibited.
introductionHow to Use tHis Book
cast
Padawan training
waLKtHrougH
secrets and extras
cHecKLists
nintendo ds
contents
How to use tHis eguide
introduction
Thank you for purchasing Prima’s Official Game Guide to LEGO Star Wars III: The Clone Wars. We’ve charted out a galaxy of easy-to-follow tips, maps, game screens, and walkthroughs that reveal everything you could want to know about the incredible LEGO Clone Wars adventure!
How to use tHis BooKThe information in this guide is presented in several chapters. Here’s what you’ll find in each one:
CastNearly 160 characters, ships, and vehicles can be unlocked and purchased for use in LEGO Star Wars III—and this chapter reveals everything about them all!
Padawan trainingThis section of the guide teaches you the fundamentals of intergalactic adventuring, from game mode overviews to adventuresome actions.
4
Download from www.chipper.pl

intr
od
uc
tio
n
Prima Official Game Guide
www.primagames.com
Protected by copyright. Unauthorized or unlawful copying or downloading expressly prohibited.
introductionHow to Use tHis Book
cast
Padawan training
waLKtHrougH
secrets and extras
cHecKLists
nintendo ds
contents
How to use tHis eguide
walktHroUgHThe walkthrough guides you through every challenge you face during LEGO Star Wars III’s thrilling Story missions, providing everything from puzzle solutions to minikit locations! Because LEGO Star Wars III offers you so much freedom of choice in how you experience it, the walkthrough is presented as follows:
CHeCklistsUse the quick-reference checklists at the end of the guide to record all of your goodie-collecting efforts!
• Prologue: Geonosian Arena (one level)• Count Dooku story line (six levels)• General Grievous story line (six levels)• Asajj Ventress story line (six levels)• Epilogue: The Zillo Beast (one level)• Hub Areas (Resolute and Invisible Hand)• Separatist Missions (two levels)
seCrets and extrasFlip to this chapter to learn all about LEGO Star Wars III’s special game modes, including space combat, ground assault, and bounty hunter challenges!
5
Download from www.chipper.pl
ca
st
Prima Official Game Guide
www.primagames.com
castSo many unique and memorable faces await you in the universe of LEGO Star Wars III, and this chapter tells you all about each one. Read on to discover every character, ship, and vehicle you can play with, including details on their special traits and info on how you can unlock each one.
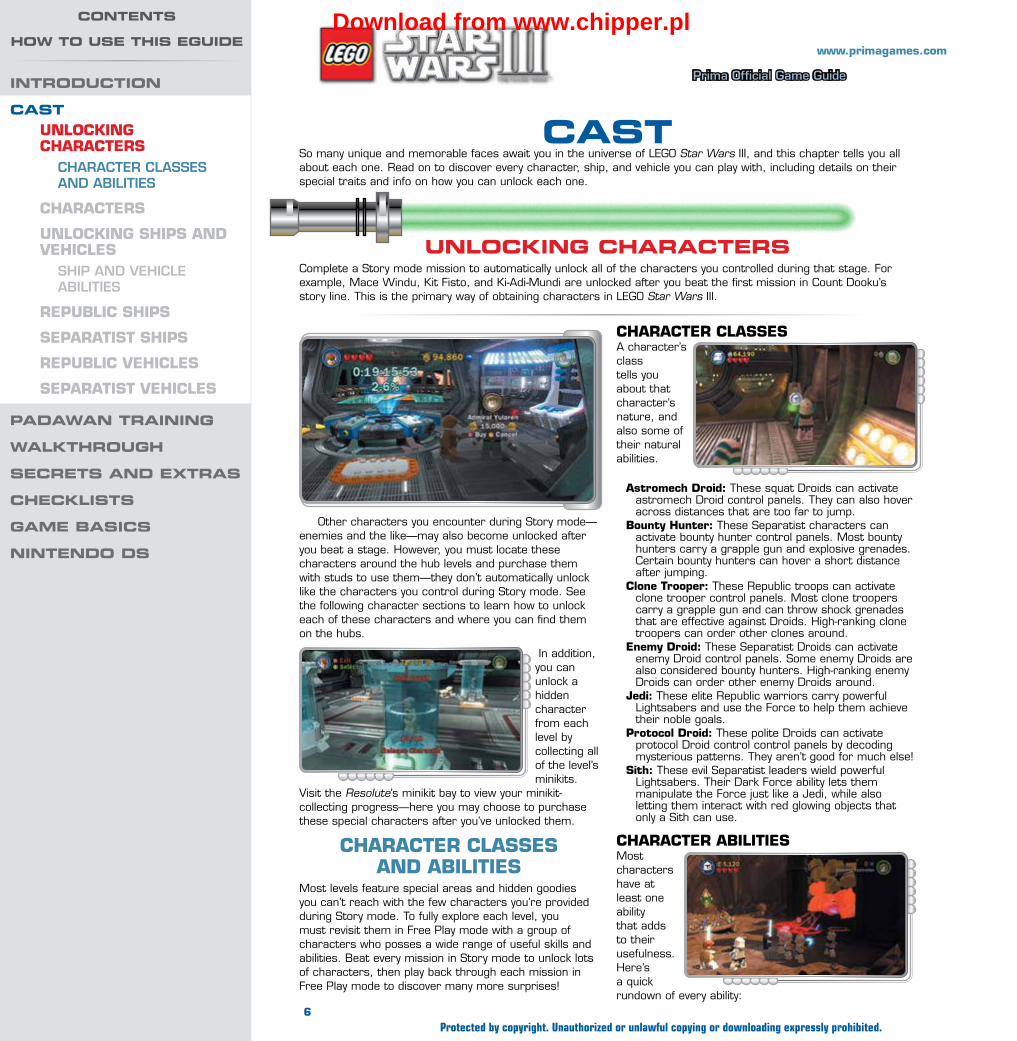
Unlocking charactersComplete a Story mode mission to automatically unlock all of the characters you controlled during that stage. For example, Mace Windu, Kit Fisto, and Ki-Adi-Mundi are unlocked after you beat the first mission in Count Dooku’s story line. This is the primary way of obtaining characters in LEGO Star Wars III.
Other characters you encounter during Story mode—enemies and the like—may also become unlocked after you beat a stage. However, you must locate these characters around the hub levels and purchase them with studs to use them—they don’t automatically unlock like the characters you control during Story mode. See the following character sections to learn how to unlock each of these characters and where you can find them on the hubs.
In addition, you can unlock a hidden character from each level by collecting all of the level’s minikits.
Visit the Resolute’s minikit bay to view your minikit-collecting progress—here you may choose to purchase these special characters after you’ve unlocked them.
CharaCter Classes and abilities
Most levels feature special areas and hidden goodies you can’t reach with the few characters you’re provided during Story mode. To fully explore each level, you must revisit them in Free Play mode with a group of characters who posses a wide range of useful skills and abilities. Beat every mission in Story mode to unlock lots of characters, then play back through each mission in Free Play mode to discover many more surprises!
CharaCter ClassesA character’s class tells you about that character’s nature, and also some of their natural abilities.
astromech droid: These squat Droids can activate astromech Droid control panels. They can also hover across distances that are too far to jump.
bounty hunter: These Separatist characters can activate bounty hunter control panels. Most bounty hunters carry a grapple gun and explosive grenades. Certain bounty hunters can hover a short distance after jumping.
Clone trooper: These Republic troops can activate clone trooper control panels. Most clone troopers carry a grapple gun and can throw shock grenades that are effective against Droids. High-ranking clone troopers can order other clones around.
enemy droid: These Separatist Droids can activate enemy Droid control panels. Some enemy Droids are also considered bounty hunters. High-ranking enemy Droids can order other enemy Droids around.
Jedi: These elite Republic warriors carry powerful Lightsabers and use the Force to help them achieve their noble goals.
Protocol droid: These polite Droids can activate protocol Droid control control panels by decoding mysterious patterns. They aren’t good for much else!
sith: These evil Separatist leaders wield powerful Lightsabers. Their Dark Force ability lets them manipulate the Force just like a Jedi, while also letting them interact with red glowing objects that only a Sith can use.
CharaCter abilitiesMost characters have at least one ability that adds to their usefulness. Here’s a quick rundown of every ability:
6Protected by copyright. Unauthorized or unlawful copying or downloading expressly prohibited.
introdUction
castUnloCking CharaCters
CharaCter Classes and abilities
CharaCters
UnloCking shiPs and VehiCles
shiP and VehiCle abilities
rePUbliC shiPs
seParatist shiPs
rePUbliC VehiCles
seParatist VehiCles
Padawan training
walkthroUgh
secrets and extras
checklists
game Basics
nintendo ds
contents
how to Use this egUideDownload from www.chipper.pl

ca
st
Prima Official Game Guide
www.primagames.com
aayla seCUra Class: Jediabilities: Force manipulationWeaponry: Lightsaberhow to Unlock: Story mode
progressionCost/location: None
adi gallia Class: Jediabilities: Force manipulationWeaponry: Lightsaberhow to Unlock: Story mode
progressionCost/location: None
admiral aCkbar (ClassiC)
Class: Noneabilities: Grapple gunWeaponry: Blasterhow to Unlock: Minikits (“Count
Dooku 2: Gungan General”)Cost/location: 50,000/Resolute
(Minikit Bay)
admiral yUlarenClass: Noneabilities: Grapple gunWeaponry: Blasterhow to Unlock: Complete
“Prologue: Geonosian Arena”Cost/location: 15,000/Resolute
(Bridge)
ahsoka tanoClass: Jediabilities: Force manipulationWeaponry: Lightsaberhow to Unlock: Story mode
progressionCost/location: None
anakin skyWalkerClass: Jediabilities: Force manipulationWeaponry: Lightsaberhow to Unlock: Story mode
progressionCost/location: None
asaJJ Ventress Class: Sithabilities: Dark Force manipulationWeaponry: Dual Lightsabers, Sith
chokehow to Unlock: Complete “Asajj
Ventress 4: Storm Over Ryloth”Cost/location: 250,000/
Invisible Hand (Wizard’s Tower)
aUrra singClass: Bounty hunterabilities: Sniper shot, explosive
attacksWeaponry: Sniper rifle, grenadeshow to Unlock: Story mode
progressionCost/location: None
bail organaClass: Noneabilities: Grapple gunWeaponry: Blasterhow to Unlock: Complete
“Separatist Mission 1: Hostage Crisis”
Cost/location: 25,000/Resolute (Reactor Chamber)
barriss offeeClass: Jediabilities: Force manipulationWeaponry: Lightsaberhow to Unlock: Story mode
progressionCost/location: None
Charge Up: Enables certain characters to activate power panels.
Command Clones: Allows high-ranking clones to issue orders to groups of clone troopers.
Command droids: Allows high-ranking enemy Droids to issue orders to squads of battle Droids.
dark force manipulation: Enables Sith characters to manipulate all objects that glow with energy, including red glowing objects.
explosive attacks: Lets certain characters destroy silver objects. (Only explosive attacks can destroy silver objects.)
force manipulation: Enables Jedi characters to manipulate all objects that glow with energy, except for red glowing objects. (Only a Sith can manipulate red glowing objects.)
grapple gun: Allows certain characters to grapple and pull orange hook points for a variety of benefits.
hover: Lets all astromech Droids and certain bounty hunters, such as Jango Fett, hover a short distance after jumping.
invincible: The Gold Super Battle Droid can’t be destroyed.
rapid fire: Lets characters overheat and destroy gold objects, which are otherwise indestructible. (Only rapid-fire attacks can overheat and destroy gold objects.)
small size: Short characters can crawl through little orange and blue crawl space hatches to reach special places.
sniper shot: This ability lets characters pick off distant targets that other characters can’t hit.
super Jump: This ability is unique to Jar Jar Binks. Jar Jar can jump much higher than other characters and this comes in quite handy.
characters
7Protected by copyright. Unauthorized or unlawful copying or downloading expressly prohibited.
introdUction
castUnloCking CharaCters
CharaCter Classes and abilities
CharaCters
UnloCking shiPs and VehiCles
shiP and VehiCle abilities
rePUbliC shiPs
seParatist shiPs
rePUbliC VehiCles
seParatist VehiCles
Padawan training
walkthroUgh
secrets and extras
checklists
game Basics
nintendo ds
contents
how to Use this egUideDownload from www.chipper.pl

ca
st
Prima Official Game Guide
www.primagames.com
battle droidClass: Enemy Droidabilities: NoneWeaponry: Blasterhow to Unlock: Complete “Asajj
Ventress 1: The Hidden Enemy”Cost/location: 6,500/Invisible
Hand (Ground Assault Staging Area)
battle droid Commander
Class: Enemy Droidabilities: Command DroidsWeaponry: Blasterhow to Unlock: Complete “Count
Dooku 1: Battle of Geonosis”Cost/location: 30,000/Invisible
Hand (Hangar)
bib fortUnaClass: Noneabilities: Grapple gunWeaponry: Blasterhow to Unlock: Complete “Count
Dooku 5: Weapons Factory”Cost/location: 30,000/Invisible
Hand (Ziro’s Chamber)
boba fett (ClassiC)Class: Bounty hunterabilities: Hover, explosive attacksWeaponry: Blasterhow to Unlock: Minikits (“General
Grievous 6: Grievous Intrigue”)Cost/location: 100,000/
Resolute (Minikit Bay)
boilClass: Clone trooperabilities: NoneWeaponry: Blaster, shock
grenadeshow to Unlock: Story mode
progressionCost/location: None
C-3PoClass: Protocol Droidabilities: NoneWeaponry: Nonehow to Unlock: Story mode
progressionCost/location: None
Cad bane Class: Bounty hunterabilities: Hover, explosive attacks,
grapple gunWeaponry: Dual
blasters,grenadeshow to Unlock: Complete
“Prologue: Geonosian Arena”Cost/location: 250,000/
Invisible Hand (Hangar)
CaPtain antilles (ClassiC)
Class: Noneabilities: Grapple gunWeaponry: Blasterhow to Unlock: Minikits (“Asajj
Ventress 5: Innocents of Ryloth”)Cost/location: 50,000/Resolute
(Minikit Bay)
CaPtain rexClass: Clone trooperabilities: Command clones,
grapple gunWeaponry: Dual blasters, shock
grenadeshow to Unlock: Story mode
progressionCost/location: None
CaPtain tyPho Class: Noneabilities: Grapple gunWeaponry: Blasterhow to Unlock: Complete “Asajj
Ventress 3: Blue Shadow Virus”Cost/location: 10,000/Resolute
(Hangar Overlook)
ChanCellor PalPatineClass: Noneabilities: Grapple gunWeaponry: Blasterhow to Unlock: Control all
systems as the Republic (See “Secrets and Extras” Chapter)
Cost/location: 250,000/Resolute (Bridge)
CheWbaCCa (ClassiC)Class: Noneabilities: Grapple gunWeaponry: Blasterhow to Unlock: Minikits
(“Epilogue: The Zillo Beast”)Cost/location: 50,000/
Resolute (Minikit Bay)
Clone PilotClass: Clone trooperabilities: Grapple gunWeaponry: Blaster, shock
grenadeshow to Unlock: Complete
“General Grievous 5: Rookies”Cost/location: 15,000/Resolute
(Bridge)
Clone shadoW trooPer (ClassiC)
Class: Clone trooperabilities: Grapple gunWeaponry: Blasterhow to Unlock: Minikits (“Asajj
Ventress 3: Blue Shadow Virus”)Cost/location: 50,000/
Resolute (Minikit Bay)
8Protected by copyright. Unauthorized or unlawful copying or downloading expressly prohibited.
introdUction
castUnloCking CharaCters
CharaCter Classes and abilities
CharaCters
UnloCking shiPs and VehiCles
shiP and VehiCle abilities
rePUbliC shiPs
seParatist shiPs
rePUbliC VehiCles
seParatist VehiCles
Padawan training
walkthroUgh
secrets and extras
checklists
game Basics
nintendo ds
contents
how to Use this egUideDownload from www.chipper.pl

ca
st
Prima Official Game Guide
www.primagames.com
Clone trooPerClass: Clone trooperabilities: Grapple gunWeaponry: Blaster, shock
grenadeshow to Unlock: Story mode
progressionCost/location: None
Commander blyClass: Clone trooperabilities: Command clones,
grapple gunWeaponry: Blaster, shock
grenadeshow to Unlock: Story mode
progressionCost/location: None
Commander CodyClass: Clone trooperabilities: Command clones,
grapple gunWeaponry: Blaster, shock
grenadeshow to Unlock: Story mode
progressionCost/location: None
Commander filClass: Clone trooperabilities: Command clones,
grapple gunWeaponry: Blaster, shock
grenadeshow to Unlock: Story mode
progressionCost/location: None
Commander PondsClass: Clone trooperabilities: Command clones,
grapple gunWeaponry: Blaster, shock
grenadeshow to Unlock: Story mode
progressionCost/location: None
Commander stoneClass: Clone trooperabilities: Command clones,
grapple gunWeaponry: Dual blasters, shock
grenadeshow to Unlock: Story mode
progressionCost/location: None
Commando droidClass: Enemy Droidabilities: Explosive attacks,
grapple gunWeaponry: Blaster, grenadeshow to Unlock: Story mode
progressionCost/location: None
CoUnt dookUClass: Sithabilities: Dark Force manipulationWeaponry: Lightsaber, Sith
lightninghow to Unlock: Complete
“Prologue: Geonosian Arena”Cost/location: 250,000/
Invisible Hand (Hangar)
darth maUl (ClassiC)Class: Sithabilities: Dark Force manipulationWeaponry: Lightsaber staff, Sith
chokehow to Unlock: Minikits (“General
Grievous 5: Rookies”)Cost/location: 275,000/
Resolute (Minikit Bay)
darth sidioUs (ClassiC)Class: Sithabilities: Dark Force manipulationWeaponry: Lightsaber, Sith
lightninghow to Unlock: Minikits
(“Prologue: Geonosian Arena”)Cost/location: 275,000/
Resolute (Minikit Bay)
darth Vader (ClassiC)Class: Sithabilities: Dark Force manipulationWeaponry: Lightsaber, Sith chokehow to Unlock: Minikits (“Asajj
Ventress 6: Liberty on Ryloth”)Cost/location: 275,000/
Resolute (Minikit Bay)
darth Vader battle damaged (ClassiC)
Class: Sithabilities: Dark Force manipulationWeaponry: Lightsaber, Sith chokehow to Unlock: Minikits (“Asajj
Ventress 2: Ambush!”)Cost/location: 275,000/
Resolute (Minikit Bay)
destroyer droidClass: Enemy Droidabilities: NoneWeaponry: Dual blastershow to Unlock: Complete
“General Grievous 1: Duel of the Droids”
Cost/location: 40,000/Invisible Hand (Ground Assault Staging Area)
dr. nUVo VindiClass: Noneabilities: Grapple gunWeaponry: Blasterhow to Unlock: Complete “Asajj
Ventress 3: Blue Shadow Virus”Cost/location: 50,000/
Resolute (Brig)
9Protected by copyright. Unauthorized or unlawful copying or downloading expressly prohibited.
introdUction
castUnloCking CharaCters
CharaCter Classes and abilities
CharaCters
UnloCking shiPs and VehiCles
shiP and VehiCle abilities
rePUbliC shiPs
seParatist shiPs
rePUbliC VehiCles
seParatist VehiCles
Padawan training
walkthroUgh
secrets and extras
checklists
nintendo ds
contents
how to Use this egUideDownload from www.chipper.pl

ca
st
Prima Official Game Guide
www.primagames.com
eChoClass: Clone trooperabilities: Explosive attacksWeaponry: Rocket launcherhow to Unlock: Story mode
progressionCost/location: None
eeth kothClass: Jediabilities: Force manipulationWeaponry: Lightsaberhow to Unlock: Story mode
progressionCost/location: None
fiVesClass: Clone trooperabilities: Grapple gunWeaponry: Blaster, shock
grenadeshow to Unlock: Story mode
progressionCost/location: None
gamorrean gUardClass: Noneabilities: NoneWeaponry: Melee axehow to Unlock: Complete
“Separatist Mission 2: Castle of Doom”
Cost/location: 40,000/Invisible Hand (Ziro’s Chamber)
general grieVoUsClass: Enemy Droidabilities: NoneWeaponry: Quadruple Lightsabershow to Unlock: Complete
“General Grievous 6: Grievous Intrigue”
Cost/location: 250,000/Invisible Hand (Bridge)
geonosian gUardClass: Noneabilities: Grapple gunWeaponry: Blasterhow to Unlock: Complete “Count
Dooku 5: Weapons Factory”Cost/location: 15,000/Invisible
Hand (Ziro’s Chamber)
gold sUPer battle droid
Class: Enemy Droidabilities: Rapid fire, invincibilityWeaponry: Blasterhow to Unlock: Complete “Asajj
Ventress 3: Blue Shadow Virus”Cost/location: 6,000/Invisible
Hand (Hangar)
gonk droidClass: Noneabilities: NoneWeaponry: Nonehow to Unlock: Complete “Asajj
Ventress 3: Blue Shadow Virus”Cost/location: 3,000/Invisible
Hand (Wizard’s Tower)
grand moff tarkinClass: Noneabilities: Grapple gunWeaponry: Blasterhow to Unlock: Control all
systems as the Separatists (See “Secrets and Extras” Chapter)
Cost/location: 250,000/Invisible Hand (Bridge)
greedo (ClassiC)Class: Bounty hunterabilities: Explosive attacks,
grapple gunWeaponry: Blaster, grenadeshow to Unlock: Minikits (“Asajj
Ventress 1: The Hidden Enemy”)Cost/location: 70,000/Resolute
(Minikit Bay)
han solo (ClassiC)Class: Noneabilities: Grapple gunWeaponry: Blasterhow to Unlock: Minikits (“General
Grievous 1: Duel of the Droids”)Cost/location: 50,000/Resolute
(Minikit Bay)
heaVy sUPer battle droid
Class: Enemy Droidabilities: Explosive attacksWeaponry: Arm blasterhow to Unlock: Complete
“General Grievous 3: Destroy Malevolence”
Cost/location: 25,000/Invisible Hand (Ground Assault Staging Area)
heaVy WeaPons Clone trooPer
Class: Clone trooperabilities: Explosive attacksWeaponry: Rocket launcherhow to Unlock: Story mode
progressionCost/location: None
helios-3dClass: Enemy Droid/bounty
hunterabilities: Explosive attacks,
grapple gunWeaponry: Blaster, grenadeshow to Unlock: Story mode
progressionCost/location: None
10Protected by copyright. Unauthorized or unlawful copying or downloading expressly prohibited.
introdUction
castUnloCking CharaCters
CharaCter Classes and abilities
CharaCters
UnloCking shiPs and VehiCles
shiP and VehiCle abilities
rePUbliC shiPs
seParatist shiPs
rePUbliC VehiCles
seParatist VehiCles
Padawan training
walkthroUgh
secrets and extras
checklists
nintendo ds
contents
how to Use this egUideDownload from www.chipper.pl

ca
st
Prima Official Game Guide
www.primagames.com
heVyClass: Clone trooperabilities: Rapid fire, grapple gunWeaponry: Big blasterhow to Unlock: Story mode
progressionCost/location: None
hondo ohnakaClass: Bounty hunterabilities: Explosive attacks,
grapple gunWeaponry: Blaster, grenadeshow to Unlock: Complete “Count
Dooku 2: Gungan General”Cost/location: 45,000/Invisible
Hand (Ziro’s Chamber)
ig-86Class: Enemy Droid/bounty
hunterabilities: Explosive attacks,
grapple gunWeaponry: Blaster, grenadeshow to Unlock: Story mode
progressionCost/location: None
imPerial gUard (ClassiC)
Class: Noneabilities: NoneWeaponry: Melee spearhow to Unlock: Minikits
(“Separatist Mission 2: Castle of Doom”)
Cost/location: 50,000/Resolute (Minikit Bay)
Jango fettClass: Bounty hunterabilities: Hover, explosive attacks,
grapple gunWeaponry: Dual blastershow to Unlock: Complete
“Prologue: Geonosian Arena”Cost/location: 70,000/Invisible Hand (Ziro’s
Chamber)
Jar Jar binksClass: Noneabilities: Super jumpWeaponry: Melee blowshow to Unlock: Story mode
progressionCost/location: None
JekClass: Clone trooperabilities: Explosive attacks,
grapple gun Weaponry: Rocket launcherhow to Unlock: Story mode
progressionCost/location: None
ki-adi-mUndiClass: Jediabilities: Force manipulationWeaponry: Lightsaberhow to Unlock: Story mode
progressionCost/location: None
kit fistoClass: Jediabilities: Force manipulationWeaponry: Lightsaberhow to Unlock: Story mode
progressionCost/location: None
lando Calrissian (ClassiC)
Class: Noneabilities: Grapple gunWeaponry: Blasterhow to Unlock: Minikits (“General
Grievous 2: Shadow of Malev-olence”)
Cost/location: 50,000/Resolute (Minikit Bay)
leP serVant droidClass: Enemy Droidabilities: NoneWeaponry: Nonehow to Unlock: Complete “Asajj
Ventress 3: Blue Shadow Virus”Cost/location: 6,000/Invisible
Hand (Hangar)
lieUtenant thireClass: Clone trooperabilities: Rapid fire, grapple gunWeaponry: Big blasterhow to Unlock: Story mode
progressionCost/location: None
lok dUrdClass: Noneabilities: Grapple gunWeaponry: Blasterhow to Unlock: Complete “Count
Dooku 4: Defenders of Peace”Cost/location: 50,000/Resolute
(Brig)
lUke skyWalker (ClassiC)
Class: Jediabilities: Force manipulationWeaponry: Lightsaberhow to Unlock: Minikits (“Count
Dooku 5: Weapons Factory”)Cost/location: 50,000/Resolute (Minikit Bay)
11Protected by copyright. Unauthorized or unlawful copying or downloading expressly prohibited.
introdUction
castUnloCking CharaCters
CharaCter Classes and abilities
CharaCters
UnloCking shiPs and VehiCles
shiP and VehiCle abilities
rePUbliC shiPs
seParatist shiPs
rePUbliC VehiCles
seParatist VehiCles
Padawan training
walkthroUgh
secrets and extras
checklists
nintendo ds
contents
how to Use this egUideDownload from www.chipper.pl

ca
st
Prima Official Game Guide
www.primagames.com
lUminara UndUliClass: Jediabilities: Force manipulationWeaponry: Lightsaberhow to Unlock: Story mode
progressionCost/location: None
lUrmen VillagerClass: Noneabilities: Small size, grapple gunWeaponry: Melee whiphow to Unlock: Complete “Count
Dooku 4: Defenders of Peace”Cost/location: 6,000/Resolute
(Ground Assault Staging Area)
lUxUry droidClass: Noneabilities: NoneWeaponry: Nonehow to Unlock: Complete
“Separatist Mission 1: Hostage Crisis”
Cost/location: 150,000/Resolute (Medical Bay)
maCe WindUClass: Jediabilities: Force manipulationWeaponry: Lightsaberhow to Unlock: Story mode
progressionCost/location: None
magnagUardClass: Enemy Droidabilities: Charge upWeaponry: Melee staffhow to Unlock: Story mode
progressionCost/location: None
mse-6 Class: Noneabilities: NoneWeaponry: Nonehow to Unlock: Complete
“General Grievous 6: Grievous Intrigue”
Cost/location: 6,000/Resolute (Medical Bay)
nahdar VebbClass: Jediabilities: Force manipulationWeaponry: Lightsaberhow to Unlock: Story mode
progressionCost/location: None
neimoidianClass: Noneabilities: Grapple gunWeaponry: Blasterhow to Unlock: Complete
“Prologue: Geonosian Arena”Cost/location: 20,000/Invisible
Hand (Hangar)
nUte gUnrayClass: Noneabilities: Grapple gunWeaponry: Blasterhow to Unlock: Complete
“Republic Assault: Naboo” (See “Secrets and Extras” Chapter)
Cost/location: 50,000/Resolute (Brig)
obi-Wan kenobiClass: Jediabilities: Force manipulationWeaponry: Lightsaberhow to Unlock: Story mode
progressionCost/location: None
obi-Wan kenobi (ClassiC)
Class: Jediabilities: Force manipulationWeaponry: Lightsaberhow to Unlock: Minikits (“Count
Dooku 3: Jedi Crash”)Cost/location: 50,000/Resolute
(Minikit Bay)
onaConda farrClass: Noneabilities: Grapple gunWeaponry: Blasterhow to Unlock: Complete
“Separatist Mission 1: Hostage Crisis”
Cost/location: 25,000/Resolute (Bridge)
Padmé amidalaClass: Noneabilities: Grapple gunWeaponry: Blasterhow to Unlock: Story mode
progressionCost/location: None
Pirate rUffianClass: Noneabilities: Grapple gunWeaponry: Blasterhow to Unlock: Complete “Count
Dooku 2: Gungan General”Cost/location: 10,000/Invisible
Hand (Ziro’s Chamber)
12Protected by copyright. Unauthorized or unlawful copying or downloading expressly prohibited.
introdUction
castUnloCking CharaCters
CharaCter Classes and abilities
CharaCters
UnloCking shiPs and VehiCles
shiP and VehiCle abilities
rePUbliC shiPs
seParatist shiPs
rePUbliC VehiCles
seParatist VehiCles
Padawan training
walkthroUgh
secrets and extras
checklists
nintendo ds
contents
how to Use this egUideDownload from www.chipper.pl

ca
st
Prima Official Game Guide
www.primagames.com
Plo koonClass: Jediabilities: Force manipulationWeaponry: Lightsaberhow to Unlock: Story mode
progressionCost/location: None
Poggle the lesser Class: Noneabilities: Grapple gunWeaponry: Blasterhow to Unlock: Complete “Count
Dooku 6: Legacy of Terror”Cost/location: 50,000/Resolute
(Brig)
PrinCess leia (ClassiC)Class: Noneabilities: Grapple gunWeaponry: Blasterhow to Unlock: Minikits (“Count
Dooku 1: Battle of Geonosis”)Cost/location: 50,000/Resolute
(Minikit Bay)
Probe droidClass: Noneabilities: NoneWeaponry: Blasterhow to Unlock: Complete “Count
Dooku 4: Defenders of Peace”Cost/location: 6,000/Invisible
Hand (Turbo Laser Bay)
QUeen neeyUtnee Class: Noneabilities: Grapple gunWeaponry: Blasterhow to Unlock: Complete “Asajj
Ventress 3: Blue Shadow Virus”Cost/location: 30,000/
Resolute (Hangar Overlook)
QUi-gon Jinn (ClassiC)Class: Jediabilities: Force manipulationWeaponry: Lightsaberhow to Unlock: Minikits (“Asajj
Ventress 4: Storm Over Ryloth”)Cost/location: 50,000/Resolute
(Minikit Bay)
r2-d2Class: Astromech Droidabilities: HoverWeaponry: Melee shockhow to Unlock: Story mode
progressionCost/location: None
r3-s6Class: Astromech Droidabilities: HoverWeaponry: Melee shockhow to Unlock: Story mode
progressionCost/location: None
r4-P17Class: Astromech Droidabilities: HoverWeaponry: Melee shockhow to Unlock: Story mode
progressionCost/location: 35,000/Resolute
(Hangar)
r6-h5Class: Astromech Droidabilities: HoverWeaponry: Melee shockhow to Unlock: Complete
“General Grievous 4: Lair of Grievous”
Cost/location: 25,000/Resolute (Reactor Chamber)
rebel Commando (ClassiC)
Class: Noneabilities: Grapple gunWeaponry: Blasterhow to Unlock: Minikits (“General
Grievous 4: Lair of Grievous”)Cost/location: 50,000/Resolute
(Minikit Bay)
roboninoClass: Bounty hunterabilities: Charge up, small size,
explosive attacksWeaponry: Blaster, grenadeshow to Unlock: Story mode
progressionCost/location: None
rysClass: Clone trooperabilities: Grapple gunWeaponry: Blaster, shock
grenadeshow to Unlock: Story mode
progressionCost/location: None
saVage oPressClass: Sithabilities: Dark Force manipulationWeaponry: Lightsaber staff, Sith
chokehow to Unlock: Enter unlock
code (See “Secrets and Extras” Chapter)
Cost/location: 250,000/Invisible Hand (Wizard’s Tower)
senate CommandoClass: Clone trooperabilities: Grapple gunWeaponry: Blasterhow to Unlock: Complete
“Separatist Mission 1: Hostage Crisis”
Cost/location: 25,000/Resolute (Hangar Overlook)
13Protected by copyright. Unauthorized or unlawful copying or downloading expressly prohibited.
introdUction
castUnloCking CharaCters
CharaCter Classes and abilities
CharaCters
UnloCking shiPs and VehiCles
shiP and VehiCle abilities
rePUbliC shiPs
seParatist shiPs
rePUbliC VehiCles
seParatist VehiCles
Padawan training
walkthroUgh
secrets and extras
checklists
nintendo ds
contents
how to Use this egUideDownload from www.chipper.pl

ca
st
Prima Official Game Guide
www.primagames.com
senate Commando (CaPtain)
Class: Clone trooperabilities: Grapple gunWeaponry: Blasterhow to Unlock: Complete
“Separatist Mission 1: Hostage Crisis”
Cost/location: 25,000/Resolute (Bridge)
senator kharrUsClass: Noneabilities: NoneWeaponry: Melee staffhow to Unlock: Complete “Count
Dooku 2: Gungan General”Cost/location: 20,000/Resolute
(Ground Assault Staging Area)
senator PhiloClass: Noneabilities: NoneWeaponry: Melee spearhow to Unlock: Complete
“Separatist Mission 1: Hostage Crisis”
Cost/location: 30,000/Resolute (Hangar Overlook)
shahan alamaClass: Bounty hunterabilities: Explosive attacks,
grapple gunWeaponry: Blaster, grenadeshow to Unlock: Complete “Count
Dooku 2: Gungan General”Cost/location: 45,000/Invisible
Hand (Ziro’s Chamber)
sionVer bollClass: Noneabilities: Grapple gunWeaponry: Blasterhow to Unlock: Complete
“Epilogue: The Zillo Beast”Cost/location: 25,000/Resolute
(Reactor Chamber)
stormtrooPer (ClassiC)
Class: Clone trooperabilities: Grapple gunWeaponry: Blasterhow to Unlock: Minikits (“Count
Dooku 6: Legacy of Terror”)Cost/location: 50,000/
Resolute (Minikit Bay)
sUPer battle droidClass: Enemy Droidabilities: Rapid fireWeaponry: Arm blasterhow to Unlock: Complete “Asajj
Ventress 2: Ambush!”Cost/location: 25,000/Invisible
Hand (Hangar)
tee Watt kaaClass: Noneabilities: Small size, grapple gunWeaponry: Melee whiphow to Unlock: Complete “Count
Dooku 3: Jedi Crash”Cost/location: 15,000/Resolute
(Ground Assault Staging Area)
tUrk falsoClass: Bounty hunterabilities: Explosive attacks,
grapple gunWeaponry: Blaster, grenadeshow to Unlock: Complete “Count
Dooku 3: Jedi Crash”Cost/location: 45,000/Invisible
Hand (Ziro’s Chamber)
tUsken raider (ClassiC)Class: Noneabilities: Grapple gunWeaponry: Blasterhow to Unlock: Minikits
(“Separatist Mission 1: Hostage Crisis”)
Cost/location: 50,000/Resolute (Minikit Bay)
tx-20Class: Enemy Droidabilities: Command DroidsWeaponry: Blasterhow to Unlock: Complete “Count
Dooku 5: Weapons Factory”Cost/location: 50,000/Invisible
Hand (Ground Assault Staging Area)
Undead geonosianClass: Noneabilities: NoneWeaponry: Nonehow to Unlock: Complete “Count
Dooku 6: Legacy of Terror”Cost/location: 10,000/Invisible
Hand (Ground Assault Staging Area)
Vader’s aPPrentiCe (ClassiC)
Class: Sithabilities: Dark Force manipulationWeaponry: Lightsaber, Sith
lightninghow to Unlock: Minikits (“Count
Dooku 4: Defenders of Peace”)Cost/location: 275,000/Resolute (Minikit Bay)
Wag tooClass: Noneabilities: Small size, grapple gunWeaponry: Melee whiphow to Unlock: Story mode
progressionCost/location: None
14Protected by copyright. Unauthorized or unlawful copying or downloading expressly prohibited.
introdUction
castUnloCking CharaCters
CharaCter Classes and abilities
CharaCters
UnloCking shiPs and VehiCles
shiP and VehiCle abilities
rePUbliC shiPs
seParatist shiPs
rePUbliC VehiCles
seParatist VehiCles
Padawan training
walkthroUgh
secrets and extras
checklists
nintendo ds
contents
how to Use this egUideDownload from www.chipper.pl
ca
st
Prima Official Game Guide
www.primagames.com
Wat tamborClass: Noneabilities: Grapple gunWeaponry: Blasterhow to Unlock: Complete “Asajj
Ventress 4: Storm Over Ryloth”Cost/location: 50,000/Resolute
(Brig)
WaxerClass: Clone trooperabilities: Explosive attacks,
grapple gunWeaponry: Rocket launcherhow to Unlock: Story mode
progressionCost/location: None
Wedge antilles (ClassiC)
Class: Noneabilities: Grapple gunWeaponry: Blasterhow to Unlock: Minikits (“General
Grievous 3: Destroy Malev-olence”)
Cost/location: 50,000/Resolute Minikit Bay)
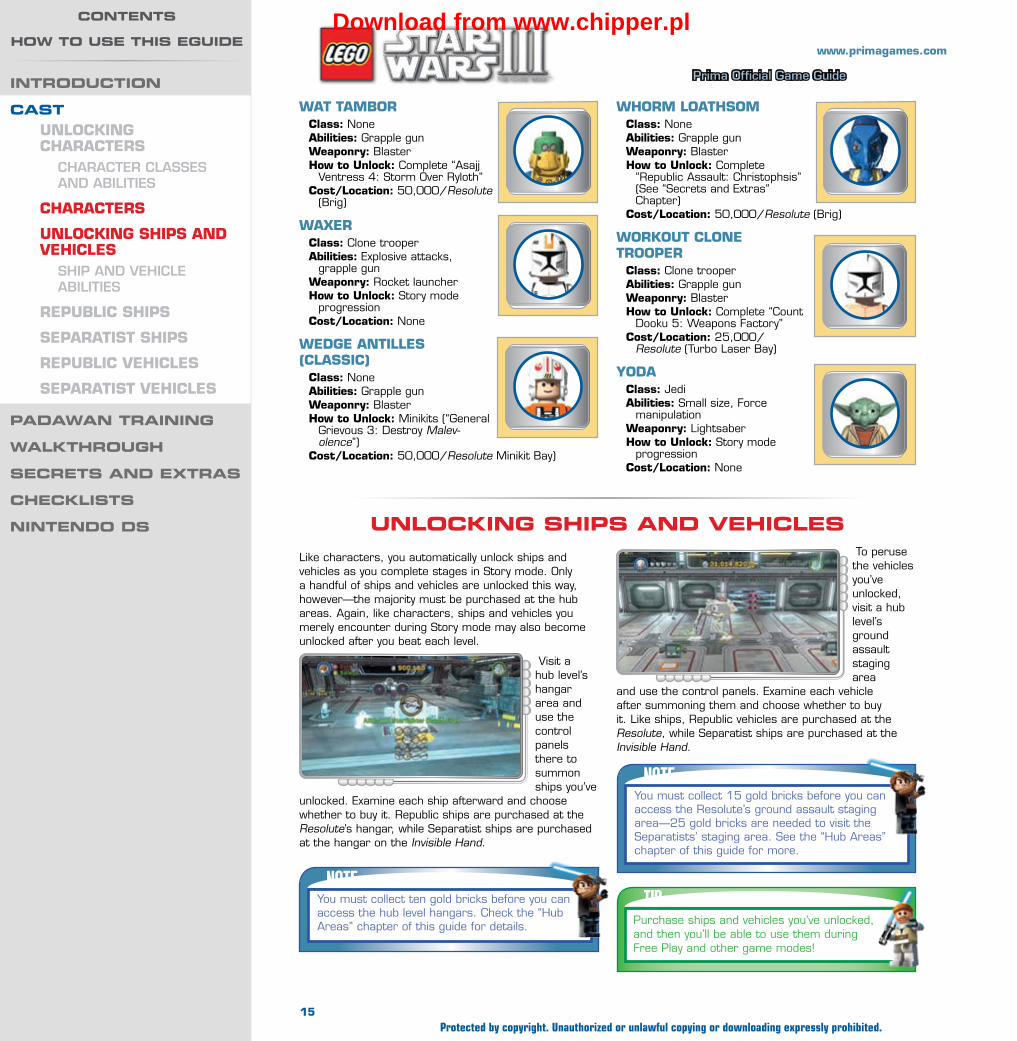
Like characters, you automatically unlock ships and vehicles as you complete stages in Story mode. Only a handful of ships and vehicles are unlocked this way, however—the majority must be purchased at the hub areas. Again, like characters, ships and vehicles you merely encounter during Story mode may also become unlocked after you beat each level.
Visit a hub level’s hangar area and use the control panels there to summon ships you’ve
unlocked. Examine each ship afterward and choose whether to buy it. Republic ships are purchased at the Resolute’s hangar, while Separatist ships are purchased at the hangar on the Invisible Hand.
NOTEYou must collect ten gold bricks before you can access the hub level hangars. Check the “Hub Areas” chapter of this guide for details.
To peruse the vehicles you’ve unlocked, visit a hub level’s ground assault staging area
and use the control panels. Examine each vehicle after summoning them and choose whether to buy it. Like ships, Republic vehicles are purchased at the Resolute, while Separatist ships are purchased at the Invisible Hand.
NOTEYou must collect 15 gold bricks before you can access the Resolute’s ground assault staging area—25 gold bricks are needed to visit the Separatists’ staging area. See the “Hub Areas” chapter of this guide for more.
TIPPurchase ships and vehicles you’ve unlocked, and then you’ll be able to use them during Free Play and other game modes!
Whorm loathsomClass: Noneabilities: Grapple gunWeaponry: Blasterhow to Unlock: Complete
“Republic Assault: Christophsis” (See “Secrets and Extras” Chapter)
Cost/location: 50,000/Resolute (Brig)
WorkoUt Clone trooPer
Class: Clone trooperabilities: Grapple gunWeaponry: Blasterhow to Unlock: Complete “Count
Dooku 5: Weapons Factory”Cost/location: 25,000/
Resolute (Turbo Laser Bay)
yodaClass: Jediabilities: Small size, Force
manipulationWeaponry: Lightsaberhow to Unlock: Story mode
progressionCost/location: None
Unlocking shiPs and Vehicles
15Protected by copyright. Unauthorized or unlawful copying or downloading expressly prohibited.
introdUction
castUnloCking CharaCters
CharaCter Classes and abilities
CharaCters
UnloCking shiPs and VehiCles
shiP and VehiCle abilities
rePUbliC shiPs
seParatist shiPs
rePUbliC VehiCles
seParatist VehiCles
Padawan training
walkthroUgh
secrets and extras
checklists
nintendo ds
contents
how to Use this egUideDownload from www.chipper.pl

ca
st
Prima Official Game Guide
www.primagames.com
shiP and VehiCle abilitiesLike characters, ships and vehicles can have their own special abilities. Ships that have special abilities
are easy to spot—their abilities are described right in their names! Such isn’t the case with vehicles, but not to worry—we disclose each ship’s and vehicle’s special abilities in the sections that follow!
boost: Used to dramatically increase the ship’s or vehicle’s speed.
explosive attacks: Lets certain ships and vehicles destroy silver objects and structures. (Only explosive attacks can destroy silver objects and structures.)
invincible: The Separatists’ gold-plated Super Tank can’t be destroyed.
rapid fire: Lets certain ships and vehicles overheat and destroy gold objects and structures, which are otherwise indestructible. (Only rapid-fire attacks can overheat and destroy gold objects and structures.)
torpedoes: Certain ships come stocked with torpedoes, which can destroy special pink targets for a variety of benefits.
VehiCle ClassesA vehicle’s class tells you the base structure from which the vehicle is produced. Ships are
not produced from bases, so this field does not appear in their sections. See the next chapter, “Padawan Training,” for more on base building and structures.
h-tyPe nUbian yaChtabilities:
BoostWeaponry:
Blastershow to
Unlock: Complete “General Grievous 3: Destroy Malevolence”
Cost/location: 50,000/Resolute (Hangar)
Jedi shUttleabilities: BoostWeaponry: Blastershow to Unlock: Complete
“General Grievous 6—Grievous Intrigue”
Cost/location: 50,000/Resolute (Hangar)
kit fisto’s Jedi starfighter
abilities: BoostWeaponry:
Blastershow to Unlock: Complete “General Grievous 4: Lair of
Grievous” Cost/location: 50,000/Resolute (Hangar)
mediCal frigate (torPedoes)
abilities: Torpedoes, boost
Weaponry: Torpedoes, blasters
how to Unlock: Complete “General Grievous 3: Destroy Malevolence”
Cost/location: 50,000/Resolute (Hangar)
obi-Wan’s Jedi starfighter
abilities: BoostWeaponry:
Blastershow to Unlock:
Complete “Prologue: Geonosian Arena”Cost/location: 50,000/Resolute (Hangar)
Plo koon’s Jedi starfighterabilities: BoostWeaponry:
Blastershow to Unlock:
Story mode progression
Cost/location: None
rePUBlic shiPsanakin’s Jedi starfighter
abilities: BoostWeaponry:
Blastershow to Unlock:
Story mode progression
Cost/location: None
arC-170 starfighter (raPid fire)abilities: Rapid
Fire, boostWeaponry:
Blastershow to Unlock:
Complete “Epilogue: The Zillo Beast”
Cost/location: 50,000/Resolute (Hangar)
16Protected by copyright. Unauthorized or unlawful copying or downloading expressly prohibited.
introdUction
castUnloCking CharaCters
CharaCter Classes and abilities
CharaCters
UnloCking shiPs and VehiCles
shiP and VehiCle abilities
rePUbliC shiPs
seParatist shiPs
rePUbliC VehiCles
seParatist VehiCles
Padawan training
walkthroUgh
secrets and extras
checklists
nintendo ds
contents
how to Use this egUideDownload from www.chipper.pl

ca
st
Prima Official Game Guide
www.primagames.com
rePUbliC attaCk shUttleabilities:
BoostWeaponry:
Blastershow to
Unlock: Complete “General Grievous 4: Lair of Grievous”
Cost/location: 50,000/Resolute (Hangar)
rePUbliC CrUiser (missiles + torPedoes)
abilities: Torpedoes, explosive attacks, boost
Weaponry: Missiles, torpedoes, blasters
how to Unlock: Complete “Count Dooku 3: Jedi Crash”
Cost/location: 50,000/Resolute (Hangar)
rePUbliC droPshiP (raPid fire)abilities: Rapid fire, boostWeaponry:
Blastershow to
Unlock: Complete “Asajj Ventress 6: Liberty on Ryloth”
Cost/location: 50,000/Resolute (Hangar)
rePUbliC gUnshiPabilities: BoostWeaponry: Blastershow to Unlock:
Story mode progression
Cost/location: None
stealth shiP (missiles + torPedoes)
abilities: Torpedoes, explosive attacks, boost
Weaponry: Blastershow to Unlock:
Collect all 130 gold bricks, then build at superkit bay
Cost/location: 200,000/Resolute (Hangar)
the tWilightabilities: BoostWeaponry: Blastershow to Unlock: Complete
“Count Dooku 2: Gungan General”
Cost/location: 50,000/Resolute (Hangar)
V-19 torrent starfighterabilities: BoostWeaponry:
Blastershow to
Unlock: Story mode progression
Cost/location: None
y-Wing starfighterabilities: BoostWeaponry:
Blastershow to Unlock:
Complete “General Grievous 2: Shadow of Malevolence”
Cost/location: 50,000/Resolute (Hangar)
seParatist shiPsgeonosian solar sailor
abilities: BoostWeaponry: Blastershow to Unlock:
Complete “Count Dooku 6: Legacy of Terror”
Cost/location: 200,000/Invisible Hand (Hangar)
geonosian starfighterabilities: BoostWeaponry: Blastershow to Unlock: Buy
Poggle the LesserCost/location:
50,000/Invisible Hand (Hangar)
hyena bomberabilities: BoostWeaponry: Blastershow to Unlock:
Complete “Prologue: Geonosian Arena”
Cost/location: 50,000/Invisible Hand (Hangar)
magnagUard starfighterabilities: BoostWeaponry:
Blastershow to
Unlock: Buy MagnaGuard
Cost/location: 50,000/Invisible Hand (Hangar)
17Protected by copyright. Unauthorized or unlawful copying or downloading expressly prohibited.
introdUction
castUnloCking CharaCters
CharaCter Classes and abilities
CharaCters
UnloCking shiPs and VehiCles
shiP and VehiCle abilities
rePUbliC shiPs
seParatist shiPs
rePUbliC VehiCles
seParatist VehiCles
Padawan training
walkthroUgh
secrets and extras
checklists
nintendo ds
contents
how to Use this egUideDownload from www.chipper.pl
ca
st
Prima Official Game Guide
www.primagames.com
Xanadu Blood (raPid fire)abilities: Rapid fire,
boostWeaponry: Blastershow to Unlock:
Complete any of Ziro’s bounty hunter missions.
Cost/location: None
neimoidian shUttleabilities: BoostWeaponry: Blastershow to Unlock: Buy Nute
GunrayCost/location: 50,000/
Invisible Hand (Hangar)
Pirate saUCer (missiles)
abilities: Explosive attacks, boostWeaponry: Missiles,
blastershow to Unlock: Buy Hondo
OhnakaCost/location: 50,000/
Invisible Hand (Hangar)
slave Iabilities: BoostWeaponry: Blastershow to Unlock: Purchase the
character Jango FettCost/location: N/A, Invisible
Hand (Ziro’s Room)
souless one (raPid fire)abilities: Rapid fire,
boostWeaponry: Blastershow to Unlock:
Complete “General Grievous 6: Grievous Intrigue”
Cost/location: 200,000/Invisible Hand (Hangar)
the halo (raPid fire)abilities: Rapid fire, boostWeaponry: Blastershow to Unlock: Story mode
progressionCost/location: 200,000/
Invisible Hand (Hangar)
trident assaUlt Craft (missiles + torPedoes)
abilities: Torpedoes, explosive attacks, boost
Weaponry: Missiles, torpedoes, blasters
how to Unlock: Complete “Asajj Ventress 6: Liberty on Ryloth”
Cost/location: 50,000/Invisible Hand (Hangar)
VUltUre droidabilities: Boost, explosive
attacks (ground mode only)
Weaponry: Blasters, missiles (ground mode only)
how to Unlock: Complete “Prologue: Geonosian Arena”
Cost/location: 50,000/Invisible Hand (Hangar)
rePUBlic Vehiclesat-rt
Class: Small air supportabilities: NoneWeaponry: Blasterhow to Unlock: Build the vehicle
during any ground assault stage.Cost/location: 50,000/Resolute
(Ground Assault Staging Area)
at-aP WalkerClass: Air supportabilities: Explosive attacksWeaponry: Cannon, blastershow to Unlock: Build the vehicle
during any ground assault stage.
Cost/location: 75,000/Resolute (Ground Assault Staging Area)
at-teClass: Air supportabilities: Explosive attacksWeaponry: Cannons, blastershow to Unlock: Build the
vehicle during any ground assault stage.
Cost/location: 100,000/Resolute (Ground Assault Staging Area)
barC sPeederClass: Small air
supportabilities: BoostWeaponry: Blastershow to Unlock: Build
the vehicle during any ground assault stage.
Cost/location: —
Pirate sPeeder tankClass: Air supportabilities: Explosive attacksWeaponry: Cannonhow to Unlock: Build the vehicle
during any ground assault stage.Cost/location: 75,000/Resolute (Ground Assault
Staging Area)
18Protected by copyright. Unauthorized or unlawful copying or downloading expressly prohibited.
introdUction
castUnloCking CharaCters
CharaCter Classes and abilities
CharaCters
UnloCking shiPs and VehiCles
shiP and VehiCle abilities
rePUbliC shiPs
seParatist shiPs
rePUbliC VehiCles
seParatist VehiCles
Padawan training
walkthroUgh
secrets and extras
checklists
nintendo ds
contents
how to Use this egUideDownload from www.chipper.pl

ca
st
Prima Official Game Guide
www.primagames.com
rx-200 tankClass: Air supportabilities: Rapid fireWeaponry: Laser cannonhow to Unlock: Build the
vehicle during any ground assault stage.
Cost/location: 250,000/Resolute (Ground Assault Staging Area)
starhaWk sPeeder bikeClass: Small air supportabilities: BoostWeaponry: Blasterhow to Unlock: Build
the vehicle during any ground assault stage.
Cost/location: 50,000/Resolute (Ground Assault Staging Area)
Pirate sPeeder tankClass: Air supportabilities: Explosive attacksWeaponry: Cannonhow to Unlock: Build the vehicle
during any ground assault stage.Cost/location: None
staPClass: Small air supportabilities: BoostWeaponry: Blastershow to Unlock: Build the vehicle
during any ground assault stage.Cost/location: None
starhaWk sPeeder bikeClass: Small air supportabilities: BoostWeaponry: Blastershow to Unlock: Build
the vehicle during any ground assault stage.
Cost/location: None
sUPer tankClass: Air supportabilities: Explosive attacks,
invincibleWeaponry: Missiles,
blastershow to Unlock: Build the
vehicle during any ground assault stage.
Cost/location: 100,000/Invisible Hand (Ground Assault Staging Area)
aatClass: Air supportabilities: Explosive attacksWeaponry: Cannon, blastershow to Unlock: Build the
vehicle during any ground assault stage.
Cost/location: 50,000/Invisible Hand (Ground Assault Staging Area)
dWarf sPider droid
Class: Small air supportabilities: NoneWeaponry: Blastershow to Unlock: Build
the vehicle during any ground assault stage.
Cost/location: 75,000/Invisible Hand (Ground Assault Staging Area)
hailfire droidClass: Air supportabilities: Explosive
attacksWeaponry: Missileshow to Unlock: Build
the vehicle during any ground assault stage.
Cost/location: 75,000/Invisible Hand (Ground Assault Staging Area)
og-9 homing sPider droid
Class: Air supportabilities: Rapid fireWeaponry: Laser cannonhow to Unlock: Build the
vehicle during any ground assault stage.
Cost/location: 250,000/Invisible Hand (Ground Assault Staging Area)
seParatist Vehicles
19Protected by copyright. Unauthorized or unlawful copying or downloading expressly prohibited.
introdUction
castUnloCking CharaCters
CharaCter Classes and abilities
CharaCters
UnloCking shiPs and VehiCles
shiP and VehiCle abilities
rePUbliC shiPs
seParatist shiPs
rePUbliC VehiCles
seParatist VehiCles
Padawan training
walkthroUgh
secrets and extras
checklists
nintendo ds
contents
how to Use this egUideDownload from www.chipper.pl

pa
da
wa
n t
ra
inin
g
Prima Official Game Guide
www.primagames.com
padawan training
Flow oF the game
There are two primary game modes in LEGO Star Wars III: Story and Free Play. You play each mission in Story mode first—after you beat one, you unlock Free Play mode for that mission and are able to revisit the stage with new characters. This lets you explore the level more thoroughly and discover more hidden goodies!
Story Mode
Free Play Mode
NOTE
After beating the mandatory prologue mission (Geonosian Arena), you’re able to venture down one of three paths through the game: Count Dooku (blue), General Grievous (green), or Asajj Ventress (purple). We recommend starting with Count Dooku, as you’ll end up unlocking a lot of vehicles for Republic Assault mode. See the various walkthrough chapters for complete info on every mission, including how to find every minikit!
Ready to bring peace to the galaxy, young one? Even the most promising apprentice must begin somewhere—for you, that place is Padawan Training. Here you’ll learn the basics of interstellar adventuring, along with a general sense of what LEGO Star Wars III has in store. May the Force be with you!
In Story mode, the missions play out much as they do in the critically-acclaimed Star Wars: The Clone Wars TV series. Each mission is based around one of the show’s episodes, and you often get to control several of the episode’s central characters. You’re treated to brief and hilarious scenes throughout Story mode, and your band of heroes owns just enough skills to get you through the stage without allowing for excessive exploration.
Free Play mode does away with the cutscenes and character limitations of Story mode. It sets you free in each level, letting you use a variety of characters to help you explore the stage more completely. You choose your main character when starting up Free Play, but that’s all—the game automatically scans the characters you’ve unlocked and picks out a group of supporting characters for you. You may then magically toggle your Free Play character to any member of your group at anytime during gameplay, which lets you mix and match their skills to help you achieve all manner of heroic feats!
20Protected by copyright. Unauthorized or unlawful copying or downloading expressly prohibited.
introduction
cast
padawan trainingFlow oF the GaMe
StOry MOde
Free Play MOde
adventurouS actionSFiGhtinG
BreakinG StuFF
BuildinG StuFF
activatinG PanelS
uSinG the FOrce
liGhtSaBer Play
SPace coMbatlandinG PadS
BOOSt rinGS
tOrPedOeS
Ground aSSaultSthe MiniMaP
attackinG BaSeS
BaSe BuildinG
tantalizinG treaSureSStudS
MinikitS
GOld BrickS
red POwer BrickS
walKthrough
secrets and extras
checKlists
nintendo ds
contents
how to use this eguideDownload from www.chipper.pl

pa
da
wa
n t
ra
inin
g
Prima Official Game Guide
www.primagames.com
adventurous actions
FiGhtinGThe Clone Wars saga takes place during a period of civil war, so expect to do a lot of fighting. Fortunately,
combat couldn’t be easier in LEGO Star Wars III—just hammer the Attack button to whale away at whatever stands before you. Many characters carry some form of weapon—some are more useful than others!
• Melee weapons usually pack quite a punch, but they’re useless until you get close.
• Basic blasters will defeat the weak, but they lack firepower.
• Explosive weapons, such as grenades and rocket launchers, are devastating against most targets, and they’re the only weapons that can destroy silver objects.
• Rapid-fire weapons are better suited to mowing down crowds, and they’re the only weapons that can overheat and destroy gold objects.
• Sniper rifles are powerful blasters that let you pick off remote targets other weapons can’t reach.
• Lightsabers are lethal at close range, and they can be throw at distant targets. See the following “Lightsaber Play” section for details.
breakinG StuFFTearing through enemy Droids is a big part of life in LEGO Star Wars III, but so is smashing stuff.
Attack everything you see to find all sorts of goodies, from loose studs to jiggling LEGO pieces that can be built into useful objects.
buildinG StuFFBuilding stuff helps you get ahead. Whenever you spy a pile of jiggling pieces, stand
next to them, then press and hold the Action button. Whatever you end up building, it’s sure to help you!
activatinG PanelSMany areas you’ll visit will feature one or more special panels. Stand close and these will light
up with an image of a certain character class (clone trooper, bounty hunter, astromech Droid, etc.). Only characters whose class matches the one shown on the panel will be able to activate it! Activating panels often leads to beneficial changes in your nearby surroundings.
NOTEThe supporting characters you’re given will always feature the best array of Free Play skills for the level you’re about to play.
Once you’ve played through the entire game in Story mode, you’ll have unlocked plenty of characters with enough skills to fully explore Free Play. Beat all missions in Story mode first, then go back through on Free Play and hunt for all those goodies you couldn’t get before!
TIPPress and hold the Attack button to aim your current weapon. This helps you line up precision shots!
NOTEAll characters armed with weapons have unlimited ammo. Handy!
NOTESee the previous “Cast” chapter for a complete listing of every playable character, with details on their classes, abilities, weaponry, and how to unlock them!
uSinG the ForceThe Force is an unseen energy that unifies and binds together everything
21Protected by copyright. Unauthorized or unlawful copying or downloading expressly prohibited.
introduction
cast
padawan trainingFlow oF the GaMe
StOry MOde
Free Play MOde
adventurouS actionSFiGhtinG
BreakinG StuFF
BuildinG StuFF
activatinG PanelS
uSinG the FOrce
liGhtSaBer Play
SPace coMbatlandinG PadS
BOOSt rinGS
tOrPedOeS
Ground aSSaultSthe MiniMaP
attackinG BaSeS
BaSe BuildinG
tantalizinG treaSureSStudS
MinikitS
GOld BrickS
red POwer BrickS
walKthrough
secrets and extras
checKlists
nintendo ds
contents
how to use this eguideDownload from www.chipper.pl

pa
da
wa
n t
ra
inin
g
Prima Official Game Guide
www.primagames.com
Jedi and Sith characters can also use the Force to slam the ground and create a powerful
shockwave. Simply jump and press the Attack button to perform the Force slam maneuver. Use Force slams to quickly clear out swarming enemies—it’s particularly useful against groups of battle Droids!
liGhtSaber PlayJedi and Sith characters get to use powerful melee weapons called Lightsabers. These lethal weapons can make short work of practically anything, including armored vehicles and even structures. Best of all, when attacking with a Lightsaber, you’ll automatically deflect inbound blaster fire back at enemies!
in existence. Jedi and Sith characters are able to “use the Force” to manipulate this unseen energy to create beneficial changes in their surroundings. Anything in the environment that glows with a mysterious aura can be manipulated in some fashion by using the Force—try it and see what happens!
Press and hold the Attack button to take aim with a Lightsaber. Move your cursor about
the screen and see what you can target, then release the Attack button to hurl your Lightsaber at everything you’ve highlighted. This is a great way to strike out-of-reach foes!
The most common manipulation is the Force lift. Press and hold the Action button to lift enemies and smaller objects up off the ground! Once lifted, an enemy or object can often be moved about by manipulating the left thumbstick. Releasing the Action button may cause you to throw the enemy or object (if possible).
TIPForce-throw enemies into one another to really shake them up!
NOTEWhile aiming to throw a Lightsaber, you’ll automatically deflect all inbound blaster fire. Handy!
Lightsabers can also be used to carve holes into solid objects, such as walls and doors. Look for special
blue Jedi logos that appear on the ground—these let you know that some serious saber-play can be performed! Stand on a Jedi logo and press the Attack button to use your Lightsaber. Then see what kind of damage you can cause!
Lastly, Lightsabers allow Jedi and Sith characters to “saber-jump” between special checkered
walls. Simply jump into a checkered wall, and your character will automatically use their Lightsaber to gain a grip. Jump back and forth between two checkered walls to reach great heights!
space combatNew to LEGO Star Wars III, space battles are grand-scale affairs that put you in the pilot’s seat.
22Protected by copyright. Unauthorized or unlawful copying or downloading expressly prohibited.
introduction
cast
padawan trainingFlow oF the GaMe
StOry MOde
Free Play MOde
adventurouS actionSFiGhtinG
BreakinG StuFF
BuildinG StuFF
activatinG PanelS
uSinG the FOrce
liGhtSaBer Play
SPace coMbatlandinG PadS
BOOSt rinGS
tOrPedOeS
Ground aSSaultSthe MiniMaP
attackinG BaSeS
BaSe BuildinG
tantalizinG treaSureSStudS
MinikitS
GOld BrickS
red POwer BrickS
walKthrough
secrets and extras
checKlists
nintendo ds
contents
how to use this eguideDownload from www.chipper.pl
pa
da
wa
n t
ra
inin
g
Prima Official Game Guide
www.primagames.com
You have complete freedom of movement during space combat scenarios and can fly anywhere you like within the confines of the mission area. Don’t fly too far away though—you’ll be destroyed!
All ships share a few common abilities. Hold the Jump button while piloting any ship to boost, and
double-tap the control sticks in any direction to perform a quick evasive roll. Hold the Attack button to unleash your ship’s weapons and obliterate enemy targets!
landinG PadSMost space combat scenarios ask you to land at various sites to complete objectives on foot.
Look for giant red crosses on the ground and fly up close, then press the Change Character button to land on these special landing pads. Do whatever needs to be done at the landing site to help you accomplish your mission, then return to your ship and lift off in search of the next objective.
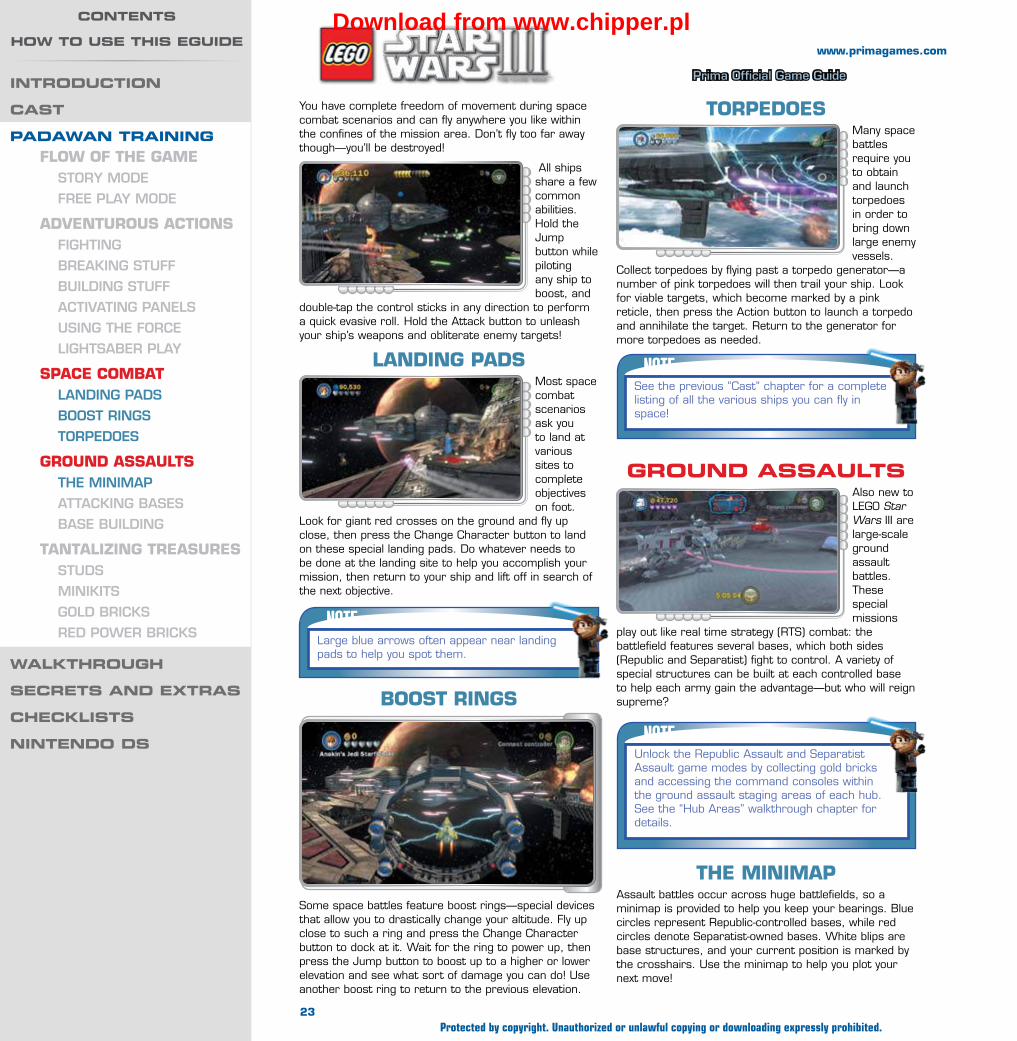
torPedoeSMany space battles require you to obtain and launch torpedoes in order to bring down large enemy vessels.
Collect torpedoes by flying past a torpedo generator—a number of pink torpedoes will then trail your ship. Look for viable targets, which become marked by a pink reticle, then press the Action button to launch a torpedo and annihilate the target. Return to the generator for more torpedoes as needed.
NOTELarge blue arrows often appear near landing pads to help you spot them.
booSt rinGS
Some space battles feature boost rings—special devices that allow you to drastically change your altitude. Fly up close to such a ring and press the Change Character button to dock at it. Wait for the ring to power up, then press the Jump button to boost up to a higher or lower elevation and see what sort of damage you can do! Use another boost ring to return to the previous elevation.
NOTEUnlock the Republic Assault and Separatist Assault game modes by collecting gold bricks and accessing the command consoles within the ground assault staging areas of each hub. See the “Hub Areas” walkthrough chapter for details.
NOTESee the previous “Cast” chapter for a complete listing of all the various ships you can fly in space!
ground assaultsAlso new to LEGO Star Wars III are large-scale ground assault battles. These special missions
play out like real time strategy (RTS) combat: the battlefield features several bases, which both sides (Republic and Separatist) fight to control. A variety of special structures can be built at each controlled base to help each army gain the advantage—but who will reign supreme?
the MiniMaPAssault battles occur across huge battlefields, so a minimap is provided to help you keep your bearings. Blue circles represent Republic-controlled bases, while red circles denote Separatist-owned bases. White blips are base structures, and your current position is marked by the crosshairs. Use the minimap to help you plot your next move!
23Protected by copyright. Unauthorized or unlawful copying or downloading expressly prohibited.
introduction
cast
padawan trainingFlow oF the GaMe
StOry MOde
Free Play MOde
adventurouS actionSFiGhtinG
BreakinG StuFF
BuildinG StuFF
activatinG PanelS
uSinG the FOrce
liGhtSaBer Play
SPace coMbatlandinG PadS
BOOSt rinGS
tOrPedOeS
Ground aSSaultSthe MiniMaP
attackinG BaSeS
BaSe BuildinG
tantalizinG treaSureSStudS
MinikitS
GOld BrickS
red POwer BrickS
walKthrough
secrets and extras
checKlists
nintendo ds
contents
how to use this eguideDownload from www.chipper.pl
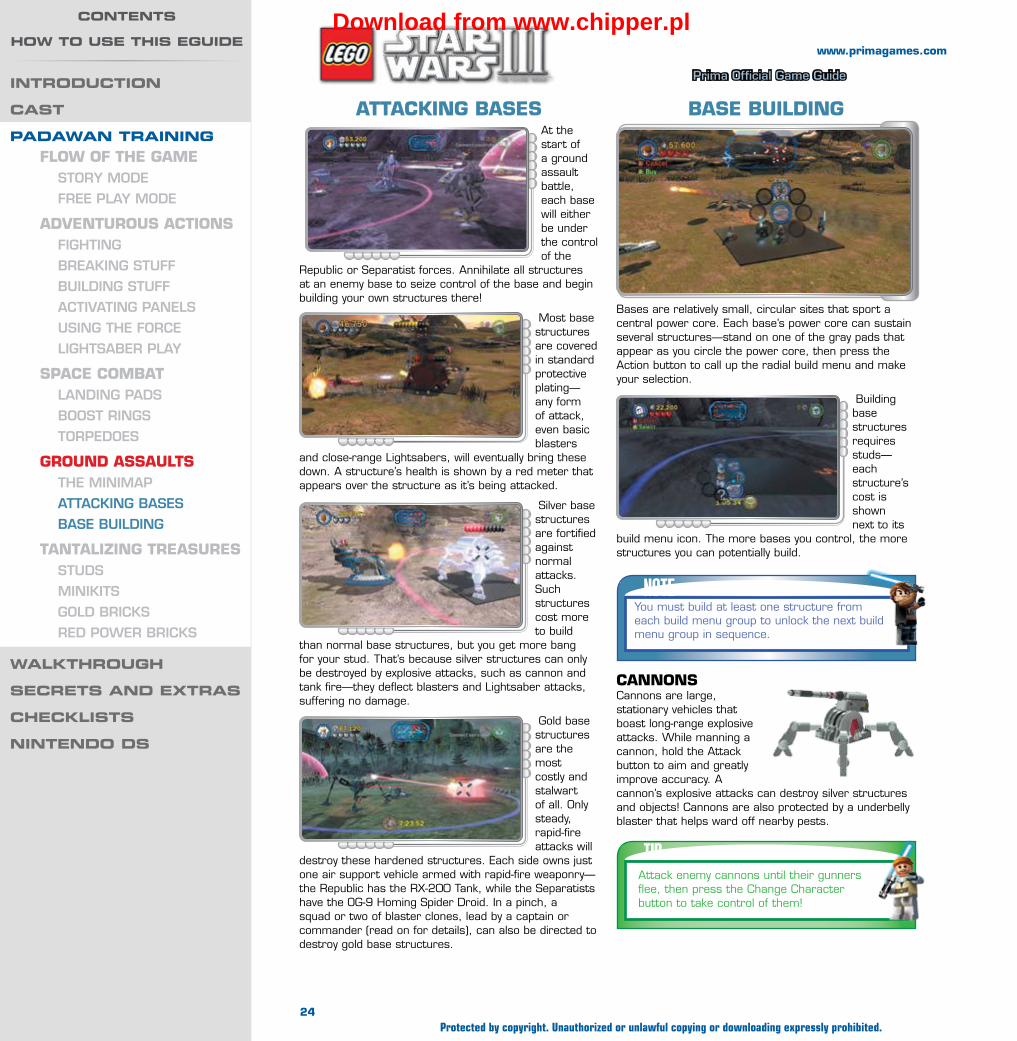
pa
da
wa
n t
ra
inin
g
Prima Official Game Guide
www.primagames.com
Bases are relatively small, circular sites that sport a central power core. Each base’s power core can sustain several structures—stand on one of the gray pads that appear as you circle the power core, then press the Action button to call up the radial build menu and make your selection.
Building base structures requires studs—each structure’s cost is shown next to its
build menu icon. The more bases you control, the more structures you can potentially build.
attackinG baSeSAt the start of a ground assault battle, each base will either be under the control of the
Republic or Separatist forces. Annihilate all structures at an enemy base to seize control of the base and begin building your own structures there!
Most base structures are covered in standard protective plating—any form of attack, even basic blasters
and close-range Lightsabers, will eventually bring these down. A structure’s health is shown by a red meter that appears over the structure as it’s being attacked.
Silver base structures are fortified against normal attacks. Such structures cost more to build
than normal base structures, but you get more bang for your stud. That’s because silver structures can only be destroyed by explosive attacks, such as cannon and tank fire—they deflect blasters and Lightsaber attacks, suffering no damage.
Gold base structures are the most costly and stalwart of all. Only steady, rapid-fire attacks will
destroy these hardened structures. Each side owns just one air support vehicle armed with rapid-fire weaponry—the Republic has the RX-200 Tank, while the Separatists have the OG-9 Homing Spider Droid. In a pinch, a squad or two of blaster clones, lead by a captain or commander (read on for details), can also be directed to destroy gold base structures.
baSe buildinG
NOTEYou must build at least one structure from each build menu group to unlock the next build menu group in sequence.
cannonS Cannons are large, stationary vehicles that boast long-range explosive attacks. While manning a cannon, hold the Attack button to aim and greatly improve accuracy. A cannon’s explosive attacks can destroy silver structures and objects! Cannons are also protected by a underbelly blaster that helps ward off nearby pests.
TIPAttack enemy cannons until their gunners flee, then press the Change Character button to take control of them!
24Protected by copyright. Unauthorized or unlawful copying or downloading expressly prohibited.
introduction
cast
padawan trainingFlow oF the GaMe
StOry MOde
Free Play MOde
adventurouS actionSFiGhtinG
BreakinG StuFF
BuildinG StuFF
activatinG PanelS
uSinG the FOrce
liGhtSaBer Play
SPace coMbatlandinG PadS
BOOSt rinGS
tOrPedOeS
Ground aSSaultSthe MiniMaP
attackinG BaSeS
BaSe BuildinG
tantalizinG treaSureSStudS
MinikitS
GOld BrickS
red POwer BrickS
walKthrough
secrets and extras
checKlists
nintendo ds
contents
how to use this eguideDownload from www.chipper.pl

pa
da
wa
n t
ra
inin
g
Prima Official Game Guide
www.primagames.com
barrackSBarracks are squat structures that generate squads of infantry. There are two primary types of barracks: blaster clones/Droids, and rocket clones/Droids. Construct lots of barracks to flood the battlefield with troops and hamper the enemy’s advance!
• Blaster clones/Droids can destroy gold structures.• Rocket clones/Droids can destroy silver structures.
Special characters, such as high-ranking clones and enemy Droids, can issue orders to infantry
troops. While using such a character, simply stand next to a group of friendly infantry and press the Action button to get their attention. Now they’ll follow you around!
Hold the Attack button to designate targets for troops you’ve got following you. The soldiers will
continue firing at the target until it has been destroyed. Leading troops around with a commander character can be a good way to do some damage, and it helps negate enemy shields (keep reading)—but don’t expect infantry to last long against direct fire!
SMall air SuPPortUse the small air support menu to call down smaller vehicles such as speeders. Small vehicles are faster and lighter than tanks and walkers, but they generally suffer from weak firepower and little armor. Use smaller vehicles primarily as transports to help you quickly navigate the battlefield—speeders are especially useful for getting around!
Each time you wish to designate a new target for your infantry, you must first press the Action button to get their attention.
air SuPPortAir support structures work just like their smaller peers, however these towers call for far larger and more powerful vehicles. Race to conquer your first four bases so you can begin calling down tanks and heavy walkers with air support!
Shield GeneratorSShield generators bestow dome-like energy barriers around bases. These “bubble” shields repel all outside attacks, including long-range cannon fire. Shields also prevent vehicles from passing through, but they have no effect against infantry troops—run right through shields on foot and attack the generator structure directly to destroy it. This brings the barrier down for good.
NOTESee the previous “Cast” chapter for a complete listing of all ground assault vehicles, with info on their abilities and weapons, and how to unlock them.
NOTEYou can pull a shield generator’s control lever to instantly disable the shield. This is only temporary, however—the enemy can reactivate the shield by throwing the switch again!
ray ShieldSRay shields are uniquely used to protect other structures. Once built, a ray shield emits a wave of energy at a nearby base structure or power core—this coats the target in an impenetrable shield that protects it from all harm! There’s no getting through a ray shield’s projected barrier—you must destroy the ray shield to cut off the energy wave.
torPedo GeneratorSTorpedo generators are special structures that turn humble speeders into hit-and-run assault
units. Build a torpedo generator, then cruise by on a speeder and collect some pink bombs. Base power cores will now become highlighted by pink reticles—press the Action button to fire a torpedo and completely destroy one of the base’s structures. Successive torpedoes destroy more structures until the base is clear.
25Protected by copyright. Unauthorized or unlawful copying or downloading expressly prohibited.
introduction
cast
padawan trainingFlow oF the GaMe
StOry MOde
Free Play MOde
adventurouS actionSFiGhtinG
BreakinG StuFF
BuildinG StuFF
activatinG PanelS
uSinG the FOrce
liGhtSaBer Play
SPace coMbatlandinG PadS
BOOSt rinGS
tOrPedOeS
Ground aSSaultSthe MiniMaP
attackinG BaSeS
BaSe BuildinG
tantalizinG treaSureSStudS
MinikitS
GOld BrickS
red POwer BrickS
walKthrough
secrets and extras
checKlists
nintendo ds
contents
how to use this eguideDownload from www.chipper.pl

pa
da
wa
n t
ra
inin
g
Prima Official Game Guide
www.primagames.com
MinikitSMinikits are rare finds—search high and low for these worthy prizes. Ten minikits are hidden within
each level, and some are more difficult to claim than others. Collect all 10 minikits from a level to earn a gold brick and unlock the level’s hidden character! Visit the Resolute’s minikit bay to view and purchase the minikit characters you’ve unlocked.
Gold brickSGold bricks aren’t found, but earned. There are 130 gold bricks to obtain in all, and the more
you own, the more hub areas you’ll have access to. You receive one gold brick each time you accomplish one of the following:
• Beat a level in Story mode.• Satisfy a level’s True Jedi stud requirement during
Story or Free Play mode.• Collect all 10 minikits from a level (you can
accomplish this only during Free Play).• Beat a ground assault mission, space combat
mission, or bounty hunter mission.
extraSThe final build menu option, the Extras menu, only comes into play during certain missions. In some
Story mode levels, you can purchase a minikit dispenser through the Extras menu—this is the only way to acquire one of the level’s minikits. In certain Republic Assault and Separatist Assault battles, this menu is used to construct a special Escape Pod structure, which you need to build to win some of these missions. If there’s nothing special to build during the mission, then the Extras menu option won’t be accessible.
tantalizing treasures
StudSStuds are the sole form of currency in LEGO Star Wars III. You’ll find them all over the place,
so it’s easy to build your fortune. Collect every single stud you see, and smash every breakable object to find even more. Spend your hard-earned studs to purchase cool extras around the hub areas! See the “Hub Areas” chapter of this guide for details.
• Silver studs are common and worth 10 studs.• Gold studs are uncommon and are worth 100 studs.• Blue studs are rare and are worth 1,000 studs.• Purple studs are the rarest of all—each one’s worth a
whopping 10,000 studs!
true JediEarn True Jedi status in each stage by collecting enough studs to fill the True Jedi meter at the top of
the screen—you’ll earn a gold brick each time! See each level’s walkthrough section to learn how many studs you need to collect to achieve True Jedi status.
NOTE
TIPTorpedo an enemy base’s power core to quickly cripple all of its structures!
TIPPurchase score multiplier power bricks to make achieving True Jedi status much easier! See the following “Red Power Bricks” section for details.
See the various walkthrough sections to learn how to obtain each level’s minikits. Check the “Secrets and Extras” chapter to learn all about ground assault missions, space combat missions, and bounty hunter missions!
26Protected by copyright. Unauthorized or unlawful copying or downloading expressly prohibited.
introduction
cast
padawan trainingFlow oF the GaMe
StOry MOde
Free Play MOde
adventurouS actionSFiGhtinG
BreakinG StuFF
BuildinG StuFF
activatinG PanelS
uSinG the FOrce
liGhtSaBer Play
SPace coMbatlandinG PadS
BOOSt rinGS
tOrPedOeS
Ground aSSaultSthe MiniMaP
attackinG BaSeS
BaSe BuildinG
tantalizinG treaSureSStudS
MinikitS
GOld BrickS
red POwer BrickS
walKthrough
secrets and extras
checKlists
nintendo ds
contents
how to use this eguideDownload from www.chipper.pl

pa
da
wa
n t
ra
inin
g
Prima Official Game Guide
www.primagames.com
red Power brickSThe most precious and rarest prizes of all, red power bricks (also called “red bricks” or “power bricks”) are
found only in the hub areas. Search the hubs thoroughly to discover these special collectables, then purchase them to gain awesome advantages, like score multipliers and invincibility! See the “Hub Areas” chapter for complete details on every power brick.
NOTEAfter purchasing a red power brick, you must visit the Pause screen’s Extras menu and activate the brick to gain its advantages. You can turn these advantages on and off as you please through this menu.
Your training concludes with some final words of wisdom from one with great knowledge of the Force—none other than LEGO Star Wars III’s most kind and noble producer, Brett Rector! Keep these final bits of sage advice in mind as you revel in your galaxy-wide adventures.
General tiPS• When in doubt, break everything you can! Oftentimes the solution to a puzzle will be exposed where you
least expect it.• Take advantage of the abundance of studs on the Resolute’s bridge. Each time you return to the hub, the
studs are replenished. Be a true Jedi and grab all you can!• Once you attain True Jedi in a level, you will not lose that status if your stud total drops below the level
requirement.• If you want to quickly begin amassing studs, start by playing the Asajj Ventress story arch, beginning
with Chapter I: The Hidden Enemy. Beating Chapter 2: Ambush! unlocks Yoda and the clone trooper Jek. Yoda is small enough to fit through the small ports on the Resolute’s bridge, while Jek wields a rocket launcher, which will help you destroy silver objects around the ship.
cOMBat tiPS• Jump and press the Attack button to unleash a Force slam attack and clear out multiple enemies at
once! This is a very handy tactic to employ as you weave through the battlefield with a Jedi.• You can deactivate a Droideka’s shields without getting too close if you use a clone trooper’s shock
grenade. Simply toss the grenade at the Droideka, detonate to deplete the shield, and then switch to a Jedi for quick destruction.
• Throwing a Jedi’s Lightsaber is very useful, especially when confronting a handful of battle Droids in narrow hallways. It cuts down these easy enemies in a flash!
GrOund aSSault tiPS• Use speeders during ground missions to weave around the battlefield and quickly get to underprotected
targets.• It’s important to drop enemy base shields and destroy the generators that create them. Once this is
accomplished, you can concentrate on depleting the rest of your enemy’s forces.• The AT-TE proves to be the workhorse of the Republic fleet. Despite the fact it moves slowly, it is
extremely tough and has the ability to destroy almost anything—including silver base structures—in record time.
• Be sure to request the Republic’s RX-200 Tank at one of your bases—it’s the key to winning many ground battles. Often it is the fastest way to destroy the Separatist’s gold brick structures.
MiSSiOn StrateGieS• General Grievous 2—Shadow of Malevolence: Flight missions are some of the most difficult to obtain True
Jedi stud status in. When facing off against the Malevolence, go after the turrets alongside the massive starship. You’ll destroy its armaments and gain a wealth of studs!
• General Grievous 3—Destroy Malevolence: When battling Grievous, don’t mind the Droidekas unless they’re right in front of you. You’ll end up fighting more enemies than you need to.
• Asajj Ventress 6—Innocents of Ryloth: After summoning and hopping aboard the AT-AP walker, use it to smash through obstacles and collect studs. You will be impervious to almost any attacks.
brett’S bitS
27Protected by copyright. Unauthorized or unlawful copying or downloading expressly prohibited.
introduction
cast
padawan trainingFlow oF the GaMe
StOry MOde
Free Play MOde
adventurouS actionSFiGhtinG
BreakinG StuFF
BuildinG StuFF
activatinG PanelS
uSinG the FOrce
liGhtSaBer Play
SPace coMbatlandinG PadS
BOOSt rinGS
tOrPedOeS
Ground aSSaultSthe MiniMaP
attackinG BaSeS
BaSe BuildinG
tantalizinG treaSureSStudS
MinikitS
GOld BrickS
red POwer BrickS
walKthrough
secrets and extras
checKlists
nintendo ds
contents
how to use this eguideDownload from www.chipper.pl
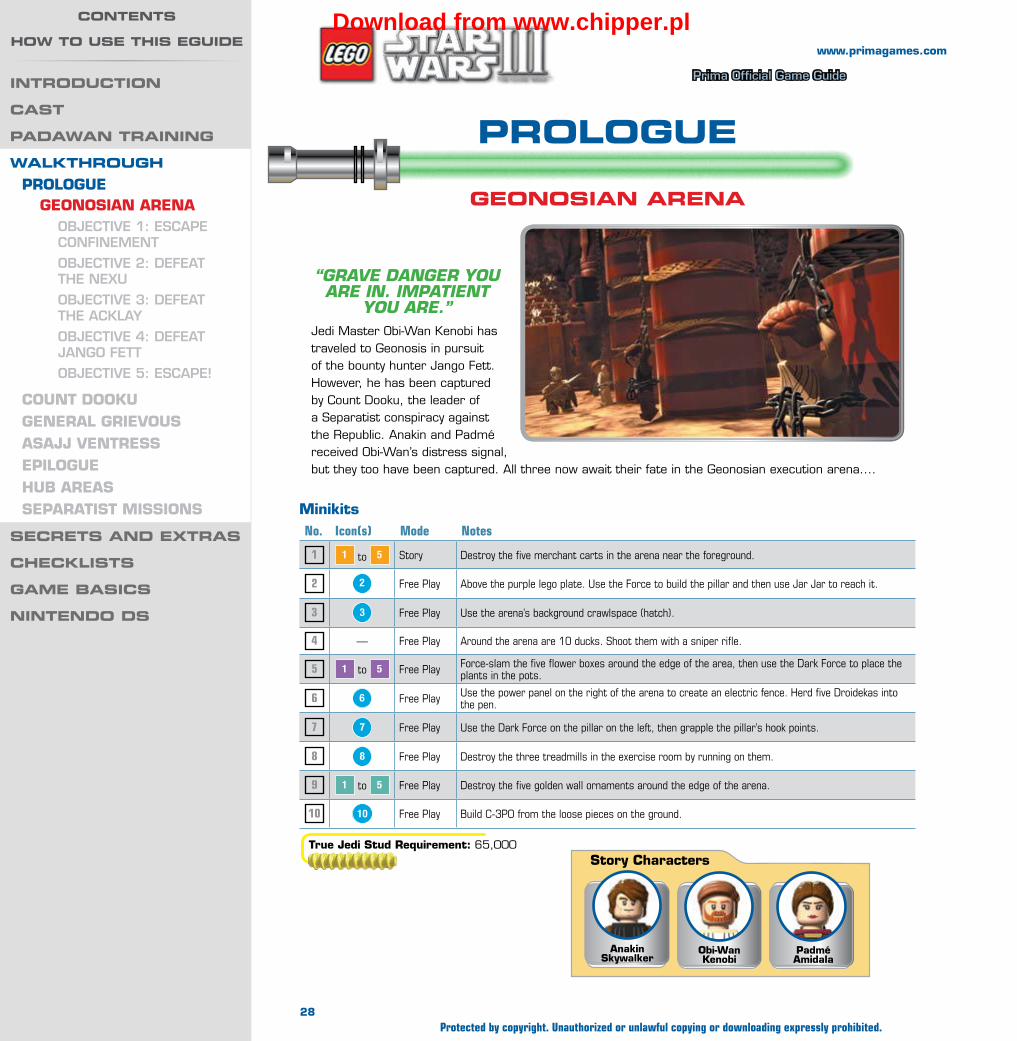
WALKTHROUGH
WA
LK
TH
RO
UG
H —
PR
OLO
GU
e
Prima Official Game Guide
www.primagames.com
PROLOGUe
“GRave danGeR you aRe In. ImpatIent
you aRe.”Jedi Master Obi-Wan Kenobi has traveled to Geonosis in pursuit of the bounty hunter Jango Fett. However, he has been captured by Count Dooku, the leader of a Separatist conspiracy against the Republic. Anakin and Padmé received Obi-Wan’s distress signal, but they too have been captured. All three now await their fate in the Geonosian execution arena....
GeOnOsiAn ARenA
MinikitsNo. Icon(s) Mode Notes
1 1 to 5 Story Destroy the five merchant carts in the arena near the foreground.
2 2 Free Play Above the purple lego plate. Use the Force to build the pillar and then use Jar Jar to reach it.
3 3 Free Play Use the arena’s background crawlspace (hatch).
4 — Free Play Around the arena are 10 ducks. Shoot them with a sniper rifle.
5 1 to 5 Free Play Force-slam the five flower boxes around the edge of the area, then use the Dark Force to place the plants in the pots.
6 6 Free Play Use the power panel on the right of the arena to create an electric fence. Herd five Droidekas into the pen.
7 7 Free Play Use the Dark Force on the pillar on the left, then grapple the pillar’s hook points.
8 8 Free Play Destroy the three treadmills in the exercise room by running on them.
9 1 to 5 Free Play Destroy the five golden wall ornaments around the edge of the arena.
10 10 Free Play Build C-3PO from the loose pieces on the ground.
True Jedi Stud Requirement: 65,000Story Characters
Padmé Amidala
Obi-Wan Kenobi
Anakin Skywalker
28Protected by copyright. Unauthorized or unlawful copying or downloading expressly prohibited.
inTROdUcTiOn
cAsT
PAdAWAn TRAininG
WALKTHROUGHPROlOgue
geOnOSiAn ARenAObjective 1: escaPe cOnfinement
Objective 2: Defeat the nexu
Objective 3: Defeat the acklay
Objective 4: Defeat janGO fett
Objective 5: escaPe!
COunT DOOKugeneRAl gRievOuSASAJJ venTReSSePilOgueHub AReASSePARATiST MiSSiOnS
secReTs And exTRAs
cHecKLisTs
GAme BAsics
ninTendO ds
cOnTenTs
HOW TO Use THis eGUideDownload from www.chipper.pl
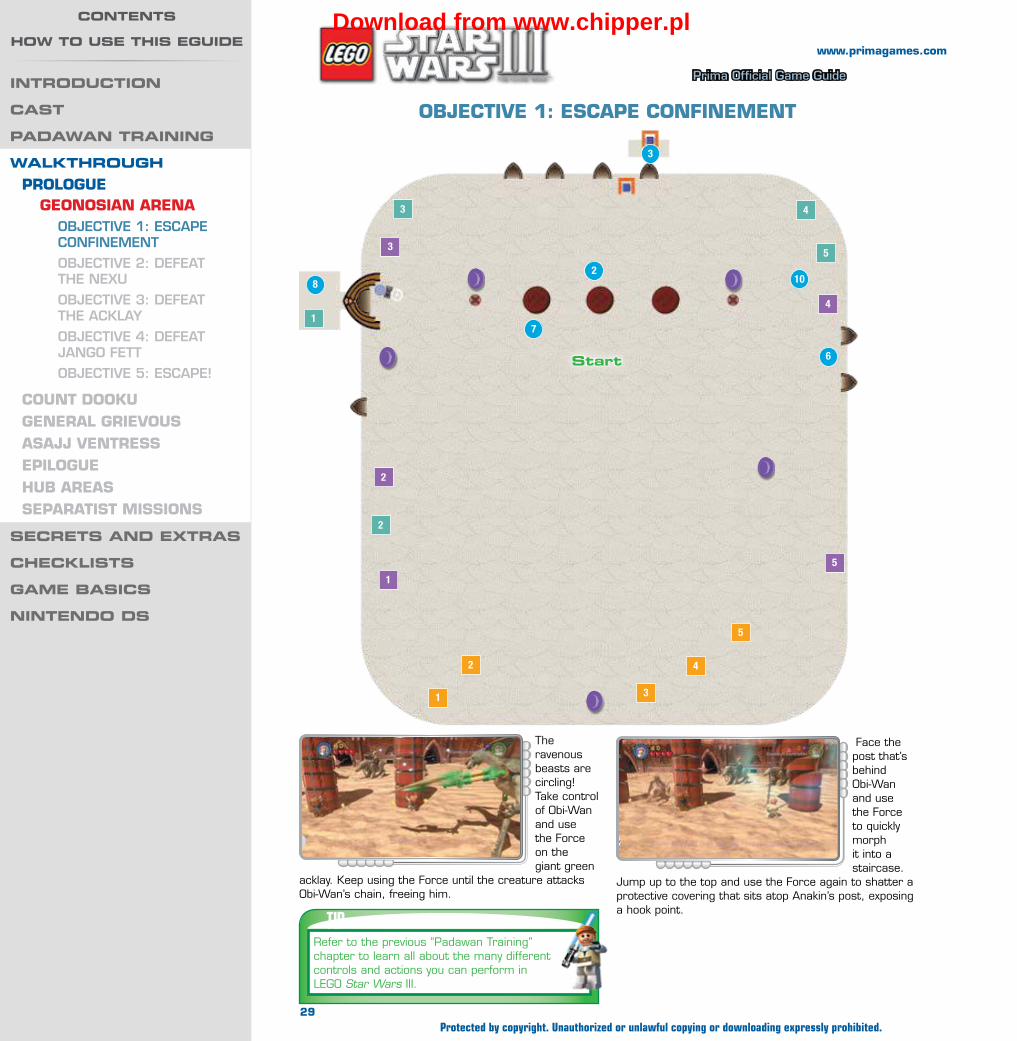
WA
LK
TH
RO
UG
H —
PR
OLO
GU
e
Prima Official Game Guide
www.primagames.com
ObJeCTive 1: eSCAPe COnfineMenT
The ravenous beasts are circling! Take control of Obi-Wan and use the Force on the giant green
acklay. Keep using the Force until the creature attacks Obi-Wan’s chain, freeing him.
TIPRefer to the previous “Padawan Training” chapter to learn all about the many different controls and actions you can perform in LEGO Star Wars III.
Face the post that’s behind Obi-Wan and use the Force to quickly morph it into a staircase.
Jump up to the top and use the Force again to shatter a protective covering that sits atop Anakin’s post, exposing a hook point.
1
2
2
3
6
7
8 10
3
4
5
1
2
3
4
5
1
2
3 4
5
start
29Protected by copyright. Unauthorized or unlawful copying or downloading expressly prohibited.
inTROdUcTiOn
cAsT
PAdAWAn TRAininG
WALKTHROUGHPROlOgue
geOnOSiAn ARenAObjective 1: escaPe cOnfinement
Objective 2: Defeat the nexu
Objective 3: Defeat the acklay
Objective 4: Defeat janGO fett
Objective 5: escaPe!
COunT DOOKugeneRAl gRievOuSASAJJ venTReSSePilOgueHub AReASSePARATiST MiSSiOnS
secReTs And exTRAs
cHecKLisTs
GAme BAsics
ninTendO ds
cOnTenTs
HOW TO Use THis eGUideDownload from www.chipper.pl
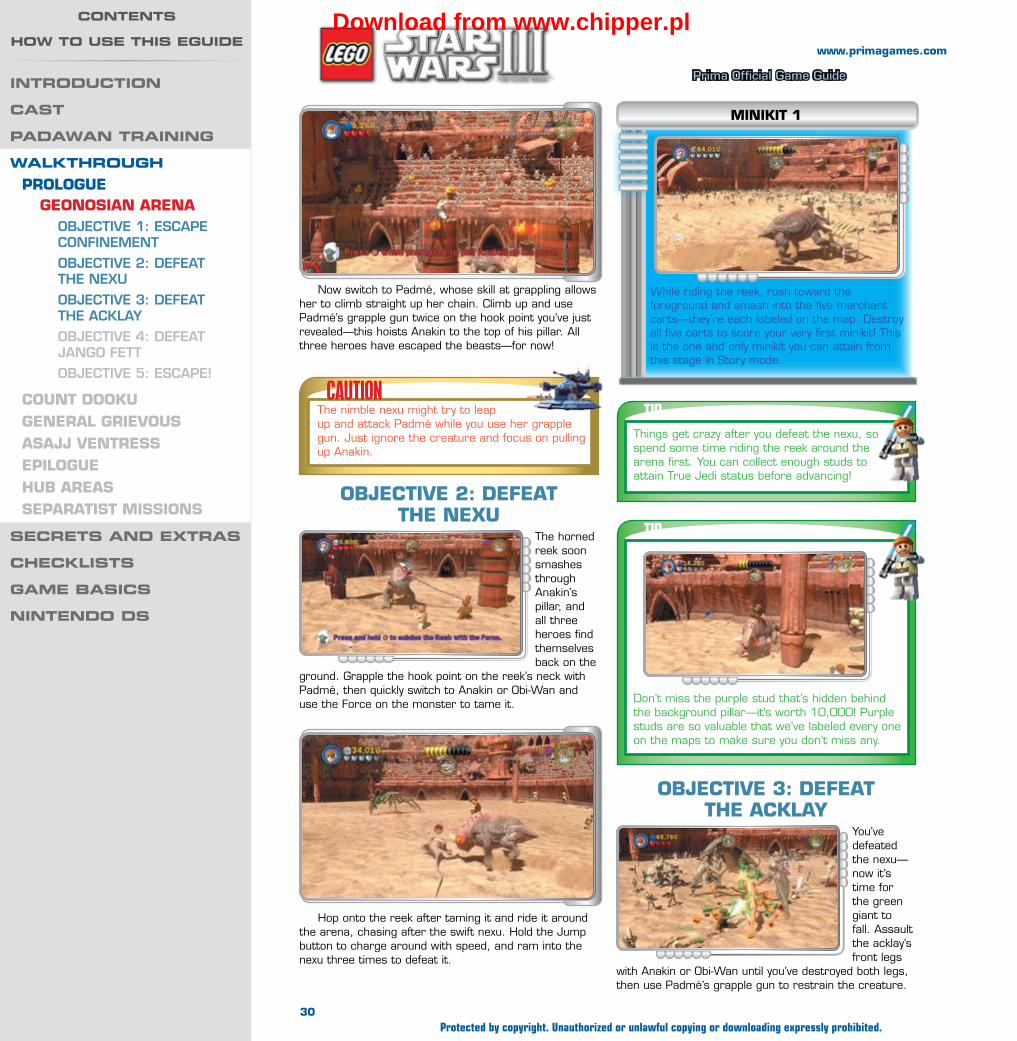
WA
LK
TH
RO
UG
H —
PR
OLO
GU
e
Prima Official Game Guide
www.primagames.com
ObJeCTive 3: DefeAT THe ACKlAy
You’ve defeated the nexu—now it’s time for the green giant to fall. Assault the acklay’s front legs
with Anakin or Obi-Wan until you’ve destroyed both legs, then use Padmé’s grapple gun to restrain the creature.
ObJeCTive 2: DefeAT THe nexu
The horned reek soon smashes through Anakin’s pillar, and all three heroes find themselves back on the
ground. Grapple the hook point on the reek’s neck with Padmé, then quickly switch to Anakin or Obi-Wan and use the Force on the monster to tame it.
Now switch to Padmé, whose skill at grappling allows her to climb straight up her chain. Climb up and use Padmé’s grapple gun twice on the hook point you’ve just revealed—this hoists Anakin to the top of his pillar. All three heroes have escaped the beasts—for now!
TIP
While riding the reek, rush toward the foreground and smash into the five merchant carts—they’re each labeled on the map. Destroy all five carts to score your very first minikit! This is the one and only minikit you can attain from this stage in Story mode.
MiniKiT 1
TIPThings get crazy after you defeat the nexu, so spend some time riding the reek around the arena first. You can collect enough studs to attain True Jedi status before advancing!
Don’t miss the purple stud that’s hidden behind the background pillar—it’s worth 10,000! Purple studs are so valuable that we’ve labeled every one on the maps to make sure you don’t miss any.
CAUTIONThe nimble nexu might try to leap up and attack Padmé while you use her grapple gun. Just ignore the creature and focus on pulling up Anakin.
Hop onto the reek after taming it and ride it around the arena, chasing after the swift nexu. Hold the Jump button to charge around with speed, and ram into the nexu three times to defeat it.
30Protected by copyright. Unauthorized or unlawful copying or downloading expressly prohibited.
inTROdUcTiOn
cAsT
PAdAWAn TRAininG
WALKTHROUGHPROlOgue
geOnOSiAn ARenAObjective 1: escaPe cOnfinement
Objective 2: Defeat the nexu
Objective 3: Defeat the acklay
Objective 4: Defeat janGO fett
Objective 5: escaPe!
COunT DOOKugeneRAl gRievOuSASAJJ venTReSSePilOgueHub AReASSePARATiST MiSSiOnS
secReTs And exTRAs
cHecKLisTs
GAme BAsics
ninTendO ds
cOnTenTs
HOW TO Use THis eGUideDownload from www.chipper.pl
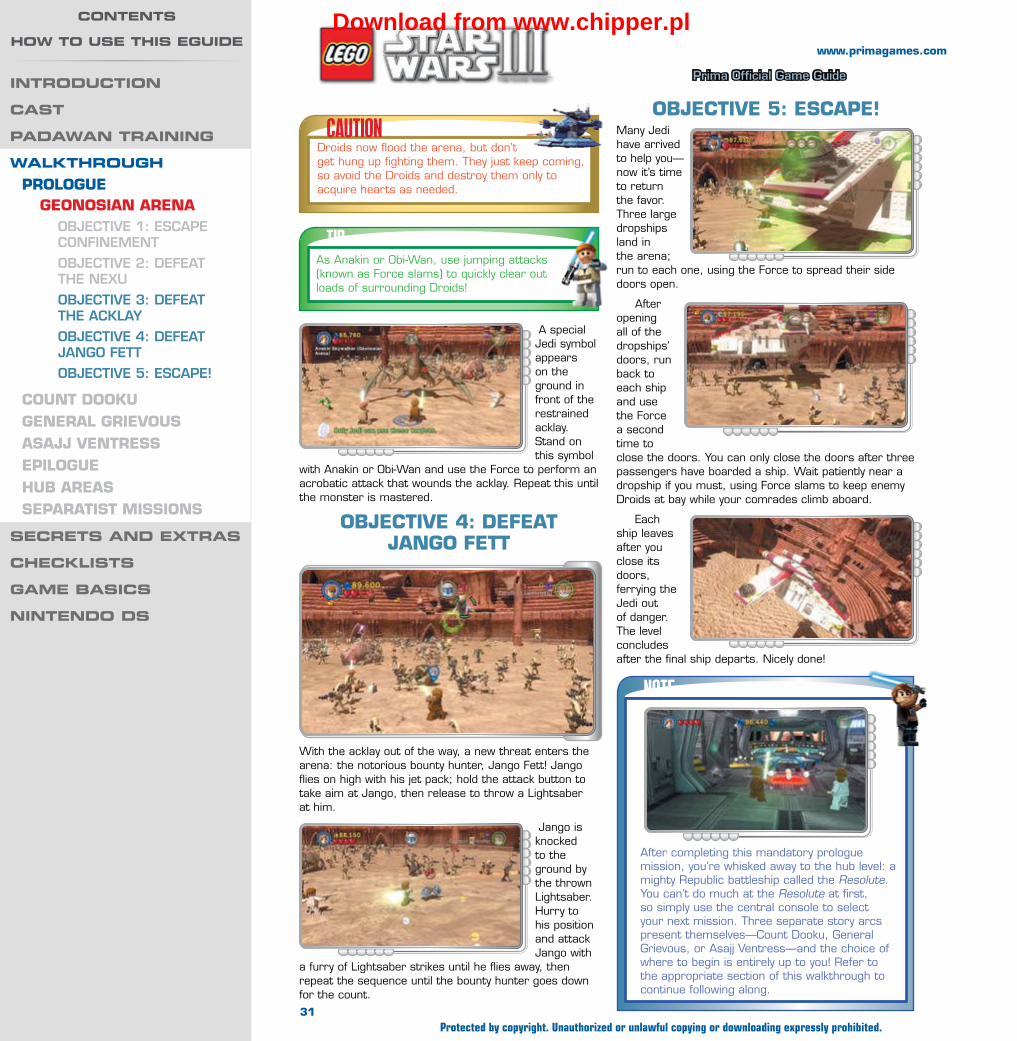
WA
LK
TH
RO
UG
H —
PR
OLO
GU
e
Prima Official Game Guide
www.primagames.com
With the acklay out of the way, a new threat enters the arena: the notorious bounty hunter, Jango Fett! Jango flies on high with his jet pack; hold the attack button to take aim at Jango, then release to throw a Lightsaber at him.
Jango is knocked to the ground by the thrown Lightsaber. Hurry to his position and attack Jango with
a furry of Lightsaber strikes until he flies away, then repeat the sequence until the bounty hunter goes down for the count.
ObJeCTive 5: eSCAPe!Many Jedi have arrived to help you—now it’s time to return the favor. Three large dropships land in the arena; run to each one, using the Force to spread their side doors open.
After opening all of the dropships’ doors, run back to each ship and use the Force a second time to close the doors. You can only close the doors after three passengers have boarded a ship. Wait patiently near a dropship if you must, using Force slams to keep enemy Droids at bay while your comrades climb aboard.
Each ship leaves after you close its doors, ferrying the Jedi out of danger. The level concludes after the final ship departs. Nicely done!
TIPAs Anakin or Obi-Wan, use jumping attacks (known as Force slams) to quickly clear out loads of surrounding Droids!
CAUTIONDroids now flood the arena, but don’t get hung up fighting them. They just keep coming, so avoid the Droids and destroy them only to acquire hearts as needed.
A special Jedi symbol appears on the ground in front of the restrained acklay. Stand on this symbol
with Anakin or Obi-Wan and use the Force to perform an acrobatic attack that wounds the acklay. Repeat this until the monster is mastered.
ObJeCTive 4: DefeAT JAngO feTT
NOTE
After completing this mandatory prologue mission, you’re whisked away to the hub level: a mighty Republic battleship called the Resolute. You can’t do much at the Resolute at first, so simply use the central console to select your next mission. Three separate story arcs present themselves—Count Dooku, General Grievous, or Asajj Ventress—and the choice of where to begin is entirely up to you! Refer to the appropriate section of this walkthrough to continue following along.
31Protected by copyright. Unauthorized or unlawful copying or downloading expressly prohibited.
inTROdUcTiOn
cAsT
PAdAWAn TRAininG
WALKTHROUGHPROlOgue
geOnOSiAn ARenAObjective 1: escaPe cOnfinement
Objective 2: Defeat the nexu
Objective 3: Defeat the acklay
Objective 4: Defeat janGO fett
Objective 5: escaPe!
COunT DOOKugeneRAl gRievOuSASAJJ venTReSSePilOgueHub AReASSePARATiST MiSSiOnS
secReTs And exTRAs
cHecKLisTs
GAme BAsics
ninTendO ds
cOnTenTs
HOW TO Use THis eGUideDownload from www.chipper.pl
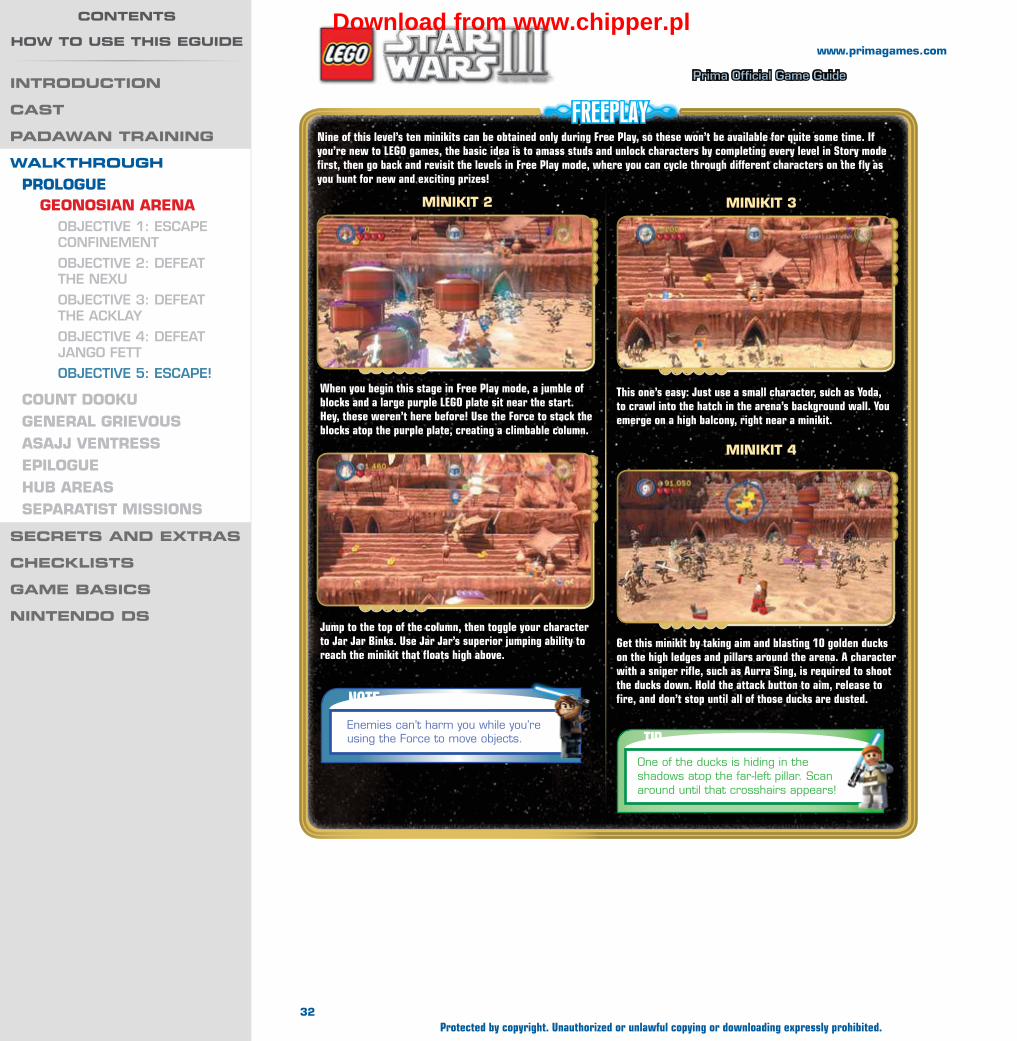
WA
LK
TH
RO
UG
H —
PR
OLO
GU
e
Prima Official Game Guide
www.primagames.com
FREEPLAYNine of this level’s ten minikits can be obtained only during Free Play, so these won’t be available for quite some time. If you’re new to LEGO games, the basic idea is to amass studs and unlock characters by completing every level in Story mode first, then go back and revisit the levels in Free Play mode, where you can cycle through different characters on the fly as you hunt for new and exciting prizes!
MiniKiT 4
NOTE
TIPEnemies can’t harm you while you’re using the Force to move objects.
MiniKiT 2
Jump to the top of the column, then toggle your character to Jar Jar Binks. Use Jar Jar’s superior jumping ability to reach the minikit that floats high above.
MiniKiT 3
One of the ducks is hiding in the shadows atop the far-left pillar. Scan around until that crosshairs appears!
When you begin this stage in Free Play mode, a jumble of blocks and a large purple LEGO plate sit near the start. Hey, these weren’t here before! Use the Force to stack the blocks atop the purple plate, creating a climbable column.
This one’s easy: Just use a small character, such as Yoda, to crawl into the hatch in the arena’s background wall. You emerge on a high balcony, right near a minikit.
Get this minikit by taking aim and blasting 10 golden ducks on the high ledges and pillars around the arena. A character with a sniper rifle, such as Aurra Sing, is required to shoot the ducks down. Hold the attack button to aim, release to fire, and don’t stop until all of those ducks are dusted.
32Protected by copyright. Unauthorized or unlawful copying or downloading expressly prohibited.
inTROdUcTiOn
cAsT
PAdAWAn TRAininG
WALKTHROUGHPROlOgue
geOnOSiAn ARenAObjective 1: escaPe cOnfinement
Objective 2: Defeat the nexu
Objective 3: Defeat the acklay
Objective 4: Defeat janGO fett
Objective 5: escaPe!
COunT DOOKugeneRAl gRievOuSASAJJ venTReSSePilOgueHub AReASSePARATiST MiSSiOnS
secReTs And exTRAs
cHecKLisTs
GAme BAsics
ninTendO ds
cOnTenTs
HOW TO Use THis eGUideDownload from www.chipper.pl

WA
LK
TH
RO
UG
H —
PR
OLO
GU
e
Prima Official Game Guide
www.primagames.com
FREEPLAYMiniKiT 5 MiniKiT 7
MiniKiT 6
Find this minikit by fiddling with five flower boxes around the arena. First, pound each flower box with a Force slam (jump and then attack in midair) to cause the seed to grow. Then use a Sith character, such as Count Dooku, to stuff the resulting plant into the nearby pot using the Dark Force. The five flower boxes are marked on the map for your reference.
Use a MagnaGuard or similar character to charge up the power panel to the right, causing an electric fence to appear. How curious!
Find a Droideka rolling around (they’re the larger Droids with bubble shields) and use the Force to shove the Droideka toward the electric fence. Herd five Droidekas into the confines of the fence to receive a minikit as your reward!
Use a Sith character, such as Count Dooku, to manipulate the sinister-looking pillar at the rear of the arena with the Dark Force. Then switch to a grapple character and yank out the two hook points that are revealed by the Dark Force. This causes the pillar to collapse, exposing a minikit.
MiniKiT 9
MiniKiT 10
MiniKiT 8
Use a bounty hunter, such as Cad Bane, to access to the small exercise room on the left side of the arena. Destroy everything inside for studs, then run onto each of the three treadmills (which can’t be destroyed) and keep running until they explode. A minikit pops out of the final treadmill. Feel the burn!
Five golden objects are affixed to the arena’s walls. Destroy all five with a rapid-fire character, such as Lieutenant Thire, to reveal a minikit. The five golden objects are marked on the map—one is hidden within the aforementioned exercise room.
Explore the right side of the background wall to discover parts of a Droid lying on the ground. Use the Force to assemble the Droid into a familiar face (C-3PO!); you’ll earn a minikit for your efforts.
33Protected by copyright. Unauthorized or unlawful copying or downloading expressly prohibited.
inTROdUcTiOn
cAsT
PAdAWAn TRAininG
WALKTHROUGHPROlOgue
geOnOSiAn ARenAObjective 1: escaPe cOnfinement
Objective 2: Defeat the nexu
Objective 3: Defeat the acklay
Objective 4: Defeat janGO fett
Objective 5: escaPe!
COunT DOOKugeneRAl gRievOuSASAJJ venTReSSePilOgueHub AReASSePARATiST MiSSiOnS
secReTs And exTRAs
cHecKLisTs
GAme BAsics
ninTendO ds
cOnTenTs
HOW TO Use THis eGUideDownload from www.chipper.pl
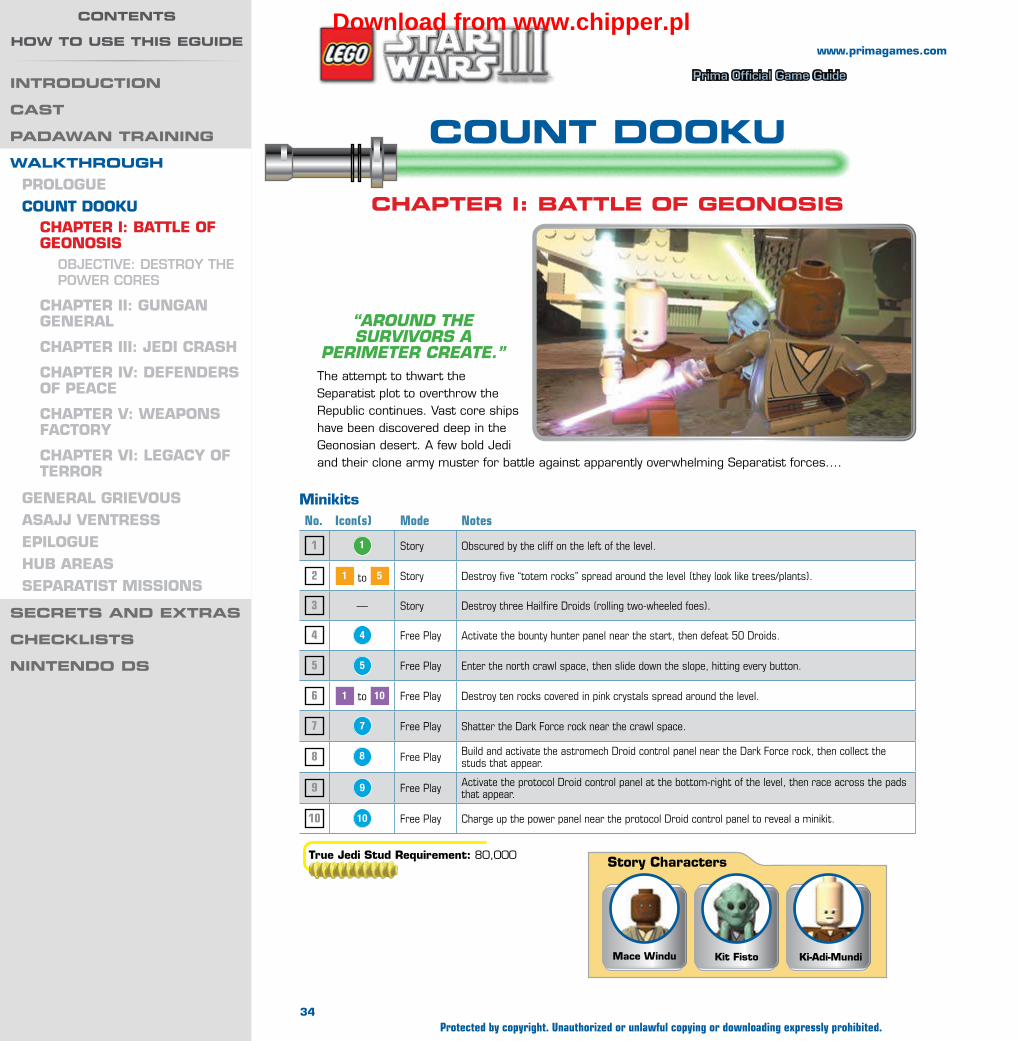
Wa
lk
th
ro
ug
h —
Co
un
t D
oo
ku
Prima Official Game Guide
www.primagames.com
Count Dooku
Chapter I: Battle of geonosIs
“aRound the suRvIvoRs a
peRImeteR cReate.”The attempt to thwart the Separatist plot to overthrow the Republic continues. Vast core ships have been discovered deep in the Geonosian desert. A few bold Jedi and their clone army muster for battle against apparently overwhelming Separatist forces....
MinikitsNo. Icon(s) Mode Notes
1 1 Story Obscured by the cliff on the left of the level.
2 1 to 5 Story Destroy five “totem rocks” spread around the level (they look like trees/plants).
3 — Story Destroy three Hailfire Droids (rolling two-wheeled foes).
4 4 Free Play Activate the bounty hunter panel near the start, then defeat 50 Droids.
5 5 Free Play Enter the north crawl space, then slide down the slope, hitting every button.
6 1 to 10 Free Play Destroy ten rocks covered in pink crystals spread around the level.
7 7 Free Play Shatter the Dark Force rock near the crawl space.
8 8 Free Play Build and activate the astromech Droid control panel near the Dark Force rock, then collect the studs that appear.
9 9 Free Play Activate the protocol Droid control panel at the bottom-right of the level, then race across the pads that appear.
10 10 Free Play Charge up the power panel near the protocol Droid control panel to reveal a minikit.
True Jedi Stud Requirement: 80,000 Story Characters
Ki-Adi-MundiKit FistoMace Windu
34Protected by copyright. Unauthorized or unlawful copying or downloading expressly prohibited.
IntroDuCtIon
Cast
paDaWan traInIng
WalkthroughPRologueCounT DooKu
ChAPTeR I: BATTle oF geonoSIS
Objective: DestrOy the POwer cOres
ChAPTeR II: gungAn geneRAl
ChAPTeR III: JeDI CRASh
ChAPTeR IV: DeFenDeRS oF PeACe
ChAPTeR V: WeAPonS FACToRy
ChAPTeR VI: legACy oF TeRRoR
geneRAl gRIeVouSASAJJ VenTReSSePIloguehuB AReASSePARATIST MISSIonS
seCrets anD extras
CheCklIsts
nIntenDo Ds
Contents
hoW to use thIs eguIDeDownload from www.chipper.pl
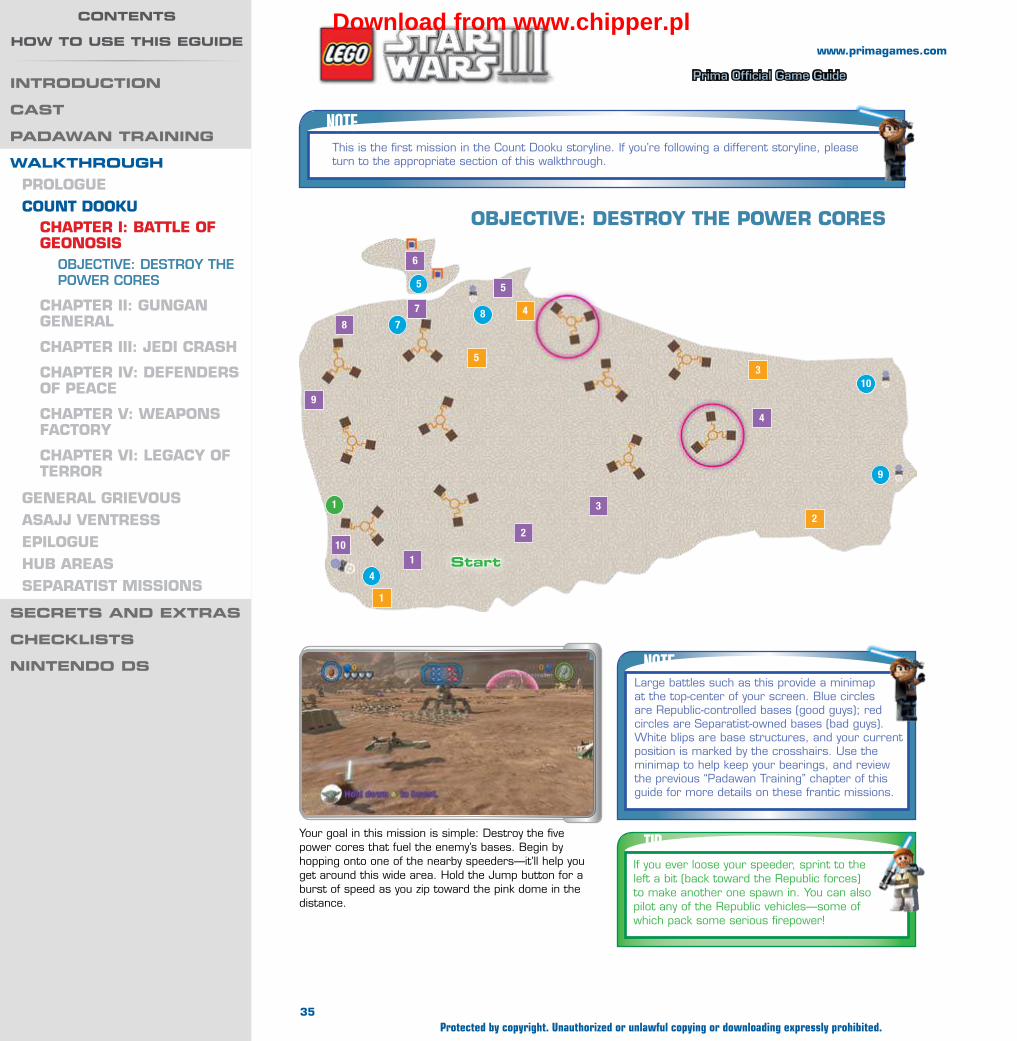
Wa
lk
th
ro
ug
h —
Co
un
t D
oo
ku
Prima Official Game Guide
www.primagames.com
Your goal in this mission is simple: Destroy the five power cores that fuel the enemy’s bases. Begin by hopping onto one of the nearby speeders—it’ll help you get around this wide area. Hold the Jump button for a burst of speed as you zip toward the pink dome in the distance.
NOTEThis is the first mission in the Count Dooku storyline. If you’re following a different storyline, please turn to the appropriate section of this walkthrough.
oBJeCTIVe: DeSTRoy The PoWeR CoReS
TIPIf you ever loose your speeder, sprint to the left a bit (back toward the Republic forces) to make another one spawn in. You can also pilot any of the Republic vehicles—some of which pack some serious firepower!
NOTELarge battles such as this provide a minimap at the top-center of your screen. Blue circles are Republic-controlled bases (good guys); red circles are Separatist-owned bases (bad guys). White blips are base structures, and your current position is marked by the crosshairs. Use the minimap to help keep your bearings, and review the previous “Padawan Training” chapter of this guide for more details on these frantic missions.
1
21
4
5
78
9
103
4
5
1
2
3
4
5
6
7
8
9
10
start
35Protected by copyright. Unauthorized or unlawful copying or downloading expressly prohibited.
IntroDuCtIon
Cast
paDaWan traInIng
WalkthroughPRologueCounT DooKu
ChAPTeR I: BATTle oF geonoSIS
Objective: DestrOy the POwer cOres
ChAPTeR II: gungAn geneRAl
ChAPTeR III: JeDI CRASh
ChAPTeR IV: DeFenDeRS oF PeACe
ChAPTeR V: WeAPonS FACToRy
ChAPTeR VI: legACy oF TeRRoR
geneRAl gRIeVouSASAJJ VenTReSSePIloguehuB AReASSePARATIST MISSIonS
seCrets anD extras
CheCklIsts
nIntenDo Ds
Contents
hoW to use thIs eguIDeDownload from www.chipper.pl

Wa
lk
th
ro
ug
h —
Co
un
t D
oo
ku
Prima Official Game Guide
www.primagames.com
To hurry things up, search near the middle ground between the Republic and Separatist bases to locate a torpedo generator (a small device with a glowing pink orb). Pass over this object to collect a torpedo, which trails behind your speeder.
Each enemy base features a tall power core that you must destroy. However, some bases are protected by pink, dome-shaped shields, and these shields deflect attacks and keep vehicles at bay. Get close on your speeder, then hop off and sprint through a shield on foot.
Once inside a shield, you have a few options. You can attack the base structures directly with your
Lightsaber, or you can pull the lever on the shield generator to disable the protective dome, allowing powerful vehicles to bear down with mighty fire.
While carrying torpedoes, viable enemy targets will become highlighted by pink reticles. Press the Action button to fire your torpedo at any enemy structure. Torpedoes are incredibly powerful, and many structures will be destroyed by just one hit!
TIP
To acquire True Jedi status, methodically destroy every enemy structure and hurry to collect the many studs that spill out afterward. Do “donuts” in a speeder to quickly snag all those loose studs, favoring the blue ones, which are worth 1,000 apiece!
TIPStrike each base’s central power core with a torpedo to quickly obliterate all of the base’s structures. Then hurry and collect all of those loose studs before they vanish!
NOTETorpedoes won’t pass through shields, so deactivate them first.
Before destroying the final power core (and thus ending the mission), take a moment to swipe some minikits from this stage. One’s just sitting out in the open, slightly obscured by the far-left cliff. Mosey over and grab it at your convenience.
MInIKIT 1
36Protected by copyright. Unauthorized or unlawful copying or downloading expressly prohibited.
IntroDuCtIon
Cast
paDaWan traInIng
WalkthroughPRologueCounT DooKu
ChAPTeR I: BATTle oF geonoSIS
Objective: DestrOy the POwer cOres
ChAPTeR II: gungAn geneRAl
ChAPTeR III: JeDI CRASh
ChAPTeR IV: DeFenDeRS oF PeACe
ChAPTeR V: WeAPonS FACToRy
ChAPTeR VI: legACy oF TeRRoR
geneRAl gRIeVouSASAJJ VenTReSSePIloguehuB AReASSePARATIST MISSIonS
seCrets anD extras
CheCklIsts
nIntenDo Ds
Contents
hoW to use thIs eguIDeDownload from www.chipper.pl
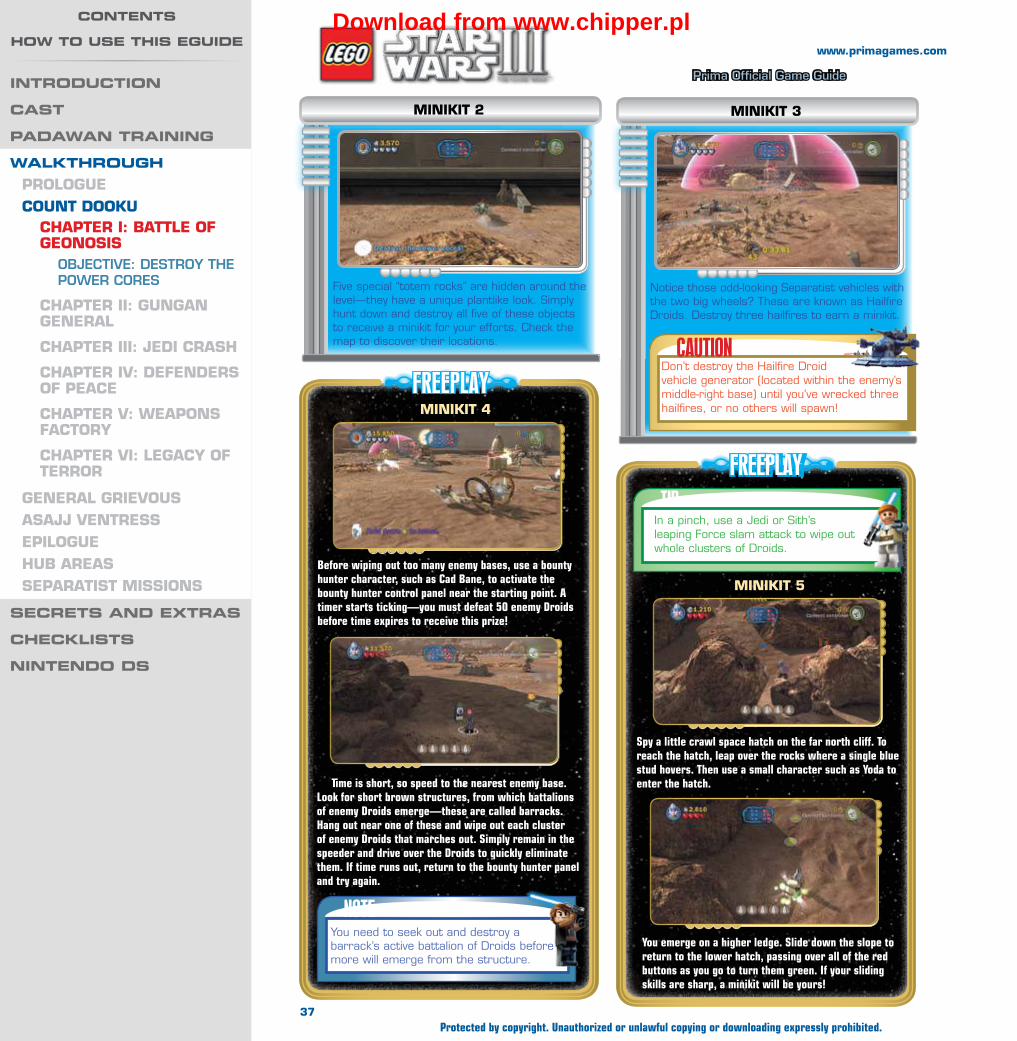
Wa
lk
th
ro
ug
h —
Co
un
t D
oo
ku
Prima Official Game Guide
www.primagames.com
Notice those odd-looking Separatist vehicles with the two big wheels? These are known as Hailfire Droids. Destroy three hailfires to earn a minikit.
MInIKIT 3
Five special “totem rocks” are hidden around the level—they have a unique plantlike look. Simply hunt down and destroy all five of these objects to receive a minikit for your efforts. Check the map to discover their locations.
MInIKIT 2
CAUTIONDon’t destroy the Hailfire Droid vehicle generator (located within the enemy’s middle-right base) until you’ve wrecked three hailfires, or no others will spawn!
FREEPLAY
FREEPLAY
MInIKIT 4
Before wiping out too many enemy bases, use a bounty hunter character, such as Cad Bane, to activate the bounty hunter control panel near the starting point. A timer starts ticking—you must defeat 50 enemy Droids before time expires to receive this prize!
Time is short, so speed to the nearest enemy base. Look for short brown structures, from which battalions of enemy Droids emerge—these are called barracks. Hang out near one of these and wipe out each cluster of enemy Droids that marches out. Simply remain in the speeder and drive over the Droids to quickly eliminate them. If time runs out, return to the bounty hunter panel and try again.
NOTEYou need to seek out and destroy a barrack’s active battalion of Droids before more will emerge from the structure.
TIPIn a pinch, use a Jedi or Sith’s leaping Force slam attack to wipe out whole clusters of Droids.
MInIKIT 5
Spy a little crawl space hatch on the far north cliff. To reach the hatch, leap over the rocks where a single blue stud hovers. Then use a small character such as Yoda to enter the hatch.
You emerge on a higher ledge. Slide down the slope to return to the lower hatch, passing over all of the red buttons as you go to turn them green. If your sliding skills are sharp, a minikit will be yours!
37Protected by copyright. Unauthorized or unlawful copying or downloading expressly prohibited.
IntroDuCtIon
Cast
paDaWan traInIng
WalkthroughPRologueCounT DooKu
ChAPTeR I: BATTle oF geonoSIS
Objective: DestrOy the POwer cOres
ChAPTeR II: gungAn geneRAl
ChAPTeR III: JeDI CRASh
ChAPTeR IV: DeFenDeRS oF PeACe
ChAPTeR V: WeAPonS FACToRy
ChAPTeR VI: legACy oF TeRRoR
geneRAl gRIeVouSASAJJ VenTReSSePIloguehuB AReASSePARATIST MISSIonS
seCrets anD extras
CheCklIsts
nIntenDo Ds
Contents
hoW to use thIs eguIDeDownload from www.chipper.pl
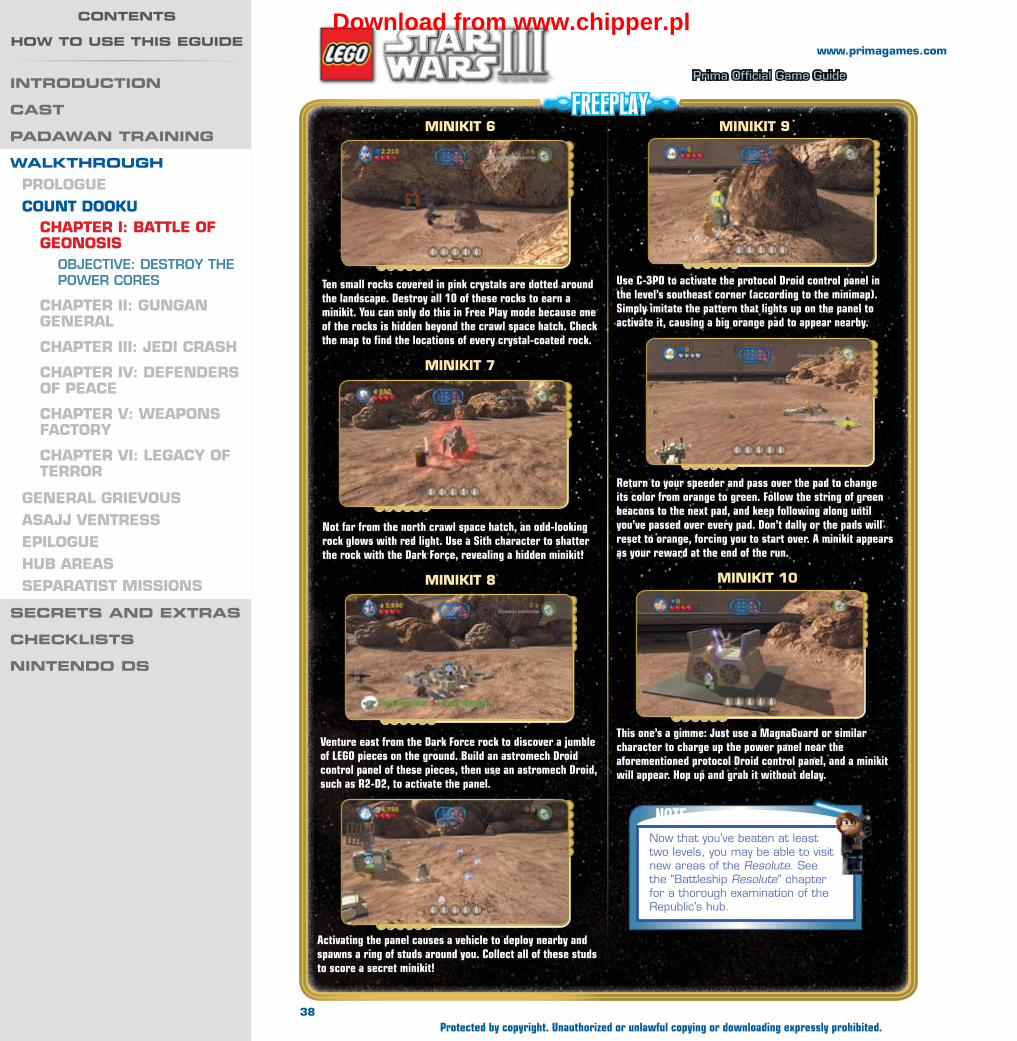
Wa
lk
th
ro
ug
h —
Co
un
t D
oo
ku
Prima Official Game Guide
www.primagames.com
FREEPLAY
This one’s a gimme: Just use a MagnaGuard or similar character to charge up the power panel near the aforementioned protocol Droid control panel, and a minikit will appear. Hop up and grab it without delay.
MInIKIT 6
Ten small rocks covered in pink crystals are dotted around the landscape. Destroy all 10 of these rocks to earn a minikit. You can only do this in Free Play mode because one of the rocks is hidden beyond the crawl space hatch. Check the map to find the locations of every crystal-coated rock.
MInIKIT 7
Not far from the north crawl space hatch, an odd-looking rock glows with red light. Use a Sith character to shatter the rock with the Dark Force, revealing a hidden minikit!
MInIKIT 8
Venture east from the Dark Force rock to discover a jumble of LEGO pieces on the ground. Build an astromech Droid control panel of these pieces, then use an astromech Droid, such as R2-D2, to activate the panel.
Activating the panel causes a vehicle to deploy nearby and spawns a ring of studs around you. Collect all of these studs to score a secret minikit!
MInIKIT 9
Use C-3PO to activate the protocol Droid control panel in the level’s southeast corner (according to the minimap). Simply imitate the pattern that lights up on the panel to activate it, causing a big orange pad to appear nearby.
Return to your speeder and pass over the pad to change its color from orange to green. Follow the string of green beacons to the next pad, and keep following along until you’ve passed over every pad. Don’t dally or the pads will reset to orange, forcing you to start over. A minikit appears as your reward at the end of the run.
MInIKIT 10
NOTENow that you’ve beaten at least two levels, you may be able to visit new areas of the Resolute. See the “Battleship Resolute” chapter for a thorough examination of the Republic’s hub.
38Protected by copyright. Unauthorized or unlawful copying or downloading expressly prohibited.
IntroDuCtIon
Cast
paDaWan traInIng
WalkthroughPRologueCounT DooKu
ChAPTeR I: BATTle oF geonoSIS
Objective: DestrOy the POwer cOres
ChAPTeR II: gungAn geneRAl
ChAPTeR III: JeDI CRASh
ChAPTeR IV: DeFenDeRS oF PeACe
ChAPTeR V: WeAPonS FACToRy
ChAPTeR VI: legACy oF TeRRoR
geneRAl gRIeVouSASAJJ VenTReSSePIloguehuB AReASSePARATIST MISSIonS
seCrets anD extras
CheCklIsts
nIntenDo Ds
Contents
hoW to use thIs eguIDeDownload from www.chipper.pl
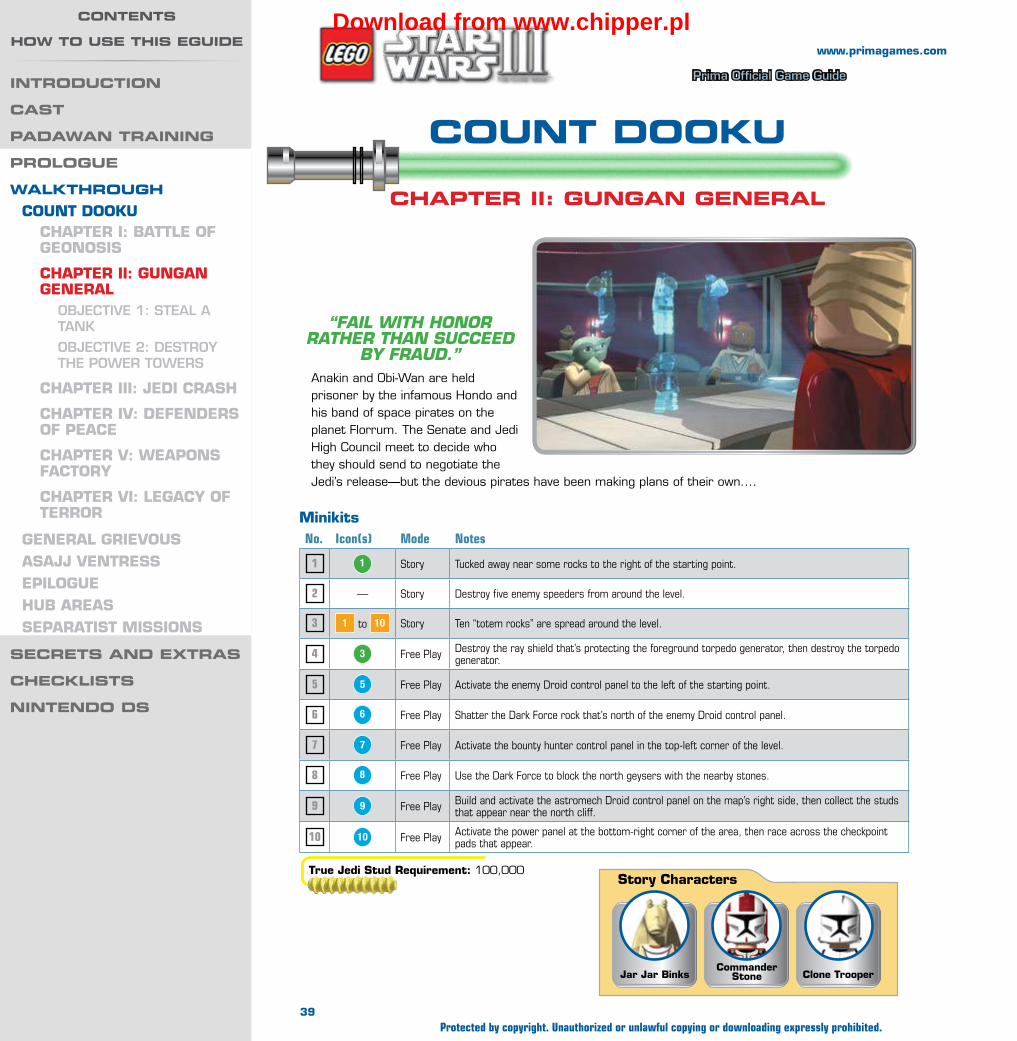
Wa
lk
th
ro
ug
h —
co
un
t d
oo
ku
Prima Official Game Guide
www.primagames.com
count dooku
chapter II: gungan general
MinikitsNo. Icon(s) Mode Notes
1 1 Story Tucked away near some rocks to the right of the starting point.
2 — Story Destroy five enemy speeders from around the level.
3 1 to 10 Story Ten “totem rocks” are spread around the level.
4 3 Free Play Destroy the ray shield that’s protecting the foreground torpedo generator, then destroy the torpedo generator.
5 5 Free Play Activate the enemy Droid control panel to the left of the starting point.
6 6 Free Play Shatter the Dark Force rock that’s north of the enemy Droid control panel.
7 7 Free Play Activate the bounty hunter control panel in the top-left corner of the level.
8 8 Free Play Use the Dark Force to block the north geysers with the nearby stones.
9 9 Free Play Build and activate the astromech Droid control panel on the map’s right side, then collect the studs that appear near the north cliff.
10 10 Free Play Activate the power panel at the bottom-right corner of the area, then race across the checkpoint pads that appear.
True Jedi Stud Requirement: 100,000
Story Characters
Clone TrooperCommander
StoneJar Jar Binks
“FaIl wIth honoR RatheR than succeed
By FRaud.”Anakin and Obi-Wan are held prisoner by the infamous Hondo and his band of space pirates on the planet Florrum. The Senate and Jedi High Council meet to decide who they should send to negotiate the Jedi’s release—but the devious pirates have been making plans of their own....
39Protected by copyright. Unauthorized or unlawful copying or downloading expressly prohibited.
IntroductIon
cast
padaWan traInIng
prologue
WalkthroughCounT Dooku
ChapTeR I: BaTTle of GeonoSIS
ChapTeR II: GunGan GeneRal
Objective 1: Steal a tank
Objective 2: DeStrOy the POwer tOwerS
ChapTeR III: JeDI CRaSh
ChapTeR IV: DefenDeRS of peaCe
ChapTeR V: WeaponS faCToRy
ChapTeR VI: leGaCy of TeRRoR
GeneRal GRIeVouSaSaJJ VenTReSSepIloGuehuB aReaSSepaRaTIST MISSIonS
secrets and extras
checklIsts
nIntendo ds
contents
hoW to use thIs eguIdeDownload from www.chipper.pl

Wa
lk
th
ro
ug
h —
co
un
t d
oo
ku
Prima Official Game Guide
www.primagames.com
oBJeCTIVe 1: STeal a Tank
This is another grand-assault battle, but there are no Republic forces in sight. Begin by hopping onto one of the nearby beasts, which are called skalders.
Enemy speeders are inbound. Hold the Jump button to ram into one with your
skalder, knocking off the pilot. Now you can claim a much sweeter ride!
Speeders are nice, but tanks are even better. Attack an inbound enemy tank with your speeder’s blasters until its pilot flees, then trade your speeder for some real
firepower.
Tanks give you all the firepower you need to lay waste to the Separatists’ bases. Turn your tank’s
explosive weaponry on the many enemy structures in the vicinity, starting with those pesky cannons. Be sure to scoop up studs that spill out—this is the way to reach True Jedi status! Tanks you steal will be air-lifted out of play after a few minutes of use, so make the most of them and keep stealing more with the skalders.
TIPIf you’re ever stuck without transportation, simply travel to the left to cause more skalders to spawn.
1
2
1
3
6
7
8
9
10
3
4
56
7
8
9
10
5 start
40Protected by copyright. Unauthorized or unlawful copying or downloading expressly prohibited.
IntroductIon
cast
padaWan traInIng
WalkthroughpRoloGueCounT Dooku
ChapTeR I: BaTTle of GeonoSIS
ChapTeR II: GunGan GeneRal
Objective 1: Steal a tank
Objective 2: DeStrOy the POwer tOwerS
ChapTeR III: JeDI CRaSh
ChapTeR IV: DefenDeRS of peaCe
ChapTeR V: WeaponS faCToRy
ChapTeR VI: leGaCy of TeRRoR
GeneRal GRIeVouSaSaJJ VenTReSSepIloGuehuB aReaSSepaRaTIST MISSIonS
secrets and extras
checklIsts
nIntendo ds
contents
hoW to use thIs eguIdeDownload from www.chipper.pl
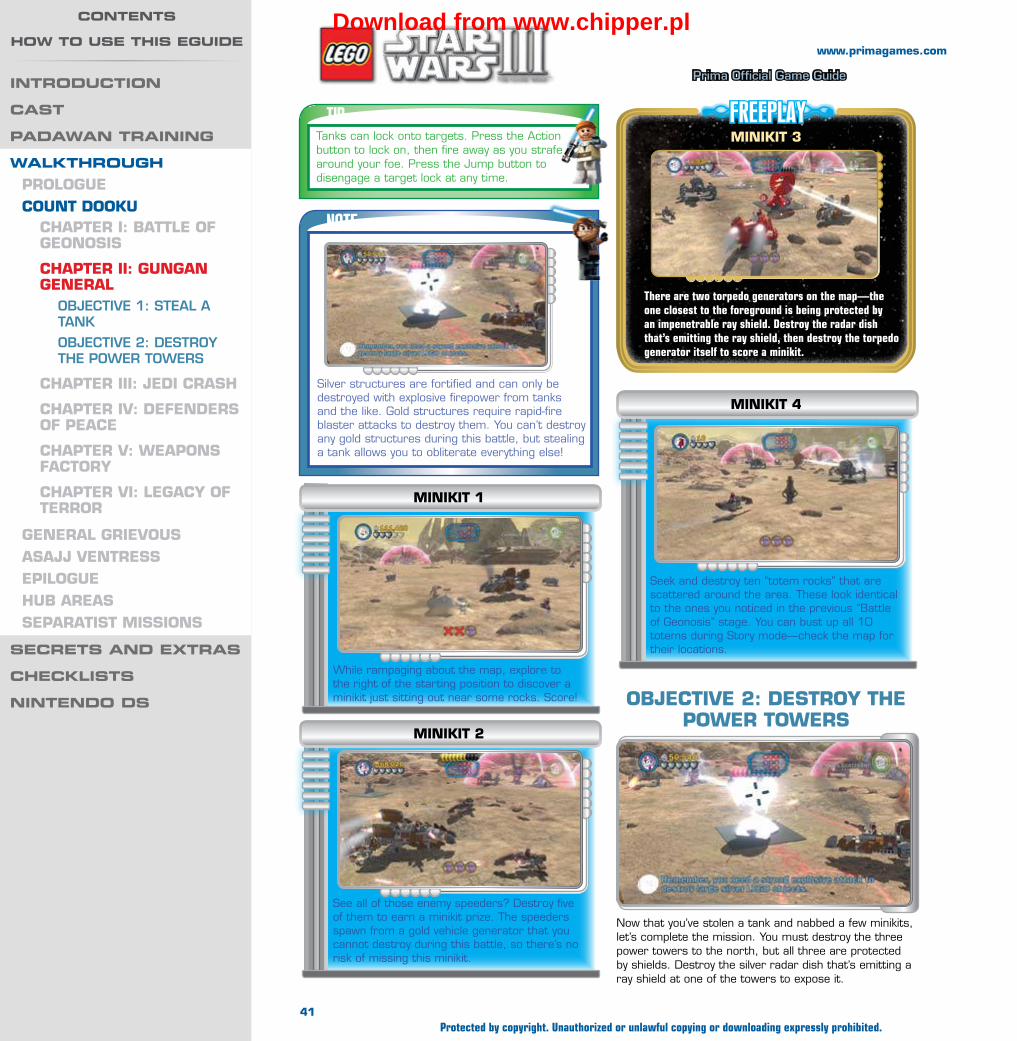
Wa
lk
th
ro
ug
h —
co
un
t d
oo
ku
Prima Official Game Guide
www.primagames.com
FREEPLAYTIPTanks can lock onto targets. Press the Action button to lock on, then fire away as you strafe around your foe. Press the Jump button to disengage a target lock at any time.
NOTE
Silver structures are fortified and can only be destroyed with explosive firepower from tanks and the like. Gold structures require rapid-fire blaster attacks to destroy them. You can’t destroy any gold structures during this battle, but stealing a tank allows you to obliterate everything else!
While rampaging about the map, explore to the right of the starting position to discover a minikit just sitting out near some rocks. Score!
MInIkIT 1
Seek and destroy ten “totem rocks” that are scattered around the area. These look identical to the ones you noticed in the previous “Battle of Geonosis” stage. You can bust up all 10 totems during Story mode—check the map for their locations.
MInIkIT 4
See all of those enemy speeders? Destroy five of them to earn a minikit prize. The speeders spawn from a gold vehicle generator that you cannot destroy during this battle, so there’s no risk of missing this minikit.
MInIkIT 2
There are two torpedo generators on the map—the one closest to the foreground is being protected by an impenetrable ray shield. Destroy the radar dish that’s emitting the ray shield, then destroy the torpedo generator itself to score a minikit.
MInIkIT 3
oBJeCTIVe 2: DeSTRoy The poWeR ToWeRS
Now that you’ve stolen a tank and nabbed a few minikits, let’s complete the mission. You must destroy the three power towers to the north, but all three are protected by shields. Destroy the silver radar dish that’s emitting a ray shield at one of the towers to expose it.
41Protected by copyright. Unauthorized or unlawful copying or downloading expressly prohibited.
IntroductIon
cast
padaWan traInIng
WalkthroughpRoloGueCounT Dooku
ChapTeR I: BaTTle of GeonoSIS
ChapTeR II: GunGan GeneRal
Objective 1: Steal a tank
Objective 2: DeStrOy the POwer tOwerS
ChapTeR III: JeDI CRaSh
ChapTeR IV: DefenDeRS of peaCe
ChapTeR V: WeaponS faCToRy
ChapTeR VI: leGaCy of TeRRoR
GeneRal GRIeVouSaSaJJ VenTReSSepIloGuehuB aReaSSepaRaTIST MISSIonS
secrets and extras
checklIsts
nIntendo ds
contents
hoW to use thIs eguIdeDownload from www.chipper.pl

Wa
lk
th
ro
ug
h —
co
un
t d
oo
ku
Prima Official Game Guide
www.primagames.com
FREEPLAY The other two towers are protected by pink bubble shields. You know what to do: Run past each shield on foot and pull the lever to deactivate it. Now the tower is fully exposed.
The power towers can’t be harmed by firepower, even from your tank. To destroy them, use a tank or
speeder to score some torpedoes from the generators near the center of the map, then close in and torpedo each tower. Obliterate all three power towers to bring the mission to a close.
NOTE
Structures that surround a power tower will be destroyed when the tower is torpedoed.
A Dark Force rock stands just north of the protocol Droid control panel. Shatter the rock with a Sith character to acquire another easy minikit.
MInIkIT 7
MInIkIT 6
FREEPLAY
Nab this easy Free Play minikit by activating the enemy Droid control panel to the left of the starting position. The minikit appears above the panel; hop up and claim it.
MInIkIT 5
Search the map’s northwest corner to spy a bounty hunter control panel that’s hidden among the rocks. Activate this panel with any bounty hunter character to make a minikit blink into existence behind you.
MInIkIT 8
Three small geysers are spewing steam up north, just behind the power towers. Use the Force to lift the nearby rocks, placing one atop each geyser. Block all three geysers with rocks and a minikit will be your reward!
42Protected by copyright. Unauthorized or unlawful copying or downloading expressly prohibited.
IntroductIon
cast
padaWan traInIng
WalkthroughpRoloGueCounT Dooku
ChapTeR I: BaTTle of GeonoSIS
ChapTeR II: GunGan GeneRal
Objective 1: Steal a tank
Objective 2: DeStrOy the POwer tOwerS
ChapTeR III: JeDI CRaSh
ChapTeR IV: DefenDeRS of peaCe
ChapTeR V: WeaponS faCToRy
ChapTeR VI: leGaCy of TeRRoR
GeneRal GRIeVouSaSaJJ VenTReSSepIloGuehuB aReaSSepaRaTIST MISSIonS
secrets and extras
checklIsts
nIntendo ds
contents
hoW to use thIs eguIdeDownload from www.chipper.pl

Wa
lk
th
ro
ug
h —
co
un
t d
oo
ku
Prima Official Game Guide
www.primagames.com
FREEPLAY
NOTENow that you’ve beaten at least three levels, you may be able to visit new areas of the Resolute. See the “Battleship Resolute” chapter for an in-depth look at the Republic’s hub.
MInIkIT 9
Venture to the level’s southeast region to discover a pile of loose pieces. Build these into an astromech Droid control panel, then activate the panel to summon a UFO.
Hop into the UFO and speed north toward the cliff. A string of blue and purple studs now appears here; collect them all to score some fast cash, along with a minikit!
MInIkIT 10
Explore the southeast corner of the stage to spot a power panel. Activate this with a MagnaGuard or the like to cause a large orange pad to appear nearby.
Steal a speeder from an enemy if you haven’t got one, then pass over the pad to change its color to green. Follow the line of green beacons to locate the next pad, and keep following along until you’ve passed over every pad. The pads reset to orange after a time, so don’t get sidetracked. Turn all those pads green to receive a shiny minikit prize!
43Protected by copyright. Unauthorized or unlawful copying or downloading expressly prohibited.
IntroductIon
cast
padaWan traInIng
WalkthroughpRoloGueCounT Dooku
ChapTeR I: BaTTle of GeonoSIS
ChapTeR II: GunGan GeneRal
Objective 1: Steal a tank
Objective 2: DeStrOy the POwer tOwerS
ChapTeR III: JeDI CRaSh
ChapTeR IV: DefenDeRS of peaCe
ChapTeR V: WeaponS faCToRy
ChapTeR VI: leGaCy of TeRRoR
GeneRal GRIeVouSaSaJJ VenTReSSepIloGuehuB aReaSSepaRaTIST MISSIonS
secrets and extras
checklIsts
nIntendo ds
contents
hoW to use thIs eguIdeDownload from www.chipper.pl

Wa
lk
th
ro
ug
h —
Co
un
t D
oo
ku
Prima Official Game Guide
www.primagames.com
Count Dooku
Chapter III: JeDI Crash
MinikitsNo. Icon(s) Mode Notes
1 — Free Play Follow the green arrows and destroy the five highlighted ships.
2 2 Free Play Follow the green arrows and destroy the five highlighted probes.
3 — Free Play Destroy the six gold circles around the blue-lit hangar of the battleship on the left.
4 — Free Play Attack the glowing red object at the back of the left battleship with an enemy (Separatist) spacecraft (such as a Vulture Droid).
5 5 Free Play Destroy the secret landing pad’s three gold toilet stalls.
6 6 Free Play Land on the first landing pad. Pull the switch at the back. Destroy the two silver pipe sections near the ceiling to put out the fire.
7 1 to 5 Free Play Destroy five Probe Droids, one on each landing pad (except the secret one). Smash crates to reveal it.
8 8 Free Play Destroy the gold gate covering the crawl space near the third water spout and head through.
9 9 Free Play On the torpedo generator landing pad, destroy the gold box, then build a crane and grapple down.
10 10 Free Play In the hangar, use Jar Jar to jump onto the tall platform in the rear-left of the area.
True Jedi Stud Requirement: 80,000Story Characters
Aayla SecuraObi-Wan Kenobi
Anakin Skywalker
Commander Bly
“GReed and FeaR oF loss aRe the Roots
that lead to the tRee oF evIl.”
Count Dooku’s war against the Republic is waged on many fronts. A fleet led by Aayla Secura is under heavy attack from Separatist Munificent-class frigates, and the Republic’s flagship is in danger of being overrun by the enemy. Fortunately, two Jedi heroes are not far behind....
44Protected by copyright. Unauthorized or unlawful copying or downloading expressly prohibited.
IntroDuCtIon
Cast
paDaWan traInIng
WalkthroughPROlOgueCOunT DOOKu
ChAPTeR I: BATTle Of geOnOSIS
ChAPTeR II: gungAn geneRAl
ChAPTeR III: JeDI CRAShObjective 1: ActivAte the WAter SPOutS
Objective 2: Free the cruiSer
Objective 3: eScAPe!
ChAPTeR IV: DefenDeRS Of PeACe
ChAPTeR V: WeAPOnS fACTORy
ChAPTeR VI: legACy Of TeRROR
geneRAl gRIeVOuSASAJJ VenTReSSePIlOguehuB AReASSePARATIST MISSIOnS
seCrets anD extras
CheCklIsts
nIntenDo Ds
Contents
hoW to use thIs eguIDeDownload from www.chipper.pl

Wa
lk
th
ro
ug
h —
Co
un
t D
oo
ku
Prima Official Game Guide
www.primagames.com
Fly to the right until you spy a fiery landing pad on the burning battleship. (The landing pad is marked by
a blue arrow.) Fly close and press the Change Character button to land.
OBJeCTIVe 1: ACTIVATe The WATeR SPOuTS
You begin this mission in the heat of an intense space battle. Familiarize yourself with your
starship’s controls as you fly to the right. Hold the Jump button to boost, and double-tap in any direction to perform a swift roll maneuver.
NOTELanding pads are lit up by spotlights and sport a giant red “+” to help them stand out from the chaos of battle.
FREEPLAYMInIKIT 1
During Free Play, five ships are highlighted with green reticles at the start of the mission. Before doing anything else, seek out and destroy all five of these ships to secure your first minikit from this level.
Fly to the left and look for a blue rectangle on the side of one of the battleships—this is its hangar. Toggle to a rapid-fire starship and blast the six gold circles that surround the hangar to destroy them. You’ll earn a minikit for your efforts.
NOTEShips with special armaments, such as rapid-fire blasters, are denoted as such in their names. You must purchase these special ships at the Resolute’s hangar in order to use them during Free Play. See the “Battleship Resolute” chapter of this guide for details.
MInIKIT 2
Five special probes are also highlighted with green reticles during Free Play. Fly around and destroy all five of these floating probes to score a minikit.
MInIKIT 3
45Protected by copyright. Unauthorized or unlawful copying or downloading expressly prohibited.
IntroDuCtIon
Cast
paDaWan traInIng
WalkthroughPROlOgueCOunT DOOKu
ChAPTeR I: BATTle Of geOnOSIS
ChAPTeR II: gungAn geneRAl
ChAPTeR III: JeDI CRAShObjective 1: ActivAte the WAter SPOutS
Objective 2: Free the cruiSer
Objective 3: eScAPe!
ChAPTeR IV: DefenDeRS Of PeACe
ChAPTeR V: WeAPOnS fACTORy
ChAPTeR VI: legACy Of TeRROR
geneRAl gRIeVOuSASAJJ VenTReSSePIlOguehuB AReASSePARATIST MISSIOnS
seCrets anD extras
CheCklIsts
nIntenDo Ds
Contents
hoW to use thIs eguIDeDownload from www.chipper.pl

Wa
lk
th
ro
ug
h —
Co
un
t D
oo
ku
Prima Official Game Guide
www.primagames.com
FREEPLAY
FREEPLAY
MInIKIT 5 With the battleship’s top section gone, a new landing pad is exposed. Touch down here and use a rapid-fire character, such as Lieutenant Thire, to destroy the three gold bathroom stalls in the background. Embarrassed clone troopers pop out of each stall, along with a minikit!
Soar to the front of the battleship on the right—the one with all of the fire and landing pads. Then fly into the background, toward the enemy vessels. Before long, the top portion of the burning battleship explodes and breaks off. Whoa!
The fIRST WATeR SPOuTRun toward the landing pad’s tall checkered background walls. Leap between the checkered walls, and Anakin will use his Lightsaber to help himself ascend the height.
5
1
6
MInIKIT 4 A large object glows with red energy at the rear of the left battleship. Toggle to any enemy starship, such as a Vulture Droid, and fire on the object until it explodes, coughing up a minikit.
NOTEEnemy ships must be purchased at the Invisible Hand’s hangar before you can use them in Free Play. See the “Invisible Hand” chapter of this guide for details.
46Protected by copyright. Unauthorized or unlawful copying or downloading expressly prohibited.
IntroDuCtIon
Cast
paDaWan traInIng
WalkthroughPROlOgueCOunT DOOKu
ChAPTeR I: BATTle Of geOnOSIS
ChAPTeR II: gungAn geneRAl
ChAPTeR III: JeDI CRAShObjective 1: ActivAte the WAter SPOutS
Objective 2: Free the cruiSer
Objective 3: eScAPe!
ChAPTeR IV: DefenDeRS Of PeACe
ChAPTeR V: WeAPOnS fACTORy
ChAPTeR VI: legACy Of TeRROR
geneRAl gRIeVOuSASAJJ VenTReSSePIlOguehuB AReASSePARATIST MISSIOnS
seCrets anD extras
CheCklIsts
nIntenDo Ds
Contents
hoW to use thIs eguIDeDownload from www.chipper.pl

Wa
lk
th
ro
ug
h —
Co
un
t D
oo
ku
Prima Official Game Guide
www.primagames.com
There’s a checkered path above the checkered walls. Pull the lever you discover at the
far end to reveal a fiery back room with a generator. Get behind the generator and shove it back along the checkered path.
Maneuver the generator into contact with the purple plug at the path’s opposite end. Power begins to flow into the nearby water spout, which quickly begins to douse the landing pad’s flames.
TIPUse the Force to slide the generator if you’re being scorched by the nearby flames.
NOTE
Each time you land, spend some time bashing crates and the like for studs. Attaining True Jedi status is difficult on this mission in Story mode, but you can at least go for it! Reaching the True Jedi stud requirement is a lot easier when you revisit this stage in Free Play mode.
FREEPLAYMInIKIT 6
Toggle to a character with explosive weaponry, such as Echo, and blast the silver pipes near the ceiling where you found the generator. This extinguishes the background flames, letting you safely leap up and grab the minikit that was previously too hot to handle.
MInIKIT 7
Notice the silver boxes on this landing pad’s lower-left corner? Destroy these with explosive weaponry in Free Play mode to reveal an enemy Probe Droid, then destroy the Probe Droid. Find and destroy four more Probe Droids like this one to earn a minikit! The Probe Droids are scattered about the various landing pads, so scour each one for them. We’ve marked their locations on the maps to help you find them.
The SeCOnD WATeR SPOuT
2
47Protected by copyright. Unauthorized or unlawful copying or downloading expressly prohibited.
IntroDuCtIon
Cast
paDaWan traInIng
WalkthroughPROlOgueCOunT DOOKu
ChAPTeR I: BATTle Of geOnOSIS
ChAPTeR II: gungAn geneRAl
ChAPTeR III: JeDI CRAShObjective 1: ActivAte the WAter SPOutS
Objective 2: Free the cruiSer
Objective 3: eScAPe!
ChAPTeR IV: DefenDeRS Of PeACe
ChAPTeR V: WeAPOnS fACTORy
ChAPTeR VI: legACy Of TeRROR
geneRAl gRIeVOuSASAJJ VenTReSSePIlOguehuB AReASSePARATIST MISSIOnS
seCrets anD extras
CheCklIsts
nIntenDo Ds
Contents
hoW to use thIs eguIDeDownload from www.chipper.pl
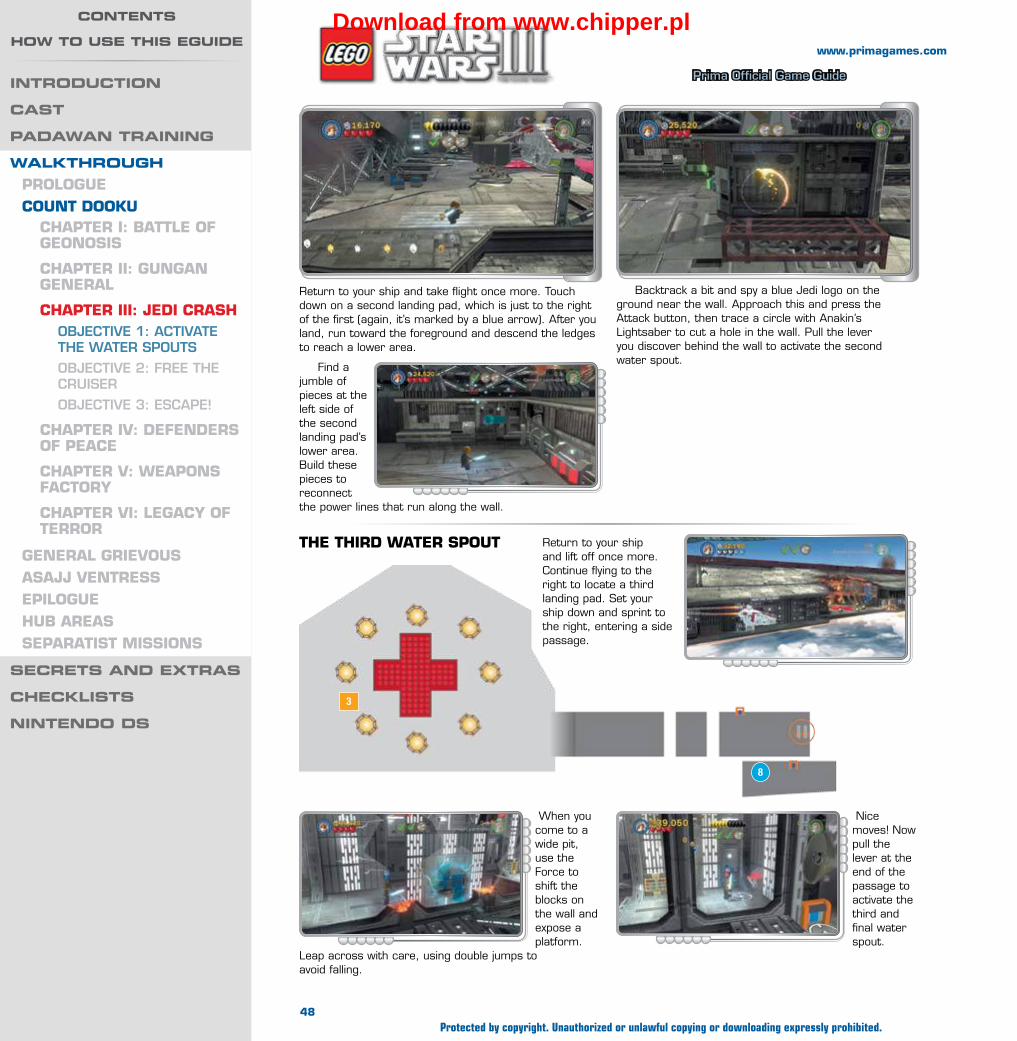
Wa
lk
th
ro
ug
h —
Co
un
t D
oo
ku
Prima Official Game Guide
www.primagames.com
Nice moves! Now pull the lever at the end of the passage to activate the third and final water spout.
Backtrack a bit and spy a blue Jedi logo on the ground near the wall. Approach this and press the Attack button, then trace a circle with Anakin’s Lightsaber to cut a hole in the wall. Pull the lever you discover behind the wall to activate the second water spout.
Return to your ship and take flight once more. Touch down on a second landing pad, which is just to the right of the first (again, it’s marked by a blue arrow). After you land, run toward the foreground and descend the ledges to reach a lower area.
Find a jumble of pieces at the left side of the second landing pad’s lower area. Build these pieces to reconnect the power lines that run along the wall.
The ThIRD WATeR SPOuT Return to your ship and lift off once more. Continue flying to the right to locate a third landing pad. Set your ship down and sprint to the right, entering a side passage.
When you come to a wide pit, use the Force to shift the blocks on the wall and expose a platform.
Leap across with care, using double jumps to avoid falling.
8
3
48Protected by copyright. Unauthorized or unlawful copying or downloading expressly prohibited.
IntroDuCtIon
Cast
paDaWan traInIng
WalkthroughPROlOgueCOunT DOOKu
ChAPTeR I: BATTle Of geOnOSIS
ChAPTeR II: gungAn geneRAl
ChAPTeR III: JeDI CRAShObjective 1: ActivAte the WAter SPOutS
Objective 2: Free the cruiSer
Objective 3: eScAPe!
ChAPTeR IV: DefenDeRS Of PeACe
ChAPTeR V: WeAPOnS fACTORy
ChAPTeR VI: legACy Of TeRROR
geneRAl gRIeVOuSASAJJ VenTReSSePIlOguehuB AReASSePARATIST MISSIOnS
seCrets anD extras
CheCklIsts
nIntenDo Ds
Contents
hoW to use thIs eguIDeDownload from www.chipper.pl

Wa
lk
th
ro
ug
h —
Co
un
t D
oo
ku
Prima Official Game Guide
www.primagames.com
FREEPLAY
Run to the background and use the Force to manipulate a giant object, erecting a torpedo generator. Pull the nearby lever afterward to supply the generator with power.
Return to your starship and take flight to advance the plot. The enemy manages to capture a Republic cruiser in a tractor beam, and your new goal is to set it free. Begin by flying left and landing on the enemy ship that’s caught the cruiser.
OBJeCTIVe 2: fRee The CRuISeR
There’s a crawl space hatch near the lever that activates the third water spout. Use a rapid-fire character, such as Lieutenant Thire, to destroy the hatch’s gold covering, then switch to a stubby character and crawl through.
MInIKIT 8
You emerge outside, close to a minikit. Grab that baby and crawl back through.
9
4
49Protected by copyright. Unauthorized or unlawful copying or downloading expressly prohibited.
IntroDuCtIon
Cast
paDaWan traInIng
WalkthroughPROlOgueCOunT DOOKu
ChAPTeR I: BATTle Of geOnOSIS
ChAPTeR II: gungAn geneRAl
ChAPTeR III: JeDI CRAShObjective 1: ActivAte the WAter SPOutS
Objective 2: Free the cruiSer
Objective 3: eScAPe!
ChAPTeR IV: DefenDeRS Of PeACe
ChAPTeR V: WeAPOnS fACTORy
ChAPTeR VI: legACy Of TeRROR
geneRAl gRIeVOuSASAJJ VenTReSSePIlOguehuB AReASSePARATIST MISSIOnS
seCrets anD extras
CheCklIsts
nIntenDo Ds
Contents
hoW to use thIs eguIDeDownload from www.chipper.pl
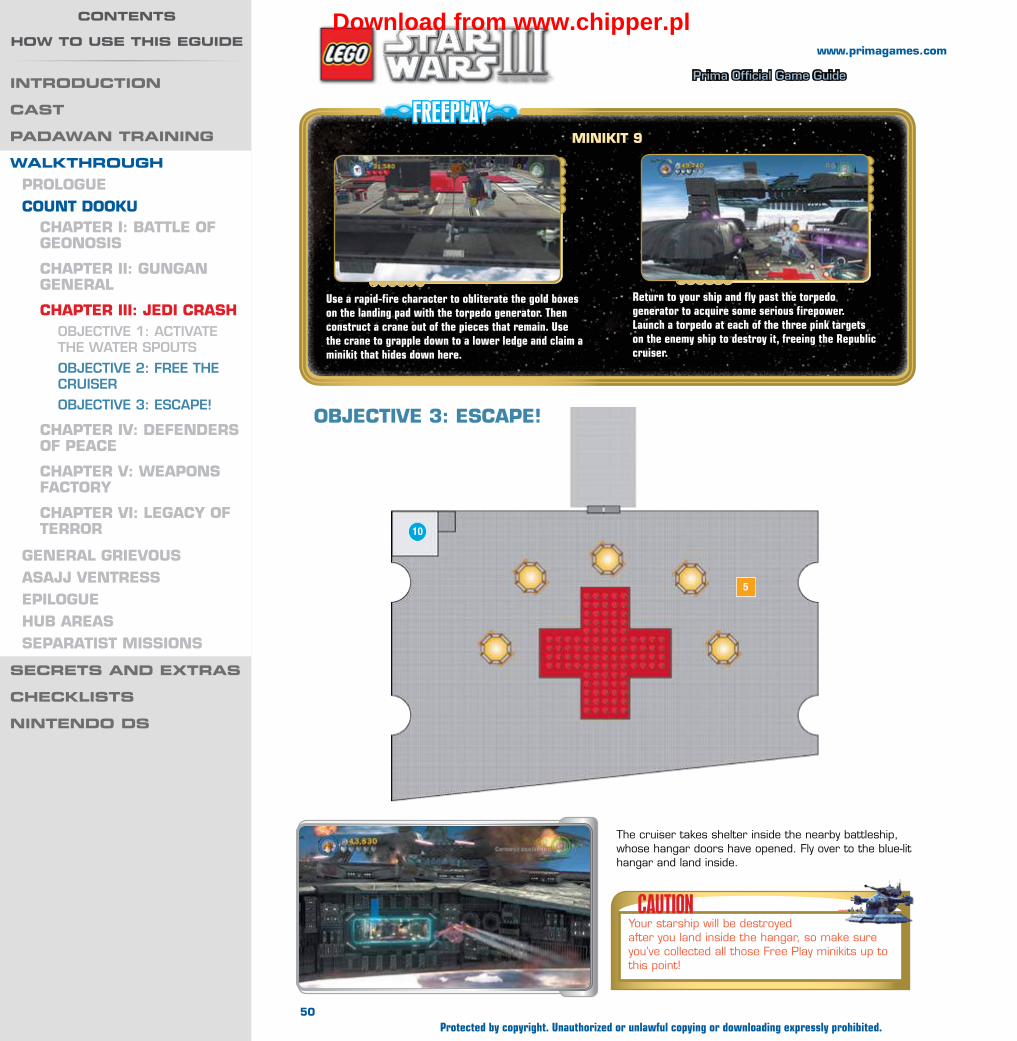
Wa
lk
th
ro
ug
h —
Co
un
t D
oo
ku
Prima Official Game Guide
www.primagames.com
OBJeCTIVe 3: eSCAPe!
FREEPLAYMInIKIT 9
Use a rapid-fire character to obliterate the gold boxes on the landing pad with the torpedo generator. Then construct a crane out of the pieces that remain. Use the crane to grapple down to a lower ledge and claim a minikit that hides down here.
Return to your ship and fly past the torpedo generator to acquire some serious firepower. Launch a torpedo at each of the three pink targets on the enemy ship to destroy it, freeing the Republic cruiser.
The cruiser takes shelter inside the nearby battleship, whose hangar doors have opened. Fly over to the blue-lit hangar and land inside.
CAUTIONYour starship will be destroyed after you land inside the hangar, so make sure you’ve collected all those Free Play minikits up to this point!
10
5
50Protected by copyright. Unauthorized or unlawful copying or downloading expressly prohibited.
IntroDuCtIon
Cast
paDaWan traInIng
WalkthroughPROlOgueCOunT DOOKu
ChAPTeR I: BATTle Of geOnOSIS
ChAPTeR II: gungAn geneRAl
ChAPTeR III: JeDI CRAShObjective 1: ActivAte the WAter SPOutS
Objective 2: Free the cruiSer
Objective 3: eScAPe!
ChAPTeR IV: DefenDeRS Of PeACe
ChAPTeR V: WeAPOnS fACTORy
ChAPTeR VI: legACy Of TeRROR
geneRAl gRIeVOuSASAJJ VenTReSSePIlOguehuB AReASSePARATIST MISSIOnS
seCrets anD extras
CheCklIsts
nIntenDo Ds
Contents
hoW to use thIs eguIDeDownload from www.chipper.pl

Wa
lk
th
ro
ug
h —
Co
un
t D
oo
ku
Prima Official Game Guide
www.primagames.com
Proceed down the tunnel beyond the hangar, nabbing valuable studs as you go. The
Republic cruiser you rescued moments ago is docked at the tunnel’s far end. Hop aboard to get a move on.
Fly far to the left to discover another enemy vessel that has caught a Republic battleship in a tractor
FREEPLAY
A number of Super Battle Droids have pinned down Ahsoka and Commander Bly inside the hangar. Dispatch the Droids until the coast is clear and your allies drop down from their perch to join you.
Smash up the hangar for studs if you like, then assume control of Commander Bly. Use the clone’s grapple gun to tug on the hook point near the background door and open the way forward.
MInIKIT 10
After securing the hangar, toggle to Jar Jar and use his superior jumping height to reach the back-left ledge, where Ahsoka and Commander Bly were previously trapped. Use his jumping ability again to leap up and grab a minikit that hovers high above.
beam. Your cruiser is already armed with torpedoes; launch one at each of the three pink targets on the enemy ship. Strike all three targets to disable the tractor beam.
That’s it; you’re out of here! Simply fly beneath the Republic battleship that you’ve just freed (the one on the left) and dock when prompted to make good your escape.
51Protected by copyright. Unauthorized or unlawful copying or downloading expressly prohibited.
IntroDuCtIon
Cast
paDaWan traInIng
WalkthroughPROlOgueCOunT DOOKu
ChAPTeR I: BATTle Of geOnOSIS
ChAPTeR II: gungAn geneRAl
ChAPTeR III: JeDI CRAShObjective 1: ActivAte the WAter SPOutS
Objective 2: Free the cruiSer
Objective 3: eScAPe!
ChAPTeR IV: DefenDeRS Of PeACe
ChAPTeR V: WeAPOnS fACTORy
ChAPTeR VI: legACy Of TeRROR
geneRAl gRIeVOuSASAJJ VenTReSSePIlOguehuB AReASSePARATIST MISSIOnS
seCrets anD extras
CheCklIsts
nIntenDo Ds
Contents
hoW to use thIs eguIDeDownload from www.chipper.pl
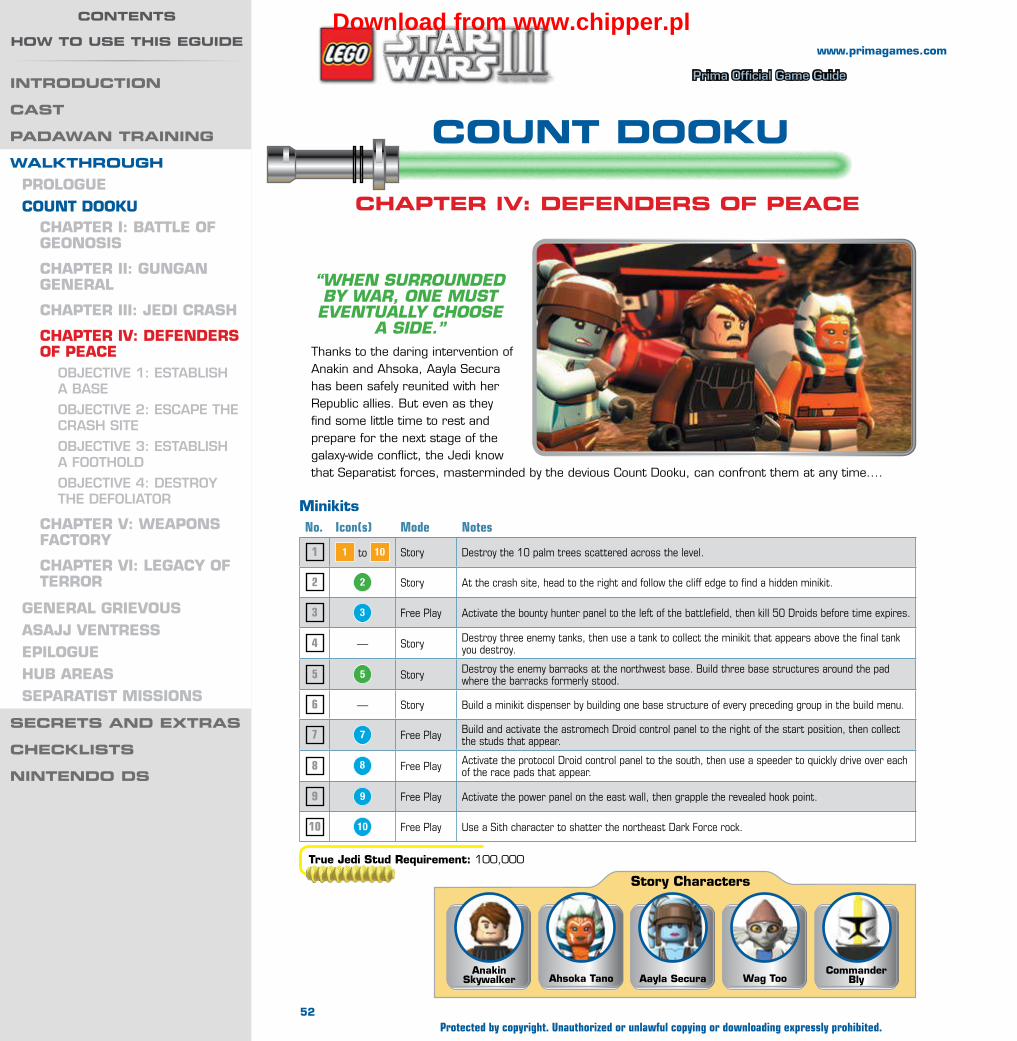
Wa
lk
th
ro
ug
h —
Co
un
t D
oo
ku
Prima Official Game Guide
www.primagames.com
Count Dooku
Chapter IV: DefenDers of peaCe
MinikitsNo. Icon(s) Mode Notes
1 1 to 10 Story Destroy the 10 palm trees scattered across the level.
2 2 Story At the crash site, head to the right and follow the cliff edge to find a hidden minikit.
3 3 Free Play Activate the bounty hunter panel to the left of the battlefield, then kill 50 Droids before time expires.
4 — Story Destroy three enemy tanks, then use a tank to collect the minikit that appears above the final tank you destroy.
5 5 Story Destroy the enemy barracks at the northwest base. Build three base structures around the pad where the barracks formerly stood.
6 — Story Build a minikit dispenser by building one base structure of every preceding group in the build menu.
7 7 Free Play Build and activate the astromech Droid control panel to the right of the start position, then collect the studs that appear.
8 8 Free Play Activate the protocol Droid control panel to the south, then use a speeder to quickly drive over each of the race pads that appear.
9 9 Free Play Activate the power panel on the east wall, then grapple the revealed hook point.
10 10 Free Play Use a Sith character to shatter the northeast Dark Force rock.
True Jedi Stud Requirement: 100,000
Story Characters
Commander BlyWag TooAayla SecuraAhsoka Tano
Anakin Skywalker
“when suRRounded By waR, one must eventually choose
a sIde.”Thanks to the daring intervention of Anakin and Ahsoka, Aayla Secura has been safely reunited with her Republic allies. But even as they find some little time to rest and prepare for the next stage of the galaxy-wide conflict, the Jedi know that Separatist forces, masterminded by the devious Count Dooku, can confront them at any time....
52Protected by copyright. Unauthorized or unlawful copying or downloading expressly prohibited.
IntroDuCtIon
Cast
paDaWan traInIng
WalkthroughPRologueCounT Dooku
ChAPTeR I: BATTle of geonoSIS
ChAPTeR II: gungAn geneRAl
ChAPTeR III: JeDI CRASh
ChAPTeR IV: DefenDeRS of PeACe
Objective 1: establish a base
Objective 2: escaPe the crash site
Objective 3: establish a FOOthOld
Objective 4: destrOy the deFOliatOr
ChAPTeR V: WeAPonS fACToRy
ChAPTeR VI: legACy of TeRRoR
geneRAl gRIeVouSASAJJ VenTReSSePIloguehuB AReASSePARATIST MISSIonS
seCrets anD extras
CheCklIsts
nIntenDo Ds
Contents
hoW to use thIs eguIDeDownload from www.chipper.pl
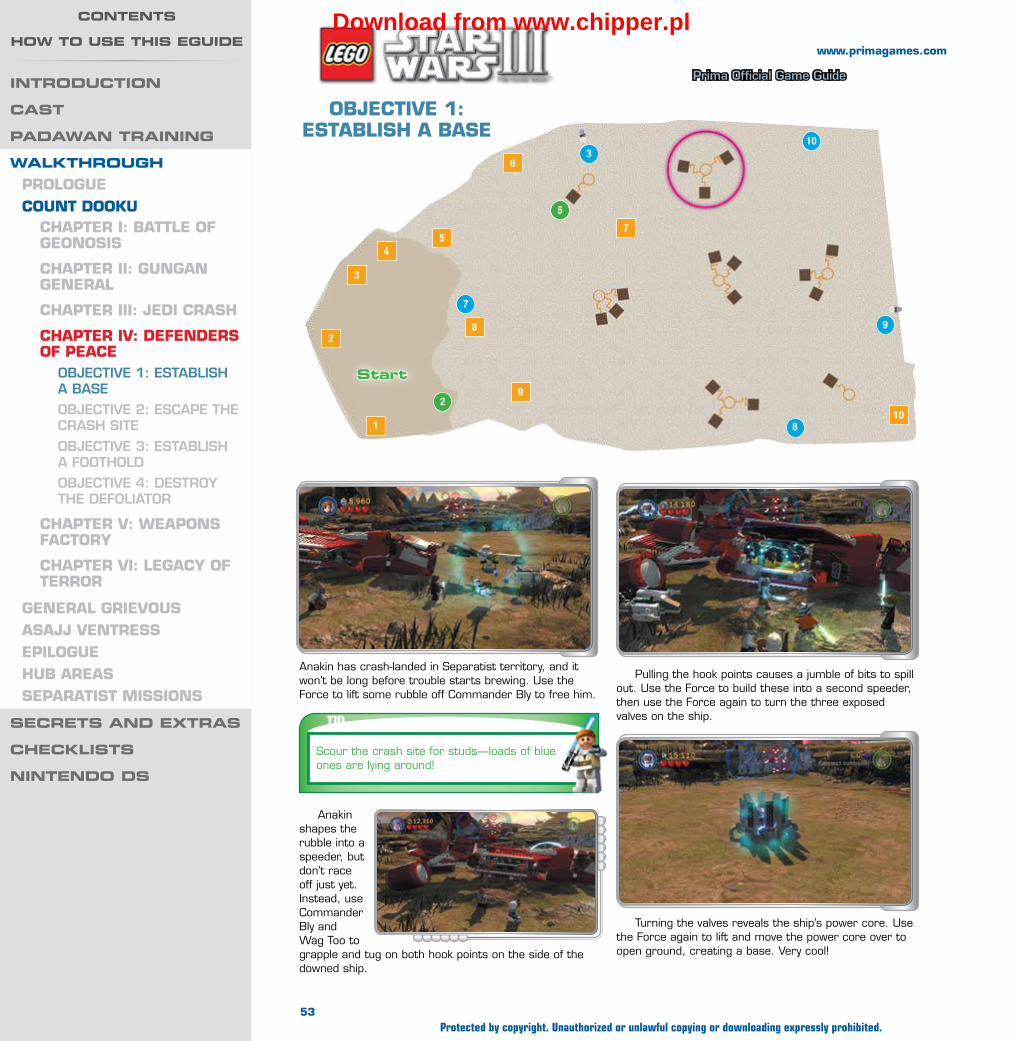
Wa
lk
th
ro
ug
h —
Co
un
t D
oo
ku
Prima Official Game Guide
www.primagames.com
Pulling the hook points causes a jumble of bits to spill out. Use the Force to build these into a second speeder, then use the Force again to turn the three exposed valves on the ship.
Anakin has crash-landed in Separatist territory, and it won’t be long before trouble starts brewing. Use the Force to lift some rubble off Commander Bly to free him.
05d-002
oBJeCTIVe 1: eSTABlISh A BASe
TIPScour the crash site for studs—loads of blue ones are lying around!
Anakin shapes the rubble into a speeder, but don’t race off just yet. Instead, use Commander Bly and Wag Too to grapple and tug on both hook points on the side of the downed ship.
Turning the valves reveals the ship’s power core. Use the Force again to lift and move the power core over to open ground, creating a base. Very cool!
1
2
2
5
3
7
8
9
10
3
45
6
7
8
9
10
start
53Protected by copyright. Unauthorized or unlawful copying or downloading expressly prohibited.
IntroDuCtIon
Cast
paDaWan traInIng
WalkthroughPRologueCounT Dooku
ChAPTeR I: BATTle of geonoSIS
ChAPTeR II: gungAn geneRAl
ChAPTeR III: JeDI CRASh
ChAPTeR IV: DefenDeRS of PeACe
Objective 1: establish a base
Objective 2: escaPe the crash site
Objective 3: establish a FOOthOld
Objective 4: destrOy the deFOliatOr
ChAPTeR V: WeAPonS fACToRy
ChAPTeR VI: legACy of TeRRoR
geneRAl gRIeVouSASAJJ VenTReSSePIloguehuB AReASSePARATIST MISSIonS
seCrets anD extras
CheCklIsts
nIntenDo Ds
Contents
hoW to use thIs eguIDeDownload from www.chipper.pl

Wa
lk
th
ro
ug
h —
Co
un
t D
oo
ku
Prima Official Game Guide
www.primagames.com
oBJeCTIVe 2: eSCAPe The CRASh SITe
A wall of silver rubble prevents you from advancing, but not for long. Notice the large gray pads that appear on the ground as you circle the power core of your base. Stand on a pad that’s close to the rubble and press the Action button to call up the build menu.
At this point, you can only construct a basic cannon. Purchase the cannon to make it appear.
Now you need some cash—base-building is expensive! Zip around on a speeder or on foot, scouring the crash site for studs. You can collect over 20,000 from this small area.
While hunting for studs, smash four small palm trees around the crash site (check the map for their locations). After you escape the crash site, you can hunt down the remaining six trees. Destroy all 10 for a minikit!
MInIkIT 1
This minikit is tucked away near the cliff on the right side of the crash site. Grab it at your convenience.
MInIkIT 2
CAUTIONDon’t pull the lever near you base’s power core after you build the cannon—this destroys the structure! If you pull the lever by accident, hurry and collect the studs from the collapsing cannon to minimize your losses.
With the cannon in place, jump into the gunner’s seat and hold the Attack button to aim. Target the silver rubble ahead and release the Attack button to fire. Repeat this until the rubble is removed.
TIPAfter obliterating the rubble, pull the lever near your base’s power core to destroy the cannon and collect the studs that spill out for extra funds. Or leave the cannon be if you’re hoping to build up to the minikit dispenser (see the “Minikit 6” sidebar).
54Protected by copyright. Unauthorized or unlawful copying or downloading expressly prohibited.
IntroDuCtIon
Cast
paDaWan traInIng
WalkthroughPRologueCounT Dooku
ChAPTeR I: BATTle of geonoSIS
ChAPTeR II: gungAn geneRAl
ChAPTeR III: JeDI CRASh
ChAPTeR IV: DefenDeRS of PeACe
Objective 1: establish a base
Objective 2: escaPe the crash site
Objective 3: establish a FOOthOld
Objective 4: destrOy the deFOliatOr
ChAPTeR V: WeAPonS fACToRy
ChAPTeR VI: legACy of TeRRoR
geneRAl gRIeVouSASAJJ VenTReSSePIloguehuB AReASSePARATIST MISSIonS
seCrets anD extras
game BasICs
nIntenDo Ds
Contents
hoW to use thIs eguIDeDownload from www.chipper.pl

Wa
lk
th
ro
ug
h —
Co
un
t D
oo
ku
Prima Official Game Guide
www.primagames.com
With the rubble out of your way, hop into a speeder and zip up the path. Attack the nearby enemy
base, which features only a Droid barracks. Destroy this lone structure with your speeder’s blasters or a Jedi’s Lightsaber to capture the base.
oBJeCTIVe 3: eSTABlISh A fooTholD
With the base under your command, build a cannon, then sprint to the right. Head for the middle-north enemy base, which is covered by a shield. Run through the shield on foot and attack all of the base’s structures with a Jedi to destroy them, or drop the shield by pulling the lever and assault the structures with vehicles.
With the second enemy base captured, open your build menu to see that you can now erect structures
that call for “small air support.” Select the AT-RT (the only option) to build a little radio tower that orders an AT-RT vehicle to deploy nearby.
TIP
Attack an enemy tank with a speeder until its pilot flees, then commandeer the tank to gain a formidable vehicle that can destroy silver objects. And if you’re ever stuck without transportation, just run to the left until a new speeder spawns in for you.
CAUTIONStay agile out there! Enemy cannon fire rains down on you throughout this mission.
FREEPLAYMInIkIT 3
During Free Play, don’t destroy the first barracks until you’ve activated the nearby bounty hunter panel to the left. Activate the bounty hunter control panel, then camp out near the barracks and destroy the Droids that regularly emerge. You may need to seek out and destroy the barrack’s active battalion of Droids before more will emerge from the structure.
NOTEThe more bases you control, the more structures you can build. Capture bases and build structures on them (at least one per base) to open up more and more construction options!
oBJeCTIVe 4: DeSTRoy The DefolIAToR
Head for the enemy’s far west base, which features two barracks and a cannon. Destroy all of these, then build two blaster clone barracks and a silver cannon in their place.
55Protected by copyright. Unauthorized or unlawful copying or downloading expressly prohibited.
IntroDuCtIon
Cast
paDaWan traInIng
WalkthroughPRologueCounT Dooku
ChAPTeR I: BATTle of geonoSIS
ChAPTeR II: gungAn geneRAl
ChAPTeR III: JeDI CRASh
ChAPTeR IV: DefenDeRS of PeACe
Objective 1: establish a base
Objective 2: escaPe the crash site
Objective 3: establish a FOOthOld
Objective 4: destrOy the deFOliatOr
ChAPTeR V: WeAPonS fACToRy
ChAPTeR VI: legACy of TeRRoR
geneRAl gRIeVouSASAJJ VenTReSSePIloguehuB AReASSePARATIST MISSIonS
seCrets anD extras
CheCklIsts
nIntenDo Ds
Contents
hoW to use thIs eguIDeDownload from www.chipper.pl

Wa
lk
th
ro
ug
h —
Co
un
t D
oo
ku
Prima Official Game Guide
www.primagames.com
Assault the nearest southern base next, destroying another two barracks and a vehicle generator. The next base to the north features a silver cannon and ray shield, so build a gold cannon and use it to obliterate them. Remember to hold the Attack button to aim and release to fire.
Destroy three enemy tanks to make a minikit appear above the final tank you destroy. You can only collect this minikit in Story mode by driving a stolen enemy tank (or similarly large vehicle) into it. (During Free Play, you can use Jar Jar to double-jump and grab this minikit.)
MInIkIT 4
To acquire this minikit, you must capture enough bases and build enough structures to unlock to the final build menu option, “minikit dispenser.” Simply ensure that you’ve built at least one structure at each captured base, and that you build one structure from each category (cannon, barracks, etc.) You’ll eventually unlock the minikit dispenser, which you may purchase for a tidy sum.
MInIkIT 6
This minikit hides beneath the first barracks you destroyed, in the enemy’s northwest base. To claim it, you must build structures around the construction pad where the enemy barracks formerly stood. Build a structure to the right of the pad, and another to the left. Build a third structure anywhere else to reveal the minikit.
MInIkIT 5
With the silver ray shield destroyed, the enemy’s northeast defoliator weapon is made vulnerable. Spend some time wiping out any remaining enemy structures for fun and studs before destroying the defoliator to end the mission.
TIPIf you’re short on studs, destroy some of the more expensive structures you’ve built by pulling the levers near their bases’ power cores. Just make sure to leave at least one structure from each group!
56Protected by copyright. Unauthorized or unlawful copying or downloading expressly prohibited.
IntroDuCtIon
Cast
paDaWan traInIng
WalkthroughPRologueCounT Dooku
ChAPTeR I: BATTle of geonoSIS
ChAPTeR II: gungAn geneRAl
ChAPTeR III: JeDI CRASh
ChAPTeR IV: DefenDeRS of PeACe
Objective 1: establish a base
Objective 2: escaPe the crash site
Objective 3: establish a FOOthOld
Objective 4: destrOy the deFOliatOr
ChAPTeR V: WeAPonS fACToRy
ChAPTeR VI: legACy of TeRRoR
geneRAl gRIeVouSASAJJ VenTReSSePIloguehuB AReASSePARATIST MISSIonS
seCrets anD extras
CheCklIsts
nIntenDo Ds
Contents
hoW to use thIs eguIDeDownload from www.chipper.pl

Wa
lk
th
ro
ug
h —
Co
un
t D
oo
ku
Prima Official Game Guide
www.primagames.com
FREEPLAY
NOTENow that you’ve beaten at least five levels, you may be able to visit new areas of the Resolute. See the “Battleship Resolute” chapter for details.
MInIkIT 7
Build the pile of loose pieces you find on the cliff to the left of the starting point. Activate the astromech Droid control panel you create from the bits to summon a vehicle, then collect the line of studs that appears to the right to score a minikit.
MInIkIT 8
Swing your speeder to the southeast area of the battlefield and find a protocol Droid control panel. Activate this with C-3PO to cause a familiar-looking orange pad to appear nearby.
Return to your speeder and pass over the pad to change its color to green. Follow the line of green beacons to locate the next pad, and keep following along until you’ve passed over every pad. The pads reset to orange after a time, so try to keep a good pace. Turn all those pads green to win a minikit!
Use MagnaGuard or a similar character to activate the power panel on the battlefield’s far-right wall. This extends a hook point above you; toggle to a grapple character and yank on the hook point to bring down a minikit.
MInIkIT 10
Use a Sith character to shatter the Dark Force rock in the area’s northeast corner (near the defoliator). A hidden minikit pops out!
MInIkIT 9
57Protected by copyright. Unauthorized or unlawful copying or downloading expressly prohibited.
IntroDuCtIon
Cast
paDaWan traInIng
WalkthroughPRologueCounT Dooku
ChAPTeR I: BATTle of geonoSIS
ChAPTeR II: gungAn geneRAl
ChAPTeR III: JeDI CRASh
ChAPTeR IV: DefenDeRS of PeACe
Objective 1: establish a base
Objective 2: escaPe the crash site
Objective 3: establish a FOOthOld
Objective 4: destrOy the deFOliatOr
ChAPTeR V: WeAPonS fACToRy
ChAPTeR VI: legACy of TeRRoR
geneRAl gRIeVouSASAJJ VenTReSSePIloguehuB AReASSePARATIST MISSIonS
seCrets anD extras
CheCklIsts
nIntenDo Ds
Contents
hoW to use thIs eguIDeDownload from www.chipper.pl
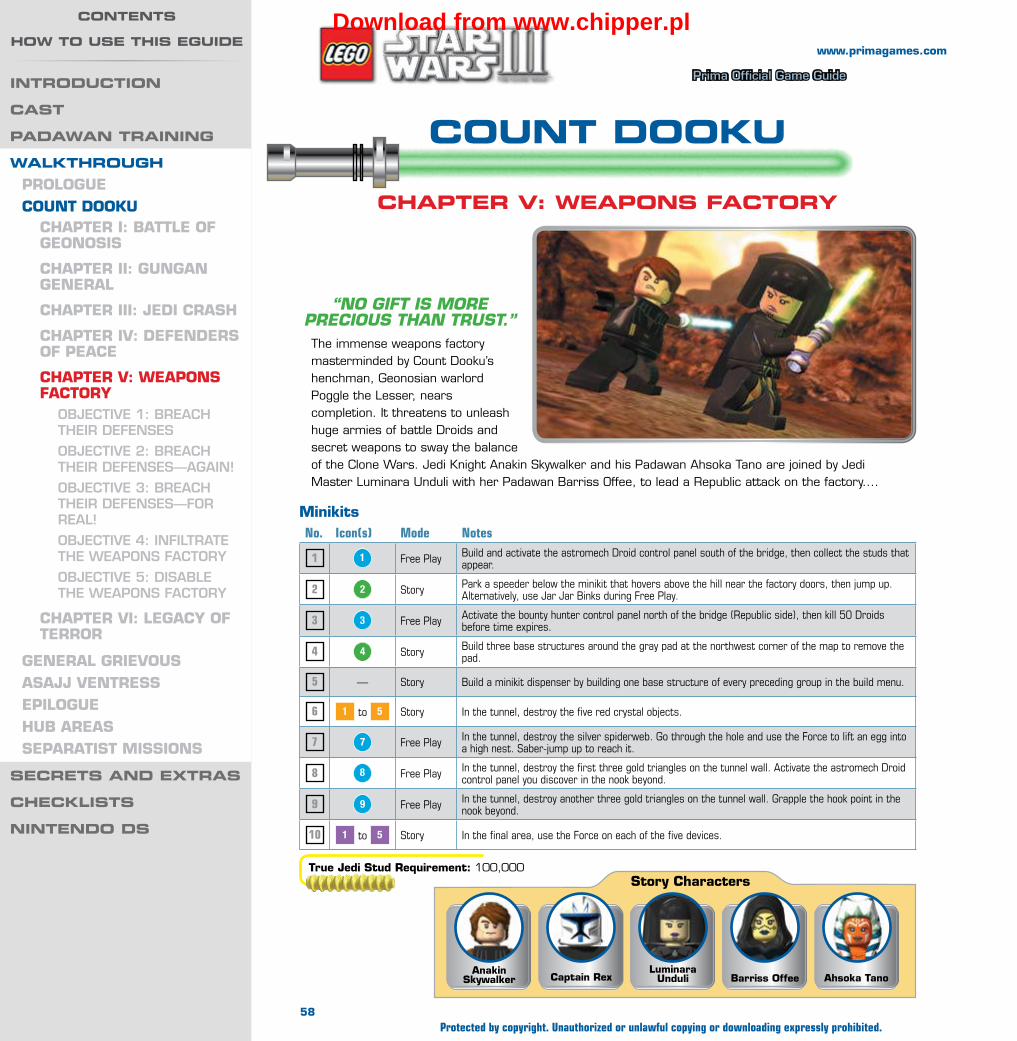
Wa
lk
th
ro
ug
h —
Co
un
t D
oo
ku
Prima Official Game Guide
www.primagames.com
Count Dooku
Chapter V: Weapons FaCtory
MinikitsNo. Icon(s) Mode Notes
1 1 Free Play Build and activate the astromech Droid control panel south of the bridge, then collect the studs that appear.
2 2 Story Park a speeder below the minikit that hovers above the hill near the factory doors, then jump up. Alternatively, use Jar Jar Binks during Free Play.
3 3 Free Play Activate the bounty hunter control panel north of the bridge (Republic side), then kill 50 Droids before time expires.
4 4 Story Build three base structures around the gray pad at the northwest corner of the map to remove the pad.
5 — Story Build a minikit dispenser by building one base structure of every preceding group in the build menu.
6 1 to 5 Story In the tunnel, destroy the five red crystal objects.
7 7 Free Play In the tunnel, destroy the silver spiderweb. Go through the hole and use the Force to lift an egg into a high nest. Saber-jump up to reach it.
8 8 Free Play In the tunnel, destroy the first three gold triangles on the tunnel wall. Activate the astromech Droid control panel you discover in the nook beyond.
9 9 Free Play In the tunnel, destroy another three gold triangles on the tunnel wall. Grapple the hook point in the nook beyond.
10 1 to 5 Story In the final area, use the Force on each of the five devices.
True Jedi Stud Requirement: 100,000
Story Characters
Ahsoka TanoBarriss OffeeLuminara
UnduliCaptain RexAnakin
Skywalker
“no GIFt Is moRe pRecIous than tRust.”The immense weapons factory masterminded by Count Dooku’s henchman, Geonosian warlord Poggle the Lesser, nears completion. It threatens to unleash huge armies of battle Droids and secret weapons to sway the balance of the Clone Wars. Jedi Knight Anakin Skywalker and his Padawan Ahsoka Tano are joined by Jedi Master Luminara Unduli with her Padawan Barriss Offee, to lead a Republic attack on the factory....
58Protected by copyright. Unauthorized or unlawful copying or downloading expressly prohibited.
IntroDuCtIon
Cast
paDaWan traInIng
WalkthroughPROLOgUeCOUnT DOOkU
ChAPTeR I: BATTLe Of geOnOSIS
ChAPTeR II: gUngAn geneRAL
ChAPTeR III: JeDI CRASh
ChAPTeR IV: DefenDeRS Of PeACe
ChAPTeR V: WeAPOnS fACTORy
Objective 1: breach their Defenses
Objective 2: breach their Defenses—aGain!
Objective 3: breach their Defenses—fOr real!
Objective 4: infiltrate the WeaPOns factOry
Objective 5: Disable the WeaPOns factOry
ChAPTeR VI: LegACy Of TeRROR
geneRAL gRIeVOUSASAJJ VenTReSSePILOgUehUB AReASSePARATIST MISSIOnS
seCrets anD extras
CheCklIsts
nIntenDo Ds
Contents
hoW to use thIs eguIDeDownload from www.chipper.pl

Wa
lk
th
ro
ug
h —
Co
un
t D
oo
ku
Prima Official Game Guide
www.primagames.com
FREEPLAY
OBJeCTIVe 1: BReACh TheIR DefenSeS
That factory must fall! Hop in a speeder and cruise northeast, heading for the narrow bridge that leads to the Separatists’ compound.
TIPWhile things are still relatively quiet, destroy the rocks and plantlife around the level for studs, working toward True Jedi status.
NOTEYou can cause more speeders to spawn in if you sprint to the left on foot.
MInIkIT 1
Before crossing the bridge, build the pile of loose pieces you find on the ground to the south to form an astromech Droid control panel. Activate the panel with a Droid such as R2-D2 to summon a sweet new ride.
Hop into the driver’s seat and loop around the nearby base node, scooping up the trail of blue studs that now encircles it. Follow the stud trail across the bridge, nabbing every one to score a minikit!
4
1
3
A
start
2
59Protected by copyright. Unauthorized or unlawful copying or downloading expressly prohibited.
IntroDuCtIon
Cast
paDaWan traInIng
WalkthroughPROLOgUeCOUnT DOOkU
ChAPTeR I: BATTLe Of geOnOSIS
ChAPTeR II: gUngAn geneRAL
ChAPTeR III: JeDI CRASh
ChAPTeR IV: DefenDeRS Of PeACe
ChAPTeR V: WeAPOnS fACTORy
Objective 1: breach their Defenses
Objective 2: breach their Defenses—aGain!
Objective 3: breach their Defenses—fOr real!
Objective 4: infiltrate the WeaPOns factOry
Objective 5: Disable the WeaPOns factOry
ChAPTeR VI: LegACy Of TeRROR
geneRAL gRIeVOUSASAJJ VenTReSSePILOgUehUB AReASSePARATIST MISSIOnS
seCrets anD extras
CheCklIsts
nIntenDo Ds
Contents
hoW to use thIs eguIDeDownload from www.chipper.pl

Wa
lk
th
ro
ug
h —
Co
un
t D
oo
ku
Prima Official Game Guide
www.primagames.com
Lead your rocket clones north, moving to assault the two enemy barracks up here. Simply hold the Attack button and highlight each barracks in turn to order your rocket clones to attack them—they’ll keep firing until their target is destroyed. One of the barracks is silver—only your rocket clones can take this one out!
Seeing their cannons obliterated, the Separatists rush to rally. You find yourself back on the bridge, with five new enemy bases to wipe out. (No fair!) The nearest cannon is protected by a ray shield; race over and destroy the satellite dish that’s emitting the shield, then wipe out the cannon.
Across the bridge, three enemy cannons fire upon you from three separate bases.
Destroy all three cannons, using your speeder to circle around them and attack from safe angles. Make sure to collect every stud that spills out from the cannons after they go boom.
With the cannon out of the way, you’re ready to build base structures. Construct a rocket clones barracks and wait for the troopers to emerge. As Captain Rex, approach the rocket clones and press the Action button to get their attention and make them follow you. Sweet!
CAUTIONWhen battling cannons close up, focus on dodging the fire from their small underbelly blasters—these are deceptively dangerous.
While assaulting the enemy’s cannons, look for a hill formation near the factory doors. A minikit hovers high above; drive a speeder onto the hill, park beneath the minikit and then jump up to claim this prize. You can also grab this minikit easily during Free Play by using Jar Jar Binks’ superior jumping ability.
OBJeCTIVe 2: BReACh TheIR DefenSeS—AgAIn!
NOTEAfter assigning your clones a target, you must press the Action button to get their attention again if you wish to give them further orders.
MInIkIT 2
60Protected by copyright. Unauthorized or unlawful copying or downloading expressly prohibited.
IntroDuCtIon
Cast
paDaWan traInIng
WalkthroughPROLOgUeCOUnT DOOkU
ChAPTeR I: BATTLe Of geOnOSIS
ChAPTeR II: gUngAn geneRAL
ChAPTeR III: JeDI CRASh
ChAPTeR IV: DefenDeRS Of PeACe
ChAPTeR V: WeAPOnS fACTORy
Objective 1: breach their Defenses
Objective 2: breach their Defenses—aGain!
Objective 3: breach their Defenses—fOr real!
Objective 4: infiltrate the WeaPOns factOry
Objective 5: Disable the WeaPOns factOry
ChAPTeR VI: LegACy Of TeRROR
geneRAL gRIeVOUSASAJJ VenTReSSePILOgUehUB AReASSePARATIST MISSIOnS
seCrets anD extras
CheCklIsts
nIntenDo Ds
Contents
hoW to use thIs eguIDeDownload from www.chipper.pl
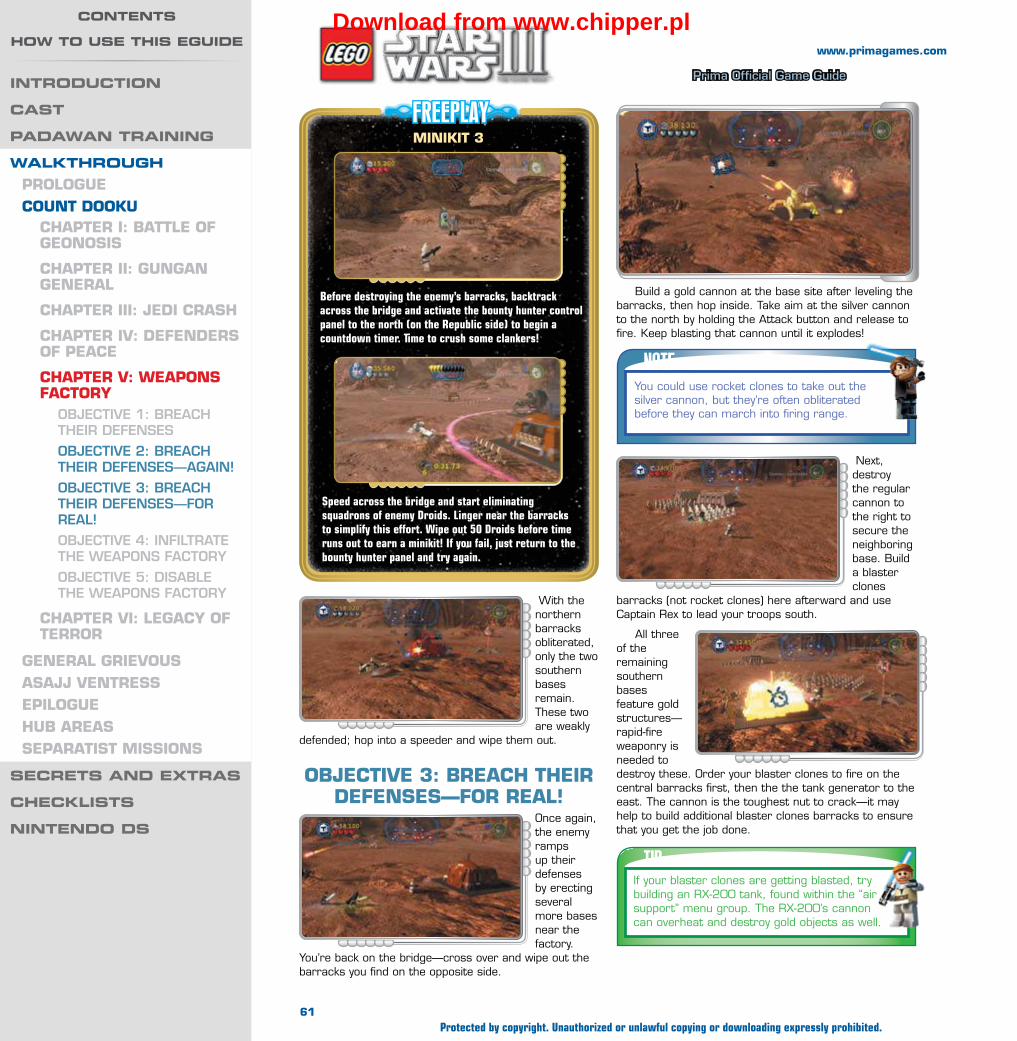
Wa
lk
th
ro
ug
h —
Co
un
t D
oo
ku
Prima Official Game Guide
www.primagames.com
OBJeCTIVe 3: BReACh TheIR DefenSeS—fOR ReAL!
Once again, the enemy ramps up their defenses by erecting several more bases near the factory.
You’re back on the bridge—cross over and wipe out the barracks you find on the opposite side.
With the northern barracks obliterated, only the two southern bases remain. These two are weakly
defended; hop into a speeder and wipe them out.
FREEPLAY
Before destroying the enemy’s barracks, backtrack across the bridge and activate the bounty hunter control panel to the north (on the Republic side) to begin a countdown timer. Time to crush some clankers!
Build a gold cannon at the base site after leveling the barracks, then hop inside. Take aim at the silver cannon to the north by holding the Attack button and release to fire. Keep blasting that cannon until it explodes!
MInIkIT 3
Speed across the bridge and start eliminating squadrons of enemy Droids. Linger near the barracks to simplify this effort. Wipe out 50 Droids before time runs out to earn a minikit! If you fail, just return to the bounty hunter panel and try again.
NOTEYou could use rocket clones to take out the silver cannon, but they’re often obliterated before they can march into firing range.
Next, destroy the regular cannon to the right to secure the neighboring base. Build a blaster clones
barracks (not rocket clones) here afterward and use Captain Rex to lead your troops south.
All three of the remaining southern bases feature gold structures—rapid-fire weaponry is needed to destroy these. Order your blaster clones to fire on the central barracks first, then the the tank generator to the east. The cannon is the toughest nut to crack—it may help to build additional blaster clones barracks to ensure that you get the job done.
TIPIf your blaster clones are getting blasted, try building an RX-200 tank, found within the “air support” menu group. The RX-200’s cannon can overheat and destroy gold objects as well.
61Protected by copyright. Unauthorized or unlawful copying or downloading expressly prohibited.
IntroDuCtIon
Cast
paDaWan traInIng
WalkthroughPROLOgUeCOUnT DOOkU
ChAPTeR I: BATTLe Of geOnOSIS
ChAPTeR II: gUngAn geneRAL
ChAPTeR III: JeDI CRASh
ChAPTeR IV: DefenDeRS Of PeACe
ChAPTeR V: WeAPOnS fACTORy
Objective 1: breach their Defenses
Objective 2: breach their Defenses—aGain!
Objective 3: breach their Defenses—fOr real!
Objective 4: infiltrate the WeaPOns factOry
Objective 5: Disable the WeaPOns factOry
ChAPTeR VI: LegACy Of TeRROR
geneRAL gRIeVOUSASAJJ VenTReSSePILOgUehUB AReASSePARATIST MISSIOnS
seCrets anD extras
CheCklIsts
nIntenDo Ds
Contents
hoW to use thIs eguIDeDownload from www.chipper.pl
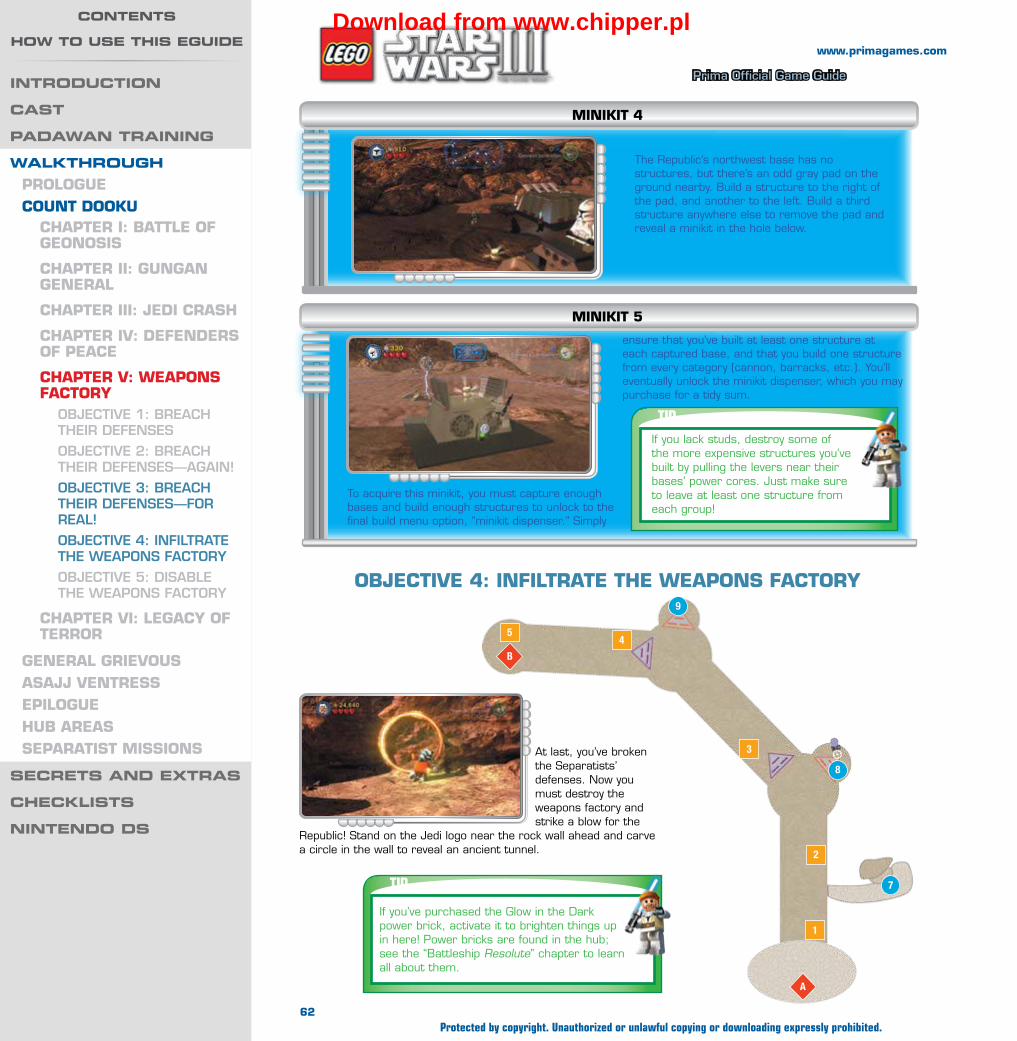
Wa
lk
th
ro
ug
h —
Co
un
t D
oo
ku
Prima Official Game Guide
www.primagames.com
OBJeCTIVe 4: InfILTRATe The WeAPOnS fACTORy
The Republic’s northwest base has no structures, but there’s an odd gray pad on the ground nearby. Build a structure to the right of the pad, and another to the left. Build a third structure anywhere else to remove the pad and reveal a minikit in the hole below.
MInIkIT 4
To acquire this minikit, you must capture enough bases and build enough structures to unlock to the final build menu option, “minikit dispenser.” Simply
MInIkIT 5
TIPIf you lack studs, destroy some of the more expensive structures you’ve built by pulling the levers near their bases’ power cores. Just make sure to leave at least one structure from each group!
ensure that you’ve built at least one structure at each captured base, and that you build one structure from every category (cannon, barracks, etc.). You’ll eventually unlock the minikit dispenser, which you may purchase for a tidy sum.
At last, you’ve broken the Separatists’ defenses. Now you must destroy the weapons factory and strike a blow for the
Republic! Stand on the Jedi logo near the rock wall ahead and carve a circle in the wall to reveal an ancient tunnel.
TIPIf you’ve purchased the Glow in the Dark power brick, activate it to brighten things up in here! Power bricks are found in the hub; see the “Battleship Resolute” chapter to learn all about them.
1
2
7
8
9
3
45
A
B
62Protected by copyright. Unauthorized or unlawful copying or downloading expressly prohibited.
IntroDuCtIon
Cast
paDaWan traInIng
WalkthroughPROLOgUeCOUnT DOOkU
ChAPTeR I: BATTLe Of geOnOSIS
ChAPTeR II: gUngAn geneRAL
ChAPTeR III: JeDI CRASh
ChAPTeR IV: DefenDeRS Of PeACe
ChAPTeR V: WeAPOnS fACTORy
Objective 1: breach their Defenses
Objective 2: breach their Defenses—aGain!
Objective 3: breach their Defenses—fOr real!
Objective 4: infiltrate the WeaPOns factOry
Objective 5: Disable the WeaPOns factOry
ChAPTeR VI: LegACy Of TeRROR
geneRAL gRIeVOUSASAJJ VenTReSSePILOgUehUB AReASSePARATIST MISSIOnS
seCrets anD extras
CheCklIsts
nIntenDo Ds
Contents
hoW to use thIs eguIDeDownload from www.chipper.pl

Wa
lk
th
ro
ug
h —
Co
un
t D
oo
ku
Prima Official Game Guide
www.primagames.com
FREEPLAY
Two triangular patterns adorn the walls ahead. Force-slam the pattern on the right to make
three triangle pieces fall out, then use the Force to maneuver each piece onto the pattern to the left. When all three are inserted, the passage opens, allowing you to proceed deeper into the tunnel.Five unique objects exist inside the tunnel—spot
these easily by the red crystal that sits atop each one. The first sits just to the right of the entrance; destroy it, along with the remaining four, to earn a minikit. We’ve marked these objects’ locations on the map to help you find them, but they’re all pretty easy to spot.
MInIkIT 6
MInIkIT 7
Just inside the tunnel, blast the silver spiderweb on the right wall to reveal a secret passage. Head through to reach an outdoor ledge.
Use the Force to lift the large egg out here, raising it up to the nest near the giant lizard feet on the ledge above. The egg hatches once in place—congratulations, it’s a minikit! Use a Jedi to saber-jump up the checkered wall and claim your prize.
FREEPLAYMInIkIT 8
The triangular pattern on the right also sports three gold triangles. Use a rapid-fire character to blow these away, revealing a hidden nook with an astromech Droid control panel.
Activate the panel with an astromech Droid to power up a robot. Thrilled to be alive, the robot does a happy little dance before leaving a minikit behind in gratitude.
Keep going until you come to another pair of triangular patterns. Perform a Force slam to free the
lone triangle piece from the pattern on the right. Carve a hole in the wall next to the Jedi logo to discover the second piece. Find the third piece by performing a Force slam to knock it down from the hammock on the left. Use the Force to fit each piece onto the pattern on the left, thereby opening the way forward.
63Protected by copyright. Unauthorized or unlawful copying or downloading expressly prohibited.
IntroDuCtIon
Cast
paDaWan traInIng
WalkthroughPROLOgUeCOUnT DOOkU
ChAPTeR I: BATTLe Of geOnOSIS
ChAPTeR II: gUngAn geneRAL
ChAPTeR III: JeDI CRASh
ChAPTeR IV: DefenDeRS Of PeACe
ChAPTeR V: WeAPOnS fACTORy
Objective 1: breach their Defenses
Objective 2: breach their Defenses—aGain!
Objective 3: breach their Defenses—fOr real!
Objective 4: infiltrate the WeaPOns factOry
Objective 5: Disable the WeaPOns factOry
ChAPTeR VI: LegACy Of TeRROR
geneRAL gRIeVOUSASAJJ VenTReSSePILOgUehUB AReASSePARATIST MISSIOnS
seCrets anD extras
CheCklIsts
nIntenDo Ds
Contents
hoW to use thIs eguIDeDownload from www.chipper.pl
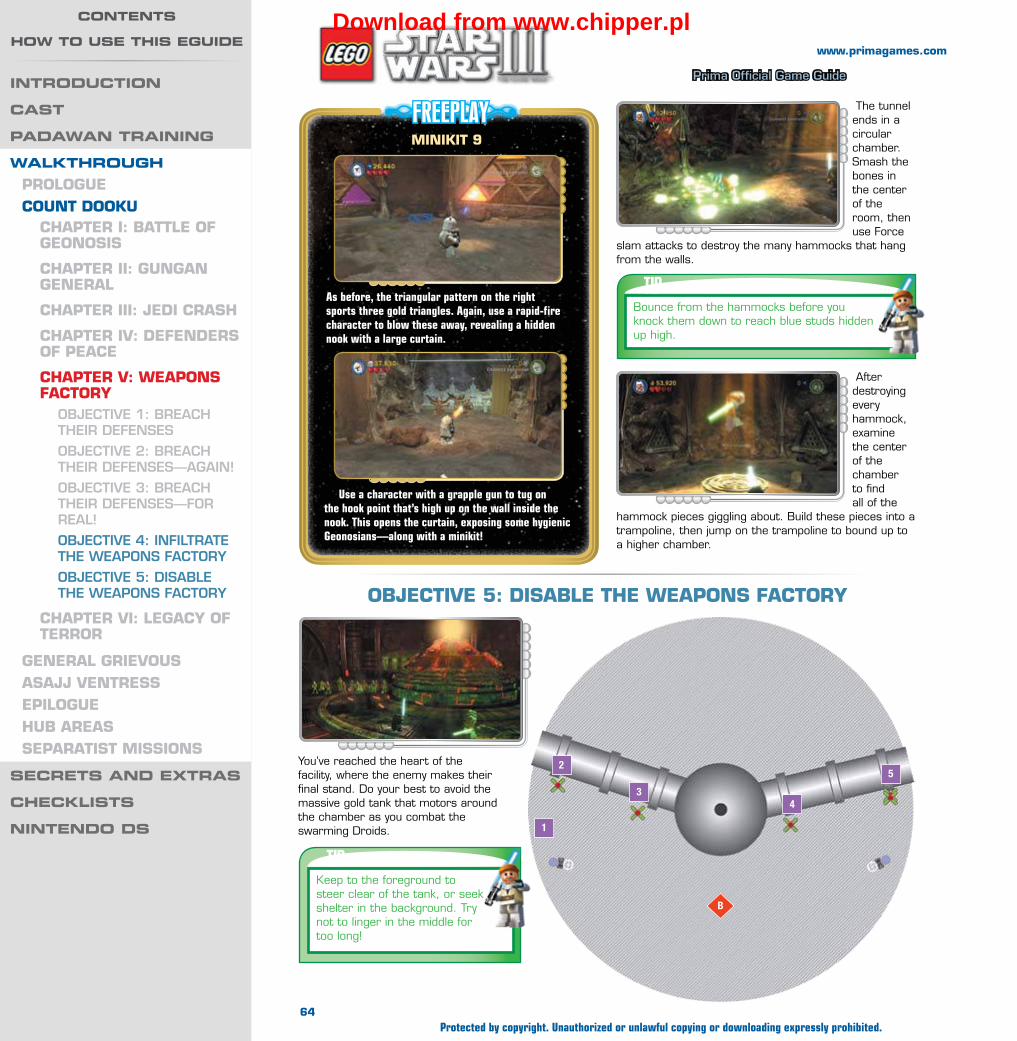
Wa
lk
th
ro
ug
h —
Co
un
t D
oo
ku
Prima Official Game Guide
www.primagames.com
The tunnel ends in a circular chamber. Smash the bones in the center of the room, then use Force
slam attacks to destroy the many hammocks that hang from the walls.
FREEPLAYMInIkIT 9
As before, the triangular pattern on the right sports three gold triangles. Again, use a rapid-fire character to blow these away, revealing a hidden nook with a large curtain.
Use a character with a grapple gun to tug on the hook point that’s high up on the wall inside the nook. This opens the curtain, exposing some hygienic Geonosians—along with a minikit!
TIPBounce from the hammocks before you knock them down to reach blue studs hidden up high.
After destroying every hammock, examine the center of the chamber to find all of the
hammock pieces giggling about. Build these pieces into a trampoline, then jump on the trampoline to bound up to a higher chamber.
OBJeCTIVe 5: DISABLe The WeAPOnS fACTORy
You’ve reached the heart of the facility, where the enemy makes their final stand. Do your best to avoid the massive gold tank that motors around the chamber as you combat the swarming Droids.
TIPKeep to the foreground to steer clear of the tank, or seek shelter in the background. Try not to linger in the middle for too long!
1
2
34
5
B
64Protected by copyright. Unauthorized or unlawful copying or downloading expressly prohibited.
IntroDuCtIon
Cast
paDaWan traInIng
WalkthroughPROLOgUeCOUnT DOOkU
ChAPTeR I: BATTLe Of geOnOSIS
ChAPTeR II: gUngAn geneRAL
ChAPTeR III: JeDI CRASh
ChAPTeR IV: DefenDeRS Of PeACe
ChAPTeR V: WeAPOnS fACTORy
Objective 1: breach their Defenses
Objective 2: breach their Defenses—aGain!
Objective 3: breach their Defenses—fOr real!
Objective 4: infiltrate the WeaPOns factOry
Objective 5: Disable the WeaPOns factOry
ChAPTeR VI: LegACy Of TeRROR
geneRAL gRIeVOUSASAJJ VenTReSSePILOgUehUB AReASSePARATIST MISSIOnS
seCrets anD extras
CheCklIsts
nIntenDo Ds
Contents
hoW to use thIs eguIDeDownload from www.chipper.pl
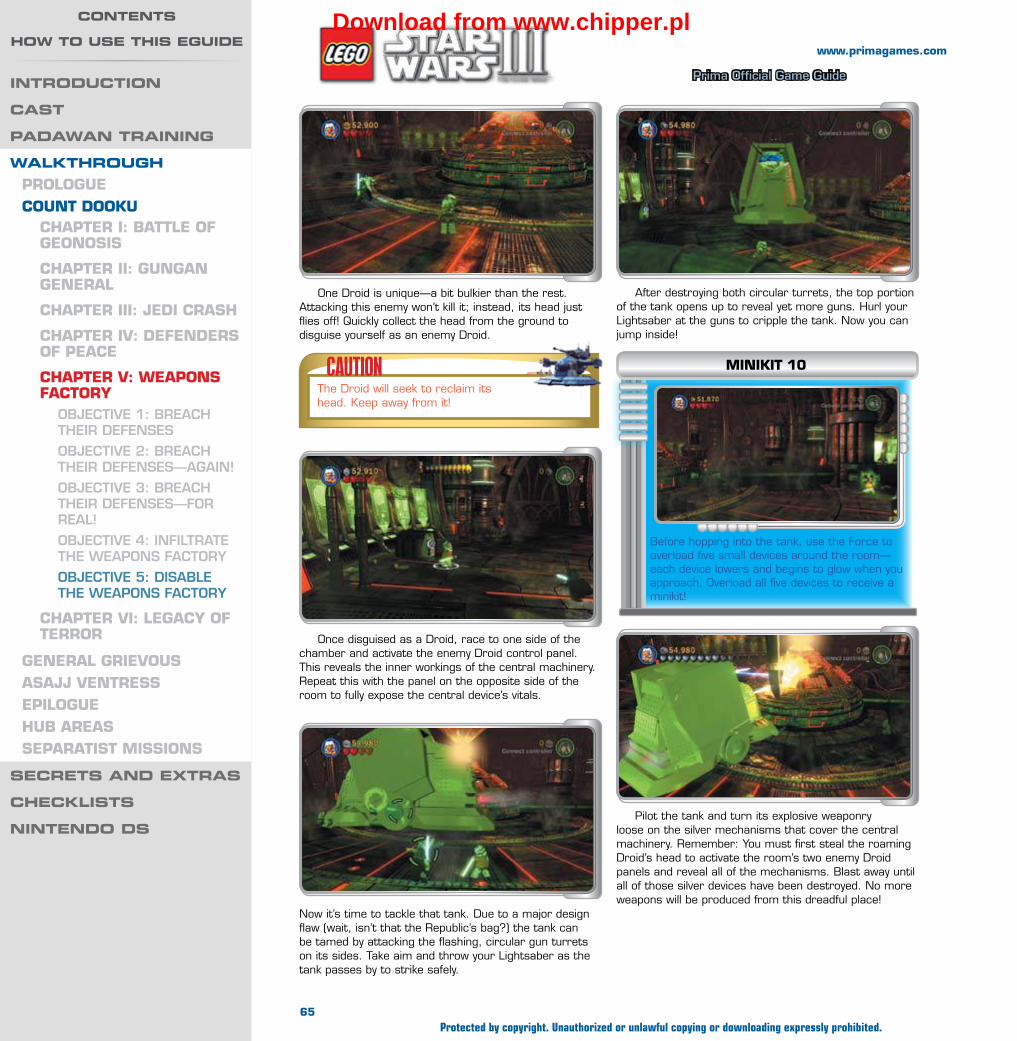
Wa
lk
th
ro
ug
h —
Co
un
t D
oo
ku
Prima Official Game Guide
www.primagames.com
Once disguised as a Droid, race to one side of the chamber and activate the enemy Droid control panel. This reveals the inner workings of the central machinery. Repeat this with the panel on the opposite side of the room to fully expose the central device’s vitals.
One Droid is unique—a bit bulkier than the rest. Attacking this enemy won’t kill it; instead, its head just flies off! Quickly collect the head from the ground to disguise yourself as an enemy Droid.
Before hopping into the tank, use the Force to overload five small devices around the room—each device lowers and begins to glow when you approach. Overload all five devices to receive a minikit!
MInIkIT 10CAUTIONThe Droid will seek to reclaim its head. Keep away from it!
After destroying both circular turrets, the top portion of the tank opens up to reveal yet more guns. Hurl your Lightsaber at the guns to cripple the tank. Now you can jump inside!
Pilot the tank and turn its explosive weaponry loose on the silver mechanisms that cover the central machinery. Remember: You must first steal the roaming Droid’s head to activate the room’s two enemy Droid panels and reveal all of the mechanisms. Blast away until all of those silver devices have been destroyed. No more weapons will be produced from this dreadful place!
Now it’s time to tackle that tank. Due to a major design flaw (wait, isn’t that the Republic’s bag?) the tank can be tamed by attacking the flashing, circular gun turrets on its sides. Take aim and throw your Lightsaber as the tank passes by to strike safely.
65Protected by copyright. Unauthorized or unlawful copying or downloading expressly prohibited.
IntroDuCtIon
Cast
paDaWan traInIng
WalkthroughPROLOgUeCOUnT DOOkU
ChAPTeR I: BATTLe Of geOnOSIS
ChAPTeR II: gUngAn geneRAL
ChAPTeR III: JeDI CRASh
ChAPTeR IV: DefenDeRS Of PeACe
ChAPTeR V: WeAPOnS fACTORy
Objective 1: breach their Defenses
Objective 2: breach their Defenses—aGain!
Objective 3: breach their Defenses—fOr real!
Objective 4: infiltrate the WeaPOns factOry
Objective 5: Disable the WeaPOns factOry
ChAPTeR VI: LegACy Of TeRROR
geneRAL gRIeVOUSASAJJ VenTReSSePILOgUehUB AReASSePARATIST MISSIOnS
seCrets anD extras
CheCklIsts
nIntenDo Ds
Contents
hoW to use thIs eguIDeDownload from www.chipper.pl

Wa
lk
th
ro
ug
h —
Co
un
t D
oo
ku
Prima Official Game Guide
www.primagames.com
Count Dooku
Chapter VI: legaCy of terror
MinikitsNo. Icon(s) Mode Notes
1 1 Free Play Grapple the overhead statue on the entry area’s right ledge.
2 2 Story Build the colored block stairs perfectly.
3 1 to 5 Free Play Find and build five Geonosian statues throughout the level that will in turn dance.
4 1 to 5 Story In the first tunnel, destroy the five statues that pop out from the sides of the walls.
5 5 Free Play In the first tunnel, activate the astromech Droid control panel, then fix the mine cart track in the side room.
6 6 Free Play In the first tunnel, destroy four gold plates on the walls, then build the walker. Stand on the orange pad, then use Jar Jar to grab the minikit in the side room.
7 7 Free Play In the lower tunnel, activate the power panel and obtain a minikit from the cake in the side room.
8 8 Free Play In the lower tunnel, destroy the silver objects on the spider web, then use the Dark Force to place the purple objects onto the web.
9 1 to 5 Story Force-slam five clay jars during the escape run.
10 10 Story Saber-jump up the checkered wall at the end of the escape run.
True Jedi Stud Requirement: 115,000
Story Characters
Commander Cody
Obi-Wan Kenobi
Anakin Skywalker Clone Trooper
“sometImes, acceptInG help Is haRdeR than
oFFeRInG It.”Following a tremendous victory on Geonosis, Jedi Masters Obi-Wan Kenobi and Luminara Unduli have been charged with the task of capturing Separatist leader Poggle the Lesser. Their quarry has taken Luminara deep into the desert....
66Protected by copyright. Unauthorized or unlawful copying or downloading expressly prohibited.
IntroDuCtIon
Cast
paDaWan traInIng
WalkthroughPROlOgueCOunT DOOKu
ChAPTeR I: BATTle Of geOnOSIS
ChAPTeR II: gungAn geneRAl
ChAPTeR III: JeDI CRASh
ChAPTeR IV: DefenDeRS Of PeACe
ChAPTeR V: WeAPOnS fACTORy
ChAPTeR VI: legACy Of TeRROR
Objective 1: enter the tunnels
Objective 2: naviGate the tunnel
Objective 3: Find luminara
Objective 4: rescue luminara
Objective 5: escaPe!
geneRAl gRIeVOuSASAJJ VenTReSSePIlOguehuB AReASSePARATIST MISSIOnS
seCrets anD extras
CheCklIsts
nIntenDo Ds
Contents
hoW to use thIs eguIDeDownload from www.chipper.pl

Wa
lk
th
ro
ug
h —
Co
un
t D
oo
ku
Prima Official Game Guide
www.primagames.com
Luminara has been captured by the enemy—you’ve got to save her! Loot the quiet starting chamber for studs, then assume control of Commander Cody.
As Commander Cody, stand near the small group of blaster clones and press the Action button to get their attention. Hold the Attack button and target the gold rubble on the right to order the clones to open fire. Repeat this until the debris is completely removed.
Way to blast! Now switch to a Jedi and saber-jump up the checkered wall you’ve uncovered. Build the bits you discover on the ledge above to complete the checkered path, then slide the large statue along the path and over the edge of the ledge.
OBJeCTIVe 1: enTeR The TunnelS
A
1
1
start2
67Protected by copyright. Unauthorized or unlawful copying or downloading expressly prohibited.
IntroDuCtIon
Cast
paDaWan traInIng
WalkthroughPROlOgueCOunT DOOKu
ChAPTeR I: BATTle Of geOnOSIS
ChAPTeR II: gungAn geneRAl
ChAPTeR III: JeDI CRASh
ChAPTeR IV: DefenDeRS Of PeACe
ChAPTeR V: WeAPOnS fACTORy
ChAPTeR VI: legACy Of TeRROR
Objective 1: enter the tunnels
Objective 2: naviGate the tunnel
Objective 3: Find luminara
Objective 4: rescue luminara
Objective 5: escaPe!
geneRAl gRIeVOuSASAJJ VenTReSSePIlOguehuB AReASSePARATIST MISSIOnS
seCrets anD extras
CheCklIsts
nIntenDo Ds
Contents
hoW to use thIs eguIDeDownload from www.chipper.pl

Wa
lk
th
ro
ug
h —
Co
un
t D
oo
ku
Prima Official Game Guide
www.primagames.com
The statue crashes on the ground below, revealing some jiggling pieces. Build these to restore a portion of the crest on the background door.
Once on the ledge, use Commander Cody’s grapple gun to yank on the hook point affixed to the nearby pillar. Pull on the line to topple the pillar, then run along the fallen column until it collapses.
FREEPLAY
After saber-jumping up the checkered wall, toggle to a grapple gun character and pull down the overhead statue. It shatters when it hits the ground, revealing a minikit!
MInIKIT 1
Stack the colored blocks into a “perfect” staircase (as pictured) to earn a minikit. The blocks must be painstakingly aligned with one another (no gaps!) and situated precisely on the purple base pad. During Free Play, you can receive a hint about obtaining this minikit by using a Sith character’s Dark Force ability to uncover a sketch that’s hidden on the nearby wall.
MInIKIT 2
FREEPLAYMInIKIT 3
Use an explosive character to destroy the silver rock you discover above the colored block stairs. Build the pieces that spill out to assemble a Geonosian statue, which does a happy little dance before vanishing. Find four more of these special Geonosian statues throughout this level and rebuild each one to earn a minikit! We’ve marked these fellows on the maps to help you find them.
Next, perform a Force-slam to knock the large colored blocks down from the left wall. Use the Force to assemble these into a staircase, then switch to Commander Cody and hop up to the ledge above.
68Protected by copyright. Unauthorized or unlawful copying or downloading expressly prohibited.
IntroDuCtIon
Cast
paDaWan traInIng
WalkthroughPROlOgueCOunT DOOKu
ChAPTeR I: BATTle Of geOnOSIS
ChAPTeR II: gungAn geneRAl
ChAPTeR III: JeDI CRASh
ChAPTeR IV: DefenDeRS Of PeACe
ChAPTeR V: WeAPOnS fACTORy
ChAPTeR VI: legACy Of TeRROR
Objective 1: enter the tunnels
Objective 2: naviGate the tunnel
Objective 3: Find luminara
Objective 4: rescue luminara
Objective 5: escaPe!
geneRAl gRIeVOuSASAJJ VenTReSSePIlOguehuB AReASSePARATIST MISSIOnS
seCrets anD extras
CheCklIsts
nIntenDo Ds
Contents
hoW to use thIs eguIDeDownload from www.chipper.pl
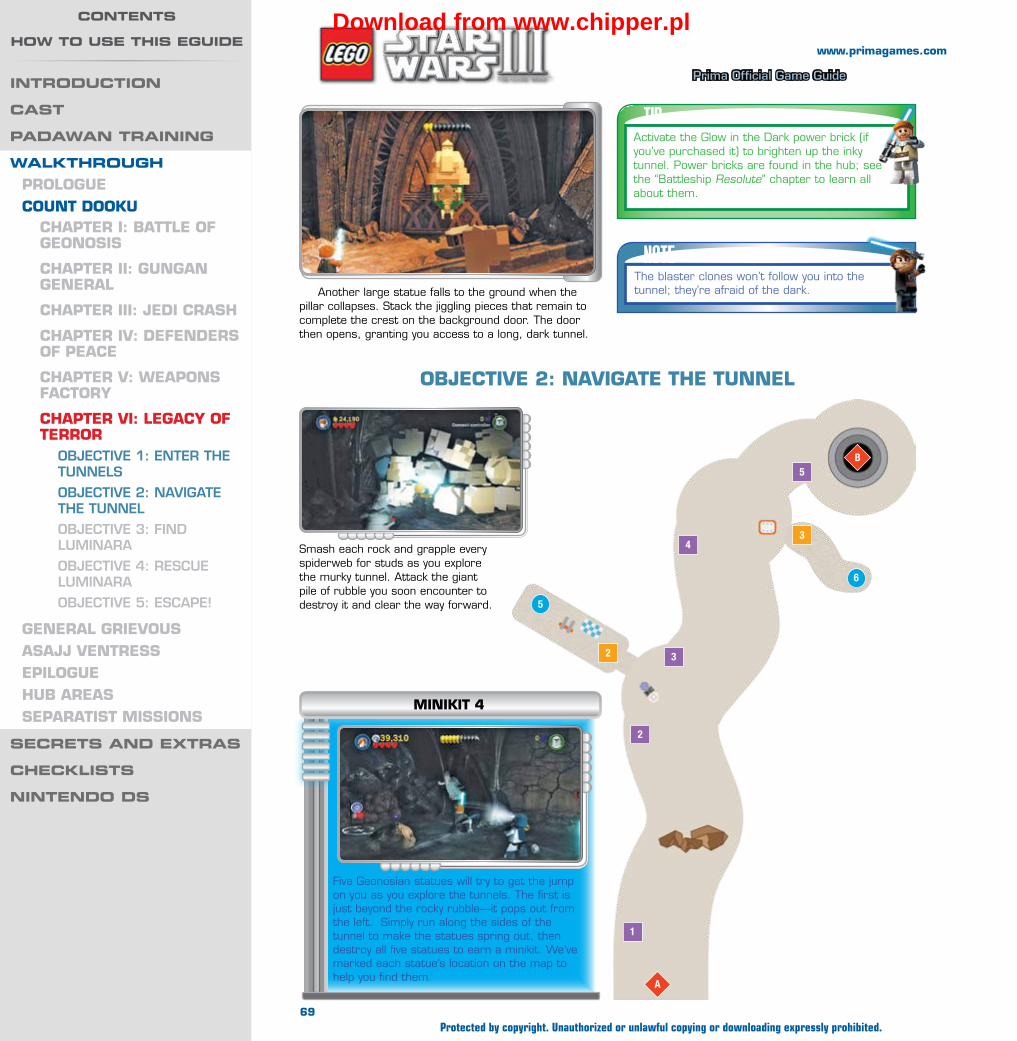
Wa
lk
th
ro
ug
h —
Co
un
t D
oo
ku
Prima Official Game Guide
www.primagames.com
Another large statue falls to the ground when the pillar collapses. Stack the jiggling pieces that remain to complete the crest on the background door. The door then opens, granting you access to a long, dark tunnel.
TIPActivate the Glow in the Dark power brick (if you’ve purchased it) to brighten up the inky tunnel. Power bricks are found in the hub; see the “Battleship Resolute” chapter to learn all about them.
NOTEThe blaster clones won’t follow you into the tunnel; they’re afraid of the dark.
OBJeCTIVe 2: nAVIgATe The Tunnel
Smash each rock and grapple every spiderweb for studs as you explore the murky tunnel. Attack the giant pile of rubble you soon encounter to destroy it and clear the way forward.
Five Geonosian statues will try to get the jump on you as you explore the tunnels. The first is just beyond the rocky rubble—it pops out from the left. Simply run along the sides of the tunnel to make the statues spring out, then destroy all five statues to earn a minikit. We’ve marked each statue’s location on the map to help you find them.
MInIKIT 4
2
6
3
1
2
3
4
5
A
B
5
69Protected by copyright. Unauthorized or unlawful copying or downloading expressly prohibited.
IntroDuCtIon
Cast
paDaWan traInIng
WalkthroughPROlOgueCOunT DOOKu
ChAPTeR I: BATTle Of geOnOSIS
ChAPTeR II: gungAn geneRAl
ChAPTeR III: JeDI CRASh
ChAPTeR IV: DefenDeRS Of PeACe
ChAPTeR V: WeAPOnS fACTORy
ChAPTeR VI: legACy Of TeRROR
Objective 1: enter the tunnels
Objective 2: naviGate the tunnel
Objective 3: Find luminara
Objective 4: rescue luminara
Objective 5: escaPe!
geneRAl gRIeVOuSASAJJ VenTReSSePIlOguehuB AReASSePARATIST MISSIOnS
seCrets anD extras
CheCklIsts
nIntenDo Ds
Contents
hoW to use thIs eguIDeDownload from www.chipper.pl

Wa
lk
th
ro
ug
h —
Co
un
t D
oo
ku
Prima Official Game Guide
www.primagames.com
FREEPLAY
Farther ahead, a solid stone wall blocks your progress. Yank the wall’s hook point with a grapple character to bring it crashing down, then venture onward.
MInIKIT 5
Activate the astromech Droid control panel to the left of the hook point wall to start up a nearby drill. Pass through the hole that the drill makes in the nearby rubble to reach a secret chamber!
A mine cart track has fallen into disrepair here. Grapple the hook point to pull a length of track off the wall, then use the Force to reassemble the track, making sure that all three segments are set in place. Pull the nearby lever afterward to send a minikit rolling your way!
MInIKIT 6
Four gold plates adorn the walls just beyond the hook point wall. Blast all four to pieces with a rapid-fire character, then assemble the resulting pieces into a mighty walker!
Pilot the walker and stomp down the tunnel. Step onto the orange pad you soon discover to detonate the nearby fuel tanks, blasting a hole through the wall.
Exit the walker and enter the hole you’ve created to visit a side chamber. Toggle to Jar Jar and double-jump into the soft overhead light to nab a minikit that hovers up high.
70Protected by copyright. Unauthorized or unlawful copying or downloading expressly prohibited.
IntroDuCtIon
Cast
paDaWan traInIng
WalkthroughPROlOgueCOunT DOOKu
ChAPTeR I: BATTle Of geOnOSIS
ChAPTeR II: gungAn geneRAl
ChAPTeR III: JeDI CRASh
ChAPTeR IV: DefenDeRS Of PeACe
ChAPTeR V: WeAPOnS fACTORy
ChAPTeR VI: legACy Of TeRROR
Objective 1: enter the tunnels
Objective 2: naviGate the tunnel
Objective 3: Find luminara
Objective 4: rescue luminara
Objective 5: escaPe!
geneRAl gRIeVOuSASAJJ VenTReSSePIlOguehuB AReASSePARATIST MISSIOnS
seCrets anD extras
CheCklIsts
nIntenDo Ds
Contents
hoW to use thIs eguIDeDownload from www.chipper.pl
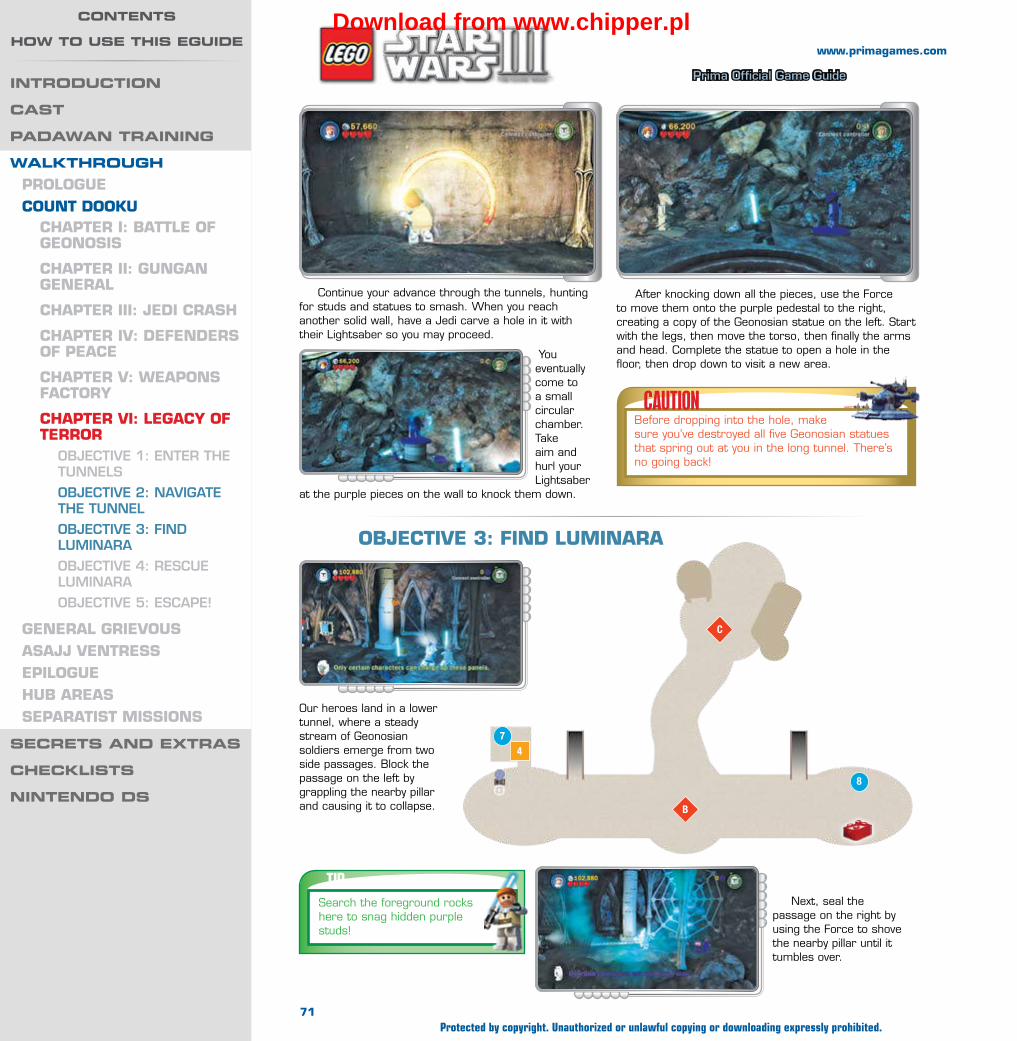
Wa
lk
th
ro
ug
h —
Co
un
t D
oo
ku
Prima Official Game Guide
www.primagames.com
Next, seal the passage on the right by using the Force to shove the nearby pillar until it tumbles over.
After knocking down all the pieces, use the Force to move them onto the purple pedestal to the right, creating a copy of the Geonosian statue on the left. Start with the legs, then move the torso, then finally the arms and head. Complete the statue to open a hole in the floor, then drop down to visit a new area.
Continue your advance through the tunnels, hunting for studs and statues to smash. When you reach another solid wall, have a Jedi carve a hole in it with their Lightsaber so you may proceed.
You eventually come to a small circular chamber. Take aim and hurl your Lightsaber
at the purple pieces on the wall to knock them down.
CAUTIONBefore dropping into the hole, make sure you’ve destroyed all five Geonosian statues that spring out at you in the long tunnel. There’s no going back!
OBJeCTIVe 3: fInD luMInARA
Our heroes land in a lower tunnel, where a steady stream of Geonosian soldiers emerge from two side passages. Block the passage on the left by grappling the nearby pillar and causing it to collapse.
TIPSearch the foreground rocks here to snag hidden purple studs!
7
8
4
B
C
71Protected by copyright. Unauthorized or unlawful copying or downloading expressly prohibited.
IntroDuCtIon
Cast
paDaWan traInIng
WalkthroughPROlOgueCOunT DOOKu
ChAPTeR I: BATTle Of geOnOSIS
ChAPTeR II: gungAn geneRAl
ChAPTeR III: JeDI CRASh
ChAPTeR IV: DefenDeRS Of PeACe
ChAPTeR V: WeAPOnS fACTORy
ChAPTeR VI: legACy Of TeRROR
Objective 1: enter the tunnels
Objective 2: naviGate the tunnel
Objective 3: Find luminara
Objective 4: rescue luminara
Objective 5: escaPe!
geneRAl gRIeVOuSASAJJ VenTReSSePIlOguehuB AReASSePARATIST MISSIOnS
seCrets anD extras
CheCklIsts
nIntenDo Ds
Contents
hoW to use thIs eguIDeDownload from www.chipper.pl

Wa
lk
th
ro
ug
h —
Co
un
t D
oo
ku
Prima Official Game Guide
www.primagames.com
Collapsing both pillars causes the background wall to crumble, revealing more tunnel. Luminara can’t be far!
Continue along the tunnel until you reach a mass of debris. Stand on the Jedi logo and press the Attack button to slice into the junk, then use the Force to send it flying out of your way. Venture onward to at last discover your wayward ally.
FREEPLAYMInIKIT 7
Before carrying on, charge up the power panel to the left to gain access to a surprisingly festive room.
Use the Force to light the four rock formations in the little room. Once all four are lit, streamers and balloons drop from the ceiling, and a birthday cake pops up in the room’s center! Bash the cake open to receive your present: A precious minikit! It’s just what you’ve always wanted.
FREEPLAYMInIKIT 8
Exit the party room and run to the right to discover a giant spiderweb on the wall. First, blow away the web’s silver pieces with explosive weaponry. Then use a Sith character’s Dark Force ability to lift and place four nearby purple objects onto the web.
Once all four objects have been fitted to the web, a spider drops to the ground and coughs up a minikit! You can pilot the spider around afterward for fun if you like.
72Protected by copyright. Unauthorized or unlawful copying or downloading expressly prohibited.
IntroDuCtIon
Cast
paDaWan traInIng
WalkthroughPROlOgueCOunT DOOKu
ChAPTeR I: BATTle Of geOnOSIS
ChAPTeR II: gungAn geneRAl
ChAPTeR III: JeDI CRASh
ChAPTeR IV: DefenDeRS Of PeACe
ChAPTeR V: WeAPOnS fACTORy
ChAPTeR VI: legACy Of TeRROR
Objective 1: enter the tunnels
Objective 2: naviGate the tunnel
Objective 3: Find luminara
Objective 4: rescue luminara
Objective 5: escaPe!
geneRAl gRIeVOuSASAJJ VenTReSSePIlOguehuB AReASSePARATIST MISSIOnS
seCrets anD extras
CheCklIsts
nIntenDo Ds
Contents
hoW to use thIs eguIDeDownload from www.chipper.pl
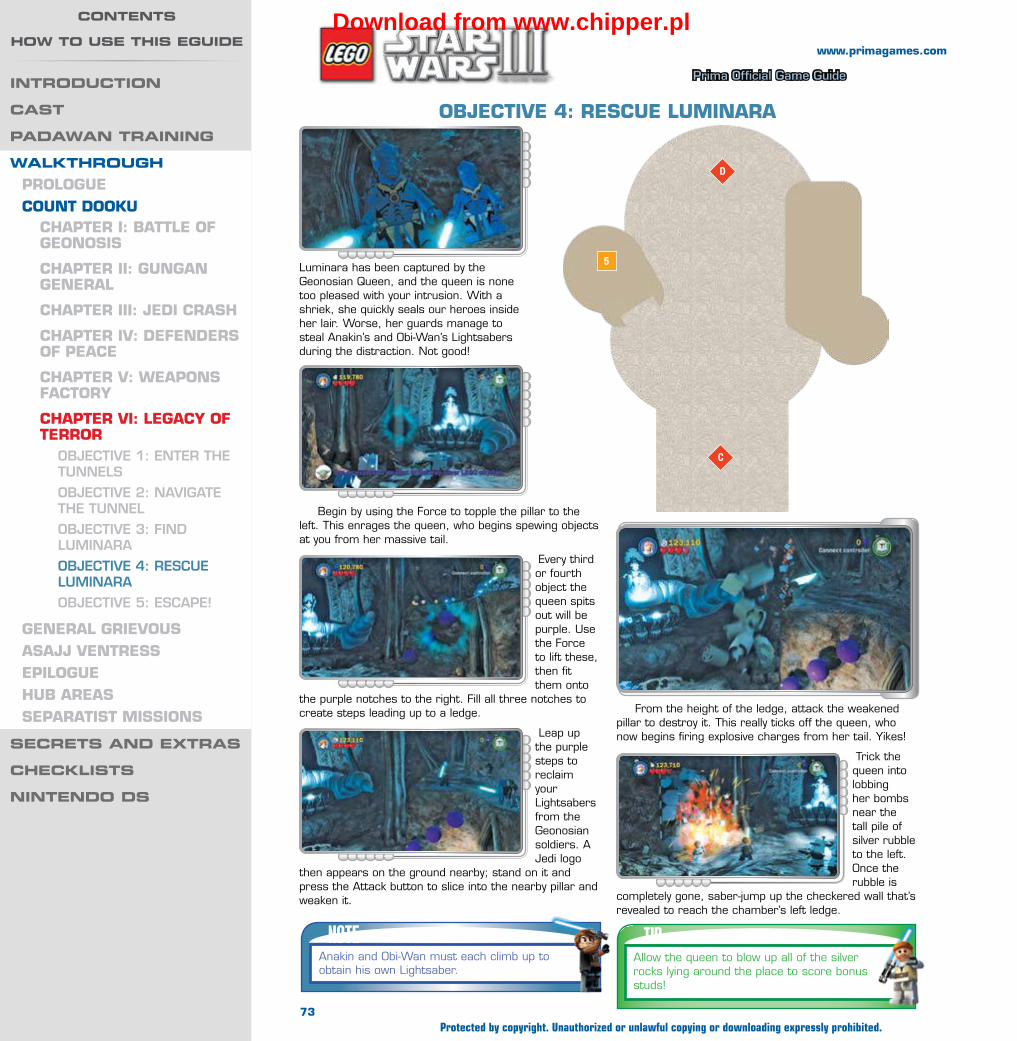
Wa
lk
th
ro
ug
h —
Co
un
t D
oo
ku
Prima Official Game Guide
www.primagames.com
5
C
D
OBJeCTIVe 4: ReSCue luMInARA
Luminara has been captured by the Geonosian Queen, and the queen is none too pleased with your intrusion. With a shriek, she quickly seals our heroes inside her lair. Worse, her guards manage to steal Anakin’s and Obi-Wan’s Lightsabers during the distraction. Not good!
Begin by using the Force to topple the pillar to the left. This enrages the queen, who begins spewing objects at you from her massive tail.
Every third or fourth object the queen spits out will be purple. Use the Force to lift these, then fit them onto
the purple notches to the right. Fill all three notches to create steps leading up to a ledge.
Leap up the purple steps to reclaim your Lightsabers from the Geonosian soldiers. A Jedi logo
then appears on the ground nearby; stand on it and press the Attack button to slice into the nearby pillar and weaken it.
NOTEAnakin and Obi-Wan must each climb up to obtain his own Lightsaber.
From the height of the ledge, attack the weakened pillar to destroy it. This really ticks off the queen, who now begins firing explosive charges from her tail. Yikes!
Trick the queen into lobbing her bombs near the tall pile of silver rubble to the left. Once the rubble is
completely gone, saber-jump up the checkered wall that’s revealed to reach the chamber’s left ledge.
TIPAllow the queen to blow up all of the silver rocks lying around the place to score bonus studs!
73Protected by copyright. Unauthorized or unlawful copying or downloading expressly prohibited.
IntroDuCtIon
Cast
paDaWan traInIng
WalkthroughPROlOgueCOunT DOOKu
ChAPTeR I: BATTle Of geOnOSIS
ChAPTeR II: gungAn geneRAl
ChAPTeR III: JeDI CRASh
ChAPTeR IV: DefenDeRS Of PeACe
ChAPTeR V: WeAPOnS fACTORy
ChAPTeR VI: legACy Of TeRROR
Objective 1: enter the tunnels
Objective 2: naviGate the tunnel
Objective 3: Find luminara
Objective 4: rescue luminara
Objective 5: escaPe!
geneRAl gRIeVOuSASAJJ VenTReSSePIlOguehuB AReASSePARATIST MISSIOnS
seCrets anD extras
CheCklIsts
nIntenDo Ds
Contents
hoW to use thIs eguIDeDownload from www.chipper.pl

Wa
lk
th
ro
ug
h —
Co
un
t D
oo
ku
Prima Official Game Guide
www.primagames.com
The chamber is quickly collapsing now—hurry down to the ground floor and use the Jedi logo that now
appears in front of the Queen to at last free Luminara. It’s time for a hasty retreat!
Stand on the Jedi logo on this ledge and use it to slice into the nearby pillar, weakening it as you
did the previous one. Climb back up onto the ledge and attack the weakened pillar to topple it.
OBJeCTIVe 5: eSCAPe!You must now make a frantic dash through a tunnel, with a massive swarm of Geonosians hot on your tail. Just keep sprinting toward the foreground, dodging enemies and leaping over debris that falls in your way. It won’t be long before you’ve made good your escape, ending the mission.
CAUTIONIf you’re overwhelmed by the trailing swarm, you’ll have to restart from the beginning of the run. Try not to fall behind!
Five clay jars rest inside the escape tunnel—the first is right near the start of the run. Use fast Force slams to quickly destroy each jar as you flee the scene. The jars appear to alternate sides of the tunnel and are easy to spot, but we’ve also marked them on the map to ensure that you don’t miss any. Bash all five to score a minikit!
MInIKIT 9
TIPIf you miss a jar, allow the swarm to overtake you so that you may try again.
Scale the checkered walls at the very end of the escape run to claim a minikit that hovers way up high.
MInIKIT 10
NOTECongratulations, you’ve completed the Count Dooku story line! Now clear the General Grievous and Asajj Ventress story lines to unlock the exciting epilogue!
10
1
2
3
4
5
D
74Protected by copyright. Unauthorized or unlawful copying or downloading expressly prohibited.
IntroDuCtIon
Cast
paDaWan traInIng
WalkthroughPROlOgueCOunT DOOKu
ChAPTeR I: BATTle Of geOnOSIS
ChAPTeR II: gungAn geneRAl
ChAPTeR III: JeDI CRASh
ChAPTeR IV: DefenDeRS Of PeACe
ChAPTeR V: WeAPOnS fACTORy
ChAPTeR VI: legACy Of TeRROR
Objective 1: enter the tunnels
Objective 2: naviGate the tunnel
Objective 3: Find luminara
Objective 4: rescue luminara
Objective 5: escaPe!
geneRAl gRIeVOuSASAJJ VenTReSSePIlOguehuB AReASSePARATIST MISSIOnS
seCrets anD extras
CheCklIsts
nIntenDo Ds
Contents
hoW to use thIs eguIDeDownload from www.chipper.pl

Wa
lk
th
ro
ug
h —
gen
er
al g
rie
vo
us
Prima Official Game Guide
www.primagames.com
“you hold onto FRIends By keepInG
youR heaRt a lIttle soFteR than
youR head.”Anakin’s faithful astromech Droid R2-D2 has been captured and delivered to General Grievous, who intends to extract secret military information from the Droid’s memory. Assisted by his Padawan, Ahsoka, and a replacement Droid, R3-S6, Anakin leads a mission to destroy the Separatist base where R2-D2 is being held. Together with a small detachment of clone troopers, the Jedi launch their attack on Grievous’ secret base....
general grievous
Chapter i: Duel of the DroiDs
MinikitsNo. Icon(s) Mode Notes
1 1 to 5 Story Destroy the five tea dispensers in the side consoles.
2 2 Free Play Activate the power panel near the start, then go through the crawl space and destroy the three Droids.
3 1 to 5 Free Play Destroy the five mouse Droids throughout the level (two hide behind Dark Force side consoles).
4 1 to 4 Free Play Find and build five Gold Super Battle Droids (destroy side consoles to reveal).
5 1 to 3 Story Destroy the three golden boxes with the help of the Gold Super Battle Droids.
6 1 to 5 Free Play Activate the three protocol Droid control panels in the corridors and destroy the five beach balls you find.
7 7 Free Play After defeating Grievous, hover to the left ledge, then activate the power panel.
8 8 Free Play Use the Dark Force to reveal minikit pieces in the room with R2-D2. Build it on the purple table.
9 9 Free Play Use the Dark Force to reveal UFO bits in the hangar area. Drive the UFO over the orange pads.
10 10 Free Play Jump through the hole above the hangar balcony, then knock down the pins in the bowling alley.
True Jedi Stud Requirement: 110,000Story Characters
R2-D2Anakin
SkywalkerR3-S6Captain RexAhsoka Tano
75Protected by copyright. Unauthorized or unlawful copying or downloading expressly prohibited.
introDuCtion
Cast
paDaWan training
WalkthroughPRologueCounT DookugeneRAl gRievouS
ChAPTeR i: Duel of The DRoiDS
Objective 1: Place the exPlOsive charGes
Objective 2: Defeat General GrievOus
Objective 3: DetOnate the charGes
Objective 4: escaPe!
ChAPTeR ii: ShADow of MalevolenCeChAPTeR iii: DeSTRoy MalevolenCeChAPTeR iv: lAiR of gRievouS
ChAPTeR v: RookieS
ChAPTeR vi: gRievouS inTRigue
ASAJJ venTReSSePiloguehub AReASSePARATiST MiSSionS
seCrets anD extras
CheCklists
nintenDo Ds
Contents
hoW to use this eguiDeDownload from www.chipper.pl
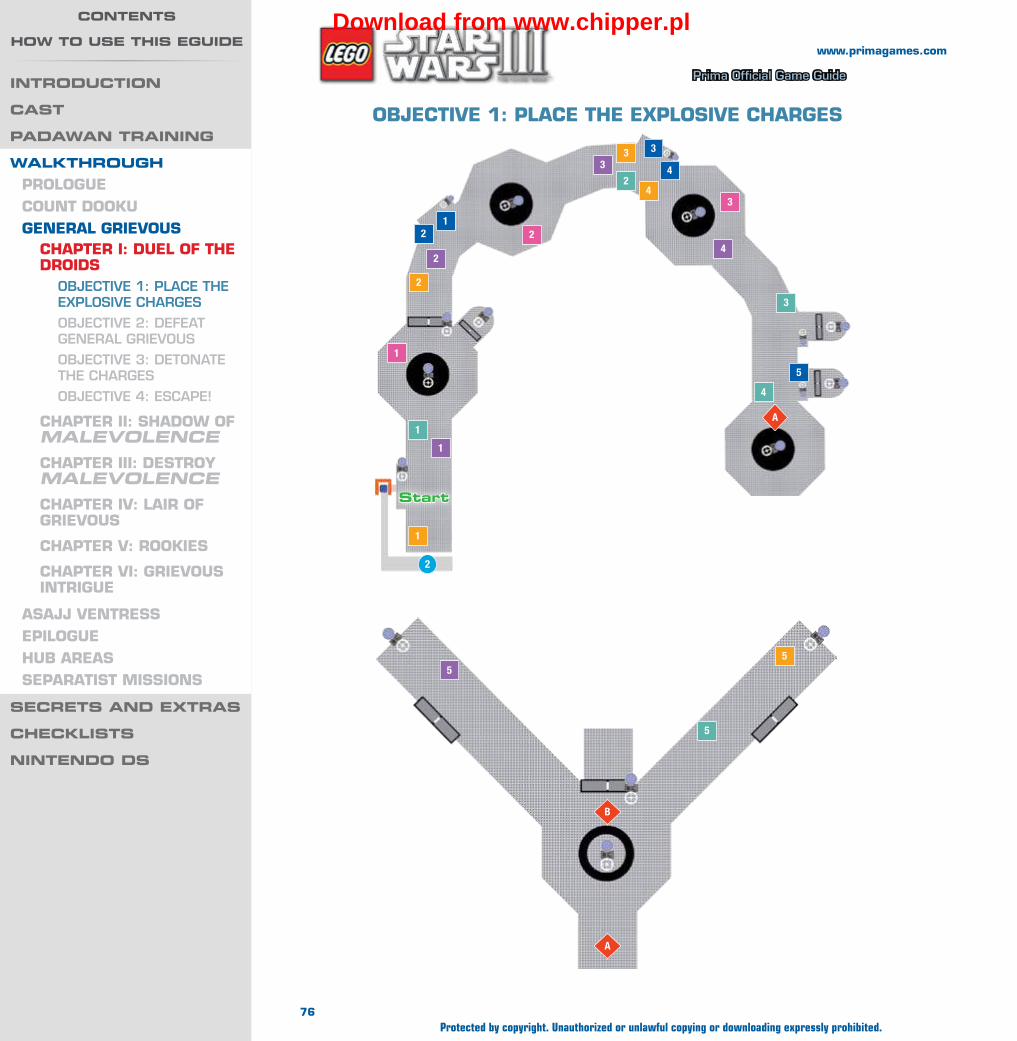
Wa
lk
th
ro
ug
h —
gen
er
al g
rie
vo
us
Prima Official Game Guide
www.primagames.com
obJeCTive 1: PlACe The exPloSive ChARgeS
B
5
A
5
5
A
1
2
2
3
4
1
2
3
1
2
3
1
2
3
12
3
4
5
4
4
start
76Protected by copyright. Unauthorized or unlawful copying or downloading expressly prohibited.
introDuCtion
Cast
paDaWan training
WalkthroughPRologueCounT DookugeneRAl gRievouS
ChAPTeR i: Duel of The DRoiDS
Objective 1: Place the exPlOsive charGes
Objective 2: Defeat General GrievOus
Objective 3: DetOnate the charGes
Objective 4: escaPe!
ChAPTeR ii: ShADow of MalevolenCeChAPTeR iii: DeSTRoy MalevolenCeChAPTeR iv: lAiR of gRievouS
ChAPTeR v: RookieS
ChAPTeR vi: gRievouS inTRigue
ASAJJ venTReSSePiloguehub AReASSePARATiST MiSSionS
seCrets anD extras
CheCklists
nintenDo Ds
Contents
hoW to use this eguiDeDownload from www.chipper.pl

Wa
lk
th
ro
ug
h —
gen
er
al g
rie
vo
us
Prima Official Game Guide
www.primagames.com
TIP
Attack the many side consoles in the facility’s corridors to expose an assortment of objects that can be destroyed for studs.
Destroying a fortified base is no easy task—you’ll need to place several explosive charges about the compound to get the job done. Wipe out the Droids that storm you from the start, then make your way to the circular chamber ahead.
From the starting point, run toward the foreground and destroy a side console to reveal a tea dispenser. Find and destroy a total of five tea dispensers throughout these corridors to receive a refreshing minikit! Each one pops out of a side console, so be sure to attack those walls. You’ll find each tea dispenser labeled on the maps for your convenience.
MinikiT 1
FREEPLAYMinikiT 2
Activate the power panel near the staring point, then crawl through the hatch that’s revealed to reach a balcony. Defeat the three lazy Droids out here to score a minikit!
MinikiT 3
Use a Sith character to open the side console that glows with red energy near the staring point. A little mouse Droid pops out—destroy it before it scurries off! Find and destroy four other mouse Droids in these corridors to earn a minikit. The next three are running around free in the corridors, while the final one is hidden in another Dark Force side console near the end of the corridors (each is marked on the map).
MinikiT 4
Smash a side console near the staring point to reveal parts of a Gold Super Battle Droid. Use the Force to reassemble the Droid, who joins your crew and fights for your side as an indestructible ally! Find two more Gold Super Battle Droids in the corridors and rebuild them in this same fashion to score a minikit. Naturally, we’ve marked their locations on the maps to ensure you don’t miss them.
77Protected by copyright. Unauthorized or unlawful copying or downloading expressly prohibited.
introDuCtion
Cast
paDaWan training
WalkthroughPRologueCounT DookugeneRAl gRievouS
ChAPTeR i: Duel of The DRoiDS
Objective 1: Place the exPlOsive charGes
Objective 2: Defeat General GrievOus
Objective 3: DetOnate the charGes
Objective 4: escaPe!
ChAPTeR ii: ShADow of MalevolenCeChAPTeR iii: DeSTRoy MalevolenCeChAPTeR iv: lAiR of gRievouS
ChAPTeR v: RookieS
ChAPTeR vi: gRievouS inTRigue
ASAJJ venTReSSePiloguehub AReASSePARATiST MiSSionS
seCrets anD extras
CheCklists
nintenDo Ds
Contents
hoW to use this eguiDeDownload from www.chipper.pl

Wa
lk
th
ro
ug
h —
gen
er
al g
rie
vo
us
Prima Official Game Guide
www.primagames.com
A force field blocks your progress, but not for long. Use R3-S6 to activate the astromech Droid control panel on the nearby wall to open a side room.
Switch to Captain Rex and enter the side room. Activate the clone panel within the room to make
Captain Rex place an explosive charge atop the panel—the first of many charges you must place.
Next, destroy the gray box to the right of the room’s central pit, then stack the remaining pieces to
form a hook point. Yank this with Captain Rex’s grapple gun to raise a platform up from the central pit.
In the second circular chamber, stand on the Jedi logo near the central pit and carve a hole in the machinery to expose a hook point. Grapple this to raise the central platform up from the pit, then place a charge on the platform’s clone panel.
The platform features another clone panel—have Captain Rex set an explosive charge on this one as well. With both charges placed, the force field vanishes. Proceed to the next circular chamber ahead.
Destroy three gold boxes in these corridors to earn a minikit—each box is marked on the maps. You can accomplish this in Story mode by building Gold Super Battle Droids as part of obtaining minikit 4—the Droids’ rapid-fire blasters make short work of those boxes!
MinikiT 5
FREEPLAYMinikiT 6
Use C-3PO to activate the three protocol Droid control panels in the corridors—the first one is just beyond the first circular chamber. This opens the nearby storage closets, causing all sorts of junk to spill out. Spot and pop five beach balls that tumble out from these closets to earn a minikit!
78Protected by copyright. Unauthorized or unlawful copying or downloading expressly prohibited.
introDuCtion
Cast
paDaWan training
WalkthroughPRologueCounT DookugeneRAl gRievouS
ChAPTeR i: Duel of The DRoiDS
Objective 1: Place the exPlOsive charGes
Objective 2: Defeat General GrievOus
Objective 3: DetOnate the charGes
Objective 4: escaPe!
ChAPTeR ii: ShADow of MalevolenCeChAPTeR iii: DeSTRoy MalevolenCeChAPTeR iv: lAiR of gRievouS
ChAPTeR v: RookieS
ChAPTeR vi: gRievouS inTRigue
ASAJJ venTReSSePiloguehub AReASSePARATiST MiSSionS
seCrets anD extras
CheCklists
nintenDo Ds
Contents
hoW to use this eguiDeDownload from www.chipper.pl

Wa
lk
th
ro
ug
h —
gen
er
al g
rie
vo
us
Prima Official Game Guide
www.primagames.com
Place a charge on the platform’s clone panel as you’ve done before, then activate
the nearby astromech Droid control panel to open the chamber’s side room. The room is full of nasty critters; use the Force on the overhead pipes to flood the room with searing flame.
Venture onward and activate the astromech Droid control panel in the following hall to access a
side room with a shielded gun turret. Quickly take cover behind the nearby crate to avoid being shot to bits.
While safely behind the crate, grapple the hook point above the gun turret. Debris crashes down upon it, ending the threat. Now you can place a charge on the clone panel the turret was guarding!
Slap a charge on the clone panel inside the side room, then venture on to the next circular chamber. Activate the astromech Droid control panel here to open two side passages, but beware: Enemy Droids storm you from these corridors!
CAUTIONMake sure you’ve done everything you want to do around the corridors before placing these two charges. There’s no going back afterward!
Proceed to the third circular chamber and use the Force to raise a hook point near the central pit. Grapple this to raise the central platform, then quickly switch to Ahsoka and lay waste to the unwelcome Droidekas that ride up as well.
Next, activate the nearby astromech Droid control panel to open a side room. Use Ahsoka’s Lightsaber to make short work of the shielded Droideka inside the room, then use the Force to move the room’s power plug over to the left socket. Place a charge on the clone panel once power is restored.
Use Ahsoka to make short work of the Droids, then simply place explosive charges at the end of both passages to advance the plot. More Droids may ambush you, so be on your guard!
79Protected by copyright. Unauthorized or unlawful copying or downloading expressly prohibited.
introDuCtion
Cast
paDaWan training
WalkthroughPRologueCounT DookugeneRAl gRievouS
ChAPTeR i: Duel of The DRoiDS
Objective 1: Place the exPlOsive charGes
Objective 2: Defeat General GrievOus
Objective 3: DetOnate the charGes
Objective 4: escaPe!
ChAPTeR ii: ShADow of MalevolenCeChAPTeR iii: DeSTRoy MalevolenCeChAPTeR iv: lAiR of gRievouS
ChAPTeR v: RookieS
ChAPTeR vi: gRievouS inTRigue
ASAJJ venTReSSePiloguehub AReASSePARATiST MiSSionS
seCrets anD extras
CheCklists
nintenDo Ds
Contents
hoW to use this eguiDeDownload from www.chipper.pl

Wa
lk
th
ro
ug
h —
gen
er
al g
rie
vo
us
Prima Official Game Guide
www.primagames.com
R3-S6 has revealed himself to be a traitor, and now Ahsoka must do battle against the fearsome General Grievous. Crossing Lightsabers with Grievous is folly—he’s got four of them! Instead, use the Force to hurl objects at Grievous to stun him, then close in and strike.
obJeCTive 2: DefeAT geneRAl gRievouS
C7
B
80Protected by copyright. Unauthorized or unlawful copying or downloading expressly prohibited.
introDuCtion
Cast
paDaWan training
WalkthroughPRologueCounT DookugeneRAl gRievouS
ChAPTeR i: Duel of The DRoiDS
Objective 1: Place the exPlOsive charGes
Objective 2: Defeat General GrievOus
Objective 3: DetOnate the charGes
Objective 4: escaPe!
ChAPTeR ii: ShADow of MalevolenCeChAPTeR iii: DeSTRoy MalevolenCeChAPTeR iv: lAiR of gRievouS
ChAPTeR v: RookieS
ChAPTeR vi: gRievouS inTRigue
ASAJJ venTReSSePiloguehub AReASSePARATiST MiSSionS
seCrets anD extras
CheCklists
nintenDo Ds
Contents
hoW to use this eguiDeDownload from www.chipper.pl
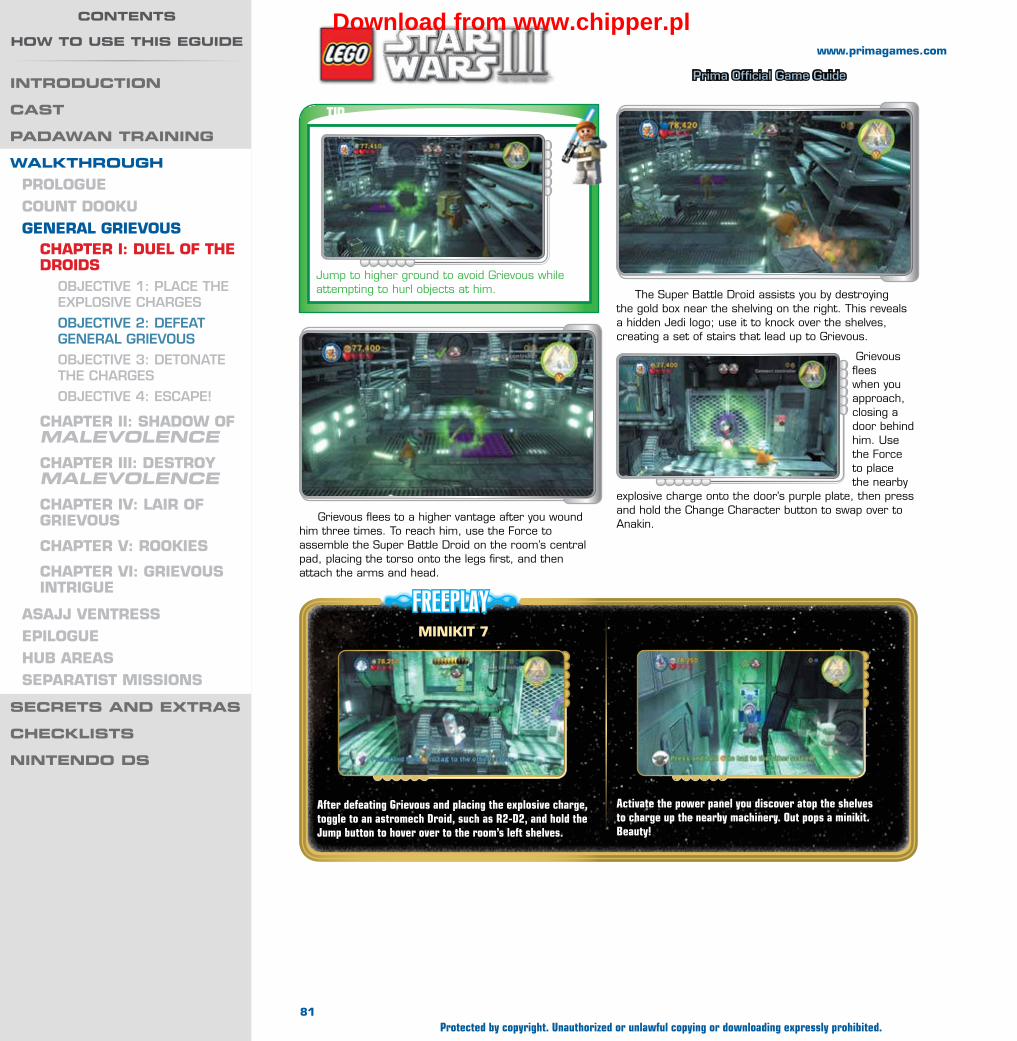
Wa
lk
th
ro
ug
h —
gen
er
al g
rie
vo
us
Prima Official Game Guide
www.primagames.com
FREEPLAY
Grievous flees to a higher vantage after you wound him three times. To reach him, use the Force to assemble the Super Battle Droid on the room’s central pad, placing the torso onto the legs first, and then attach the arms and head.
MinikiT 7
After defeating Grievous and placing the explosive charge, toggle to an astromech Droid, such as R2-D2, and hold the Jump button to hover over to the room’s left shelves.
The Super Battle Droid assists you by destroying the gold box near the shelving on the right. This reveals a hidden Jedi logo; use it to knock over the shelves, creating a set of stairs that lead up to Grievous.
Grievous flees when you approach, closing a door behind him. Use the Force to place the nearby
explosive charge onto the door’s purple plate, then press and hold the Change Character button to swap over to Anakin.
TIP
Jump to higher ground to avoid Grievous while attempting to hurl objects at him.
Activate the power panel you discover atop the shelves to charge up the nearby machinery. Out pops a minikit. Beauty!
81Protected by copyright. Unauthorized or unlawful copying or downloading expressly prohibited.
introDuCtion
Cast
paDaWan training
WalkthroughPRologueCounT DookugeneRAl gRievouS
ChAPTeR i: Duel of The DRoiDS
Objective 1: Place the exPlOsive charGes
Objective 2: Defeat General GrievOus
Objective 3: DetOnate the charGes
Objective 4: escaPe!
ChAPTeR ii: ShADow of MalevolenCeChAPTeR iii: DeSTRoy MalevolenCeChAPTeR iv: lAiR of gRievouS
ChAPTeR v: RookieS
ChAPTeR vi: gRievouS inTRigue
ASAJJ venTReSSePiloguehub AReASSePARATiST MiSSionS
seCrets anD extras
CheCklists
nintenDo Ds
Contents
hoW to use this eguiDeDownload from www.chipper.pl
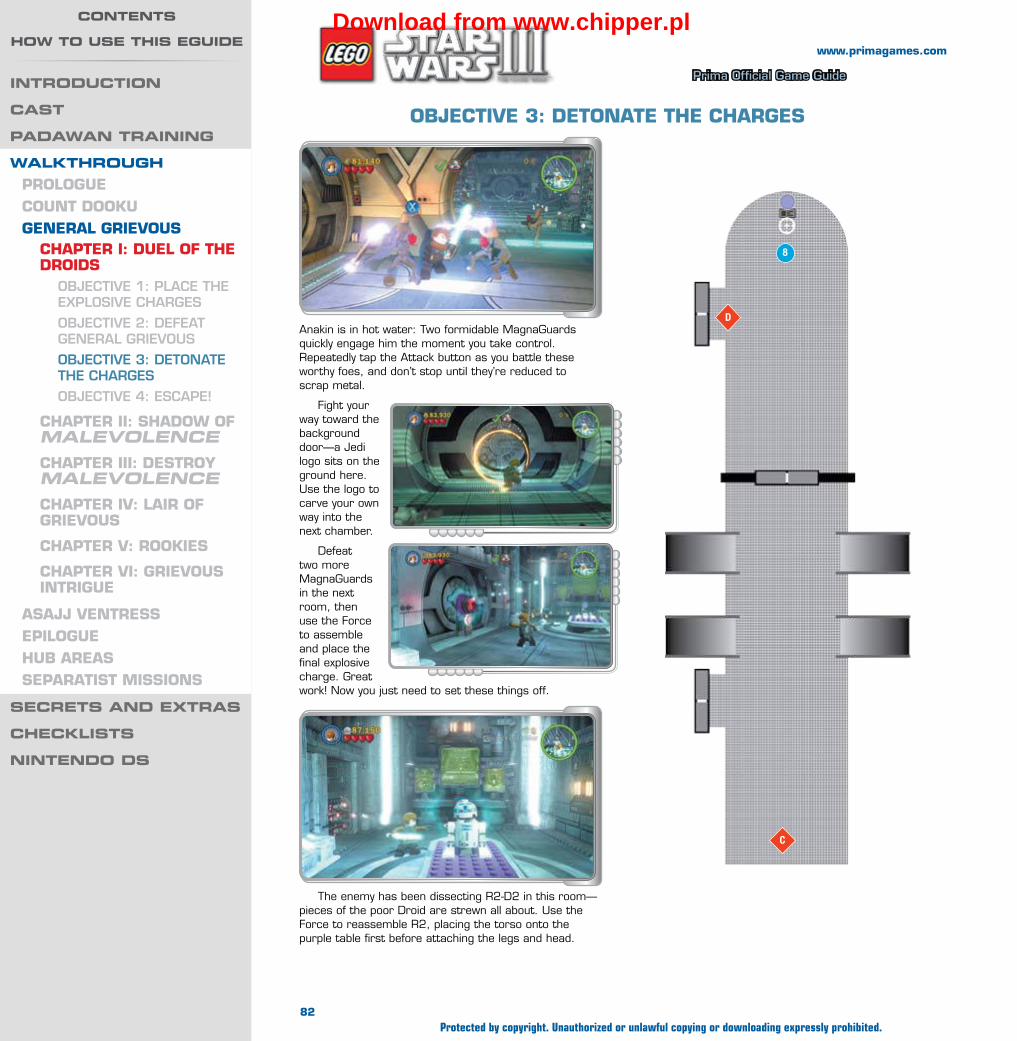
Wa
lk
th
ro
ug
h —
gen
er
al g
rie
vo
us
Prima Official Game Guide
www.primagames.com
obJeCTive 3: DeTonATe The ChARgeS
Anakin is in hot water: Two formidable MagnaGuards quickly engage him the moment you take control. Repeatedly tap the Attack button as you battle these worthy foes, and don’t stop until they’re reduced to scrap metal.
Fight your way toward the background door—a Jedi logo sits on the ground here. Use the logo to carve your own way into the next chamber.
Defeat two more MagnaGuards in the next room, then use the Force to assemble and place the final explosive charge. Great work! Now you just need to set these things off.
The enemy has been dissecting R2-D2 in this room—pieces of the poor Droid are strewn all about. Use the Force to reassemble R2, placing the torso onto the purple table first before attaching the legs and head.
D
8
C
82Protected by copyright. Unauthorized or unlawful copying or downloading expressly prohibited.
introDuCtion
Cast
paDaWan training
WalkthroughPRologueCounT DookugeneRAl gRievouS
ChAPTeR i: Duel of The DRoiDS
Objective 1: Place the exPlOsive charGes
Objective 2: Defeat General GrievOus
Objective 3: DetOnate the charGes
Objective 4: escaPe!
ChAPTeR ii: ShADow of MalevolenCeChAPTeR iii: DeSTRoy MalevolenCeChAPTeR iv: lAiR of gRievouS
ChAPTeR v: RookieS
ChAPTeR vi: gRievouS inTRigue
ASAJJ venTReSSePiloguehub AReASSePARATiST MiSSionS
seCrets anD extras
CheCklists
nintenDo Ds
Contents
hoW to use this eguiDeDownload from www.chipper.pl

Wa
lk
th
ro
ug
h —
gen
er
al g
rie
vo
us
Prima Official Game Guide
www.primagames.com
9
10
D
Time to bail out of here! Hurry through the side door that has now opened to reach the final area.
FREEPLAYMinikiT 8
The nook near R2-D2’s assembly table glows with red energy. Use a Sith character’s Dark Force ability to open the nook, causing two curious objects to roll out.
With R2 back in action, you’re now able to activate the astromech Droid control panel at the back of the
room. Do so to set off all of the charges you’ve placed around the facility and cause widespread damage.
Smash the objects to reduce them to pieces, then use the Force to build a minikit by stacking these pieces on the central table. Start with the mid-sized white piece, then add one of the gray pieces. Place the large white piece next, followed by the other gray piece. Top it all off with the smallest white piece to complete your minikit masterpiece!
obJeCTive 4: eSCAPe!You’ve come to a hangar filled with enemy Droids. Hop into the vacant Vulture Droid and lay waste to everything in the hangar, including all of those silver boxes and crates.
After leveling the place, look for some jiggling pieces near the hangar’s central pad. Build these into
a torpedo generator, then use the Force to place the generator onto the pad, activating it. This will soon come in handy!
83Protected by copyright. Unauthorized or unlawful copying or downloading expressly prohibited.
introDuCtion
Cast
paDaWan training
WalkthroughPRologueCounT DookugeneRAl gRievouS
ChAPTeR i: Duel of The DRoiDS
Objective 1: Place the exPlOsive charGes
Objective 2: Defeat General GrievOus
Objective 3: DetOnate the charGes
Objective 4: escaPe!
ChAPTeR ii: ShADow of MalevolenCeChAPTeR iii: DeSTRoy MalevolenCeChAPTeR iv: lAiR of gRievouS
ChAPTeR v: RookieS
ChAPTeR vi: gRievouS inTRigue
ASAJJ venTReSSePiloguehub AReASSePARATiST MiSSionS
seCrets anD extras
CheCklists
nintenDo Ds
Contents
hoW to use this eguiDeDownload from www.chipper.pl

Wa
lk
th
ro
ug
h —
gen
er
al g
rie
vo
us
Prima Official Game Guide
www.primagames.com
Switch to R2-D2 and activate the astromech Droid control panel to rise up on a lift. Hover over to the nearby balcony and activate a second panel to drop the barrier between you and that treacherous tinnie, R3-S6.
Approach R3-S6 and hammer the Attack button to give the Droid a nasty shock. Repeat
after R3-S6 retreats to knock off another one of its hearts and cause it to retreat behind a barricade.
You can’t reach R3-S6, so activate the nearby astromech Droid control panel instead to raise a starship from the pit below. That’s your ticket out of
here!
Switch to a Jedi and lay waste to the enemies that have flooded the lower portion of
the hangar, including two fearsome Vulture Droids. Use a Vulture Droid of your own to speed things up if you like.
FREEPLAYMinikiT 9
Toggle to a Sith character and use the Dark Force on the two glowing sections of floor to uncover some loose pieces. Build these into a low-flying UFO.
Pilot the UFO and drive it over the orange pads on the hangar’s floor. Change every pad’s color to green to receive a minikit for your troubles!
FREEPLAYMinikiT 10
After R3-S6 has fled, toggle to a different character so you may jump into the hole in the wall above the balcony.
The hole leads to a bowling alley. Pull the lever, then grapple the hook points to send the balls rolling at the pins—you can slide the hook points around to angle your shots. Knock down every pin on the left lane to strike a ton of studs, along with a minikit!
84Protected by copyright. Unauthorized or unlawful copying or downloading expressly prohibited.
introDuCtion
Cast
paDaWan training
WalkthroughPRologueCounT DookugeneRAl gRievouS
ChAPTeR i: Duel of The DRoiDS
Objective 1: Place the exPlOsive charGes
Objective 2: Defeat General GrievOus
Objective 3: DetOnate the charGes
Objective 4: escaPe!
ChAPTeR ii: ShADow of MalevolenCeChAPTeR iii: DeSTRoy MalevolenCeChAPTeR iv: lAiR of gRievouS
ChAPTeR v: RookieS
ChAPTeR vi: gRievouS inTRigue
ASAJJ venTReSSePiloguehub AReASSePARATiST MiSSionS
seCrets anD extras
CheCklists
nintenDo Ds
Contents
hoW to use this eguiDeDownload from www.chipper.pl
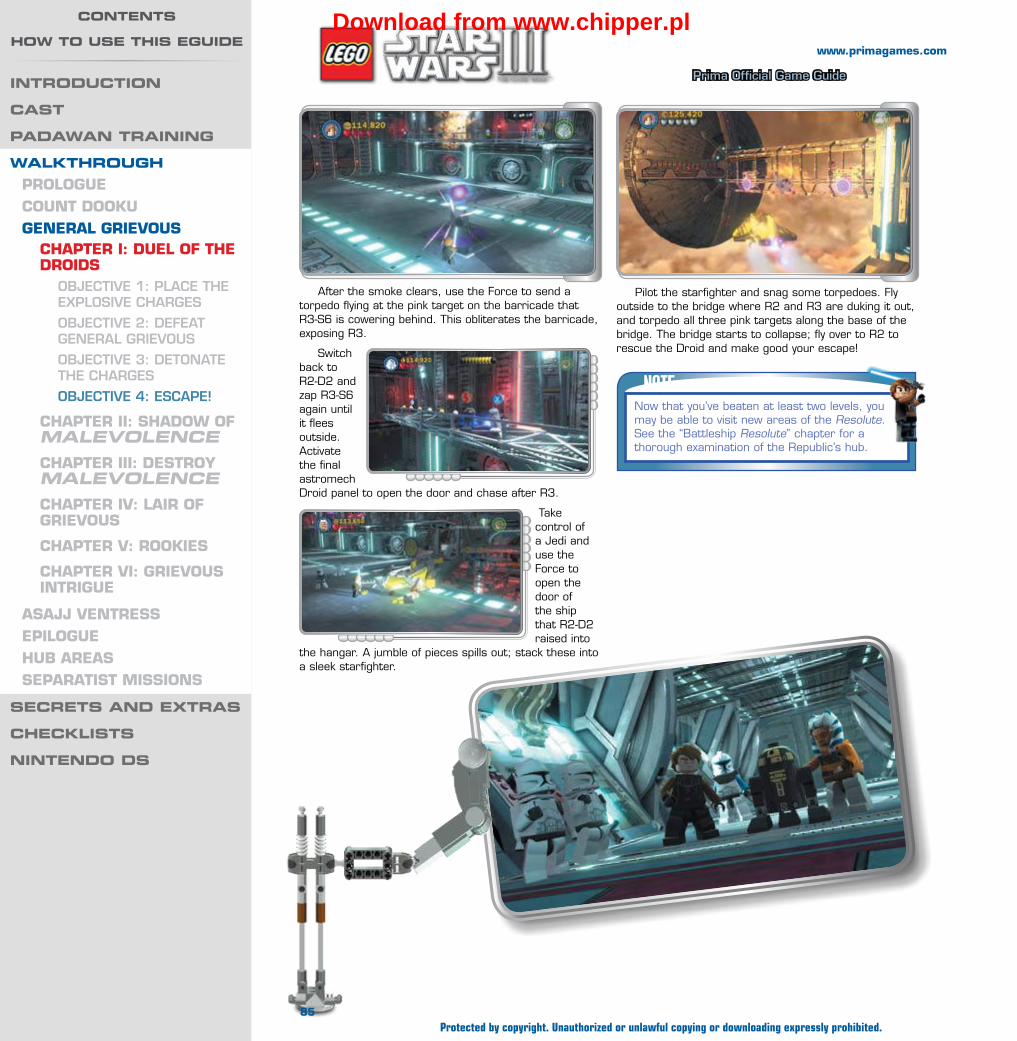
Wa
lk
th
ro
ug
h —
gen
er
al g
rie
vo
us
Prima Official Game Guide
www.primagames.com
After the smoke clears, use the Force to send a torpedo flying at the pink target on the barricade that R3-S6 is cowering behind. This obliterates the barricade, exposing R3.
Switch back to R2-D2 and zap R3-S6 again until it flees outside. Activate the final astromech Droid panel to open the door and chase after R3.
Take control of a Jedi and use the Force to open the door of the ship that R2-D2 raised into
the hangar. A jumble of pieces spills out; stack these into a sleek starfighter.
Pilot the starfighter and snag some torpedoes. Fly outside to the bridge where R2 and R3 are duking it out, and torpedo all three pink targets along the base of the bridge. The bridge starts to collapse; fly over to R2 to rescue the Droid and make good your escape!
NOTENow that you’ve beaten at least two levels, you may be able to visit new areas of the Resolute. See the “Battleship Resolute” chapter for a thorough examination of the Republic’s hub.
85Protected by copyright. Unauthorized or unlawful copying or downloading expressly prohibited.
introDuCtion
Cast
paDaWan training
WalkthroughPRologueCounT DookugeneRAl gRievouS
ChAPTeR i: Duel of The DRoiDS
Objective 1: Place the exPlOsive charGes
Objective 2: Defeat General GrievOus
Objective 3: DetOnate the charGes
Objective 4: escaPe!
ChAPTeR ii: ShADow of MalevolenCeChAPTeR iii: DeSTRoy MalevolenCeChAPTeR iv: lAiR of gRievouS
ChAPTeR v: RookieS
ChAPTeR vi: gRievouS inTRigue
ASAJJ venTReSSePiloguehub AReASSePARATiST MiSSionS
seCrets anD extras
CheCklists
nintenDo Ds
Contents
hoW to use this eguiDeDownload from www.chipper.pl

Wa
lk
th
ro
ug
h —
gen
er
al g
rie
vo
us
Prima Official Game Guide
“easy Is the path to wIsdom FoR those not
BlInded By eGo.”Suspecting that General Grievous will attack the Kallida Shoals Medical Center in his seemingly invincible ship, the Malevolence, Anakin Skywalker plans a daring ambush. Accompanied by Master Plo Koon in his Jedi starfighter, Anakin leads Shadow Squadron and their Y-wings in a bold mission to disable the Separatist warship before it can bring its deadly ion cannon to bear on the Medical Center....
general grievous
Chapter ii: shaDoW of MalevolenCe
MinikitsNo. Icon(s) Mode Notes
1 — Free Play Destroy the five highlighted ships.
2 — Free Play At the far left of the Malevolence, lower deck, use an enemy ship to destroy the glowing red object.
3 3 Free Play Grapple down the box on the first landing pad, then use Jar Jar to jump up to the minikit.
4 4 Free Play Launch the shuttle on the first landing pad, then destroy it in space.
5 — Free Play Destroy the gold object on the Malevolence near the first landing pad with a rapid-fire ship.
6 6 Free Play On the second landing pad, activate the protocol Droid control panel, then grapple the pool hook point and use Jar Jar to reach the minikit.
7 7 Free Play On the second landing pad, grapple the hook point to find two plunk Droids, then use them to turn the nearby pads green.
8 8 Story On the third landing pad, use the Force to send three red dumpsters to the trash compactor.
9 9 Free Play Launch another shuttle from the third landing pad, then destroy it in space.
10 — Free Play Fly close to the ion cannon at high altitude to open a secret panel, then destroy the silver object within with missiles.
True Jedi Stud Requirement: 190,000 Story Characters
Plo koonAnakin Skywalker
86
www.primagames.com
Protected by copyright. Unauthorized or unlawful copying or downloading expressly prohibited.
introDuCtion
Cast
paDaWan training
WalkthroughPRologueCounT DookugeneRAl gRievouS
ChAPTeR i: Duel of The DRoiDS
ChAPTeR ii: ShADow of MalevolenCe
Objective 1: acquire tOrPeDOes
Objective 2: tOrPeDO the tarGets
Objective 3: DestrOy the iOn cannOn
ChAPTeR iii: DeSTRoy MalevolenCe
ChAPTeR iv: lAiR of gRievouS
ChAPTeR v: RookieS
ChAPTeR vi: gRievouS inTRigue
ASAJJ venTReSSePiloguehub AReASSePARATiST MiSSionS
seCrets anD extras
CheCklists
nintenDo Ds
Contents
hoW to use this eguiDeDownload from www.chipper.pl

Wa
lk
th
ro
ug
h —
gen
er
al g
rie
vo
us
Prima Official Game Guide
Strap yourself in—you’re piloting a starfighter in this fast-paced mission! Get a feel for
your ship’s controls as you fly about the imposing Malevolence. Hold the Jump button to boost, and double-tap the control stick in any direction to perform a swift roll maneuver.
Fly around and look for one of several circular objects floating in space—these are called boost
rings. Fly close to one and press the Change Character button to dock at the ring, then press the Jump button to boost down to a lower altitude.
obJeCTive 1: ACquiRe ToRPeDoeS
TIPDestroy the Malevolence’s many turbo lasers, along with other vulnerable parts of the battleship, to score fast studs.
Scan the lower section of the Malevolence and spy a large blue arrow that points to a landing pad. Fly close and press the Change Character button to set your ship down.
FREEPLAYMinikiT 1
During Free Play, five enemy ships will be highlighted by green reticles. Destroy all five ships to strike a blow for the Republic and earn a minikit! You may need to use boost rings to change your elevation and find them all.
FREEPLAYMinikiT 2
Toggle to any enemy ship, such as a Vulture Droid, and fire on the glowing red object at the rear (far left) of the Malevolence. Only enemy ships can destroy this object, which spits out a minikit when obliterated.
87
www.primagames.com
Protected by copyright. Unauthorized or unlawful copying or downloading expressly prohibited.
introDuCtion
Cast
paDaWan training
WalkthroughPRologueCounT DookugeneRAl gRievouS
ChAPTeR i: Duel of The DRoiDS
ChAPTeR ii: ShADow of MalevolenCe
Objective 1: acquire tOrPeDOes
Objective 2: tOrPeDO the tarGets
Objective 3: DestrOy the iOn cannOn
ChAPTeR iii: DeSTRoy MalevolenCe
ChAPTeR iv: lAiR of gRievouS
ChAPTeR v: RookieS
ChAPTeR vi: gRievouS inTRigue
ASAJJ venTReSSePiloguehub AReASSePARATiST MiSSionS
seCrets anD extras
CheCklists
nintenDo Ds
Contents
hoW to use this eguiDeDownload from www.chipper.pl
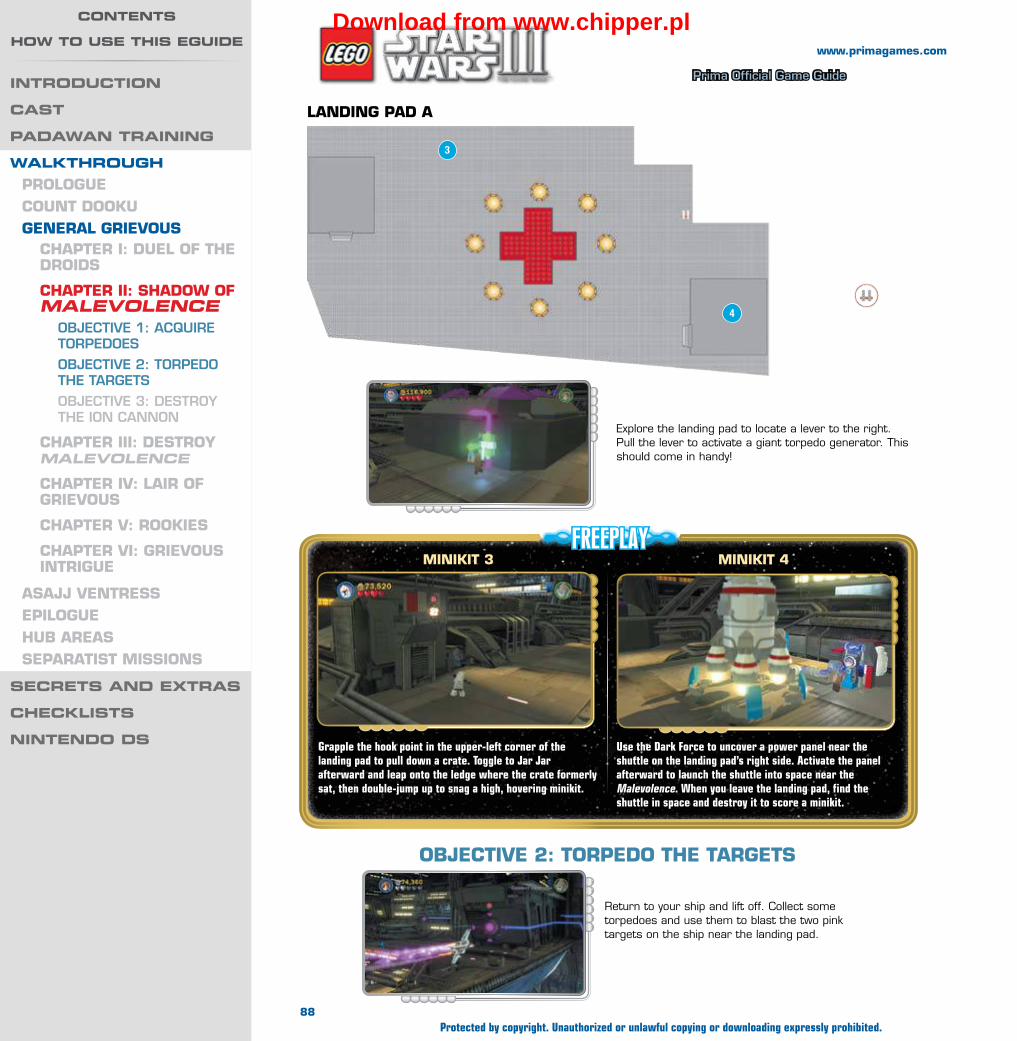
Wa
lk
th
ro
ug
h —
gen
er
al g
rie
vo
us
Prima Official Game Guide
3
4
FREEPLAYMinikiT 3
Grapple the hook point in the upper-left corner of the landing pad to pull down a crate. Toggle to Jar Jar afterward and leap onto the ledge where the crate formerly sat, then double-jump up to snag a high, hovering minikit.
MinikiT 4
Use the Dark Force to uncover a power panel near the shuttle on the landing pad’s right side. Activate the panel afterward to launch the shuttle into space near the Malevolence. When you leave the landing pad, find the shuttle in space and destroy it to score a minikit.
lAnDing PAD A
Explore the landing pad to locate a lever to the right. Pull the lever to activate a giant torpedo generator. This should come in handy!
obJeCTive 2: ToRPeDo The TARgeTS
Return to your ship and lift off. Collect some torpedoes and use them to blast the two pink targets on the ship near the landing pad.
88
www.primagames.com
Protected by copyright. Unauthorized or unlawful copying or downloading expressly prohibited.
introDuCtion
Cast
paDaWan training
WalkthroughPRologueCounT DookugeneRAl gRievouS
ChAPTeR i: Duel of The DRoiDS
ChAPTeR ii: ShADow of MalevolenCe
Objective 1: acquire tOrPeDOes
Objective 2: tOrPeDO the tarGets
Objective 3: DestrOy the iOn cannOn
ChAPTeR iii: DeSTRoy MalevolenCe
ChAPTeR iv: lAiR of gRievouS
ChAPTeR v: RookieS
ChAPTeR vi: gRievouS inTRigue
ASAJJ venTReSSePiloguehub AReASSePARATiST MiSSionS
seCrets anD extras
CheCklists
nintenDo Ds
Contents
hoW to use this eguiDeDownload from www.chipper.pl
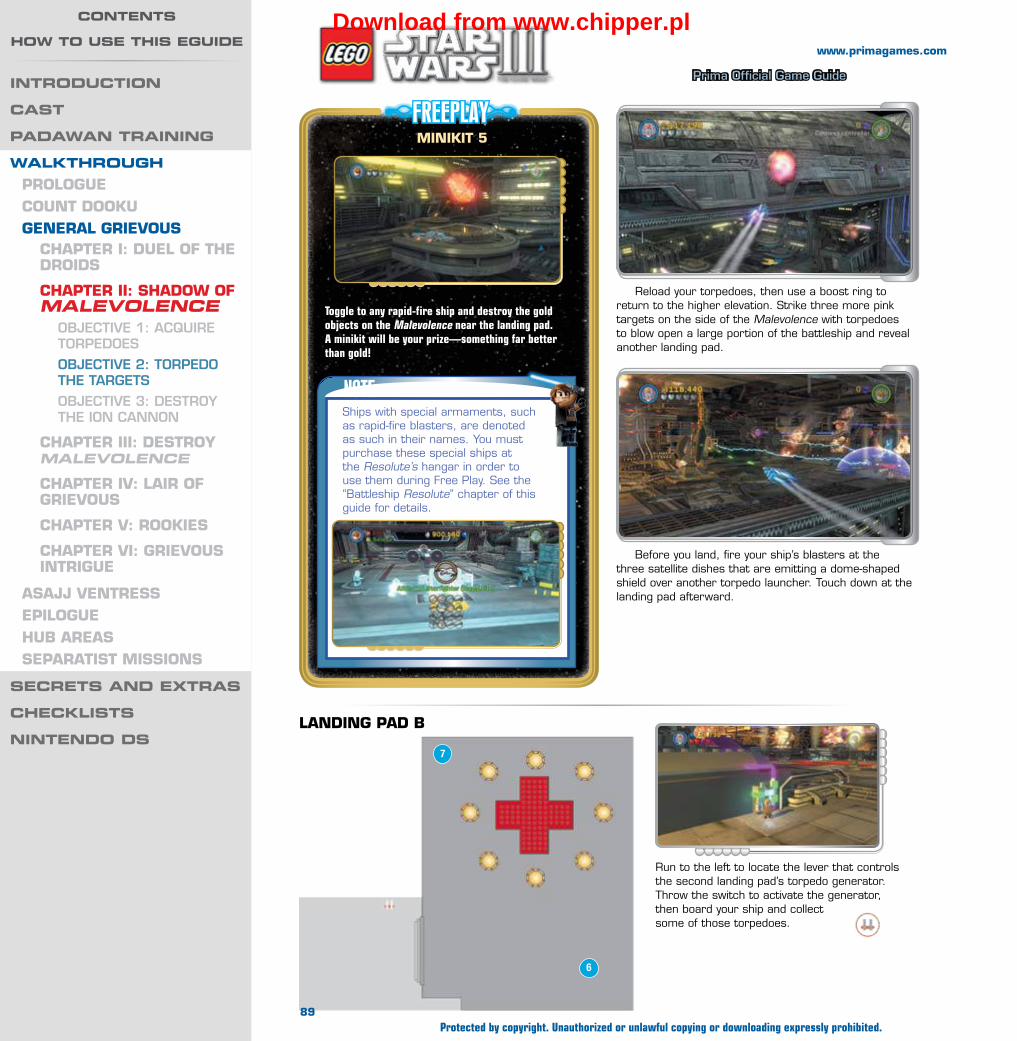
Wa
lk
th
ro
ug
h —
gen
er
al g
rie
vo
us
Prima Official Game Guide
6
7
Reload your torpedoes, then use a boost ring to return to the higher elevation. Strike three more pink targets on the side of the Malevolence with torpedoes to blow open a large portion of the battleship and reveal another landing pad.
Before you land, fire your ship’s blasters at the three satellite dishes that are emitting a dome-shaped shield over another torpedo launcher. Touch down at the landing pad afterward.
FREEPLAYMinikiT 5
Toggle to any rapid-fire ship and destroy the gold objects on the Malevolence near the landing pad. A minikit will be your prize—something far better than gold!
NOTEShips with special armaments, such as rapid-fire blasters, are denoted as such in their names. You must purchase these special ships at the Resolute’s hangar in order to use them during Free Play. See the “Battleship Resolute” chapter of this guide for details.
lAnDing PAD b
Run to the left to locate the lever that controls the second landing pad’s torpedo generator. Throw the switch to activate the generator, then board your ship and collect some of those torpedoes.
89
www.primagames.com
Protected by copyright. Unauthorized or unlawful copying or downloading expressly prohibited.
introDuCtion
Cast
paDaWan training
WalkthroughPRologueCounT DookugeneRAl gRievouS
ChAPTeR i: Duel of The DRoiDS
ChAPTeR ii: ShADow of MalevolenCe
Objective 1: acquire tOrPeDOes
Objective 2: tOrPeDO the tarGets
Objective 3: DestrOy the iOn cannOn
ChAPTeR iii: DeSTRoy MalevolenCe
ChAPTeR iv: lAiR of gRievouS
ChAPTeR v: RookieS
ChAPTeR vi: gRievouS inTRigue
ASAJJ venTReSSePiloguehub AReASSePARATiST MiSSionS
seCrets anD extras
CheCklists
nintenDo Ds
Contents
hoW to use this eguiDeDownload from www.chipper.pl

Wa
lk
th
ro
ug
h —
gen
er
al g
rie
vo
us
Prima Official Game Guide
8
9
FREEPLAY
obJeCTive 3: DeSTRoy The ion CAnnon
MinikiT 6Use C-3PO to activate the protocol Droid control panel on the landing pad’s right side. A swimming pool emerges from the nearby ground—how nice! Switch to a grapple gun character and yank on the pool’s central hook point to uncork a floating minikit that only Jar Jar can reach.
MinikiT 7
Grapple the hook point on the second landing pad’s upper-left bin to discover a pair of plunk Droids. Wonder how these got here ...
Hop into one of the plunk Droids and steer it onto the nearest of the nearby orange pads to turn the pad green. Park the plunk Droid here and drive the other plunk Droid over the remaining pads, starting with the farthest pad and rolling toward the plunk Droid you parked. All this plunk Droid-based zaniness earns you a minikit.
Torpedo the two pink targets near the upper landing pad, then reload your torpedoes and fly to the left. Blast three more targets to destroy another portion of the Malevolence; you’ll reveal a third landing pad.
90
www.primagames.com
Protected by copyright. Unauthorized or unlawful copying or downloading expressly prohibited.
introDuCtion
Cast
paDaWan training
WalkthroughPRologueCounT DookugeneRAl gRievouS
ChAPTeR i: Duel of The DRoiDS
ChAPTeR ii: ShADow of MalevolenCe
Objective 1: acquire tOrPeDOes
Objective 2: tOrPeDO the tarGets
Objective 3: DestrOy the iOn cannOn
ChAPTeR iii: DeSTRoy MalevolenCe
ChAPTeR iv: lAiR of gRievouS
ChAPTeR v: RookieS
ChAPTeR vi: gRievouS inTRigue
ASAJJ venTReSSePiloguehub AReASSePARATiST MiSSionS
seCrets anD extras
CheCklists
nintenDo Ds
Contents
hoW to use this eguiDeDownload from www.chipper.pl
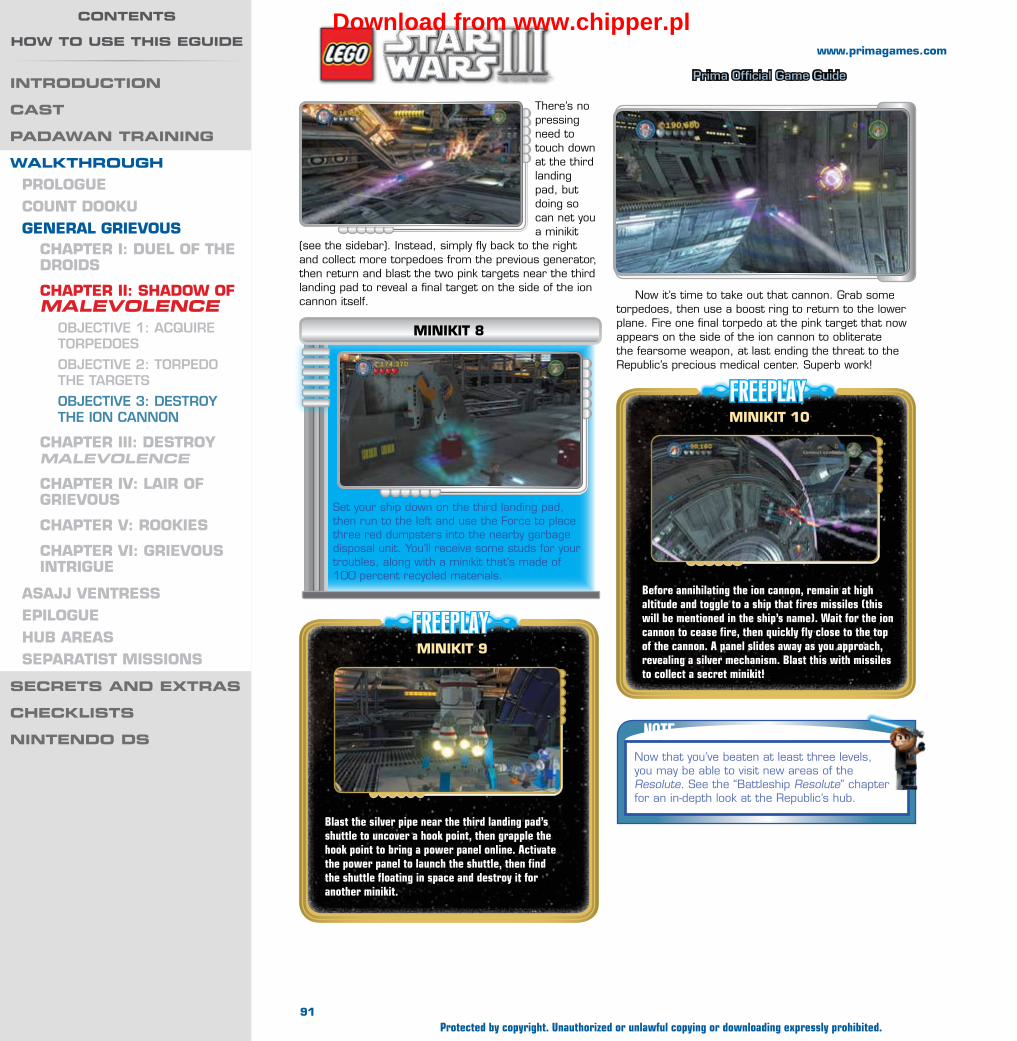
Wa
lk
th
ro
ug
h —
gen
er
al g
rie
vo
us
Prima Official Game Guide
There’s no pressing need to touch down at the third landing pad, but doing so can net you a minikit
(see the sidebar). Instead, simply fly back to the right and collect more torpedoes from the previous generator, then return and blast the two pink targets near the third landing pad to reveal a final target on the side of the ion cannon itself. Now it’s time to take out that cannon. Grab some
torpedoes, then use a boost ring to return to the lower plane. Fire one final torpedo at the pink target that now appears on the side of the ion cannon to obliterate the fearsome weapon, at last ending the threat to the Republic’s precious medical center. Superb work!
Set your ship down on the third landing pad, then run to the left and use the Force to place three red dumpsters into the nearby garbage disposal unit. You’ll receive some studs for your troubles, along with a minikit that’s made of 100 percent recycled materials.
MinikiT 8
FREEPLAYMinikiT 9
Blast the silver pipe near the third landing pad’s shuttle to uncover a hook point, then grapple the hook point to bring a power panel online. Activate the power panel to launch the shuttle, then find the shuttle floating in space and destroy it for another minikit.
FREEPLAYMinikiT 10
Before annihilating the ion cannon, remain at high altitude and toggle to a ship that fires missiles (this will be mentioned in the ship’s name). Wait for the ion cannon to cease fire, then quickly fly close to the top of the cannon. A panel slides away as you approach, revealing a silver mechanism. Blast this with missiles to collect a secret minikit!
NOTENow that you’ve beaten at least three levels, you may be able to visit new areas of the Resolute. See the “Battleship Resolute” chapter for an in-depth look at the Republic’s hub.
91
www.primagames.com
Protected by copyright. Unauthorized or unlawful copying or downloading expressly prohibited.
introDuCtion
Cast
paDaWan training
WalkthroughPRologueCounT DookugeneRAl gRievouS
ChAPTeR i: Duel of The DRoiDS
ChAPTeR ii: ShADow of MalevolenCe
Objective 1: acquire tOrPeDOes
Objective 2: tOrPeDO the tarGets
Objective 3: DestrOy the iOn cannOn
ChAPTeR iii: DeSTRoy MalevolenCe
ChAPTeR iv: lAiR of gRievouS
ChAPTeR v: RookieS
ChAPTeR vi: gRievouS inTRigue
ASAJJ venTReSSePiloguehub AReASSePARATiST MiSSionS
seCrets anD extras
CheCklists
nintenDo Ds
Contents
hoW to use this eguiDeDownload from www.chipper.pl

Wa
lk
th
ro
ug
h —
gen
er
al g
rie
vo
us
Prima Official Game Guide
general grievous
Chapter iii: Destroy MalevolenCe
MinikitsNo. Icon(s) Mode Notes
1 1 Free Play Activate the clone panel near the start, then use the Force to solve the tilt maze.
2 1 to 5 Free Play Use the Dark Force on five Sith washing machines hidden throughout the level.
3 3 Free Play Grapple the two hook points at the start of the train yard.
4 4 Free Play In the train yard, hover over and activate the protocol Droid control panel, then destroy the gold boxing glove.
5 5 Free PlayDestroy the silver box on the second train, then build and activate an astromech Droid control panel to reveal a caged minikit. Use the crane to open the minikit’s cage, then return the gray object to its original platform and hover over.
6 6 Free Play Before leaving the train yard, jump to the background platform and destroy the silver object to drift up to the minikit.
7 7 Free Play In the chamber where you battle Grievous, destroy the five silver points.
8 8 Story Cut down a Droideka’s shield, then Force-throw the Droideka into Grievous. Do this five times.
9 9 Story When slotting the three colored bits into the wall, match the colors to those on the left.
10 10 Free Play Activate the power panel on the bridge, then grapple the hook point before it retracts.
True Jedi Stud Requirement: Story Characters
C-3PoPadmé AmidalaR2-D2obi-wan kenobi
Anakin Skywalker
“a plan Is only as Good as those who
see It thRouGh.”Republic strike forces are on the verge of complete victory over General Grievous and his stricken ship, the Malevolence. However, Padmé Amidala and her protocol Droid C-3PO are about to become unwitting bargaining chips for the devious Separatists....
92
www.primagames.com
Protected by copyright. Unauthorized or unlawful copying or downloading expressly prohibited.
introDuCtion
Cast
paDaWan training
WalkthroughPRologueCounT DookugeneRAl gRievouS
ChAPTeR i: Duel of The DRoiDS
ChAPTeR ii: ShADow of MalevolenCeChAPTeR iii: DeSTRoy MalevolenCe
Objective 1: rescue PaDmé anD c-3PO
Objective 2: escaPe cOnfinement
Objective 3: extenD the briDGe
Objective 4: Defeat General GrievOus
Objective 5: reach the shiP’s briDGe
Objective 6: DestrOy the MAlevolenCe
ChAPTeR iv: lAiR of gRievouS
ChAPTeR v: RookieS
ChAPTeR vi: gRievouS inTRigue
ASAJJ venTReSSePiloguehub AReASSePARATiST MiSSionS
seCrets anD extras
CheCklists
nintenDo Ds
Contents
hoW to use this eguiDeDownload from www.chipper.pl
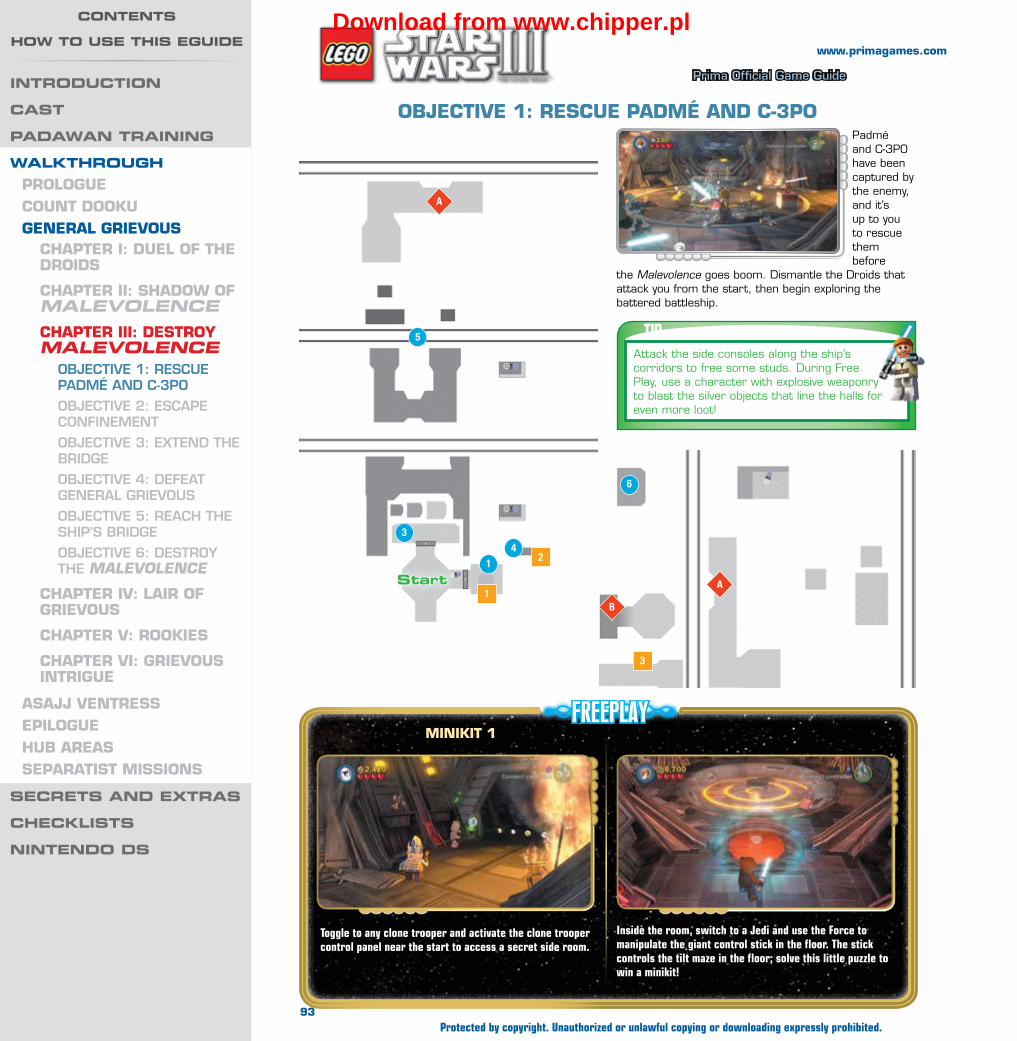
Wa
lk
th
ro
ug
h —
gen
er
al g
rie
vo
us
Prima Official Game Guide
obJeCTive 1: ReSCue PADMé AnD C-3PoPadmé and C-3PO have been captured by the enemy, and it’s up to you to rescue them before
the Malevolence goes boom. Dismantle the Droids that attack you from the start, then begin exploring the battered battleship.
TIPAttack the side consoles along the ship’s corridors to free some studs. During Free Play, use a character with explosive weaponry to blast the silver objects that line the halls for even more loot!
FREEPLAYMinikiT 1
Toggle to any clone trooper and activate the clone trooper control panel near the start to access a secret side room.
Inside the room, switch to a Jedi and use the Force to manipulate the giant control stick in the floor. The stick controls the tilt maze in the floor; solve this little puzzle to win a minikit!
B
6
3
A
A
1
21
34
5
start
93
www.primagames.com
Protected by copyright. Unauthorized or unlawful copying or downloading expressly prohibited.
introDuCtion
Cast
paDaWan training
WalkthroughPRologueCounT DookugeneRAl gRievouS
ChAPTeR i: Duel of The DRoiDS
ChAPTeR ii: ShADow of MalevolenCeChAPTeR iii: DeSTRoy MalevolenCe
Objective 1: rescue PaDmé anD c-3PO
Objective 2: escaPe cOnfinement
Objective 3: extenD the briDGe
Objective 4: Defeat General GrievOus
Objective 5: reach the shiP’s briDGe
Objective 6: DestrOy the MAlevolenCe
ChAPTeR iv: lAiR of gRievouS
ChAPTeR v: RookieS
ChAPTeR vi: gRievouS inTRigue
ASAJJ venTReSSePiloguehub AReASSePARATiST MiSSionS
seCrets anD extras
CheCklists
nintenDo Ds
Contents
hoW to use this eguiDeDownload from www.chipper.pl

Wa
lk
th
ro
ug
h —
gen
er
al g
rie
vo
us
Prima Official Game Guide
Switch to R2-D2 and use the Droid’s hover ability to reach the small platform in the background. (Simply hold the Jump button to hover.) R2 can just barely clear this distance.
Activate the platform’s astromech Droid control panel to summon a train full of Super Battle
Droids. Switch to Anakin or Obi-Wan and make short work of these pests.
A large train yard lies just ahead. Drop down the step-like platforms to reach the lower walkways
and destroy the many crates down here for studs.
FREEPLAYMinikiT 2
Five washing machines are hidden throughout this level—the first is found within the secret tilt-maze room. Use a Sith character’s Dark Force ability to lift and destroy all five washing machines and you’ll receive a fresh, clean minikit. The five Sith washing machines are marked on the maps to help you find them; some are hidden inside of gray and blue boxes that you must first destroy.
CAUTIONDon’t fall from the train yard’s platforms—it’s a long way down!
FREEPLAYMinikiT 3
As you descend the step-like platforms, spy a pair of hook points on the wall to the right. Grapple and pull both hook points out from the wall to expose a minikit below.
FREEPLAYMinikiT 4
After activating the astromech Droid control panel, toggle to any other character so you can jump up onto the lip of the platform. From here, switch back to an astromech Droid and then hover over to the far background platform.
Nab two purple studs from the far platform, then change to C-3PO and activate the protocol Droid control panel to cause a giant gold boxing glove to pop out from the wall. Switch to a rapid-fire character and melt the glove down to discover a minikit! Pocket the prize, then change back to an astromech Droid and hover back to the previous platform.
94
www.primagames.com
Protected by copyright. Unauthorized or unlawful copying or downloading expressly prohibited.
introDuCtion
Cast
paDaWan training
WalkthroughPRologueCounT DookugeneRAl gRievouS
ChAPTeR i: Duel of The DRoiDS
ChAPTeR ii: ShADow of MalevolenCeChAPTeR iii: DeSTRoy MalevolenCe
Objective 1: rescue PaDmé anD c-3PO
Objective 2: escaPe cOnfinement
Objective 3: extenD the briDGe
Objective 4: Defeat General GrievOus
Objective 5: reach the shiP’s briDGe
Objective 6: DestrOy the MAlevolenCe
ChAPTeR iv: lAiR of gRievouS
ChAPTeR v: RookieS
ChAPTeR vi: gRievouS inTRigue
ASAJJ venTReSSePiloguehub AReASSePARATiST MiSSionS
seCrets anD extras
CheCklists
nintenDo Ds
Contents
hoW to use this eguiDeDownload from www.chipper.pl

Wa
lk
th
ro
ug
h —
gen
er
al g
rie
vo
us
Prima Official Game Guide
Switch to R2 once the Droid has reached the platform, and roll onto the red button to turn it
green. This knocks some crates out of your way; drop down and activate the platform’s astromech Droid control panel.
The panel summons another train. Defeat its Droid passengers, then use the Force to lift the large gray object that sits atop the purple platform in the background. Move the gray object onto a different platform in the foreground, which crackles with blue energy.
Leap from the gray platform to reach the next platform ahead. Lay waste to the Droids here, then
take aim and hurl your Lightsaber at the background platform with the two battle Droids.
Striking the platform with a well-aimed Lightsaber causes the platform to drop.
Leap from the train to reach the next platform ahead and wipe out the battle Droids you face there. Afterward, use the Force to lift R2-D2 and move the Droid over to another background platform.
Force-lift R2-D2 and move him over to the platform, then activate the astromech Droid control panel as you’ve done before.
A third train pulls up—use the Force to transform its front car into a massive crane. Run along
the remainder of the train afterward and hop into the crane’s operator seat to take control.
FREEPLAYMinikiT 5
Use an explosive attack to destroy the silver box on the second train, then build the remaining bits into an astromech Droid control panel. Activate this to raise a remote background platform that sports a minikit.
Unfortunately, the minikit is held in a cage that prevents you from collecting it. Use the crane you build from the third train to shatter the cage. Now you just need to get over there!
Use the Force to return the large gray object to its original purple platform. Leap onto the gray object, then switch to an astromech Droid and hover over to claim your prize. It’s a difficult distance, but it can be done!
95
www.primagames.com
Protected by copyright. Unauthorized or unlawful copying or downloading expressly prohibited.
introDuCtion
Cast
paDaWan training
WalkthroughPRologueCounT DookugeneRAl gRievouS
ChAPTeR i: Duel of The DRoiDS
ChAPTeR ii: ShADow of MalevolenCeChAPTeR iii: DeSTRoy MalevolenCe
Objective 1: rescue PaDmé anD c-3PO
Objective 2: escaPe cOnfinement
Objective 3: extenD the briDGe
Objective 4: Defeat General GrievOus
Objective 5: reach the shiP’s briDGe
Objective 6: DestrOy the MAlevolenCe
ChAPTeR iv: lAiR of gRievouS
ChAPTeR v: RookieS
ChAPTeR vi: gRievouS inTRigue
ASAJJ venTReSSePiloguehub AReASSePARATiST MiSSionS
seCrets anD extras
CheCklists
nintenDo Ds
Contents
hoW to use this eguiDeDownload from www.chipper.pl
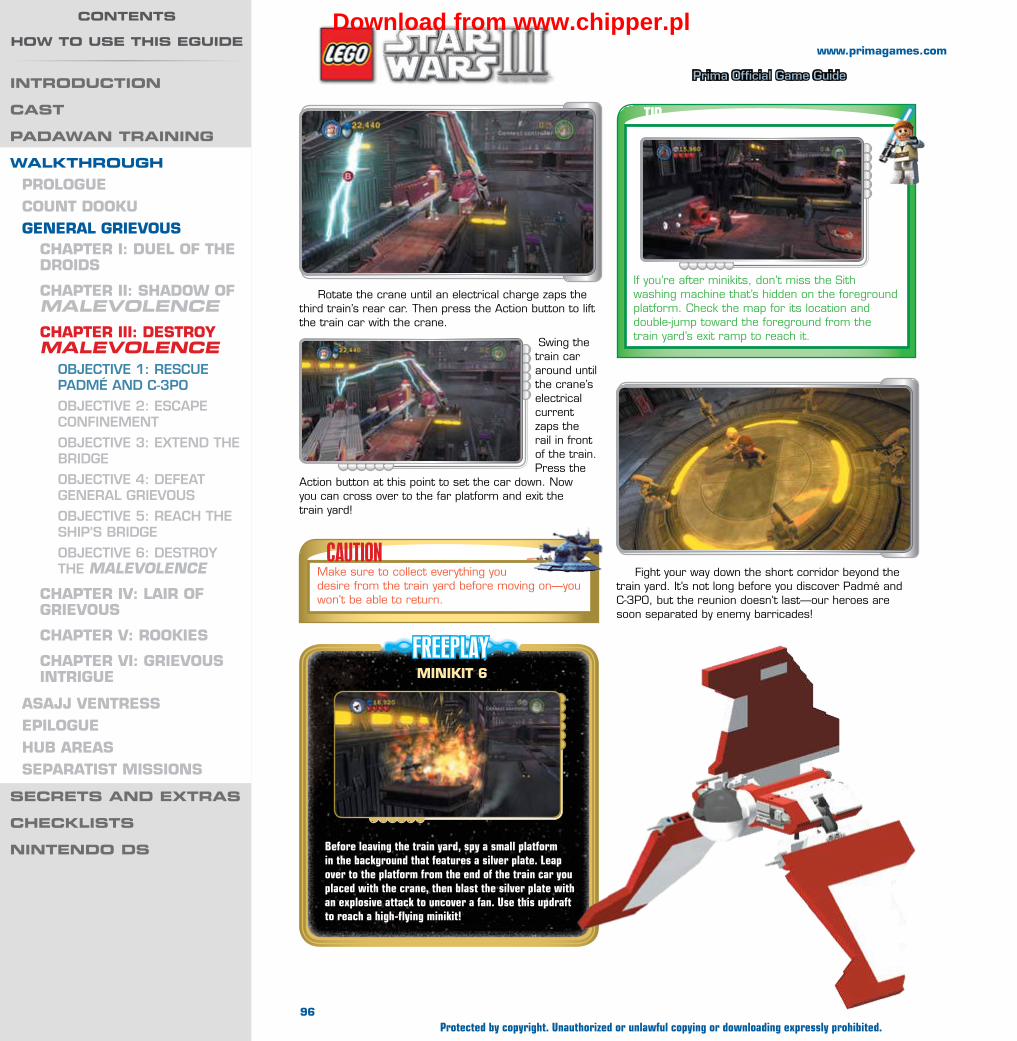
Wa
lk
th
ro
ug
h —
gen
er
al g
rie
vo
us
Prima Official Game Guide
Rotate the crane until an electrical charge zaps the third train’s rear car. Then press the Action button to lift the train car with the crane.
Swing the train car around until the crane’s electrical current zaps the rail in front of the train. Press the
Action button at this point to set the car down. Now you can cross over to the far platform and exit the train yard!
Fight your way down the short corridor beyond the train yard. It’s not long before you discover Padmé and C-3PO, but the reunion doesn’t last—our heroes are soon separated by enemy barricades!
CAUTIONMake sure to collect everything you desire from the train yard before moving on—you won’t be able to return.
FREEPLAYMinikiT 6
Before leaving the train yard, spy a small platform in the background that features a silver plate. Leap over to the platform from the end of the train car you placed with the crane, then blast the silver plate with an explosive attack to uncover a fan. Use this updraft to reach a high-flying minikit!
TIP
If you’re after minikits, don’t miss the Sith washing machine that’s hidden on the foreground platform. Check the map for its location and double-jump toward the foreground from the train yard’s exit ramp to reach it.
96
www.primagames.com
Protected by copyright. Unauthorized or unlawful copying or downloading expressly prohibited.
introDuCtion
Cast
paDaWan training
WalkthroughPRologueCounT DookugeneRAl gRievouS
ChAPTeR i: Duel of The DRoiDS
ChAPTeR ii: ShADow of MalevolenCeChAPTeR iii: DeSTRoy MalevolenCe
Objective 1: rescue PaDmé anD c-3PO
Objective 2: escaPe cOnfinement
Objective 3: extenD the briDGe
Objective 4: Defeat General GrievOus
Objective 5: reach the shiP’s briDGe
Objective 6: DestrOy the MAlevolenCe
ChAPTeR iv: lAiR of gRievouS
ChAPTeR v: RookieS
ChAPTeR vi: gRievouS inTRigue
ASAJJ venTReSSePiloguehub AReASSePARATiST MiSSionS
seCrets anD extras
CheCklists
nintenDo Ds
Contents
hoW to use this eguiDeDownload from www.chipper.pl
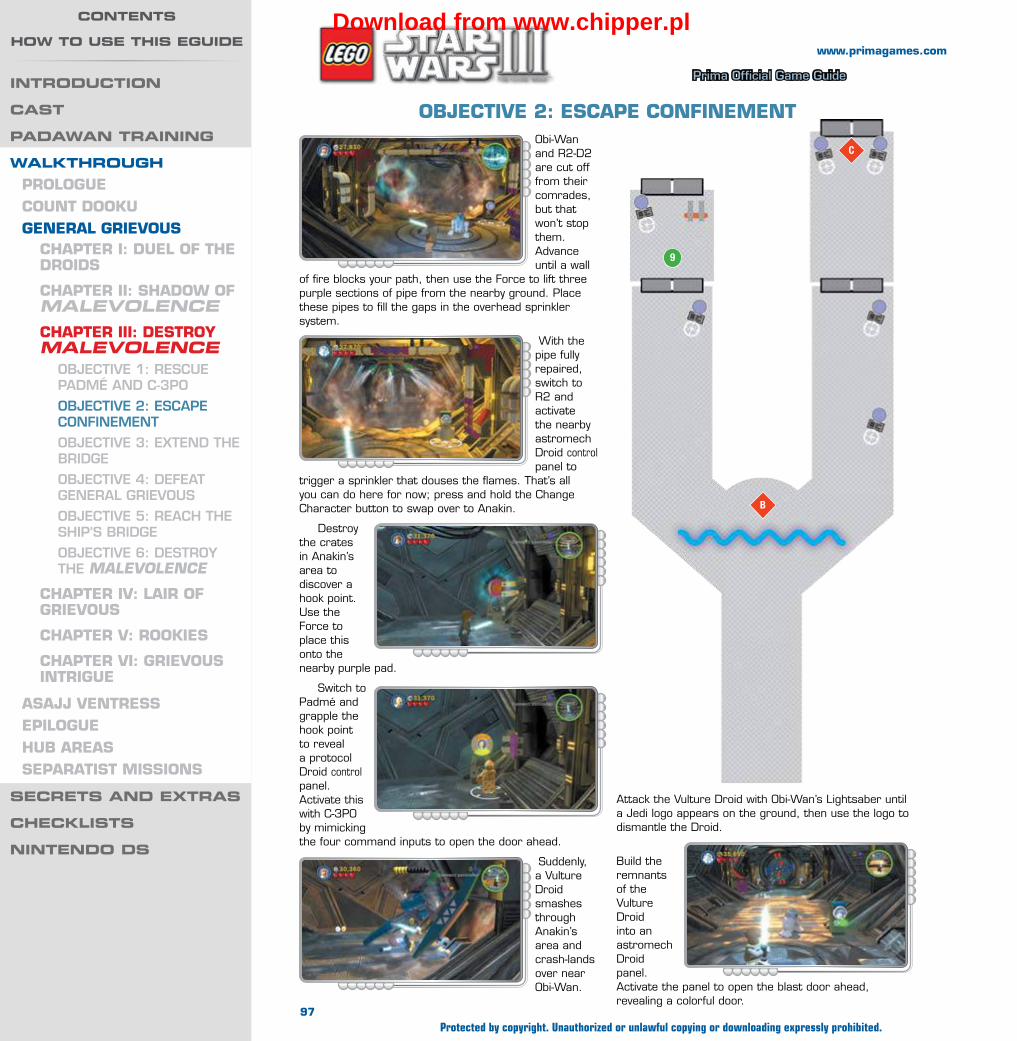
Wa
lk
th
ro
ug
h —
gen
er
al g
rie
vo
us
Prima Official Game Guide
obJeCTive 2: eSCAPe ConfineMenTObi-Wan and R2-D2 are cut off from their comrades, but that won’t stop them. Advance until a wall
of fire blocks your path, then use the Force to lift three purple sections of pipe from the nearby ground. Place these pipes to fill the gaps in the overhead sprinkler system.
With the pipe fully repaired, switch to R2 and activate the nearby astromech Droid control panel to
trigger a sprinkler that douses the flames. That’s all you can do here for now; press and hold the Change Character button to swap over to Anakin.
Destroy the crates in Anakin’s area to discover a hook point. Use the Force to place this onto the nearby purple pad.
Switch to Padmé and grapple the hook point to reveal a protocol Droid control panel. Activate this with C-3PO by mimicking the four command inputs to open the door ahead.
Suddenly, a Vulture Droid smashes through Anakin’s area and crash-lands over near Obi-Wan.
Attack the Vulture Droid with Obi-Wan’s Lightsaber until a Jedi logo appears on the ground, then use the logo to dismantle the Droid.
Build the remnants of the Vulture Droid into an astromech Droid panel. Activate the panel to open the blast door ahead, revealing a colorful door.
C
9
B
97
www.primagames.com
Protected by copyright. Unauthorized or unlawful copying or downloading expressly prohibited.
introDuCtion
Cast
paDaWan training
WalkthroughPRologueCounT DookugeneRAl gRievouS
ChAPTeR i: Duel of The DRoiDS
ChAPTeR ii: ShADow of MalevolenCeChAPTeR iii: DeSTRoy MalevolenCe
Objective 1: rescue PaDmé anD c-3PO
Objective 2: escaPe cOnfinement
Objective 3: extenD the briDGe
Objective 4: Defeat General GrievOus
Objective 5: reach the shiP’s briDGe
Objective 6: DestrOy the MAlevolenCe
ChAPTeR iv: lAiR of gRievouS
ChAPTeR v: RookieS
ChAPTeR vi: gRievouS inTRigue
ASAJJ venTReSSePiloguehub AReASSePARATiST MiSSionS
seCrets anD extras
CheCklists
nintenDo Ds
Contents
hoW to use this eguiDeDownload from www.chipper.pl
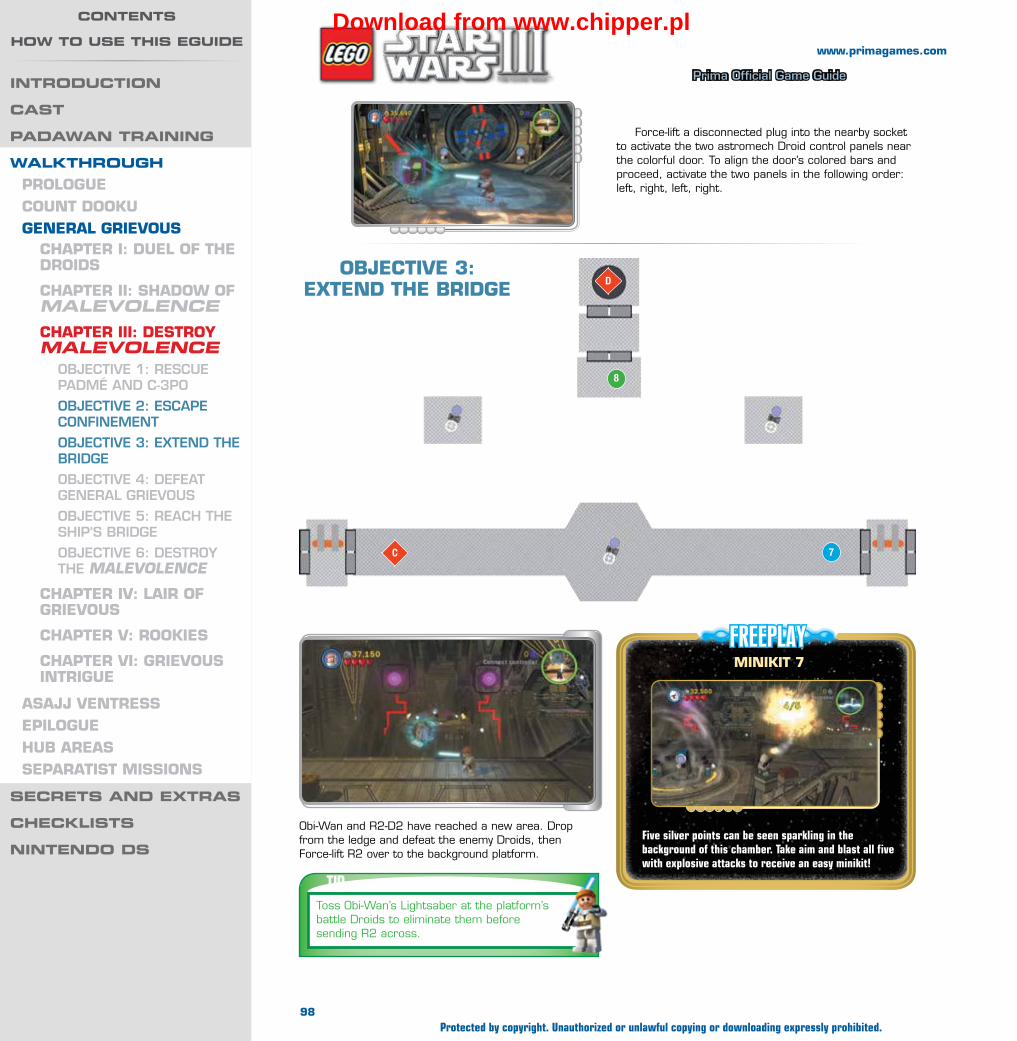
Wa
lk
th
ro
ug
h —
gen
er
al g
rie
vo
us
Prima Official Game Guide
D
8
7C
Force-lift a disconnected plug into the nearby socket to activate the two astromech Droid control panels near the colorful door. To align the door’s colored bars and proceed, activate the two panels in the following order: left, right, left, right.
Obi-Wan and R2-D2 have reached a new area. Drop from the ledge and defeat the enemy Droids, then Force-lift R2 over to the background platform.
TIPToss Obi-Wan’s Lightsaber at the platform’s battle Droids to eliminate them before sending R2 across.
FREEPLAYMinikiT 7
Five silver points can be seen sparkling in the background of this chamber. Take aim and blast all five with explosive attacks to receive an easy minikit!
obJeCTive 3: exTenD The bRiDge
98
www.primagames.com
Protected by copyright. Unauthorized or unlawful copying or downloading expressly prohibited.
introDuCtion
Cast
paDaWan training
WalkthroughPRologueCounT DookugeneRAl gRievouS
ChAPTeR i: Duel of The DRoiDS
ChAPTeR ii: ShADow of MalevolenCeChAPTeR iii: DeSTRoy MalevolenCe
Objective 1: rescue PaDmé anD c-3PO
Objective 2: escaPe cOnfinement
Objective 3: extenD the briDGe
Objective 4: Defeat General GrievOus
Objective 5: reach the shiP’s briDGe
Objective 6: DestrOy the MAlevolenCe
ChAPTeR iv: lAiR of gRievouS
ChAPTeR v: RookieS
ChAPTeR vi: gRievouS inTRigue
ASAJJ venTReSSePiloguehub AReASSePARATiST MiSSionS
seCrets anD extras
CheCklists
nintenDo Ds
Contents
hoW to use this eguiDeDownload from www.chipper.pl

Wa
lk
th
ro
ug
h —
gen
er
al g
rie
vo
us
Prima Official Game Guide
Switch to R2-D2 and activate the platform’s astromech Droid control panel to fire up a torpedo generator. Switch back to Obi-Wan and use the Force to hurl torpedoes at the two background targets to destroy them. Repeat this with the similar platform to the right, torpedoing another two targets. This banishes the shield that covers the central panel.
Activate the central astromech Droid control panel to extend a bridge leading toward
the background door. Beware: General Grievous himself stalks out from behind the door. He’s ready to do battle!
obJeCTive 4: DefeAT geneRAl gRievouS
Don’t attack Grievous directly; use the Force to hurl surrounding objects at him instead. Whack
Grievous twice to make him run over to the chamber’s left side.
Chase Grievous and Force-throw another object at him to knock him through the bars behind
him. Grievous flees again, this time to the chamber’s right side. Pull the lever within the side room before giving chase.
Force-throw another object at Grievous to knock him through another set of bars. Pull the lever in the
small room beyond after Grievous flees to the chamber’s center.
With both levers thrown, the background door opens. Now you just have to finish off that creepy clanker!
Grievous hides behind two shielded Droidekas; dispatch these bodyguards, then Force-throw one final object at the General to send him packing.
CAUTIONShielded Droidekas now appear to block you. Lay into them with Obi-Wan’s Lightsaber as you go about your business.
CAUTIONThe Droidekas will return after a time, so be on your guard.
Before defeating Grievous, attack a Droideka to remove its shield, then Force-throw the Droideka into Grievous to wound him. Do this five times to score a super-secret minikit! You’ll need to chase Grievous around the chamber to accomplish this feat.
MinikiT 8
99
www.primagames.com
Protected by copyright. Unauthorized or unlawful copying or downloading expressly prohibited.
introDuCtion
Cast
paDaWan training
WalkthroughPRologueCounT DookugeneRAl gRievouS
ChAPTeR i: Duel of The DRoiDS
ChAPTeR ii: ShADow of MalevolenCeChAPTeR iii: DeSTRoy MalevolenCe
Objective 1: rescue PaDmé anD c-3PO
Objective 2: escaPe cOnfinement
Objective 3: extenD the briDGe
Objective 4: Defeat General GrievOus
Objective 5: reach the shiP’s briDGe
Objective 6: DestrOy the MAlevolenCe
ChAPTeR iv: lAiR of gRievouS
ChAPTeR v: RookieS
ChAPTeR vi: gRievouS inTRigue
ASAJJ venTReSSePiloguehub AReASSePARATiST MiSSionS
seCrets anD extras
CheCklists
nintenDo Ds
Contents
hoW to use this eguiDeDownload from www.chipper.pl

Wa
lk
th
ro
ug
h —
gen
er
al g
rie
vo
us
Prima Official Game Guide
As Anakin, use the Force to place the colored bits on the three purple notches to the right.
The order of the bits doesn’t matter—unless you’re after a minikit! See the sidebar for details.
After Obi-Wan and R2-D2 defeat Grievous and ride down the lift, the scene switches
back to Anakin and friends. Take control of Padmé and grapple the hook point near the far door to reveal three colored bits that tumble to the floor.
With Grievous out of the way, cross the bridge and stand on one of the two buttons beyond. R2 will automatically move onto the other button, opening the next door ahead. Proceed down the lift beyond.
obJeCTive 5: ReACh The ShiP’S bRiDge
MinikiT 9To score an easy minikit, place the bits in the same order as shown on the left wall. Start with the bottom bit (green) and work your way up to the top (red). Deductive reasoning tells us that yellow must then go in the middle!
With the bits slotted into place, the nearby protocol panel comes online. Time to shine, Threepio! Activate the panel, then ride up the lift beyond to reach the battleship’s bridge.
100
www.primagames.com
Protected by copyright. Unauthorized or unlawful copying or downloading expressly prohibited.
introDuCtion
Cast
paDaWan training
WalkthroughPRologueCounT DookugeneRAl gRievouS
ChAPTeR i: Duel of The DRoiDS
ChAPTeR ii: ShADow of MalevolenCeChAPTeR iii: DeSTRoy MalevolenCe
Objective 1: rescue PaDmé anD c-3PO
Objective 2: escaPe cOnfinement
Objective 3: extenD the briDGe
Objective 4: Defeat General GrievOus
Objective 5: reach the shiP’s briDGe
Objective 6: DestrOy the MAlevolenCe
ChAPTeR iv: lAiR of gRievouS
ChAPTeR v: RookieS
ChAPTeR vi: gRievouS inTRigue
ASAJJ venTReSSePiloguehub AReASSePARATiST MiSSionS
seCrets anD extras
CheCklists
nintenDo Ds
Contents
hoW to use this eguiDeDownload from www.chipper.pl
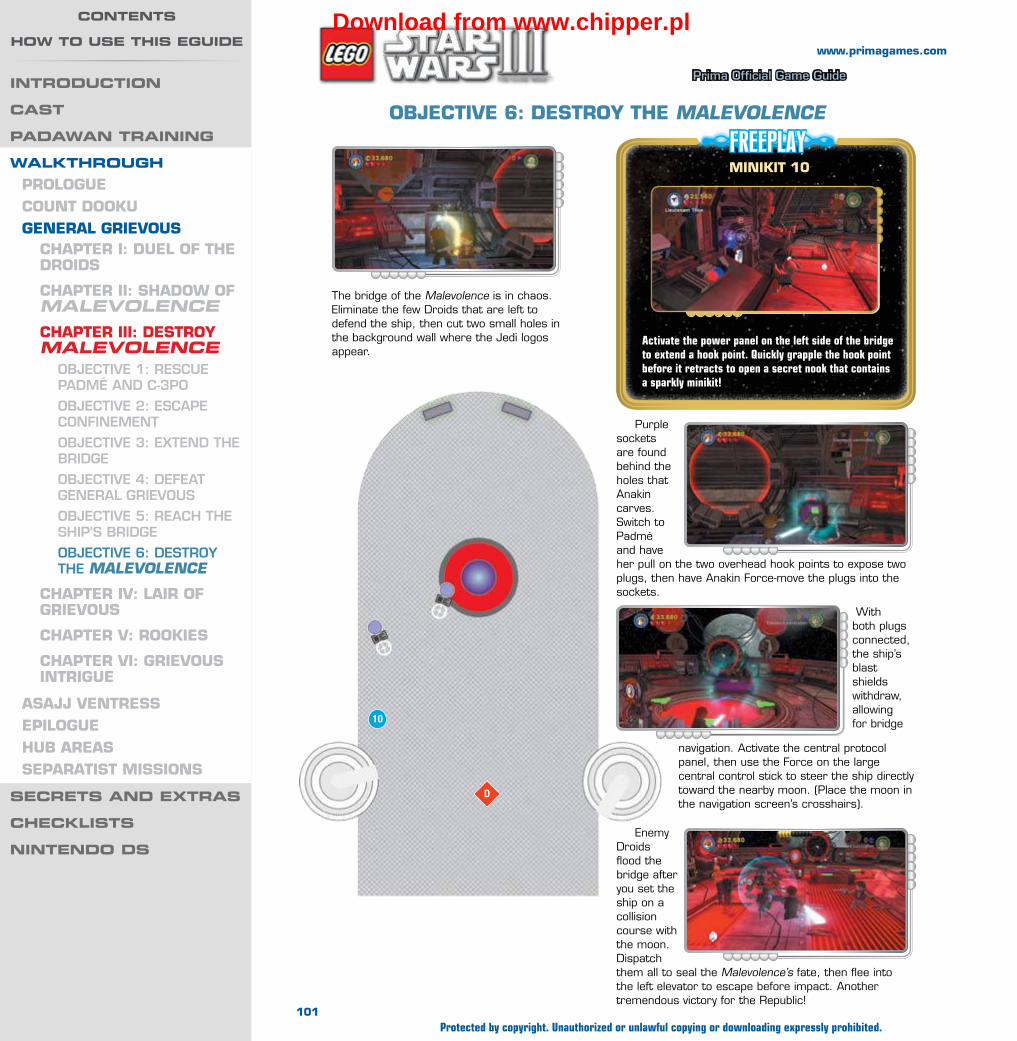
Wa
lk
th
ro
ug
h —
gen
er
al g
rie
vo
us
Prima Official Game Guide
10
D
Enemy Droids flood the bridge after you set the ship on a collision course with the moon. Dispatch them all to seal the Malevolence’s fate, then flee into the left elevator to escape before impact. Another tremendous victory for the Republic!
obJeCTive 6: DeSTRoy The MAlevolenCe
The bridge of the Malevolence is in chaos. Eliminate the few Droids that are left to defend the ship, then cut two small holes in the background wall where the Jedi logos appear.
FREEPLAYMinikiT 10
Activate the power panel on the left side of the bridge to extend a hook point. Quickly grapple the hook point before it retracts to open a secret nook that contains a sparkly minikit!
Purple sockets are found behind the holes that Anakin carves. Switch to Padmé and have her pull on the two overhead hook points to expose two plugs, then have Anakin Force-move the plugs into the sockets.
With both plugs connected, the ship’s blast shields withdraw, allowing for bridge
navigation. Activate the central protocol panel, then use the Force on the large central control stick to steer the ship directly toward the nearby moon. (Place the moon in the navigation screen’s crosshairs).
101
www.primagames.com
Protected by copyright. Unauthorized or unlawful copying or downloading expressly prohibited.
introDuCtion
Cast
paDaWan training
WalkthroughPRologueCounT DookugeneRAl gRievouS
ChAPTeR i: Duel of The DRoiDS
ChAPTeR ii: ShADow of MalevolenCeChAPTeR iii: DeSTRoy MalevolenCe
Objective 1: rescue PaDmé anD c-3PO
Objective 2: escaPe cOnfinement
Objective 3: extenD the briDGe
Objective 4: Defeat General GrievOus
Objective 5: reach the shiP’s briDGe
Objective 6: DestrOy the MAlevolenCe
ChAPTeR iv: lAiR of gRievouS
ChAPTeR v: RookieS
ChAPTeR vi: gRievouS inTRigue
ASAJJ venTReSSePiloguehub AReASSePARATiST MiSSionS
seCrets anD extras
CheCklists
nintenDo Ds
Contents
hoW to use this eguiDeDownload from www.chipper.pl
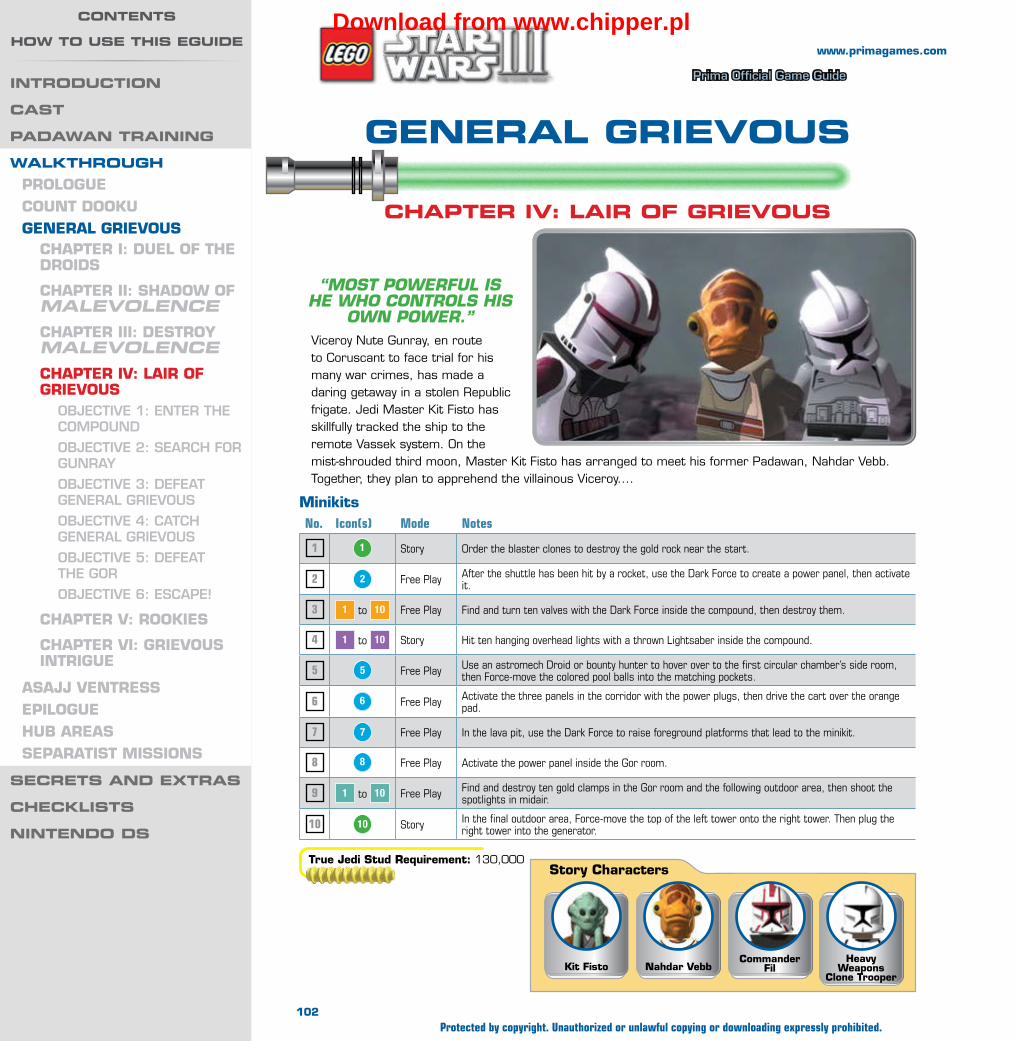
Wa
lk
th
ro
ug
h —
gen
er
al g
rie
vo
us
Prima Official Game Guide
www.primagames.com
Protected by copyright. Unauthorized or unlawful copying or downloading expressly prohibited.
introduction
cast
PadaWan training
WalkthroughPrologueCount Dookugeneral grievous
ChaPter i: Duel of the DroiDs
ChaPter ii: shaDow of MalevolenceChaPter iii: Destroy MalevolenceChaPter iv: lair of grievous
Objective 1: enter the cOmPOund
Objective 2: Search fOr Gunray
Objective 3: defeat General GrievOuS
Objective 4: catch General GrievOuS
Objective 5: defeat the GOr
Objective 6: eScaPe!
ChaPter v: rookies
ChaPter vi: grievous intrigue
asajj ventressePiloguehub areasseParatist Missions
secrets and extras
checklists
nintendo ds
contents
hoW to use this eguide
“most poweRFul Is he who contRols hIs
own poweR.”Viceroy Nute Gunray, en route to Coruscant to face trial for his many war crimes, has made a daring getaway in a stolen Republic frigate. Jedi Master Kit Fisto has skillfully tracked the ship to the remote Vassek system. On the mist-shrouded third moon, Master Kit Fisto has arranged to meet his former Padawan, Nahdar Vebb. Together, they plan to apprehend the villainous Viceroy....
general grievous
chaPter iv: lair of grievous
MinikitsNo. Icon(s) Mode Notes
1 1 Story Order the blaster clones to destroy the gold rock near the start.
2 2 Free Play After the shuttle has been hit by a rocket, use the Dark Force to create a power panel, then activate it.
3 1 to 10 Free Play Find and turn ten valves with the Dark Force inside the compound, then destroy them.
4 1 to 10 Story Hit ten hanging overhead lights with a thrown Lightsaber inside the compound.
5 5 Free Play Use an astromech Droid or bounty hunter to hover over to the first circular chamber’s side room, then Force-move the colored pool balls into the matching pockets.
6 6 Free Play Activate the three panels in the corridor with the power plugs, then drive the cart over the orange pad.
7 7 Free Play In the lava pit, use the Dark Force to raise foreground platforms that lead to the minikit.
8 8 Free Play Activate the power panel inside the Gor room.
9 1 to 10 Free Play Find and destroy ten gold clamps in the Gor room and the following outdoor area, then shoot the spotlights in midair.
10 10 Story In the final outdoor area, Force-move the top of the left tower onto the right tower. Then plug the right tower into the generator.
true jedi stud requirement: 130,000story Characters
Commander filnahdar vebbkit fisto
heavy weapons
Clone trooper
102
Download from www.chipper.pl

Wa
lk
th
ro
ug
h —
gen
er
al g
rie
vo
us
Prima Official Game Guide
www.primagames.com
Protected by copyright. Unauthorized or unlawful copying or downloading expressly prohibited.
introduction
cast
PadaWan training
WalkthroughPrologueCount Dookugeneral grievous
ChaPter i: Duel of the DroiDs
ChaPter ii: shaDow of MalevolenceChaPter iii: Destroy MalevolenceChaPter iv: lair of grievous
Objective 1: enter the cOmPOund
Objective 2: Search fOr Gunray
Objective 3: defeat General GrievOuS
Objective 4: catch General GrievOuS
Objective 5: defeat the GOr
Objective 6: eScaPe!
ChaPter v: rookies
ChaPter vi: grievous intrigue
asajj ventressePiloguehub areasseParatist Missions
secrets and extras
checklists
nintendo ds
contents
hoW to use this eguide
You begin this mission just outside of General Grievous’s lair. Destroy everything around the landing zone for studs, then lead your comrades into the thick fog ahead.
TIP
Perform daring double jumps to reach the two purple studs that hover on high to the right of this outdoor area. You may plummet to your doom a few times during the effort, but the reward is worth the risk!
You soon encounter a number of blaster clones near a shuttle. You can’t control these troopers
directly, so take control of Commander Fil instead and press the Action button to get the clones to follow you.
A
1
2
start
Take control of Commander Fil and order the blaster clones to follow you. Lead the clones back to the starting point and then order them to fire on the gold rock to the left. The rock soon explodes, revealing a minikit! Leap over and claim your prize.
Minikit 1
objeCtive 1: enter the CoMPounD
103
Download from www.chipper.pl
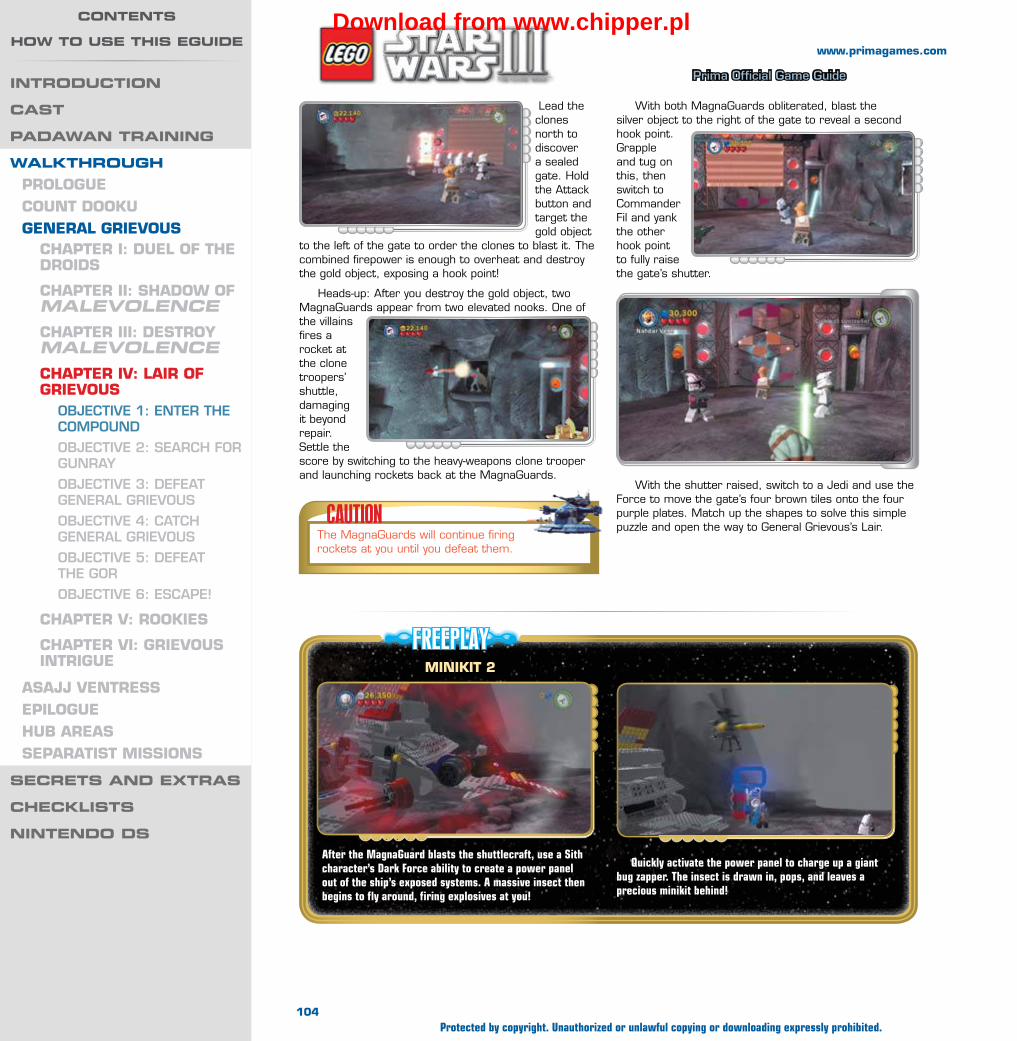
Wa
lk
th
ro
ug
h —
gen
er
al g
rie
vo
us
Prima Official Game Guide
www.primagames.com
Protected by copyright. Unauthorized or unlawful copying or downloading expressly prohibited.
introduction
cast
PadaWan training
WalkthroughPrologueCount Dookugeneral grievous
ChaPter i: Duel of the DroiDs
ChaPter ii: shaDow of MalevolenceChaPter iii: Destroy MalevolenceChaPter iv: lair of grievous
Objective 1: enter the cOmPOund
Objective 2: Search fOr Gunray
Objective 3: defeat General GrievOuS
Objective 4: catch General GrievOuS
Objective 5: defeat the GOr
Objective 6: eScaPe!
ChaPter v: rookies
ChaPter vi: grievous intrigue
asajj ventressePiloguehub areasseParatist Missions
secrets and extras
checklists
nintendo ds
contents
hoW to use this eguide
Lead the clones north to discover a sealed gate. Hold the Attack button and target the gold object
to the left of the gate to order the clones to blast it. The combined firepower is enough to overheat and destroy the gold object, exposing a hook point!
Heads-up: After you destroy the gold object, two MagnaGuards appear from two elevated nooks. One of the villains fires a rocket at the clone troopers’ shuttle, damaging it beyond repair. Settle the score by switching to the heavy-weapons clone trooper and launching rockets back at the MagnaGuards.
With the shutter raised, switch to a Jedi and use the Force to move the gate’s four brown tiles onto the four purple plates. Match up the shapes to solve this simple puzzle and open the way to General Grievous’s Lair.
With both MagnaGuards obliterated, blast the silver object to the right of the gate to reveal a second hook point. Grapple and tug on this, then switch to Commander Fil and yank the other hook point to fully raise the gate’s shutter.
CAUTIONThe MagnaGuards will continue firing rockets at you until you defeat them.
FREEPLAYMinikit 2
After the MagnaGuard blasts the shuttlecraft, use a Sith character’s Dark Force ability to create a power panel out of the ship’s exposed systems. A massive insect then begins to fly around, firing explosives at you!
Quickly activate the power panel to charge up a giant bug zapper. The insect is drawn in, pops, and leaves a precious minikit behind!
104
Download from www.chipper.pl
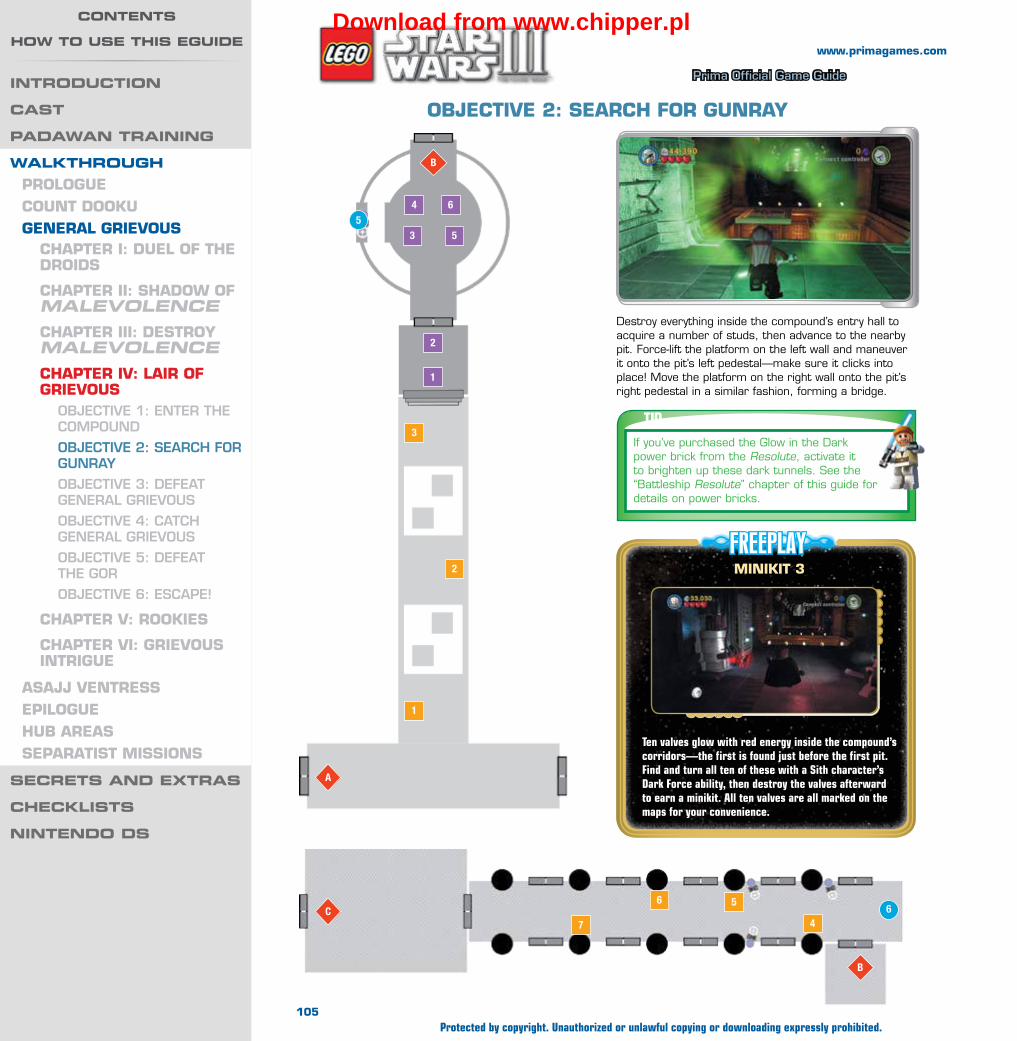
Wa
lk
th
ro
ug
h —
gen
er
al g
rie
vo
us
Prima Official Game Guide
www.primagames.com
Protected by copyright. Unauthorized or unlawful copying or downloading expressly prohibited.
introduction
cast
PadaWan training
WalkthroughPrologueCount Dookugeneral grievous
ChaPter i: Duel of the DroiDs
ChaPter ii: shaDow of MalevolenceChaPter iii: Destroy MalevolenceChaPter iv: lair of grievous
Objective 1: enter the cOmPOund
Objective 2: Search fOr Gunray
Objective 3: defeat General GrievOuS
Objective 4: catch General GrievOuS
Objective 5: defeat the GOr
Objective 6: eScaPe!
ChaPter v: rookies
ChaPter vi: grievous intrigue
asajj ventressePiloguehub areasseParatist Missions
secrets and extras
checklists
nintendo ds
contents
hoW to use this eguide
objeCtive 2: searCh for gunray
Destroy everything inside the compound’s entry hall to acquire a number of studs, then advance to the nearby pit. Force-lift the platform on the left wall and maneuver it onto the pit’s left pedestal—make sure it clicks into place! Move the platform on the right wall onto the pit’s right pedestal in a similar fashion, forming a bridge.
TIPIf you’ve purchased the Glow in the Dark power brick from the Resolute, activate it to brighten up these dark tunnels. See the “Battleship Resolute” chapter of this guide for details on power bricks.
FREEPLAYMinikit 3
Ten valves glow with red energy inside the compound’s corridors—the first is found just before the first pit. Find and turn all ten of these with a Sith character’s Dark Force ability, then destroy the valves afterward to earn a minikit. All ten valves are all marked on the maps for your convenience.
C 64
56
7
B
B
1
2
5
1
2
3
4
5
6
A
3
105
Download from www.chipper.pl

Wa
lk
th
ro
ug
h —
gen
er
al g
rie
vo
us
Prima Official Game Guide
www.primagames.com
Protected by copyright. Unauthorized or unlawful copying or downloading expressly prohibited.
introduction
cast
PadaWan training
WalkthroughPrologueCount Dookugeneral grievous
ChaPter i: Duel of the DroiDs
ChaPter ii: shaDow of MalevolenceChaPter iii: Destroy MalevolenceChaPter iv: lair of grievous
Objective 1: enter the cOmPOund
Objective 2: Search fOr Gunray
Objective 3: defeat General GrievOuS
Objective 4: catch General GrievOuS
Objective 5: defeat the GOr
Objective 6: eScaPe!
ChaPter v: rookies
ChaPter vi: grievous intrigue
asajj ventressePiloguehub areasseParatist Missions
secrets and extras
checklists
nintendo ds
contents
hoW to use this eguide
Lay waste to the Droids in the circular chamber to secure the area, then inspect the central console. A hologram of Count Dooku appears and taunts our heroes before vanishing. What a creep! Proceed through the background door that opens afterward.
Use the same tactics to cross the second pit, then wipe out the group of unsuspecting battle Droids beyond. Scale the steps that follow on your way to a circular chamber.
Ignore the enemy Droid and bounty hunter panels in the next corridor and proceed to the far door. Force-move two power plugs into the nearby sockets to open the door and reach a chamber full of Droid parts.
Take aim and hurl a Lightsaber at the six overhead lights beyond the pits. Look for four more hanging lights later in the level (in the hall with the lava pit trap) and hit these as well. Smack all 10 hanging lights to earn a minikit! Check the maps for the lights’ locations.
Minikit 4
FREEPLAYMinikit 5
Before leaving the circular chamber, use an astromech Droid to hover over to the left ledge. Activate the ledge’s bounty hunter panel to access a small side room.
Pull the lever inside the room to turn on the lights, revealing a pool table. Force-move each of the colored balls into the matching pockets to rack up a minikit! OK, who wants to break next?
106
Download from www.chipper.pl

Wa
lk
th
ro
ug
h —
gen
er
al g
rie
vo
us
Prima Official Game Guide
www.primagames.com
Protected by copyright. Unauthorized or unlawful copying or downloading expressly prohibited.
introduction
cast
PadaWan training
WalkthroughPrologueCount Dookugeneral grievous
ChaPter i: Duel of the DroiDs
ChaPter ii: shaDow of MalevolenceChaPter iii: Destroy MalevolenceChaPter iv: lair of grievous
Objective 1: enter the cOmPOund
Objective 2: Search fOr Gunray
Objective 3: defeat General GrievOuS
Objective 4: catch General GrievOuS
Objective 5: defeat the GOr
Objective 6: eScaPe!
ChaPter v: rookies
ChaPter vi: grievous intrigue
asajj ventressePiloguehub areasseParatist Missions
secrets and extras
checklists
nintendo ds
contents
hoW to use this eguide
Defeat the MagnaGuard that attacks you in the parts chamber by hammering the Attack button (with a Jedi). Afterward, run around and destroy everything else in the room for studs.
... And none other than Grievous himself emerges from behind the door!
objeCtive 3: Defeat general grievous
Grievous’s whirling Lightsabers are lethal, so don’t get too close. Instead, run to the foreground to find a
box of pieces sitting near the chamber’s entrance, and Force-throw this box at the wicked General to stun him.
After stunning Grievous, quickly switch to a clone character and grapple the hook point that now appears on his leg. Yank off the leg, then repeat this sequence to tear Grievous’s other leg off. (The box of pieces will respawn indefinitely.)
Having lost both of his locomotors, Grievous changes tactics and begins climbing around the ceiling,
hurling Lightsabers at you. Toss that same box of pieces at him again, hitting him three times to knock him to the ground.
FREEPLAYMinikit 6
During Free Play, activate the three panels in the corridor to receive an assortment of pieces. Build these into an orange pad and a utility truck, then drive the truck over the pad to claim an easy minikit!
TIPToss a Lightsaber at the hanging Droid scraps to smash them and score even more loot!
Blast the two silver boxes near the background door to reveal some special Droid parts. Pull
two sets of hook points out of another two silver objects, then blast these as well to reveal even more special parts.
Switch to a Jedi and Force-move the Droid parts onto the background door.
Place the arms to the sides, the legs at the bottom, the torso in the middle, and the head up top. The finished product resembles General Grievous ...
107
Download from www.chipper.pl
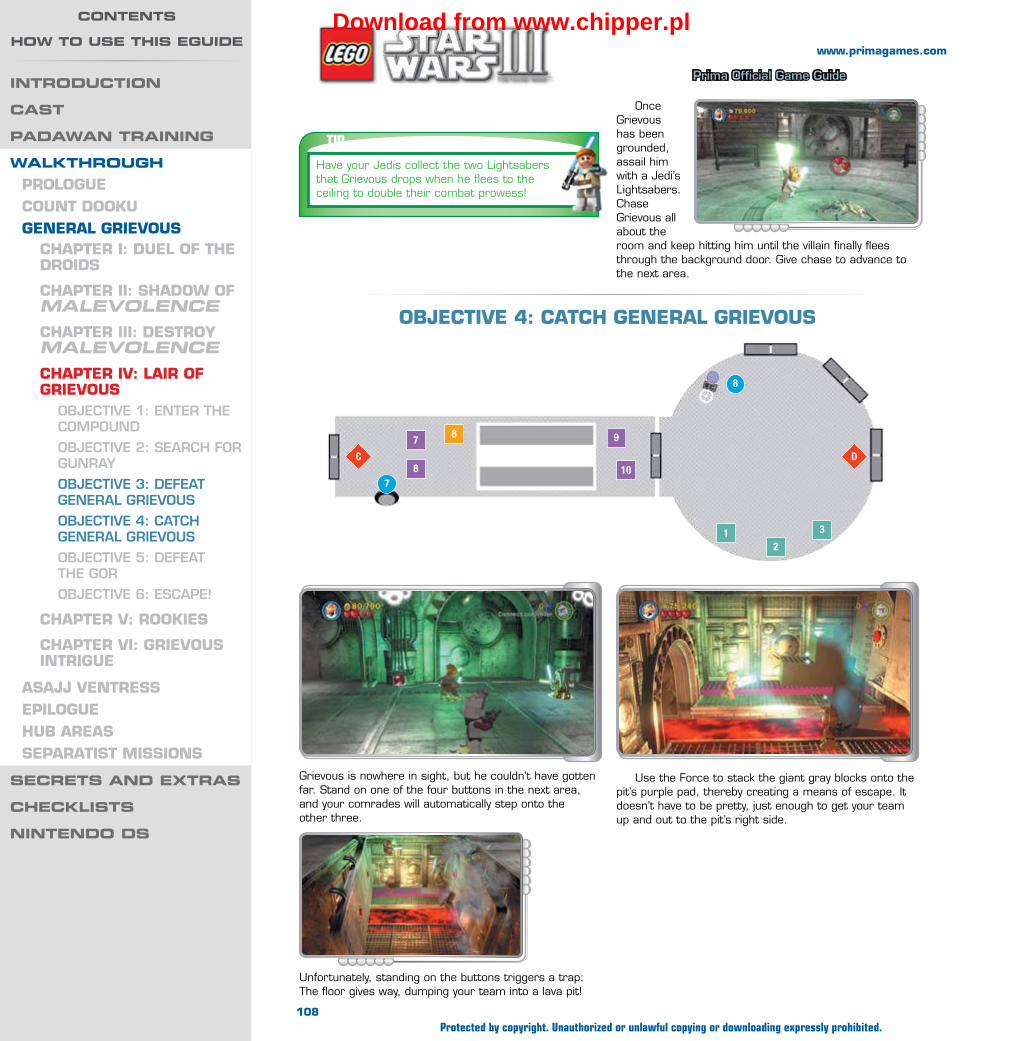
Wa
lk
th
ro
ug
h —
gen
er
al g
rie
vo
us
Prima Official Game Guide
www.primagames.com
Protected by copyright. Unauthorized or unlawful copying or downloading expressly prohibited.
introduction
cast
PadaWan training
WalkthroughPrologueCount Dookugeneral grievous
ChaPter i: Duel of the DroiDs
ChaPter ii: shaDow of MalevolenceChaPter iii: Destroy MalevolenceChaPter iv: lair of grievous
Objective 1: enter the cOmPOund
Objective 2: Search fOr Gunray
Objective 3: defeat General GrievOuS
Objective 4: catch General GrievOuS
Objective 5: defeat the GOr
Objective 6: eScaPe!
ChaPter v: rookies
ChaPter vi: grievous intrigue
asajj ventressePiloguehub areasseParatist Missions
secrets and extras
checklists
nintendo ds
contents
hoW to use this eguide
Once Grievous has been grounded, assail him with a Jedi’s Lightsabers. Chase Grievous all about the room and keep hitting him until the villain finally flees through the background door. Give chase to advance to the next area.
TIPHave your Jedis collect the two Lightsabers that Grievous drops when he flees to the ceiling to double their combat prowess!
objeCtive 4: CatCh general grievous
Grievous is nowhere in sight, but he couldn’t have gotten far. Stand on one of the four buttons in the next area, and your comrades will automatically step onto the other three.
Unfortunately, standing on the buttons triggers a trap: The floor gives way, dumping your team into a lava pit!
Use the Force to stack the giant gray blocks onto the pit’s purple pad, thereby creating a means of escape. It doesn’t have to be pretty, just enough to get your team up and out to the pit’s right side.
D
7
8
12
3
87
8
9
10C
108
Download from www.chipper.pl

Wa
lk
th
ro
ug
h —
gen
er
al g
rie
vo
us
Prima Official Game Guide
www.primagames.com
Protected by copyright. Unauthorized or unlawful copying or downloading expressly prohibited.
introduction
cast
PadaWan training
WalkthroughPrologueCount Dookugeneral grievous
ChaPter i: Duel of the DroiDs
ChaPter ii: shaDow of MalevolenceChaPter iii: Destroy MalevolenceChaPter iv: lair of grievous
Objective 1: enter the cOmPOund
Objective 2: Search fOr Gunray
Objective 3: defeat General GrievOuS
Objective 4: catch General GrievOuS
Objective 5: defeat the GOr
Objective 6: eScaPe!
ChaPter v: rookies
ChaPter vi: grievous intrigue
asajj ventressePiloguehub areasseParatist Missions
secrets and extras
checklists
nintendo ds
contents
hoW to use this eguide
Through a window in the next circular chamber, General Grievous can be seen receiving some
much-needed repairs. This is the least of your concerns, however—for the monstrous Gor soon stomps into the room!
objeCtive 5: Defeat the gor
Do your best to avoid Gor as you work at grappling the two hook points on its sides. Once both
FREEPLAYMinikit 7
Before leaving the lava pit, toggle to a Sith character and face the foreground. Use the Dark Force to raise a hidden platform up from the lava, and keep using the Dark Force until the platform stabilizes.
Hop onto the platform, then quickly use the Dark Force to raise another one to the left—don’t dally because the platforms soon sink. Repeat this once more to reach a small ledge with a minikit!
FREEPLAYMinikit 8
During Free Play, activate the power panel on the left side of Gor’s chamber to get the party started. A disco ball drops from the ceiling, tunes starts pumping, and lights begin to flash—who knew Grievous was such a party animal? Snag the minikit that appears near the power panel while Gor is busy grooving to the beat.
hook points are grappled, a Jedi logo appears near the monster—use this to leap up and hack off one of Gor’s appendages. Repeat this sequence until the brute goes down for the count.
TIPBlast the disco ball with a rocket launcher character to “make it rain”—studs, that is!
Minikit 9Find and shoot ten spotlights during Free Play to earn a minikit. The first three are found in the foreground of Gor’s chamber—destroy the protective gold clamps with a rapid-fire character, then shoot the spotlights into the air. Keep firing to hit them again in midair—it may help to stand back a bit. Do this to the seven remaining spotlights in the next area and your marksmanship will be richly rewarded!
109
Download from www.chipper.pl
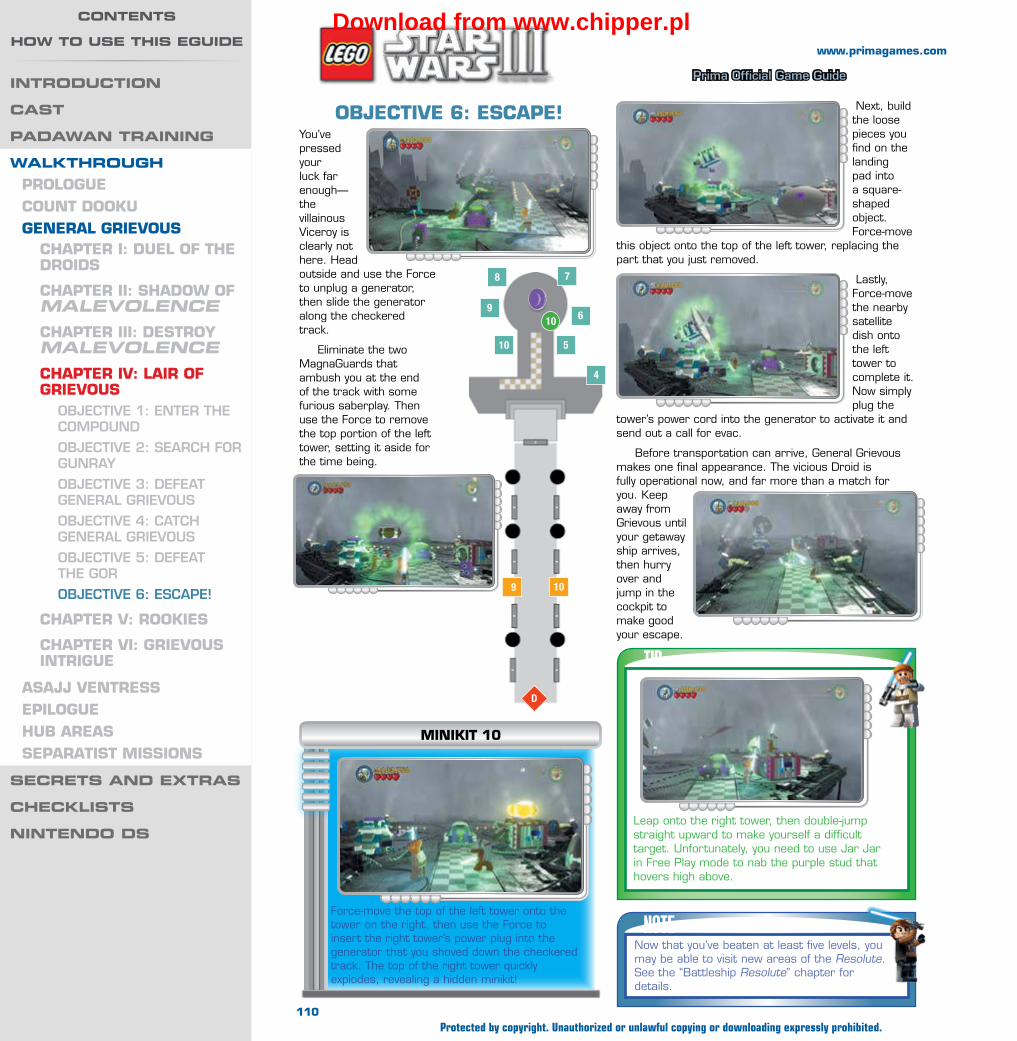
Wa
lk
th
ro
ug
h —
gen
er
al g
rie
vo
us
Prima Official Game Guide
www.primagames.com
Protected by copyright. Unauthorized or unlawful copying or downloading expressly prohibited.
introduction
cast
PadaWan training
WalkthroughPrologueCount Dookugeneral grievous
ChaPter i: Duel of the DroiDs
ChaPter ii: shaDow of MalevolenceChaPter iii: Destroy MalevolenceChaPter iv: lair of grievous
Objective 1: enter the cOmPOund
Objective 2: Search fOr Gunray
Objective 3: defeat General GrievOuS
Objective 4: catch General GrievOuS
Objective 5: defeat the GOr
Objective 6: eScaPe!
ChaPter v: rookies
ChaPter vi: grievous intrigue
asajj ventressePiloguehub areasseParatist Missions
secrets and extras
checklists
nintendo ds
contents
hoW to use this eguide
Next, build the loose pieces you find on the landing pad into a square-shaped object. Force-move
this object onto the top of the left tower, replacing the part that you just removed.
Lastly, Force-move the nearby satellite dish onto the left tower to complete it. Now simply plug the
tower’s power cord into the generator to activate it and send out a call for evac.
Before transportation can arrive, General Grievous makes one final appearance. The vicious Droid is fully operational now, and far more than a match for you. Keep away from Grievous until your getaway ship arrives, then hurry over and jump in the cockpit to make good your escape.
TIP
Leap onto the right tower, then double-jump straight upward to make yourself a difficult target. Unfortunately, you need to use Jar Jar in Free Play mode to nab the purple stud that hovers high above.
Force-move the top of the left tower onto the tower on the right, then use the Force to insert the right tower’s power plug into the generator that you shoved down the checkered track. The top of the right tower quickly explodes, revealing a hidden minikit!
NOTENow that you’ve beaten at least five levels, you may be able to visit new areas of the Resolute. See the “Battleship Resolute” chapter for details.
D
4
5
9 10
6
78
9
10
10
Minikit 10
objeCtive 6: esCaPe!You’ve pressed your luck far enough—the villainous Viceroy is clearly not here. Head outside and use the Force to unplug a generator, then slide the generator along the checkered track.
Eliminate the two MagnaGuards that ambush you at the end of the track with some furious saberplay. Then use the Force to remove the top portion of the left tower, setting it aside for the time being.
110
Download from www.chipper.pl

Wa
lk
th
ro
ug
h —
gen
er
al g
rie
vo
us
Prima Official Game Guide
general grievous
chaPter v: rookies
MinikitsNo. Icon(s) Mode Notes
1 1 Free Play Destroy the silver barricade at the start, then build and use the cleaning machine on the six goo piles.
2 2 Free Play After the worm flees, use the Dark Force to enter a cave. Hatch the five eggs inside.
3 3 Free Play After the worm flees, destroy the silver rubble, then jump into the high cave. Grapple the three hook points inside.
4 4 Free Play After defeating the worm, use the Jedi logo to access a cave. Feed the young worm the five minikit pieces.
5 1 to 5 Free Play After defeating the worm, find and plug five steaming vents throughout the level.
6 6 Free Play After defeating the worm, activate the power panel, followed by the astromech Droid control panel.
7 1 to 5 Story Find and destroy five blue consoles inside the station to reveal hook points, then grapple these.
8 8 Story Destroy the six gold boxes with Hevy when battling the army of Droids.
9 9 Free Play Use the Dark Force to open the vent in the control room. Drain the jacuzzi outside.
10 10 Free Play Use the Dark Force to open the vent in the control room. Activate the radio tower, then collect the minikit with Hevy.
true jedi stud requirement: 75,000
story Characters
fiveshevyechoCommander
CodyCaptain rex
“the Best conFIdence BuIldeR Is
eXpeRIence.”A tracking station on the remote Rishi Moon, operated by a crew of clone troopers fresh out of training, is the Republic’s first line of defense against Separatist invasion in the area. Commander Cody and Captain Rex are on their way to carry out a routine inspection of the base—but things are not always as they seem....
111
www.primagames.com
Protected by copyright. Unauthorized or unlawful copying or downloading expressly prohibited.
introduction
cast
PadaWan training
WalkthroughPrologueCount Dookugeneral grievous
ChaPter i: Duel of the DroiDs
ChaPter ii: shaDow of MalevolenceChaPter iii: Destroy MalevolenceChaPter v: rookies
Objective 1: flee the landinG Site
Objective 2: defeat the WOrm
Objective 3: enter the StatiOn
Objective 4: PurGe the StatiOn
ChaPter vi: grievous intrigue
asajj ventressePiloguehub areasseParatist Missions
secrets and extras
checklists
nintendo ds
contents
hoW to use this eguideDownload from www.chipper.pl

Wa
lk
th
ro
ug
h —
gen
er
al g
rie
vo
us
Prima Official Game Guide
FREEPLAY
With the barricade destroyed, use the Force on the large crate to obtain some pieces, then build these into a cleaning machine. Drive this over the six piles of goo on the ground to receive an environmentally sound minikit!
Minikit 1
No need to toy with those Droids during Free Play—simply toggle to a character with explosive attacks, then obliterate the barricade itself!
There’ll be nothing routine about this inspection—the Separatists’ legions have taken over the station! You can’t destroy the silver barricade that the enemy has erected near the landing site, so blast the commando Droids that stand atop the barricade instead.
objeCtive 1: flee the lanDing site
TIPIf you’re having trouble blasting the Droids, get close and press the Action button to hurl shock grenades at them instead!
A
1
2
1
2
3
6
3
4
start
112
www.primagames.com
Protected by copyright. Unauthorized or unlawful copying or downloading expressly prohibited.
introduction
cast
PadaWan training
WalkthroughPrologueCount Dookugeneral grievous
ChaPter i: Duel of the DroiDs
ChaPter ii: shaDow of MalevolenceChaPter iii: Destroy MalevolenceChaPter v: rookies
Objective 1: flee the landinG Site
Objective 2: defeat the WOrm
Objective 3: enter the StatiOn
Objective 4: PurGe the StatiOn
ChaPter vi: grievous intrigue
asajj ventressePiloguehub areasseParatist Missions
secrets and extras
checklists
nintendo ds
contents
hoW to use this eguideDownload from www.chipper.pl

Wa
lk
th
ro
ug
h —
gen
er
al g
rie
vo
us
Prima Official Game Guide
A second team of Droids leaps onto the barricade and hurls explosive grenades that destroy
your shuttle. Not good! Eliminate these clankers as well, then build the bits that now appear in front of the barricade to form a crane.
Stand near the crane and grapple its winch drum. Lower yourself downward to escape this dangerous situation.
Run around and collect studs from the lower area. Beware: a massive worm soon emerges from one of the background holes, and it isn’t very friendly!
objeCtive 2: Defeat the worM
Keep your distance to avoid the worm’s earth-shaking attacks. When you see the worm’s hearts appear above its head, blast it until you knock off a portion of its mouth.
NOTEYou can only damage the worm when its hearts are displayed above its head.
Eventually, the worm will flee from the holes and knock down a bunch of pieces as it slithers to the
left. Build these into a bridge so you can cross over to the left side of the area, where a trio of friendly clone troopers await.
FREEPLAYMinikit 2
After the worm flees, use a Sith character’s Dark Force ability to remove the red-glowing rubble on the background cliff, then enter the hole beyond.
The hole leads to a small cavern. Force-move the five eggs you find in here, placing them onto the central incubator. Activate the power panel afterward to hatch the eggs and receive a minikit!
Minikit 3
After you’ve forced the worm to flee, blast the silver rubble on the background cliff to expose a high hole. Change to any character that can double-jump and leap inside.
The worm uses this odd cave as a nursery. Grapple and pull on the three hook points here to start the cribs’ mobiles spinning, soothing the young wormlings and earning a minikit in the process!
113
www.primagames.com
Protected by copyright. Unauthorized or unlawful copying or downloading expressly prohibited.
introduction
cast
PadaWan training
WalkthroughPrologueCount Dookugeneral grievous
ChaPter i: Duel of the DroiDs
ChaPter ii: shaDow of MalevolenceChaPter iii: Destroy MalevolenceChaPter v: rookies
Objective 1: flee the landinG Site
Objective 2: defeat the WOrm
Objective 3: enter the StatiOn
Objective 4: PurGe the StatiOn
ChaPter vi: grievous intrigue
asajj ventressePiloguehub areasseParatist Missions
secrets and extras
checklists
nintendo ds
contents
hoW to use this eguideDownload from www.chipper.pl

Wa
lk
th
ro
ug
h —
gen
er
al g
rie
vo
us
Prima Official Game Guide
It’s not long before the worm reappears on the left side of the area. Switch to Echo, then take aim
and use his rocket launcher to blast the worm each time it emerges from a background hole. Remember to wait until the worm’s hearts appear over its head! The worm collapses after eating a few rockets.
objeCtive 3: enter the station
You’ve done well to survive thus far, but you still need to enter the station. Build the pieces on the ground
near the fallen worm to create a set of stairs, then switch to Hevy and climb up.
FREEPLAYMinikit 4
Before climbing the stairs, toggle to a Jedi and cut a hole in the background cliff where the Jedi logo appears. Then head through the hole to reach another small cave.
A hungry young worm awaits its dinner inside the cave. Force-throw the surrounding minikit parts into the worm’s mouth, feeding it all five pieces. The worm can’t stomach the minikit and quickly burps it back up. Collect this regurgitated goodie, which is only a little slimy.
CAUTIONDon’t get too close to that baby worm—he bites!
Begin hopping across the metal platforms above the stairs, using Hevy to destroy the gold object that blocks your progress. Grapple the hook point that remains after the gold object is destroyed and swing over to the next platform ahead.
114
www.primagames.com
Protected by copyright. Unauthorized or unlawful copying or downloading expressly prohibited.
introduction
cast
PadaWan training
WalkthroughPrologueCount Dookugeneral grievous
ChaPter i: Duel of the DroiDs
ChaPter ii: shaDow of MalevolenceChaPter iii: Destroy MalevolenceChaPter v: rookies
Objective 1: flee the landinG Site
Objective 2: defeat the WOrm
Objective 3: enter the StatiOn
Objective 4: PurGe the StatiOn
ChaPter vi: grievous intrigue
asajj ventressePiloguehub areasseParatist Missions
secrets and extras
checklists
nintendo ds
contents
hoW to use this eguideDownload from www.chipper.pl
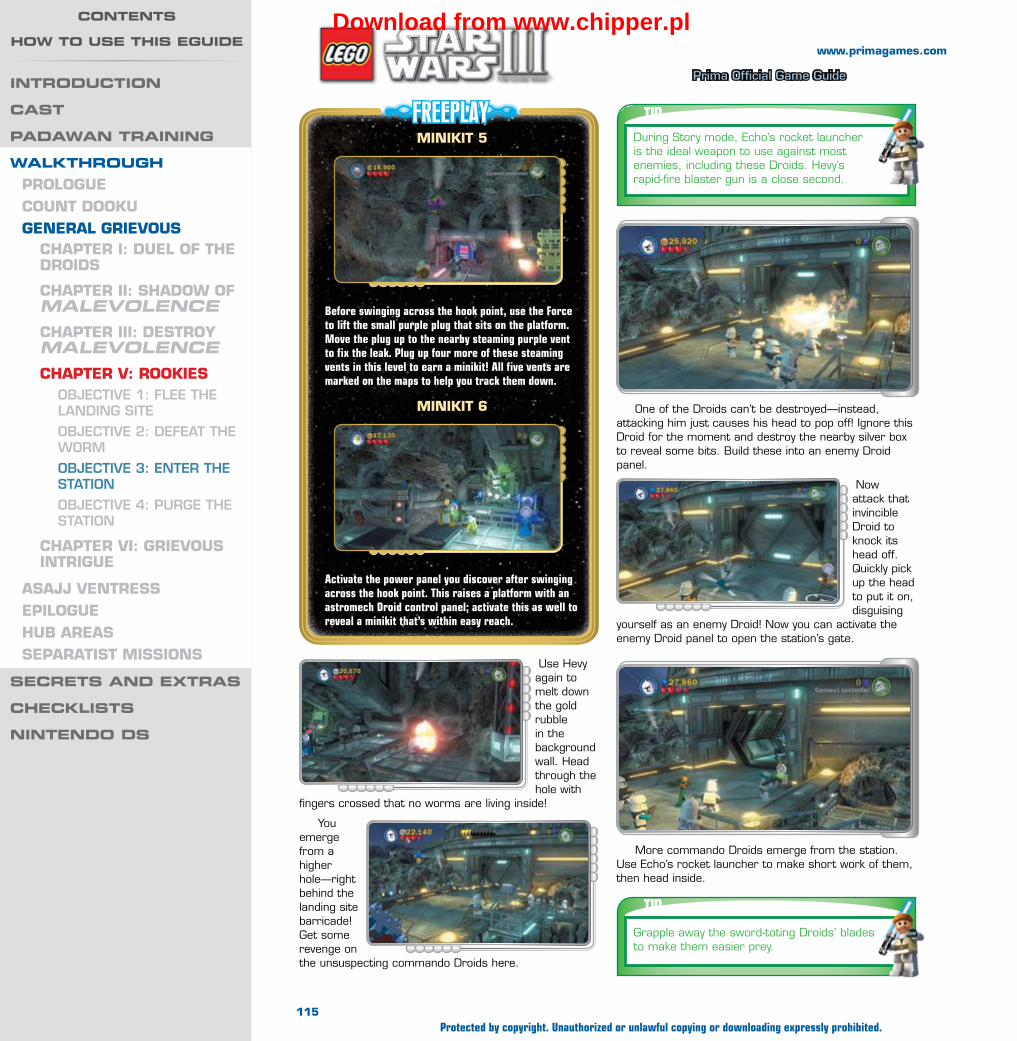
Wa
lk
th
ro
ug
h —
gen
er
al g
rie
vo
us
Prima Official Game Guide
One of the Droids can’t be destroyed—instead, attacking him just causes his head to pop off! Ignore this Droid for the moment and destroy the nearby silver box to reveal some bits. Build these into an enemy Droid panel.
Now attack that invincible Droid to knock its head off. Quickly pick up the head to put it on, disguising
yourself as an enemy Droid! Now you can activate the enemy Droid panel to open the station’s gate.
FREEPLAYMinikit 5
Before swinging across the hook point, use the Force to lift the small purple plug that sits on the platform. Move the plug up to the nearby steaming purple vent to fix the leak. Plug up four more of these steaming vents in this level to earn a minikit! All five vents are marked on the maps to help you track them down.
Minikit 6
Activate the power panel you discover after swinging across the hook point. This raises a platform with an astromech Droid control panel; activate this as well to reveal a minikit that’s within easy reach.
Use Hevy again to melt down the gold rubble in the background wall. Head through the hole with
fingers crossed that no worms are living inside!
You emerge from a higher hole—right behind the landing site barricade! Get some revenge on the unsuspecting commando Droids here.
TIPDuring Story mode, Echo’s rocket launcher is the ideal weapon to use against most enemies, including these Droids. Hevy’s rapid-fire blaster gun is a close second.
TIPGrapple away the sword-toting Droids’ blades to make them easier prey.
More commando Droids emerge from the station. Use Echo’s rocket launcher to make short work of them, then head inside.
115
www.primagames.com
Protected by copyright. Unauthorized or unlawful copying or downloading expressly prohibited.
introduction
cast
PadaWan training
WalkthroughPrologueCount Dookugeneral grievous
ChaPter i: Duel of the DroiDs
ChaPter ii: shaDow of MalevolenceChaPter iii: Destroy MalevolenceChaPter v: rookies
Objective 1: flee the landinG Site
Objective 2: defeat the WOrm
Objective 3: enter the StatiOn
Objective 4: PurGe the StatiOn
ChaPter vi: grievous intrigue
asajj ventressePiloguehub areasseParatist Missions
secrets and extras
checklists
nintendo ds
contents
hoW to use this eguideDownload from www.chipper.pl
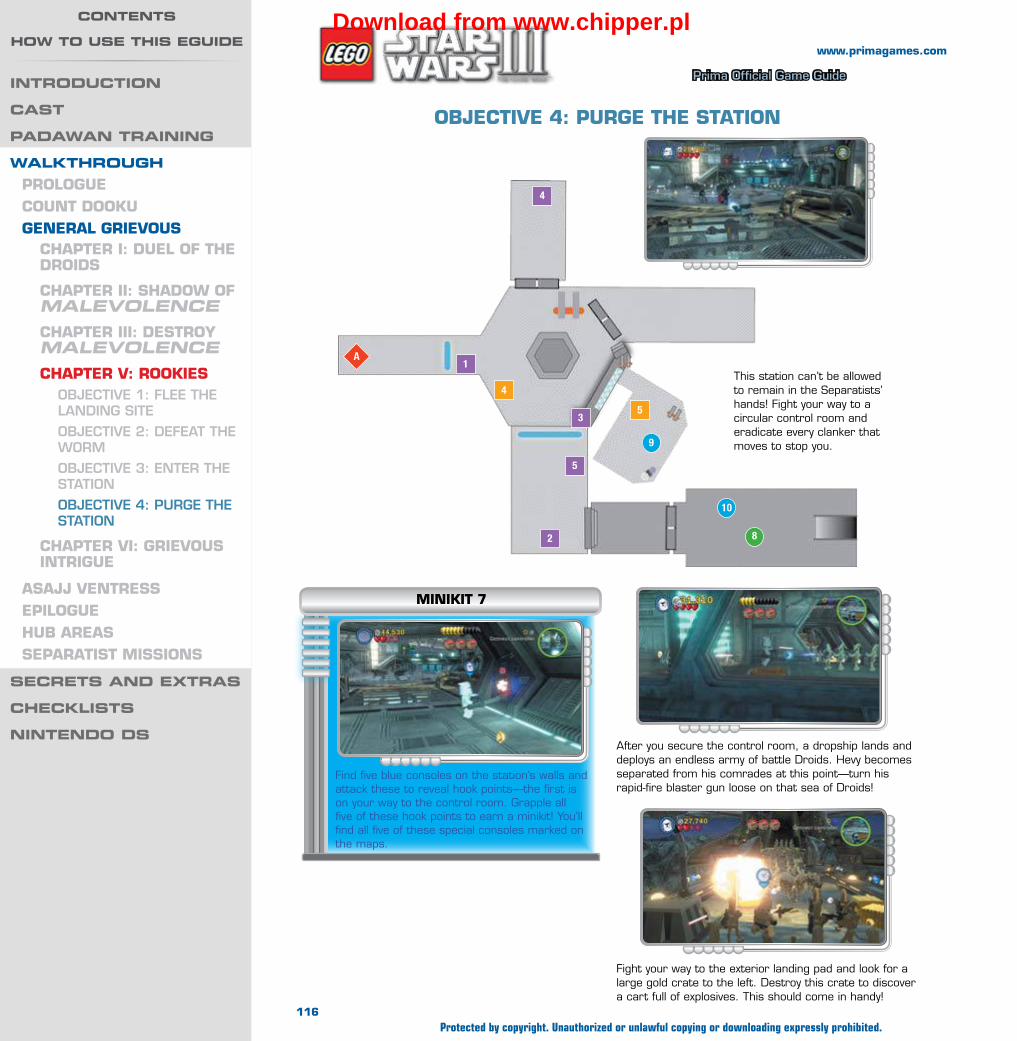
Wa
lk
th
ro
ug
h —
gen
er
al g
rie
vo
us
Prima Official Game Guide
8
9
10
4
5
1
2
3
4
5
A
objeCtive 4: Purge the station
This station can’t be allowed to remain in the Separatists’ hands! Fight your way to a circular control room and eradicate every clanker that moves to stop you.
Find five blue consoles on the station’s walls and attack these to reveal hook points—the first is on your way to the control room. Grapple all five of these hook points to earn a minikit! You’ll find all five of these special consoles marked on the maps.
Minikit 7
After you secure the control room, a dropship lands and deploys an endless army of battle Droids. Hevy becomes separated from his comrades at this point—turn his rapid-fire blaster gun loose on that sea of Droids!
Fight your way to the exterior landing pad and look for a large gold crate to the left. Destroy this crate to discover a cart full of explosives. This should come in handy!
116
www.primagames.com
Protected by copyright. Unauthorized or unlawful copying or downloading expressly prohibited.
introduction
cast
PadaWan training
WalkthroughPrologueCount Dookugeneral grievous
ChaPter i: Duel of the DroiDs
ChaPter ii: shaDow of MalevolenceChaPter iii: Destroy MalevolenceChaPter v: rookies
Objective 1: flee the landinG Site
Objective 2: defeat the WOrm
Objective 3: enter the StatiOn
Objective 4: PurGe the StatiOn
ChaPter vi: grievous intrigue
asajj ventressePiloguehub areasseParatist Missions
secrets and extras
checklists
nintendo ds
contents
hoW to use this eguideDownload from www.chipper.pl

Wa
lk
th
ro
ug
h —
gen
er
al g
rie
vo
us
Prima Official Game Guide
Hop into the plunk Droids and drive it back the way you came. Park the Droid on the orange pad near the energy barrier to disable the barrier, then leave Hevy alone and hold the Change Character button to switch to your other troops.
Back in the control room, destroy the boxes to the left to obtain some pieces. Build these
to repair the nearby circuitry, restoring power to a lever. Pull the lever to open the nearby door.
While battling the endless army of Droids, use Hevy’s rapid-fire blaster gun to melt down six small gold boxes, revealing even smaller crates of pieces. Destroy these six crates to receive a minikit for your efforts! The gold boxes are all in close proximity to one another, which makes them easy to find.
Minikit 8
FREEPLAYMinikit 9
Some clones are enjoying an nice soak in a hot tub out here. Slackers! Activate the nearby power panel to drain the jacuzzi, then hop in and grab the minikit you discover.
Use a Sith character to open the vent that glows with red energy in the control room. Head through the vent to reach an outdoor ledge.
117
www.primagames.com
Protected by copyright. Unauthorized or unlawful copying or downloading expressly prohibited.
introduction
cast
PadaWan training
WalkthroughPrologueCount Dookugeneral grievous
ChaPter i: Duel of the DroiDs
ChaPter ii: shaDow of MalevolenceChaPter iii: Destroy MalevolenceChaPter v: rookies
Objective 1: flee the landinG Site
Objective 2: defeat the WOrm
Objective 3: enter the StatiOn
Objective 4: PurGe the StatiOn
ChaPter vi: grievous intrigue
asajj ventressePiloguehub areasseParatist Missions
secrets and extras
checklists
nintendo ds
contents
hoW to use this eguideDownload from www.chipper.pl

Wa
lk
th
ro
ug
h —
gen
er
al g
rie
vo
us
Prima Official Game Guide
Lay waste to the commando Droids that emerge from behind the door, then use Echo’s rocket launcher to destroy the silver object on the ceiling (you’ll need to aim upward). Pull the hook point you reveal to open the nearby gate.
Defeat the Droid that’s riding the plunk Droid beyond the gate, then hop in and drive the plunk Droid back to the
control room. Park on one of the three orange pads on the floor to lock the Droid in place.
Next, run up the control room’s stairs to reach a narrow balcony.
Wipe out the commando Droids that storm out from behind the door, then obliterate the silver gate with Echo to obtain another plunk Droid. Drive this Droid onto another orange pad back in the control room.
With two plunk Droids locked in place, the nearby energy barrier lowers. Run down the corridor to regroup with Hevy, then roll his plunk Droid back to the control room. There’s no saving the station, so place the Droid on the final orange pad to end this mission with a bang!
FREEPLAYMinikit 10
After obtaining the hot tub minikit, pull the nearby lever to activate a radio tower. The tower sends a signal to its twin, which stands near the Droid dropship on Hevy’s side of the station.
Activating the radio towers causes a panel to open, revealing a hidden minikit! Hold the Change Character button to swap to Hevy, then brave the Droid army once more and claim this worthy prize.
Slide a generator along the checkered track up here to restore power to a lever, then pull the lever to open another door.
118
www.primagames.com
Protected by copyright. Unauthorized or unlawful copying or downloading expressly prohibited.
introduction
cast
PadaWan training
WalkthroughPrologueCount Dookugeneral grievous
ChaPter i: Duel of the DroiDs
ChaPter ii: shaDow of MalevolenceChaPter iii: Destroy MalevolenceChaPter v: rookies
Objective 1: flee the landinG Site
Objective 2: defeat the WOrm
Objective 3: enter the StatiOn
Objective 4: PurGe the StatiOn
ChaPter vi: grievous intrigue
asajj ventressePiloguehub areasseParatist Missions
secrets and extras
checklists
nintendo ds
contents
hoW to use this eguideDownload from www.chipper.pl
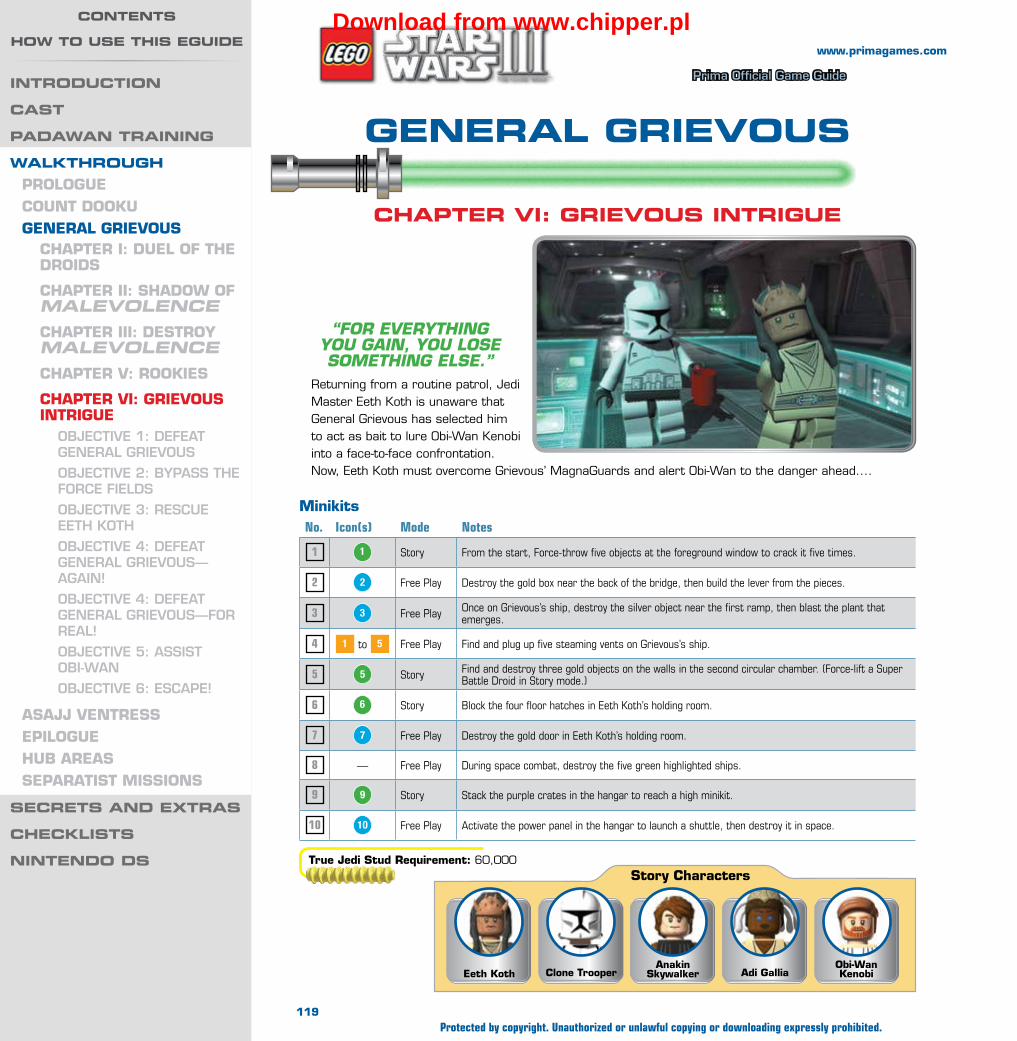
Wa
lk
th
ro
ug
h —
gen
er
al g
rie
vo
us
Prima Official Game Guide
“FoR eveRythInG you GaIn, you lose somethInG else.”
Returning from a routine patrol, Jedi Master Eeth Koth is unaware that General Grievous has selected him to act as bait to lure Obi-Wan Kenobi into a face-to-face confrontation. Now, Eeth Koth must overcome Grievous’ MagnaGuards and alert Obi-Wan to the danger ahead....
general grievous
chaPter vi: grievous intrigue
MinikitsNo. Icon(s) Mode Notes
1 1 Story From the start, Force-throw five objects at the foreground window to crack it five times.
2 2 Free Play Destroy the gold box near the back of the bridge, then build the lever from the pieces.
3 3 Free Play Once on Grievous’s ship, destroy the silver object near the first ramp, then blast the plant that emerges.
4 1 to 5 Free Play Find and plug up five steaming vents on Grievous’s ship.
5 5 Story Find and destroy three gold objects on the walls in the second circular chamber. (Force-lift a Super Battle Droid in Story mode.)
6 6 Story Block the four floor hatches in Eeth Koth’s holding room.
7 7 Free Play Destroy the gold door in Eeth Koth’s holding room.
8 — Free Play During space combat, destroy the five green highlighted ships.
9 9 Story Stack the purple crates in the hangar to reach a high minikit.
10 10 Free Play Activate the power panel in the hangar to launch a shuttle, then destroy it in space.
true jedi stud requirement: 60,000story Characters
obi-wan kenobiadi gallia
anakin skywalkerClone troopereeth koth
119
www.primagames.com
Protected by copyright. Unauthorized or unlawful copying or downloading expressly prohibited.
introduction
cast
PadaWan training
WalkthroughPrologueCount Dookugeneral grievous
ChaPter i: Duel of the DroiDs
ChaPter ii: shaDow of MalevolenceChaPter iii: Destroy MalevolenceChaPter v: rookies
ChaPter vi: grievous intrigue
Objective 1: defeat General GrievOuS
Objective 2: byPaSS the fOrce fieldS
Objective 3: reScue eeth KOth
Objective 4: defeat General GrievOuS—aGain!
Objective 4: defeat General GrievOuS—fOr real!
Objective 5: aSSiSt Obi-Wan
Objective 6: eScaPe!
asajj ventressePiloguehub areasseParatist Missions
secrets and extras
checklists
nintendo ds
contents
hoW to use this eguideDownload from www.chipper.pl
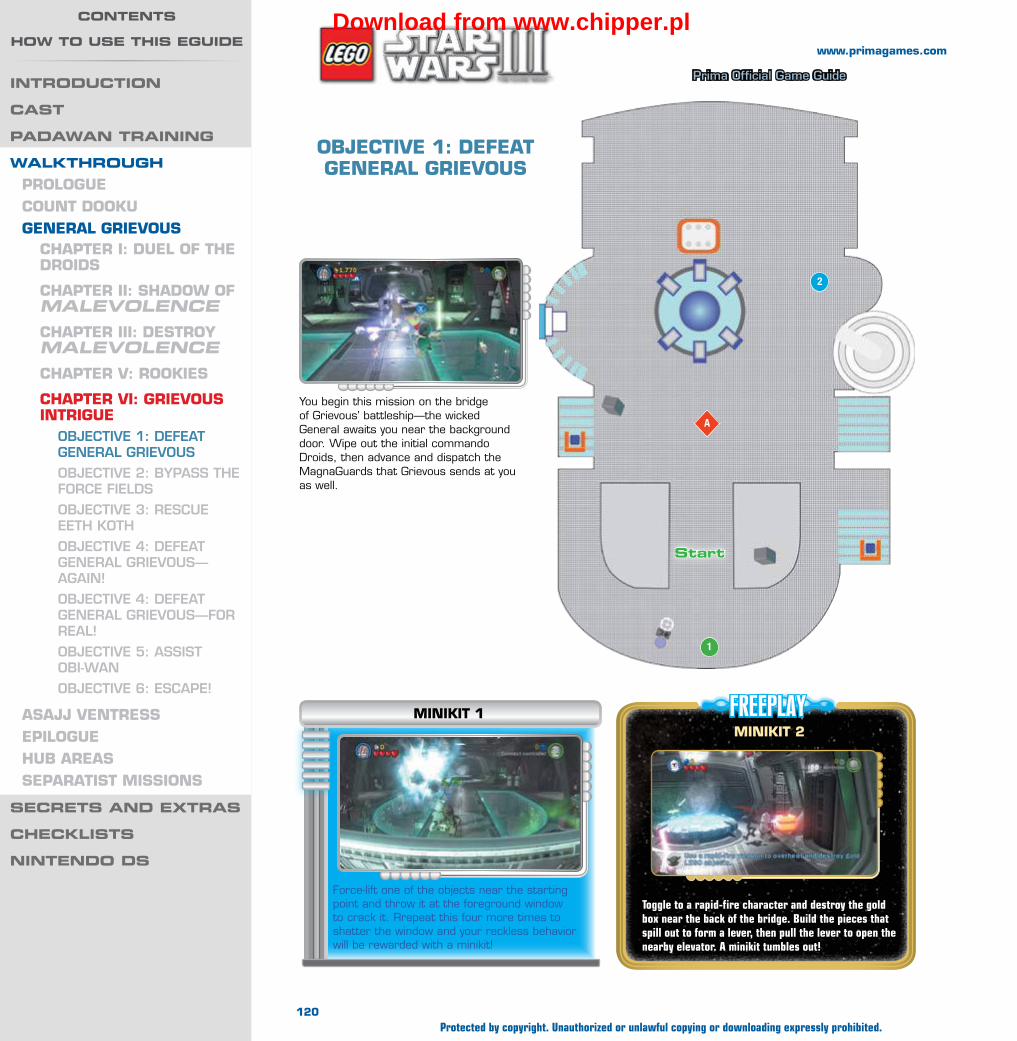
Wa
lk
th
ro
ug
h —
gen
er
al g
rie
vo
us
Prima Official Game Guide
objeCtive 1: Defeat general grievous
You begin this mission on the bridge of Grievous’ battleship—the wicked General awaits you near the background door. Wipe out the initial commando Droids, then advance and dispatch the MagnaGuards that Grievous sends at you as well.
FREEPLAYMinikit 2
Toggle to a rapid-fire character and destroy the gold box near the back of the bridge. Build the pieces that spill out to form a lever, then pull the lever to open the nearby elevator. A minikit tumbles out!
Force-lift one of the objects near the starting point and throw it at the foreground window to crack it. Rrepeat this four more times to shatter the window and your reckless behavior will be rewarded with a minikit!
Minikit 1
A
1
2
start
120
www.primagames.com
Protected by copyright. Unauthorized or unlawful copying or downloading expressly prohibited.
introduction
cast
PadaWan training
WalkthroughPrologueCount Dookugeneral grievous
ChaPter i: Duel of the DroiDs
ChaPter ii: shaDow of MalevolenceChaPter iii: Destroy MalevolenceChaPter v: rookies
ChaPter vi: grievous intrigue
Objective 1: defeat General GrievOuS
Objective 2: byPaSS the fOrce fieldS
Objective 3: reScue eeth KOth
Objective 4: defeat General GrievOuS—aGain!
Objective 4: defeat General GrievOuS—fOr real!
Objective 5: aSSiSt Obi-Wan
Objective 6: eScaPe!
asajj ventressePiloguehub areasseParatist Missions
secrets and extras
checklists
nintendo ds
contents
hoW to use this eguideDownload from www.chipper.pl
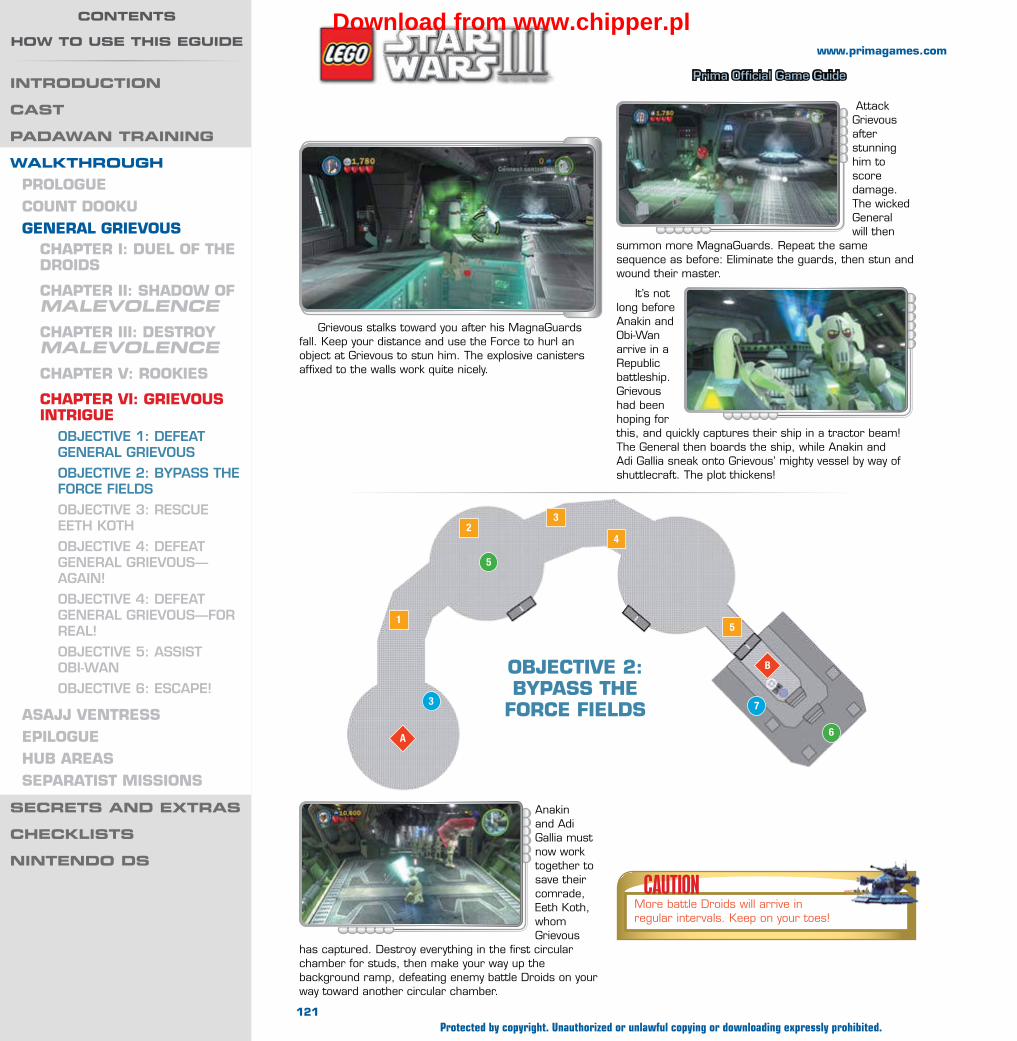
Wa
lk
th
ro
ug
h —
gen
er
al g
rie
vo
us
Prima Official Game Guide
Anakin and Adi Gallia must now work together to save their comrade, Eeth Koth, whom Grievous
has captured. Destroy everything in the first circular chamber for studs, then make your way up the background ramp, defeating enemy battle Droids on your way toward another circular chamber.
Attack Grievous after stunning him to score damage. The wicked General will then
summon more MagnaGuards. Repeat the same sequence as before: Eliminate the guards, then stun and wound their master.
It’s not long before Anakin and Obi-Wan arrive in a Republic battleship. Grievous had been hoping for this, and quickly captures their ship in a tractor beam! The General then boards the ship, while Anakin and Adi Gallia sneak onto Grievous’ mighty vessel by way of shuttlecraft. The plot thickens!
Grievous stalks toward you after his MagnaGuards fall. Keep your distance and use the Force to hurl an object at Grievous to stun him. The explosive canisters affixed to the walls work quite nicely.
objeCtive 2: byPass the
forCe fielDs
CAUTIONMore battle Droids will arrive in regular intervals. Keep on your toes!
B
1
2
5
6
3 7
3
4
5
A
121
www.primagames.com
Protected by copyright. Unauthorized or unlawful copying or downloading expressly prohibited.
introduction
cast
PadaWan training
WalkthroughPrologueCount Dookugeneral grievous
ChaPter i: Duel of the DroiDs
ChaPter ii: shaDow of MalevolenceChaPter iii: Destroy MalevolenceChaPter v: rookies
ChaPter vi: grievous intrigue
Objective 1: defeat General GrievOuS
Objective 2: byPaSS the fOrce fieldS
Objective 3: reScue eeth KOth
Objective 4: defeat General GrievOuS—aGain!
Objective 4: defeat General GrievOuS—fOr real!
Objective 5: aSSiSt Obi-Wan
Objective 6: eScaPe!
asajj ventressePiloguehub areasseParatist Missions
secrets and extras
checklists
nintendo ds
contents
hoW to use this eguideDownload from www.chipper.pl
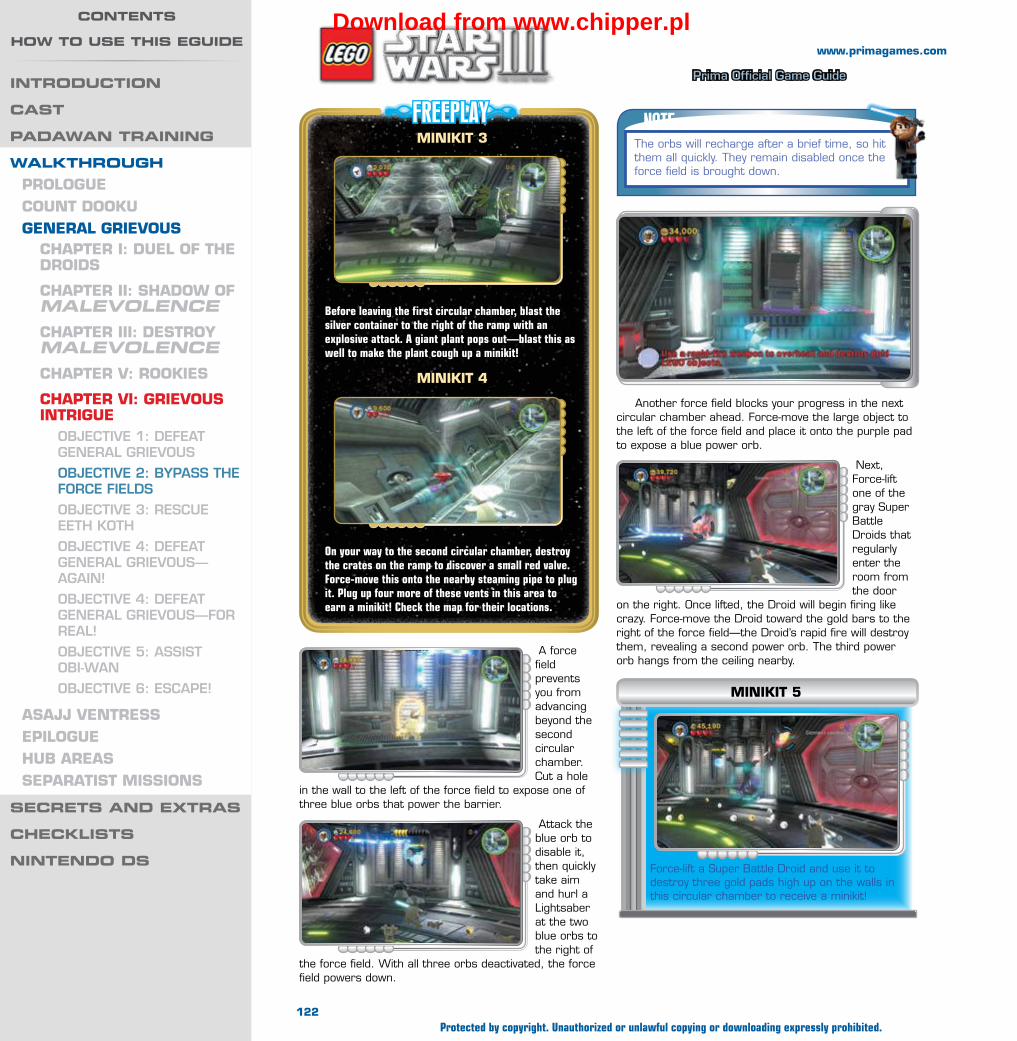
Wa
lk
th
ro
ug
h —
gen
er
al g
rie
vo
us
Prima Official Game Guide
A force field prevents you from advancing beyond the second circular chamber. Cut a hole
in the wall to the left of the force field to expose one of three blue orbs that power the barrier.
Attack the blue orb to disable it, then quickly take aim and hurl a Lightsaber at the two blue orbs to the right of
the force field. With all three orbs deactivated, the force field powers down.
Another force field blocks your progress in the next circular chamber ahead. Force-move the large object to the left of the force field and place it onto the purple pad to expose a blue power orb.
Next, Force-lift one of the gray Super Battle Droids that regularly enter the room from the door
on the right. Once lifted, the Droid will begin firing like crazy. Force-move the Droid toward the gold bars to the right of the force field—the Droid’s rapid fire will destroy them, revealing a second power orb. The third power orb hangs from the ceiling nearby.
FREEPLAYMinikit 3
Before leaving the first circular chamber, blast the silver container to the right of the ramp with an explosive attack. A giant plant pops out—blast this as well to make the plant cough up a minikit!
Minikit 4
On your way to the second circular chamber, destroy the crates on the ramp to discover a small red valve. Force-move this onto the nearby steaming pipe to plug it. Plug up four more of these vents in this area to earn a minikit! Check the map for their locations.
NOTEThe orbs will recharge after a brief time, so hit them all quickly. They remain disabled once the force field is brought down.
Force-lift a Super Battle Droid and use it to destroy three gold pads high up on the walls in this circular chamber to receive a minikit!
Minikit 5
122
www.primagames.com
Protected by copyright. Unauthorized or unlawful copying or downloading expressly prohibited.
introduction
cast
PadaWan training
WalkthroughPrologueCount Dookugeneral grievous
ChaPter i: Duel of the DroiDs
ChaPter ii: shaDow of MalevolenceChaPter iii: Destroy MalevolenceChaPter v: rookies
ChaPter vi: grievous intrigue
Objective 1: defeat General GrievOuS
Objective 2: byPaSS the fOrce fieldS
Objective 3: reScue eeth KOth
Objective 4: defeat General GrievOuS—aGain!
Objective 4: defeat General GrievOuS—fOr real!
Objective 5: aSSiSt Obi-Wan
Objective 6: eScaPe!
asajj ventressePiloguehub areasseParatist Missions
secrets and extras
checklists
nintendo ds
contents
hoW to use this eguideDownload from www.chipper.pl

Wa
lk
th
ro
ug
h —
gen
er
al g
rie
vo
us
Prima Official Game Guide
objeCtive 3: resCue eeth koth
You soon arrive at a control room, where Eeth Koth is being held. Scrap the commando Droids that
ambush you here, then look around for a special Droid whose head you can remove.
With all three power orbs exposed, take aim and toss your Lightsaber at them to deactivate all three in short order. The force field then deactivates—hurry onward! CAUTION
Those commando Droids just keep coming. Stay alert!
Plug the control room’s four floor hatches to stem the flow of commando Droids and earn a minikit in the process. Here’s how to plug each floor hatch, from left to right:
Minikit 6
1. Use the Force to unplug the hatch’s power cord.
2. Destroy the chair near Eeth Koth, then build the bits that remain to cover the hatch.
3. Toss your Lightsaber at the overhead screen, which falls onto the hatch.
4. Force-move the nearby crate onto the hatch.
Knock off the Droid’s head, then quickly collect it from the ground it to put it on. Now that you’re in disguise, activate the enemy Droid control panel near Eeth Koth to free him from captivity.
FREEPLAYMinikit 7
Score an easy minikit during Free Play by destroying the gold door on the control room’s right side with a rapid-fire character; the minikit sits in the nook beyond. A lack of Super Battle Droids prevents you from acquiring this prize in Story mode.
123
www.primagames.com
Protected by copyright. Unauthorized or unlawful copying or downloading expressly prohibited.
introduction
cast
PadaWan training
WalkthroughPrologueCount Dookugeneral grievous
ChaPter i: Duel of the DroiDs
ChaPter ii: shaDow of MalevolenceChaPter iii: Destroy MalevolenceChaPter v: rookies
ChaPter vi: grievous intrigue
Objective 1: defeat General GrievOuS
Objective 2: byPaSS the fOrce fieldS
Objective 3: reScue eeth KOth
Objective 4: defeat General GrievOuS—aGain!
Objective 4: defeat General GrievOuS—fOr real!
Objective 5: aSSiSt Obi-Wan
Objective 6: eScaPe!
asajj ventressePiloguehub areasseParatist Missions
secrets and extras
checklists
nintendo ds
contents
hoW to use this eguideDownload from www.chipper.pl
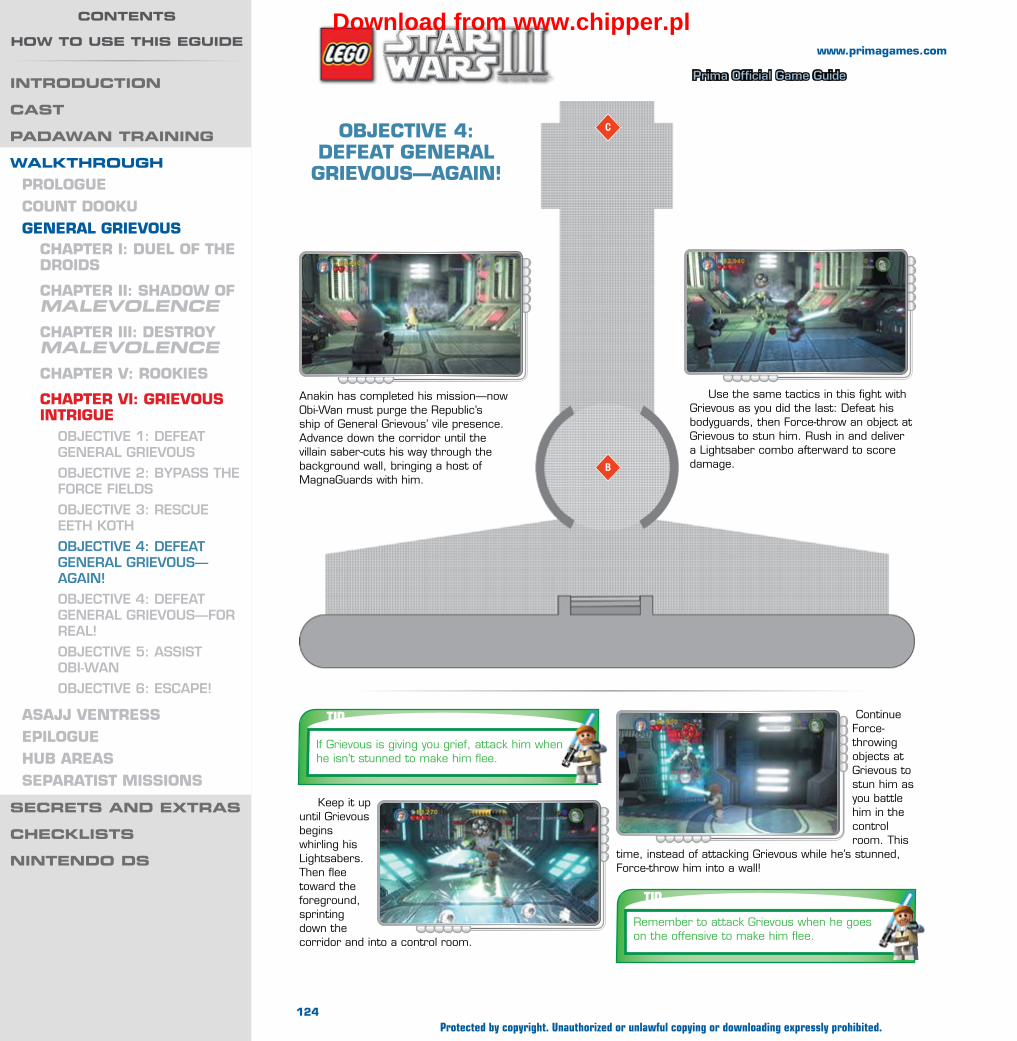
Wa
lk
th
ro
ug
h —
gen
er
al g
rie
vo
us
Prima Official Game Guide
Continue Force-throwing objects at Grievous to stun him as you battle him in the control room. This
time, instead of attacking Grievous while he’s stunned, Force-throw him into a wall!
C
B
objeCtive 4: Defeat general
grievous—again!
Anakin has completed his mission—now Obi-Wan must purge the Republic’s ship of General Grievous’ vile presence. Advance down the corridor until the villain saber-cuts his way through the background wall, bringing a host of MagnaGuards with him.
Use the same tactics in this fight with Grievous as you did the last: Defeat his bodyguards, then Force-throw an object at Grievous to stun him. Rush in and deliver a Lightsaber combo afterward to score damage.
TIPRemember to attack Grievous when he goes on the offensive to make him flee.
TIPIf Grievous is giving you grief, attack him when he isn’t stunned to make him flee.
Keep it up until Grievous begins whirling his Lightsabers. Then flee toward the foreground, sprinting down the corridor and into a control room.
124
www.primagames.com
Protected by copyright. Unauthorized or unlawful copying or downloading expressly prohibited.
introduction
cast
PadaWan training
WalkthroughPrologueCount Dookugeneral grievous
ChaPter i: Duel of the DroiDs
ChaPter ii: shaDow of MalevolenceChaPter iii: Destroy MalevolenceChaPter v: rookies
ChaPter vi: grievous intrigue
Objective 1: defeat General GrievOuS
Objective 2: byPaSS the fOrce fieldS
Objective 3: reScue eeth KOth
Objective 4: defeat General GrievOuS—aGain!
Objective 4: defeat General GrievOuS—fOr real!
Objective 5: aSSiSt Obi-Wan
Objective 6: eScaPe!
asajj ventressePiloguehub areasseParatist Missions
secrets and extras
checklists
nintendo ds
contents
hoW to use this eguideDownload from www.chipper.pl

Wa
lk
th
ro
ug
h —
gen
er
al g
rie
vo
us
Prima Official Game Guide
It’s not long before General Grievous hightails it out of the control room, sealing you inside. Saber-cut through the doors and give chase.
objeCtive 4: Defeat general grievous—for
real!Grievous makes his final stand on the boarding tunnel between his ship and Obi-Wan’s. You can’t
penetrate his frontal defenses, so switch to Adi Gallia—who sneaks up behind the General. Attack Grievous from the rear instead.
objeCtive 5: assist obi-wan
General Grievous has fled back to his ship, and Obi-Wan finds himself in a precarious position,
stuck at the bottom of the collapsed boarding tunnel. Build the nearby bits to form a platform, then use the Force to lock it in place.
TIPDon’t miss the purple studs near the foreground!
Attacking Grievous’ hind side causes him to spin around. Quickly change back to Obi-Wan
and strike Grievous’ back again. Repeat this until the wicked General can take no more.
CAUTIONDon’t fly too close to electrically charged engines on the left—they’ll give you a nasty jolt!
CAUTIONFlee from Grievous when he starts spinning—it’s a lethal attack!
FREEPLAYMinikit 8
During Free Play, five enemy ships will be highlighted by green reticles. Hunt down these special ships and destroy all five to score a minikit!
Press and hold the Change Character button to switch to Anakin, who’s flying around in a shuttlecraft. Set the ship down on the landing pad atop the Republic battleship, which is marked by a blue arrow.
125
www.primagames.com
Protected by copyright. Unauthorized or unlawful copying or downloading expressly prohibited.
introduction
cast
PadaWan training
WalkthroughPrologueCount Dookugeneral grievous
ChaPter i: Duel of the DroiDs
ChaPter ii: shaDow of MalevolenceChaPter iii: Destroy MalevolenceChaPter v: rookies
ChaPter vi: grievous intrigue
Objective 1: defeat General GrievOuS
Objective 2: byPaSS the fOrce fieldS
Objective 3: reScue eeth KOth
Objective 4: defeat General GrievOuS—aGain!
Objective 4: defeat General GrievOuS—fOr real!
Objective 5: aSSiSt Obi-Wan
Objective 6: eScaPe!
asajj ventressePiloguehub areasseParatist Missions
secrets and extras
checklists
nintendo ds
contents
hoW to use this eguideDownload from www.chipper.pl
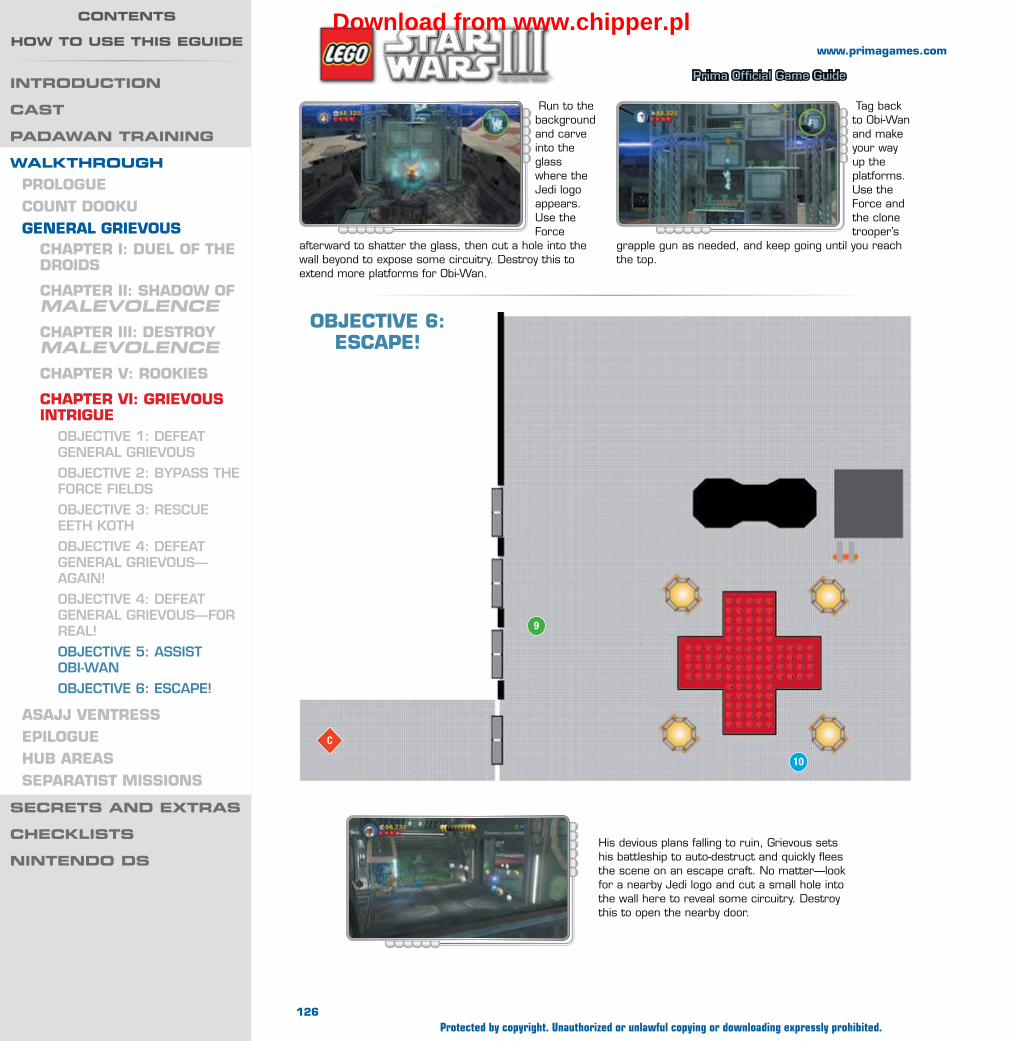
Wa
lk
th
ro
ug
h —
gen
er
al g
rie
vo
us
Prima Official Game Guide
Tag back to Obi-Wan and make your way up the platforms. Use the Force and the clone trooper’s
grapple gun as needed, and keep going until you reach the top.
Run to the background and carve into the glass where the Jedi logo appears. Use the Force
afterward to shatter the glass, then cut a hole into the wall beyond to expose some circuitry. Destroy this to extend more platforms for Obi-Wan.
objeCtive 6: esCaPe!
His devious plans falling to ruin, Grievous sets his battleship to auto-destruct and quickly flees the scene on an escape craft. No matter—look for a nearby Jedi logo and cut a small hole into the wall here to reveal some circuitry. Destroy this to open the nearby door.
9
10
C
126
www.primagames.com
Protected by copyright. Unauthorized or unlawful copying or downloading expressly prohibited.
introduction
cast
PadaWan training
WalkthroughPrologueCount Dookugeneral grievous
ChaPter i: Duel of the DroiDs
ChaPter ii: shaDow of MalevolenceChaPter iii: Destroy MalevolenceChaPter v: rookies
ChaPter vi: grievous intrigue
Objective 1: defeat General GrievOuS
Objective 2: byPaSS the fOrce fieldS
Objective 3: reScue eeth KOth
Objective 4: defeat General GrievOuS—aGain!
Objective 4: defeat General GrievOuS—fOr real!
Objective 5: aSSiSt Obi-Wan
Objective 6: eScaPe!
asajj ventressePiloguehub areasseParatist Missions
secrets and extras
checklists
nintendo ds
contents
hoW to use this eguideDownload from www.chipper.pl

Wa
lk
th
ro
ug
h —
gen
er
al g
rie
vo
us
Prima Official Game Guide
The door leads to a hangar. Eliminate the enemy Droids here, then destroy the upper-right boxes to obtain some bits. Build these into a lever, then pull the lever to activate a torpedo generator outside the ship.
Toggle to Anakin and return to his shuttle. Collect some of those torpedoes from the side of the battleship, then blast the four pink targets near the hangar to drop its force field.
Inside the hangar, use the Force to stack the three purple boxes to the left, carefully placing them onto the nearby purple pad. A minikit appears high above the boxes after you stack them—jump up and claim your prize! It may help to stagger the boxes a bit and create footholds.
Minikit 9
FREEPLAYMinikit 10
During Free Play, blast the silver covering off the power panel inside the hangar, then activate the panel to send a shuttle flying into space. Switch to Anakin and shoot the shuttle from range to claim a minikit. That’s teamwork!
With the hangar’s force field disabled, land your shuttle to rescue Obi-Wan and company—and not a moment too soon!
NOTECongratulations, you’ve completed the General Grievous story line! Clear the Count Dooku and Asajj Ventress story lines as well to unlock the epic epilogue!
127
www.primagames.com
Protected by copyright. Unauthorized or unlawful copying or downloading expressly prohibited.
introduction
cast
PadaWan training
WalkthroughPrologueCount Dookugeneral grievous
ChaPter i: Duel of the DroiDs
ChaPter ii: shaDow of MalevolenceChaPter iii: Destroy MalevolenceChaPter v: rookies
ChaPter vi: grievous intrigue
Objective 1: defeat General GrievOuS
Objective 2: byPaSS the fOrce fieldS
Objective 3: reScue eeth KOth
Objective 4: defeat General GrievOuS—aGain!
Objective 4: defeat General GrievOuS—fOr real!
Objective 5: aSSiSt Obi-Wan
Objective 6: eScaPe!
asajj ventressePiloguehub areasseParatist Missions
secrets and extras
checklists
nintendo ds
contents
hoW to use this eguideDownload from www.chipper.pl
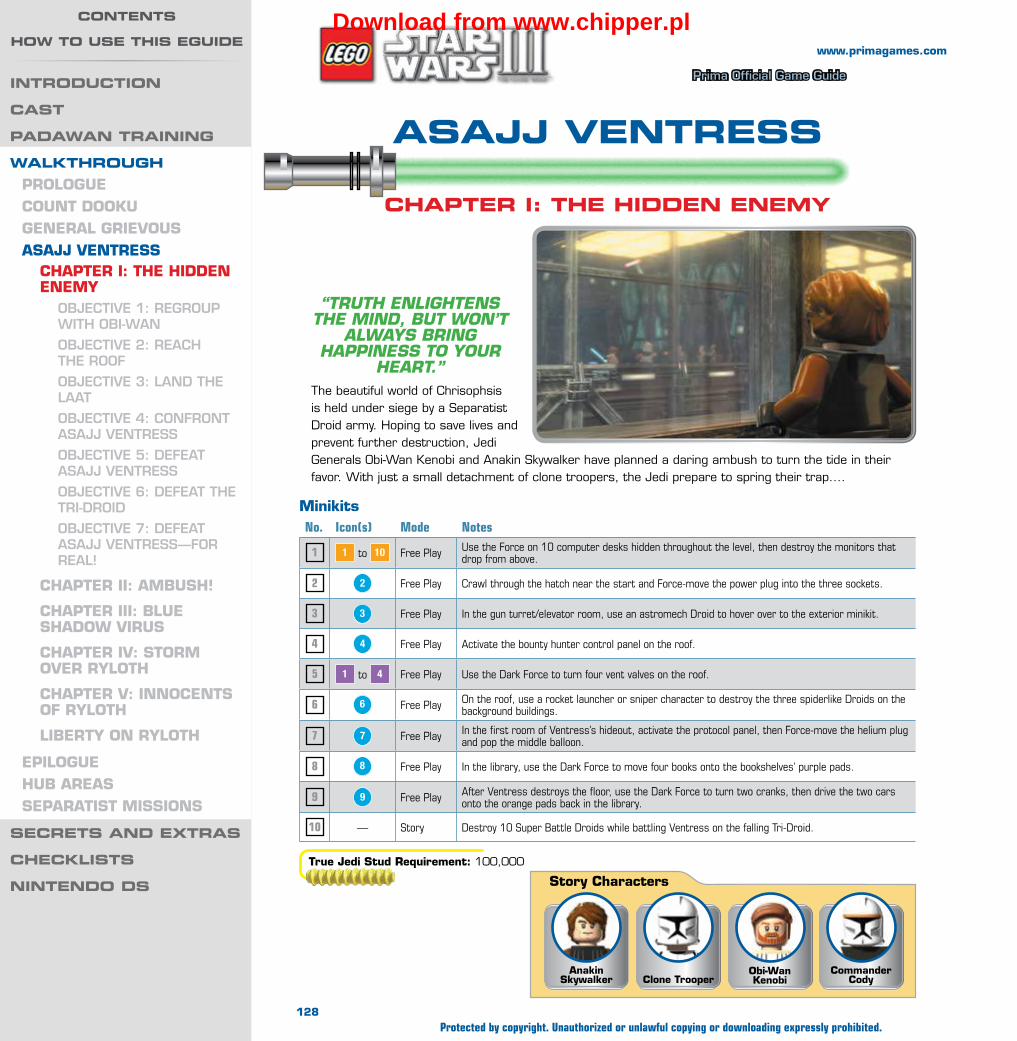
Wa
lk
th
ro
ug
h —
as
ajj v
en
tr
es
s
Prima Official Game Guide
www.primagames.com
“tRuth enlIGhtens the mInd, But won’t
always BRInG happIness to youR
heaRt.”The beautiful world of Chrisophsis is held under siege by a Separatist Droid army. Hoping to save lives and prevent further destruction, Jedi Generals Obi-Wan Kenobi and Anakin Skywalker have planned a daring ambush to turn the tide in their favor. With just a small detachment of clone troopers, the Jedi prepare to spring their trap....
asajj ventress
Chapter I: the hIdden enemy
MinikitsNo. Icon(s) Mode Notes
1 1 to 10 Free Play Use the Force on 10 computer desks hidden throughout the level, then destroy the monitors that drop from above.
2 2 Free Play Crawl through the hatch near the start and Force-move the power plug into the three sockets.
3 3 Free Play In the gun turret/elevator room, use an astromech Droid to hover over to the exterior minikit.
4 4 Free Play Activate the bounty hunter control panel on the roof.
5 1 to 4 Free Play Use the Dark Force to turn four vent valves on the roof.
6 6 Free Play On the roof, use a rocket launcher or sniper character to destroy the three spiderlike Droids on the background buildings.
7 7 Free Play In the first room of Ventress’s hideout, activate the protocol panel, then Force-move the helium plug and pop the middle balloon.
8 8 Free Play In the library, use the Dark Force to move four books onto the bookshelves’ purple pads.
9 9 Free Play After Ventress destroys the floor, use the Dark Force to turn two cranks, then drive the two cars onto the orange pads back in the library.
10 — Story Destroy 10 Super Battle Droids while battling Ventress on the falling Tri-Droid.
True Jedi Stud Requirement: 100,000
Story Characters
Obi-Wan KenobiClone Trooper
Anakin Skywalker
Commander Cody
128Protected by copyright. Unauthorized or unlawful copying or downloading expressly prohibited.
IntroduCtIon
Cast
padaWan traInIng
WalkthroughPROlOgueCOunT DOOKugeneRAl gRievOuSASAJJ venTReSS
ChAPTeR i: The hiDDen enemy
Objective 1: ReGROuP with Obi-wan
Objective 2: Reach the ROOf
Objective 3: Land the Laat
Objective 4: cOnfROnt asajj ventRess
Objective 5: defeat asajj ventRess
Objective 6: defeat the tRi-dROid
Objective 7: defeat asajj ventRess—fOR ReaL!
ChAPTeR ii: AmbuSh!
ChAPTeR iii: blue ShADOW viRuS
ChAPTeR iv: STORm OveR RylOTh
ChAPTeR v: innOCenTS Of RylOTh
libeRTy On RylOTh
ePilOguehub AReASSePARATiST miSSiOnS
seCrets and extras
CheCklIsts
nIntendo ds
Contents
hoW to use thIs eguIdeDownload from www.chipper.pl

Wa
lk
th
ro
ug
h —
as
ajj v
en
tr
es
s
Prima Official Game Guide
www.primagames.com
A
12
2
3
3
45
start
ObJeCTive 1: RegROuP WiTh Obi-WAn
You begin this mission in a small room. As Anakin, approach the Jedi logo near the window and press
the Attack button to slice into the glass. Then press and hold the Action button to use the Force and shatter the window.
FREEPLAYminiKiT 1
Use the Force on the computer desk in the starting room’s bottom-right corner. Several monitor screens then drop from the ceiling—attack and destroy the screens before they retract. Find ten of these special Force-activated computer desks in this level and destroy their monitors to earn a minikit! Many of the desks are hidden in areas you can only access during Free Play—check the maps to discover the location of each one.
miniKiT 2
During Free Play, toggle to a small character and crawl through the starting room’s hatch to reach the adjacent room. Then toggle to a Jedi and use the Force to plug a purple power cord into each of the three wall sockets. A minikit will emerge from one of the three background water tanks!
With the glass shattered, switch to the clone trooper and press the Action button to grapple the outdoor hook point. The clone trooper then rides along a pulley, landing near the neighboring building.
129Protected by copyright. Unauthorized or unlawful copying or downloading expressly prohibited.
IntroduCtIon
Cast
padaWan traInIng
WalkthroughPROlOgueCOunT DOOKugeneRAl gRievOuSASAJJ venTReSS
ChAPTeR i: The hiDDen enemy
Objective 1: ReGROuP with Obi-wan
Objective 2: Reach the ROOf
Objective 3: Land the Laat
Objective 4: cOnfROnt asajj ventRess
Objective 5: defeat asajj ventRess
Objective 6: defeat the tRi-dROid
Objective 7: defeat asajj ventRess—fOR ReaL!
ChAPTeR ii: AmbuSh!
ChAPTeR iii: blue ShADOW viRuS
ChAPTeR iv: STORm OveR RylOTh
ChAPTeR v: innOCenTS Of RylOTh
libeRTy On RylOTh
ePilOguehub AReASSePARATiST miSSiOnS
seCrets and extras
CheCklIsts
nIntendo ds
Contents
hoW to use thIs eguIdeDownload from www.chipper.pl
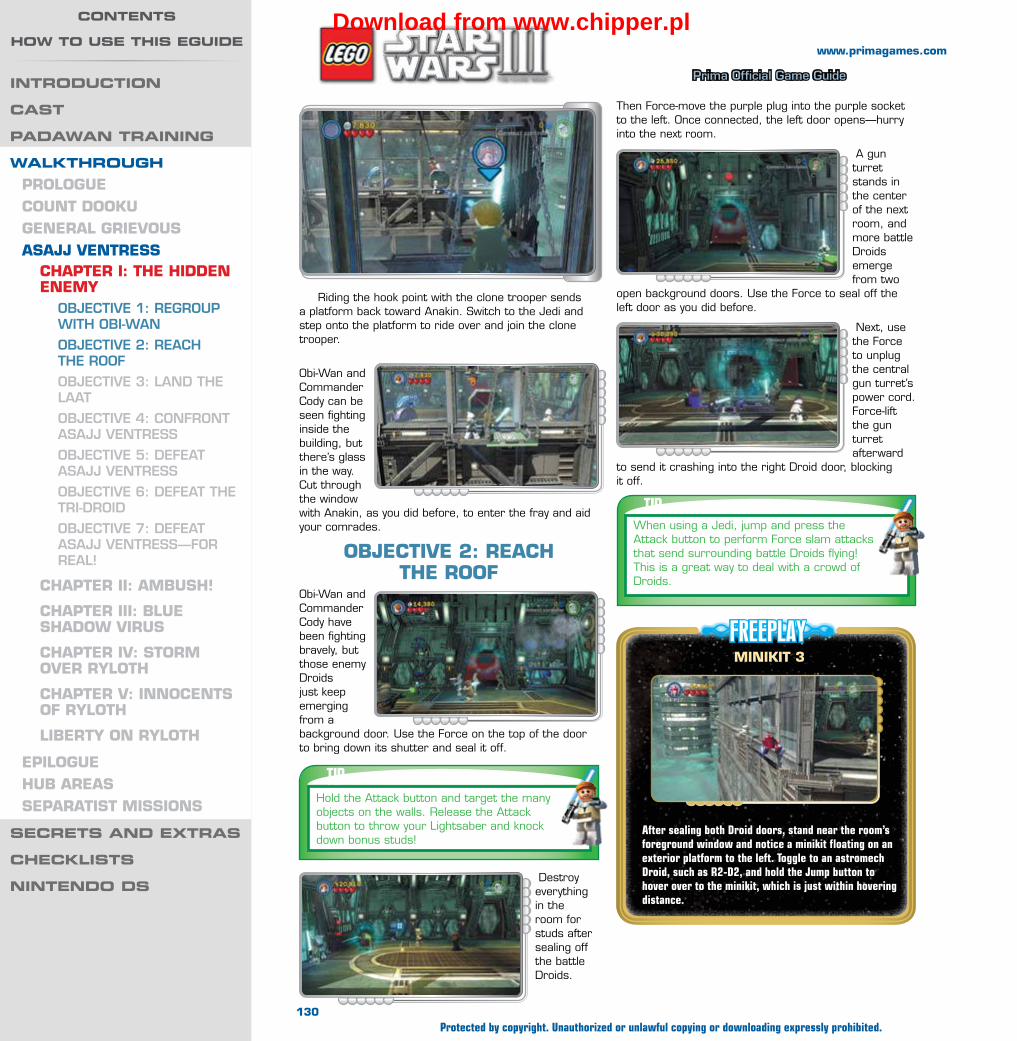
Wa
lk
th
ro
ug
h —
as
ajj v
en
tr
es
s
Prima Official Game Guide
www.primagames.com
Destroy everything in the room for studs after sealing off the battle Droids.
Riding the hook point with the clone trooper sends a platform back toward Anakin. Switch to the Jedi and step onto the platform to ride over and join the clone trooper.
Obi-Wan and Commander Cody can be seen fighting inside the building, but there’s glass in the way. Cut through the window with Anakin, as you did before, to enter the fray and aid your comrades.
ObJeCTive 2: ReACh The ROOf
Obi-Wan and Commander Cody have been fighting bravely, but those enemy Droids just keep emerging from a background door. Use the Force on the top of the door to bring down its shutter and seal it off.
Then Force-move the purple plug into the purple socket to the left. Once connected, the left door opens—hurry into the next room.
A gun turret stands in the center of the next room, and more battle Droids emerge from two
open background doors. Use the Force to seal off the left door as you did before.
Next, use the Force to unplug the central gun turret’s power cord. Force-lift the gun turret afterward
to send it crashing into the right Droid door, blocking it off.
TIPHold the Attack button and target the many objects on the walls. Release the Attack button to throw your Lightsaber and knock down bonus studs!
TIPWhen using a Jedi, jump and press the Attack button to perform Force slam attacks that send surrounding battle Droids flying! This is a great way to deal with a crowd of Droids.
FREEPLAYminiKiT 3
After sealing both Droid doors, stand near the room’s foreground window and notice a minikit floating on an exterior platform to the left. Toggle to an astromech Droid, such as R2-D2, and hold the Jump button to hover over to the minikit, which is just within hovering distance.
130Protected by copyright. Unauthorized or unlawful copying or downloading expressly prohibited.
IntroduCtIon
Cast
padaWan traInIng
WalkthroughPROlOgueCOunT DOOKugeneRAl gRievOuSASAJJ venTReSS
ChAPTeR i: The hiDDen enemy
Objective 1: ReGROuP with Obi-wan
Objective 2: Reach the ROOf
Objective 3: Land the Laat
Objective 4: cOnfROnt asajj ventRess
Objective 5: defeat asajj ventRess
Objective 6: defeat the tRi-dROid
Objective 7: defeat asajj ventRess—fOR ReaL!
ChAPTeR ii: AmbuSh!
ChAPTeR iii: blue ShADOW viRuS
ChAPTeR iv: STORm OveR RylOTh
ChAPTeR v: innOCenTS Of RylOTh
libeRTy On RylOTh
ePilOguehub AReASSePARATiST miSSiOnS
seCrets and extras
CheCklIsts
nIntendo ds
Contents
hoW to use thIs eguIdeDownload from www.chipper.pl

Wa
lk
th
ro
ug
h —
as
ajj v
en
tr
es
s
Prima Official Game Guide
www.primagames.com
With both Droid doors blocked, the central elevator’s door opens. Step onto the lift and wait for your comrades to join you. The lift then ferries you up to the building’s roof.
ObJeCTive 3: lAnD The lAAT
A Republic LAAT transport ship is unable to land on the rooftop until you destroy the roof’s two silver gun turrets. Silver objects such as these require explosive attacks to destroy them. Smash the two crates near the roof’s center to obtain some pieces, then build these into a gun turret of your own.
TIPStep on the buttons near the roof’s side doors to shut them for a brief time and stem the tide of battle Droids.
TIP
Search the rooftop thoroughly for studs, especially the foreground. Leap onto the four large vents and ride the updrafts to reach blue studs that float high above!
FREEPLAYminiKiT 4
Toggle to a bounty hunter character, such as Cad Bane, and activate the bounty hunter control panel in the foreground of the roof. This causes a probe to fly down and retrieve a minikit from a tank for you. Simply jump up and grab the goodie after the probe returns!
4
6
1
2 3
4
A
B
131Protected by copyright. Unauthorized or unlawful copying or downloading expressly prohibited.
IntroduCtIon
Cast
padaWan traInIng
WalkthroughPROlOgueCOunT DOOKugeneRAl gRievOuSASAJJ venTReSS
ChAPTeR i: The hiDDen enemy
Objective 1: ReGROuP with Obi-wan
Objective 2: Reach the ROOf
Objective 3: Land the Laat
Objective 4: cOnfROnt asajj ventRess
Objective 5: defeat asajj ventRess
Objective 6: defeat the tRi-dROid
Objective 7: defeat asajj ventRess—fOR ReaL!
ChAPTeR ii: AmbuSh!
ChAPTeR iii: blue ShADOW viRuS
ChAPTeR iv: STORm OveR RylOTh
ChAPTeR v: innOCenTS Of RylOTh
libeRTy On RylOTh
ePilOguehub AReASSePARATiST miSSiOnS
seCrets and extras
CheCklIsts
nIntendo ds
Contents
hoW to use thIs eguIdeDownload from www.chipper.pl
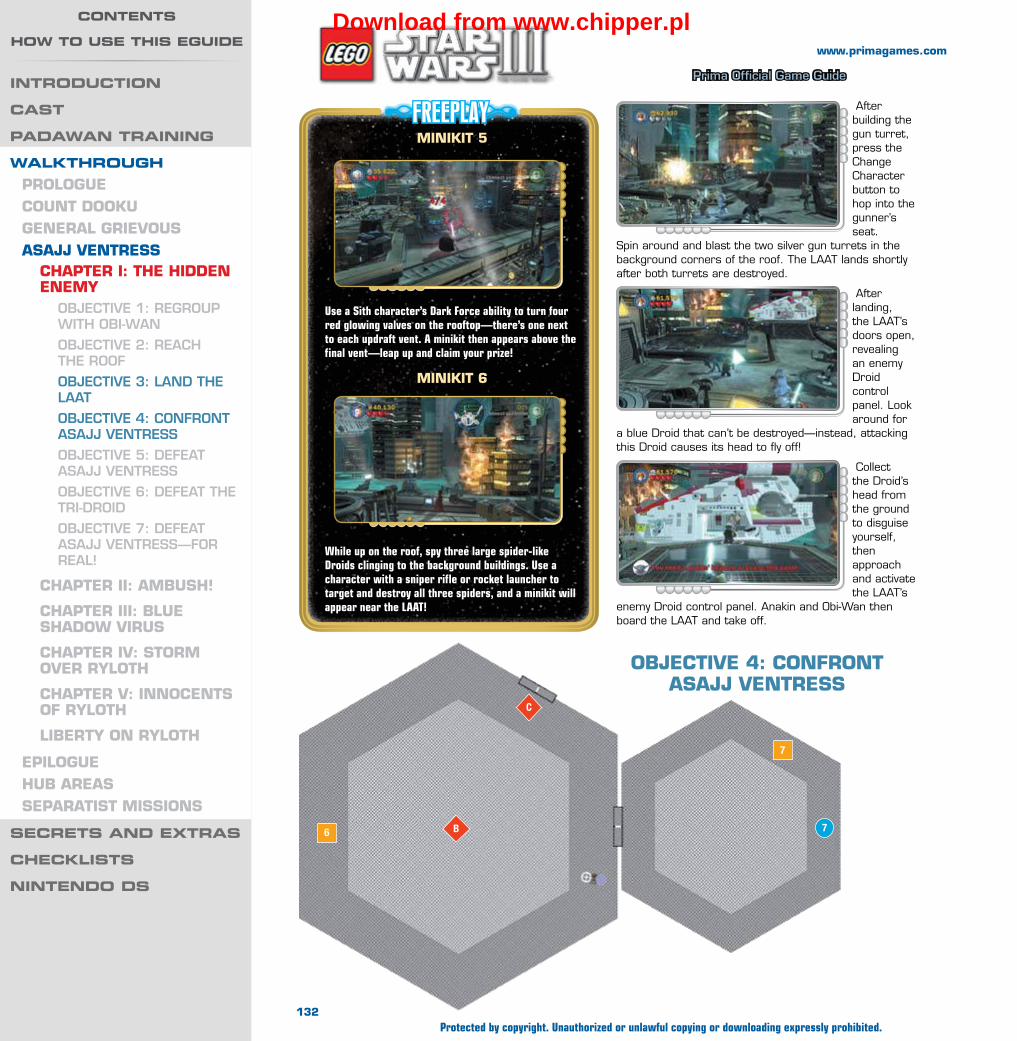
Wa
lk
th
ro
ug
h —
as
ajj v
en
tr
es
s
Prima Official Game Guide
www.primagames.com
After building the gun turret, press the Change Character button to hop into the gunner’s seat.
Spin around and blast the two silver gun turrets in the background corners of the roof. The LAAT lands shortly after both turrets are destroyed.
After landing, the LAAT’s doors open, revealing an enemy Droid control panel. Look around for
a blue Droid that can’t be destroyed—instead, attacking this Droid causes its head to fly off!
Collect the Droid’s head from the ground to disguise yourself, then approach and activate the LAAT’s
enemy Droid control panel. Anakin and Obi-Wan then board the LAAT and take off.
FREEPLAYminiKiT 5
Use a Sith character’s Dark Force ability to turn four red glowing valves on the rooftop—there’s one next to each updraft vent. A minikit then appears above the final vent—leap up and claim your prize!
miniKiT 6
While up on the roof, spy three large spider-like Droids clinging to the background buildings. Use a character with a sniper rifle or rocket launcher to target and destroy all three spiders, and a minikit will appear near the LAAT!
B 76
7
C
ObJeCTive 4: COnfROnT ASAJJ venTReSS
132Protected by copyright. Unauthorized or unlawful copying or downloading expressly prohibited.
IntroduCtIon
Cast
padaWan traInIng
WalkthroughPROlOgueCOunT DOOKugeneRAl gRievOuSASAJJ venTReSS
ChAPTeR i: The hiDDen enemy
Objective 1: ReGROuP with Obi-wan
Objective 2: Reach the ROOf
Objective 3: Land the Laat
Objective 4: cOnfROnt asajj ventRess
Objective 5: defeat asajj ventRess
Objective 6: defeat the tRi-dROid
Objective 7: defeat asajj ventRess—fOR ReaL!
ChAPTeR ii: AmbuSh!
ChAPTeR iii: blue ShADOW viRuS
ChAPTeR iv: STORm OveR RylOTh
ChAPTeR v: innOCenTS Of RylOTh
libeRTy On RylOTh
ePilOguehub AReASSePARATiST miSSiOnS
seCrets and extras
CheCklIsts
nIntendo ds
Contents
hoW to use thIs eguIdeDownload from www.chipper.pl
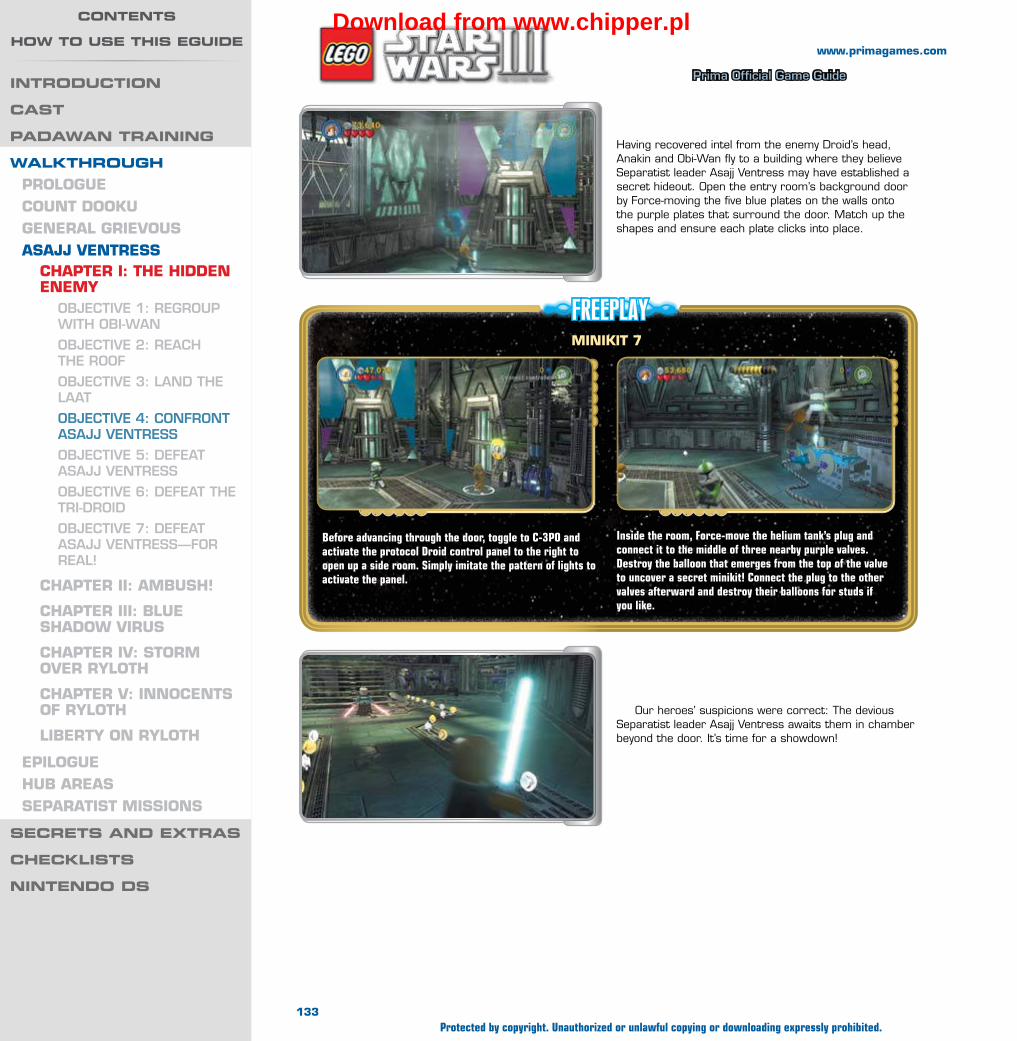
Wa
lk
th
ro
ug
h —
as
ajj v
en
tr
es
s
Prima Official Game Guide
www.primagames.com
Having recovered intel from the enemy Droid’s head, Anakin and Obi-Wan fly to a building where they believe Separatist leader Asajj Ventress may have established a secret hideout. Open the entry room’s background door by Force-moving the five blue plates on the walls onto the purple plates that surround the door. Match up the shapes and ensure each plate clicks into place.
FREEPLAYminiKiT 7
Before advancing through the door, toggle to C-3PO and activate the protocol Droid control panel to the right to open up a side room. Simply imitate the pattern of lights to activate the panel.
Inside the room, Force-move the helium tank’s plug and connect it to the middle of three nearby purple valves. Destroy the balloon that emerges from the top of the valve to uncover a secret minikit! Connect the plug to the other valves afterward and destroy their balloons for studs if you like.
Our heroes’ suspicions were correct: The devious Separatist leader Asajj Ventress awaits them in chamber beyond the door. It’s time for a showdown!
133Protected by copyright. Unauthorized or unlawful copying or downloading expressly prohibited.
IntroduCtIon
Cast
padaWan traInIng
WalkthroughPROlOgueCOunT DOOKugeneRAl gRievOuSASAJJ venTReSS
ChAPTeR i: The hiDDen enemy
Objective 1: ReGROuP with Obi-wan
Objective 2: Reach the ROOf
Objective 3: Land the Laat
Objective 4: cOnfROnt asajj ventRess
Objective 5: defeat asajj ventRess
Objective 6: defeat the tRi-dROid
Objective 7: defeat asajj ventRess—fOR ReaL!
ChAPTeR ii: AmbuSh!
ChAPTeR iii: blue ShADOW viRuS
ChAPTeR iv: STORm OveR RylOTh
ChAPTeR v: innOCenTS Of RylOTh
libeRTy On RylOTh
ePilOguehub AReASSePARATiST miSSiOnS
seCrets and extras
CheCklIsts
nIntendo ds
Contents
hoW to use thIs eguIdeDownload from www.chipper.pl

Wa
lk
th
ro
ug
h —
as
ajj v
en
tr
es
s
Prima Official Game Guide
www.primagames.com
ObJeCTive 5: DefeAT ASAJJ venTReSS
Asajj Ventress is a gifted Sith, so this fight won’t be easy. Knock one of Ventress’s Lightsabers out of her hand by jumping and pressing the Attack button to perform a powerful Jedi slam.
NOTEDon’t worry about smashing up the place for studs—you’ll have a chance to do so after you best Ventress.
D
8
9
10
C
8 9D
134Protected by copyright. Unauthorized or unlawful copying or downloading expressly prohibited.
IntroduCtIon
Cast
padaWan traInIng
WalkthroughPROlOgueCOunT DOOKugeneRAl gRievOuSASAJJ venTReSS
ChAPTeR i: The hiDDen enemy
Objective 1: ReGROuP with Obi-wan
Objective 2: Reach the ROOf
Objective 3: Land the Laat
Objective 4: cOnfROnt asajj ventRess
Objective 5: defeat asajj ventRess
Objective 6: defeat the tRi-dROid
Objective 7: defeat asajj ventRess—fOR ReaL!
ChAPTeR ii: AmbuSh!
ChAPTeR iii: blue ShADOW viRuS
ChAPTeR iv: STORm OveR RylOTh
ChAPTeR v: innOCenTS Of RylOTh
libeRTy On RylOTh
ePilOguehub AReASSePARATiST miSSiOnS
seCrets and extras
CheCklIsts
nIntendo ds
Contents
hoW to use thIs eguIdeDownload from www.chipper.pl
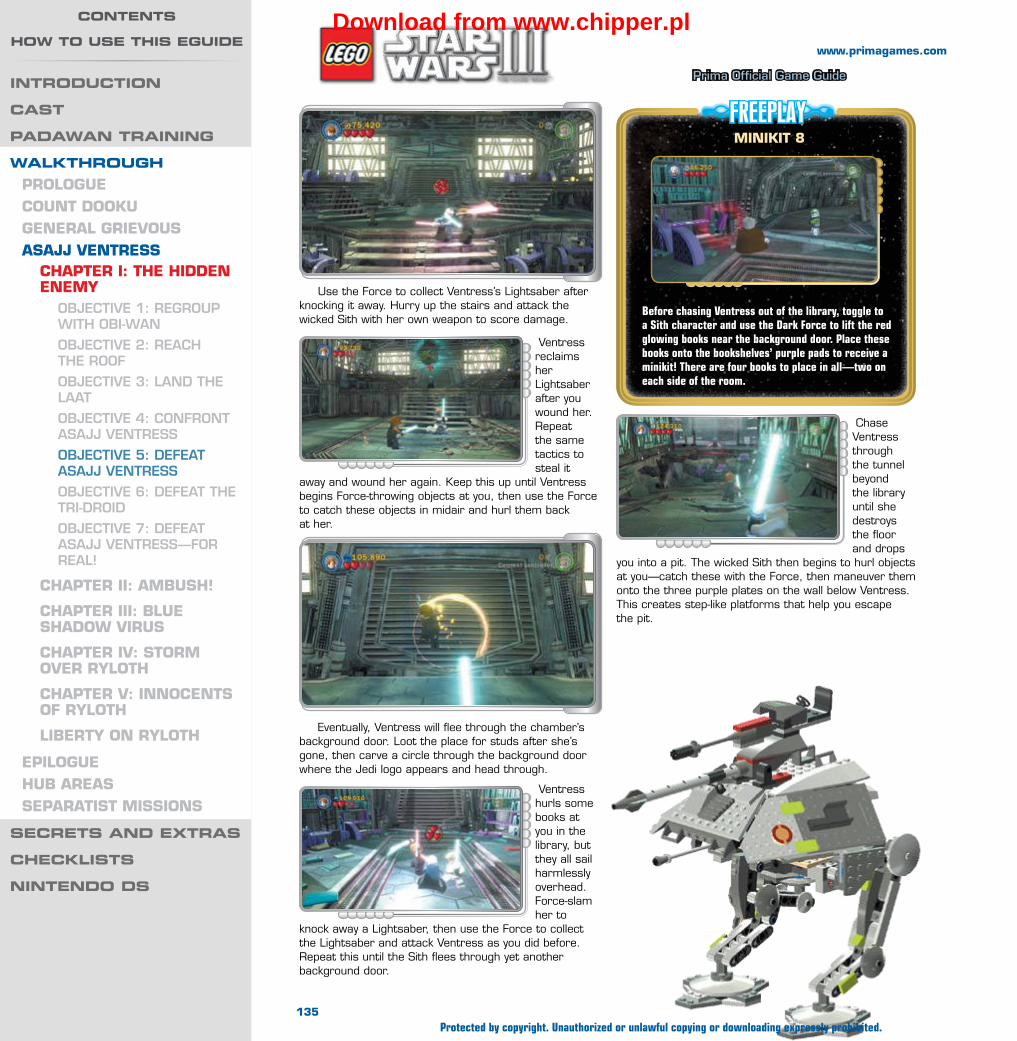
Wa
lk
th
ro
ug
h —
as
ajj v
en
tr
es
s
Prima Official Game Guide
www.primagames.com
Eventually, Ventress will flee through the chamber’s background door. Loot the place for studs after she’s gone, then carve a circle through the background door where the Jedi logo appears and head through.
Ventress hurls some books at you in the library, but they all sail harmlessly overhead. Force-slam her to
knock away a Lightsaber, then use the Force to collect the Lightsaber and attack Ventress as you did before. Repeat this until the Sith flees through yet another background door.
Ventress reclaims her Lightsaber after you wound her. Repeat the same tactics to steal it
away and wound her again. Keep this up until Ventress begins Force-throwing objects at you, then use the Force to catch these objects in midair and hurl them back at her.
Chase Ventress through the tunnel beyond the library until she destroys the floor and drops
you into a pit. The wicked Sith then begins to hurl objects at you—catch these with the Force, then maneuver them onto the three purple plates on the wall below Ventress. This creates step-like platforms that help you escape the pit.
FREEPLAYminiKiT 8
Before chasing Ventress out of the library, toggle to a Sith character and use the Dark Force to lift the red glowing books near the background door. Place these books onto the bookshelves’ purple pads to receive a minikit! There are four books to place in all—two on each side of the room.
Use the Force to collect Ventress’s Lightsaber after knocking it away. Hurry up the stairs and attack the wicked Sith with her own weapon to score damage.
135Protected by copyright. Unauthorized or unlawful copying or downloading expressly prohibited.
IntroduCtIon
Cast
padaWan traInIng
WalkthroughPROlOgueCOunT DOOKugeneRAl gRievOuSASAJJ venTReSS
ChAPTeR i: The hiDDen enemy
Objective 1: ReGROuP with Obi-wan
Objective 2: Reach the ROOf
Objective 3: Land the Laat
Objective 4: cOnfROnt asajj ventRess
Objective 5: defeat asajj ventRess
Objective 6: defeat the tRi-dROid
Objective 7: defeat asajj ventRess—fOR ReaL!
ChAPTeR ii: AmbuSh!
ChAPTeR iii: blue ShADOW viRuS
ChAPTeR iv: STORm OveR RylOTh
ChAPTeR v: innOCenTS Of RylOTh
libeRTy On RylOTh
ePilOguehub AReASSePARATiST miSSiOnS
seCrets and extras
CheCklIsts
nIntendo ds
Contents
hoW to use thIs eguIdeDownload from www.chipper.pl

Wa
lk
th
ro
ug
h —
as
ajj v
en
tr
es
s
Prima Official Game Guide
www.primagames.com
FREEPLAYminiKiT 9
After placing the three step-like platforms, hop up and use the Dark Force to turn the red glowing cranks on the nearby walls. This raises two shutters, revealing two sporty vehicles.
Hop into one of the cars and drive it back to the library. Park the car on one of the two orange pads here to turn the pad green, then hop out and return for the other car. Park the second car on the remaining pad to open a secret nook, free the Jones boys (how did they end up here anyway?), and obtain a sparkly minikit that smells of adventure!
Ventress flees again after you affix all three platforms to the wall. Scale the platforms and hurry outside to begin the final showdown.
Ventress taunts you outside, then jumps off the edge of the building when you approach. Moments
later, a monstrous three-legged Droid emerges from the edge of the building. This can’t be good!
ObJeCTive 6: DefeAT The TRi-DROiD
Look at the size of that thing! There’s no hope of escape, so take aim at the Tri-Droid’s central
blaster by holding the Attack button. Release the Attack button after targeting the blaster to hurl your Lightsaber and disable the Droid’s weapon.
Each time you take out one of the Tri-Droid’s central blasters, the behemoth spins its top to reveal
another. Keep whacking the Tri-Droid’s central blasters until they’ve all been disabled.
NOTEWhile holding the Attack button to aim, you’ll automatically deflect blaster attacks with your Lightsaber. Keep near the foreground throughout this battle and you’ll deflect nearly every blast that comes your way!
Eventually, the Tri-Droid will begin stomping one of its massive legs in an effort to crush you. Jump to avoid the resulting shock waves, then repeatedly attack the leg until a Jedi logo appears nearby.
136Protected by copyright. Unauthorized or unlawful copying or downloading expressly prohibited.
IntroduCtIon
Cast
padaWan traInIng
WalkthroughPROlOgueCOunT DOOKugeneRAl gRievOuSASAJJ venTReSS
ChAPTeR i: The hiDDen enemy
Objective 1: ReGROuP with Obi-wan
Objective 2: Reach the ROOf
Objective 3: Land the Laat
Objective 4: cOnfROnt asajj ventRess
Objective 5: defeat asajj ventRess
Objective 6: defeat the tRi-dROid
Objective 7: defeat asajj ventRess—fOR ReaL!
ChAPTeR ii: AmbuSh!
ChAPTeR iii: blue ShADOW viRuS
ChAPTeR iv: STORm OveR RylOTh
ChAPTeR v: innOCenTS Of RylOTh
libeRTy On RylOTh
ePilOguehub AReASSePARATiST miSSiOnS
seCrets and extras
CheCklIsts
nIntendo ds
Contents
hoW to use thIs eguIdeDownload from www.chipper.pl

Wa
lk
th
ro
ug
h —
as
ajj v
en
tr
es
s
Prima Official Game Guide
www.primagames.com
Hurry to the Jedi logo and press the Attack button to sever the Tri-Droid’s leg with an acrobatic maneuver. Repeat this with the Tri-Droid’s other leg to loosen the monster’s grip on the building and cause it to fall.
NOTEIf you miss your chance to use a Jedi logo, the Tri-Droid’s central blaster may come back online. Hurl your Lightsaber to disable it again, then go after those legs.
ObJeCTive 7: DefeAT ASAJJ venTReSS—fOR ReAl!
Leap onto the Tri-Droid as it begins to fall—you then must battle Asajj Ventress as you plummet
downward. Simply use the Force to catch each object she Force-throws at you and send it back at her.
NOTEThough you’re falling at a breakneck pace, there’s no actual time limit to this scenario. Take as much time as you need to defeat Asajj.
After catching and Force-throwing an object back at Ventress, leap over to where she’s standing
and attack her to score damage. Ventress then flees to another part of the Tri-Droid—get your bearings and repeat the same tactics until you at last defeat the wicked Sith.
Destroy ten Super Battle Droids (the gray ones) while battling Ventress during the final plummet to earn a minikit. This is the only minikit you can obtain during Story mode in this level.
miniKiT 10
NOTENow that you’ve beaten at least two levels, you may be able to visit new areas of the Resolute. See the “Battleship Resolute” chapter for a thorough examination of the Republic’s hub.
137Protected by copyright. Unauthorized or unlawful copying or downloading expressly prohibited.
IntroduCtIon
Cast
padaWan traInIng
WalkthroughPROlOgueCOunT DOOKugeneRAl gRievOuSASAJJ venTReSS
ChAPTeR i: The hiDDen enemy
Objective 1: ReGROuP with Obi-wan
Objective 2: Reach the ROOf
Objective 3: Land the Laat
Objective 4: cOnfROnt asajj ventRess
Objective 5: defeat asajj ventRess
Objective 6: defeat the tRi-dROid
Objective 7: defeat asajj ventRess—fOR ReaL!
ChAPTeR ii: AmbuSh!
ChAPTeR iii: blue ShADOW viRuS
ChAPTeR iv: STORm OveR RylOTh
ChAPTeR v: innOCenTS Of RylOTh
libeRTy On RylOTh
ePilOguehub AReASSePARATiST miSSiOnS
seCrets and extras
CheCklIsts
nIntendo ds
Contents
hoW to use thIs eguIdeDownload from www.chipper.pl

Wa
lk
th
ro
ug
h —
as
ajj v
en
tr
es
s
Prima Official Game Guide
“GReat leadeRs InspIRe GReatness In
otheRs.”Master Yoda has been dispatched to Rugosa in order to convince the Toydarians to ally themselves with the Republic. However, Asajj Ventress has learned of Yoda’s mission, and has her own plans to force Toydarian King Katuunko into an alliance with the Separatists. As Master Yoda’s ship nears the small moon, they find Separatist ships awaiting them....
asajj ventress
Chapter II: ambush!
MinikitsNo. Icon(s) Mode Notes
1 1 Story Knock off the shuttle’s four thrusters, then pull the hook point.
2 1 to 5 Story Find and destroy five hermit crabs that hide under rocks around the level.
3 3 Free Play Use the cylindrical plants to reach a high ledge, then hover to the right. Knock a box off the right ledge and build the bits into a big crab. Ride the crab and smack its five babies.
4 4 Free Play Use the Dark Force to build a platform near the end of the path. Enter the high cave and play the crab’s song on the mushrooms.
5 1 to 5 Free Play Find and destroy five worms that hide beneath purple plants around the level.
6 6 Free Play Hover from the valley’s entry ledge, then activate an astromech Droid control panel and grapple the squid in the cave.
7 7 Free Play Destroy the gold coral near the first tank to enter a cave, then use the Force to light up the cave’s rocks. Use Jar Jar to claim the high minikit.
8 8 Free Play Use the Dark Force to move some pink coral near the second tank and enter a cave. Build three purple objects inside the cave to reveal an ark. Grapple the ark.
9 9 Free PlayActivate the power panel near the second tank, then build a platform from the resulting bits. Stand one character on the platform and use the other to Force-lift the partner on the platform up to the minikit.
10 10 Story Destroy three purple plants near the third tank, then build the remaining pieces to form a friendly crab.
True Jedi Stud Requirement: 75,000 Story Characters
Jeklieutenant
Thireyoda Rys
138
www.primagames.com
Protected by copyright. Unauthorized or unlawful copying or downloading expressly prohibited.
IntroduCtIon
Cast
padaWan traInIng
WalkthroughPROlOgueCOunT DOOKugeneRAl gRievOuSASAJJ venTReSS
ChAPTeR i: The hiDDen enemy
ChAPTeR ii: AmbuSh!Objective 1: bLOck the dROid aRmies
Objective 2: destROy the cORaL bLOckeR
Objective 3: destROy the enemy tanks
Objective 4: take Out the dROidekas
ChAPTeR iii: blue ShADOW viRuS
ChAPTeR iv: STORm OveR RylOTh
ChAPTeR v: innOCenTS Of RylOTh
libeRTy On RylOTh
ePilOguehub AReASSePARATiST miSSiOnS
seCrets and extras
CheCklIsts
nIntendo ds
Contents
hoW to use thIs eguIdeDownload from www.chipper.pl

Wa
lk
th
ro
ug
h —
as
ajj v
en
tr
es
s
Prima Official Game Guide
After destroying the gold coral, stack the remaining bits to block the background
ObJeCTive 1: blOCK The DROiD ARmieS
First thing’s first: You need to stop the Separatists’ battle Droids from overrunning the place! Run down the path until you spot a some gold coral, then use Lieutenant Thire’s rapid-fire blaster gun to destroy the coral.
TIPSearch the path thoroughly—including the foreground area and back near our heroes’ landing shuttle—to find several valuable studs. Smash up the local plant life for even more loot!
Throw Yoda’s Lightsaber at the four thrusters of the shuttle he took to get here. Use the Force to remove a glowing clamp afterward, then switch to any clone trooper and grapple the shuttle’s hook point. Out pops a minikit!
miniKiT 1
TIPHit the remainder of the shuttle with Jek’s rocket launcher after obtaining the minikit to destroy most of the shuttle and score some bonus studs!
1
1
3
4
1
start
A
139
www.primagames.com
Protected by copyright. Unauthorized or unlawful copying or downloading expressly prohibited.
IntroduCtIon
Cast
padaWan traInIng
WalkthroughPROlOgueCOunT DOOKugeneRAl gRievOuSASAJJ venTReSS
ChAPTeR i: The hiDDen enemy
ChAPTeR ii: AmbuSh!Objective 1: bLOck the dROid aRmies
Objective 2: destROy the cORaL bLOckeR
Objective 3: destROy the enemy tanks
Objective 4: take Out the dROidekas
ChAPTeR iii: blue ShADOW viRuS
ChAPTeR iv: STORm OveR RylOTh
ChAPTeR v: innOCenTS Of RylOTh
libeRTy On RylOTh
ePilOguehub AReASSePARATiST miSSiOnS
seCrets and extras
CheCklIsts
nIntendo ds
Contents
hoW to use thIs eguIdeDownload from www.chipper.pl

Wa
lk
th
ro
ug
h —
as
ajj v
en
tr
es
s
Prima Official Game Guide
With both Droid passages blocked, the giant pink coral in the background explodes, revealing more path. Wipe out the crew of Super Battle Droids that ambush you as you fight your way north.
path from which the enemy Droids are emerging. This should hold them off for a while!
More Droids emerge from a cave to the right. This time, use Jek’s rocket launcher to destroy the nearby silver coral formation, then stack the remaining bits to seal off the cave.
Attack the small brown rock near the Droid cave to cause a purple hermit crab to poke its head out. Attack the crab to destroy it (it’s not very friendly anyway). Find and destroy a total of five hermit crabs in this level to earn a minikit! The next four are all in the valley area, hiding under rocks in the open ground—check the next area’s map for their locations.
miniKiT 2
FREEPLAYminiKiT 3
Use the Force to grow three cylindrical plants along the north stretch of path. The plants create an updraft—use this to reach an overhead ledge.
Once you’re on the ledge, toggle to an astromech Droid, such as R2-D2, and hold the Jump button to hover over to another ledge to the right. Shove the box you find here off the ledge to make it smash on the ground below.
Drop down and build the box’s remaining bits into a large crab that you can ride. Hop onto the crab and search for five tiny pink crabs around this area—they’re all pretty easy to find. Attack each baby crab to smack it and get it to follow you. Get all five baby crabs following you to score a minikit!
140
www.primagames.com
Protected by copyright. Unauthorized or unlawful copying or downloading expressly prohibited.
IntroduCtIon
Cast
padaWan traInIng
WalkthroughPROlOgueCOunT DOOKugeneRAl gRievOuSASAJJ venTReSS
ChAPTeR i: The hiDDen enemy
ChAPTeR ii: AmbuSh!Objective 1: bLOck the dROid aRmies
Objective 2: destROy the cORaL bLOckeR
Objective 3: destROy the enemy tanks
Objective 4: take Out the dROidekas
ChAPTeR iii: blue ShADOW viRuS
ChAPTeR iv: STORm OveR RylOTh
ChAPTeR v: innOCenTS Of RylOTh
libeRTy On RylOTh
ePilOguehub AReASSePARATiST miSSiOnS
seCrets and extras
CheCklIsts
nIntendo ds
Contents
hoW to use thIs eguIdeDownload from www.chipper.pl

Wa
lk
th
ro
ug
h —
as
ajj v
en
tr
es
s
Prima Official Game Guide
ObJeCTive 2: DeSTROy The CORAl blOCKeR
More gold coral blocks your progress at the north end of the path. Open fire with Lieutenant Thire to remove this obstacle.
Hang on—before Lieutenant Thire can finish his work on the gold coral, enemy Droids shoot off
his arm! The poor clone is next to useless from this point forward. Poor guy!
TIPUse Super Battle Droids to destroy the path’s gold boulders as well—you’ll score lots of studs!
You’ve got to get past that gold coral! Switch to Yoda and use the Force to lift one of the gray Super Battle Droids that emerge from the overhead caves. Once lifted, the Droid begins firing its blaster like crazy—maneuver the Droid close to the gold coral and it’ll make short work of the obstruction for you.
FREEPLAYminiKiT 4
Use a Sith character’s Dark Force ability to transform the red glowing bits near the gold coral into a platform. Scale the platform to reach an overhead cave.
A happy crab is singing a colorful tune inside the cave. Watch the color of the notes the crab sings, then jump on the cave’s three colored mushrooms in the same order. This makes the crab really happy (almost too happy, really)—to the tune of handing over a precious minikit!
TIPIf you missed the crab’s melody, whack the little fellow to make it sing again.
miniKiT 5
Find and dispatch five shy worms throughout this level to earn a minikit. The first worm is hiding inside the singing crab’s cave—attack the purple plant to make the worm pop up from the ground, then attack the worm itself to squash it (just like every worm deserves). Each worm is labeled on the maps to ensure that you find them all.
141
www.primagames.com
Protected by copyright. Unauthorized or unlawful copying or downloading expressly prohibited.
IntroduCtIon
Cast
padaWan traInIng
WalkthroughPROlOgueCOunT DOOKugeneRAl gRievOuSASAJJ venTReSS
ChAPTeR i: The hiDDen enemy
ChAPTeR ii: AmbuSh!Objective 1: bLOck the dROid aRmies
Objective 2: destROy the cORaL bLOckeR
Objective 3: destROy the enemy tanks
Objective 4: take Out the dROidekas
ChAPTeR iii: blue ShADOW viRuS
ChAPTeR iv: STORm OveR RylOTh
ChAPTeR v: innOCenTS Of RylOTh
libeRTy On RylOTh
ePilOguehub AReASSePARATiST miSSiOnS
seCrets and extras
CheCklIsts
nIntendo ds
Contents
hoW to use thIs eguIdeDownload from www.chipper.pl
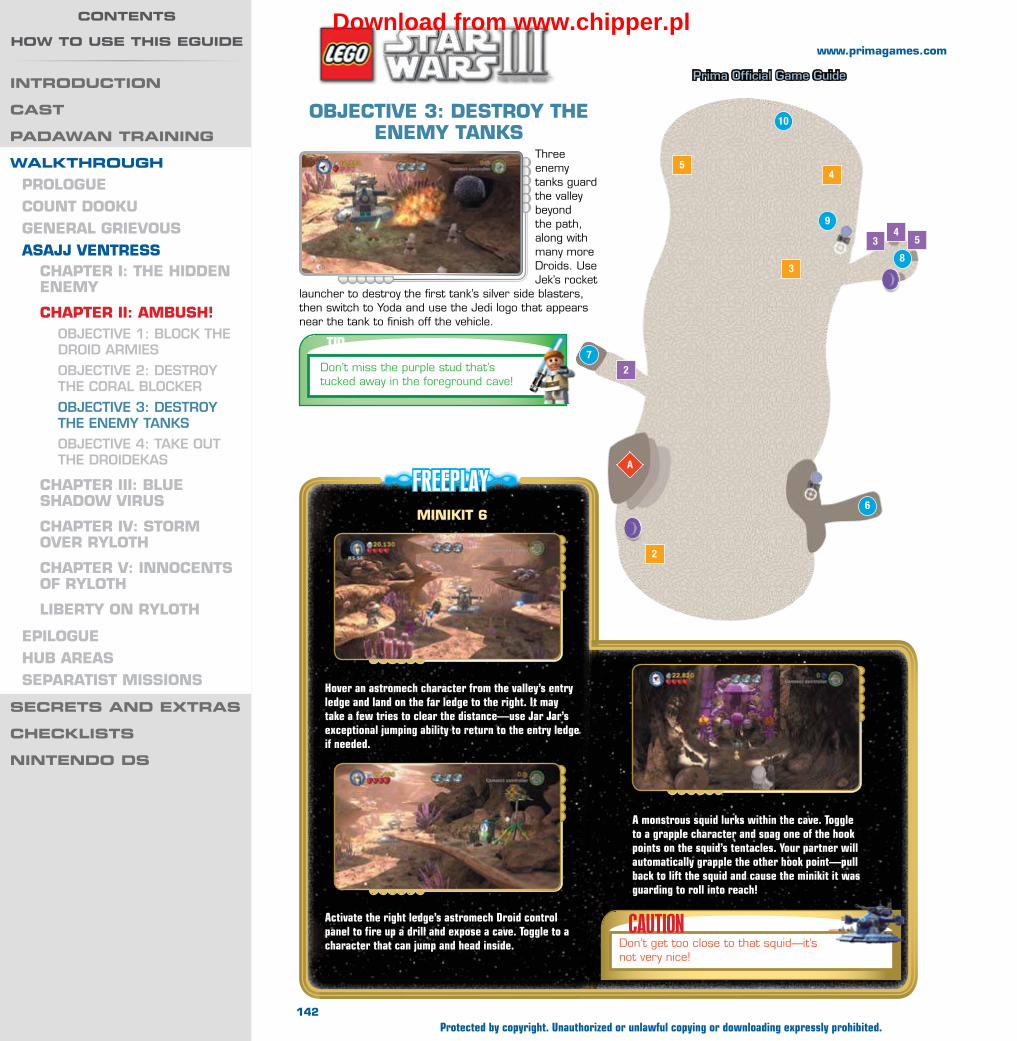
Wa
lk
th
ro
ug
h —
as
ajj v
en
tr
es
s
Prima Official Game Guide
ObJeCTive 3: DeSTROy The enemy TAnKS
Three enemy tanks guard the valley beyond the path, along with many more Droids. Use Jek’s rocket
launcher to destroy the first tank’s silver side blasters, then switch to Yoda and use the Jedi logo that appears near the tank to finish off the vehicle.
TIPDon’t miss the purple stud that’s tucked away in the foreground cave!
FREEPLAYminiKiT 6
Hover an astromech character from the valley’s entry ledge and land on the far ledge to the right. It may take a few tries to clear the distance—use Jar Jar’s exceptional jumping ability to return to the entry ledge if needed.
Activate the right ledge’s astromech Droid control panel to fire up a drill and expose a cave. Toggle to a character that can jump and head inside.
A monstrous squid lurks within the cave. Toggle to a grapple character and snag one of the hook points on the squid’s tentacles. Your partner will automatically grapple the other hook point—pull back to lift the squid and cause the minikit it was guarding to roll into reach!
CAUTIONDon’t get too close to that squid—it’s not very nice!
2
6
7
8
9
3
45
2
34
5
A
10
142
www.primagames.com
Protected by copyright. Unauthorized or unlawful copying or downloading expressly prohibited.
IntroduCtIon
Cast
padaWan traInIng
WalkthroughPROlOgueCOunT DOOKugeneRAl gRievOuSASAJJ venTReSS
ChAPTeR i: The hiDDen enemy
ChAPTeR ii: AmbuSh!Objective 1: bLOck the dROid aRmies
Objective 2: destROy the cORaL bLOckeR
Objective 3: destROy the enemy tanks
Objective 4: take Out the dROidekas
ChAPTeR iii: blue ShADOW viRuS
ChAPTeR iv: STORm OveR RylOTh
ChAPTeR v: innOCenTS Of RylOTh
libeRTy On RylOTh
ePilOguehub AReASSePARATiST miSSiOnS
seCrets and extras
CheCklIsts
nIntendo ds
Contents
hoW to use thIs eguIdeDownload from www.chipper.pl

Wa
lk
th
ro
ug
h —
as
ajj v
en
tr
es
s
Prima Official Game Guide
Lieutenant Thire is still out of commission, so Force-lift a Super Battle Droid and use it to destroy the second tank’s gold side blasters. Use the Jedi logo that appears near the tank to finish the job as you did before.
FREEPLAYminiKiT 7
After destroying the valley’s first tank, switch to a rapid-fire character and destroy the gold coral that’s blocking a cave to the left.
Use the Force on the three rock formations inside the cave to make them open up—this reveals luminous crystals that cause the overhead tentacles to retract. Run to the rear of the cave and use Jar Jar to leap up and snag the high minikit afterward.
143
www.primagames.com
Protected by copyright. Unauthorized or unlawful copying or downloading expressly prohibited.
IntroduCtIon
Cast
padaWan traInIng
WalkthroughPROlOgueCOunT DOOKugeneRAl gRievOuSASAJJ venTReSS
ChAPTeR i: The hiDDen enemy
ChAPTeR ii: AmbuSh!Objective 1: bLOck the dROid aRmies
Objective 2: destROy the cORaL bLOckeR
Objective 3: destROy the enemy tanks
Objective 4: take Out the dROidekas
ChAPTeR iii: blue ShADOW viRuS
ChAPTeR iv: STORm OveR RylOTh
ChAPTeR v: innOCenTS Of RylOTh
libeRTy On RylOTh
ePilOguehub AReASSePARATiST miSSiOnS
seCrets and extras
CheCklIsts
nIntendo ds
Contents
hoW to use thIs eguIdeDownload from www.chipper.pl
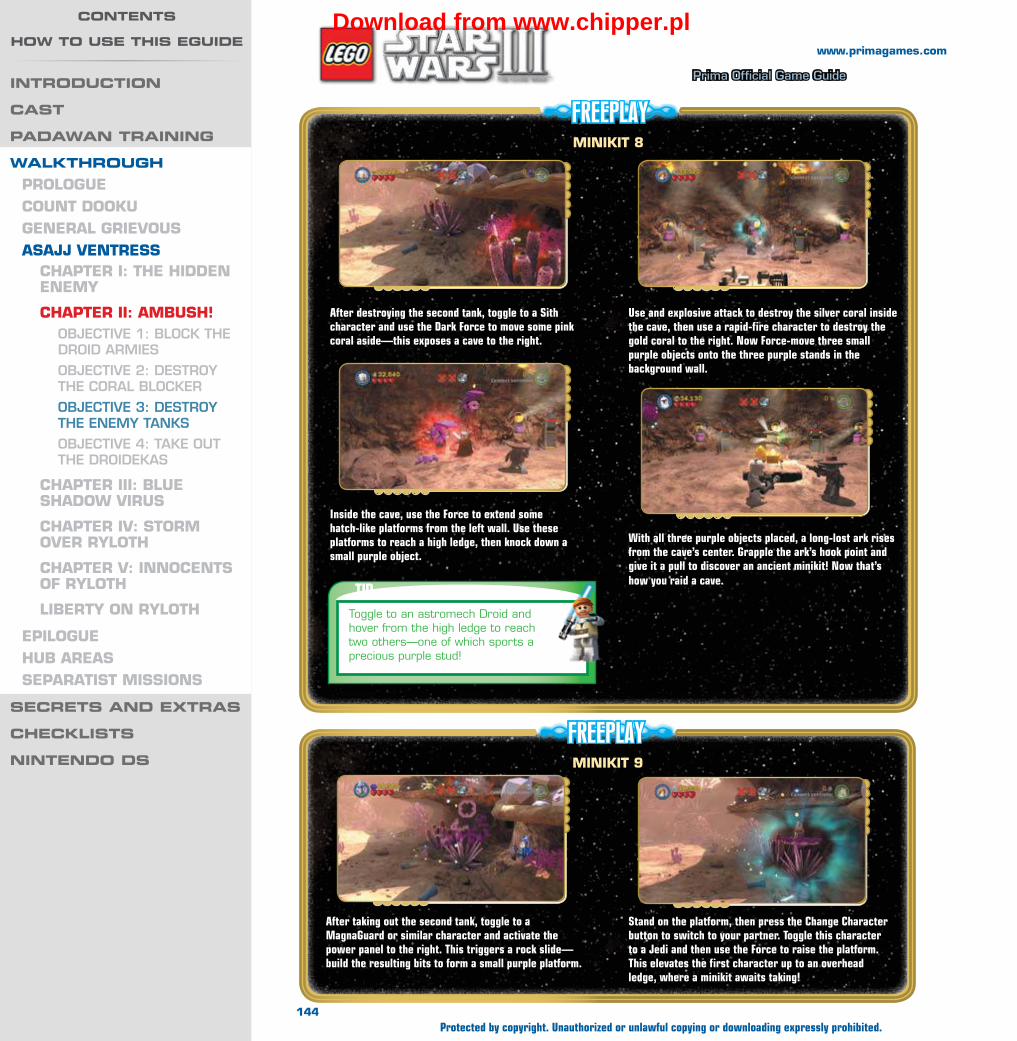
Wa
lk
th
ro
ug
h —
as
ajj v
en
tr
es
s
Prima Official Game Guide
FREEPLAYminiKiT 9
After taking out the second tank, toggle to a MagnaGuard or similar character and activate the power panel to the right. This triggers a rock slide—build the resulting bits to form a small purple platform.
Stand on the platform, then press the Change Character button to switch to your partner. Toggle this character to a Jedi and then use the Force to raise the platform. This elevates the first character up to an overhead ledge, where a minikit awaits taking!
FREEPLAY
After destroying the second tank, toggle to a Sith character and use the Dark Force to move some pink coral aside—this exposes a cave to the right.
Inside the cave, use the Force to extend some hatch-like platforms from the left wall. Use these platforms to reach a high ledge, then knock down a small purple object.
TIPToggle to an astromech Droid and hover from the high ledge to reach two others—one of which sports a precious purple stud!
Use and explosive attack to destroy the silver coral inside the cave, then use a rapid-fire character to destroy the gold coral to the right. Now Force-move three small purple objects onto the three purple stands in the background wall.
With all three purple objects placed, a long-lost ark rises from the cave’s center. Grapple the ark’s hook point and give it a pull to discover an ancient minikit! Now that’s how you raid a cave.
miniKiT 8
144
www.primagames.com
Protected by copyright. Unauthorized or unlawful copying or downloading expressly prohibited.
IntroduCtIon
Cast
padaWan traInIng
WalkthroughPROlOgueCOunT DOOKugeneRAl gRievOuSASAJJ venTReSS
ChAPTeR i: The hiDDen enemy
ChAPTeR ii: AmbuSh!Objective 1: bLOck the dROid aRmies
Objective 2: destROy the cORaL bLOckeR
Objective 3: destROy the enemy tanks
Objective 4: take Out the dROidekas
ChAPTeR iii: blue ShADOW viRuS
ChAPTeR iv: STORm OveR RylOTh
ChAPTeR v: innOCenTS Of RylOTh
libeRTy On RylOTh
ePilOguehub AReASSePARATiST miSSiOnS
seCrets and extras
CheCklIsts
nIntendo ds
Contents
hoW to use thIs eguIdeDownload from www.chipper.pl

Wa
lk
th
ro
ug
h —
as
ajj v
en
tr
es
s
Prima Official Game Guide
Red-shielded Droidekas are invincible to all attacks, making them tough customers. Get creative and use the
Force to shove these rollers into the background pit. No sort of shield will spare them from that kind of fall!
Some red-shielded Droidekas may be too far from the pit—look up and spy silver boulders above these troublesome rollers. Switch to Jek and hold the Attack button to target the silver boulders, then release the Attack button to fire a rocket. The debris comes crashing down on the Droideka below, turning it into scrap.
You’ve dealt with the three tanks—now you must contend with a number of shielded Droidekas. Dispatch the blue-shielded Droidekas easily with Yoda’s furious Lightsaber combos.
The final tank’s side blasters feature hook points. Grapple and pull on these with any clone trooper (except Lieutenant Thire—poor guy) to disable the weapons, then use the Jedi logo to terminate the tank.
Destroy the cylindrical purple plants to the right of the final tank, then build the remaining bits to form a crab. The critter quickly dives into the nearby hole and fishes out a minikit for you. What a pal!
miniKiT 10
NOTEYou may need to use the Force and push certain Droidekas to line them up and ensure the boulders will fall on them. The boulders respawn if you miss, so don’t worry if it takes a few tries!
ObJeCTive 4: TAKe OuT The DROiDeKAS
The mission concludes after you destroy all five Droidekas. Suffice it to say that you’ve more than impressed good King Katuunko!
NOTENow that you’ve beaten at least three levels, you may be able to visit new areas of the Resolute. See the “Battleship Resolute” chapter for an in-depth look at the Republic’s hub.
145
www.primagames.com
Protected by copyright. Unauthorized or unlawful copying or downloading expressly prohibited.
IntroduCtIon
Cast
padaWan traInIng
WalkthroughPROlOgueCOunT DOOKugeneRAl gRievOuSASAJJ venTReSS
ChAPTeR i: The hiDDen enemy
ChAPTeR ii: AmbuSh!Objective 1: bLOck the dROid aRmies
Objective 2: destROy the cORaL bLOckeR
Objective 3: destROy the enemy tanks
Objective 4: take Out the dROidekas
ChAPTeR iii: blue ShADOW viRuS
ChAPTeR iv: STORm OveR RylOTh
ChAPTeR v: innOCenTS Of RylOTh
libeRTy On RylOTh
ePilOguehub AReASSePARATiST miSSiOnS
seCrets and extras
CheCklIsts
nIntendo ds
Contents
hoW to use thIs eguIdeDownload from www.chipper.pl

Wa
lk
th
ro
ug
h —
as
ajj v
en
tr
es
s
Prima Official Game Guide
“FeaR Is a dIsease; hope Is Its only cuRe.”
Senator Amidala and Representative Jar Jar Binks have returned to Naboo, investigating reports of Separatist activity on their home planet. Amidala’s faithful head of security, Captain Typho, hopes to extract crucial information from a captured TX-20 Droid....
asajj ventress
Chapter III: blue shadoW vIrus
MinikitsNo. Icon(s) Mode Notes
1 1 to 5 Story Destroy five security cameras in the swamp.
2 2 StoryDestroy the gold idol in the swamp, build the bits into a tractor, and mow the grass.
3 1 to 5 Free PlayForce-lift five carrots up from the ground in the swamp, then destroy them.
4 1 to 6 Free PlayUse the Dark Force to lift six objects from the swamp water, then destroy them.
5 1 to 4 StoryUse the Force to close four gates inside the enemy base, then use it again to lock their purple clamps.
6 — Free Play Activate the LAAT’s astromech Droid control panel.
7 7 Free PlayActivate the two enemy Droid panels inside the base twice to make minikit pictures appear on both monitors.
8 8 Free Play
Activate the protocol Droid control panel beyond the Droidekas, then enter the bar. Use the Force to pour the MagnaGuard a drink.
9 9 Free PlayUse the crawl space hatch while battling the LEP Droid, then saber-jump up the checkered walls.
10 10 Free Play
Defeat the LEP Droid, then confront Dr. Vindi on the landing pad with both Free Play characters. Pull both hook points on his ship.
True Jedi Stud Requirement: 200,000
Story Characters
Clone Trooper
Anakin Skywalker
Obi-Wan Kenobi
Captain RexAhsoka Tano
Jar Jar binks
Padmé Amidala
146
www.primagames.com
Protected by copyright. Unauthorized or unlawful copying or downloading expressly prohibited.
IntroduCtIon
Cast
padaWan traInIng
WalkthroughPROlOgueCOunT DOOKugeneRAl gRievOuSASAJJ venTReSS
ChAPTeR i: The hiDDen enemy
ChAPTeR ii: AmbuSh!
ChAPTeR iii: blue ShADOW viRuS
Objective 1: infiLtRate the enemy base
Objective 2: byPass the dROidekas
Objective 3: Rescue jaR jaR and Padmé
Objective 4: defeat dR. vindi
Objective 5: defeat the LeP dROid
Objective 6: defeat dR. vindi—fOR ReaL!
ChAPTeR iv: STORm OveR RylOTh
ChAPTeR v: innOCenTS Of RylOTh
libeRTy On RylOTh
ePilOguehub AReASSePARATiST miSSiOnS
seCrets and extras
CheCklIsts
nIntendo ds
Contents
hoW to use thIs eguIdeDownload from www.chipper.pl
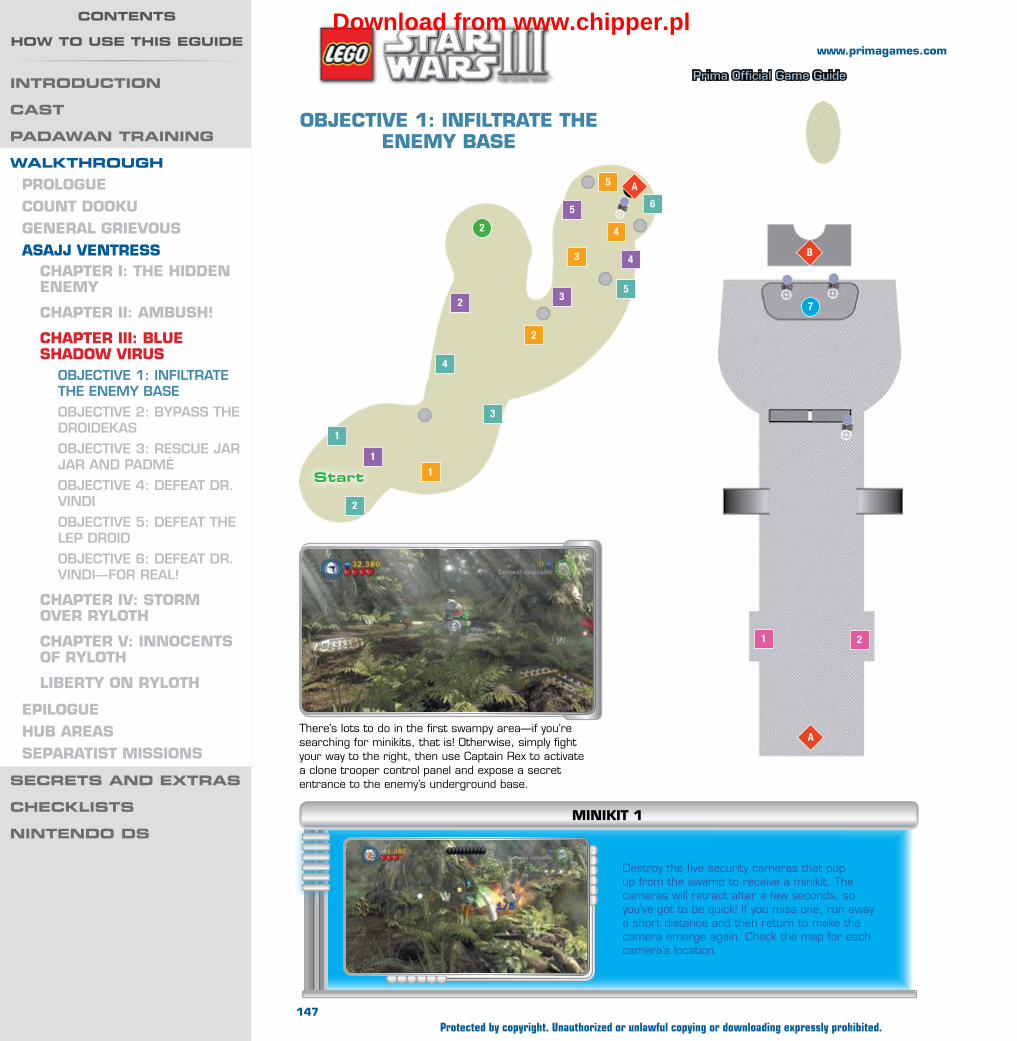
Wa
lk
th
ro
ug
h —
as
ajj v
en
tr
es
s
Prima Official Game Guide
There’s lots to do in the first swampy area—if you’re searching for minikits, that is! Otherwise, simply fight your way to the right, then use Captain Rex to activate a clone trooper control panel and expose a secret entrance to the enemy’s underground base.
Destroy the five security cameras that pop up from the swamp to receive a minikit. The cameras will retract after a few seconds, so you’ve got to be quick! If you miss one, run away a short distance and then return to make the camera emerge again. Check the map for each camera’s location.
miniKiT 1
B
7
1 2
A
A
1
2
2
3
4
5
1
2 3
4
5
1
2
3
4
5
6
start
ObJeCTive 1: infilTRATe The enemy bASe
147
www.primagames.com
Protected by copyright. Unauthorized or unlawful copying or downloading expressly prohibited.
IntroduCtIon
Cast
padaWan traInIng
WalkthroughPROlOgueCOunT DOOKugeneRAl gRievOuSASAJJ venTReSS
ChAPTeR i: The hiDDen enemy
ChAPTeR ii: AmbuSh!
ChAPTeR iii: blue ShADOW viRuS
Objective 1: infiLtRate the enemy base
Objective 2: byPass the dROidekas
Objective 3: Rescue jaR jaR and Padmé
Objective 4: defeat dR. vindi
Objective 5: defeat the LeP dROid
Objective 6: defeat dR. vindi—fOR ReaL!
ChAPTeR iv: STORm OveR RylOTh
ChAPTeR v: innOCenTS Of RylOTh
libeRTy On RylOTh
ePilOguehub AReASSePARATiST miSSiOnS
seCrets and extras
CheCklIsts
nIntendo ds
Contents
hoW to use thIs eguIdeDownload from www.chipper.pl
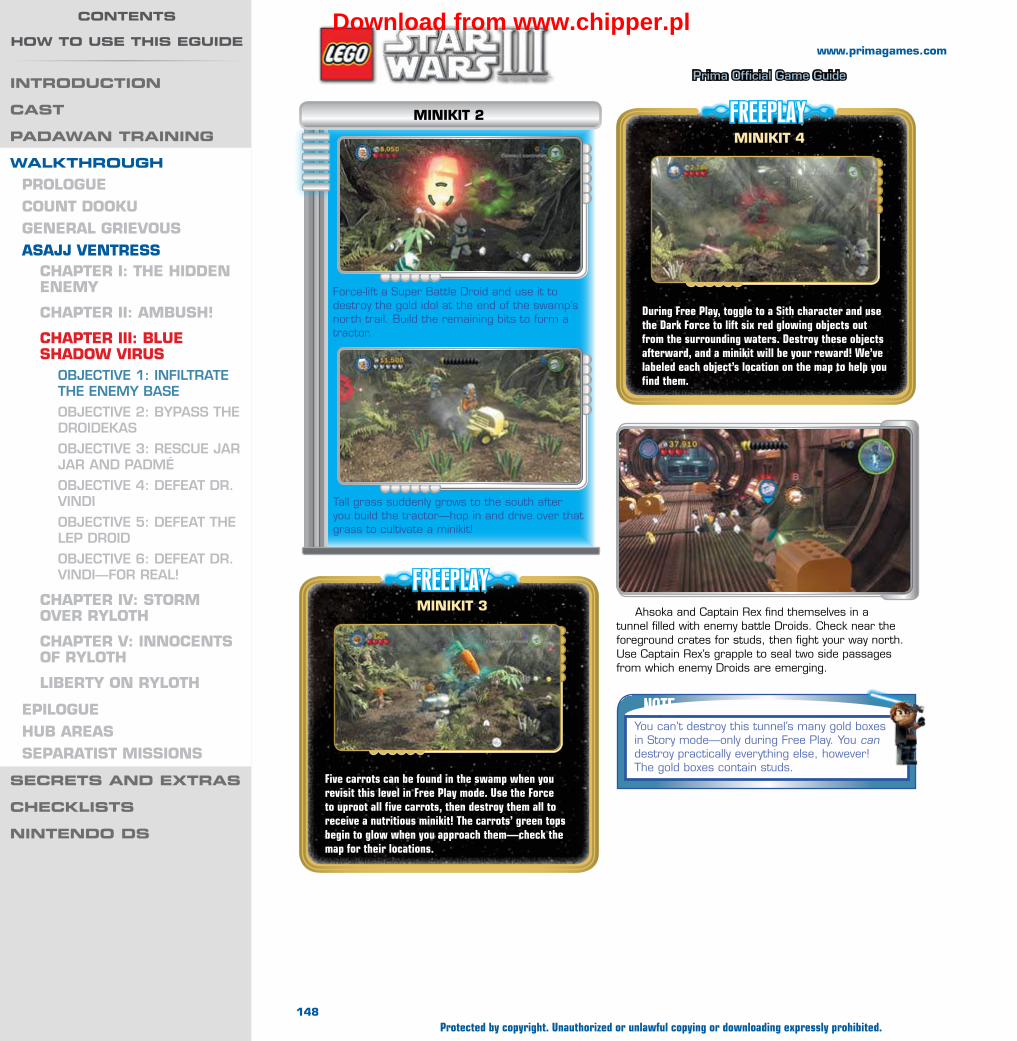
Wa
lk
th
ro
ug
h —
as
ajj v
en
tr
es
s
Prima Official Game Guide
Ahsoka and Captain Rex find themselves in a tunnel filled with enemy battle Droids. Check near the foreground crates for studs, then fight your way north. Use Captain Rex’s grapple to seal two side passages from which enemy Droids are emerging.
Force-lift a Super Battle Droid and use it to destroy the gold idol at the end of the swamp’s north trail. Build the remaining bits to form a tractor.
Tall grass suddenly grows to the south after you build the tractor—hop in and drive over that grass to cultivate a minikit!
miniKiT 2
FREEPLAYminiKiT 3
Five carrots can be found in the swamp when you revisit this level in Free Play mode. Use the Force to uproot all five carrots, then destroy them all to receive a nutritious minikit! The carrots’ green tops begin to glow when you approach them—check the map for their locations.
FREEPLAYminiKiT 4
During Free Play, toggle to a Sith character and use the Dark Force to lift six red glowing objects out from the surrounding waters. Destroy these objects afterward, and a minikit will be your reward! We’ve labeled each object’s location on the map to help you find them.
NOTEYou can’t destroy this tunnel’s many gold boxes in Story mode—only during Free Play. You can destroy practically everything else, however! The gold boxes contain studs.
148
www.primagames.com
Protected by copyright. Unauthorized or unlawful copying or downloading expressly prohibited.
IntroduCtIon
Cast
padaWan traInIng
WalkthroughPROlOgueCOunT DOOKugeneRAl gRievOuSASAJJ venTReSS
ChAPTeR i: The hiDDen enemy
ChAPTeR ii: AmbuSh!
ChAPTeR iii: blue ShADOW viRuS
Objective 1: infiLtRate the enemy base
Objective 2: byPass the dROidekas
Objective 3: Rescue jaR jaR and Padmé
Objective 4: defeat dR. vindi
Objective 5: defeat the LeP dROid
Objective 6: defeat dR. vindi—fOR ReaL!
ChAPTeR iv: STORm OveR RylOTh
ChAPTeR v: innOCenTS Of RylOTh
libeRTy On RylOTh
ePilOguehub AReASSePARATiST miSSiOnS
seCrets and extras
CheCklIsts
nIntendo ds
Contents
hoW to use thIs eguIdeDownload from www.chipper.pl

Wa
lk
th
ro
ug
h —
as
ajj v
en
tr
es
s
Prima Official Game Guide
ObJeCTive 2: byPASS The DROiDeKAS
As you near the end of the tunnel, two red-shielded Droidekas roll up to block you, and a door closes
behind them. You can’t defeat these enemies at present, so hold the Change Character button and swap to Obi-Wan, who’s flying around the swamp in a LAAT transport ship.
After destroying all the shield emitters, fire on the central hatch itself to blow off its cover. Obi-Wan then flies up close—hop out of the gunner’s seat and leap into the hole.
FREEPLAYminiKiT 5
Use the Force to seal off another pair of side passages in the tunnel from which enemy Droids are emerging. First use the Force to close the passages’ gates, then use it again to raise the purple locking mechanisms up to the purple plates above. Find two more of these Force-operated gates later in the level and seal them off as well to earn a minikit! Check the following maps for their locations.
FREEPLAYminiKiT 6
During Free Play, activate the LAAT’s astromech Droid control panel to extend a bug-catching net beneath the ship. You won’t nab any bugs, but you do snag something much better—a minikit!
TIPForce-lift the Super Battle Droids and use them to destroy the gold boxes in Obi-Wan’s tunnel for lots of bonus studs!
Man the LAAT’s gun turret and destroy the four shield emitters that are covering the central hatch with a force field. It takes a while for the LAAT gun turret’s projectiles to find their mark, so be patient and just keep firing. It may help to aim to the right and arc your shots.
Obi-Wan lands in a tunnel that runs above Ahsoka and Captain Rex. Tear through enemy Droids as you venture to the right, then use the Force to remove two purple clamps that are holding some overhead machinery close to the ceiling.
149
www.primagames.com
Protected by copyright. Unauthorized or unlawful copying or downloading expressly prohibited.
IntroduCtIon
Cast
padaWan traInIng
WalkthroughPROlOgueCOunT DOOKugeneRAl gRievOuSASAJJ venTReSS
ChAPTeR i: The hiDDen enemy
ChAPTeR ii: AmbuSh!
ChAPTeR iii: blue ShADOW viRuS
Objective 1: infiLtRate the enemy base
Objective 2: byPass the dROidekas
Objective 3: Rescue jaR jaR and Padmé
Objective 4: defeat dR. vindi
Objective 5: defeat the LeP dROid
Objective 6: defeat dR. vindi—fOR ReaL!
ChAPTeR iv: STORm OveR RylOTh
ChAPTeR v: innOCenTS Of RylOTh
libeRTy On RylOTh
ePilOguehub AReASSePARATiST miSSiOnS
seCrets and extras
CheCklIsts
nIntendo ds
Contents
hoW to use thIs eguIdeDownload from www.chipper.pl

Wa
lk
th
ro
ug
h —
as
ajj v
en
tr
es
s
Prima Official Game Guide
Removing the purple clamps causes the overhead machinery to fall, smash through the floor, and crush the two red-shielded Droidekas in Ahsoka’s tunnel below. Drop through the hole afterward to hook up with Anakin’s fearless Padawan.
Pieces are jiggling away in the lower tunnel. Build these into a clone trooper control panel,
then use Captain Rex to activate the panel and open the background door.
Yank the hook point in the following chamber to pull down a platform, then
move Obi-Wan or Ahsoka onto it. Use the other Jedi to Force-lift the platform upward so that the platform’s occupant can reach the overhead ledge.
FREEPLAYminiKiT 7
Toggle to any enemy Droid and activate the two panels beneath the overhead ledge. Activate each panel twice to make pictures of minikits appear on the nearby monitors. The middle monitor then explodes, revealing a minikit that appears in high definition!
Switch to the character that you’ve elevated to the ledge and then carve a small hole in the background wall where the Jedi logo appears. Repeatedly attack the exposed circuitry to disable another outdoor hatch’s force field and allow Anakin to enter the base.
C
8
34
B
ObJeCTive 3: ReSCue JAR JAR AnD PADmé
150
www.primagames.com
Protected by copyright. Unauthorized or unlawful copying or downloading expressly prohibited.
IntroduCtIon
Cast
padaWan traInIng
WalkthroughPROlOgueCOunT DOOKugeneRAl gRievOuSASAJJ venTReSS
ChAPTeR i: The hiDDen enemy
ChAPTeR ii: AmbuSh!
ChAPTeR iii: blue ShADOW viRuS
Objective 1: infiLtRate the enemy base
Objective 2: byPass the dROidekas
Objective 3: Rescue jaR jaR and Padmé
Objective 4: defeat dR. vindi
Objective 5: defeat the LeP dROid
Objective 6: defeat dR. vindi—fOR ReaL!
ChAPTeR iv: STORm OveR RylOTh
ChAPTeR v: innOCenTS Of RylOTh
libeRTy On RylOTh
ePilOguehub AReASSePARATiST miSSiOnS
seCrets and extras
CheCklIsts
nIntendo ds
Contents
hoW to use thIs eguIdeDownload from www.chipper.pl
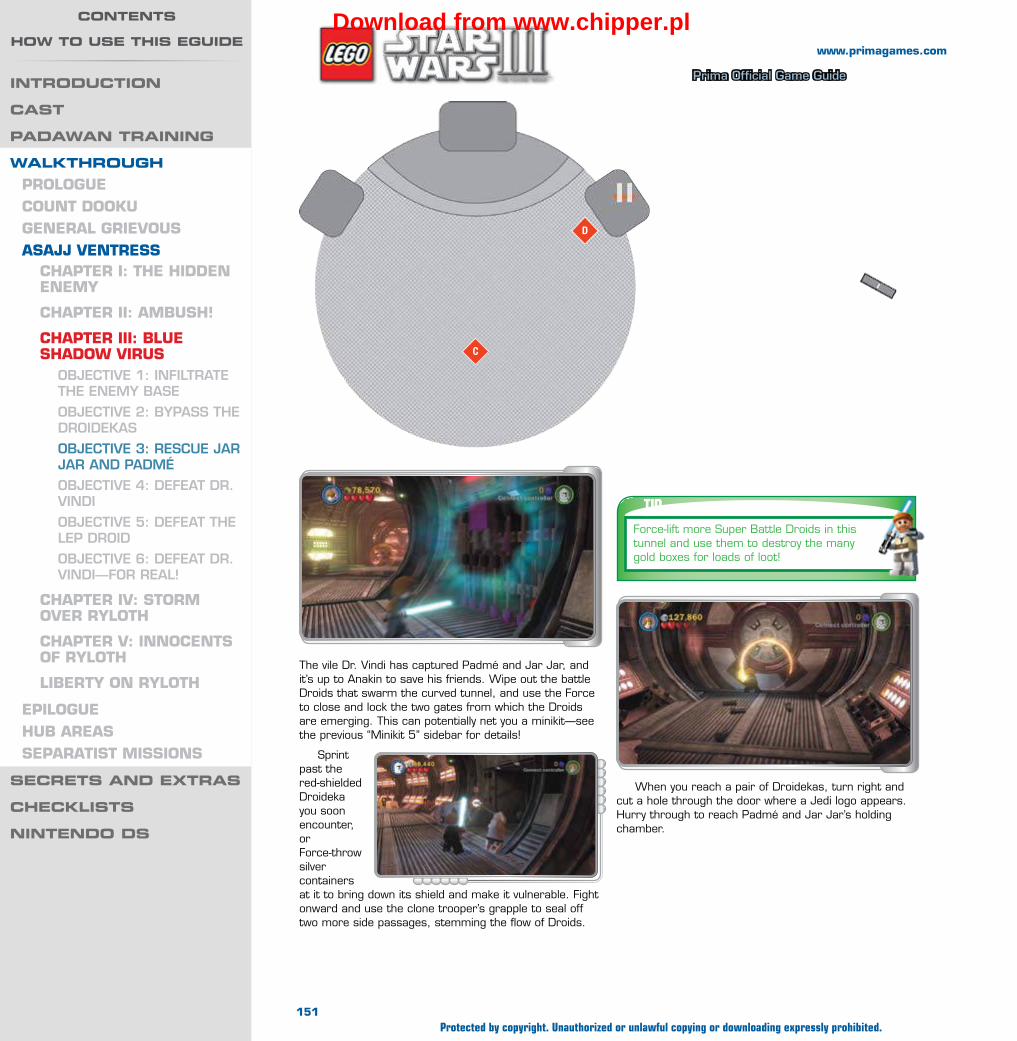
Wa
lk
th
ro
ug
h —
as
ajj v
en
tr
es
s
Prima Official Game Guide
The vile Dr. Vindi has captured Padmé and Jar Jar, and it’s up to Anakin to save his friends. Wipe out the battle Droids that swarm the curved tunnel, and use the Force to close and lock the two gates from which the Droids are emerging. This can potentially net you a minikit—see the previous “Minikit 5” sidebar for details!
Sprint past the red-shielded Droideka you soon encounter, or Force-throw silver containers at it to bring down its shield and make it vulnerable. Fight onward and use the clone trooper’s grapple to seal off two more side passages, stemming the flow of Droids.
07c-022
TIPForce-lift more Super Battle Droids in this tunnel and use them to destroy the many gold boxes for loads of loot!
When you reach a pair of Droidekas, turn right and cut a hole through the door where a Jedi logo appears. Hurry through to reach Padmé and Jar Jar’s holding chamber.
D
C
151
www.primagames.com
Protected by copyright. Unauthorized or unlawful copying or downloading expressly prohibited.
IntroduCtIon
Cast
padaWan traInIng
WalkthroughPROlOgueCOunT DOOKugeneRAl gRievOuSASAJJ venTReSS
ChAPTeR i: The hiDDen enemy
ChAPTeR ii: AmbuSh!
ChAPTeR iii: blue ShADOW viRuS
Objective 1: infiLtRate the enemy base
Objective 2: byPass the dROidekas
Objective 3: Rescue jaR jaR and Padmé
Objective 4: defeat dR. vindi
Objective 5: defeat the LeP dROid
Objective 6: defeat dR. vindi—fOR ReaL!
ChAPTeR iv: STORm OveR RylOTh
ChAPTeR v: innOCenTS Of RylOTh
libeRTy On RylOTh
ePilOguehub AReASSePARATiST miSSiOnS
seCrets and extras
CheCklIsts
nIntendo ds
Contents
hoW to use thIs eguIdeDownload from www.chipper.pl

Wa
lk
th
ro
ug
h —
as
ajj v
en
tr
es
s
Prima Official Game Guide
FREEPLAYminiKiT 8
Before saber-cutting through the door to reach Padmé and Jar Jar, activate the protocol Droid control panel behind the Droidekas to open the background door. Inspect the walls beyond the door and a panel will automatically slide away, revealing a secret room!
ObJeCTive 4: DefeAT DR. vinDi
Enter the secret room to visit a happenin’ bar. Force-lift the large red and white canister behind the bar and place it onto the purple plate on the background wall.
Next, Force-move the empty glass that sits on the bar near a MagnaGuard. Place the glass beneath the canister, then pull the nearby lever to fill it.
Force-move the glass back over to the MagnaGuard once it’s full. The Droid quickly downs the drink, then sprints to the nearby restroom—and out pops a minikit!
Padmé and Jar Jar are being tortured by the cruel Dr. Vindi—you’ve got to save them! Force-throw any of the room’s many silver objects at Dr. Vindi, who hops around the high background platforms.
Dr. Vindi flees after you strike him with several objects. Your friends are saved! Take control of Jar Jar and use his exceptional jumping ability to reach the high background platforms. Pull the lever on the right to open the door below, then head through.
152
www.primagames.com
Protected by copyright. Unauthorized or unlawful copying or downloading expressly prohibited.
IntroduCtIon
Cast
padaWan traInIng
WalkthroughPROlOgueCOunT DOOKugeneRAl gRievOuSASAJJ venTReSS
ChAPTeR i: The hiDDen enemy
ChAPTeR ii: AmbuSh!
ChAPTeR iii: blue ShADOW viRuS
Objective 1: infiLtRate the enemy base
Objective 2: byPass the dROidekas
Objective 3: Rescue jaR jaR and Padmé
Objective 4: defeat dR. vindi
Objective 5: defeat the LeP dROid
Objective 6: defeat dR. vindi—fOR ReaL!
ChAPTeR iv: STORm OveR RylOTh
ChAPTeR v: innOCenTS Of RylOTh
libeRTy On RylOTh
ePilOguehub AReASSePARATiST miSSiOnS
seCrets and extras
CheCklIsts
nIntendo ds
Contents
hoW to use thIs eguIdeDownload from www.chipper.pl

Wa
lk
th
ro
ug
h —
as
ajj v
en
tr
es
s
Prima Official Game Guide
9
10
D
Wipe out the army of Droids in the tunnel beyond the torture chamber, then chase Dr. Vindi’s LEP Droid
down the left passage. Use Jar Jar to reach the high ledge, then stand on one of the two red buttons up here to turn it green. Wait for Padmé to use her grapple to join you and stand on the other button.
Activating both buttons traps Jar Jar and Padmé on the ledge, but also opens a door back
near their comrades. Before switching to Anakin and Obi-Wan, enter the room beyond the buttons and watch the unusual plants closely—one of them will start to wiggle! Blast this plant with Padmé to destroy it and expose Dr. Vindi’s pesky LEP Droid.
While the LEP Droid is exposed, blast it from afar or whack it up close to score damage.
ObJeCTive 5: DefeAT The leP DROiD
Eventually, the LEP will flee to the background room. Fight your way through some Droids to reach the LEP, then attack the LEP Droid each time it stands still and its hearts appear over its head.
The LEP Droid then flees to another plant—watch carefully to see which one wiggles, then blast that plant and wound the LEP Droid again.
153
www.primagames.com
Protected by copyright. Unauthorized or unlawful copying or downloading expressly prohibited.
IntroduCtIon
Cast
padaWan traInIng
WalkthroughPROlOgueCOunT DOOKugeneRAl gRievOuSASAJJ venTReSS
ChAPTeR i: The hiDDen enemy
ChAPTeR ii: AmbuSh!
ChAPTeR iii: blue ShADOW viRuS
Objective 1: infiLtRate the enemy base
Objective 2: byPass the dROidekas
Objective 3: Rescue jaR jaR and Padmé
Objective 4: defeat dR. vindi
Objective 5: defeat the LeP dROid
Objective 6: defeat dR. vindi—fOR ReaL!
ChAPTeR iv: STORm OveR RylOTh
ChAPTeR v: innOCenTS Of RylOTh
libeRTy On RylOTh
ePilOguehub AReASSePARATiST miSSiOnS
seCrets and extras
CheCklIsts
nIntendo ds
Contents
hoW to use thIs eguIdeDownload from www.chipper.pl

Wa
lk
th
ro
ug
h —
as
ajj v
en
tr
es
s
Prima Official Game Guide
Keep attacking the LEP until it finally crumbles into a pile of bits. Build these to complete the background circuitry, then pull the nearby lever to activate it. That’s all for Padmé and Jar Jar—hold the Change Character button to switch to Anakin and Obi-Wan.
ObJeCTive 6: DefeAT DR. vinDi—fOR ReAl!
As Anakin and Obi-Wan, chase after Dr. Vindi, dismantling Droids as you go. Saber-cut through the
door that Vindi closes to reach a landing pad area.
FREEPLAYminiKiT 9
While battling the LEP Droid in the background room, toggle to a small character and crawl into the nearby hatch. You emerge near two checkered walls—switch to a Jedi (if necessary) and saber-jump up the walls to reach a high minikit!
The vile doctor has fled to a shuttlecraft—you can’t let him escape! Use the Force to catch the explosives that Dr. Vindi hurls at you and send them flying back at him to score damage. Repeat this until the doctor finally gets a dose of his own medicine.
TIPHold the Attack button to aim while Dr. Vindi is firing his blaster—you’ll automatically deflect his shots! If you’re wounded, run around and defeat battle Droids for hearts.
FREEPLAYminiKiT 10
If you’ve beaten the LEP Droid, then both Free Play partners will be able to participate in the final showdown against Dr. Vindi. Toggle to a pair of characters that own grapple guns and yank the two hook points on Vindi’s ship to obtain a minikit!
154
www.primagames.com
Protected by copyright. Unauthorized or unlawful copying or downloading expressly prohibited.
IntroduCtIon
Cast
padaWan traInIng
WalkthroughPROlOgueCOunT DOOKugeneRAl gRievOuSASAJJ venTReSS
ChAPTeR i: The hiDDen enemy
ChAPTeR ii: AmbuSh!
ChAPTeR iii: blue ShADOW viRuS
Objective 1: infiLtRate the enemy base
Objective 2: byPass the dROidekas
Objective 3: Rescue jaR jaR and Padmé
Objective 4: defeat dR. vindi
Objective 5: defeat the LeP dROid
Objective 6: defeat dR. vindi—fOR ReaL!
ChAPTeR iv: STORm OveR RylOTh
ChAPTeR v: innOCenTS Of RylOTh
libeRTy On RylOTh
ePilOguehub AReASSePARATiST miSSiOnS
seCrets and extras
CheCklIsts
nIntendo ds
Contents
hoW to use thIs eguIdeDownload from www.chipper.pl

Wa
lk
th
ro
ug
h —
as
ajj v
en
tr
es
s
Prima Official Game Guide
www.primagames.com
asajj ventress
Chapter Iv: storm over ryloth
MinikitsNo. Icon(s) Mode Notes
1 — Free Play Use a rapid-fire ship to destroy the 10 gold objects on the front of the Republic battleship.
2 — Free Play Use an enemy ship to destroy the red glowing object near the Republic battleship’s bridge.
3 — Free Play Destroy the five enemy ships that are highlighted with green reticles.
4 4 Free Play Destroy the silver crate inside the first turbo laser bay, then build and activate an astromech Droid control panel. Collect the minikit in space.
5 5 Story While operating a turbo laser turret, destroy 10 enemy fighters.
6 6 Free Play Activate the power panel on the left landing pad, then commandeer a Vulture Droid and walk it across the orange pads.
7 7 Free Play Destroy the gold door on the bridge.
8 8 Free Play Grapple the hook point on the bridge, then use the Dark Force to build a pad. Step on the pad.
9 9 Free Play Use Jar Jar to leap up and grab the minikit that hovers near the ramp to the bridge.
10 10 Free Play Use the crawl space hatch near the torpedo generator.
True Jedi Stud Requirement: 70,000 Story Characters
Obi-Wan Kenobi
Anakin Skywalker
“It Is a RouGh Road that leads to the heIGhts oF
GReatness.”As ordered by Ventress, vile Separatist leader Wat Tambor has invaded the Twi’lek home world of Ryloth. While his Droid army plunders the planet of its treasure, his fleet of ships have formed a blockade in orbit around Ryloth to prevent any relief getting to the starving civilians. The Republic responds by sending Admiral Yularen with Jedi Generals Kenobi and Skywalker to break the blockade and defeat Tambor....
155Protected by copyright. Unauthorized or unlawful copying or downloading expressly prohibited.
IntroduCtIon
Cast
padaWan traInIng
WalkthroughPROlOgueCOunT DOOKugeneRAl gRievOuSASAJJ venTReSS
ChAPTeR i: The hiDDen enemy
ChAPTeR ii: AmbuSh!
ChAPTeR iii: blue ShADOW viRuS
ChAPTeR iv: STORm OveR RylOTh
Objective 1: DestrOy the First enemy WarshiP
Objective 2: DestrOy the secOnD enemy WarshiP
Objective 3: visit the briDGe
Objective 4: DestrOy the Final WarshiPs
ChAPTeR v: innOCenTS Of RylOTh
libeRTy On RylOTh
ePilOguehub AReASSePARATiST miSSiOnS
seCrets and extras
CheCklIsts
nIntendo ds
Contents
hoW to use thIs eguIdeDownload from www.chipper.pl
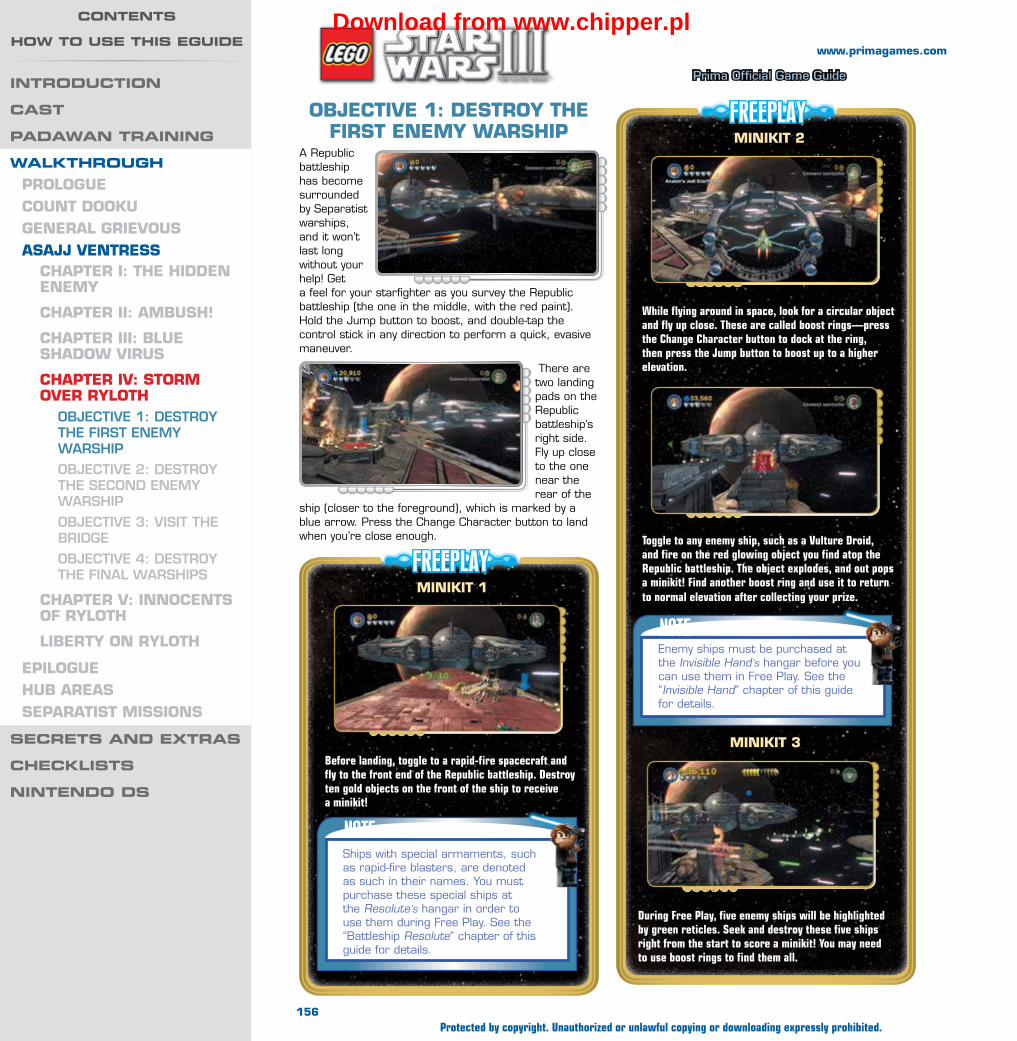
Wa
lk
th
ro
ug
h —
as
ajj v
en
tr
es
s
Prima Official Game Guide
www.primagames.com
ObJeCTive 1: DeSTROy The fiRST enemy WARShiP
A Republic battleship has become surrounded by Separatist warships, and it won’t last long without your help! Get a feel for your starfighter as you survey the Republic battleship (the one in the middle, with the red paint). Hold the Jump button to boost, and double-tap the control stick in any direction to perform a quick, evasive maneuver.
There are two landing pads on the Republic battleship’s right side. Fly up close to the one near the rear of the
ship (closer to the foreground), which is marked by a blue arrow. Press the Change Character button to land when you’re close enough.
FREEPLAYminiKiT 1
Before landing, toggle to a rapid-fire spacecraft and fly to the front end of the Republic battleship. Destroy ten gold objects on the front of the ship to receive a minikit!
NOTEShips with special armaments, such as rapid-fire blasters, are denoted as such in their names. You must purchase these special ships at the Resolute’s hangar in order to use them during Free Play. See the “Battleship Resolute” chapter of this guide for details.
FREEPLAYminiKiT 2
While flying around in space, look for a circular object and fly up close. These are called boost rings—press the Change Character button to dock at the ring, then press the Jump button to boost up to a higher elevation.
Toggle to any enemy ship, such as a Vulture Droid, and fire on the red glowing object you find atop the Republic battleship. The object explodes, and out pops a minikit! Find another boost ring and use it to return to normal elevation after collecting your prize.
NOTEEnemy ships must be purchased at the Invisible Hand’s hangar before you can use them in Free Play. See the “Invisible Hand” chapter of this guide for details.
miniKiT 3
During Free Play, five enemy ships will be highlighted by green reticles. Seek and destroy these five ships right from the start to score a minikit! You may need to use boost rings to find them all.
156Protected by copyright. Unauthorized or unlawful copying or downloading expressly prohibited.
IntroduCtIon
Cast
padaWan traInIng
WalkthroughPROlOgueCOunT DOOKugeneRAl gRievOuSASAJJ venTReSS
ChAPTeR i: The hiDDen enemy
ChAPTeR ii: AmbuSh!
ChAPTeR iii: blue ShADOW viRuS
ChAPTeR iv: STORm OveR RylOTh
Objective 1: DestrOy the First enemy WarshiP
Objective 2: DestrOy the secOnD enemy WarshiP
Objective 3: visit the briDGe
Objective 4: DestrOy the Final WarshiPs
ChAPTeR v: innOCenTS Of RylOTh
libeRTy On RylOTh
ePilOguehub AReASSePARATiST miSSiOnS
seCrets and extras
CheCklIsts
nIntendo ds
Contents
hoW to use thIs eguIdeDownload from www.chipper.pl

Wa
lk
th
ro
ug
h —
as
ajj v
en
tr
es
s
Prima Official Game Guide
www.primagames.com
lAnDing PAD A
On the first landing pad, cut a small hole in the wall where the Jedi logo appears to expose a socket. Force-move the nearby plug into the wall socket, then enter the door that opens.
FREEPLAYminiKiT 4
The door leads to one of the Republic battleship’s turbo laser bays. Smash up the place for studs, then hop into one of the gunner’s seats.
Toggle to a character with explosive attacks and destroy the silver crate inside the turbo laser bay. Build the remaining bits into an astromech Droid control panel, then slide the panel along the checkered track and activate it to make a minikit float out into space! Look for the minikit after you lift off—it won’t be far.
A
4
A
5
157Protected by copyright. Unauthorized or unlawful copying or downloading expressly prohibited.
IntroduCtIon
Cast
padaWan traInIng
WalkthroughPROlOgueCOunT DOOKugeneRAl gRievOuSASAJJ venTReSS
ChAPTeR i: The hiDDen enemy
ChAPTeR ii: AmbuSh!
ChAPTeR iii: blue ShADOW viRuS
ChAPTeR iv: STORm OveR RylOTh
Objective 1: DestrOy the First enemy WarshiP
Objective 2: DestrOy the secOnD enemy WarshiP
Objective 3: visit the briDGe
Objective 4: DestrOy the Final WarshiPs
ChAPTeR v: innOCenTS Of RylOTh
libeRTy On RylOTh
ePilOguehub AReASSePARATiST miSSiOnS
seCrets and extras
CheCklIsts
nIntendo ds
Contents
hoW to use thIs eguIdeDownload from www.chipper.pl

Wa
lk
th
ro
ug
h —
as
ajj v
en
tr
es
s
Prima Official Game Guide
www.primagames.com
Pass your targeting reticle over the enemy warship and notice that three of the ship’s turbo lasers become highlighted. Fire on each of these three targets until they go boom, and the entire warship will be destroyed.
ObJeCTive 2: DeSTROy The SeCOnD enemy WARShiP
After destroying the first enemy warship, use your turbo lasers to shoot down ten enemy fighters—you’ll be rewarded with a minikit! This is also a great way to rack up studs for the mission’s True Jedi requirement.
miniKiT 5
Return to your ship and take flight. Fly to the left to discover a landing pad on the Republic battleship’s left side, and touch down here.
lAnDing PAD b
Spy a ruined vulture Droid on this landing pad and attack it to reveal some pieces. Build these to create a lever, then pull the lever to expose a wall socket. Force-move the nearby plug into the socket to open a door.
B
6
B
158Protected by copyright. Unauthorized or unlawful copying or downloading expressly prohibited.
IntroduCtIon
Cast
padaWan traInIng
WalkthroughPROlOgueCOunT DOOKugeneRAl gRievOuSASAJJ venTReSS
ChAPTeR i: The hiDDen enemy
ChAPTeR ii: AmbuSh!
ChAPTeR iii: blue ShADOW viRuS
ChAPTeR iv: STORm OveR RylOTh
Objective 1: DestrOy the First enemy WarshiP
Objective 2: DestrOy the secOnD enemy WarshiP
Objective 3: visit the briDGe
Objective 4: DestrOy the Final WarshiPs
ChAPTeR v: innOCenTS Of RylOTh
libeRTy On RylOTh
ePilOguehub AReASSePARATiST miSSiOnS
seCrets and extras
CheCklIsts
nIntendo ds
Contents
hoW to use thIs eguIdeDownload from www.chipper.pl

Wa
lk
th
ro
ug
h —
as
ajj v
en
tr
es
s
Prima Official Game Guide
www.primagames.com
The door leads to another turbo laser bay. Hop into a gunner’s seat and pass your reticle over the enemy warship as you did before to highlight three turbo lasers. Destroy all three of these to bring down the ship.
Destroying the second enemy warship enables you to land at a new site, which is located on top of the Republic battleship. Return to your fighter and take off, then look for a circular object in space, called a boost ring. Press the Change Character button to dock at the ring, then press the Jump button to boost up to a higher elevation.
FREEPLAYminiKiT 6
Toggle to a MagnaGuard or similar character and activate the power panel at the south end of the landing pad. This causes a number of orange pads to appear on the ground.
Attack a functional enemy Vulture Droid to disable it, then use the Jedi logo that appears in front of the Vulture Droid to sever its “head” and take control. Steer the Vulture Droid over each of the orange pads to turn them green and obtain a minikit! The pads reset to orange after a time, so you need to make a swift circuit of the area.
ObJeCTive 3: viSiT The bRiDge
Fly close to the Republic battleship to discover the new landing site. Set your ship down here and descend the ramp to reach the ship’s bridge.
159Protected by copyright. Unauthorized or unlawful copying or downloading expressly prohibited.
IntroduCtIon
Cast
padaWan traInIng
WalkthroughPROlOgueCOunT DOOKugeneRAl gRievOuSASAJJ venTReSS
ChAPTeR i: The hiDDen enemy
ChAPTeR ii: AmbuSh!
ChAPTeR iii: blue ShADOW viRuS
ChAPTeR iv: STORm OveR RylOTh
Objective 1: DestrOy the First enemy WarshiP
Objective 2: DestrOy the secOnD enemy WarshiP
Objective 3: visit the briDGe
Objective 4: DestrOy the Final WarshiPs
ChAPTeR v: innOCenTS Of RylOTh
libeRTy On RylOTh
ePilOguehub AReASSePARATiST miSSiOnS
seCrets and extras
CheCklIsts
nIntendo ds
Contents
hoW to use thIs eguIdeDownload from www.chipper.pl

Wa
lk
th
ro
ug
h —
as
ajj v
en
tr
es
s
Prima Official Game Guide
www.primagames.com
Smash up the bridge for studs, then run toward the background to discover a pair of levers. Only one of the levers is functional at present; pull it and then return to your ship.
FREEPLAYminiKiT 7
This one’s a cinch: Just use a rapid-fire character to destroy the gold door on the left side of the bridge, then claim the minikit from the nook beyond!
C
9
7
8
C
lAnDing PAD C
160Protected by copyright. Unauthorized or unlawful copying or downloading expressly prohibited.
IntroduCtIon
Cast
padaWan traInIng
WalkthroughPROlOgueCOunT DOOKugeneRAl gRievOuSASAJJ venTReSS
ChAPTeR i: The hiDDen enemy
ChAPTeR ii: AmbuSh!
ChAPTeR iii: blue ShADOW viRuS
ChAPTeR iv: STORm OveR RylOTh
Objective 1: DestrOy the First enemy WarshiP
Objective 2: DestrOy the secOnD enemy WarshiP
Objective 3: visit the briDGe
Objective 4: DestrOy the Final WarshiPs
ChAPTeR v: innOCenTS Of RylOTh
libeRTy On RylOTh
ePilOguehub AReASSePARATiST miSSiOnS
seCrets and extras
CheCklIsts
nIntendo ds
Contents
hoW to use thIs eguIdeDownload from www.chipper.pl
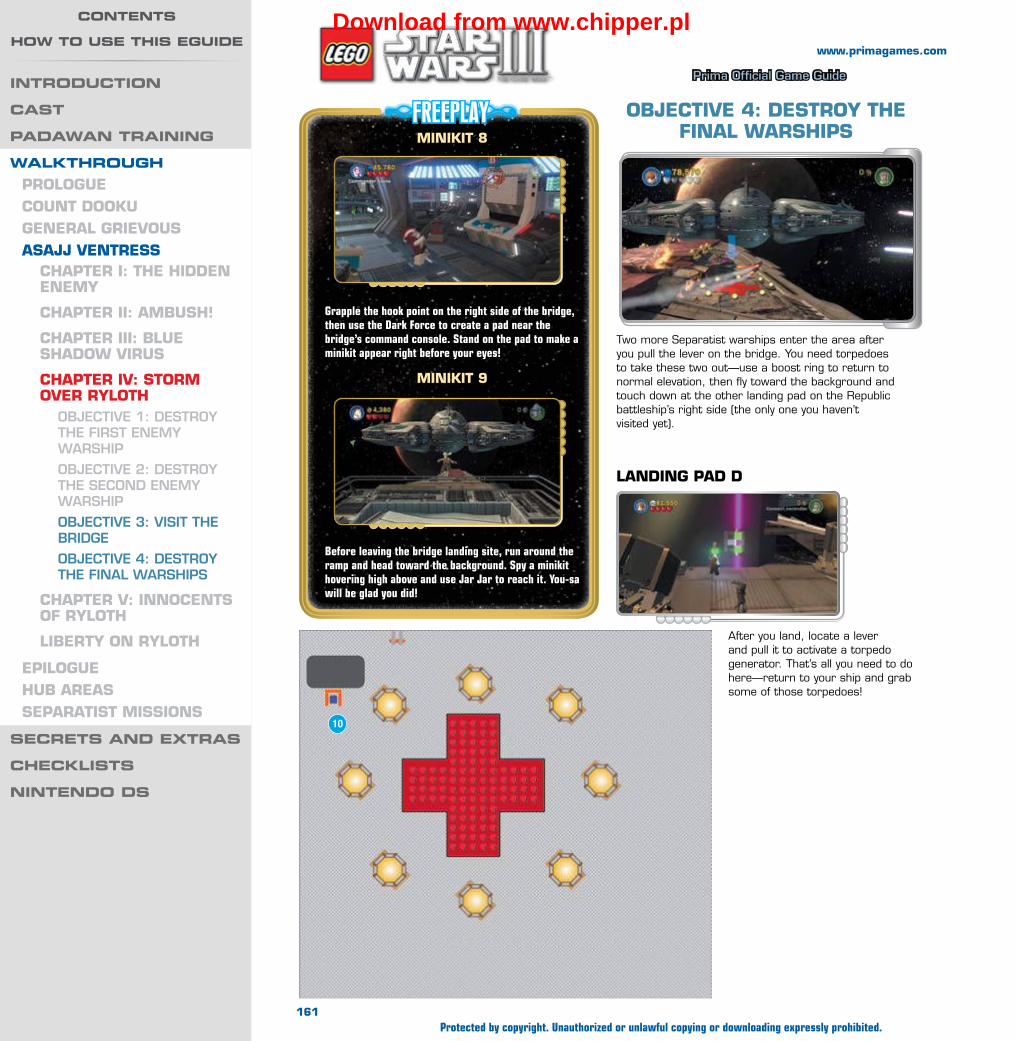
Wa
lk
th
ro
ug
h —
as
ajj v
en
tr
es
s
Prima Official Game Guide
www.primagames.com
ObJeCTive 4: DeSTROy The finAl WARShiPS
FREEPLAYminiKiT 8
Grapple the hook point on the right side of the bridge, then use the Dark Force to create a pad near the bridge’s command console. Stand on the pad to make a minikit appear right before your eyes!
miniKiT 9
Before leaving the bridge landing site, run around the ramp and head toward the background. Spy a minikit hovering high above and use Jar Jar to reach it. You-sa will be glad you did!
Two more Separatist warships enter the area after you pull the lever on the bridge. You need torpedoes to take these two out—use a boost ring to return to normal elevation, then fly toward the background and touch down at the other landing pad on the Republic battleship’s right side (the only one you haven’t visited yet).
After you land, locate a lever and pull it to activate a torpedo generator. That’s all you need to do here—return to your ship and grab some of those torpedoes!
lAnDing PAD D
10
161Protected by copyright. Unauthorized or unlawful copying or downloading expressly prohibited.
IntroduCtIon
Cast
padaWan traInIng
WalkthroughPROlOgueCOunT DOOKugeneRAl gRievOuSASAJJ venTReSS
ChAPTeR i: The hiDDen enemy
ChAPTeR ii: AmbuSh!
ChAPTeR iii: blue ShADOW viRuS
ChAPTeR iv: STORm OveR RylOTh
Objective 1: DestrOy the First enemy WarshiP
Objective 2: DestrOy the secOnD enemy WarshiP
Objective 3: visit the briDGe
Objective 4: DestrOy the Final WarshiPs
ChAPTeR v: innOCenTS Of RylOTh
libeRTy On RylOTh
ePilOguehub AReASSePARATiST miSSiOnS
seCrets and extras
CheCklIsts
nIntendo ds
Contents
hoW to use thIs eguIdeDownload from www.chipper.pl
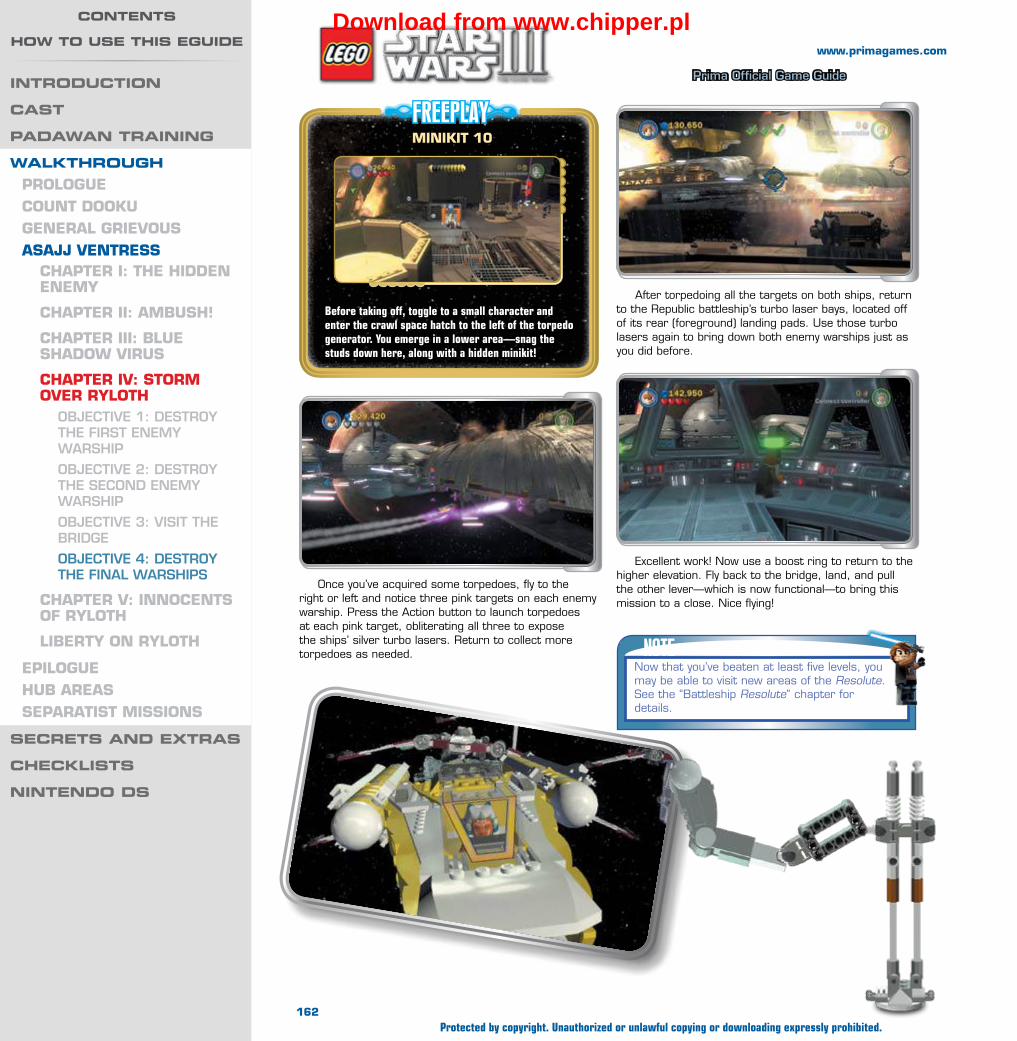
Wa
lk
th
ro
ug
h —
as
ajj v
en
tr
es
s
Prima Official Game Guide
www.primagames.com
Once you’ve acquired some torpedoes, fly to the right or left and notice three pink targets on each enemy warship. Press the Action button to launch torpedoes at each pink target, obliterating all three to expose the ships’ silver turbo lasers. Return to collect more torpedoes as needed.
FREEPLAYminiKiT 10
Before taking off, toggle to a small character and enter the crawl space hatch to the left of the torpedo generator. You emerge in a lower area—snag the studs down here, along with a hidden minikit!
Excellent work! Now use a boost ring to return to the higher elevation. Fly back to the bridge, land, and pull the other lever—which is now functional—to bring this mission to a close. Nice flying!
NOTENow that you’ve beaten at least five levels, you may be able to visit new areas of the Resolute. See the “Battleship Resolute” chapter for details.
After torpedoing all the targets on both ships, return to the Republic battleship’s turbo laser bays, located off of its rear (foreground) landing pads. Use those turbo lasers again to bring down both enemy warships just as you did before.
162Protected by copyright. Unauthorized or unlawful copying or downloading expressly prohibited.
IntroduCtIon
Cast
padaWan traInIng
WalkthroughPROlOgueCOunT DOOKugeneRAl gRievOuSASAJJ venTReSS
ChAPTeR i: The hiDDen enemy
ChAPTeR ii: AmbuSh!
ChAPTeR iii: blue ShADOW viRuS
ChAPTeR iv: STORm OveR RylOTh
Objective 1: DestrOy the First enemy WarshiP
Objective 2: DestrOy the secOnD enemy WarshiP
Objective 3: visit the briDGe
Objective 4: DestrOy the Final WarshiPs
ChAPTeR v: innOCenTS Of RylOTh
libeRTy On RylOTh
ePilOguehub AReASSePARATiST miSSiOnS
seCrets and extras
CheCklIsts
nIntendo ds
Contents
hoW to use thIs eguIdeDownload from www.chipper.pl
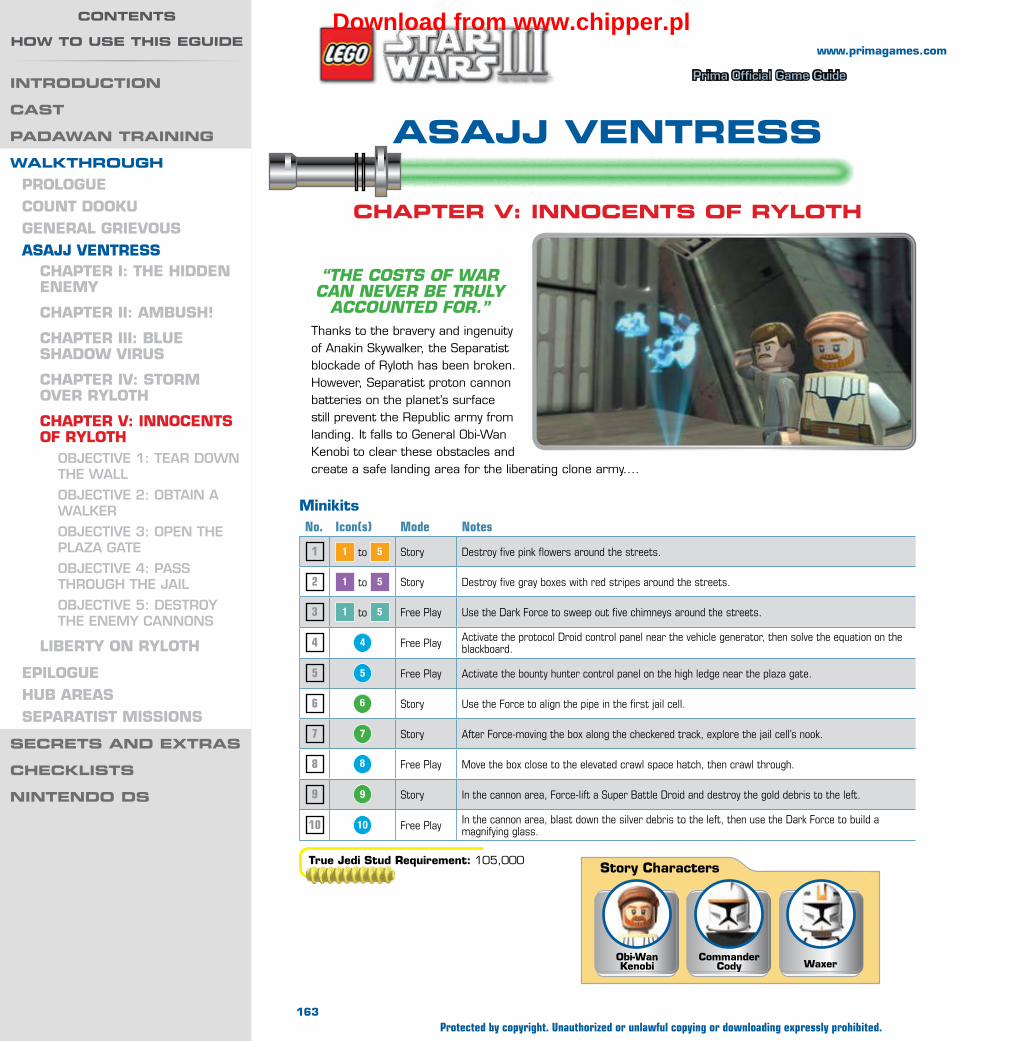
Wa
lk
th
ro
ug
h —
as
ajj v
en
tr
es
s
Prima Official Game Guide
www.primagames.com
asajj ventress
Chapter v: InnoCents of ryloth
MinikitsNo. Icon(s) Mode Notes
1 1 to 5 Story Destroy five pink flowers around the streets.
2 1 to 5 Story Destroy five gray boxes with red stripes around the streets.
3 1 to 5 Free Play Use the Dark Force to sweep out five chimneys around the streets.
4 4 Free Play Activate the protocol Droid control panel near the vehicle generator, then solve the equation on the blackboard.
5 5 Free Play Activate the bounty hunter control panel on the high ledge near the plaza gate.
6 6 Story Use the Force to align the pipe in the first jail cell.
7 7 Story After Force-moving the box along the checkered track, explore the jail cell’s nook.
8 8 Free Play Move the box close to the elevated crawl space hatch, then crawl through.
9 9 Story In the cannon area, Force-lift a Super Battle Droid and destroy the gold debris to the left.
10 10 Free Play In the cannon area, blast down the silver debris to the left, then use the Dark Force to build a magnifying glass.
True Jedi Stud Requirement: 105,000Story Characters
WaxerCommander
CodyObi-Wan Kenobi
“the costs oF waR can neveR Be tRuly
accounted FoR.”Thanks to the bravery and ingenuity of Anakin Skywalker, the Separatist blockade of Ryloth has been broken. However, Separatist proton cannon batteries on the planet’s surface still prevent the Republic army from landing. It falls to General Obi-Wan Kenobi to clear these obstacles and create a safe landing area for the liberating clone army....
163
www.primagames.com
Protected by copyright. Unauthorized or unlawful copying or downloading expressly prohibited.
IntroduCtIon
Cast
padaWan traInIng
WalkthroughPROlOgueCOunT DOOKugeneRAl gRievOuSASAJJ venTReSS
ChAPTeR i: The hiDDen enemy
ChAPTeR ii: AmbuSh!
ChAPTeR iii: blue ShADOW viRuS
ChAPTeR iv: STORm OveR RylOTh
ChAPTeR v: innOCenTS Of RylOTh
Objective 1: tear DOWn the Wall
Objective 2: Obtain a Walker
Objective 3: OPen the Plaza Gate
Objective 4: Pass thrOuGh the jail
Objective 5: DestrOy the enemy cannOns
libeRTy On RylOTh
ePilOguehub AReASSePARATiST miSSiOnS
seCrets and extras
CheCklIsts
nIntendo ds
Contents
hoW to use thIs eguIdeDownload from www.chipper.pl
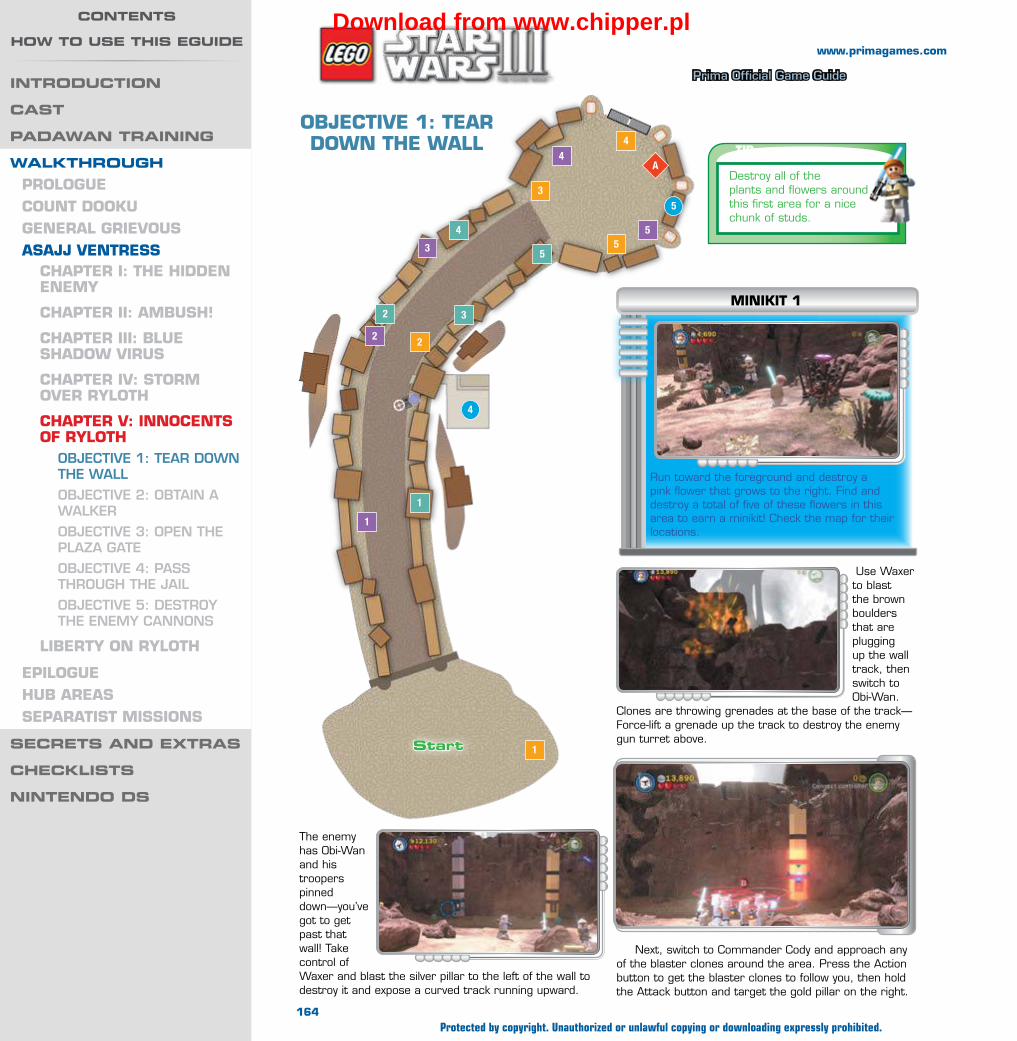
Wa
lk
th
ro
ug
h —
as
ajj v
en
tr
es
s
Prima Official Game Guide
www.primagames.com
ObJeCTive 1: TeAR DOWn The WAll
The enemy has Obi-Wan and his troopers pinned down—you’ve got to get past that wall! Take control of Waxer and blast the silver pillar to the left of the wall to destroy it and expose a curved track running upward.
Use Waxer to blast the brown boulders that are plugging up the wall track, then switch to Obi-Wan.
Clones are throwing grenades at the base of the track—Force-lift a grenade up the track to destroy the enemy gun turret above.
TIPDestroy all of the plants and flowers around this first area for a nice chunk of studs.
Run toward the foreground and destroy a pink flower that grows to the right. Find and destroy a total of five of these flowers in this area to earn a minikit! Check the map for their locations.
miniKiT 1
A
1
2
4
53
4
5
1
2
3
4
5
1
2 3
4
5
start
Next, switch to Commander Cody and approach any of the blaster clones around the area. Press the Action button to get the blaster clones to follow you, then hold the Attack button and target the gold pillar on the right.
164
www.primagames.com
Protected by copyright. Unauthorized or unlawful copying or downloading expressly prohibited.
IntroduCtIon
Cast
padaWan traInIng
WalkthroughPROlOgueCOunT DOOKugeneRAl gRievOuSASAJJ venTReSS
ChAPTeR i: The hiDDen enemy
ChAPTeR ii: AmbuSh!
ChAPTeR iii: blue ShADOW viRuS
ChAPTeR iv: STORm OveR RylOTh
ChAPTeR v: innOCenTS Of RylOTh
Objective 1: tear DOWn the Wall
Objective 2: Obtain a Walker
Objective 3: OPen the Plaza Gate
Objective 4: Pass thrOuGh the jail
Objective 5: DestrOy the enemy cannOns
libeRTy On RylOTh
ePilOguehub AReASSePARATiST miSSiOnS
seCrets and extras
CheCklIsts
nIntendo ds
Contents
hoW to use thIs eguIdeDownload from www.chipper.pl
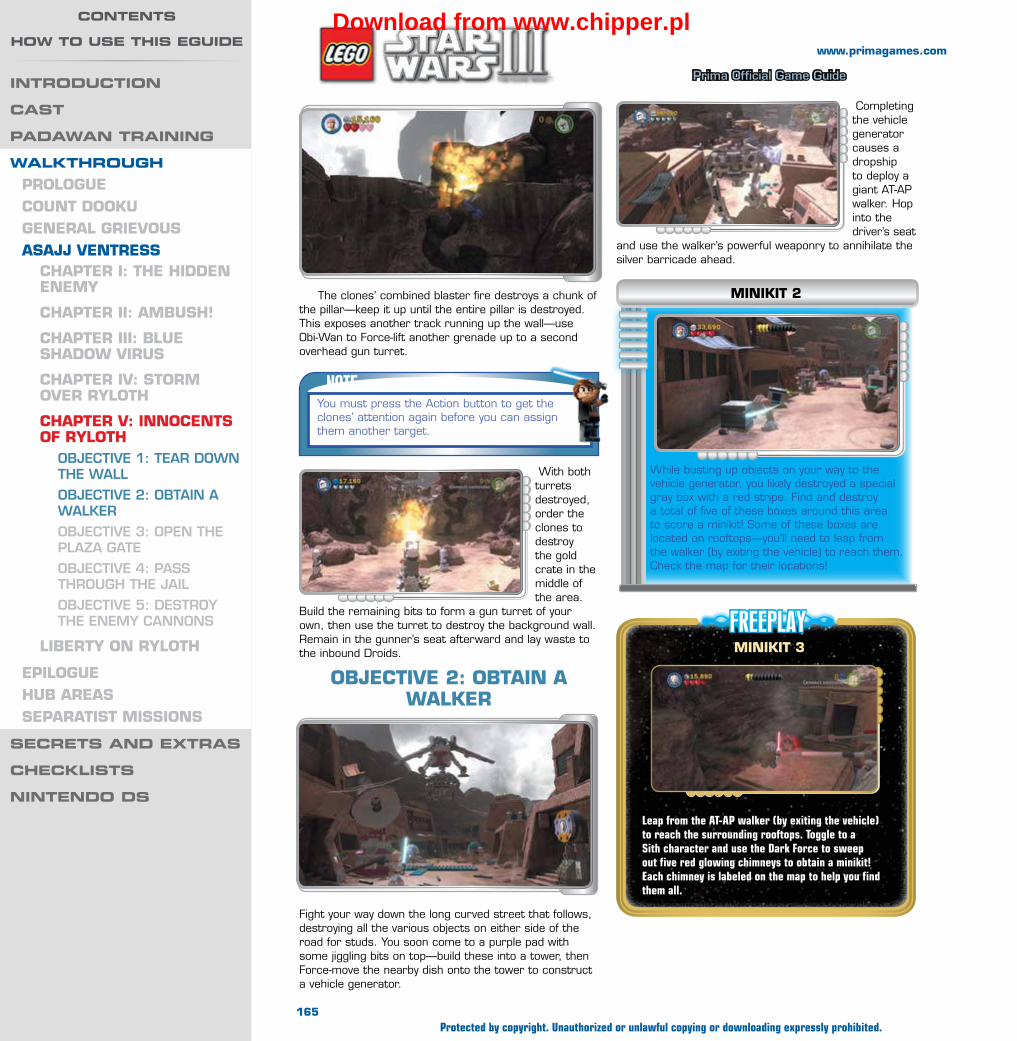
Wa
lk
th
ro
ug
h —
as
ajj v
en
tr
es
s
Prima Official Game Guide
www.primagames.com
The clones’ combined blaster fire destroys a chunk of the pillar—keep it up until the entire pillar is destroyed. This exposes another track running up the wall—use Obi-Wan to Force-lift another grenade up to a second overhead gun turret.
Completing the vehicle generator causes a dropship to deploy a giant AT-AP walker. Hop into the driver’s seat
and use the walker’s powerful weaponry to annihilate the silver barricade ahead.
NOTEYou must press the Action button to get the clones’ attention again before you can assign them another target.
With both turrets destroyed, order the clones to destroy the gold crate in the middle of the area.
Build the remaining bits to form a gun turret of your own, then use the turret to destroy the background wall. Remain in the gunner’s seat afterward and lay waste to the inbound Droids.
ObJeCTive 2: ObTAin A WAlKeR
While busting up objects on your way to the vehicle generator, you likely destroyed a special gray box with a red stripe. Find and destroy a total of five of these boxes around this area to score a minikit! Some of these boxes are located on rooftops—you’ll need to leap from the walker (by exiting the vehicle) to reach them. Check the map for their locations!
miniKiT 2
FREEPLAYminiKiT 3
Leap from the AT-AP walker (by exiting the vehicle) to reach the surrounding rooftops. Toggle to a Sith character and use the Dark Force to sweep out five red glowing chimneys to obtain a minikit! Each chimney is labeled on the map to help you find them all.
Fight your way down the long curved street that follows, destroying all the various objects on either side of the road for studs. You soon come to a purple pad with some jiggling bits on top—build these into a tower, then Force-move the nearby dish onto the tower to construct a vehicle generator.
165
www.primagames.com
Protected by copyright. Unauthorized or unlawful copying or downloading expressly prohibited.
IntroduCtIon
Cast
padaWan traInIng
WalkthroughPROlOgueCOunT DOOKugeneRAl gRievOuSASAJJ venTReSS
ChAPTeR i: The hiDDen enemy
ChAPTeR ii: AmbuSh!
ChAPTeR iii: blue ShADOW viRuS
ChAPTeR iv: STORm OveR RylOTh
ChAPTeR v: innOCenTS Of RylOTh
Objective 1: tear DOWn the Wall
Objective 2: Obtain a Walker
Objective 3: OPen the Plaza Gate
Objective 4: Pass thrOuGh the jail
Objective 5: DestrOy the enemy cannOns
libeRTy On RylOTh
ePilOguehub AReASSePARATiST miSSiOnS
seCrets and extras
CheCklIsts
nIntendo ds
Contents
hoW to use thIs eguIdeDownload from www.chipper.pl
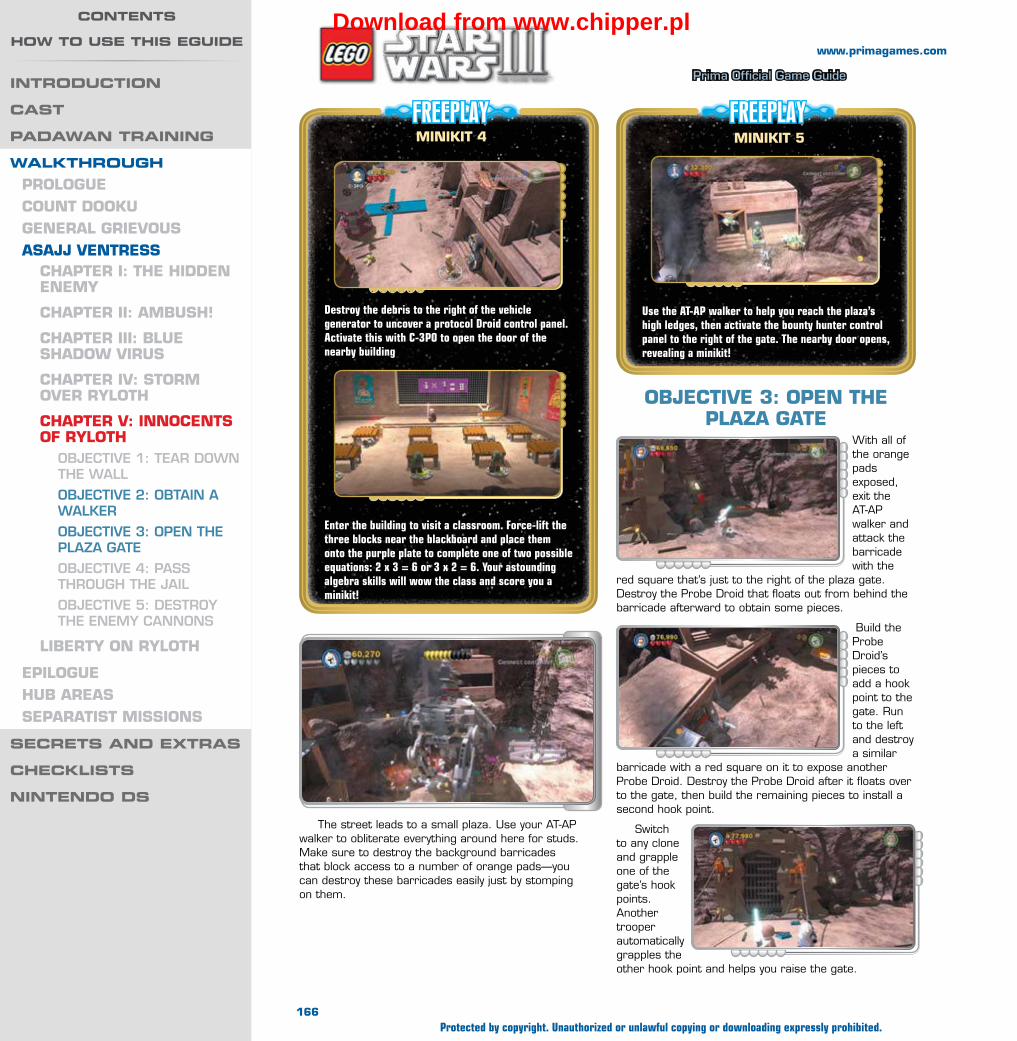
Wa
lk
th
ro
ug
h —
as
ajj v
en
tr
es
s
Prima Official Game Guide
www.primagames.com
ObJeCTive 3: OPen The PlAzA gATe
With all of the orange pads exposed, exit the AT-AP walker and attack the barricade with the
red square that’s just to the right of the plaza gate. Destroy the Probe Droid that floats out from behind the barricade afterward to obtain some pieces.
Build the Probe Droid’s pieces to add a hook point to the gate. Run to the left and destroy a similar
barricade with a red square on it to expose another Probe Droid. Destroy the Probe Droid after it floats over to the gate, then build the remaining pieces to install a second hook point.
Switch to any clone and grapple one of the gate’s hook points. Another trooper automatically grapples the other hook point and helps you raise the gate.
The street leads to a small plaza. Use your AT-AP walker to obliterate everything around here for studs. Make sure to destroy the background barricades that block access to a number of orange pads—you can destroy these barricades easily just by stomping on them.
FREEPLAYminiKiT 4
Destroy the debris to the right of the vehicle generator to uncover a protocol Droid control panel. Activate this with C-3PO to open the door of the nearby building
Enter the building to visit a classroom. Force-lift the three blocks near the blackboard and place them onto the purple plate to complete one of two possible equations: 2 x 3 = 6 or 3 x 2 = 6. Your astounding algebra skills will wow the class and score you a minikit!
FREEPLAYminiKiT 5
Use the AT-AP walker to help you reach the plaza’s high ledges, then activate the bounty hunter control panel to the right of the gate. The nearby door opens, revealing a minikit!
166
www.primagames.com
Protected by copyright. Unauthorized or unlawful copying or downloading expressly prohibited.
IntroduCtIon
Cast
padaWan traInIng
WalkthroughPROlOgueCOunT DOOKugeneRAl gRievOuSASAJJ venTReSS
ChAPTeR i: The hiDDen enemy
ChAPTeR ii: AmbuSh!
ChAPTeR iii: blue ShADOW viRuS
ChAPTeR iv: STORm OveR RylOTh
ChAPTeR v: innOCenTS Of RylOTh
Objective 1: tear DOWn the Wall
Objective 2: Obtain a Walker
Objective 3: OPen the Plaza Gate
Objective 4: Pass thrOuGh the jail
Objective 5: DestrOy the enemy cannOns
libeRTy On RylOTh
ePilOguehub AReASSePARATiST miSSiOnS
seCrets and extras
CheCklIsts
nIntendo ds
Contents
hoW to use thIs eguIdeDownload from www.chipper.pl
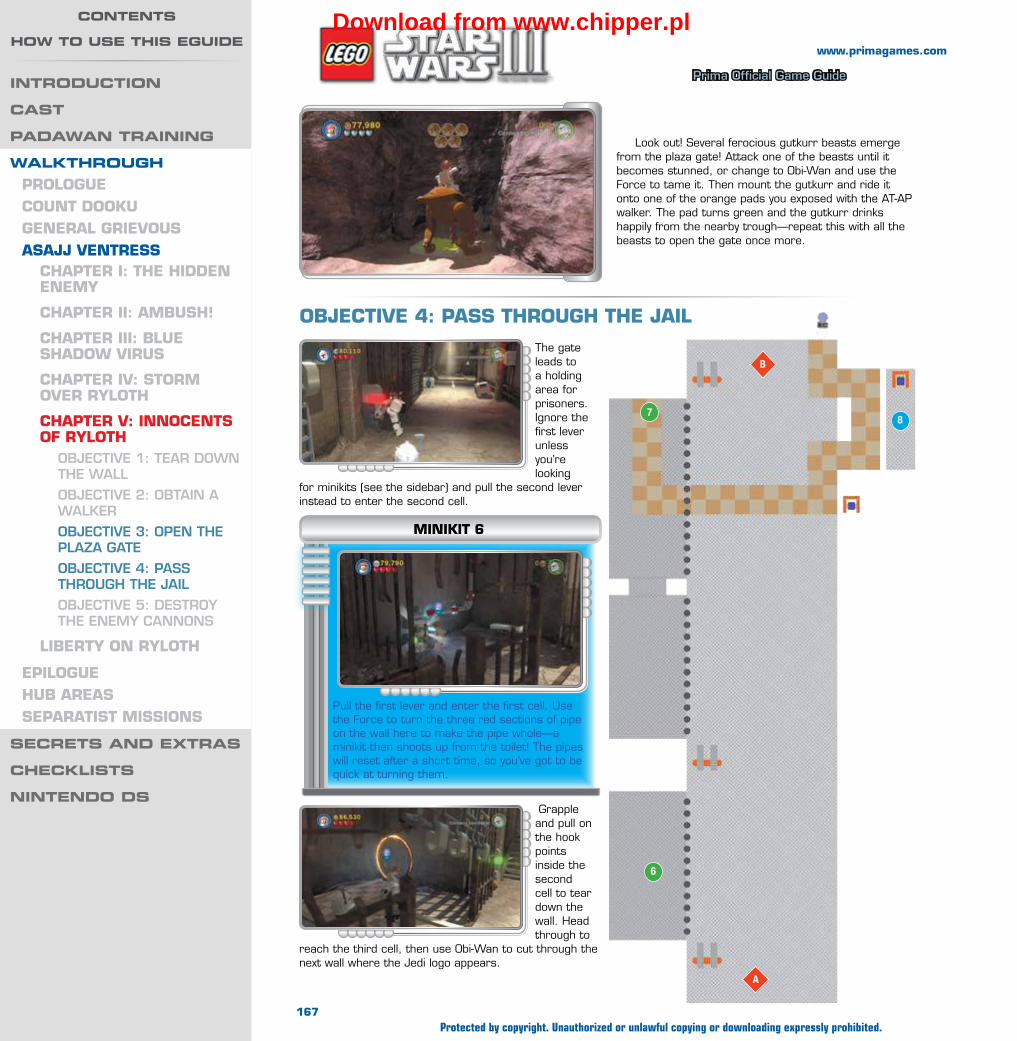
Wa
lk
th
ro
ug
h —
as
ajj v
en
tr
es
s
Prima Official Game Guide
www.primagames.com
Grapple and pull on the hook points inside the second cell to tear down the wall. Head through to
reach the third cell, then use Obi-Wan to cut through the next wall where the Jedi logo appears.
The gate leads to a holding area for prisoners. Ignore the first lever unless you’re looking
for minikits (see the sidebar) and pull the second lever instead to enter the second cell.
Look out! Several ferocious gutkurr beasts emerge from the plaza gate! Attack one of the beasts until it becomes stunned, or change to Obi-Wan and use the Force to tame it. Then mount the gutkurr and ride it onto one of the orange pads you exposed with the AT-AP walker. The pad turns green and the gutkurr drinks happily from the nearby trough—repeat this with all the beasts to open the gate once more.
ObJeCTive 4: PASS ThROugh The JAil
Pull the first lever and enter the first cell. Use the Force to turn the three red sections of pipe on the wall here to make the pipe whole—a minikit then shoots up from the toilet! The pipes will reset after a short time, so you’ve got to be quick at turning them.
miniKiT 6
B
6
78
A
167
www.primagames.com
Protected by copyright. Unauthorized or unlawful copying or downloading expressly prohibited.
IntroduCtIon
Cast
padaWan traInIng
WalkthroughPROlOgueCOunT DOOKugeneRAl gRievOuSASAJJ venTReSS
ChAPTeR i: The hiDDen enemy
ChAPTeR ii: AmbuSh!
ChAPTeR iii: blue ShADOW viRuS
ChAPTeR iv: STORm OveR RylOTh
ChAPTeR v: innOCenTS Of RylOTh
Objective 1: tear DOWn the Wall
Objective 2: Obtain a Walker
Objective 3: OPen the Plaza Gate
Objective 4: Pass thrOuGh the jail
Objective 5: DestrOy the enemy cannOns
libeRTy On RylOTh
ePilOguehub AReASSePARATiST miSSiOnS
seCrets and extras
CheCklIsts
nIntendo ds
Contents
hoW to use thIs eguIdeDownload from www.chipper.pl

Wa
lk
th
ro
ug
h —
as
ajj v
en
tr
es
s
Prima Official Game Guide
www.primagames.com
Force-move the large box you discover behind the wall and slide it along the checkered track. Use Waxer to destroy the silver debris to the right so you can slide the box out of the cell.
This one’s a breeze: after Force-moving the large box out of its nook, simply inspect the nook to discover a minikit. You can’t miss it!
miniKiT 7
Two sections of the checkered track are missing. Spy two checkered plates on the nearby wall and blast them with Waxer to knock them down. Force-move the plates afterward, placing them on the purple gaps to complete the track.
FREEPLAYminiKiT 8
9
10
B
Maneuver the box over to the elevated clone panel so you can jump up and activate the panel. This opens the background gate—hurry through to reach the final area.
After repairing the checkered track, slide the large box over to the high crawl space hatch. Jump onto the box and toggle to a small character so you may crawl through. You emerge in a nearby nook, right next to a hidden minikit!
168
www.primagames.com
Protected by copyright. Unauthorized or unlawful copying or downloading expressly prohibited.
IntroduCtIon
Cast
padaWan traInIng
WalkthroughPROlOgueCOunT DOOKugeneRAl gRievOuSASAJJ venTReSS
ChAPTeR i: The hiDDen enemy
ChAPTeR ii: AmbuSh!
ChAPTeR iii: blue ShADOW viRuS
ChAPTeR iv: STORm OveR RylOTh
ChAPTeR v: innOCenTS Of RylOTh
Objective 1: tear DOWn the Wall
Objective 2: Obtain a Walker
Objective 3: OPen the Plaza Gate
Objective 4: Pass thrOuGh the jail
Objective 5: DestrOy the enemy cannOns
libeRTy On RylOTh
ePilOguehub AReASSePARATiST miSSiOnS
seCrets and extras
CheCklIsts
nIntendo ds
Contents
hoW to use thIs eguIdeDownload from www.chipper.pl
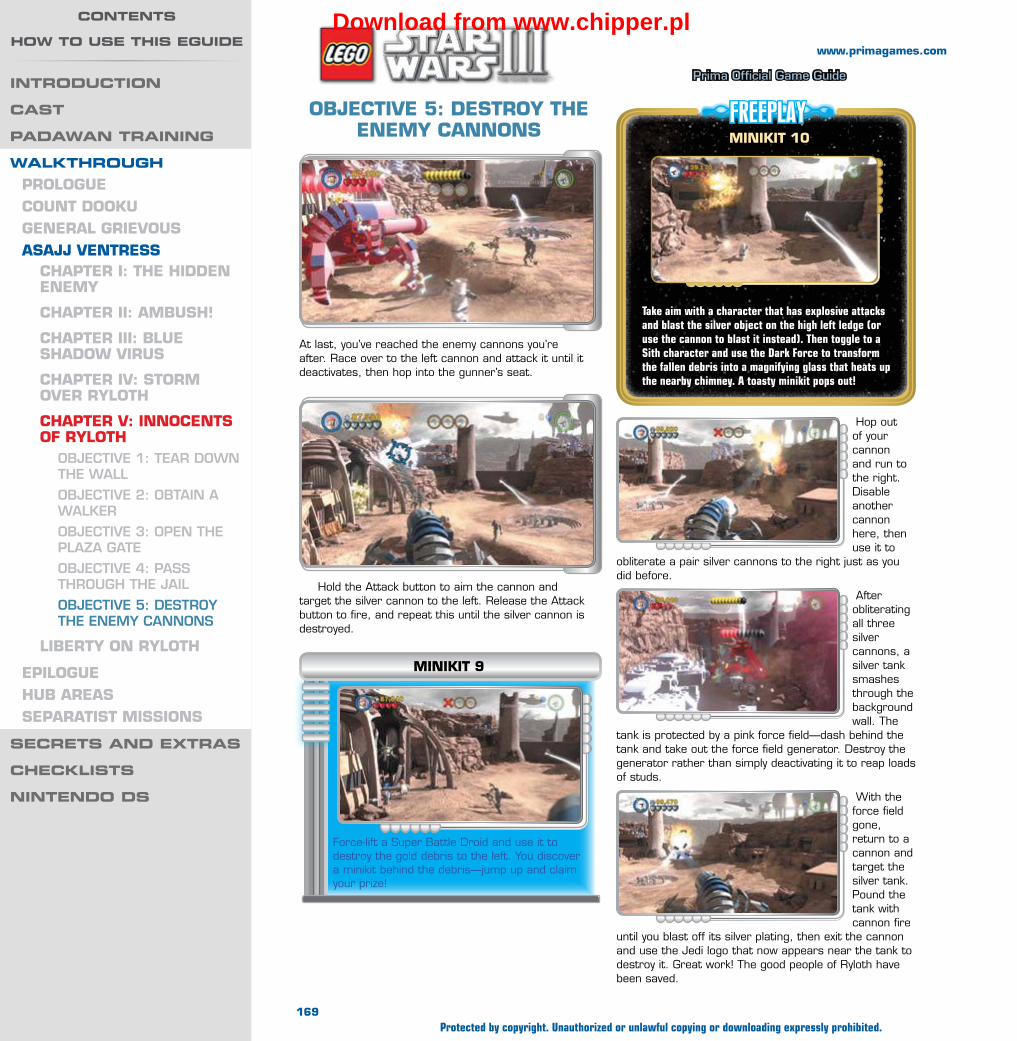
Wa
lk
th
ro
ug
h —
as
ajj v
en
tr
es
s
Prima Official Game Guide
www.primagames.com
ObJeCTive 5: DeSTROy The enemy CAnnOnS
At last, you’ve reached the enemy cannons you’re after. Race over to the left cannon and attack it until it deactivates, then hop into the gunner’s seat.
Force-lift a Super Battle Droid and use it to destroy the gold debris to the left. You discover a minikit behind the debris—jump up and claim your prize!
miniKiT 9
FREEPLAYminiKiT 10
Take aim with a character that has explosive attacks and blast the silver object on the high left ledge (or use the cannon to blast it instead). Then toggle to a Sith character and use the Dark Force to transform the fallen debris into a magnifying glass that heats up the nearby chimney. A toasty minikit pops out!
Hop out of your cannon and run to the right. Disable another cannon here, then use it to
obliterate a pair silver cannons to the right just as you did before.
After obliterating all three silver cannons, a silver tank smashes through the background wall. The
tank is protected by a pink force field—dash behind the tank and take out the force field generator. Destroy the generator rather than simply deactivating it to reap loads of studs.
With the force field gone, return to a cannon and target the silver tank. Pound the tank with cannon fire
until you blast off its silver plating, then exit the cannon and use the Jedi logo that now appears near the tank to destroy it. Great work! The good people of Ryloth have been saved.
Hold the Attack button to aim the cannon and target the silver cannon to the left. Release the Attack button to fire, and repeat this until the silver cannon is destroyed.
169
www.primagames.com
Protected by copyright. Unauthorized or unlawful copying or downloading expressly prohibited.
IntroduCtIon
Cast
padaWan traInIng
WalkthroughPROlOgueCOunT DOOKugeneRAl gRievOuSASAJJ venTReSS
ChAPTeR i: The hiDDen enemy
ChAPTeR ii: AmbuSh!
ChAPTeR iii: blue ShADOW viRuS
ChAPTeR iv: STORm OveR RylOTh
ChAPTeR v: innOCenTS Of RylOTh
Objective 1: tear DOWn the Wall
Objective 2: Obtain a Walker
Objective 3: OPen the Plaza Gate
Objective 4: Pass thrOuGh the jail
Objective 5: DestrOy the enemy cannOns
libeRTy On RylOTh
ePilOguehub AReASSePARATiST miSSiOnS
seCrets and extras
CheCklIsts
nIntendo ds
Contents
hoW to use thIs eguIdeDownload from www.chipper.pl

Wa
lk
th
ro
ug
h —
as
ajj v
en
tr
es
s
Prima Official Game Guide
www.primagames.com
asajj ventress
lIberty on ryloth
MinikitsNo. Icon(s) Mode Notes
1 1 to 10 Story Destroy 10 gray, crystal-covered rocks around the level.
2 1 to 5 Story Destroy five palm trees around the level.
3 3 Story Search the far-left cliff.
4 — Story Destroy three enemy tanks.
5 5 Free Play Build and activate the northwest astromech Droid control panel, then collect the line of studs that appears.
6 6 Free Play Enter the north crawl space and destroy the Darth Vader head sculpture.
7 7 Free Play Activate the bounty hunter control panel near the northeast enemy base, then destroy 50 Droids.
8 8 Free Play Activate the protocol Droid control panel to the south, then race over all of the orange pads that appear.
9 9 Free Play Use the Dark Force to shatter the red glowing rock to the southeast.
10 — Story Build a minikit dispenser by building one base structure of every preceding group in the build menu.
True Jedi Stud Requirement: 100,000Story Characters
Commander Pondsmace Windu
“compRomIse Is a vIRtue to Be
cultIvated, not a weakness to Be
despIsed.”Separatist forces under the command of Wat Tambor still occupy the planet of Ryloth. But Republic victory is at hand! Jedi General Mace Windu leads Republic forces to liberate the Twi’lek capital city of Lessu....
170
www.primagames.com
Protected by copyright. Unauthorized or unlawful copying or downloading expressly prohibited.
IntroduCtIon
Cast
padaWan traInIng
WalkthroughPROlOgueCOunT DOOKugeneRAl gRievOuSASAJJ venTReSS
ChAPTeR i: The hiDDen enemy
ChAPTeR ii: AmbuSh!
ChAPTeR iii: blue ShADOW viRuS
ChAPTeR iv: STORm OveR RylOTh
ChAPTeR v: innOCenTS Of RylOTh
libeRTy On RylOThObjective 1: enter enemy territOry
Objective 2: criPPle the enemy bases
Objective 3: restOre the briDGe
ePilOguehub AReASSePARATiST miSSiOnS
seCrets and extras
CheCklIsts
nIntendo ds
Contents
hoW to use thIs eguIdeDownload from www.chipper.pl
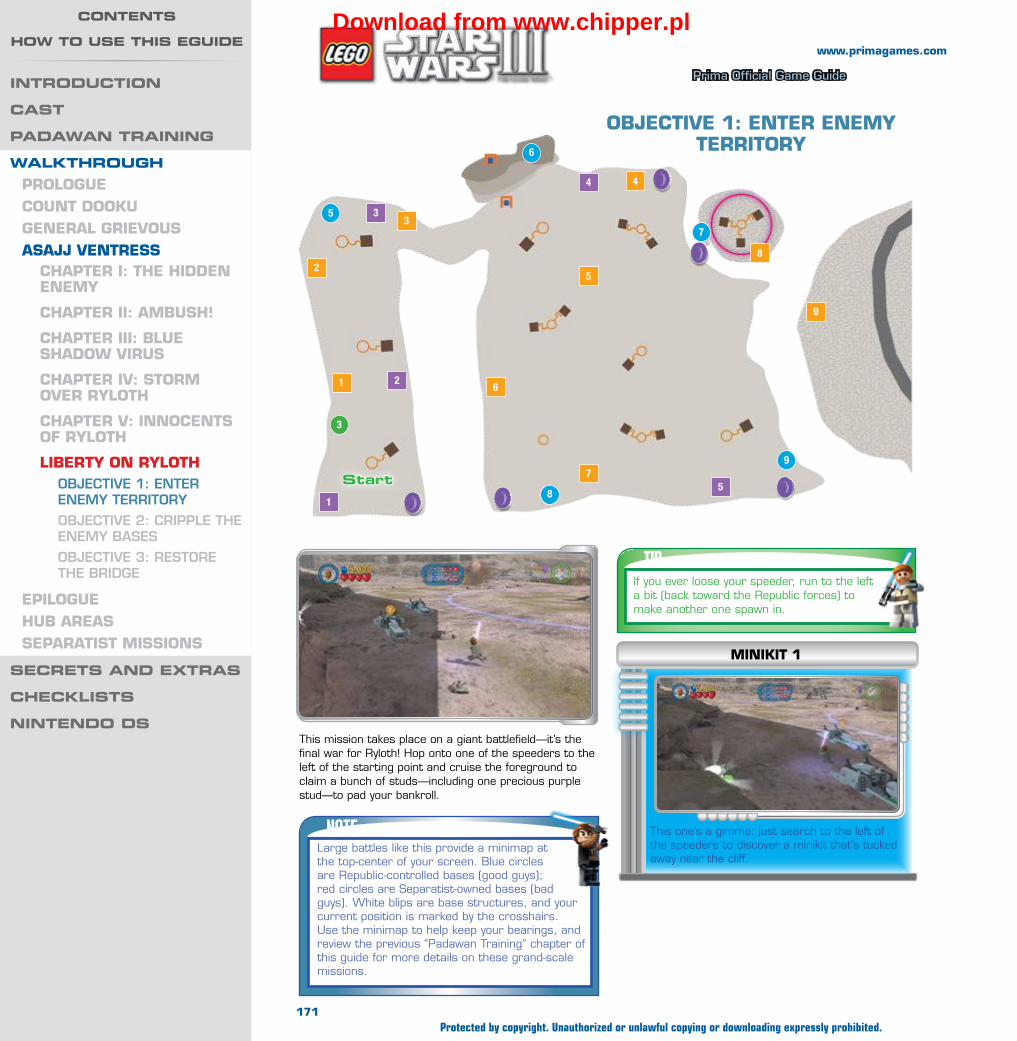
Wa
lk
th
ro
ug
h —
as
ajj v
en
tr
es
s
Prima Official Game Guide
www.primagames.com
ObJeCTive 1: enTeR enemy TeRRiTORy
This mission takes place on a giant battlefield—it’s the final war for Ryloth! Hop onto one of the speeders to the left of the starting point and cruise the foreground to claim a bunch of studs—including one precious purple stud—to pad your bankroll.
NOTELarge battles like this provide a minimap at the top-center of your screen. Blue circles are Republic-controlled bases (good guys); red circles are Separatist-owned bases (bad guys). White blips are base structures, and your current position is marked by the crosshairs. Use the minimap to help keep your bearings, and review the previous “Padawan Training” chapter of this guide for more details on these grand-scale missions.
TIPIf you ever loose your speeder, run to the left a bit (back toward the Republic forces) to make another one spawn in.
This one’s a gimme: just search to the left of the speeders to discover a minikit that’s tucked away near the cliff.
miniKiT 1
1
2
3
5
6
7
8
9
3
4
5
1
2
3
4
5
6
7
8
9
start
171
www.primagames.com
Protected by copyright. Unauthorized or unlawful copying or downloading expressly prohibited.
IntroduCtIon
Cast
padaWan traInIng
WalkthroughPROlOgueCOunT DOOKugeneRAl gRievOuSASAJJ venTReSS
ChAPTeR i: The hiDDen enemy
ChAPTeR ii: AmbuSh!
ChAPTeR iii: blue ShADOW viRuS
ChAPTeR iv: STORm OveR RylOTh
ChAPTeR v: innOCenTS Of RylOTh
libeRTy On RylOThObjective 1: enter enemy territOry
Objective 2: criPPle the enemy bases
Objective 3: restOre the briDGe
ePilOguehub AReASSePARATiST miSSiOnS
seCrets and extras
CheCklIsts
nIntendo ds
Contents
hoW to use thIs eguIdeDownload from www.chipper.pl
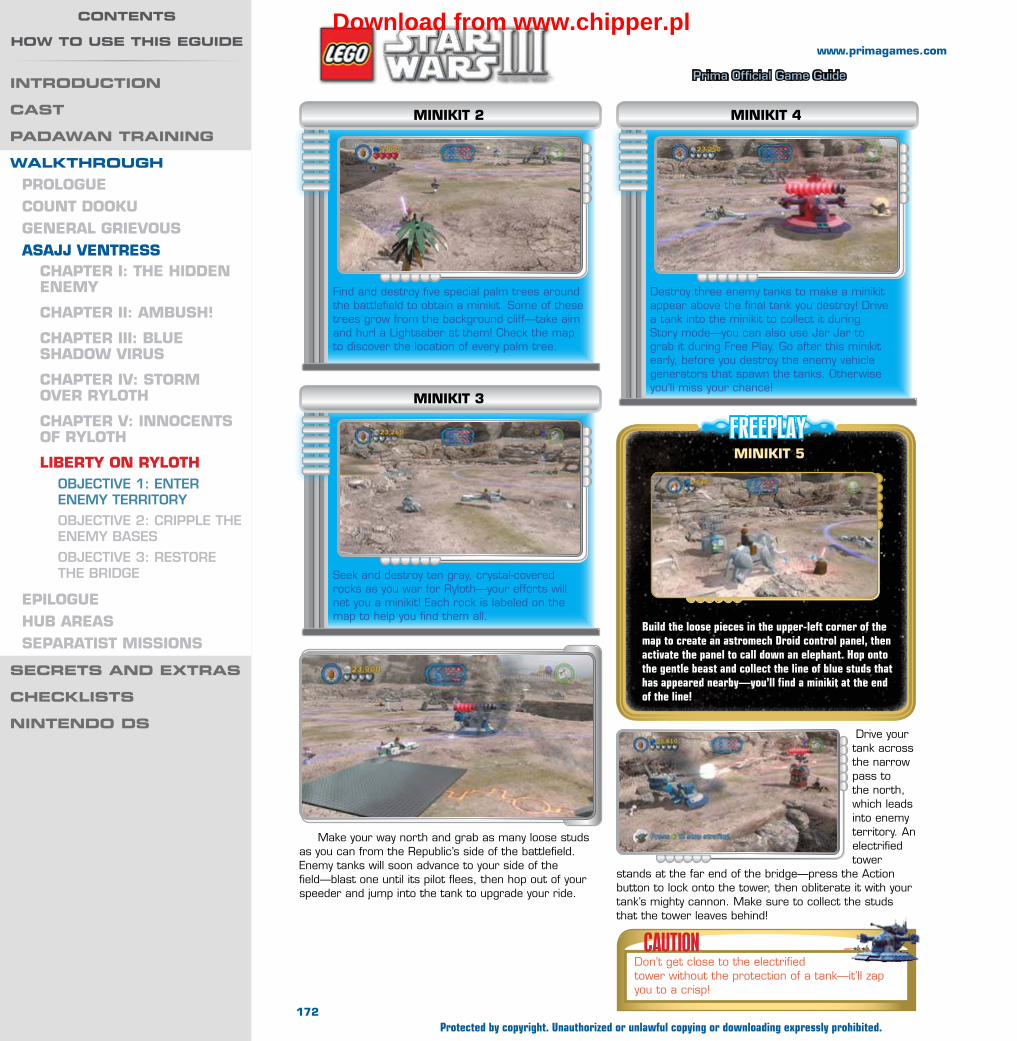
Wa
lk
th
ro
ug
h —
as
ajj v
en
tr
es
s
Prima Official Game Guide
www.primagames.com
Drive your tank across the narrow pass to the north, which leads into enemy territory. An electrified tower
stands at the far end of the bridge—press the Action button to lock onto the tower, then obliterate it with your tank’s mighty cannon. Make sure to collect the studs that the tower leaves behind!
Make your way north and grab as many loose studs as you can from the Republic’s side of the battlefield. Enemy tanks will soon advance to your side of the field—blast one until its pilot flees, then hop out of your speeder and jump into the tank to upgrade your ride.
Find and destroy five special palm trees around the battlefield to obtain a minikit. Some of these trees grow from the background cliff—take aim and hurl a Lightsaber at them! Check the map to discover the location of every palm tree.
miniKiT 2
07f-005
Seek and destroy ten gray, crystal-covered rocks as you war for Ryloth—your efforts will net you a minikit! Each rock is labeled on the map to help you find them all.
miniKiT 3
Destroy three enemy tanks to make a minikit appear above the final tank you destroy! Drive a tank into the minikit to collect it during Story mode—you can also use Jar Jar to grab it during Free Play. Go after this minikit early, before you destroy the enemy vehicle generators that spawn the tanks. Otherwise you’ll miss your chance!
miniKiT 4
FREEPLAYminiKiT 5
Build the loose pieces in the upper-left corner of the map to create an astromech Droid control panel, then activate the panel to call down an elephant. Hop onto the gentle beast and collect the line of blue studs that has appeared nearby—you’ll find a minikit at the end of the line!
CAUTIONDon’t get close to the electrified tower without the protection of a tank—it’ll zap you to a crisp!
172
www.primagames.com
Protected by copyright. Unauthorized or unlawful copying or downloading expressly prohibited.
IntroduCtIon
Cast
padaWan traInIng
WalkthroughPROlOgueCOunT DOOKugeneRAl gRievOuSASAJJ venTReSS
ChAPTeR i: The hiDDen enemy
ChAPTeR ii: AmbuSh!
ChAPTeR iii: blue ShADOW viRuS
ChAPTeR iv: STORm OveR RylOTh
ChAPTeR v: innOCenTS Of RylOTh
libeRTy On RylOThObjective 1: enter enemy territOry
Objective 2: criPPle the enemy bases
Objective 3: restOre the briDGe
ePilOguehub AReASSePARATiST miSSiOnS
seCrets and extras
CheCklIsts
nIntendo ds
Contents
hoW to use thIs eguIdeDownload from www.chipper.pl

Wa
lk
th
ro
ug
h —
as
ajj v
en
tr
es
s
Prima Official Game Guide
www.primagames.com
Pilot your RX-200 tank or AT-AP over to the nearest enemy base and lay waste to the Separatist structures. You can do a whole lot of damage in these vehicles! Ignore the northeast base that’s covered by a pink shield for now and focus on wiping out the other bases instead.
You’ve now captured two enemy bases. Run around either base and notice that gray panels appear on the ground. Stand on one of these panels and press the Action button to call up the build menu, then choose to build either a RX-200 tank or an AT-AP walker from the air support menu option—both are fine choices.
Destroying the cannon gives you control over the enemy’s northwest base—check the minimap to see that it has turned blue. For now, just head south and attack the base below. First destroy the silver cannon with the use of a stolen enemy tank. Then destroy the vehicle generator to reduce the number of enemy tanks in the field.
ObJeCTive 2: CRiPPle The enemy bASeS
Now that you’ve reached enemy territory, focus on destroying their bases. Start with the base near the north pass, which features a single cannon. Your sluggish tank isn’t likely to last long over here, but that’s OK—Mace Windu’s Lightsaber is an effective weapon against enemy tanks and structures!
FREEPLAYminiKiT 6
Toggle to a small character and crawl through the little hatch in the north cliff. You emerge on a high ledge—use the Force to shatter the giant Darth Vader sculpture up here and expose a hidden minikit!
TIPGrab the purple studs near the north cliff for some fast cash!
NOTEThe enemy still has one more tank generator—it’s located in one of their southern bases.
TIPIf your vehicle is destroyed, simply return to the generator you’ve built and obtain another.
173
www.primagames.com
Protected by copyright. Unauthorized or unlawful copying or downloading expressly prohibited.
IntroduCtIon
Cast
padaWan traInIng
WalkthroughPROlOgueCOunT DOOKugeneRAl gRievOuSASAJJ venTReSS
ChAPTeR i: The hiDDen enemy
ChAPTeR ii: AmbuSh!
ChAPTeR iii: blue ShADOW viRuS
ChAPTeR iv: STORm OveR RylOTh
ChAPTeR v: innOCenTS Of RylOTh
libeRTy On RylOThObjective 1: enter enemy territOry
Objective 2: criPPle the enemy bases
Objective 3: restOre the briDGe
ePilOguehub AReASSePARATiST miSSiOnS
seCrets and extras
CheCklIsts
nIntendo ds
Contents
hoW to use thIs eguIdeDownload from www.chipper.pl

Wa
lk
th
ro
ug
h —
as
ajj v
en
tr
es
s
Prima Official Game Guide
www.primagames.com
FREEPLAY
Explore the battlefield’s south ridge to discover a protocol Droid control panel. Activate this with C-3PO to make a large orange pad appear to the left.
FREEPLAY
FREEPLAYminiKiT 7
Leave at least one enemy barracks intact (the squat brown structures from which battle Droids emerge) and jump to the tiny isles near the enemy’s northeast base. Activate the bounty hunter control panel here to begin a timer—it’s Droid-smashing time!
Race to the nearest bunker and wipe out the enemy Droids as they emerge. Simply do donuts in a speeder near the bunker to crush the Droids as they march out. Or jump and press the Attack button in midair to dispatch the Droids quickly with a Jedi slam! Dispatch 50 Droids before time expires to receive a minikit.
NOTEYou need to seek out and destroy a barracks’s active battalion of Droids before more will emerge from the structure.
Use a Sith character’s Dark Force ability to shatter the red glowing rock at the southeast corner of the battlefield. When the rock explodes, a minikit pops out!
miniKiT 9
miniKiT 8
If you haven’t got a speeder, obtain one by running to the left. Then pass over the orange pad near the protocol panel to change its color to green. Then follow the line of green beacons to locate the next pad, and keep following along until you’ve passed over every pad. The pads reset to orange after a time, so don’t dally! Turn all those pads green to receive a fabulous minikit prize.
174
www.primagames.com
Protected by copyright. Unauthorized or unlawful copying or downloading expressly prohibited.
IntroduCtIon
Cast
padaWan traInIng
WalkthroughPROlOgueCOunT DOOKugeneRAl gRievOuSASAJJ venTReSS
ChAPTeR i: The hiDDen enemy
ChAPTeR ii: AmbuSh!
ChAPTeR iii: blue ShADOW viRuS
ChAPTeR iv: STORm OveR RylOTh
ChAPTeR v: innOCenTS Of RylOTh
libeRTy On RylOThObjective 1: enter enemy territOry
Objective 2: criPPle the enemy bases
Objective 3: restOre the briDGe
ePilOguehub AReASSePARATiST miSSiOnS
seCrets and extras
CheCklIsts
nIntendo ds
Contents
hoW to use thIs eguIdeDownload from www.chipper.pl

Wa
lk
th
ro
ug
h —
as
ajj v
en
tr
es
s
Prima Official Game Guide
www.primagames.com
With both gold plate towers built, a bridge materializes over the ravine. Pilot an AT-AP walker
across the bridge and destroy the silver gate beyond to liberate the besieged city of Lessu. Exit your vehicle and run through the gates to tell the people of your great success!
to the enemy’s northeast base as possible, then take aim and fire on the silver cannon until it goes boom.
Leap back over to the northeast base, which is now under your control. Stand on the gold plate
here and press the Action button to erect another special tower.
You can’t destroy the base’s silver cannon at present, but you can bring down the surrounding shield.
Stand to the right of the shield generator to place it between you and the silver cannon, then assail the generator with Mace Windu’s trusty purple Lightsaber.
With the shield generator destroyed, leap back across the tiny isles and build a gold cannon at the
neighboring base to the west. Place the cannon as close
The enemy’s southeast base (according to the minimap) features an unusual gold plate. Destroy the base’s structures, then stand on the plate and press the Action button to build a special tower that emits a ray of energy across the nearby ravine. Interesting ...
Next, take control of Mace Windu and double-jump to the tiny isles near the enemy’s northeast base. Nab
the purple studs here, then leap over to the base without fear—you’ll pass right through the pink shield.
ObJeCTive 3: ReSTORe The bRiDge
NOTEShields repel vehicles and weapons fire, but have no effect against ground troops.
Now’s a great time to obtain a pricey minikit. Go around to each base you’ve captured and build one structure from every category (cannon, barracks, etc.). You’ll soon “tech up” to the special minikit dispenser, which you may purchase for a tidy sum! It’s best to achieve True Jedi status before going after this minikit due to the costs involved.
miniKiT 10
NOTECongratulations, you’ve completed the Asajj Ventress story line! Now clear the Count Dooku and General Grievous story lines to unlock the thrilling epilogue!
175
www.primagames.com
Protected by copyright. Unauthorized or unlawful copying or downloading expressly prohibited.
IntroduCtIon
Cast
padaWan traInIng
WalkthroughPROlOgueCOunT DOOKugeneRAl gRievOuSASAJJ venTReSS
ChAPTeR i: The hiDDen enemy
ChAPTeR ii: AmbuSh!
ChAPTeR iii: blue ShADOW viRuS
ChAPTeR iv: STORm OveR RylOTh
ChAPTeR v: innOCenTS Of RylOTh
libeRTy On RylOThObjective 1: enter enemy territOry
Objective 2: criPPle the enemy bases
Objective 3: restOre the briDGe
ePilOguehub AReASSePARATiST miSSiOnS
seCrets and extras
CheCklIsts
nIntendo ds
Contents
hoW to use thIs eguIdeDownload from www.chipper.pl
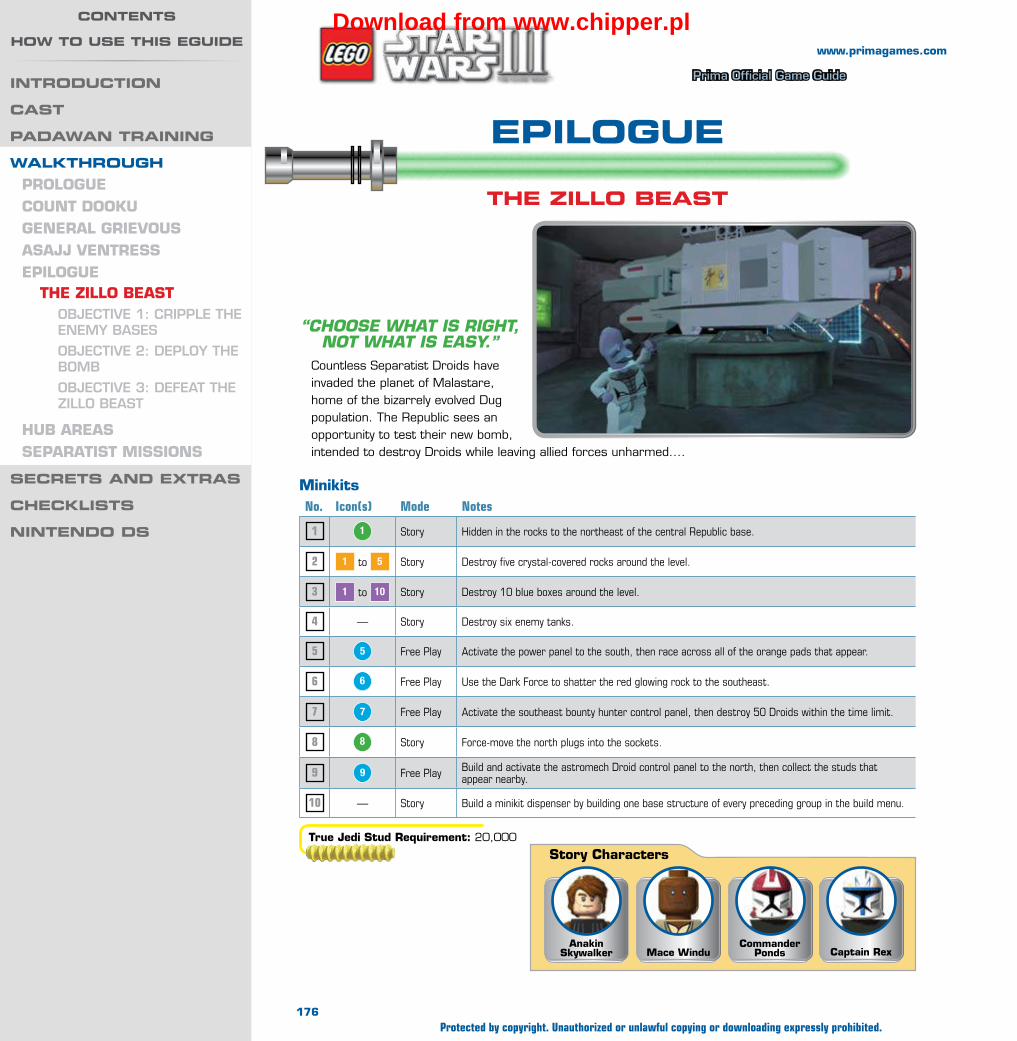
Wa
lk
th
ro
ug
h —
epil
og
ue
Prima Official Game Guide
www.primagames.com
epilogue
the Zillo Beast
MinikitsNo. Icon(s) Mode Notes
1 1 Story Hidden in the rocks to the northeast of the central Republic base.
2 1 to 5 Story Destroy five crystal-covered rocks around the level.
3 1 to 10 Story Destroy 10 blue boxes around the level.
4 — Story Destroy six enemy tanks.
5 5 Free Play Activate the power panel to the south, then race across all of the orange pads that appear.
6 6 Free Play Use the Dark Force to shatter the red glowing rock to the southeast.
7 7 Free Play Activate the southeast bounty hunter control panel, then destroy 50 Droids within the time limit.
8 8 Story Force-move the north plugs into the sockets.
9 9 Free Play Build and activate the astromech Droid control panel to the north, then collect the studs that appear nearby.
10 — Story Build a minikit dispenser by building one base structure of every preceding group in the build menu.
True Jedi Stud Requirement: 20,000
Story Characters
Commander PondsMace Windu
Anakin Skywalker Captain Rex
“choose what Is RIGht, not what Is easy.”
Countless Separatist Droids have invaded the planet of Malastare, home of the bizarrely evolved Dug population. The Republic sees an opportunity to test their new bomb, intended to destroy Droids while leaving allied forces unharmed....
176Protected by copyright. Unauthorized or unlawful copying or downloading expressly prohibited.
introduction
cast
padaWan training
WalkthroughPRologueCounT DookugeneRAl gRievouSASAJJ venTReSSePilogue
The Zillo BeASTObjective 1: criPPle the enemy bases
Objective 2: DePlOy the bOmb
Objective 3: Defeat the ZillO beast
huB AReASSePARATiST MiSSionS
secrets and extras
checklists
nintendo ds
contents
hoW to use this eguideDownload from www.chipper.pl
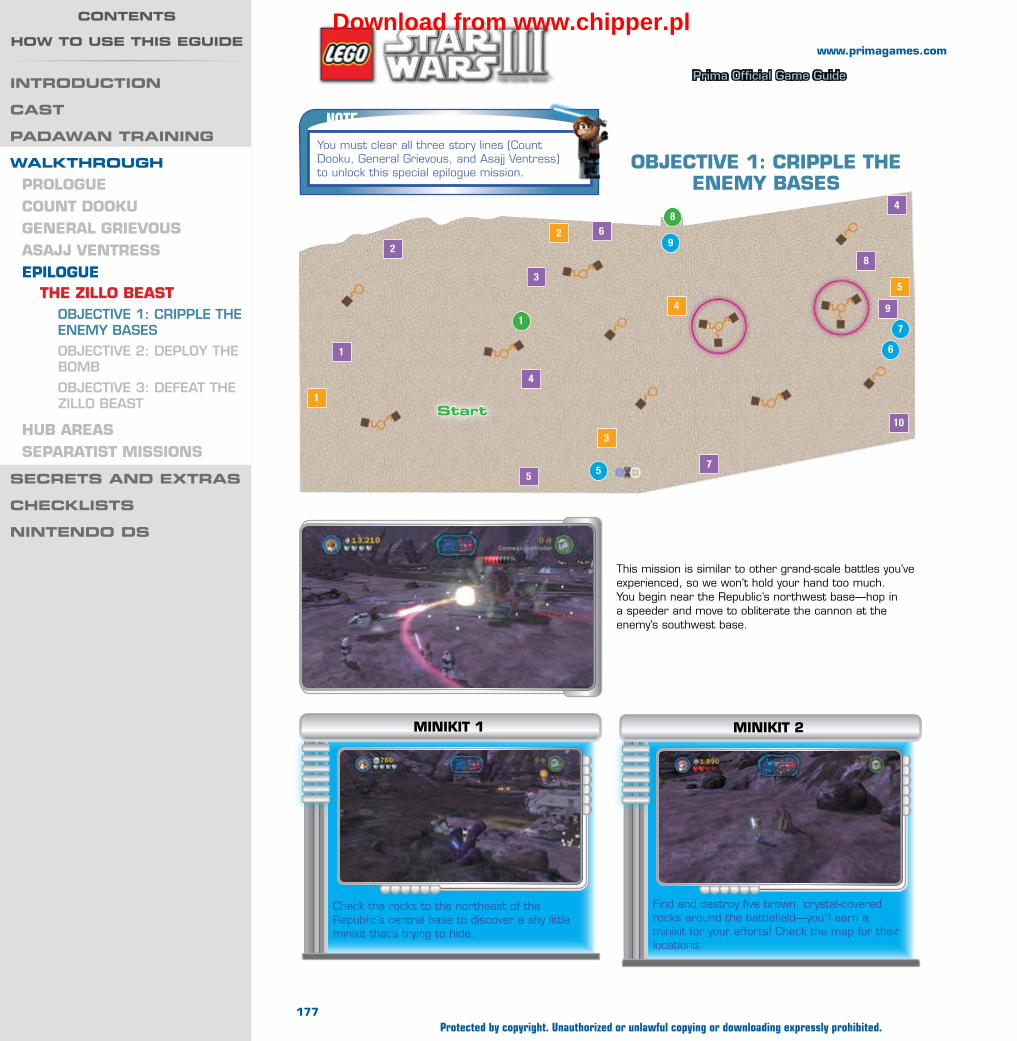
Wa
lk
th
ro
ug
h —
epil
og
ue
Prima Official Game Guide
www.primagames.com
oBJeCTive 1: CRiPPle The eneMy BASeS
NOTEYou must clear all three story lines (Count Dooku, General Grievous, and Asajj Ventress) to unlock this special epilogue mission.
This mission is similar to other grand-scale battles you’ve experienced, so we won’t hold your hand too much. You begin near the Republic’s northwest base—hop in a speeder and move to obliterate the cannon at the enemy’s southwest base.
Check the rocks to the northeast of the Republic’s central base to discover a shy little minikit that’s trying to hide.
MinikiT 1
Find and destroy five brown, crystal-covered rocks around the battlefield—you’ll earn a minikit for your efforts! Check the map for their locations.
MinikiT 2
1
2
1
8
5
6
7
9
3
4
5
1
2
3
4
5
6
7
8
9
10start
4
177Protected by copyright. Unauthorized or unlawful copying or downloading expressly prohibited.
introduction
cast
padaWan training
WalkthroughPRologueCounT DookugeneRAl gRievouSASAJJ venTReSSePilogue
The Zillo BeASTObjective 1: criPPle the enemy bases
Objective 2: DePlOy the bOmb
Objective 3: Defeat the ZillO beast
huB AReASSePARATiST MiSSionS
secrets and extras
checklists
nintendo ds
contents
hoW to use this eguideDownload from www.chipper.pl

Wa
lk
th
ro
ug
h —
epil
og
ue
Prima Official Game Guide
www.primagames.com
Destroy six enemy tanks to make a minikit appear above the final tank you trash. Collect this minikit during Story mode with a tall vehicle, such as a stolen enemy tank or an AT-AP walker. Or use Jar Jar to bound up and nab it during Free Play!
MinikiT 4
Seek and destroy 10 blue boxes that are dotted around the map—a minikit will be your prize! The boxes take a bit of firepower to destroy them, though a Jedi’s Lightsaber does the trick while you’re on foot. Each box is labeled on the maps.
MinikiT 3
Attack the enemy’s southern bases next, starting with the ray shield that’s protecting another base’s barracks (the squat, brown structure). Leave the barracks alone if you’re after Free Play minikits (see the sidebar)—otherwise, simply destroy everything in sight.
FREEPLAYMinikiT 5
Activate the power panel to the southeast of the Republic’s central base with a character such as a MagnaGuard. This causes a large orange pad to appear nearby.
Run to the left a bit to obtain a speeder, then pass over the orange pad to change its color to green. Follow the line of green beacons to locate the next pad, and keep following along until you’ve passed over every pad. The pads reset to orange after a time, so don’t get sidetracked. Turn all those pads green to find a minikit at the end of the line!
FREEPLAYMinikiT 6
Use a Sith character’s Dark Force ability to shake a minikit out of the red glowing rock near the battlefield’s southeast cliff. If you only knew the power!
178Protected by copyright. Unauthorized or unlawful copying or downloading expressly prohibited.
introduction
cast
padaWan training
WalkthroughPRologueCounT DookugeneRAl gRievouSASAJJ venTReSSePilogue
The Zillo BeASTObjective 1: criPPle the enemy bases
Objective 2: DePlOy the bOmb
Objective 3: Defeat the ZillO beast
huB AReASSePARATiST MiSSionS
secrets and extras
checklists
nintendo ds
contents
hoW to use this eguideDownload from www.chipper.pl
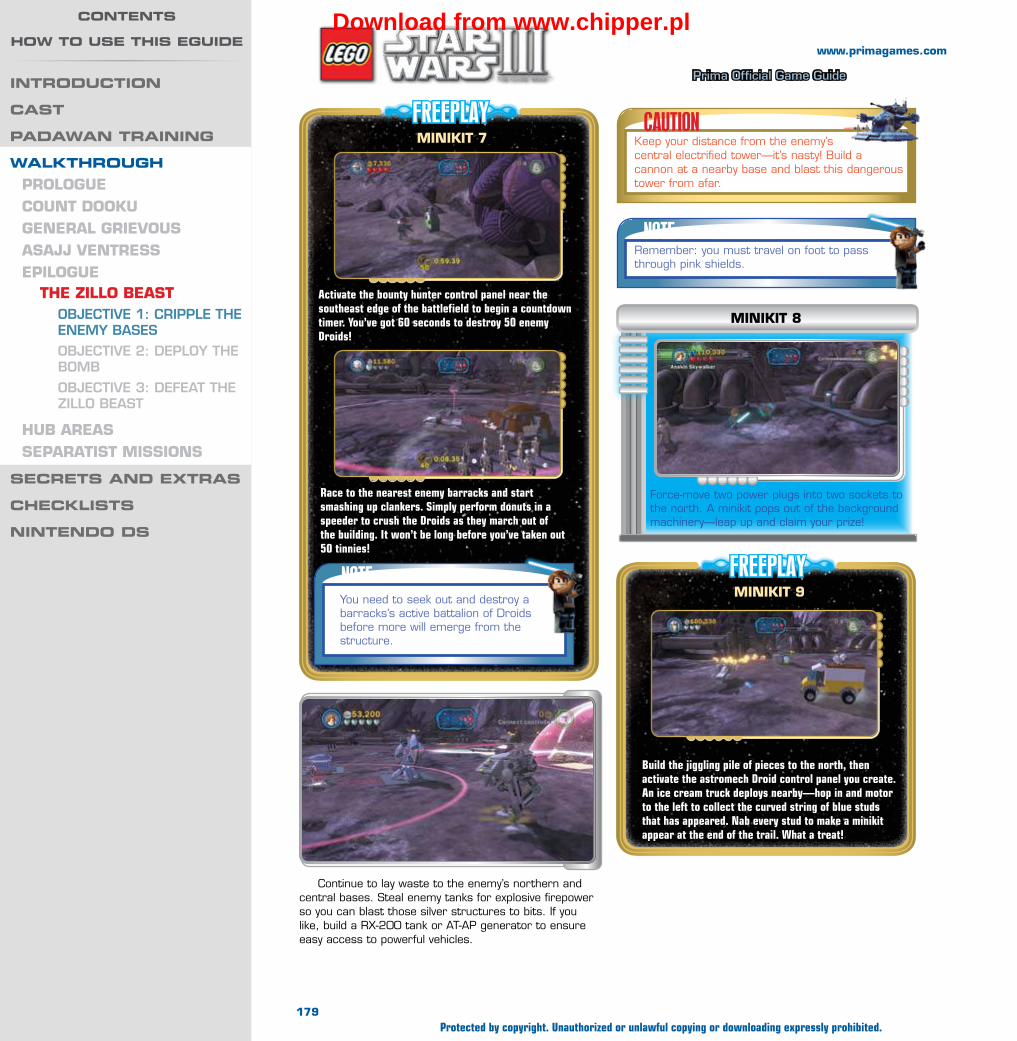
Wa
lk
th
ro
ug
h —
epil
og
ue
Prima Official Game Guide
www.primagames.com
Continue to lay waste to the enemy’s northern and central bases. Steal enemy tanks for explosive firepower so you can blast those silver structures to bits. If you like, build a RX-200 tank or AT-AP generator to ensure easy access to powerful vehicles.
FREEPLAYMinikiT 7
NOTEYou need to seek out and destroy a barracks’s active battalion of Droids before more will emerge from the structure.
CAUTIONKeep your distance from the enemy’s central electrified tower—it’s nasty! Build a cannon at a nearby base and blast this dangerous tower from afar.
NOTERemember: you must travel on foot to pass through pink shields.
Force-move two power plugs into two sockets to the north. A minikit pops out of the background machinery—leap up and claim your prize!
MinikiT 8
FREEPLAYMinikiT 9
Build the jiggling pile of pieces to the north, then activate the astromech Droid control panel you create. An ice cream truck deploys nearby—hop in and motor to the left to collect the curved string of blue studs that has appeared. Nab every stud to make a minikit appear at the end of the trail. What a treat!
Activate the bounty hunter control panel near the southeast edge of the battlefield to begin a countdown timer. You’ve got 60 seconds to destroy 50 enemy Droids!
Race to the nearest enemy barracks and start smashing up clankers. Simply perform donuts in a speeder to crush the Droids as they march out of the building. It won’t be long before you’ve taken out 50 tinnies!
179Protected by copyright. Unauthorized or unlawful copying or downloading expressly prohibited.
introduction
cast
padaWan training
WalkthroughPRologueCounT DookugeneRAl gRievouSASAJJ venTReSSePilogue
The Zillo BeASTObjective 1: criPPle the enemy bases
Objective 2: DePlOy the bOmb
Objective 3: Defeat the ZillO beast
huB AReASSePARATiST MiSSionS
secrets and extras
checklists
nintendo ds
contents
hoW to use this eguideDownload from www.chipper.pl
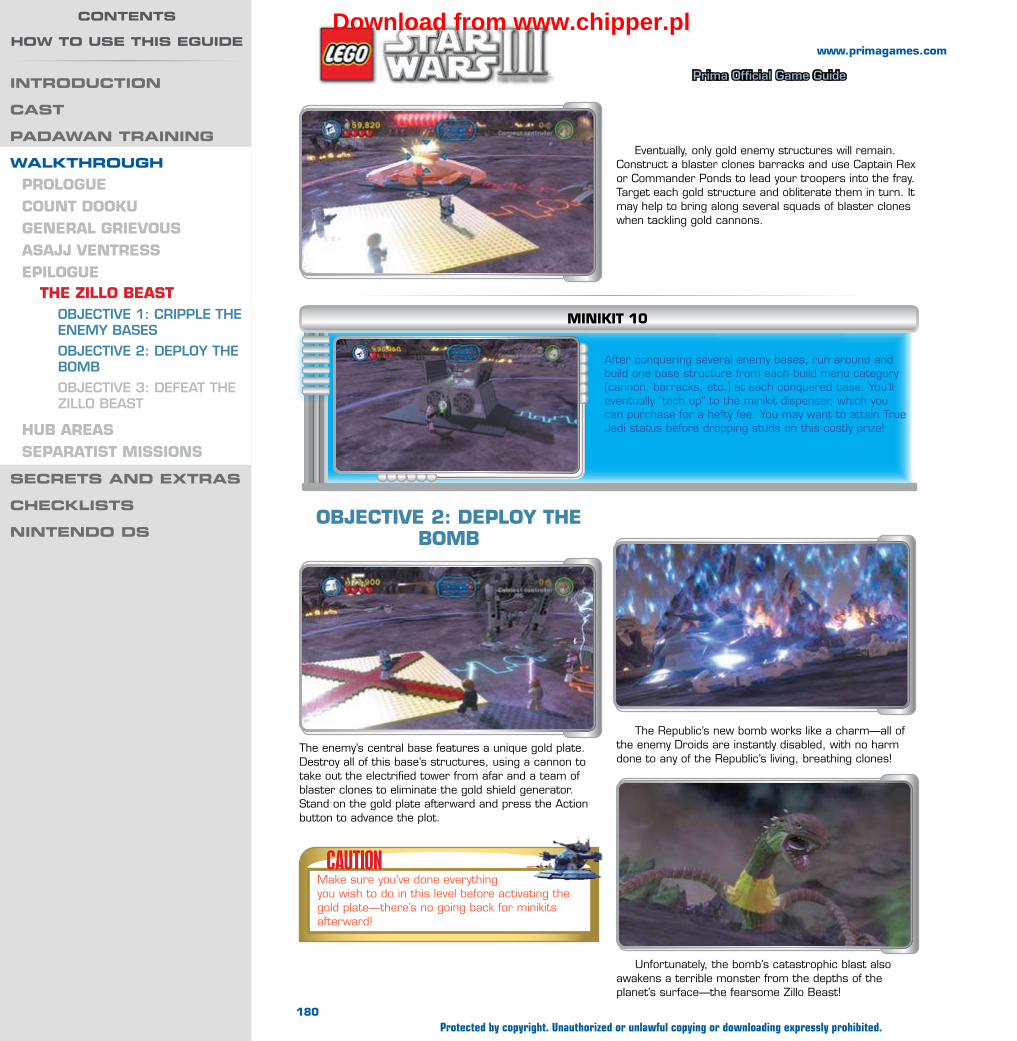
Wa
lk
th
ro
ug
h —
epil
og
ue
Prima Official Game Guide
www.primagames.com
After conquering several enemy bases, run around and build one base structure from each build menu category (cannon, barracks, etc.) at each conquered base. You’ll eventually “tech up” to the minikit dispenser, which you can purchase for a hefty fee. You may want to attain True Jedi status before dropping studs on this costly prize!
MinikiT 10
oBJeCTive 2: DePloy The BoMB
CAUTIONMake sure you’ve done everything you wish to do in this level before activating the gold plate—there’s no going back for minikits afterward!
The Republic’s new bomb works like a charm—all of the enemy Droids are instantly disabled, with no harm done to any of the Republic’s living, breathing clones!
Eventually, only gold enemy structures will remain. Construct a blaster clones barracks and use Captain Rex or Commander Ponds to lead your troopers into the fray. Target each gold structure and obliterate them in turn. It may help to bring along several squads of blaster clones when tackling gold cannons.
The enemy’s central base features a unique gold plate. Destroy all of this base’s structures, using a cannon to take out the electrified tower from afar and a team of blaster clones to eliminate the gold shield generator. Stand on the gold plate afterward and press the Action button to advance the plot.
Unfortunately, the bomb’s catastrophic blast also awakens a terrible monster from the depths of the planet’s surface—the fearsome Zillo Beast!
180Protected by copyright. Unauthorized or unlawful copying or downloading expressly prohibited.
introduction
cast
padaWan training
WalkthroughPRologueCounT DookugeneRAl gRievouSASAJJ venTReSSePilogue
The Zillo BeASTObjective 1: criPPle the enemy bases
Objective 2: DePlOy the bOmb
Objective 3: Defeat the ZillO beast
huB AReASSePARATiST MiSSionS
secrets and extras
checklists
nintendo ds
contents
hoW to use this eguideDownload from www.chipper.pl
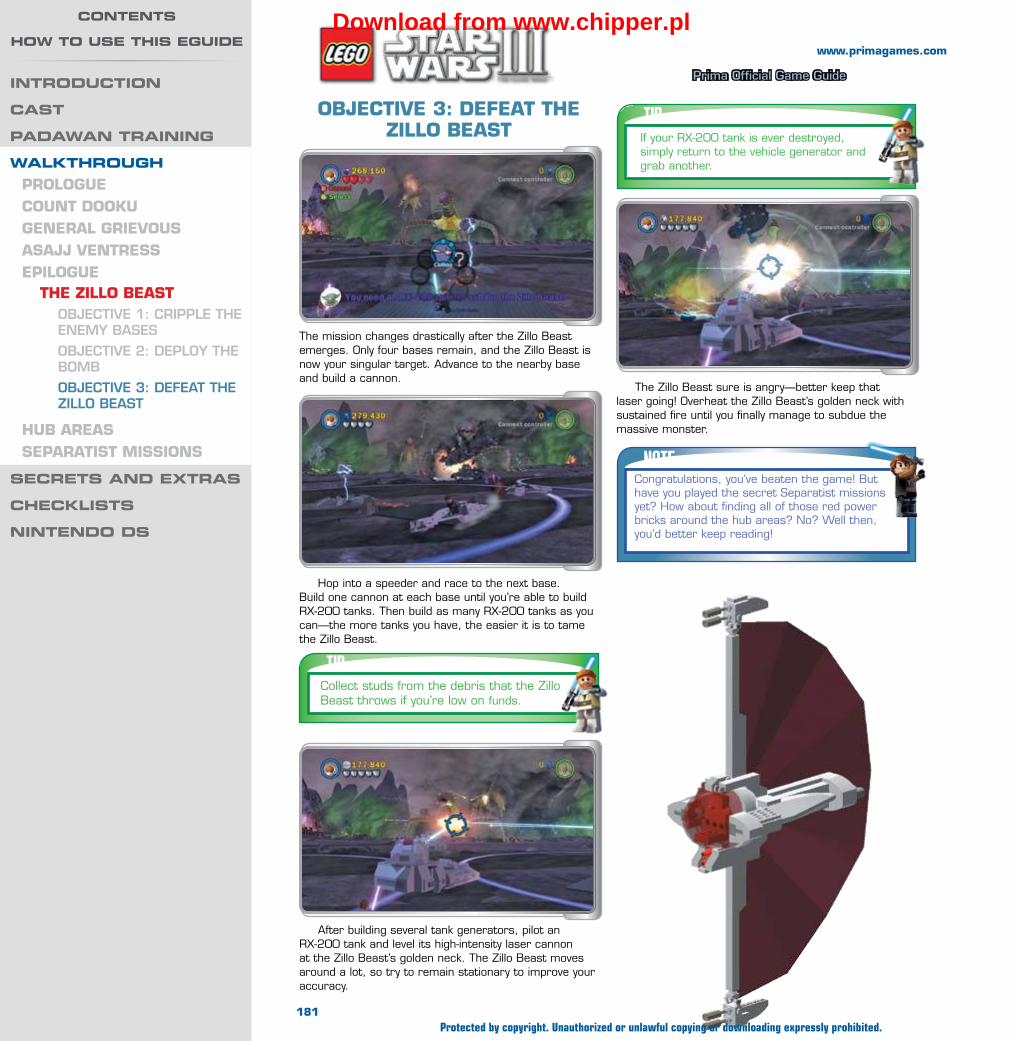
Wa
lk
th
ro
ug
h —
epil
og
ue
Prima Official Game Guide
www.primagames.com
The mission changes drastically after the Zillo Beast emerges. Only four bases remain, and the Zillo Beast is now your singular target. Advance to the nearby base and build a cannon.
oBJeCTive 3: DefeAT The Zillo BeAST
The Zillo Beast sure is angry—better keep that laser going! Overheat the Zillo Beast’s golden neck with sustained fire until you finally manage to subdue the massive monster.
TIP
NOTECongratulations, you’ve beaten the game! But have you played the secret Separatist missions yet? How about finding all of those red power bricks around the hub areas? No? Well then, you’d better keep reading!
Hop into a speeder and race to the next base. Build one cannon at each base until you’re able to build RX-200 tanks. Then build as many RX-200 tanks as you can—the more tanks you have, the easier it is to tame the Zillo Beast.
After building several tank generators, pilot an RX-200 tank and level its high-intensity laser cannon at the Zillo Beast’s golden neck. The Zillo Beast moves around a lot, so try to remain stationary to improve your accuracy.
TIPIf your RX-200 tank is ever destroyed, simply return to the vehicle generator and grab another.
Collect studs from the debris that the Zillo Beast throws if you’re low on funds.
181Protected by copyright. Unauthorized or unlawful copying or downloading expressly prohibited.
introduction
cast
padaWan training
WalkthroughPRologueCounT DookugeneRAl gRievouSASAJJ venTReSSePilogue
The Zillo BeASTObjective 1: criPPle the enemy bases
Objective 2: DePlOy the bOmb
Objective 3: Defeat the ZillO beast
huB AReASSePARATiST MiSSionS
secrets and extras
checklists
nintendo ds
contents
hoW to use this eguideDownload from www.chipper.pl
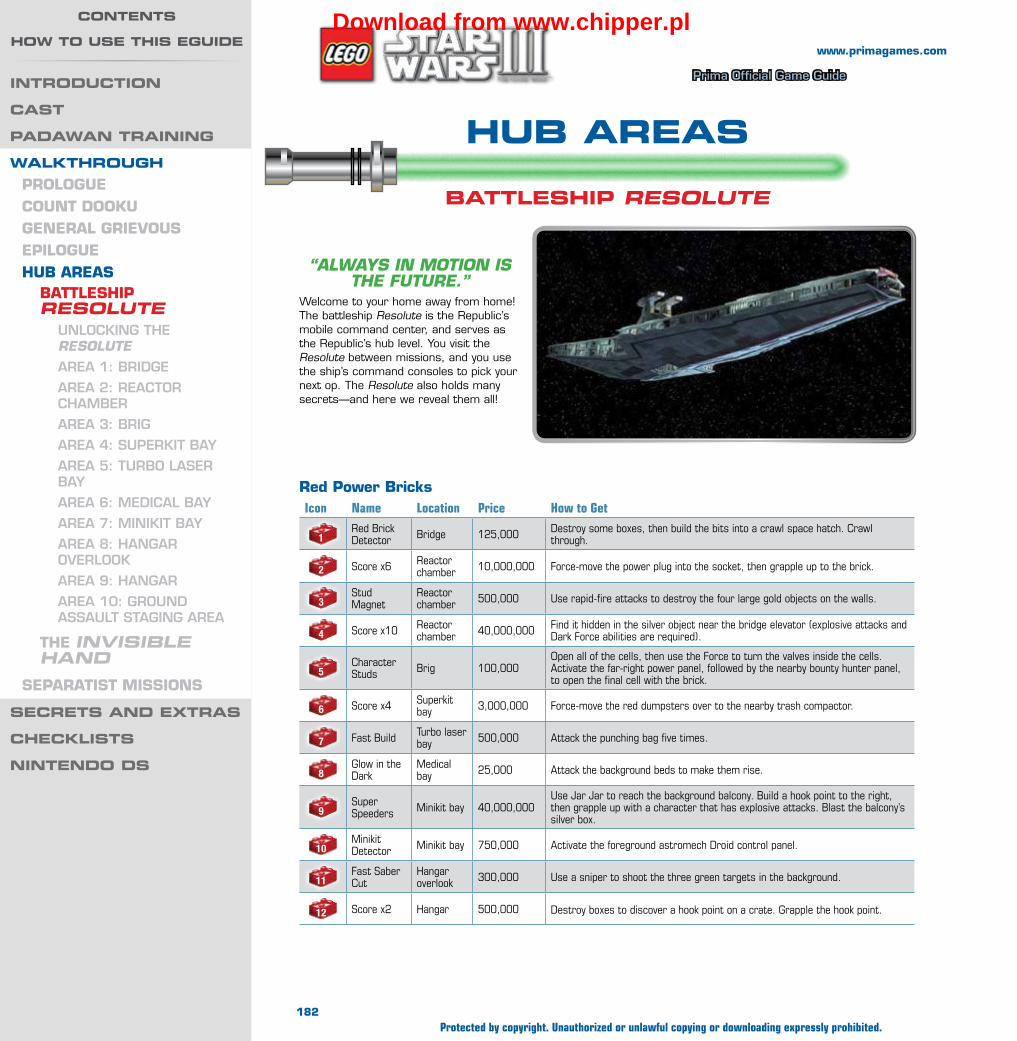
Wa
lk
th
ro
ug
h —
hu
b a
rea
s
Prima Official Game Guide
www.primagames.com
hub areas
battleship resolute
Red Power BricksIcon Name Location Price How to Get
1Red Brick Detector Bridge 125,000 Destroy some boxes, then build the bits into a crawl space hatch. Crawl
through.
2 Score x6 Reactor chamber 10,000,000 Force-move the power plug into the socket, then grapple up to the brick.
3Stud Magnet
Reactor chamber 500,000 Use rapid-fire attacks to destroy the four large gold objects on the walls.
4 Score x10 Reactor chamber 40,000,000 Find it hidden in the silver object near the bridge elevator (explosive attacks and
Dark Force abilities are required).
5Character Studs Brig 100,000
Open all of the cells, then use the Force to turn the valves inside the cells. Activate the far-right power panel, followed by the nearby bounty hunter panel, to open the final cell with the brick.
6 Score x4 Superkit bay 3,000,000 Force-move the red dumpsters over to the nearby trash compactor.
7 Fast Build Turbo laser bay 500,000 Attack the punching bag five times.
8Glow in the Dark
Medical bay 25,000 Attack the background beds to make them rise.
9Super Speeders Minikit bay 40,000,000
Use Jar Jar to reach the background balcony. Build a hook point to the right, then grapple up with a character that has explosive attacks. Blast the balcony’s silver box.
10Minikit Detector Minikit bay 750,000 Activate the foreground astromech Droid control panel.
11Fast Saber Cut
Hangar overlook 300,000 Use a sniper to shoot the three green targets in the background.
12 Score x2 Hangar 500,000 Destroy boxes to discover a hook point on a crate. Grapple the hook point.
“always In motIon Is the FutuRe.”
Welcome to your home away from home! The battleship Resolute is the Republic’s mobile command center, and serves as the Republic’s hub level. You visit the Resolute between missions, and you use the ship’s command consoles to pick your next op. The Resolute also holds many secrets—and here we reveal them all!
182Protected by copyright. Unauthorized or unlawful copying or downloading expressly prohibited.
introduction
cast
padaWan training
WalkthroughPrologueCount Dookugeneral grievousePilogueHub areas
battlesHiP resolute
UnlOckinG the Resolute
AreA 1: BridGe
AreA 2: reActOr chAmBer
AreA 3: BriG
AreA 4: SUPerkit BAy
AreA 5: tUrBO lASer BAy
AreA 6: medicAl BAy
AreA 7: minikit BAy
AreA 8: hAnGAr OverlOOk
AreA 9: hAnGAr
AreA 10: GrOUnd ASSAUlt StAGinG AreA
tHe invisible hand
seParatist Missions
secrets and extras
checklists
nintendo ds
contents
hoW to use this eguideDownload from www.chipper.pl
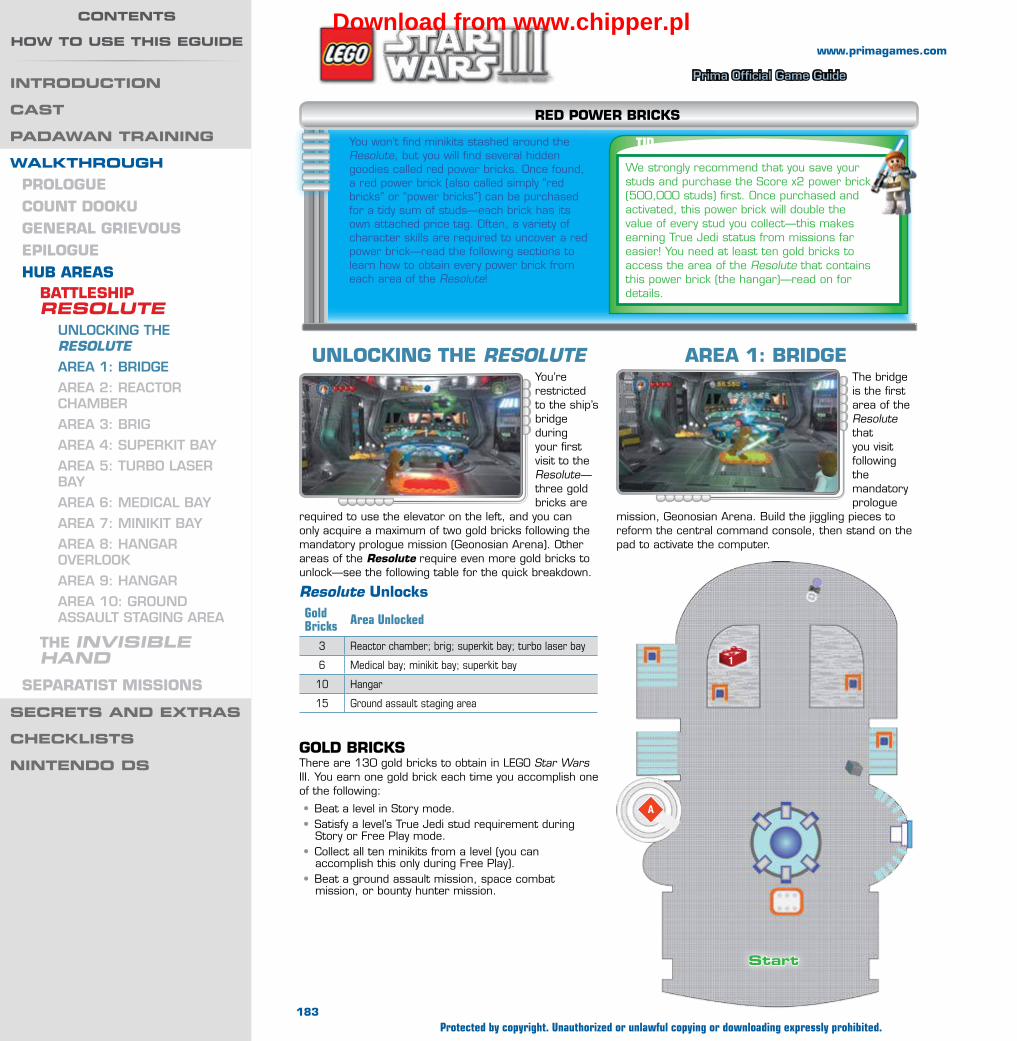
Wa
lk
th
ro
ug
h —
hu
b a
rea
s
Prima Official Game Guide
www.primagames.com
unloCking tHe Resolute You’re restricted to the ship’s bridge during your first visit to the Resolute—three gold bricks are
required to use the elevator on the left, and you can only acquire a maximum of two gold bricks following the mandatory prologue mission (Geonosian Arena). Other areas of the Resolute require even more gold bricks to unlock—see the following table for the quick breakdown.
Resolute UnlocksGold Bricks Area Unlocked
3 Reactor chamber; brig; superkit bay; turbo laser bay
6 Medical bay; minikit bay; superkit bay
10 Hangar
15 Ground assault staging area
golD briCksThere are 130 gold bricks to obtain in LEGO Star Wars III. You earn one gold brick each time you accomplish one of the following:
• Beat a level in Story mode.• Satisfy a level’s True Jedi stud requirement during
Story or Free Play mode.• Collect all ten minikits from a level (you can
accomplish this only during Free Play).• Beat a ground assault mission, space combat
mission, or bounty hunter mission.
area 1: briDgeThe bridge is the first area of the Resolute that you visit following the mandatory prologue
mission, Geonosian Arena. Build the jiggling pieces to reform the central command console, then stand on the pad to activate the computer.
You won’t find minikits stashed around the Resolute, but you will find several hidden goodies called red power bricks. Once found, a red power brick (also called simply “red bricks” or “power bricks”) can be purchased for a tidy sum of studs—each brick has its own attached price tag. Often, a variety of character skills are required to uncover a red power brick—read the following sections to learn how to obtain every power brick from each area of the Resolute!
reD Power briCks
TIPWe strongly recommend that you save your studs and purchase the Score x2 power brick (500,000 studs) first. Once purchased and activated, this power brick will double the value of every stud you collect—this makes earning True Jedi status from missions far easier! You need at least ten gold bricks to access the area of the Resolute that contains this power brick (the hangar)—read on for details.
1
A
start
183Protected by copyright. Unauthorized or unlawful copying or downloading expressly prohibited.
introduction
cast
padaWan training
WalkthroughPrologueCount Dookugeneral grievousePilogueHub areas
battlesHiP resolute
UnlOckinG the Resolute
AreA 1: BridGe
AreA 2: reActOr chAmBer
AreA 3: BriG
AreA 4: SUPerkit BAy
AreA 5: tUrBO lASer BAy
AreA 6: medicAl BAy
AreA 7: minikit BAy
AreA 8: hAnGAr OverlOOk
AreA 9: hAnGAr
AreA 10: GrOUnd ASSAUlt StAGinG AreA
tHe invisible hand
seParatist Missions
secrets and extras
checklists
nintendo ds
contents
hoW to use this eguideDownload from www.chipper.pl

Wa
lk
th
ro
ug
h —
hu
b a
rea
s
Prima Official Game Guide
www.primagames.com
Most objects on the bridge can be destroyed for studs. Use an explosive attack from a character
such as Waxer to destroy the silver box, then stack the jiggling pieces to form a decorative hang-up that rains studs. Grapple the hook point to the right of the command console to expose even more hidden studs. Activate the background astromech Droid control panel to turn on the ship’s windshield wipers. Fun!
Three red power bricks can be acquired in the reactor chamber—see the sidebars for details!
The command console lets you pick your next mission. Choose to follow along one of three separate story lines: Count Dooku (blue), General Grievous (green), or Asajj Ventress (purple). Each path features six unique missions that put your heroism and adventuring skills to the test. Clear all three story lines to unlock the bonus epilogue mission!
NOTEThe command console also lets you change your hub level character. This is useful when you need special skills to obtain a certain red power brick!
Cost: 125,000skills needed: Small sizeeffect: Helps you track down red power bricks
reD Power briCk 1: reD briCk DeteCtor
Destroy the junk on the bridge’s left side, then build the pieces to form a crawl space hatch. Use a small character to crawl through. You emerge in a lower area—right next to a power brick!
area 2: reaCtor CHaMberAfter acquiring just three gold bricks (see the previous “Unlocking the Resolute” section to learn how gold bricks can be acquired), you’re able to explore beyond the Resolute’s bridge and visit the reactor chamber—a cavernous area that connects to several other rooms.
2
3
4 5
A
B
C
E
G
184Protected by copyright. Unauthorized or unlawful copying or downloading expressly prohibited.
introduction
cast
padaWan training
WalkthroughPrologueCount Dookugeneral grievousePilogueHub areas
battlesHiP resolute
UnlOckinG the Resolute
AreA 1: BridGe
AreA 2: reActOr chAmBer
AreA 3: BriG
AreA 4: SUPerkit BAy
AreA 5: tUrBO lASer BAy
AreA 6: medicAl BAy
AreA 7: minikit BAy
AreA 8: hAnGAr OverlOOk
AreA 9: hAnGAr
AreA 10: GrOUnd ASSAUlt StAGinG AreA
tHe invisible hand
seParatist Missions
secrets and extras
checklists
nintendo ds
contents
hoW to use this eguideDownload from www.chipper.pl

Wa
lk
th
ro
ug
h —
hu
b a
rea
s
Prima Official Game Guide
www.primagames.com
Cost: 500,000skills needed: Force manipulation; grapple
gun; rapid fireeffect: Draws in nearby studs for easier
collecting
Grapple up to Red Power Brick 2 awith a rapid-fire character such as Lieutenant Thire, then use rapid-fire attacks to overheat and destroy the gold turbine on the wall. After the turbine spins and falls, open fire again to destroy the exposed core on the wall.
Go right and stand on a platform’s right button to extend the platform. Destroy another gold turbine and core on the background wall with rapid-fire attacks.
Grapple down to the ground floor and spy a third gold turbine to the right. Blast this with rapid-fire attacks as well, then destroy the exposed core. Find and destroy a fourth gold turbine and core to the left of the bridge elevator to make a red power brick appear nearby!
TIP
The reactor chamber hides a precious purple stud—Force-move the foreground power plug into the blue socket to uncover an updraft, then float up to claim the prize!
TIPWhen hunting for red power bricks in the reactor chamber, return to the ship’s bridge and use the command console to change your two active characters to those with the skills you need.
Cost: 10,000,000skills needed: Force manipulation; grapple guneffect: Multiplies the value of studs you collect
Use the Force to lift the power plug that dangles near the elevator to the bridge. Force-move the plug over to the nearby purple socket to extend a hook point high above.
Grapple the hook point and climb up to a high walkway. Check to the left to discover a shy power brick that’s trying to hide!
reD Power briCk 2: sCore x6
reD Power briCk 3: stuD Magnet
185Protected by copyright. Unauthorized or unlawful copying or downloading expressly prohibited.
introduction
cast
padaWan training
WalkthroughPrologueCount Dookugeneral grievousePilogueHub areas
battlesHiP resolute
UnlOckinG the Resolute
AreA 1: BridGe
AreA 2: reActOr chAmBer
AreA 3: BriG
AreA 4: SUPerkit BAy
AreA 5: tUrBO lASer BAy
AreA 6: medicAl BAy
AreA 7: minikit BAy
AreA 8: hAnGAr OverlOOk
AreA 9: hAnGAr
AreA 10: GrOUnd ASSAUlt StAGinG AreA
tHe invisible hand
seParatist Missions
secrets and extras
checklists
nintendo ds
contents
hoW to use this eguideDownload from www.chipper.pl

Wa
lk
th
ro
ug
h —
hu
b a
rea
s
Prima Official Game Guide
www.primagames.com
Bring any Sith character (such as Count Dooku) and any enemy Droid (such as HELIOS-3D) down to the brig—use the command console on the bridge to change your character. Use the Dark Force to move a plug into a socket, then use your enemy Droid to activate one of the panels and open a cell.
To open the second cell from the right, you must first beat the Republic Assault mission at Naboo (see the “Secrets and Extras” chapter for details). Then you’ll be able to use the Dark Force to spin the device on the wall near the cell. Spin the device quickly to light up all four of its lights and bring the nearby enemy Droid control panel online. Then quickly activate the panel before the device’s lights go out.
Cost: 40,000,000skills needed: Explosive attacks; charge up;
Dark Force manipulationeffect: Multiplies the value of studs you collect
Destroy the boxes next to the silver object near the elevator to the bridge, then build the remaining bits to construct a panel. Then blast the silver object with an explosive attack from a character such as Jek, and build the resulting pieces to bring the panel online.
Activate the power panel with a character such as the MagnaGuard to make a small cage rise nearby. Use a Sith character’s Dark Force ability to shatter the cage and expose a spendy red power brick!
reD Power briCk 4: sCore x10
area 3: brig
No special access is required to reach the ship’s brig—it’s located just off the reactor chamber to the right. Several Separatist character skills are required to open the brig’s cells, where the most notorious Separatist pawns, such as Poggle the Lesser, are being held.
NOTESeparatist characters can be acquired by flying a starship over to the Invisible Hand—the Separatists’ battleship and hub level. Ten gold bricks are needed to access the Resolute’s hangar and fly to the Invisible Hand—read on for details!
TIPTake aim and blast the high blue plates on the brig’s background wall to obtain some hidden studs!
Return to the bridge and trade your enemy Droid for Robonino, but keep Count Dooku. Use Robonino to activate the remaining panels in the brig—this should allow you to open every cell except the one on the far right, which contains the brig’s red power brick. See the sidebar for details!
186Protected by copyright. Unauthorized or unlawful copying or downloading expressly prohibited.
introduction
cast
padaWan training
WalkthroughPrologueCount Dookugeneral grievousePilogueHub areas
battlesHiP resolute
UnlOckinG the Resolute
AreA 1: BridGe
AreA 2: reActOr chAmBer
AreA 3: BriG
AreA 4: SUPerkit BAy
AreA 5: tUrBO lASer BAy
AreA 6: medicAl BAy
AreA 7: minikit BAy
AreA 8: hAnGAr OverlOOk
AreA 9: hAnGAr
AreA 10: GrOUnd ASSAUlt StAGinG AreA
tHe invisible hand
seParatist Missions
secrets and extras
checklists
nintendo ds
contents
hoW to use this eguideDownload from www.chipper.pl

Wa
lk
th
ro
ug
h —
hu
b a
rea
s
Prima Official Game Guide
www.primagames.com
Pass through the brig to reach the superkit bay, which is also accessible after collecting
just three gold bricks. Here, a super-secret ship can be built after you’ve toiled long and hard enough to obtain all 130 gold bricks in the game (see the previous “Unlocking the Resolute” section to learn how gold bricks can be acquired). Use the superkit bay’s left elevator to proceed to the Resolute’s turbo laser bay.
NOTE
Cost: 100,000skills needed: Charge up; Dark Force manipu-
lation; enemy Droid; bounty huntereffect: Causes enemies to give off studs when
defeated
Open every cell in the brig except the one on the far right. Enter each cell and perform a Force slam attack by jumping up and then pressing the Attack button with any Jedi or Sith
reD Power briCk 5: CHaraCter stuDs
With every cell’s valve turned, the far-right power panel comes online. Activate this with Robonino to expose a bounty hunter control panel, then activate this with Robonino as well to at last open the final cell. The brig’s lone power brick awaits you inside!
character. This shatters the plate on the background wall of each cell and exposes a valve—spin each valve with the Force to reconnect the flow of green energy through the piping.
Use the foreground panels to summon a variety of fun vehicles, such as ice cream trucks and UFOs. There’s no real reason to do this except for the pure silliness of it all!
6
CD
area 4: suPerkit bay
187Protected by copyright. Unauthorized or unlawful copying or downloading expressly prohibited.
introduction
cast
padaWan training
WalkthroughPrologueCount Dookugeneral grievousePilogueHub areas
battlesHiP resolute
UnlOckinG the Resolute
AreA 1: BridGe
AreA 2: reActOr chAmBer
AreA 3: BriG
AreA 4: SUPerkit BAy
AreA 5: tUrBO lASer BAy
AreA 6: medicAl BAy
AreA 7: minikit BAy
AreA 8: hAnGAr OverlOOk
AreA 9: hAnGAr
AreA 10: GrOUnd ASSAUlt StAGinG AreA
tHe invisible hand
seParatist Missions
secrets and extras
checklists
nintendo ds
contents
hoW to use this eguideDownload from www.chipper.pl

Wa
lk
th
ro
ug
h —
hu
b a
rea
s
Prima Official Game Guide
www.primagames.com
area 5: turbo laser bay
Cost: 3,000,000skills needed: Force Manipulationeffect: Multiplies the value of studs you collectUse the Force to move the bay’s three red dumpsters over to the nearby compactor. Place each dumpster on the machine’s purple plate to make the mechanical arm give them a good shake. A red power brick emerges from the base of the machine after it upends the final dumpster!
reD Power briCk 6: sCore x4
Take the superkit bay’s left elevator to reach the ship’s turbo laser bay. There’s plenty to smash here for studs, and you can even man the gunner’s seats to blow away some Separatist fighters that buzz about your battleship!
Cost: 500,000skills needed: None.effect: Lets you build objects from bits very
quicklyTo obtain this pricey power brick, simply attack the turbo laser bay’s punching bag five times. Numbers light up on the board behind the bag as you whack it—reach the number five to make a red power brick appear!
reD Power briCk 7: Fast builD
7
B
188Protected by copyright. Unauthorized or unlawful copying or downloading expressly prohibited.
introduction
cast
padaWan training
WalkthroughPrologueCount Dookugeneral grievousePilogueHub areas
battlesHiP resolute
UnlOckinG the Resolute
AreA 1: BridGe
AreA 2: reActOr chAmBer
AreA 3: BriG
AreA 4: SUPerkit BAy
AreA 5: tUrBO lASer BAy
AreA 6: medicAl BAy
AreA 7: minikit BAy
AreA 8: hAnGAr OverlOOk
AreA 9: hAnGAr
AreA 10: GrOUnd ASSAUlt StAGinG AreA
tHe invisible hand
seParatist Missions
secrets and extras
checklists
nintendo ds
contents
hoW to use this eguideDownload from www.chipper.pl

Wa
lk
th
ro
ug
h —
hu
b a
rea
s
Prima Official Game Guide
www.primagames.com
8
E
F
Once you’ve gathered six gold bricks, you’re allowed access to the Resolute’s medical
bay. Simply build the jiggling pieces near the reactor chamber’s left door to repair it and open the door.
The medical bay is a neat area—here you can customize and create your own characters! Simply
use the customization panels in the background wall to formulate your own incredible action heroes. More customization options will become available to you as you unlock more characters, so stop by often!
area 6: MeDiCal bay
reD Power briCk 8: glow in tHe Dark
Cost: 25,000skills needed: Noneeffect: Lights up the area around the playerBash the medical beds in the medical bay’s background wall to make them rise. An affordable red power brick hides beneath one of the beds!
area 7: Minikit bay
Exit the medical bay via the left elevator to reach the minikit bay. All of the minikits you collect from the game’s 22 missions are stored here for safekeeping!
9
10
F
189Protected by copyright. Unauthorized or unlawful copying or downloading expressly prohibited.
introduction
cast
padaWan training
WalkthroughPrologueCount Dookugeneral grievousePilogueHub areas
battlesHiP resolute
UnlOckinG the Resolute
AreA 1: BridGe
AreA 2: reActOr chAmBer
AreA 3: BriG
AreA 4: SUPerkit BAy
AreA 5: tUrBO lASer BAy
AreA 6: medicAl BAy
AreA 7: minikit BAy
AreA 8: hAnGAr OverlOOk
AreA 9: hAnGAr
AreA 10: GrOUnd ASSAUlt StAGinG AreA
tHe invisible hand
seParatist Missions
secrets and extras
checklists
nintendo ds
contents
hoW to use this eguideDownload from www.chipper.pl

Wa
lk
th
ro
ug
h —
hu
b a
rea
s
Prima Official Game Guide
www.primagames.com
TIP
Bounce atop the blue machinery near the minikit bay’s astromech Droid control panel—you can reach the tops of the minikit capsules! Leap along these to collect some valuable studs.
Each minikit is actually a part of a secret character—once you’ve acquired all ten minikits from a
level, visit the minikit bay and see how many studs it’ll cost you to purchase the character you’ve unlocked!
NOTEPeruse this guide’s “Cast” chapter to learn about every character, including their skills and abilities, how to unlock them, and how much they cost to purchase.
Cost: 40,000,000skills needed: Super jump; grapple gun;
explosive attackseffect: Speeders become invulnerable during
ground assault missions, and their increased firepower can destroy silver and gold structures
Use Jar Jar’s superior jumping ability to reach the tops of the minikit capsules, then leap to the high background balcony.
reD Power briCk 9: suPer sPeeDer
Run to the balcony’s right end and destroy the boxes to obtain some bits. Build these into a hook point so that a character with explosive attacks and a grapple gun, such as Waxer, can grapple up to the balcony.
Run left and use an explosive attack to destroy the silver object on the balcony’s left side to expose a red power brick. Score!
190Protected by copyright. Unauthorized or unlawful copying or downloading expressly prohibited.
introduction
cast
padaWan training
WalkthroughPrologueCount Dookugeneral grievousePilogueHub areas
battlesHiP resolute
UnlOckinG the Resolute
AreA 1: BridGe
AreA 2: reActOr chAmBer
AreA 3: BriG
AreA 4: SUPerkit BAy
AreA 5: tUrBO lASer BAy
AreA 6: medicAl BAy
AreA 7: minikit BAy
AreA 8: hAnGAr OverlOOk
AreA 9: hAnGAr
AreA 10: GrOUnd ASSAUlt StAGinG AreA
tHe invisible hand
seParatist Missions
secrets and extras
checklists
nintendo ds
contents
hoW to use this eguideDownload from www.chipper.pl

Wa
lk
th
ro
ug
h —
hu
b a
rea
s
Prima Official Game Guide
www.primagames.com
Cost: 750,000skills needed: Astromech Droideffect: Helps you track down minikits during
missionsSimply use an astromech Droid, such as R2-D2, to activate the astromech Droid control panel in the minikit bay’s left foreground. A red power brick pops out of the nearby device!
reD Power briCk 10: Minikit DeteCtor
area 8: Hangar overlook
Things really begin to open up for you once you’ve amassed ten gold bricks. Now you can build the jiggling bits to repair the reactor chamber’s background door and access the hangar overlook! You can’t access the elevator on the right without fifteen gold bricks, so use the one on the left instead to reach the Resolute’s hangar.
Cost: 300,000skills needed: Sniper shoteffect: Allows Jedi and Sith characters to cut holes in
walls much faster than normalUse any sniper character, such as Aurra Sing, to take aim and blast the three green targets in the hangar overlook’s background. The targets must drop down before you can target them. Blast all three to make a power brick appear on the walkway!
reD Power briCk 11: suPer saber Cut
11
G
IH
12
H
area 9: Hangar
191Protected by copyright. Unauthorized or unlawful copying or downloading expressly prohibited.
introduction
cast
padaWan training
WalkthroughPrologueCount Dookugeneral grievousePilogueHub areas
battlesHiP resolute
UnlOckinG the Resolute
AreA 1: BridGe
AreA 2: reActOr chAmBer
AreA 3: BriG
AreA 4: SUPerkit BAy
AreA 5: tUrBO lASer BAy
AreA 6: medicAl BAy
AreA 7: minikit BAy
AreA 8: hAnGAr OverlOOk
AreA 9: hAnGAr
AreA 10: GrOUnd ASSAUlt StAGinG AreA
tHe invisible hand
seParatist Missions
secrets and extras
checklists
nintendo ds
contents
hoW to use this eguideDownload from www.chipper.pl
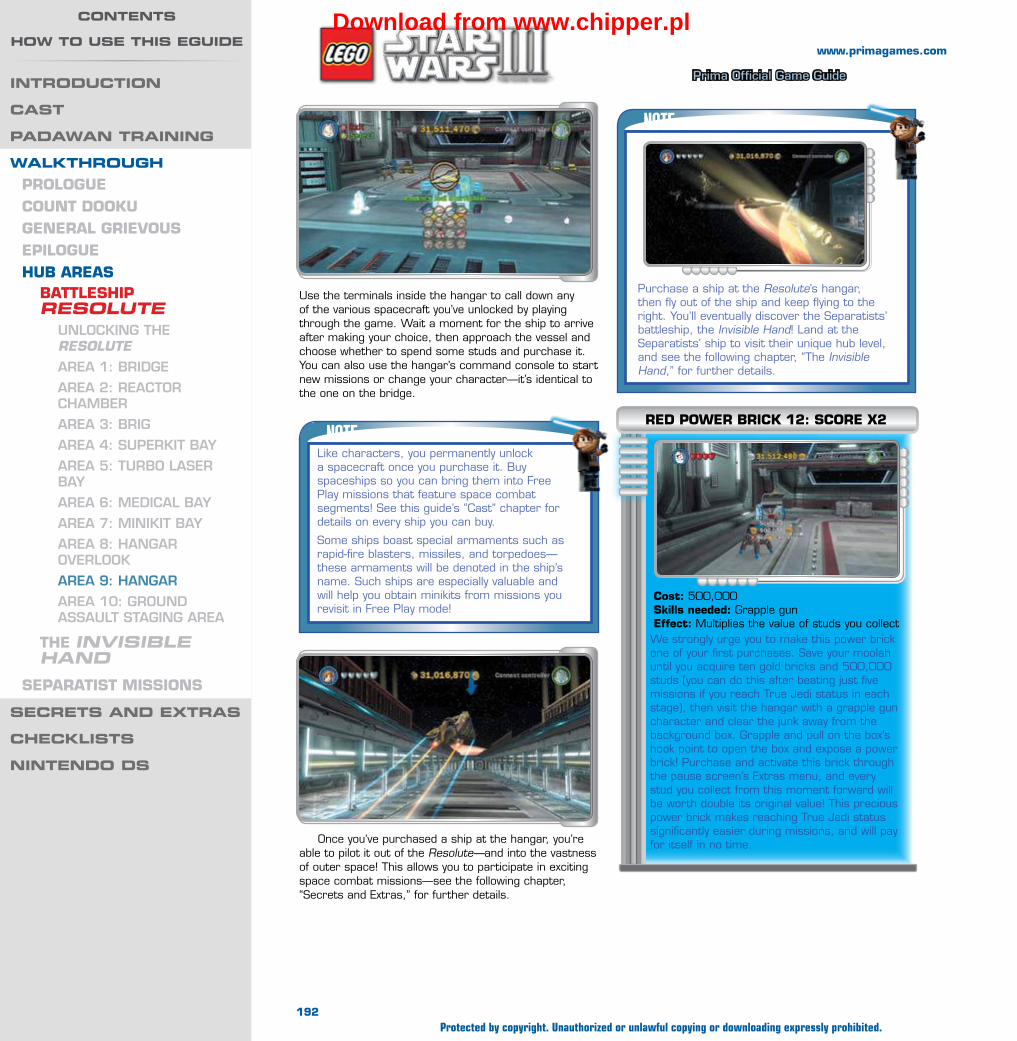
Wa
lk
th
ro
ug
h —
hu
b a
rea
s
Prima Official Game Guide
www.primagames.com
NOTE
Purchase a ship at the Resolute’s hangar, then fly out of the ship and keep flying to the right. You’ll eventually discover the Separatists’ battleship, the Invisible Hand! Land at the Separatists’ ship to visit their unique hub level, and see the following chapter, “The Invisible Hand,” for further details.
NOTELike characters, you permanently unlock a spacecraft once you purchase it. Buy spaceships so you can bring them into Free Play missions that feature space combat segments! See this guide’s “Cast” chapter for details on every ship you can buy.
Some ships boast special armaments such as rapid-fire blasters, missiles, and torpedoes—these armaments will be denoted in the ship’s name. Such ships are especially valuable and will help you obtain minikits from missions you revisit in Free Play mode!
Once you’ve purchased a ship at the hangar, you’re able to pilot it out of the Resolute—and into the vastness of outer space! This allows you to participate in exciting space combat missions—see the following chapter, “Secrets and Extras,” for further details.
Cost: 500,000skills needed: Grapple guneffect: Multiplies the value of studs you collectWe strongly urge you to make this power brick one of your first purchases. Save your moolah until you acquire ten gold bricks and 500,000 studs (you can do this after beating just five missions if you reach True Jedi status in each stage), then visit the hangar with a grapple gun character and clear the junk away from the background box. Grapple and pull on the box’s hook point to open the box and expose a power brick! Purchase and activate this brick through the pause screen’s Extras menu, and every stud you collect from this moment forward will be worth double its original value! This precious power brick makes reaching True Jedi status significantly easier during missions, and will pay for itself in no time.
reD Power briCk 12: sCore x2
Use the terminals inside the hangar to call down any of the various spacecraft you’ve unlocked by playing through the game. Wait a moment for the ship to arrive after making your choice, then approach the vessel and choose whether to spend some studs and purchase it. You can also use the hangar’s command console to start new missions or change your character—it’s identical to the one on the bridge.
192Protected by copyright. Unauthorized or unlawful copying or downloading expressly prohibited.
introduction
cast
padaWan training
WalkthroughPrologueCount Dookugeneral grievousePilogueHub areas
battlesHiP resolute
UnlOckinG the Resolute
AreA 1: BridGe
AreA 2: reActOr chAmBer
AreA 3: BriG
AreA 4: SUPerkit BAy
AreA 5: tUrBO lASer BAy
AreA 6: medicAl BAy
AreA 7: minikit BAy
AreA 8: hAnGAr OverlOOk
AreA 9: hAnGAr
AreA 10: GrOUnd ASSAUlt StAGinG AreA
tHe invisible hand
seParatist Missions
secrets and extras
checklists
nintendo ds
contents
hoW to use this eguideDownload from www.chipper.pl

Wa
lk
th
ro
ug
h —
hu
b a
rea
s
Prima Official Game Guide
www.primagames.com
Acquire fifteen gold bricks and repair the hangar overlook’s right elevator to reach the Resolute’s final site, the ground assault staging area. Here you may use panels to call down ground assault vehicles, such as the rugged AT-AP walker!
Call down an AT-AP walker and spend a few studs to purchase the vehicle. Pilot the AT-AP
and use it to destroy the silver force field emitter in the background. This exposes a small control room with a command console similar to the ones found in the hangar and on the bridge.
area 10: grounD assault staging area
Access the staging area’s command console to unlock a whole new game mode: Republic Assault! Now you can participate in special grand-scale battles at many of the planets you’ve visited! Complete Republic Assault missions to earn gold bricks that help you access new hub areas. That’s right—you might be finished with the Resolute, but there’s another hub level to explore: the Separatists’ battleship!
I
193Protected by copyright. Unauthorized or unlawful copying or downloading expressly prohibited.
introduction
cast
padaWan training
WalkthroughPrologueCount Dookugeneral grievousePilogueHub areas
battlesHiP resolute
UnlOckinG the Resolute
AreA 1: BridGe
AreA 2: reActOr chAmBer
AreA 3: BriG
AreA 4: SUPerkit BAy
AreA 5: tUrBO lASer BAy
AreA 6: medicAl BAy
AreA 7: minikit BAy
AreA 8: hAnGAr OverlOOk
AreA 9: hAnGAr
AreA 10: GrOUnd ASSAUlt StAGinG AreA
tHe invisible hand
seParatist Missions
secrets and extras
checklists
nintendo ds
contents
hoW to use this eguideDownload from www.chipper.pl

Wa
lk
th
ro
ug
h —
hu
b a
rea
s
Prima Official Game Guide
www.primagames.com
hub areas
the invisible hand
Red Power BricksIcon Name Location Price How to Get
1 Dual Wield Hangar 250,000 Force-lift the left bridge all the way up, then jump to the hovering brick.
2Perfect Deflect Hangar 100,000
Force-lift the right bridge, then use the panel to obtain an ice cream truck. Park on the orange pad across the right bridge, then destroy the silver trophy.
3Regenerate Hearts Ziro’s room 400,000 Take aim and knock down the four large objects that hang from the ceiling,
then destroy them.
4 Dark Side Bridge 150,000 Use the Dark Force to bring down the red glowing panel above the command console.
5 Invincibility Ground assault staging area 1,000,000 Activate the clone trooper control panel to the right.
6 Score x8 Wizard’s room 20,000,000 Destroy the silver table in the center of the room.
“BelIeF Is not a matteR oF choIce, But
oF convIctIon.”The Invisible Hand is a mighty Separatist battleship, and serves as the “bad guy” hub level. The Invisible Hand is always nearby, locked in constant conflict with the Republic’s stalwart Resolute. Like the Resolute, the Invisible Hand holds many secrets—so let’s explore them all!
Like on the Resolute, special red power bricks (also called simply “red bricks” or “power bricks”) are stashed around the Invisible Hand. Once found, a red power brick can be purchased for a tidy sum of studs—each brick has its own attached price tag. Often, several character skills are required to uncover a power brick—read the following sections to learn how to obtain every power brick from each area of the Separatists’ hub!
reD Power briCks
TIPWe strongly recommend that you save your studs and make the Score x2 power brick (500,000 studs) from the Resolute your very first purchase. Once activated, this power brick doubles the value of every stud you collect, which makes earning True Jedi status from missions far easier! You need at least 10 gold bricks to access the area of the Resolute that contains this special power brick (the hangar)—see the following sidebar for details.
194Protected by copyright. Unauthorized or unlawful copying or downloading expressly prohibited.
introduction
cast
padaWan training
WalkthroughPrologueCount Dookugeneral grievousePilogueHub areas
battlesHiP resolutetHe invisible hand
UnlOckinG the InvIsIBle handAreA 1: hAnGAr
AreA 2: ZirO’S chAmBer
AreA 3: BridGe
AreA 4: GrOUnd ASSAUlt StAGinG AreA
AreA 5: WiZArd’S tOWer
seParatist Missions
secrets and extras
checklists
nintendo ds
contents
hoW to use this eguideDownload from www.chipper.pl
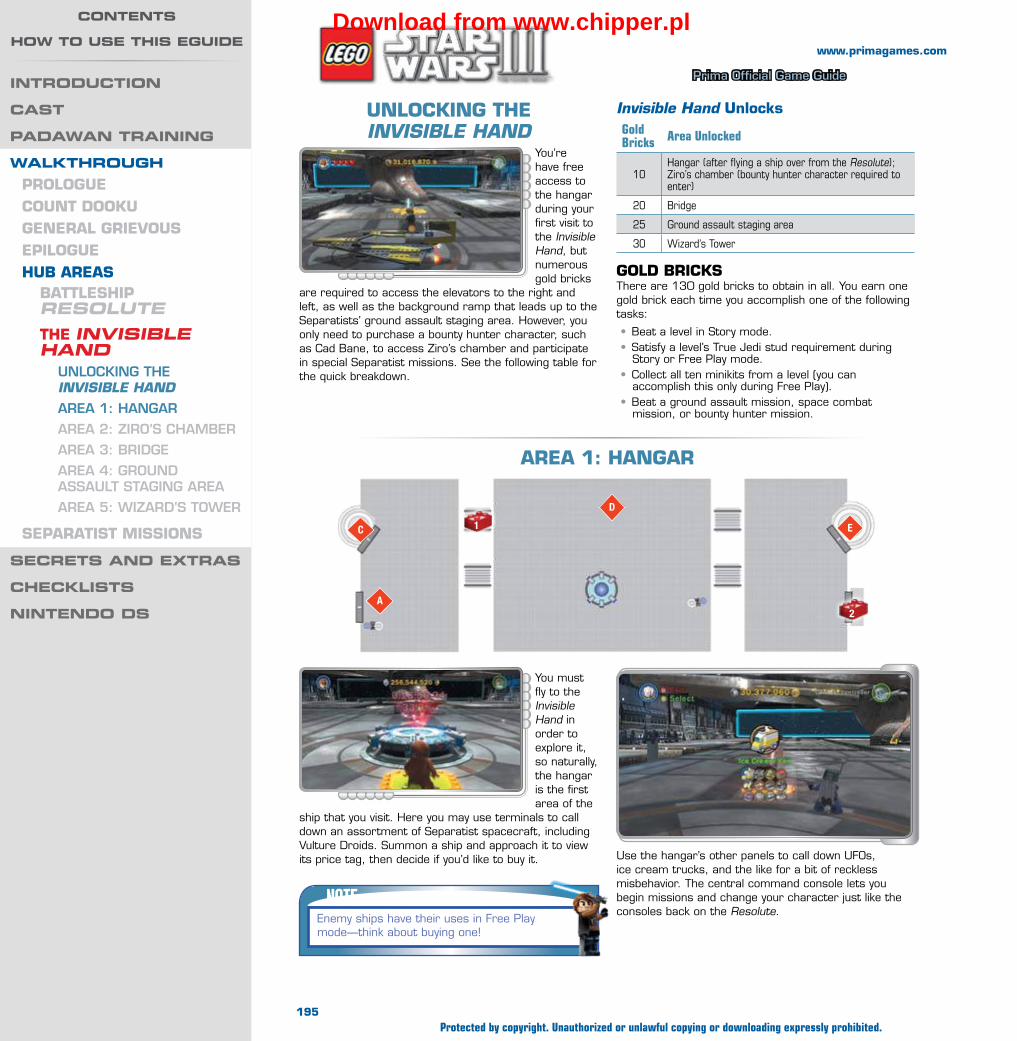
Wa
lk
th
ro
ug
h —
hu
b a
rea
s
Prima Official Game Guide
www.primagames.com
You must fly to the Invisible Hand in order to explore it, so naturally, the hangar is the first area of the
ship that you visit. Here you may use terminals to call down an assortment of Separatist spacecraft, including Vulture Droids. Summon a ship and approach it to view its price tag, then decide if you’d like to buy it.
unloCking tHe InvIsIBle hand
You’re have free access to the hangar during your first visit to the Invisible Hand, but numerous gold bricks
are required to access the elevators to the right and left, as well as the background ramp that leads up to the Separatists’ ground assault staging area. However, you only need to purchase a bounty hunter character, such as Cad Bane, to access Ziro’s chamber and participate in special Separatist missions. See the following table for the quick breakdown.
Invisible Hand UnlocksGold Bricks Area Unlocked
10Hangar (after flying a ship over from the Resolute); Ziro’s chamber (bounty hunter character required to enter)
20 Bridge
25 Ground assault staging area
30 Wizard’s Tower
golD briCksThere are 130 gold bricks to obtain in all. You earn one gold brick each time you accomplish one of the following tasks:
• Beat a level in Story mode.• Satisfy a level’s True Jedi stud requirement during
Story or Free Play mode.• Collect all ten minikits from a level (you can
accomplish this only during Free Play).• Beat a ground assault mission, space combat
mission, or bounty hunter mission.
area 1: Hangar
NOTEEnemy ships have their uses in Free Play mode—think about buying one!
Use the hangar’s other panels to call down UFOs, ice cream trucks, and the like for a bit of reckless misbehavior. The central command console lets you begin missions and change your character just like the consoles back on the Resolute.
start
1
2A
C
D
E
195Protected by copyright. Unauthorized or unlawful copying or downloading expressly prohibited.
introduction
cast
padaWan training
WalkthroughPrologueCount Dookugeneral grievousePilogueHub areas
battlesHiP resolutetHe invisible hand
UnlOckinG the InvIsIBle handAreA 1: hAnGAr
AreA 2: ZirO’S chAmBer
AreA 3: BridGe
AreA 4: GrOUnd ASSAUlt StAGinG AreA
AreA 5: WiZArd’S tOWer
seParatist Missions
secrets and extras
checklists
nintendo ds
contents
hoW to use this eguideDownload from www.chipper.pl

Wa
lk
th
ro
ug
h —
hu
b a
rea
s
Prima Official Game Guide
www.primagames.com
area 2: Ziro’s CHaMber
Switch to a Jedi and use the Force to raise the purple bridges to the right and left of the hangar. This lets you explore a bit more of the area. Lifting the left purple bridge to the right height can also help you reach a red power brick (see the sidebars).
If you’re packing some serious studs, consider buying a bounty hunter character
that strolls about the hangar, such as Cad Bane. The cost may be steep, but once you own a bounty hunter, you can activate the panel across the hangar’s left bridge and enter a special Separatist hangout where secret missions can be found!
Cost: 250,000skills needed: Force manipulationeffect: Grants Jedi and Sith characters a
second Lightsaber, thereby doubling their attack power
Force-lift the purple bridge on the hangar’s left side as high as it will go. Leap onto the bridge, then jump up and quickly press the Action button to view and purchase the red power brick that hovers above. It’s a good one!
reD Power briCk 1: Dual wielD
Cost: 100,000skills needed: Force manipulation; explosive
attackseffect: Makes Jedi and Sith characters auto-
deflect incoming blaster fireSimply call down an ice cream truck using one of the panels inside the hangar, then raise the right bridge with the Force and drive across.
Park your ice cream truck on the orange pad that you discover on the far right side of the hangar. This opens a shutter and exposes a giant silver trophy—blow that sucker sky high with an explosive attack to discover a hidden red power brick!
reD Power briCk 2: PerFeCt DeFleCt
Purchase a bounty hunter character (such as Cad Bane) at the Invisible Hand’s hangar, then use the character to activate the bounty hunter control panel on the far-left side and access the secret chamber of Ziro the Hutt. Use the command console here to undertake a special Separatist mission: Hostage Crisis!
196Protected by copyright. Unauthorized or unlawful copying or downloading expressly prohibited.
introduction
cast
padaWan training
WalkthroughPrologueCount Dookugeneral grievousePilogueHub areas
battlesHiP resolutetHe invisible hand
UnlOckinG the InvIsIBle handAreA 1: hAnGAr
AreA 2: ZirO’S chAmBer
AreA 3: BridGe
AreA 4: GrOUnd ASSAUlt StAGinG AreA
AreA 5: WiZArd’S tOWer
seParatist Missions
secrets and extras
checklists
nintendo ds
contents
hoW to use this eguideDownload from www.chipper.pl

Wa
lk
th
ro
ug
h —
hu
b a
rea
s
Prima Official Game Guide
www.primagames.com
NOTE
Take the left elevator to reach the Invisible Hand’s turbo laser bay. There’s little to do in this small area except destroy objects for studs or man the turrets and gun down some Republic fighters. Good times!
There are two Separatist missions to play—Hostage Crisis and Castle of Doom—and each puts you in control of a team of bad guys. (Castle of Doom is available in the Wizard’s Tower area—read on for details). Play both Separatist missions to unlock many valuable Free Play characters, such as the MagnaGuard, Count Dooku, enemy Droids, snipers, bounty hunters, and more. Beating both Separatist missions also allows you to participate in Ziro’s special bounty hunter challenges—see the “Secrets and Extras” chapter for details!
NOTECheck the following chapters of this guide for complete, step-by-step walkthroughs for both secret Separatist missions.
Cost: 400,000skills needed: Explosive attackseffect: Lost hearts are slowly restored over
timeTake aim and blast the four large canisters that hang down from the ceiling in Ziro’s chamber. Destroy all four canisters after they crash to the floor. A secret power brick will appear near Ziro!
reD Power briCk 3: regenerate Hearts
3
B
A
B
197Protected by copyright. Unauthorized or unlawful copying or downloading expressly prohibited.
introduction
cast
padaWan training
WalkthroughPrologueCount Dookugeneral grievousePilogueHub areas
battlesHiP resolutetHe invisible hand
UnlOckinG the InvIsIBle handAreA 1: hAnGAr
AreA 2: ZirO’S chAmBer
AreA 3: BridGe
AreA 4: GrOUnd ASSAUlt StAGinG AreA
AreA 5: WiZArd’S tOWer
seParatist Missions
secrets and extras
checklists
nintendo ds
contents
hoW to use this eguideDownload from www.chipper.pl

Wa
lk
th
ro
ug
h —
hu
b a
rea
s
Prima Official Game Guide
www.primagames.com
With 25 gold bricks tucked away in your collection, you’re able to build the loose pieces at the hangar’s background and access the Separatists’ ground assault staging area. Call down an AAT tank here and use it to obliterate the silver barricade emitter and access a special command console.
area 3: briDge
Accumulate 20 gold bricks and Force-lift the hangar’s left bridge. Build some jiggling pieces to repair an elevator and use it to reach the bridge of the Invisible Hand.
The bridge’s command console grants access to missions just like the ones in the Invisible Hand’s hangar, but no new Separatist missions are available here. See the sidebar to learn about the red power brick that’s hidden on the bridge.
Cost: 150,000skills needed: Dark Force manipulationeffect: Enables Jedi to manipulate Dark Force
objects like a SithUse a Sith character such as Count Dooku to spin the red glowing plate above the bridge’s command console. A red power brick falls from the plate, landing on the ground within easy reach!
reD Power briCk 4: Dark siDe
area 4: grounD assault staging area
4
C
5
D
198Protected by copyright. Unauthorized or unlawful copying or downloading expressly prohibited.
introduction
cast
padaWan training
WalkthroughPrologueCount Dookugeneral grievousePilogueHub areas
battlesHiP resolutetHe invisible hand
UnlOckinG the InvIsIBle handAreA 1: hAnGAr
AreA 2: ZirO’S chAmBer
AreA 3: BridGe
AreA 4: GrOUnd ASSAUlt StAGinG AreA
AreA 5: WiZArd’S tOWer
seParatist Missions
secrets and extras
checklists
nintendo ds
contents
hoW to use this eguideDownload from www.chipper.pl
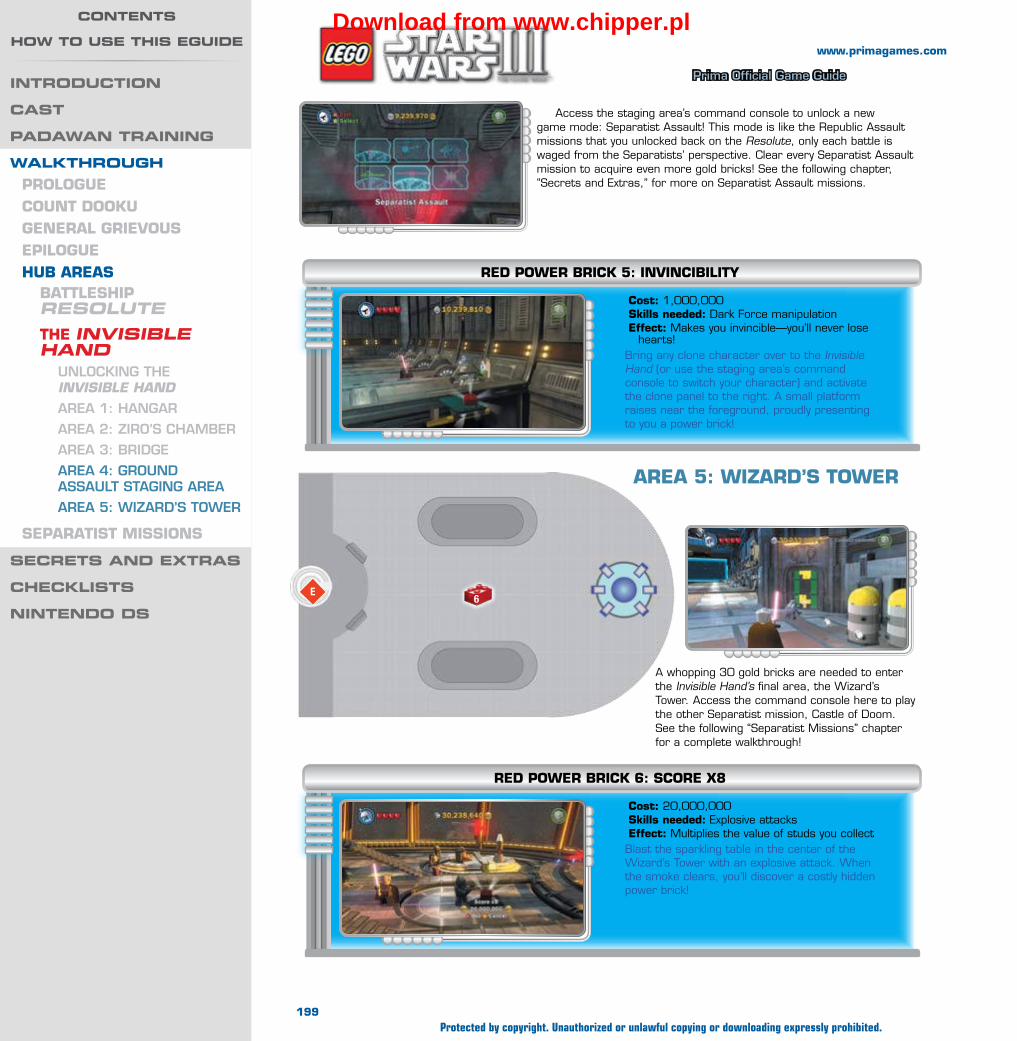
Wa
lk
th
ro
ug
h —
hu
b a
rea
s
Prima Official Game Guide
www.primagames.com
6E
Access the staging area’s command console to unlock a new game mode: Separatist Assault! This mode is like the Republic Assault missions that you unlocked back on the Resolute, only each battle is waged from the Separatists’ perspective. Clear every Separatist Assault mission to acquire even more gold bricks! See the following chapter, “Secrets and Extras,” for more on Separatist Assault missions.
Cost: 1,000,000skills needed: Dark Force manipulationeffect: Makes you invincible—you’ll never lose
hearts!Bring any clone character over to the Invisible Hand (or use the staging area’s command console to switch your character) and activate the clone panel to the right. A small platform raises near the foreground, proudly presenting to you a power brick!
reD Power briCk 5: invinCibility
area 5: wiZarD’s tower
A whopping 30 gold bricks are needed to enter the Invisible Hand’s final area, the Wizard’s Tower. Access the command console here to play the other Separatist mission, Castle of Doom. See the following “Separatist Missions” chapter for a complete walkthrough!
Cost: 20,000,000skills needed: Explosive attackseffect: Multiplies the value of studs you collectBlast the sparkling table in the center of the Wizard’s Tower with an explosive attack. When the smoke clears, you’ll discover a costly hidden power brick!
reD Power briCk 6: sCore x8
199Protected by copyright. Unauthorized or unlawful copying or downloading expressly prohibited.
introduction
cast
padaWan training
WalkthroughPrologueCount Dookugeneral grievousePilogueHub areas
battlesHiP resolutetHe invisible hand
UnlOckinG the InvIsIBle handAreA 1: hAnGAr
AreA 2: ZirO’S chAmBer
AreA 3: BridGe
AreA 4: GrOUnd ASSAUlt StAGinG AreA
AreA 5: WiZArd’S tOWer
seParatist Missions
secrets and extras
checklists
nintendo ds
contents
hoW to use this eguideDownload from www.chipper.pl

Wa
lk
th
ro
ug
h —
sepa
ra
tis
t m
iss
ion
s
Prima Official Game Guide
www.primagames.com
separatist missions
Chapter i: hostage Crisis
MinikitsNo. Icon(s) Mode Notes
1 1 Free Play Use Jar Jar to reach the minikit that hovers above the landing site’s left cruiser.
2 1 to 2 Free Play Defeat the five clone troopers that are scrubbing the ships.
3 3 Free PlayRepair the landing site’s damaged right cruiser by Force-moving the three nearby parts onto the ship.
4 4 Free PlayBuild and activate the landing site’s astromech Droid control panel, then use a Hailfire Droid to destroy the central fighter.
5 1 to 5 Story Destroy five mouse Droids in the corridor beyond the landing site.
6 1 to 5 Free Play Use the Force to reveal five ice cream machines in the corridor.
7 7 Free Play Use the Dark Force to expose a crawl space hatch in the corridor, then head through.
8 8 Free Play Use the Dark Force to activate the video game inside the second clone panel room.
9 9 Free PlayUse the Jedi logo to cut a hole in the wall and discover a lever, then use an astromech Droid to hover to the foreground minikit.
10 10 Free Play
Destroy the gold bars at the end of the corridor and activate the astromech Droid control panel, then give the four senate guards new hairstyles.
True Jedi Stud Requirement: 72,000
Story Characters
Shahan Alama
RoboninoCad Bane
HELIOS-3DAurra Sing
Commando Droid
IG-86
“a secRet shaRed Is a tRust FoRmed.”
The disgusting gangster Ziro the Hutt has commissioned bounty hunter Cad Bane to secure his release from prison. Leading a band of deadly criminals, Bane intends to launch a brazen attack on the Senate Building on Coruscant, then trade the Senators’ freedom for that of the Hutt....
200Protected by copyright. Unauthorized or unlawful copying or downloading expressly prohibited.
introduCtion
Cast
padaWan training
WalkthroughPROLOGuECOunT DOOkuGEnERAL GRIEvOuSASAJJ vEnTRESSEPILOGuEHuB AREASSEPARATIST MISSIOnS
CHAPTER I: HOSTAGE CRISIS
Objective 1: clear the landinG Site
Objective 2: StOrm the Senate buildinG
CHAPTER II: CASTLE Of DOOM
seCrets and extras
CheCklists
nintendo ds
Contents
hoW to use this eguideDownload from www.chipper.pl

Wa
lk
th
ro
ug
h —
sepa
ra
tis
t m
iss
ion
s
Prima Official Game Guide
www.primagames.com
NOTEYou must visit the Separatists’ hub area—a battleship called the Invisible Hand—before you can play Separatist missions. This particular mission is acquired by accessing the command console in the Invisible Hand’s “Ziro’s Room” area. See the previous “Hub Areas” chapter for details!
Breaking into a senate building is no easy feat—clone guards are everywhere! Hold the Attack
button to aim through Aura Sing’s scope and pick off as many blue-armored senate guards as possible from the comfort of your transport ship.
You won’t be able to hit every guard from your starting position, so take control of the ship’s pilot—a
Droid named HELIOS-3D—and fly right and left so you can pick off the stragglers.
HELIOS-3D lands the ship after all the senate guards have been eliminated. Take control of Cad Bane and press the Action button to hurl grenades at the silver objects to either side of the background door, from which more senate guards are emerging.
A
1
2
1
3
4
start
OBJECTIvE 1: CLEAR THE LAnDInG SITE
201Protected by copyright. Unauthorized or unlawful copying or downloading expressly prohibited.
introduCtion
Cast
padaWan training
WalkthroughPROLOGuECOunT DOOkuGEnERAL GRIEvOuSASAJJ vEnTRESSEPILOGuEHuB AREASSEPARATIST MISSIOnS
CHAPTER I: HOSTAGE CRISIS
Objective 1: clear the landinG Site
Objective 2: StOrm the Senate buildinG
CHAPTER II: CASTLE Of DOOM
seCrets and extras
CheCklists
nintendo ds
Contents
hoW to use this eguideDownload from www.chipper.pl
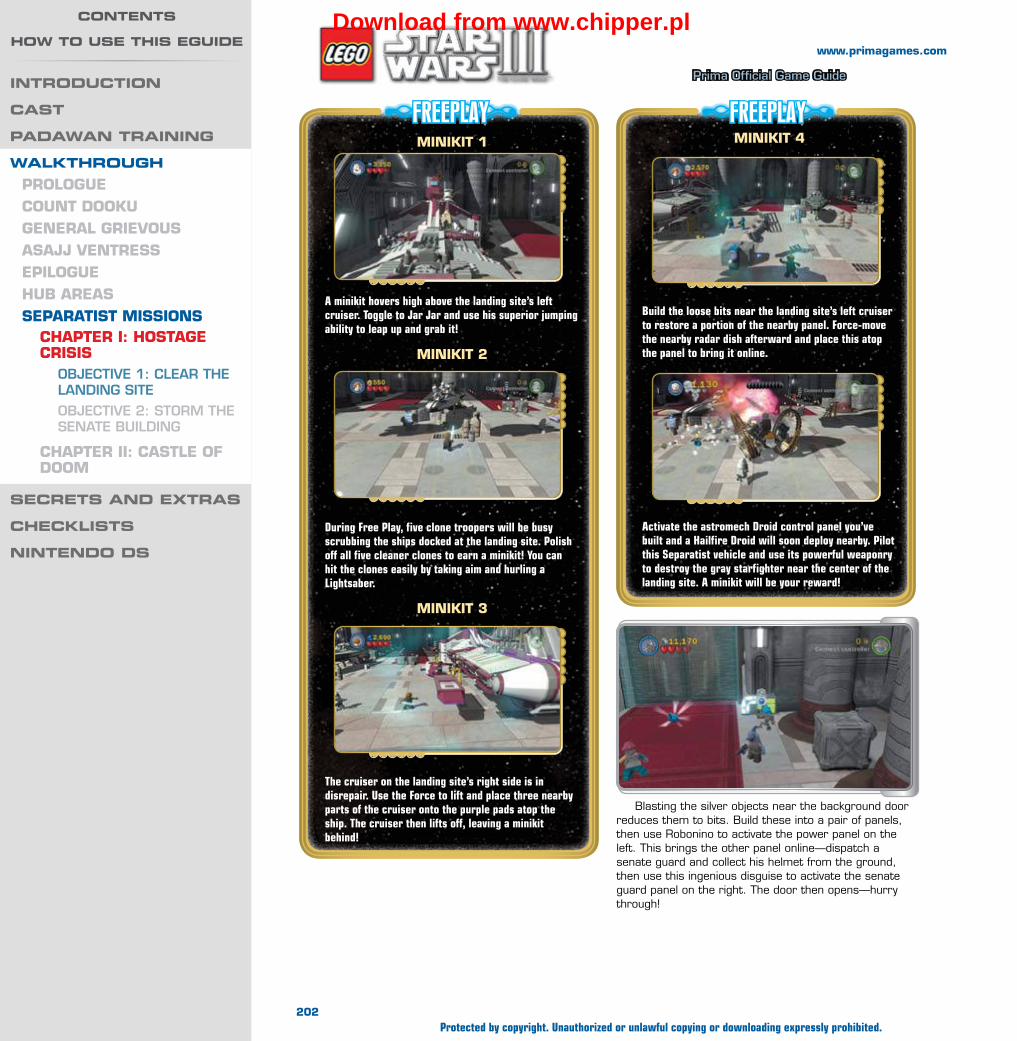
Wa
lk
th
ro
ug
h —
sepa
ra
tis
t m
iss
ion
s
Prima Official Game Guide
www.primagames.com
FREEPLAYMInIkIT 4
Build the loose bits near the landing site’s left cruiser to restore a portion of the nearby panel. Force-move the nearby radar dish afterward and place this atop the panel to bring it online.
Activate the astromech Droid control panel you’ve built and a Hailfire Droid will soon deploy nearby. Pilot this Separatist vehicle and use its powerful weaponry to destroy the gray starfighter near the center of the landing site. A minikit will be your reward!
FREEPLAYMInIkIT 1
A minikit hovers high above the landing site’s left cruiser. Toggle to Jar Jar and use his superior jumping ability to leap up and grab it!
MInIkIT 2
During Free Play, five clone troopers will be busy scrubbing the ships docked at the landing site. Polish off all five cleaner clones to earn a minikit! You can hit the clones easily by taking aim and hurling a Lightsaber.
MInIkIT 3
The cruiser on the landing site’s right side is in disrepair. Use the Force to lift and place three nearby parts of the cruiser onto the purple pads atop the ship. The cruiser then lifts off, leaving a minikit behind!
10a-005
Blasting the silver objects near the background door reduces them to bits. Build these into a pair of panels, then use Robonino to activate the power panel on the left. This brings the other panel online—dispatch a senate guard and collect his helmet from the ground, then use this ingenious disguise to activate the senate guard panel on the right. The door then opens—hurry through!
202Protected by copyright. Unauthorized or unlawful copying or downloading expressly prohibited.
introduCtion
Cast
padaWan training
WalkthroughPROLOGuECOunT DOOkuGEnERAL GRIEvOuSASAJJ vEnTRESSEPILOGuEHuB AREASSEPARATIST MISSIOnS
CHAPTER I: HOSTAGE CRISIS
Objective 1: clear the landinG Site
Objective 2: StOrm the Senate buildinG
CHAPTER II: CASTLE Of DOOM
seCrets and extras
CheCklists
nintendo ds
Contents
hoW to use this eguideDownload from www.chipper.pl

Wa
lk
th
ro
ug
h —
sepa
ra
tis
t m
iss
ion
s
Prima Official Game Guide
www.primagames.com
Sprint down the corridor beyond the landing site and eliminate all senate guards that try to stop you. Steal
another helmet if need be and use it to activate the first senate guard control panel you encounter to open the nearby door.
OBJECTIvE 2: STORM THE SEnATE BuILDInG
TIP
Don’t miss the purple stud near the foreground crates!
Five MSE-6 mouse Droids emerge from tiny wall hatches and scurry about the corridor. Seek and destroy all five of these wee Droids to receive a minikit! This is the only minikit you can obtain during Story mode from this mission. Check the map for the general locations of each little Droid.
MInIkIT 5
FREEPLAYMInIkIT 6
Use the Force to open five special wall consoles in the corridor and reveal soft-serve ice cream machines. Reveal all five of these delectable dessert stands to obtain a delightful minikit! Each ice cream machine is labeled on the map to help you find them.
7
8
9
10
1 2 3
4
5
1
2 3 4
5
A
203Protected by copyright. Unauthorized or unlawful copying or downloading expressly prohibited.
introduCtion
Cast
padaWan training
WalkthroughPROLOGuECOunT DOOkuGEnERAL GRIEvOuSASAJJ vEnTRESSEPILOGuEHuB AREASSEPARATIST MISSIOnS
CHAPTER I: HOSTAGE CRISIS
Objective 1: clear the landinG Site
Objective 2: StOrm the Senate buildinG
CHAPTER II: CASTLE Of DOOM
seCrets and extras
CheCklists
nintendo ds
Contents
hoW to use this eguideDownload from www.chipper.pl

Wa
lk
th
ro
ug
h —
sepa
ra
tis
t m
iss
ion
s
Prima Official Game Guide
www.primagames.com
The pipes glow with blue energy after they’ve all been restored. Exit the room
and follow the glowing pipes down the corridor to reach another senate guard control panel. Activate this panel to enter a second room.
Destroy everything inside the senate guard control panel room to obtain several red pieces. Build these to repair the pipes that run along the wall near the ceiling. Use Cad Bane’s explosives to destroy the silver objects and obtain more pieces.
Again, destroy everything inside the second senate guard control panel room, using Cad
Bane’s grenades as needed. Build the loose pieces you discover to repair the overhead piping and construct
several power generators.
After repairing the piping and building all of the generators, quickly slide
the generators toward the background wall. Start with the left generator and work your way to the right. Do this quickly to restore the flow of blue energy.
TIPJump on the senate guards’ bunk beds to knock loose some studs!
FREEPLAYMInIkIT 7
Toggle to a Sith character and use the Dark Force to raise the red glowing object near the corridor’s second senate guard control panel. This exposes a crawl space hatch—switch to a small character and creep through to reach a little ledge with a minikit!
FREEPLAYMInIkIT 8
After connecting all of the generators in the second senate guard control panel room, toggle to a Sith character and use the Dark Force to expose a lever to the right. Pull this to make a projection screen drop from the ceiling.
Pull the lever near the screen to start an exciting video game starring Indiana Jones. Quickly move onto the nearby button and watch as Indy runs to the right. Jump each time our hero nears a pit to make him leap the obstacle. Help Indy jump over every pit to set the high score and win a minikit!
204Protected by copyright. Unauthorized or unlawful copying or downloading expressly prohibited.
introduCtion
Cast
padaWan training
WalkthroughPROLOGuECOunT DOOkuGEnERAL GRIEvOuSASAJJ vEnTRESSEPILOGuEHuB AREASSEPARATIST MISSIOnS
CHAPTER I: HOSTAGE CRISIS
Objective 1: clear the landinG Site
Objective 2: StOrm the Senate buildinG
CHAPTER II: CASTLE Of DOOM
seCrets and extras
CheCklists
nintendo ds
Contents
hoW to use this eguideDownload from www.chipper.pl
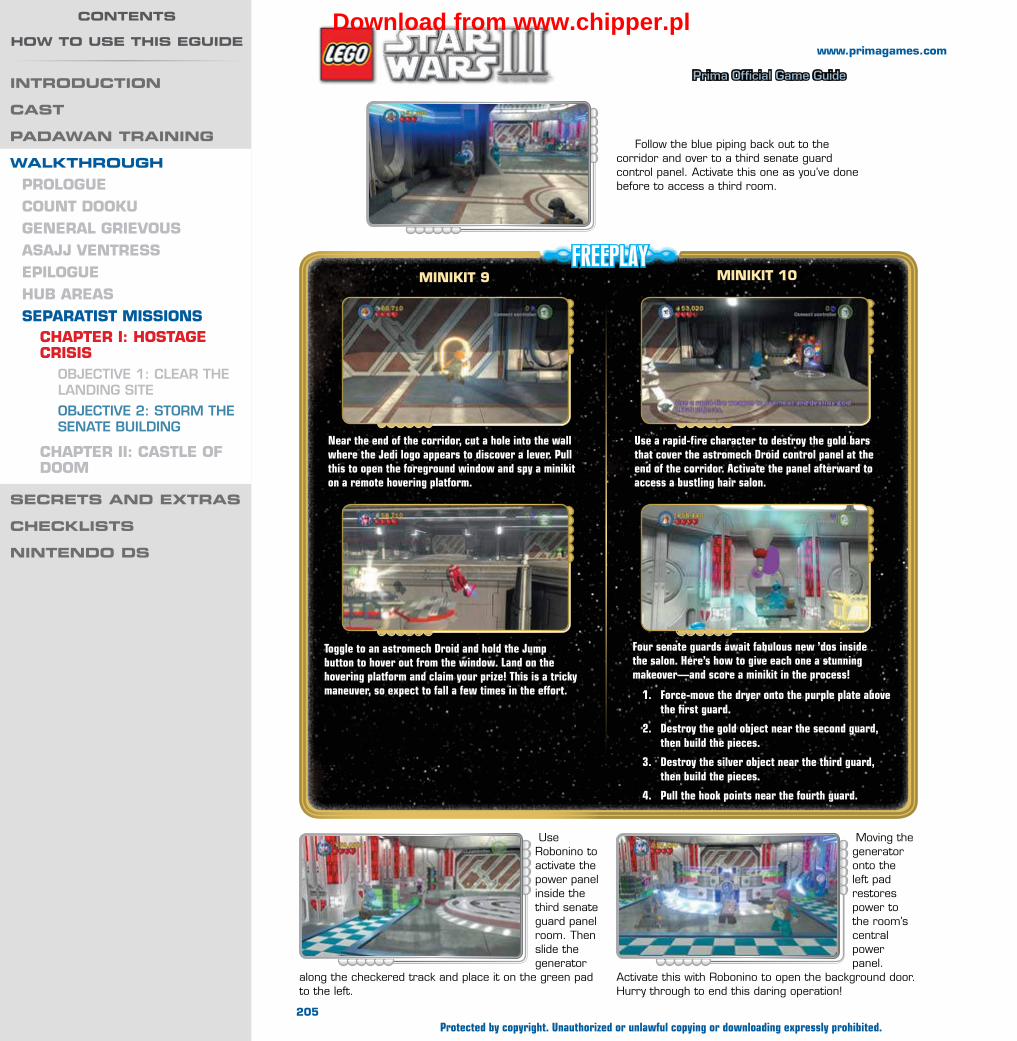
Wa
lk
th
ro
ug
h —
sepa
ra
tis
t m
iss
ion
s
Prima Official Game Guide
www.primagames.com
Moving the generator onto the left pad restores power to the room’s central power panel.
Activate this with Robonino to open the background door. Hurry through to end this daring operation!
Use Robonino to activate the power panel inside the third senate guard panel room. Then slide the generator
along the checkered track and place it on the green pad to the left.
Follow the blue piping back out to the corridor and over to a third senate guard control panel. Activate this one as you’ve done before to access a third room.
FREEPLAYMInIkIT 9
Near the end of the corridor, cut a hole into the wall where the Jedi logo appears to discover a lever. Pull this to open the foreground window and spy a minikit on a remote hovering platform.
Toggle to an astromech Droid and hold the Jump button to hover out from the window. Land on the hovering platform and claim your prize! This is a tricky maneuver, so expect to fall a few times in the effort.
MInIkIT 10
Use a rapid-fire character to destroy the gold bars that cover the astromech Droid control panel at the end of the corridor. Activate the panel afterward to access a bustling hair salon.
Four senate guards await fabulous new ’dos inside the salon. Here’s how to give each one a stunning makeover—and score a minikit in the process!
1. Force-move the dryer onto the purple plate above the first guard.
2. Destroy the gold object near the second guard, then build the pieces.
3. Destroy the silver object near the third guard, then build the pieces.
4. Pull the hook points near the fourth guard.
205Protected by copyright. Unauthorized or unlawful copying or downloading expressly prohibited.
introduCtion
Cast
padaWan training
WalkthroughPROLOGuECOunT DOOkuGEnERAL GRIEvOuSASAJJ vEnTRESSEPILOGuEHuB AREASSEPARATIST MISSIOnS
CHAPTER I: HOSTAGE CRISIS
Objective 1: clear the landinG Site
Objective 2: StOrm the Senate buildinG
CHAPTER II: CASTLE Of DOOM
seCrets and extras
CheCklists
nintendo ds
Contents
hoW to use this eguideDownload from www.chipper.pl
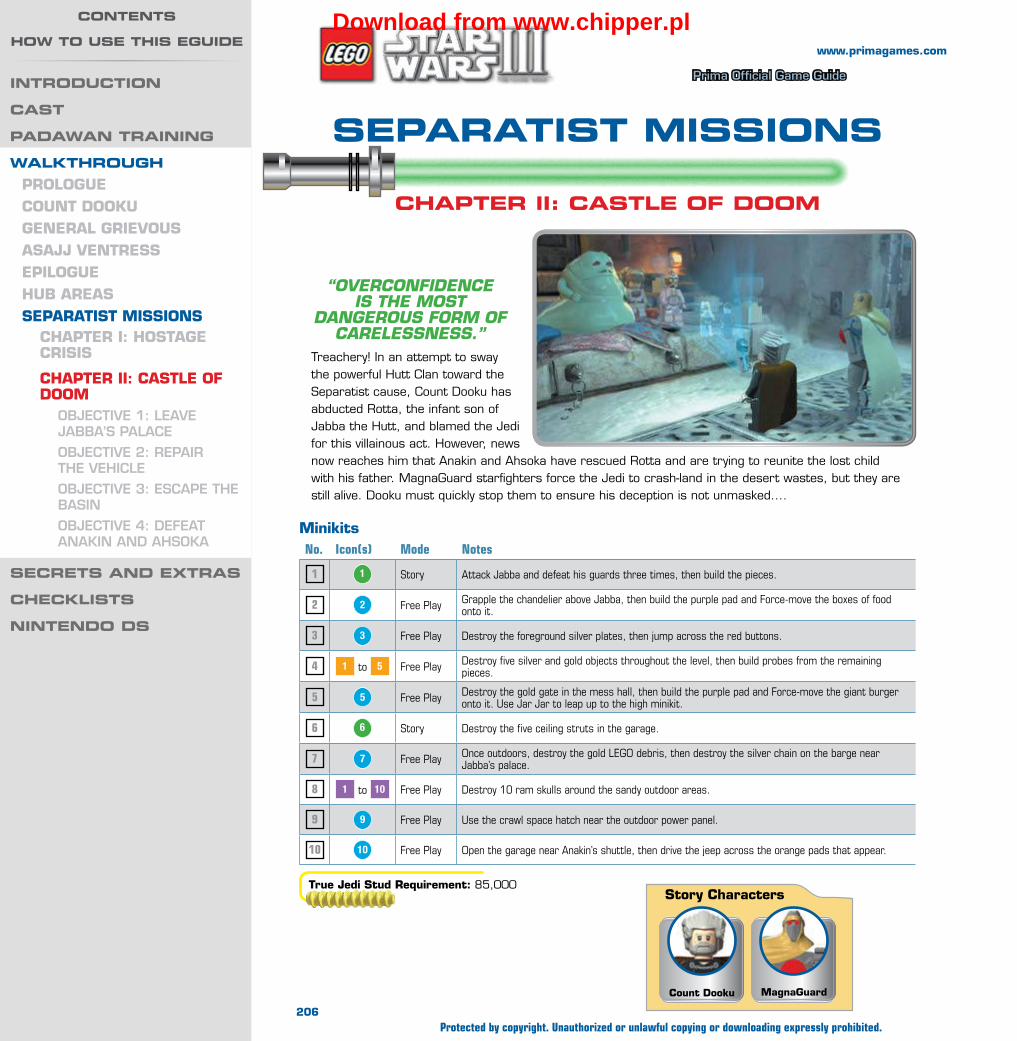
Wa
lk
th
ro
ug
h —
sepa
ra
tis
t m
iss
ion
s
Prima Official Game Guide
www.primagames.com
“oveRconFIdence Is the most
danGeRous FoRm oF caRelessness.”
Treachery! In an attempt to sway the powerful Hutt Clan toward the Separatist cause, Count Dooku has abducted Rotta, the infant son of Jabba the Hutt, and blamed the Jedi for this villainous act. However, news now reaches him that Anakin and Ahsoka have rescued Rotta and are trying to reunite the lost child with his father. MagnaGuard starfighters force the Jedi to crash-land in the desert wastes, but they are still alive. Dooku must quickly stop them to ensure his deception is not unmasked....
separatist missions
Chapter ii: Castle of doom
MinikitsNo. Icon(s) Mode Notes
1 1 Story Attack Jabba and defeat his guards three times, then build the pieces.
2 2 Free Play Grapple the chandelier above Jabba, then build the purple pad and Force-move the boxes of food onto it.
3 3 Free Play Destroy the foreground silver plates, then jump across the red buttons.
4 1 to 5 Free Play Destroy five silver and gold objects throughout the level, then build probes from the remaining pieces.
5 5 Free Play Destroy the gold gate in the mess hall, then build the purple pad and Force-move the giant burger onto it. Use Jar Jar to leap up to the high minikit.
6 6 Story Destroy the five ceiling struts in the garage.
7 7 Free Play Once outdoors, destroy the gold LEGO debris, then destroy the silver chain on the barge near Jabba’s palace.
8 1 to 10 Free Play Destroy 10 ram skulls around the sandy outdoor areas.
9 9 Free Play Use the crawl space hatch near the outdoor power panel.
10 10 Free Play Open the garage near Anakin’s shuttle, then drive the jeep across the orange pads that appear.
True Jedi Stud Requirement: 85,000 Story Characters
MagnaGuardCount Dooku
206Protected by copyright. Unauthorized or unlawful copying or downloading expressly prohibited.
introduCtion
Cast
padaWan training
WalkthroughPROLOGuECOunT DOOkuGEnERAL GRIEvOuSASAJJ vEnTRESSEPILOGuEHuB AREASSEPARATIST MISSIOnS
CHAPTER I: HOSTAGE CRISIS
CHAPTER II: CASTLE Of DOOM
Objective 1: leave jabba’S Palace
Objective 2: rePair the vehicle
Objective 3: eScaPe the baSin
Objective 4: defeat anakin and ahSOka
seCrets and extras
CheCklists
nintendo ds
Contents
hoW to use this eguideDownload from www.chipper.pl
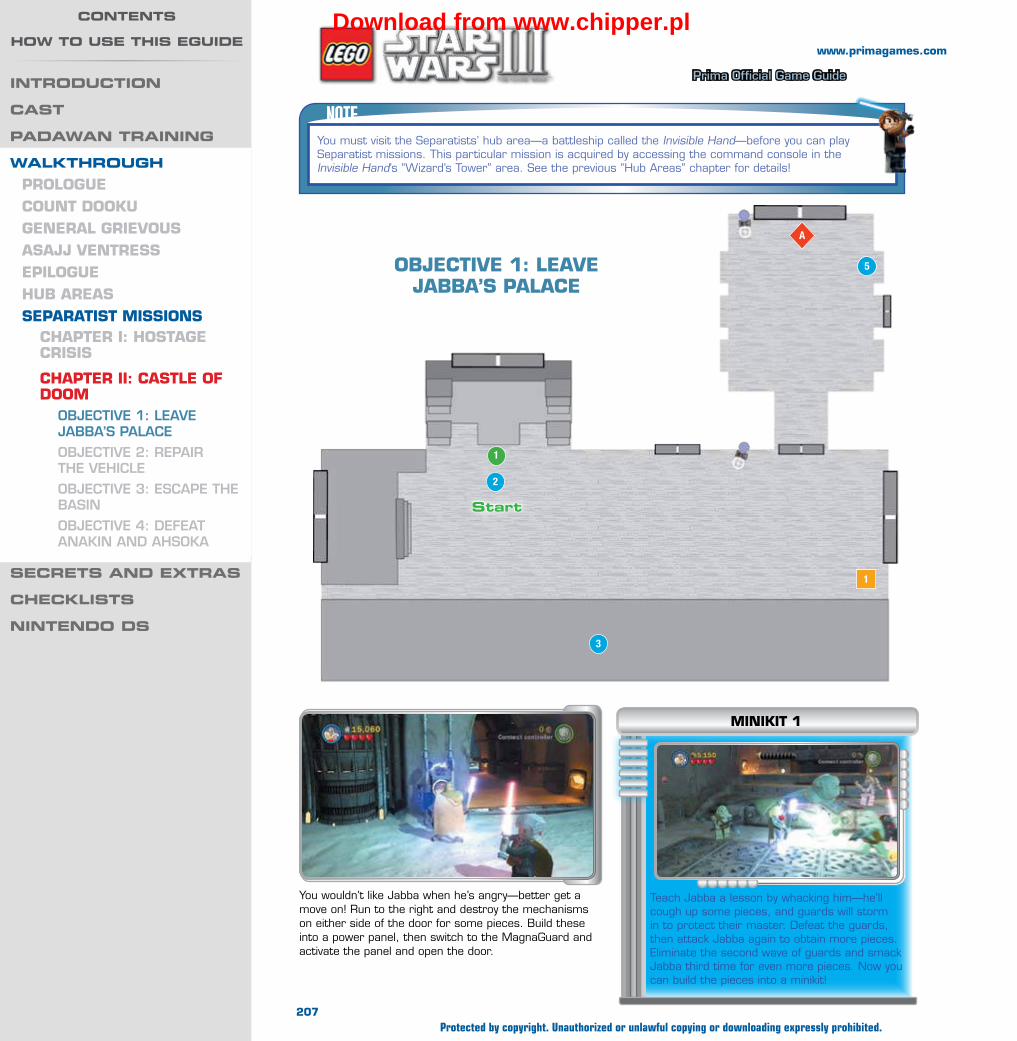
Wa
lk
th
ro
ug
h —
sepa
ra
tis
t m
iss
ion
s
Prima Official Game Guide
www.primagames.com
NOTEYou must visit the Separatists’ hub area—a battleship called the Invisible Hand—before you can play Separatist missions. This particular mission is acquired by accessing the command console in the Invisible Hand’s “Wizard’s Tower” area. See the previous “Hub Areas” chapter for details!
You wouldn’t like Jabba when he’s angry—better get a move on! Run to the right and destroy the mechanisms on either side of the door for some pieces. Build these into a power panel, then switch to the MagnaGuard and activate the panel and open the door.
Teach Jabba a lesson by whacking him—he’ll cough up some pieces, and guards will storm in to protect their master. Defeat the guards, then attack Jabba again to obtain more pieces. Eliminate the second wave of guards and smack Jabba third time for even more pieces. Now you can build the pieces into a minikit!
MInIkIT 1
OBJECTIvE 1: LEAvE JABBA’S PALACE
A
1
1
2
3
5
start
207Protected by copyright. Unauthorized or unlawful copying or downloading expressly prohibited.
introduCtion
Cast
padaWan training
WalkthroughPROLOGuECOunT DOOkuGEnERAL GRIEvOuSASAJJ vEnTRESSEPILOGuEHuB AREASSEPARATIST MISSIOnS
CHAPTER I: HOSTAGE CRISIS
CHAPTER II: CASTLE Of DOOM
Objective 1: leave jabba’S Palace
Objective 2: rePair the vehicle
Objective 3: eScaPe the baSin
Objective 4: defeat anakin and ahSOka
seCrets and extras
CheCklists
nintendo ds
Contents
hoW to use this eguideDownload from www.chipper.pl
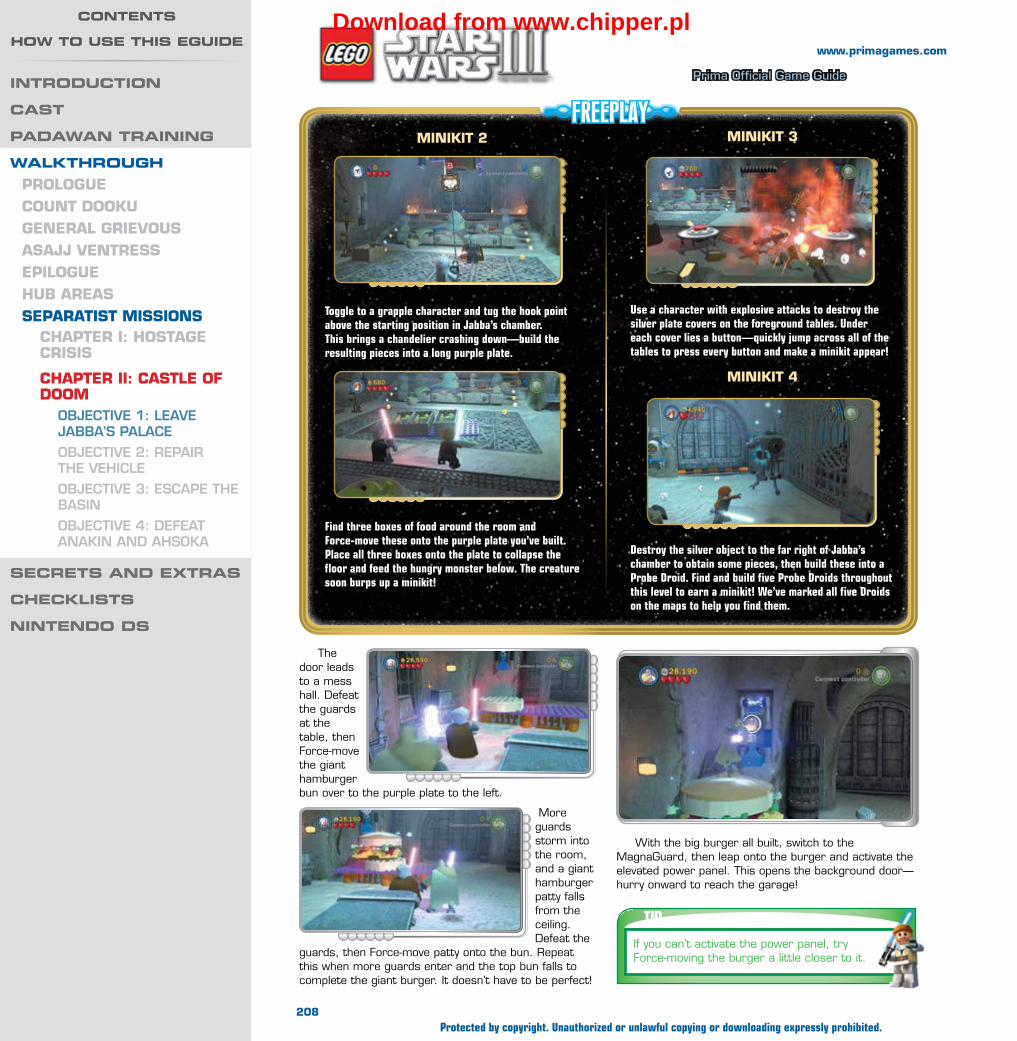
Wa
lk
th
ro
ug
h —
sepa
ra
tis
t m
iss
ion
s
Prima Official Game Guide
www.primagames.com
The door leads to a mess hall. Defeat the guards at the table, then Force-move the giant hamburger bun over to the purple plate to the left.
More guards storm into the room, and a giant hamburger patty falls from the ceiling. Defeat the
guards, then Force-move patty onto the bun. Repeat this when more guards enter and the top bun falls to complete the giant burger. It doesn’t have to be perfect!
FREEPLAYMInIkIT 3
Use a character with explosive attacks to destroy the silver plate covers on the foreground tables. Under each cover lies a button—quickly jump across all of the tables to press every button and make a minikit appear!
MInIkIT 4
Destroy the silver object to the far right of Jabba’s chamber to obtain some pieces, then build these into a Probe Droid. Find and build five Probe Droids throughout this level to earn a minikit! We’ve marked all five Droids on the maps to help you find them.
MInIkIT 2
Toggle to a grapple character and tug the hook point above the starting position in Jabba’s chamber. This brings a chandelier crashing down—build the resulting pieces into a long purple plate.
Find three boxes of food around the room and Force-move these onto the purple plate you’ve built. Place all three boxes onto the plate to collapse the floor and feed the hungry monster below. The creature soon burps up a minikit!
With the big burger all built, switch to the MagnaGuard, then leap onto the burger and activate the elevated power panel. This opens the background door—hurry onward to reach the garage!
TIPIf you can’t activate the power panel, try Force-moving the burger a little closer to it.
208Protected by copyright. Unauthorized or unlawful copying or downloading expressly prohibited.
introduCtion
Cast
padaWan training
WalkthroughPROLOGuECOunT DOOkuGEnERAL GRIEvOuSASAJJ vEnTRESSEPILOGuEHuB AREASSEPARATIST MISSIOnS
CHAPTER I: HOSTAGE CRISIS
CHAPTER II: CASTLE Of DOOM
Objective 1: leave jabba’S Palace
Objective 2: rePair the vehicle
Objective 3: eScaPe the baSin
Objective 4: defeat anakin and ahSOka
seCrets and extras
CheCklists
nintendo ds
Contents
hoW to use this eguideDownload from www.chipper.pl
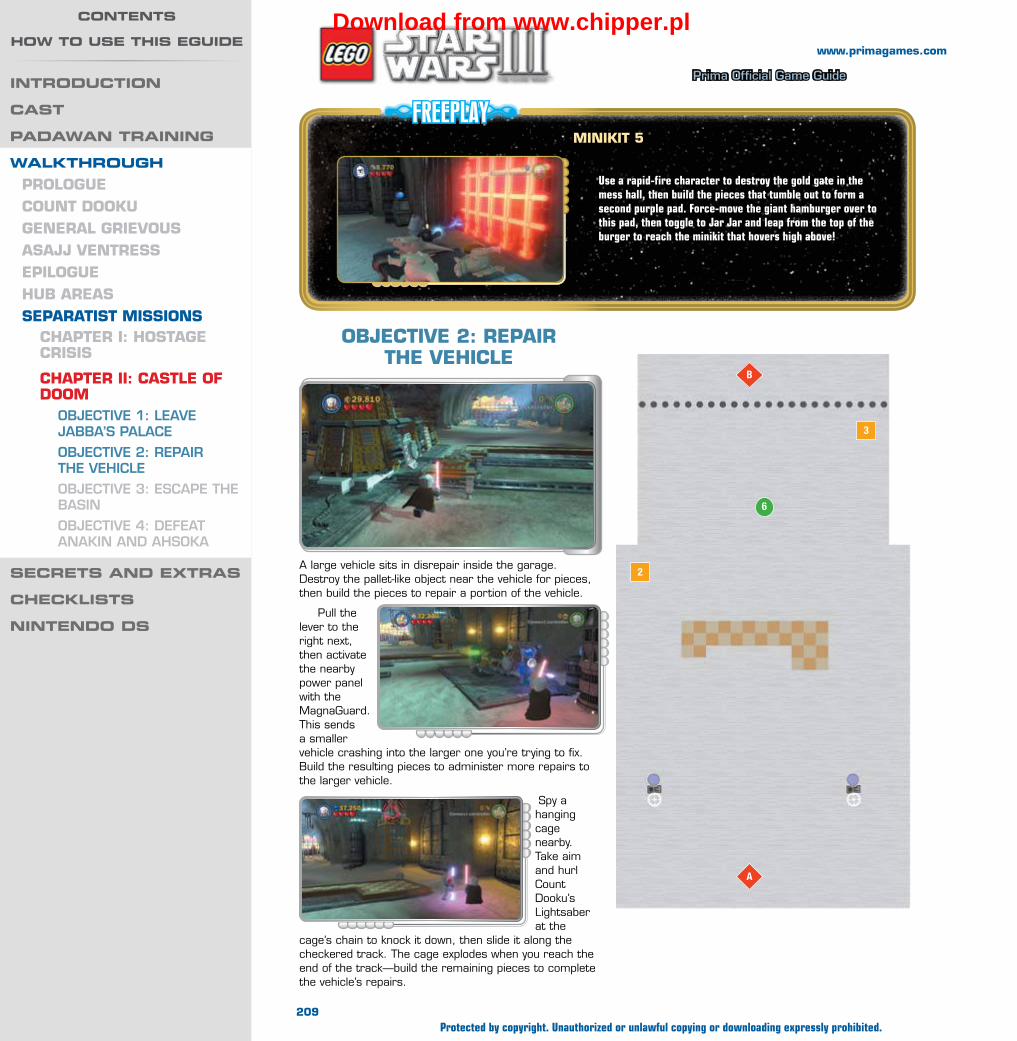
Wa
lk
th
ro
ug
h —
sepa
ra
tis
t m
iss
ion
s
Prima Official Game Guide
www.primagames.com
A large vehicle sits in disrepair inside the garage. Destroy the pallet-like object near the vehicle for pieces, then build the pieces to repair a portion of the vehicle.
Pull the lever to the right next, then activate the nearby power panel with the MagnaGuard. This sends a smaller vehicle crashing into the larger one you’re trying to fix. Build the resulting pieces to administer more repairs to the larger vehicle.
Spy a hanging cage nearby. Take aim and hurl Count Dooku’s Lightsaber at the
cage’s chain to knock it down, then slide it along the checkered track. The cage explodes when you reach the end of the track—build the remaining pieces to complete the vehicle’s repairs.
OBJECTIvE 2: REPAIR THE vEHICLE
FREEPLAYMInIkIT 5
Use a rapid-fire character to destroy the gold gate in the mess hall, then build the pieces that tumble out to form a second purple pad. Force-move the giant hamburger over to this pad, then toggle to Jar Jar and leap from the top of the burger to reach the minikit that hovers high above!
B
2
6
3
A
209Protected by copyright. Unauthorized or unlawful copying or downloading expressly prohibited.
introduCtion
Cast
padaWan training
WalkthroughPROLOGuECOunT DOOkuGEnERAL GRIEvOuSASAJJ vEnTRESSEPILOGuEHuB AREASSEPARATIST MISSIOnS
CHAPTER I: HOSTAGE CRISIS
CHAPTER II: CASTLE Of DOOM
Objective 1: leave jabba’S Palace
Objective 2: rePair the vehicle
Objective 3: eScaPe the baSin
Objective 4: defeat anakin and ahSOka
seCrets and extras
CheCklists
nintendo ds
Contents
hoW to use this eguideDownload from www.chipper.pl
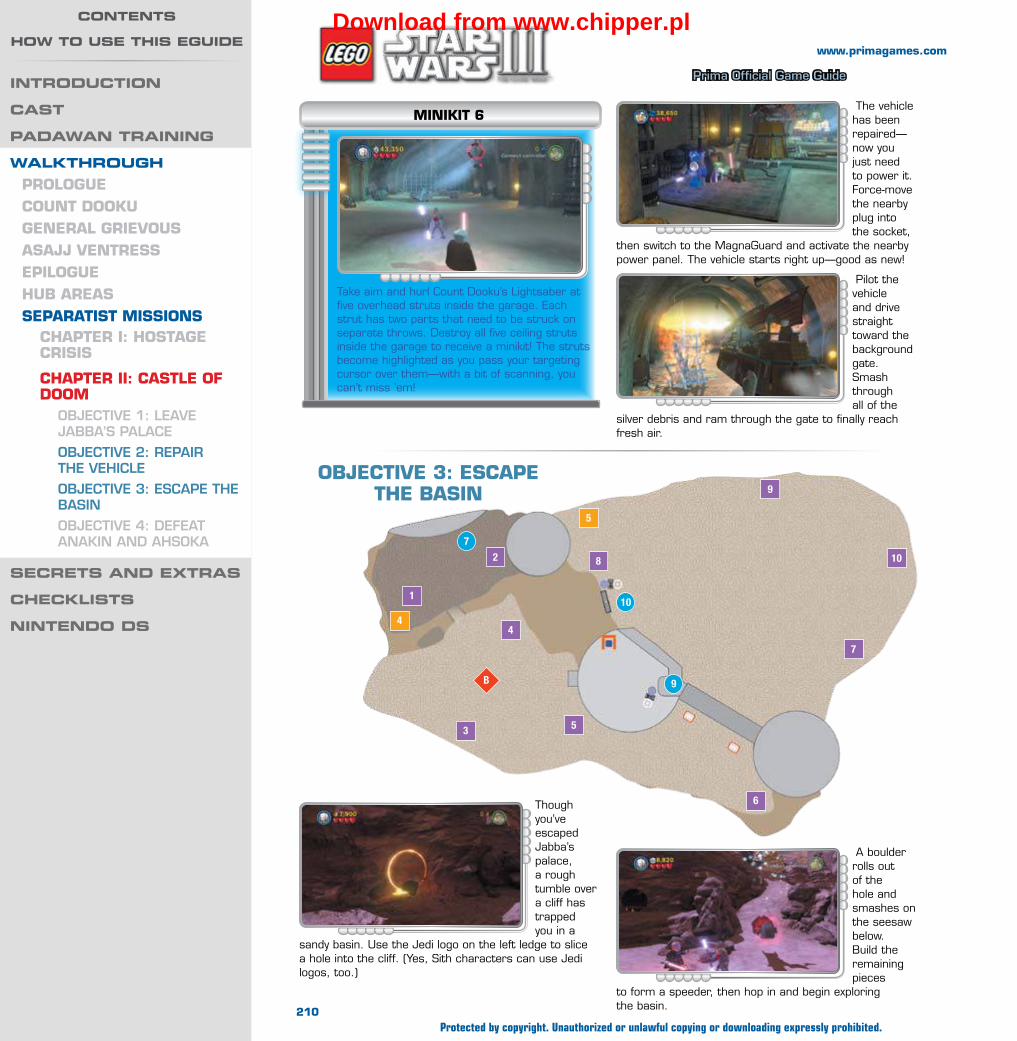
Wa
lk
th
ro
ug
h —
sepa
ra
tis
t m
iss
ion
s
Prima Official Game Guide
www.primagames.com
The vehicle has been repaired—now you just need to power it. Force-move the nearby plug into the socket,
then switch to the MagnaGuard and activate the nearby power panel. The vehicle starts right up—good as new!
Pilot the vehicle and drive straight toward the background gate. Smash through all of the
silver debris and ram through the gate to finally reach fresh air.
Take aim and hurl Count Dooku’s Lightsaber at five overhead struts inside the garage. Each strut has two parts that need to be struck on separate throws. Destroy all five ceiling struts inside the garage to receive a minikit! The struts become highlighted as you pass your targeting cursor over them—with a bit of scanning, you can’t miss ’em!
MInIkIT 6
Though you’ve escaped Jabba’s palace, a rough tumble over a cliff has trapped you in a
sandy basin. Use the Jedi logo on the left ledge to slice a hole into the cliff. (Yes, Sith characters can use Jedi logos, too.)
A boulder rolls out of the hole and smashes on the seesaw below. Build the remaining pieces
to form a speeder, then hop in and begin exploring the basin.
7
9
10
4
5
1
2
3
4
5
6
7
8
9
10
B
OBJECTIvE 3: ESCAPE THE BASIn
210Protected by copyright. Unauthorized or unlawful copying or downloading expressly prohibited.
introduCtion
Cast
padaWan training
WalkthroughPROLOGuECOunT DOOkuGEnERAL GRIEvOuSASAJJ vEnTRESSEPILOGuEHuB AREASSEPARATIST MISSIOnS
CHAPTER I: HOSTAGE CRISIS
CHAPTER II: CASTLE Of DOOM
Objective 1: leave jabba’S Palace
Objective 2: rePair the vehicle
Objective 3: eScaPe the baSin
Objective 4: defeat anakin and ahSOka
seCrets and extras
CheCklists
nintendo ds
Contents
hoW to use this eguideDownload from www.chipper.pl

Wa
lk
th
ro
ug
h —
sepa
ra
tis
t m
iss
ion
s
Prima Official Game Guide
www.primagames.com
FREEPLAY
FREEPLAYMInIkIT 7
Use a rapid-fire character to destroy the gold obstruction atop the background hill. This lets you climb up and explore the area above.
Toggle to a character with explosive weaponry and blast the silver chain on the barge near Jabba’s palace. After the smoke clears, collect the minikit you discover inside the barge!
Destroy 10 ram skulls around the sandy outdoor area to earn a minikit! Some of these skulls are hidden near Jabba’s palace, so rapid-fire weaponry is needed to destroy the gold obstruction on the hill and find them all. Check the map for the locations of every skull that needs pulping.
Use a Force slam attack to knock loose the pieces on the background boulder. Build the loose pieces into a second speeder, which will soon come in handy.
MInIkIT 8
Locate a purple pad to the right and attack the nearby rocks to loosen them from the cliff. Force-move
the rocks, stacking them atop the purple pad so that MagnaGuard can leap up onto the concrete ledge above.
Use MagnaGuard to activate the power panel you discover atop the ledge. This makes two orange pads appear near the gate—one for each speeder!
FREEPLAYMInIkIT 9
During Free Play, toggle to a small character and crawl through the little hatch on the ledge with the power panel. You emerge on a higher ledge—right near a minikit!
211Protected by copyright. Unauthorized or unlawful copying or downloading expressly prohibited.
introduCtion
Cast
padaWan training
WalkthroughPROLOGuECOunT DOOkuGEnERAL GRIEvOuSASAJJ vEnTRESSEPILOGuEHuB AREASSEPARATIST MISSIOnS
CHAPTER I: HOSTAGE CRISIS
CHAPTER II: CASTLE Of DOOM
Objective 1: leave jabba’S Palace
Objective 2: rePair the vehicle
Objective 3: eScaPe the baSin
Objective 4: defeat anakin and ahSOka
seCrets and extras
CheCklists
nintendo ds
Contents
hoW to use this eguideDownload from www.chipper.pl

Wa
lk
th
ro
ug
h —
sepa
ra
tis
t m
iss
ion
s
Prima Official Game Guide
www.primagames.com
FREEPLAY
Attack Ahsoka with reckless abandon—she’ll eventually drop her Lightsaber. Then use the
Dark Force to collect her weapon. Then turn your two Lightsabers loose against Anakin. Repeat this strategy until a glorious Separatist victory is assured!
Cruise the dunes for studs, then approach the shuttle that has crashed down in the middle of the sand.
Attack the red panel on the side of the shuttle to expose a power panel—charge this up with the MagnaGuard.
Drop from the ledge and park both speeders on the orange pads you’ve uncovered to turn both pads green. The massive gate then opens, granting access to the vast desert dunes beyond.
MInIkIT 10
Before inspecting the downed shuttle, use an astromech Droid to open the garage door on the left. An ultimate off-road vehicle awaits you inside!
TIP
NOTEThus ends the Separatist missions. If you’ve already beaten these and the epilogue, it might be time for some ground assault, space combat, or bounty hunter challenges! Flip to the next chapter, “Secrets and Extras,” for further details.
OBJECTIvE 4: DEfEAT AnAkIn AnD AHSOkA
Opening the garage causes a number of orange pads to appear around the area. Hop into your jeep and cruise across the pads, following the green beacons to locate the next pad in sequence. Cross over every pad to turn them all green and discover a minikit at the end of the run! The pads revert to orange after a time, so try to keep pace.
Charging the power panel partially opens the shuttle door. Switch to Count Dooku and
use the Dark Force to heave the door aside and begin an intense battle against a very meddlesome Jedi—and his pesky Padawan!
Search the inside of the shuttle to snag a worthy purple stud!
212Protected by copyright. Unauthorized or unlawful copying or downloading expressly prohibited.
introduCtion
Cast
padaWan training
WalkthroughPROLOGuECOunT DOOkuGEnERAL GRIEvOuSASAJJ vEnTRESSEPILOGuEHuB AREASSEPARATIST MISSIOnS
CHAPTER I: HOSTAGE CRISIS
CHAPTER II: CASTLE Of DOOM
Objective 1: leave jabba’S Palace
Objective 2: rePair the vehicle
Objective 3: eScaPe the baSin
Objective 4: defeat anakin and ahSOka
seCrets and extras
CheCklists
nintendo ds
Contents
hoW to use this eguideDownload from www.chipper.pl

sec
rets
an
d e
xtr
as
Prima Official Game Guide
www.primagames.com
secrets and extras
Here we delve into LEGO Star Wars III’s extra-special game modes. Read on to learn about the many different space combat, ground assault, and bounty hunter challenges that await you! Each one you beat earns you a gold brick, so check ’em all out. Flip to the end of this chapter for some super-secret cheat codes, too!
NOTEYou must progress through several Story mode missions before you can unlock the following game modes. See each section for requirement details.
space combat Select any planet from the Systems menu to engage hyperdrive and travel there. Then call down a
suitable ship for the space combat mission at hand. Use the following table to determine what sort of firepower you need for each challenge.
General StrateGieSBoard your ship to fly out into space. Track a yellow marker to locate a gold brick that floats
around between the Resolute and the Invisible Hand. Repeatedly shoot the gold brick to begin the system’s unique space combat mission.
In all space combat missions, your goal is to collect a certain amount of studs in just a few short minutes.
Different weaponry is needed to mine studs from whatever targets are made available (enemy ships, space creatures, debris, etc.). The following table gives a quick description of each space combat mission and tells you what sort of firepower gives you the edge.
TIPSpecial armaments are needed for most Space Combat missions, so buy ships that are armed with torpedoes, missiles, or rapid-fire blasters.
Collect ten gold bricks to gain entry to the Resolute’s hangar, which is located off the generator chamber. Here you may use special panels to summon the various starships you’ve unlocked by progressing through the game. Examine each ship you’ve unlocked and decide whether you’d like to purchase it.
The hangar features a command console, just like the one on the bridge. Use this console and select the
Systems menu option. It’s not immediately obvious, but a special space combat mission is now available at every system you’ve visited thus far!
213Protected by copyright. Unauthorized or unlawful copying or downloading expressly prohibited.
IntroductIon
cast
padawan traInIng
waLKtHrougH
secrets and extrasSpace combat
Ground aSSault
cheat codeS
cHecKLIsts
nIntendo ds
contents
How to use tHIs eguIdeDownload from www.chipper.pl

sec
rets
an
d e
xtr
as
Prima Official Game Guide
www.primagames.com
summon a vehicle with explosive attacks (such as a pirate speeder tank or AT-AP walker),
then use that vehicle to destroy the force field emitter in the staging area’s background.
miSSion prepIn all ground assault missions, you’re allowed to bring one vehicle that you’ve unlocked
and purchased into the battle with you. The vehicle you bring is a critical decision, and it’s usually best to bring one that boasts explosive attacks and strong
Space Combat MissionsNo. Planet Target Weapons Needed
1 Christophsis Silver asteroids Missiles
2 Coruscant Separatist ships Any
3 Dead Moon of Antar Neebray creatures Any
4 Florrum Enemy ships Any
5 Geonosis Separatist ships Any
6 Malastare Enemy debris Enemy ship blasters and torpedoes
7 Maridun Republic ships Any
8 Naboo Asteroids Torpedoes
9 Quell Debris Any
10 Rishi Moon Gold Neebray Rapid-fire blasters
11 Rugosa Silver Neebray creatures Missiles
12 Ruusan Moon Separatist ships Any
13 Ryloth Separatist ships Any
14 Saleucami Asteroids Torpedoes
15 Tatooine Separatist ships Any
16 Vassek Separatist ships Any
The force field was guarding a special command console. Access the staging area’s command
console to unlock Republic Assault mode. Now you can participate in challenging ground assault missions at each of the systems you’ve visited!
The Separatists also have their own ground assault missions. Earn 25 gold bricks to
access the background ramp of the Invisible Hand’s hangar, which leads to the Separatists’ ground assault staging area. Destroy another silver force field array here to access a special command console and unlock Separatist Assault mode!
Earn 15 gold bricks to access the final area of the Resolute: the ground assault staging area, which is just to the right of the hangar. Use the staging area’s panels to summon any of the Republic vehicles you’ve unlocked thus far by playing through the game. Inspect each vehicle and choose whether to purchase it.
NOTEYou unlock ground assault vehicles by building and using them in ground assault missions. Unlock lots of Republic vehicles early on by playing through Count Dooku’s story line first.
NOTEYou can access the ground assault modes from any command console after you’ve unlocked them. See the “Padawan Training” chapter of this guide to learn the basics of playing ground assault battles.
ground assauLt
Vehicles you’ve purchased at the Resolute’s ground assault staging area can be brought into special Republic Assault battles. To unlock Republic Assault mode, first 214
Protected by copyright. Unauthorized or unlawful copying or downloading expressly prohibited.
IntroductIon
cast
padawan traInIng
waLKtHrougH
secrets and extrasSpace combat
Ground aSSaultMissiOn Objectives
cheat codeS
cHecKLIsts
nIntendo ds
contents
How to use tHIs eguIdeDownload from www.chipper.pl

sec
rets
an
d e
xtr
as
Prima Official Game Guide
www.primagames.com
miSSion objectiveSEach ground assault mission features a strict time limit (shown onscreen), so speed is vital. Your objective will be one of the following:
destroy all enemy bases: Wipe out everything on the map!
destroy the enemy’s command center: Bring down a special building!
destroy all enemy Statues: Shatter a number of false idols!
build an escape pod: Conquer bases and build the escape pod structure!
deStroy all enemy baSeSThis one’s easy enough—just bring your baddest vehicle into the mission and lay waste to
the enemy’s bases! Conquer as many bases as possible and build structures of your own to unlock advanced vehicles. Quickly “tech up” to anti-gold vehicles so you can wipe out all gold enemy structures—this is vital!
Some of the more challenging ground assault missions don’t allow you to build base structures.
If gold enemy buildings must still be destroyed, you’ll need to use a high-ranking commander character to rally up some blaster troops. Locate a group of blaster clones (Republic) or Droids (Separatists) and press the Action button to get their attention.
Infantry are extremely vulnerable, so rush to reach your target. Hold the Attack button and aim at the golden foe,
then release the Attack button to order your troops to fire. Enough blaster clones/Droids can overheat and destroy gold buildings—provided they survive long enough!
deStroy the enemy’S command center
You have only one target for these missions, but the enemy’s command center is often
remote and well covered by shields. Command centers are also hardened structures that require extensive amounts of explosive firepower to destroy —their health regenerates over time. Always begin these missions by racing off to inspect the enemy command center—these structures have a unique look, and a special orange health meter appears over them when they’re attacked.
Once you’ve located the command center, determine what you need to do to expose it. You’ll
commonly need to deactivate its base’s shield generator so you can bring a vehicle’s explosive weaponry to bear. Come up with your plan of attack and fight to see it through!
TIPIf you haven’t unlocked many vehicles yet, play a few Republic or Separatist Assault missions anyway. Focus on conquering bases and building new vehicles—this will unlock more vehicles for future use. Don’t worry about winning missions; just work toward “teching up” to the big guns!
NOTEThe RX-200 Tank is the Republic’s anti-gold vehicle, while the OG-9 Homing Spider Droid is the Separatists’. Both are accessed from the “air support” build menu group and require a minimum of four bases to deploy.
armor. Therefore, the best choices for each side are the indestructible AT-TE (Republic) and Super Tank (Separatist).
NOTEIf the vehicle you select to bring into a ground assault mission is destroyed, a new one will respawn at the mission’s starting point.
215Protected by copyright. Unauthorized or unlawful copying or downloading expressly prohibited.
IntroductIon
cast
padawan traInIng
waLKtHrougH
secrets and extrasSpace combat
Ground aSSaultMissiOn Objectives
cheat codeS
cHecKLIsts
nIntendo ds
contents
How to use tHIs eguIdeDownload from www.chipper.pl

sec
rets
an
d e
xtr
as
Prima Official Game Guide
www.primagames.com
build an eScape podTreat these missions like “destroy everything” missions, because that’s exactly what you need to do at first. Rush out
and conquer enemy bases, and build a structure of your own at each base you take. Keep stealing bases and building structures until you unlock the final build menu group, “extras.” Build the escape pod from this group, then hop aboard to secure your victory!
Republic Assault Missions
No. Planet Objective How to Unlock1 Quell Build an escape pod Complete "Count Dooku 3:
Jedi Crash"
2 Ruusan Moon Destroy all enemy bases
Complete "General Grievous 1: Duel of the Droids"
3 Dead Moon of Antar
Destroy all enemy bases
Complete "General Grievous 3: Destroy Malevolence"
4 Vassek Destroy the enemy's command center
Complete "General Grievous 4: Lair of Grievous"
5 Christophsis Destroy all enemy bases
Complete "Asajj Ventress 1: The Hidden Enemy"
6 Naboo Destroy all enemy bases
Complete "Asajj Ventress 3: Blue Shadow Virus"
deStroy all enemy StatueSYou must destroy a number of enemy statues to beat these unique ground assault challenges.
The statues can be made of silver or gold—they may also be protected by shields. Race off to investigate the statues and see what you’re up against. Build bases so you can access your faction’s anti-gold vehicle and lay waste to every statue!
Republic Assault Missions (cont.)7 Coruscant Destroy all enemy
basesComplete "Separatist Mission 1: Hostage Crisis"
8 Tatooine Build an escape pod Complete "Separatist Mission 2: Castle of Doom"
9 Florrum Build an escape pod Complete "Separatist Assault: Florrum"
10 Geonosis Build an escape pod Complete "Separatist Assault: Geonosis"
11 Malastare Destroy all enemy statues
Complete "Separatist Assault: Malastare"
12 Maridun Destroy all enemy statues
Complete "Separatist Assault: Maridun"
13 Rishi Moon Destroy all enemy statues
Complete "Separatist Assault: Rishi Moon"
14 Rugosa Destroy all enemy statues
Complete "Separatist Assault: Rugosa"
15 Ryloth Destroy all enemy bases
Complete "Separatist Assault: Ryloth"
16 Saleucami Destroy all enemy bases
Complete "Separatist Assault: Saleucami"
TIPDon’t simply shut off shield generators—attack them until they’re destroyed to ensure those shields stay down!
NOTEIf you can’t build bases in a statue mission, you’ll need to lead troops of blaster clones/Droids against gold enemy statues. Destroy everything you can until time runs short, then lead a group of blaster troops in for the final strike.
Separatist Ground Missions
No. Planet Objective How to Unlock1 Florrum Build an escape pod Complete "Count Dooku 2:
Gungan General"
2 Rishi Moon Destroy the enemy's command center
Complete "General Grievous 5: Rookies"
3 Saleucami Build an escape podComplete "General Grievous 6: Grievous Intrigue"
4 Rugosa Destroy all enemy bases
Complete "Asajj Ventress 2: Ambush!"
5 Malastare Destroy the enemy's command center
Complete "Epilogue: The Zillo Beast"
6 Coruscant Destroy all enemy statues
Complete "Republic Assault: Coruscant"
7 Dead Moon of Antar Build an escape pod
Complete "Republic Assault: Dead Moon of Antar"
8 Quell Destroy all enemy statues
Complete "Republic Assault: Quell"
9 Ruusan Moon Build an escape pod Complete "Republic Assault: Ruusan Moon"
10 Tatooine Destroy all enemy statues
Complete "Republic Assault: Tatooine"
11 Vassek Destroy all enemy statues
Complete "Republic Assault: Vassek"
12 Maridun Destroy the enemy's command center
Unlock and purchase Lok Durd
13 Naboo Destroy the enemy's command center
Unlock and purchase Nute Gunray
14 Geonosis Destroy the enemy's command center
Unlock and purchase Poggle the Lesser
15 Ryloth Destroy the enemy's command center
Unlock and purchase Wat Tambor
16 Christophsis Destroy the enemy's command center
Unlock and purchase Whorm Loathsom
bounty Hunter mIssIons
Complete the two secret Separatist missions (“Hostage Crisis” and “Castle of Doom”) to unlock a
series of special bounty hunter challenges. Now you can visit the Invisible Hand and stand on the pad near Ziro
216Protected by copyright. Unauthorized or unlawful copying or downloading expressly prohibited.
IntroductIon
cast
padawan traInIng
waLKtHrougH
secrets and extrasSpace combat
Ground aSSaultMissiOn Objectives
cheat codeS
cHecKLIsts
nIntendo ds
contents
How to use tHIs eguIdeDownload from www.chipper.pl

sec
rets
an
d e
xtr
as
Prima Official Game Guide
www.primagames.com
to call up a list of special bounty hunter targets! Select a bounty and go after it.
Each of these missions plays out like a brief Free Play stage. You control a group of shady bounty hunter characters, and you may toggle to any member of the group at any time. Your goal is simple: Locate and apprehend the character you’re after! See the following table for details on where each bounty can be found.
Character Name CodeYoda csqtmb
Ahsoka Tano 2vj9th
Kit Fisto pywj6n
Plo Koon bud4vu
Commander Cody smn259
Super Battle Droid mjkdv5
Character Name CodeHeavy Super Battle Droid g65kjj
Jar Jar Binks mespts
Geonosian Guard gafzud
Greedo fuw4c2
Chewbacca 66uu3t
Stud Magnet 6mz5ch
Ship/Vehicle Name CodeY-wing Starfighter xtl6y3
Republic Gunship c7m3du
ARC-170 Starfighter zy3ae2
Obi-Wan's Jedi Starfighter 25fmvt
AT-RT z7h46t
Super Tank rylvnw
cHeat codesWe’ve saved the best for last! Enter any of the following codes at the pause screen to unlock all sorts of cool stuff. May the Force be with you!
Bounty Hunter MissionsImage Target Associated Mission How to Get
Aayla Secura Count Dooku 3: Jedi Crash Boost to the right, then fly behind the flaming battleship to make its top explode. Land at the new landing pad and run to the background to find Aayla near the wall.
Commander Ponds Count Dooku 5: Weapons Factory Simply run down the tunnel until you spy Commander Ponds hiding near the wall on the
right.
Luminara Unduli Count Dooku 6: Legacy of Terror
Run down the tunnel until you discover an astromech Droid control panel. Activate the panel with HELIOS-3D to start a large drill, then chase after the drill to find Luminara hiding in the area beyond.
R2-D2 General Grievous 1: Duel of the Droids Activate the power panel near the start, then crawl through and find R2-D2 on the balcony.
Plo Koon General Grievous 2: Shadow of Malevolence
Use a boost ring to reach the lower landing pad. Land and then run right to find Plo Koon hiding in the background.
Anakin Skywalker
General Grievous 3: Destroy Malevolence
Race to the train area. As Cad Bane, hover over to the astromech Droid control panels—activate these with HELIOS-3D to summon trains. Hurry left, across the trains, then hover across the final gap and run toward the foreground to find Anakin standing around.
Kit Fisto General Grievous 4: Lair of Grievous
Hover over both fire pits with Cad Bane and hurry past the enemy Droids. Hover over to the circular chamber's left ledge and activate the bounty hunter control panel there to access a small side room where Kit Fisto hides.
Captain Rex General Grievous 5: Rookies Build a crane from the bits near the barricade and grapple down to the lower area. Hover to the left to find Captain Rex standing around.
Eeth Koth General Grievous 6: Grievous Intrigue
Turn toward the foreground and repeatedly throw grenades at the foreground windshield to crack it. Keep it up to shatter the windshield and make Eeth Koth appear nearby.
Commander Cody
Asajj Ventress 1: The Hidden Enemy
Run to the middle of the roof, then run toward the foreground to discover Commander Cody standing on a ledge.
Yoda Asajj Ventress 2: Ambush! Run straight past the first two tanks. Yoda hides behind the pink coral just to the left of the third tank.
Padmé Amidala
Asajj Ventress 3: Blue Shadow Virus
Race down the tunnel until you reach a protocol panel. Activate the panel, then enter the secret bar beyond. Padmé hides in the back.
Obi-Wan Kenobi
Asajj Ventress 4: Storm Over Ryloth
From the start, fly directly toward the background. Pass the Republic battleship's first landing pad and land on the distant pad with the torpedo generator. Enter the cralwspace hatch and find Obi-Wan in the lower area.
Waxer Asajj Ventress 5: Innocents of Ryloth
Press the Action button to hurl grenades at the silver pillar. Press the button again to detonate. Destroy the first two silver sections, then jump and hover from the large nearby rock, and quickly throw and detonate grenades to destroy the top section and bring down Waxer.
Bail Organa Separatist Mission 1: Hostage Crisis
Defeat a senate guard and steal his helmet. Enter the first senate guard control panel room and restore the background pipes to restore the energy flow. Enter the second senate guard control panel room to discover Bail Organa inside.
Ahsoka Tano Separatist Mission 2: Castle of Doom
Run left from the start and leap onto the rocky ledge. Leap up the rocks to the left to find Ahsoka hiding nearby.
NOTETo unlock each bounty hunter target, you must first unlock the associated character. Simply beat every Story mission to unlock all of the targets except for Bail Organa—beat the Separatists’ “Hostage Crisis” mission, then purchase Bail at the Resolute’s reactor chamber to unlock his mission.
217Protected by copyright. Unauthorized or unlawful copying or downloading expressly prohibited.
IntroductIon
cast
padawan traInIng
waLKtHrougH
secrets and extrasSpace combat
Ground aSSaultMissiOn Objectives
cheat codeS
cHecKLIsts
nIntendo ds
contents
How to use tHIs eguIdeDownload from www.chipper.pl

ch
ec
klis
t
Prima Official Game Guide
www.primagames.com
checklists
charactersOwned? Image Name Class Abilities Weaponry How to Unlock Cost/Location
Aayla Secura Jedi Force manipulation Lightsaber Story mode progression —
Adi Gallia Jedi Force manipulation Lightsaber Story mode progression —
Admiral Ackbar (Classic)
— Grapple gun Blaster Minikits (“Count Dooku 2: Gungan General”)
50,000/Resolute (Minikit Bay)
Admiral Yularen — Grapple gun Blaster Complete “Prologue:
Geonosian Arena”15,000/Resolute (Bridge)
Ahsoka Tano Jedi Force manipulation Lightsaber Story mode progression —
Anakin Skywalker Jedi Force manipulation Lightsaber Story mode progression —
Asajj Ventress Sith Dark Force manipu-lation
Dual Light-sabers; Sith choke
Complete “Asajj Ventress 4: Storm Over Ryloth”
250,000/Invisible Hand (Wizard’s Tower)
Aurra Sing Bounty hunter Sniper shot; explosive attacks
Sniper rifle; grenades Story mode progression —
Bail Organa — Grapple gun BlasterComplete “Separatist Mission 1: Hostage Crisis”
25,000/Resolute (Reactor Chamber)
Barriss Offee Jedi Force manipulation Lightsaber Story mode progression —
Battle Droid Enemy Droid — Blaster Complete “Asajj Ventress 1: The Hidden Enemy”
6,500/Invisible Hand (Ground Assault Staging Area)
Battle Droid Commander Enemy Droid Command Droids Blaster Complete “Count Dooku 1:
Battle of Geonosis”30,000/Invisible Hand (Hangar)
Bib Fortuna — Grapple gun Blaster Complete “Count Dooku 5: Weapons Factory”
30,000/Invisible Hand (Ziro’s Chamber)
Boba Fett (Classic) Bounty hunter Hover; explosive
attacks BlasterMinikits (“General Grievous 6: Grievous Intrigue”)
100,000/Resolute (Minikit Bay)
Boil Clone trooper — Blaster; shock grenades Story mode progression —
C-3PO Protocol Droid — — Story mode progression —
Cad Bane Bounty hunter Hover; explosive attacks; grapple gun
Dual blasters; grenades
Complete “Prologue: Geonosian Arena”
250,000/Invisible Hand (Hangar)
Captain Antilles (Classic)
— Grapple gun Blaster Minikits (“Asajj Ventress 5: Innocents of Ryloth”)
50,000/Resolute (Minikit Bay)
Captain Rex Clone trooper Command clones; grapple gun
Dual blasters; shock grenades
Story mode progression —
Captain Typho — Grapple gun Blaster Complete “Asajj Ventress 3: Blue Shadow Virus”
10,000/Resolute (Hangar Overlook)
Chancellor Palpatine — Grapple gun Blaster
Control all systems as the Republic (see “Secrets and Extras” chapter)
250,000/Resolute (Bridge)
Great, you’ve found the checklists! Use these handy tables to keep track of all your goodie-grabbing progress. You can also use them to quickly track down anything you might be searching for. See the opening sections of this guide for descriptions and details on each of the items covered in these tables.
218Protected by copyright. Unauthorized or unlawful copying or downloading expressly prohibited.
introduction
cast
Padawan training
walkthrough
secrets and extras
checklistsCharaCters
ships
VehiCles
Minikits
red power BriCks
Gold BriCks
aChieVeMents and trophies
nintendo ds
contents
how to use this eguideDownload from www.chipper.pl

ch
ec
klis
t
Prima Official Game Guide
www.primagames.com
Owned? Image Name Class Abilities Weaponry How to Unlock Cost/LocationChewbacca (Classic) — Grapple gun Blaster Minikits (“Epilogue: The
Zillo Beast”)50,000/Resolute (Minikit Bay)
Clone Pilot Clone trooper Grapple gun Blaster; shock grenades
Complete “General Grievous 5: Rookies”
15,000/Resolute (Bridge)
Clone Shadow Trooper (Classic)
Clone trooper Grapple gun Blaster Minikits (“Asajj Ventress 3: Blue Shadow Virus”)
50,000/Resolute (Minikit Bay)
Clone Trooper Clone trooper Grapple gun Blaster; shock grenades Story mode progression —
Commander Bly Clone trooper Command clones;
grapple gunBlaster; shock grenades Story mode progression —
Commander Cody Clone trooper Command clones;
grapple gunBlaster; shock grenades Story mode progression —
Commander Fil Clone trooper Command clones;
grapple gunBlaster; shock grenades Story mode progression —
Commander Ponds Clone trooper Command clones;
grapple gunBlaster; shock grenades Story mode progression —
Commander Stone Clone trooper Command clones;
grapple gun
Dual blasters; shock grenades
Story mode progression —
Commando Droid Enemy Droid Explosive attacks;
grapple gunBlaster; grenades Story mode progression —
Count Dooku Sith Dark Force manipu-lation
Lightsaber; Sith lightning
Complete “Prologue: Geonosian Arena”
250,000/Invisible Hand (Hangar)
Darth Maul (Classic) Sith Dark Force manipu-
lation
Lightsaber staff; Sith choke
Minikits (“General Grievous 5: Rookies”)
275,000/Resolute (Minikit Bay)
Darth Sidious (Classic) Sith Dark Force manipu-
lationLightsaber; Sith lightning
Minikits (“Prologue: Geonosian Arena”)
275,000/Resolute (Minikit Bay)
Darth Vader (Classic) Sith Dark Force manipu-
lationLightsaber; Sith choke
Minikits (“Asajj Ventress 6: Liberty on Ryloth”)
275,000/Resolute (Minikit Bay)
Darth Vader Battle Damaged (Classic)
Sith Dark Force manipu-lation
Lightsaber; Sith choke
Minikits (“Asajj Ventress 2: Ambush!”)
275,000/Resolute (Minikit Bay)
Destroyer Droid Enemy Droid — Dual twin
blasters
Complete “General Grievous 1: Duel of the Droids”
40,000/Invisible Hand (Ground Assault Staging Area)
Dr. Nuvo Vindi — Grapple gun Blaster Complete “Asajj Ventress 3: Blue Shadow Virus”
50,000/Resolute (Brig)
Echo Clone trooper Explosive attacks Rocket launcher Story mode progression —
Eeth Koth Jedi Force manipulation Lightsaber Story mode progression —
Fives Clone trooper Grapple gun Blaster; shock grenades Story mode progression —
Gamorrean Guard — — Melee axe
Complete “Separatist Mission 2: Castle of Doom”
40,000/Invisible Hand (Ziro’s Chamber)
General Grievous Enemy Droid — Quadruple
Lightsabers
Complete “General Grievous 6: Grievous Intrigue”
250,000/Invisible Hand (Bridge)
Geonosian Guard — Grapple gun Blaster Complete “Count Dooku 5:
Weapons Factory”15,000/Invisible Hand (Ziro’s Chamber)
Gold Super Battle Droid Enemy Droid Rapid fire; invincibility Blaster Complete “Asajj Ventress
3: Blue Shadow Virus”6,000/Invisible Hand (Hangar)
219Protected by copyright. Unauthorized or unlawful copying or downloading expressly prohibited.
introduction
cast
Padawan training
walkthrough
secrets and extras
checklistsCharaCters
ships
VehiCles
Minikits
red power BriCks
Gold BriCks
aChieVeMents and trophies
nintendo ds
contents
how to use this eguideDownload from www.chipper.pl

ch
ec
klis
t
Prima Official Game Guide
www.primagames.com
Owned? Image Name Class Abilities Weaponry How to Unlock Cost/Location
GONK Droid — — — Complete “Asajj Ventress 3: Blue Shadow Virus”
3,000/Invisible Hand (Wizard’s Tower)
Grand Moff Tarkin — Grapple gun Blaster
Control all systems as the Separatists (see “Secrets and Extras” chapter)
250,000/Invisible Hand (Bridge)
Greedo (Classic) Bounty hunter Explosive attacks;
grapple gunBlaster; grenades
Minikits (“Asajj Ventress 1: The Hidden Enemy”)
70,000/Resolute (Minikit Bay)
Han Solo (Classic) — Grapple gun Blaster
Minikits (“General Grievous 1: Duel of the Droids”)
50,000/Resolute (Minikit Bay)
Heavy Super Battle Droid Enemy Droid Explosive attacks Arm blaster
Complete “General Grievous 3: Destroy Malevolence”
25,000/Invisible Hand (Ground Assault Staging Area)
Heavy Weapons Clone Trooper
Clone trooper Explosive attacks Rocket launcher Story mode progression —
HELIOS-3DEnemy Droid/bounty
hunter/protocol Droid/astromech Droid
Explosive attacks; grapple gun
Blaster; grenades Story mode progression —
Hevy Clone trooper Rapid fire; grapple gun Big blaster Story mode progression —
Hondo Ohnaka Bounty hunter Explosive attacks; grapple gun
Blaster; grenades
Complete “Count Dooku 2: Gungan General”
45,000/Invisible Hand (Ziro’s Chamber)
IG-86Enemy Droid/bounty
hunter/protocol Droid/astromech Droid
Explosive attacks; grapple gun
Blaster; grenades Story mode progression —
Imperial Guard (Classic) — — Melee spear
Minikits (“Separatist Mission 2: Castle of Doom”)
50,000/Resolute (Minikit Bay)
Jango Fett Bounty hunter Hover; explosive attacks; grapple gun Dual blasters Complete “Prologue:
Geonosian Arena”70,000/Invisible Hand (Ziro’s Chamber)
Jar Jar Binks — Super jump Melee blows Story mode progression —
Jek Clone trooper Explosive attacks; grapple gun
Rocket launcher Story mode progression —
Ki-Adi-Mundi Jedi Force manipulation Lightsaber Story mode progression —
Kit Fisto Jedi Force manipulation Lightsaber Story mode progression —
Lando Calrissian (Classic)
— Grapple gun BlasterMinikits (“General Grievous 2: Shadow of Malevolence”)
50,000/Resolute (Minikit Bay)
LEP Servant Droid Enemy Droid — — Complete “Asajj Ventress
3: Blue Shadow Virus”6,000/Invisible Hand (Hangar)
Lieutenant Thire Clone trooper Rapid fire; grapple gun Big blaster Story mode progression —
Lok Durd — Grapple gun Blaster Complete “Count Dooku 4: Defenders of Peace”
50,000/Resolute (Brig)
Luke Skywalker (Classic) Jedi Force manipulation Lightsaber Minikits (“Count Dooku 5:
Weapons Factory”)50,000/Resolute (Minikit Bay)
Luminara Unduli Jedi Force manipulation Lightsaber Story mode progression —
Lurmen Villager — Small size; grapple gun Melee whip Complete “Count Dooku 4:
Defenders of Peace”
6,000/Resolute (Ground Assault Staging Area)
Luxury Droid — — —Complete “Separatist Mission 1: Hostage Crisis”
150,000/Resolute (Medical Bay)
220Protected by copyright. Unauthorized or unlawful copying or downloading expressly prohibited.
introduction
cast
Padawan training
walkthrough
secrets and extras
checklistsCharaCters
ships
VehiCles
Minikits
red power BriCks
Gold BriCks
aChieVeMents and trophies
nintendo ds
contents
how to use this eguideDownload from www.chipper.pl

ch
ec
klis
t
Prima Official Game Guide
www.primagames.com
Owned? Image Name Class Abilities Weaponry How to Unlock Cost/Location
Mace Windu Jedi Force manipulation Lightsaber Story mode progression —
MagnaGuard Enemy Droid Charge up Melee staff Story mode progression —
MSE-6 — — —Complete “General Grievous 6: Grievous Intrigue”
6,000/Resolute (Medical Bay)
Nahdar Vebb Jedi Force manipulation Lightsaber Story mode progression —
Neimoidian — Grapple gun Blaster Complete “Prologue: Geonosian Arena”
20,000/Invisible Hand (Hangar)
Nute Gunray — Grapple gun Blaster
Complete “Republic Assault: Naboo” (see “Secrets and Extras” chapter)
50,000/Resolute (Brig)
Obi-Wan Kenobi Jedi Force manipulation Lightsaber Story mode progression —
Obi-Wan Kenobi (Classic)
Jedi Force manipulation Lightsaber Minikits (“Count Dooku 3: Jedi Crash”)
50,000/Resolute (Minikit Bay)
Onaconda Farr — Grapple gun BlasterComplete “Separatist Mission 1: Hostage Crisis”
25,000/Resolute (Bridge)
Padmé Amidala — Grapple gun Blaster Story mode progression —
Pirate Ruffian — Grapple gun Blaster Complete “Count Dooku 2: Gungan General”
10,000/Invisible Hand (Ziro’s Chamber)
Plo Koon Jedi Force manipulation Lightsaber Story mode progression —
Poggle the Lesser — Grapple gun Blaster Complete “Count Dooku 6:
Legacy of Terror”50,000/Resolute (Brig)
Princess Leia (Classic) — Grapple gun Blaster Minikits (“Count Dooku 1:
Battle of Geonosis”)50,000/Resolute (Minikit Bay)
Probe Droid — — Blaster Complete “Count Dooku 4: Defenders of Peace”
6,000/Invisible Hand (Turbo Laser Bay)
Queen Neeyutnee — Grapple gun Blaster Complete “Asajj Ventress
3: Blue Shadow Virus”30,000/Resolute (Hangar Overlook)
Qui-Gon Jinn (Classic) Jedi Force manipulation Lightsaber Minikits (“Asajj Ventress
4: Storm Over Ryloth”)50,000/Resolute (Minikit Bay)
R2-D2 Astromech Droid Hover Melee shock Story mode progression —
R3-S6 Astromech Droid Hover Melee shock Story mode progression —
R4-P17 Astromech Droid Hover Melee shock Story mode progression 35,000/Resolute (Hangar)
R6-H5 Astromech Droid Hover Melee shockComplete “General Grievous 4: Lair of Grievous”
25,000/Resolute (Reactor Chamber)
Rebel Commando (Classic)
— Grapple gun BlasterMinikits (“General Grievous 4: Lair of Grievous”)
50,000/Resolute (Minikit Bay)
Robonino Bounty hunter Charge up; small size; explosive attacks
Blaster; grenades Story mode progression —
Rys Clone trooper Grapple gun Blaster; shock grenades Story mode progression —
221Protected by copyright. Unauthorized or unlawful copying or downloading expressly prohibited.
introduction
cast
Padawan training
walkthrough
secrets and extras
checklistsCharaCters
ships
VehiCles
Minikits
red power BriCks
Gold BriCks
aChieVeMents and trophies
nintendo ds
contents
how to use this eguideDownload from www.chipper.pl

ch
ec
klis
t
Prima Official Game Guide
www.primagames.com
Owned? Image Name Class Abilities Weaponry How to Unlock Cost/LocationSavage Opress Sith Dark Force manipu-
lation
Lightsaber staff; Sith choke
Enter unlock code (see “Secrets and Extras” chapter)
250,000/Invisible Hand (Wizard’s Tower)
Senate Commando Clone trooper Grapple gun Blaster
Complete “Separatist Mission 1: Hostage Crisis”
25,000/Resolute (Hangar Overlook)
Senate Commando (Captain)
Clone trooper Grapple gun BlasterComplete “Separatist Mission 1: Hostage Crisis”
25,000/Resolute (Bridge)
Senator Kharrus — — Melee staff Complete “Count Dooku 2:
Gungan General”
20,000/Resolute (Ground Assault Staging Area)
Senator Philo — — Melee spearComplete “Separatist Mission 1: Hostage Crisis”
30,000/Resolute (Hangar Overlook)
Shahan Alama Bounty hunter Explosive attacks; grapple gun
Blaster; grenades
Complete “Count Dooku 2: Gungan General”
45,000/Invisible Hand (Ziro’s Chamber)
Sionver Boll — Grapple gun Blaster Complete “Epilogue: The Zillo Beast”
25,000/Resolute (Reactor Chamber)
Stormtrooper (Classic) Clone trooper Grapple gun Blaster Minikits (“Count Dooku 6:
Legacy of Terror”)50,000/Resolute (Minikit Bay)
Super Battle Droid Enemy Droid Rapid fire Arm blaster Complete “Asajj Ventress
2: Ambush!”25,000/Invisible Hand (Hangar)
Tee Watt Kaa — Small size; grapple gun Melee whip Complete “Count Dooku 3: Jedi Crash”
15,000/Resolute (Ground Assault Staging Area)
Turk Falso Bounty hunter Explosive attacks; grapple gun
Blaster; grenades
Complete “Count Dooku 3: Jedi Crash”
45,000/Invisible Hand (Ziro’s Chamber)
Tusken Raider (Classic) — Grapple gun Blaster
Minikits (“Separatist Mission 1: Hostage Crisis”)
50,000/Resolute (Minikit Bay)
TX-20 Enemy Droid Command Droids Blaster Complete “Count Dooku 5: Weapons Factory”
50,000/Invisible Hand (Ground Assault Staging Area)
Undead Geonosian — — — Complete “Count Dooku 6:
Legacy of Terror”
10,000/Invisible Hand (Ground Assault Staging Area)
Vader's Apprentice (Classic)
Sith Dark Force manipu-lation
Lightsaber; Sith lightning
Minikits (“Count Dooku 4: Defenders of Peace”)
275,000/Resolute (Minikit Bay)
Wag Too — Small size; grapple gun Melee whip Story mode progression —
Wat Tambor — Grapple gun Blaster Complete “Asajj Ventress 4: Storm Over Ryloth”
50,000/Resolute (Brig)
Waxer Clone trooper Explosive attacks; grapple gun
Rocket launcher Story mode progression —
Wedge Antilles (Classic)
— Grapple gun BlasterMinikits (“General Grievous 3: Destroy Malevolence”)
50,000/Resolute (Minikit Bay)
Whorm Loathsom — Grapple gun Blaster
Complete “Republic Assault: Christophsis” (see “Secrets and Extras” chapter)
50,000/Resolute (Brig)
Workout Clone Trooper Clone trooper Grapple gun Blaster Complete “Count Dooku 5:
Weapons Factory”25,000/Resolute (Turbo Laser Bay)
Yoda Jedi Small size; Force manipulation Lightsaber Story mode progression —
222Protected by copyright. Unauthorized or unlawful copying or downloading expressly prohibited.
introduction
cast
Padawan training
walkthrough
secrets and extras
checklistsCharaCters
ships
VehiCles
Minikits
red power BriCks
Gold BriCks
aChieVeMents and trophies
nintendo ds
contents
how to use this eguideDownload from www.chipper.pl

ch
ec
klis
t
Prima Official Game Guide
www.primagames.com
shiPsOwned? Image Name Abilities Weaponry How to Unlock Cost/LocationRepublic Ships
Anakin's Jedi Starfighter Boost Blasters Story mode progression —
ARC-170 Starfighter (Rapid Fire) Rapid fire; boost Blasters Complete “Epilogue: The Zillo
Beast”50,000/Resolute (Hangar)
H-type Nubian Yacht Boost Blasters Complete “General Grievous 3: Destroy Malevolence”
50,000/Resolute (Hangar)
Jedi Shuttle Boost Blasters Complete “General Grievous 6—Grievous Intrigue”
50,000/Resolute (Hangar)
Kit Fisto's Jedi Starfighter Boost Blasters Complete “General Grievous 4:
Lair of Grievous”50,000/Resolute (Hangar)
Medical Frigate (Torpedoes) Torpedoes; boost Torpedoes;
blastersComplete “General Grievous 3: Destroy Malevolence”
50,000/Resolute (Hangar)
Obi-Wan's Jedi Starfighter Boost Blasters Complete “Prologue: Geonosian
Arena”50,000/Resolute (Hangar)
Plo Koon's Jedi Starfighter Boost Blasters Story mode progression —
Republic Attack Shuttle Boost Blasters Complete “General Grievous 4: Lair of Grievous”
50,000/Resolute (Hangar)
Republic Cruiser (Missiles + Torpedoes)
Torpedoes; explosive attacks; boost
Missiles; torpedoes; blasters
Complete “Count Dooku 3: Jedi Crash”
50,000/Resolute (Hangar)
Republic Dropship (Rapid Fire) Rapid fire; boost Blasters Complete “Asajj Ventress 6:
Liberty on Ryloth”50,000/Resolute (Hangar)
Republic Gunship Boost Blasters Story mode progression —
Stealth Ship (Missiles + Torpedoes)
Torpedoes; explosive attacks; boost Blasters Collect all 130 gold bricks, then
build at superkit bay200,000/Resolute (Hangar)
The Twilight Boost Blasters Complete “Count Dooku 2: Gungan General”
50,000/Resolute (Hangar)
V-19 Torrent Starfighter Boost Blasters Story mode progression —
Y-wing Starfighter Boost Blasters Complete “General Grievous 2: Shadow of Malevolence”
50,000/Resolute (Hangar)
Separatist Ships
Geonosian Solar Sailor Boost Blasters Complete “Count Dooku 6: Legacy of Terror”
200,000/Invisible Hand (Hangar)
Geonosian Starfighter Boost Blasters Buy Poggle the Lesser 50,000/Invisible Hand (Hangar)
Hyena Bomber Boost Blasters Complete “Prologue: Geonosian Arena”
50,000/Invisible Hand (Hangar)
MagnaGuard Starfighter Boost Blasters Buy MagnaGuard 50,000/Invisible Hand (Hangar)
Neimoidian Shuttle Boost Blasters Buy Nute Gunray 50,000/Invisible Hand (Hangar)
Pirate Saucer (Missiles) Explosive attacks; boost Missiles; blasters Buy Hondo Ohnaka 50,000/Invisible
Hand (Hangar)
Slave I Boost Blasters Purchase the character Jango Fett —
Souless One (Rapid Fire) Rapid fire; boost Blasters Complete “General Grievous 6: Grievous Intrigue”
200,000/Invisible Hand (Hangar)
The Halo (Rapid Fire) Rapid fire; boost Blasters Story mode progression 200,000/Invisible Hand (Hangar)
223Protected by copyright. Unauthorized or unlawful copying or downloading expressly prohibited.
introduction
cast
Padawan training
walkthrough
secrets and extras
checklistsCharaCters
ships
VehiCles
Minikits
red power BriCks
Gold BriCks
aChieVeMents and trophies
nintendo ds
contents
how to use this eguideDownload from www.chipper.pl

ch
ec
klis
t
Prima Official Game Guide
www.primagames.com
Owned? Image Name Abilities Weaponry How to Unlock Cost/LocationTrident Assault Craft (Missiles + Torpedoes)
Torpedoes; explosive attacks; boost
Missiles; torpedoes; blasters
Complete “Asajj Ventress 6: Liberty on Ryloth”
200,000/Invisible Hand (Hangar)
Vulture Droid Boost Blasters Complete “Prologue: Geonosian Arena”
100/Invisible Hand (Hangar)
Xanadu Blood (Rapid Fire) Rapid fire; boost Blasters Complete any of Ziro’s bounty
hunter missions. —
VehiclesOwned? Image Name Class Abilities Weaponry How to Unlock Cost/LocationRepublic Vehicles
AT-RT Small air support Boost Blasters Build the vehicle during any
ground assault stage. —
AT-AP Walker Air support Explosive
attacks Cannon Build the vehicle during any ground assault stage.
75,000/Resolute (Ground Assault Staging Area)
AT-TE Air support Explosive attacks
Cannons; blasters
Build the vehicle during any ground assault stage.
100,000/Resolute (Ground Assault Staging Area)
BARC Speeder
Small air support Boost Blasters Build the vehicle during any
ground assault stage. —
Pirate Speeder Tank
Air support Explosive attacks Cannon Build the vehicle during any
ground assault stage.75,000/Resolute (Ground Assault Staging Area)
RX-200 Tank Air support Rapid fire Laser cannon Build the vehicle during any
ground assault stage.250,000/Resolute (Ground Assault Staging Area)
Starhawk Speeder Bike
Small air support Boost Blaster Build the vehicle during any
ground assault stage.50,000/Resolute (Ground Assault Staging Area)
Separatist Vehicles
AAT Air support Explosive attacks
Cannon; blasters
Build the vehicle during any ground assault stage.
50,000/Invisible Hand (Ground Assault Staging Area)
Dwarf Spider Droid
Small air support — Blasters Build the vehicle during any
ground assault stage.
75,000/Invisible Hand (Ground Assault Staging Area)
Hailfire Droid Air support Explosive
attacks Missiles Build the vehicle during any ground assault stage.
75,000/Invisible Hand (Ground Assault Staging Area)
OG-9 Homing Spider Droid
Air support Rapid fire Laser cannon Build the vehicle during any ground assault stage.
250,000/Invisible Hand (Ground Assault Staging Area
Pirate Speeder Tank
Air support Explosive attacks Cannon Build the vehicle during any
ground assault stage. —
STAP Small air support Boost Blasters Build the vehicle during any
ground assault stage. —
Starhawk Speeder Bike
Small air support Boost Blasters Build the vehicle during any
ground assault stage. —
Super Tank Air supportExplosive attacks; invincible
Missiles; blasters
Build the vehicle during any ground assault stage.
100,000/Invisible Hand (Ground Assault Staging Area)
224Protected by copyright. Unauthorized or unlawful copying or downloading expressly prohibited.
introduction
cast
Padawan training
walkthrough
secrets and extras
checklistsCharaCters
ships
VehiCles
Minikits
red power BriCks
Gold BriCks
aChieVeMents and trophies
nintendo ds
contents
how to use this eguideDownload from www.chipper.pl

ch
ec
klis
t
Prima Official Game Guide
www.primagames.com
MinikitsNo. Mode NotesPrologue—Geonosian Arena
1 Story Destroy the five merchant carts in the arena near the foreground.
2 Free Play Above the purple LEGO plate. Use the Force to build the pillar and then use Jar Jar to reach it.
3 Free Play Use the arena's background crawl space (hatch).
4 Free Play Around the arena are ten ducks. Shoot them with a sniper rifle.
5 Free Play Force-slam the five flower boxes around the edge of the area, then use the Dark Force to place the plants in the pots.
6 Free Play Use the power panel on the right of the arena to create an electric fence. Herd five Droidekas into the pen.
7 Free Play Use the Dark Force on the pillar on the left, then grapple the pillar's hook points.
8 Free Play Destroy the three treadmills in the exercise room by running on them.
9 Free Play Destroy the five golden wall ornaments around the edge of the arena.
10 Free Play Build C-3PO from the loose pieces on the ground.
Count Dooku 1—Battle of Geonosis
1 Story Obscured by the cliff on the left of the level.
2 Story Destroy five "totem rocks" spread around the level (they look like trees/plants).
3 Story Destroy 3 Hailfire Droids (rolling two-wheeled foes).
4 Free Play Activate the bounty hunter control panel near the start, then defeat 50 Droids.
5 Free Play Enter the north crawl space, then slide down the slope, hitting every button.
6 Free Play Destroy ten rocks covered in pink crystals spread around the level.
7 Free Play Shatter the Dark Force rock near the crawl space.
8 Free Play Build and activate the astromech Droid control panel near the Dark Force rock, then collect the studs that appear.
9 Free Play Activate the protocol Droid control panel at the bottom-right of the level, then race across the pads that appear.
10 Free Play Charge up the power panel near the protocol Droid control panel to reveal a minikit.
Count Dooku 2—Gungan General
1 Story Tucked away near some rocks to the right of the starting point.
2 Story Destroy five enemy speeders from around the level.
3 Story Ten "totem rocks" are spread around the level.
4 Story Destroy the ray shield that’s protecting the foreground torpedo generator, then destroy the torpedo generator.
5 Free Play Activate the enemy Droid control panel to the left of the starting point.
6 Free Play Shatter the Dark Force rock that's north of the enemy Droid control panel.
7 Free Play Activate the bounty hunter control panel in the top-left corner of the level.
8 Free Play Use the Dark Force to block the north geysers with the nearby stones.
9 Free Play Build and activate the astromech Droid control panel on the map's right side, then collect the studs that appear near the north cliff.
10 Free Play Activate the power panel at the bottom-right corner of the area, then race across the checkpoint pads that appear.
225Protected by copyright. Unauthorized or unlawful copying or downloading expressly prohibited.
introduction
cast
Padawan training
walkthrough
secrets and extras
checklistsCharaCters
ships
VehiCles
Minikits
red power BriCks
Gold BriCks
aChieVeMents and trophies
nintendo ds
contents
how to use this eguideDownload from www.chipper.pl

ch
ec
klis
t
Prima Official Game Guide
www.primagames.com
No. Mode NotesCount Dooku 3—Jedi Crash
1 Free Play Follow the green arrows and destroy the five highlighted ships.
2 Free Play Follow the green arrows and destroy the five highlighted Probe Droids.
3 Free Play Destroy the six gold circles around the blue-lit hangar of the battleship on the left.
4 Free Play Attack the glowing red object at the back of the left battleship with an enemy (Separatist) spacecraft (such as a Vulture Droid).
5 Free Play Destroy the secret landing pad’s three gold toilet stalls.
6 Free Play Land on the first landing pad. Pull the switch at the back. Destroy the two silver pipe sections near the ceiling to put out the fire.
7 Free Play Destroy five Probe Droids, one on each landing pad (except the secret one). Smash crates to reveal it.
8 Free Play Destroy the gold gate covering the crawl space near the third water spout and head through.
9 Free Play On the torpedo generator landing pad, destroy the gold box, then build a crane and grapple down.
10 Free Play In the hangar, use Jar Jar to jump onto the tall platform in the rear-left of the area.
Count Dooku 4—Defenders of Peace
1 Story Destroy the 10 palm trees scattered across the level.
2 Story At the crash site, head to the right and follow the cliff edge to find a hidden minikit.
3 Free Play Activate the bounty hunter control panel to the left of the battlefield, then kill 50 Droids before time expires.
4 Story Destroy three enemy tanks, then use a tank to collect the minikit that appears above the final tank you destroy.
5 Story Destroy the enemy barracks at the northwest base. Build three base structures around the pad where the barracks formerly stood.
6 Story Build a minikit dispenser by building one base structure of every preceding group in the build menu.
7 Free Play Build and activate the astromech Droid control panel to the right of the start position, then collect the studs that appear.
8 Free Play Activate the protocol Droid control panel to the south, then use a speeder to quickly drive over each of the race pads that appear.
9 Free Play Activate the power panel on the east wall, then grapple the revealed hook point.
10 Free Play Use a Sith character to shatter the northeast Dark Force rock.
Count Dooku 5—Weapons Factory
1 Free Play Build and activate the astromech Droid control panel south of the bridge, then collect the studs that appear.
2 Story Park a speeder below the minikit that hovers above the hill near the factory doors, then jump up. Alternatively, use Jar Jar Binks during Free Play.
3 Free Play Activate the bounty hunter control panel north of the bridge (Republic side), then kill 50 Droids before time expires.
4 Story Build three base structures around the gray pad at the northwest corner of the map to remove the pad.
5 Story Build a minikit dispenser by building one base structure of every preceding group in the build menu.
6 Story In the tunnel, destroy the five red crystal objects.
7 Free Play In the tunnel, destroy the silver spiderweb. Go through the hole and use the Force to lift an egg into a high nest. Sabre-jump up to reach.
8 Free Play In the tunnel, destroy the first three gold triangles on the tunnel wall. Activate the astromech Droid control panel you discover in the nook beyond.
9 Free Play In the tunnel, destroy another three gold triangles on the tunnel wall. Grapple the hook point in the nook beyond.
10 Story In the final area, use the Force on each of the five devices.
226Protected by copyright. Unauthorized or unlawful copying or downloading expressly prohibited.
introduction
cast
Padawan training
walkthrough
secrets and extras
checklistsCharaCters
ships
VehiCles
Minikits
red power BriCks
Gold BriCks
aChieVeMents and trophies
nintendo ds
contents
how to use this eguideDownload from www.chipper.pl

ch
ec
klis
t
Prima Official Game Guide
www.primagames.com
No. Mode NotesCount Dooku 6—Legacy of Terror
1 Free Play Grapple the overhead statue on the entry area's right ledge.
2 Story Build the colored block stairs perfectly.
3 Free Play Find and build five Geonosian statues throughout the level that will in turn dance.
4 Story In the first tunnel, destroy the five statues that pop out from the sides of the walls.
5 Free Play In the first tunnel, activate the astromech Droid control panel, then fix the mine cart track in the side room.
6 Free Play In the first tunnel, destroy four gold plates on the walls, then build the walker. Stand on the orange pad, then use Jar Jar to grab the minikit in the side room.
7 Free Play In the lower tunnel, activate the power panel and obtain a minikit from the cake in the side room.
8 Free Play In the lower tunnel, destroy the silver objects on the spider web, then use the Dark Force to place the purple objects onto the web.
9 Story Force-slam five clay jars during the escape run.
10 Story Sabre-jump up the checkered wall at the end of the escape run.
General Grievous 1—Duel of the Droids
1 Story Destroy the five tea dispensers in the side consoles.
2 Free Play Activate the power panel near the start, then go through the crawl space and destroy the three Droids.
3 Free Play Destroy the five MSE-6 mouse Droids throughout the level (two hide behind Dark Force side consoles).
4 Free Play Find and build three Gold Super Battle Droids (destroy side consoles to reveal).
5 Story Destroy the three golden boxes with the help of the Gold Super Battle Droids.
6 Free Play Activate the three protocol Droid control panels in the corridors and destroy the five beach balls you find.
7 Free Play After defeating Grievous, hover to the left ledge, then activate the power panel.
8 Free Play Use the Dark Force to reveal minikit bits in the room with R2-D2. Build it on the purple table.
9 Free Play Use the Dark Force to reveal UFO bits in the hangar area. Drive the UFO over the orange pads.
10 Free Play Jump through the hole above the hangar balcony, then knock down the pins in the bowling alley.
General Grievous 2—Shadow of Malevolence
1 Free Play Destroy the five highlighted ships.
2 Free Play At the far left of the Malevolence, lower deck, use an enemy ship to destroy the glowing red object.
3 Free Play Grapple down the box on the first landing pad, then use Jar Jar to jump up to the minikit.
4 Free Play Launch the shuttle on the first landing pad, then destroy it in space.
5 Free Play Destroy the gold object on the Malevolence near the first landing pad with a rapid-fire ship.
6 Free Play On the second landing pad, activate the protocol Droid control panel, then grapple the pool hook point and use Jar Jar to reach the minikit.
7 Free Play On the second landing pad, grapple the hook point to find two plunk Droids, then use them to turn the nearby pads green.
8 Story On the third landing pad, use the Force to send three red dumpsters to the trash compactor.
9 Free Play Launch another shuttle from the third landing pad, then destroy it in space.
10 Free Play Fly close to the ion cannon at high altitude to open a secret panel, then destroy the silver object within with missiles.
227Protected by copyright. Unauthorized or unlawful copying or downloading expressly prohibited.
introduction
cast
Padawan training
walkthrough
secrets and extras
checklistsCharaCters
ships
VehiCles
Minikits
red power BriCks
Gold BriCks
aChieVeMents and trophies
nintendo ds
contents
how to use this eguideDownload from www.chipper.pl

ch
ec
klis
t
Prima Official Game Guide
www.primagames.com
No. Mode NotesGeneral Grievous 3—Destroy Malevolence
1 Free Play Activate the clone trooper cotrol panel near the start, then use the Force to solve the tilt maze.
2 Free Play Use the Dark Force on five Sith washing machines hidden throughout the level.
3 Free Play Grapple the two hook points at the start of the train yard.
4 Free Play In the train yard, hover over and activate the protocol Droid control panel, then destroy the gold boxing glove.
5 Free Play Destroy the silver box on the second train, then build and activate an astromech Droid control panel to reveal a caged minikit. Use the crane to open the minikit's cage, then return the gray object to its original platform and hover over.
6 Free Play Before leaving the train yard, jump to the background platform and destroy the silver object to drift up to the minikit.
7 Free Play In the chamber where you battle Grievous, destroy the five silver points.
8 Story Cut down a Droideka's shield, then Force-throw the Droideka into Grievous. Do this five times.
9 Story When slotting the three colored bits into the wall, match the colors to those on the left.
10 Free Play Activate the power panel on the bridge, then grapple the hook point before it retracts.
General Grievous 4—Lair of Grievous
1 Story Order the blaster clones to destroy the gold rock near the start.
2 Free Play After the shuttle has been hit by a rocket, use the Dark Force to create a power panel, then activate it.
3 Free Play Find and turn ten valves with the Dark Force inside the compound, then destroy them.
4 Story Hit ten hanging overhead lights with a thrown Lightsaber inside the compound.
5 Free Play Use an astromech Droid or bounty hunter to hover over to the first circular chamber’s side room, then Force-move the colored pool balls into the matching pockets.
6 Free Play Activate the three panels in the corridor with the power plugs, then drive the cart over the orange pad.
7 Free Play In the lava pit, use the Dark Force to raise foreground platforms that lead to the minikit.
8 Free Play Activate the power panel inside the Gor room.
9 Free Play Find and destroy ten gold clamps in the Gor room and the following outdoor area, then shoot the spotlights in midair.
10 Story In the final outdoor area, Force-move the top of the left tower onto the right tower. Then plug the right tower into the generator.
General Grievous 5—Rookies
1 Free Play Destroy the silver barricade at the start, then build and use the cleaning machine on the six goo piles.
2 Free Play After the worm flees, use the Dark Force to enter a cave. Hatch the five eggs inside.
3 Free Play After the worm flees, destroy the silver rubble, then jump into the high cave. Grapple the three hook points inside.
4 Free Play After defeating the worm, use the Jedi logo to access a cave. Feed the young worm the five minikit pieces.
5 Free Play After defeating the worm, find and plug five steaming vents throughout the level.
6 Free Play After defeating the worm, activate the power panel, followed by the astromech Droid control panel.
7 Story Find and destroy five blue consoles inside the station to reveal hook points, then grapple these.
8 Story Destroy the six gold boxes with Hevy when battling the army of Droids.
9 Free Play Use the Dark Force to open the vent in the control room. Drain the jacuzzi outside.
10 Free Play Use the Dark Force to open the vent in the control room. Activate the radio tower, then collect the minikit with Hevy.
228Protected by copyright. Unauthorized or unlawful copying or downloading expressly prohibited.
introduction
cast
Padawan training
walkthrough
secrets and extras
checklistsCharaCters
ships
VehiCles
Minikits
red power BriCks
Gold BriCks
aChieVeMents and trophies
nintendo ds
contents
how to use this eguideDownload from www.chipper.pl

ch
ec
klis
t
Prima Official Game Guide
www.primagames.com
No. Mode NotesGeneral Grievous 6—Grievous Intrigue
1 Story From the start, Force-throw five objects at the foreground window to crack it five times.
2 Free Play Destroy the gold box near the back of the bridge, then build the lever from the bits.
3 Free Play Once on Grievous' ship, destroy the silver object near the first ramp, then blast the plant that emerges.
4 Free Play Find and plug up five steaming vents on Grievous' ship.
5 Story Find and destroy three gold objects on the walls in the second circular chamber. (Force-lift a Super Battle Droid in Story mode.)
6 Story Block the four floor hatches in Eeth Koth's holding room.
7 Free Play Destroy the gold door in Eeth Koth's holding room.
8 Free Play During space combat, destroy the five green highlighted ships.
9 Story Stack the purple crates in the hangar to reach a high minikit.
10 Free Play Activate the power panel in the hangar to launch a shuttle, then destroy it in space.
Asajj Ventress 1—The Hidden Enemy
1 Free Play Use the Force on ten computer desks hidden throughout the level, then destroy the monitors that drop from above.
2 Free Play Crawl through the hatch near the start and Force-move the power plug into the three sockets.
3 Free Play In the gun turret/elevator room, use an astromech Droid to hover over to the exterior minikit.
4 Free Play Activate the bounty hunter control panel on the roof.
5 Free Play Use the Dark Force to turn four vent valves on the roof.
6 Free Play On the roof, use a rocket launcher or sniper character to destroy the three spider-like Droids on the background buildings.
7 Free Play In the first room of Ventress' hideout, activate the protocol Droid control panel, then Force-move the helium plug and pop the middle balloon.
8 Free Play In the library, use the Dark Force to move four books onto the bookshelves' purple pads.
9 Free Play After Ventress destroys the floor, use the Dark Force to turn two cranks, then drive the two cars onto the orange pads back in the library.
10 Story Destroy ten Super Battle Droids while battling Ventress on the falling Tri-Droid.
Asajj Ventress 2—Ambush!
1 Story Knock off the shuttle's four thrusters, then pull the hook point.
2 Story Find and destroy five hermit crabs that hide under rocks around the level.
3 Free Play Use the cylindrical plants to reach a high ledge, then hover to the right. Knock a box off the right ledge and build the pieces into a big crab. Ride the crab and smack its five babies.
4 Free Play Use the Dark Force to build a platform near the end of the path. Enter the high cave and play the crab's song on the mushrooms.
5 Free Play Find and destroy five worms that hide beneath purple plants around the level.
6 Free Play Hover from the valley's entry ledge, then activate an astromech Droid control panel and grapple the squid in the cave.
7 Free Play Destroy the gold coral near the first tank to enter a cave, then use the Force to light up the cave's rocks. Use Jar Jar to claim the high minikit.
8 Free Play Use the Dark Force to move some pink coral near the second tank and enter a cave. Build three purple objects inside the cave to reveal an ark. Grapple the ark.
9 Free Play Activate the power panel near the second tank, then build a platform from the resulting bits. Stand one character on the platform and use the other to Force-lift their partner up to the minikit.
10 Story Destroy three purple plants near the third tank, then build the remaining pieces to form a friendly crab.
229Protected by copyright. Unauthorized or unlawful copying or downloading expressly prohibited.
introduction
cast
Padawan training
walkthrough
secrets and extras
checklistsCharaCters
ships
VehiCles
Minikits
red power BriCks
Gold BriCks
aChieVeMents and trophies
nintendo ds
contents
how to use this eguideDownload from www.chipper.pl

ch
ec
klis
t
Prima Official Game Guide
www.primagames.com
No. Mode NotesAsajj Ventress 3—Blue Shadow Virus
1 Story Destroy five security cameras in the swamp.
2 Story Destroy the gold idol in the swamp, build the pieces into a tractor, and mow the grass.
3 Free Play Force-lift five carrots up from the ground in the swamp, then destroy them.
4 Free Play Use the Dark Force to lift six objects from the swamp water, then destroy them.
5 Story Use the Force to close four gates inside the enemy base, then use it again to lock their purple clamps.
6 Free Play Activate the LAAT's astromech Droid control panel.
7 Free Play Activate the two enemy Droid panels inside the base twice to make minikit pictures appear on both monitors.
8 Free Play Activate the protocol Droid control panel beyond the Droidekas, then enter the bar. Use the Force to pour the MagnaGuard a drink.
9 Free Play Use the crawl space hatch while battling the LEP Droid, then saber-jump up the checkered walls.
10 Free Play Defeat the LEP Droid, then confront Dr. Vindi on the landing pad with both Free Play characters. Pull both hook points on his ship.
Asajj Ventress 4—Storm Over Ryloth
1 Free Play Use a rapid-fire ship to destroy the ten gold objects on the front of the Republic battleship.
2 Free Play Use an enemy ship to destroy the red glowing object near the Republic battleship's bridge.
3 Free Play Destroy the five enemy ships that are highlighted with green reticles.
4 Free Play Destroy the silver crate inside the first turbo laser bay, then build and activate an astromech Droid control panel. Collect the minikit in space.
5 Story While operating a turbo laser turret, destroy ten enemy fighters.
6 Free Play Activate the power panel on the left landing pad, then commandeer a Vulture Droid and walk it across the orange pads.
7 Free Play Destroy the gold door on the bridge.
8 Free Play Grapple the hook point on the bridge, then use the Dark Force to build a pad. Step on the pad.
9 Free Play Use Jar Jar to leap up and grab the minikit that hovers near the ramp to the bridge.
10 Free Play Use the crawl space hatch near the torpedo generator.
Asajj Ventress 5—Innocents of Ryloth
1 Story Destroy five pink flowers around the streets.
2 Story Destroy five gray boxes with red stripes around the streets.
3 Free Play Use the Dark Force to sweep out five chimneys around the streets.
4 Free Play Activate the protocol Droid control panel near the vehicle generator, then solve the equation on the blackboard.
5 Free Play Activate the bounty hunter control panel on the high ledge near the plaza gate.
6 Story Use the Force to align the pipe in the first jail cell.
7 Story After Force-moving the box along the checkered track, explore the jail cell's nook.
8 Free Play Move the box close to the elevated crawl space hatch, then crawl through.
9 Story In the cannon area, Force-lift a Super Battle Droid and destroy the gold debris to the left.
10 Free Play In the cannon area, blast down the silver debris to the left, then use the Dark Force to build a magnifying glass.
230Protected by copyright. Unauthorized or unlawful copying or downloading expressly prohibited.
introduction
cast
Padawan training
walkthrough
secrets and extras
checklistsCharaCters
ships
VehiCles
Minikits
red power BriCks
Gold BriCks
aChieVeMents and trophies
nintendo ds
contents
how to use this eguideDownload from www.chipper.pl

ch
ec
klis
t
Prima Official Game Guide
www.primagames.com
No. Mode NotesAsajj Ventress 6—Liberty on Ryloth
1 Story Destroy ten gray, crystal-covered rocks around the level.
2 Story Destroy five palm trees around the level.
3 Story Search the far-left cliff.
4 Story Destroy three enemy tanks.
5 Free Play Build and activate the northwest astromech Droid control panel, then collect the line of studs that appears.
6 Free Play Enter the north crawl space and destroy the Darth Vader head sculpture.
7 Free Play Activate the bounty hunter control panel near the northeast enemy base, then destroy 50 Droids.
8 Free Play Activate the protocol Droid control panel to the south, then race over all of the orange pads that appear.
9 Free Play Use the Dark Force to shatter the red glowing rock to the southeast.
10 Story Build a minikit dispenser by building one base structure of every preceding group in the build menu.
Epliogue—The Zillo Beast
1 Story Find it hidden in the rocks to the northeast of the central Republic base.
2 Story Destroy five crystal-covered rocks around the level.
3 Story Destroy ten blue boxes around the level.
4 Story Destroy six enemy tanks.
5 Free Play Activate the power panel to the south, then race across all of the orange pads that appear.
6 Free Play Use the Dark Force to shatter the red glowing rock to the southeast.
7 Free Play Activate the southeast bounty hunter control panel, then destroy 50 Droids within the time limit.
8 Story Force-move the north plugs into the sockets.
9 Free Play Build and activate the astromech Droid control panel to the north, then collect the studs that appear nearby.
10 Story Build a minikit dispenser by building one base structure of every preceding group in the build menu.
Separatist Missions—Hostage Crisis
1 Free Play Use Jar Jar to reach the minikit that hovers above the landing site's left cruiser.
2 Free Play Defeat the five clone troopers that are scrubbing the ships.
3 Free Play Repair the landing site's damaged right cruiser by Force-moving the three nearby parts onto the ship.
4 Free Play Build and activate the landing site's astromech Droid control panel, then use a hailfire Droid to destroy the central fighter.
5 Story Destroy five MSE-6 mouse Droids in the corridor beyond the landing site.
6 Free Play Use the Force to reveal five ice cream machines in the corridor.
7 Free Play Use the Dark Force to expose a crawl space hatch in the corridor, then head through.
8 Free Play Use the Dark Force to activate the video game inside the second clone panel room.
9 Free Play Use the Jedi logo to cut a hole in the wall and discover a lever, then use an astromech Droid to hover to the foreground minikit.
10 Free Play Destroy the gold bars at the end of the corridor and activate the astromech Droid control panel, then give the four senate guards new hairstyles.
231Protected by copyright. Unauthorized or unlawful copying or downloading expressly prohibited.
introduction
cast
Padawan training
walkthrough
secrets and extras
checklistsCharaCters
ships
VehiCles
Minikits
red power BriCks
Gold BriCks
aChieVeMents and trophies
nintendo ds
contents
how to use this eguideDownload from www.chipper.pl

ch
ec
klis
t
Prima Official Game Guide
www.primagames.com
No. Mode NotesSeparatist Missions—Castle of Doom
1 Story Attack Jabba and defeat his guards three times, then build the pieces.
2 Free Play Grapple the chandelier above Jabba, then build the purple pad and Force-move the boxes of food onto it.
3 Free Play Destroy the foreground silver plates, then jump across the red buttons.
4 Free Play Destroy five silver and gold objects throughout the level, then build Probe Droids from the remaining pieces.
5 Free Play Destroy the gold gate in the mess hall, then build the purple pad and Force-move the giant burger onto it. Use Jar Jar to leap up to the high minikit.
6 Story Destroy the five ceiling struts in the garage.
7 Free Play Once outdoors, destroy the gold LEGO debris, then destroy the silver clamp on the barge near Jabba's palace.
8 Free Play Destroy ten ram skulls around the sandy outdoor areas.
9 Free Play Use the crawl space hatch near the outdoor power panel.
10 Free Play Open the garage near Anakin's shuttle, then drive the jeep across the orange pads that appear.
red Power BricksNo. Name Location Price How to GetBattleship Resolute
1 Red Brick Detector Bridge 125,000 Destroy some boxes, then build the pieces into a crawl space hatch. Crawl through.
2 Score x6 Reactor chamber 10,000,000 Force-move the power plug into the socket, then grapple up to the brick.
3 Stud Magnet Reactor chamber 500,000 Use rapid-fire attacks to destroy the four large gold objects on the walls.
4 Score x10 Reactor chamber 40,000,000 Hidden in the silver object near the bridge elevator (explosive attacks and Dark
Force abilities required).
5 Character Studs Brig 100,000Open all of the cells, then use the Force to turn the valves inside the cells. Activate the far-right power panel, followed by the nearby bounty hunter control panel, to open the final cell with the brick.
6 Score x4 Superkit bay 3,000,000 Force-move the red dumpsters over to the nearby trash compactor.
7 Fast Build Turbo laser bay 500,000 Attack the punching bag five times.
8 Glow in the Dark Medical bay 25,000 Attack the background beds to make them rise.
9 Super Speeders Minikit bay 40,000,000Use Jar Jar to reach the background balcony. Build a hook point to the right, then grapple up with a character that has explosive attacks. Blast the balcony's silver box.
10 Minikit Detector Minikit bay 750,000 Activate the foreground astromech Droid control panel.
11 Fast Saber Cut Hangar overlook 300,000 Use a sniper to shoot the three green targets in the background.
12 Score x2 Hangar 500,000 Destroy boxes to discover a hook point on a crate. Grapple the hook point.
The Invisible Hand
1 Dual Wield Hangar 250,000 Force-lift the left bridge all the way up, then jump to the hovering brick.
2 Perfect Deflect Hangar 100,000 Force-lift the right bridge, then use the panel to obtain an ice cream truck. Park on the orange pad across the right bridge, then destroy the silver trophy.
3 Regenerate Hearts Ziro's room 400,000 Take aim and knock down the four large objects that hang from the ceiling, then destroy them.
4 Dark Side Bridge 150,000 Use the Dark Force to bring down the red glowing panel above the command console.
5 Invincibility Ground assault staging area 1,000,000 Activate the clone panel to the right.
6 Score x8 Wizard's Tower 20,000,000 Destroy the silver table in the center of the room.
232Protected by copyright. Unauthorized or unlawful copying or downloading expressly prohibited.
introduction
cast
Padawan training
walkthrough
secrets and extras
checklistsCharaCters
ships
VehiCles
Minikits
red power BriCks
Gold BriCks
aChieVeMents and trophies
nintendo ds
contents
how to use this eguideDownload from www.chipper.pl

ch
ec
klis
t
Prima Official Game Guide
www.primagames.com
gold Bricks
achieVeMents and troPhiesAchievement/Trophy How to Get Achieved?This is just the beginning! Complete "Prologue:
Geonosian Arena"The pleasure is all mine my dear
Complete "Asajj Ventress 1: The Hidden Enemy"
Okay clankers, suck lasers!
Complete "Asajj Ventress 2: Ambush!"
Me'sa rescued you Complete "Count Dooku 2: Gungan Genera"
Are all Jedi so reckless? Complete "Count Dooku 3: Jedi Crash"
There goes my promotion Complete "Count Dooku 4: Defenders of Peace"
Oops. What happened? Complete "Asajj Ventress 3: Blue Shadow Virus"
Follow me, boys! Complete "General Grievous 1: Duel of the Droids"
Torpedoes away! Complete "General Grievous 2: Shadow of Malevolence"
Abandon ship! Complete "General Grievous 3: Destroy Malevolence"
R6 take me home Complete "General Grievous 4: Lair of Grievous"
Not so tough now are ya Sparky?
Complete "General Grievous 5: Rookies"
We live to fight another day
Complete "General Grievous 6: Grievous Intrigue"
That's no moon Complete "Count Dooku 1: Battle of Geonosis"
You can have my ship! Complete "Asajj Ventress 4: Storm Over Ryloth"
Time to take the capital Complete "Asajj Ventress 5: Innocents of Ryloth"
Liberation! Complete "Asajj Ventress 6: Liberty on Ryloth"
Tank 'n' Spank Complete "Count Dooku 5: Weapons Factory"
Another bug hunt Complete "Count Dooku 6: Legacy of Terror"
What a Rotta! Complete "Separatist Mission 2: Castle of Doom"
Sure, as long as I get paid Complete "Separatist Mission 1: Hostage Crisis"
Zillo Tolerance Complete "Epilogue: Zillo Beast"
Impressive, most impressive
Complete the game to 100% (single-player only)
A presence I've not felt since
Collect all minikits (single-player only).
The Force is with youComplete a Story level without dying (and no invinci-bility cheat).
Viceroy of the fleet
Convert every system to Separatist control in Separatist Assault mode (single-player only).
Admiral of the fleetConvert every system to the Republic in Republic Assault mode (single-player only).
Accomplishment Total Potential Bricks Achieved?
Beat all missions on Story mode 22
Reach each mission's True Jedi stud requirement 22
Collect all 10 minikits from every mission 22
Beat all 16 Republic Assault missions 16
Accomplishment Total Potential Bricks Achieved?
Beat all 16 Separatist Assault missions 16
Beat all 16 bounty hunter missions 16
Beat all 16 space combat missions 16
Total 130
Achievement/Trophy How to Get Achieved?The Dark Side I sense in you
Free all villains from Resolute's brig (single-player only).
Got a bad feeling about this
Land on the Invisible Hand (Separatist hub).
Field commanderCommand troops 50 times with a high-ranking clone or Droid.
Goldie Blocks Overheat and destroy 50 gold LEGO objects.
Saberang MasterUse Yoda to defeat 5 enemies with one Lightsaber throw.
Twice the pride, double the fall
Defeat Anakin with Count Dooku.
Isn't negotiation the Jedi way?
Complete all bounty hunter missions (single-player only).
We really did say no prisoners
Destroy 100 Droids with a rapid-fire clone trooper (such as Lieutenant Thire).
UH OH!Force-lift a Super Battle Droid and use it to destroy 50 other Droids.
Blending in
Have all of your party members disguised as senate guards in "Separatist Mission 1: Hostage Crisis" (Story mode only).
They'll never see us coming
Win three consecutive Arcade Mode Battles.
Attack of the clones! Deploy 500 clones during any ground assault battle.
Finders Keepers Hijack 20 enemy units in ground assault battles.
Great shot kidDestroy an enemy building with a torpedo in any ground assault battle.
It ain't like dusting crops boy
Complete five loop the loops, five back flips, and five corkscrews by double-tapping in various directions while piloting a ship.
Land-o CalrissianDuring any space combat scenario, land a ship while controlling Lando Calrissian.
Jango's army!Unlock/purchase all clone trooper characters (single-player only).
Clanker collectorUnlock/purchase all of the various Droid characters (single-player only).
Jedi MasterAttain True Jedi status in every level (single-player only).
Cheat! Collect all red power bricks (single-player only).
Stealth wealth Collect all gold bricks (single-player only).
The Chosen One Collect all Achievements/Trophies.
233Protected by copyright. Unauthorized or unlawful copying or downloading expressly prohibited.
introduction
cast
Padawan training
walkthrough
secrets and extras
checklistsCharaCters
ships
VehiCles
Minikits
red power BriCks
Gold BriCks
aChieVeMents and trophies
nintendo ds
contents
how to use this eguideDownload from www.chipper.pl

NINTENDO DS
NIN
TEN
DO
DS
—G
am
E B
aS
IcS
Prima Official Game Guide
www.primagames.com
med bayVisit the med bay for a whole new you. Most of the characters you unlock can be customized in this cutting-edge facility. Each tank can hold one customized character for use in Free Play.
adjacent Rooms: Rec Room, Hallway
hallwayUse the hallway as a shortcut between distant areas of the hub. Looking to change things up? The hallway is also a great place to swap characters while you navigate your base of operations.
adjacent Rooms: Rec Room, Med Bay, Minikit Storage
Rec RoomEvery Trooper needs a place to kick back between missions, and the rec room is just the place to do it. Visit the rec room to review cutscenes or purchase available characters and extras.
adjacent Rooms: Bridge, Hallway, Med Bay
bRidgeUndoubtedly the most important room of the hub, the bridge allows you to select and play any of your unlocked missions. Activate the holoprojector to access available levels.
adjacent Rooms: Minikit Storage, Rec Room
for each K.O. you score; bonus studs are awarded for taking out opponents in rapid succession.
Saberball gives a new twist to a classic game. Swing your Lightsaber to send the ball flying, then use the Force to change its path mid-flight. Studs are rewarded for accuracy. Earn bonus studs for risky landings near outfielders.
Vulture Shootout pits you against swarms of enemy starfighters. Destroy as many Vulture Droids as you can within the time limit. Earn studs for each enemy you defeat; survive until the time expires to earn bonus studs.
GamE BaSIcS
ThE huBEach room in the hub gives you access to different features of the game. The hub can seem confusing at first, so make use of door signs to help you navigate the halls.
Astromech Volleyball moves the rivalry between R2-D2 and R3-S6 to a whole new arena. Be the first to score five points to
win the match. Studs are awarded for every point above your opponent’s score; a special bonus is awarded for a perfect match.
Snowball Fight gives you the chance take on the Talz without having to face those nasty claws. Find a safe spot to pack a few snowballs, then
take on waves of relentless opponents. Earn studs
Rec Room minigames
234Protected by copyright. Unauthorized or unlawful copying or downloading expressly prohibited.
INTrODucTION
caST
PaDawaN TraINING
waLKThrOuGh
SEcrETS aND ExTraS
chEcKLISTS
NINTENDO DSgame basics
The hubbridGe
rec rOOm
med bay
hallway
minikit stOraGe
game modes
game PRogRess
chaRacTeR abiliTies
chaRacTeRs
shiPs
ambushdesTRoy maLEvOLENcERookiesduel of The dRoidslaiR of gRievousgungan geneRalJedi cRashhidden enemyblue shadow viRussToRm oveR RyloThlibeRTy on RyloThweaPons facToRylegacy of TeRRoRchecklisTs
cONTENTS
hOw TO uSE ThIS EGuIDEDownload from www.chipper.pl

NIN
TEN
DO
DS
—G
am
E B
aS
IcS
Prima Official Game Guide
www.primagames.com
characTEr aBILITIES
chaRacTeR classesMost Story characters fall into one of five main character classes. Character classes are defined by a unit’s special abilities, and are the key to understanding the characters in your party. Experiment with the different classes to see which characters best match your playing style, and how to make the most of your party’s abilities.
JediJedi serve as the peacekeepers and protectors of the Galactic Republic, so it’s no surprise they’re among the most capable characters in the game. The Jedi has an impressive skill set, and offers an excellent option for general play.
A Jedi’s Lightsaber is a powerful and versatile tool. Run in and use the Lightsaber in close combat, or hang back and use well-timed deflections to turn incoming blaster fire against your enemies.
minikiT sToRageSwing by minikit storage to view all of your completed models. Whenever you collect all 10 of a mission’s minikits, you can use this room’s holoprojector to enjoy the results of your hard work.
GamE mODESWhen you begin a mission, you have a choice between the game’s two primary modes. Each game mode has its own rules and rewards, so it’s best to be prepared when you make your selection.
sToRyThe Story mode allows you to reenact some of the key missions in the conflict between the Galactic Republic and the Confederacy of Independent Systems. Story mode limits your party to the characters who were originally involved in the mission, which renders some areas and objects inaccessible. When you complete a mission in Story mode, you unlock new characters, the next Story mission, and the ability to revisit the completed mission in Free Play.
fRee PlayFree Play gives you the opportunity tackle a completed mission with a full party. The unique skills of Jedi, Sith, bounty hunters, and more can be combined to solve puzzles and overcome obstacles. Many of the game’s hidden objects can only be recovered in Free Play—as long as you’ve already unlocked characters with the required skills.
When you begin a Free Play session, you can jump straight to any of the mission’s three acts. After you select a character, remaining party slots are automatically filled. If you’ve unlocked suitable characters, every ability will be available during the mission.
GamE PrOGrESSAll of your accomplishments are automatically tracked by the game. Activate the bridge’s holoprojector to check your overall progress; advance through the menus to check your progress broken down by mission or act.
Progress: Your progress is expressed as a percentage of all available achievements. Each mission you complete, item you collect, or extra you unlock contributes to this number.
minikits: Each of the game’s 13 missions contains 10 minikits. These items are usually well hidden, and many of them can be collected only during Free Play.
Red bricks: There is a single red brick in each mission. Red bricks unlock special extras you can then purchase in the rec room. Activate these extras for powerful bonuses, such as stud multipliers, heart regeneration, or even invincibility.
True Jedi: Every stud you collect in a Story mission builds up your True Jedi meter. Fill the meter before you complete a mission to earn a True Jedi rating.
True Jedi free Play: Each Free Play mission has its own True Jedi requirement. Just as in Story mode, a True Jedi Free Play rating depends on stud collection. Since a full party allows you access to more areas, the True Jedi stud requirement is usually much higher for Free Play missions.
characters: You start the game with very few playable characters. Some characters are awarded as you play through Story mode; other characters must be purchased in the rec room after they become available.
NOTETo help you keep track specific minikits, we’ve provided a useful checklist at the beginning of each mission’s walkthrough.
235Protected by copyright. Unauthorized or unlawful copying or downloading expressly prohibited.
INTrODucTION
caST
PaDawaN TraINING
waLKThrOuGh
SEcrETS aND ExTraS
chEcKLISTS
NINTENDO DSgame basics
The hubbridGe
rec rOOm
med bay
hallway
minikit stOraGe
game modes
game PRogRess
chaRacTeR abiliTies
chaRacTeRs
shiPs
ambushdesTRoy maLEvOLENcERookiesduel of The dRoidslaiR of gRievousgungan geneRalJedi cRashhidden enemyblue shadow viRussToRm oveR RyloThlibeRTy on RyloThweaPons facToRylegacy of TeRRoRchecklisTs
cONTENTS
hOw TO uSE ThIS EGuIDEDownload from www.chipper.pl

NIN
TEN
DO
DS
—G
am
E B
aS
IcS
Prima Official Game Guide
www.primagames.com
A Jedi can use superior agility to execute an impressive double-jump. Use the extra height and distance from the double-jump to reach areas other characters can’t.
The Force allows a Jedi to lift heavy objects from a distance. Keep an eye out for the glowing objects, then use the Force to manipulate your surroundings.
When dealing with a squad of battle Droids, the Jedi ground slam is an absolutely devastating tool. Resilient Droids caught in the sphere of impact are temporarily disabled, while weaker Droids are destroyed outright.
Jedi pads allow the Jedi to perform even more remarkable feats. Activate these pads to perform Force jumps, climb walls, or cut new paths straight through obstacles. The available action is determined by the Jedi pad, but every pad allows a Jedi to reach otherwise inaccessible areas.
siThThe Sith possess all of the same skills as the Jedi. The Lightsaber, double-jump, Force lift, ground slam, and Jedi pads are can all be used by both the Jedi and Sith, but the two character types are attuned to opposite
sides of the Force. Some objects only respond to the light or dark sides of the Force. When an object emits a faint red glow—even in the presence of a Jedi—only a Sith can use the Force to affect it.
lighT cloneLight clones favor precision and mobility over raw power. These expert marksmen are capable of basic combat, but a light clone’s special abilities are best used away from the battlefield. Although most of these characters are clones, this class extends to individuals with the same abilities: many smugglers, bodyguards, and
officers can also be considered light clones.
Light clones always carry some variety of blaster. Blasters may not be particularly powerful, but they are both accurate and lightweight.
Sharpshoot targets allow light clones to showcase their skill with a blaster. Whenever you come across a sharpshoot target, take careful aim and let precision accomplish what brute force can’t.
Grapple pads allow light clones to reach otherwise inaccessible areas. Activate these pads to swing across gaps, reel yourself up to high ledges, or topple obstacles in the environment.
heavy cloneThere are several varieties of heavy clone, but they all have one thing in common: firepower. Heavy clones carry powerful blaster cannons capable of clearing an entire battlefield. Their focus on combat makes heavy clones ill-suited to exploration, but few units can hope to match their raw power.
Thanks to the rotating barrel, the heavy clone’s blaster cannon has a very high rate of fire. Heavy clones sacrifice efficiency for effectiveness; their massive weapons virtually eliminate the need for aiming.
Heavy clones also carry Droid poppers—EMP grenades capable of disabling or destroying any Droids within the blast radius. Aside from the Jedi’s ground slam, the heavy clone’s Droid popper is the only tool capable of penetrating a Droideka’s shield.
236Protected by copyright. Unauthorized or unlawful copying or downloading expressly prohibited.
INTrODucTION
caST
PaDawaN TraINING
waLKThrOuGh
SEcrETS aND ExTraS
chEcKLISTS
NINTENDO DSgame basics
The hubbridGe
rec rOOm
med bay
hallway
minikit stOraGe
game modes
game PRogRess
chaRacTeR abiliTies
chaRacTeRs
shiPs
ambushdesTRoy maLEvOLENcERookiesduel of The dRoidslaiR of gRievousgungan geneRalJedi cRashhidden enemyblue shadow viRussToRm oveR RyloThlibeRTy on RyloThweaPons facToRylegacy of TeRRoRchecklisTs
cONTENTS
hOw TO uSE ThIS EGuIDEDownload from www.chipper.pl

NIN
TEN
DO
DS
—G
am
E B
aS
IcS
Prima Official Game Guide
www.primagames.com
Some obstacles can be cleared away only by the heavy clone’s blaster cannon. Whenever you come across a stack of flashing bricks, use the heavy clone’s firepower to clear the way.
Use the heavy clone’s weapons expertise to detonate large bombs. Explosions from these special bombs can dramatically alter the environment, removing obstacles and revealing secret areas in the process.
bounTy hunTeRMost bounty hunters act as soldiers for hire, offering their services to anyone willing to pay. Many bounty hunters carry advanced weaponry, but their independent nature results in more variety than you’ll find in the other character classes. Because of their mercenary nature, many pirates and gang members are also considered bounty hunters.
Bounty hunters rely on a wide variety of equipment, but nearly all of them use blasters for basic combat.
Most bounty hunters use thermal detonators to intimidate enemies and overcome superior numbers. These unstable explosives are extremely dangerous, but they can be very useful outside of combat. Whenever you find clusters of thermal detonators in the environment, use a bounty hunter to set off a chain reaction.
Bounty hunters can make use of special control panels. Approach a control panel to find out which characters can use it; if a portrait of Jango Fett appears above the panel, any bounty hunter can use it.
secondaRy TRaiTsSecondary traits are special abilities or characteristics that aren’t standard within any of the main character classes. Some of these traits appear in multiple character classes, while others allow miscellaneous characters to fill supporting roles within your party.
dRoidSince they’re designed for such a wide variety of uses, Droid models can have wildly different abilities. One thing most Droids have in common, however, is the ability to use special control panels. Look for a portrait to
appear above the Droid control panel, and then select the appropriate character to access it.
sePaRaTisTSeparatists are members of the Confederacy of Independent Systems, or individuals who are sympathetic to its cause. Multiple classes contain Separatist elements, and all of these characters can
operate designated control panels. Whenever the CIS symbol appears over a panel, use a Separatist character to access it.
smallSome characters are small enough to fit through narrow passages. These narrow passages are indicated by special doors. Whenever you come across one of these doors, use a small character to access a hidden area.
JeTPackA jetpack allows a character to hover for a short time. Certain Droids, bounty hunters, and clone troopers are equipped with jetpacks, which makes it possible for them to cross large gaps without the need
for grapple or Jedi pads. Characters like King Katuunko or R2-D2 are also considered jetpack characters, even though they have different methods of hovering.
237Protected by copyright. Unauthorized or unlawful copying or downloading expressly prohibited.
INTrODucTION
caST
PaDawaN TraINING
waLKThrOuGh
SEcrETS aND ExTraS
chEcKLISTS
NINTENDO DSgame basics
The hubbridGe
rec rOOm
med bay
hallway
minikit stOraGe
game modes
game PRogRess
chaRacTeR abiliTies
chaRacTeRs
shiPs
ambushdesTRoy maLEvOLENcERookiesduel of The dRoidslaiR of gRievousgungan geneRalJedi cRashhidden enemyblue shadow viRussToRm oveR RyloThlibeRTy on RyloThweaPons facToRylegacy of TeRRoRchecklisTs
cONTENTS
hOw TO uSE ThIS EGuIDEDownload from www.chipper.pl

NIN
TEN
DO
DS
—G
am
E B
aS
IcS
Prima Official Game Guide
www.primagames.com
NOTESome characters have limited abilities, and don’t belong to any of the main character classes. Other characters—like Jango Fett and Aurra Sing—have abilities beyond most members of their class. As long as you’ve unlocked characters with suitable abilities, you can safely select anyone you like for a Free Play mission.
When a valid character uses a control panel, it triggers a short minigame. Droid, bounty hunter, and Separatist control panels each offer different challenges. Complete a panel’s minigame within the time limit to activate a nearby mechanism. All of the minigames involve matching LEGO bricks, and all of them reward extra studs for doing so quickly.
After you activate a Droid control panel, quickly check the sequence of bricks on upper screen. Use the stylus to rotate the matching bricks into place on the touch screen. Find each brick, and move it each one into the top position on the wheel. When a brick snaps into place, it appears on the upper screen. You can then safely move onto the next brick in the sequence.
When you activate bounty hunter control panel, follow the brick sequence in the upper screen by grabbing the matching bricks from the touchscreen. The falling bricks move quickly, so snap each one into place before the timer runs out.
conTRol Panel minigames
The Separatist control panel’s minigame requires you to find the matching pairs of bricks on the touchscreen. Touch a slot to reveal the hidden brick, then try to find the matching brick somewhere on the touchscreen. If the selected bricks match, the appropriate brick appears on the upper screen. Match all six pairs to fill the slots on the upper screen before time runs out.
238Protected by copyright. Unauthorized or unlawful copying or downloading expressly prohibited.
INTrODucTION
caST
PaDawaN TraINING
PrOLOGuE
waLKThrOuGh
SEcrETS aND ExTraS
chEcKLISTS
NINTENDO DSgame basics
The hubbridGe
rec rOOm
med bay
hallway
minikit stOraGe
game modes
game PRogRess
chaRacTeR abiliTies
chaRacTeRs
shiPs
ambushdesTRoy maLEvOLENcERookiesduel of The dRoidslaiR of gRievousgungan geneRalJedi cRashhidden enemyblue shadow viRussToRm oveR RyloThlibeRTy on RyloThweaPons facToRylegacy of TeRRoRchecklisTs
cONTENTS
hOw TO uSE ThIS EGuIDEDownload from www.chipper.pl

NIN
TEN
DO
DS
—G
am
E B
aS
IcS
Prima Official Game Guide
www.primagames.com
senaTe commando caPT.
abilities: Heavy clonecost: 25,000 studsunlock Requirements: Complete
Hidden Enemy
caPTain Rexabilities: Light clonecost: 80,000 studsunlock
Requirements: Complete Rookies
geneRal gRievousabilities: Droid,
Separatist, Lightsaber
cost: 120,000 studsunlock
Requirements: Complete Lair of Grievous
Jango feTTabilities: Bounty
hunter, jetpack, grapple
cost: 250,000 studsunlock
Requirements: Complete Rookies
senaTe guaRdabilities: Light clonecost: 20,000 studsunlock
Requirements: Complete Weapons Factory
Poggle The lesseRabilities: Separatist,
jetpack, blastercost: 60,000 studsunlock
Requirements: Complete Legacy of Terror
baTTle dRoid PiloT
abilities: Droid, Separatist, blaster
cost: Noneunlock
Requirements: Complete Destroy Malevolence
asaJJ venTRessabilities: Sith,
Separatistcost: 120,000 studsunlock
Requirements: Complete Hidden Enemy
mace winduabilities: Jedicost: 80,000 studsunlock
Requirements: Complete Liberty on Ryloth
leP seRvanT dRoid
abilities: Droidcost: Noneunlock
Requirements: Complete Blue Shadow Virus
commandeR cody
abilities: Heavy clonecost: 60,000 studsunlock
Requirements: Complete Rookies
clone PiloTabilities: Blastercost: Noneunlock
Requirements: Complete Hidden Enemy
nuTe gunRayabilities: Separatist,
blastercost: 30,000 studsunlock
Requirements: Complete Lair of Grievous
ahsoka Tanoabilities: Jedi, smallcost: 80,000 studsunlock
Requirements: Complete Duel of the Droids
suPeR baTTle dRoid
abilities: Droid, Separatist, blaster
cost: 25,000 studsunlock Requirements: Complete
Destroy Malevolence
obi-wanabilities: Jedicost: Noneunlock
Requirements: None (always available)
anakinabilities: Jedicost: Noneunlock
Requirements: None (always available)
chancelloR PalPaTine
abilities: Nonecost: 60,000 studsunlock
Requirements: Complete Weapons Factory
hondo ohnakaabilities: Bounty
huntercost: 60,000 studsunlock
Requirements: Complete Gungan General
clone TRooPeRabilities: Light clonecost: Noneunlock
Requirements: None (always available)
baTTle dRoidabilities: Droid,
Separatist, blastercost: 15,000 studsunlock
Requirements: Complete Ambush
counT dookuabilities: Sith,
Separatistcost: Noneunlock
Requirements: Complete Gungan General
senaTe commando
abilities: Heavy clonecost: 20,000 studsunlock
Requirements: Complete Hidden Enemy
characTErSWith 106 playable characters, it can be a challenge to keep them all straight. Here we’ve compiled the vital information for each character, including their class/abilities, the stud cost (if any) to purchase them, and at what point in the game they become available.
239Protected by copyright. Unauthorized or unlawful copying or downloading expressly prohibited.
INTrODucTION
caST
PaDawaN TraINING
waLKThrOuGh
SEcrETS aND ExTraS
chEcKLISTS
NINTENDO DSgame basics
The hubbridGe
rec rOOm
med bay
hallway
minikit stOraGe
game modes
game PRogRess
chaRacTeR abiliTies
chaRacTeRs
shiPs
ambushdesTRoy maLEvOLENcERookiesduel of The dRoidslaiR of gRievousgungan geneRalJedi cRashhidden enemyblue shadow viRussToRm oveR RyloThlibeRTy on RyloThweaPons facToRylegacy of TeRRoRchecklisTs
cONTENTS
hOw TO uSE ThIS EGuIDEDownload from www.chipper.pl

NIN
TEN
DO
DS
—G
am
E B
aS
IcS
Prima Official Game Guide
www.primagames.com
galacTic maRine
abilities: Heavy clonecost: 25,000 studsunlock
Requirements: Complete Destroy Malevolence
bosskabilities: Bounty
huntercost: 80,000 studsunlock
Requirements: Complete Gungan General
maR Tuukabilities: Separatistcost: 30,000 studsunlock
Requirements: Complete Storm Over Ryloth
numaabilities: Smallcost: 30,000 studsunlock
Requirements: Complete Storm Over Ryloth
chewbaccaabilities: Light clonecost: 250,000 studsunlock
Requirements: Complete Liberty on Ryloth
aayla secuRaabilities: Jedicost: 100,000unlock
Requirements: Complete Storm Over Ryloth
c-3Poabilities: Droidcost: Noneunlock
Requirements: Complete Destroy Malevolence
Riyo chuchiabilities: Smallcost: 20,000 studsunlock
Requirements: Complete Jedi Crash
wullf yulaRenabilities: Light clonecost: 45,000 studsunlock
Requirements: Complete Destroy Malevolence
baRRiss offeeabilities: Jedicost: 45,000 studsunlock
Requirements: Complete Weapons Factory
TuRk falsoabilities: Bounty
huntercost: 45,000 studsunlock
Requirements: Complete Gungan General
yodaabilities: Jedi, smallcost: 250,000 studsunlock
Requirements: Complete Ambush
Padméabilities: Light clonecost: 75,000 studsunlock
Requirements: Complete Destroy Malevolence
caTo PaRasiTTiabilities: Light clonecost: 75,000 studsunlock
Requirements: Complete Cato Parasitti
cham syndullaabilities: Light clonecost: 30,000 studsunlock
Requirements: Complete Liberty on Ryloth
chi choabilities: Light clonecost: 30,000 studsunlock
Requirements: Complete Jedi Crash
faRo aRgyusabilities: Light clone,
Separatistcost: 45,000 studsunlock
Requirements: Complete Hidden Enemy
Jaybo hoodabilities: Smallcost: Noneunlock
Requirements: Complete Blue Shadow Virus
magnaguaRdabilities: Droid,
Separatistcost: 60,000 studsunlock
Requirements: Complete Duel of the Droids
geonosianabilities: Jetpack,
blastercost: Noneunlock
Requirements: Complete Weapons Factory
JeTPack dRoidabilities: Abilities:
Droid, jetpack, Separatist, blaster
cost: Noneunlock Requirements: Complete
Weapons Factory
onaconda faRRabilities: Blastercost: 20,000 studsunlock
Requirements: Complete Ambush
ig-86abilities: Droid,
blastercost: 75,000 studsunlock
Requirements: Complete Duel of the Droids
JaR JaRabilities: Blaster,
double-jumpcost: Noneunlock
Requirements: Complete Gungan General
commando dRoid
abilities: Droid, Separatist, blaster, double-jump
cost: Noneunlock Requirements: Complete
Rookies
gonk dRoidabilities: Nonecost: Noneunlock
Requirements: Complete Duel of the Droids
nahdaR vebbabilities: Jedicost: Noneunlock
Requirements: Complete Lair of Grievous
240Protected by copyright. Unauthorized or unlawful copying or downloading expressly prohibited.
INTrODucTION
caST
PaDawaN TraINING
waLKThrOuGh
SEcrETS aND ExTraS
chEcKLISTS
NINTENDO DSgame basics
The hubbridGe
rec rOOm
med bay
hallway
minikit stOraGe
game modes
game PRogRess
chaRacTeR abiliTies
chaRacTeRs
shiPs
ambushdesTRoy maLEvOLENcERookiesduel of The dRoidslaiR of gRievousgungan geneRalJedi cRashhidden enemyblue shadow viRussToRm oveR RyloThlibeRTy on RyloThweaPons facToRylegacy of TeRRoRchecklisTs
cONTENTS
hOw TO uSE ThIS EGuIDEDownload from www.chipper.pl

NIN
TEN
DO
DS
—G
am
E B
aS
IcS
Prima Official Game Guide
www.primagames.com
Thi-senabilities: Nonecost: 40,000 studsunlock
Requirements: Complete Jedi Crash
PePPi bowabilities: Double-jumpcost: 40,000 studsunlock
Requirements: Complete Blue Shadow Virus
clone snowTRooPeR
abilities: Heavy clonecost: Noneunlock
Requirements: Complete Jedi Crash
gRegaR TyPhoabilities: Light clonecost: 45,000 studsunlock
Requirements: Complete Blue Shadow Virus
shahan alamaabilities: Bounty
hunter, grapplecost: 60,000 studsunlock
Requirements: Complete Blue Shadow Virus
JaR JaR (bombad)
abilities: Double-jumpcost: 80,000 studsunlock
Requirements: Complete Gungan General
a4-dabilities: Droidcost: Noneunlock
Requirements: Complete Liar of Grievous
sTealTh TRooPeR
abilities: Light clonecost: 30,000 studsunlock
Requirements: Complete Rookies
kiT fisToabilities: Jedicost: 80,000 studsunlock
Requirements: Complete Lair of Grievous
clone TRooPeR (heavy)
abilities: Heavy clonecost: Noneunlock
Requirements: Complete Ambush
R2-d2abilities: Droid,
jetpackcost: 60,000 studsunlock
Requirements: Complete Destroy Malevolence
Tx-20abilities: Droid,
Separatist, blastercost: 40,000 studsunlock
Requirements: Complete Storm Over Ryloth
lok duRdabilities: Separatist,
blastercost: 60,000 studsunlock
Requirements: Complete Jedi Crash
dR. nuvo vindiabilities: Blastercost: 40,000 studsunlock
Requirements: Complete Blue Shadow Virus
wag Tooabilities: Smallcost: 30,000 studsunlock
Requirements: Complete Jedi Crash
bolla RoPalabilities: Jedicost: 60,000 studsunlock
Requirements: Complete Weapons Factory
anakin (snow)abilities: Jedicost: 120,000 studsunlock
Requirements: Complete Jedi Crash
clone commandeR (Phase ii)
abilities: Heavy clonecost: Noneunlock Requirements: Complete
Liberty on Ryloth
weequay PiRaTe
abilities: Bounty hunter
cost: 50,000 studsunlock
Requirements: Complete Gungan General
senaToR oRgana
abilities: Light clonecost: 20,000 studsunlock
Requirements: Complete Hidden Enemy
geonosian Zombie
abilities: Jetpackcost: Noneunlock
Requirements: Complete Legacy of Terror
clone TRooPeR boil
abilities: Heavy clonecost: Noneunlock
Requirements: Complete Storm Over Ryloth
clone TRooPeR boil (no helmeT)
abilities: Heavy clonecost: 30,000 studsunlock Requirements: Complete
Storm Over Ryloth
clone TRooPeR waxeR
abilities: Light clonecost: Noneunlock
Requirements: Complete Storm Over Ryloth
clone TRooPeR waxeR (no helmeT)
abilities: Light clonecost: 30,000 studsunlock
Requirements: Complete Storm Over Ryloth
241Protected by copyright. Unauthorized or unlawful copying or downloading expressly prohibited.
INTrODucTION
caST
PaDawaN TraINING
waLKThrOuGh
SEcrETS aND ExTraS
chEcKLISTS
NINTENDO DSgame basics
The hubbridGe
rec rOOm
med bay
hallway
minikit stOraGe
game modes
game PRogRess
chaRacTeR abiliTies
chaRacTeRs
shiPs
ambushdesTRoy maLEvOLENcERookiesduel of The dRoidslaiR of gRievousgungan geneRalJedi cRashhidden enemyblue shadow viRussToRm oveR RyloThlibeRTy on RyloThweaPons facToRylegacy of TeRRoRchecklisTs
cONTENTS
hOw TO uSE ThIS EGuIDEDownload from www.chipper.pl

NIN
TEN
DO
DS
—G
am
E B
aS
IcS
Prima Official Game Guide
www.primagames.com
clone gRunT lighT
abilities: Light clonecost: Noneunlock
Requirements: Complete Hidden Enemy
Roboninoabilities: Bounty
hunter (cannot use Thermal detonator)
cost: 60,000 studsunlock
Requirements: Complete Blue Shadow Virus
luminaRa unduli
abilities: Jedicost: Noneunlock
Requirements: Complete Legacy of Terror
senaToR Philoabilities: Nonecost: 35,000 studsunlock
Requirements: Complete Gungan General
kashyyyk clone TRooPeR
abilities: Light clonecost: 30,000 studsunlock
Requirements: Complete Liberty on Ryloth
daRTh maulabilities: Sith,
Separatistcost: 350,000 studsunlock
Requirements: Complete Hidden Enemy
daRTh sidiousabilities: Sith,
Separatistcost: 250,000 studsunlock
Requirements: Complete Weapons Factory
daRTh vadeRabilities: Sith,
Separatistcost: 450,000 studsunlock
Requirements: Complete Legacy of Terror
advanced Recon foRce TRooPeR
abilities: Heavy clonecost: Noneunlock Requirements: Complete
Liberty on Ryloth
clone gunneRabilities: Heavy clone
(laser cannon)cost: Noneunlock
Requirements: Complete Rookies
waT TamboRabilities: Separatist,
blastercost: 30,000 studsunlock
Requirements: Complete Liberty on Ryloth
cad baneabilities: Bounty
hunter, jetpack, grapple
cost: 150,000 studs
unlock Requirements: Complete Blue Shadow Virus
auRRa singabilities: Bounty
hunter, Separatist, double-jump
cost: 120,000 studsunlock
Requirements: Complete Blue Shadow Virus
obi wan (snow)abilities: Jedicost: 120,000 studsunlock
Requirements: Complete Jedi Crash
Plo koonabilities: Jedicost: 75,000 studsunlock
Requirements: Complete Destroy Malevolence
R3-s6abilities: Droid,
jetpackcost: Noneunlock
Requirements: Complete Duel of the Droids
ewokabilities: Smallcost: 80,000 studsunlock
Requirements: Complete Ambush
gha nachkTabilities: Light clonecost: 30,000 studsunlock
Requirements: Complete Duel of the Droids
han soloabilities: Light clonecost: 300,000 studsunlock
Requirements: Complete Liberty on Ryloth
Jawaabilities: Blaster,
smallcost: 60,000 studsunlock
Requirements: Complete Duel of the Droids
ki-adi-mundiabilities: Jedicost: 75,000 studsunlock
Requirements: Complete Weapons Factory
king kaTuunkoabilities: Jetpack,
Blastercost: Noneunlock
Requirements: Complete Ambush
lando calRissian
abilities: Light clonecost: 250,000 studsunlock
Requirements: Complete Duel of the Droids
PRincess leia (slave)
abilities: Light clonecost: 300,000 studsunlock
Requirements: Complete Legacy of Terror
luke skywalkeR
abilities: Jedicost: 400,000 studsunlock Requirements: Complete
Legacy of Terror242
Protected by copyright. Unauthorized or unlawful copying or downloading expressly prohibited.
INTrODucTION
caST
PaDawaN TraINING
waLKThrOuGh
SEcrETS aND ExTraS
chEcKLISTS
NINTENDO DSgame basics
The hubbridGe
rec rOOm
med bay
hallway
minikit stOraGe
game modes
game PRogRess
chaRacTeR abiliTies
chaRacTeRs
shiPs
ambushdesTRoy maLEvOLENcERookiesduel of The dRoidslaiR of gRievousgungan geneRalJedi cRashhidden enemyblue shadow viRussToRm oveR RyloThlibeRTy on RyloThweaPons facToRylegacy of TeRRoRchecklisTs
cONTENTS
hOw TO uSE ThIS EGuIDEDownload from www.chipper.pl

NIN
TEN
DO
DS
—G
am
E B
aS
IcS
Prima Official Game Guide
www.primagames.com
mini RePublic aTTack cRuiseRCollect the 10 minikits in Rookies to unlock.
mini aRc-170 sTaRfighTeRCollect the 10 minikits in Duel of the Droids to unlock.
mini v-19 ToRRenTCollect the 10 minikits in Lair of Grievous to unlock.
mini sTaR desTRoyeRCollect the 10 minikits in Gungan General to unlock.
mini siTh infilTRaToRCollect the 10 minikits in Jedi Crash to unlock.
anakin’s Jedi sTaRfighTeRCollect the 10 minikits in Hidden Enemy to unlock.
Tusken RaideRabilities: Blastercost: 60,000 studsunlock
Requirements: Complete Lair of Grievous
Tie fighTeR PiloT
abilities: Blastercost: 75,000 studsunlock
Requirements: Complete Rookies
old ben kenobiabilities: Jedicost: 450,000 studsunlock
Requirements: Complete Legacy of Terror
sToRmTRooPeRabilities: Light clonecost: 60,000 studsunlock
Requirements: Complete Rookies
clone TRooPeR JeTPack
abilities: Light clone, jetpack
cost: 60,000 studsunlock Requirements: Complete
Lair of Grievous
Tubabilities: Smallcost: Noneunlock
Requirements: Complete Jedi Crash
ShIPSSome missions contain sections of aerial or space combat. When you revisit these missions in Free Play mode, you have the opportunity to select from a number ships. Early in the game, you have only a few ships to choose from. Collect the minikits from each mission to complete models and unlock new ships.
y-wingThe Y-wing is always available for use in Free Play.
laaTThe LAAT is always available for use in Free Play.
ahsoka’s sTaRfighTeRAhsoka’s Starfighter is always available for use in Free Play.
anakin’s sTaRfighTeRAnakin’s Starfighter is always available for use in Free Play.
mini snowsPeedeRCollect the 10 minikits in Ambush to unlock.
mini imPeRial shuTTleCollect the 10 minikits in Destroy Malevolence to unlock.
mini Tie fighTeRCollect the 10 minikits in Blue Shadow Virus to unlock.
mini Tie inTeRcePToRCollect the 10 minikits in Storm Over Ryloth to unlock.
mini x-wingCollect the 10 minikits in Liberty on Ryloth to unlock.
mini slave 1Collect the 10 minikits in Weapons Factory to unlock.
mini millennium falconCollect the 10 minikits in Legacy of Terror to unlock.
daRTh vadeR’s Tie fighTeRCollect all 130 minikits in the game to unlock.
243Protected by copyright. Unauthorized or unlawful copying or downloading expressly prohibited.
INTrODucTION
caST
PaDawaN TraINING
waLKThrOuGh
SEcrETS aND ExTraS
chEcKLISTS
NINTENDO DSgame basics
The hubbridGe
rec rOOm
med bay
hallway
minikit stOraGe
game modes
game PRogRess
chaRacTeR abiliTies
chaRacTeRs
shiPs
ambushdesTRoy maLEvOLENcERookiesduel of The dRoidslaiR of gRievousgungan geneRalJedi cRashhidden enemyblue shadow viRussToRm oveR RyloThlibeRTy on RyloThweaPons facToRylegacy of TeRRoRchecklisTs
cONTENTS
hOw TO uSE ThIS EGuIDEDownload from www.chipper.pl

NIN
TEN
DO
DS
—a
mB
uS
h
Prima Official Game Guide
www.primagames.com
MinikitsNo. Mode Notes
1 Story At the beginning of Act 1, use the Force to turn the escape pod engine into a fan. Hop on to reach the minikit.
2 Story After the double-jump tutorial, build a small door in the canyon wall and head through.
3 Story Build two platforms near the wrecked AAT. Climb up and find the minikit.
4 Free PlayBuild and activate the Separatist control panel inside the wrecked AAT. Complete the minigame to open a hidden compartment.
5 Free PlayDetonate the bomb inside the cavern, then follow the path around to the left. Use a Sith character to move a new platform into place and jump across.
6 Story After you leave the cavern, grapple up and follow the ledge to the left.
7 Story Toward the end of Act 2, use the bouncer to reach the floating minikit.
8 Free Play Near the end of Act 2, use a thermal detonator to clear away the marked rock.
9 Story At the beginning of Act 3, destroy the plants to the right.
10 Story Toward the end of Act 3, recover this minikit from the center of the path.
story characters
yoda
clone Trooper (heavy)
clone Trooper
True Jedi stud requirement: 40,000True Jedi free Play stud requirement: 60,000
amBuSh
a GalaXy dIvIded By waR!Peaceful worlds must choose sides or face the threat of invasion. Republic and Separatist armies vie for the allegiance of neutral planets. Desperate to build a Republic supply base on the system of Toydaria, Jedi Master Yoda travels to secret negotiations on a remote neutral moon.…
acT 1
The level opens with Yoda near the wreckage of his escape pod. The path to the right is marked with two trails of LEGO studs, but don’t be too quick to leave the crash site.
Target the escape pod’s thruster and use Yoda’s Force ability (hold ! or follow the touchscreen commands) to build a powerful fan near the rock wall. Hop onto the fan and float up to grab the minikit from the ledge above you.
minikiT 1
244Protected by copyright. Unauthorized or unlawful copying or downloading expressly prohibited.
INTrODucTION
caST
PaDawaN TraINING
waLKThrOuGh
SEcrETS aND ExTraS
chEcKLISTS
NINTENDO DSgame basicsambushdesTRoy maLEvOLENcERookiesduel of The dRoidslaiR of gRievousgungan geneRalJedi cRashhidden enemyblue shadow viRussToRm oveR RyloThlibeRTy on RyloThweaPons facToRylegacy of TeRRoRchecklisTs
cONTENTS
hOw TO uSE ThIS EGuIDEDownload from www.chipper.pl

NIN
TEN
DO
DS
—a
mB
uS
h
Prima Official Game Guide
www.primagames.com
The AAT leaves two battle Droids to deal with you and retreats through a passage to the right. Press and hold the Attack button to deflect incoming blaster fire with Yoda’s Lightsaber. Defend yourself as you close the distance to the battle Droids. If the battle Droids manage to survive the deflected blaster shots, use the Lightsaber to deal with your attackers. Two more battle Droids repel into the area; deal with them and sweep the area for breakable objects and LEGO studs.
FREEPLAYRed bRick
Select any Sith in your party, then target the latch above the escape pod’s hatch. Use the Force to open the pod and head inside. Four lights and a broken Droid control panel are mounted on the wall. To repair the panel, use the Force to turn on each of the lights.
Select a Droid from your party and activate the panel. Successfully complete the Droid minigame to reveal a hidden crate. When the crate shatters,
collect the red brick from the floor of the escape pod and head back outside.
After you collect this red brick, you are able to purchase the minigames for the rec room.
When you’re ready to continue, collect the LEGO studs from the groves to the right. Remember to smash any coral, grass, or rocks along the path; every stud you collect helps ensure that you reach True Jedi status before the end of the level. Jump through the trail of silver studs to head across the canyon. Follow the stud trails and use Yoda’s double-jump to clear the larger gaps.
When you reach the canyon’s far side, move up and leap onto the platform near the top of the screen. The gap may look a little daunting, but a well-timed double-jump is enough to safely reach the platform.
When you land, grab the blue stud and hop to the platform on the left.
Smash the rock to create a pile of LEGO bricks. Stand near the bricks and hold the Action button to build a small door in the canyon wall. Take advantage of Yoda’s small size and hop through the newly constructed
crawl space.
When you reach the other side, grab the minikit and blue stud from the platform, then use the
crawl space return to the canyon. Hop along the platforms to reach the canyon’s right side and continue along the main path.
minikiT 2
The basic battle Droid is the most common unit in the Separatist army. Battle Droids are poorly armored, but their blasters make them extremely dangerous in large numbers. Most character classes are more than a match for basic battle Droids. Use a Jedi to deflect incoming blaster shots and move in for close combat, or dodge a battle Droid’s attacks and return fire with any ranged character.
baTTle dRoid
245Protected by copyright. Unauthorized or unlawful copying or downloading expressly prohibited.
INTrODucTION
caST
PaDawaN TraINING
waLKThrOuGh
SEcrETS aND ExTraS
chEcKLISTS
NINTENDO DSgame basicsambushdesTRoy maLEvOLENcERookiesduel of The dRoidslaiR of gRievousgungan geneRalJedi cRashhidden enemyblue shadow viRussToRm oveR RyloThlibeRTy on RyloThweaPons facToRylegacy of TeRRoRchecklisTs
cONTENTS
hOw TO uSE ThIS EGuIDEDownload from www.chipper.pl

NIN
TEN
DO
DS
—a
mB
uS
h
Prima Official Game Guide
www.primagames.com
Search the area for LEGO studs, then head back to the entrance and follow the ramp down to the right. When you reach the end of the path, jump across to the green coral formation.
When you’re ready to leave the area, follow the AAT through the large passage to the right.
When you land, smash both the box and the breakable rock on the platform and use the LEGO bricks to build two new grapple pads. The pad on the right allows you to swing back across the canyon, while the pad
on the left lets you grapple up to the platform above you.
The ATT is waiting for you on the other side of the passage. As you approach, it lays down a heavy stream of blaster fire from across another canyon. Continue to the right until you target the boulder
near the ledge, then use Yoda’s Force ability to throw the boulder across the canyon. The AAT falls from its platform and the resulting explosion blocks the way out.
Make your way across the coral, but be sure to grab the blue stud at the center of the formation before moving on.
When you reach the next platform, switch characters and take control of your light clone. Hold the Target button to activate the light clone’s sharpshoot ability. Move the aiming reticle to the target above the two battle Droids, then release the button to bring several rocks down on your enemies.
Tap the Attack button to fire the trooper’s blaster into the rock on the platform’s right edge, then use the pile of LEGO bricks to build a grapple pad. Stand on the pad and tap the
Attack button (or follow the touchscreen commands) to swing across the canyon.
Use the grapple pad on the platform’s left side to reach the next platform. Blast the box in front of you to reveal a pile of LEGO bricks. Use the bricks to build a large bomb, then switch to your heavy clone. Activate the bomb to clear the passage, then head inside.
TIPWhenever you visit this area in Free Play, you can collect some extra LEGO studs before heading into the passage. Switch to a
jetpack character and hover off the platform’s left side. Follow the trail to discover a nice stash of blue studs.
On the other side of the passage you find two battle Droids arguing near a crashed AAT. When the Droids finally notice your arrival, charge in and take them out. Deal with any reinforcements, then sweep the area for LEGO studs.
CAUTIONStay off of the crashed AAT—the smoldering flame at the center of the wreckage is extremely dangerous!
246Protected by copyright. Unauthorized or unlawful copying or downloading expressly prohibited.
cONTENTS
hOw TO uSE ThIS EGuIDE
INTrODucTION
caST
PaDawaN TraINING
waLKThrOuGh
SEcrETS aND ExTraS
chEcKLISTS
NINTENDO DSgame basicsambushdesTRoy maLEvOLENcERookiesduel of The dRoidslaiR of gRievousgungan geneRalJedi cRashhidden enemyblue shadow viRussToRm oveR RyloThlibeRTy on RyloThweaPons facToRylegacy of TeRRoRchecklisTs
Download from www.chipper.pl

NIN
TEN
DO
DS
—a
mB
uS
h
Prima Official Game Guide
www.primagames.com
Head across the light bridge. Double-jump to grab the blue stud high above the bridge, then draw your Lightsaber and prepare to face some heavy resistance.
Move past the AAT and locate the device along the rocks. Build a power cell from the nearby pile of LEGO bricks, then use Yoda’s Force ability to drop the cell into the machine. When the power cell is in place, a small box pops out of the machine and breaks apart into LEGO bricks.
Move down and deal with the Droids guarding the nearby crate. Smash the crate to reveal a second pile of LEGO bricks, then use the Force to build the far half of a light bridge. Move back to the bricks near the
machine and build the second half of the bridge.
When you reach the far side of the bridge, three Droids open fire. By now, you should be fairly comfortable dealing with battle Droids, but the Super Battle Droid is a much tougher enemy. Deflect incoming blaster fire
and perform a Jedi ground slam as you approach the Droids. Double-jump toward the attackers and tap the Attack button to weaken them, and then finish them off with a Lightsaber strike.
The Super Battle Droid is well-armed, heavily armored, and has a crushing melee attack to deal with nearby foes. Whenever you come across one of these formidable opponents, switch to an available Jedi or heavy clone. When combined with the Lightsaber’s defensive properties, the Jedi’s ground slam offers what is probably the safest option. However, the heavy clone’s blaster cannon and Droid poppers can clear even the most crowded battlefield in a matter of seconds.
suPeR baTTle dRoid
After you clear the area, two fresh battle Droids emerge from the nearby AAT. Deal with them, then search the area for breakable objects and LEGO studs. The two coral sprouts near the AAT turn into LEGO bricks when they shatter. Stand near the pile to the left and build a small platform on the rock wall. Target the second pile of bricks and use the Force to form another platform.
Jump up along the platforms to collect minikit from the ledge high above the AAT, then drop back down to the ground.
minikiT 3
Head into the open AAT and take care of the battle Droids inside. Smash the destructible panels and collect the LEGO studs. You can use the pile of LEGO bricks to build a Separatist control panel, but none of the characters available in Story mode are able to use it.
247Protected by copyright. Unauthorized or unlawful copying or downloading expressly prohibited.
cONTENTS
hOw TO uSE ThIS EGuIDE
INTrODucTION
caST
PaDawaN TraINING
waLKThrOuGh
SEcrETS aND ExTraS
chEcKLISTS
NINTENDO DSgame basicsambushdesTRoy maLEvOLENcERookiesduel of The dRoidslaiR of gRievousgungan geneRalJedi cRashhidden enemyblue shadow viRussToRm oveR RyloThlibeRTy on RyloThweaPons facToRylegacy of TeRRoRchecklisTs
Download from www.chipper.pl

NIN
TEN
DO
DS
—a
mB
uS
h
Prima Official Game Guide
www.primagames.com
When you’re ready to continue, leave the AAT and follow the trail of studs to the next area. Watch out for blaster fire as you continue to the right, and target the boulder in the canyon wall and use the Force to throw it toward the battle Droids.
Keep Yoda’s Lightsaber handy and make your way toward the two Super Battle Droids to the right. Take out the Droids with deflected blaster fire, or use a well placed ground slam to stun both enemies.
When the Droideka rolls up, switch to your light clone and sharpshoot the two targets across the canyon. You can’t move while the sharpshoot ability is active, so try to hit both targets before the Droideka opens fire.
FREEPLAYminikiT 4
Clear out the open AAT and smash the destructible panels at the end of the walkway, then use the LEGO bricks to build a Separatist control panel. Select a valid (highlighted) character and activate the panel and complete the Separatist minigame. Collect the minikit from the hidden compartment and head back outside.
TIPAfter you clear out a group of enemies, always remember to circle back and check for any breakable items or LEGO studs you may have passed up in the heat of battle.
Switch to one of your clone troopers and face the battle Droids across the canyon. Hold the Attack button to lay down a steady stream of blaster fire and keep moving to dodge incoming attacks.
NOTEHold down the Attack button to enable strafing while controlling any character equipped with a ranged weapon.
The Droideka is among the most dangerous units in any Droid army. The Droideka travels at high speeds by tucking itself into a wheel and rolling at its enemies. A fully deployed Droideka boasts massive firepower and a nearly impenetrable shield. Droidekas are vulnerable to blaster fire when they’re on the move—just be sure to stay out of their way. When you face a Droideka in direct combat, select an available Jedi or heavy clone. Use the ground slam or Droid popper to disable its shield, then finish the Droideka off before it recovers.
dRoideka
After the metal supports collapse on the Droideka, switch back to Yoda. Use the Force on the wreckage to build a bridge, then head across the canyon.
248Protected by copyright. Unauthorized or unlawful copying or downloading expressly prohibited.
cONTENTS
hOw TO uSE ThIS EGuIDE
INTrODucTION
caST
PaDawaN TraINING
waLKThrOuGh
SEcrETS aND ExTraS
chEcKLISTS
NINTENDO DSgame basicsambushdesTRoy maLEvOLENcERookiesduel of The dRoidslaiR of gRievousgungan geneRalJedi cRashhidden enemyblue shadow viRussToRm oveR RyloThlibeRTy on RyloThweaPons facToRylegacy of TeRRoRchecklisTs
Download from www.chipper.pl

NIN
TEN
DO
DS
—a
mB
uS
h
Prima Official Game Guide
www.primagames.com
Use your heavy clone to destroy the flashing bricks and exit the cavern.
Locate the stack of flashing bricks and open fire with your heavy clone’s blaster cannon. Keep shooting until you destroy the bricks, then sweep the cavern floor for breakable objects and LEGO studs. Head back to the left and switch to your light clone, then use the grapple pad to return to the ledge.
Follow the ledge to the right. Destroy the rocks to drop the bomb into place. Activate the bomb with your heavy clone to clear the path ahead of you.
Drop down to the cavern floor and move to the right. Locate the bricks left by the falling stalactite to build a Jedi pad. Select Yoda and press and hold the Action button to leap at the wall and climb all the way up the ledge.NOTE
Objects with white outlines can take a lot of damage but will eventually break. Watch for the outline to flash red—this means that you’re landing effective attacks. Just keep attacking until the object is destroyed.
Move to the pile of bricks and build the Jedi pad. Switch to Yoda and activate the pad to perform a Force jump. Steer your jump to land near the bomb on the ledge above you.
Use your heavy clone to activate the bomb and shake a stalactite from the cavern ceiling.
acT 2At the start of the level, Yoda arrives in a large cavern. A tremor shakes several rocks loose, blocking the passage to the surface. When the cutscene ends, drop down from the ledge and explore the cavern floor.
FREEPLAYminikiT 5
After you detonate the bomb, pass through the nearby enclosure to reach a small ledge. Select a Sith character from your party and target the platform below you.
Use the Force to raise the platform into place, then jump across and collect the minikit all the way to the left.
Once you’re outside, clear out the battle Droids to the right. There are plenty of items to break and collect, but be sure to grab the blue stud hidden in the wall. Use the pile of bricks to build a grapple pad, then select your light clone and pull down the bricks to the right.
249Protected by copyright. Unauthorized or unlawful copying or downloading expressly prohibited.
cONTENTS
hOw TO uSE ThIS EGuIDE
INTrODucTION
caST
PaDawaN TraINING
waLKThrOuGh
SEcrETS aND ExTraS
chEcKLISTS
NINTENDO DSgame basicsambushdesTRoy maLEvOLENcERookiesduel of The dRoidslaiR of gRievousgungan geneRalJedi cRashhidden enemyblue shadow viRussToRm oveR RyloThlibeRTy on RyloThweaPons facToRylegacy of TeRRoRchecklisTs
Download from www.chipper.pl

NIN
TEN
DO
DS
—a
mB
uS
h
Prima Official Game Guide
www.primagames.com
Drop back down to the grapple pads and continue along the path. A number of battle Droids are waiting to ambush you, so stay on your toes. Aside from the enemies standing in your path, watch for
the Droids pouring in from the large hole in the wall. If you’ve switched characters for the fight, switch back to the light clone when the STAPs appear. Use your sharpshooting ability to take these agile enemies out of the fight.
Follow the touchscreen prompt to slice through the rocks with your Lightsaber.
Drop down through the opening to find another pile of bricks. Build a new Jedi pad and collect the nearby studs. When you’re ready to continue, activate the Jedi pad and climb up along the walls.
When you reach the ledge at the top of your climb, deal with the battle Droids and select your heavy clone. Clear out the flashing bricks to reveal a small alcove. Use the rubble to build a bouncer, then hop on to spring into the air.
Select Yoda and use the Force to move the latch point onto the wall, then use the toppled bricks to build another grapple pad. Switch to your light clone and swing up to the ledge above you. Grab the studs along the ledge and pick up the minikit at the end of the trail.
minikiT 6
The STAP (Single Trooper Aerial Platform) is piloted by a single battle Droid, and boasts twin blaster cannons and excellent maneuverability. These small vehicles are generally used for scouting purposes, but they also make fairly effective anti-personnel units. STAPs are lightly armored, so their defenses are dependant on their considerable speed. STAPs are vulnerable to sharpshooting, but a Jedi’s double-jump can also cause the pilots to lose control of the vehicle.
sTaP
Sharpshoot the two STAPs and wait for a third to swoop in. The pilot loses control of the vehicle, and the STAP shatters against the rocks. Build a Jedi pad out of the wreckage and use Yoda to activate it.
Before you continue through passage, hold the Jump button to gain some extra height on your next bounce. Grab the minikit above you, then bounce into the passage and continue to the right.
minikiT 7
Before you drop down to the next area, make sure you’re ready to take on a Droideka. Yoda or your heavy clone are both up to the task, so select your preferred character and clear out all opposition. Move over
to the checkered tiles and use the LEGO bricks to build a bouncer.
250Protected by copyright. Unauthorized or unlawful copying or downloading expressly prohibited.
cONTENTS
hOw TO uSE ThIS EGuIDE
INTrODucTION
caST
PaDawaN TraINING
waLKThrOuGh
SEcrETS aND ExTraS
chEcKLISTS
NINTENDO DSgame basicsambushdesTRoy maLEvOLENcERookiesduel of The dRoidslaiR of gRievousgungan geneRalJedi cRashhidden enemyblue shadow viRussToRm oveR RyloThlibeRTy on RyloThweaPons facToRylegacy of TeRRoRchecklisTs
Download from www.chipper.pl

NIN
TEN
DO
DS
—a
mB
uS
h
Prima Official Game Guide
www.primagames.com
When you are ready to exit the level, push the bouncer toward the wall. Once you reach the edge of the checkered tiles, use the bouncer to reach the passage high above the ground.
Use the Force to throw one of the brown rocks at the AAT. The impact takes out the main gun and one of the laser blasters. Slide across to target the other rock, and throw it to take out the AAT’s remaining weapon.
Move in and target the AAT. Use the Force to remove the upper section; when the heavy piece of machinery comes crashing down, it clears a path straight through the AAT. Before you move on,
head back down and take out the battle Droids as they drop into the canyon.
Pass through the AAT’s wreckage, and double-jump over the gap. As you begin the jump, two battle Droids pop up from the ground. Follow the trail of studs over the gap, then take out your attackers. There’s a nasty surprise hiding in the tall grass ahead of you, so try to stay back until the fight is over.
When you’ve defeated all the battle Droids in the area, destroy the patch of tall grass to trigger a hidden land mine. The mine explodes shortly after it starts flashing, so quickly move out of the blast radius. The explosion brings some large rocks crashing to the canyon floor. Retreat back toward the gap, then continue up the path when things settle down.
Continue up the path and take out the next two battle Droids. The next mine is hidden in a patch of green grass near a large gap. Trigger the mine and retreat to a safe distance, then carefully approach the edge of the gap.
FREEPLAYminikiT 8
Move to the shaded area on the bouncer’s left side and locate the rock covered in thermal detonators. Select a bounty hunter and toss a fresh thermal detonator onto the rock. Stay clear of the explosion, then jump up to grab the exposed minikit before leaving the area.
acT 3At the beginning of the level, Yoda arrives at the bottom of a narrow canyon. Move to the right until you trigger a short cutscene. In an attempt to block your path, an AAT fires into the canyon walls.
Destroy the plants along canyon’s right wall to reveal the minikit. Grab the minikit and carefully make your way past the fallen rocks.
minikiT 9
251Protected by copyright. Unauthorized or unlawful copying or downloading expressly prohibited.
cONTENTS
hOw TO uSE ThIS EGuIDE
INTrODucTION
caST
PaDawaN TraINING
waLKThrOuGh
SEcrETS aND ExTraS
chEcKLISTS
NINTENDO DSgame basicsambushdesTRoy maLEvOLENcERookiesduel of The dRoidslaiR of gRievousgungan geneRalJedi cRashhidden enemyblue shadow viRussToRm oveR RyloThlibeRTy on RyloThweaPons facToRylegacy of TeRRoRchecklisTs
Download from www.chipper.pl

NIN
TEN
DO
DS
—a
mB
uS
h
Prima Official Game Guide
www.primagames.com
Move up the path until the Droids appear across the gap. Use Yoda to take out your attackers with deflected blaster shots, or switch to one of your clone troopers and lay down some fire of your own. When it’s
safe to continue, use Yoda’s double-jump to follow the trail of studs over the gap.
The next mine is located near two Super Battle Droids. Use Yoda’s Lightsaber to protect yourself from their attacks and move in to trigger the mine. Pull back and let the mine clear out the enemies, then continue up the path. Take out any reinforcements and make a quick sweep for studs before moving onto the next area.
When you enter the next area, move along path’s left wall to stay clear of the turret. Stay in cover and use the Force on the rock to your right. The rock crashes against the side of the ravine, and the impact brings some boulders down on the turret.
Continue up the path until a fresh wave of battle Droids moves in to attack. Watch out for the nearby Super Battle Droid—it’s standing near another hidden mine. Deal with your attackers directly, or trigger the mine and let the explosion to the work for you.
Follow the path around to the right until you trigger a short cutscene. Two Droids are manning a massive laser cannon, so stick to the wall and stay out of sight. Slide over until you can target the mine in the
center of the path, then use the Force to plant it near the cannon.
After the explosion, run in and rebuild the laser cannon. Another AAT is just up the path, so try your best to avoid its heavy fire. When the cannon is finished, hop in and use it to take out the AAT’s weapons. Each
of the AAT’s laser blasters takes five shots to destroy. Destroy both weapons, then focus your fire at the center of the AAT.
When the path is clear, hop out of the laser cannon and follow the trail of studs across the bridge. As you gather the last of the studs, a Droideka rolls in to attack. Use your preferred method to defeat this enemy, then clear out the battle Droids that join in the fight.
When you defeat the last of the battle Droids, new studs appear in the shape of an arrow. Collect any remaining LEGO studs and follow the arrow out to complete the level.
TIPLook for opportunities to trigger mines near enemies or breakable objects.
After you take care of the Super Battle Droid, trigger the nearby land mine. Collect the minikit as you continue up the path.
minikiT 10
• The Clone Trooper (Heavy) and King Katuunko characters are unlocked and ready to be used in Free Play.
• The Yoda, Onaconda Farr, Battle Droid, and Ewok characters are available for purchase in the rec room.
• The Ambush level is available in Free Play.
ambush sToRy RewaRds
252Protected by copyright. Unauthorized or unlawful copying or downloading expressly prohibited.
cONTENTS
hOw TO uSE ThIS EGuIDE
INTrODucTION
caST
PaDawaN TraINING
waLKThrOuGh
SEcrETS aND ExTraS
chEcKLISTS
NINTENDO DSgame basicsambushdesTRoy maLEvOLENcERookiesduel of The dRoidslaiR of gRievousgungan geneRalJedi cRashhidden enemyblue shadow viRussToRm oveR RyloThlibeRTy on RyloThweaPons facToRylegacy of TeRRoRchecklisTs
Download from www.chipper.pl

nin
ten
do
ds
—d
es
tr
oy
Ma
lev
olen
ce
Prima Official Game Guide
www.primagames.com
destroy Malevolence
MinikitsNo. Mode Notes
1 Story At the beginning of Act 1, find and destroy the three blue cores in the space debris.
2 Story When you reach the Malevolence, find the minikit on the ion cannon’s right side.
3 Story Destroy the 10 blue panels along the side of the Malevolence to reveal the minikit above the ion cannon.
4 Free Play
After boarding the Malevolence, use a heavy clone to destroy the flashing hatch door.
5 Story After boarding the Malevolence, cross the large gap and break the boxes to the right.
6 Story Use the Force to break the control panel near the first set of tracks.
7 Story After the jetpack tutorial, drop down and break the boxes on the rail jet car.
8 Free Play
When you reactivate the rail jet, use the Separatist control panel to the right. Enter the open door and make your way through the secret area.
9 Story After you take control of Anakin and Padmé, smash the box near the Super Battle Droid.
10 Free Play
When you cross the hole in the floor, shoot the flashing hatch with a heavy clone.
True Jedi Stud Requirement: 50,000True Jedi Free Play Stud Requirement: 100,000
Story Characters:
Anakin
Obi-Wan
R2-D2
Padmé
C-3PO
GRIevous In RetReat!Before the battleship Malevolence could destroy an Outer Rim clone medical base, a Republic strike force, under the command of Jedi General Anakin Skywalker, crippled the warship, disabling its dreaded ion cannon. Now the Jedi relentlessly pursue the Malevolence….
act 1 The level opens with the Republic’s strike force suffering heavy losses. You take control of a Y-wing as your squad mates are picked off, one after the other. The game offers a brief tutorial before enemy fighters arrive. Follow the onscreen instructions to get a feel for your ship, and take a moment to make any desired adjustments to the controls.
When the first Vulture Droids arrive, scan the area. Avoid engaging your enemies for now. Instead, fly toward the floating bits of space debris press and hold the Attack button to fire your blasters. There are three destructible pieces of debris in the area, so watch for signs of an effective attack. When blaster fire causes a target to flash read, continue attacking until you expose the blue core at the center of the debris.
253
contents
How to Use tHis eGUide
introdUction
cast
Padawan traininG
walKtHroUGH
secrets and extras
cHecKlists
nintendo dsGAme BASiCSAmBuShDeSTROy MalevolenceROOkieSDuel OF The DROiDSlAiR OF GRievOuSGunGAn GeneRAlJeDi CRAShhiDDen enemyBlue ShADOW viRuSSTORm OveR RylOThliBeRTy On RylOThWeAPOnS FACTORyleGACy OF TeRRORCheCkliSTS
Protected by copyright. Unauthorized or unlawful copying or downloading expressly prohibited.
Download from www.chipper.pl

nin
ten
do
ds
—d
es
tr
oy
Ma
lev
olen
ce
Prima Official Game Guide
www.primagames.com
The blue cores can only be destroyed by your ship’s torpedoes. Hold your crosshairs over the exposed core and wait for your torpedo to lock on. After the pink indicators zoom in on your target, press the Torpedo button to fire a torpedo and destroy the core.
Try to keep the Vulture Droid near the center of the screen. When the reticle turns red, use your blasters to rip through the enemy starfighter. Your accuracy improves as you get closer to your target, so press the Boost button to help close the distance if you don’t seem to be doing much damage. Use your ship’s blasters to eliminate both of the Vulture Droids and wait for the next wave of enemies to arrive.
After a moment, two Hyena Bombers enter the battle. Follow the pink arrows on the sides of your screen to help locate these heavy ordinance Droid ships.
NOTETo switch lock-on targets, place your reticle on the new target and tap the Target button.
The three bits of destructible debris have the same basic appearance, so look for similar pieces once you’ve identified one of the valid targets. The enemy Vulture Droids don’t pose much of a threat at this time, so keep searching the debris for the two remaining cores.
When you destroy the third core, a minikit automatically appears in front of your ship. Once you’ve collected the minikit, turn your attention toward the attacking Vulture Droids.
minikiT 1
To track a Vulture Droid, follow the yellow arrow at the edge of your screen. Vulture Droids appear inside of white brackets, and can be destroyed by blaster fire.
The Vulture Droid is Separatist starfighter that can transform to act as a walking weapons platform. When in flight, Vulture Droids are extremely nimble—since Vulture Droids are computer-controlled, they can make sharp turns and sudden speed changes that would injure a living pilot. Vulture Droids are armed with both blasters and missiles, making them extremely effective in large numbers.
vulTuRe DROiD
The Hyena Bomber is used to deliver heavy damage to key targets. Hyena Bombers are less agile than Vulture Droids, which makes them vulnerable to missile locks. Whenever you spot a Hyena Bomber on the battlefield, make sure to take it down as quickly as possible. Hyena Bombers are only deployed to attack strategically important targets, so preventing a Hyena Bomber from completing a bombing run should always be a priority. Get in close enough to lock on, then fire off a missile to take these enemies out with a single shot.
hyenA BOmBeR
254
contents
How to Use tHis eGUide
introdUction
cast
Padawan traininG
walKtHroUGH
secrets and extras
cHecKlists
nintendo dsGAme BASiCSAmBuShDeSTROy MalevolenceROOkieSDuel OF The DROiDSlAiR OF GRievOuSGunGAn GeneRAlJeDi CRAShhiDDen enemyBlue ShADOW viRuSSTORm OveR RylOThliBeRTy On RylOThWeAPOnS FACTORyleGACy OF TeRRORCheCkliSTS
Protected by copyright. Unauthorized or unlawful copying or downloading expressly prohibited.
Download from www.chipper.pl

nin
ten
do
ds
—d
es
tr
oy
Ma
lev
olen
ce
Prima Official Game Guide
www.primagames.com
You must defeat six Vulture Droids to complete this phase of the battle. Collisions can deal serious damage to your ship, so watch out for floating debris as you chase the Vulture Droids around the
area. Check the lower-right corner of the screen for your current status as you destroy each of the ships.
Lock on to a Hyena Bomber and destroy it with one of your Y-wing’s torpedoes. Chase down and destroy the second Hyena Bomber to trigger the next wave of enemy fighters.
Destroy four Vulture Droids to expose one of the Malevolence’s shield generators and move onto the battle’s next phase. Lock on to the exposed generator and take it out with your torpedoes. Land three successful hits
to destroy the shield generator and expose the next generator in the chain.
Destroy six enemies to trigger the next wave of Vulture Droids. Again, use your blasters to destroy all the enemy starfighters in the area. Many of the Vulture Droids are busy attacking other targets; try to destroy each enemy before it has a chance to return fire. Clear the battlefield of all Vulture Droids to enter the next stage of the battle.
After a short cutscene, you appear just outside the Malevolence. Veer off to the ion cannon’s right side; use your thrusters to clear the cannon before it fires another shot. The Vulture Droids
protecting the Malevolence are much more aggressive than those you faced in the previous waves. Don’t chase after any of the Vulture Droids just yet; focus on dodging enemy attacks as you fly toward the Malevolence.
TIPWatch for onscreen warnings about incoming missiles. Hold your course until the message tells you to evade, then tap the Evade button to dodge the attack.
Look for the minikit just to the right of the ion cannon. Grab the minikit and look for the blue panel just to your right.
minikiT 2
There are 10 blue panels spread across the Malevolence. Six of the panels are circling the ion cannon; the remaining panels run along the side of the ship. Use your blasters to destroy each of the blue panels. Defend yourself from incoming Vulture Droids, but make the blue panels your priority.
You receive a status update each time you destroy a panel. When you destroy the last panel, a minikit appears
above the ion cannon. Fly over and collect the minikit, then shift your focus to the Vulture Droids.
minikiT 3
255
contents
How to Use tHis eGUide
introdUction
cast
Padawan traininG
walKtHroUGH
secrets and extras
cHecKlists
nintendo dsGAme BASiCSAmBuShDeSTROy MalevolenceROOkieSDuel OF The DROiDSlAiR OF GRievOuSGunGAn GeneRAlJeDi CRAShhiDDen enemyBlue ShADOW viRuSSTORm OveR RylOThliBeRTy On RylOThWeAPOnS FACTORyleGACy OF TeRRORCheCkliSTS
Protected by copyright. Unauthorized or unlawful copying or downloading expressly prohibited.
Download from www.chipper.pl

nin
ten
do
ds
—d
es
tr
oy
Ma
lev
olen
ce
Prima Official Game Guide
www.primagames.com
There are four linked shield generators leading to the ion cannon. Each time you destroy a generator, it exposes the next. When you run out of torpedoes, follow the pink arrow to find a Droid supply ship. Use your blasters to destroy the ship, then fly through the payload to restock your torpedoes.
Destroy the four shield generators and find another supply ship to reload your torpedoes. Destroy the generator on the ion cannon’s side to disable the dreaded weapon.
act 2The level opens with Anakin, Obi-Wan, and R2-D2 boarding the Malevolence in an attempt to rescue Padmé and C-3PO. Step out of the hatch and clear the battle Droids to the right. Circle back to break the boxes and wall panels before moving on.
Two battle Droids are waiting on the gap’s far side. Destroy them, then move to the right until two Super Battle Droids arrive on the lift. Rush in to get the jump on these Droids as they step into the hall.
TIPIn addition to the normal boxes and debris, the halls of the Malevolence are lined with breakable wall panels. Destroy these wall panels to gain extra studs and expose inter-active objects.
Approach the large gap in the floor and target the nearest wall grate. Use the Force on the wall grates to build new platforms and make your way across the gap.
FREEPLAYminikiT 4
When you reach the last platform, switch to a heavy clone and shoot the flashing hatch. After you destroy the hatch, use a Jedi or jetpack character to safely collect the revealed minikit.
Continue to the right and destroy the boxes at the end of the hall. Grab the minikit, then turn around and use the Jedi pad on the lift.
minikiT 5
Activate the Jedi pad to climb up along the walls. More enemies are waiting at the top of the lift, so be ready to defend yourself. Smash the boxes to the right and use the bricks to build another Jedi pad.
When you’re ready to leave the area, activate the pad to cut a hole in the door.
When you pass through the door, clear out the enemies to the right, then head down the ramp and follow the tracks back to the left. There is a control panel mounted above two green lights on the wall.
256
contents
How to Use tHis eGUide
introdUction
cast
Padawan traininG
walKtHroUGH
secrets and extras
cHecKlists
nintendo dsGAme BASiCSAmBuShDeSTROy MalevolenceROOkieSDuel OF The DROiDSlAiR OF GRievOuSGunGAn GeneRAlJeDi CRAShhiDDen enemyBlue ShADOW viRuSSTORm OveR RylOThliBeRTy On RylOThWeAPOnS FACTORyleGACy OF TeRRORCheCkliSTS
Protected by copyright. Unauthorized or unlawful copying or downloading expressly prohibited.
Download from www.chipper.pl

nin
ten
do
ds
—d
es
tr
oy
Ma
lev
olen
ce
Prima Official Game Guide
www.primagames.com
Activate the Jedi pad to cut through the glass, then push the sliding box toward the wall. When the box snaps into place, the door to the right opens to reveal a lever. Pull the lever to reactivate the rail jet. Drop down from the walkway or use the elevator to the left and return to the ground.
Before you cross to the next platform, move to the right and double-jump onto the next car. Grab the three blue studs above the rail jet, then hop back down and cross to the other side of the tracks.
Head back up the ramp to the right. Target the debris at the top of the ramp, and use the Force to clear a path. When you reach the large gap, the game offers a brief jetpack tutorial.
When you’re ready to continue, pass through the door to the right. Another group of Droids arrives on a rail jet car. Clear the area of enemies, then step onto the rail jet.
Use the Force to break the control panel. When the lights turn red, two battle Droids pull up in on a handcar; board the car to deal with the Droids and grab the minikit.
minikiT 6
Instead of hovering through the silver LEGO studs, drop down to the rail jet car below you. Smash both boxes to reveal a build-it and a minikit. Grab the minikit, then build a Jedi pad and return to the main path.
minikiT 7
Switch to R2-D2 and and hold the Jump button to hover through the trail of silver studs. After you cross the gap, use the Droid control panel on the wall to extend a bridge. When the bridge snaps into
place, two Super Battle Droids enter from the right. Select one of your Jedi characters to stun the Droids before they have a chance to attack.
TIPBefore you leave the area, move back to the left and double-jump to grab the blue stud above the bridge.
When you step off the rail jet, turn right and move to the ledge past the blue build-it pad. Switch to R2-D2 and hover through the trail of silver LEGO studs to reach the Droid control panel across the gap.
Use the Droid control panel to extend the bridge, then pull the lever to the right. Wait for the blue crate to appear, then carry it over to the build-it pad across the bridge.
After you drop the crate on the pad, use the bricks to build a Jedi pad. Activate the pad to send one of your Jedi soaring up to the walkway high above you. When you land, smash the nearby box and build another Jedi pad from the contents.
257
contents
How to Use tHis eGUide
introdUction
cast
Padawan traininG
walKtHroUGH
secrets and extras
cHecKlists
nintendo dsGAme BASiCSAmBuShDeSTROy MalevolenceROOkieSDuel OF The DROiDSlAiR OF GRievOuSGunGAn GeneRAlJeDi CRAShhiDDen enemyBlue ShADOW viRuSSTORm OveR RylOThliBeRTy On RylOThWeAPOnS FACTORyleGACy OF TeRRORCheCkliSTS
Protected by copyright. Unauthorized or unlawful copying or downloading expressly prohibited.
Download from www.chipper.pl

nin
ten
do
ds
—d
es
tr
oy
Ma
lev
olen
ce
Prima Official Game Guide
www.primagames.com
Return to the rail jet and destroy the newly arrived battle Droids. When you’re ready to move on, step on each of the car’s switches and continue to the next area.
FREEPLAYReD BRiCk AnD minikiT 8
After you reactivate the rail jet, follow the walkway to the right. Select a valid character and activate the Separatist control panel near the locked door. When the door opens, pull the lever to open the door below the walkway. Move back to the left and take the elevator down one level.
Step off the elevator and pass through the open door. Grab the studs to the right, and continue to the boxes near the end of the long window. Break the boxes and build a small door from the contents, then select a valid character to slip through to a secret area.
You appear in a small, secure room. Smash the boxes to reveal some bricks and then build a Jedi pad. Activate the pad to cut through the glass and walk through the opening. Use a light clone’s sharpshooting ability to shoot the controls across the gap. The conveyor belt starts up and drops a flashing crate on the ground.
Use a heavy clone to destroy the flashing crate. Switch to a Jedi and use the Force on the crate’s contents. After the grapple pad appears beneath you, switch back to the light clone and swing across to grab the red brick and minikit near the conveyor belt. Use the bricks to build another grapple pad, then swing back over and head out the way you came in.
This mission’s red brick makes the Infinite Missiles extra available for purchase.
When the rail jet stops, hop off and deal with the waiting Droids. Move to the right and pull the lever to raise a Jedi pad into place. Follow the ramp up to the Jedi pad to cut through the crane’s base. After the crane comes crashing down, move back down the ramp and return to the rail jet.
The wrecked rail jet offers a usable platform, but the two Super Battle Droids make it a dangerous leap. Deflect their blaster fire to defeat them from a safe distance. When the Droideka comes rolling in, double-jump across the gap and take it out as quickly as possible. Approach the hatch in the wall to rescue Padmé and C-3PO. Sweep the area for any studs you might have missed, then pass through the door to reach the next area.
TIPMake sure to grab the blue studs in the area. Use the Force on the debris to uncover the stud near the lever, return to the rail jet and double-jump over to the next car for three more studs.
act 3The act opens with Obi-Wan, R2-D2, and C-3PO fighting to reach the Malevolence’s hyperdrive. Use Obi-Wan’s Lightsaber to deflect the battle Droids’ attacks. When the room is clear, switch to R2-D2
and hover through the trail of studs as it turns off to the right.
258
contents
How to Use tHis eGUide
introdUction
cast
Padawan traininG
walKtHroUGH
secrets and extras
cHecKlists
nintendo dsGAme BASiCSAmBuShDeSTROy MalevolenceROOkieSDuel OF The DROiDSlAiR OF GRievOuSGunGAn GeneRAlJeDi CRAShhiDDen enemyBlue ShADOW viRuSSTORm OveR RylOThliBeRTy On RylOThWeAPOnS FACTORyleGACy OF TeRRORCheCkliSTS
Protected by copyright. Unauthorized or unlawful copying or downloading expressly prohibited.
Download from www.chipper.pl

nin
ten
do
ds
—d
es
tr
oy
Ma
lev
olen
ce
Prima Official Game Guide
www.primagames.com
When you reach the platform, use Obi-Wan to break the boxes and assemble the build-it. Use one of your Droids to access the control panel and extend the room’s walkways. Follow the walkways up to the large door near the blue build-it pad.
Approach the damaged section of the hall; there is a huge hole in the floor and air is rushing through an open door. Use Anakin to Force-lift one of the wall panels, then switch to Padmé and shoot the door
controls. When the room is sealed, walk over to the door and jump across the remaining bits of floor to cross the gap.
When you reach the large door, turn left and follow the path to find two Super Battle Droids. Defeat the Droids and move to the wall on your left. Use the Force on the debris to reveal a build-it. Use the bricks
to assemble a large fuse. Move to the right and push a second fuse toward the wall until it lights up.
When both fuses are active, a Droideka appears from a nearby lift. Take out the Droideka and enter the lift to pick up a blue crate. Walk all the way back to the build-it pad by the large door. Use the contents of the
crate to build a lever. Pull the lever and chase General Grievous through the large door.
In the next room, Grievous stops to fight. After you land two hits, Grievous climbs up the shaft at the back of the room. When you approach the shaft, General Grievous kicks down a box from above. Assemble the box’s contents to build a Jedi pad and climb up the shaft. Hit Grievous one more time and use the rail jet to continue the chase.
While Obi-Wan is busy with Grievous, Anakin and Padmé head for the navigation computer. Grievous’ Droids are on full alert, so anticipate heavy resistance each time you enter a room. Use the Force to clear
away the first barricade and continue through the door when the path is clear.
In the next area, locate the box near the Super Battle Droid. When the room is clear, double-jump across to the box and smash it open to recover a minikit.
minikiT 9
FREEPLAYminikiT 10
When you cross the damaged section of the hallway, use a heavy clone to destroy the flashing hatch on the wall. Jump over to grab the minikit, then continue to the right.
Move to the end of the corridor and use the Force to reassemble the broken Droid. After the Droid summons the lift, stand back and wait for the doors to open. Dispatch the Super Battle Droid and collect any studs still in the area. When you’re ready, use the lift to reach the bridge.
259
contents
How to Use tHis eGUide
introdUction
cast
Padawan traininG
walKtHroUGH
secrets and extras
cHecKlists
nintendo dsGAme BASiCSAmBuShDeSTROy MalevolenceROOkieSDuel OF The DROiDSlAiR OF GRievOuSGunGAn GeneRAlJeDi CRAShhiDDen enemyBlue ShADOW viRuSSTORm OveR RylOThliBeRTy On RylOThWeAPOnS FACTORyleGACy OF TeRRORCheCkliSTS
Protected by copyright. Unauthorized or unlawful copying or downloading expressly prohibited.
Download from www.chipper.pl

nin
ten
do
ds
—r
oo
Kie
s
Prima Official Game Guide
www.primagames.com
MinikitsNo. Mode Notes
1 Free Play At the start of the mission, use the Force on the shuttle to open the ramp.
2 Free Play Near the end of Act 1, build the Jedi pad and climb up to the minikit.
3 Free Play Double-jump over the Act 1 exit and clear a path to the lift. Ride the lift and crash the duck into the arcade cabinet.
4 Free Play Use the Dark Force on the gray crate in the eel’s lair.
5 Free Play Use the Force on the dish in the eel’s lair. Activate the nearby Droid control panel and switch to fire a laser.
6 Story After you defeat the eel, break the objects near the cavern stairs.
7 Free Play At the start of Act 3, use the Dark Force to throw the two mouse Droids.
8 Free Play Build the Jedi pad in the control room. Follow the ledge and hover out through the trail of studs.
9 Free Play After you leave the control room, build a small door and slip under the floor panels.
10 Story Release the last gonk Droid and retrieve the minikit from its wall compartment.
When you step off the lift, rush in to take out the crew and any reinforcements. Destroy the chair on the platform and use Padmé to hit the sharpshoot target above the navigation computer. Switch back to Anakin and use the Force to rearrange the computer’s components. Step on each of the switches to change the images on the three screens. To complete the mission, change the display to show the ship on the first screen, an arrow on the second, and the moon on the third.
• The Battle Droid Pilot and C-3PO characters are unlocked and ready to be used in Free Play.
• The Super Battle Droid, Padmé, Galactic Marine, Wullf Yularen, R2-D2, and Plo Koon characters are available for purchase in the rec room.
• Destroy Malevolence is available for Free Play.
DeSTROy malevolence STORy ReWARDS
rooKies
True Jedi Stud Requirement: 70,000True Jedi Free Play Stud Requirement: 90,000
clone FoRces Rally!As the war escalates in the Outer Rim, the Jedi Knights are spread thinly across the galaxy. Many new clones are rushed into service to support their Jedi generals. Unfortunately, because of the relentless demands of battle, many young clones must join in the struggle before their intensive training has been completed. These clones, manning a vital network of tracking stations, are all that stand between the Republic and invasion.…
Story Characters:
Captain Rex Commander Cody
act 1Just as General Grievous launches an assault on the listening post, Captain Rex and Commander Cody arrive for a routine inspection. When the rookie holdouts manage to fire off a warning flare, the seasoned veterans spring into action.
The level opens with Captain Rex and Commander Cody still on the landing pad. Super Battle Droids are hidden in two of the boxes near the shuttle; use Cody’s blaster cannon to cut through these enemies before they have a chance to attack. Assemble the build-its and hop on the two fans to collect the floating studs.
260
contents
How to Use tHis eGUide
introdUction
cast
Padawan traininG
walKtHroUGH
secrets and extras
cHecKlists
nintendo dsGAme BASiCSAmBuShDeSTROy MalevolenceROOkieSDuel OF The DROiDSlAiR OF GRievOuSGunGAn GeneRAlJeDi CRAShhiDDen enemyBlue ShADOW viRuSSTORm OveR RylOThliBeRTy On RylOThWeAPOnS FACTORyleGACy OF TeRRORCheCkliSTS
Download from www.chipper.pl

nin
ten
do
ds
—r
oo
Kie
s
Prima Official Game Guide
www.primagames.com
Jump along the platforms and use Captain Rex to sharpshoot the brown rock across the gap. When the boulder rolls into place, jump on and continue to the right. Plenty of studs are in the area, so make a thorough sweep to collect them.
Follow the path to the right. Watch out for the commando Droids hiding behind the boxes, and use Cody’s heavy weapon to clear out the entire area. When you reach the red barrier, aim your fire at the Droids across the gap.
Use Commander Cody’s blaster cannon to clear out the corridor a section at a time. Each barrier drops when you get close enough, so take your time, keep shooting, and strafe to dodge incoming fire. Keep moving forward until a Droid appears and throws a thermal detonator into the corridor. Back out of the blast radius, then continue forward and drop down through the hole in the floor.
FREEPLAYminikiT 1
Before you leave the landing pad, use the Force to open the shuttle. The minikit comes sliding down the ramp; grab the minikit after it lands on the ground.
Despite their heavy armor, commando Droids are remarkably agile. These Droids are usually deployed for covert missions, but they’re also extremely effective in direct combat. Commando Droids are fast enough to dodge both grenades and blaster fire; time your shots to hit them between jumps, or use a Jedi ground slam to take them out when they get close.
COmmAnDO DROiD
Build the grapple pad near the red barrier and swing across the gap. When you land, follow the ledge back to the left. Step on the switch to extend the bridge, then use the build-it to assemble the locking
mechanism’s lever. When you pull the lever, the red barrier deactivates. Run back across the bridge and move to the next area.
TIPOn your way through the corridor, shoot all the columns and check the damaged patches for hidden studs. In Free Play mode, use the Dark Force on the barrier mechanisms for even more studs.
When you land, smash the rocks to uncover two build-its. Assemble the build-its and use the lever to flip the bridge into place. You can’t use the Jedi pad in Story mode, so move across the bridge when you’re ready to continue.
Move past the barricaded exit to find extra studs, breakable objects, and a Jedi pad build-it. When you’re ready to continue, head back and use Commander Cody to shoot your way through the exit.
261
contents
How to Use tHis eGUide
introdUction
cast
Padawan traininG
walKtHroUGH
secrets and extras
cHecKlists
nintendo dsGAme BASiCSAmBuShDeSTROy MalevolenceROOkieSDuel OF The DROiDSlAiR OF GRievOuSGunGAn GeneRAlJeDi CRAShhiDDen enemyBlue ShADOW viRuSSTORm OveR RylOThliBeRTy On RylOThWeAPOnS FACTORyleGACy OF TeRRORCheCkliSTS
Download from www.chipper.pl

nin
ten
do
ds
—r
oo
Kie
s
Prima Official Game Guide
www.primagames.com
Climb the steps to reach the bounty hunter control panel on the cavern’s right side. This panel can only be used in Free Play, but there is a nice stash of studs nearby.
FREEPLAYminikiT 2
Activate the Jedi pad to the right of the exit. Climb up the walls to collect a minikit and some blue studs. Follow the stud trails to the left and double-jump over the exit.
minikiT 3 Use the Jedi pad to reach the ledge above the exit. Move to the left and use the build-it to assemble a bomb. Detonate the bomb to clear to a path to the lift, then use a bounty hunter to access the control panel.
When the lift stops, step off and take out the two Droids to the right. Use the build-it to assemble a Droid control panel at the end of the walkway. Activate the panel and assemble the Jedi pad behind the doors. Use the pad to reach the studs on the ledge above you. Attack the large duck on the ledge to send it flying around the area. The duck crashes into the arcade cabinet near the door and reveals a minikit. Grab the minikit and jump through the studs on your right to return to the exit.
act 2The level opens with Rex and Cody deep in the tunnels of the Rishi moon. Defend yourself from incoming commando Droids and take a moment to collect the studs in there area. Make a full sweep around
the cavern floor to discover studs and hidden build-its. Assemble grapple pads to pull latch points off the walls, and shoot all the flowers sprouting up from the ground.
TIPDuring Free Play, use the bounty hunter control panel to drop two Lightsabers from the nearby dispenser.
Switch between Jedi and Sith characters to play a round of Lightsaber tic-tac-toe. Finish the game to win a board full of blue studs.
FREEPLAYReD BRiCk
Stand at near the cavern steps and use the Force to move the large rocks away from the wall. Move to the right and use the Jedi pad inside the hidden area.
Climb up to the top of the shaft and clear away the rocks from the ledge. When the dust settles, collect the red brick from the ledge, drop back down the shaft, and return to the cavern.
After you collect this red brick, the “Score ×2” extra is available for purchase in the rec room.
262
contents
How to Use tHis eGUide
introdUction
cast
Padawan traininG
walKtHroUGH
secrets and extras
cHecKlists
nintendo dsGAme BASiCSAmBuShDeSTROy MalevolenceROOkieSDuel OF The DROiDSlAiR OF GRievOuSGunGAn GeneRAlJeDi CRAShhiDDen enemyBlue ShADOW viRuSSTORm OveR RylOThliBeRTy On RylOThWeAPOnS FACTORyleGACy OF TeRRORCheCkliSTS
Download from www.chipper.pl

nin
ten
do
ds
—r
oo
Kie
s
Prima Official Game Guide
www.primagames.com
After you’ve collected everything from the cavern floor, head up the ramp near the entrance. Use the build-it to assemble and detonate a large bomb. After the explosion, a trail of studs appears; follow
the studs to the edge of the platform to get a better view of the cavern ceiling. Use Commander Cody to shoot the stalactite and create a bridge.
Cross the bridge and continue to the right. Hit the sharpshoot target to bring the next stalactite down. Use the rubble to build a box, then use the box to reach the ledge.
Follow the path up to another barricaded exit. Use Commander Cody to shoot the flashing planks, then switch to Rex and blast the sharpshoot target above the boulder. Run out of the boulder’s path and wait for it to
roll by. Take moment to collect the studs to the right, then return to the exit and move onto the next area.
You arrive in a Rishi eel’s lair. Follow the studs to the right and drop down near a large gray crate. There are plenty of studs to collect in the area, but don’t take another step to the right until you’ve dealt with the eel.
When you reach the grapple pad, break the brown rock to the right. Use the build-it to assemble a second grapple pad, then round up the hidden studs in the area. Pull the sliding box away from the wall to reach
the blue stud, and use the first grapple pad to pull down the latch point. When you’re ready to leave, use the grapple pad to the right and detonate the bomb to clear the exit.
Break every object you can find in the next area. Build the grapple pad and swing across the gap. When you reach the other side, use the build-it to assemble a lever and activate the energy bridge. Head back and collect the studs from the bridge before moving on.
Follow the path around to the right. Jump up to the grapple pad on the platform and pull the rock down to make a bridge. There are still plenty of studs hidden in breakable objects; be sure to search the area before you cross the bridge.
FREEPLAYminikiT 4
When you drop down near the eel, use the Dark Force on the gray crate. The eel pops out to grab the crate as it moves into range. When the dust settles, a minikit
is sitting near the eel’s hole. Don’t attempt to collect the minikit until after you’ve dealt with the eel.
minikiT 5Break the objects on the cavern’s left side, then approach the shallow pit. Use the Force to pull the dish out of the ground and shake a build-it loose from the ceiling. Build the Droid control panel, and use it to activate the switch nearby switch. Hit the switch to fire a laser. After the dish is destroyed, collect the minikit from the pit.
263
contents
How to Use tHis eGUide
introdUction
cast
Padawan traininG
walKtHroUGH
secrets and extras
cHecKlists
nintendo dsGAme BASiCSAmBuShDeSTROy MalevolenceROOkieSDuel OF The DROiDSlAiR OF GRievOuSGunGAn GeneRAlJeDi CRAShhiDDen enemyBlue ShADOW viRuSSTORm OveR RylOThliBeRTy On RylOThWeAPOnS FACTORyleGACy OF TeRRORCheCkliSTS
Download from www.chipper.pl

nin
ten
do
ds
—r
oo
Kie
s
Prima Official Game Guide
www.primagames.com
There are two sharpshoot targets on the eel’s hole. Move into position and use Captain Rex to shoot the targets; when the large rock drops into place, follow the narrow path to the right. The eel emerges from a second hole. Hit one more sharpshoot target to seal the hole and clear the path to the exit. When you’re ready to leave, use Commander Cody to clear away the barricade.
After the eel’s second tantrum, two build-its fall from the ceiling. Assemble the bricks to make a grapple pad and a large bomb. Move Captain Rex onto the grapple pad and latch onto the eel. When the eel comes crashing to the ground, switch to Commander Cody and detonate the large bomb to chase off the eel for good.
When the eel retreats, it knocks another build-it to the ground. Assemble the bouncer to reach the cavern stairs, then climb up to the narrow ledge along the wall. Use Commander Cody’s blaster cannon
to clear the exit at the top of the stairs.
TIPWhen you’re in Free Play mode, use the Force to pull a build-it down from the ledge. Assemble the bouncer, and
jump up to the ledge. Use the Force to block the first laser, then dodge the remaining lasers to reach the blue studs to the right. Activate the bounty hunter control panel to shut the lasers down and return to the exit.
When you enter the next area, the Rishi eel bursts up through the ground. The fight ahead takes a while, so select your preferred character and start shooting. Strafe to dodge the automated turrets, and keep picking away at the eel’s health. When the eel loses its fourth heart, it slams against the cavern steps.
After the tremor, rocks begin falling from the ceiling. Watch the ground for shadows to predict where rocks will land. Dodge both rocks and blaster fire as you continue to shoot the eel. After you deal enough damage, a sharpshoot target appears on the eel. Use Captain Rex to shoot both of the eel’s eyes.
Before you leave the eel’s lair, break the objects along the ledge near the stairs. Collect the minikit, then head through the exit.
minikiT 6
act 3At the start of Act 3, Captain Rex and Commander Cody reach the heart of the base. Move to the right until you find a locking mechanism near a large well. Pull the mechanism’s lever to fire a beam up through the well and open the shutters across the room.
Move up and fire through the open shutters. Take out the battle Droids as they roll into the room, and keep strafing to expose the targets behind the crates. Use Captain Rex to shoot all three sharpshoot targets to reveal a blue crate in the wall.
264
contents
How to Use tHis eGUide
introdUction
cast
Padawan traininG
walKtHroUGH
secrets and extras
cHecKlists
nintendo dsGAme BASiCSAmBuShDeSTROy MalevolenceROOkieSDuel OF The DROiDSlAiR OF GRievOuSGunGAn GeneRAlJeDi CRAShhiDDen enemyBlue ShADOW viRuSSTORm OveR RylOThliBeRTy On RylOThWeAPOnS FACTORyleGACy OF TeRRORCheCkliSTS
Download from www.chipper.pl

nin
ten
do
ds
—r
oo
Kie
s
Prima Official Game Guide
www.primagames.com
Run over and grab the crate, then follow the stud trail down the ramp and around a second well. Drop the crate on the build-it pad and use the contents to assemble another lever. Pull the lever to activate the well and open the room’s exit. Take out the attacking Droids, and scour the room for studs.
The area has several pieces of equipment placed around glass floor panels. Clear out the battle Droids and pick up the blue crate at the center of the room. Drop the crate on the build-it pad and
assemble the lever for the nearby mechanism. Pull the lever to release another gonk Droid. Shoot the objects in the room to uncover extra studs and a build-it.
FREEPLAYminikiT 7
Stand between the two wells and wait for the two mouse (MSE-series) Droids to roll by. Select a Sith character, and use the Dark Force to throw the mouse Droids across the room. After both Droids have been tossed away, a minikit appears on the grate between the wells.
For some extra studs, use the Force to stack the boxes near the room’s entrance. Climb up the boxes and double-jump to reach four blue studs.
When you enter the next area, battle Droids are launching a full assault on the base’s control room. Circle the room and take out the Droids as they drop in from the ceiling. After you take care of the
last attacker, a gonk Droid emerges from the wall and powers up one of the floor panels. Before you exit the room, smash the equipment to reveal studs and a build-it.
FREEPLAYminikiT 8
Build the Jedi pad in the control room and jump up to the walkway. Follow the wall around to the right and look for the trail of studs hovering out toward the center of the room. Grab everything you need from the walkway, then return to the floating studs. Select a jetpack character to hover through the studs and grab the minikit at the center of the room.
FREEPLAYminikiT 9
Assemble the small door on the room’s left side. Use a small character to slip through the door and emerge below the glass floor panels. Collect the minikit below the floor, then use the small door to return to the room.
When you’re ready to move on, select Cody and shoot the planks blocking the exit. Keep shooting to take care of the Droids rushing in through the open door, then move into the next area.
265
contents
How to Use tHis eGUide
introdUction
cast
Padawan traininG
walKtHroUGH
secrets and extras
cHecKlists
nintendo dsGAme BASiCSAmBuShDeSTROy MalevolenceROOkieSDuel OF The DROiDSlAiR OF GRievOuSGunGAn GeneRAlJeDi CRAShhiDDen enemyBlue ShADOW viRuSSTORm OveR RylOThliBeRTy On RylOThWeAPOnS FACTORyleGACy OF TeRRORCheCkliSTS
Download from www.chipper.pl

nin
ten
do
ds
—d
Uel o
f t
He d
ro
ids
Prima Official Game Guide
www.primagames.com
The place is packed with enemies, but focus on the sharpshoot targets before you deal with them. Use Captain Rex to hit the four sharpshoot targets on the wall, then blast the battle Droids across the gap. When the STAPs appear, shoot them out of the air.
Two Super Battle Droids enter from the far side of the room. Destroy both enemies to release a gonk Droid from a wall compartment. Break any remaining objects and assemble the Jedi pad build-it before you continue. Use the hovering platforms to cross the gap.
When you return to the control room, wait for the explosives to appear in the center of the room. Walk over and place the explosive on the gonk Droids to complete the mission.
Before you leave, grab a minikit just to the left of the exit.
minikiT 10
• The Commando Droid and Clone Gunner characters are unlocked and ready to be used in Free Play.• The Commander Cody, Captain Rex, Jango Fett, Stealth Trooper, Stormtrooper, and TIE Fighter Pilot
characters are available for purchase in the rec room.• Rookies is available for Free Play.
ROOkieS STORy ReWARDS
dUel of tHe droids
minikitsNo. Mode Notes
1 Free Play
After Anakin leaves the party, use the Dark Force to move a step into place. Climb up and destroy the panels on the rooftop.
2 Story After Anakin leaves the party, push the crate off the main path. Build a Jedi pad and cut through the wall.
3 Story Build the recycling bin and the beginning of Act 2. Use the Force on the paper airplanes.
4 Free Play Use Sith and Jedi characters to open the cage above the red barrier.
5 Story After the MagnaGuards appear, build the Jedi pad and disable the barrier.
6 Free Play
grapple to the platform above the walkway and access the Droid control panel.
7 Story Use the Force to move the minikit from the wall to the platform.
8 Story At the start of Act 3, shoot the wall panels to your left.
9 Story After you disable the Vulture Droids, shoot the box in the center of the lift.
10 Free Play
After the hangar, use the Dark Force to move the unbreakable panel and activate the three switches in the wall.
True Jedi Stud Requirement: 50,000True Jedi Free Play Stud Requirement: 100,000
Story Characters:
Anakin
Clone Trooper
R3-S6
Ahsoka
Clone Trooper (heavy)
R2-D2
266
contents
How to Use tHis eGUide
introdUction
cast
Padawan traininG
walKtHroUGH
secrets and extras
cHecKlists
nintendo dsGAme BASiCSAmBuShDeSTROy MalevolenceROOkieSDuel OF The DROiDSlAiR OF GRievOuSGunGAn GeneRAlJeDi CRAShhiDDen enemyBlue ShADOW viRuSSTORm OveR RylOThliBeRTy On RylOThWeAPOnS FACTORyleGACy OF TeRRORCheCkliSTS
Download from www.chipper.pl

nin
ten
do
ds
—d
Uel o
f t
He d
ro
ids
Prima Official Game Guide
www.primagames.com
mIssInG In actIon!Anakin Skywalker’s heroic Droid navigator R2-D2 was lost in battle. When a desperate search fails to locate Artoo, Anakin is forced to take on a new navigator, R3-S6. Now the Jedi embark on a dangerous new mission, to find a secret enemy listening post. Meanwhile, R2-D2 has fallen into the hands of a vile Droid smuggler and is on his way to General Grievous, who will surely plunder the Republic’s secrets hidden within him.…
act 1At the start of the act, Anakin, Ahsoka, and the clone troopers have arrived on the outskirts of the enemy listening post. When you land, break the rotating dish on the platform’s right edge. Use the pieces to build
a grapple pad, then switch to your light clone to pull the antenna down. Check the platform for studs, then run across the antenna.
Look for the walkway jutting out from the top edge of the path. Follow the trail of studs up the walkway to find a rotating dish atop a tower. Use your light clone’s sharpshooting ability to shoot the target below the dish; two crates appear near the exit lift, and three battle Droids rush into the area. Turn around and head back to the main path. When you step off the walkway, approach the crate in front of you and push it over the edge. Drop down and assemble the Jedi pad.
TIPUse the Force on the lights for a few studs, then destroy them to gain several more. Similar lights are located all through the listening post, so remember to hit them all before you leave an area.
When you reach the next platform, use the Force to repair the broken panel and head through the open door. Take care of the battle Droids blocking your path and wait for their reinforcements to set up an ambush. Use the Force to attach the explosive charge to the gate.
After the dust settles, Anakin breaks of from the party. Take Ahsoka and the clone troopers through the gate and follow the path around to the right.
FREEPLAYminikiT 1
After Anakin leaves the party, use a Sith character to move the black and red object on the other side of the gate. Climb up the wall to reach the rooftop to the left.
Continue across the rooftop until you find the red energy barrier. Smash the four panels in front of the barrier and head over to grab the minikit.
Use the Jedi pad to cut through the wall panel and reveal a minikit.
minikiT 2
267
contents
How to Use tHis eGUide
introdUction
cast
Padawan traininG
walKtHroUGH
secrets and extras
cHecKlists
nintendo dsGAme BASiCSAmBuShDeSTROy MalevolenceROOkieSDuel OF The DROiDSlAiR OF GRievOuSGunGAn GeneRAlJeDi CRAShhiDDen enemyBlue ShADOW viRuSSTORm OveR RylOThliBeRTy On RylOThWeAPOnS FACTORyleGACy OF TeRRORCheCkliSTS
Download from www.chipper.pl

nin
ten
do
ds
—d
Uel o
f t
He d
ro
ids
Prima Official Game Guide
www.primagames.com
Break the nearby boxes and assemble a new Jedi pad. Activate the pad to jump up to the exit. Clear out the Droids and push the two crates back into the wall. When the lift opens, head inside and pull the lever to leave the area.
After you leave the lift, clear the area of incoming enemies. Break the box in the corner and assemble a Jedi pad from the pieces. Use the pad to climb up along the walls. At the end of your climb, you find
another Jedi pad in front of a wall panel. Use the pad to cut through the panel and destroy the red tube behind it.
After you break the tube, a team is deployed to investigate. Drop back down and take out the fresh battle Droids. When you’re ready to move on, head through the open door. Plenty of studs are hidden in lights and wall panels, so make a thorough sweep of the area before you leave.
In the next area, fight your way past the battle Droids to the left. Move past the door and use the Force to reassemble R3-S6. After R3-S6 joins your party, access the Droid control panel to open the room’s exit. Check
the area for studs, then head through the door to begin the next act.
act 2At the beginning of Act 2, a Droid is sitting on a box, throwing paper airplanes across the room. Chase the Droid out of the area and deal with any reinforcements.
Smash the boxes to reveal two build-its. Use the pieces to assemble two Jedi pads.
Smash the wall panels in the corner and assemble the blue recycling bin. Use the Force to place all the paper airplanes into the bin. After a moment, a minikit pops out of the bin.
minikiT 3
Smash the two boxes to the right and assemble a grapple pad from the pieces, then use your light clone to pull the bridge into position. Before you cross the bridge, jump down to the boxes in the area below.
Activate the pad on the right and climb up along the walls. Drop back down and use the pad on the left and return to the bridge.
After you collect this red brick, the “Funny Jump” extra can be purchased in the rec room.
ReD BRiCk
268
contents
How to Use tHis eGUide
introdUction
cast
Padawan traininG
walKtHroUGH
secrets and extras
cHecKlists
nintendo dsGAme BASiCSAmBuShDeSTROy MalevolenceROOkieSDuel OF The DROiDSlAiR OF GRievOuSGunGAn GeneRAlJeDi CRAShhiDDen enemyBlue ShADOW viRuSSTORm OveR RylOThliBeRTy On RylOThWeAPOnS FACTORyleGACy OF TeRRORCheCkliSTS
Download from www.chipper.pl

nin
ten
do
ds
—d
Uel o
f t
He d
ro
ids
Prima Official Game Guide
www.primagames.com
Run across the shelves and use the Force to remove the grate from the wall. Use the ventilation duct to exit the room.
Drop back down and use the pad on the left and return to the bridge. Cross the bridge and clear out the Droids in the next hallway. Enemy reinforcements come from both directions, so be ready to defend yourself. When the hallway is clear, smash the wall panels on either side of the exit.
Jump from the platform’s left side toward the narrow ledge in front of the door. When you land, use the Force to rebuild the latch and open the door.
FREEPLAYminikiT 4
Assemble the Jedi pad to the left of the exit. Use the pad and jump up to the cage above the door. Select a Sith character and use the Dark Force to remove the first set of bars, then switch to a Jedi to clear away the second set. After you collect the minikit, drop back down to the red barrier.
Assemble a lever from the build-it near the exit. Pull the lever to drop the barrier, then use R3-S6 to activate the Droid control panel. When the door opens, check for remaining studs and move onto the next area.
General Grievous is waiting for you in the center of the room. Run in and attack; after Grievous suffers enough damage, he escapes to the next room.
TIPDestroy every object on the platform to reveal six blue studs.
In the next room, several Droids arrive to help General Grievous escape. Deal with each Droid as it drops to the ground, then take out the reinforcements across the room. When the room is secure, smash
the boxes and build the Jedi pad to reach the walkway above you.
Follow the walkway to the grapple pad on the right. Use a light clone to latch onto the crate; when the crate crashes to the ground, hop down and build a bomb from the pieces. Have your heavy clone detonate the bomb to topple the shelves like dominoes.
The scene shifts to Anakin and his own clone troopers. Use Anakin to defeat General Grievous’ MagnaGuards and any reinforcements.
269
contents
How to Use tHis eGUide
introdUction
cast
Padawan traininG
walKtHroUGH
secrets and extras
cHecKlists
nintendo dsGAme BASiCSAmBuShDeSTROy MalevolenceROOkieSDuel OF The DROiDSlAiR OF GRievOuSGunGAn GeneRAlJeDi CRAShhiDDen enemyBlue ShADOW viRuSSTORm OveR RylOThliBeRTy On RylOThWeAPOnS FACTORyleGACy OF TeRRORCheCkliSTS
Download from www.chipper.pl

nin
ten
do
ds
—d
Uel o
f t
He d
ro
ids
Prima Official Game Guide
www.primagames.com
After the fight, break the box near the red barrier. Assemble the Jedi pad and cut through the wall panel. Destroy the red tube to drop the barrier, then use the Force to pull the gonk Droid out from the enclosure. Jump onto the gonk Droid and bounce up to the ledge above you.
Designed by General Grievous himself, MagnaGuards are capable of facing Jedi in direct combat. Each MagnaGuard carries an electrostaff, a powerful weapon capable of withstanding Lightsaber attacks. A MagnaGuard has excellent defensive capabilities, and is capable of blocking most attacks with its weapon. When facing these skilled opponents, attack with a Jedi until the two weapons clash. Follow the touchscreen commands during the struggle to destroy the vulnerable MagnaGuard.
mAGnAGuARD
After you drop the red barrier, grab the minikit near the gonk Droid.
minikiT 5
When you land, clear out the Droids and break the nearby boxes. Build a new grapple pad to swing up to the next floor. There is a lever just ahead of you and a crate off to the right.
Follow the path to the right. Destroy the equipment and wall panels as you fight your way through the battle Droids. Smash the box at the end of the walkway, then build the grapple pad and swing across the gap.
When you pull the lever, the shutter in front of you opens up. Move to the railing and shoot the sharpshoot target to destroy the red tubes. The blast clears the path on the other walkway and drops the barrier blocking the exit.
FREEPLAYminikiT 6
After you shoot the red tubes, move past the gate to your left. Use the Droid control panel to open the gate and clear a path to the minikit.
When the shutter slams shut, push the crate off the edge of the platform. Drop down and assemble a lever from the pieces. When you’re ready to move on, pull the lever and pass through the open door.
Destroy the MagnaGuard, then move to the upper left corner of the platform. Use the Force to pull the minikit over from the wall.
minikiT 7
270
contents
How to Use tHis eGUide
introdUction
cast
Padawan traininG
walKtHroUGH
secrets and extras
cHecKlists
nintendo dsGAme BASiCSAmBuShDeSTROy MalevolenceROOkieSDuel OF The DROiDSlAiR OF GRievOuSGunGAn GeneRAlJeDi CRAShhiDDen enemyBlue ShADOW viRuSSTORm OveR RylOThliBeRTy On RylOThWeAPOnS FACTORyleGACy OF TeRRORCheCkliSTS
Download from www.chipper.pl

nin
ten
do
ds
—d
Uel o
f t
He d
ro
ids
Prima Official Game Guide
www.primagames.com
Continue to the right and rebuild R2-D2 from the pieces on the cart. After R2-D2 joins your party, use the Droid control panel to open the exit. Pick up any remaining studs and pass through the door to end the act.
Pull the lever in the next room to extend the walkway, then continue across to the spinning core. Circle around the core and shoot all the glowing coils on the outside of the walkway. When you destroy the last coil, the core stops spinning. Use your heavy clone to destroy all the flashing blocks, then take the walkway back out.
In the next area, the entire party meets up again. Follow the path to the left and break the wall panels for extra studs. When you reach the door, use the Force to reveal the Droid control panel on the wall. Use the Droid control panel to open the door and move onto the next area.
R3-S6 triggers a security alert, and R2-D2 chases the traitor down the hallway. Two Vulture Droids open fire from across the hangar. Take cover behind the panel and use the build-it to assemble a
lever. Pull the lever to activate a crane and destroy the Vulture Droids.
Two more Vulture Droids drop in from above. Run to the left and take cover. After the Vulture Droids damage the ship, pull the lever to return fire. After the first Vulture Droid tumbles into the gap, use the build-it to
assemble a grapple pad. Switch to your light clone and use the grapple pad to pull the second Vulture Droid off the ledge. After a moment, a lift brings the Vulture Droids back to the surface.
act 3
Act 3 opens with two clone troopers attempting to sabotage the station.
After the barrier drops, shoot the box and assemble a grapple pad. Swing across the gap and clear the enemies to the right. Pass between the gray supports and jump over to the yellow lift.
Grab the blue crate and carry it back to the build-it pad. Drop the crate and assemble the large bomb, then use your heavy clone to set it off.
The explosion destroys one of the supports and creates a ramp to the upper level. Head up and use strafing fire to clear out everything across the gap. Two Super Battle Droids enter through the door and the yellow lift moves up from below. Take out the Droids, cross the gap, and exit through the door.
Move to the left and clear away the boxes and wall panels. Collect the minikit from the corner, then head out to the right.
minikiT 8
After you finish off the Vulture Droids, shoot the box in the center of the lift to reveal a minikit.
minikiT 9
271
contents
How to Use tHis eGUide
introdUction
cast
Padawan traininG
walKtHroUGH
secrets and extras
cHecKlists
nintendo dsGAme BASiCSAmBuShDeSTROy MalevolenceROOkieSDuel OF The DROiDSlAiR OF GRievOuSGunGAn GeneRAlJeDi CRAShhiDDen enemyBlue ShADOW viRuSSTORm OveR RylOThliBeRTy On RylOThWeAPOnS FACTORyleGACy OF TeRRORCheCkliSTS
Download from www.chipper.pl

nin
ten
do
ds
—d
Uel o
f t
He d
ro
ids
Prima Official Game Guide
www.primagames.com
Move past the Vulture Droids and pull the lever on the wall. A ship appears on another lift; a crate tumbles out of the ship as Anakin and Ahsoka hop in and escape the listening post. Grab the blue crate and carry it to the build-it pad past the disabled Vulture Droids. Assemble the flashing door panel, then use your heavy clone to destroy it. When you’re ready to leave, use the door to reach the next area.
Move to the left and clear the battle Droids from the hallway. Plenty of studs are hidden in the wall panels; destroy everything you can before you turn the corner.
FREEPLAYminikiT 10
Use the Dark Force to move the unbreakable wall panel. Step on the three switches along the hallway; when the minikit appears to the right, run over and collect it at the end of the hall.
When you turn the corner, open fire on the attacking ship. The ship performs a few strafing runs along the walkway. When you deal enough damage, the ship moves on and the station’s core explodes. The tremor shakes a crate down to the walkway. Break the box and assemble the build-it, then grapple up to the pad atop of the walkway.
Swing over the gap to the left. When you land, R2-D2 arrives and joins your party. Continue to the left and push the crate over the edge. Drop down and assemble a Droid control panel from the contents. Select R2-D2 and activate the Droid control panel to complete the mission.
• The Gonk Droid and R3-S6 characters are unlocked and ready to be used in Free Play.
• The Ahsoka, MagnaGuard, IG-86, Gha Nachkt, Jawa, and Lando Calrissian characters are available for purchase in the rec room.
• Duel of the Droids is available for Free Play.
Duel OF The DROiDS STORy ReWARDS
272
contents
How to Use tHis eGUide
introdUction
cast
Padawan traininG
walKtHroUGH
secrets and extras
cHecKlists
nintendo dsGAme BASiCSAmBuShDeSTROy MalevolenceROOkieSDuel OF The DROiDSlAiR OF GRievOuSGunGAn GeneRAlJeDi CRAShhiDDen enemyBlue ShADOW viRuSSTORm OveR RylOThliBeRTy On RylOThWeAPOnS FACTORyleGACy OF TeRRORCheCkliSTS
Download from www.chipper.pl

nin
ten
do
ds
—la
ir o
f g
rie
vo
us
Prima Official Game Guide
www.primagames.com
Run past Fisto’s ship and pull the lever to the right of the landing pad. When the bridge malfunctions, head back and use the Force to rearrange parts of Fisto’s ship into a platform.
After the platform moves into place, use it to clear the gap. Continue to the next lever; when you activate the lever, it bursts into pieces. Move to the edge of the platform and drop down past the latch point.
lair of grievous
MinikitsNo. Mode Notes
1 Story At the start of the mission, use the Force to open the shuttle and reveal the Jedi pad inside.
2 Free Play Before you enter the castle, move left and drop down to the hidden ledge. Use the Dark Force to open the chamber.
3 Free Play Enter the castle and use the Dark Force on the white fixtures between the tanks.
4 Free Play Use the grapple pad in the throne room, then pass through the small door.
5 Free Play Near the start of Act 2, flip the switch on the ledge. Jetpack out to retrieve the minikit.
6 Free Play Before you step on the red button, destroy the wall grates with thermal detonators.
7 Free Play Build the small door in the roggwart room. Recover the minikit from the upper ledge.
8 Free Play After Grievous is repaired, use the small door to the right.
9 Story Destroy the cart near the table in the repair room.
10 Free Play Before you take the lift up to Grievous, use the thermal detonator to destroy the yellow bars.
Story Characters:
Kit Fisto
Nahdar Vebb
Clone Trooper
Clone Trooper (Heavy)
True Jedi Stud Requirement: 45,000True Jedi Free Play Stud Requirement: 80,000
vIceRoy GunRay escapes!
En route to Coruscant to stand trial for war crimes, evil Separatist leader Nute Gunray has broken free of his Jedi escort. With the help of Count Dooku’s sinister agents, the villainous viceroy has made a daring getaway. Alerted to the bold prison break, Jedi Master Kit Fisto has traced the stolen ship to a remote system, hoping to recapture Gunray and return him to justice.…
act 1At the start of the act, Kit Fisto joins the rest of the party on the landing pad. There is a Republic shuttle located on the nearby ledge, while Fisto’s ship is just to the right.
Move to the left and use the Force to lower the shuttle’s ramp. Enter the shuttle and brake the equipment to gather the studs. Use the Force on the loose floor panel to reveal a Jedi pad. Activate the pad to break through the roof and grab the minikit high above the shuttle.
miNiKiT 1
273
contents
How to use tHis eguide
introduction
cast
Padawan training
walKtHrougH
secrets and extras
cHecKlists
nintendo dsGame BaSiCSamBuSHDeSTRoy MalevolenceRooKieSDuel oF THe DRoiDSlaiR oF GRieVouSGuNGaN GeNeRalJeDi CRaSHHiDDeN eNemyBlue SHaDow ViRuSSToRm oVeR RyloTHliBeRTy oN RyloTHweaPoNS FaCToRyleGaCy oF TeRRoRCHeCKliSTS
Protected by copyright. Unauthorized or unlawful copying or downloading expressly prohibited.
Download from www.chipper.pl

nin
ten
do
ds
—la
ir o
f g
rie
vo
us
Prima Official Game Guide
www.primagames.com
Move to the door at the top of the steps. Use the Force to reveal the grapple pad under the loose floor panel. Select your light clone and grapple up to the ledge. Collect the studs and use the build-it to assemble a
lever. Hop down and pull the lever, then continue onto the next area.
You arrive in a large room to find a hologram of Nute Gunray sitting in a throne. Run in and clear out the battle Droids around the throne. Reinforcements enter from a door across
the room. When you’ve cleared the area, step off the walkways and drop down to the water.
When you’re ready to continue, return to the castle entrance and go inside. Smash the crate near the first MagnaGuard tank and assemble a grapple pad. Use a light clone swing onto the tank. There are panels of glass running along the top of the room. Switch to a Jedi and double-jump across the tanks to the right.
When you reach the fourth tank, jump and collect the silver stud, then follow the corridor behind the glass panels to the left. The path leads you to the studs above the castle entrance. Collect the studs, then drop down
to the ground and reenter the castle.
Use the Force to move the gears over and drop a new grapple pad into place. Stand on the pad near the gears and use a light clone to crank part of the bridge into place. Move back to the first pad and
grapple back up to the main path. Head to the right and double-jump across the gap.
You arrive at the castle entrance. Use the Force on the gray panels to reveal the two levers near the door. Pull the lever to the left of the door, then move to the right. Smash the rocks near the door and build a grapple pad, then use a light clone to pull the second switch.
Before you enter the castle, follow the path to the left. When you pass the breakable rock, drop down from the path to collect the gold studs from the ledge below you.
FREEPLAYmiNiKiT 2
After you drop down to collect the gold studs, drop down once more to find a hidden chamber in the mountainside. Use the Dark Force to open the chamber and reveal a minikit.
TIPDuring Free Play, use a jetpack character to collect the hidden studs to right of the castle.
FREEPLAYmiNiKiT 3
Select a Sith character and use the Dark Force on the white fixtures between the MagnaGuard tanks. When you destroy the fourth fixture, a tank opens at the end of the hall. Move to the right and collect the minikit from the tank.
274
contents
How to use tHis eguide
introduction
cast
Padawan training
walKtHrougH
secrets and extras
cHecKlists
nintendo dsGame BaSiCSamBuSHDeSTRoy MalevolenceRooKieSDuel oF THe DRoiDSlaiR oF GRieVouSGuNGaN GeNeRalJeDi CRaSHHiDDeN eNemyBlue SHaDow ViRuSSToRm oVeR RyloTHliBeRTy oN RyloTHweaPoNS FaCToRyleGaCy oF TeRRoRCHeCKliSTS
Protected by copyright. Unauthorized or unlawful copying or downloading expressly prohibited.
Download from www.chipper.pl

nin
ten
do
ds
—la
ir o
f g
rie
vo
us
Prima Official Game Guide
www.primagames.com
When you’re ready to move on, run across the ledge and drop down to find another tank. Deal with the MagnaGuard and continue to the right. For extra studs, repair the broken Droid and use the Force on the wall fixture. When you’re ready, drop down into the large room to the right.
When you enter the next room, target the wall to the right and use the Force to flip a platform into place. General Grievous appears from the door in front of you and runs in to attack. Fight with Grievous until he jumps onto the nearby platform.
Use the wall panel to climb up to the ledge on the right. Switch to your light clone and use the grapple pad to latch onto General Grievous. Drop to the ground and move across the room. Grapple up to the ledge and activate the pad to trap Grievous on his platform.
Drop back to the ground and assemble the Jedi pad in the center of the room. Use the pad to jump up to General Grievous, then hit him once more with a Lightsaber. Though badly damaged,
Grievous escapes through a vent near the ceiling. Drop down and search the room for studs, then exit through the door to the right.
act 2Act 2 opens with Fisto, Vebb, and the clone troopers deep in General Grievous’ lair. Move to the right until the MagnaGuard bursts out of its tank. Defeat the Droid, then assemble the nearby Jedi pad. Activate the
Jedi pad to jump up to the ledge; when you land, use the Force to flip the switch to the right.
Collect the studs from the water, then use the Jedi pad to return to the walkway. When you’re ready to continue, head through the open door and up the steps.
FREEPLAYmiNiKiT 4
After you drop down to the water, use a light clone to activate the grapple pad on the throne room’s left side. When you land, use a small character to pass through the door to the right. Follow the trail of studs to collect the minikit. Drop down from the ledge to return to the water.
TIPDuring Free Play, use the bounty hunter control panel near the left door to reveal some valuable studs.
FREEPLAYmiNiKiT 5
After you flip the switch, turn back to the left. Use a jetpack character to hover through the studs and grab the floating minikit.
CAUTIONThe large room’s floor separates when you touch the red button—stay clear of it until you’re ready to leave the area.
275
contents
How to use tHis eguide
introduction
cast
Padawan training
walKtHrougH
secrets and extras
cHecKlists
nintendo dsGame BaSiCSamBuSHDeSTRoy MalevolenceRooKieSDuel oF THe DRoiDSlaiR oF GRieVouSGuNGaN GeNeRalJeDi CRaSHHiDDeN eNemyBlue SHaDow ViRuSSToRm oVeR RyloTHliBeRTy oN RyloTHweaPoNS FaCToRyleGaCy oF TeRRoRCHeCKliSTS
Protected by copyright. Unauthorized or unlawful copying or downloading expressly prohibited.
Download from www.chipper.pl

nin
ten
do
ds
—la
ir o
f g
rie
vo
us
Prima Official Game Guide
www.primagames.com
In the next room, run up the stairs to clear out the MagnaGuards and battle Droids. When the large door opens, General Grievous’ pet roggwart emerges. Move to the left and assemble the Jedi pad.
Jump up to the ledge and use the Force to pull the red panel from the wall.
Drop down to the ground. Stay clear of the roggwart and assemble the grapple pad on the right. Grapple up to the ledge and remove a second red panel with the Force. Move to the center of the room and
use your light clone’s sharpshooting ability to shoot the exposed chains and bring the door crashing down on the roggwart. Step on the red
button and back away until the floor splits apart. Drop down to one of the rocks floating in the lava pool. Whenever you touch a rock, it sinks into the lava. Jump toward the bricks
near the wall. Switch to your heavy clone and shoot the bricks, but keep moving across the rocks to stay out of the lava.
When you destroy the last of the bricks, a platform emerges from the lava. Hop across and assemble the built-it. Step on the switch to ride up to the locked door. Activate the Jedi pad and climb up to the ledge high
above you. Use the Force to move the three wall panels into place. When the door opens, drop down and fight the MagnaGuard below you.
FREEPLAYmiNiKiT 6
In the large room, avoid the red button in the center of the floor. Move to the right and locate the grate covered in thermal detonators. Use a bounty hunter to destroy the grate, then switch to a Jedi to double-jump through the gap. Move along the wall to collect the minikit behind the grates.
NOTERepeat the process on the room’s left side to collect some extra studs.
TIPWhen you drop from the ledge, steer your drop into the wall to collect the studs above the door.
FREEPLAYmiNiKiT 7
Before you leave the roggwart room, assemble the small door to the left. Use the door to reach the ledge above you. Move to the right and collect the minikit at the end of the ledge. There are plenty of additional studs to collect, so make a full sweep of the ledge.
276
contents
How to use tHis eguide
introduction
cast
Padawan training
walKtHrougH
secrets and extras
cHecKlists
nintendo dsGame BaSiCSamBuSHDeSTRoy MalevolenceRooKieSDuel oF THe DRoiDSlaiR oF GRieVouSGuNGaN GeNeRalJeDi CRaSHHiDDeN eNemyBlue SHaDow ViRuSSToRm oVeR RyloTHliBeRTy oN RyloTHweaPoNS FaCToRyleGaCy oF TeRRoRCHeCKliSTS
Protected by copyright. Unauthorized or unlawful copying or downloading expressly prohibited.
Download from www.chipper.pl

nin
ten
do
ds
—la
ir o
f g
rie
vo
us
Prima Official Game Guide
www.primagames.com
When you enter the next area, jump across the gap to the right. Assemble the grapple pad and pull yourself up to a stud-covered ledge. Follow the ledge to the left; after you collect the studs, drop back down to the walkway.
When you’re ready to continue, use the Force to lift the door off the roggwart. Jump onto the fallen beast and leave the room.
act 3The level opens with Master Fisto and his squad in the Droid assembly room. Move to the right and approach the window. Shortly after A4-D begins repairs on General Grievous, several battle Droids appear. Fight off your attackers until Grievous is fully repaired and the barrier drops.
FREEPLAYReD BRiCK
Before you leave the roggwart room, access the Droid control panel and open the door to the right. When you enter the next room, move to the Jedi pad and jump up to the ledge. Collect the studs and assemble the switch. Trigger the switch to open a panel in the wall below you. Drop down and build the first statue of General Grievous.
Now move to the right. Use the Force to move the build-it from behind a red barrier at the end of the room. Use the grapple pad to reach the ledge above you. When you land, build the second Grievous statue. A third statue appears near the center of the room. Drop down behind the red barrier. Grab the studs, then use the Jedi pad to get back over the barrier.
Destroy the third Grievous statue to expose a Jedi pad. Use the pad and climb up to the red brick above you. Collect any remaining studs in the area, then head back out to the roggwart room.
NOTEAfter you collect this red brick, the “Auto Pickup” extra can be purchased in the rec room.
FREEPLAYmiNiKiT 8
After you defeat Grievous’ battle Droids, use the small door near the room’s right wall. When you exit the passage, collect the minikit to the left, then drop back down to the ground.
miNiKiT 9
Head into the repair room and run past the table. Destroy the cart to collect the minikit, then follow General Grievous out of the room.
277
contents
How to use tHis eguide
introduction
cast
Padawan training
walKtHrougH
secrets and extras
cHecKlists
nintendo dsGame BaSiCSamBuSHDeSTRoy MalevolenceRooKieSDuel oF THe DRoiDSlaiR oF GRieVouSGuNGaN GeNeRalJeDi CRaSHHiDDeN eNemyBlue SHaDow ViRuSSToRm oVeR RyloTHliBeRTy oN RyloTHweaPoNS FaCToRyleGaCy oF TeRRoRCHeCKliSTS
Protected by copyright. Unauthorized or unlawful copying or downloading expressly prohibited.
Download from www.chipper.pl

nin
ten
do
ds
—la
ir o
f g
rie
vo
us
Prima Official Game Guide
www.primagames.com
The general is in top form, so don’t rush in to attack. When the fight starts, keep your distance and let Grievous chase you around the area. When Grievous stops to cough, take advantage of his
weakened state. Run in and do as much damage as possible. When Grievous knocks you back, run away until he suffers another fit.
After you’ve dealt enough damage to Grievous, Kit Fisto’s ship pulls up to the left. Abandon the fight and jump onto the ship to complete the mission.
Fight through waves of General Grievous’ battle Droids as you follow the walkway to the left. When you reach the gap in the walkway, build the grapple pad and swing across. After you clear the gap, break the nearby box and assemble a bouncer. Hop on the bouncer to grab the studs high above you. When you land, make your way to the end of the walkway.
At the end of the walkway, use the Force to push the tank over the ledge. Build the Jedi pad and jump up to the next ledge. When you land, follow the ledge to the left. Break the boxes and assemble a lever from
the contents. Pull the lever, then follow the ledge back to the right.
Double-jump across the gap and continue to the red flashing bricks. Use a heavy clone to shoot through the bricks, then pull the lever to summon the lift. Before you head back to face the Super Battle Droids,
break the box and assemble the Jedi pad. Use the Force on the wall switch to collect some extra studs, then use the Jedi pad to collect several more.
When you’re ready to continue, take care of the Super Battle Droids on the lift. Clear out both Droids to activate the lift and ride up to face General Grievous.
FREEPLAYmiNiKiT 10
Before you head up, use a bounty hunter to throw a thermal detonator at the yellow bars above the lift. Step off the lift and grab the minikit. Drop down and head to the left. Use the Jedi pad to return to the lift, then continue up to General Grievous.
• The Nahdar Vebb and A4-D characters are unlocked and ready to be used in Free Play.
• The Nute Gunray, General Grievous, Kit Fisto, Tusken Raider, and Clone Trooper Jetpack characters are available for purchase in the rec room.
• Lair of Grievous is available for Free Play.
laiR oF GRieVouS SToRy RewaRDS
278
contents
How to use tHis eguide
introduction
cast
Padawan training
walKtHrougH
secrets and extras
cHecKlists
nintendo dsGame BaSiCSamBuSHDeSTRoy MalevolenceRooKieSDuel oF THe DRoiDSlaiR oF GRieVouSGuNGaN GeNeRalJeDi CRaSHHiDDeN eNemyBlue SHaDow ViRuSSToRm oVeR RyloTHliBeRTy oN RyloTHweaPoNS FaCToRyleGaCy oF TeRRoRCHeCKliSTS
Protected by copyright. Unauthorized or unlawful copying or downloading expressly prohibited.
Download from www.chipper.pl

nin
ten
do
ds
—g
un
ga
n g
en
er
al
Prima Official Game Guide
www.primagames.com
The level opens with Jar Jar and the clone troopers near the crashed ship. Search the crash site for studs, then follow the path toward the pirate stronghold. When you reach the large gap,
jump up to the narrow ledge on your left. Cross the ledge to reach the gap’s far side.
Watch for signs of incoming mortar fire; stay clear of the red targeting circles as you fight your way through the pirates. After you destroy the mortar, prepare yourself for a significantly tougher opponent.
When you reach the pirate tank, open fire and strafe to the right. Try to damage the brown engines atop the tank, but keep moving to avoid its attacks. Whenever your weapon fails to target the tank’s
engines, stop firing long enough to reset your aim. Destroy both engines to send the tank crashing into the mountainside.
gungan general
MinikitsNo. Mode Notes
1 Free Play In the underground passage, build the first Jedi pad and jump up to the ledge.
2 Free Play In the underground passage, build the second Jedi pad and cut through the wall.
3 Free Play Use the small door in the underground passage.
4 Free PlayAfter you escape your cell, destroy the brown vent and build a grapple pad. Grapple up to the crawl space.
5 StoryAfter you escape your cell, use the Force on the second cell. Use the blue crate to build a Jedi pad, then cut into the third cell.
6 Story Use the Force to free the trapped pirate.
7 Story Near the end of Act 2, use a ground slam to break through the floor grate.
8 Free PlayUse the Jedi pad past the steam valves. When you land, latch onto the grate and pull it from the wall.
9 Story After the battle Droids, use the Force to smash the armory and replace all of the blasters.
10 Free Play Use the Jedi pad in the hangar, then grapple across to the right.
Story Characters:
Jar Jar
Clone Trooper
Clone Trooper (Heavy)
anakin
obi-wan
Count Dooku
True Jedi Stud Requirement: 45,000True Jedi Free Play Stud Requirement: 75,000
dooku held FoR Ransom!After escaping capture by Jedi Knights Anakin Skywalker and Obi-Wan Kenobi, the villainous Count Dooku fell into the clutches of pirates led by the brigand Hondo Ohnaka. Eager to get custody of Dooku, the Republic agreed to pay Hondo a hefty sum in exchange for the Sith Lord. But Anakin and Obi-Wan had not counted on the treacherous cunning of Ohnaka and his band.…
act 1
279
contents
How to use tHis eguide
introduction
cast
Padawan training
walKtHrougH
secrets and extras
cHecKlists
nintendo dsGame BaSiCSamBuSHDeSTRoy MalevolenceRooKieSDuel oF THe DRoiDSlaiR oF GRieVouSGuNGaN GeNeRalJeDi CRaSHHiDDeN eNemyBlue SHaDow ViRuSSToRm oVeR RyloTHliBeRTy oN RyloTHweaPoNS FaCToRyleGaCy oF TeRRoRCHeCKliSTS
Download from www.chipper.pl

nin
ten
do
ds
—g
un
ga
n g
en
er
al
Prima Official Game Guide
www.primagames.com
When you exit the passage, follow the path up toward the pirates. When the cart is destroyed by a mortar round, use the pieces to assemble a large bomb.
Climb up to the grapple pad and pull a rock into the next geyser. Jump onto the rock and wait for a burst of steam to lift you to the exit.
When you land, follow the passage to the right and clear out the pirates. Before you use the grapple pad, break all the rocks in the area and use the build-its to assemble two Jedi pads. These Jedi
pads can only be used in Free Play, but the extra studs are well worth your time.
After you destroy the tank, continue to the right. Clear out the remaining pirates, then follow the studs and drop down the hole at the end of the path.
Use the grapple pad to swing up and continue to the right. Break the rock near the steaming geyser and assemble a new grapple pad. Use the pad to pull a large rock over the geyser. After a moment, the rock flies off the geyser; destroy the rock to reveal a blue crate.
Drop the crate onto the build-it pad and use the pieces to assemble a bomb. Detonate the bomb and shoot the debris to clear a path. Continue to the right, and take out the pirates at the top of the ramp.
TIPBefore you drop down into the hole, be sure to grab the blue stud hidden at the end of the spiral.
FREEPLAYmiNiKiT 1
Use the Jedi pads near the entrance to find two minikits. Activate the first Jedi pad to reach a minikit and four blue studs. Drop down and move to the right.
miNiKiT 2Use the second Jedi pad to cut through the wall. When the dust settles, grab the minikit and use the grapple pad to the right.
FREEPLAYmiNiKiT 3
Select a small character to use the door at the top of the ramp. When you reach the other side, destroy the brown column to reveal a minikit.
280
contents
How to use tHis eguide
introduction
cast
Padawan training
walKtHrougH
secrets and extras
cHecKlists
nintendo dsGame BaSiCSamBuSHDeSTRoy MalevolenceRooKieSDuel oF THe DRoiDSlaiR oF GRieVouSGuNGaN GeNeRalJeDi CRaSHHiDDeN eNemyBlue SHaDow ViRuSSToRm oVeR RyloTHliBeRTy oN RyloTHweaPoNS FaCToRyleGaCy oF TeRRoRCHeCKliSTS
Download from www.chipper.pl

nin
ten
do
ds
—g
un
ga
n g
en
er
al
Prima Official Game Guide
www.primagames.com
Move to the right and stand near the large door. Use the Force on the two wall fixtures to create a battering ram. Select Count Dooku, then use the Dark Force on the battering ram to smash through the door. Continue to the right and search the last cell for extra studs. When you’re ready to move on, exit the hall through the large door.
act 2The level opens with Anakin, Obi-Wan, and Count Dooku locked in the pirate stronghold. Use the Force on the control panel to open the cell door. Step into the hall and clear out the attacking pirates.
Detonate the bomb to topple the nearby beam. After the explosion, jump onto the beam and run up to the gate. Double-jump across to the ledge on the right, then activate the lever to open the gate.
Drop down and head through the gate. Destroy the boxes near the ship and assemble the grapple pad. Use the pad to open the ship, then head inside and fire its blasters. Leave the ship and destroy the nearby
mortar. Reassemble the pieces to fire the mortar back toward the pirates.
Follow the trail of studs up to the first turbine. Shoot the turbine until you destroy it. Double-jump over to the right and shoot the second turbine until you destroy the pirate’s power grid.
Use the Force on the second cell’s control panel. Carry the blue crate over to the build-it pad and assemble a Jedi pad from the pieces.
CAUTIONAct 1 ends when the power grid fails. Make sure you collect all the available studs before you destroy the second turbine.
FREEPLAYmiNiKiT 4
Stand outside the second cell and use a Jedi ground slam to shatter the brown grate on the floor. Assemble a grapple pad from the pieces, then swing up to the hidden crawl space. Collect the studs and break all the grates in the crawl space; collect the minikit from behind the last grate.
Activate the Jedi pad to cut your way into the third cell. Destroy the box in the cell to collect a minikit.
miNiKiT 5
281
contents
How to use tHis eguide
introduction
cast
Padawan training
walKtHrougH
secrets and extras
cHecKlists
nintendo dsGame BaSiCSamBuSHDeSTRoy MalevolenceRooKieSDuel oF THe DRoiDSlaiR oF GRieVouSGuNGaN GeNeRalJeDi CRaSHHiDDeN eNemyBlue SHaDow ViRuSSToRm oVeR RyloTHliBeRTy oN RyloTHweaPoNS FaCToRyleGaCy oF TeRRoRCHeCKliSTS
Download from www.chipper.pl

nin
ten
do
ds
—g
un
ga
n g
en
er
al
Prima Official Game Guide
www.primagames.com
Use the Force on the remaining debris to place create platforms along the wall. Before you climb the platforms, use a ground slam to smash through the grate on the floor, then drop down for some extra
studs. Use your Lightsaber to deflect attacks from the hidden pirate.
Return to the surface and jump up along the platforms. Use the Dark Force on the pipes to open a path through the ceiling.
When you reach the next area, use the Force to lift the debris and free the trapped pirate.
act 3Anakin, Obi-Wan, and Count Dooku are in the midst of their escape. Take out the next wave of pirates and move to the left end of the hall. Break the box near the red barrier to uncover a build-it pad, then use a ground slam to break through the floor grate.
Use the Force on the steam valves to safely reach the far end of the duct. Smash the objects past the valves to uncover a blue crate and a build it. Assemble the Jedi pad and hop on to collect a few extra studs.
After you free the trapped pirate, a minikit pops out of the wall.
miNiKiT 6
TIPDrop to the ground before you exit through the ceiling. Smash the pipes you removed from the ceiling and collect some extra studs.
In the next area, defend yourself from the attacking pirates. Use a ground slam to break through one of the floor grates. Smash the wall panels and use the Force to open the exit. Before you leave, check the
area for any studs or objects you might have missed.
Break the boxes under the floor to collect the minikit. Grab any remaining studs and jump back up to the surface.
miNiKiT 7
FREEPLAYmiNiKiT 8
Use the Jedi pad to the left of the steam valves. When you land, use the grapple pad to latch onto the grate in the wall. After you pull the grate loose, double-jump over to collect the minikit.
282
contents
How to use tHis eguide
introduction
cast
Padawan training
walKtHrougH
secrets and extras
cHecKlists
nintendo dsGame BaSiCSamBuSHDeSTRoy MalevolenceRooKieSDuel oF THe DRoiDSlaiR oF GRieVouSGuNGaN GeNeRalJeDi CRaSHHiDDeN eNemyBlue SHaDow ViRuSSToRm oVeR RyloTHliBeRTy oN RyloTHweaPoNS FaCToRyleGaCy oF TeRRoRCHeCKliSTS
Download from www.chipper.pl

nin
ten
do
ds
—g
un
ga
n g
en
er
al
Prima Official Game Guide
www.primagames.com
When you’re ready to continue, use the Dark Force to unlock the doors blocking the exit.
Carry the blue crate back to the build-it pad. Assemble the pieces, then pull the lever to drop the red barrier. Head over to the Jedi pad and climb up to the next area. Take out the battle Droids, then destroy any breakable objects.
Move to the right and smash the box near the hangar door. Build the Jedi pad and use it to climb up to the ledge above you. Use the Jedi pad above the hangar door to cut through the glass. Use the Force to move the lever into range. Pull the lever and drop back down to the floor.
Smash the box on the raised platform and use the Force on its contents. After the mechanism is in place, the hangar door opens. Collect any remaining studs from the hallway and head through the door.
After you enter the hangar, attack the speeder near the door. The speeder flies around the hanger and crashes into the wall. Use the Force to place
Use the Force to throw the crate into the wall. Destroy any remaining breakable objects, then use the Force to place all the blaster rifles back on the wall. A crate pops out of the wall and shatters to reveal a minikit.
miNiKiT 9
In the next area, Count Dooku escapes through a side door. Clear the pirates out of the hallway and scour the area for breakable objects.
FREEPLAYReD BRiCK
Move left and use the grapple pad at the end of the hall. When you land on the ledge, take care of the pirates and pull the lever to the right.
Move back to the left and wait for the targets to pop up in the shooting gallery. Use your light clone’s sharpshooting ability to take out each target. Hit enough of the targets to win the red brick. Claim your prize and drop back down to the hallway.
NOTEAfter you collect this red brick, the “One Shot” extra can be purchased in the rec room.
283
contents
How to use tHis eguide
introduction
cast
Padawan training
walKtHrougH
secrets and extras
cHecKlists
nintendo dsGame BaSiCSamBuSHDeSTRoy MalevolenceRooKieSDuel oF THe DRoiDSlaiR oF GRieVouSGuNGaN GeNeRalJeDi CRaSHHiDDeN eNemyBlue SHaDow ViRuSSToRm oVeR RyloTHliBeRTy oN RyloTHweaPoNS FaCToRyleGaCy oF TeRRoRCHeCKliSTS
Download from www.chipper.pl

nin
ten
do
ds
—jed
i c
ra
sH
Prima Official Game Guide
www.primagames.com
the power cell into the nearby equipment. Move to the left and use the Force to place another power cell into a second piece of equipment. When you’re ready,
leave the hangar to complete the mission.FREEPLAY
miNiKiT 10Smash the box in the corner to uncover a build-it. Assemble the Jedi pad and jump up to the platform above you. Stand on the grapple pad and swing across to find a minikit and four blue studs.
• The Count Dooku and Jar Jar characters are unlocked and ready to be used in Free Play.
• The Hondo Ohnaka, Turk Falso, Bossk, Jar Jar (Bombad), Weequay Pirate, and Senator Philo characters are available for purchase in the rec room.
• Gungan General is available for Free Play.
jedi crasH
MinikitsNo. Mode Notes
1 Story Fly to the cruiser’s engines at the beginning of the mission.
2 Story Prevent the Hyena Bombers from bombing the cruiser.
3 Story After you move back down below the deck, smash the box near the Super Battle Droid.
4 Story After you assemble the thruster, break the crate on the path to the right.
5 Story Use the Force on the crate in the giant tree. When the crate lands, smash it open.
6 Story After Wag Too leaves, smash the crate on the cart.
7 StoryAfter you find Lok Durd, destroy the AAT parts and assemble a grapple pad. Use the pad to pull a crate to the ground.
8 Story Shoot all the ducks in under 30 seconds.
9 Story Use the Force on the stacked boxes in Lok Durd’s workshop.
10 Story Before leaving Lok Durd’s workshop, smash the box near the ramp.
True Jedi Stud Requirement: 50,000True Jedi Free Play Stud Requirement: 100,000
Story Characters:
anakin
Clone Trooper
ahsoka Tano
Clone Trooper (Heavy)
the RepuBlIc Fleet Is on the deFensIve and pushed to
the BRInk!As war rages in the much contested Outer Rim Territories, chaos and fear mount as the Separatist army wages an epic battle against heavily outnumbered Republic ships in the far reaches of the Quell system. Anakin Skywalker and his Padawan, Ahsoka Tano, race across the galaxy to aid Jedi Knight Aayla Secura, who is in the midst of a fight for her life as the sinister Droid army closes in….
GuNGaN GeNeRal SToRy RewaRDS
284
contents
How to use tHis eguide
introduction
cast
Padawan training
walKtHrougH
secrets and extras
cHecKlists
nintendo dsGame BaSiCSamBuSHDeSTRoy MalevolenceRooKieSDuel oF THe DRoiDSlaiR oF GRieVouSGuNGaN GeNeRalJeDi CRaSHHiDDeN eNemyBlue SHaDow ViRuSSToRm oVeR RyloTHliBeRTy oN RyloTHweaPoNS FaCToRyleGaCy oF TeRRoRCHeCKliSTS
Download from www.chipper.pl

nin
ten
do
ds
—jed
i c
ra
sH
Prima Official Game Guide
www.primagames.com
When you reach the locked doors, target the beam through the glass. Use the Force to drop the beam to clear the path and open the doors.
Continue up the corridor to find Ahsoka battling a group of Droids. After she joins your party, follow the corridor up to the cruiser’s deck.
Shoot down eight Vulture Droids to trigger the battle’s next phase. The Separatists begin launching Hyena Bombers. The first wave has only one bomber. Use the pink arrow to locate the Hyena Bomber and use
a missile to take it out before it attacks the cruiser.
Each wave adds an extra bomber to the attack. Shoot down the two Hyena Bombers in the second wave, then the three Hyena Bombers that follow. You should run out of missiles just as you finish off the third
wave of Hyena Bombers. Find and destroy the supply ship to restock your missiles before the next wave of Hyena Bombers arrive. Shoot down the last four Hyena Bombers, too, then clear out the remaining Vulture Droids.
act 1Anakin and Ahsoka arrive to defend one of Aayla Secura’s cruisers. Before you engage the attacking Vulture Droids, fly along the length of the cruiser. Keep flying until you reach the edge of the battlefield,
then turn around and fly back toward the cruiser.
act 2Anakin and a clone trooper emerging from the crashed transport. When you approach the large door, it snaps open to reveal a corridor swarming with battle Droids. Clear out the Droids as you make your way up the corridor.
At the large gap in the floor, use the Force to move a platform into place to bridge the gap. Jump across the gap and continue up the corridor.
Grab the minikit near the cruiser’s engines, then fly into battle with the Vulture Droids.
miNiKiT 1
If you managed to destroy all ten bombers before the cruiser took any damage, a minikit appears between the cruiser’s bridge towers. Fly over and grab the minikit before you finish off the Vulture Droids.
miNiKiT 2
285
contents
How to use tHis eguide
introduction
cast
Padawan training
walKtHrougH
secrets and extras
cHecKlists
nintendo dsGame BaSiCSamBuSHDeSTRoy MalevolenceRooKieSDuel oF THe DRoiDSlaiR oF GRieVouSGuNGaN GeNeRalJeDi CRaSHHiDDeN eNemyBlue SHaDow ViRuSSToRm oVeR RyloTHliBeRTy oN RyloTHweaPoNS FaCToRyleGaCy oF TeRRoRCHeCKliSTS
Download from www.chipper.pl

nin
ten
do
ds
—jed
i c
ra
sH
Prima Official Game Guide
www.primagames.com
Move away from the wreckage to find a series of platforms running along the cliff side. Drop down and follow the studs across the platforms to the right.
act 3Anakin, Ahsoka, and a heavy clone are at the crash site. Use the Force on the speeder to add the clone trooper.
The deck is packed with enemy Droids; stay sharp to avoid both the incoming blaster fire and the holes in the deck. There are plenty of studs to collect along the way, so take the time to go back for any
you may have missed in the heat of battle.
After the deck gives way, follow the ramp back down into the corridor. Be prepared to come under heavy fire when you reach the bottom of the ramp. Use your preferred method to take out the three Droids farther up the corridor.
When you reach the crate, smash it open and assemble a grapple pad. Use your light clone to swing across the gap, then destroy the debris to reveal another build-it. Assemble a new grapple pad to pull the bit of wreckage down to the platforms.
Switch to one of your Jedi and use the Force on the piece of wreckage. After it lands near the thruster, double-jump across the platforms and return to the crashed ship. Target the piece of wreckage
and use the Force to reassemble the thruster.
After the thruster clears the path, clear out the battle Droids and follow the path to the right.Break the
box near the Super Battle Droid to collect a minikit, then continue to the end of the corridor.
miNiKiT 3
Destroy the crate near the fallen tree to collect a minikit.
miNiKiT 4
TIPFor some extra studs, use the Force to make budding flowers bloom.
286
contents
How to use tHis eguide
introduction
cast
Padawan training
walKtHrougH
secrets and extras
cHecKlists
nintendo dsGame BaSiCSamBuSHDeSTRoy MalevolenceRooKieSDuel oF THe DRoiDSlaiR oF GRieVouSGuNGaN GeNeRalJeDi CRaSHHiDDeN eNemyBlue SHaDow ViRuSSToRm oVeR RyloTHliBeRTy oN RyloTHweaPoNS FaCToRyleGaCy oF TeRRoRCHeCKliSTS
Download from www.chipper.pl

nin
ten
do
ds
—jed
i c
ra
sH
Prima Official Game Guide
www.primagames.com
Approach the barrier, then use the Force to throw some debris into the nearby turret. Run up to the debris and use another throw to take out a second turret.
Continue to the right until the AAT moves in to attack. Use the Force to throw a large rock; the impact breaks a piece of the wall loose and pins the AAT near the entrance. Build the grapple pad to reach the ledge above you.
Step on the two switches to open the entrance, then drop down through the studs.
Continue to the Lurmen colony at the end of the path. Collect all of the studs above the awnings, then follow Wag Too through the main structure.
Continue to the right. Jump through the studs and drop to the ground. When you land, fight through the waves of enemies and take out the Separatist recon Droid blocking your path.
In the next area, use the Force to pull the crate onto the path. Smash the crate, then use its contents to assemble build a large bomb. Activate the bomb to blast the giant seed pod out of your path.
The explosion shakes more seed pods loose from the giant tree. Avoid the shadows of falling seed pods and continue down the path. When you reach the giant tree, follow its spiraling trunk onto an offshoot.
Use the Force to move the gray crate onto the offshoot. Smash the crate to reveal a minikit.
miNiKiT 5
The recon Droid is used to scout hostile territory or keep watch of enemy movements. When one of these Droids spots you, it relays your position and calls for reinforcements. Recon Droids are lightly armored, and are sometimes equipped with basic blasters.
ReCoN DRoiD
After Wag Too leads you back outside, follow the path to the right. Take out the Droid near the cart, then move the blue crate onto the build-it pad. Assemble the large bomb, then set it off to topple the nearby tree. The tree crashes down, destroying the red barrier farther up the path.
Jump on the cart and smash the remaining crate to collect a minikit, then continue up the path.
miNiKiT 6
TIPBefore you go inside, make sure you collect the studs to the right of the AAT.
287
contents
How to use tHis eguide
introduction
cast
Padawan training
walKtHrougH
secrets and extras
cHecKlists
nintendo dsGame BaSiCSamBuSHDeSTRoy MalevolenceRooKieSDuel oF THe DRoiDSlaiR oF GRieVouSGuNGaN GeNeRalJeDi CRaSHHiDDeN eNemyBlue SHaDow ViRuSSToRm oVeR RyloTHliBeRTy oN RyloTHweaPoNS FaCToRyleGaCy oF TeRRoRCHeCKliSTS
Download from www.chipper.pl

nin
ten
do
ds
—jed
i c
ra
sH
Prima Official Game Guide
www.primagames.com
When you’re ready, move up the ramp and use the Force to open the door. Confront Lok Durd to complete the mission.
Climb into the AAT turret, then use it to destroy Lok Durd’s secret weapon. When the battle Droids appear on the walkway across the room, shoot the columns out from under them.
After you enter the building, Lok Durd and his battle Droids taunt you from behind thick bars. Use the Force to push the bars out of the way, then run in and deal with the Droids.
Move to the left and destroy the smaller AAT pieces to reveal a build-it. Assemble the grapple pad, and use it to latch onto the nearby crate. Pull the crate down to reveal a minikit.
miNiKiT 7
Move to the right and smash the crate near the ramp to reveal a minikit. If you haven’t done so already, collect the red brick and studs to the right.
miNiKiT 10
Move to the upper-left corner of the room. Use the Force on the stacked crates to reveal a minikit.
miNiKiT 9
When the battle Droids appear behind you, swivel the turret around and wipe out the reinforcements as they arrive. When the battle Droids stop coming, the wall opens up to reveal a shooting gallery. Shoot all the ducks within the 30-second time limit to reveal the minikit. Leave the turret and collect the minikit on the stage.
miNiKiT 8
After you use the AAT turret to destroy the walkway, a large crate comes tumbling down along with the Droids.
After you collect this red brick, the “Score ×4” extra can be purchased in the rec room.
ReD BRiCK
• The Clone Snowtrooper and Tub characters are unlocked and ready to be used in Free Play.• The Chi Cho, Riyo Chuchi, Lok Durd, Wag Too, Anakin (Snow), Thi-Sen, and Obi-Wan (Snow) characters
are available for purchase in the rec room.• Jedi Crash is available for Free Play.
JeDi CRaSH SToRy RewaRDS
288
contents
How to use tHis eguide
introduction
cast
Padawan training
walKtHrougH
secrets and extras
cHecKlists
nintendo dsGame BaSiCSamBuSHDeSTRoy MalevolenceRooKieSDuel oF THe DRoiDSlaiR oF GRieVouSGuNGaN GeNeRalJeDi CRaSHHiDDeN eNemyBlue SHaDow ViRuSSToRm oVeR RyloTHliBeRTy oN RyloTHweaPoNS FaCToRyleGaCy oF TeRRoRCHeCKliSTS
Download from www.chipper.pl

nin
ten
do
ds
—h
idd
en
en
em
y
Prima Official Game Guide
www.primagames.com
a planet undeR sIeGe!Separatist forces mercilessly batter the beautiful and elegant world of Christophsis. Unable to defend themselves any longer, the people of Christophsis call upon the Jedi for assistance. Hoping to save lives and prevent further destruction, Obi-Wan Kenobi and Anakin Skywalker plan a daring ambush that can turn the tide in the fight for this crucial star system.…
hidden enemy
MinikitsNo. Mode Notes
1 Story At the beginning of the mission, stand outside the lift and use the Force to contain the bomb’s explosion.
2 Free Play
Access the Separatist control panel in the lift. Use the Force to hang three chandeliers.
3 Free Play
After you jump across the hallway chandeliers, use the Droid control panel to drop the red barrier. Pull the lever through the small door, then fight the Droids in the newly opened room.
4 Free Play Use the small door near the lift at the end of Act 1.
5 Story Blast a hole in the rooftop’s right side. Drop down and search the area below.
6 Story Blast a hole in the rooftop’s left side. Drop down and use the Force on the large fan.
7 Story Destroy all four antennas on the rooftop.
8 Story During the flying segment, watch the path’s left edge.
9 Story During the flying segment, find the minikit above the road.
10 Free Play
After you free the blue crate in Act 3, use the small door to the right.
Story Characters:
Anakin
Commander Cody
Captain Rex
Obi-Wan
True Jedi Stud Requirement: 55,000True Jedi Free Play Stud Requirement: 70,000
act 1Anakin and Captain Rex are separated from their allies. Before you explore the room, move to the right and take care of the battle Droids in the lift.
Draw the battle Droids into the hall before you attack. The lift holds a large bomb with a proximity trigger. Use the Force to move a panel in front of the bomb. After the explosion, enter the lift and collect the minikit.
minikiT 1
CAUTIONIf the bomb detonates before the panel is in place, the minikit is destroyed. Stay out of the lift and avoid using blasters until the explosion has been contained.
289
contents
how to Use this eGUide
introdUction
cast
Padawan traininG
waLKthroUGh
secrets and extras
checKLists
nintendo dsGAme BASiCSAmBuShDeSTROy maLevoLenceROOkieSDuel OF The DROiDSlAiR OF GRievOuSGunGAn GeneRAlJeDi CRAShhiDDen enemyBlue ShADOW viRuSSTORm OveR RylOThliBeRTy On RylOThWeAPOnS FACTORyleGACy OF TeRRORCheCkliSTS
Protected by copyright. Unauthorized or unlawful copying or downloading expressly prohibited.
Download from www.chipper.pl

nin
ten
do
ds
—h
idd
en
en
em
y
Prima Official Game Guide
www.primagames.com
After you find your allies, destroy the crates to the left. Assemble a Jedi pad and climb up to the ledge. Push the crate over the edge, then hop down and assemble the large turret.
When you reach the next area, fight through the battle Droids to the right. Move to the window at the end of the hall. Use the Force to assemble the bomb behind the glass.
When you land on the far ledge, switch back to Anakin and use the Force to drop the crate from the ledge. Hop down and use the pieces to build a Jedi pad.
Return to the main room and smash the boxes to the left. Assemble the large fan, then use it to float up to the ledge above you. Smash the box on the ledge and assemble a grapple pad; use the pad to swing across to the right.
FREEPLAYminikiT 2
After you enter the lift, use the build-it to assemble a Separatist control panel. Activate the panel and ride the lift to the next floor.
Clear out the battle Droids and search the room for studs. There are three chandeliers on the floor; use the Force to move them back into place.
When a fourth chandelier drops down from the ceiling, jump up to collect the minikit. When you’re ready to leave, return to the lift and pull the lever.
Hop in the turret and shoot down the STAPs as they fly past the window. A transport arrives and drops off a blue crate. When you leave the turret, three battle Droids appear from the right. Take care of
your attackers, then carry the crate to the build-it pad.
Assemble the lever and open the exit. Search the room for studs; use the Force on the light fixtures and break any remaining objects. When you’re ready, leave through the open door.
After the explosion, destroy the nearby wall panel to reveal a lever. When you pull the lever, a chandelier drops down from the ceiling.
TIPDuring Free Play, use a jetpack character to hover through the studs near the ceiling—the trail leads to a huge stash on the ledge to the right.
Pick up any remaining studs, then use the Jedi pad to cut through the glass. Step onto the ledge and use Captain Rex’s sharpshooting ability to run a zip-line to the other tower. After the
pad appears under your feet, slide across the zip-line to reunite with Commander Cody and Obi-Wan.
290
contents
how to Use this eGUide
introdUction
cast
Padawan traininG
waLKthroUGh
secrets and extras
checKLists
nintendo dsGAme BASiCSAmBuShDeSTROy maLevoLenceROOkieSDuel OF The DROiDSlAiR OF GRievOuSGunGAn GeneRAlJeDi CRAShhiDDen enemyBlue ShADOW viRuSSTORm OveR RylOThliBeRTy On RylOThWeAPOnS FACTORyleGACy OF TeRRORCheCkliSTS
Protected by copyright. Unauthorized or unlawful copying or downloading expressly prohibited.
Download from www.chipper.pl

nin
ten
do
ds
—h
idd
en
en
em
y
Prima Official Game Guide
www.primagames.com
Clear out the battle Droids waiting in the next area, then deal with their reinforcements. Use your heavy clone to destroy the flashing panel near the entrance. Carry the blue crate down to the build-it pad, then use the pieces to assemble a large bomb.
Detonate the bomb to destroy the red barrier. Continue to the right and take out the battle Droids on the lift. Search the room for studs and breakable objects. When you’re ready to move on, enter the lift and activate the lever.
When you reach the last chandelier, jump over to the red barrier above the exit. When you land, pull the nearby lever to open the door below you.
Break the remaining wall panels to uncover additional levers. Watch the doors as you make your way back to the left. Whenever a battle Droid appears, it kicks a bomb into the hall. Stay back and use one of your clone troopers to destroy both the Droid and the bomb from a safe distance.
Deal with the Droids and bombs as they appear, and activate the four levers hidden in the wall. Smash the crates at the end of the hall, then use the pieces to build a grapple pad. Grapple up to the ledge and pull the fifth lever. When the last chandelier drops into place, follow the studs to the right.
Sweep the hall for additional studs. When you’re ready to leave, head through the exit at the end of the hall.
FREEPLAYminikiT 3
After you cross the chandeliers, use the Droid control panel above the exit. After the barrier drops, use the small door in the wall. Pull the lever on the other side, then use the small door to return to the hall. Drop down from the ledge and move to the left.
Enter the room at the end of the hall. sharpshoot the STAP hovering just outside the window. Move forward until three Droids repel onto the
ledge, then clear them out to collect a minikit.
FREEPLAYminikiT 4
Before you leave, destroy the equipment near the lift to uncover a door.
Use a small character to pop through the door, then collect the minikit on the other side of the glass. Break the objects and
collect all the studs in the room, then head back through the small door.
291
contents
how to Use this eGUide
introdUction
cast
Padawan traininG
waLKthroUGh
secrets and extras
checKLists
nintendo dsGAme BASiCSAmBuShDeSTROy maLevoLenceROOkieSDuel OF The DROiDSlAiR OF GRievOuSGunGAn GeneRAlJeDi CRAShhiDDen enemyBlue ShADOW viRuSSTORm OveR RylOThliBeRTy On RylOThWeAPOnS FACTORyleGACy OF TeRRORCheCkliSTS
Protected by copyright. Unauthorized or unlawful copying or downloading expressly prohibited.
Download from www.chipper.pl

nin
ten
do
ds
—h
idd
en
en
em
y
Prima Official Game Guide
www.primagames.com
Obi-Wan, Anakin, and the clones reach the rooftop. Step out of the elevator and head up the stairs to the right.
Move to the left and take out the battle Droid at the far corner. Break the box to assemble another bomb, shoot the bomb, and drop down through the hole.
act 2
Deal with the battle Droid at the corner of the rooftop. Smash the nearby box and use the pieces to build a proximity bomb. Shoot the bomb to blast through the rooftop, then drop down through the hole.
When you land, use the Force to construct a platform from the nearby debris. Move to the right to collect the minikit near the wall. Pull the lever to activate the fans; use the fans to reach the first platform. Double-jump to the right and pull the lever on the next platform.
A box breaks free from the wall and crashes down to the left. Jump down and build a grapple pad, then use Captain Rex to return to the rooftop.
minikiT 5
After you explore the hidden area, destroy the antenna at the edge of the rooftop.
When you land, move to the right. Use the Force on the large fan to reveal a minikit. Jump back up to the left and smash the equipment to reveal a build-it. Assemble the Jedi pad and jump back up to the surface.
minikiT 6
After you appear on the rooftop, destroy the antenna on the ledge to the left. Move around the edge of the rooftop; find and destroy the two remaining antennas.
When you destroy all four antennas, a minikit appears at the center of the rooftop.
minikiT 7
Smash the crates above the lift. Assemble the two build-its to radio for reinforcements.
292
contents
how to Use this eGUide
introdUction
cast
Padawan traininG
waLKthroUGh
secrets and extras
checKLists
nintendo dsGAme BASiCSAmBuShDeSTROy maLevoLenceROOkieSDuel OF The DROiDSlAiR OF GRievOuSGunGAn GeneRAlJeDi CRAShhiDDen enemyBlue ShADOW viRuSSTORm OveR RylOThliBeRTy On RylOThWeAPOnS FACTORyleGACy OF TeRRORCheCkliSTS
Protected by copyright. Unauthorized or unlawful copying or downloading expressly prohibited.
Download from www.chipper.pl

nin
ten
do
ds
—h
idd
en
en
em
y
Prima Official Game Guide
www.primagames.com
At beginning of Act 3, Anakin and Obi-Wan arrive at an enemy base. Approach the entrance and use the Force to rebuild the walkway.
Droids emerge from the doors across the roof and a timer appears on the bottom of the screen. Charge in and take out the first two Droids, then run to the left and head off the second group. Alternate between the two doors to take care of each wave of enemies as it appears. After you defeat all the Droids, your reinforcements arrive.
When you reach the Tri-Droid, fly under the rotating beams. After a beam passes, pop up and shoot the Tri-Droid’s head. Swoop back down before the next beam reaches you.
Move to the left and use the Force to push the box off the walkway. Continue to the left to find a blue crate stuck in one of the windows. Smash the glass to free the crate.
If you clear out all the Droids within the 45-second time limit, a red brick appears in the lift. Grab the brick before you meet up with your reinforcements.
After you collect this red brick, the “Fast Build” extra can be purchased in the rec room.
ReD BRiCk
Fly the transport through the city. Keep shooting while you look for lock-on targets. Use your missiles to take out heavy vehicles and bridges.
There are two minikits floating along your path. Watch the screen’s left edge for the first minikit; it’s located just past a sharp bend in the path. Be ready for heavy fire from the nearby AAT.
minikiT 8
Look for the minikit above the long, straight section of road.
minikiT 9
Keep picking away at the Tri-Droid’s health. One of the three gaps is larger than the other two, but you can get a few shots off each time a beam passes you by. The Tri-Droid tilts as it rotates, so try to predict how low a beam might swing by the time it reaches you. Keep attacking until you destroy the Tri-Droid.
act 3
Move to the right and smash the box near the wall. Assemble the Jedi pad and use it to reach the walkway.
293
contents
how to Use this eGUide
introdUction
cast
Padawan traininG
waLKthroUGh
secrets and extras
checKLists
nintendo dsGAme BASiCSAmBuShDeSTROy maLevoLenceROOkieSDuel OF The DROiDSlAiR OF GRievOuSGunGAn GeneRAlJeDi CRAShhiDDen enemyBlue ShADOW viRuSSTORm OveR RylOThliBeRTy On RylOThWeAPOnS FACTORyleGACy OF TeRRORCheCkliSTS
Protected by copyright. Unauthorized or unlawful copying or downloading expressly prohibited.
Download from www.chipper.pl

nin
ten
do
ds
—h
idd
en
en
em
y
Prima Official Game Guide
www.primagames.com
After you successfully counter two of her attacks, Ventress changes her tactics. Watch for the moving shadow on the ground. Stand still until the shadow reaches you, then run to the side before the crystal slams into the floor. After you dodge four crystals, use the Force to arrange them into some stairs. Climb out of the hole and approach Asajj Ventress.
When the fight resumes, run away from Ventress’ spinning attack. Wait for your opponent to tire out, then move in to attack while she’s vulnerable. After you deal enough damage, Asajj Ventress escapes through the window.
Ventress jumps off the roof and reappears atop a Tri-Droid. Run to one of the Tri-Droid’s legs; keep moving within the green circle, and stay clear of the red indicator to avoid the leg each time it smashes down.
On the fourth stomp, the leg stays put for a short time Run in and attack the Tri-Droid’s foot with your Lightsaber. When the leg pulls back, dodge another four hits and resume your attack.
FREEPLAYminikiT 10
Before you pick up the blue crate, move through the broken glass and follow the windows to the right. Use the small door at the end of the hall. When you exit the passage, smash the damaged glass and grab the minikit from the ledge. Head back through the small door and return to the blue crate.
Collect all the studs from the ledge, then pick up the blue crate. Drop down and place the crate on the build-it pad. Assemble and activate levers near the door. After you collect the remaining studs, head through the entrance.
Search for studs around the hallway, then head up the stairs. When Asajj Ventress appears, run in and attack her. Land a successful hit, then chase her up the stairs.
When you reach the next area, run forward until Asajj Ventress destroys the floor beneath you. Wait for Ventress to throw a stack of books, then use the Force to toss them back.
CAUTIONIf you leave the green circle, the Tri-Droid restarts its attack sequence. Stay inside the line for four stomps, or you’ll never get the chance to attack.
After you destroy the first foot, use the same strategy to destroy the second one. When the Tri-Droid begins to slip off the building, use the Force to send it plummeting to the ground.
• The Clone Pilot and Clone Grunt Light characters are unlocked and ready to be used in Free Play.
• The Senate Commando, Asajj Ventress, Senate Commando Capt., Faro Argyus, Senator Organa, and Darth Maul characters are available for purchase in the rec room.
• Hidden Enemy is available for Free Play.
hiDDen enemy STORy ReWARDS
294
contents
how to Use this eGUide
introdUction
cast
Padawan traininG
waLKthroUGh
secrets and extras
checKLists
nintendo dsGAme BASiCSAmBuShDeSTROy maLevoLenceROOkieSDuel OF The DROiDSlAiR OF GRievOuSGunGAn GeneRAlJeDi CRAShhiDDen enemyBlue ShADOW viRuSSTORm OveR RylOThliBeRTy On RylOThWeAPOnS FACTORyleGACy OF TeRRORCheCkliSTS
Protected by copyright. Unauthorized or unlawful copying or downloading expressly prohibited.
Download from www.chipper.pl

nin
ten
do
ds
—b
LU
e s
ha
do
w v
irU
s
Prima Official Game Guide
www.primagames.com
bLUe shadow virUs
MinikitsNo. Mode Notes
1 Free Play
Detonate the bomb at the beginning of the mission. Build the stairs and climb up to the ledge.
2 Free Play
Use the Droid control panel near the lift. Ride up and destroy the round flower, then jump across the gap to the left.
3 Story Jump on the two shaaks to reach the ledge above them.
4 Free Play Use the Dark Force on the plants near the stone head.
5 Story Destroy the Hyena Bomber launching platform.
6 Story When the timer appears, destroy eight Droids within the 40-second time limit.
7 Free Play
Toward the end of Act 2, use the Separatist control panel and assemble the fan. Float into the large tube, then follow it around the room.
8 Free Play After you rescue Padmé, detonate the large bomb near the wall.
9 Free Play
Toward the end of the mission, climb up to the carnivorous plant, then jump over to the right. Use a jetpack character to hover through the trail of studs.
10 Free Play Use the grapple pad near Dr. Vindi’s lift.
Story Characters:
Ahsoka
Obi-Wan
Anakin
Captain Rex
Clone Trooper (heavy)
True Jedi Stud Requirement: 50,000True Jedi Free Play Stud Requirement: 100,000
Battle dRoIds on naBoo!As the Separatist rebellion rages through the galaxy, even peaceful planets are threatened. Following the discovery of Separatist Droids wandering the grassy wasteland, Naboo is once again on high alert. Fearing their home is facing another invasion, Senator Amidala and Representative Binks race to Naboo to assess the situation. Meanwhile, near the Gungan swamplands, an even graver threat is about to be discovered....
Clone Trooper
act 1Ahsoka Tano and Captain Rex are searching the swamps of Naboo. Move to the water’s edge and use Rex’s sharpshooting ability to destroy the nearby tree. Use the Force on the splintered tree to build a platform in the water.
FREEPLAYminikiT 1
Before you cross the water, use a heavy clone to detonate the large bomb. When the withered tree explodes, use the pieces to build some stairs. Climb up the stairs, then double-jump up to the minikit.
295
contents
how to Use this eGUide
introdUction
cast
Padawan traininG
waLKthroUGh
secrets and extras
checKLists
nintendo dsGAme BASiCSAmBuShDeSTROy maLevoLenceROOkieSDuel OF The DROiDSlAiR OF GRievOuSGunGAn GeneRAlJeDi CRAShhiDDen enemyBlue ShADOW viRuSSTORm OveR RylOThliBeRTy On RylOThWeAPOnS FACTORyleGACy OF TeRRORCheCkliSTS
Download from www.chipper.pl

nin
ten
do
ds
—b
LU
e s
ha
do
w v
irU
s
Prima Official Game Guide
www.primagames.com
When you’re ready to continue, use the platform to jump across the water. The tall grass to the right is infested with Droids. Charge in and destroy the security camera. Wipe out the Droids as they emerge from the grass. After you finish off the two Super Battle Droids, search the area for studs.
Search for studs and breakable objects, then follow the path around to the next area. When you reach the next patch of tall grass, run in and clear out the hidden Droids. After you defeat the two Super Battle Droids, continue to the right.
TIPSome of the budding flowers react only to the Dark Force, but most flowers can be destroyed for extra studs.
Jump onto the stump near the tall grass. Jump along the fungi platforms to climb the tree. When you reach the last platform, climb into the trunk and destroy the flower in the tree hollow.
When the vines extend over the water, drop back to the ground. Follow the vines over the water, then jump across to dry land and continue down the path.
FREEPLAYminikiT 2
Use the Droid control panel along the trail to activate the nearby lift. Ride up to reach the ledge on the lift’s left side.
Destroy the round flower to clear the vines from the path. Continue to the left and jump over the gap to collect a minikit.
TIPAs you leave the tall grass, look for a hidden switch behind the nearby tree. Step on the switch to reveal a trail of studs along the path.
Use the build-it near the water to assemble a Jedi pad, then use it to climb up the trees.
Take care of the battle Droids in the lookout, then continue to the left. Use the grapple pad to pull the mounted dish free. The dish shatters on the rocks below you. Drop down and use the pieces to assemble a new grapple pad.
Collect the studs to the right, then use the grapple pad to swing across to the left. When you land, follow the studs up to the next lookout.
After you clear out the battle Droids in the lookout, activate the switch on the floor. Two platforms rise out of the water in the path head. After the platforms are in place, build the Jedi pad and jump onto the lookout’s roof. Follow the studs across the treetops and back down to the ground. Jump across the platforms and follow the path to the next area.
296
contents
how to Use this eGUide
introdUction
cast
Padawan traininG
waLKthroUGh
secrets and extras
checKLists
nintendo dsGAme BASiCSAmBuShDeSTROy maLevoLenceROOkieSDuel OF The DROiDSlAiR OF GRievOuSGunGAn GeneRAlJeDi CRAShhiDDen enemyBlue ShADOW viRuSSTORm OveR RylOThliBeRTy On RylOThWeAPOnS FACTORyleGACy OF TeRRORCheCkliSTS
Download from www.chipper.pl

nin
ten
do
ds
—b
LU
e s
ha
do
w v
irU
s
Prima Official Game Guide
www.primagames.com
Destroy the flower to unravel the vines, then follow them across the water.
When you reach the next area, there are two shaaks just off the path. Select Ahsoka and double-jump onto one of the large animals.
Jump onto the one of the shaaks. Bounce a few times to build up some height, then steer yourself onto the stone head. When you land, jump up to the moss-covered ledge, then jump across the platforms to the right.
Bounce on the shaaks to reach the ledge above you. Grab the minikit, then drop back down and continue along the path.
minikiT 3
At the stone head, switch to Captain Rex and shoot the figure’s eyes. After the pit fills with water, the two shaaks move over to drink near the stone head. Continue to the right and search the area for studs.
FREEPLAYminikiT 4
Use the Dark Force on the large plants beyond the stone head; collect the minikit, then search are for extra studs.
TIPBe quick when you collect the studs above the carnivorous plant—shortly after you touch down on one
of these plants, the jaws snap shut.
Continue moving to the right; jump across any gaps in your path. Drop down and clear out the enemies in the tall grass. After you destroy the last surveillance camera, use the pieces to assemble a turret.
Search the grass for extra studs, then use the turret to destroy the flashing hatch.
act 2Act 2 starts in the skies of Naboo, high above Dr. Vindi’s laboratory complex. Use the pink arrows to find valid lock-on targets. Before you attack the Hyena Bombers, locate the launching platform on the ground.
When the battle starts, manually lock on to the Hyena Bomber’s launching platform. Land three successful missile hits to destroy the platform and reveal a minikit.
minikiT 5
297
contents
how to Use this eGUide
introdUction
cast
Padawan traininG
waLKthroUGh
secrets and extras
checKLists
nintendo dsGAme BASiCSAmBuShDeSTROy maLevoLenceROOkieSDuel OF The DROiDSlAiR OF GRievOuSGunGAn GeneRAlJeDi CRAShhiDDen enemyBlue ShADOW viRuSSTORm OveR RylOThliBeRTy On RylOThWeAPOnS FACTORyleGACy OF TeRRORCheCkliSTS
Download from www.chipper.pl

nin
ten
do
ds
—b
LU
e s
ha
do
w v
irU
s
Prima Official Game Guide
www.primagames.com
Look for a supply ship to restock your missiles, then clear out the next wave of Vulture Droids. Destroy the last radar tower, then begin a third bombing run. After you destroy the last hatch, Obi-Wan launches an assault into Dr. Vindi’s laboratory.
When you land, move up the corridor and clear out the battle Droids as they appear from the doors. After you destroy the first wave of Droids, a 40-second timer appears on the screen.
After you destroy the launching platform, track down and destroy the airborne Hyena Bombers.
After you deal with the air cover, your missiles are nearly depleted. Locate and destroy the supply ship to restock your missiles, then land three successful hits on the radar tower.
When the tower crumbles, fly to the pink marker to begin a short bombing run. Dodge incoming attacks and destroy the AATs along the river.
Destroy the hatch at the end of your bombing run. The explosion opens one of the laboratory’s three hidden entrances.
When the Vulture Droids appear, fly in to attack. Clear the skies to reveal another radar tower. Destroy the tower, then complete another bombing run. Destroy the second hatch to start the sequence over again.
When the timer appears, return to the beginning of the corridor. Destroy the Super Battle Droids, then fight your way back up the corridor. Destroy the Droideka, then continue to the group of battle Droids. Destroy eight Droids within the 40-second time limit to receive a minikit.
minikiT 6
When you reach the blockage at the next door, use the Force to move the debris aside. Use the Force to wedge the pole in the door, then continue down the corridor.
Reinforcements arrive and deliver a blue crate. Carry the crate to the build-it pad, then assemble the pieces. Search the area for studs, then use the Jedi pad to cut through the door.
When you reach the next area, two commando Droids move in to attack; take them out, then deal with the Droids near the red barrier. After you clear the area, the barrier drops and a crate pops out near the entrance. Move back down the hall and use the build-it to assemble a Separatist control panel.
298
contents
how to Use this eGUide
introdUction
cast
Padawan traininG
waLKthroUGh
secrets and extras
checKLists
nintendo dsGAme BASiCSAmBuShDeSTROy maLevoLenceROOkieSDuel OF The DROiDSlAiR OF GRievOuSGunGAn GeneRAlJeDi CRAShhiDDen enemyBlue ShADOW viRuSSTORm OveR RylOThliBeRTy On RylOThWeAPOnS FACTORyleGACy OF TeRRORCheCkliSTS
Download from www.chipper.pl

nin
ten
do
ds
—b
LU
e s
ha
do
w v
irU
s
Prima Official Game Guide
www.primagames.com
Ahsoka Tano and Captain Rex are in the heart of Dr. Vindi’s laboratory. Push the potted plant along the track and position it under the giant faucet, then move back to the right and stand under the broken railing.
Use the Force to move a step into place, then jump up through the broken railing. Assemble a grapple pad, then use Captain Rex to swing up to the ledge above you. After the LEP Servant Droid dives into the wall,
smash the crate and assemble the lever.
Use the Jedi pad on the room’s right side to reach the ledge above you. Push the green box into the wall to switch off the second light.
Continue up the hall and across the bridge. Take out the hostile Droids and continue to the next red barrier. Destroy the two tubes to drop the barrier, then use your heavy clone to detonate the large bomb.
After the explosion, the scene switches to Anakin and his clone trooper. Move to the left and use the Force on the floor grates. Drop down and push the green box into the wall. One of the three indicator lights near Padmé and Jar Jar switches off.
FREEPLAYminikiT 7
After you use the Separatist control panel, a crate pops out of the wall to the left. Walk over and use the pieces to build a large fan. Jump on the fan to float into the air.
Enter the tube and follow it around the room.
Jump across to the grapple pad on the room’s left side. Use the pad to pull the green box out of the wall; when the electricity shuts off, Padmé and Jar Jar recover.
Move to the left and use the Force on the glass tube. Jump to the exposed platform and destroy the next tube.
Use a heavy clone to detonate the large bomb on the room’s left side. After the explosion, collect the minikit from the hidden alcove.
minikiT 8
Check the room for any remaining studs, then head out through the exit.
act 3
299
contents
how to Use this eGUide
introdUction
cast
Padawan traininG
waLKthroUGh
secrets and extras
checKLists
nintendo dsGAme BASiCSAmBuShDeSTROy maLevoLenceROOkieSDuel OF The DROiDSlAiR OF GRievOuSGunGAn GeneRAlJeDi CRAShhiDDen enemyBlue ShADOW viRuSSTORm OveR RylOThliBeRTy On RylOThWeAPOnS FACTORyleGACy OF TeRRORCheCkliSTS
Download from www.chipper.pl

nin
ten
do
ds
—b
LU
e s
ha
do
w v
irU
s
Prima Official Game Guide
www.primagames.com
Jump past the exit, onto the brown fungus, then onto the carnivorous plant.
Use the Force to pull the grate off the wall. Assemble the Jedi pad, then climb up to the walkway.
Pull the lever to water the potted plant, then move to the right. When you reach the wall, turn and shoot the guard rail on the small ledge. Switch to Ahsoka, then double-jump over to collect some studs. Drop down and return to the potted plant.
Pull the potted plant away from the faucet; try to position it directly under the floating studs. Make a final sweep of the room, then jump onto the flower and bounce to the ledge on the left.
The scene switches to Obi-Wan and Anakin in a similar room. Move to the potted plant and push it under the faucet.
Move to the right and drop down to the ground. Jump onto the platform along the large pipe.
Jump onto the walkway and use the Force to pull the grate off the wall.
Use the Jedi pad to return to the faucet. Continue to the left and pull the lever to water the potted plant. Move the plant to the left. Use the plant to collect the studs in the air, then push the pot to the end of the track. Jump on the plant and bounce up to the ledge.
After you drop the grate, climb down and jump onto the carnivorous plant. Use the broken grate to patch the pipe, then jump clear of the plant before it snaps shut.
Follow the walkway to the right. Use the Jedi pad to cut through the wall, then destroy the round flower. Continue to the right and double-jump across the gap. When you land, use the Force on the panel just past the exit. The panel flips up to create a platform. Jump onto the platform, then face back to the left.
When you touch down on the carnivorous plant, jump across the platforms to the left. Move quickly—each small platform gives way soon after you touch it. When you reach the ledge, collect the red brick near the wall.
After you collect this red brick, the “Regenerate Hearts” extra can be purchased in the rec room.
ReD BRiCk
300
contents
how to Use this eGUide
introdUction
cast
Padawan traininG
waLKthroUGh
secrets and extras
checKLists
nintendo dsGAme BASiCSAmBuShDeSTROy maLevoLenceROOkieSDuel OF The DROiDSlAiR OF GRievOuSGunGAn GeneRAlJeDi CRAShhiDDen enemyBlue ShADOW viRuSSTORm OveR RylOThliBeRTy On RylOThWeAPOnS FACTORyleGACy OF TeRRORCheCkliSTS
Download from www.chipper.pl

nin
ten
do
ds
—b
LU
e s
ha
do
w v
irU
s
Prima Official Game Guide
www.primagames.com
When you’re ready, return to the exit and move on to the next area.
FREEPLAYminikiT 9
When you reach the carnivorous plant, jump to the walkway on your right. Continue across the walkway, then use a jetpack character to hover through the studs and collect the minikit.
Dodge the red circles and climb up the platforms. Use the first Jedi pad to reach the higher platforms, then jump up to the grate. Use the build-it on the ledge to assemble a new Jedi pad. Use the Force on the grate to reveal some extra studs.
Use the Jedi pad to reach the upper walkways. Destroy the red tubes to disable Dr. Vindi’s lift.
When you’re ready to leave, jump over to the lift. Defeat Dr. Vindi and his Droids to complete the mission.
FREEPLAYminikiT 10
Use the grapple pad near the wall and collect the minikit above the red tubes.
• The LEP Servant Droid and Jaybo Hood characters are unlocked and ready to be used in Free Play.
• The Dr. Nuvo Vindi, Peppi Bow, Gregar Typho, Shahan Alama, Cad Bane, Aurra Sing, and Robonino characters are available for purchase in the rec room.
• Blue Shadow Virus is available for Free Play.
Blue ShADOW viRuS STORy ReWARDS
301
contents
how to Use this eGUide
introdUction
cast
Padawan traininG
waLKthroUGh
secrets and extras
checKLists
nintendo dsGAme BASiCSAmBuShDeSTROy maLevoLenceROOkieSDuel OF The DROiDSlAiR OF GRievOuSGunGAn GeneRAlJeDi CRAShhiDDen enemyBlue ShADOW viRuSSTORm OveR RylOThliBeRTy On RylOThWeAPOnS FACTORyleGACy OF TeRRORCheCkliSTS
Download from www.chipper.pl

nin
ten
do
ds
—s
to
rm
ov
er
ry
Lo
th
Prima Official Game Guide
www.primagames.com
storm over ryLoth
MinikitsNo. Mode Notes
1 Story Destroy five of the Vulture Droids defending the frigate.
2 Free Play
Near the start of Act 2, find and assemble the Jedi pad on the rooftops. Cut through the wall and follow the hidden passage.
3 Free Play Use the Droid control panel inside the city, then enter the open room.
4 Free Play
After you grapple onto the giant bone, use the Jedi pad to the left. Bounce up to the crate, build another Jedi pad, then cut a hole in the wall.
5 Free Play When you rescue Numa, use the Force to rebuild the fountain.
6 Free Play
After you enter the sewer, use a thermal detonator to free the hatch on the wall. Build a platform, then use the Dark Force to remove the bars to the left.
7 Free Play Use a thermal detonator to destroy the large hatch in the sewer.
8 Story Use the two levers to drain the sewer water.
9 StoryAfter Waxer, Boil, and Numa join your party, trigger the switch through the small door. Assemble the Jedi pad and jump up to the minikit.
10 Free Play
Use a thermal detonator to unlatch hatches on the wall. Use the build-it to assemble a platform, then jump to the ledge on the left.
True Jedi Stud Requirement: 50,000True Jedi Free Play Stud Requirement: 85,000
planet Ryloth Invaded!Subjected to a brutal Droid occupation, the people of Ryloth are starving under the blockade of a Separatist fleet. Evil Separatist leader Wat Tambor now rules with an iron fist. Answering a plea from the Senate, the Grand Army of the Republic mounts a bold offensive to liberate the system. It is up to Anakin Skywalker and his Padawan, Ahsoka, to make way for Obi-Wan’s ground assault....
Story Characters:
Obi-Wan
Clone Trooper
Clone Trooper Boil (no helmet)
Commander Cody
Clone Trooper Waxer
numa
act 1The level opens with a fierce conflict above Ryloth. For the battle’s first phase track down and destroy eight Vulture Droids. When you destroy the last Vulture Droid, an enemy frigate appears.
Before you attack the frigate, fly out and engage the surrounding fighters.
302
contents
how to Use this eGUide
introdUction
cast
Padawan traininG
waLKthroUGh
secrets and extras
checKLists
nintendo dsGAme BASiCSAmBuShDeSTROy maLevoLenceROOkieSDuel OF The DROiDSlAiR OF GRievOuSGunGAn GeneRAlJeDi CRAShhiDDen enemyBlue ShADOW viRuSSTORm OveR RylOThliBeRTy On RylOThWeAPOnS FACTORyleGACy OF TeRRORCheCkliSTS
Download from www.chipper.pl

nin
ten
do
ds
—s
to
rm
ov
er
ry
Lo
th
Prima Official Game Guide
www.primagames.com
When you’re ready to take down the frigate, destroy the pink panels spread across the ship. Only your missiles can damage the panels, so use the pink arrow to help you find a valid lock-on target. Land
three successful missile hits to destroy a frigate panel.
Shoot down supply ships to restock your missiles as needed. Destroy the six pink panels, then target the frigate’s bridge tower. Land three more missile hits to destroy the frigate.
After the transport touches down on Ryloth, Obi-Wan and Commander Cody set out to liberate the Twi’lek people. Move up the path and clear out the attacking Droids. When the red targeting circles appear, stay back and wait for the bombs to clear the path ahead.
Separatist boarding ships touch down to deploy fresh Droids; a new Droid appears every few seconds, so focus on destroying the ships before dealing with new enemies.
When you reach the large gap, a Vulture Droid crashes into the path. Use the Force on the wreckage to build a platform, then jump across to the gap’s far side.
Return to the grapple pad and swing back up to the rooftops. Move to the left and jump onto the awning. Use the awning to bounce up to the large bomb.
After you shoot down five Vulture Droids, a minikit appears above the frigate. Fly down and grab the minikit, then turn your attention back to the mission.
minikiT 1 After you cross the gap, switch to Commander Cody. Use the blaster cannon to clear away enemy bombs.
Continue up the path to find a clone trooper near the crashed ship. After the clone trooper joins your party, engage the battle Droids at the end of the path. Avoid the red targeting circles as you destroy the attacking Droids. A ship drops three large crates into the area. Destroy the crates and assemble the grapple pad. Use your clone trooper to pull the mortar to the ground.
Use the Force to move the mortar into position. Walk over and use the Force to aim and fire the mortar; destroy the remaining mortar, then blast a hole through the city wall.
act 2Clone troopers Waxer and Boil are inside the Twi’lek city. Move to the right to find the build-it pad near a damaged building. There is a blue crate in the small room to the left. A crate sits on the rooftop.
Carry the blue crate to the build-it pad. Assemble the grapple pad, then swing up to the crate. Push the crate over the edge, then drop down and build a switch. Trigger the switch to reveal a trail of studs.
303
contents
how to Use this eGUide
introdUction
cast
Padawan traininG
waLKthroUGh
secrets and extras
checKLists
nintendo dsGAme BASiCSAmBuShDeSTROy maLevoLenceROOkieSDuel OF The DROiDSlAiR OF GRievOuSGunGAn GeneRAlJeDi CRAShhiDDen enemyBlue ShADOW viRuSSTORm OveR RylOThliBeRTy On RylOThWeAPOnS FACTORyleGACy OF TeRRORCheCkliSTS
Download from www.chipper.pl

nin
ten
do
ds
—s
to
rm
ov
er
ry
Lo
th
Prima Official Game Guide
www.primagames.com
Clear out the battle Droids around the fountain, then continue to the right. Shoot the recon Droid out of the air; after the crash, Numa joins your party.
Clear out the next wave of Droids, then use the grapple pad past the giant bones in the ground. When you land on the roof, use the next grapple pad to whip one of the bones into the building across the alley.
FREEPLAYminikiT 2
Before you detonate the large bomb, smash the boxes to the left. Assemble the Jedi pad, then use it to cut through the wall.
Drop down through the hole, then follow the passage under the grates to collect a minikit. Use the Jedi pad at the end of the passage to return to the surface.
TIPDuring Free Play, use the Force on the red boxes scattered throughout the city—doing so gains you some extra studs.
When you’re ready to leave, detonate the large bomb and continue to the next area.
Look for the recon Droid hovering in the next area. The Droid is too high to hit with normal blaster fire; use your light clone’s sharpshooting ability to knock it out of the air. After the recon Droid shatters, use the pieces to build a large bomb. Detonate the bomb to blast through the door and then continue through the buildings.
TIPDuring Free Play, use the Force to hang all of the laundry on the clothesline. When the line is full, a trail of studs appears to the left.
FREEPLAYminikiT 3
When you reach the city’s next open area, use the Droid control panel on the wall. When the door opens, head inside and collect the minikit.
FREEPLAYminikiT 4
After you grapple onto the building, use the Jedi pad to the left. Jump to the awnings and bounce up to the crate near the battle Droids. Take out the Droids, then push the crate off the ledge. Drop down and assemble a Jedi pad, then cut through the wall to collect the minikit.
When you’re ready to move on, follow the studs over the building to the right.
304
contents
how to Use this eGUide
introdUction
cast
Padawan traininG
waLKthroUGh
secrets and extras
checKLists
nintendo dsGAme BASiCSAmBuShDeSTROy maLevoLenceROOkieSDuel OF The DROiDSlAiR OF GRievOuSGunGAn GeneRAlJeDi CRAShhiDDen enemyBlue ShADOW viRuSSTORm OveR RylOThliBeRTy On RylOThWeAPOnS FACTORyleGACy OF TeRRORCheCkliSTS
Download from www.chipper.pl

nin
ten
do
ds
—s
to
rm
ov
er
ry
Lo
th
Prima Official Game Guide
www.primagames.com
Move to the right, and use Numa to pass through the small door. After you reach the building’s next floor, pull the lever to open the exit. Drop down and search for extra studs, then continue onto the next area.
Smash all of the objects in the next room. Use the small door to reach the blue crate on the ledge. Take the crate to the build-it pad, then use the pieces to assemble a lever. Pull the lever to open the floor panel.
When you’re ready to leave, drop down into the sewer.
When you pop out from the small door, switch to clone trooper Waxer. Shoot the pipe along the wall to release the steam. Pull the lever near the gate, then follow the studs to the left.
Move back to the right and detonate the large bomb. After the explosion, pull the lever to release more steam from the pipes. When you’re ready to move on, continue to the right and exit the sewer.
FREEPLAYminikiT 5
Use the Force to repair the fountain. When the water starts flowing, a minikit drops to the ground.
When you land, follow the path to the right. Use the small door to slip past the locked gate.
FREEPLAYminikiT 6
Before you use the small door, select a bounty hunter to set off the thermal detonators to the left. After the hatch flips up, assemble the platform above the door. Use the Dark Force to remove the bars in the wall. Hop onto the hatch and double-jump up to the minikit in the wall.
act 3Obi-Wan and Commander Cody are inside the city walls. Detonate the large bomb near the statue, then use the pieces to assemble a small door.
NOTEDuring Free Play, you can use the small door right away; during Story mode, you’ll need to return to this spot after you add a small character to your party.
Follow the studs up the ramp and approach the building to the left. Double-jump to reach the blue crate on the second floor. Drop down and carry the crate to the nearby build-it pad. Use the pieces to assemble a large bomb. Detonate the bomb, then continue through the hole in the wall.
TIPDuring Free Play, use the bounty hunter control panel just through the wall. When the door opens, step on the
switch to reveal a huge stash of studs.
305
contents
how to Use this eGUide
introdUction
cast
Padawan traininG
waLKthroUGh
secrets and extras
checKLists
nintendo dsGAme BASiCSAmBuShDeSTROy maLevoLenceROOkieSDuel OF The DROiDSlAiR OF GRievOuSGunGAn GeneRAlJeDi CRAShhiDDen enemyBlue ShADOW viRuSSTORm OveR RylOThliBeRTy On RylOThWeAPOnS FACTORyleGACy OF TeRRORCheCkliSTS
Download from www.chipper.pl

nin
ten
do
ds
—s
to
rm
ov
er
ry
Lo
th
Prima Official Game Guide
www.primagames.com
When you land, follow the sewer to the right. Some of the pipes vent steam at regular intervals. Wait for a break in the steam, then continue past the pipe before the next burst. Continue to the right
and double-jump over the gap. When you land, use the build-it to assemble the grapple pad.
Follow the ramp down to meet up with Boil, Waxer, and Numa as they emerge from the sewer. After the three characters join your party, drop down into the sewer.
When you’re ready to leave, assemble the Jedi pad on the sewer floor. Use the pad to return to the main path, then climb back up to the gears on the wall. Use the Force on the gears to bring the platform to the ledge.
Ride the platform up to the top of its path, then jump to the ledge above the gears. Grab the studs, then exit to the surface.
You appear from a door near the sewer entrance. Use the grapple pad to extend the awning over the door. Jump up along the rocks, then hop onto the awning. Bounce on the awning until you can reach the next ledge, then use the small door in the wall.
FREEPLAYminikiT 7
Use a bounty hunter to set off the thermal detonators on the hatch door near the grapple pad. Jump through the hatch and move to the left. Collect the minikit behind the grates, then exit back through the hatch.
Use the grapple pad to reach the ledge above you. Double-jump past the gears to reach the grapple pad to the left. Wait for the nearby pipe to stop venting steam, then use the grapple pad to swing across
the gap. When you land, pull the lever on the wall. After the water level drops, hop down to explore the revealed areas.
Hit the switch to reveal a trail of studs, then use a light clone to hit the sharpshoot target on the pipe. Drop down to the platforms below you, and pull the lever to the right. When the water level drops a
second time, jump down to explore the floor below you.
After you drain the sewer water, follow the studs on the ground to collect the minikit.
minikiT 8
You pop out of a small door near a lever. Pull the lever to open another sewer entrance, then drop to the ground.
306
contents
how to Use this eGUide
introdUction
cast
Padawan traininG
waLKthroUGh
secrets and extras
checKLists
nintendo dsGAme BASiCSAmBuShDeSTROy maLevoLenceROOkieSDuel OF The DROiDSlAiR OF GRievOuSGunGAn GeneRAlJeDi CRAShhiDDen enemyBlue ShADOW viRuSSTORm OveR RylOThliBeRTy On RylOThWeAPOnS FACTORyleGACy OF TeRRORCheCkliSTS
Download from www.chipper.pl

nin
ten
do
ds
—s
to
rm
ov
er
ry
Lo
th
Prima Official Game Guide
www.primagames.com
When you’re ready to leave the area, Move up the ramp and drop down through the sewer entrance.
Move past the bars and jump up to the ledge at the end of the sewer. Repair the gears on the wall; the sewer exit opens to the left. When you’re ready to leave the area, jump down from the ledge and head up through the exit.
When you return to the city, clear out all of the attacking Droids. Detonate the large bomb near the statue, then use the pieces to build a grapple pad. Grapple up to the blue crate on the building, then drop down and carry the crate to the build-it pad.
Assemble a new grapple pad, then use it to topple the headless statue. After the statue shatters, build the Jedi pad and climb up between the buildings.
Before you enter the sewer, head down the nearby ramp. Use Numa to pass through the small door you built earlier, then follow the grates to activate the hidden switch. A crate pops out of the wall and reveals a build-it.
Exit through the small door, then use the build-it to assemble the Jedi pad. Activate the pad to jump right through the minikit. Land on the ledge to the left to collect some extra studs.
minikiT 9
FREEPLAYminikiT 10
When you land in the sewer, use thermal detonators to unlatch the hatches on the wall. Use the build-it to assemble a new platform, then jump up and grab the minikit to the left.
Follow the sewer to the right. Smash the breakable objects and collect extra studs. When you approach a pipe, wait for a break in the steam before you pass. When you reach the flowing water, jump across the debris to continue along the path.
When you reach the flowing water. Wait for the red brick to appear on the floating debris. Jump across the debris to collect the red brick, then continue to the right. After you collect this red brick, the “Score ×6” extra can be purchased in the rec room.
ReD BRiCk
Use the Force to turn the turrets against each other. Collect the studs atop the city wall, then drop back down to the ground.
307
contents
how to Use this eGUide
introdUction
cast
Padawan traininG
waLKthroUGh
secrets and extras
checKLists
nintendo dsGAme BASiCSAmBuShDeSTROy maLevoLenceROOkieSDuel OF The DROiDSlAiR OF GRievOuSGunGAn GeneRAlJeDi CRAShhiDDen enemyBlue ShADOW viRuSSTORm OveR RylOThliBeRTy On RylOThWeAPOnS FACTORyleGACy OF TeRRORCheCkliSTS
Download from www.chipper.pl

nin
ten
do
ds
—Lib
er
ty
on
ry
Lo
th
Prima Official Game Guide
www.primagames.com
Search the area for hidden studs, then step into the damaged building. When you’re ready to leave, pull the lever to complete the mission.
• Clone Trooper Boil and Clone Trooper Waxer characters are unlocked and ready to be used in Free Play.
• The Mar Tuuk, Numa, Aayla Secura, TX-20, Clone Trooper Boil (No Helmet), and Clone Trooper Waxer (No Helmet) characters are available for purchase in the rec room.
• Storm Over Ryloth is available for Free Play.
STORm OveR RylOTh STORy ReWARDS
Liberty on ryLoth
MinikitsNo. Mode Notes
1 Free Play
At the start of the mission, destroy the thermal detonator on the console. Assemble and activate the Droid control panel, then use the Jedi pad.
2 Free Play
Destroy the brown rocks along the path to reveal a small door.
3 Free Play
Destroy the flashing bricks past the crashed AT-TE. Use a jetpack character to reach the minikit.
4 StoryAt the start of Act 2, assemble two monuments. Smash the cactus and build a switch to raise the third monument into place.
5 Free Play
After you uncover the passage through the rusted transport, use the Dark Force to rearrange the panel you removed. Use the new platform to reach the ledge to the left.
6 Free Play
Hit the sharpshoot target to reveal a small door. Use the door to reach the minikit.
7 Free Play
Use a thermal detonator to free the container, then use the Droid control panel to open the door.
8 Story When you reach the plasma bridge, clear out 12 Droids within the 35-second time limit.
9 Free Play
Use the bounty hunter control panel in the control room. Pull the lever on the wall to unlock the container.
10 Story Destroy all four Hyena Bombers before they damage the city.
RepuBlIc vIctoRy Is at hand!Clone troopers under the command of the Jedi have successfully invaded the Separatist-occupied world of Ryloth. Anakin Skywalker battles the enemy in the skies, while Obi-Wan Kenobi frees villages from the grip of vile Separatist leader, Wat Tambor. Now, Jedi General Mace Windu leads the attack on the enemy lines in the final offensive to liberate the capital city of Lessu....
True Jedi Stud Requirement: 45,000True Jedi Free Play Stud Requirement: 85,000
Story Characters:
mace Windu
Clone Trooper
Clone Commander (Phase ii)
act 1The act opens with Mace Windu and his clones caught in an ambush. Avoid the red targeting circles while you search the area for studs.
308
contents
how to Use this eGUide
introdUction
cast
Padawan traininG
waLKthroUGh
secrets and extras
checKLists
nintendo dsGAme BASiCSAmBuShDeSTROy maLevoLenceROOkieSDuel OF The DROiDSlAiR OF GRievOuSGunGAn GeneRAlJeDi CRAShhiDDen enemyBlue ShADOW viRuSSTORm OveR RylOThliBeRTy On RylOThWeAPOnS FACTORyleGACy OF TeRRORCheCkliSTS
Download from www.chipper.pl

nin
ten
do
ds
—Lib
er
ty
on
ry
Lo
th
Prima Official Game Guide
www.primagames.com
Assemble the Jedi pad near the red barrier. Use the Jedi pad to jump over the barrier; when you land, destroy the nearby power cells. Deal with the two STAPs to the right, then continue down the path.
Fight past the battle Droids, then use the Force on the large rock formation. When the rocks are in place, climb up to continue along the path.
FREEPLAYminikiT 1
Use a bounty hunter to destroy the thermal detonator on the console. The explosion clears the Jedi pad to the right, and a build-it pops out of the console. Use the pieces to assemble a Droid control panel.
After you access the Droid control panel, the disabled AT-TE (All Terrain Tactical Enforcer) fires its cannon into the rocks. Use the Jedi pad to collect the minikit, then drop back to the ground.
TIPJump along the STAPs to reach the three blue studs above them.
Continue to the right; clear out the enemies and objects until you uncover a build it. Assemble the grapple pad, then continue onto the next area.
TIPAfter you climb the rocks, use the Jedi pad to reach a nice selection of extra studs.
Several battle Droids repel onto the path; take them out, destroy the brown rocks to reveal a small door.
FREEPLAYminikiT 2
Use the small door to reach the ledge high above you, then double-jump through the studs to the right. Collect the minikit, then drop back down to the path.
When you reach the crashed AT-TE, use the Force to reveal a Jedi pad, then cut through the hatch to free the clone trooper inside. After the rescued clone joins your party, use the build-it to assemble a grapple pad.
309
contents
how to Use this eGUide
introdUction
cast
Padawan traininG
waLKthroUGh
secrets and extras
checKLists
nintendo dsGAme BASiCSAmBuShDeSTROy maLevoLenceROOkieSDuel OF The DROiDSlAiR OF GRievOuSGunGAn GeneRAlJeDi CRAShhiDDen enemyBlue ShADOW viRuSSTORm OveR RylOThliBeRTy On RylOThWeAPOnS FACTORyleGACy OF TeRRORCheCkliSTS
Download from www.chipper.pl

nin
ten
do
ds
—Lib
er
ty
on
ry
Lo
th
Prima Official Game Guide
www.primagames.com
When you’re ready to continue, use the grapple pad to cross the gap past the crashed AT-TE. After you swing across the gap, a platform falls into place.
act 2TIPHead back to the previous area after you recover the clone trooper. Use the grapple pad you assembled earlier to reach the studs and
breakable objects high above the path.
FREEPLAYminikiT 3
Jump to the new platform, then use a heavy clone to destroy the flashing bricks in the rock wall. Select a jetpack character, then hover through the studs and collect the minikit.
Continue up along the path until you reach the next gap. sharpshoot the STAP out of the air, then use the Force to move the bridge into place.
Cross the bridge and clear out the Droids past the AAT. Use the Force to plug the AAT’s cannon with the nearby rock. After the red barrier drops, defeat the enemy reinforcements and continue through the exit.
Mace Windu and the clones reach the outskirts of a war-torn Twi’lek city.
TIPDuring Free Play, use the nearby small door to collect some blue studs.
When you’re ready to move on, follow the path to the right. The next area is littered with piles of debris. Look for the large pile to the right; when you walk into range, a Super Battle Droid springs out to attack. Use one of your ranged characters to destroy the pile from a distance, or execute a Jedi ground slam when the Droid reveals itself.
Move to the upper-left corner of the area; use the Force on the rubble to assemble a monument. Move to the right and assemble a second monument. Smash the cactus in the lower-right corner of the area. Assemble the switch, then use it to raise a third monument from the ground.
When all three monuments are in place, the nearby statue drops to the ground. Jump up to collect the minikit from the statue’s outstretched hand.
minikiT 4
310
contents
how to Use this eGUide
introdUction
cast
Padawan traininG
waLKthroUGh
secrets and extras
checKLists
nintendo dsGAme BASiCSAmBuShDeSTROy maLevoLenceROOkieSDuel OF The DROiDSlAiR OF GRievOuSGunGAn GeneRAlJeDi CRAShhiDDen enemyBlue ShADOW viRuSSTORm OveR RylOThliBeRTy On RylOThWeAPOnS FACTORyleGACy OF TeRRORCheCkliSTS
Download from www.chipper.pl

nin
ten
do
ds
—Lib
er
ty
on
ry
Lo
th
Prima Official Game Guide
www.primagames.com
Use the Force to reveal a passage through the rusted transport. Search the passage for studs, then continue to the right.
Continue along the path and take care of the Super Battle Droid hidden in a large debris pile. Use the Jedi pad to right; after you cut the wing loose, it falls over to make a new platform. Jump up along the rocks and fight your way to the tunnel.
FREEPLAYminikiT 5
After you reveal the passage, use the Dark Force on the panel you removed from the transport; the pieces assemble into a new platform. Use the platform to reach the minikit to the left.
Look for the sharpshoot target along the rocks. Use your light clone to shoot the panel and reveal a small door.
FREEPLAYminikiT 6
After you hit the sharpshoot target, use the small door to find a minikit high above the path.
Detonate the large bomb to clear the path to the right. Approach the large pile of debris and use your preferred method to deal with the hidden Super Battle Droid.
FREEPLAYminikiT 7
When you reach the freight container, use a bounty hunter to set off the thermal detonators. After the explosion, use the Droid control panel to collect the minikit inside.
TIPBefore you enter the tunnel, search the small ledge on the right for extra studs.
Follow the tunnel past the bars. Pull the lever to open the second cell, then head inside to collect some studs. Smash the boxes to find a build-it for a Separatist control panel.
FREEPLAYReD BRiCk
Use the Separatist control panel in the cell to open a panel in the wall. Approach the blurrg in the next cell. Use the grapple pad near the bars to pull the red brick out of the blurrg’s mouth.
After you collect this red brick, the “Score ×10” extra can be purchased in the rec room.
311
contents
how to Use this eGUide
introdUction
cast
Padawan traininG
waLKthroUGh
secrets and extras
checKLists
nintendo dsGAme BASiCSAmBuShDeSTROy maLevoLenceROOkieSDuel OF The DROiDSlAiR OF GRievOuSGunGAn GeneRAlJeDi CRAShhiDDen enemyBlue ShADOW viRuSSTORm OveR RylOThliBeRTy On RylOThWeAPOnS FACTORyleGACy OF TeRRORCheCkliSTS
Download from www.chipper.pl

nin
ten
do
ds
—Lib
er
ty
on
ry
Lo
th
Prima Official Game Guide
www.primagames.com
Follow the tunnel to find Cham Syndulla trapped in a cage. Take out the battle Droid guards, then clear out the reinforcements. After the fight, assemble the grapple pad near the throne; use the pad to
free Syndulla from his cage. Syndulla pushes the throne aside to reveal a secret exit. When you’re ready to leave, follow Syndulla outside.
TIPCollect the studs along the top of the room before you move on; use the throne to reach the ledge on the wall.
After you exit the throne room, jump down and clear out the Droids. Collect the studs in the area, then use the Force to open the transport. When you’re ready to move on, head up the ramp and take the transport to the next area.
Mace Windu and the clones are on an enemy-held plasma bridge. After you exit the transport, move up the bridge and clear out the battle Droids in your path.
Clear out the Droids in the control room. When the commando Droids drop in through the vents, they knock a build-it to the ground. After you deal with the Droids, use the build-it to assemble a large bomb. Detonate the bomb to drop the red barrier blocking the controls.
act 3
After the timer appears on the screen, use your heavy clone to quickly destroy the enemy Droids. If you destroy 12 Droids within the 35-second time limit, you automatically receive a minikit.
minikiT 8
Cross the bridge and take out the Droideka and remaining battle Droids. When you’re ready to continue, use the Force to open a path to the next area.
CAUTIONBe sure to collect any studs you missed before you step off the bridge. After you cross the final section, the plasma bridge powers down.
FREEPLAYminikiT 9
After you disable the barrier, smash the breakable control consoles. Assemble the bounty hunter control panel near the lever. Access the panel to activate an energy bridge. Follow the wall to the bridge, then pull the nearby lever.
After the container opens, move to the right and collect the minikit.
312
contents
how to Use this eGUide
introdUction
cast
Padawan traininG
waLKthroUGh
secrets and extras
checKLists
nintendo dsGAme BASiCSAmBuShDeSTROy maLevoLenceROOkieSDuel OF The DROiDSlAiR OF GRievOuSGunGAn GeneRAlJeDi CRAShhiDDen enemyBlue ShADOW viRuSSTORm OveR RylOThliBeRTy On RylOThWeAPOnS FACTORyleGACy OF TeRRORCheCkliSTS
Download from www.chipper.pl

nin
ten
do
ds
—Lib
er
ty
on
ry
Lo
th
Prima Official Game Guide
www.primagames.com
Search the control room for studs, then pull the lever on the observation deck to move on.
In the battle’s final phase, four Hyena Bombers attempt to destroy the city. Two Hyena Bombers appear right away; use your boosters to get into range, then shoot down both bombers. Defend yourself from the swarming Vulture Droids, and find a supply ship if needed. When the next two Hyena Bombers appear, destroy them before they reach the city.
The scene switches to the skies above Ryloth. When the fight starts, engage the attacking Vulture Droids. Shoot down five Vulture Droids to begin the next phase of the battle.
When the enemy AATs flee the city, move in to prevent their escape. Use your missiles to destroy the three tanks, then hunt down a supply ship to restock your weapons.
In the battle’s next phase, four AATs try to escape through the canyon. Use your missiles to destroy the tanks. Evade incoming missiles and restock your weapons as needed.
After you destroy the last of the tanks, turn your attention to the radar array. It takes three missiles to destroy each dish, so keep an eye out for supply ships. Destroy all four dishes to end the radar transmission.
If you destroy all four Hyena Bombers before they damage the city, a minikit appears on the battlefield. Fly over and collect the minikit above the city before the mission ends.
minikiT 10
After you destroy the Hyena Bombers, defend yourself from enemy attacks until the mission ends.
• The Clone Commander (Phase II) and Advanced Recon Force Trooper characters are unlocked and ready to be used in Free Play.
• The Mace Windu, Cham Syndulla, Chewbacca, Wat Tambor, Kashyyyk Clone Trooper, and Han Solo characters are available for purchase in the rec room.
• Liberty on Ryloth is available for Free Play.
liBeRTy On RylOTh STORy ReWARDS
313
contents
how to Use this eGUide
introdUction
cast
Padawan traininG
waLKthroUGh
secrets and extras
checKLists
nintendo dsGAme BASiCSAmBuShDeSTROy maLevoLenceROOkieSDuel OF The DROiDSlAiR OF GRievOuSGunGAn GeneRAlJeDi CRAShhiDDen enemyBlue ShADOW viRuSSTORm OveR RylOThliBeRTy On RylOThWeAPOnS FACTORyleGACy OF TeRRORCheCkliSTS
Download from www.chipper.pl

nin
ten
do
ds
—w
ea
po
ns
fa
cto
ry
Prima Official Game Guide
www.primagames.com
the FInal suRGe.Having learned of warlord Poggle the Lesser’s plot to rebuild a Separatist Droid foundry on Geonosis, Jedi Knight Anakin Skywalker and his Padawan, Ahsoka Tano, prepare to assault this heavily fortified installation. Their mission: destroy the factory at all costs. Anticipating stiff resistance, Republic commanders send Jedi Master Luminara Unduli and her Padawan, Barriss Offee, to reinforce the attack. But time runs short for our intrepid heroes as the dreaded Droid mill nears completion....
weapons factory
MinikitsNo. Mode Notes
1 Free Play
Use the Dark Force to near the wrecked AT-TEs to assemble two radar dishes.
2 Free Play
After you destroy the turret, use a bounty hunter to set off the nearby thermal detonators.
3 Story When the timer appears, destroy 30 Droids within the 60-second time limit.
4 Story Near the start of Act 2, smash the crate and build a Jedi pad. Use the pad to cut through the rock.
5 Free Play After you cross the gap, smash the crate and build the grapple pad.
6 Free Play
Destroy the two Poggle statues in the cavern. Use the bounty hunter control panel to find the first statue; assemble a grapple pad to reach the second statue.
7 Free Play
Sharpshoot the bulb on the wall. Collect the minikit behind the shriveled roots.
8 Free Play At the start of Act 3, use the Droid control panel to the left.
9 Story Build the Jedi pad in the assembly room, then use the pad to find a blue crate. Carry the crate back to the build-it pad.
10 Free Play
After you reach the upper level of conveyor belts, use the Dark Force on the valve. After the fire burns out, drop down to collect the minikit near the wall.
Story Characters:
Anakin
Captain Rex
Ahsoka
Obi-Wan
Clone Trooper (Heavy)
True Jedi Stud Requirement: 30,000True Jedi Free Play Stud Requirement: 35,000
Barriss Offee
act 1Anakin, Obi-Wan, and their clone troopers are mounting a frontal assault on the weapons factory. Use the Force to on the brown rock to detonate the hidden mine, then run in and clear out the battle Droids near the AT-TE wreckage.
FREEPLAYminikiT 1: STeP 1
Use the Dark Force to assemble the dish near the wrecked AT-TE, then continue up the path.
314
contents
How to Use tHis eGUide
introdUction
cast
padawan traininG
waLKtHroUGH
secrets and extras
cHecKLists
nintendo dsGAme BASiCSAmBuSHDeSTROy MaLevoLenceROOkieSDuel OF THe DROiDSlAiR OF GRievOuSGunGAn GeneRAlJeDi CRASHHiDDen enemyBlue SHADOW viRuSSTORm OveR RylOTHliBeRTy On RylOTHWeAPOnS FACTORyleGACy OF TeRRORCHeCkliSTS
Protected by copyright. Unauthorized or unlawful copying or downloading expressly prohibited.
Download from www.chipper.pl

nin
ten
do
ds
—w
ea
po
ns
fa
cto
ry
Prima Official Game Guide
www.primagames.com
As you move up the path, a massive Droid army marches out to meet you. Use a heavy clone to cut a path straight through the enemy units.
Continue up the path; avoid or destroy the land mines and watch out for falling rocks after any explosions. When you approach the turret, use the Force to throw a rock at the nearby mine.
When the Droideka appears, target the rock near the land mine. Use the Force to drop the rock on the mine. If you move quickly, the Droideka is destroyed before it attacks. Smash the large dish near the wall, then use the pieces to assemble a large bomb.
TIPAfter you destroy the turret, collect the blue stud to the left. Be sure to grab the stud before you destroy the crates—you’ll need the extra height they provide.
Move up the path and jump over the gap. When you land, use the Force on the nearby rock. After the explosion, deal with the attacking battle Droids. Search the area for studs, then continue across the narrow bridge.
FREEPLAYminikiT 1: STeP 2
After you cross the bridge, the path splits around the rocks. Take the path to the right to find another wrecked AT-TE, then use the Dark Force to assemble a dish from the debris. When you assemble both of the dishes in the area, you automatically receive a minikit. Move back to the left, then continue up the main path.
When you’re ready, detonate the bomb and continue to the next area.
A heavy turret guards the path ahead of you. Use a Lightsaber to deflect incoming fire back at the turret. Search the area for studs, then continue up the path.
FREEPLAYminikiT 2
After you destroy the turret, move to the left. Use a bounty hunter to set off the thermal detonators on the rocks. After the explosion, you automatically receive a minikit.
315
contents
How to Use tHis eGUide
introdUction
cast
padawan traininG
waLKtHroUGH
secrets and extras
cHecKLists
nintendo dsGAme BASiCSAmBuSHDeSTROy MaLevoLenceROOkieSDuel OF THe DROiDSlAiR OF GRievOuSGunGAn GeneRAlJeDi CRASHHiDDen enemyBlue SHADOW viRuSSTORm OveR RylOTHliBeRTy On RylOTHWeAPOnS FACTORyleGACy OF TeRRORCHeCkliSTS
Protected by copyright. Unauthorized or unlawful copying or downloading expressly prohibited.
Download from www.chipper.pl

nin
ten
do
ds
—w
ea
po
ns
fa
cto
ry
Prima Official Game Guide
www.primagames.com
Ahsoka and Barriss Offee are attempting to sneak into the weapons factory. Climb down to the canyon floor.
Use the Force to move the brown column into the gap, then follow the studs to the right.
When the timer appears, move in and attack the enemy Droids. If you destroy 30 Droids within the 60-second time limit, you automatically receive a minikit. Use your heavy clone to maintain a steady spray of blaster fire, then just sweep through the approaching enemies.
minikiT 3
act 2
Check the area for studs and follow the path to the right. Use the Force to move the rubble out of your way, then clear out the attacking Droids. Use the nearby crate to reach the blue stud near the rock formation.
Smash the crate, then use the pieces to build a Jedi pad. Stand on the pad and cut through the rock to reveal a minikit.
minikiT 4
FREEPLAYminikiT 5
After you cross the gap, smash the crate and assemble a grapple pad; activate the pad to reach the minikit above the gap.
When the Droids taunt you from the ledge, use the Force to build a platform out of the rubble. Jump up and destroy the Droids, then clear a path to the right.
When you reach the wreckage, use the Force to build three platforms along the wall. After the platforms are in place, climb up to the ledge. Collect any remaining studs, then use the Jedi pad to cut through to the next area.
After you enter the cavern, move to the right. Stand near the large roots, then use the Force to pull the Jedi pad to you. Use the pad to cut through the roots and continue to the right.
316
contents
How to Use tHis eGUide
introdUction
cast
padawan traininG
waLKtHroUGH
secrets and extras
cHecKLists
nintendo dsGAme BASiCSAmBuSHDeSTROy MaLevoLenceROOkieSDuel OF THe DROiDSlAiR OF GRievOuSGunGAn GeneRAlJeDi CRASHHiDDen enemyBlue SHADOW viRuSSTORm OveR RylOTHliBeRTy On RylOTHWeAPOnS FACTORyleGACy OF TeRRORCHeCkliSTS
Protected by copyright. Unauthorized or unlawful copying or downloading expressly prohibited.
Download from www.chipper.pl

nin
ten
do
ds
—w
ea
po
ns
fa
cto
ry
Prima Official Game Guide
www.primagames.com
When you reach the end of the path, a Geonosian emerges from the blue pod near the wall. Defeat the enemy, then use the nearby bricks to assemble a small door.
your attackers, use the crate to reach the blue stud floating between the pods.
FREEPLAYminikiT 6: STeP 1
Before you move on, use the nearby bounty hunter control panel. Destroy the statue, then continue to the right.
Thanks their hard exoskeletons, Geonosians can withstand a fair amount of damage. Most Geonosians are armed with some form of blaster weapon, but their real strength lies in their superior numbers; Geonosian warriors rarely attack alone.
GeOnOSiAn
Use the small door to reach a small room. Break the crate near the room’s left wall, then use the pieces to build a Jedi pad. Cut through the root cluster to reveal a bulb. Destroy the bulb and move to the right.
Use the Force to clear the clear the pillars blocking the second bulb. When you destroy the both bulbs, some of the roots in the main passage shrivel away to expose a Jedi pad.
Head through the small door to return to the passage, then use the Jedi pad to climb up the shaft. When you reach the ledge, two more Geonosians emerge from their pods. After you defeat
FREEPLAYminikiT 6: STeP 2
After you collect the blue stud, smash the crate to reveal a build-it. Assemble the grapple pad, then swing up to the ledge. When you land, destroy the statue to the right. After you destroy both of the statues, you automatically receive a minikit. Drop back down and continue to the left.
minikiT 7Use a light clone to shoot the bulb on the wall. After the roots wither, collect the minikit to the left.
ReD BRiCk
After you shoot the bulb, pass through the small door to the left. Use the Dark Force to pull the platform from the room’s right wall, then jump up to the Jedi pad above the locked door.
Use the Jedi pad to reach the next ledge. When you land, use a bounty hunter to set off the thermal detonators in front of you. After the explosion,
collect the red brick behind the door. Drop down and use the small door to return to the main passage.
After you collect this red brick, the “Invincibility” extra can be purchased in the rec room.
317
contents
How to Use tHis eGUide
introdUction
cast
padawan traininG
waLKtHroUGH
secrets and extras
cHecKLists
nintendo dsGAme BASiCSAmBuSHDeSTROy MaLevoLenceROOkieSDuel OF THe DROiDSlAiR OF GRievOuSGunGAn GeneRAlJeDi CRASHHiDDen enemyBlue SHADOW viRuSSTORm OveR RylOTHliBeRTy On RylOTHWeAPOnS FACTORyleGACy OF TeRRORCHeCkliSTS
Protected by copyright. Unauthorized or unlawful copying or downloading expressly prohibited.
Download from www.chipper.pl

nin
ten
do
ds
—w
ea
po
ns
fa
cto
ry
Prima Official Game Guide
www.primagames.com
When you’re ready to move on, follow the studs to the left. Take out the next Geonosian, then use the Force to pull a platform from the wall. When you’re ready, climb the platform and move on to the next area.
act 3Ahsoka and Barriss Offee are directly under the weapons factory. When you step into the hall, there are Geonosians in both directions. Move to the left and take out the first enemy, then deal with the enemies to the right.
Stand near the assembly table, and use the Force on the Droid parts. After the Droid moves to the conveyor belt, pull the lever on the wall. After a moment, the machine produces some gears. Use the
Force to move the gears to the door. Search the room for studs, then move on to the next area.
In the next area, step onto the first conveyor belt. When the press slams down, run to the right. When the press lifts out of the way, slip past and continue along the belt. When the second press moves out of
your way, run to the right and jump to the next belt.
When you land, run toward the top of the screen. Every few seconds, two Droids appear on the belt. Double-jump toward the Droids to overcome the belt’s movement. Try to reach the next conveyor belt before the Droids can attack.
FREEPLAYminikiT 8
Use the Droid control panel to reveal the minikit behind the door.
Continue to the right; move past the build-it pad to find a crate in the corner. Smash the crate and assemble the Jedi pad, then use the pad to reach the assembly room. Clear out the enemy Droids, then search the room for studs.
Smash the crate between the two large pipes, then assemble the Jedi pad. Use the pad to cut through the pipe, then use the Force to reveal a blue crate. Grab the crate, then drop back down through the floor.
When you land, carry the crate to the left. Drop the crate on the build-it pad, then assemble the pieces. Use the Jedi pad to reach the minikit on the ledge. Drop down and return to the assembly room.
minikiT 9
318
contents
How to Use tHis eGUide
introdUction
cast
padawan traininG
waLKtHroUGH
secrets and extras
cHecKLists
nintendo dsGAme BASiCSAmBuSHDeSTROy MaLevoLenceROOkieSDuel OF THe DROiDSlAiR OF GRievOuSGunGAn GeneRAlJeDi CRASHHiDDen enemyBlue SHADOW viRuSSTORm OveR RylOTHliBeRTy On RylOTHWeAPOnS FACTORyleGACy OF TeRRORCHeCkliSTS
Protected by copyright. Unauthorized or unlawful copying or downloading expressly prohibited.
Download from www.chipper.pl

nin
ten
do
ds
—w
ea
po
ns
fa
cto
ry
Prima Official Game Guide
www.primagames.com
Ride across to the right, then jump onto the fourth conveyer belt. Jump away from the fire; when you reach the end of the belt, hop to the platform on the right. Pull the nearby lever to reposition the conveyor belts. After the red barrier shuts down, use the Jedi pad to reach the room’s upper level.
When you land, jump on the next conveyor belt. Use a Jedi ground slam to clear out the two Droids, then jump to the platform on your left.
When you reach the factory’s reactor, run to the room’s far side. Jump on the crates and grab the blue stud above you, then plant the first explosive charge.
FREEPLAYminikiT 10
When you reach the platform, stand near the large pipe on the wall. Use the Dark Force on the valve to put out the fire below you. Drop down and collect the minikit under the pipe, then climb back to the room’s upper level.
Break the guard rails for some extra studs, then jump to the next conveyor belt. Continue to the left and jump on the moving platforms. Stand still as you ride around to the left, then jump to the last conveyor belt.
Hop onto the platform to reach the exit.
TIPFor some extra studs, drop through the shaft and search the lower level. When you’re ready to leave,
assemble the lift and return to the exit.
Defend yourself from the attacking Geonosians. Circle around the reactor and set the two remaining charges. When all three charges are in place, search the room for new enemies.
When the super tank arrives, circle the room and avoid the incoming fire. After it fires ten shots, the tank opens up to expose a battle Droid. Jump up and destroy the Droid to complete the mission.
• The Geonosian and Jetpack Droid characters are unlocked and ready to be used in Free Play.
• The Chancellor Palpatine, Senate Guard, Barriss Offee, Bolla Ropal, Darth Sidious, and Ki-Adi-Mundi characters are available for purchase in the rec room.
• Weapons Factory is available for Free Play.
WeAPOnS FACTORy STORy ReWARDS
319
contents
How to Use tHis eGUide
introdUction
cast
padawan traininG
waLKtHroUGH
secrets and extras
cHecKLists
nintendo dsGAme BASiCSAmBuSHDeSTROy MaLevoLenceROOkieSDuel OF THe DROiDSlAiR OF GRievOuSGunGAn GeneRAlJeDi CRASHHiDDen enemyBlue SHADOW viRuSSTORm OveR RylOTHliBeRTy On RylOTHWeAPOnS FACTORyleGACy OF TeRRORCHeCkliSTS
Protected by copyright. Unauthorized or unlawful copying or downloading expressly prohibited.
Download from www.chipper.pl

nin
ten
do
ds
—LeG
ac
y o
f t
er
ro
r
Prima Official Game Guide
www.primagames.com
LeGacy of terror
vIctoRy on GeonosIs!After a massive planetary siege, the Separatist forces on Geonosis have finally fallen. Key weapons factories have been destroyed, but at a heavy cost to Republic troops. Now, as Jedi Master Luminara Unduli and Obi-Wan Kenobi begin a cleanup of the planet, they launch an intense campaign to find Separatist leader Poggle the Lesser and bring him to justice....
MinikitsNo. Mode Notes
1 Free Play
At the start of the mission, assemble and use the Separatist control panel to the right.
2 Free Play
After you create the platforms in the temple’s first room, climb up and use the small door.
3 Free Play
After you drop down from the bridge, use a bounty hunter to set off the thermal detonators to the left.
4 Free Play
At the start of Act 2, find and assemble the nearby Droid control panel. Use the panel to open the door.
5 Free Play
After you drop through the floor, follow the hall to the left. Use the Dark Force on the sculpture above the door.
6 Story After you use the build-it pad, grapple up to the exit. Move the right, then jump toward the lower right-corner.
7 Story When you reach the stairs, assemble the Jedi pad to the right. Use the pad to cut through the door.
8 Free Play
Near the end of Act 2, use the Dark Force to extend the platform over the gap.
9 Story When the timer appears on the screen, defeat 20 Geonosian zombies within the 60-second time limit.
10 Story After you defeat the queen, escape from the temple in a single attempt.
True Jedi Stud Requirement: 50,000True Jedi Free Play Stud Requirement: 100,000
Story Characters:
Anakin
Clone Trooper
luminara unduli
Obi-Wan
Commander Cody
act 1Anakin, Obi-Wan, and their clone troopers are searching for Luminara Unduli. Collect the studs on the path’s left side, then smash the boxes to the right. When you’re ready, continue up the path.
FREEPLAYminikiT 1
After you break the boxes, use the pieces to build a Separatist control panel. When you activate the panel, a minikit appears to the right.
320
contents
How to Use tHis eGUide
introdUction
cast
padawan traininG
waLKtHroUGH
secrets and extras
cHecKLists
nintendo dsGAme BASiCSAmBuSHDeSTROy MaLevoLenceROOkieSDuel OF THe DROiDSlAiR OF GRievOuSGunGAn GeneRAlJeDi CRASHHiDDen enemyBlue SHADOW viRuSSTORm OveR RylOTHliBeRTy On RylOTHWeAPOnS FACTORyleGACy OF TeRRORCHeCkliSTS
Download from www.chipper.pl

nin
ten
do
ds
—LeG
ac
y o
f t
er
ro
r
Prima Official Game Guide
www.primagames.com
When you reach the speeder, use the Force to send it crashing into the rubble. Search the path for extra studs, then head into the temple.
After you step into the next area, a cave-in blocks the passage behind you. Smash the breakable objects to the left, then follow the path to the right. When the bridge crumbles away, select your light clone. Hit the sharpshoot target to drop a new platform into place.
TIPWhen you approach the entrance, look for the blue stud hidden behind the rubble to the left.
The first room is filled with studs and breakable rocks. Smash the rocks to find a build-it near one of the support beams. Assemble the Jedi pad, then use it to cut through the beam.
When the beam falls, it breaks into three pieces. Use the Force on the two smaller pieces to create new platforms. Use the platforms to follow the studs up to a small door.
FREEPLAYminikiT 2
Use the small door near the top of the room. When you pop out from the next door, you land right on a minikit.
When you’re ready to leave, return to the broken support beam. Use the Force to turn the beam into a battering ram. Smash through the exit, then move on to the next area.
To collect some extra studs, drop down to find a hidden area below the bridge.
Sweep the area for studs and breakable objects. When you’re ready to continue, move to the left. Use the Force to pull the platforms out of the rock, then climb back up to the main path.
Move across the bridge and follow the path to the right. After another tremor, Geonosian zombies crawl out of the ground near the column. Take out the first two attackers, then wipe out additional enemies when they appear from the nearby doors.
FREEPLAYminikiT 3
When you land, move to the left; stand near the wall covered in thermal detonators. Use a bounty hunter to trigger the explosion, then collect the minikit behind the wall.
321
contents
How to Use tHis eGUide
introdUction
cast
padawan traininG
waLKtHroUGH
secrets and extras
cHecKLists
nintendo dsGAme BASiCSAmBuSHDeSTROy MaLevoLenceROOkieSDuel OF THe DROiDSlAiR OF GRievOuSGunGAn GeneRAlJeDi CRASHHiDDen enemyBlue SHADOW viRuSSTORm OveR RylOTHliBeRTy On RylOTHWeAPOnS FACTORyleGACy OF TeRRORCHeCkliSTS
Download from www.chipper.pl

nin
ten
do
ds
—LeG
ac
y o
f t
er
ro
r
Prima Official Game Guide
www.primagames.com
Use Commander Cody to destroy flashing bricks around the column. The column falls over and creates a bridge to the next platform. When you’re ready to move on, hop onto the column and walk across the gap.
Clear out the Geonosian zombies across the gap. Smash the rocks to the left, then assemble the Jedi pad. Collect any remaining studs, then use the Jedi pad to cut through the door.
Move down the ramp to the right. After you clear out the enemies, smash the rocks to uncover a build-it. Assemble the large bomb, then select your heavy clone. After you detonate the bomb, the statue falls through the floor. Drop down through the hole to continue.
When you land, three Geonosian zombies burst through the closed doors. Take care of your attackers, then collect the studs down the hall on the left.
Geonosian zombies are controlled directly by their queen. As a result, these mindless enemies show no fear, pain, or strategy when they attack. The slow-moving Geonosian zombies can absorb a large amount of damage, but they’re limited to basic melee attacks. When these shambling enemies attack, use your preferred weapon to eliminate them before they surround you.
GeOnOSiAn ZOmBie
act 2Act 2 finds Anakin, Obi-Wan, and their clone troopers deep in the Geonosian temple. Clear the enemies, then collect the studs along the wall.
FREEPLAYminikiT 4
Follow the gold studs to the door. Smash the nearby rock to reveal a build-it. Use the pieces to assemble a Droid control panel, then access the panel to open the door. After you collect the minikit, return to the main path.
FREEPLAYminikiT 5
Stand near the end of the hall. Use the Dark Force to destroy the sculpture above the door. Collect the minikit, then move back to the right.
Follow the path out to the right, then head down the ramp. Defeat the enemies and continue to the next room. Jump through the gold studs to land near a build-it pad.
322
contents
How to Use tHis eGUide
introdUction
cast
padawan traininG
waLKtHroUGH
secrets and extras
cHecKLists
nintendo dsGAme BASiCSAmBuSHDeSTROy MaLevoLenceROOkieSDuel OF THe DROiDSlAiR OF GRievOuSGunGAn GeneRAlJeDi CRASHHiDDen enemyBlue SHADOW viRuSSTORm OveR RylOTHliBeRTy On RylOTHWeAPOnS FACTORyleGACy OF TeRRORCHeCkliSTS
Download from www.chipper.pl

nin
ten
do
ds
—LeG
ac
y o
f t
er
ro
r
Prima Official Game Guide
www.primagames.com
After you repair the statue, use the Force to push it back toward the wall. The floor drops away to form some stairs and reveal the exit. Collect the studs around the room, then head down to the next area.
Select Commander Cody and shoot the flashing bricks around the column. After the column falls over, grab the blue crate across the gap. Bring the crate to the build-it pad, then use the pieces to assemble a grapple pad.
Ascend the stairs to find three pieces of a statue scattered around the room. Move to the door on the left and use the Force to move the statue’s first piece onto the pedestal. After the piece touches down,
a Geonosian zombie appears through the door. Take out your attacker, then move to the right.
Stand near the stairs on the room’s right side, and use the Force to move the statue’s second piece. Head to the left, then use the Force to move the last piece into place.
Grapple up to the next ledge. When you land, follow the studs to the right.
When you’re ready to continue, move on to the next area. You appear in front of some stairs. Sweep the lower level for studs and breakable objects.
Move past the exit, then jump toward the lower-right corner of your screen. After you land, collect the minikit, then use the grapple pad to return to the exit.
minikiT 6
Smash the rocks to the right of the stairs, then use the pieces to assemble a Jedi pad. Use the pad to cut
through the door and reveal a minikit.
minikiT 7
Smash the plant to the left of the stairs, then use the pieces to assemble a Jedi pad. Use the pad to cut through the door and reveal a red brick.
After you collect this red brick, the “Score ×8” extra can be purchased in the rec room.
ReD BRiCk
Follow the path to the right. When you reach the gap, smash the rock and build a large bomb. Detonate the bomb to reveal a Jedi pad, then use the pad to climb up to the ledge. Take out the enemies to the right,
then drop down through the hole to land on the gap’s far side.
323
contents
How to Use tHis eGUide
introdUction
cast
padawan traininG
waLKtHroUGH
secrets and extras
cHecKLists
nintendo dsGAme BASiCSAmBuSHDeSTROy MaLevoLenceROOkieSDuel OF THe DROiDSlAiR OF GRievOuSGunGAn GeneRAlJeDi CRASHHiDDen enemyBlue SHADOW viRuSSTORm OveR RylOTHliBeRTy On RylOTHWeAPOnS FACTORyleGACy OF TeRRORCHeCkliSTS
Download from www.chipper.pl

nin
ten
do
ds
—LeG
ac
y o
f t
er
ro
r
Prima Official Game Guide
www.primagames.com
Fight through the enemies until you reach the room to the right. Use your light clone to hit the sharpshoot target above the door. When the build-it falls to the ground, run over and assemble the lever.
Get ready for a fight, then pull the lever to summon a huge group of Geonosian zombies. Defend yourself from your attackers until the exit opens.
act 3At the start of Act 3, Anakin, Obi-Wan, and their clone troopers have found Luminara Unduli in the Geonosian Queen’s chamber. When the fight begins, switch to your light clone. You must knock Poggle the Lesser out of the air before you can damage him. Poggle moves very quickly. Aim using your sharpshoot ability along his path, then fire as he flies into your crosshairs. After Poggle lands, attack him until he surrenders and leaves the fight.
FREEPLAYminikiT 8
Before you use the Jedi pad, select a Sith character and carefully approach the gap. Use the Dark Force to extend the platform under the minikit. Jump over to the platform to collect the minikit. To nab some extra studs, jump back and use the Jedi pad to the left. If you prefer, jump to the right and continue down the path.
After you pull the lever, a timer appears on the screen. The Geonosian zombies appear in seven small groups. Use Lightsaber attacks to clear them out quickly. Destroy all 20 Geonosian zombies within the 60-second time limit to reveal a minikit near the center of the room.
minikiT 9
TIPWhile you deal with Poggle the Lesser, Geonosian zombies move in to attack. Deal with them as needed, but try to ground Poggle before these new enemies overwhelm you.
Clear out the remaining enemies, then hit the sharpshoot targets on Unduli’s restraints. After you destroy the restraints, Luminara Unduli joins your party, and the Geonosian Queen bursts into the room.
After the queen moves into place, she begins her attack. Avoid the red targeting circles to dodge the queen’s eggs. When an egg breaks, it leaves a dangerous substance on the ground. Avoid these areas until the puddles fade away. After the fifth egg, the queen moves on to the battle’s next phase.
When the queen slams her tail, large chunks of the ceiling come crashing down. Watch for the shadows of falling rocks and try to stay clear of the impact. Keep dodging the rocks until a build-it appears.
324
contents
How to Use tHis eGUide
introdUction
cast
padawan traininG
waLKtHroUGH
secrets and extras
cHecKLists
nintendo dsGAme BASiCSAmBuSHDeSTROy MaLevoLenceROOkieSDuel OF THe DROiDSlAiR OF GRievOuSGunGAn GeneRAlJeDi CRASHHiDDen enemyBlue SHADOW viRuSSTORm OveR RylOTHliBeRTy On RylOTHWeAPOnS FACTORyleGACy OF TeRRORCHeCkliSTS
Download from www.chipper.pl

nin
ten
do
ds
—LeG
ac
y o
f t
er
ro
r
Prima Official Game Guide
www.primagames.com
The queen throws another five eggs at you. Dodge them just like you did the first time. When the queen slams her tail, more rocks shake loose from the ceiling. This time, however, the splattered eggs remain
on the ground while the rocks come crashing down. Be careful to avoid the egg puddles while you dodge the falling rocks.
Run in and assemble the grapple pad, then use it to weaken one of the support beams. Switch to a Jedi character, then use the Force to throw the beam at the Geonosian Queen.
Keep an eye out for blue studs along the path. They usually signal a dangerous change in the environment. When you approach a blue stud, watch out for cracks in the corridor. Find safe footing whenever the floor starts to give way. Escape the cave-in to complete the mission.
When the build-it appears, run over and assemble the large bomb. When you detonate the bomb, the chamber comes down on the Geonosian Queen.
After the chamber collapses, the rest of the temple follows. The only escape route takes you through a long, crumbling corridor. Follow a trail of studs—and move quickly to stay ahead of the cave-in.
If you escape the corridor in a single attempt, you’ll find a minikit just before the exit. If you fail to escape on your first attempt, the minikit vanishes, and you must try again during a separate visit.
minikiT 10
• The Geonosian Zombie and Luminara Unduli characters are unlocked and ready to be used in Free Play.
• The Poggle the Lesser, Darth Vader, Princess Leia (Slave), Luke Skywalker, and Old Ben Kenobi characters are available for purchase in the rec room.
• Legacy of Terror is available for Free Play.
leGACy OF TeRROR STORy ReWARDS
325
contents
How to Use tHis eGUide
introdUction
cast
padawan traininG
waLKtHroUGH
secrets and extras
cHecKLists
nintendo dsGAme BASiCSAmBuSHDeSTROy MaLevoLenceROOkieSDuel OF THe DROiDSlAiR OF GRievOuSGunGAn GeneRAlJeDi CRASHHiDDen enemyBlue SHADOW viRuSSTORm OveR RylOTHliBeRTy On RylOTHWeAPOnS FACTORyleGACy OF TeRRORCHeCkliSTS
Download from www.chipper.pl

nin
ten
do
ds
—c
hec
klis
ts
Prima Official Game Guide
www.primagames.com
checklists
minikitsAmbushNo. Mode Notes
1 StoryAt the beginning of Act 1, use the Force to turn the escape pod engine into a fan. Hop on to reach the minikit.
2 Story After the double-jump tutorial, build a small door in the canyon wall and head through.
3 Story Build two platforms near the wrecked AAT. Climb up and find the minikit.
4 Free PlayBuild and activate the Separatist control panel inside the wrecked AAT. Complete the minigame to open a hidden compartment.
5 Free Play Detonate the bomb inside the cavern, then follow the path around to the left. Use a Sith character to move a new platform into place and jump across.
6 Story After you leave the cavern, grapple up and follow the ledge to the left.
7 Story Toward the end of Act 2, use the bouncer to reach the floating minikit.
8 Free Play Near the end of Act 2, use a thermal detonator to clear away the marked rock.
9 Story At the beginning of Act 3, destroy the plants to the right.
10 Story Toward the end of Act 3, recover this minikit from the center of the path.
Destroy Malevolence
No. Mode Notes
1 Story At the beginning of Act 1, find and destroy the three blue cores in the space debris.
2 Story When you reach the Malevolence, find the minikit on the ion cannon’s right side.
3 Story Destroy the ten blue panels along the side of the Malevolence to reveal the minikit above the ion cannon.
4 Free Play After boarding the Malevolence, use a heavy clone to destroy the flashing hatch door.
5 Story After boarding the Malevolence, cross the large gap and break the boxes to the right.
6 Story Use the Force to break the control panel near the first set of tracks.
7 Story After the jetpack tutorial, drop down and break the boxes on the rail jet car.
8 Free PlayWhen you reactivate the rail jet, use the Separatist control panel to the right. Enter the open door and make your way through the secret area.
9 Story After you take control of Anakin and Padmé, smash the box near the Super Battle Droid.
10 Free Play When you cross the hole in the floor, shoot the flashing hatch with a heavy clone.
326Protected by copyright. Unauthorized or unlawful copying or downloading expressly prohibited.
introduction
cast
Padawan training
walkthrough
secrets and extras
checklists
nintendo dsGame BasicsamBushDestroy malevolencerookiesDuel of the DroiDslair of GrievousGunGan GeneralJeDi crashhiDDen enemyBlue shaDow virusstorm over rylothliBerty on rylothweapons factoryleGacy of terrorchecklists
minikits
reD Bricks
purchaseD items
contents
how to use this eguideDownload from www.chipper.pl

nin
ten
do
ds
—c
hec
klis
ts
Prima Official Game Guide
www.primagames.com
RookiesNo. Mode Notes
1 Free Play At the start of the mission, use the Force on the shuttle to open the ramp.
2 Free Play Near the end of Act 1, build the Jedi pad and climb up to the minikit.
3 Free PlayDouble-jump over the Act 1 exit and clear a path to the lift. Ride the lift and crash the duck into the arcade cabinet.
4 Free Play Use the Dark Force on the gray crate in the eel’s lair.
5 Free Play Use the Force on the dish in the eel’s lair. Activate the nearby Droid control panel and switch to fire a laser.
6 Story After you defeat the eel, break the objects near the cavern stairs.
7 Free Play At the start of Act 3, use the Dark Force to throw the two mouse Droids.
8 Free Play Build the Jedi pad in the control room. Follow the ledge and hover out through the trail of studs.
9 Free Play After you leave the control room, build a small door and slip under the floor panels.
10 Story Release the last gonk Droid and retrieve the minikit from its wall compartment.
Duel of the DroidsNo. Mode Notes
1 Free PlayAfter Anakin leaves the party, use the Dark Force to move a step into place. Climb up and destroy the panels on the rooftop.
2 Story After Anakin leaves the party, push the crate off the main path. Build a Jedi pad and cut through the wall.
3 Story Build the recycling bin and the beginning of Act 2. Use the Force on the paper airplanes.
4 Free Play Use Sith and Jedi characters to open the cage above the red barrier.
5 Story After the MagnaGuards appear, build the Jedi pad and disable the barrier.
6 Free Play Grapple to the platform above the walkway and access the Droid control panel.
7 Story Use the Force to move the minikit from the wall to the platform.
8 Story At the start of Act 3, shoot the wall panels to your left.
9 Story After you disable the Vulture Droids, shoot the box in the center of the lift.
10 Free PlayAfter the hangar, use the Dark Force to move the unbreakable panel and activate the three switches in the wall.
327Protected by copyright. Unauthorized or unlawful copying or downloading expressly prohibited.
introduction
cast
Padawan training
walkthrough
secrets and extras
checklists
nintendo dsGame BasicsamBushDestroy malevolencerookiesDuel of the DroiDslair of GrievousGunGan GeneralJeDi crashhiDDen enemyBlue shaDow virusstorm over rylothliBerty on rylothweapons factoryleGacy of terrorchecklists
minikits
reD Bricks
purchaseD items
contents
how to use this eguideDownload from www.chipper.pl

nin
ten
do
ds
—c
hec
klis
ts
Prima Official Game Guide
www.primagames.com
Lair of GrievousNo. Mode Notes
1 Story At the start of the mission, use the Force to open the shuttle and reveal the Jedi pad inside.
2 Free PlayBefore you enter the castle, move left and drop down to the hidden ledge. Use the Dark Force to open the chamber.
3 Free Play Enter the castle and use the Dark Force on the white fixtures between the tanks.
4 Free Play Use the grapple pad in the throne room, then pass through the small door.
5 Free Play Near the start of Act 2, flip the switch on the ledge. Jetpack out to retrieve the minikit.
6 Free Play Before you step on the red button, destroy the wall grates with thermal detonators.
7 Free Play Build the small door in the roggwart room. Recover the minikit from the upper ledge.
8 Free Play After Grievous is repaired, use the small door to the right.
9 Story Destroy the cart near the table in the repair room.
10 Free Play Before you take the lift up to Grievous, use the thermal detonator to destroy the yellow bars.
Gungan GeneralNo. Mode Notes
1 Free Play In the underground passage, build the first Jedi pad and jump up to the ledge.
2 Free Play In the underground passage, build the second Jedi pad and cut through the wall.
3 Free Play Use the small door in the underground passage.
4 Free Play After you escape your cell, destroy the brown vent and build a grapple pad. Grapple up to the crawl space.
5 StoryAfter you escape your cell, use the Force on the second cell. Use the blue crate to build a Jedi pad, then cut into the third cell.
6 Story Use the Force to free the trapped pirate.
7 Story Near the end of Act 2, use a ground slam to break through the floor grate.
8 Free Play Use the Jedi pad past the steam valves. When you land, latch onto the grate and pull it from the wall.
9 Story After the battle Droids, use the Force to smash the armory and replace all the blasters.
10 Free Play Use the Jedi pad in the hangar, then grapple across to the right.
328Protected by copyright. Unauthorized or unlawful copying or downloading expressly prohibited.
introduction
cast
Padawan training
walkthrough
secrets and extras
checklists
nintendo dsGame BasicsamBushDestroy malevolencerookiesDuel of the DroiDslair of GrievousGunGan GeneralJeDi crashhiDDen enemyBlue shaDow virusstorm over rylothliBerty on rylothweapons factoryleGacy of terrorchecklists
minikits
reD Bricks
purchaseD items
contents
how to use this eguideDownload from www.chipper.pl

nin
ten
do
ds
—c
hec
klis
ts
Prima Official Game Guide
www.primagames.com
Jedi CrashNo. Mode Notes
1 Story Fly to the cruiser’s engines at the beginning of the mission.
2 Story Prevent the Hyena Bombers from bombing the cruiser.
3 Story After you move back down below the deck, smash the box near the Super Battle Droid.
4 Story After you assemble the thruster, break the crate on the path to the right.
5 Story Use the Force on the crate in the giant tree. When the crate lands, smash it open.
6 Story After Wag Too leaves, smash the crate on the cart.
7 StoryAfter you find Lok Durd, destroy the AAT parts and assemble a grapple pad. Use the pad to pull a crate to the ground.
8 Story Shoot all the ducks in under 30 seconds.
9 Story Use the Force on the stacked boxes in Lok Durd’s workshop.
10 Story Before leaving Lok Durd’s workshop, smash the box near the ramp.
Hidden EnemyNo. Mode Notes
1 Story At the beginning of the mission, stand outside the lift and use the Force to contain the bomb’s explosion.
2 Free Play Access the Separatist control panel in the lift. Use the Force to hang three chandeliers.
3 Free PlayAfter you jump across the hallway chandeliers, use the Droid control panel to drop the red barrier. Pull the lever through the small door, then fight the Droids in the newly opened room.
4 Free Play Use the small door near the lift at the end of Act 1.
5 Story Blast a hole in the rooftop’s right side. Drop down and search the area below.
6 Story Blast a hole in the rooftop’s left side. Drop down and use the Force on the large fan.
7 Story Destroy all four antennas on the rooftop.
8 Story During the flying segment, watch the path’s left edge.
9 Story During the flying segment, find the minikit above the road.
10 Free Play After you free the blue crate in Act 3, use the small door to the right.
329Protected by copyright. Unauthorized or unlawful copying or downloading expressly prohibited.
introduction
cast
Padawan training
walkthrough
secrets and extras
checklists
nintendo dsGame BasicsamBushDestroy malevolencerookiesDuel of the DroiDslair of GrievousGunGan GeneralJeDi crashhiDDen enemyBlue shaDow virusstorm over rylothliBerty on rylothweapons factoryleGacy of terrorchecklists
minikits
reD Bricks
purchaseD items
contents
how to use this eguideDownload from www.chipper.pl

nin
ten
do
ds
—c
hec
klis
ts
Prima Official Game Guide
www.primagames.com
Blue Shadow VirusNo. Mode Notes
1 Free Play Detonate the bomb at the beginning of the mission. Build the stairs and climb up to the ledge.
2 Free PlayUse the Droid control panel near the lift. Ride up and destroy the round flower, then jump across the gap to the left.
3 Story Jump on the two shaaks to reach the ledge above them.
4 Free Play Use the Dark Force on the plants near the stone head.
5 Story Destroy the Hyena Bomber launching platform.
6 Story When the timer appears, destroy eight Droids within the 40-second time limit.
7 Free PlayToward the end of Act 2, use the Separatist control panel and assemble the fan. Float into the large tube, then follow it around the room.
8 Free Play After you rescue Padmé, detonate the large bomb near the wall.
9 Free PlayToward the end of the mission, climb up to the carnivorous plant, then jump over to the right. Use a jetpack character to hover through the trail of studs.
10 Free Play Use the grapple pad near Dr. Vindi’s lift.
Storm Over RylothNo. Mode Notes
1 Story Destroy five of the Vulture Droids defending the frigate.
2 Free PlayNear the start of Act 2, find and assemble the Jedi pad on the rooftops. Cut through the wall and follow the hidden passage.
3 Free Play Use the Droid control panel inside the city, then enter the open room.
4 Free PlayAfter you grapple onto the giant bone, use the Jedi pad to the left. Bounce up to the crate, build another Jedi pad, then cut a hole in the wall.
5 Free Play When you rescue Numa, use the Force to rebuild the fountain.
6 Free PlayAfter you enter the sewer, use a thermal detonator to free the hatch on the wall. Build a platform, then use the Dark Force to remove the bars to the left.
7 Free Play Use a thermal detonator to destroy the large hatch in the sewer.
8 Story Use the two levers to drain the sewer water.
9 StoryAfter Waxer, Boil, and Numa join your party, trigger the switch through the small door. Assemble the Jedi pad and jump up to the minikit.
10 Free PlayUse a thermal detonator to unlatch hatches on the wall. Use the build-it to assemble a platform, then jump to the ledge on the left.
330Protected by copyright. Unauthorized or unlawful copying or downloading expressly prohibited.
introduction
cast
Padawan training
walkthrough
secrets and extras
checklists
nintendo dsGame BasicsamBushDestroy malevolencerookiesDuel of the DroiDslair of GrievousGunGan GeneralJeDi crashhiDDen enemyBlue shaDow virusstorm over rylothliBerty on rylothweapons factoryleGacy of terrorchecklists
minikits
reD Bricks
purchaseD items
contents
how to use this eguideDownload from www.chipper.pl

nin
ten
do
ds
—c
hec
klis
ts
Prima Official Game Guide
www.primagames.com
Liberty on RylothNo. Mode Notes
1 Free PlayAt the start of the mission, destroy the thermal detonator on the console. Assemble and activate the Droid control panel, then use the Jedi pad.
2 Free Play Destroy the brown rocks along the path to reveal a small door.
3 Free Play Destroy the flashing bricks past the crashed AT-TE. Use a jetpack character to reach the minikit.
4 StoryAt the start of Act 2, assemble two monuments. Smash the cactus and build a switch to raise the third monument into place.
5 Free PlayAfter you uncover the passage through the rusted transport, use the Dark Force to rearrange the panel you removed. Use the new platform to reach the ledge to the left.
6 Free Play Hit the sharpshoot target to reveal a small door. Use the door to reach the minikit.
7 Free Play Use a thermal detonator to free the container, then use the Droid control panel to open the door.
8 Story When you reach the plasma bridge, clear out 12 Droids within the 35-second time limit.
9 Free Play Use the bounty hunter control panel in the control room. Pull the lever on the wall to unlock the container.
10 Story Destroy all four Hyena Bombers before they damage the city.
Weapons FactoryNo. Mode Notes
1 Free Play Use the Dark Force to near the wrecked AT-TEs to assemble two radar dishes.
2 Free Play After you destroy the turret, use a bounty hunter to set off the nearby thermal detonators.
3 Story When the timer appears, destroy 30 Droids within the 60-second time limit.
4 Story Near the start of Act 2, smash the crate and build a Jedi pad. Use the pad to cut through the rock.
5 Free Play After you cross the gap, smash the crate and build the grapple pad.
6 Free PlayDestroy the two Poggle statues in the cavern. Use the bounty hunter control panel to find the first statue; assemble a grapple pad to reach the second statue.
7 Free Play Sharpshoot the bulb on the wall. Collect the minikit behind the shriveled roots.
8 Free Play At the start of Act 3, use the Droid control panel to the left.
9 StoryBuild the Jedi pad in the assembly room, then use the pad to find a blue crate. Carry the crate back to the build-it pad.
10 Free PlayAfter you reach the upper level of conveyor belts, use the Dark Force on the valve. After the fire burns out, drop down to collect the minikit near the wall.
331Protected by copyright. Unauthorized or unlawful copying or downloading expressly prohibited.
introduction
cast
Padawan training
walkthrough
secrets and extras
checklists
nintendo dsGame BasicsamBushDestroy malevolencerookiesDuel of the DroiDslair of GrievousGunGan GeneralJeDi crashhiDDen enemyBlue shaDow virusstorm over rylothliBerty on rylothweapons factoryleGacy of terrorchecklists
minikits
reD Bricks
purchaseD items
contents
how to use this eguideDownload from www.chipper.pl

nin
ten
do
ds
—c
hec
klis
ts
Prima Official Game Guide
www.primagames.com
Legacy of TerrorNo. Mode Notes
1 Free Play At the start of the mission, assemble and use the Separatist control panel to the right.
2 Free Play After you create the platforms in the temple’s first room, climb up and use the small door.
3 Free Play After you drop down from the bridge, use a bounty hunter to set off the thermal detonators to the left.
4 Free Play At the start of Act 2, find and assemble the nearby Droid control panel. Use the panel to open the door.
5 Free PlayAfter you drop through the floor, follow the hall to the left. Use the Dark Force on the sculpture above the door.
6 StoryAfter you use the build-it pad, grapple up to the exit. Move the right, then jump toward the lower-right corner.
7 Story When you reach the stairs, assemble the Jedi pad to the right. Use the pad to cut through the door.
8 Free Play Near the end of Act 2, use the Dark Force to extend the platform over the gap.
9 Story When the timer appears on the screen, defeat 20 Geonosian zombies within the 60-second time limit.
10 Story After you defeat the queen, escape from the temple in a single attempt.
red bricksRed bricksNo. Mission Mode Notes
1 Ambush Free PlayUse the Dark Force on the escape pod. Activate the four lights inside, then access the Droid control panel.
2 Destroy Malevolence Free PlayWhen you reactivate the rail jet, use the Separatist control panel to the right. Enter the open door and make your way through the secret area.
3 Rookies Free PlayAt the start of Act 2, move to the right and use the Force to open the hidden area. Use the Jedi pad to reach the ledge.
4 Duel of the Droids StoryAfter you extend the bridge in Act 2, drop down and assemble two Jedi pads. Use the pad on the right to climb up to the ledge.
5 Lair of Grievous Free PlayUse the Droid control panel near the roggwart, then enter the hidden room. Assemble the first two Grievous statues, then destroy the third.
6 Gungan General Free Play Grapple up to the shooting gallery in Act 3, then successfully complete the challenge.
7 Jedi Crash Story Use the AAT turret to destroy the walkway in Lok Durd’s workshop.
8 Hidden Enemy Story When the timer appears, destroy all the Droids within the 45-second time limit.
9 Blue Shadow Virus StoryBefore you leave Dr. Vindi’s laboratory, climb to the carnivorous plant. Continue across the platforms to the left.
10 Storm Over Ryloth StoryBefore you cross the flowing sewer water, wait for the red brick to appear on the debris.
11 Liberty on Ryloth Free Play Use the Separatist control panel in the cell, then use the grapple pad near the blurrg.
12 Weapons Factory Free PlayShoot the bulb to reveal the small door. Navigate the hidden area, and then set off the thermal detonators on the door.
13 Legacy of Terror Story Assemble and use the Jedi pad to the left of the staircase.
332Protected by copyright. Unauthorized or unlawful copying or downloading expressly prohibited.
introduction
cast
Padawan training
walkthrough
secrets and extras
checklists
nintendo dsGame BasicsamBushDestroy malevolencerookiesDuel of the DroiDslair of GrievousGunGan GeneralJeDi crashhiDDen enemyBlue shaDow virusstorm over rylothliBerty on rylothweapons factoryleGacy of terrorchecklists
minikits
reD Bricks
purchaseD items
contents
how to use this eguideDownload from www.chipper.pl

nin
ten
do
ds
—c
hec
klis
ts
Prima Official Game Guide
www.primagames.com
Purchased items
NOTEAll Hints are available for purchase from the start of the game. Each Hint has a cost of 500 studs.
HintsNo. Hint Text
1 “The more LEGO studs you collect, the more things you will be able to buy here.”
2“Many areas of the levels can only be reached by certain characters. Access these areas in Free Play.”
3 “Free Play mode lets you replay a level with any character that you have unlocked.”
4 “The minigames are unlocked by the red brick found in the first mission, Ambush.”
5 “Unlock or buy characters to open more options for character customization.”
6“The True Jedi meter appears at the top of the screen in each level. Fill it up by collecting LEGO studs.”
7 “There is one Red Power Brick in each level. These unlock Extras that can be bought here.”
8 “Collect all 10 minikit capsules in each Story level to gain a new minikit model.”
9 “Control panels can only be operated by Droids, bounty hunters or Separatists.”
10 “Heavy clones have a stronger weapon and are better suited to combat.”
11 “Free Play mode allows you to start from the beginning of any act in a mission.”
12 “The minigames available in the rec room are a great way to earn more studs.”
13 “The heavy clone has a Droid popper grenade. It’s great for tackling enemies.”
14 “Use the Character Customizer in the med bay to create your own hero.”
15 “Smaller objects can often yield studs if you use the Force on them.”
16 “Touch R2-D2 when he appears on the Touch Screen for helpful tips.”
17 “Complete the Vulture Shootout minigame without dying to earn a Survivor Bonus.”
18 “Score a ×10 chain in the Vulture Shootout minigame for bonus studs.”
19 “Space debris will often award you with something good if you can destroy it all.”
20 “Take out a Droideka shield using the Jedi ground slam.”
21 “A Droid popper will cause a battle Droid to panic if it lands on it.”
22 “You can jump onto the blue, hovering STAP platform that some Droids use to fly.”
23 “The heavy clone can throw a Droid popper to take out a Droideka shield.”
ExtrasNo. Name Cost Prerequisite
1 Unlock Minigames
50,000 studs
Collect the red brick from Ambush.
2 Infinite Missiles
150,000 studs
Collect the red brick from Destroy Malev-olence.
3 Score ×2100,000 studs
Collect the red brick from Rookies.
4 Funny Jump250,000 studs
Collect the red brick from Duel of the Droids.
5 Auto Pickup500,000 studs
Collect the red brick from Lair of Grievous.
6 One Shot2,000,000 studs
Collect the red brick from Gungan General.
7 Score ×4250,000 studs
Collect the red brick from Jedi Crash.
8 Fast Build500,000 studs
Collect the red brick from Hidden Enemy.
9 Regenerate Hearts
400,000 studs
Collect the red brick from Blue Shadow Virus.
10 Score ×6500,000 studs
Collect the red brick from Storm Over Ryloth.
11 Score ×10 2,500,000 studs
Collect the red brick from Liberty on Ryloth.
12 Invincibility4,000,000 studs
Collect the red brick from Weapons Factory.
13 Score ×8 1,000,000 studs
Collect the red brick from Legacy of Terror.
333Protected by copyright. Unauthorized or unlawful copying or downloading expressly prohibited.
introduction
cast
Padawan training
walkthrough
secrets and extras
checklists
nintendo dsGame BasicsamBushDestroy malevolencerookiesDuel of the DroiDslair of GrievousGunGan GeneralJeDi crashhiDDen enemyBlue shaDow virusstorm over rylothliBerty on rylothweapons factoryleGacy of terrorchecklists
minikits
reD Bricks
purchaseD items
contents
how to use this eguidePurchased itemsDownload from www.chipper.pl

CONTENTS
HOw TO USE THiS EGUidE
iNTrOdUCTiON
CaST
PadawaN TraiNiNG
waLKTHrOUGH
SECrETS aNd ExTraS
CHECKLiSTS
GamE BaSiCS
NiNTENdO dS
Protected by copyright. Unauthorized or unlawful copying or downloading expressly prohibited.334
Download from www.chipper.pl

Protected by copyright. Unauthorized or unlawful copying or downloading expressly prohibited.
iNTrOdUCTiON
CaST
PadawaN TraiNiNG
waLKTHrOUGH
SECrETS aNd ExTraS
CHECKLiSTS
NiNTENdO dS
CONTENTS
HOw TO USE THiS EGUidE
335
Download from www.chipper.pl

An Imprint of Random House, Inc. 3000 Lava Ridge Court, Suite 100 Roseville, CA 95661
www.primagames.com
The Prima Games logo is a registered trademark of Random House, Inc., registered in the United States and other countries. Primagames.com is a registered trademark of Random House, Inc., registered in the United States. Prima Games is an imprint of Random House, Inc.
LucasArts and the LucasArts logo are registered trademarks of Lucasfilm Ltd. © 2011 Lucasfilm Entertainment Company Ltd. or Lucasfilm Ltd. & ® or ™ as indicated. All rights reserved. LEGO, the LEGO logo and the Minifigure are trademarks of The LEGO Group. © 2011 The LEGO Group. All rights reserved.
© 2011 Lucasfilm Entertainment Company Ltd. or Lucasfilm Ltd. All rights reserved. No part of this book may be reproduced or transmitted in any form or by any means, electronic or mechanical, including photocopying, recording, or by any information storage or retrieval system without written permission from LucasArts, a division of Lucasfilm Entertainment Company Ltd.
PRIMA Official Game Guide
Written by Stephen Stratton & Nick von Esmarch
ISBN: 978-0307-469-144 11 12 13 14 LL 10 9 8 7 6 5 4 3 2 1
stephen strattonStephen Stratton has authored over 40 guides in his seven years with Prima. Steve is a lifelong video gamer who attended the Rochester Institute of Technology in Rochester, NY. In addition to his Prima Games guides, he also held a staff position with Computec Media and managed the strategy section of their incite.com video game website.
Senior Product Marketing Manager: Donato Tica
Design and Layout: In Color Design
Copyeditor: Sara Wilson
Maps: Anne De Govia
Manufacturing: Stephanie Sanchez
Prima Games would like to thank the following people for their help and support throughout this project: Brett Rector, Andrew Bell, Kellam Eames, Hez Chorba, Sean Thomson, Matt Shell, Katy Walden, and Anne Marie Hawkins.
Important:
Prima Games has made every effort to determine that the information contained in this book is accurate. However, the publisher makes no warranty, either expressed or implied, as to the accuracy, effectiveness, or completeness of the material in this book; nor does the publisher assume liability for damages, either incidental or consequential, that may result from using the information in this book. The publisher cannot provide any additional information or support regarding gameplay, hints and strategies, or problems with hardware or software. Such questions should be directed to the support numbers provided by the game and/or device manufacturers as set forth in their documentation. Some game tricks require precise timing and may require repeated attempts before the desired result is achieved.
nick von esmarchNick’s obsession with gaming began in the days of 8-bit
consoles and 1-button controllers. Born and raised in sunny California, Nick spent most of his
childhood indoors, careful to avoid nearly all forms of social interaction. At the
age of 22, he moved to Los Angeles to pursue opportunities in video game retail, eventually settling into a mildly successful acting career. Nick now spends all of his energy balancing acting and writing opportunities to support his fiercely defended gaming addiction.
Protected by copyright. Unauthorized or unlawful copying or downloading expressly prohibited.
Download from www.chipper.pl

How To Use THis eGUide
CoNTeNTs
How To Use THis eGUide
iNTrodUCTioN
CasT
PadawaN TraiNiNG
ProloGUe
walKTHroUGH
seCreTs aNd exTras
CHeCKlisTs
NiNTeNdo ds
Protected by copyright. Unauthorized or unlawful copying or downloading expressly prohibited.
This eGuide has a custom navigation system to allow you to easily find content within the eGuide and move between sections as you choose.
The main menu puts all of the eGuide sections for Lego Star Wars III at your fingertips. You can select the Menu button from any eGuide page to return to the main menu at any time.
Of course, you can also use the “page forward” and “return to beginning” icons to navigate through the eGuide.
For any other questions about your eGuide, check out the help button.
Enter keywords to find a specific word or phrase.
Within each eGuide section, all sub-sections are displayed for easy navigation.
Download from www.chipper.pl