leica zeno connect getting started guide...leica zeno connect getting started guide version 1.0...
TRANSCRIPT

Leica Zeno ConnectGetting Started Guide
Version 1.0English
Zeno Connect, Table of Contents 2
Table of ContentsIn this manual Chapter Page
1 Zeno Connect 31.1 Introduction 31.2 Installation 31.3 Starting 41.4 User Interface 5
1.4.1 Toolbar 51.4.2 GNSS Status Bar 6
1.5 Settings 81.5.1 Antenna Tab 81.5.2 Coordinate Systems 91.5.3 Configuring a Real-Time Source 121.5.4 Quality Gates 171.5.5 Streaming NMEA 0183 Messages 181.5.6 Use Case: Stream NMEA Messages via Bluetooth to
External Devices (Zeno 10/Zeno 15 Installation Only) 211.5.7 Connecting to a GG03/GG02 plus 22
2 Zeno Tools 232.1 Introduction 232.2 Zeno Tools on Zeno 10/Zeno 15 24
2.2.1 Using the System Settings Manager 242.2.2 Using the GS05/GS06 Firmware Loader 252.2.3 Using the Licence Manager 252.2.4 Using the Bluetooth App 27
2.3 Zeno Tools on CS25 302.4 Zeno Tools on Zeno 5 31
Zeno Connect, Zeno Connect 3
1 Zeno Connect1.1 Introduction
Functionality of Zeno Connect
Zeno Connect is a utility for 3rd party applications. It can be installed on a PC, for example a CS25, or directly on the Zeno 10/Zeno 15 or Zeno 5.
Zeno Connect can run on a several devices and OEMs.
Functionality of Zeno Connect:• Configure Zeno GNSS receiver• Stream NMEA to any 3rd party software• Log raw data• Zeno Connect can be used with Leica MobileMatriX
1.2 Installation
Installing Zeno Connect on CS10/CS15
Installing Zeno Connect on CS25
Installing Zeno Connect/Zeno Field on Zeno 5
Step Description1. Download the latest Zeno Connect on CS10/CS15 installer from
myWorld@Leica Geosystems (https://myworld.leica-geosystems.com). You can find it in this location: myDownloadsSoftware > Zeno Connect
2. Copy the Leica ZenoConnect.ARM.CAB onto the CS10/CS15 in the Program Files folder and double click the file.
3. The Leica ZenoConnect.ARM.CAB gets installed.4. To start Zeno Connect, double click the shortcut icon on the desktop.
Step Description1. Download the latest Zeno Connect on CS25 installer from myWorld@Leica
Geosystems (https://myworld.leica-geosystems.com). You can find it in this location: myDownloadsSoftware > Zeno Field/Zeno Connect
2. Copy the Leica ZenoConnect.EXE onto the PC in the Program Files folder and double click the file.
3. The Leica ZenoConnect.EXE gets installed.4. To start Zeno Connect, double click the shortcut icon on the desktop.
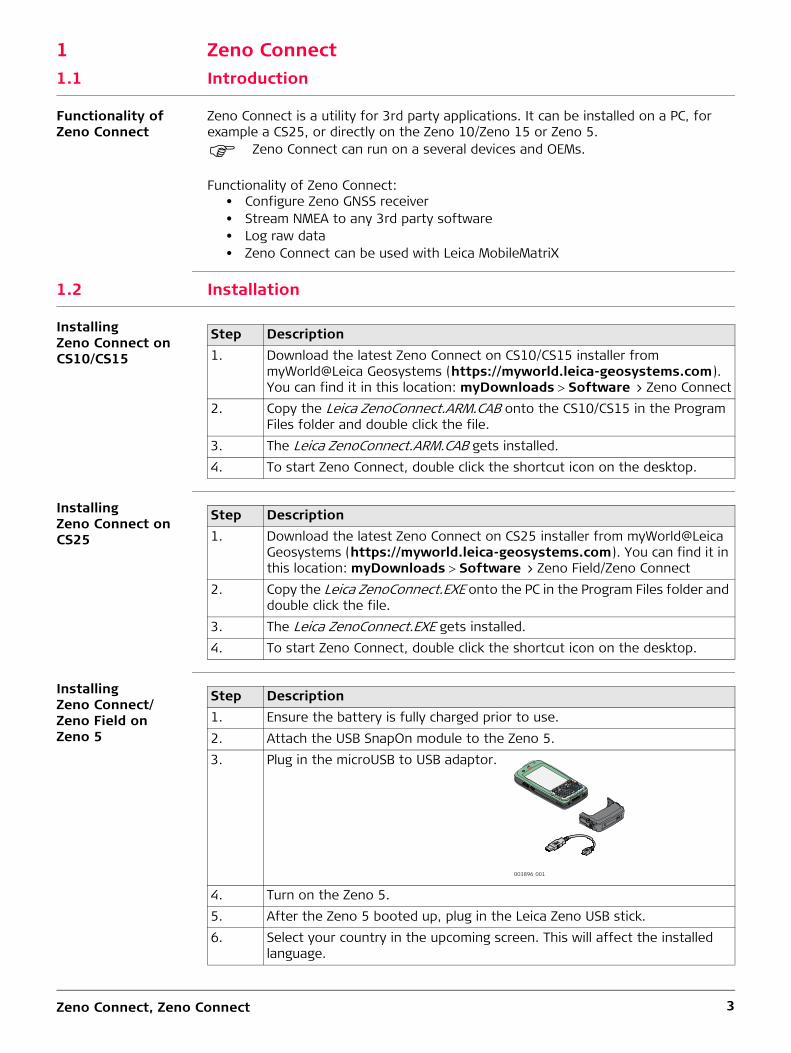
Step Description1. Ensure the battery is fully charged prior to use.2. Attach the USB SnapOn module to the Zeno 5.3. Plug in the microUSB to USB adaptor.
4. Turn on the Zeno 5.5. After the Zeno 5 booted up, plug in the Leica Zeno USB stick.6. Select your country in the upcoming screen. This will affect the installed
language.
Y U
I O
P
L K
J H
G F
D S
A Z X
C V
B N
M
.Q
W E
R T
ESC
,
SYM
TAB <
<
<
<
2 3
1 54
6
8 9
7 0
F1
F2 F7
F8
F9
F10
F3
F4
F5
F6
CTRL
#
ALT
àü
?
DEL
OK
:
=+
_@ /
003896_001

Zeno Connect, Zeno Connect 4
1.3 Starting
Starting Zeno Connect
On Zeno 10/Zeno 15
On CS25
On Zeno 5
7. The installation menu shows up.8. Select Zeno Field/Zeno Connect.9. After the installation has finished, plug off the Leica Zeno USB stick.
For entering the USB Loader menu again, plug in the USB drive again.
Step Description
Step Description1. Start Zeno Connect on the Zeno 10/Zeno 15:
Tap StartPrograms > Zeno Connect.OR
Tap the Zeno Connect icon on the desktop.
Step Description1. Start Zeno Connect on the CS25:
Tap StartAll Programs > Leica Geosystems > Zeno Connect.OR
Tap the Zeno Connect icon on the desktop.
Step Description1. Start Zeno Connect on the Zeno 5:
Tap StartZeno Connect.
Zeno Connect, Zeno Connect 5
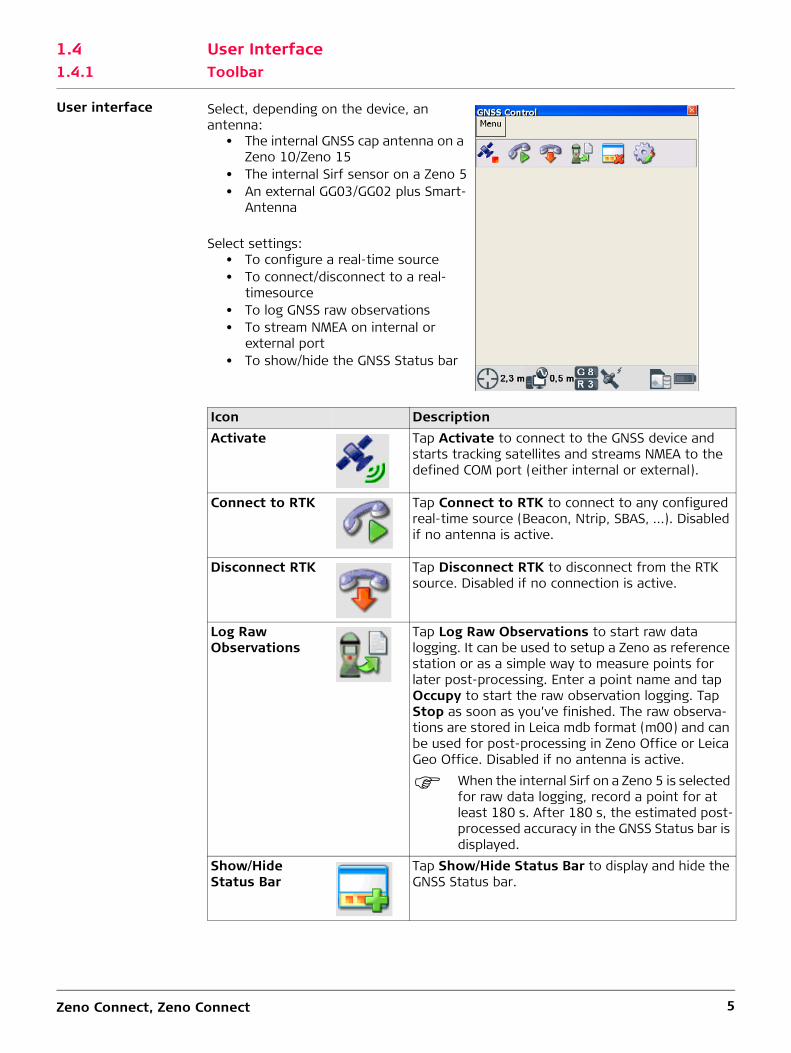
1.4 User Interface1.4.1 Toolbar
User interface Select, depending on the device, an antenna:
• The internal GNSS cap antenna on a Zeno 10/Zeno 15
• The internal Sirf sensor on a Zeno 5• An external GG03/GG02 plus Smart-
Antenna
Select settings:• To configure a real-time source• To connect/disconnect to a real-
timesource• To log GNSS raw observations• To stream NMEA on internal or
external port• To show/hide the GNSS Status bar
Icon DescriptionActivate Tap Activate to connect to the GNSS device and
starts tracking satellites and streams NMEA to the defined COM port (either internal or external).
Connect to RTK Tap Connect to RTK to connect to any configured real-time source (Beacon, Ntrip, SBAS, …). Disabled if no antenna is active.
Disconnect RTK Tap Disconnect RTK to disconnect from the RTK source. Disabled if no connection is active.
Log Raw Observations
Tap Log Raw Observations to start raw data logging. It can be used to setup a Zeno as reference station or as a simple way to measure points for later post-processing. Enter a point name and tap Occupy to start the raw observation logging. Tap Stop as soon as you’ve finished. The raw observa-tions are stored in Leica mdb format (m00) and can be used for post-processing in Zeno Office or Leica Geo Office. Disabled if no antenna is active.
When the internal Sirf on a Zeno 5 is selected for raw data logging, record a point for at least 180 s. After 180 s, the estimated post-processed accuracy in the GNSS Status bar is displayed.
Show/Hide Status Bar
Tap Show/Hide Status Bar to display and hide the GNSS Status bar.
Zeno Connect, Zeno Connect 6
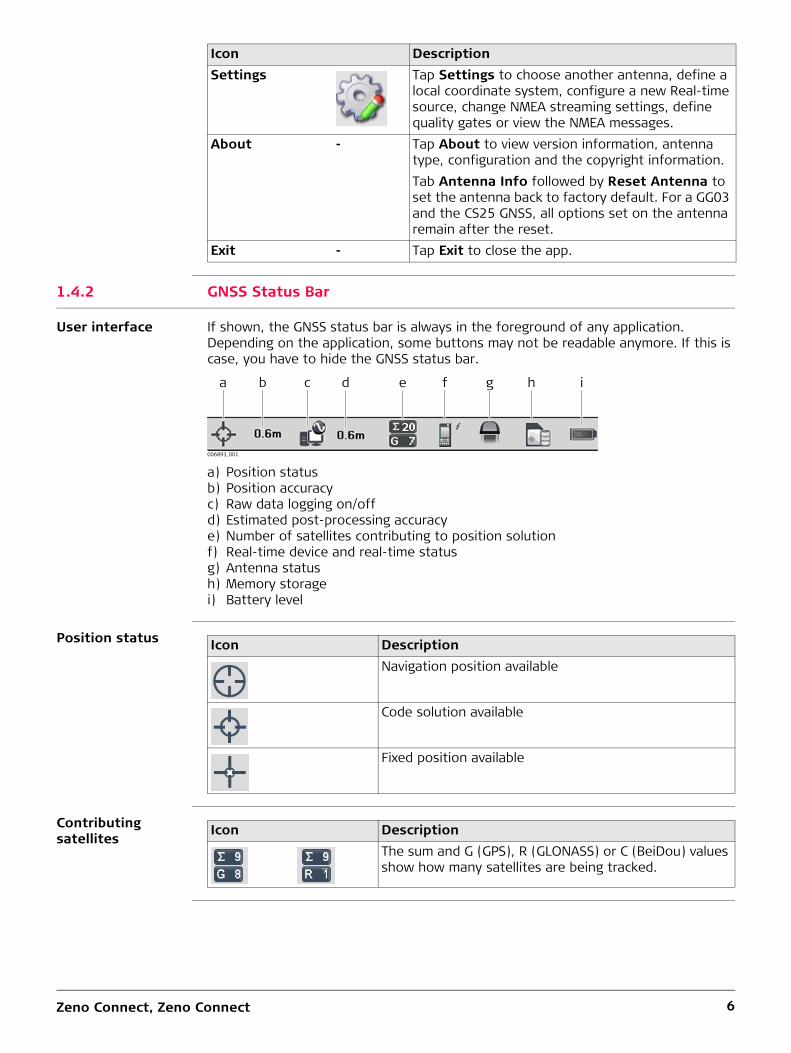
1.4.2 GNSS Status Bar
User interface If shown, the GNSS status bar is always in the foreground of any application. Depending on the application, some buttons may not be readable anymore. If this is case, you have to hide the GNSS status bar.
Position status
Contributing satellites
Settings Tap Settings to choose another antenna, define a local coordinate system, configure a new Real-time source, change NMEA streaming settings, define quality gates or view the NMEA messages.
About - Tap About to view version information, antenna type, configuration and the copyright information.Tab Antenna Info followed by Reset Antenna to set the antenna back to factory default. For a GG03 and the CS25 GNSS, all options set on the antenna remain after the reset.
Exit - Tap Exit to close the app.
Icon Description
a) Position statusb) Position accuracyc) Raw data logging on/offd) Estimated post-processing accuracye) Number of satellites contributing to position solutionf) Real-time device and real-time statusg) Antenna statush) Memory storagei) Battery level
006893_001
a b c d e f g h i
Icon DescriptionNavigation position available
Code solution available
Fixed position available
Icon DescriptionThe sum and G (GPS), R (GLONASS) or C (BeiDou) values show how many satellites are being tracked.
Zeno Connect, Zeno Connect 7
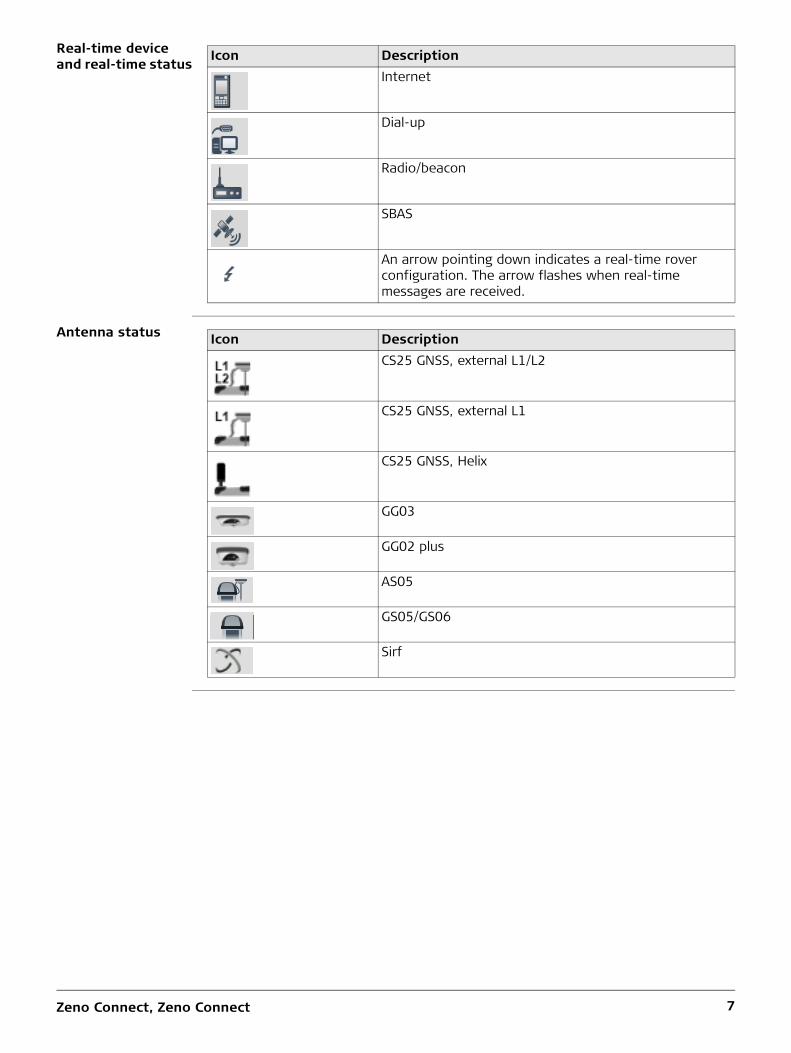
Real-time device and real-time status
Antenna status
Icon DescriptionInternet
Dial-up
Radio/beacon
SBAS
An arrow pointing down indicates a real-time rover configuration. The arrow flashes when real-time messages are received.
Icon DescriptionCS25 GNSS, external L1/L2
CS25 GNSS, external L1
CS25 GNSS, Helix
GG03
GG02 plus
AS05
GS05/GS06
Sirf
Zeno Connect, Zeno Connect 8
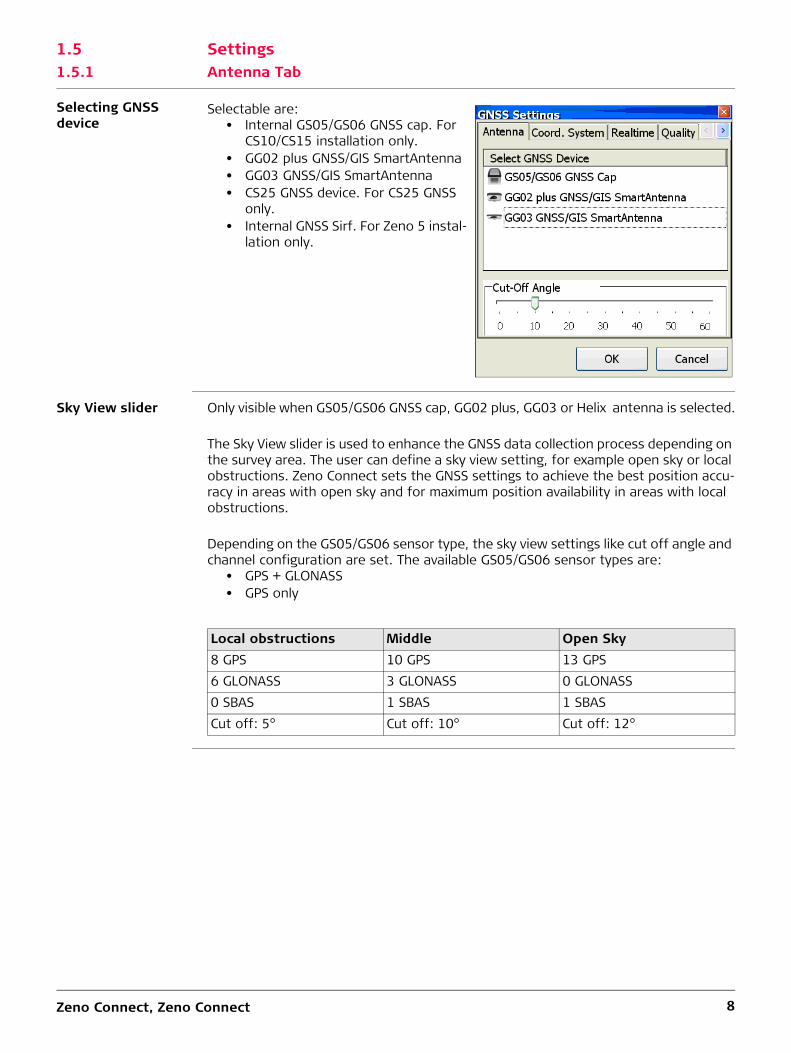
1.5 Settings1.5.1 Antenna Tab
Selecting GNSS device
Sky View slider Only visible when GS05/GS06 GNSS cap, GG02 plus, GG03 or Helix antenna is selected.
The Sky View slider is used to enhance the GNSS data collection process depending on the survey area. The user can define a sky view setting, for example open sky or local obstructions. Zeno Connect sets the GNSS settings to achieve the best position accu-racy in areas with open sky and for maximum position availability in areas with local obstructions.
Depending on the GS05/GS06 sensor type, the sky view settings like cut off angle and channel configuration are set. The available GS05/GS06 sensor types are:
• GPS + GLONASS• GPS only
Selectable are:• Internal GS05/GS06 GNSS cap. For
CS10/CS15 installation only.• GG02 plus GNSS/GIS SmartAntenna• GG03 GNSS/GIS SmartAntenna• CS25 GNSS device. For CS25 GNSS
only.• Internal GNSS Sirf. For Zeno 5 instal-
lation only.
Local obstructions Middle Open Sky8 GPS 10 GPS 13 GPS6 GLONASS 3 GLONASS 0 GLONASS0 SBAS 1 SBAS 1 SBASCut off: 5° Cut off: 10° Cut off: 12°
Zeno Connect, Zeno Connect 9
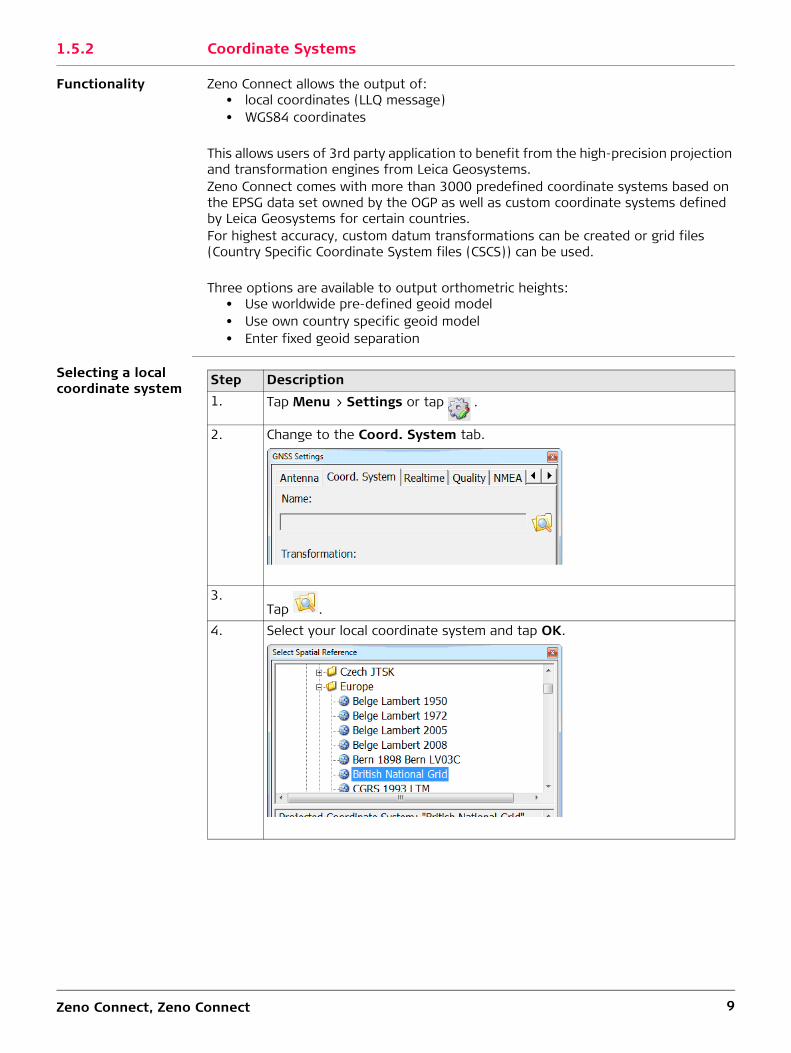
1.5.2 Coordinate Systems
Functionality Zeno Connect allows the output of:• local coordinates (LLQ message)• WGS84 coordinates
This allows users of 3rd party application to benefit from the high-precision projection and transformation engines from Leica Geosystems.Zeno Connect comes with more than 3000 predefined coordinate systems based on the EPSG data set owned by the OGP as well as custom coordinate systems defined by Leica Geosystems for certain countries.For highest accuracy, custom datum transformations can be created or grid files (Country Specific Coordinate System files (CSCS)) can be used.
Three options are available to output orthometric heights:• Use worldwide pre-defined geoid model• Use own country specific geoid model• Enter fixed geoid separation
Selecting a local coordinate system
Step Description1. Tap Menu > Settings or tap .
2. Change to the Coord. System tab.
3.Tap .
4. Select your local coordinate system and tap OK.
Zeno Connect, Zeno Connect 10
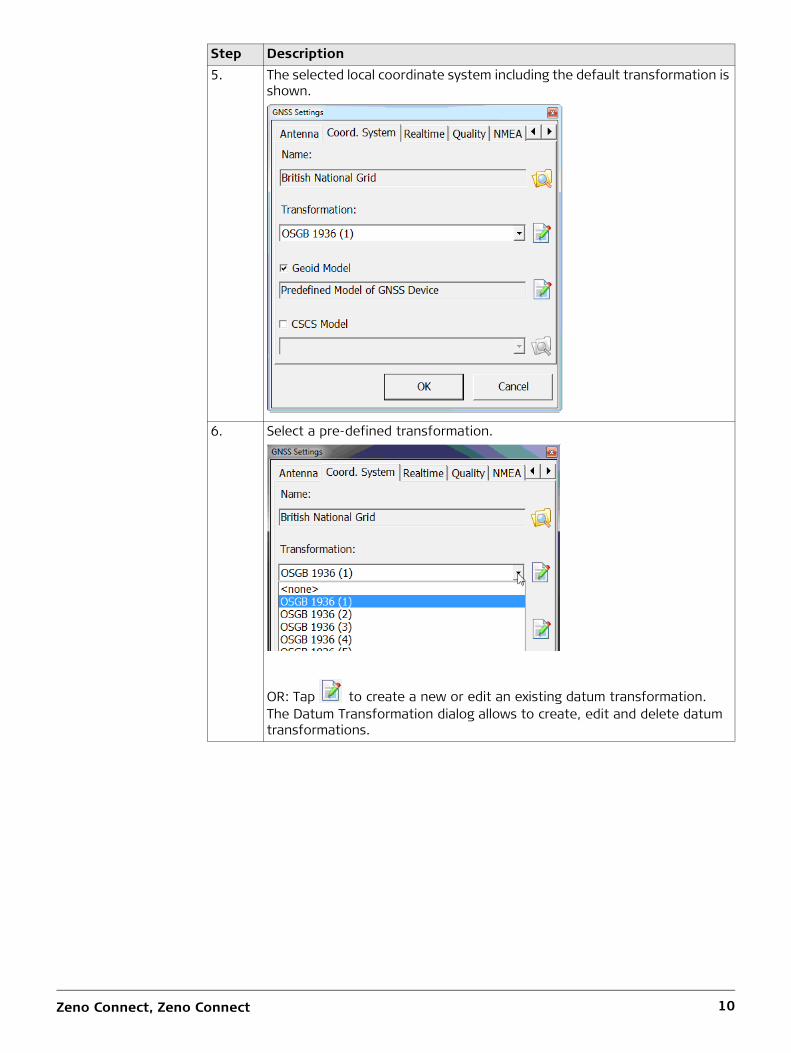
5. The selected local coordinate system including the default transformation is shown.
6. Select a pre-defined transformation.
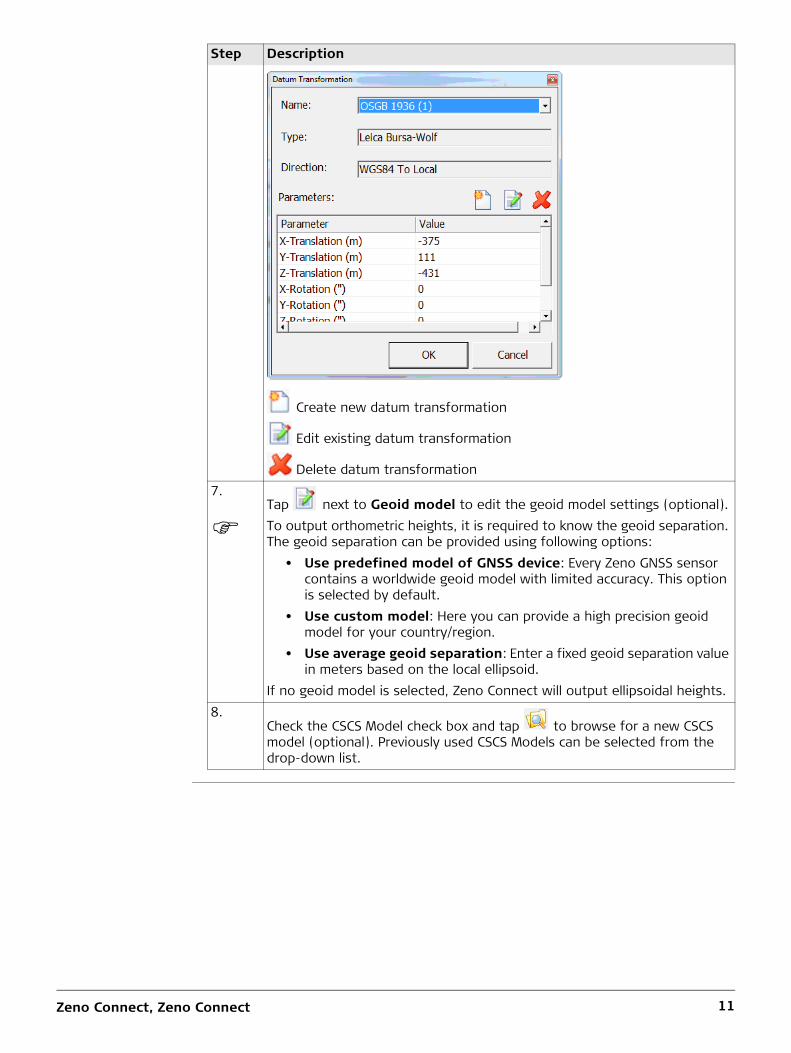
OR: Tap to create a new or edit an existing datum transformation.The Datum Transformation dialog allows to create, edit and delete datum transformations.
Step Description
Zeno Connect, Zeno Connect 11
Create new datum transformation
Edit existing datum transformation
Delete datum transformation7.
Tap next to Geoid model to edit the geoid model settings (optional).
To output orthometric heights, it is required to know the geoid separation. The geoid separation can be provided using following options:
• Use predefined model of GNSS device: Every Zeno GNSS sensor contains a worldwide geoid model with limited accuracy. This option is selected by default.
• Use custom model: Here you can provide a high precision geoid model for your country/region.
• Use average geoid separation: Enter a fixed geoid separation value in meters based on the local ellipsoid.
If no geoid model is selected, Zeno Connect will output ellipsoidal heights.8.
Check the CSCS Model check box and tap to browse for a new CSCS model (optional). Previously used CSCS Models can be selected from the drop-down list.
Step Description
Zeno Connect, Zeno Connect 12
1.5.3 Configuring a Real-Time Source
Configuring a real-time source
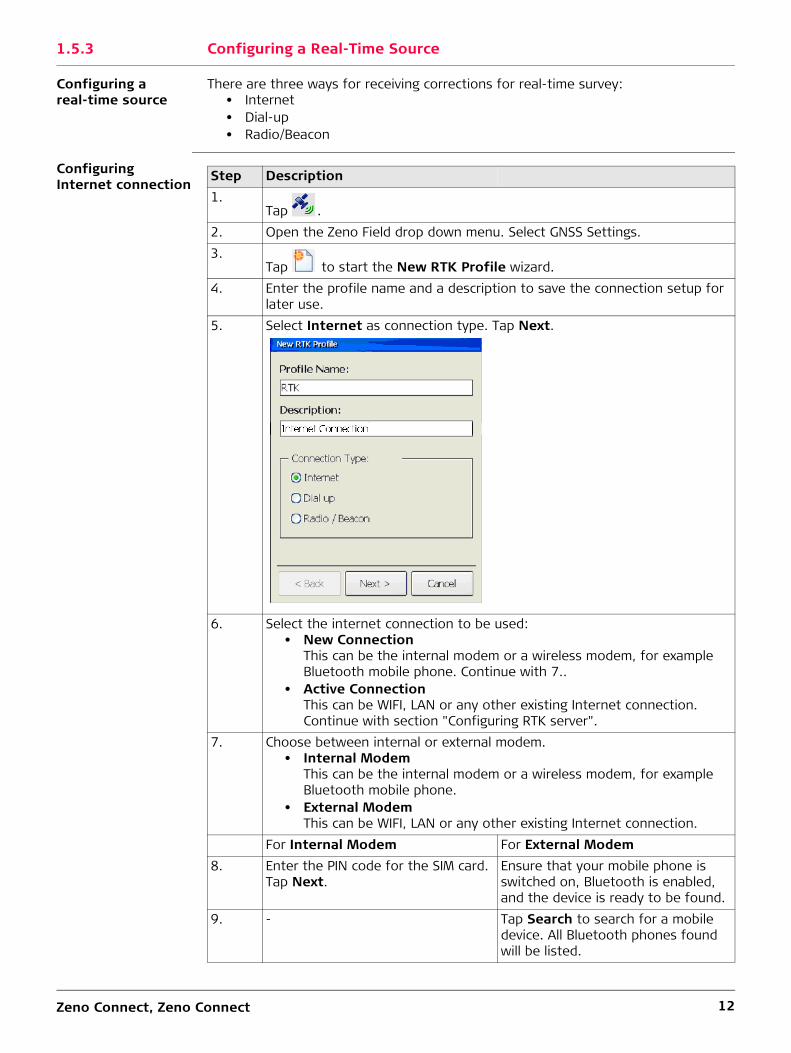
There are three ways for receiving corrections for real-time survey:• Internet• Dial-up• Radio/Beacon
Configuring Internet connection
Step Description1.
Tap .2. Open the Zeno Field drop down menu. Select GNSS Settings.3.
Tap to start the New RTK Profile wizard.4. Enter the profile name and a description to save the connection setup for
later use.5. Select Internet as connection type. Tap Next.
6. Select the internet connection to be used:• New Connection
This can be the internal modem or a wireless modem, for example Bluetooth mobile phone. Continue with 7..
• Active ConnectionThis can be WIFI, LAN or any other existing Internet connection. Continue with section "Configuring RTK server".
7. Choose between internal or external modem.• Internal Modem
This can be the internal modem or a wireless modem, for example Bluetooth mobile phone.
• External ModemThis can be WIFI, LAN or any other existing Internet connection.
For Internal Modem For External Modem8. Enter the PIN code for the SIM card.
Tap Next.Ensure that your mobile phone is switched on, Bluetooth is enabled, and the device is ready to be found.
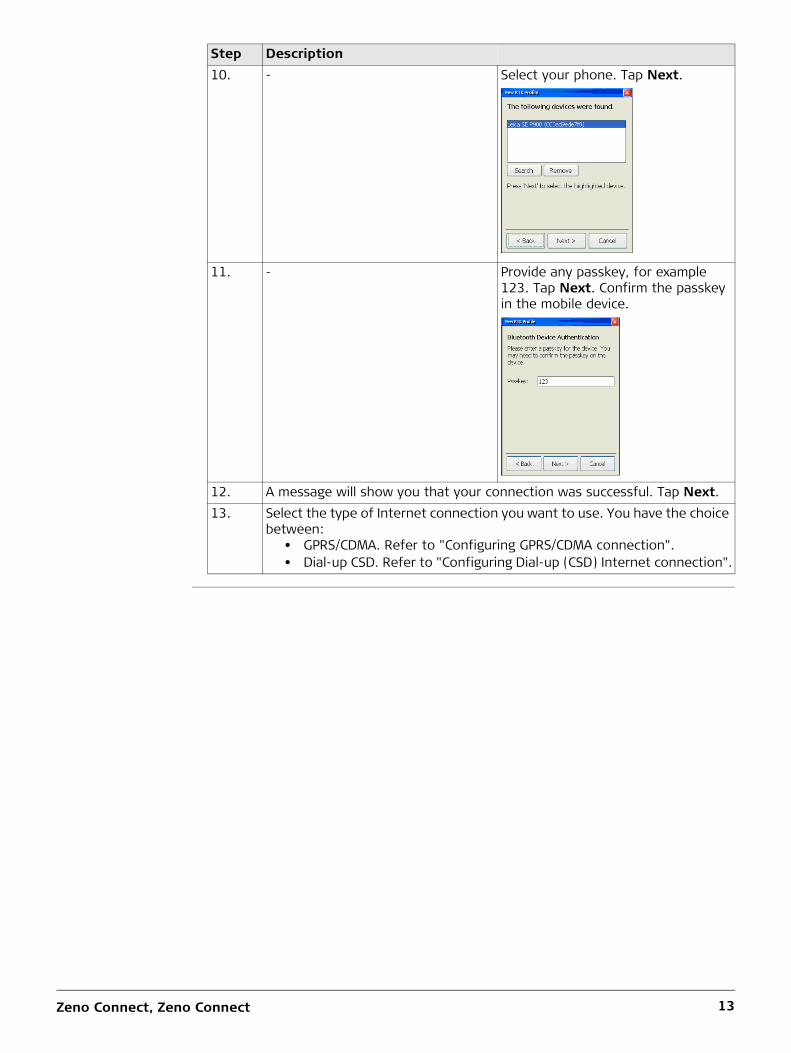
9. - Tap Search to search for a mobile device. All Bluetooth phones found will be listed.
Zeno Connect, Zeno Connect 13
10. - Select your phone. Tap Next.
11. - Provide any passkey, for example 123. Tap Next. Confirm the passkey in the mobile device.
12. A message will show you that your connection was successful. Tap Next.13. Select the type of Internet connection you want to use. You have the choice
between:• GPRS/CDMA. Refer to "Configuring GPRS/CDMA connection".• Dial-up CSD. Refer to "Configuring Dial-up (CSD) Internet connection".
Step Description
Zeno Connect, Zeno Connect 14
Configuring GPRS/CDMA connection
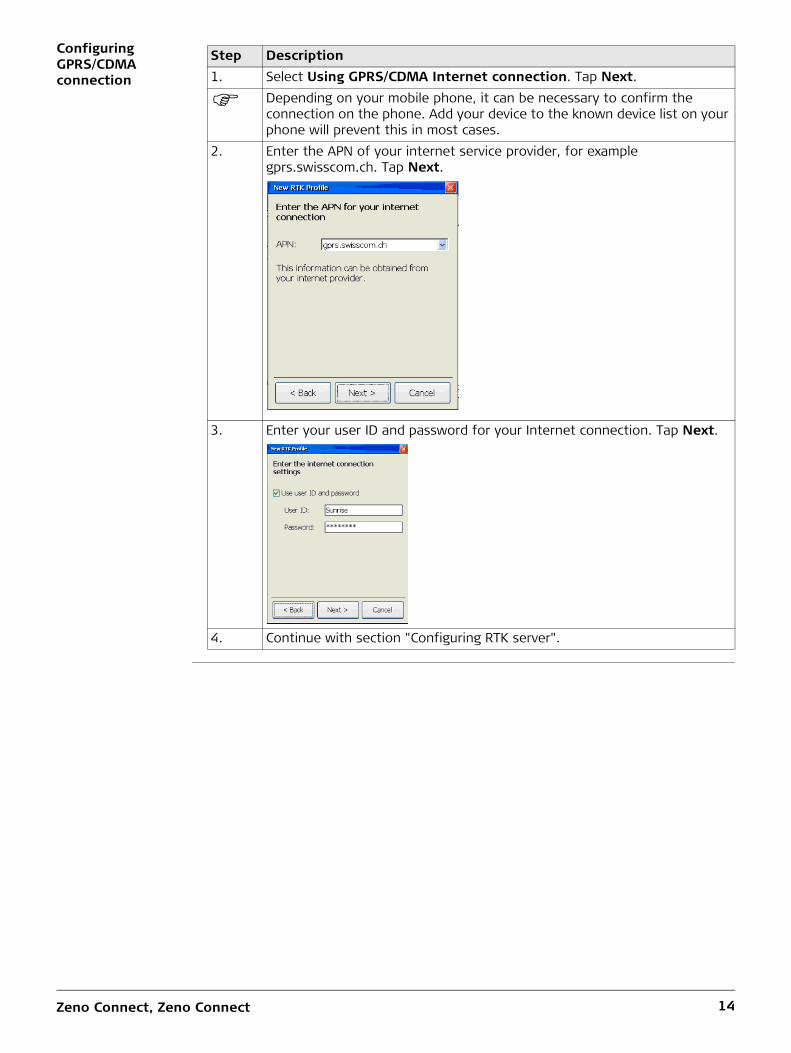
Step Description1. Select Using GPRS/CDMA Internet connection. Tap Next.
Depending on your mobile phone, it can be necessary to confirm the connection on the phone. Add your device to the known device list on your phone will prevent this in most cases.
2. Enter the APN of your internet service provider, for example gprs.swisscom.ch. Tap Next.
3. Enter your user ID and password for your Internet connection. Tap Next.
4. Continue with section "Configuring RTK server".
Zeno Connect, Zeno Connect 15
Configuring Dial-up (CSD) Internet connection
Step Description1. Select Using dial-up (CSD) Internet connection. Tap Next.2. Provide a name to save the dial-up station information for later use. Enter
the Internet provider phone number and the type of protocol used for connection. Tap Next.
3. Enter your user ID and password for your Internet connection. Tap Next.The dial-up station details can be obtained from your RTK service provider.You can also edit or delete an existing dial-up station.
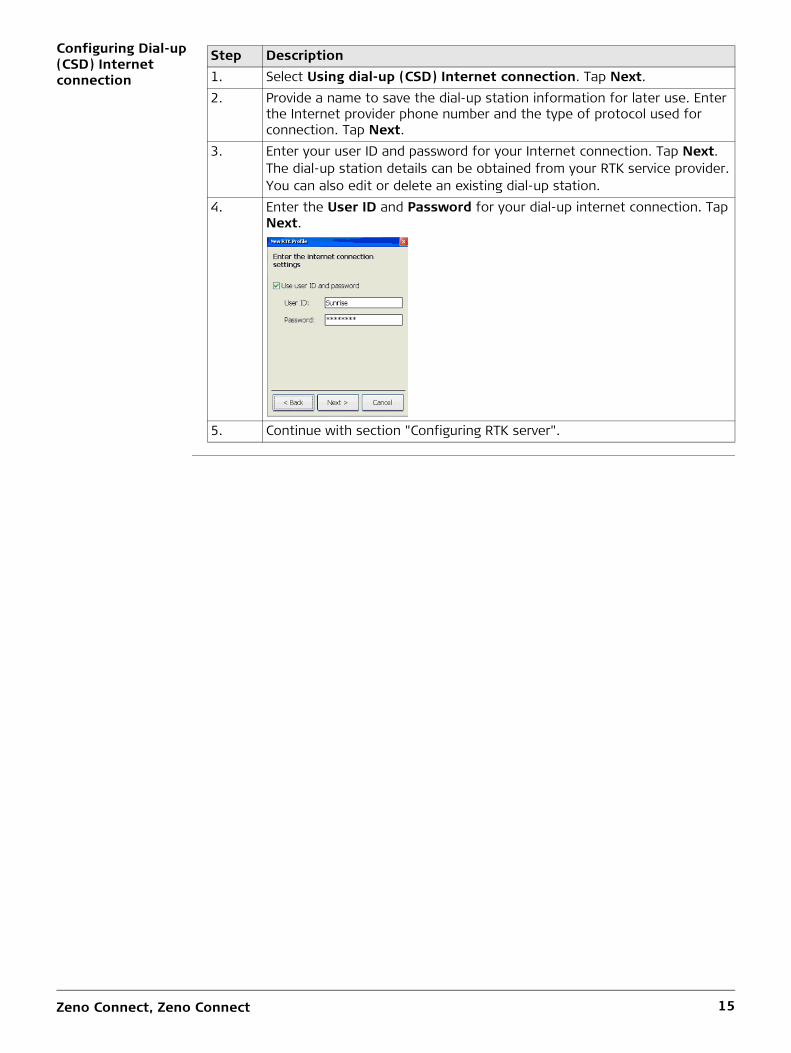
4. Enter the User ID and Password for your dial-up internet connection. Tap Next.
5. Continue with section "Configuring RTK server".
Zeno Connect, Zeno Connect 16
Configuring RTK server
Step Description1. Tap New to create a new server.
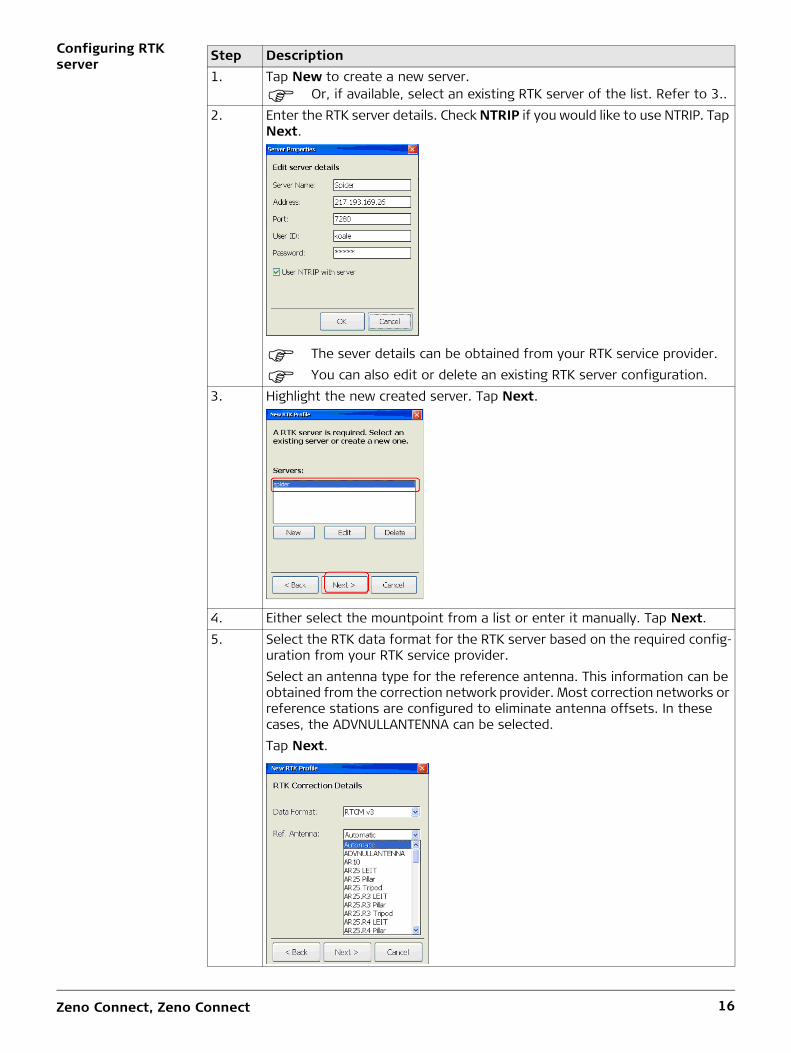
Or, if available, select an existing RTK server of the list. Refer to 3..2. Enter the RTK server details. Check NTRIP if you would like to use NTRIP. Tap
Next.
The sever details can be obtained from your RTK service provider.
You can also edit or delete an existing RTK server configuration.3. Highlight the new created server. Tap Next.
4. Either select the mountpoint from a list or enter it manually. Tap Next.5. Select the RTK data format for the RTK server based on the required config-
uration from your RTK service provider.Select an antenna type for the reference antenna. This information can be obtained from the correction network provider. Most correction networks or reference stations are configured to eliminate antenna offsets. In these cases, the ADVNULLANTENNA can be selected.Tap Next.
Zeno Connect, Zeno Connect 17
1.5.4 Quality Gates
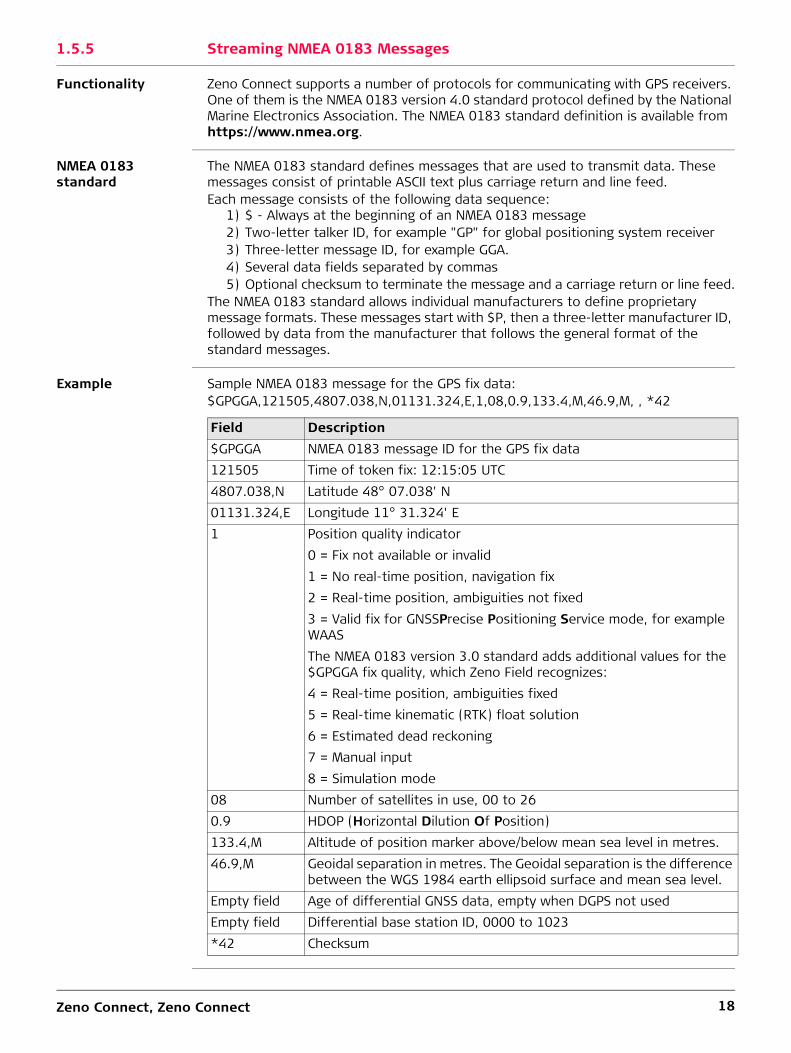
Setting quality gates
The Quality tab allows to define quality limits based on PDOP, HDOP, position accu-racy, height accuracy and solution type. The GGA and GSA NMEA messages streamed indicate exceeded quality gates like following:
• GGA: GPS Quality Indicator = 0. Fix not available or invalid.• GSA: Mode = 1. Fix not available.
Acoustic warnings Acoustic warnings can be defined for following cases:• No Position:
Warning if the GNSS sensor cannot compute a position.• Solution Changed:
Warning as soon as the position status changes either when changing to a less accurate position status or when changing to a more accurate position status.Example: From phase fixed to code or from navigated to code.
• DGPS Solution lost:Warning as soon as the position status changes to a less accurate position status.Example: From phase fixed to code or from code to navigated.
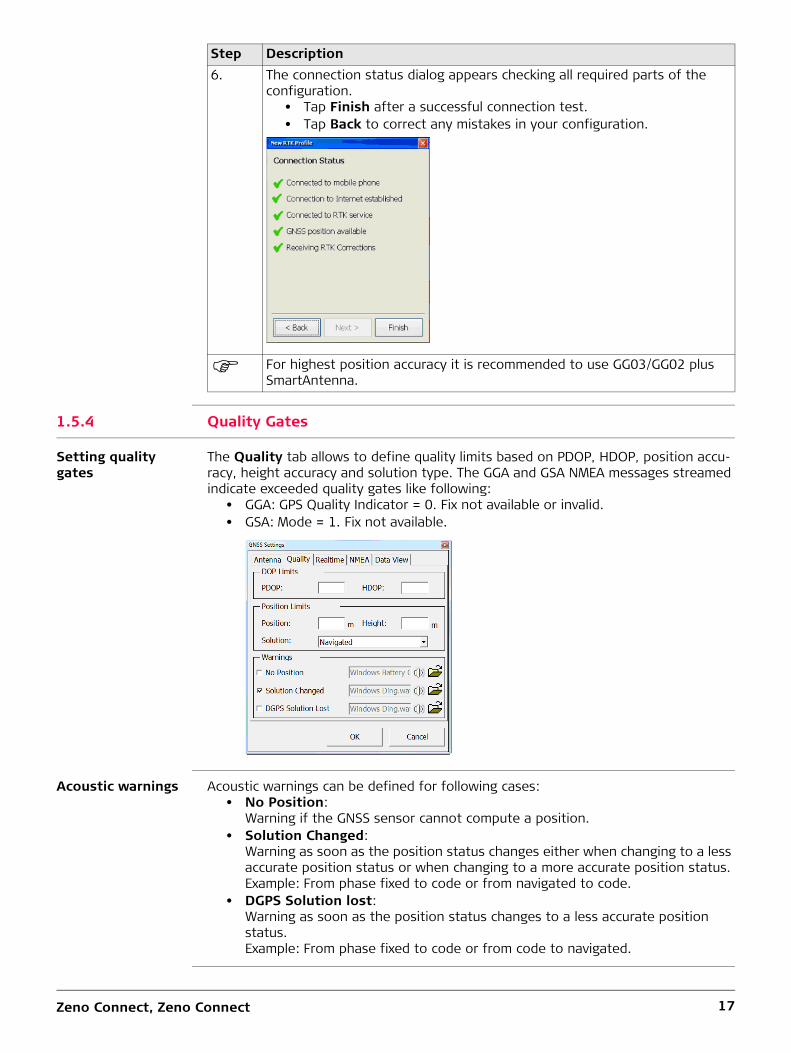
6. The connection status dialog appears checking all required parts of the configuration.
• Tap Finish after a successful connection test.• Tap Back to correct any mistakes in your configuration.
For highest position accuracy it is recommended to use GG03/GG02 plus SmartAntenna.
Step Description
Zeno Connect, Zeno Connect 18
1.5.5 Streaming NMEA 0183 Messages
Functionality Zeno Connect supports a number of protocols for communicating with GPS receivers. One of them is the NMEA 0183 version 4.0 standard protocol defined by the National Marine Electronics Association. The NMEA 0183 standard definition is available from https://www.nmea.org.
NMEA 0183 standard
The NMEA 0183 standard defines messages that are used to transmit data. These messages consist of printable ASCII text plus carriage return and line feed.Each message consists of the following data sequence:
1) $ - Always at the beginning of an NMEA 0183 message2) Two-letter talker ID, for example "GP" for global positioning system receiver3) Three-letter message ID, for example GGA.4) Several data fields separated by commas5) Optional checksum to terminate the message and a carriage return or line feed.
The NMEA 0183 standard allows individual manufacturers to define proprietary message formats. These messages start with $P, then a three-letter manufacturer ID, followed by data from the manufacturer that follows the general format of the standard messages.
Example Sample NMEA 0183 message for the GPS fix data:$GPGGA,121505,4807.038,N,01131.324,E,1,08,0.9,133.4,M,46.9,M, , *42
Field Description$GPGGA NMEA 0183 message ID for the GPS fix data121505 Time of token fix: 12:15:05 UTC4807.038,N Latitude 48° 07.038' N01131.324,E Longitude 11° 31.324' E1 Position quality indicator
0 = Fix not available or invalid1 = No real-time position, navigation fix2 = Real-time position, ambiguities not fixed3 = Valid fix for GNSSPrecise Positioning Service mode, for example WAASThe NMEA 0183 version 3.0 standard adds additional values for the $GPGGA fix quality, which Zeno Field recognizes:4 = Real-time position, ambiguities fixed5 = Real-time kinematic (RTK) float solution6 = Estimated dead reckoning7 = Manual input8 = Simulation mode
08 Number of satellites in use, 00 to 260.9 HDOP (Horizontal Dilution Of Position)133.4,M Altitude of position marker above/below mean sea level in metres.46.9,M Geoidal separation in metres. The Geoidal separation is the difference
between the WGS 1984 earth ellipsoid surface and mean sea level.Empty field Age of differential GNSS data, empty when DGPS not usedEmpty field Differential base station ID, 0000 to 1023*42 Checksum

Zeno Connect, Zeno Connect 19
NMEA messages supported by Zeno Connect
Zeno Connect streams the NMEA 0183 version 2.0 or higher messages listed in the table:
Configuring NMEA output It is recommended to use the LEMO connector module, when streaming NMEA
data to another PC.Recommended cables:
• GEV218: LEMO to USB• GEV162: LEMO-1, 8 pin, 135° / 9 pin, RS232 serial
Message DescriptionGGA Global Positioning System Fix DataGGQ Real-Time Position with CQGLL Geographic Position Latitude/LongitudeGSA GNSS DOP and Active SatellitesGST Pseudo range error statistics (2D + 1D quality)GSV GNSS Satellites in ViewLLQ Leica Local Position and QualityRMC Recommended Minimum Specific GNSS DataVTG Course Over Ground and Ground Speed
Step Description1. Tap Menu > Settings or tap .
2. Change to the NMEA tab.3. Define the interval for NMEA message streaming:
None, 0.2 s, 1 s, 2 s, 5 s or 10 s.
0.2 s is only available for sensors with 5 Hz option.
Use the default settings for best performance.
The required messages depend on the application, which will use the NMEA stream.
You can stream NMEA messages to multiple ports at the same time.4. Activate the desired output port(s) by checking the check box.
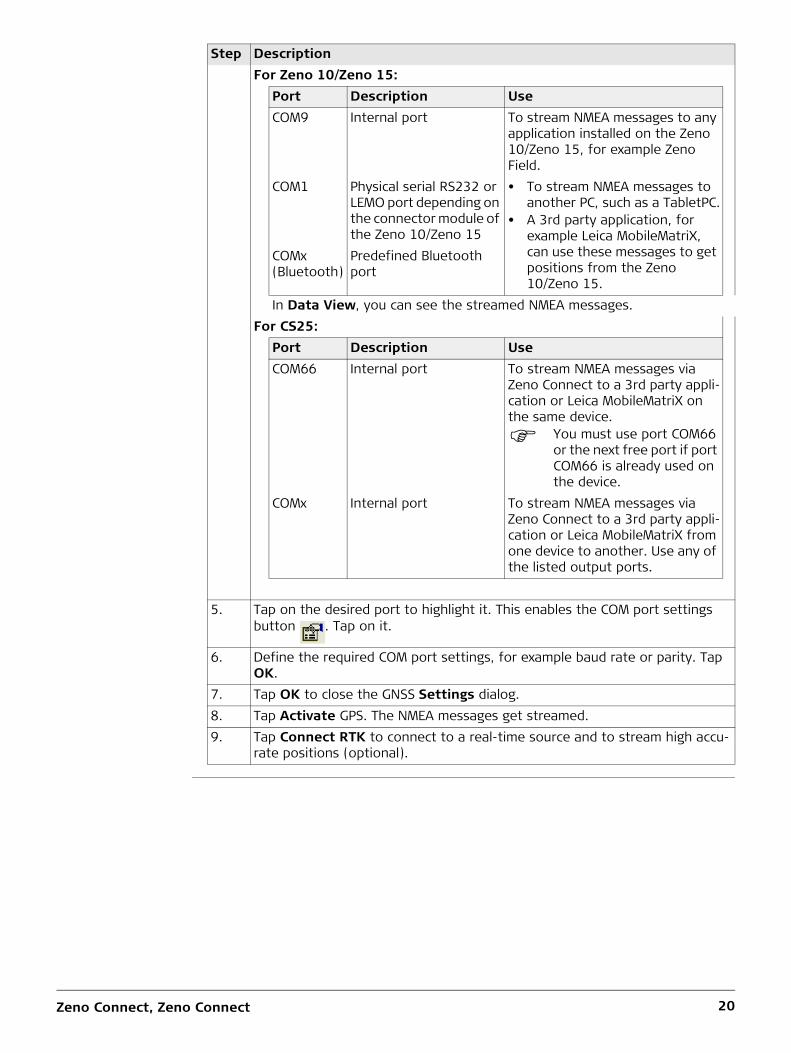
Zeno Connect, Zeno Connect 20
For Zeno 10/Zeno 15:Port Description UseCOM9 Internal port To stream NMEA messages to any
application installed on the Zeno 10/Zeno 15, for example Zeno Field.
COM1 Physical serial RS232 or LEMO port depending on the connector module of the Zeno 10/Zeno 15
• To stream NMEA messages to another PC, such as a TabletPC.
• A 3rd party application, for example Leica MobileMatriX, can use these messages to get positions from the Zeno 10/Zeno 15.
COMx (Bluetooth)
Predefined Bluetooth port
In Data View, you can see the streamed NMEA messages.For CS25:
Port Description UseCOM66 Internal port To stream NMEA messages via
Zeno Connect to a 3rd party appli-cation or Leica MobileMatriX on the same device.
You must use port COM66 or the next free port if port COM66 is already used on the device.
COMx Internal port To stream NMEA messages via Zeno Connect to a 3rd party appli-cation or Leica MobileMatriX from one device to another. Use any of the listed output ports.
5. Tap on the desired port to highlight it. This enables the COM port settings button . Tap on it.
6. Define the required COM port settings, for example baud rate or parity. Tap OK.
7. Tap OK to close the GNSS Settings dialog.8. Tap Activate GPS. The NMEA messages get streamed.9. Tap Connect RTK to connect to a real-time source and to stream high accu-
rate positions (optional).
Step Description
Zeno Connect, Zeno Connect 21
1.5.6 Use Case: Stream NMEA Messages via Bluetooth to External Devices (Zeno 10/Zeno 15 Installation Only)
Streaming NMEA messages via Bluetooth
Step Description1. The Bluetooth Manager in Zeno Tools includes a pre-configured serial port to
stream data. This is COM0.
To review the port settings, tap in the Bluetooth Manager. Open the serial port properties.
2. Configure the Zeno for NMEA output. Refer to "1.5.5 Streaming NMEA 0183 Messages".
3. Now you are able to connect from your external device, for example a Tablet PC or PC, to this NMEA stream coming from the Zeno.
The following steps can vary depending on the used Bluetooth stack. Refer to the Bluetooth stack user guide for details.
4. Search for Bluetooth devices in range. The Zeno will be found and the device name is shown, for example CS10 and the serial number.
5. Pair the two devices using the passkey ‘0000’. You have to confirm the passkey on the Zeno.
6. Search for the available services.7. Connect to the serial Bluetooth port.8. A COM port will be shown to which your device has connected to the Zeno.9. Now you can connect to this COM port from any application. You can use the
Zeno, for example:• as a GNSS sensor to work in Leica MobileMatriX• to connect to the port in a terminal program to view the incoming
NMEA messages.
Zeno Connect, Zeno Connect 22
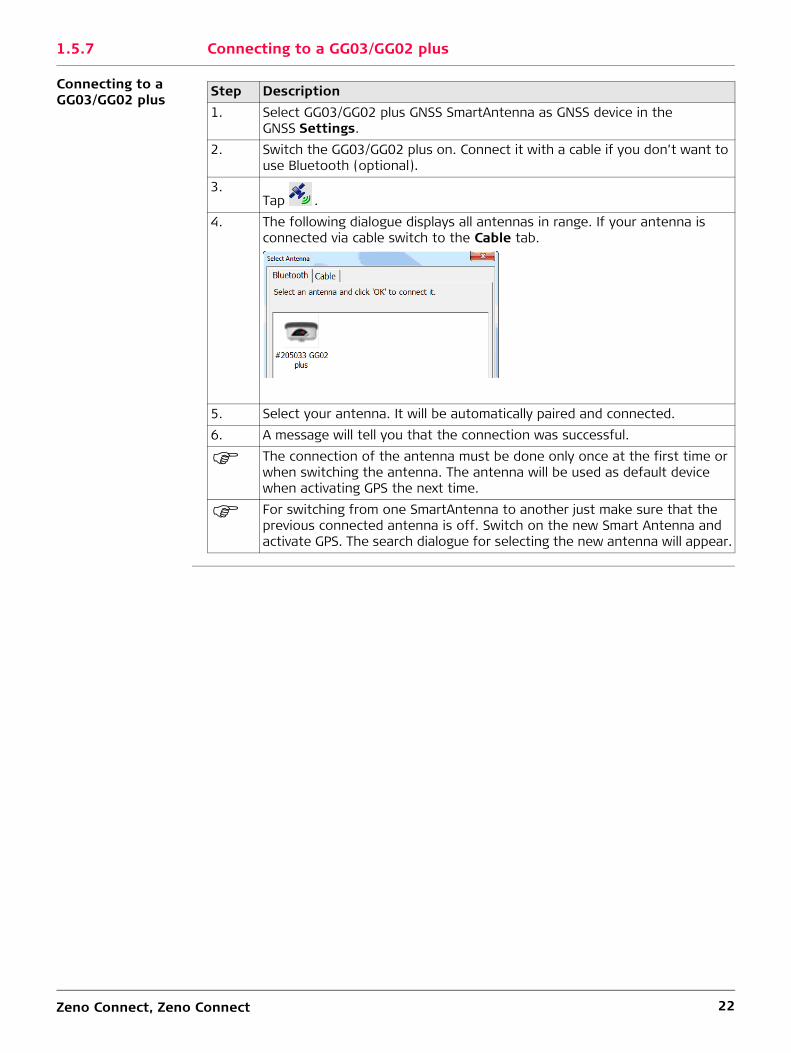
1.5.7 Connecting to a GG03/GG02 plus
Connecting to a GG03/GG02 plus
Step Description1. Select GG03/GG02 plus GNSS SmartAntenna as GNSS device in the
GNSS Settings.2. Switch the GG03/GG02 plus on. Connect it with a cable if you don’t want to
use Bluetooth (optional).3.
Tap .4. The following dialogue displays all antennas in range. If your antenna is
connected via cable switch to the Cable tab.
5. Select your antenna. It will be automatically paired and connected.6. A message will tell you that the connection was successful.
The connection of the antenna must be done only once at the first time or when switching the antenna. The antenna will be used as default device when activating GPS the next time.
For switching from one SmartAntenna to another just make sure that the previous connected antenna is off. Switch on the new Smart Antenna and activate GPS. The search dialogue for selecting the new antenna will appear.

Zeno Connect, Zeno Tools 23
2 Zeno Tools2.1 Introduction
Functionality of Zeno Tools
Zeno Tools consists of apps to configure: • Zeno 5• Zeno 10/Zeno 15• CS25• CS25 GNSS• GG02 plus• GG03
Depending on the hardware on which Zeno Tools is installed, the following apps can be used:
Installation onZeno 5 • Licence ManagerZeno 10/Zeno 15 • Bluetooth Manager to connect external Bluetooth devices
such as laser rangefinder• Change the System Settings
Example: Font size• Add new licence keys
Example: New maintenance key or a Glonass key for the GS05/GS06
• Uploading a new firmware for the GS05/GS06 capsCS25 • Upload a new firmware on a GG03/GG02 plus
• Upload upgrade keys on a GG03/GG02 plus or CS25 GNSS
Zeno Connect, Zeno Tools 24
2.2 Zeno Tools on Zeno 10/Zeno 152.2.1 Using the System Settings Manager
Functionality In the System Settings Manager, you can• Change the font sizes• Reset the GS05/GS06 cap to factory defaults. The reset deletes the almanac and
re-initializes the cap.• Define the USB speed
Changing the system font size
Use this tool to set the system font size for the Zeno handheld device. The available font sizes are small, medium, large, and Zeno optimized fonts.
Using larger font sizes will also resize dialog boxes. Some dialogs will not be fully visible anymore.
Changing USB settings
The USB speed can be changed from USB Full Speed to the faster USB High Speed setting. The setting is required, because some computers do not support USB High Speed.
Resetting GS05/GS06 GNSS cap
The reset function for the GS05/GS06 resets to the factory default. This means that, for example, the almanac gets deleted. A reset can be helpful for faster position acqui-sition after the Zeno device was moved a long distance.
Step Description1. Start System Settings Manager on your Zeno 10/Zeno 10:
Tap Start > Programs > Zeno Tools > System Settings Manager.2. Select the preferred text size.3. Tap OK. A dialog box will ask you to restart the system. Tap Yes and the
system will restart with the new text size settings.
Step Description1. Start System Settings Manager on the Zeno 10/Zeno 15:
Tap Start > Programs > Zeno Tools > System Settings Manager.2. Change to the USB Settings tab.3. Select the preferred USB speed.4. Tap OK. A dialog box will ask you to restart the system. Tap Yes and the
system will restart with the new USB speed setting.
Step Description1. Start System Settings Manager on your Zeno 10/Zeno 15:
Tap Start > Programs > Zeno Tools > System Settings Manager.2. Change to the Reset tab.3. Tap Reset.4. Tap OK to close the System Settings Manager.

Zeno Connect, Zeno Tools 25
2.2.2 Using the GS05/GS06 Firmware Loader
Functionality Use Firmware Loader to upload new firmware to the GS05/GS06.
Always ensure that you have enough battery power during the firmware upload.
To upload a new firmware, a valid CCP key may be required. Prior to browsing and uploading, the new firmware needs to be copied onto the Zeno.
Loading firmware
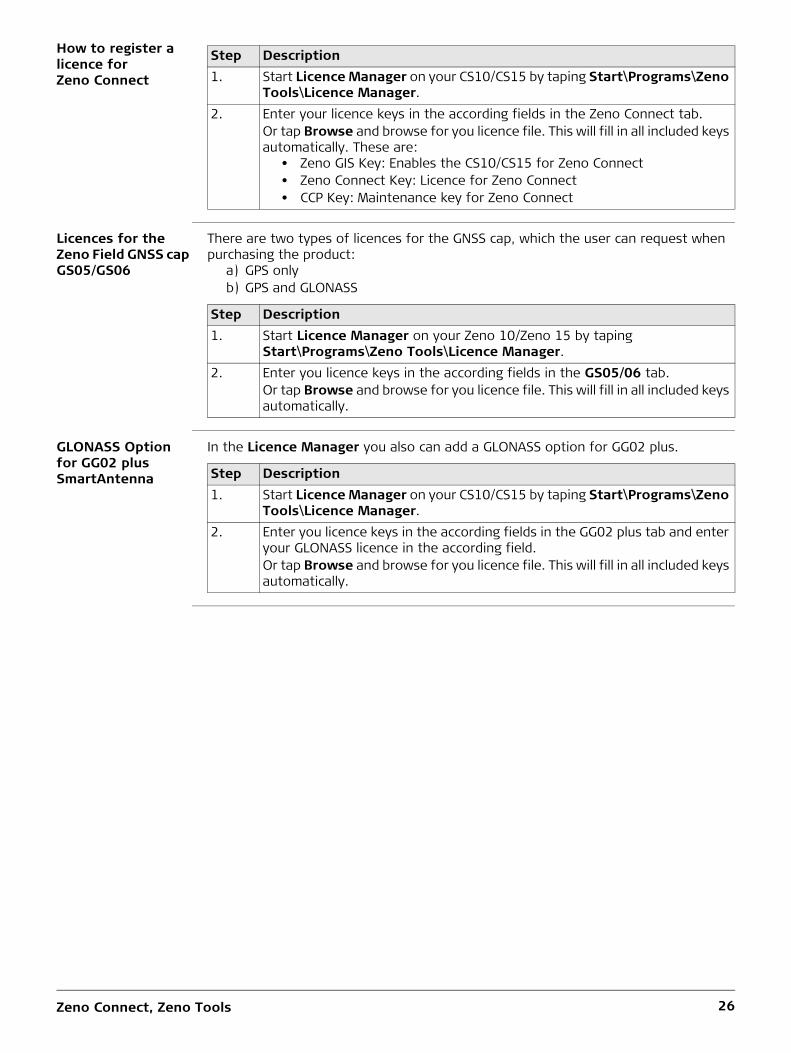
2.2.3 Using the Licence Manager
Licencing Zeno Field/Zeno Connect
For using Zeno Field and Zeno Connect, a valid licence is required.In the Licence Manager, you can register licences for:
• Zeno Field: Zeno Field licence, Zeno GIS key, CCP keys• Zeno Connect: Zeno Connect licence, Zeno GIS key, CCP keys• GS05/GS06: Add GPS and GLONASS licences to GS05/GS06• GG02 plus: GLONASS option
All Zeno devices are shipped with pre-installed licence keys. Additionally, you receive the keys in printed form. In some cases it is necessary to register new licence keys, for example if the key for a CCP licence has expired.
How to register a licence for Zeno Field
Step Description1. Download the most recent GS05/GS06 firmware file from
https://myworld.leica-geosystems.com.2. Copy the GS05/GS06 firmware file into a folder on the Zeno 10/Zeno 15, SD
card, Leica Compact Flash card or USB stick via ActiveSync or mobile Device Center, USB memory stick or SD Card.
3. Start GS05/GS06 Firmware Loader on the Zeno 10/Zeno 15:Tap Start > Programs > Zeno Tools > GS05/GS06 Firmware Loader.
4. Tap the folder icon on the load firmware dialog.5. Browse to the directory of the GS05/GS06 firmware file.6. Select the GS05/GS06 firmware file and start the upload.
Step Description1. Start Licence Manager on your CS10/CS15 by taping Start\Programs\Zeno
Tools\Licence Manager.2. Enter your licence keys in the according fields in the Zeno Field tab.
Or tap Browse and browse for you licence file. This will fill in all included keys automatically. These are:
• Zeno GIS Key: Enables the CS10/CS15 for Zeno Field• Zeno Field Key: Licence for Zeno Field• CCP Key: Maintenance key for Zeno Field
Zeno Connect, Zeno Tools 26
How to register a licence for Zeno Connect
Licences for the Zeno Field GNSS cap GS05/GS06
There are two types of licences for the GNSS cap, which the user can request when purchasing the product:
a) GPS onlyb) GPS and GLONASS
GLONASS Option for GG02 plus SmartAntenna
In the Licence Manager you also can add a GLONASS option for GG02 plus.
Step Description1. Start Licence Manager on your CS10/CS15 by taping Start\Programs\Zeno
Tools\Licence Manager.2. Enter your licence keys in the according fields in the Zeno Connect tab.
Or tap Browse and browse for you licence file. This will fill in all included keys automatically. These are:
• Zeno GIS Key: Enables the CS10/CS15 for Zeno Connect• Zeno Connect Key: Licence for Zeno Connect• CCP Key: Maintenance key for Zeno Connect
Step Description1. Start Licence Manager on your Zeno 10/Zeno 15 by taping
Start\Programs\Zeno Tools\Licence Manager.2. Enter you licence keys in the according fields in the GS05/06 tab.
Or tap Browse and browse for you licence file. This will fill in all included keys automatically.
Step Description1. Start Licence Manager on your CS10/CS15 by taping Start\Programs\Zeno
Tools\Licence Manager.2. Enter you licence keys in the according fields in the GG02 plus tab and enter
your GLONASS licence in the according field.Or tap Browse and browse for you licence file. This will fill in all included keys automatically.
Zeno Connect, Zeno Tools 27
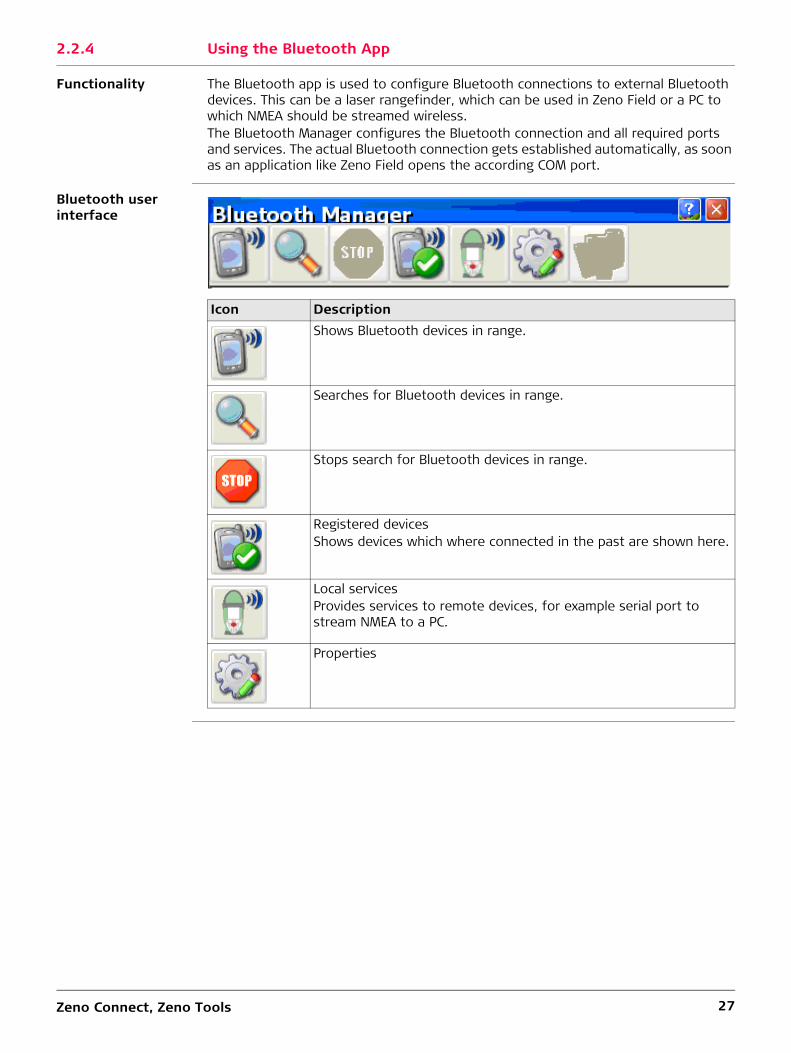
2.2.4 Using the Bluetooth App
Functionality The Bluetooth app is used to configure Bluetooth connections to external Bluetooth devices. This can be a laser rangefinder, which can be used in Zeno Field or a PC to which NMEA should be streamed wireless.The Bluetooth Manager configures the Bluetooth connection and all required ports and services. The actual Bluetooth connection gets established automatically, as soon as an application like Zeno Field opens the according COM port.
Bluetooth user interface
Icon DescriptionShows Bluetooth devices in range.
Searches for Bluetooth devices in range.
Stops search for Bluetooth devices in range.
Registered devicesShows devices which where connected in the past are shown here.
Local servicesProvides services to remote devices, for example serial port to stream NMEA to a PC.
Properties
Zeno Connect, Zeno Tools 28
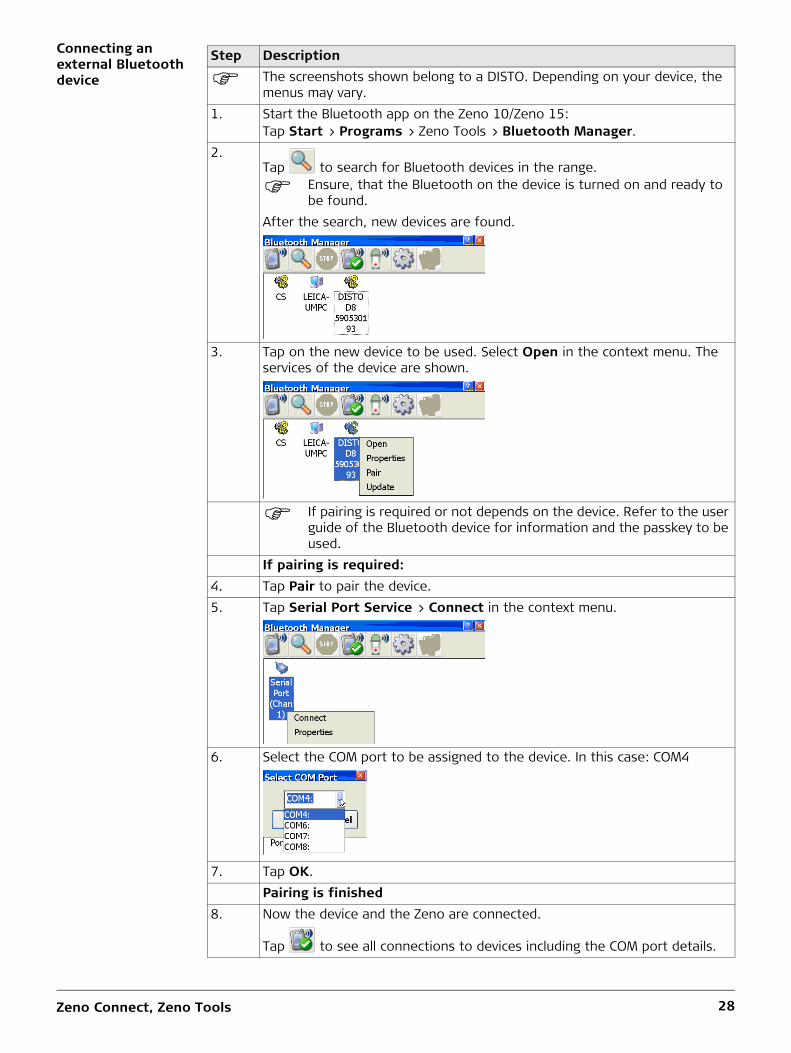
Connecting an external Bluetooth device
Step Description
The screenshots shown belong to a DISTO. Depending on your device, the menus may vary.
1. Start the Bluetooth app on the Zeno 10/Zeno 15:Tap Start > Programs > Zeno Tools > Bluetooth Manager.
2.Tap to search for Bluetooth devices in the range.
Ensure, that the Bluetooth on the device is turned on and ready to be found.
After the search, new devices are found.
3. Tap on the new device to be used. Select Open in the context menu. The services of the device are shown.
If pairing is required or not depends on the device. Refer to the user guide of the Bluetooth device for information and the passkey to be used.
If pairing is required:4. Tap Pair to pair the device.5. Tap Serial Port Service > Connect in the context menu.
6. Select the COM port to be assigned to the device. In this case: COM4
7. Tap OK.Pairing is finished
8. Now the device and the Zeno are connected.
Tap to see all connections to devices including the COM port details.
Zeno Connect, Zeno Tools 29
Using a Leica DISTO via Bluetooth
A Bluetooth enabled Leica DISTO can connected to a Zeno with the Leica DISTO Transfer PPC software. You can download Leica DISTO Transfer PPC from myWorld@Leica Geosystems (https://myworld.leica-geosystems.com).The DISTO Transfer PPC software can be used to transfer values to Zeno Field or any other application.
Installing Leica DISTO Transfer PPC software on the Zeno
Connecting a DISTO the first time to DISTO Transfer PPC
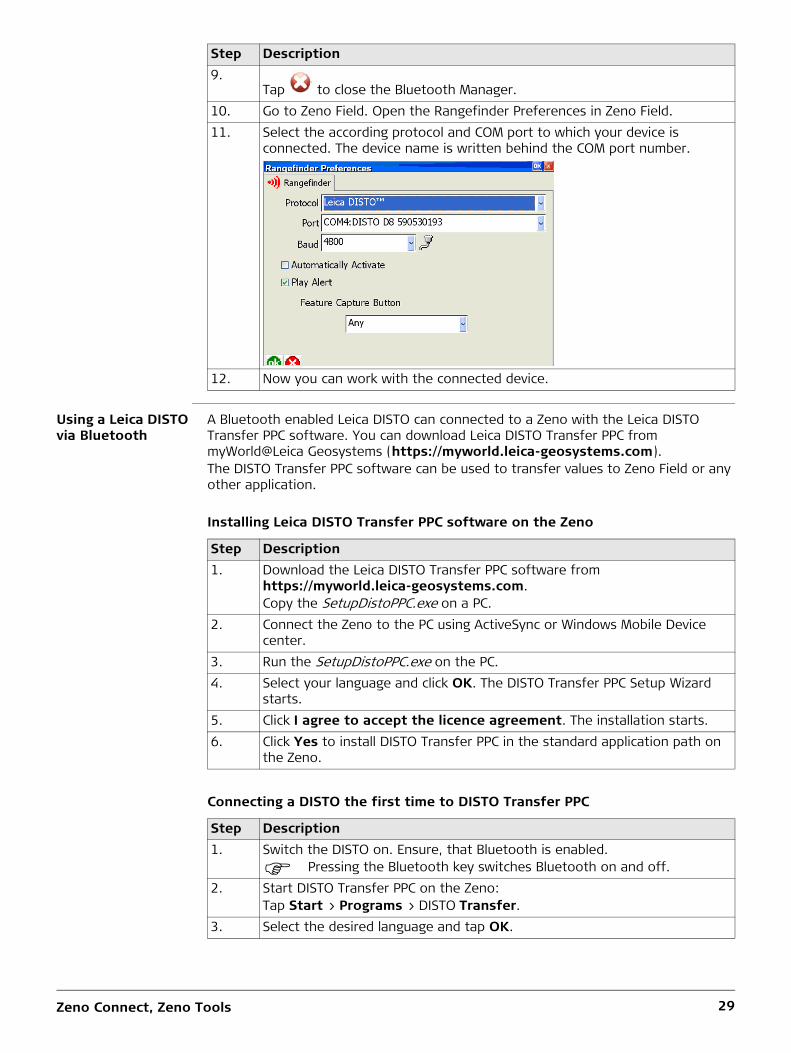
9.Tap to close the Bluetooth Manager.
10. Go to Zeno Field. Open the Rangefinder Preferences in Zeno Field.11. Select the according protocol and COM port to which your device is
connected. The device name is written behind the COM port number.
12. Now you can work with the connected device.
Step Description
Step Description1. Download the Leica DISTO Transfer PPC software from
https://myworld.leica-geosystems.com.Copy the SetupDistoPPC.exe on a PC.
2. Connect the Zeno to the PC using ActiveSync or Windows Mobile Device center.
3. Run the SetupDistoPPC.exe on the PC.4. Select your language and click OK. The DISTO Transfer PPC Setup Wizard
starts.5. Click I agree to accept the licence agreement. The installation starts.6. Click Yes to install DISTO Transfer PPC in the standard application path on
the Zeno.
Step Description1. Switch the DISTO on. Ensure, that Bluetooth is enabled.
Pressing the Bluetooth key switches Bluetooth on and off.2. Start DISTO Transfer PPC on the Zeno:
Tap Start > Programs > DISTO Transfer.3. Select the desired language and tap OK.

Zeno Connect, Zeno Tools 30
Using DISTO Transfer PPC to transfer values to Zeno Field
2.3 Zeno Tools on CS25
Uploading firmware for GG03/GG02 plus
With Zeno Tools installed on the CS25 you are able to upload new firmware to the GG03/GG02 plus.
4. A dialog appears showing all active DISTOs in range.Select your DISTO and tap OK.
The next time, DISTO Transfer PPC will connect to your DISTO automatically.
Step Description1. Switch the DISTO on. Ensure, that Bluetooth is enabled.
Pressing the Bluetooth key switches Bluetooth on and off.2. Start DISTO Transfer PPC on the Zeno:
Tap Start > Programs > DISTO Transfer.3. DISTO Transfer PPC starts and connects to your DISTO automatically.4. It is recommended to use following settings:
5. Click into the field into which the DISTO measurement should be entered.
You can send a measured value to any editable field of any applica-tion. In Zeno Field this can be either the distance field in the offset point dialog, or an attribute field, for example the depth of a manhole.
6. Take a distance measurement with the DISTO.7. Press the Bluetooth key on the DISTO to transfer the value to the selected
edit field.
Step Description
Step Description1. Connect GG03/GG02 plus to your PC by using Bluetooth or the GEV162 cable.2. Start the Firmware Loader Tool on your CS25 by taping Start > All Programs
> Leica Geosystems > Leica Zeno Tools > Firmware Loader GG0X.3. Switch on the GG03/GG02 plus.4. Click the COM Port drop-down arrow to select the serial port on the CS25
which is connected with the GG03/GG02 plus. The Bluetooth COM port number can be found on the Hardware tab of the Bluetooth Device Prop-erties.
5. Browse for the new firmware. 6. Check that the version number of the new firmware is higher than the
current version.7. Click Upload to start the firmware update.8. Click Close when the upload is done.
Zeno Connect, Zeno Tools 31
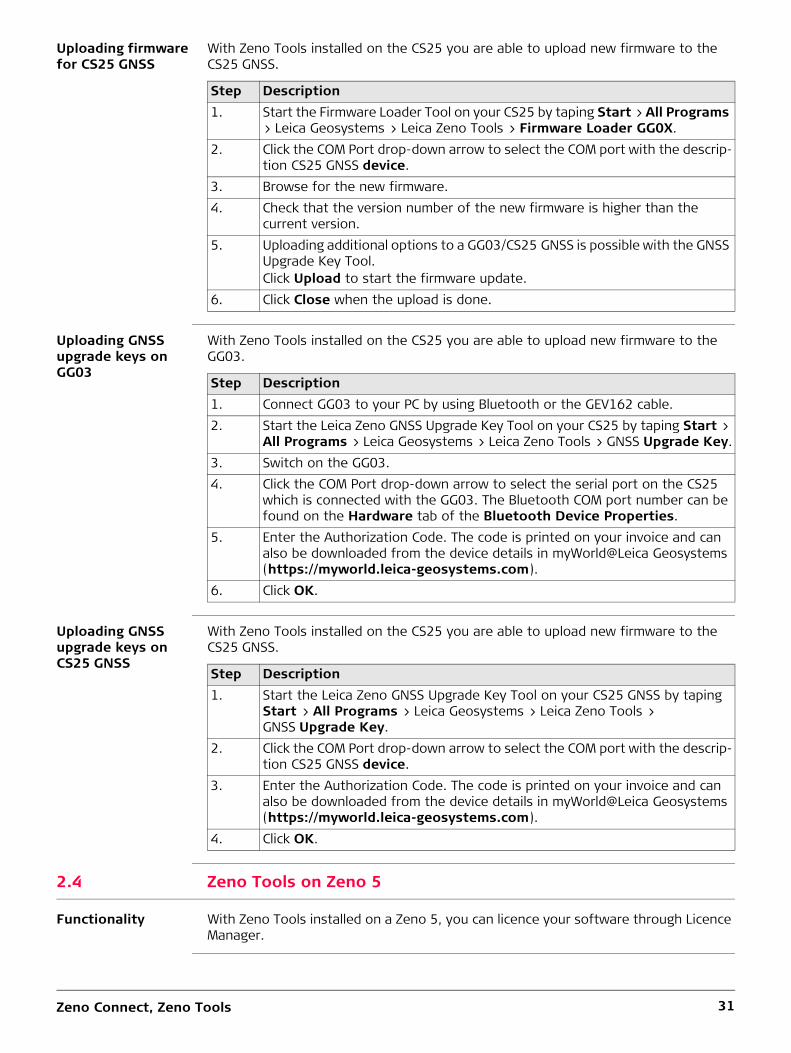
Uploading firmware for CS25 GNSS
With Zeno Tools installed on the CS25 you are able to upload new firmware to the CS25 GNSS.
Uploading GNSS upgrade keys on GG03
With Zeno Tools installed on the CS25 you are able to upload new firmware to the GG03.
Uploading GNSS upgrade keys on CS25 GNSS
With Zeno Tools installed on the CS25 you are able to upload new firmware to the CS25 GNSS.
2.4 Zeno Tools on Zeno 5
Functionality With Zeno Tools installed on a Zeno 5, you can licence your software through Licence Manager.
Step Description1. Start the Firmware Loader Tool on your CS25 by taping Start > All Programs
> Leica Geosystems > Leica Zeno Tools > Firmware Loader GG0X.2. Click the COM Port drop-down arrow to select the COM port with the descrip-
tion CS25 GNSS device.3. Browse for the new firmware.4. Check that the version number of the new firmware is higher than the
current version.5. Uploading additional options to a GG03/CS25 GNSS is possible with the GNSS
Upgrade Key Tool.Click Upload to start the firmware update.
6. Click Close when the upload is done.
Step Description1. Connect GG03 to your PC by using Bluetooth or the GEV162 cable.2. Start the Leica Zeno GNSS Upgrade Key Tool on your CS25 by taping Start >
All Programs > Leica Geosystems > Leica Zeno Tools > GNSS Upgrade Key.3. Switch on the GG03.4. Click the COM Port drop-down arrow to select the serial port on the CS25
which is connected with the GG03. The Bluetooth COM port number can be found on the Hardware tab of the Bluetooth Device Properties.
5. Enter the Authorization Code. The code is printed on your invoice and can also be downloaded from the device details in myWorld@Leica Geosystems (https://myworld.leica-geosystems.com).
6. Click OK.
Step Description1. Start the Leica Zeno GNSS Upgrade Key Tool on your CS25 GNSS by taping
Start > All Programs > Leica Geosystems > Leica Zeno Tools > GNSS Upgrade Key.
2. Click the COM Port drop-down arrow to select the COM port with the descrip-tion CS25 GNSS device.
3. Enter the Authorization Code. The code is printed on your invoice and can also be downloaded from the device details in myWorld@Leica Geosystems (https://myworld.leica-geosystems.com).
4. Click OK.
Leica Geosystems AGHeinrich-Wild-StrasseCH-9435 HeerbruggSwitzerlandPhone +41 71 727 31 31www.leica-geosystems.com
812975-1.0.0enOriginal text Printed in Switzerland© 2014 Leica Geosystems AG, Heerbrugg, Switzerland