lesson 2: basic map symbols - reenactor pro€¦ · lesson 2: basic map symbols . references: fm...
TRANSCRIPT

Lesson 2: Basic map symbols References: FM 21-25; FM 21-30 As we saw in Lesson 1, a map is a symbolic representation of an piece of ground. Before was can make much use of symbols, we need to learn what they stand for on the ground. 1. Man made structures Below are the standard symbols for (l-r): buildings; school; church; cemetery.
We also make movement easier by constructing roads. The rod symbols on the left (top to bottom) represent: primary highway; secondary highway; other surfaced roads (for example, gravel); dirt road. The single dashed lines on the right represent (top) dirt trail, and (bottom) foot path.
Railway tracks are shown in a special way. If there is a single track (which means trains can only move one direction in the same line) or a double track (two way traffic) the symbol is self-explanatory: There will be slight variances in symbols from one nation to another, but they will be minor and usually obvious.
PRO TIPS: Map Reading

Roads are generally constructed along the straightest possible lines. Sometimes the terrain refuses to cooperate, and roads curve around obstacles. Sometimes, however, the engineers will have to change the ground by making road cuts and fills. Here is an example from a WWII-era military map: 2. Woods and vegetation To appreciate the nature of a battlefield, we need to know some things about woods, fields, and other vegetation. These features affect movement (tanks don't always fit between trees!), cover and concealment, and observation and fields of fire. You need to know not only what is growing there, but just what is growing.

On modern US topo maps, woods are generally depicted in solid light green. Maps from Europe (which US troops in Europe generally use) take vegetation symbols to another level. To understand why this is important, remember that Europe is much smaller in land area than the continental US, and land management is essential there because there is less of it. Woods are particularly important, particularly in western Europe. Woods are a resource, and and usually managed much more extensively that woods over here. In Germany and other places, for example, a forest is a public resource. Forest areas are managed—in Germany by the Forstmeister—who removes second growth, drags away dead wood, and maintains a sort of parklike condition. Since forests are managed, they generally have one kind of tree—hardwood (loses leaves in the winter) or softwood (evergreen). Many European map[s use symbols to indicate what kind of forest they are. In this example, the circles in the green areas indicate that this is a managed hardwood forst. In a softwood forest (pine, spruce, etc.) the round symbol is replaced with small conical symbols evocative of a Christmas tree. Special vegetation that may affect operations might include: (l-r) orchard; grassland; tropical tall grass/nipa; jungle growth.
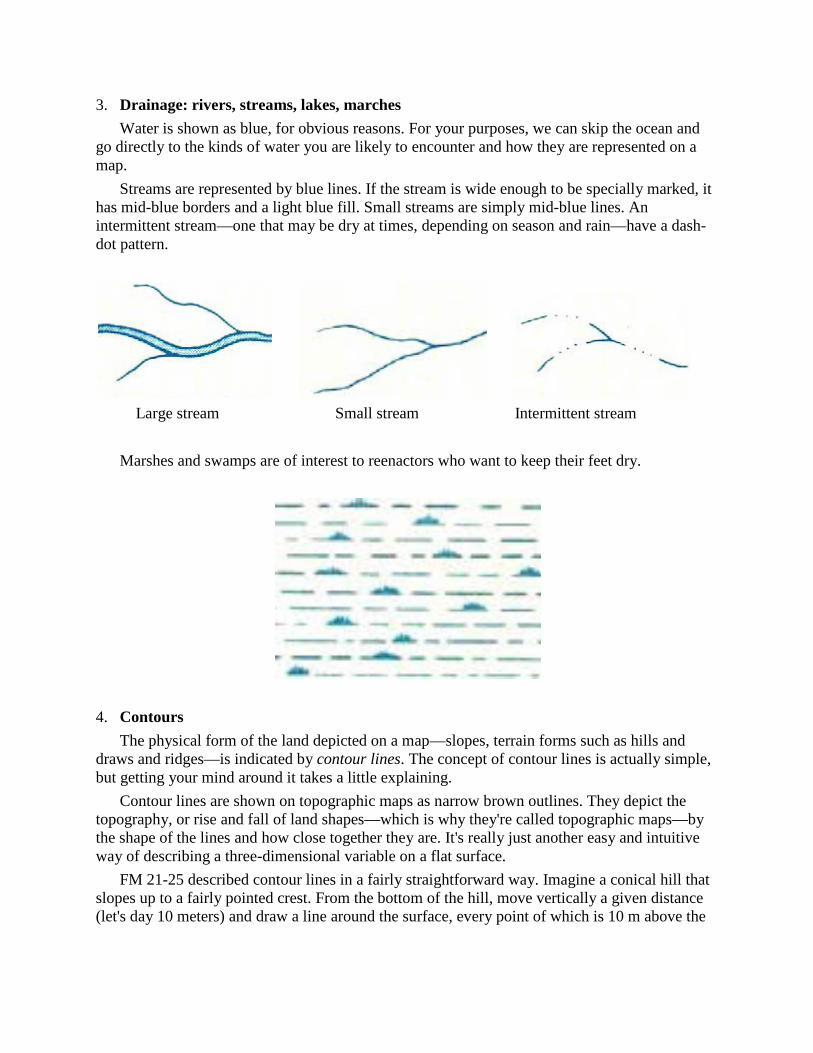
3. Drainage: rivers, streams, lakes, marches Water is shown as blue, for obvious reasons. For your purposes, we can skip the ocean and go directly to the kinds of water you are likely to encounter and how they are represented on a map. Streams are represented by blue lines. If the stream is wide enough to be specially marked, it has mid-blue borders and a light blue fill. Small streams are simply mid-blue lines. An intermittent stream—one that may be dry at times, depending on season and rain—have a dash-dot pattern.
Large stream Small stream Intermittent stream Marshes and swamps are of interest to reenactors who want to keep their feet dry.
4. Contours The physical form of the land depicted on a map—slopes, terrain forms such as hills and draws and ridges—is indicated by contour lines. The concept of contour lines is actually simple, but getting your mind around it takes a little explaining. Contour lines are shown on topographic maps as narrow brown outlines. They depict the topography, or rise and fall of land shapes—which is why they're called topographic maps—by the shape of the lines and how close together they are. It's really just another easy and intuitive way of describing a three-dimensional variable on a flat surface. FM 21-25 described contour lines in a fairly straightforward way. Imagine a conical hill that slopes up to a fairly pointed crest. From the bottom of the hill, move vertically a given distance (let's day 10 meters) and draw a line around the surface, every point of which is 10 m above the

bottom. Then go up another 10 meters and draw a new line. Keep doing this until you reach the top of the hill:
Viewed from directly above, the resulting contour lines describe the shape and slope of the hill. We create a topographic map by surveying the ground from sea level (zero) and up for uniform vertical distances, covering a large patch of ground. Here is an example:
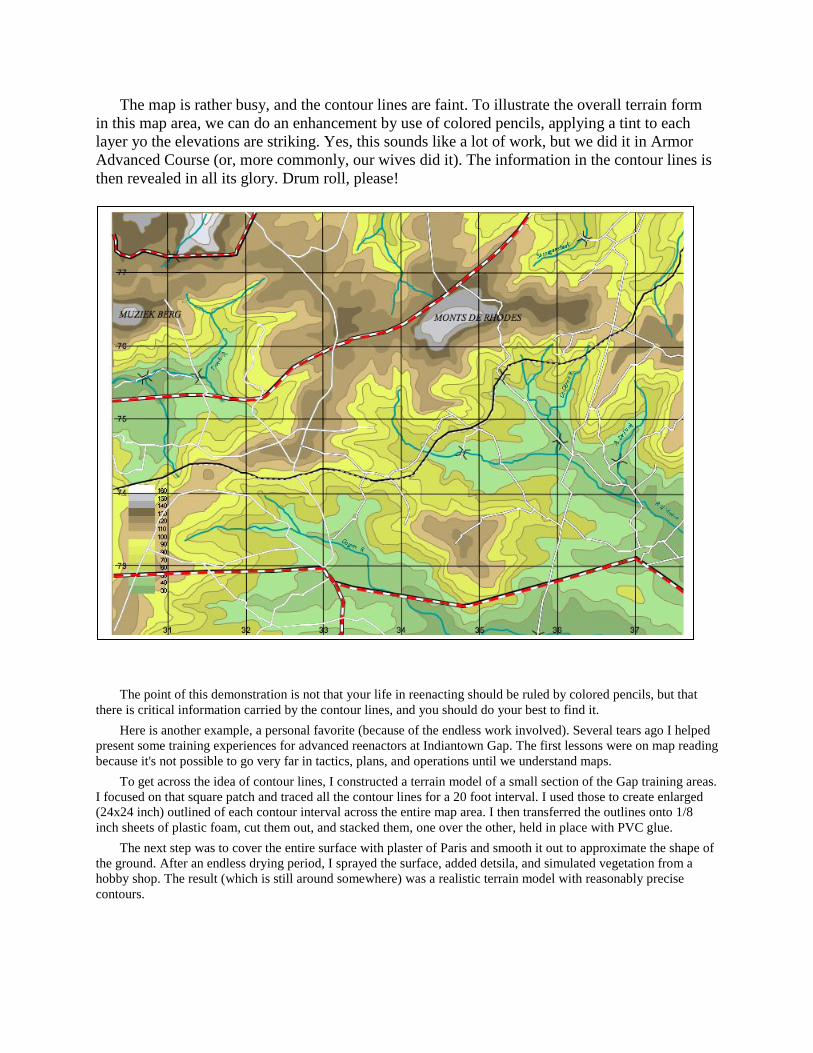
The map is rather busy, and the contour lines are faint. To illustrate the overall terrain form in this map area, we can do an enhancement by use of colored pencils, applying a tint to each layer yo the elevations are striking. Yes, this sounds like a lot of work, but we did it in Armor Advanced Course (or, more commonly, our wives did it). The information in the contour lines is then revealed in all its glory. Drum roll, please! The point of this demonstration is not that your life in reenacting should be ruled by colored pencils, but that there is critical information carried by the contour lines, and you should do your best to find it. Here is another example, a personal favorite (because of the endless work involved). Several tears ago I helped present some training experiences for advanced reenactors at Indiantown Gap. The first lessons were on map reading because it's not possible to go very far in tactics, plans, and operations until we understand maps. To get across the idea of contour lines, I constructed a terrain model of a small section of the Gap training areas. I focused on that square patch and traced all the contour lines for a 20 foot interval. I used those to create enlarged (24x24 inch) outlined of each contour interval across the entire map area. I then transferred the outlines onto 1/8 inch sheets of plastic foam, cut them out, and stacked them, one over the other, held in place with PVC glue. The next step was to cover the entire surface with plaster of Paris and smooth it out to approximate the shape of the ground. After an endless drying period, I sprayed the surface, added detsila, and simulated vegetation from a hobby shop. The result (which is still around somewhere) was a realistic terrain model with reasonably precise contours.

a. Section of training area to be modeled.
b. Layers formed of 20-ft contors (left); layers stacked (right).

c. Finished terrain model.
LESSON SUMMARY
1. A map is made up of symbols representing real features of the ground depicted. These symbols describe man made objects (buildings, roads), vegetation and water drainage (streams, lakes, swamps) and ground contours. 2. A map is used to convert conventions and symbols into a soldier's assessment of the terrain and how it affects combat. 3. Contours are depicted by contour lines that show the shape of terrain features at different elevations (contour intervals); map reading and terrain analysis require an intuitive knowledge of terrain features and how they can be deduced from a map. LESSON 3 will introduce you to map grids and coordinates.