level 2 certificate - city and guilds 2 certificate in forgework (7485-01) candidate guide august...
TRANSCRIPT

7485 Level 2 Certificate in Forgework Candidate Guide August 2008 www.nptc.org.uk
Supported by Farriery Training Agency

Level 2 Certificate in Forgework (7485-01) Candidate Guide August 2008
2
Publications and enquiries Publications for this qualification are available as a pdf file from www.nptc.org.uk under the ‘Qualifications’ tab and then click on ‘Blacksmithing’. General information may be obtained from Customer Support City & Guilds NPTC Stoneleigh Park Warwickshire CV8 2LG United Kingdom
Tel: +44 (0) 24 7685 7300 Fax: +44 (0) 24 7669 6128
Email: [email protected]
www.nptc.org.uk or www.cityandguilds.com
Equal opportunities
NPTC wholeheartedly supports the principle of equal opportunities in employment, subcontracting and delivery of assessment services. We oppose all forms of unlawful or unfair discrimination on the grounds of colour, race, nationality, ethnic or national origin, religion or belief, sexual orientation, marital status or disability. We believe that it is in NPTC’s interests, and the interests of those who work for or in association with NPTC, to ensure that the human resources, talents and skills available throughout the community are considered when employment or work opportunities arise. To this end, within the framework of the law, we are committed, wherever practicable, to achieving and maintaining a workforce which broadly reflects the local community in which we operate. Every step will be taken to ensure that individuals are treated equally and fairly and that decisions on recruitment, selection, training, promotion and career management are based solely on objective and job related criteria. Similarly, we will strive to ensure that all candidates have equal access to assessment and that they are protected against unfair or unlawful discrimination, unnecessary barriers to assessment or harassment during assessment.
For a copy of our Equal Opportunities Policy please contact your assessment centre or NPTC at the above address.
Every effort has been made to ensure that the information contained in this publication is true and correct at the time of going to press. However, NPTC products and services are subject to continuous development and improvement and the right is reserved to change products and services from time to time. NPTC cannot accept liability for loss or damage arising from the use of information in this publication.
© 2008 NPTC All rights reserved.
Registered Charity No: 1096429 Company Registration No: 4542170
Registered Office: 1 Giltspur Street, London EC1A 9DD (NPTC is a member of the City & Guilds Group )

Level 2 Certificate in Forgework (7485-01) Candidate Guide August 2008
3
NPTC Level 2 Certificate in Forgework (7485 -01) Contents
Page
Introduction
5
Aims
5
Objectives
5
General Information
5
Qualification Structure
5
Assessment and Quality Assurance
6
Test Specification
6
Candidate Guidelines for the Forgework Certificate and Practical Exam
8
Unit 001 - The operation, basic maintenance and control of forge hearths
9
Unit 002 - Practical forge work
13
Unit 003 - Using and maintaining blacksmith’s tools
19
Appendix 1 – Forging exercises for farriery apprentices
21

Level 2 Certificate in Forgework (7485-01) Candidate Guide August 2008
4
This page is intentionally blank

Level 2 Certificate in Forgework (7485-01) Candidate Guide August 2008
5
Introduction This qualification is aimed at candidates who:
• wish to develop a career as a farrier or within blacksmithing • wish for progression within or career change to the sector • are looking for progression into the Advanced Apprenticeship in Farriery, for which this
qualification is a pre-requisite, or apprenticeship in Blacksmithing • wish to add to their continuous professional development
Aims To provide an accredited qualification that will be available to all prospective blacksmiths, farrier apprentices, and others seeking a certificate of forgework competence. This qualification is appropriate for all potential apprentice farriers. Objectives The qualification is designed to ensure that candidates are competent in the practical skill of forging techniques with relevant understanding and underpinning knowledge. Forging techniques will include:
• Forging • Forming • Cutting • Joining
General Information The qualification is suitable for people 16 years and above looking for a career in blacksmithing or farriery. It provides a valuable route for candidates as an N/SVQ is not available. In view of the hazardous environment of the forge workshop, a full risk assessment must be in place, taking into account the age, experience and group size of learners. The requirements of all relevant legislation must be adhered to.
This vocationally related qualification has been designed by NPTC to support government initiatives towards the National Qualifications Framework and DEFRA’s Learning, Skills and Knowledge Review of the Land-based Industry. It has been devised in consultation with the Warwickshire College, Hereford College of Technology, Myerscough College Oatridge College, and the Farriers Registration Council.
Qualification Structure For the Level 2 Certificate in Forgework there are three mandatory units Unit 001: The operation, basic maintenance and control of forge hearths Unit 002: Practical forgework Unit 003: Using and maintaining blacksmith’s tools 240 guided learning hours have been allocated for all the units 001 002 and 003. This may be on a full-time or part-time basis.

Level 2 Certificate in Forgework (7485-01) Candidate Guide August 2008
6
Assessment and Quality assurance To gain the Level 2 Certificate in Forgework candidates must complete the following: 1. Produce a portfolio of forging evidence. This portfolio is to include ALL mandatory test pieces
from the current Forging Exercise Booklet. (Appendix 1) Candidates must bring these test pieces with them on the day of the practical examination. (Please refer to the examination guidelines on the next page.) These test pieces will be marked by the external examiner on the day of the practical examination.
2. A practical forging exam at the end of the course. The exam will consist of two mandatory test
pieces taken from the Forging Exercise Booklet. Test pieces will not include the Tie Bar or Tongs. Time given to each test piece is laid down in the Forging Exercise Booklet (Appendix 1) and this will be stated to the candidate before the exam commences. The practical examination is marked by an NPTC External Examiner.
3. A single multiple choice test available via the City and Guilds Global Online Assessments System
assessing the knowledge and understanding of all three units. The test includes 30 questions and candidates must achieve a minimum 70% correct answers in order to pass the test, i.e. at least 21 questions answered correctly. The test specification below indicates the subjects that are assessed in the multiple choice test.
The entire test will be conducted via the candidate’s VDU. All data relating to the assessment will be held by City & Guilds with results and performance feedback being delivered back to the approved centre. The table below shows a breakdown of the content that will be assessed in the multiple choice test. Paper title: Level 2 Certificate in Forgework Test duration: 1 hour Total number of questions: 30 Unit Outcome Number of
questions per test
001 1. Identify and operate solid fuel forge hearths or gas furnaces 2. Recognise and apply safe working practices when operating solid
fuel forge hearths or mobile gas furnaces
12
002 Know how to: 1. Use basic forging techniques appropriately and safely 2. Use basic forming techniques appropriately and safely 3. Use basic cutting techniques appropriately and safely 4. Use a basic joining technique appropriately and safely to produce a
simple artefact
10
003 1. Identify and report on a range of basic blacksmith tools
8
Total 30

Level 2 Certificate in Forgework (7485-01) Candidate Guide August 2008
7
All three elements must be successfully achieved before the candidate achieves the Forgework Certificate. Please note: Candidates must produce a portfolio of forgework pieces before taking the practical examination. These pieces must be brought to the practical examination with the candidate and they will be assessed during the practical examination by an NPTC Approved Examiner. If candidates fail either the portfolio or the practical examination they must re-sit the practical exam and put together a new portfolio of forging pieces. The portfolio of a failed student will be retained by the college and marked so that the pieces cannot be reoffered at a future date. However, candidates who fail either the Multiple choice test or the practical/ portfolio can re-sit these components individually. E.g. a candidate passing the practical/ portfolio but failing the Multiple choice test will only need to re-sit the multiple choice test and vice versa. No candidate is permitted to retake either the multiple choice test or the practical examination within a month of failing an exam.
Exam guidelines and procedures are detailed on the next page.

Level 2 Certificate in Forgework (7485-01) Candidate Guide August 2008
8
Candidate Guidelines for the Forgework Certificate and Practical Exam
• All prospective candidates must apply directly to the college of choice for a place on the forgework exam.
• External candidates that are not enrolled on a forgework Certificate course with a college must contact an assessment centre for advice on costs and registering.
• The assessment centres can reserve the right to refuse a candidate entry for the examination. • All those taking the forging exam must be registered with NPTC. The college will do this prior
to the assessment taking place. • The college will provide candidates with detailed guidelines prior to the exam. • Candidates are to provide all the tools and Personal Protective Equipment that are needed to
complete the exam • Candidates must arrive with a full set of mandatory test pieces before they are permitted to
start the exam. • No candidate is permitted to retake any part of the exam within one month of failing. • The portfolio of a failed student will be retained by the college and marked so the pieces are
not reoffered at a future date. • There will be an additional charge for anybody needing to re-sit the multiple choice test or the
practical exam. • The total time allowed will be given to the candidate on the day of the practical exam.
Depending on the exercises given, this will vary, but will not exceed 2 hours. • If during the assessment the candidate makes an error they will be allowed to use extra
materials to restart that piece if they wish as long as it is within the stipulated overall time. • Forge hearths will be marked with your candidate name. Please check anvil for height (If
there is a problem consult with the examiner) • Pre cut materials will be provided • The college will provide steel forges and a selection of hollow and flat bit tongs but NO
hammers, cutting tools, punching tools, wire brush, safety glasses, centre dots or rules. • Only the specified tools are to be used no special tools, if in doubt ask the examiners. No
toolboxes in the working area. • The practical examination will take place on solid fuel forges. • Candidates will be allowed 15 minutes to read instructions and prepare tools prior to the
start. Marking out will be permitted but no hot work allowed. • Candidates will be informed when they have 30 minutes remaining. • After time is called candidates must down tools immediately. No extra time allowed. • Candidates are reminded that during the examination Health and Safety is their responsibility
and the examination will be terminated for non compliance. • No mobile telephones during the examination • No jewellery is allowed • On successful completion of all three elements of the qualification, candidates will receive a
certificate. Candidates wishing to take up the farriery apprenticeship must do so within three years of achieving the forgework certificate.

Level 2 Certificate in Forgework (7485-01) Candidate Guide August 2008
9
Unit 001 The Operation, Basic Maintenance and Control of Forge Hearths
Rationale This unit is compulsory. It covers the different types of forge hearth used in blacksmith or farriery businesses, and requires candidates to be competent in the operation, maintenance and control of either a gas furnace or solid fuel forge hearth. Learning Outcomes There are two outcomes for this unit. The candidate will be able to: 1. Identify and operate solid fuel forge hearth or gas furnaces 2. Recognise and apply safe working practices when operating solid fuel forge hearths or
mobile gas furnaces Assessment The outcomes for this unit will be assessed on evidence resulting from practical performance, and completion of the multiple choice question paper, assessing underpinning knowledge.

Level 2 Certificate in Forgework (7485-01) Candidate Guide August 2008
10
Unit 001 The Operation, Basic Maintenance and Control of Forge Hearths
Outcome 1 Identify and operate solid fuel forge hearths or gas furnaces Practical Activities The candidate will be able to: 1. Carry out basic maintenance for solid fuel forge hearths or mobile furnaces, to include cleaning,
safety checks and report faults 2. Select the resources needed to operate a forge, including fuel and other supplies 3. Safely light and adjust solid fuel forge hearths or mobile furnaces and maintain fuel supply 4. Safely control the fire to the correct heat and size for the specific tasks 5. Shut down the solid fuel forge hearth or mobile furnace safely Underpinning Knowledge The candidate will be able to demonstrate knowledge of: 1. Identify different types of forge hearth / furnace used in blacksmithing or farriery businesses, to
include:
a) Fixed solid fuel forges, e.g. coke side blast b) Mobile gas furnace, e.g. venturi gas
2. The advantages and disadvantages of various fixed forge hearths and gas furnaces, to include:
a) Different areas of the fire – e.g. oxidising, neutralising, reducing b) Maintenance requirements c) Ease of use for a range of tasks
3. Different fuel types and supply for the operation of forge hearths and furnaces. 4. Appropriate visual metal heats for working with mild steel – i.e. black, red, orange, yellow
5. Control methods to produce the working heats on mild steel
6. The effects of scaling and burning

Level 2 Certificate in Forgework (7485-01) Candidate Guide August 2008
11
Unit 001 The Operation, Basic Maintenance and Control of Forge Hearths
Outcome 2 Recognise and apply safe working practices when operating solid fuel forge hearths or mobile gas furnaces
Practical Activities The candidate will be able to: 1. Apply safe working practices to include use of personal protective equipment, consideration for
others 2. Show awareness of hazards when working with a solid fuel forge hearth or mobile furnace, and
assess the level of risk, e.g. heat, fumes, obstacles in the work area 3. Implement the requirements of a risk assessment and comply with establishment safety rules and
manufacturers’ instructions
Underpinning Knowledge The candidate will be able to demonstrate knowledge of: 1. Health and safety responsibilities of an employee 2. Hazards associated with forgework and specific risks of operating solid fuel forge hearths and
mobile gas furnaces 3. The risks associated with specific hazards to include: a) heat b) fumes c) obstacles in the work area d) dust e) noise f) impact injuries 4. Relevant legislation 5. Personal protective equipment (PPE)

Level 2 Certificate in Forgework (7485-01) Candidate Guide August 2008
12
This page is intentionally blank

Level 2 Certificate in Forgework (7485-01) Candidate Guide August 2008
13
Unit 002 Practical Forgework Rationale This unit is compulsory. It covers the basic techniques on mild steel that form the foundation for all forgework tasks. Tasks to be completed are specified in the Forging Exercise Booklet. (Appendix 1) Marking criteria for the pieces are available from the NPTC website www.nptc.org.uk. Click on ‘Qualifications’ and then click on ‘Blacksmithing’. Learning Outcomes There are five outcomes for this unit. The candidate will be able to : 1. Use basic forging techniques appropriately and safely 2. Use basic forming techniques appropriately and safely 3. Use basic cutting techniques appropriately and safely 4. Use a basic joining technique appropriately and safely to produce a simple artefact 5. Produce a portfolio of forging exercises as stated in the forging exercise booklet.
Assessment The outcomes for this unit will be assessed on a practical portfolio of specified forged pieces and an independently assessed practical examination in which specified pieces will be made in a time limit. These demonstrate that candidates have acquired the appropriate practical competence and underpinning knowledge for their production. The underpinning knowledge is assessed via the multiple choice exam.

Level 2 Certificate in Forgework (7485-01) Candidate Guide August 2008
14
Unit 002 Practical Forgework
Outcome 1 Use basic forging techniques appropriately and safely Practical Activities The candidate will be able to: 1. Over the range of required exercises, use appropriate forging techniques on mild steel for given
tasks, including:
• upsetting • drawing down • spreading • setting down
2. Select appropriate blacksmiths tools for all forging tasks 3. Control forge heat to produce the desired effect 4. Work safely at all times Underpinning Knowledge The candidate will be able to demonstrate knowledge of: 1. The differing effects of forging on mild steel – e.g. grain deformation, introduction of galls /
forging faults 2. The different forging techniques / tooling for given tasks, as in the forging exercise booklet. 3. Safe working practices for forging operations 4. Management, maintenance and control of the forge fire/furnace in forging operations

Level 2 Certificate in Forgework (7485-01) Candidate Guide August 2008
15
Unit 002 Practical Forgework
Outcome 2 Use basic forming techniques appropriately and safely Practical Activities The candidate will be able to: 1. Use appropriate forming techniques for given tasks, e.g.
• Bending evenly and to specification • Twisting
2. Select appropriate blacksmiths tools for all forming tasks 3. Manage, maintain and control the forge fire 4. Use appropriate working heats, including appropriate use of spot heat techniques 5. Control section dimensions and surface quality during the forming process Underpinning Knowledge The candidate will be able to demonstrate knowledge of: 1. The effects of bending and twisting on steel – e.g. grain structure, mean line 2. The different forming techniques / tooling required for given tasks 3. Safe working practices for forming operations 4. Management, maintenance and control of the forge fire/furnace in forming operations 5. The use of cooling media in spot heating/cooling

Level 2 Certificate in Forgework (7485-01) Candidate Guide August 2008
16
Unit 002 Practical Forgework
Outcome 3 Use basic cutting techniques appropriately and safely Practical Activities The candidate will be able to: 1. Cut or split mild steel using blacksmith tools 2. Punch holes accurately using punches and drifts 3. Select appropriate blacksmiths tools for all cutting tasks 4. Manage, maintain and control the forge fire whilst cutting and punching 5. Control distortion whilst cutting and punching Underpinning Knowledge The candidate will be able to demonstrate knowledge of: 1. Various processes for hot cutting and punching of mild steel by hand – e.g. slot / taper punches,
drift / slitter punches, hot chisel / hot sett 2. Appropriate tools for different cutting and punching tasks 3. Safe working practices in cutting and punching tasks 4. Management, maintenance and control of the forge whilst cutting and punching mild steel

Level 2 Certificate in Forgework (7485-01) Candidate Guide August 2008
17
Unit 002 Practical Forgework
Outcome 4 Use a basic joining technique appropriately and safely to produce a simple artefact Practical Activities The candidate will be able to: 1. Work within tolerance to given specification 2. Produce separate elements using blacksmithing techniques 3. Assemble finished artefact from elements using a basic joining technique – e.g. rivet, hinge plate
and justify the technique used 4. Inspect and test artefact to ensure fitness for purpose 5. Use appropriate tools throughout Underpinning Knowledge The candidate will be able to demonstrate knowledge of: 1. Reasons for working to specifications 2. The appropriate production techniques/ tools required for given tasks 3. Assembly techniques 4. Safe working practices in joining tasks

Level 2 Certificate in Forgework (7485-01) Candidate Guide August 2008
18
Unit 002 Practical Forgework
Outcome 5: Produce a portfolio of forging evidence Practical Activities 1. Produce a portfolio of forging evidence. This must include ALL test pieces from the current
Forging Exercise Booklet. The candidate will be required to bring test pieces along to their practical exam.
2. Under examination conditions, produce two test pieces from the Forging exercise booklet. These
pieces will be randomly selected by NPTC prior to the exam taking place. Tasks to be completed are specified in the Forging Exercise Booklet. (Appendix 1) Marking criteria for the pieces are available from the NPTC website www.nptc.org.uk. Click on ‘Qualifications’ and then click on ‘Blacksmithing’. Please note: Mandatory exercise 10 (Tongs) can be made right or left handed.

Level 2 Certificate in Forgework (7485-01) Candidate Guide August 2008
19
Unit 003 Using and Maintaining Blacksmith’s Tools Rationale This unit is compulsory. It covers the recognition, use and maintenance of some of the basic tools used in blacksmithing and forgework. Learning Outcomes There is one outcome for this unit. The candidate will be able to:
1. Use, identify and report on a range of basic blacksmith tools
Assessment The outcome for this unit will be assessed by production of a practical log and the multiple choice exam on the use of a range of tools.

Level 2 Certificate in Forgework (7485-01) Candidate Guide August 2008
20
Unit 003 Using and Maintaining Blacksmith’s Tools Outcome 1 Identify and report on a range of basic blacksmith tools Practical Activities The candidate will be able to: 1. Use and inspect a range of blacksmith hand tools to include:
a) hand hammer b) tongs c) rule d) punches e) hot chisel f) wire brush g) top and bottom tools h) rasp
2. Identify common faults and related hazards in basic tools, e.g. mushroomed heads, deformed
shanks, loose handles/shafts, lubrication 3. Suggest appropriate maintenance activity to correct faults Underpinning Knowledge The candidate will be able to demonstrate knowledge of: 1. Hazards associated with using basic blacksmiths tools 2. Identification of a range of blacksmith hand tools to include:
a) hand hammer b) tongs c ) rule d) punches e) hot chisel f) wire brush g) top and bottom tools h) rasp
3. Identification of parts of the anvil 4. Identification of parts of the leg vice 5. Materials used in basic tool production:
a) associated hazards b) basic metallurgy of plain carbon steel c) heat treatments
5. Faults likely to occur in basic tools and appropriate maintenance procedures

Level 2 Certificate in Forgework (7485-01) Candidate Guide August 2008
21
Appendix 1


©
ACKNOWLEDGEMENT
The design and content was produced by Mr H B Pomfret at Herefordshire College of Technology, based on the original booklet by Mr G T Sutton.
Copyright
This booklet may be used and copied without restriction for use in conjunction with the Advanced Modern Apprenticeship in Farriery or NPTC Level 2 Certificate in Forgework.
Use of the booklet, or material contained within it for any other purpose is not permitted without the permission of Herefordshire College of Technology.
HCT 2001-2006

CONTENTS
INTRODUCTION i
TOOLS&EQUIPMENT ii
CONVERSIONTABLES iii
GUIDELINEMAXIMUMTIMELIMITS iv
MANDATORYEXERCISES PAGE
1)FORGINGTOSECTION-(A)FLAT,(B)SQUARE(C)ROUND M-1
2)FORGINGPOINTS-(A)CHISEL,(B)SQUARE,(C)ROUND,(D)DIAMOND M-2,M-3
3)STAPLE-FLAT M-4
4)UNWELDEDEYE-ROUND M-5
5)FLATRING M-6
6)FIGURE8-ROUND M-7
7)SETEYEHOOK M-8,M-9
8)BOWSHACKLE-LARGE-SETEYE M-10
9)TIEBAR M-11
OPTIONALEXERCISES PAGE
1)FORGINGTOSECTION-SETDOWNSECTIONS O-1
10FLATBITTONGS M12,M13
2)STAPLE-ROUND O-2
3)UNWELDEDEYE-FLAT O-3
4)FIGURE8-FLAT O-4
5)BOWSHACKLE-SMALL-TURNEDEYE O-5
6)HEART-FORGEDRIGHTANGLEBEND O-6

INTRODUCTION
IMPORTANT INFORMATION
Trainees are not expected to make the exercises in this publication without first being given instruction, demonstration and guidance.
It is for this reason that any instructions given here are brief and merely represent points to remember when working through the exercises.
It is also assumed that after suitable instruction, anyone attempting these exercises will be able to:
1. Practice and have knowledge of current Health & Safety regulations
2. Prepare and control a fire to the correct heat and size. If possible the student should have experience of using both solid fuel and gas hearths.
3. Hold and correctly use several types of hammer. There are opportunities to work as smith and striker with some of the exercises although it is recommended that the student first becomes adept with hand hammers.
4. Select and use tongs correctly to ensure safe and efficient working. Pleasenote that badly fitting tongs are dangerous and can easily cause injury.
5. Identify the correct temperatures for forging, bending and finishing and be aware of the effects of heat and forging on the internal structure of the metal
6. Take, and control, heats on metal, of the required lengths and in the required positions, using both the forge hearth and water bosh as appropriate.
7. Be familiar with the various parts of the anvil and how they should be used when shaping metal.
8. Keep the fire, the metal and the anvil clean.
9. Acquire co-ordination between hand and eye, particularly when accurately forging sizes of stock material or bending complicated shapes.
10. Have confidence in working hot metal accurately and cleanly.
POINTS TO NOTE:
The objective is to complete all the exercises, (except where indicated for the Tie Bar), WITHOUT the use of rasps or files.
All the pieces can be produced as many times as is necessary for the potential apprentice and ATF or tutor to be satisfied that they can, during the forging test:
a) be reproduced within the given time limits, and,
b) be reproduced to the standard required.
This book is intended to help potential blacksmiths and farriery apprentices to demonstrate a level of competence in basic forge techniques and processes. These techniques cover the forging and forming skills that are used in basic forging and shoe production.
i

TOOLS & EQUIPMENT
TOOLS & EQUIPMENT
In the production of the exercises in this booklet, the student will need,(as a minimum), the following:
Personal Protective Equipment (PPE). Including:
Safety spectacles, (Not Ski type goggles).
Steel toecapped work boots.
Ear defenders or ear plugs.
Overalls or leather apron.
Leather gloves (optional).
Hand hammer .
Tongs - Flat bits to hold 6mm & 10 mm stock (1/4" & 3/8").
Tongs - Hollow bits for 16mm square (5/8") and 20mm square (3/4").
Steel or brass rule. 300mm (1 Foot) minimum. Avoid aluminium rules or those withthe divisions printed on them
Wire brush. Butchers block brush is best but ordinary type will do.
Centre punch.
Stud punch -10mm (3/8").Or tapered round punch (and) 10mm (3/8") diameter drift.
Bolster plate (optional) 10-12mm hole.
Hot chisel.
Cutting plate (optional).
ii

CONVERSIONS
iii
CONVERSION TABLE - METRIC TO IMPERIAL
These conversions are approximations for use as a guide.
For example, in certain circumstances, 5mm bar stock may be used in placeof either 3/16" or 1/4" as as 5mm lays somewhere between the two sizes.
As the size increases, so the accuracy decreases. For example, 300mm isused as the equivalent of one foot whereas the actual metric equivalent is305mm, nearly 1/4" difference.
The student must familiarise him/herself with all the commonly used stocksizes and should be able to recognise them without the aid of a ruler.
1.5mm 1/16"
3mm 1/8"
4.5mm 3/16"
6mm 1/4"
8mm 5/16"
10mm 3/8"
12mm 1/2"
16mm 5/8"
20mm 3/4"
22mm 7/8"
25mm 1"
50mm 2"
75mm 3"
100mm 4"
150mm 6"
200mm 8"
250mm 10"
300mm 1' (1Foot)

MAXIMUM TIME LIMITS
MANDATORY EXERCISES TIME LIMIT
1) FORGING TO SECTION
FLAT 30 MINUTES
SQUARE 30 MINUTES
ROUND 30 MINUTES
2) FORGING POINTS
CHISEL 15 MINUTES
SQUARE 15 MINUTES
ROUND 20 MINUTES
DIAMOND 20 MINUTES
3) STAPLE - FLAT 25 MINUTES
4) UNWELDED EYE - ROUND 15 MINUTES
5) FLAT RING 30 MINUTES
6) FIGURE 8 - ROUND 25 MINUTES
7) SET EYE HOOK 60 MINUTES 8) BOW SHACKLE - LARGE - SET EYE 60 MINUTES
9) TIE BAR 60 MINUTES
10) FLAT BIT TONGS 180 MINUTES
OPTIONAL EXERCISES TIME LIMIT
1) FORGING TO SECTION - SET DOWN SECTIONS 60 MINUTES 2) STAPLE - ROUND 20 MINUTES
3) UNWELDED EYE - FLAT 30 MINUTES 4) FIGURE 8 - FLAT 35 MINUTES 5) BOW SHACKLE - SMALL - TURNED EYE 35 MINUTES 6) HEART - UPSET RIGHT ANGLE BEND 60 MINUTES
iv

Blank page

OBJECT:After straightening the shoe, to forgea minimum of 8 inches (200mm) ofparallel section.
This section is to be as free ofhammer marks as possible and tohave a clean finish
STOCK:OLD HORSE SHOES
M-1
1. FLAT
Take a long yellow heat and forge with overlapping blows, working along the bar.Forge the edges in to achieve the flat section.As the section develops, reduce the heat to the orange range and finally through the reds tofinish.Check that the width is constant along the length frequently, that the bar is straight and thatthe sides are at right angles to each other
PLEASE NOTEYou may forge to a size of yourown choosing but the forgedsection must be at least 8"
(200mm) long
8" (200mm)minimum
2. SQUARE
To forge a round section you must first forge a square section which must be even, straightand true.Then forge in the corners from end to end until you have an octagonal (8 sided) section. Ifsome flats are wider than others then you do not have a true octagon.Only when this step is complete, forge in the corners of the octagon along the length. DO NOTtry to round up before this point.At a finishing heat and with lighter blows, round up by slowly rotating the piece under thehammer
As with the flat section but you will need to turn the metal often to maintain an even section.The forged section must be straight, parallel and square.
3. ROUND
MANDATORY EXERCISE 1
FORGING TO SECTION

STOCK:5" OF 5/8 SQUARE(125mm x 16 Sq)
Centre punch at2" (50mm)from one end
STOCK
CHISEL
SQUARE
OCTAGON
ROUND
DIAMOND
The Round point beginsas a square point.This is forged to anoctagon (8 sides)The octagon can thenbe rounded up
M-2
OBJECT:Developing the skills of forging tosection from exercises 1 & 2, you willnow forge the basic point forms, .Chisel, Square, Round and Diamond.
Use a ruler or other straight edge tocheck the sides of the points arestraight.
Make sure the points are centred onthe bar when looked at from all foursides
Each point should have a cleartransition from the stock size startingat the 2"(50mm) centre punch mark.
MANDATORY EXERCISE 2
FORGING POINTS - CHISEL, SQUARE, ROUND, DIAMOND
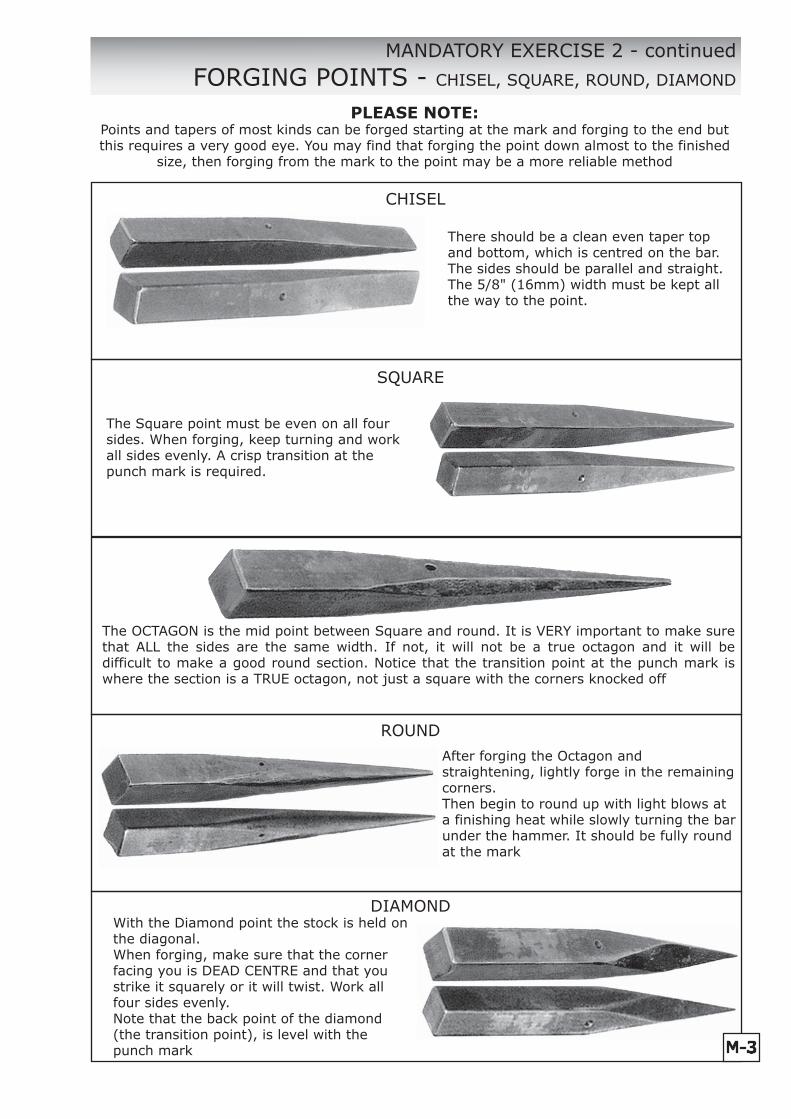
MANDATORY EXERCISE 2 - continued
FORGING POINTS - CHISEL, SQUARE, ROUND, DIAMOND
PLEASE NOTE:Points and tapers of most kinds can be forged starting at the mark and forging to the end butthis requires a very good eye. You may find that forging the point down almost to the finished
size, then forging from the mark to the point may be a more reliable method
After forging the Octagon andstraightening, lightly forge in the remainingcorners.Then begin to round up with light blows ata finishing heat while slowly turning the barunder the hammer. It should be fully roundat the mark
With the Diamond point the stock is held onthe diagonal.When forging, make sure that the cornerfacing you is DEAD CENTRE and that youstrike it squarely or it will twist. Work allfour sides evenly.Note that the back point of the diamond(the transition point), is level with thepunch mark
DIAMOND
There should be a clean even taper topand bottom, which is centred on the bar.The sides should be parallel and straight.The 5/8" (16mm) width must be kept allthe way to the point.
CHISEL
The Square point must be even on all foursides. When forging, keep turning and workall sides evenly. A crisp transition at thepunch mark is required.
The OCTAGON is the mid point between Square and round. It is VERY important to make surethat ALL the sides are the same width. If not, it will not be a true octagon and it will bedifficult to make a good round section. Notice that the transition point at the punch mark iswhere the section is a TRUE octagon, not just a square with the corners knocked off
SQUARE
ROUND
M-3

STOCK:7" OF 5/8" X 1/4" FLAT(175mm X 16 X 5mm)
Mark at centre
Take an even heat about the centre mark and bend to a right angle.
Take a heat on each end in turn and draw out a square point.
Each taper should be of equal length.
The outside edges should be straight.
Take an even heat on the middle section and bend arounduntil the legs are parallel.
The points should be in line and the bend should be evenabout the centre
M-4
OBJECT:To produce a level, well balancedstaple with square points.The outside edges of the legs shouldbe parallel.The bend should be even about thecentre mark.There should be no loss of thicknessof section towards the points.
MANDATORY EXERCISE 3
STAPLE - FLAT

STOCK:9" OF 1/4" or 5/16" ROUND(225mm OF 6mm or 8mm)
Mark at 3" (75mm)from one end
Take a yellow heat at the mark. Quench either side and bendalmost to 90o.Straighten either side and make sure the piece is flat.
Take a short yellow heat on the end.Quickly bend the end over the tip of the bick, being careful notto squash the section.Flatten, but keep the round section. Don't hit it too hard or toohot.
Another yellow heat. This time just in front of the mark.Quench the first bend to stop it opening up as you quickly bendover the bick.NOTE:Steps 2 and 3 could be reversed. The important thing is tomake the difficult bends either end of the eye before closing up.Be sure not to put flats on the round section.
Take an even orange heat between the last two bends.Quench bend No. 1 if necessary, then close up the eye.Make sure the piece is flat and that the eye is circular andcentred on the bar.The material should still be round in section.
M-5
OBJECT:To form a clean circular eye, centredon the bar.
When finished, the eye must becircular and level There should be littleevidence of hammer marks ordistortion of the section.
MANDATORY EXERCISE 4
UNWELDED EYE - ROUND
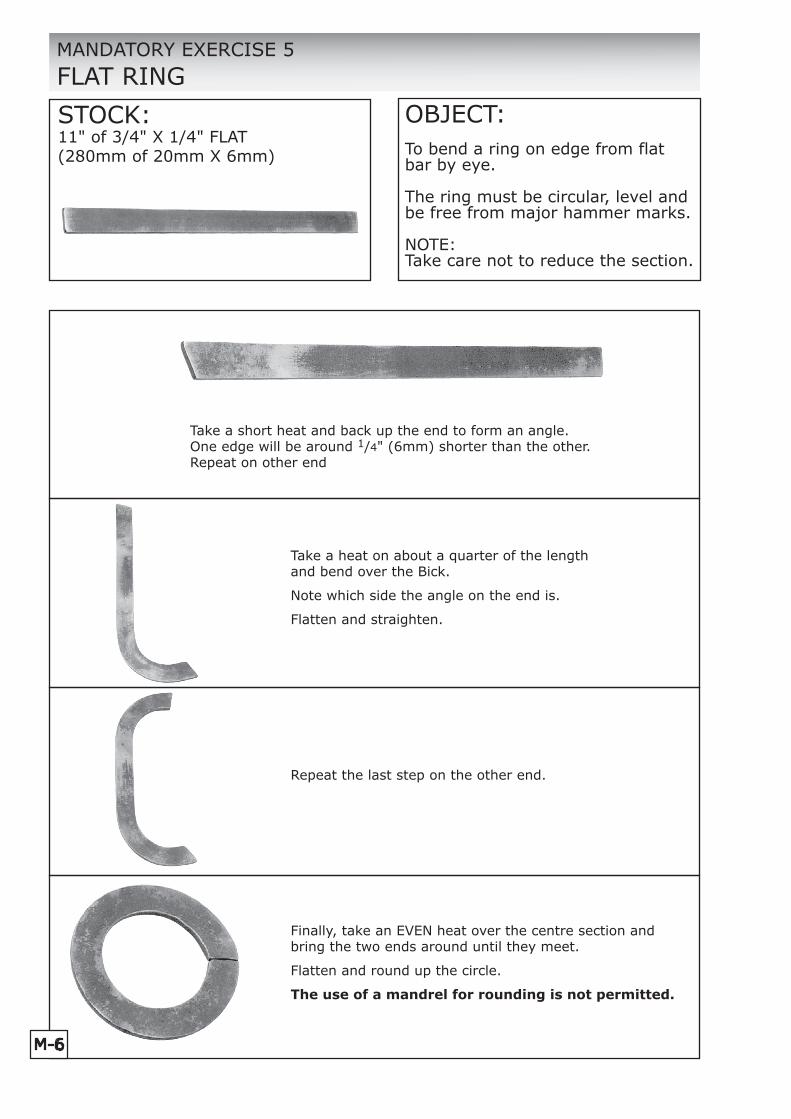
STOCK:11" of 3/4" X 1/4" FLAT(280mm of 20mm X 6mm)
Take a short heat and back up the end to form an angle.One edge will be around 1/4" (6mm) shorter than the other.Repeat on other end
Take a heat on about a quarter of the lengthand bend over the Bick.
Note which side the angle on the end is.
Flatten and straighten.
Repeat the last step on the other end.
Finally, take an EVEN heat over the centre section andbring the two ends around until they meet.
Flatten and round up the circle.
The use of a mandrel for rounding is not permitted.
M-6
OBJECT:To bend a ring on edge from flatbar by eye.
The ring must be circular, level andbe free from major hammer marks.
NOTE:Take care not to reduce the section.
MANDATORY EXERCISE 5
FLAT RING

STOCK:8" OF 1/4" OR 5/16" ROUND(200mm OF 6mm OR 8mm)
Mark at centre
Take a SHORT yellowheat on the end ofthe bar and quicklyturn it over the bick.
Straighten anydistortion in the restof the bar.
Take another yellow heataround the mark.
Quench just short of themark as well as the firstbend and turn the secondbend.
NOTE: Steps 1 & 2 couldbe reversed
Take an even heatbetween the two bendsand almost complete thecircle.
Leave it a little open fornow.
Straighten and level.
Repeat step 1 on theother end of the bar.
Repeat step 2.
You must have a goodheat and work quickly inorder to form the bendcleanly without anystraight section near themark.
Repeat step 3.
Note that the ends arenot yet closed in. This isto allow a degree ofaccess to refine theshape if necessary.
Level if distorted. Don'tflatten the section.
Finally, take a heat and close in the ends which should meet atthe centre mark.
If you have difficulty in refining the shape on the ends, twistthem to the sides to enable you to get at them with the hammer.
Level upM-7
OBJECT:To forge a shape using the Bick of theanvil to form two connected circles.
This to be done without flattening ormutilating the round section.
The final piece is to be symmetrical,level and clean.
MANDATORY EXERCISE 6
FIGURE OF EIGHT - ROUND

STOCK:7 3/4" OF 3/4" X 1/4" FLAT(195mm of 20mm X 6mm)
2 3/4"(70mm)
1 1/2"(38mm) Mark
From the 2 3/4" (70mm) mark, draw an even, straight taper 4 1/4" (106mm) long
Turn the piece around and set down at the 1 1/2" (38mm) mark.Draw it out to 3/8" (10mm) square. It should be about 2" (50mm) long.Make sure the section is parallel and not tapering.
Forge the square section into an octagon.If the end is becoming smaller in section, upset it and square up the end.
Round up the section. Straighten and true up.By now it should be approximately 2 1/2" (63mm) long
Draw a taper behind the round section. The taper should be 4 1/4" (106mm) long.Straighten and true up.
NOTE:- Make sure that the set remains well defined as a step
M-8
OBJECT:To produce a flat hook with an unwelded, forged eye.
The hook should be of clean finish and hang centrally from the eye,(see final step).
MANDATORY EXERCISE 7
SET EYE HOOK

Take a yellow heat. Quench up to the end of thetaper and quickly turn the round section almostto 90o.
Take another heat. Quench up to the bend to chill itand quickly knock the end over.
Take a SHORT yellow heat and set the curve right upto the tip.
Take an even orange heat to complete the eye.See that it is centralised.
Take a heat behind the eye. Quench the eye toprevent distortion and set a curve as shown.
Repeat on the other end.Flatten
Take an even orange heat in the central sectionand bend in the opposite direction over the Bick.
Flatten and align as necessary so that whenhung from the eye, a line can be drawnvertically through the centre of the bend.
M-9
MANDATORY EXERCISE 7 - continued
SET EYE HOOK

STOCK:12" OF 3/8" ROUND(300mm OF 10mm)
Mark at 1 1/2" (38mm) from each end
Take a heat on one end and set down on two sides only.Forge to a 5/16" (8-9mm) square section 2" (50mm) long.Forge this to an octagonal section and round up, by which time it should beapproximately 21/4" (55mm) long.Repeat on the other end. Both ends must be the same length and section.
Take a yellow heat at the set, quench up to the set and quickly bend.
Straighten any distortion created.
Form the eye as in previous exercises.
Repeat on the other end.
Straighten up.
Crank one of the eyes over to about 45o and repeat on the other end.Straighten up again and see that the eyes are in line and not twisted.
It is very important that the bar between the eyes is perfectly straightor a smooth bend will be very difficult to achieve.
Take a heat on about a quarter of the length, quenchthe eye to prevent distortion and bend over the bick.Repeat on the other end.
Finally, take an EVEN heat over the central section,chill the ends if necessary and complete the bend.
See that the form is circular and that the eyes areproperly aligned, not twisted and 3/4" (20mm) apart.
3/4"(20mm)
M-10
OBJECT:To set down a section, round up andform an eye on each end of a bar.
To shape the bar into a wellbalanced, circular form with the eyesparallel and spaced 3/4" (20mm)apart.The whole to be clean, level andwithout loss of the round section.
MANDATORY EXERCISE 8
BOW SHACKLE - LARGE - SET EYE

4"(100mm)
STOCK:8" OF 5/8" SQUARE(200mm OF 16mm)
Mark at 2" (50mm) from one end
Take a short yellow heat up to the mark. If necessary, quench to just short of the mark.Upset the end. Each heat should be to the same point to produce the shoulder.The final upset should be 1" (25mm)square and slightly thicker than the bar.
Forge the corners of the square to produce an octagon
Forge in the corners. Then round up the shape
Punch a hole in the centre and drift out to 3/8" (10mm).
Mark 3" (75mm)from the other end and using a hot chisel, split one side to the centre.
Then cut from the other side to the centre, parting the two halves.
Open out the split ends.
Hot rasp off ripped edges if present and LIGHTLY forge in the section.
Set a balanced curve on each leg leaving the ends 4" (100mm) apart.
The whole piece should retain a clean finish and be level.
M-11
1"
1"(25mm)
3/8" (10mm) Diameter
OBJECT:By upsetting, to form a circular eye.A ring may then be connected.
To split and open the bar to provide a balanced, ragged end to fix.
The whole must be level. The eye is to be central and the bar split evenly down the centre.
MANDATORY EXERCISE 9
TIE BAR

STOCK:8" OF 5/8" SQUARE (200mm of 16mmSq)(Two pieces)
Mark at 1 3/8" (35mm) FROM END
Set down at the mark.Do not forge the width back to 5/8" (16mm) or when finished, it will be undersize. Better larger than smaller as you will come back to finish the jaw & hinge area later.The dimensions of the jaw at this stage should be approximately 2" X 5/16" X 7/8"(50 X 8 X22mm).
Turn 90o to the left and set down at 45o. Make sure the set lines up with the corner of the first set.Again, allow the metal to spread. Forge to approx 5/16" X 7/8" (8mm X 22mm). True up.
Turn 90o to the left again and set down at around 1 1/2" (38-40mm) from the first set. Set down only about a third of the width. REMEMBER, THIS IS THE POINT WHICH NEEDS MAXIMUM STRENGTH. It is as thick as the hinge plate and two thirds as high.
Draw out the rein. There should be enough material to draw to 12" (300mm). The size at the end should be about 5/16" X 1/4" (8mm X 6mm) and the taper between the last set and the end should be straight and clean.DO NOT reduce the section behind the hinge plate.
From just behind the hinge plate, knock off the corners. use gentle blows to start, becoming a little heavier as you work towards the end.True up the rein.
M-12
OBJECT:To produce a pair of small flat bit tongs with a clean finish.
NOTE:Two pieces are necessary.At each step, make sure both pieces are matched.
MANDATORY EXERCISE 10
SMALL FLAT BIT TONGS

45o
Then tip the end down a little. this will help prevent the tongs slipping in the hand and to locate a ring if needed.True up.
Having knocked the corners off, now round up the top and bottom of the rein.
Take a heat on the hinge area and resting the set at 45o on the anvil, strike the upper edge to set the angles.Flatten with the set side down on the anvil. Repeat if necessary.Note that this shortens and broadens the hinge.True up.
At a bright orange/yellow heat, take a short scrap piece of 1/4" (6mm) round and hold it in the centre of the jaw. Get an assistant to hammer it in. MAKE SURE it is central before you go too far.Do the same thing at right angles to the first one.This will make the tongs more useful as they will also be able to hold small rounds and squares
Punch a 3/8" (10mm) hole in the centre of the hinge plate. Flatten out any distortion and drift the hole to its true size.If the hinge plates are slightly different sizes, punch the smaller one first and use this to mark the other from.Rivet up and set the jaws using a scrap piece of 1/4" (6mm) flat between them. Set the reins to a comfortable size.
M-13
MANDATORY EXERCISE 10 - continued
SMALL FLAT BIT TONGS

STOCK:7" of 5/8" SQUARE(180mm of 16mm Sq)
Mark at 3" (75mm) from end
Set down from the 3" (75mm) mark and draw out the remainder to 5/8" X 5/16" (16mm X 8mm).
Square off the end and make sure the bar is straight & true. Mark at 1 1/2" (38mm) from the set.
Set down from the mark and draw out the remainder to 5/16" X 5/16"(8mm X 8mm).
Straighten and mark at 2" (50mm) from the last set.
From the mark, knock off the corners to produce a true octagonal (8 sided) section.
Check that all 8 sides are the same width.
Straighten and mark at the mid point of the octagonal section.
From this point knock the corners off the octagon working up and down the length, then work off any remaining corners.
Round up at a finishing heat with light blows while slowly rotating the bar.
O-1
OBJECT:To forge to controlled sections by setting down and drawing out.
The sections are to be as free of hammer marks as possible, to be parallel and to have a clean finish.
OPTIONAL EXERCISE 1
FORGING TO SECTION - SET DOWN SECTIONS
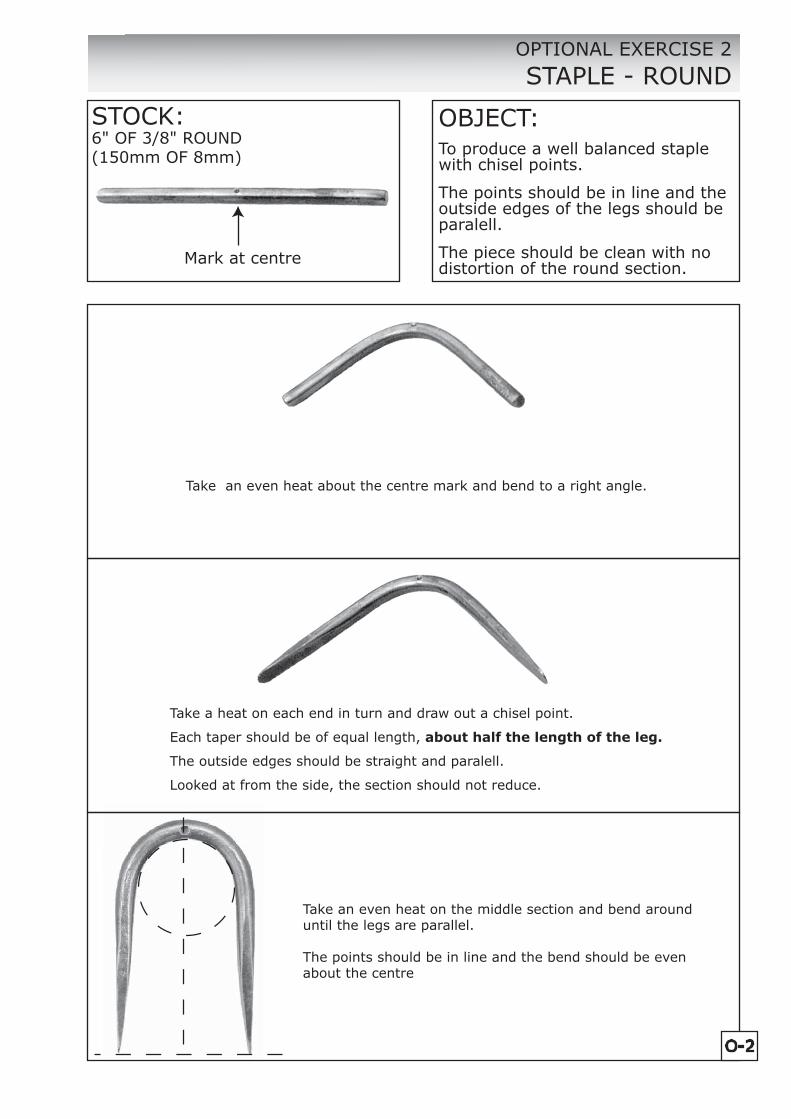
STOCK:6" OF 3/8" ROUND(150mm OF 8mm)
Mark at centre
Take an even heat about the centre mark and bend to a right angle.
Take a heat on each end in turn and draw out a chisel point.
Each taper should be of equal length, about half the length of the leg.
The outside edges should be straight and paralell.
Looked at from the side, the section should not reduce.
Take an even heat on the middle section and bend around until the legs are parallel.
The points should be in line and the bend should be even about the centre
O-2
OBJECT:To produce a well balanced staple with chisel points.
The points should be in line and the outside edges of the legs should be paralell.
The piece should be clean with no distortion of the round section.
OPTIONAL EXERCISE 2
STAPLE - ROUND

STOCK:10" OF 5/8" X 1/4" FLAT(250mm OF 16 X 5mm)
Mark at 3" (75mm)from one end
Take a yellow heat at the mark. Quench either side and bend almost to 90o.Straighten either side and make sure the piece is level.
Take a short yellow heat on the end.Quickly bend the end over the tip of the bick, being careful not to reduce the width.
Another yellow heat. This time just in front of the mark.Quench the first bend to stop it opening up as you quickly bend over the bick.NOTE:Steps 2 and 3 could be reversed. The important thing is to make the difficult bends either end of the eye before closing up
Take an even orange heat between the last two bends.Quench bend No. 1 if necessary, then close up the eye.Make sure the piece is level and that the eye is circular and centred on the bar.
O-3
OBJECT:To form a clean circular eye, centred on the bar.
When finished, the eye must be circular and level.There should be little evidence of hammer marks.
OPTIONAL EXERCISE 3
UNWELDED EYE - FLAT

STOCK:11" OF 5/8" X 1/4" FLAT(280mm OF 16 X 5mm)
Mark at centre
Take a SHORT yellow heat on the end of the bar and quickly turn it over the bick.
Straighten any distortion in the rest of the bar.
Do not reduce the width.
Take another yellow heat around the mark.
Quench just short of the mark as well as the first bend and turn the second bend.
NOTE: Steps 1 & 2 could be reversed
Take an even heat between the two bends and almost complete the circle.
Leave it a little open for now.
Straighten and level.
Repeat step 1 on the other end of the bar.
Repeat step 2.
You must have a good heat and work quickly in order to form the bend cleanly without any straight section near the mark.
Take a heat between the two bends and close up the second half.
Adjust so that the centre of each end lines up with the punch mark.
O-4
OBJECT:To forge a shape using the Bick of the Anvil to form two connected circles.
This to be done without reducing the width or thickness of the flat section.
The final piece is to be symmetrical, level and clean.
OPTIONAL EXERCISE 4
FIGURE OF EIGHT - FLAT

STOCK:10" OF 1/4" ROUND(250mm OF 6mm)
Mark at 21/4" (55mm) from ends
Take a SHORT heat about the mark and bend over the edge of the anvil.
the bend should be almost 90o.
Straighten either side of the bend.
Take a SHORT yellow heat at the tip and quickly bend it to the radius of the finished eye.
Take care not to squash the section at the tip.
Quenching the first bend will prevent distortion
Straighten.
Take another short heat ahead of the first bend.
Quench just up to the first bend and knock forwards.
Close up the eye.
The eye should be as circular as possible and centred on the bar.
Repeat on the other end.
Keep the bar straight and the eyes centred.
Crank the eyes over to approximately 45o.
See that they are not twisted and are still centred
True up and align the eyes.
The eyes should be 3/4" (20mm) apart.
Take a long even heat.
Quench the eyes and bend around.
O-5
OBJECT:To form an eye on each end of a bar.
To shape the bar into a well balanced circular form with the eyes parallel and spaced 3/4" (20mm) apart.
The whole to be clean, level and without loss of the round section.
OPTIONAL EXERCISE 5
BOW SHACKLE - SMALL - TURNED EYE

STOCK:8" OF 1/2" SQUARE(200mm OF 12mm)
Mark at centre
Take a SHORT heat in the centre of the bar.
It may help to quench either side of the punch mark.
Bend the piece but DO NOT bring it to 900.
The punch mark should be in the centre of the bend.
Again, using short heats, work each arm in turn, upsetting into the bend.
Keep the mark in the centre of the bend.As the work progresses, the angle of the bend should become tighter but at this stage, still not quite 900.
Maintain a small radius on the inside of the bend.
Continue working up the bend by upsetting the arms into it and also using the hammer on the outside faces to produce a crisp, sharp corner.
Notice the punch mark is still in the centre.
Starting almost in the corner, draw out each arm to an even taper of equal lengths.
Chill the bend or it will distort during this process.
The outer edges should be at right angles to each other.
Scroll the two ends using hammer only.
Keep checking to see that they are balanced.
Finally, bring the two arms together.
Chill the bend to prevent distortion.
Be sure to take EVEN heats and keep checking for balance O-6
OBJECT:
To forge a right angle bend byupsetting.
Then, by drawing down and controlled bending with the hammer, to produce a clean, level and balanced heart
OPTIONAL EXERCISE 6
HEART - UPSET RIGHT ANGLE BEND