liner replacement (stainless steel internal components) service...
TRANSCRIPT

Liner Replacement (Stainless Steel Internal Components) Service Instruction
Page 1 of 15
Endless Pools D90017 1116
The stainless steel edges, especially around the propeller cylinder, are very sharp.
Use extreme caution when working in and around the front housing.
Be sure to disconnect electrical service to all of your electrical components of the
pool.
If your power unit is at a higher elevation than the propulsion housing,
disconnect both hydraulic hoses at the power unit. Use the red threaded plugs to
cap the end of each hose, making sure to mark each hose so you know to which
fitting it needs to be re-connected.
Section 1: Draining pool Draining the pool is best accomplished by siphoning the water out of the pool by simply using a garden hose.
With one end of the garden hose placed into the water in the deepest location, run the other end of the hose to a
suitable drainage location that is lower than the deepest section of your pool. A submersible pump may also be
used to drain the pool.
Section 2: Removing Stainless Steel Components 1. Remove the four stainless steel corner covers with a screwdriver.
2. Unthread the screws that are holding the side benches and rear base in place. Then carefully remove
these stainless steel components from the pool. Remove all of the PVC supports and corner assemblies.
WARNING
WARNING
CAUTION

Liner Replacement (Stainless Steel Internal Components) Service Instruction
Page 2 of 15
Endless Pools D90017 1116
3. Remove the triangular shroud from the right side of the propulsion housing (if present). There are four
screws holding it in place.
4. Disconnect the throat from the housing. There are 7 screws holding it in place; 3 across the front and 2 on
each side. Remove the lower shroud bracket at this time as well.
5. Slide the vertical water conditioning grill down out of its track. Unthread the screws that are securing the
housing to the pool wall.

Liner Replacement (Stainless Steel Internal Components) Service Instruction
Page 3 of 15
Endless Pools D90017 1116
6. Unthread the 6 screws (3 on each side) that are securing the housing to the base. Carefully lift the
housing off of the base.
The cylinder surrounding the propeller (under the housing) is sharp. Work
carefully around this cylinder to avoid bodily injury.
7. Disconnect the hoses from the valve assembly (on the outside) of the pool that go through the wall and
into the pool (submersible hoses). Plug the end of each hose with the provided plugs to contain the fluid
in the hoses.
WARNING

Liner Replacement (Stainless Steel Internal Components) Service Instruction
Page 4 of 15
Endless Pools D90017 1116
Section 3: Removing Thru-Wall Fittings
8. Remove the lock nut from the submersible hose thru-wall fitting assemblies.
9. Pull the submersible hose assemblies into the pool and move the front base away from the front wall.
10. Note: If there is no shroud present and the submersible hose assemblies are below the front base, then
remove the propeller and disconnect the hose fittings from the motor. Plug the end of each hose with the
provided plugs to contain the fluid in the hoses. On the outside of the pool, loosen the compression
fittings and pull the hoses out of the pool until the hydraulic hose motor fittings are inside of the thru-wall
fittings.

Liner Replacement (Stainless Steel Internal Components) Service Instruction
Page 5 of 15
Endless Pools D90017 1116
Replacing the hydraulic motor is not an essential part of the liner replacement procedure. However, this is an ideal
time to perform this scheduled maintenance. Refer to the Hydraulic Motor Replacement Service Instruction for
more detailed information.
11. Remove any Water Quality System plumbing connections from their respective thru-wall fittings and then
remove the thru-wall fittings.
Note: Star thru-wall fittings do not have to be completely removed; only the faceplate has to be removed.
12. Remove the skimmer faceplate and then remove the skimmer mounting hardware. Take care to account
for all of the nuts and washers on the outside of the pool.

Liner Replacement (Stainless Steel Internal Components) Service Instruction
Page 6 of 15
Endless Pools D90017 1116
13. The next step is to remove the existing liner. Begin by making a horizontal cut 2” (5cm) from the top
around the perimeter of the pool. Make a similar cut 2” (5cm) up from the floor of the pool. Remove the
liner in sections to make it easier to handle. Remove top section from the liner track. LEAVE THE
FLOOR IN PLACE. This floor section acts as a tarp for any potential panel prepping.
Section 4: Panel Inspection and Preparation
It is possible that once the liner is removed that some panel corrosion will be present. This is the time to carefully
inspect the pools panels structure, paying close attention to both the top and bottom flanges of the pool panels. IT
IS CRITICAL THAT THE PANEL BE INSPECTED PRIOR TO CONTINUING. The type of severity of the
corrosion will dictate what action to take.
If the corrosion presents itself as a white powder-like texture, then very little preparation will be required. Light
"white rusting" is characterized by a formation of a white powdery residue on the surface of the galvanized steel.
It can be easily brushed off if needed. No treatment is required at this level of corrosion. Moderate "white rusting"
is characterized by a noticeable darkening and texture like buildup of white/brown residue. This type of corrosion
should be treated by using a wire brush or steel wool pad, to lightly sand down the heaviest deposits.
If the corrosion appears as a reddish/brown or "rust" colored, sand or grind the corrosion away. Wipe the area
down with Mineral Spirits and allow the area to dry. Since the protective galvanized coating has been
compromised, the area of exposed steel must be protected. It's recommended to apply a Cold Galvanizing product
such as (Rust-Oleum Cold Galvanizing Compound) to protect the exposed steel. Cold Galvanizing compound
can be purchased at your local home improvement store. This zinc coating applies a protective film, resistant to
corrosion. If the corrosion has caused pits or imperfections on the surface of the steel, multiple coats may be
necessary. This condition is usually caused by water intrusion. It's important to address the cause of water
intrusion before installing the replacement liner.
In rare circumstances, the corrosion has compromised the panels structural integrity. Examples of this include
heavy corrosion at the top or bottom flange of the panel, or holes in the panel. DO NOT REMOVE ANY
PANELS UNTIL CONTACTING CUSTOMER SERVICE. Replacing panels can be an invasive and expensive
undertaking. Very often, the existing panels can be repaired and re-supported. Contact Endless Pools customer
service for more information.

Liner Replacement (Stainless Steel Internal Components) Service Instruction
Page 7 of 15
Endless Pools D90017 1116
Section 5: Liner Installation 14. Remove any debris from the floor of the pool; including the liner floor and felt underlayment. Lay out the
provided closed-cell foam and cut it to fit on the floor of the pool. Use the provided spray adhesive to
secure the foam to the floor.
15. If not done so already, silicone the seams in the panels. Inspect the silicone seal under and on top of the
liner hanger and replace as necessary. Cut the 4 foam corners to fit into the corners of the pool. Use duct
tape or dabs of silicone between the foam corner and panel to secure the foam corners in place. Do not
put foam corners into any portion of a custom deeper section.
16. If not done so already, silicone along the back edge of the liner hanger and where it meets the vertical
face of the panel. A shop vac can be used to remove air from behind the liner, pulling the liner into place.
Duct tape over any opening in the pool (on the outside of the pool). Insert the vac hose into the skimmer

Liner Replacement (Stainless Steel Internal Components) Service Instruction
Page 8 of 15
Endless Pools D90017 1116
opening. The end of the hose should be no more than 6” (15cm) from the floor of the pool. Duct tape
around the hose sealing the skimmer opening.
17. Unfold the liner inside of the pool. Locate the vertical seam in the liner. This seam will be centered on
the front wall. Get the liner bead into the liner hanger track in the 4 corners first. Once the corners are in,
continue inserting the liner bead into the track around the remaining perimeter. Turn the shop vac on.
The vacuum will start to pull the liner into place. Work any wrinkles out and towards the edges of the
pool (any persistent wrinkle can be hidden under the benches). Start filling the pool with water. Continue
to attempt to remove any wrinkles. Stop filling with 6” (15cm) in the pool. Remove the shop vac hose.
Note: Pools with Star thru-wall fittings, will have to fill to approximately 3” (7cm) below the first set of
fittings.
Liner Replacement (Stainless Steel Internal Components) Service Instruction
Page 9 of 15
Endless Pools D90017 1116
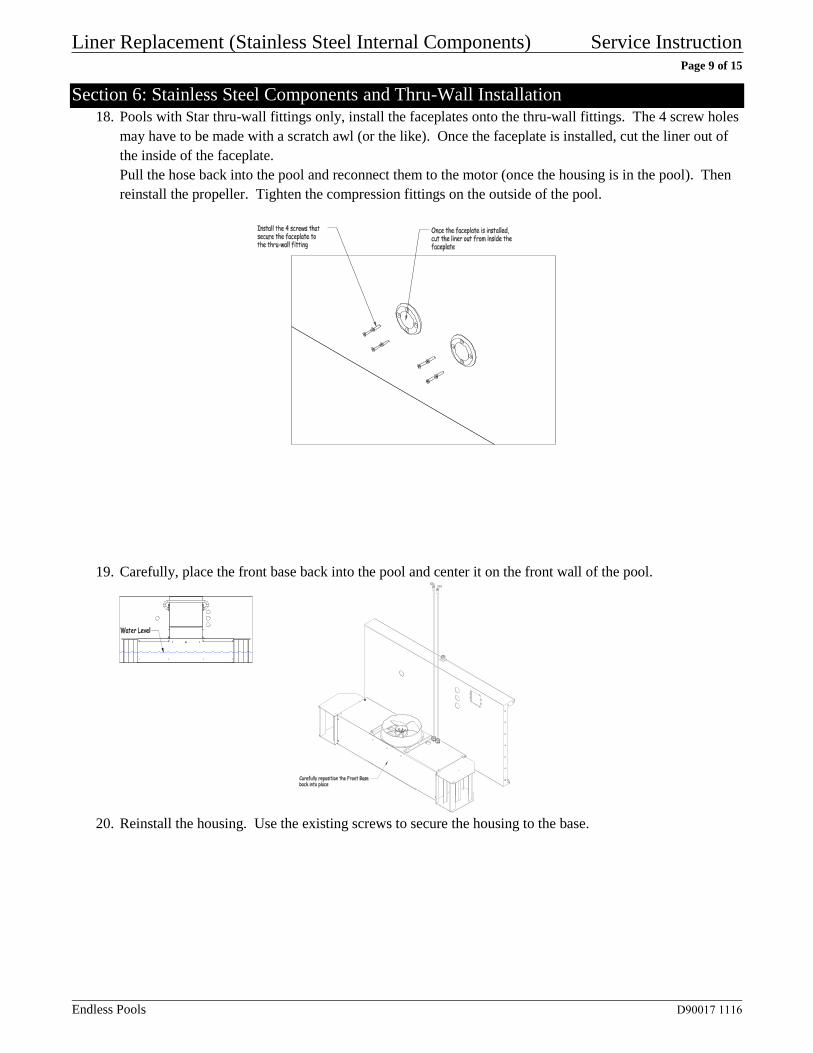
Section 6: Stainless Steel Components and Thru-Wall Installation 18. Pools with Star thru-wall fittings only, install the faceplates onto the thru-wall fittings. The 4 screw holes
may have to be made with a scratch awl (or the like). Once the faceplate is installed, cut the liner out of
the inside of the faceplate.
Pull the hose back into the pool and reconnect them to the motor (once the housing is in the pool). Then
reinstall the propeller. Tighten the compression fittings on the outside of the pool.
19. Carefully, place the front base back into the pool and center it on the front wall of the pool.
20. Reinstall the housing. Use the existing screws to secure the housing to the base.

Liner Replacement (Stainless Steel Internal Components) Service Instruction
Page 10 of 15
Endless Pools D90017 1116
21. Slide the vertical grill back into its track and then reinstall the throat. There are a total of 7 screws; 3
across the front and 2 on each side.
22. Carefully install the stainless steel benches and rear base. Use the existing screws to attach the steel
components to the PVC supports. Do not install the corner covers yet.
WARNING
The cylinder surrounding
the propeller is sharp. Take
care when working around
the cylinder to avoid bodily
injury.

Liner Replacement (Stainless Steel Internal Components) Service Instruction
Page 11 of 15
Endless Pools D90017 1116
23. Now that the swim current components have been installed, continue filling the pool until approximately
3” (7cm) below the next lowest thru-wall panel cutout. Once the water level is above the benches, the
four corner covers can be installed.
24. The next thru-wall fitting will be a suction thru-wall fitting, jet bulkhead fitting, or an underwater light.
If the pool has the optional hydrotherapy jet option, then replace the suction fitting with the provided
suction fitting. Make sure to apply Teflon thread sealant to the threads of the jet suction fitting. When
installing the bulkhead fitting add the additional gasket as shown below. Use the below diagrams as
reference when installing any of these fittings. If installing the jet bulkhead, place a film of silicone on
each side of the gasket prior to installing. Replace the existing Water Quality System secondary suction
fitting with the new suction fitting provided with the liner replacement parts kit. Make sure to apply
Teflon thread sealant to the threads of the jet suction fitting.

Liner Replacement (Stainless Steel Internal Components) Service Instruction
Page 12 of 15
Endless Pools D90017 1116
Once that fitting has been installed, continue filling the pool until the water level is approximately 3”
(7cm) below the next lowest panel hole and install the appropriate fitting. Either the thru-wall fittings
will have to be plugged on the inside of the pool or the external connections will have to be made to
prevent water from escaping the pool. Repeat this process until the water level is 3” (7cm) below the
skimmer opening. When installing the submersible hose assemblies, make sure that they are going
through the appropriate panel holes. Attach the lower shroud bracket onto the front base.
Thru-Wall Fitting Jet Bulkhead Fitting
Underwater Light Fitting
LED Light Fitting
Suction Thru-Wall Fitting (Jets or WQS)

Liner Replacement (Stainless Steel Internal Components) Service Instruction
Page 13 of 15
Endless Pools D90017 1116
25. Place the triangular shroud over top of the submersible hoses and then attach it to the upper and lower
shroud brackets using the existing screws. Reinstall the screws securing the housing to the pool wall.
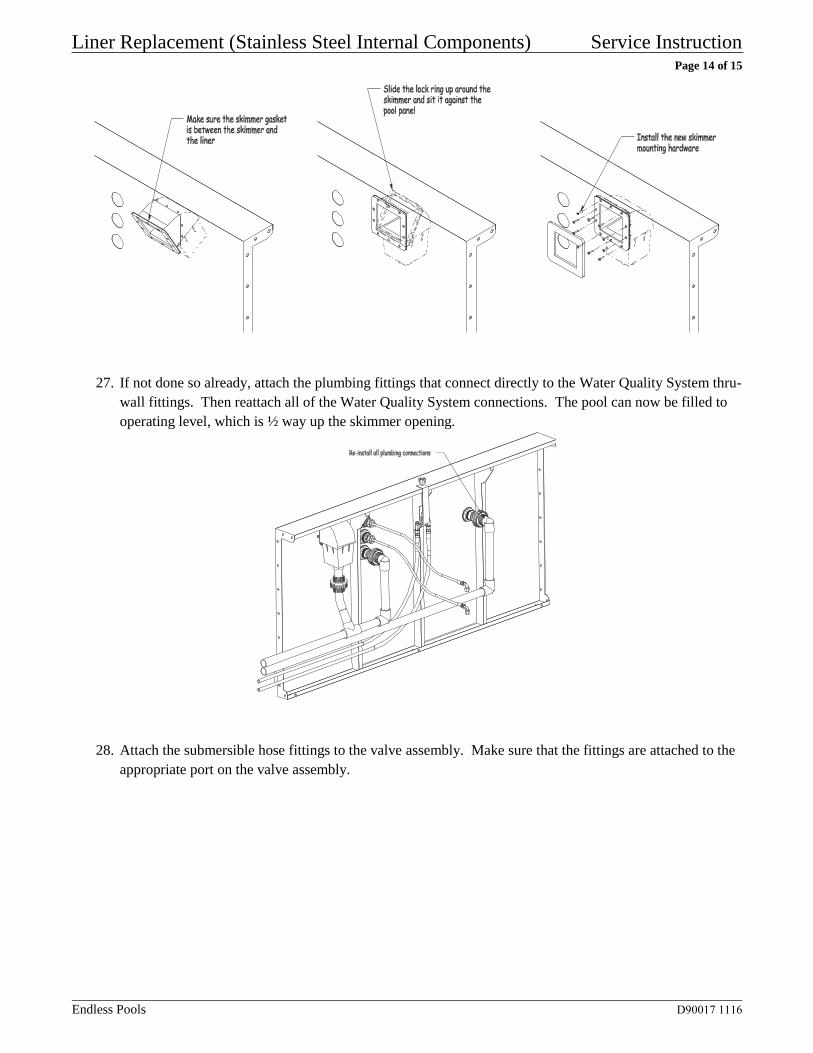
26. Cut the skimmer opening with a sharp utility knife. Place the skimmer gasket onto the skimmer flange.
Make sure to place a bead of silicone on each side of the cork gasket. Secure the skimmer to the pool
panel with the existing hardware. Place the faceplate over top of the skimmer flange.
Liner Replacement (Stainless Steel Internal Components) Service Instruction
Page 14 of 15
Endless Pools D90017 1116
27. If not done so already, attach the plumbing fittings that connect directly to the Water Quality System thru-
wall fittings. Then reattach all of the Water Quality System connections. The pool can now be filled to
operating level, which is ½ way up the skimmer opening.
28. Attach the submersible hose fittings to the valve assembly. Make sure that the fittings are attached to the
appropriate port on the valve assembly.

Liner Replacement (Stainless Steel Internal Components) Service Instruction
Page 15 of 15
Endless Pools D90017 1116