linux 101: back up your data
TRANSCRIPT
TUTORIAL BETTER BACKUPS
www.linuxvoice.com
WHY DO THIS?• Understand common
Linux/Unix archiving tools.
• Save time with incremental backups.
• Encrypt your data for maximum security.
LINUX 101: BACK UP YOUR DATAData loss can be agonising, whether it involves business documents or family photos. Never lose a file again with our guide!
TUTORIAL
82
MIKE SAUNDERS
L inus Torvalds has made some classic quipsover the years. Back in 1996, when announcing the release of Linux kernel 2.0.8, he noted that
his hard drive was close to buying the farm, and added: “Only wimps use tape backup; real men just upload their important stuff on FTP, and let the rest of the world mirror it.”
And it’s a good point, especially today. If you’re an open source software developer, you probably don’t keep backups of your code, as it’ll already be on SourceForge, or GitHub, or a million other repositories and mirror sites. But what about personal files? What
about your music collection, letters, financial documents, family snaps and so forth?
You can upload them onto a cloud storage service such as Dropbox, but there’s no guarantee that the service will be around in the future, nor that government spooks aren’t poking around inside your data. Ultimately, the best way to keep your data safe and secure is to make your own backups and maintain full control – and that’s what we’ll focus on now. We’ll start off looking at the basic archiving tools included with every Linux distro, then examine more advanced options for incremental backups and encryption.
ROLLING UP A TARBALL1
Many Linux and Unix commands have intriguingnames that hark back to the early days of computing. For instance, the tool that’s used to join a bunch of files together into a single file is called tar, which is a contraction of “tape archiver”. Yes, it’s a program that was originally designed for data tapes (we last used one in 2004), which aren’t so much in common use today, but its job is still important.
You see, the Unix philosophy is all about small anddistinct tools doing individual jobs, so that users can plug them together. (In contrast to giant megalithic applications that do a million things ineptly.) So when you create a compressed archive of some files in Linux, you actually end up using two programs. Take this command, for instance:tar cfvz mybackup.tar.gz folder1/ folder2/
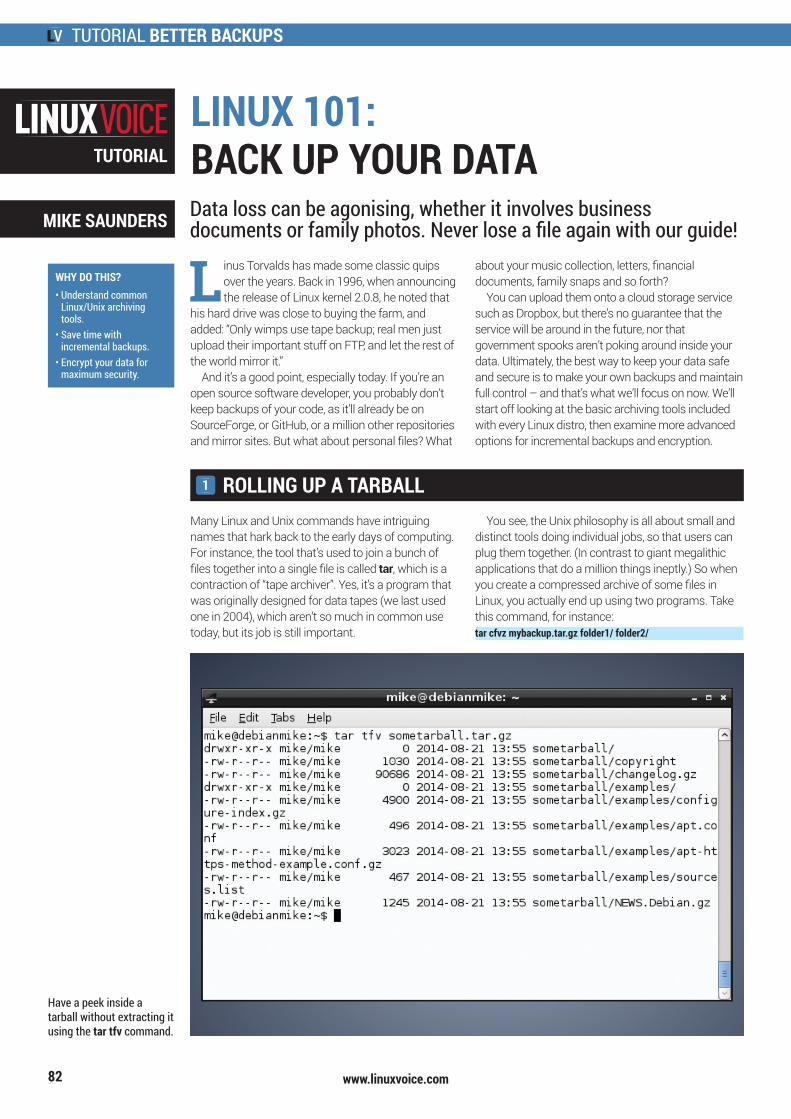
Have a peek inside a tarball without extracting it using the tar tfv command.
BETTER BACKUPS TUTORIAL
www.linuxvoice.com 83
This creates a single, compressed file (a tarball)called mybackup.tar.gz, containing folder1 and folder2 – you can add as many files or directories as you want onto the end. Now, we’re using tar here to create the tar archive (a single file), hence the .tar part of the filename. But the z option to the command says that we want to run it through the gzip compression program as well, so we end up with .tar.gz. (The c option means create an archive, f means to create a file (instead of spitting the output to the terminal), and v means verbose, so it shows each file as it’s being added.)
You can change the compression program that’s used. For instance:tar cfvj mybackup.tar.bz2 folder1/ folder2/tar cfvJ mybackup.tar.xz folder1/ folder2/
Here we’ve replaced the z (gzip) option with j and J, which means bzip2 and xz respectively. These programs use different algorithms to compress data, and the results can vary widely. The table below shows the time required to compress a 700MB folder containing a mixture of executable files, along with the resulting file size:
So you can see that xz is much, much slower than gzip, but it’s also considerably better at compression. Different compression tools work better with different file types (eg some are more suited to audio data), so for your own backups, it’s worth trying them all and seeing what results you get. You also need to consider the trade-off between speed and size: if your backup
THE MIGHTY POWER OF RSYNC2
So we’ve seen how to make simple compressedbackups of data, but it’s time to delve a bit deeper with the hugely versatile rsync tool. As its core, rsync helps you to synchronise data between a source and a destination directory, but various features make it especially useful for backup purposes. Another plus point is that it’s ubiquitous – you can find it in virtually every Linux distribution, and it’s also installed by default in Mac OS X and available for Windows.
Let’s say you have a folder called myfiles with a few items in it, and an empty folder called backup. To copy the files from the former to the latter:rsync -avh myfiles/ backup/
The -a option here means archive mode, so thatmetadata such as timestamps and permissions are preserved, while -v means verbose (providing extra information) and -h presents the information in a more human-readable form. When you execute the command, you’ll see a list of files being copied, along
with the total amount of data that was transferred.Now, you’re probably thinking: “Big wow! I can do that with a normal cp operation, right?” That’s true, but try running the same command again – and notice the amount of data that’s copied. Just a few bytes. Helpfully, rsync is cleverer than cp and checks to see if files already exist before copying them. And here’s where it’s great for backup purposes: it makes incremental backups, and doesn’t shift data around unnecessarily.
For example: say you’ve been using a USB key to back up important files each month. The last backup of /home/you was 10GB. Since the last backup,you’ve only created a few extra files and your home directory contains 11GB. If you use rsync to perform the backup, it will only transfer the 1GB that has changed in the meantime, and not copy the whole 11GB over mindlessly. This saves a lot of time (and makes flash media last longer!).
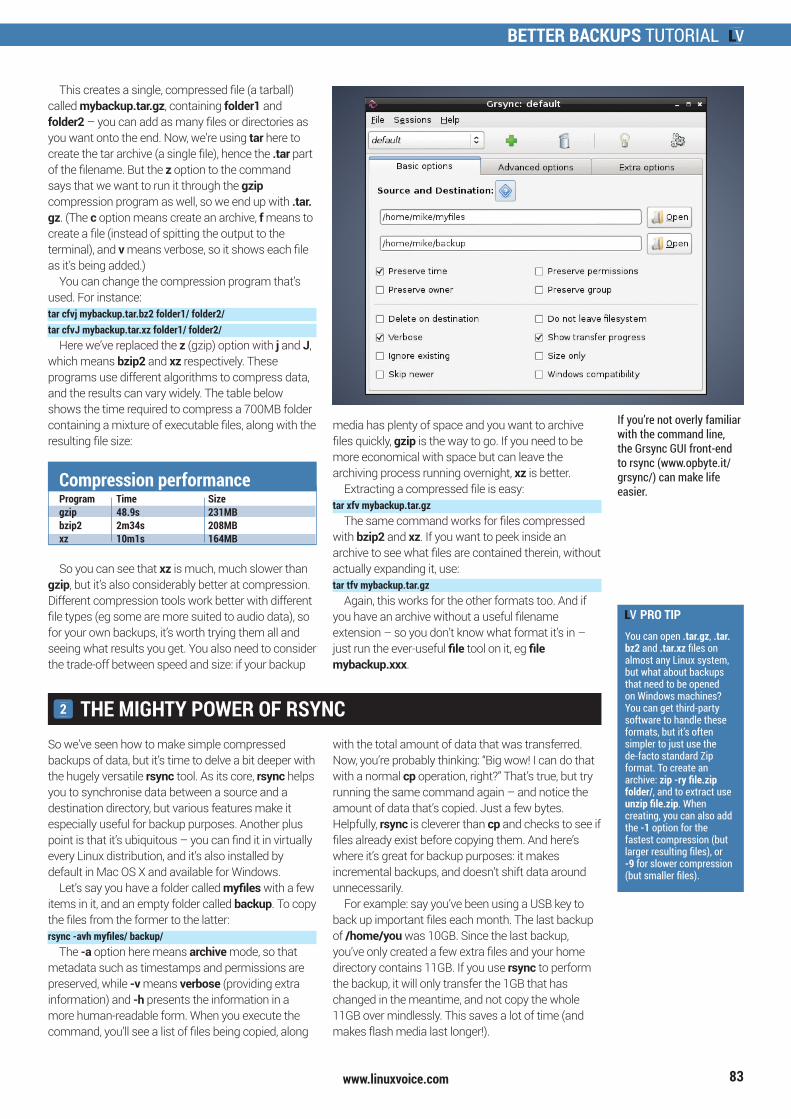
If you’re not overly familiar with the command line, the Grsync GUI front-end to rsync (www.opbyte.it/grsync/) can make life easier.
Compression performanceProgram Time Sizegzip 48.9s 231MBbzip2 2m34s 208MBxz 10m1s 164MB
PRO TIPYou can open .tar.gz, .tar.bz2 and .tar.xz files on almost any Linux system, but what about backups that need to be opened on Windows machines? You can get third-party software to handle these formats, but it’s often simpler to just use the de-facto standard Zip format. To create an archive: zip -ry file.zip folder/, and to extract use unzip file.zip. When creating, you can also add the -1 option for the fastest compression (but larger resulting files), or -9 for slower compression (but smaller files).
media has plenty of space and you want to archivefiles quickly, gzip is the way to go. If you need to be more economical with space but can leave the archiving process running overnight, xz is better.
Extracting a compressed file is easy:tar xfv mybackup.tar.gz
The same command works for files compressedwith bzip2 and xz. If you want to peek inside an archive to see what files are contained therein, without actually expanding it, use:tar tfv mybackup.tar.gz
Again, this works for the other formats too. And ifyou have an archive without a useful filename extension – so you don’t know what format it’s in – just run the ever-useful file tool on it, eg file mybackup.xxx.
TUTORIAL BETTER BACKUPS
www.linuxvoice.com84
By default, rsync won’t delete files from thedestination directory if they have been removed from the source, but you can change that with:rsync -avh --delete myfiles/ backup/
This is useful if you want your backups to be simplesnapshots from certain points in time, and you don’t want old and unwanted files lingering around forever.
Another great feature of rsync is the ability to narrow down the range of files to be stored. Try this:rsync -avh --include=”*.jpg” --exclude=”*” myfiles/ backup/In this case, we’re using wildcards to tell rsync to copyall files that end in .jpg, and exclude everything else (the asterisk means “all text” – ie any filename). This is handy when your home directory is a jumble of stuff, and you just want to back up your MP3, Ogg or FLAC files. (Use multiple --include options if you want to copy several types of file.)
Finally in this section, rsync also works a treat when copying files to remote servers. This helps if you have a NAS box somewhere on your home network, for
instance, and you want to back up your desktop orlaptop files to it. The simplest way to do this is via SSH, so if you have an SSH server running on the remote machine, you can do:rsync -avhze ssh myfiles/ [email protected]:backups/
The two options we’ve added here are z (tocompress the data going across the network), and e followed by ssh to tell rsync which protocol we’re using. Then we specify the local folder as usual, followed by a user and hostname combination, and then the folder in that user’s home directory where the backup should be created.
Oh, and a last bit of efficiency awesomeness: when large files have been modified, rsync can detect which bits have changed, so it doesn’t have to transmit entire files each time. If you take a large file and tack an extra byte on the end (eg echo x >> file), and then run rsync again, you’ll see that it only sends the chunk that has changed. This really cuts down on bandwidth usage.
PRO TIPSomtimes you’ll see .tar.gz and .tar.bz2 filenames written in a slightly shorter form: .tgz and .tbz2. This can help when files are being transmitted to older versions of certain operating systems that could get confused by multiple full-stop characters (naming no names…).
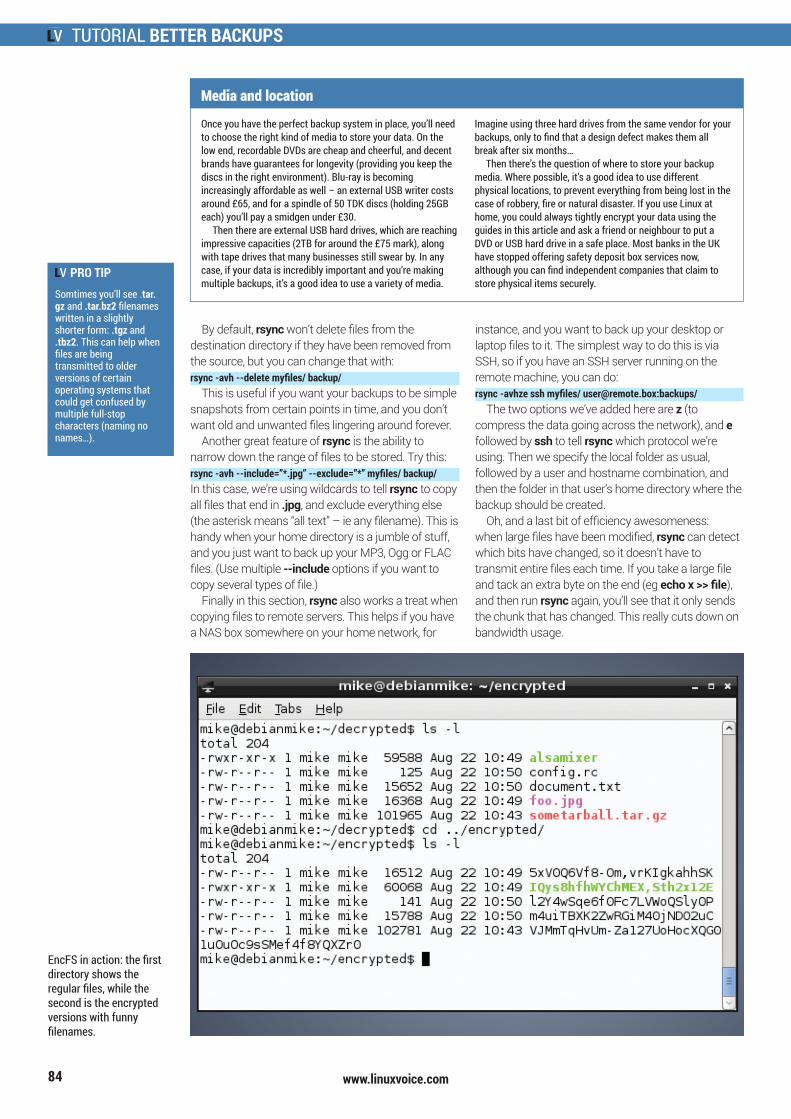
EncFS in action: the first directory shows the regular files, while the second is the encrypted versions with funny filenames.
Media and location
Once you have the perfect backup system in place, you’ll need to choose the right kind of media to store your data. On the low end, recordable DVDs are cheap and cheerful, and decent brands have guarantees for longevity (providing you keep the discs in the right environment). Blu-ray is becoming increasingly affordable as well – an external USB writer costs around £65, and for a spindle of 50 TDK discs (holding 25GB each) you’ll pay a smidgen under £30.
Then there are external USB hard drives, which are reaching impressive capacities (2TB for around the £75 mark), along with tape drives that many businesses still swear by. In any case, if your data is incredibly important and you’re making multiple backups, it’s a good idea to use a variety of media.
Imagine using three hard drives from the same vendor for your backups, only to find that a design defect makes them all break after six months…
Then there’s the question of where to store your backup media. Where possible, it’s a good idea to use different physical locations, to prevent everything from being lost in the case of robbery, fire or natural disaster. If you use Linux at home, you could always tightly encrypt your data using the guides in this article and ask a friend or neighbour to put a DVD or USB hard drive in a safe place. Most banks in the UK have stopped offering safety deposit box services now, although you can find independent companies that claim to store physical items securely.
BETTER BACKUPS TUTORIAL
www.linuxvoice.com 85
Mike Saunders stores his data by printing out hex dumps and laminating the sheets. His cellar holds a whopping 30MB!
ENCRYPTING YOUR DATA3
And here we come to arguably the most importantstep in a backup procedure: encrypting your data. Obviously, this is essential if you’re going to store your files in a cloud-based service such as Dropbox, but it’s also well worth considering for locally stored backups as well. If someone gets physical access to your machines and nabs the drives, at least they won’t get their mitts on your critical data.
If you’ve looked online for encryption tutorials before, you might’ve been overwhelmed by all of the options available. That’s not a bad thing per se – it’s good that there are so many methods and algorithms in widespread usage. Monocultures are normally bad, and if everyone were using the same encryption system and a fatal flaw in it were discovered, we’d all be doomed. So here are a couple of possibilities.
The simplest method is to use GnuPG like so:gpg -c --cipher-algo AES256 filename
You’ll be asked to enter a password (twice, toprevent typos from encrypting your file with the wrong password). The file will then be encrypted using a symmetric cypher, AES-256, which is strong enough for general usage, and the resulting file will be given a .gpg extension. To decrypt it, simply enter:gpg filename.gpg
And that’s it. It’s also possible to encrypt usingpublic/private key combinations, although that’s a more complicated process and beyond the scope of this tutorial. But if you’re interested, see http://serverfault.com/a/489148.
Extra security with EncFSInstead of encrypting individual files or tarballs, youcan also add a layer of encryption onto your filesystem. So you can work with files normally, but when you shut down your machine, they’re automatically stored in an encrypted format. To do
this, install EncFS; it’s a userspace filesystem that’savailable in most distros, and in Debian/Ubuntu it’s just an apt-get install encfs away.
Firstly, create two directories in your home directory like so:mkdir ~/encrypted ~/decrypted(If you’re not too familiar with the shell, ~ is a shortcutfor your home directory.)
Now, the first directory here will be used as a permanent store for your data (in encrypted format), while the latter will be used on a temporary basis when you want to access the files. Enter this:encfs ~/encrypted ~/decrypted
When prompted, hit p for ‘paranoid’ mode, and thenenter a password (preferably long) that will be used to secure your data. The encrypted directory will now be mounted in decrypted, so try copying some files into the latter. Everything looks normal at this stage – you can work with your files just like in any other directory. Switch into the encrypted directory, however, and run ls – you’ll see that there is the same number of files as in decrypted, but they all have bizarre names like XEfn2,34CC-Bu3hs.
These are the encrypted versions, in which the data permanently lives. So once you’re finished doing your work in the decrypted directory, enter:cd ~fusermount -u ~/decrypted
This unmounts the encrypted drive from decrypted, so the latter is now empty; as mentioned, it’s just a temporary place for working with the readable data. The permanent store is in encrypted, and you can access it at any point by repeating the previous encfs ~/encrypted ~/decrypted command and entering your password.
Alternative tools
We’ve focused on a core set of Linux tools in this article, but you can find more specialised open source backup solutions as well. Bacula (www.bacula.org) is a notable example that focuses on enterprises and backing up data over the network. To give you an example of its target users, it lets you print out special barcodes to stick on data tapes that can be then chosen in a tape drive auto-changer.
BackupPC (http://backuppc.sf.net), meanwhile, uses a client/server model, where the server organises backup schedules for multiple clients on the network. It’s a complicated program, but thanks to its web-based administration panel, you don’t have to faff around too much at the command line to set it up.
For home desktop users, Areca Backup (www.areca-backup.org) is a mature and well-designed app written in Java, while Back In Time (http://backintime.le-web.org) strives to provide a snapshot-based alternative to Apple’s Time Machine system.
PRO TIPComplex rsync operations can do potential damage, such as overriding important data, so it’s often worth adding the --dry-run option when you first run the command. This will show you exactly what rsync intends to do, without actually doing it. Once you’re satisfied that everything is in order, re-run the command without it.
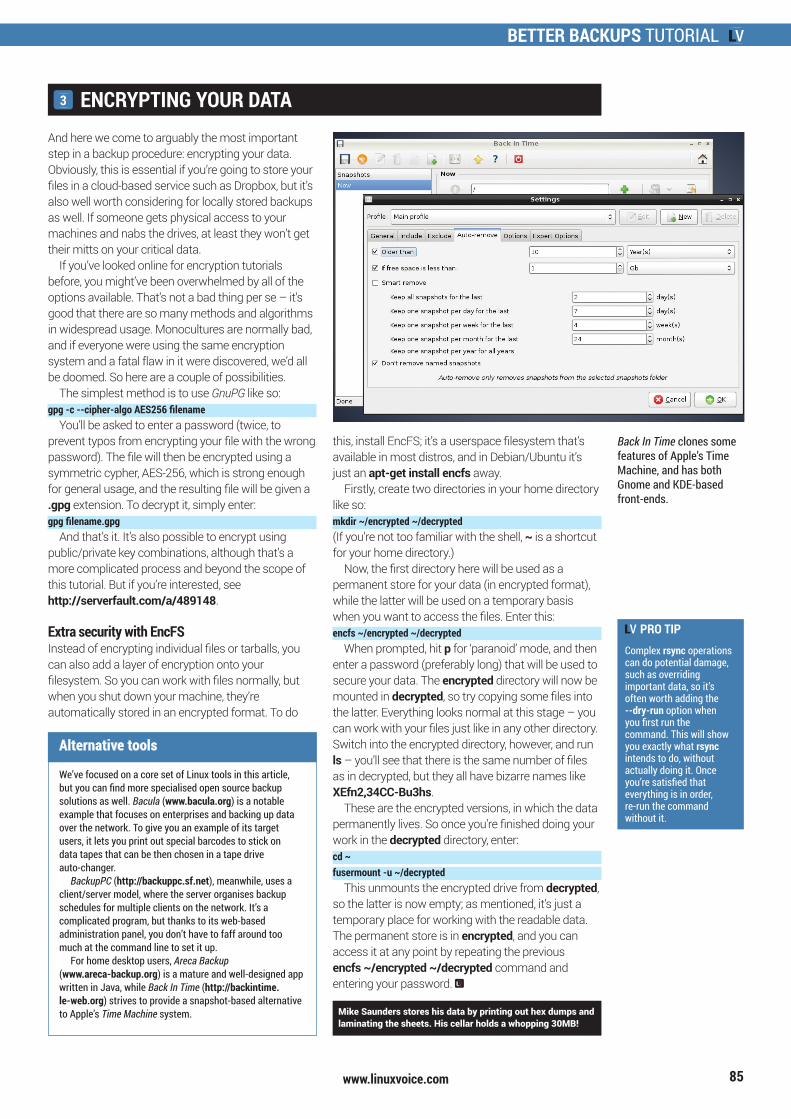
Back In Time clones some features of Apple’s Time Machine, and has both Gnome and KDE-based front-ends.