linux os installation guide rhel 6 update 4
TRANSCRIPT
7/23/2019 Linux OS Installation Guide RHEL 6 Update 4
http://slidepdf.com/reader/full/linux-os-installation-guide-rhel-6-update-4 1/53
Document ID: 400-DOC000070-E
Linux OS Installation GuideRHEL 6 update 4
Release: Standard Release Version: 1.0

7/23/2019 Linux OS Installation Guide RHEL 6 Update 4
http://slidepdf.com/reader/full/linux-os-installation-guide-rhel-6-update-4 2/53
Copyright Notice
Copyright © 2000-2013. Tejas Networks Ltd. All rights reserved. No part of this book or manual may be
reproduced or transmitted in any form or by any means, electronic or mechanical, including photocopying,recording, or by any information storage and retrieval system, without the express written permission from Tejas Networks Ltd.
Warning and Disclaimer
While every effort has been made to make this document as complete and as accurate as possible, TejasNetworks does not accept any responsibility for poorly designed or malfunctioning networks. The informationprovided in this document is on an “as is” basis and is subject to change without prior notice. The author, Tejas Networks, shall have neither liability nor responsibility to any person or entity with respect to any loss ordamage arising from the information contained in this document or from the use of equipment or softwarethat might accompany it. The opinions expressed in this document are not necessarily those of Tejas Networks.
Trademark Acknowledgments
All terms mentioned in this book that are known trademarks or service marks have been appropriatelycapitalized. All trademarks duly acknowledged. Tejas Networks cannot attest to the accuracy of third-partyinformation. Use of a term in this document should not be regarded as affecting the validity of any trademarkor service mark.
Technical Support Information
Tejas customers can contact Tejas Support Center (TSC) 24x7x365 for any assistance through helpline, fax oremail.
- Phone(s): +91 80 41719090, +91 80 26591082, +91 80 26591080
- Fax: +91 80 26591079
- Email: [email protected]
- Skype: tscsupport123
- Web: www.tejasnetworks.com
Revision History
Version Date Modifications Made
0.3 7 October 2013 Standard Release
7/23/2019 Linux OS Installation Guide RHEL 6 Update 4
http://slidepdf.com/reader/full/linux-os-installation-guide-rhel-6-update-4 3/53
Your Feedback is valuable to us!
Your opinion is of great value and will help us improve the quality of our product documentation and offerbetter services to you. Please take few moments to provide us your opinion of this document. Send yourcomments to [email protected]
Your evaluation of thisdocument
Presentation: (Introductions, Procedures, Illustrations, Completeness, Level ofDetail, Organization, Appearance)
Good Fair Average Poor Bad N/A
Intelligibility: (Language, Vocabulary, Readability and Clarity, Technical Accuracy,Content)
Good Fair Average Poor Bad N/A
Accessibility: (Contents, Index, Headings, Numbering, Glossary)
Good Fair Average Poor Bad N/A
Your suggestions forimproving thisdocument
Improve theoverview/introduction
Make it moreconcise/brief
Improve theContents
Add more step-by-stepprocedures/ tutorials
Improve the organization Add moretroubleshootinginformation
Include more figures Make it less technical Add more examples
Add more/better quickreference aids
Add more detail Improve the index
Other Suggestions:
If you wish to be contacted regarding your comments, please provide your contact details:
Name: Company:
Postcode: Address:
Telephone: Email:
7/23/2019 Linux OS Installation Guide RHEL 6 Update 4
http://slidepdf.com/reader/full/linux-os-installation-guide-rhel-6-update-4 4/53
iv
Table of Contents
Using This Guide 9
Who This Guide Is For ................................................................................................................. 9
What This Guide Covers ............................................................................................................... 9
Safety Signs Conventions ............................................................................................................ 10
Typographical Conventions ........................................................................................................ 11
Mouse Operation Conventions .................................................................................................. 11
Using Tejas Product Documentation ........................................................................................ 12
Placing Rhel6.4 DVD in DVD ROM and Setting Option Boot from DVD 13
Procedure .................................................................................................................................. 13
Index 53
7/23/2019 Linux OS Installation Guide RHEL 6 Update 4
http://slidepdf.com/reader/full/linux-os-installation-guide-rhel-6-update-4 5/53
v
List of FiguresFigure 1: RHEL Welcome Screen ...................................................................................................... 14 Figure 2: Media Test Screen ............................................................................................................... 15 Figure 3: Home Screen ........................................................................................................................ 16 Figure 4: Language Screen .................................................................................................................. 17 Figure 5: Keyboard Layout Screen .................................................................................................... 18 Figure 6: Storage Configuration Screen ............................................................................................ 19 Figure 7: Data Configuration Screen ................................................................................................. 20 Figure 8: Hostname Screen ................................................................................................................. 21 Figure 9: Network Configuration Screen .......................................................................................... 22 Figure 10: Editing System ethx Screen .............................................................................................. 23 Figure 11: Time Zone Screen ............................................................................................................. 24 Figure 12: Root Password Screen ...................................................................................................... 25 Figure 13: Weak Password Screen ..................................................................................................... 26 Figure 14: Installation Layout Screen ................................................................................................ 27 Figure 15: Partition Screen .................................................................................................................. 28 Figure 16: Create Partition Type Screen ........................................................................................... 29 Figure 17: Add Partition Screen ......................................................................................................... 30 Figure 18: List of Partitions Screen ................................................................................................... 31 Figure 19: Format Warnings Screen .................................................................................................. 32 Figure 20: Selecting Device Screen .................................................................................................... 33 Figure 21: Boot Loader Screen ........................................................................................................... 34 Figure 22: Package List Screen ........................................................................................................... 35 Figure 23: Dependency Check Screen ............................................................................................... 36 Figure 24: Starting Installation Process Screen ................................................................................ 36 Figure 25: Grub (Boot Loader) Screen ............................................................................................. 37 Figure 26: Booting Progress Bar Screen ........................................................................................... 38 Figure 27: First Boot Welcome Screen ............................................................................................. 38 Figure 28: License Agreement Screen ............................................................................................... 39 Figure 29: Create Normal Local User Screen................................................................................... 40 Figure 30: Date and Time Screen....................................................................................................... 40 Figure 31: Kernel Dump Screen ........................................................................................................ 41 Figure 32: Grub (Boot Loader) Screen ............................................................................................. 42 Figure 33: Booting Progress Bar Screen ........................................................................................... 43 Figure 34: Login Screen ....................................................................................................................... 43 Figure 35: Login Screen ....................................................................................................................... 44 Figure 36: Root Login Warning Screen............................................................................................. 44 Figure 37: Configuration Screen ........................................................................................................ 45 Figure 38: Firewall Configuration Screen ......................................................................................... 45 Figure 39: Firewall Configuration Screen ......................................................................................... 46 Figure 40: Warning Screen .................................................................................................................. 47 Figure 41: RHN Register Screen ........................................................................................................ 47 Figure 42: Registration Screen ............................................................................................................ 48 Figure 43: System Registration Screen .............................................................................................. 49

7/23/2019 Linux OS Installation Guide RHEL 6 Update 4
http://slidepdf.com/reader/full/linux-os-installation-guide-rhel-6-update-4 6/53
vi
Figure 44: Red Hat Account Screen .................................................................................................. 50 Figure 45: SE Linux Configuration Screen ....................................................................................... 51 Figure 46: SE Linux Screen ................................................................................................................ 51

7/23/2019 Linux OS Installation Guide RHEL 6 Update 4
http://slidepdf.com/reader/full/linux-os-installation-guide-rhel-6-update-4 7/53
vii
List of Tables Table 1: Safety Sign Convention ..................................................................................................... 10 Table 2: Typographical Conventions ............................................................................................. 11 Table 3: Mouse Operation ............................................................................................................... 11

7/23/2019 Linux OS Installation Guide RHEL 6 Update 4
http://slidepdf.com/reader/full/linux-os-installation-guide-rhel-6-update-4 8/53
viii
This page is intentionally left blank
7/23/2019 Linux OS Installation Guide RHEL 6 Update 4
http://slidepdf.com/reader/full/linux-os-installation-guide-rhel-6-update-4 9/53
9
This section describes who should read this guide, how it is organized, and what conventions areused in the document.
Who This Guide Is For
This document is intended for Technician or Field engineers who install and commissionhardware or software at customer premices.
What This Guide Covers
This document provides information to install the product and to initially configure the productto the point of verifying proper operation of the product in the network. The informationprovided in this document includes hardware/software installation, provision specific protocols,user accounts, services, interfaces, and related items to support the design of the network, and/orthe network application in which the product is installed. This document does not coverinstallation of racks, electrical wiring, raceways, and other supporting equipments.
Chapter 1
Using This Guide
IN THIS CHAPTER
Who This Guide Is For ................................................................................... . 9
What This Guide Covers ................................................................................. . 9
Safety Signs Conventions .............................................................................. . 10
Typographical Conventions .......................................................................... . 11
Mouse Operation Conventions .................................................................... . 11
Using Tejas Product Documentation .......................................................... . 12

7/23/2019 Linux OS Installation Guide RHEL 6 Update 4
http://slidepdf.com/reader/full/linux-os-installation-guide-rhel-6-update-4 10/53
10
Linux OS Installation Guide RHEL 6 update 4 Document ID: 400-DOC000070-E
Safety Signs Conventions
To prevent personal injury, equipment damage, and service interruptions, you must follow allprecautionary messages given in the document in addition to all the local safety standards
required by your company. The following symbols inserted in the document at various placesrepresent important situations.
Table 1: Safety Sign Convention
Symbols Meaning Represents
Caution Situations that could result in equipment damage or loss ofdata.
Danger Situation that could cause bodily injury. Failure to observe thisprecaution may result in personal injury, death, or equipmentdamage.
Hot Surface Situation that could result in bodily burns.
Optical Safety Staring directly into the optical connector output beam maycause irreparable damage to your eyes and even leading to lossof eye sight.
Electric Shock Risk Failure to observe this precaution may result in personal injury,death, or equipment damage.
Static Discharge Warning
Handle the equipment wearing a grounding wrist strap todischarge the static buildup. Failure to observe this precautionmay result in equipment damage.
Rotating Part Keep fingers, screwdrivers, and other objects away from theopenings in the fan tray assembly. The fans might still beturning when you remove the fan assembly from the chassis.

7/23/2019 Linux OS Installation Guide RHEL 6 Update 4
http://slidepdf.com/reader/full/linux-os-installation-guide-rhel-6-update-4 11/53
11
Chapter 1 Using This Guide
Typographical Conventions
Before you start using this guide, it is important to understand the terms and typographicalconventions used in the document. The following kinds of formatting in the text identify special
information.
Table 2: Typographical Conventions
Formatting Convention Type of Information
rocedures
Step-by-step procedures. You can follow these instructions tocomplete a specific task.
Special Bold Items you must select, such as menu options, command buttons,or items in a list.
Emphasis Use to emphasize the importance of a point or for variable
expressions such as parameters.CAPITALS Names of keys on the keyboard, for example, SHIFT, CTRL, or
ALT.
KEY+KEY Key combinations for which the user must press and hold downone key and then press another, for example, CTRL+P, or ALT+F4.
NOTE: Means reader take note . Notes contain helpful suggestions orreferences to materials not contained in this manual.
Mouse Operation Conventions
Table 3: Mouse Operation
Convention Description
Click Refers to pressing and releasing a mouse button to select a screen object.
Double-click Refers to pressing and releasing a mouse button twice in succession while the cursoris positioned over an object on-screen.
Drag Refers to the function of the mouse by which an element on the screen of a monitor
is moved with the cursor, while holding down the mouse button and moving themouse.
Right-click Refers to pressing the right button on a two-button mouse.
Wheel button Refers to the third (middle) button on the mouse.
7/23/2019 Linux OS Installation Guide RHEL 6 Update 4
http://slidepdf.com/reader/full/linux-os-installation-guide-rhel-6-update-4 12/53
12
Linux OS Installation Guide RHEL 6 update 4 Document ID: 400-DOC000070-E
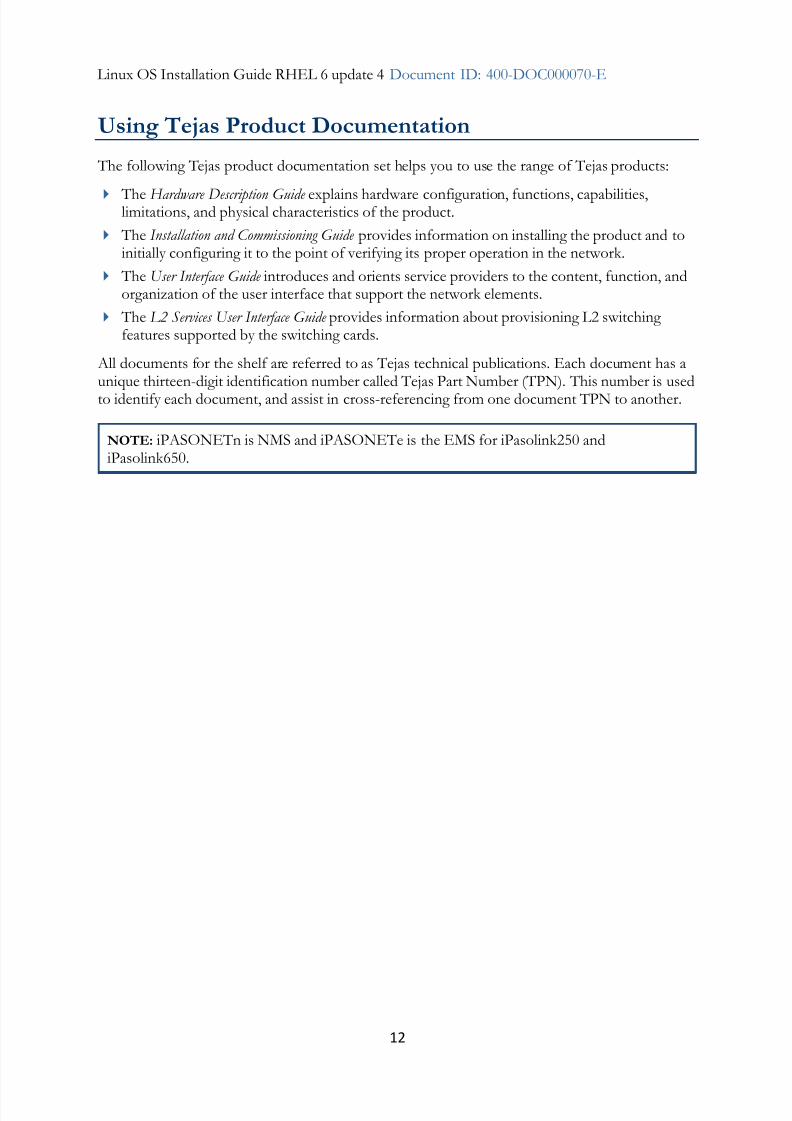
Using Tejas Product Documentation
The following Tejas product documentation set helps you to use the range of Tejas products:
The Hardware Description Guide explains hardware configuration, functions, capabilities,limitations, and physical characteristics of the product.
The Installation and Commissioning Guide provides information on installing the product and toinitially configuring it to the point of verifying its proper operation in the network.
The User Interface Guide introduces and orients service providers to the content, function, andorganization of the user interface that support the network elements.
The L2 Services User Interface Guide provides information about provisioning L2 switchingfeatures supported by the switching cards.
All documents for the shelf are referred to as Tejas technical publications. Each document has aunique thirteen-digit identification number called Tejas Part Number (TPN). This number is usedto identify each document, and assist in cross-referencing from one document TPN to another.
NOTE: iPASONETn is NMS and iPASONETe is the EMS for iPasolink250 andiPasolink650.

7/23/2019 Linux OS Installation Guide RHEL 6 Update 4
http://slidepdf.com/reader/full/linux-os-installation-guide-rhel-6-update-4 13/53
13
The Server Hardware and Software requirements to install Linux OS is mentioned in the "NMSand EMS Installation and Commissioning Guides". Please refer the corresponding Installationand Commissioning Guides for the details.
NOTE: The RHEL6.4 is installed using VMWare Player for documentation purpose. In actual
scenario, the RHEL6.4 is installed in Baremetal.
Procedure
Boot Server with CDROM as the first booting device.
Insert the first Linux CD into CD-ROM and restart the server. The server willboot by default if it is the first time installation on server, since there is nooperating system on hard disk
If you are upgrading Linux from any other version to RHEL6U4, insert the first
Linux CD into CD-ROM and restart the server. During initialization to enter intoboot menu press “F2” or “F12” or “Del” displayed at bottom line of screen whileserver entering into boot menu. From Boot menu select first boot device as CD-ROM
Chapter 2
Placing Rhel6.4 DVD in DVD ROM andSetting Option Boot from DVD
7/23/2019 Linux OS Installation Guide RHEL 6 Update 4
http://slidepdf.com/reader/full/linux-os-installation-guide-rhel-6-update-4 14/53
14
Linux OS Installation Guide RHEL 6 update 4 Document ID: 400-DOC000070-E
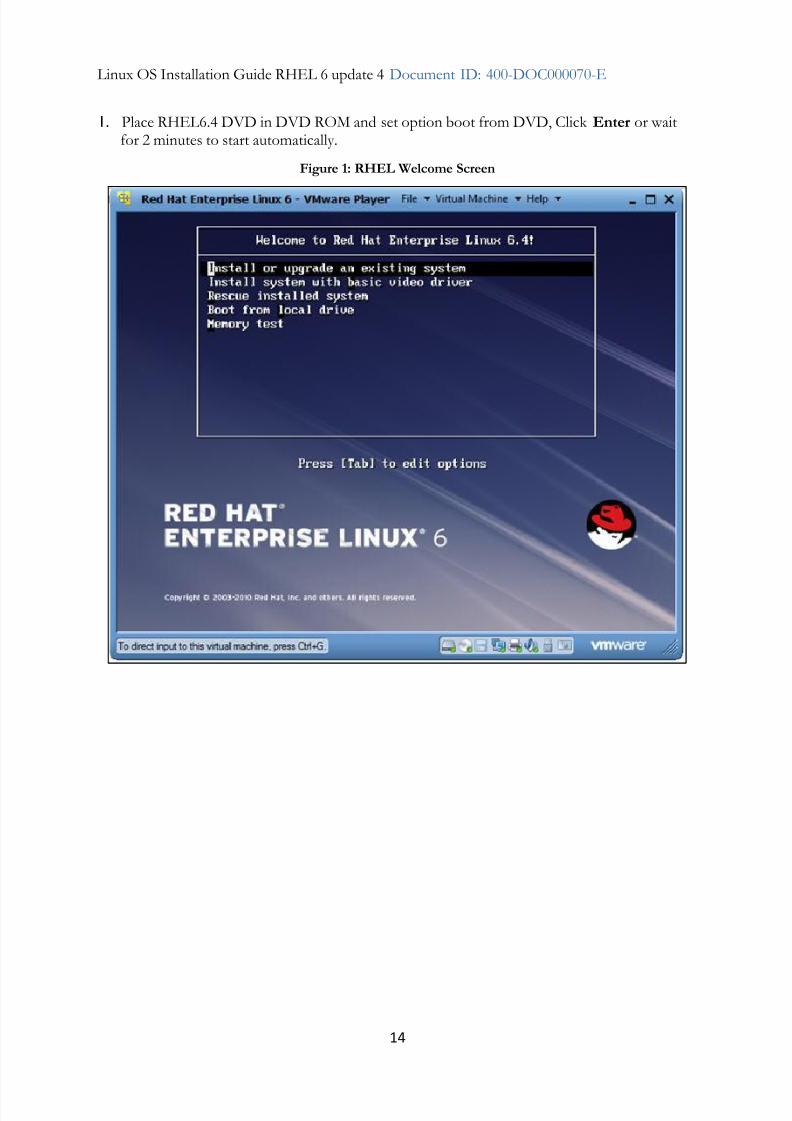
1. Place RHEL6.4 DVD in DVD ROM and set option boot from DVD, Click Enter or waitfor 2 minutes to start automatically.
Figure 1: RHEL Welcome Screen

7/23/2019 Linux OS Installation Guide RHEL 6 Update 4
http://slidepdf.com/reader/full/linux-os-installation-guide-rhel-6-update-4 15/53
15
Chapter 2 Placing Rhel6.4 DVD in DVD ROM and Setting Option Boot from DVD
2. Select and Click Install or upgrade an existing system. The Media test screen is displayed.
Figure 2: Media Test Screen
7/23/2019 Linux OS Installation Guide RHEL 6 Update 4
http://slidepdf.com/reader/full/linux-os-installation-guide-rhel-6-update-4 16/53
16
Linux OS Installation Guide RHEL 6 update 4 Document ID: 400-DOC000070-E
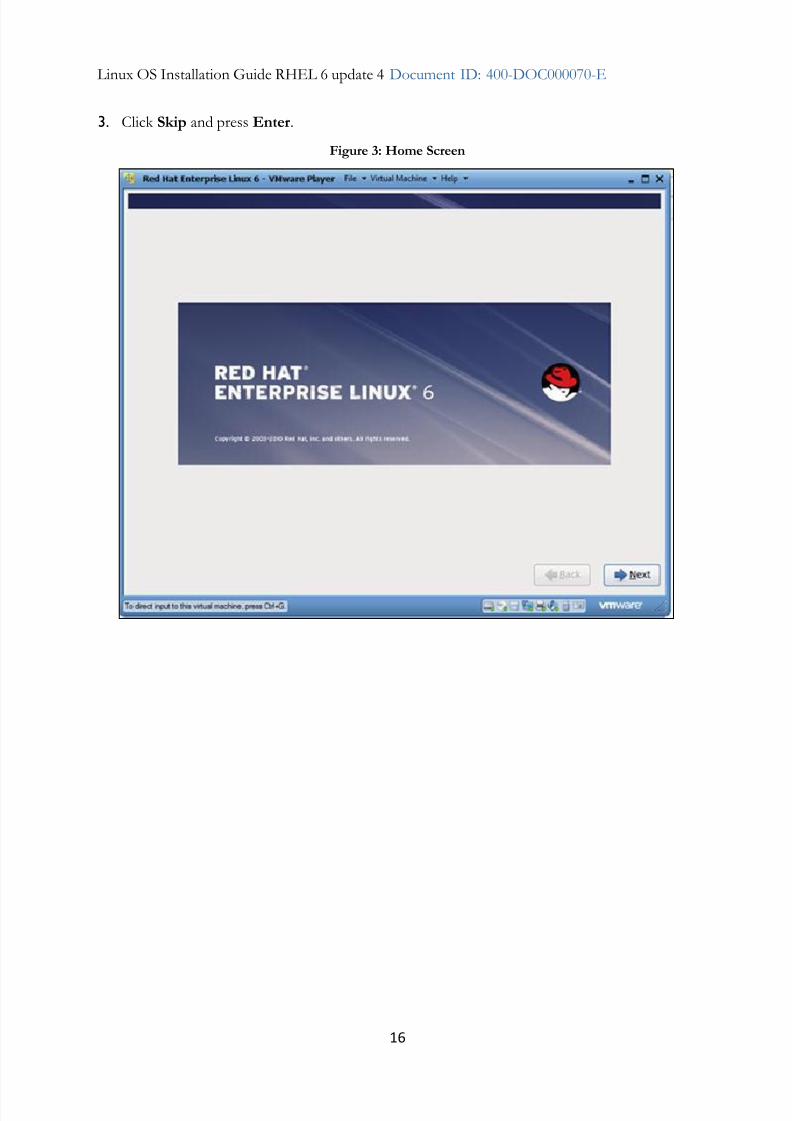
3. Click Skip and press Enter.
Figure 3: Home Screen

7/23/2019 Linux OS Installation Guide RHEL 6 Update 4
http://slidepdf.com/reader/full/linux-os-installation-guide-rhel-6-update-4 17/53
17
Chapter 2 Placing Rhel6.4 DVD in DVD ROM and Setting Option Boot from DVD
4. Click Next.
5. Choose the language.
Figure 4: Language Screen
7/23/2019 Linux OS Installation Guide RHEL 6 Update 4
http://slidepdf.com/reader/full/linux-os-installation-guide-rhel-6-update-4 18/53
18
Linux OS Installation Guide RHEL 6 update 4 Document ID: 400-DOC000070-E
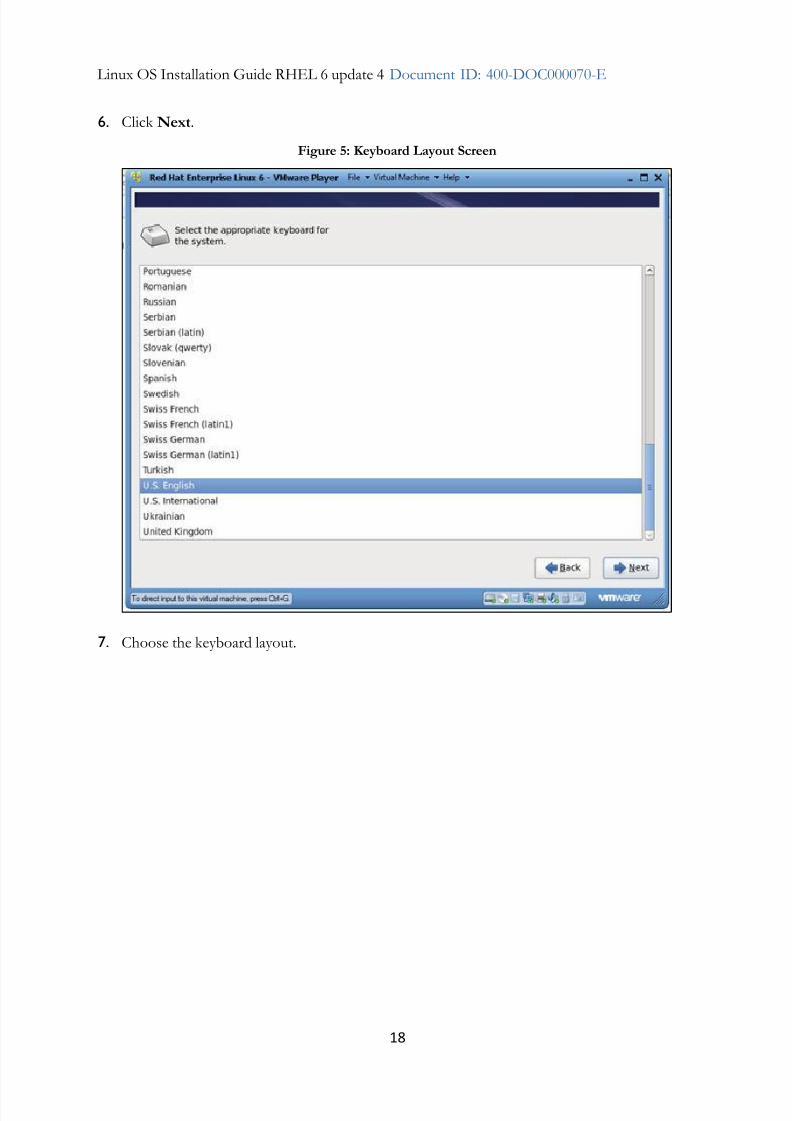
6. Click Next.
7. Choose the keyboard layout.
Figure 5: Keyboard Layout Screen
7/23/2019 Linux OS Installation Guide RHEL 6 Update 4
http://slidepdf.com/reader/full/linux-os-installation-guide-rhel-6-update-4 19/53
19
Chapter 2 Placing Rhel6.4 DVD in DVD ROM and Setting Option Boot from DVD
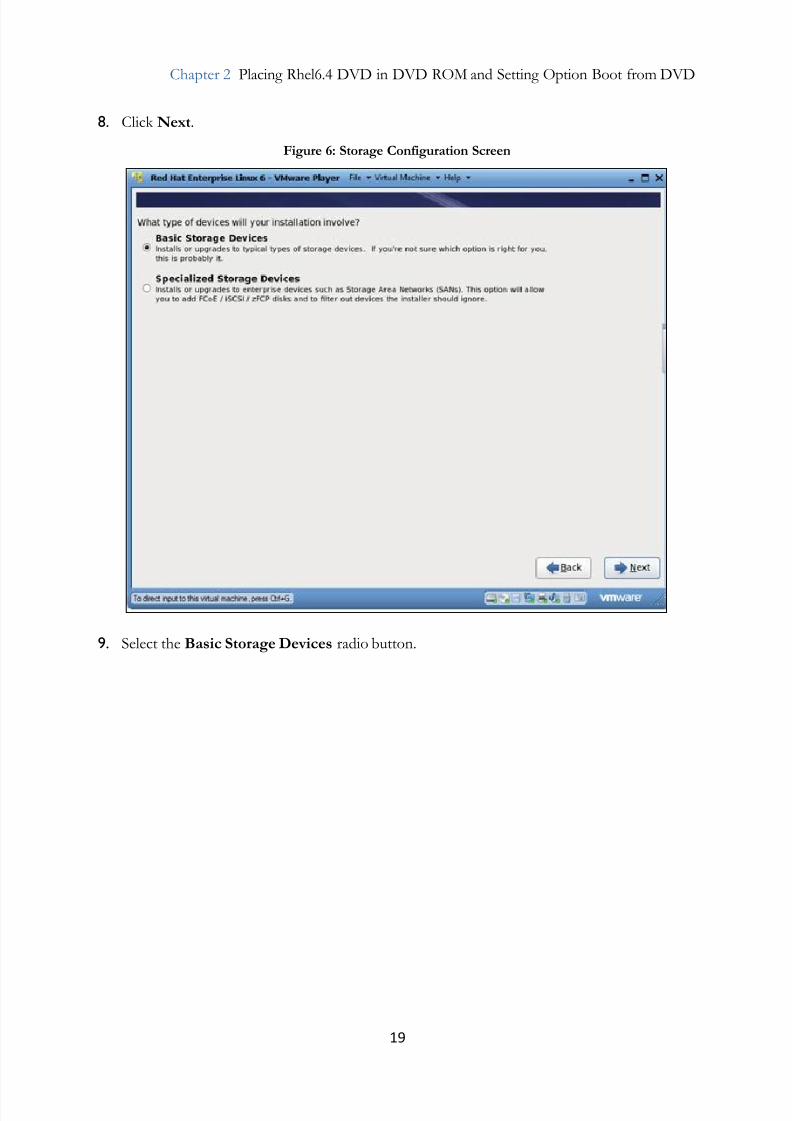
8. Click Next.
9. Select the Basic Storage Devices radio button.
Figure 6: Storage Configuration Screen
7/23/2019 Linux OS Installation Guide RHEL 6 Update 4
http://slidepdf.com/reader/full/linux-os-installation-guide-rhel-6-update-4 20/53
20
Linux OS Installation Guide RHEL 6 update 4 Document ID: 400-DOC000070-E
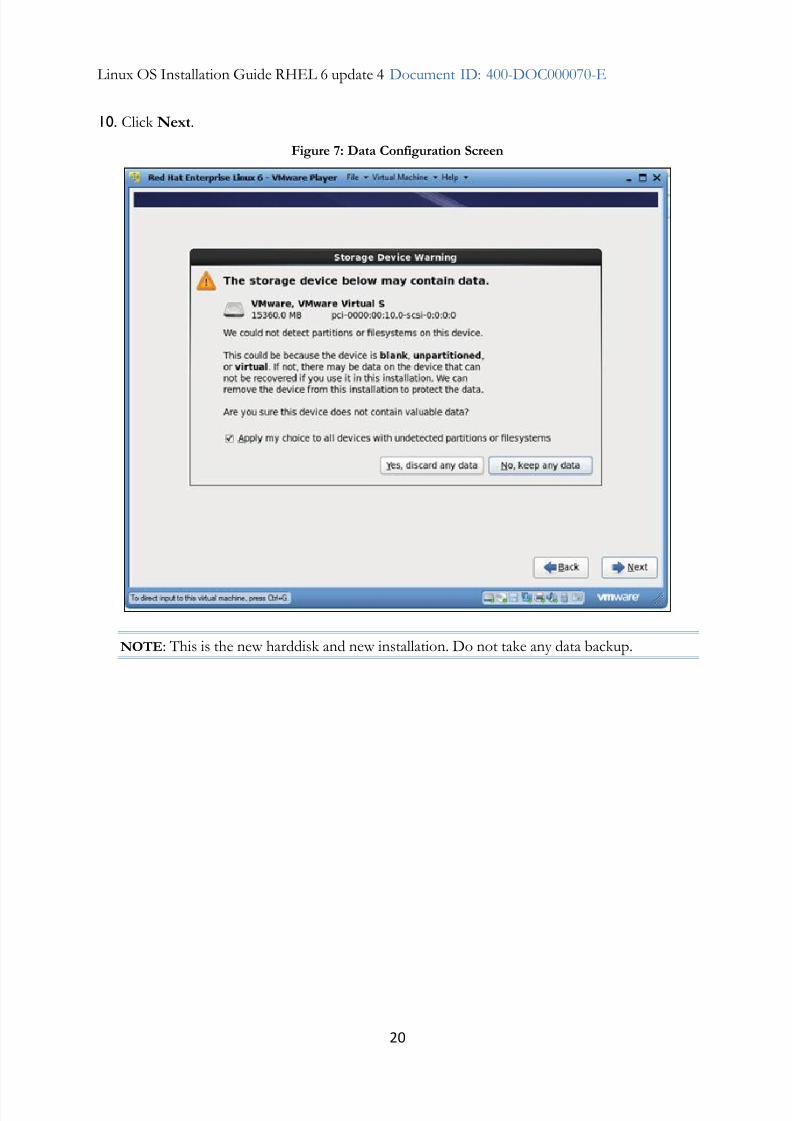
10. Click Next.
NOTE: This is the new harddisk and new installation. Do not take any data backup.
Figure 7: Data Configuration Screen
7/23/2019 Linux OS Installation Guide RHEL 6 Update 4
http://slidepdf.com/reader/full/linux-os-installation-guide-rhel-6-update-4 21/53
21
Chapter 2 Placing Rhel6.4 DVD in DVD ROM and Setting Option Boot from DVD
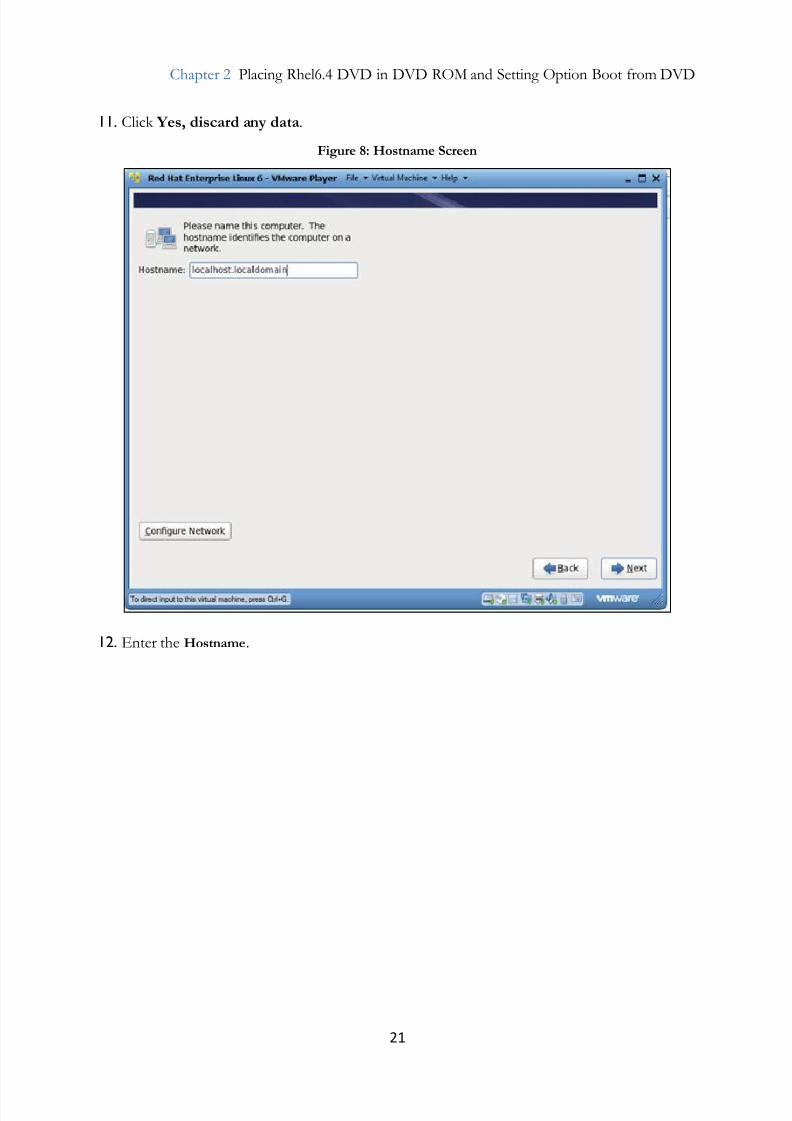
11. Click Yes, discard any data.
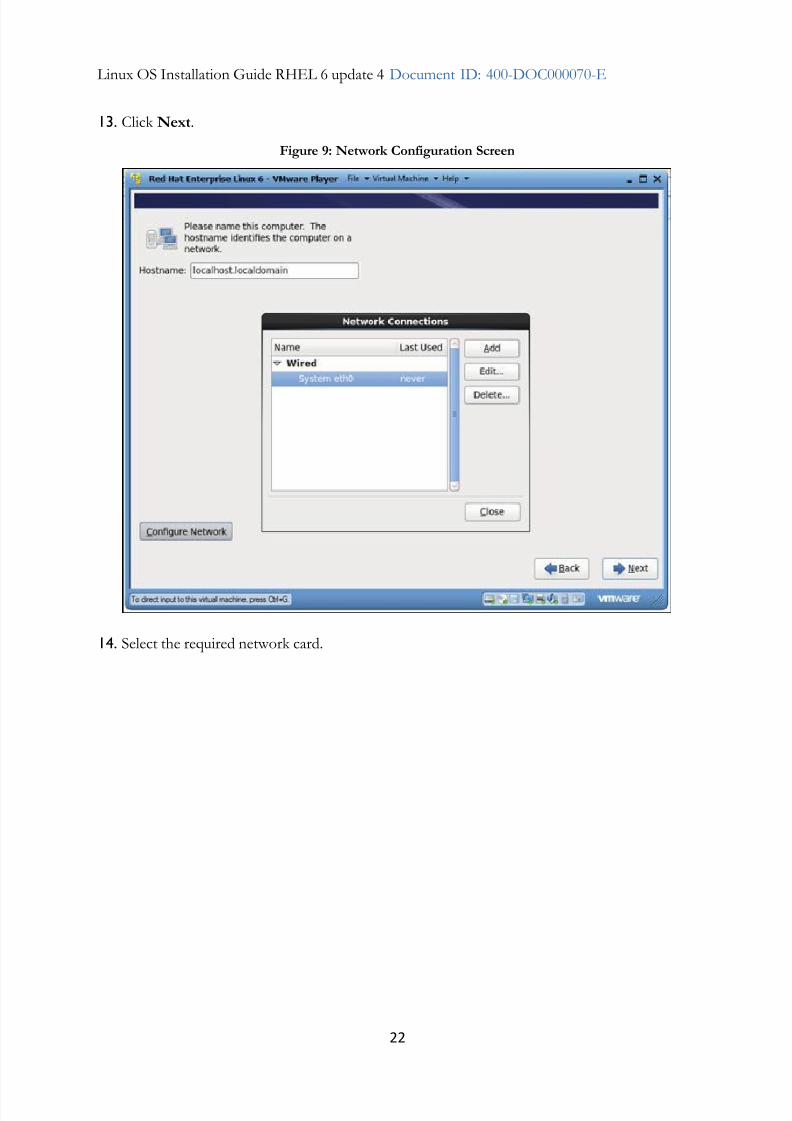
12. Enter the Hostname.
Figure 8: Hostname Screen
7/23/2019 Linux OS Installation Guide RHEL 6 Update 4
http://slidepdf.com/reader/full/linux-os-installation-guide-rhel-6-update-4 22/53
7/23/2019 Linux OS Installation Guide RHEL 6 Update 4
http://slidepdf.com/reader/full/linux-os-installation-guide-rhel-6-update-4 23/53
23
Chapter 2 Placing Rhel6.4 DVD in DVD ROM and Setting Option Boot from DVD
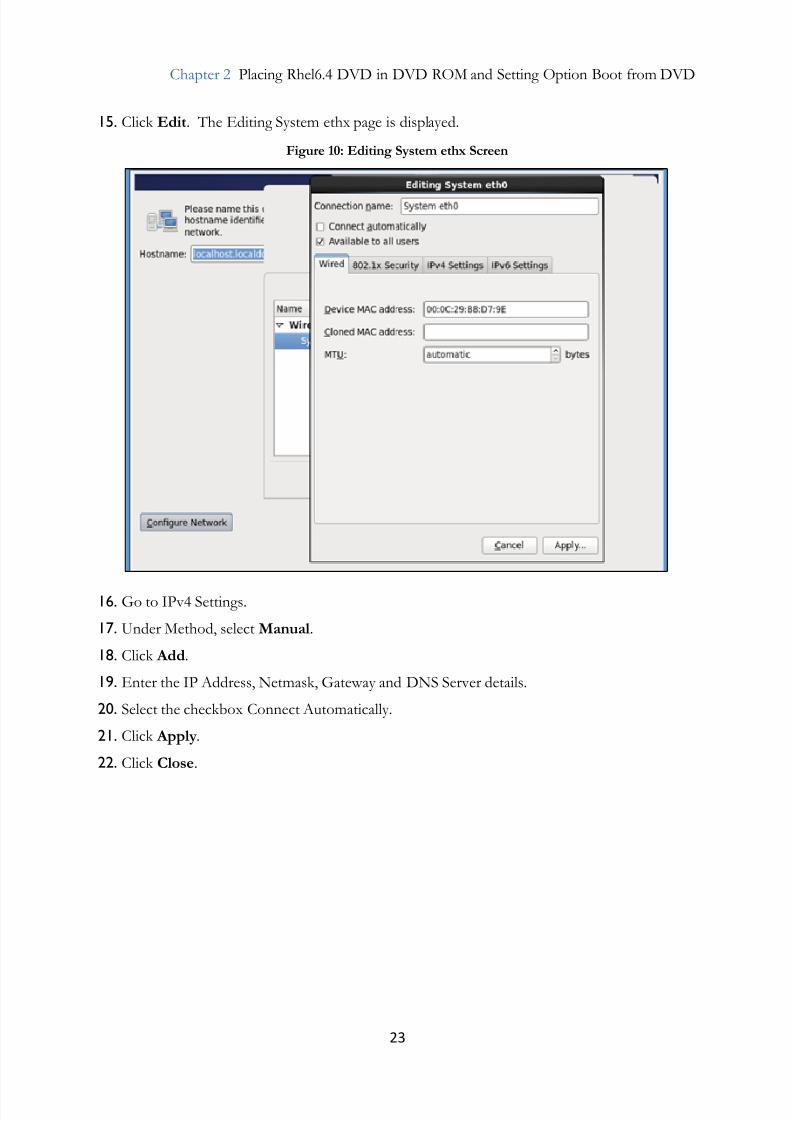
15. Click Edit. The Editing System ethx page is displayed.
16. Go to IPv4 Settings.
17. Under Method, select Manual.
18. Click Add.
19. Enter the IP Address, Netmask, Gateway and DNS Server details.
20. Select the checkbox Connect Automatically.
21. Click Apply.
22. Click Close.
Figure 10: Editing System ethx Screen
7/23/2019 Linux OS Installation Guide RHEL 6 Update 4
http://slidepdf.com/reader/full/linux-os-installation-guide-rhel-6-update-4 24/53
24
Linux OS Installation Guide RHEL 6 update 4 Document ID: 400-DOC000070-E
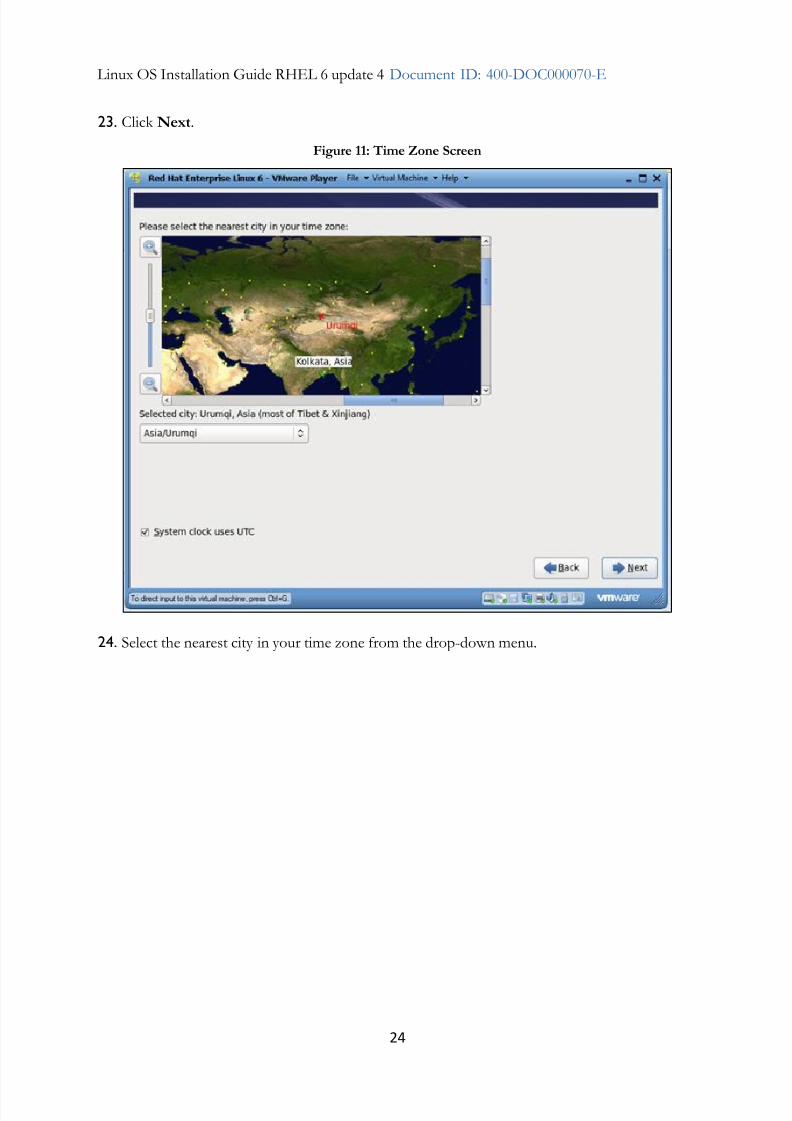
23. Click Next.
24. Select the nearest city in your time zone from the drop-down menu.
Figure 11: Time Zone Screen
7/23/2019 Linux OS Installation Guide RHEL 6 Update 4
http://slidepdf.com/reader/full/linux-os-installation-guide-rhel-6-update-4 25/53
25
Chapter 2 Placing Rhel6.4 DVD in DVD ROM and Setting Option Boot from DVD
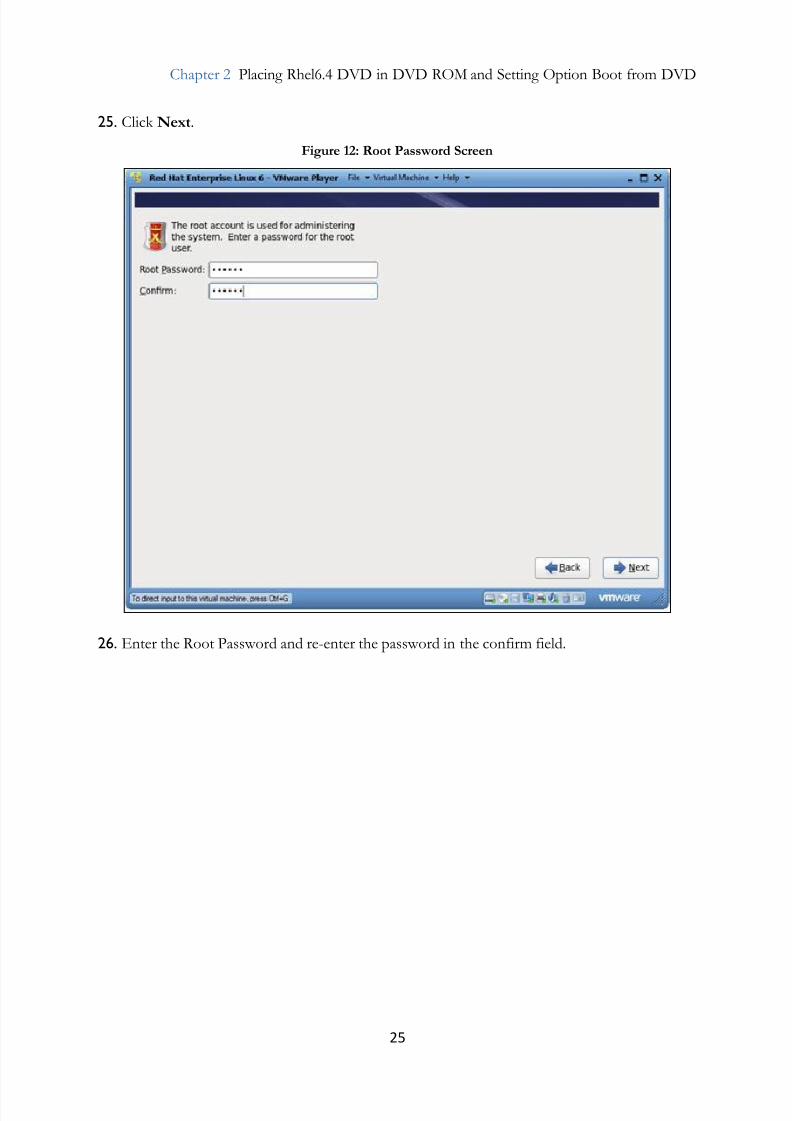
25. Click Next.
26. Enter the Root Password and re-enter the password in the confirm field.
Figure 12: Root Password Screen
7/23/2019 Linux OS Installation Guide RHEL 6 Update 4
http://slidepdf.com/reader/full/linux-os-installation-guide-rhel-6-update-4 26/53
26
Linux OS Installation Guide RHEL 6 update 4 Document ID: 400-DOC000070-E
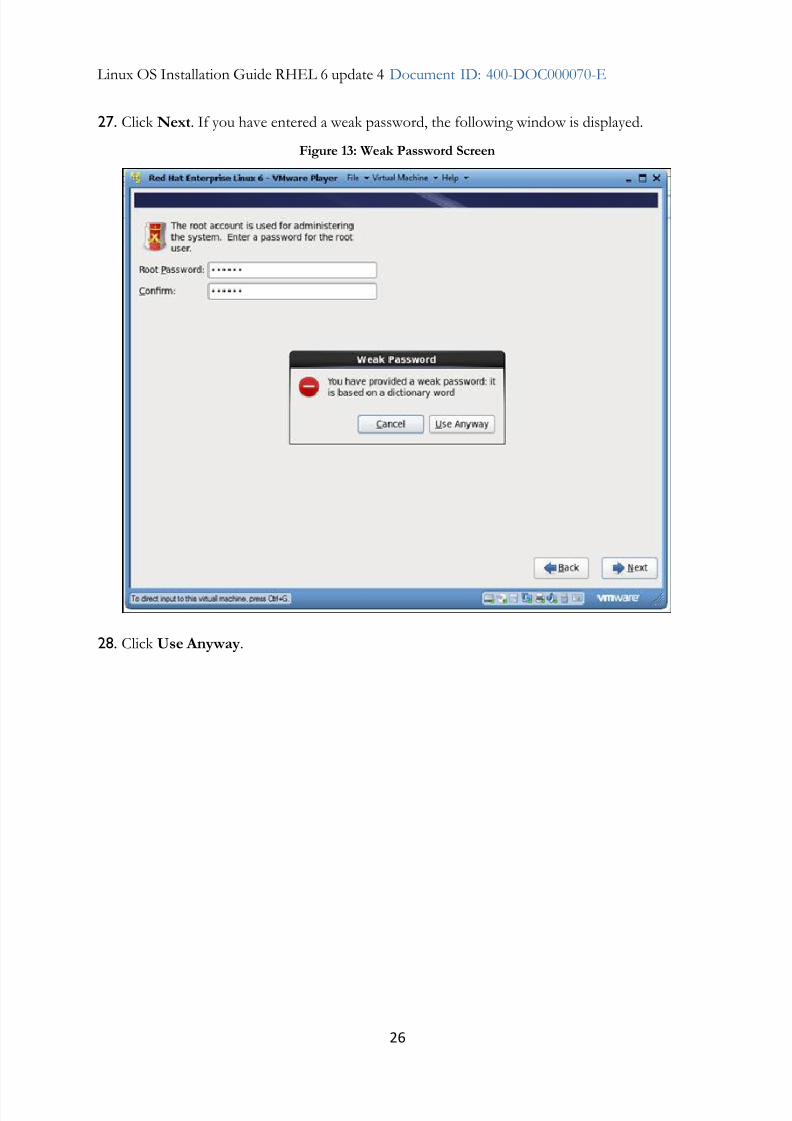
27. Click Next. If you have entered a weak password, the following window is displayed.
28. Click Use Anyway.
Figure 13: Weak Password Screen

7/23/2019 Linux OS Installation Guide RHEL 6 Update 4
http://slidepdf.com/reader/full/linux-os-installation-guide-rhel-6-update-4 27/53
27
Chapter 2 Placing Rhel6.4 DVD in DVD ROM and Setting Option Boot from DVD
29. Click Next.
30. Select Create Custom Layout radio button.
Figure 14: Installation Layout Screen

7/23/2019 Linux OS Installation Guide RHEL 6 Update 4
http://slidepdf.com/reader/full/linux-os-installation-guide-rhel-6-update-4 28/53
28
Linux OS Installation Guide RHEL 6 update 4 Document ID: 400-DOC000070-E
31. Click Next.
32. Select the required Hard Drive.
Figure 15: Partition Screen
7/23/2019 Linux OS Installation Guide RHEL 6 Update 4
http://slidepdf.com/reader/full/linux-os-installation-guide-rhel-6-update-4 29/53
29
Chapter 2 Placing Rhel6.4 DVD in DVD ROM and Setting Option Boot from DVD
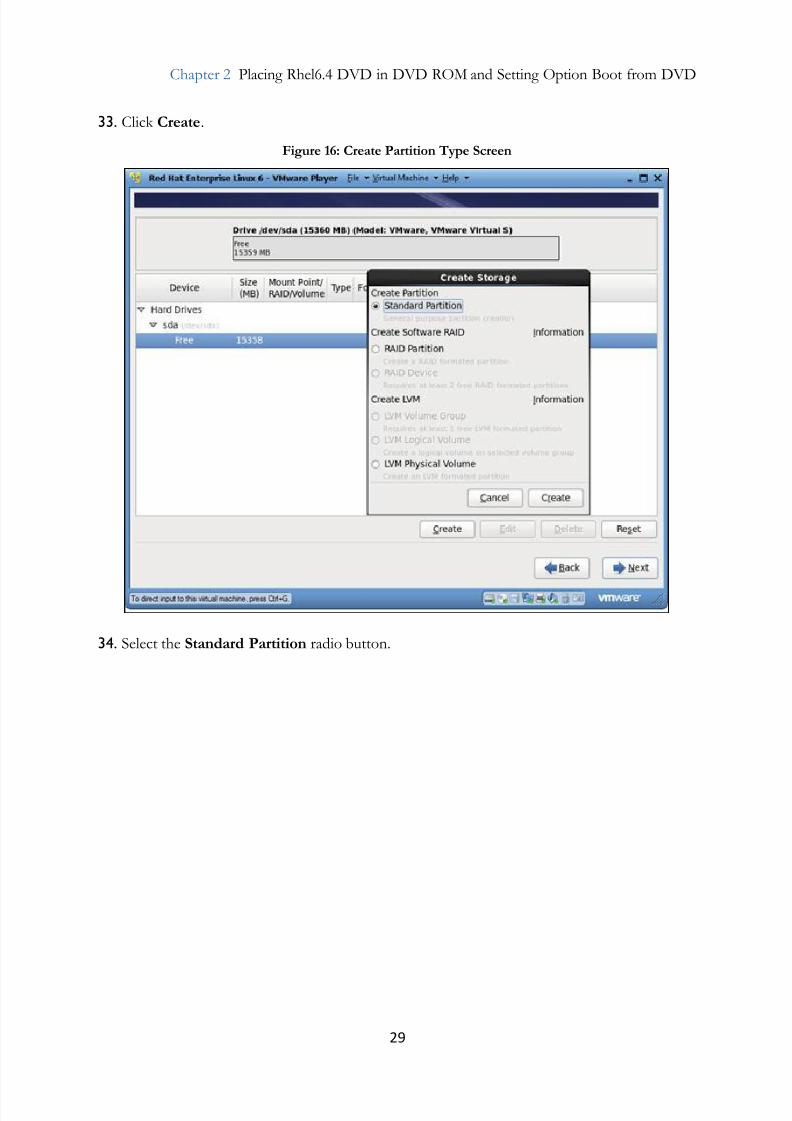
33. Click Create.
34. Select the Standard Partition radio button.
Figure 16: Create Partition Type Screen
7/23/2019 Linux OS Installation Guide RHEL 6 Update 4
http://slidepdf.com/reader/full/linux-os-installation-guide-rhel-6-update-4 30/53
30
Linux OS Installation Guide RHEL 6 update 4 Document ID: 400-DOC000070-E
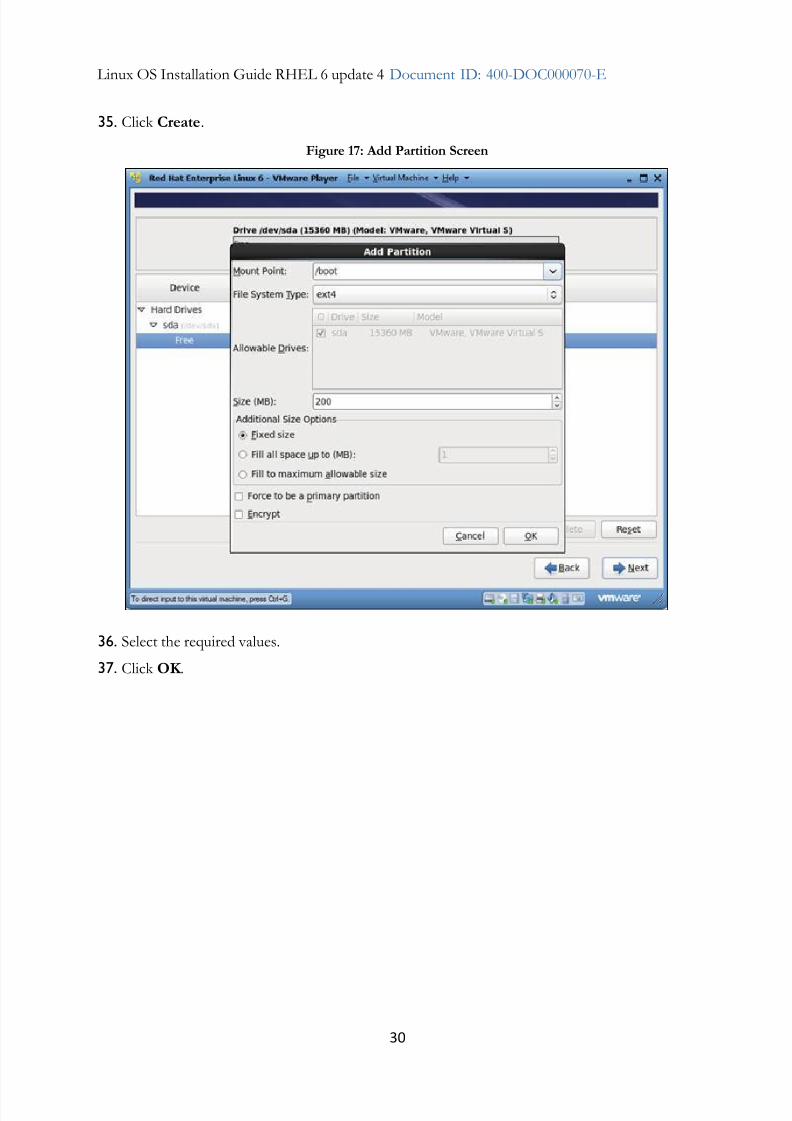
35. Click Create.
36. Select the required values.
37. Click OK .
Figure 17: Add Partition Screen
7/23/2019 Linux OS Installation Guide RHEL 6 Update 4
http://slidepdf.com/reader/full/linux-os-installation-guide-rhel-6-update-4 31/53
31
Chapter 2 Placing Rhel6.4 DVD in DVD ROM and Setting Option Boot from DVD
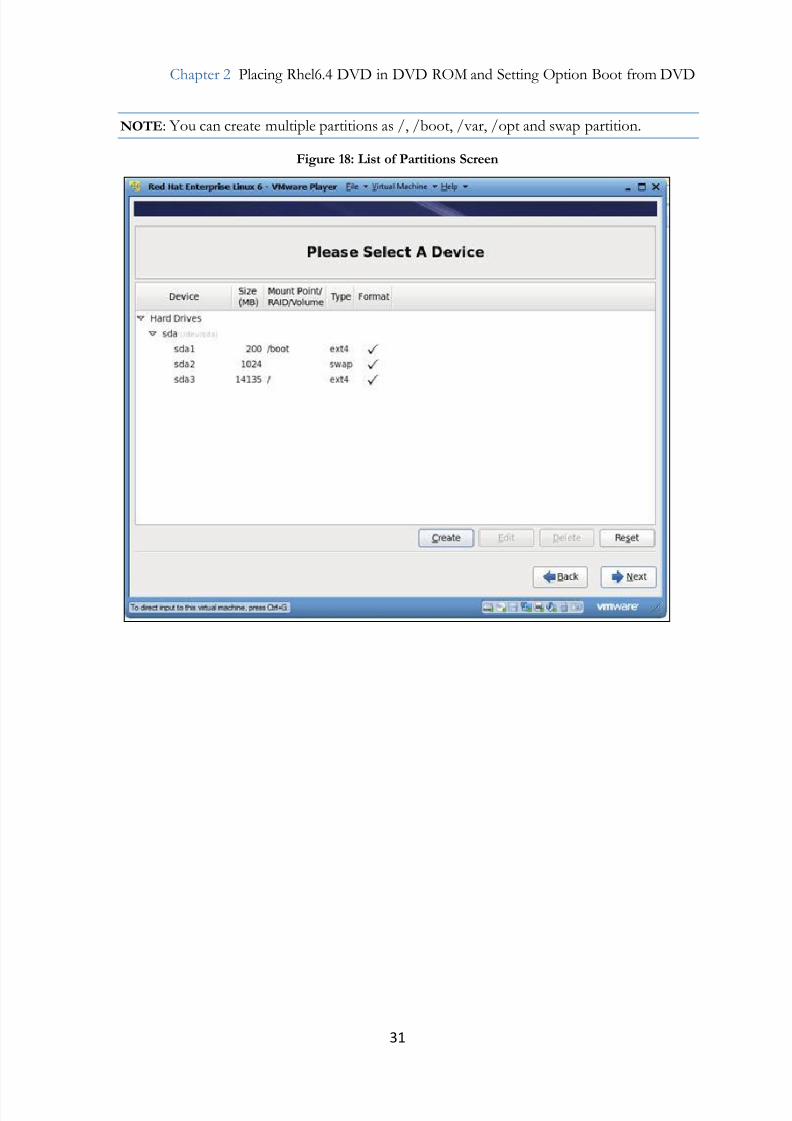
NOTE: You can create multiple partitions as /, /boot, /var, /opt and swap partition.
Figure 18: List of Partitions Screen
7/23/2019 Linux OS Installation Guide RHEL 6 Update 4
http://slidepdf.com/reader/full/linux-os-installation-guide-rhel-6-update-4 32/53
32
Linux OS Installation Guide RHEL 6 update 4 Document ID: 400-DOC000070-E
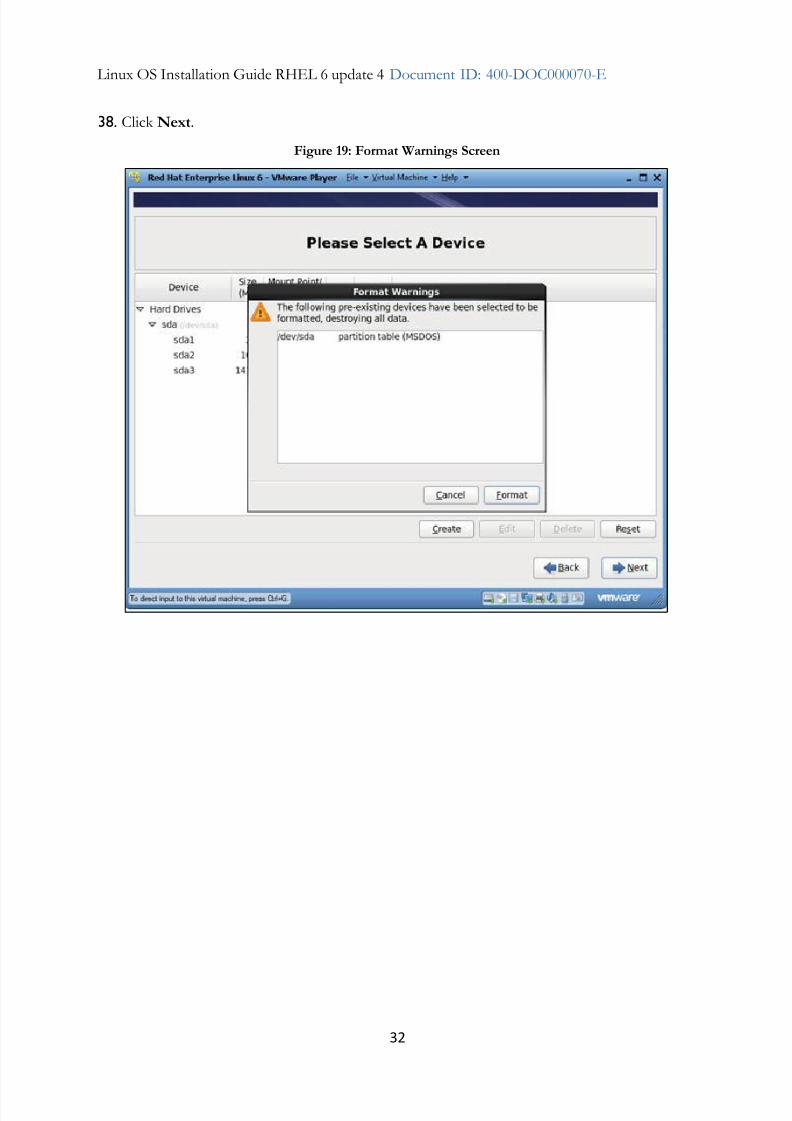
38. Click Next.
Figure 19: Format Warnings Screen
7/23/2019 Linux OS Installation Guide RHEL 6 Update 4
http://slidepdf.com/reader/full/linux-os-installation-guide-rhel-6-update-4 33/53
33
Chapter 2 Placing Rhel6.4 DVD in DVD ROM and Setting Option Boot from DVD
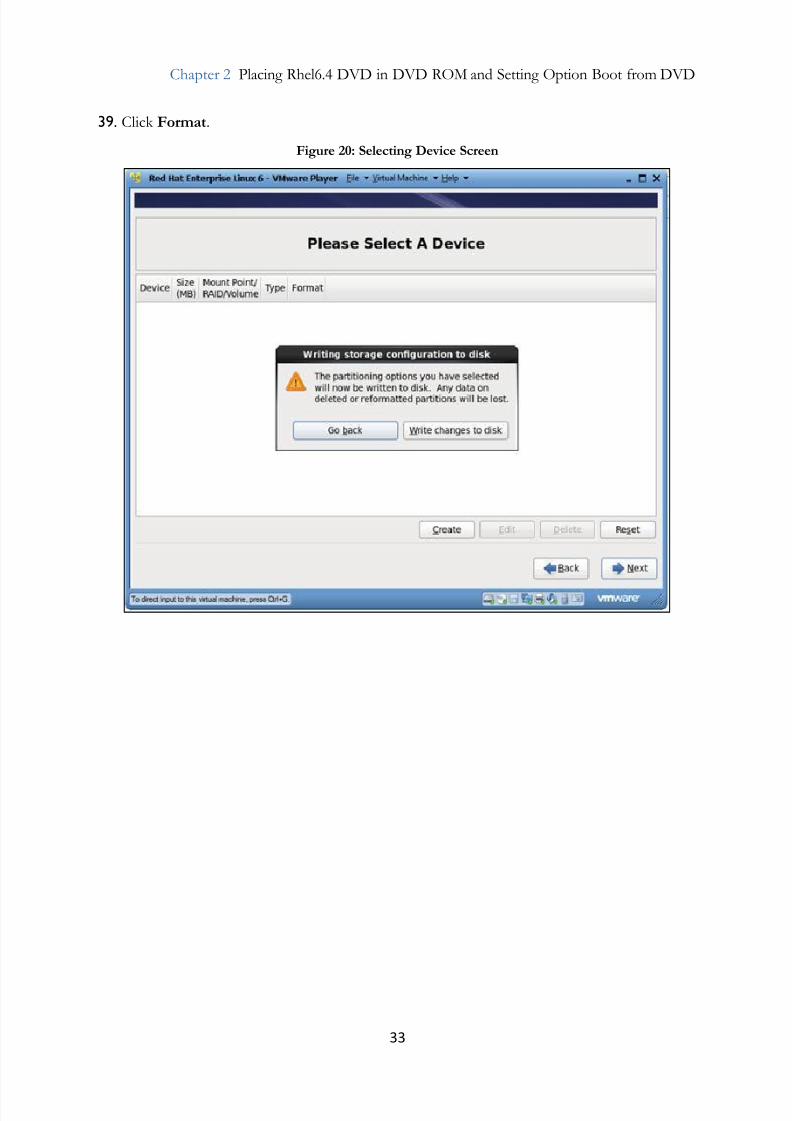
39. Click Format.
Figure 20: Selecting Device Screen
7/23/2019 Linux OS Installation Guide RHEL 6 Update 4
http://slidepdf.com/reader/full/linux-os-installation-guide-rhel-6-update-4 34/53
34
Linux OS Installation Guide RHEL 6 update 4 Document ID: 400-DOC000070-E
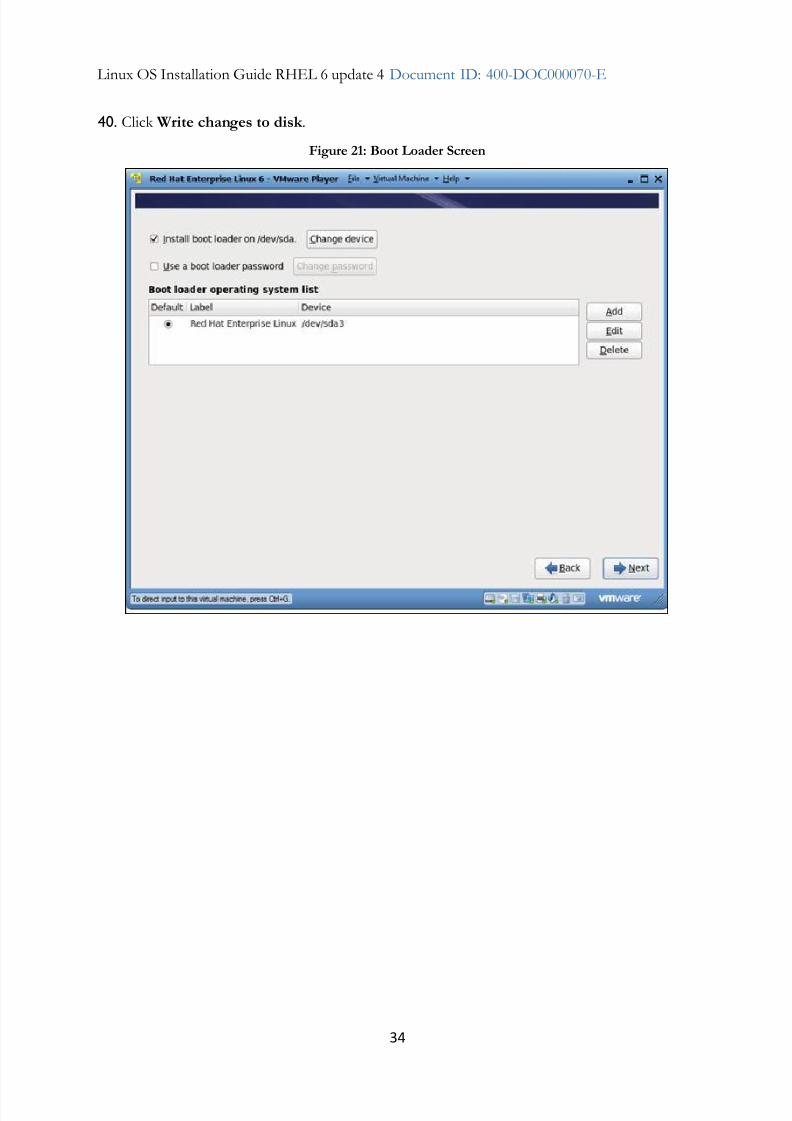
40. Click Write changes to disk .
Figure 21: Boot Loader Screen
7/23/2019 Linux OS Installation Guide RHEL 6 Update 4
http://slidepdf.com/reader/full/linux-os-installation-guide-rhel-6-update-4 35/53
35
Chapter 2 Placing Rhel6.4 DVD in DVD ROM and Setting Option Boot from DVD
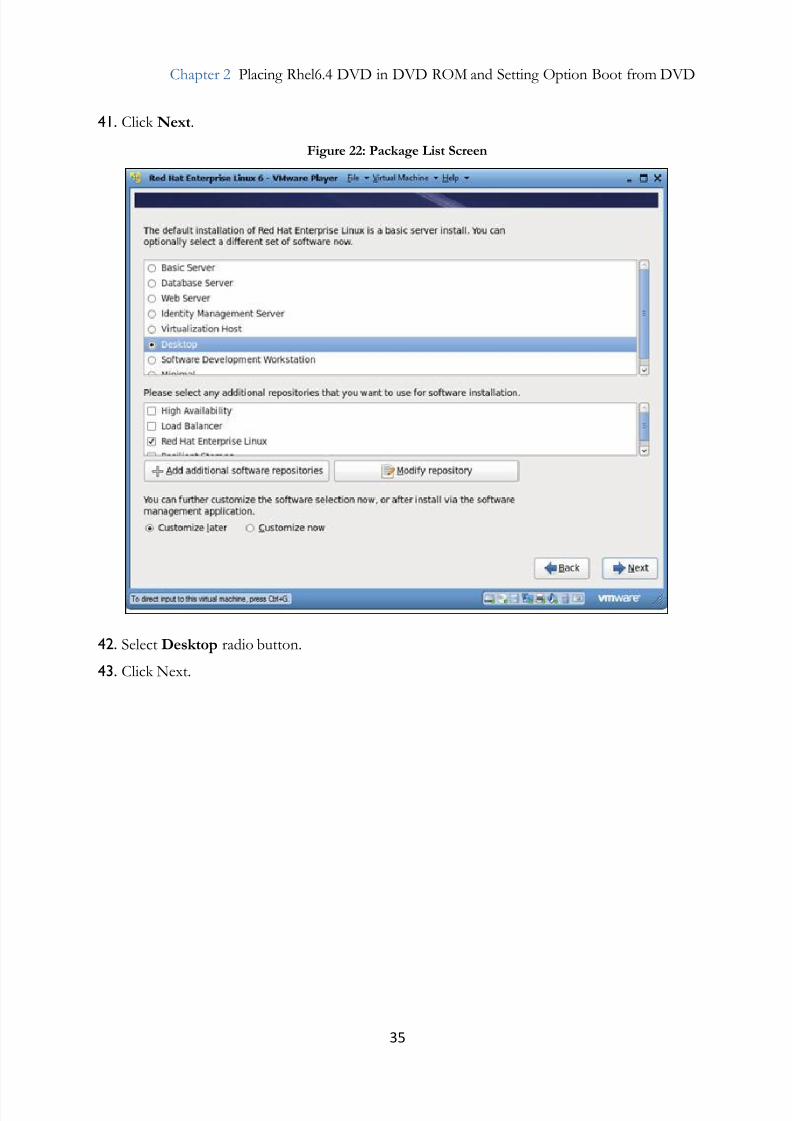
41. Click Next.
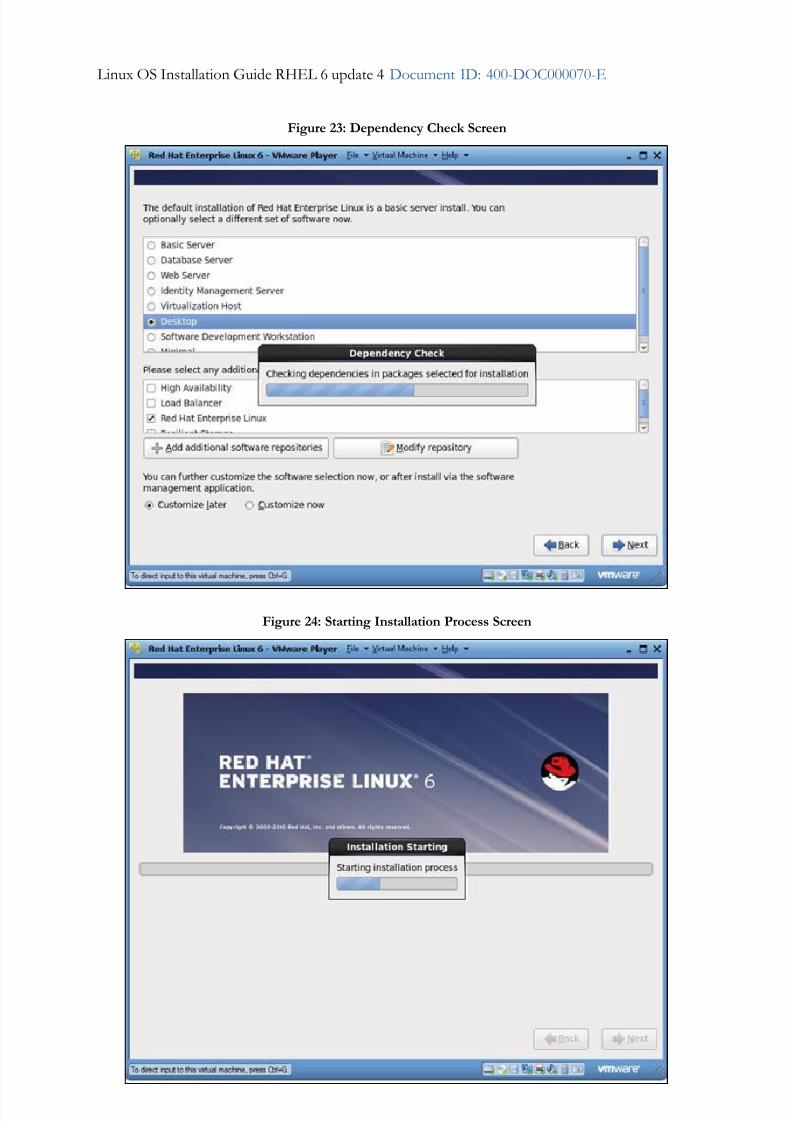
42. Select Desktop radio button.
43. Click Next.
Figure 22: Package List Screen
7/23/2019 Linux OS Installation Guide RHEL 6 Update 4
http://slidepdf.com/reader/full/linux-os-installation-guide-rhel-6-update-4 36/53
36
Linux OS Installation Guide RHEL 6 update 4 Document ID: 400-DOC000070-E
Figure 23: Dependency Check Screen
Figure 24: Starting Installation Process Screen
7/23/2019 Linux OS Installation Guide RHEL 6 Update 4
http://slidepdf.com/reader/full/linux-os-installation-guide-rhel-6-update-4 37/53
37
Chapter 2 Placing Rhel6.4 DVD in DVD ROM and Setting Option Boot from DVD
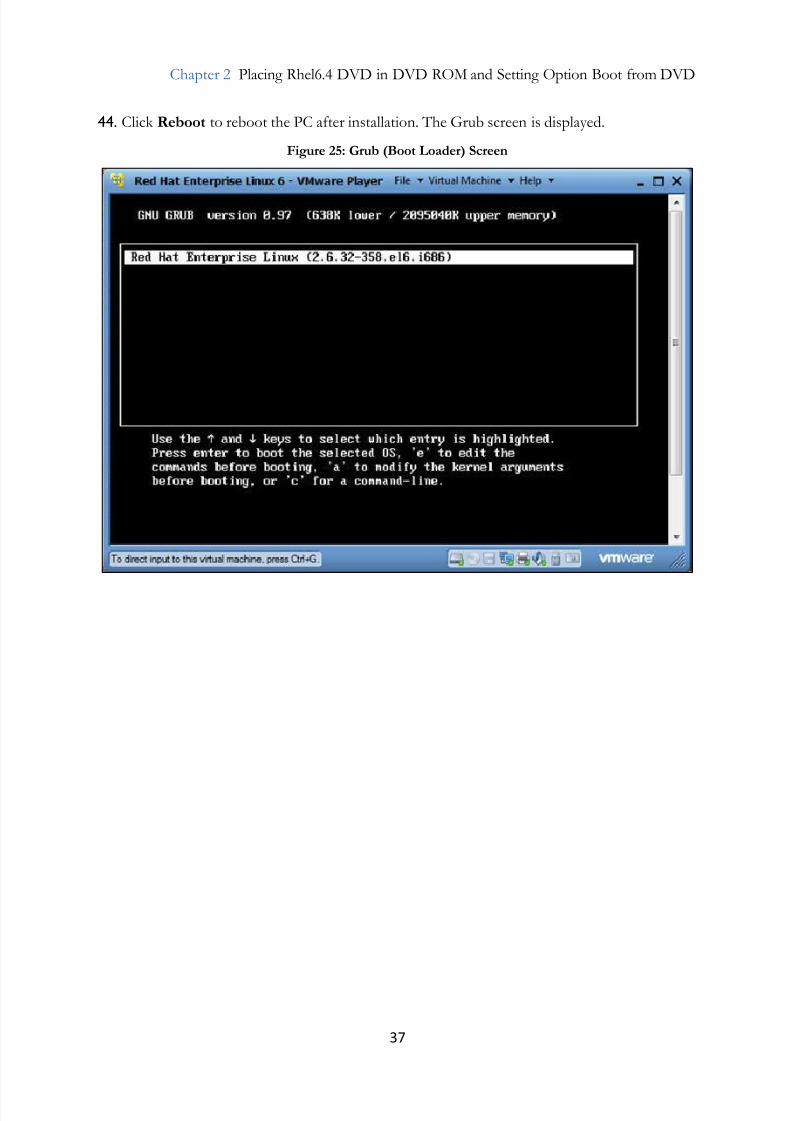
44. Click Reboot to reboot the PC after installation. The Grub screen is displayed.
Figure 25: Grub (Boot Loader) Screen

7/23/2019 Linux OS Installation Guide RHEL 6 Update 4
http://slidepdf.com/reader/full/linux-os-installation-guide-rhel-6-update-4 38/53
38
Linux OS Installation Guide RHEL 6 update 4 Document ID: 400-DOC000070-E
45. Select the OS displayed from Grub screen and press Enter.
Figure 26: Booting Progress Bar Screen
Figure 27: First Boot Welcome Screen

7/23/2019 Linux OS Installation Guide RHEL 6 Update 4
http://slidepdf.com/reader/full/linux-os-installation-guide-rhel-6-update-4 39/53
39
Chapter 2 Placing Rhel6.4 DVD in DVD ROM and Setting Option Boot from DVD
46. Click Forward.
47. Select the radio button for the field "Yes, I agree to the License Agreement".
48. Click Forward. The Setup software upgrade page is displayed.
Figure 28: License Agreement Screen

7/23/2019 Linux OS Installation Guide RHEL 6 Update 4
http://slidepdf.com/reader/full/linux-os-installation-guide-rhel-6-update-4 40/53
40
Linux OS Installation Guide RHEL 6 update 4 Document ID: 400-DOC000070-E
49. Click Forward.
50. Enter the Username, full Name, Password and Confirm the password. If the chosenpassword is weak, then a dialog box is displayed.
51. Click Yes. The Date and Time page is displayed.
Figure 29: Create Normal Local User Screen
Figure 30: Date and Time Screen

7/23/2019 Linux OS Installation Guide RHEL 6 Update 4
http://slidepdf.com/reader/full/linux-os-installation-guide-rhel-6-update-4 41/53
41
Chapter 2 Placing Rhel6.4 DVD in DVD ROM and Setting Option Boot from DVD
52. Select the Date and Time.
53. Click Forward.
54. Click Finish.
Figure 31: Kernel Dump Screen

7/23/2019 Linux OS Installation Guide RHEL 6 Update 4
http://slidepdf.com/reader/full/linux-os-installation-guide-rhel-6-update-4 42/53
42
Linux OS Installation Guide RHEL 6 update 4 Document ID: 400-DOC000070-E
55. Click Reboot to reboot the PC after installation. The Grub screen is displayed.
Figure 32: Grub (Boot Loader) Screen

7/23/2019 Linux OS Installation Guide RHEL 6 Update 4
http://slidepdf.com/reader/full/linux-os-installation-guide-rhel-6-update-4 43/53
43
Chapter 2 Placing Rhel6.4 DVD in DVD ROM and Setting Option Boot from DVD
56. Select the OS displayed from Grub screen and press Enter.
Figure 33: Booting Progress Bar Screen
Figure 34: Login Screen

7/23/2019 Linux OS Installation Guide RHEL 6 Update 4
http://slidepdf.com/reader/full/linux-os-installation-guide-rhel-6-update-4 44/53
44
Linux OS Installation Guide RHEL 6 update 4 Document ID: 400-DOC000070-E
57. Select and click Other.
58. Enter the Username as root and the password of root.
59. Click Log In.
Figure 35: Login Screen
Figure 36: Root Login Warning Screen

7/23/2019 Linux OS Installation Guide RHEL 6 Update 4
http://slidepdf.com/reader/full/linux-os-installation-guide-rhel-6-update-4 45/53
45
Chapter 2 Placing Rhel6.4 DVD in DVD ROM and Setting Option Boot from DVD
60. Click Close.
61. Open the terminal and execute the command setup.
Figure 37: Configuration Screen
Figure 38: Firewall Configuration Screen

7/23/2019 Linux OS Installation Guide RHEL 6 Update 4
http://slidepdf.com/reader/full/linux-os-installation-guide-rhel-6-update-4 46/53
46
Linux OS Installation Guide RHEL 6 update 4 Document ID: 400-DOC000070-E
62. Select and Click Firewall Configuration.
63. Click Run Tool.
64. By Default, the firewall is enabled.
65. Use spacebar key to disable/unselect firewall.
Figure 39: Firewall Configuration Screen
7/23/2019 Linux OS Installation Guide RHEL 6 Update 4
http://slidepdf.com/reader/full/linux-os-installation-guide-rhel-6-update-4 47/53
47
Chapter 2 Placing Rhel6.4 DVD in DVD ROM and Setting Option Boot from DVD
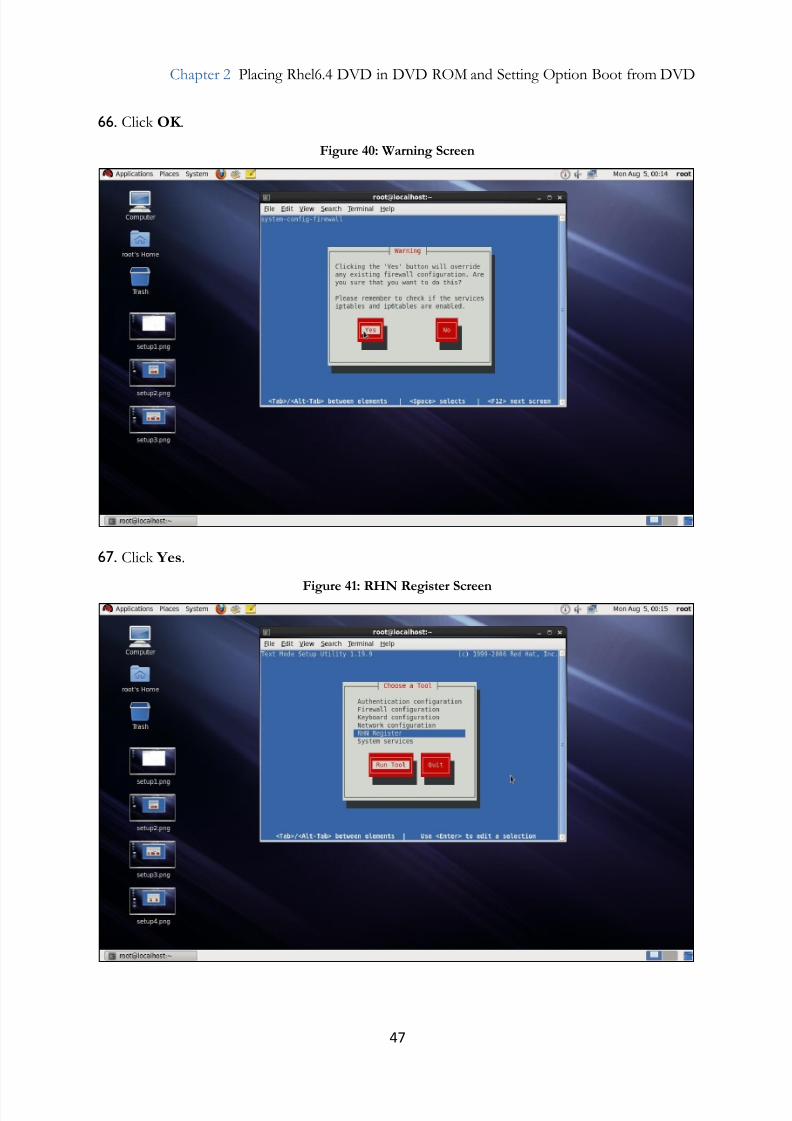
66. Click OK .
67. Click Yes.
Figure 40: Warning Screen
Figure 41: RHN Register Screen

7/23/2019 Linux OS Installation Guide RHEL 6 Update 4
http://slidepdf.com/reader/full/linux-os-installation-guide-rhel-6-update-4 48/53
48
Linux OS Installation Guide RHEL 6 update 4 Document ID: 400-DOC000070-E
68. Select and Click RHN Register.
69. Click Run Tool.
Figure 42: Registration Screen

7/23/2019 Linux OS Installation Guide RHEL 6 Update 4
http://slidepdf.com/reader/full/linux-os-installation-guide-rhel-6-update-4 49/53
49
Chapter 2 Placing Rhel6.4 DVD in DVD ROM and Setting Option Boot from DVD
70. Click Forward.
71. Select Red Hat Network (RHN) Classic radio button.
Figure 43: System Registration Screen
7/23/2019 Linux OS Installation Guide RHEL 6 Update 4
http://slidepdf.com/reader/full/linux-os-installation-guide-rhel-6-update-4 50/53
50
Linux OS Installation Guide RHEL 6 update 4 Document ID: 400-DOC000070-E
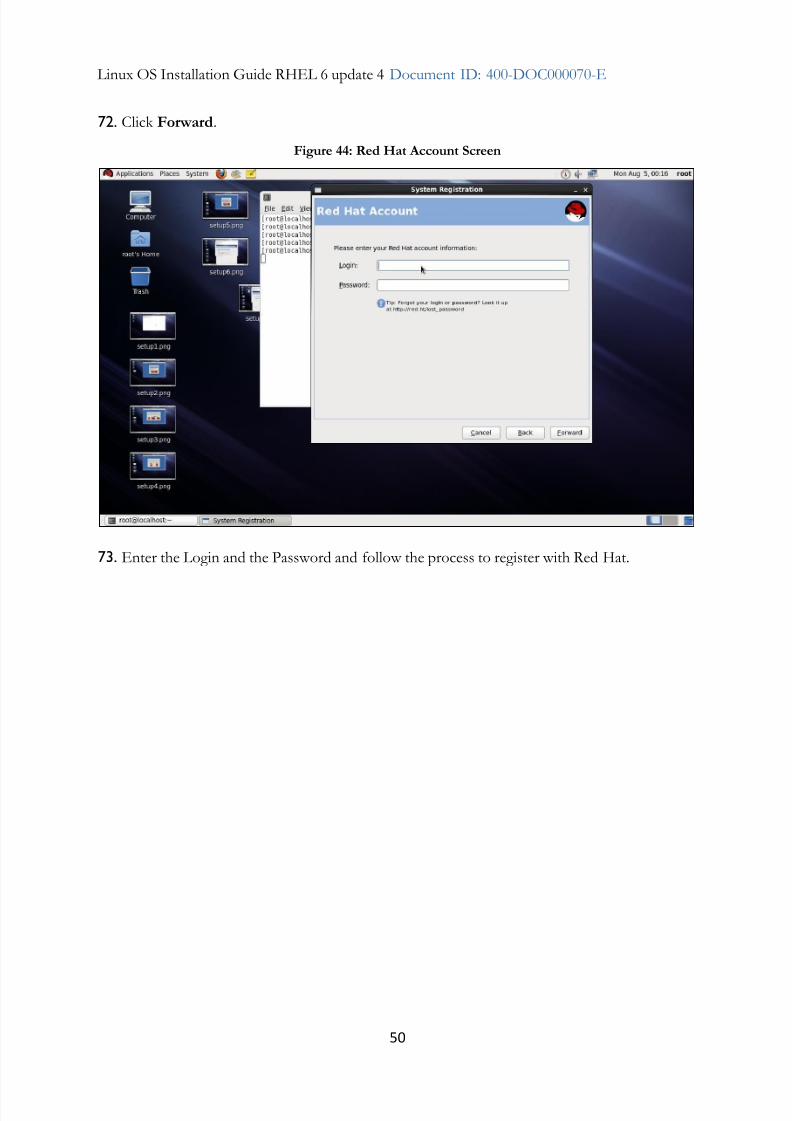
72. Click Forward.
73. Enter the Login and the Password and follow the process to register with Red Hat.
Figure 44: Red Hat Account Screen
7/23/2019 Linux OS Installation Guide RHEL 6 Update 4
http://slidepdf.com/reader/full/linux-os-installation-guide-rhel-6-update-4 51/53
51
Chapter 2 Placing Rhel6.4 DVD in DVD ROM and Setting Option Boot from DVD
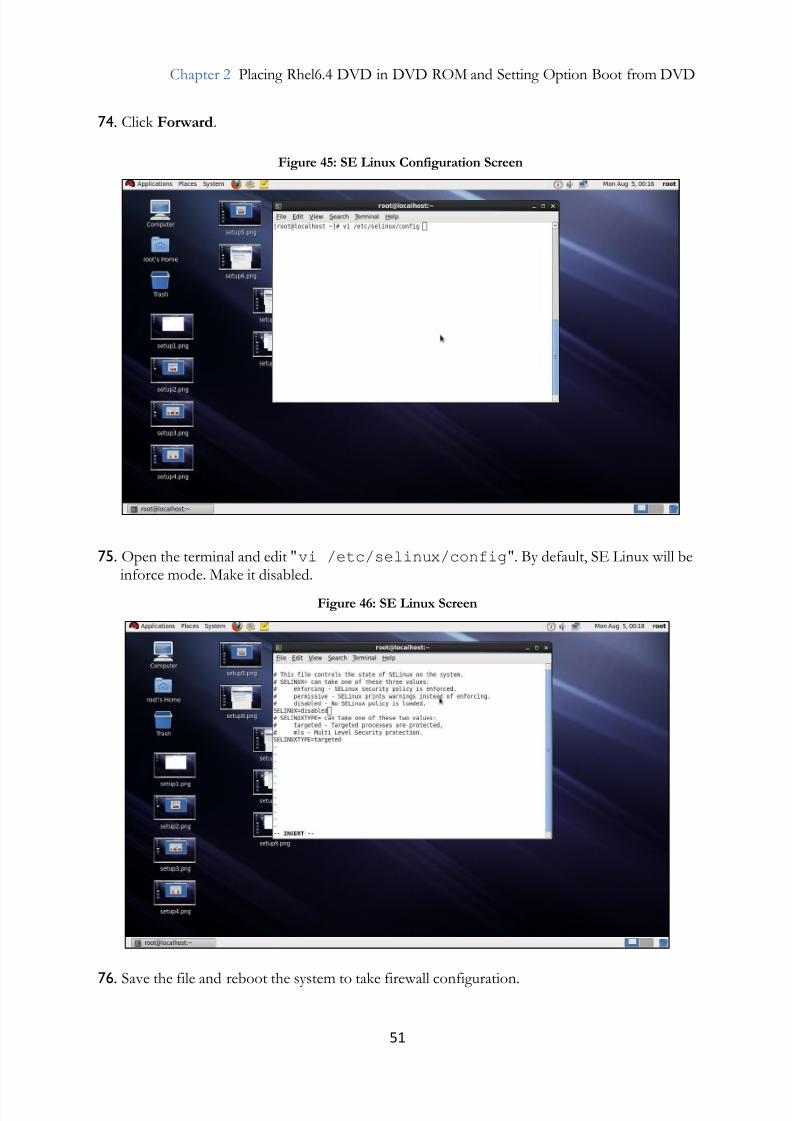
74. Click Forward.
75. Open the terminal and edit "vi /etc/selinux/config". By default, SE Linux will beinforce mode. Make it disabled.
76.
Save the file and reboot the system to take firewall configuration.
Figure 45: SE Linux Configuration Screen
Figure 46: SE Linux Screen

7/23/2019 Linux OS Installation Guide RHEL 6 Update 4
http://slidepdf.com/reader/full/linux-os-installation-guide-rhel-6-update-4 52/53
52
Linux OS Installation Guide RHEL 6 update 4 Document ID: 400-DOC000070-E
This page is intentionally left blank

7/23/2019 Linux OS Installation Guide RHEL 6 Update 4
http://slidepdf.com/reader/full/linux-os-installation-guide-rhel-6-update-4 53/53
L
List of Figures • v List of Tables • vii
M
Mouse Operation Conventions • 11
P
Placing Rhel6.4 DVD in DVD ROM andSetting Option Boot from DVD • 13
S
Safety Signs Conventions • 10
T
Typographical Conventions • 11
U
Using Tejas Product Documentation • 12
Using This Guide • 9
W
What This Guide Covers • 9 Who This Guide Is For • 9
Index