lionel conventional 0-4-0 steam locomotive owner’s manual · 0-4-0 steam locomotive owner’s...
TRANSCRIPT
71-1379-2506/12
Lionel Conventional 0-4-0 Steam Locomotive
Owner’s Manual
Lionel Conventional0-4-0 Steam Locomotive
Owner’s Manual
71-1379-250 0-4-0.indd 1 6/13/12 9:47 AM

Locomotive features
Congratulations!
2
Congratulations on your purchase of the conventional Lionel 0-4-0 Steam locomotive and ten-der. This powerful locomotive features transformer-controlled forward-neutral-reverse-neutral
operation, puffing smoke, and numerous scale details, as well as the conventional RailSounds sound system. This locomotive is ready for duty on your layout!
• Transformercontrolledforward,neutral,andreverseoperation
• ConventionalRailSoundssoundsystemwithsteamchuffing,steamwhistle,bell,andoperator-controlledmulti-partcrewdialog
• Die-castmetallocomotivebody,frame,andtrucks
• Operatingheadlight
• Operatingcoupleronfrontoflocomotiveandrearoftender
• Powerfulmaintenance-freemotorwithmomentumflywheel
• Tractiontires
• Puffingsmoke
• Engineerfigure
• Die-castmetaltenderbodyandtrucks
• Minimumcurve:O-27
The following Lionel marks are used throughout this Owner’s Manual and are protected under law. All rights reserved.
Lionel®, LEGACY™, FasTrack®, TrainMaster®, Odyssey®, RailSounds®, CrewTalk™, TowerCom™, DynaChuff™, StationSounds™, Pullmor®, ElectroCoupler™, Magne-Traction®, CAB-1® Remote Controller, American Flyer®, Lionel ZW®, ZW®, MagniVision®, TMCC®, Lionelville®, Wireless Tether™, Powerhouse™, LionMaster®, Conventional Classics™, Postwar Celebration Series™, TruRail™, PH-1 Powerhouse®, Powermaster®, Powerstation-Powerhouse®, Accessory Motor Controller™, AMC™, Accessory Switch Controller™, ASC™, Action Recorder Controller™, ARC™, Track Power Controller 300™, TPC 300™, Track Power Controller 400™, TPC 400™, Block Power Controller™, BPC™, Operating Track Controller™, OTC™, FatBoy™, Lionel Lines®, Joshua Lionel Cowen Series™, Lockon®, TrainSounds™, MultiHorn™, MultiWhistle™, Choo-Choo™
71-1379-250 0-4-0.indd 2 6/13/12 9:47 AM
3
Table of contentsRunning your locomotiveRunning your locomotive 4Adding smoke fluid to your locomotive’s smoke generator 5Coupling 6Reverse unit procedure 7
Conventional RailSounds operationsOperating the conventional RailSounds sound system 8Installing a Lionel sound activation button 9
Maintaining and servicing your locomotiveLubricating your locomotive 10Replacing your locomotive’s traction tire 11Replacing your locomotive’s headlamp 11Lionel Limited Warranty Policy & Service 12
71-1379-250 0-4-0.indd 3 6/13/12 9:47 AM
4
Running your locomotiveRunning your locomotive
With track power off, place your locomotive on the track. An O-27 minimum radius is required. Refer to page 6 for information on coupling the cars.
33
2
4
Power up your locomotive with your transformer.Yourlocomotiveisdesignedtooperateon8-18voltsalternatingcurrent. Virtually all Lionel and Lionel-compatible alternating-current transformers are suitable.
Do not power your locomotive with direct-current (DC) transformers. The locomotive was designed for use with alternating-current (AC) transformers only.
Move ‘em out!
Getyourlocomotivemoving. Your locomotive goes through a repeating pattern of operations: forward, neutral, reverse, neutral, and so on. To sequence the reverse unit, press the DIRECTION button on your transformer, or briefly bring the throttle all the way back to the OFF position and then forward, for one to four seconds. When track power is inter-rupted, the locomotive advances to the next operational state.
Adjusttrackvoltage until your locomotive moves at your desired speed.
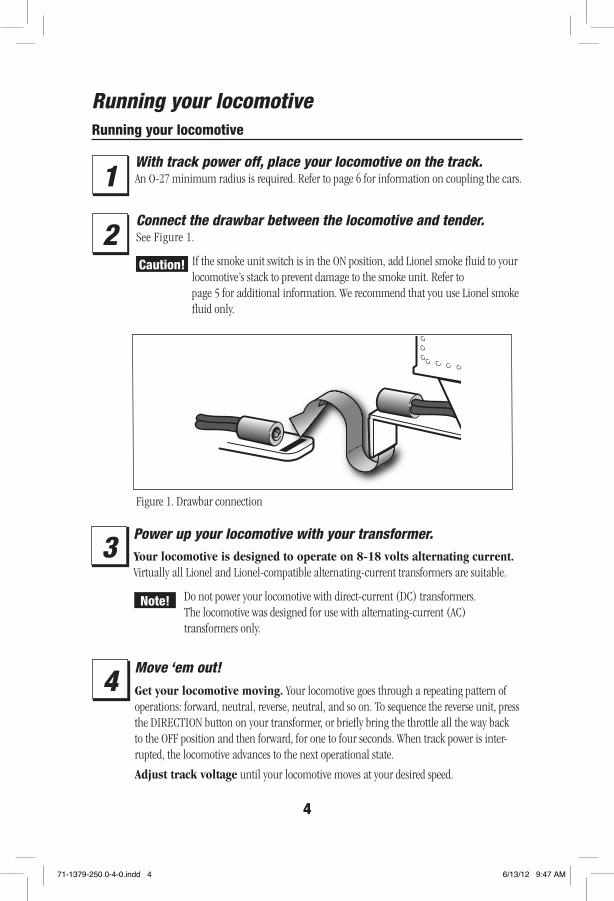
1Connect the drawbar between the locomotive and tender. See Figure 1.
If the smoke unit switch is in the ON position, add Lionel smoke fluid to your locomotive’s stack to prevent damage to the smoke unit. Refer to page 5 for additional information. We recommend that you use Lionel smoke fluid only.
Caution!
Note!
Figure 1. Drawbar connection
71-1379-250 0-4-0.indd 4 6/13/12 9:47 AM
Running your locomotive
5
Adding smoke fluid to your locomotive’s smoke generator
Y our locomotive is equipped with a smoke generator that produces safe, clean white smoke during operation if the smoke unit switch is in the ON position. Refer to Figure 3 on page 7 for the loca-
tion of the switch.The smoke generator requires the periodic addition of Lionel smoke fluid in order to function.
Add 10-15 drops of fluid directly into the locomotive’s stack. Smoke production will commence after running for several minutes. It will start faster if you run your locomotive at higher speeds. When smoke production decreases, add more fluid (about four drops).
Caution! When the smoke unit switch is in the ON position, always keep a small amount of smoke fluid in the locomotive’s smoke generator; the generator’s element can become damaged if operated without smoke fluid. This is particularly true if your locomotive sits in neutral for an extended period of time without smoke fluid in the generator.
If you prefer to operate the locomotive without smoke or you do not want to add smoke fluid, slide the smoke unit switch to the OFF position.
Note!
For best performance, we recommend that you use Lionel smoke fluid only.Note!
71-1379-250 0-4-0.indd 5 6/13/12 9:47 AM
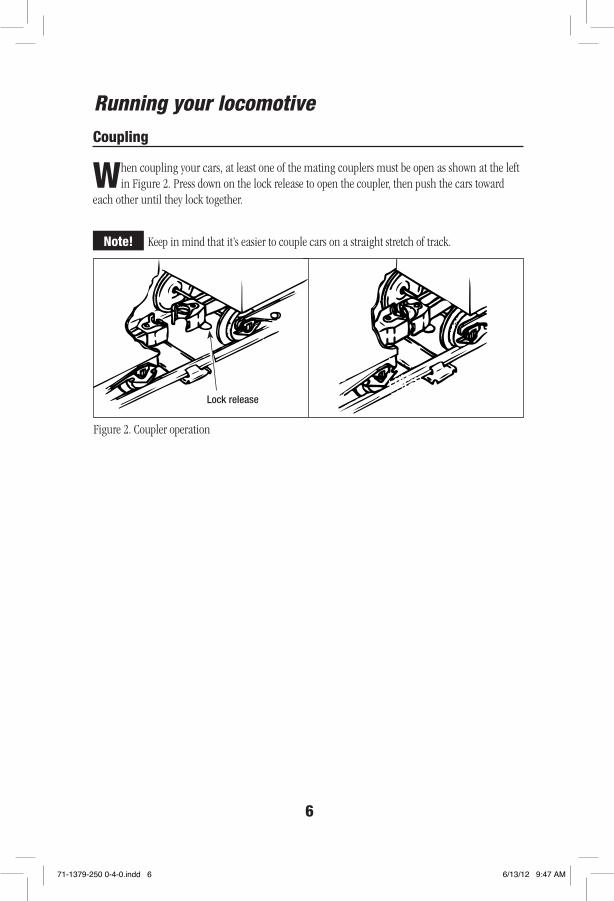
Coupling
When coupling your cars, at least one of the mating couplers must be open as shown at the left in Figure 2. Press down on the lock release to open the coupler, then push the cars toward
each other until they lock together.
Keep in mind that it’s easier to couple cars on a straight stretch of track.
Lock release
Figure 2. Coupler operation
Note!
Running your locomotive
6
71-1379-250 0-4-0.indd 6 6/13/12 9:47 AM
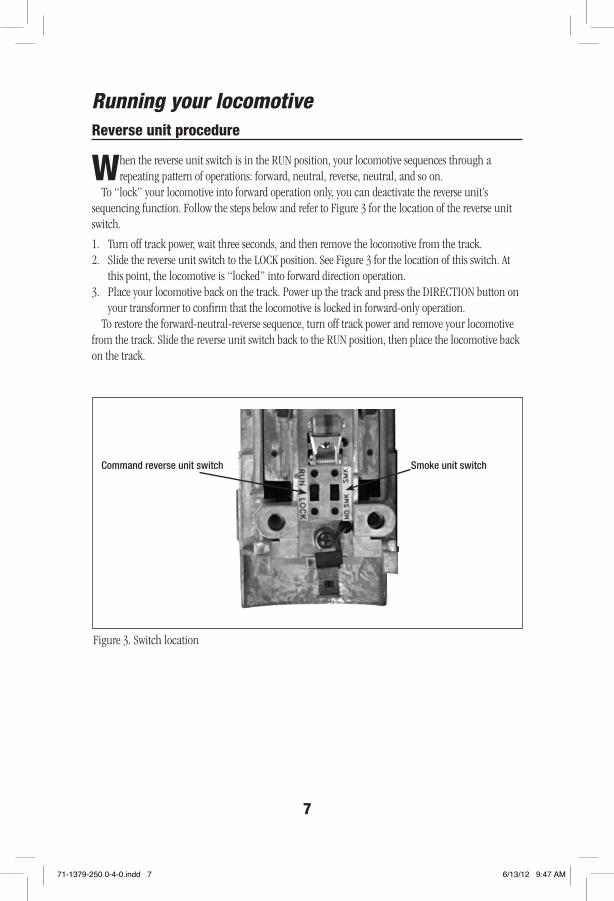
Running your locomotiveReverse unit procedure
Figure 3. Switch location
7
When the reverse unit switch is in the RUN position, your locomotive sequences through a repeating pattern of operations: forward, neutral, reverse, neutral, and so on.
To “lock” your locomotive into forward operation only, you can deactivate the reverse unit’s sequencing function. Follow the steps below and refer to Figure 3 for the location of the reverse unit switch.
1. Turn off track power, wait three seconds, and then remove the locomotive from the track. 2. Slide the reverse unit switch to the LOCK position. See Figure 3 for the location of this switch. At
this point, the locomotive is “locked” into forward direction operation. 3. Place your locomotive back on the track. Power up the track and press the DIRECTION button on
your transformer to confirm that the locomotive is locked in forward-only operation.To restore the forward-neutral-reverse sequence, turn off track power and remove your locomotive
from the track. Slide the reverse unit switch back to the RUN position, then place the locomotive back on the track.
Command reverse unit switch Smoke unit switch
71-1379-250 0-4-0.indd 7 6/13/12 9:47 AM

Conventional RailSounds operationsOperating the conventional RailSounds sound system
When you power up the locomotive on the track, you will hear the sounds of the idling steam locomotive. The chuffing sounds will increase proportionally with the locomotive's speed. Use
the volume control knob to adjust the volume. See Figure 4 below for the location of this control, which is located on the underside of the tender.
Whistle/HornPress the WHISTLE/HORN button on your transformer to sound the whistle/horn. The sound will play for as long as you hold the button.
BellPress the BELL button on your transformer to activate the bell sound. Press BELL again to dis-continue the sound.
Crew dialogCrewTalk dialog and TowerCom announcements are triggered by short whistle blasts and depend on whether the locomotive is moving or standing still, as well as the duration.• If the locomotive has been stopped for less than 15 seconds, a short whistle blast triggers a
"please stand by" dialog.• If the locomotive has been stopped for longer than 15 seconds, a short whistle blast triggers a
"clear outbound" announcement.• If the locomotive is moving, a short whistle blast triggers an "all clear ahead" dialog.• If the locomotive is moving and the bell is on, a short whistle blast triggers a "slow to restricted
speed" dialog.
8
Figure 4. Volume control on tender deck
Volume control knob
71-1379-250 0-4-0.indd 8 6/13/12 9:47 AM
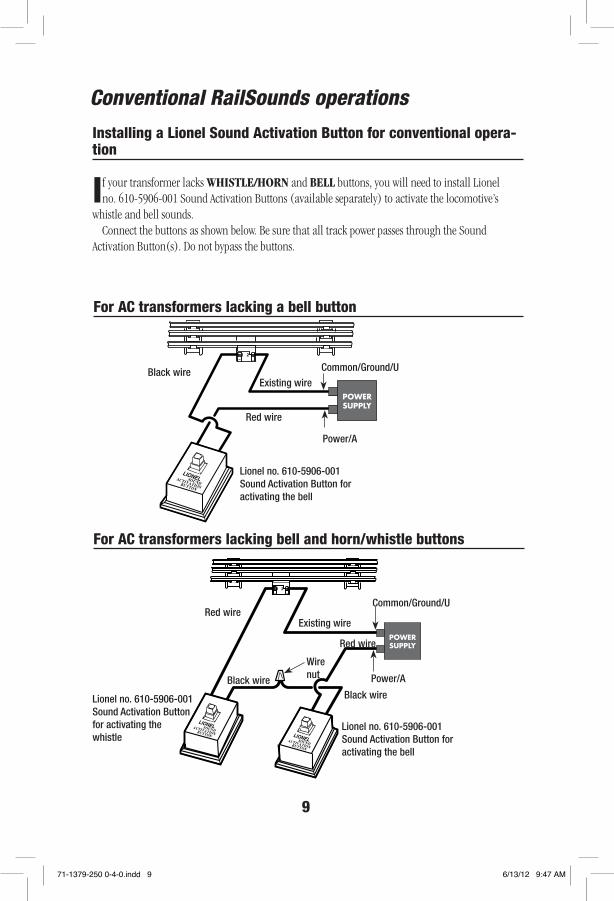
Installing a Lionel Sound Activation Button for conventional opera-tion
If your transformer lacks WHISTLE/HORN and BELL buttons, you will need to install Lionel no. 610-5906-001 Sound Activation Buttons (available separately) to activate the locomotive’s
whistle and bell sounds.Connect the buttons as shown below. Be sure that all track power passes through the Sound
Activation Button(s). Do not bypass the buttons.
POWERSUPPLY
For AC transformers lacking bell and horn/whistle buttons
Lionel no. 610-5906-001Sound Activation Button for activating the whistle
Lionel no. 610-5906-001Sound Activation Button for activating the bell
Black wireBlack wire
Wire nut
Red wire
Red wireExisting wire
Common/Ground/U
Power/A
1 2
POWERSUPPLY
For AC transformers lacking a bell button
Existing wireBlack wire
Red wire
Lionel no. 610-5906-001Sound Activation Button for activating the bell
Common/Ground/U
Power/A
Conventional RailSounds operations
9
71-1379-250 0-4-0.indd 9 6/13/12 9:47 AM

10
Maintaining and servicing your locomotiveLubricating your locomotive
H elp your steam locomotive lead a long and productive life on your railroad by maintaining it properly.
We recommend that you purchase a Lionel Lubrication and Maintenance Kit (6-62927), available from your Lionel dealer. Two basic rules to keep in mind: never over-lubricate (a small amount will do) and avoid getting grease or oil on the locomotive’s wheels, contact rollers, or your track.
You’ll know your locomotive requires lubrication when visual inspection reveals dryness on the parts indicated in Figure 5. Remove accumulated dirt and dust before lubricating, and always lubri-cate any locomotive emerging from prolonged storage.
Figure 5. Lubrication points
Lubricate withLionel oil sparingly
FRONT
REAR
71-1379-250 0-4-0.indd 10 6/13/12 9:47 AM
Maintaining and servicing your locomotive
11
Replacing your locomotive’s traction tire
Two of the locomotive’s drive wheels are fitted with rubber traction tires to enhance tractive effort, allowing your locomotive to pull many cars at once.
To replace the traction tire, simply unscrew the drive rod screw from the wheel using a 3/16” nut driver. Remove the old traction tire from under the drive rod and slip on the replacement, Lionel part no. 6308661206. Replace the spacer, retighten the drive rod screw, and you’r e ready to pull that long freight back to the yard.
Replacing your locomotive’s headlamp
Y our locomotive is illuminated by several small lamps. During the course of normal opera-tions, they may require replacement.
We recommend that you have the lamp replacement done at an authorized Lionel Service Center. See the InstructionsforObtainingService section on page 12 for more information.
71-1379-250 0-4-0.indd 11 6/13/12 9:47 AM
©2012 LIONEL L.L.C., CHESTERFIELD, MI 48051UNITED STATES OF AMERICAPRINTED IN CHINA
Lionel Limited Warranty Policy & Service
This Lionel product, including all mechanical and electrical components, moving parts, motors and structural components, with the exception of LIGHT BULBS, LED’s & TRACTION TIRES are warranted to the original owner-purchaser for a period of one
year from the original date of purchase against original defects in materials or workmanship when purchased through a Lionel Authorized Retailer*.
This warranty does NOT cover the following:• Normal wear and tear• Light bulbs or LED’s• Defects appearing in the course of commercial use• Damage resulting from abuse/misuse of the product
Transfer of this product by the original owner-purchaser to another person voids this warranty in its entirety. Modification of this product in any way; visually mechanically or electronically, voids the warranty in its entirety.
Any warranted product which is defective in original materials or workmanship and is delivered by the original owner-purchaser (this warranty is non-transferrable) to Lionel LLC or any Lionel Authorized Service Station MUST be accompanied by the original receipt for purchase (or copy) from an Authorized Lionel Retailer*, will at the discretion of Lionel LLC, be repaired or replaced, without charge for parts or labor. In the event the defective product cannot be repaired, and a suitable replacement is not available, Lionel will offer to replace the product with a comparable model (determined by Lionel LLC), if available. In the event a comparable model is not available the customer will be refunded the original purchase price (requires proof of purchase from the Authorized Lionel Retailer* it was originally purchased). Any products on which warranty service is sought must be sent freight or postage prepaid (Lionel will refuse any package when postage is due). Transportation and shipping charges are not covered as part of this warranty.
NOTE: Products that require service that do not have a receipt from an LIONEL AUTHORIZED RETAILER* will be required to pay for all parts required to repair the product (labor will not incur a charge) providing the product is not older than 3 years from date of manufacture and is within 1 year from date of purchase. A copy of the original sales receipt is required.In no event shall Lionel LLC be held liable for incidental or consequential damages. Some states do not allow the exclusion or limitation of incidental or consequential damages, so the above exclusion may not apply to you.
This warranty gives you specific legal rights and you may have other rights which vary from state to state.Instructions for Obtaining Service If service for this Lionel LLC product is required; bring the item, along with your DATED sales receipt and completed warranty information (at the bottom of this page) to the nearest Lionel Authorized Service Station. Your nearest Lionel Service Station can be found by calling 1-800-4-LIONEL or by accessing the website at www.lionel.com.
If you prefer to send your Lionel product directly to Lionel, for repair you must FIRST call 586-949-4100 extension 9105 or FAX Lionel at 586-949-5429 or write to Customer Service, 26750 Twenty Three Mile Road, Chesterfield, MI 48051-2493. Please have the 6-digit Lionel product number, the date of original purchase, the dealer where the item was purchased and what seems to be the problem. You will receive a return authorization (RA) number to ensure your merchandise will be properly tracked and handled upon receipt at Lionel LLC.
Once you have your Return Authorization (RA) number, make sure the item is packed in its original Styrofoam inner container which is placed inside the original outer display box (this will help prevent damage during shipping and handling). This shipment MUST be prepaid and we recommend that it be insured with the carrier of your choice.
Please make sure you have followed all of the above instructions carefully before returning any merchandise for service. You may choose to have your product repaired by one of Lionel LLC’s Authorized Service Stations after its warranty has expired. A reasonable service fee should be expected once the product warranty has expired.Warranty Information Please complete the information below and keep it, along with your DATED ORIGINAL SALES RECEIPT. You MUST present this form AND your DATED SALES RECEIPT when requesting warranty service.
*A complete listing of Lionel Authorized retailers can be found by calling 1-800-4-LIONEL or by visiting our website at www.lionel.com.
Products that are more than 3 years old, from date of manufacture, are not applicable for warranty coverage, even if they have never been sold prior to this date. (Under no circumstance shall any components or labor be provided free of charge.)
Name _________________________________________________________________________Address ________________________________________________________________________Place of Purchase _________________________________________________________________Date of Purchase __________________________________________________________________Product Number __________________________________________________________________Product Description ________________________________________________________________
71-1379-250 0-4-0.indd 12 6/13/12 9:47 AM