log splitter manual 4. remove and open box that is packaged between the log splitter cart and the...
TRANSCRIPT

© 2006 Mantis, Div. of Schiller-Pfeiffer Inc. All Rights Reserved.
Owners Manual and Safety Instructions
Log Splitter Manual

1
Table of Contents
A. Introduction . . . . . . . . . . . . . . . . . . . . . . . .1
B. Log Splitter Specification . . . . . . . . . . . . .1
C. Unpacking and Assembly Instructions . .2
D. Service Information . . . . . . . . . . . . . . . . .5
E. Special Safety Information . . . . . . . . . . . .51. Safety Decals . . . . . . . . . . . . . . . . . . . . . . . .52. Safety Warnings . . . . . . . . . . . . . . . . . . . . . .73. Important extension cord information . . . . .84. Always disconnect power cord from
power source . . . . . . . . . . . . . . . . . . . . . . . . .85. Hydraulic Safety . . . . . . . . . . . . . . . . . . . . . .8
F. Before You Start Splitting . . . . . . . . . . . .9
G. Operation . . . . . . . . . . . . . . . . . . . . . . . . .11
H. Removal of logs jammed on the wedge . . .12
I. How to change the hydraulic oil . . . . . .13
J. Sharpening the wedge . . . . . . . . . . . . . . .14
K. Transport . . . . . . . . . . . . . . . . . . . . . . . . .15
L. Maintenance . . . . . . . . . . . . . . . . . . . . . .15
M. Troubleshooting . . . . . . . . . . . . . . . . . . . .17
N. Storage . . . . . . . . . . . . . . . . . . . . . . . . . . .17
O. Exploded View and Parts List . . . . . . . .18
P. Mantis Warranty Policy . . . . . . . . . . . . .20
A. Introduction
The SwiftSplit log splitter is designed for residential (non-commercial) use and makes your job less physically demanding,more efficient and safer. With a log splitter, the log is split whenpressed against a fixed splitting wedge by a pressure plate.
Major Components, Controls, and Features Overview:An electric motor assembly provides the power for the system.The motor is connected to a hydraulic oil pump that creates a flowof high-pressure oil which runs to a solenoid valve. A switch set andthe solenoid valve let the operator actuate the hydraulic cylinder tosplit a log. An internal reservoir holds the hydraulic oil that feedsthe pump. The hydraulic assembly is attached to the wheel frameassembly, making it easy to move the log splitter around with nolifting. The frame is equipped with folding handles for storage,pivoting support for stability and cord storage hooks forconvenience. This log splitter is designed with two handoperating controls (two normally open switches) for safety. Theelectrical motor is protected by a 15 amp circuit breaker and thepressure relief valve protects the hydraulic assembly in case a loggets jammed. If this happens, after about 5 seconds, the pressureplate slowly travels down to the original position and can beimmediately re-activated.
Maximum Output Force 10 000 lbs (5 tons)
Total Stroke (in)- Ram Travel 15”
Total Weight 136 lbs (61.7 Kg)
L x W x H 40” L x 20” W x 38” H
Voltage 120V
Motor 1.5 kW
Motor RPM Max 3340 RPM
Maximum Log Length 20” (520mm)
Recomd. Maximum Log Diameter 12” Dia.Wheel Size 10” Dia.
B. Log Splitter Specification for Model #5000
Wedge
Vertical Beam
Log Guides
PressurePlate
Two Switches
FoldingHandle
WheelFrame
Assembly
Cord Storage Hooks
Connecting Link
Stabilizing Bar /Pivoting Support

2
C. Unpacking and Assembly Instructions
1. Cut bands; remove cover and two inserts supporting the top and the bottom of the unit.
2. Put log splitter with the cardboard part’s box in the vertical position by holding the top of the beam and carefully lifting thetop of the log splitter until it can stand.
Top of theBeam
Handle
Inserts
Cardboard Part’s Box
3. Remove handle from the box first and place it on the floor.
3
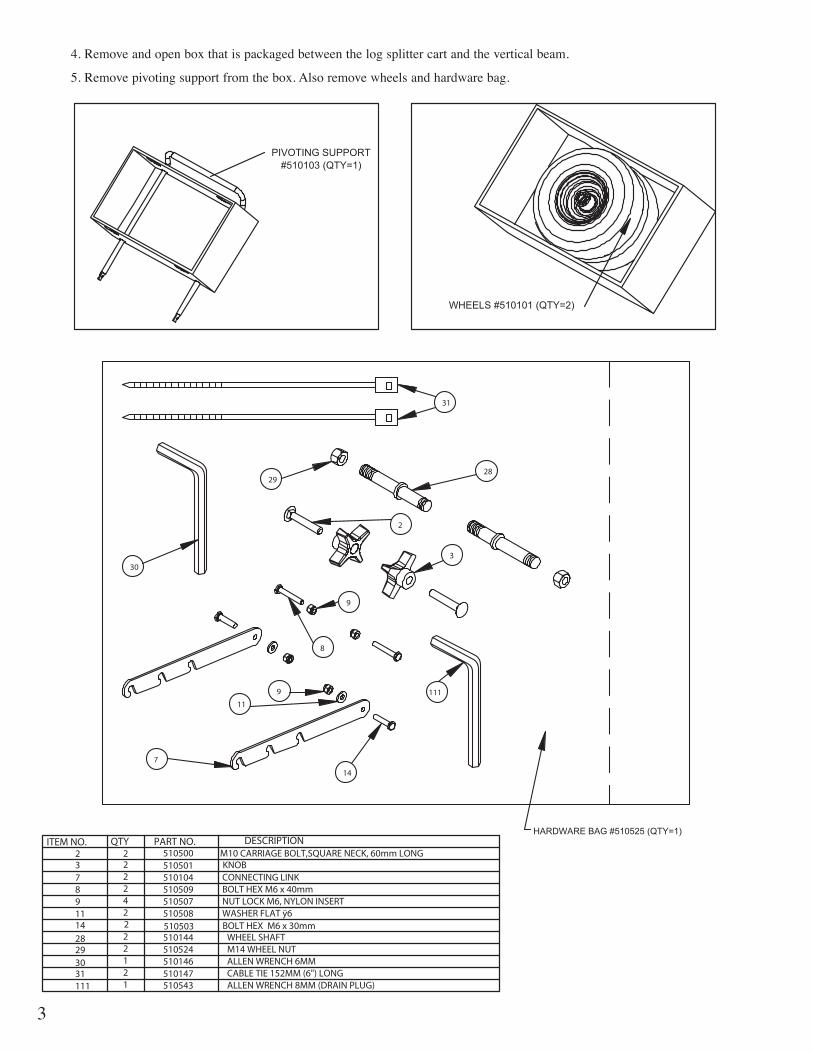
4. Remove and open box that is packaged between the log splitter cart and the vertical beam.
5. Remove pivoting support from the box. Also remove wheels and hardware bag.
9
1411
8
3
282930
11131
7KNOB
CABLE TIE 152MM (6") LONG
2 510501
21
1
22
510146
510543
510144510524
WHEEL SHAFTM14 WHEEL NUTALLEN WRENCH 6MM
ALLEN WRENCH 8MM (DRAIN PLUG)
2
24
2
2
510508
510509
510503
510104
510507
BOLT HEX M6 x 30mm
CONNECTING LINK
NUT LOCK M6, NYLON INSERTWASHER FLAT ÿ6
BOLT HEX M6 x 40mm
2 2 510500 M10 CARRIAGE BOLT,SQUARE NECK, 60mm LONG
510147
ITEM NO. QTY DESCRIPTIONPART NO.

4
6. Folding Handle: Install the folding handle onto the frame using knobs (P/N 510501) and carriage bolts (P/N 510500). To dothis, align square opening of the folding handle with the frame’s round hole and insert carriage bolt through. Secure it withthe handle knob. Repeat the same steps for the opposite side of the handle and tighten the knobs.
7. Use cable ties (P/N 510147) to secure the power cord in place.
8. Installing Wheels: Insert the Wheel Shaft (P/N 510144) in the hub of the Wheel and secure it with the Nut (P/N 510524)provided. Slide the opposite side of the Wheel Shaft through the opening in the frame and bracket, then screw, it into thewelded nut. Start by hand and then use a wrench and secure the wheel. Repeat these steps to install the second wheel.
5
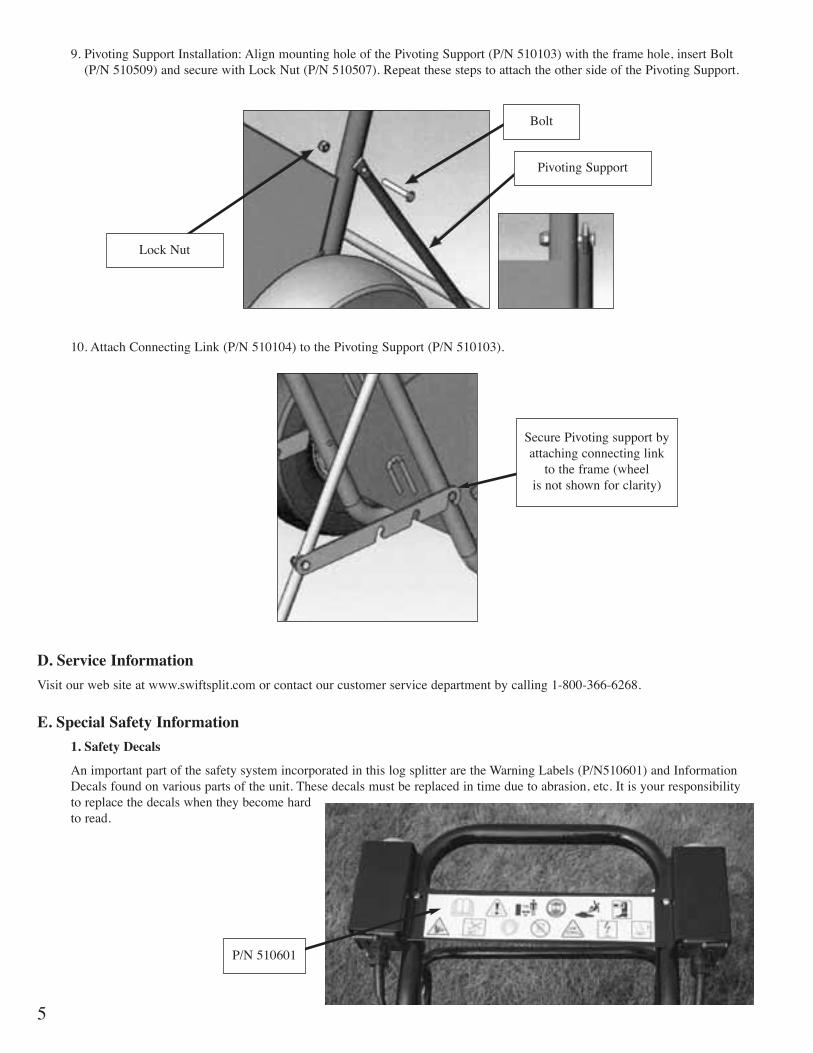
9. Pivoting Support Installation: Align mounting hole of the Pivoting Support (P/N 510103) with the frame hole, insert Bolt(P/N 510509) and secure with Lock Nut (P/N 510507). Repeat these steps to attach the other side of the Pivoting Support.
10. Attach Connecting Link (P/N 510104) to the Pivoting Support (P/N 510103).
D. Service Information
Visit our web site at www.swiftsplit.com or contact our customer service department by calling 1-800-366-6268.
E. Special Safety Information
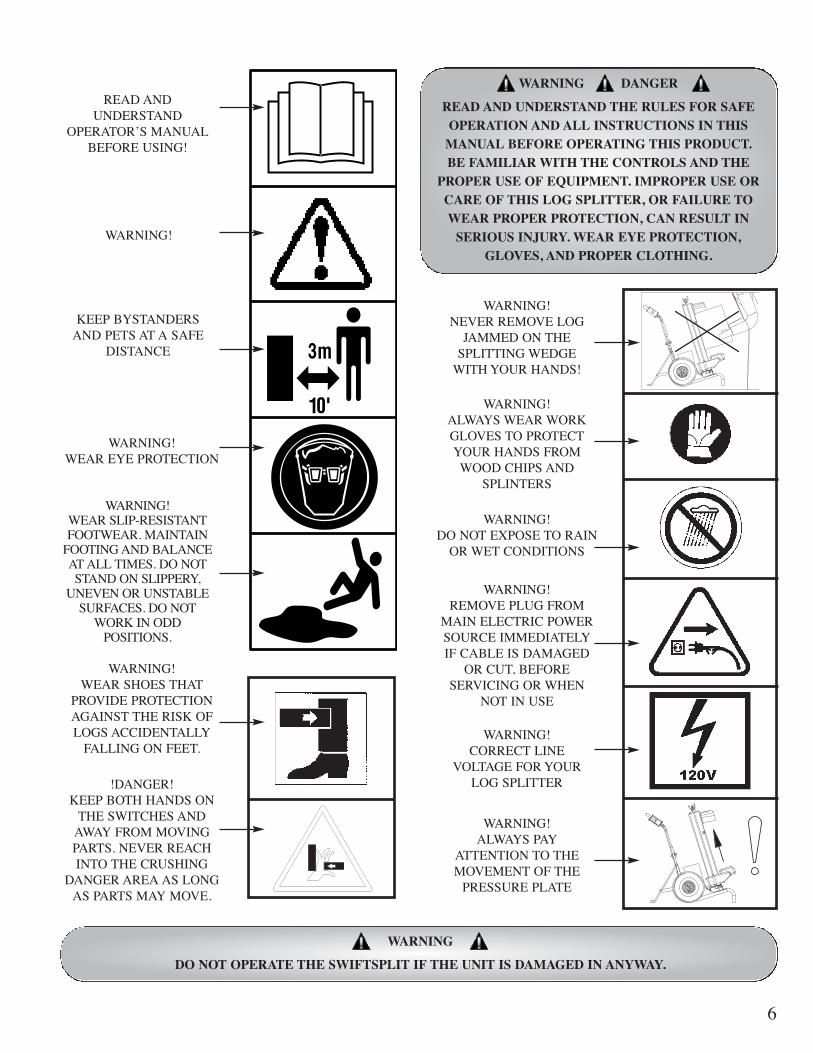
1. Safety Decals
An important part of the safety system incorporated in this log splitter are the Warning Labels (P/N510601) and InformationDecals found on various parts of the unit. These decals must be replaced in time due to abrasion, etc. It is your responsibilityto replace the decals when they become hardto read.
Lock Nut
Bolt
Pivoting Support
Secure Pivoting support byattaching connecting link
to the frame (wheel is not shown for clarity)
P/N 510601
6
WARNING DANGER
READ AND UNDERSTAND THE RULES FOR SAFEOPERATION AND ALL INSTRUCTIONS IN THIS
MANUAL BEFORE OPERATING THIS PRODUCT.BE FAMILIAR WITH THE CONTROLS AND THE
PROPER USE OF EQUIPMENT. IMPROPER USE ORCARE OF THIS LOG SPLITTER, OR FAILURE TOWEAR PROPER PROTECTION, CAN RESULT IN
SERIOUS INJURY. WEAR EYE PROTECTION,GLOVES, AND PROPER CLOTHING.
WARNING!
WARNING!WEAR EYE PROTECTION
READ ANDUNDERSTAND
OPERATOR’S MANUALBEFORE USING!
KEEP BYSTANDERSAND PETS AT A SAFE
DISTANCE 3
WARNING! WEAR SLIP-RESISTANTFOOTWEAR. MAINTAIN
FOOTING AND BALANCEAT ALL TIMES. DO NOTSTAND ON SLIPPERY,
UNEVEN OR UNSTABLESURFACES. DO NOT
WORK IN ODDPOSITIONS.
WARNING! WEAR SHOES THAT
PROVIDE PROTECTIONAGAINST THE RISK OFLOGS ACCIDENTALLY
FALLING ON FEET.
!DANGER! KEEP BOTH HANDS ON
THE SWITCHES ANDAWAY FROM MOVINGPARTS. NEVER REACHINTO THE CRUSHING
DANGER AREA AS LONGAS PARTS MAY MOVE.
WARNING!NEVER REMOVE LOG
JAMMED ON THESPLITTING WEDGE
WITH YOUR HANDS!
WARNING! ALWAYS WEAR WORKGLOVES TO PROTECTYOUR HANDS FROMWOOD CHIPS AND
SPLINTERS
WARNING! DO NOT EXPOSE TO RAIN
OR WET CONDITIONS
WARNING! REMOVE PLUG FROM
MAIN ELECTRIC POWERSOURCE IMMEDIATELYIF CABLE IS DAMAGED
OR CUT, BEFORESERVICING OR WHEN
NOT IN USE
WARNING! CORRECT LINE
VOLTAGE FOR YOUR LOG SPLITTER
WARNING! ALWAYS PAY
ATTENTION TO THEMOVEMENT OF THE
PRESSURE PLATE
WARNING
DO NOT OPERATE THE SWIFTSPLIT IF THE UNIT IS DAMAGED IN ANYWAY.

7
WARNING
WHEN USING THIS LOG SPLITTER, BASIC SAFETY PRECAUTIONS (INCLUDING THEFOLLOWING) SHOULD ALWAYS BE FOLLOWED TO REDUCE THE RISK OF FIRE,
ELECTRIC SHOCK AND PERSONAL INJURY.
IMPORTANT!
ONLY OPERATE THE LOG SPLITTER WITH THE POWER CORD PLUGGEDINTO A PROPERLY GROUNDED OUTLET THAT SUPPLIES THE CORRECT
LINE VOLTAGE AND A MINIMUM OF 15 AMPS OF CURRENT. FORADDITIONAL PROTECTION, IT IS RECOMMENDED THAT A GFCI
(GROUND FAULT CIRCUIT INTERRUPTER) OUTLET BE USED.
• The Unit is to be operated by one person only! Keep in mind that the operator or user is responsible for accidentsor hazards occurring to other people or their property. Always keep area clear of children, pets, and bystanders.
• Never request the assistance of another person to help you remove a jammed log, or for any other reason.
• Don’t allow children, incapable people, or people who are not familiar with these instructions to operate this log splitter.
• Dress properly. Do not wear loose closing or jewelry that can be caught in moving parts. Long pants, non-slip gloves andsturdy work shoes with non-skid soles are recommended when working outdoors. Wear protective hair covering tocontain long hair.
• Keep the working area clean and free from obstructions, i.e. logs, split wood, etc. Cluttered areas invite injuries.
• Work only in daylight or in good artificial light.
• Always inspect your unit before each use and ensure that handles, guards and fasteners are secure and in place. Be surethat all electrical cords are not damaged or broken.
• Never attempt to use an incomplete machine or one fitted with unauthorized modification. Any modifications to yourmachine can cause personal injuries, and will void your Warranty.
• Check the log before splitting. It should be free from nails or wire that may fly out during splitting operation. This couldcause personal injury or damage to the machine. The ends of the log should be cut as squarely as possible.
• Never attempt to split more than one log at a time, unless the ram is fully extended, and you need the second log tocomplete the split of the first log.
• Do not attempt to load the log while the ram of the log splitter is in motion. You could get trapped and injured.
• Keep your hands and body parts away from the open splits and cracks in the log. The wood can close in suddenly andcause injury.
• Do not try to defeat or override any safety features.
• Stay alert. Watch what you are doing. Use common sense. Do not operate machine when you are tired, ill, or under theinfluence of alcohol or other drugs.
• Never leave the machine unattended when in use.
• Do not use machine in an area were natural gas, gasoline fumes or flammable liquids are present.
• Never open the switch boxes or motor cover. Never try to do any electrical repairs yourself. Contact a qualifiedelectrician, or contact the Mantis Customer Service Department number for help and information.
• When log splitter is used outdoors, use only extension cords intended for outdoor use.
2. Safety Warnings

8
3. Important extension cord information
• Make sure the extension cord is in good condition before use.
• Based on the total length of cord that you are going to use, check the chart to make sure the cord meets the correctminimum cord gauge (AWG) requirements.
• Do not abuse the cord; never yank it to disconnect it from the socket or outlet.
• Keep cord away from heat, oil and sharp edges.
• Never expose log splitter to rain or operate in wet conditions.
• Never attempt to move or reposition the log splitter by pulling the cord.
• Don’t operate the log splitter with a damaged electrical or extension cord.
• Never operate the log splitter unless the power cord is plugged into a properly grounded outlet that supplies 110-120Vpower, and a minimum of 15 amps of current.
4. Disconnect power cord from power source
• When not in use
• Before servicing
• Before clearing blockages
• Before checking, cleaning or working on the cutting portion of the unit.
• When you need to move or reposition machine.
• Whenever you leave the unit
5. Hydraulic safety
Periodically check for hydraulic fluid leaks by placing a sheet of cardboard under the wood splitter when system is running.
IMPORTANT NOTE:
USING AN UNDERSIZED CORD, A LARGER NUMBER CORD GAUGE(AWG) THAN RECOMMENDED IN THE CHART, OR AN EXCESSIVELYLONG CORD COULD CAUSE A LOSS IN POWER (VOLTAGE DROPS).
THIS PREVENTS THE MOTOR FROM DEVELOPING ITS FULL POWERAND OVERHEATS THE UNIT.
Length (feet) 0 to 50 51 to 100 101 to 150
Cord Gauge (AWG) 14 12 10
EXTENSION CORD CHART
WARNING
NEVER USE YOUR HAND OR ANY PART OF YOUR BODY TO CHECK FOR HYDRAULICSYSTEM LEAKS WHILE SYSTEM IS PRESSURIZED.
ESCAPING PRESSURIZED FLUID CAN HAVE ENOUGH FORCE TO PENETRATESKIN AND CAUSE SERIOUS INJURY.

9
WARNING
NEVER CHECK HYDRAULIC FLUID LEVEL WHILE MOTOR IS RUNNING OR WHILE THE TANK IS STILL WARM AFTER THE MOTOR IS SHUT OFF.
HOT PRESSURIZED FLUID CAN ESCAPE THROUGH THE OPENING AND CAUSE SERIOUS INJURY.
BEFORE PERFORMING ANY MAINTENANCE, BE SURE THAT:
• LOG SPLITTER IS DISCONNECTED FROM THE POWER SOURCE
• PUSHER PLATE IS FULLY RETRACTED (RETURNED TO THE LOWEST POSITION) AND NO RESIDUAL HYDRAULIC ENERGY IS LEFT IN THE SYSTEM
• OIL HAS COOLED
• Call 1-800-366-6268 or a qualified hydraulic mechanic for assistance to replace worn components.
• Failure to comply in any way with these instructions, improper use of the log splitter and improper maintenanceoperations may result in serious injury.
• Manufacturer shall not be liable for any injuries or damage occurred as a result of improper use or impropermaintenance of the log splitter.
F. Before You Start Splitting
• Before each use, inspect your unit and ensure that all handles, guards and fasteners are secure and in place. Be sure thatall electrical cords are not damaged or broken.
• Before use of the log splitter, check it for alignment of moving parts, free running of moving parts, breakage of parts,mounting and any other conditions that may affect its operation.
• Inspect Hydraulic Fluid Level. Remove the Dipstick using the Allen Wrench provided, clean the Dipstick and insert it tocheck the oil level. It should be between the two notches on the stem. If level is low, add recommended type of thehydraulic oil. If the level is too high, poor out a little at a time into a suitable container.
• Reinstall the Dipstick and the O-ring seal. Be careful not to damage the threads of the Plug and Aluminum Top Cover.
DipstickP/N 510110
Allen WrenchP/N 510512 (6mm)
Aluminum Top Cover
DipstickRemoved

10
WARNING
THE PRESSURE RELIEF VALVE PROTECTS THE HYDRAULIC ASSEMBLY WHEN THE LOGIS JAMMED FOR ABOUT 5 SECONDS. THE PRESSURE PLATE SLOWLY TRAVELS DOWN TO
THE ORIGINAL POSITION AND CAN BE IMMEDIATELY RE-ACTIVATED.
IF THE LOG DOES NOT SPLIT IMMEDIATELY, DO NOT FORCE THE PRESSURE PLATE OF THE LOG SPLITTER. STOP THE LOG SPLITTER, REPOSITION THE LOG BY
TURNING IT AND TRY AGAIN. IF THE WOOD STILL CAN NOT BE SPLIT, IT MEANS THAT THE LOG EXCEEDS THE CAPACITY OF THE MACHINE AND IT SHOULD BE REJECTED.
• Break wood in the direction of the grain, never place wood across the log splitter.
• Do not hold the log by the ends when you are positioning it onto the log splitter.
• Any damaged part of the log splitter should be properly repaired or replaced by an authorized service center, unlessotherwise indicated in this instruction manual.
• Do not use the log splitter if the switch does not turn it ‘on’ and ‘off’. Have any defective switches replaced by anauthorized service center.
• Lubricate ram, vertical beam and guides to reduce wear. Use #2 Lithium grease.
NOTE: We recommend that wood be left to air dry, as it will make the splitting process much easier and faster. Wood which iswell seasoned also produces up to 44% more heat than green wood.
Several things can limit the splitting capacity of the log splitter: knotty wood, wood with twisted grain, or a stump with roots.The more of these characteristics present in a piece of wood, the more difficult it will be to split.
A knot is that portion of a branch that has become incorporated in the bole of a tree. The influence of a knot on the mechanicalproperties of a wood member is due to the interruption of continuity and change in the direction of wood fibers associated withthe knot.
The diameter of a log does not necessarily indicate the difficulty of the split. A larger log can be split easier than asmaller log, if its fiber is straight.
11
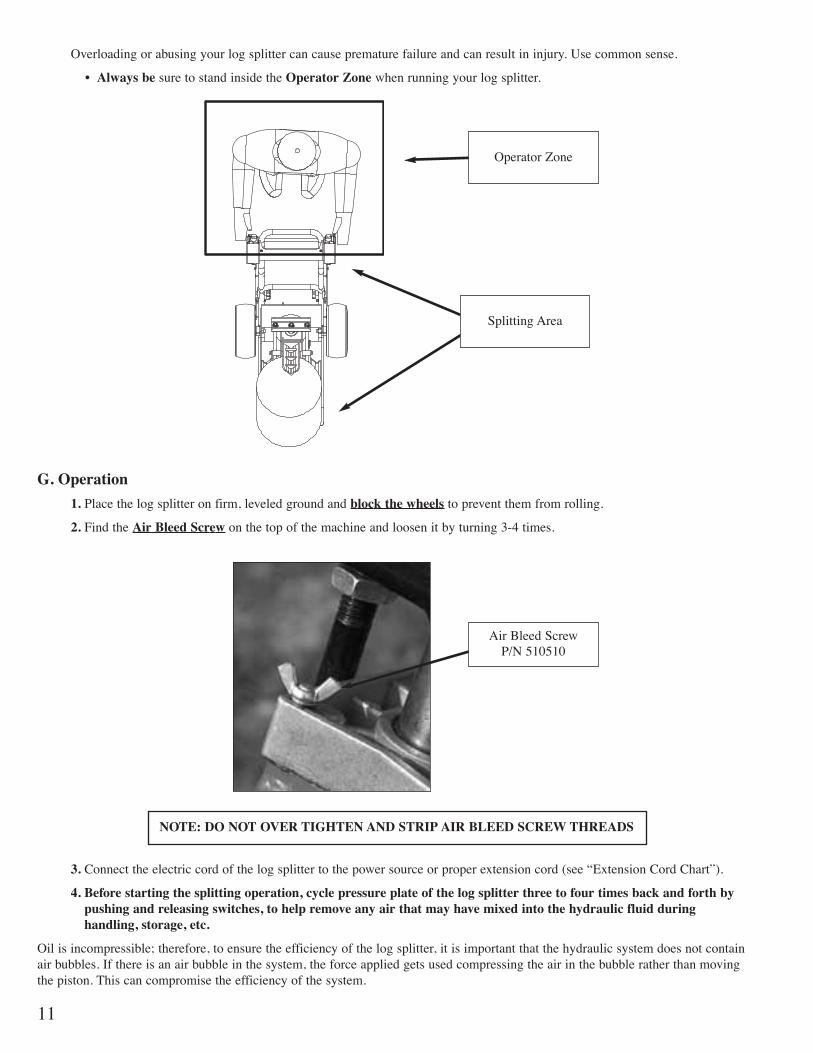
Overloading or abusing your log splitter can cause premature failure and can result in injury. Use common sense.
• Always be sure to stand inside the Operator Zone when running your log splitter.
G. Operation
1. Place the log splitter on firm, leveled ground and block the wheels to prevent them from rolling.
2. Find the Air Bleed Screw on the top of the machine and loosen it by turning 3-4 times.
NOTE: DO NOT OVER TIGHTEN AND STRIP AIR BLEED SCREW THREADS
3. Connect the electric cord of the log splitter to the power source or proper extension cord (see “Extension Cord Chart”).
4. Before starting the splitting operation, cycle pressure plate of the log splitter three to four times back and forth bypushing and releasing switches, to help remove any air that may have mixed into the hydraulic fluid duringhandling, storage, etc.
Oil is incompressible; therefore, to ensure the efficiency of the log splitter, it is important that the hydraulic system does not containair bubbles. If there is an air bubble in the system, the force applied gets used compressing the air in the bubble rather than movingthe piston. This can compromise the efficiency of the system.
Operator Zone
Air Bleed ScrewP/N 510510
Splitting Area

12
MAXIMUM LOG SIZE FOR THE SWIFT SPLIT IS 20” LONG X 12” DIA.
5. Place the log on the pressure plate of the machine. Be sure that the body of the log is lying firmly against the vertical beamof the log splitter and the end of the log is well supported by the pressure plate. If the log tends to wobble, reposition it byturning it. The supporting guides help to keep the log at the center or the log splitter.
• If the log moves away from the beam, retract the pressure plate and turn the log 90 degrees. Do not force the log on thetip part of the blade; this can damage blade welds and the body of the machine.
6. While operating the log splitter, always be sure of a safe and secure operating position and stand inside of the Operator Zone.
7. Activate pressure plate, by depressing both switches and keep holding them until split pieces of the log fall away. Then,release them. This will cause the pressure plate to retract to its starting position.
8. When the job is finished and you are ready to store your log splitter, tighten the bleed screw to prevent oil leakage duringstorage time.
WARNING
• NEVER REQUEST THE ASSISTANCE OF ANOTHER PERSON TO HELP YOU REMOVEA JAMMED LOG!
• NEVER REMOVE LOG JAMMED ON THE SPLITTING WEDGE WITH YOUR HANDS!
• KEEP YOUR HANDS AND BODY PARTS AWAY FROM THE OPEN SPLITS ANDCRACKS IN THE LOG. THE WOOD CAN CLOSE IN SUDDENLY AND CAUSE INJURY.
• NEVER TRY TO REMOVE THE JAMMED LOG BY HITTING IT WITH A HAMMER ORANY OTHER OBJECT; THIS CAN DAMAGE THE HYDRAULIC PUMP COVER, MOTORCOVER OR OTHER PARTS OF THE LOG SPLITTER.
H. Removal of logs jammed on the wedge
1. Release both switches and wait until pressure plate is fully retracted and returns in the lowest position.

13
IMPORTANT! DO NOT MIX FLUID BRANDS AND TYPES! DO NOT USE OTHER GRADE OILS.
WARNING
BEFORE PERFORMING ANY MAINTENANCE BE SURE THAT:
• LOG SPLITTER IS DISCONNECTED FROM THE POWER SOURCE.
• PUSHER PLATE IS FULLY RETRACTED (RETURNED TO THE LOWEST POSITION)AND NO RESIDUAL HYDRAULIC ENERGY IS LEFT IN THE SYSTEM.
• OIL HAS COOLED.
• YOUR MACHINE IS CLEAN. DO NOT CONTAMINATE HYDRAULIC FLUID.CONTAMINANTS OF HYDRAULIC FLUID INCLUDE SOLID PARTICLES, AIR, WATEROR ANY OTHER MATTER THAT IMPAIRS THE FUNCTION OF THE FLUID.CONTAMINATION ACCELERATES WEAR OF HYDRAULIC COMPONENTS.
I. How to change the hydraulic oil
Oil should be changed after every 200 hours of operation.The drain port is located under the unit
Recommended Oil Types:
Shell Tellus T22
Aral Vitam GF22
SP Energol HCP22
Mobil DTE11 or equivalent
Wooden Wedge
Log is jammed on the wedge
Different sizewooden wedges
2. Place a piece of wood shaped as wedge under the jammed log and activate the pressure plate of the log splitter to push it upand under the jammed log. Repeat this process using larger wooden wedges until the jammed log is released.

Drain Port
14
IMPORTANT!
IF THE OIL LEVEL IS TOO HIGH THE HEAT WILL NOT BE DISSIPATING QUICKLY ENOUGH AND THE TEMPERATURE OF THE HYDRAULIC SYSTEM WILL RISE.
IF THE OIL LEVEL IS TOO LOW IT MAY CAUSE CAVITATION*.
• To drain the oil, tip unit back, place an empty container that can hold at least 1 Gallon (4 Liters) of oil under the log splitter.
• Use an Allen Wrench [P/N 510543 (8mm)] and remove Drain Port Plug and the seal in the aluminum bottom cover plateof the log splitter.
• Hold the handle, move unit up a little and position it under the angle. Using an Allen Wrench, unscrew the Dipstick andopen the Oil Fill Port to let air in and help the oil flow out. Wait until the oil completely escapes from the oil reservoir.
• Reinstall the Drain Port Plug and the seal. Be careful not to damage the threads of the Aluminum Bottom Cover.
• After the used oil is drained, pour approximately 0.8-0.9 of a gallon (3-3.3 liters) of recommended oil into the Oil Fill Port.
• Clean the Dipstick and insert it to check the oil level; it should be between the two notches on the stem. If level is low,add recommended type of the hydraulic oil. If the level is too high, poor out a little at a time into a container.
*Reference: Cavitation occurs when the volume of hydraulic fluid demanded by any part of a hydraulic circuit exceeds the volumeof fluid being supplied. If there is an air bubble in the system, the force applied gets used compressing the air in the bubble ratherthan moving the piston. This affects the efficiency of the system. In this case, Force (Rated 5 tons) will be cut down.
• Reinstall the Dipstick and the seal. Be careful not to damage the threads of the Dipstick Plug and Aluminum Top Cover.
• Clean thoroughly.
• Loosen air bleed screw, turn 3-4 times.
• Purge air from the hydraulic system by cycling the pressure plate back and forth 3 to 4 times.
WARNING
DUMPING USED HYDRAULIC OIL IN THE ENVIRONMENT IS FORBIDDEN. THE FLUIDMUST BE DISPOSED IN ACCORDANCE WITH THE LOCAL ENVIRONMENTAL RULES
AND PROCEDURES.
WARNING
BEFORE PERFORMING ANY MAINTENANCE BE SURE THAT:
• LOG SPLITTER IS DISCONNECTED FROM POWER SOURCE.
• PUSHER PLATE IS FULLY RETRACTED (RETURNED TO THE LOWEST POSITION)AND NO RESIDUAL HYDRAULIC ENERGY IS LEFT IN THE SYSTEM.
• OIL HAS COOLED.
J. Sharpening the wedge
Sharpen the splitting wedge, as needed, using a fine-toothed file to remove any burrs, nicks or flat spots from the wedge.
Oil Fill Port

15
K. Transport
• Log splitter is equipped with two 10” dia. wheels to make it easy to move around.
• If you’d like to move your log splitter to different locations, secure the unit during transport to prevent damage or injury.Always tighten the bleed screw to prevent oil spill.
WARNING
BEFORE PERFORMING ANY MAINTENANCE BE SURE THAT:
• LOG SPLITTER IS DISCONNECTED FROM POWER SOURCE.
• PUSHER PLATE IS FULLY RETRACTED (RETURNED TO THE LOWEST POSITION)AND NO RESIDUAL HYDRAULIC ENERGY IS LEFT IN THE SYSTEM.
• OIL HAS COOLED.
L. Maintenance
Area Maintenance procedure Frequency
Inspect Hydraulic fluid level
Using an Allen Wrench, unscrewthe Dipstick.
Clean the Dipstick and inspect it to check that the oil level is between the two notches
on the stem.
(See section G for instructions)
Before each use
Inspect/Lubricate
Log Ram, Vertical Beam and Guides
Use #2 Lithium Grease
Before each use
Inspect/SharpenSplitting Wedge
(See section J for sharpening instructions)
Before each use
DIPSTICK
RAM
GUIDES
BEAM
SPLITTINGWEDGE

16
Maintain log splitter with care
• Keep the blade of the log splitter sharp and clean for better and safer performance
• Follow instructions for lubrication and oil change
• Keep proper oil level
• Inspect tool cord periodically and, if damaged, have it replaced by an authorized service facility
• Inspect extension cord periodically and replace, if damaged
• Keep cart dry, clean and free from oil and grease
Area Maintenance procedure Frequency
Inspect /TightenNuts, Bolts, hardware
Before each use
Visually Inspect All Welds.
Check alignment of moving parts and fordamaged or worn parts.
Before each use
Replace Hydraulic oilwhen oil viscosity and force decrease.
You need 0.8-0.9 of a gallon (3-3.3 liters) of oil to fill up the reservoir
(after old oil is completely drained).
(See section I for instructions)
Recommended Hydraulic oil type:Shell Tellus T22
Aral Vitam GF22SP Energol HCP22
Mobil DTE11 or equivalent
Do not mix fluid brands and types! Do not use other grade oils.
After approximately 200 hours of operation
Clean/LubricateMachine and cart
After each use
IMPORTANT!
SKILLED AUTHORIZED PERSONNEL SHOULD PERFORM ANY MAINTENANCE OR REPAIR OPERATION NOT DESCRIBED ABOVE.

17
M. Troubleshooting
N. Storage
1. Clean Unit.
2. Lubricate for rust prevention
3. Tighten the Air Bleed Screw
4. Fold in the handle (optional)
5. Store in a sheltered/dry area not accessible to children.
Problem Possible cause Remedy
Log fails to split
• Incorrect positioning of the log
• Log exceeds permitted dimensions orthe wood is too hard for the capacityof the machine
• Wedge has burrs, nicks or flat spotsand needs to be sharpened
• Oil level is low
• Leak of hydraulic oil. Hydraulicpressure is too low.
• Re-position the log
• Put this log aside and try different one
• Sharpen the splitting wedge asdirected in section J
• Adjust the oil level
• Place piece of cardboard under thelog splitter to locate the leak. Worn components should bereplaced. Contact qualified hydraulic mechanic for assistance or call 1-800-366-6268.
Pressure plate advances with a jerky motion or with strong vibration
• Air in the system
• Hydraulic fluid level is low
• Open bleed screw, and cycle pressureplate of the log splitter three to fourtimes back and forth to help removeany air that may have mixed into thehydraulic fluid.
• Check and adjust hydraulic oil level.
Slow Pressure Plate Response • Hydraulic fluid level is low • Check and adjust hydraulic oil level.
Hydraulic oil leak
• Bleed screw was not tightened before machine was moved
• Worn hydraulic oil seals.
• Tighten the bleed screw beforemoving log splitter
• Contact qualified hydraulic mechanic for assistance or call 1-800-366-6268.

18
O. Exploded View
LOG SPLITTER EXPLODED VIEW
37
3436
39
40
35
38
REV F, 12-20-05

19
O. Parts ListITEM PART #. DESCRIPTION / REMARKS QTY
1 510100 CART BOTTOM WELDED ASSEMBLY 12 510500 M10, CARRIAGE BOLT, SQ NECK, 60MM LG 23 510501 KNOB 24 510101 WHEEL 10 IN DIA 25 510102 HANDLE UPPER ASSEMBLY 16 510103 STABILIZING BAR/PIVOTING SUPPORT 17 510104 CONNECTING LINK 28 510509 BOLT HEX M6 X 40MM 29 510507 NUT LOCK M6, NYLON INSERT 6
10 510109 SOLENOID PROTECTION BRACE 111 510508 WASHER #6 412 510502 BOLT HEX M6 X15MM 213 510105 END CAP 214 510503 BOLT HEX M6 X 30MM 215 510106 PROTECTIVE BRACE 116 510504 WASHER 6MM DIA 417 510505 SCREW M6 X 35MM 218 510510 NUT M6 219 510107 SWITCH BOX ASSEMBLY 220 510506 NUT M16 (THIN) 221 510900 MOTOR ASSEMBLY 110V 122 510108 HYDRAULIC ASSEMBLY 123 510601 WARNING LABEL 124 510110 DIP STICK 125 510111 DIP STICK SEAL 126 510510 AIR BLEED SCREW 127 510512 DRAIN PLUG SEAL 128 510144 WHEEL SHAFT 229 510524 M14 WHEEL NUT 230 510512 ALLEN WRENCH 6MM (DIP STICK) 131 510147 CABLE TIE 152MM (6") LONG 132 510600 SWIFT SPLIT LOGO LABEL 233 510148 SWITCH PROTECTIVE COVER 2
SWITCH BOX ASSEMBLY34 510149 SWITCH BOX 235 510150 SWITCH BOX COVER 236 510151 SWITCH 237 510152 STRAIN RELIEF (SWITCH BOX) 238 510526 SCREW M4 X 25 LONG 839 510527 FLAT WASHER #4 840 510528 NUT M4 8
HYDRAULIC ASSEMBLY41 510153 BLEED SCREW SEAL 142 510154 UPPER COVER PLATE 143 510155 WIPER SEAL(UPPER COVER PLATE) 144 510156 O-RING, 30MM DIA, UPPER COVER PLATE 145 510157 PISTON'S REM WITH WELDED PULL BRACKET 146 510158 PISTON BODY 147 510159 O-RING 25MM DIA, PISTON 148 510160 SEAL (SQ SECTION) 25MM DIA 149 510161 RETURN SPRING 150 510529 NUT M14 251 510530 NUT M14 452 510162 THREADED RODS 453 510163 CYLINDER 154 510164 OIL RESERVOIR WITH WELDED WEDGE 155 510531 BOLT M8 X 12 LONG 456 510165 LOG GUIDE 2
ITEM PART #. DESCRIPTION / REMARKS QTY
57 510166 THRUST PAD 258 510167 PRESSURE PLATE 159 510168 BOTTOM COVER PLATE 160 510169 O-RING 55MM DIA, BOTTOM COVER 161 510170 DRAIN PLUG, M10X8MM THREAD 162 510532 LOCK NUT M10 NYLON INSERT 463 510533 EXTERNAL STAR WASHER #10 464 510534 PLUG WITH M14X1.5 THREAD, PRESSURE
RELIEF VALVE 165 510535 PLUG WITH M20X1.5 THREAD, SOLENOID 166 510171 OIL PUMP COVER 167 510172 GEAR 268 510173 KEY (TO HOLD GEAR TO THE MOTOR SHAFT) 169 510174 O-RING 10.6MM DIA, OIL SEAL 270 510175 GEAR SHAFT 171 510176 BALL 172 510177 WIRE SNAP RING 273 510178 OIL PUMP SLEEVE 274 510179 OIL PUMP PIN 8MM DIA, 25MM HIGH 275 510180 GEAR PLATE 176 510181 O-RING SEAL 45MM DIA 277 510536 BOLT M8X28MM HIGH 378 510537 SPRING LOCK WASHER#8 979 510538 FLAT WASHER #8 980 510539 BOLT M8X55 MM LONG 681 510182 RETURN SPRING (SOLENOID) 182 510183 SPOOL VALVE (SOLENOID) 183 510184 SPOOL VALVE HOUSING (SOLENOID) 184 510185 SOLENOID COIL 185 510186 SOLENOID CAP 186 510187 STRAIN RELIEF (SOLENOID) 187 510188 AC TO DC CONVERTER WITH LED INDICATOR 188 510189 RELIEF POPPET (PRESSURE RELIEF VALVE) 189 510190 RELIEF SPRING (PRESSURE RELIEF VALVE) 190 510191 PORT PLUG WITH TWO O-RINGS 191 510192 O-RING (PRESSURE RELIEF VALVE) 292 510193 PORT PLUG HOUSING (PRESSURE RELIEF VALVE) 193 510194 PRESSURE RELIEF VALVE ADJUSTMENT 194 510195 THREADED PIN (PRESSURE RELIEF VALVE) 195 510540 M6 NUT ((PRESSURE RELIEF VALVE) 196 510196 COVER (PRESSURE RELIEF VALVE) 1
MOTOR ASSEMBLY97 510197 MOTOR 198 510198 WIRE CLAMP 199 510199 15 AMP CIRCUIT BREAKER 1
100 510541 C/B NUT 1101 510200 CORD STRAIN RELIEF 1102 510201 CORD (OUTDOOR USE) 1103 510202 STRAIN RELIEF 1104 510203 RUBBER COVER 2105 510204 CAPACITOR 300VAC 1106 510205 CAPACITOR 125VAC 1107 510206 GASKET (MOTOR JUNCTION BOX) 1108 510207 MOTOR JUNCTION BOX 1109 510208 LID 1110 510542 SCREW M4X10MM SELF TAPPING 8111 510543 ALLEN WRENCH #8 (DRAIN PLUG) 1

Specifications, descriptions, and illustrative material in this literature are as accurate as known at the time of publication, but are subject to change without notice.
P/N 510700
1/06
MANTIS1028 Street Road
Southampton, PA 18966(215) 355-9700
MANTIS WARRANTY POLICY
MANTIS extends this limited warranty against defects in material and workmanshipfor a period of two years from the date of purchase, to the first retail purchaser andeach subsequent owner during the warranty period. This warranty covers all portionsof the MANTIS Log Splitter.
MANTIS will repair or replace, at its option, any part or parts of the productproven to be defective in material or workmanship under normal usage during thewarranty period. Warranty repairs and replacements will be made without chargefor parts or labor. All parts replaced under warranty will be considered as part ofthe original product, and any warranty on the replaced parts will expire coincidentwith the original product warranty. In the event of a defect or malfunction, thepurchaser must send the product, postage paid to:
Mantis2800 Turnpike Dr.Suite #12800 Commerce CenterHatboro, PA 19040
MANTIS assumes no responsibility in the event that the product was assembled or used in noncompliance with any assembly, care, safety, or operating instructionscontained in the Owner’s Manual; was not used with reasonable care; or was misused, used for other than normal or intended purposes. This warranty does notextend to parts affected or damaged by normal wear and tear.
MANTIS MAKES NO EXPRESS OR IMPLIED WARRANTIES ORREPRESENTATIONS EXCEPT THOSE CONTAINED HEREIN. THE DURATIONOF ANY IMPLIED WARRANTY, INCLUDING MERCHANTABILTY ANDFITNESS FOR A PARTICULAR PURPOSE, IS LIMITED TO THE DURATIONOF THIS WRITTEN LIMITED WARRANTY. MANTIS DISCLAIMS ALLLIABILITY FOR INDIRECT AND/OR CONSEQUENTIAL DAMAGES. SOMESTATES DO NOT ALLOW LIMITATIONS ON HOW LONG AN IMPLIEDWARRANTY LASTS AND/OR DO NOT ALLOW THE EXCLUSION ORLIMITATION OF INCIDENTAL OR CONSEQUENTIAL DAMAGES, SO THATABOVE LIMITATIONS AND EXCLUSIONS MAY NOT APPLY TO YOU. THISWARRANTY GIVES YOU SPECIFIC LEGAL RIGHTS, AND YOU MAY ALSOHAVE OTHER RIGHTS WHICH VARY FROM STATE TO STATE.