longer technology orange10 lcd 3d printer user mannual … · 2019-05-05 · if it is abnormal...
TRANSCRIPT

www.longer3d.com [email protected]
LONGER Technology Orange10 LCD 3D Printer
User Mannual Version1.0
2019-01-21
I www.longer3d.com [email protected]
Contents
1. Introduction ............................................................................................................................1
2. Specifications ..........................................................................................................................2
3. Product Overview ...................................................................................................................3
3.1 The 3D printer description .............................................................................................. 3
3.2 The accessory box ............................................................................................................ 4
4. Active Your 3D Printer ............................................................................................................4
5 Touch Screen Description ........................................................................................................5
5.1 Main Menu ...................................................................................................................... 5
5.2 File ................................................................................................................................... 5
5.3 Job ................................................................................................................................... 7
5.4 Setting ............................................................................................................................ 10
5.5 About ............................................................................................................................. 11
5.6 Leveling .......................................................................................................................... 12
6 Software User Manual .......................................................................................................... 14
6.1 PC Requirements ........................................................................................................... 14
6.2 software installation ...................................................................................................... 14
6.4 Printing Procedure ......................................................................................................... 17
6.5 main menu ..................................................................................................................... 18
6.6 Open .............................................................................................................................. 20
6.7 Edit ................................................................................................................................. 20
6.8 Fix .................................................................................................................................. 21
6.9 Support .......................................................................................................................... 22
6.10 Slice .............................................................................................................................. 24
6.11 Generating Job File ...................................................................................................... 26
6.12 Post-processing ........................................................................................................... 28
7. FAQ ...................................................................................................................................... 30
8. Attentions and Maintenance ............................................................................................... 31

1 www.longer3d.com [email protected]
Important Notice
1. Make sure there is no model under building plate
or in the resin tank by a paper card before each
printing and leveling. Otherwise, it will cause
damage to the printer.
2. Do not remove the TF card during printing.
3. Do not scape the resin tank by sharp plastic or
metal knife, it may cause film damage and resin
leakage.
4. Please take care of the metal scrapper to avoid
injury during removing the model.
5. It is recommended to add plate players to
facilitate removing the model.
6. Please dispose of the resin waste liquid according
to local regulations, and do not pour directly into
the domestic drainage channel.
1 www.longer3d.com [email protected]
1. Introduction
This user manual is provided to the operator with necessary
and detailed instructions for safe and correct operation,
software, maintenance, troubleshooting of Orange10 LCD 3D
printer. This manual document must be read carefully before
installation and operation of the printer. The non-compliance
with warnings and instructions may result in printer damage
or individual injury. And the user should be solely responsible
for the damage or failure caused by failure to follow the
instructions.
The content of this manual must be treated confidentially. No
part of this document may be given, copied, or transmitted to
others without the authorization.
All rights reserved.

2 www.longer3d.com [email protected]
2. Specifications
Equipment Model Orange10
Printing Technology LCD stereolithography
Build Size 9855140mm
Layer Thickness 0.02-0.10mm
LCD Resolution 854480 pixel, 115μm
Z axis Resolution 0.625μm
Build Speed 30mm/h ((100μm layer thickness))
Material Photopolymer Resin
Light Source UV LED 405nm
Software LONGER
Operation System Windows 7/8/10, 64-bit
Connectivity TF card
Format STL
Screen 2.8 inch touch screen
Dimension 6.7"6.7"14.2" (170170360mm)
Net Weight 5.4kg
Package Dimension 8.7"8.7"21.6" (220220550mm)
Gross Weight 7.0kg
Power Requirement 100-240V AC, 50/60Hz
Working Power 60W
Operation Environment 15-30℃, moisture 20%-70%
3 www.longer3d.com [email protected]
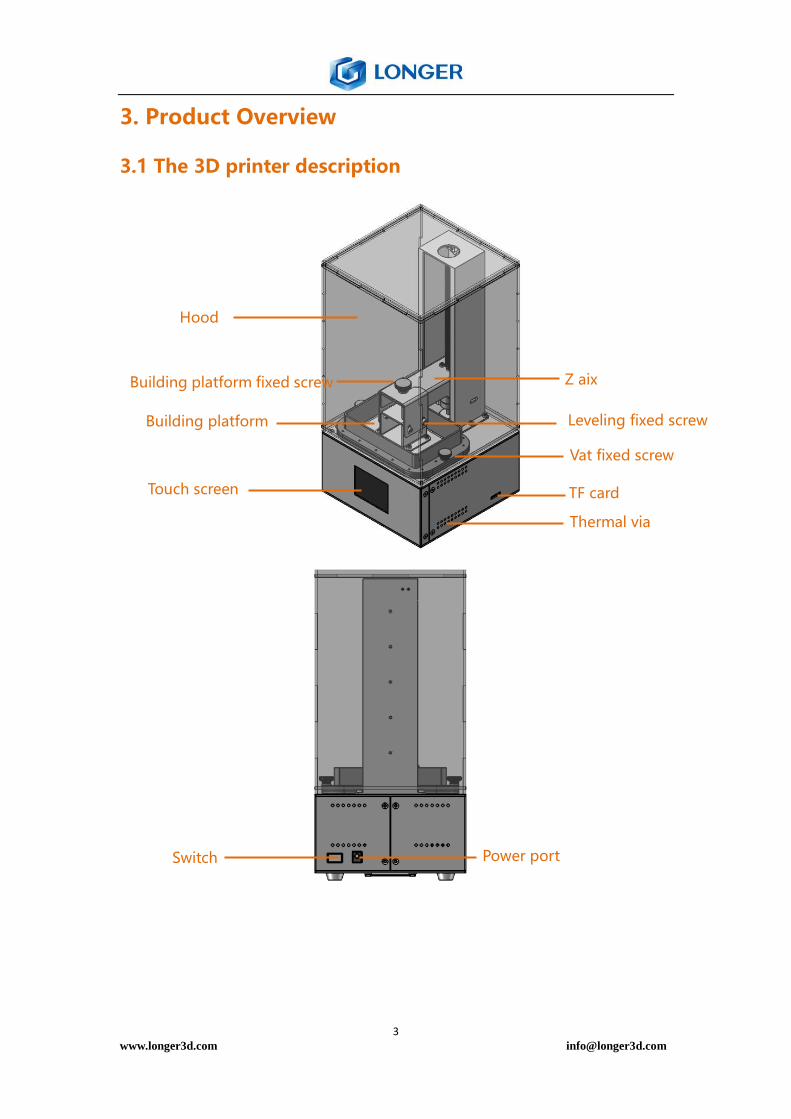
3. Product Overview
3.1 The 3D printer description
Z aix Building platform fixed screw
Vat fixed screw
Touch screen
Thermal via
Building platform Leveling fixed screw
Hood
TF card
Power port Switch

4 www.longer3d.com [email protected]
3.2 The accessory box
TF Card1 Power Adapter1 Filtering Funnel2 Latex Gloves2
Scraper1
Photopolymer
Resin 250mL1
Card5 Release Film1
Hexagon Wrench
1.5mm
Hexagon Wrench
2mm
Hexagon Wrench
2.5mm
Tape1 Card Reader1 Clean Wiper1
4. Active Your 3D Printer
Put the printer on a flat platform. Make sure that the printer is
stable. Connect power cable and power adapter. Plug into the
electronic power and switch on the printer.

5 www.longer3d.com [email protected]
5 Touch Screen Description
5.1 Main Menu
Home: enter into tools interface which contains “File” and
“Setting”.
File: the list of printing files, and selection of file to print.
Setting: move the Z axis; check LCD and LED; information of
the printer.
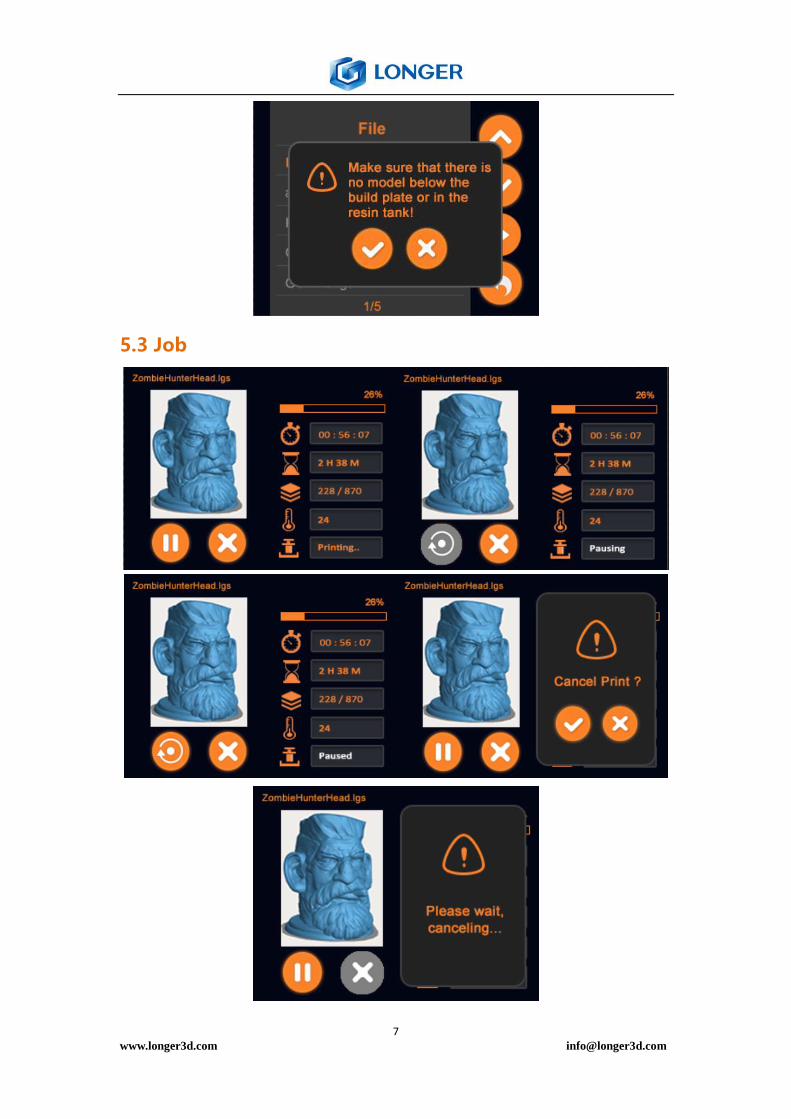
5.2 File
File: list all printing job files of TF card. The file’s suffix is lgs
and save the printing job files in TF card root directory. If
the TF card is pulled out or damaged, then it shows TF card
6 www.longer3d.com [email protected]
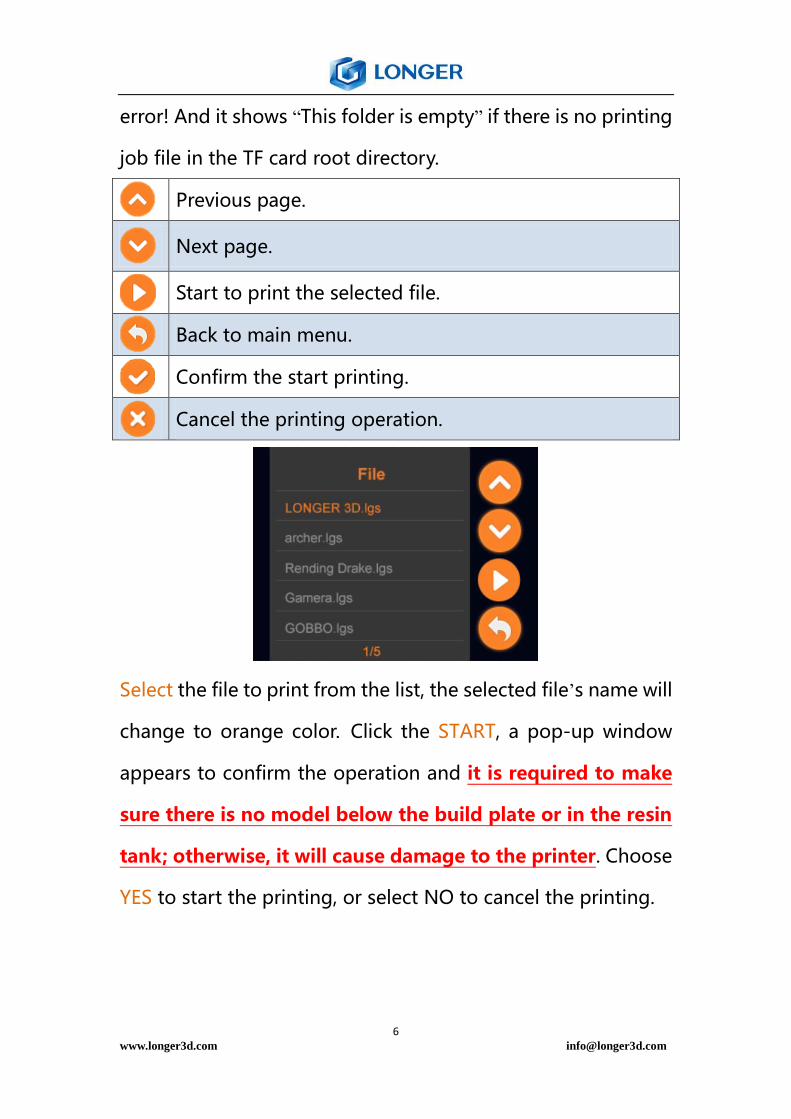
error! And it shows “This folder is empty” if there is no printing
job file in the TF card root directory.
Previous page.
Next page.
Start to print the selected file.
Back to main menu.
Confirm the start printing.
Cancel the printing operation.
Select the file to print from the list, the selected file’s name will
change to orange color. Click the START, a pop-up window
appears to confirm the operation and it is required to make
sure there is no model below the build plate or in the resin
tank; otherwise, it will cause damage to the printer. Choose
YES to start the printing, or select NO to cancel the printing.
8 www.longer3d.com [email protected]
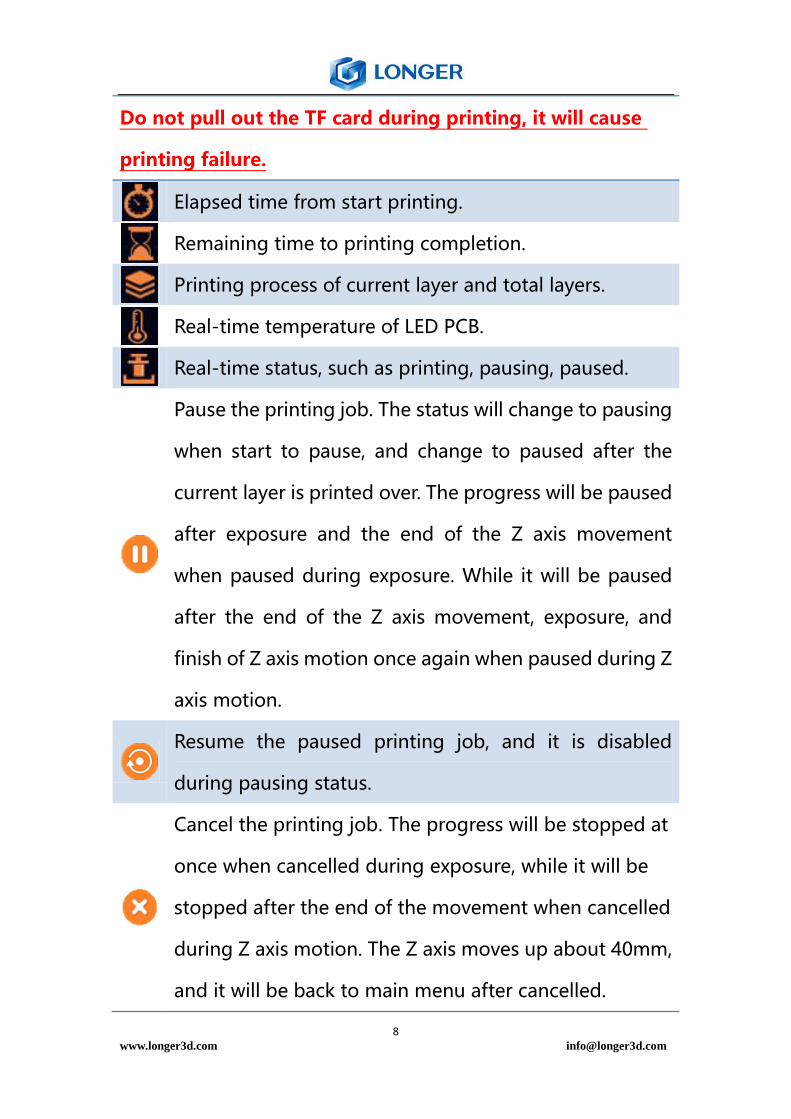
Do not pull out the TF card during printing, it will cause
printing failure.
Elapsed time from start printing.
Remaining time to printing completion.
Printing process of current layer and total layers.
Real-time temperature of LED PCB.
Real-time status, such as printing, pausing, paused.
Pause the printing job. The status will change to pausing
when start to pause, and change to paused after the
current layer is printed over. The progress will be paused
after exposure and the end of the Z axis movement
when paused during exposure. While it will be paused
after the end of the Z axis movement, exposure, and
finish of Z axis motion once again when paused during Z
axis motion.
Resume the paused printing job, and it is disabled
during pausing status.
Cancel the printing job. The progress will be stopped at
once when cancelled during exposure, while it will be
stopped after the end of the movement when cancelled
during Z axis motion. The Z axis moves up about 40mm,
and it will be back to main menu after cancelled.
9 www.longer3d.com [email protected]
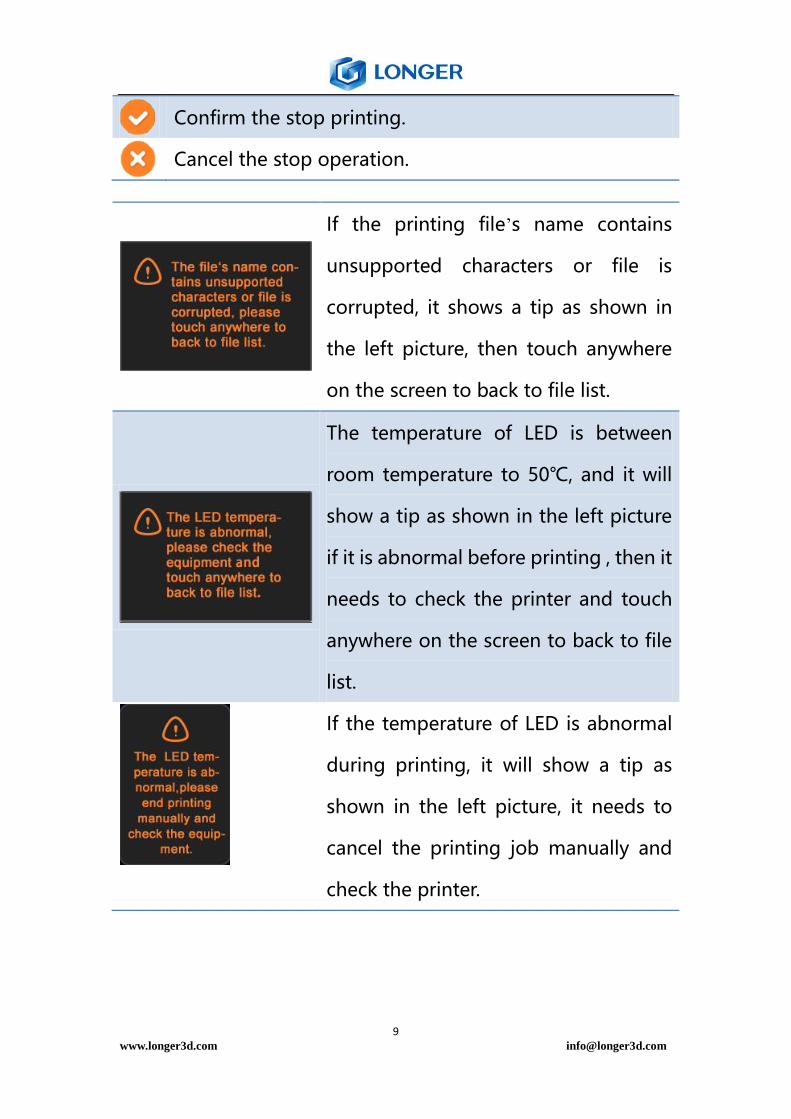
Confirm the stop printing.
Cancel the stop operation.
If the printing file’s name contains
unsupported characters or file is
corrupted, it shows a tip as shown in
the left picture, then touch anywhere
on the screen to back to file list.
The temperature of LED is between
room temperature to 50℃, and it will
show a tip as shown in the left picture
if it is abnormal before printing , then it
needs to check the printer and touch
anywhere on the screen to back to file
list.
If the temperature of LED is abnormal
during printing, it will show a tip as
shown in the left picture, it needs to
cancel the printing job manually and
check the printer.

10 www.longer3d.com [email protected]
5.4 Setting
1) Move: move the Z axis.
Move up the Z axis.
Move down the Z axis.
Move the Z axis by 1mm (change move distance by
clicking the button).
Move the Z axis by 10mm.
11 www.longer3d.com [email protected]
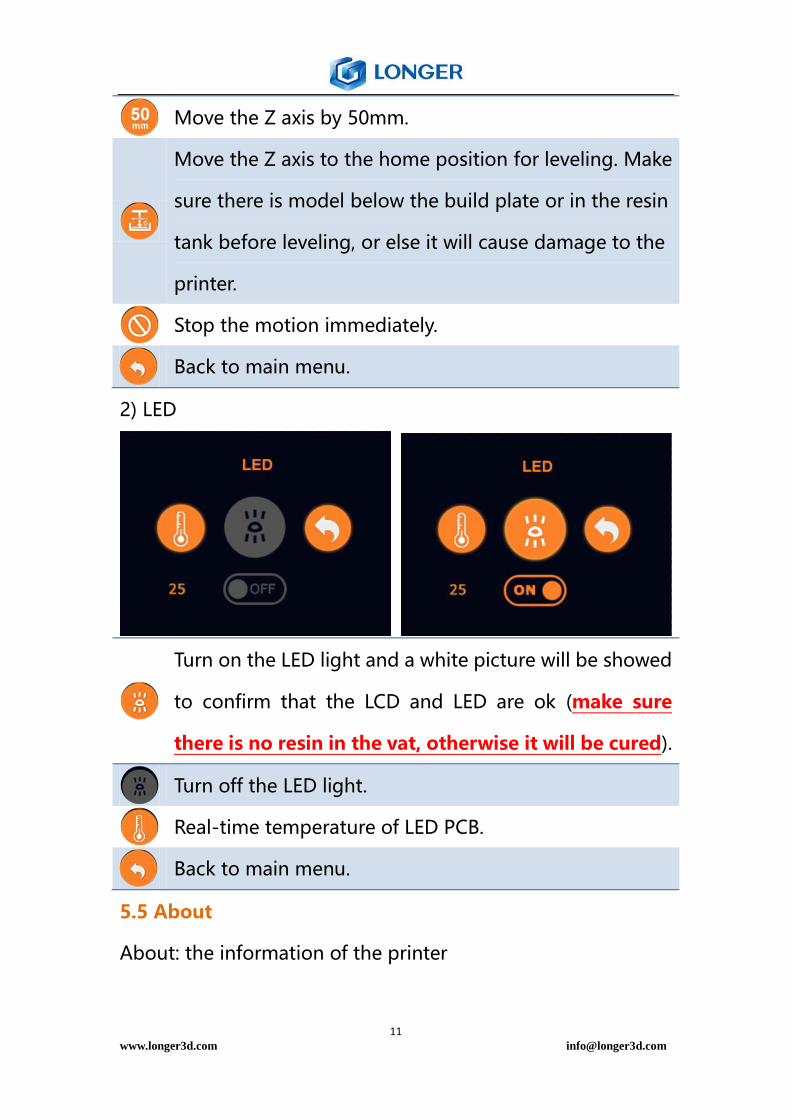
Move the Z axis by 50mm.
Move the Z axis to the home position for leveling. Make
sure there is model below the build plate or in the resin
tank before leveling, or else it will cause damage to the
printer.
Stop the motion immediately.
Back to main menu.
2) LED
Turn on the LED light and a white picture will be showed
to confirm that the LCD and LED are ok (make sure
there is no resin in the vat, otherwise it will be cured).
Turn off the LED light.
Real-time temperature of LED PCB.
Back to main menu.
5.5 About
About: the information of the printer

12 www.longer3d.com [email protected]
Printer Model: the model number of the printer.
Serial Number: the ID of the printer.
Firmware Version: the version of printer’s firmware.
5.6 Leveling
1) Turn on the printer, move up the Z axis, take out the
building plate, install it as the picture as shown below.
2) Loosen the four leveling fixed screws with hexagon wrench
4mm to make the building plate can move along Z axis freely.

13 www.longer3d.com [email protected]
3) Loosen the “vat fixed screw”, take down the resin vat, and
put a pieces of A4 paper on the LCD screen. Move down the
building platform to home position, press and hold it, then
fasten the leveling fixed screws diagonally.
4) Drag the A4 paper and feel the force of dragging the paper.
The leveling is suitable when it needs some force to drag the
paper. However, the home position is high when it can drag
the paper easily. On the contrary, the home position is low
when it needs large force to drag the paper. Then it needs to
level the platform again.
14 www.longer3d.com [email protected]
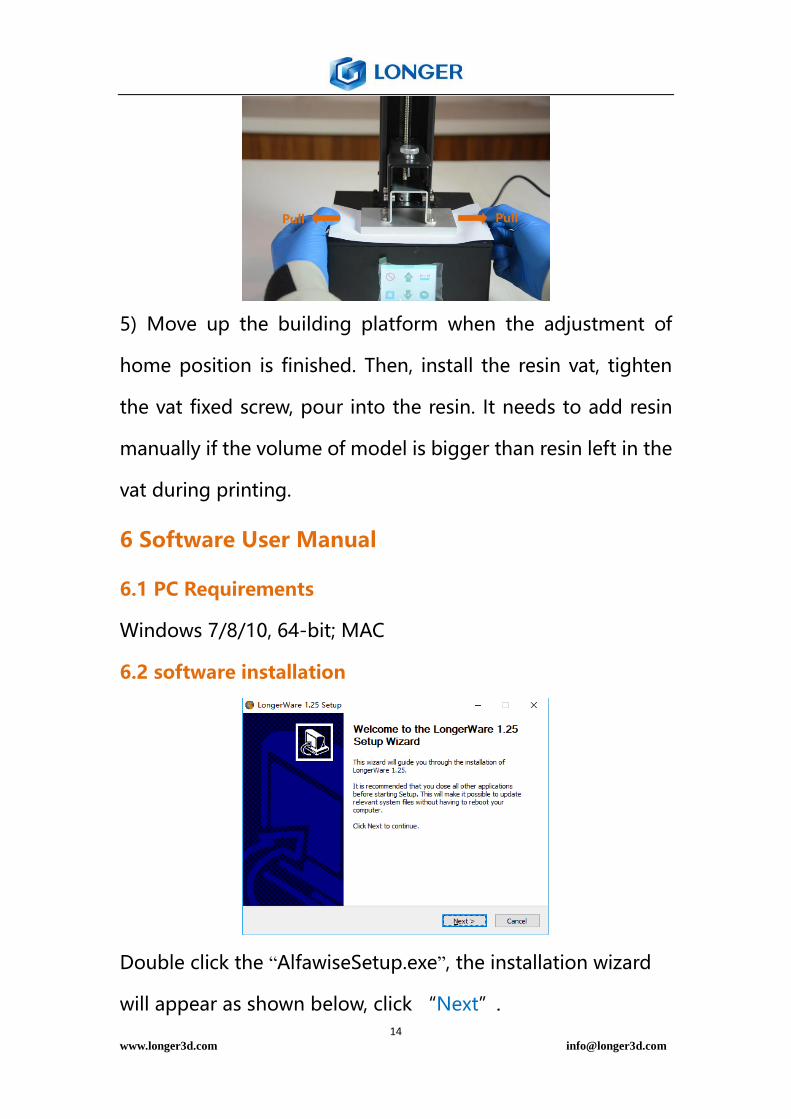
5) Move up the building platform when the adjustment of
home position is finished. Then, install the resin vat, tighten
the vat fixed screw, pour into the resin. It needs to add resin
manually if the volume of model is bigger than resin left in the
vat during printing.
6 Software User Manual
6.1 PC Requirements
Windows 7/8/10, 64-bit; MAC
6.2 software installation
Double click the “AlfawiseSetup.exe”, the installation wizard
will appear as shown below, click “Next”.
Pull Pull

15 www.longer3d.com [email protected]
Choose install location, click “Install” (the default location is
C:\Program File (86)\longerware), the installation will begin.
If there is an anti-virus software blocking program installed,
please select the option of allowing all the operations of the
software installed. To complete the installation by clicking
“Finish”, the slice software will run and create a shortcut on
the desktop.
16 www.longer3d.com [email protected]
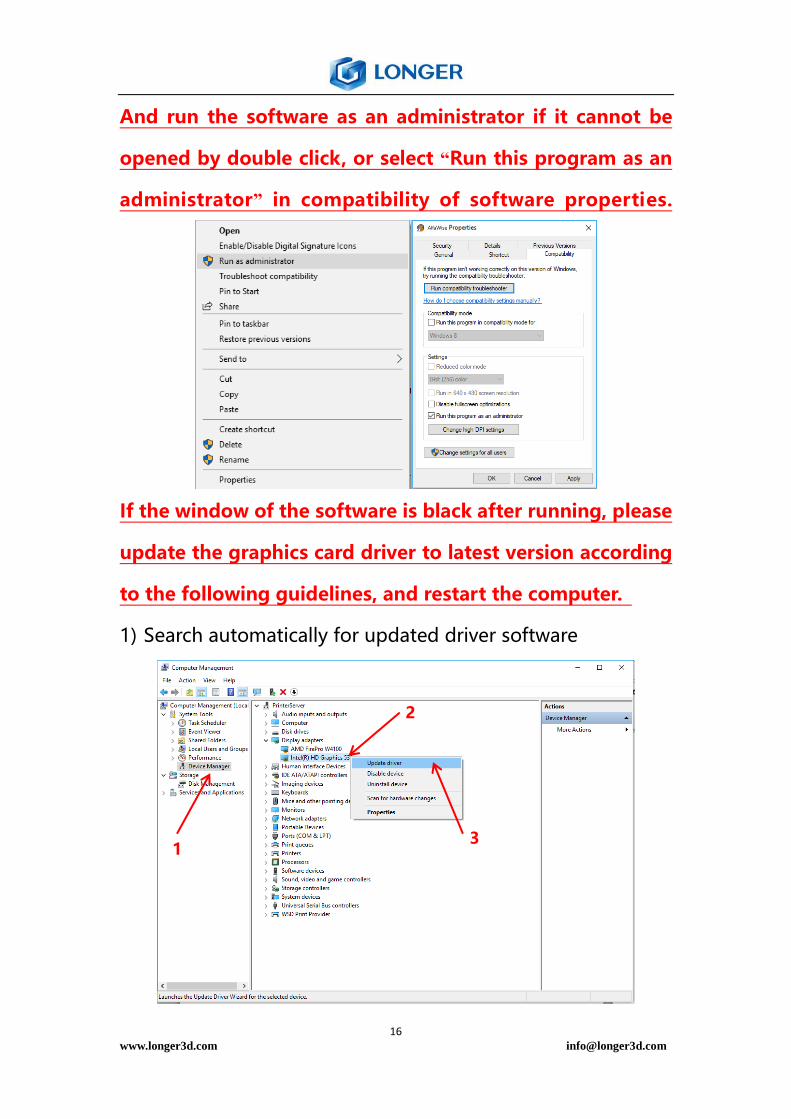
And run the software as an administrator if it cannot be
opened by double click, or select “Run this program as an
administrator” in compatibility of software properties.
If the window of the software is black after running, please
update the graphics card driver to latest version according
to the following guidelines, and restart the computer.
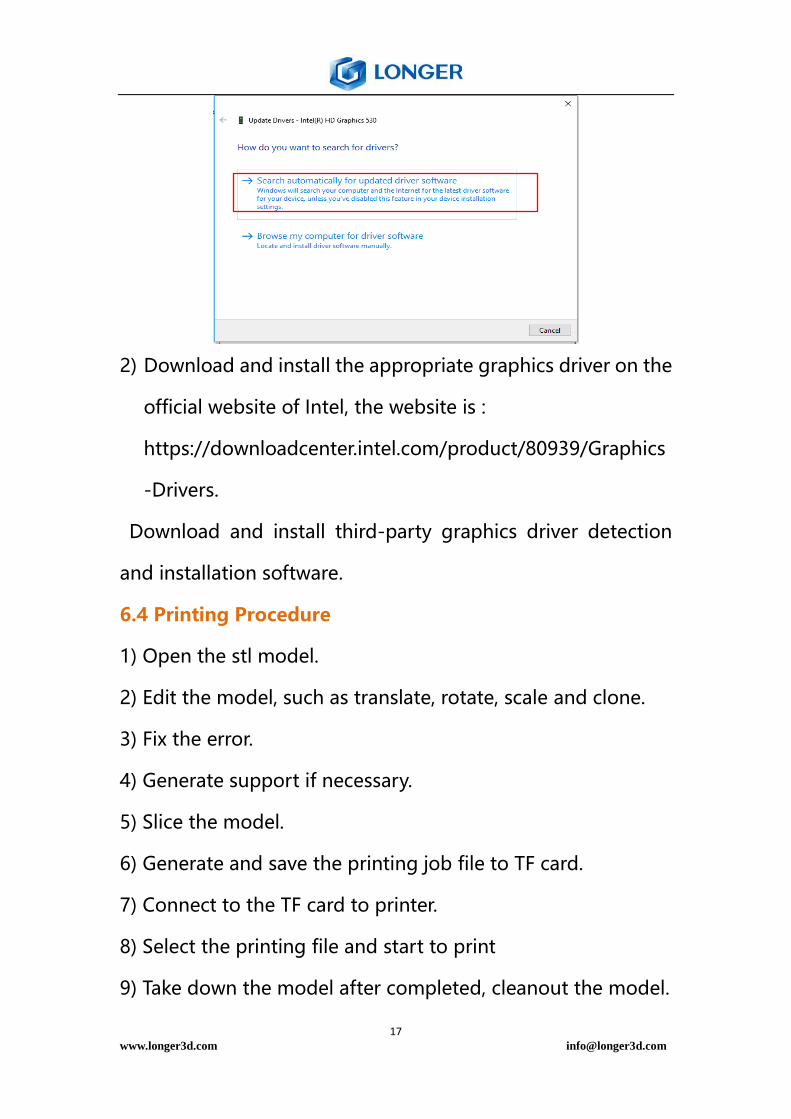
1) Search automatically for updated driver software
1
2
3
17 www.longer3d.com [email protected]
2) Download and install the appropriate graphics driver on the
official website of Intel, the website is :
https://downloadcenter.intel.com/product/80939/Graphics
-Drivers.
Download and install third-party graphics driver detection
and installation software.
6.4 Printing Procedure
1) Open the stl model.
2) Edit the model, such as translate, rotate, scale and clone.
3) Fix the error.
4) Generate support if necessary.
5) Slice the model.
6) Generate and save the printing job file to TF card.
7) Connect to the TF card to printer.
8) Select the printing file and start to print
9) Take down the model after completed, cleanout the model.
18 www.longer3d.com [email protected]
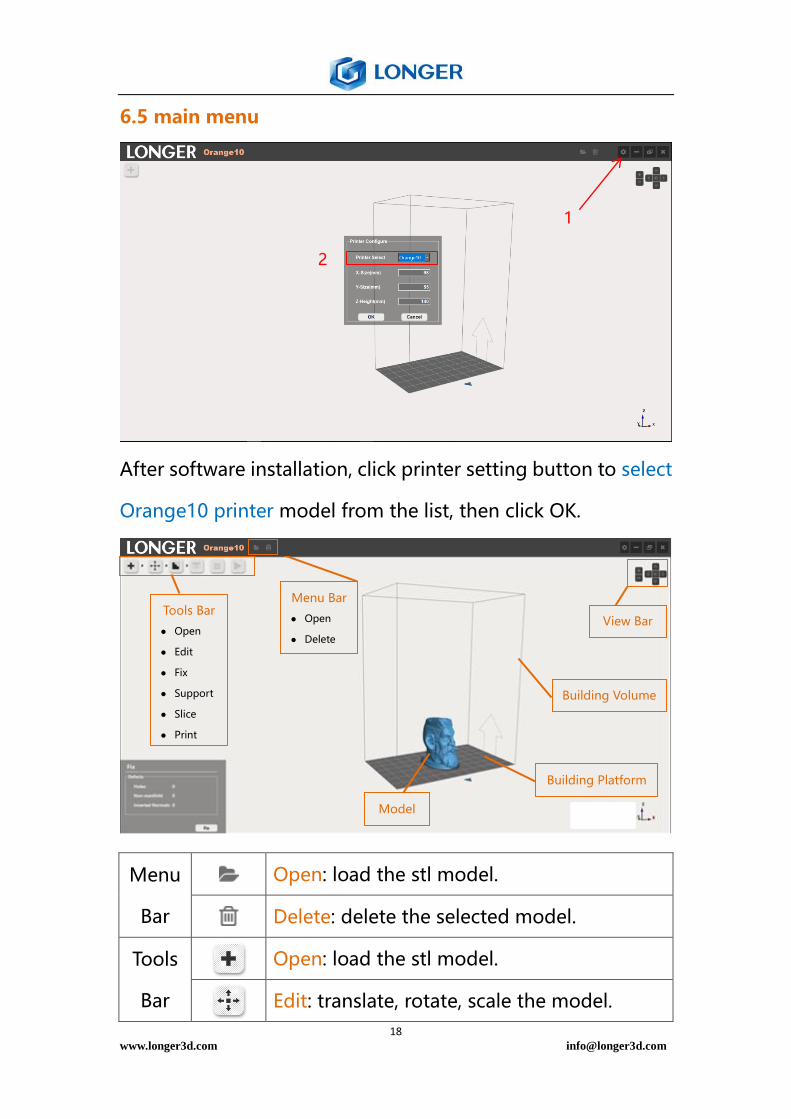
6.5 main menu
After software installation, click printer setting button to select
Orange10 printer model from the list, then click OK.
Menu
Bar
Open: load the stl model.
Delete: delete the selected model.
Tools
Bar
Open: load the stl model.
Edit: translate, rotate, scale the model.
1
2
Menu Bar
● Open
● Delete
Tools Bar
● Open
● Edit
● Fix
● Support
● Slice
View Bar
Building Volume
Building Platform
Model
19 www.longer3d.com [email protected]
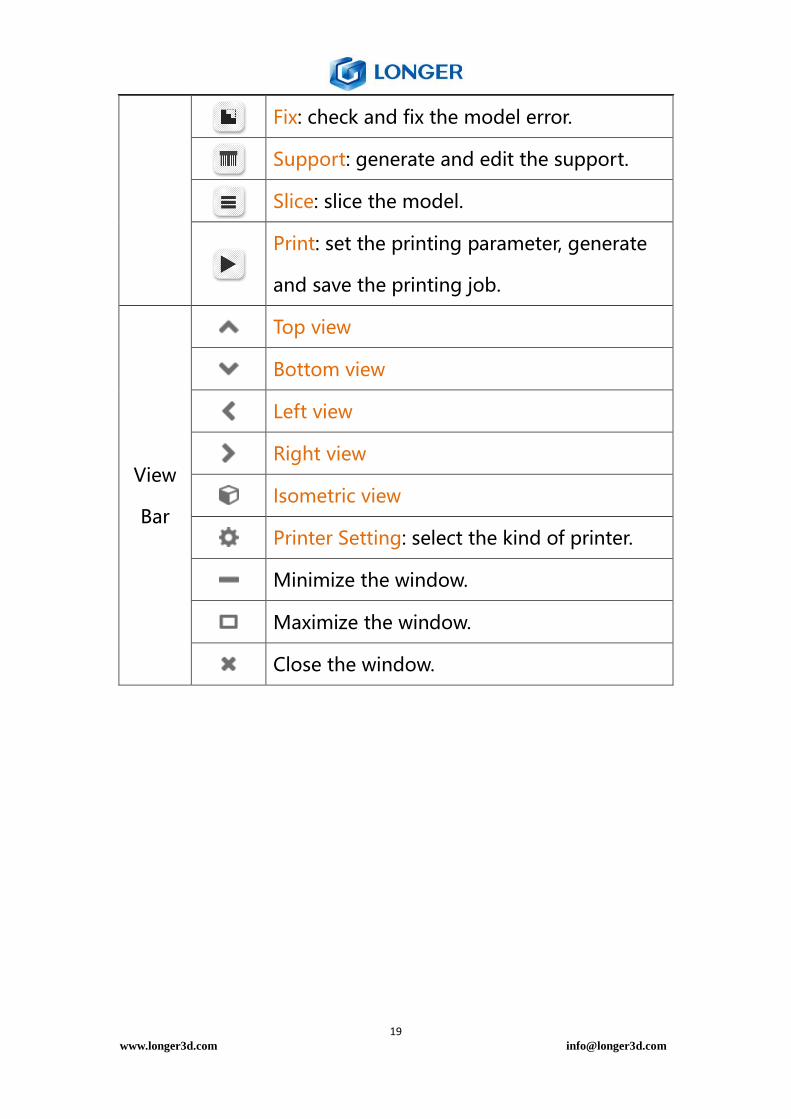
Fix: check and fix the model error.
Support: generate and edit the support.
Slice: slice the model.
Print: set the printing parameter, generate
and save the printing job.
View
Bar
Top view
Bottom view
Left view
Right view
Isometric view
Printer Setting: select the kind of printer.
Minimize the window.
Maximize the window.
Close the window.

20 www.longer3d.com [email protected]
6.6 Open
Click Open icon to load stl model. It needs to open files
separately to load different models. Select the model, three
submenus appear under the open icon, such as translate,
rotate, scale, and an edit dialog shows in the left bottom (The
model presents blue when selected, otherwise presents grey).
A popup window “model is out of range, please scale it” will
show and the color of model will change to red if the size of
the model exceeds building volume in some dimensions. It
needs to scale model when the size is out of range.
6.7 Edit
There are three edit submenus: translate, rotate, scale. The
translate
rotate
scale
①
②
③

21 www.longer3d.com [email protected]
frame of submenu appears red if it is selected.
Translate: select the model and translate icon, one way to
adjust the position is to click up and down arrow or input the
desired number directly, the other way is holding down the
left mouse and drag.
Rotate: select the model and rotate icon, input rotation angle
in the blank, or hold down the left mouse and drag it by 15°
intervals.
Scale: select the model and scale icon, input scaling factor or
size number in the blank. Or hold down the mouse wheel and
scroll up and down. The size of model will change along XYZ
axis by equal scale.
Clone: make a copy of the selected model.
Reset: recover to the original status.
Maximize: the model change to maximum size within building
volume.
6.8 Fix
Fix: check out the error(s) of the selected model, such as holes,
non-manifold, inverted normal, and click Fix to auto-repair the
error(s).

22 www.longer3d.com [email protected]
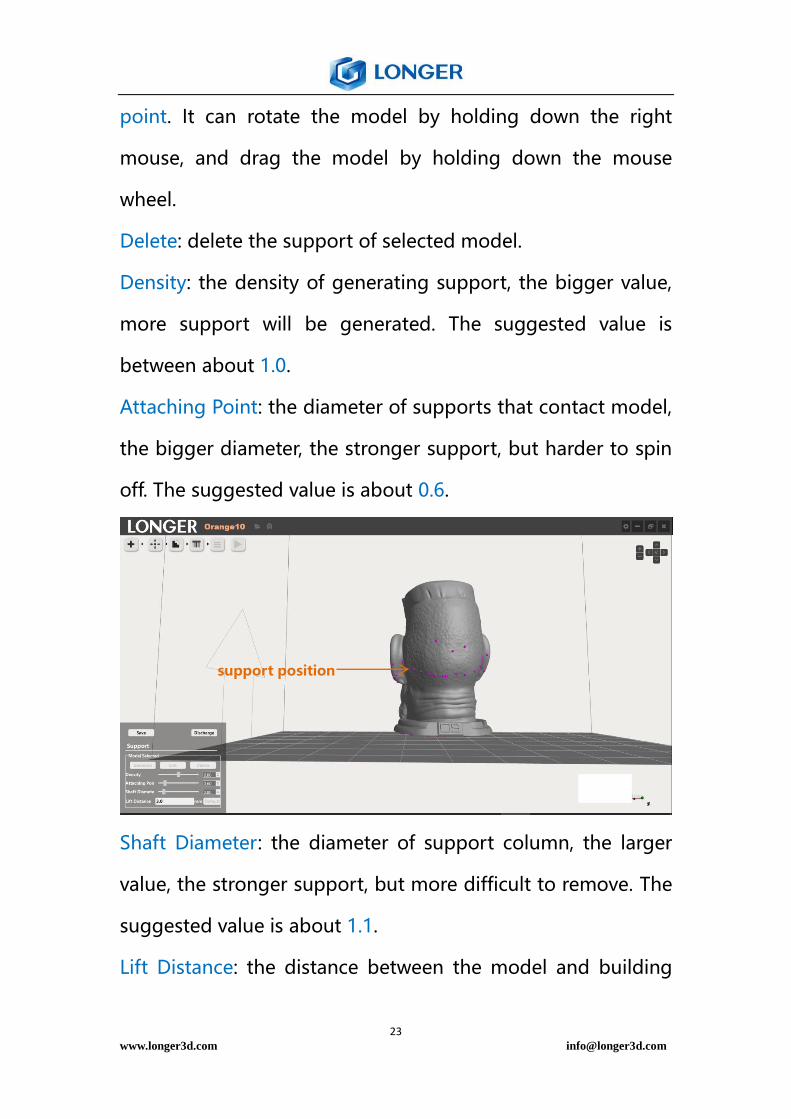
6.9 Support
Support: Select the model, click support icon, edit the
parameters, click Generate icon.
Generate: generate support for the selected model.
Edit: edit the support parameters, the support positions are
showed by purple point. Add support by left click at desired
position of the model; delete support by left click the purple
①
③
②
23 www.longer3d.com [email protected]
point. It can rotate the model by holding down the right
mouse, and drag the model by holding down the mouse
wheel.
Delete: delete the support of selected model.
Density: the density of generating support, the bigger value,
more support will be generated. The suggested value is
between about 1.0.
Attaching Point: the diameter of supports that contact model,
the bigger diameter, the stronger support, but harder to spin
off. The suggested value is about 0.6.
Shaft Diameter: the diameter of support column, the larger
value, the stronger support, but more difficult to remove. The
suggested value is about 1.1.
Lift Distance: the distance between the model and building
support position
24 www.longer3d.com [email protected]
platform is lifted by generating support. The suggested value
is between 0 to 3mm.
Default: recover support parameters to original values.
Make a copy of supported model: select the model with
support, click Edit icon, then click clone icon.
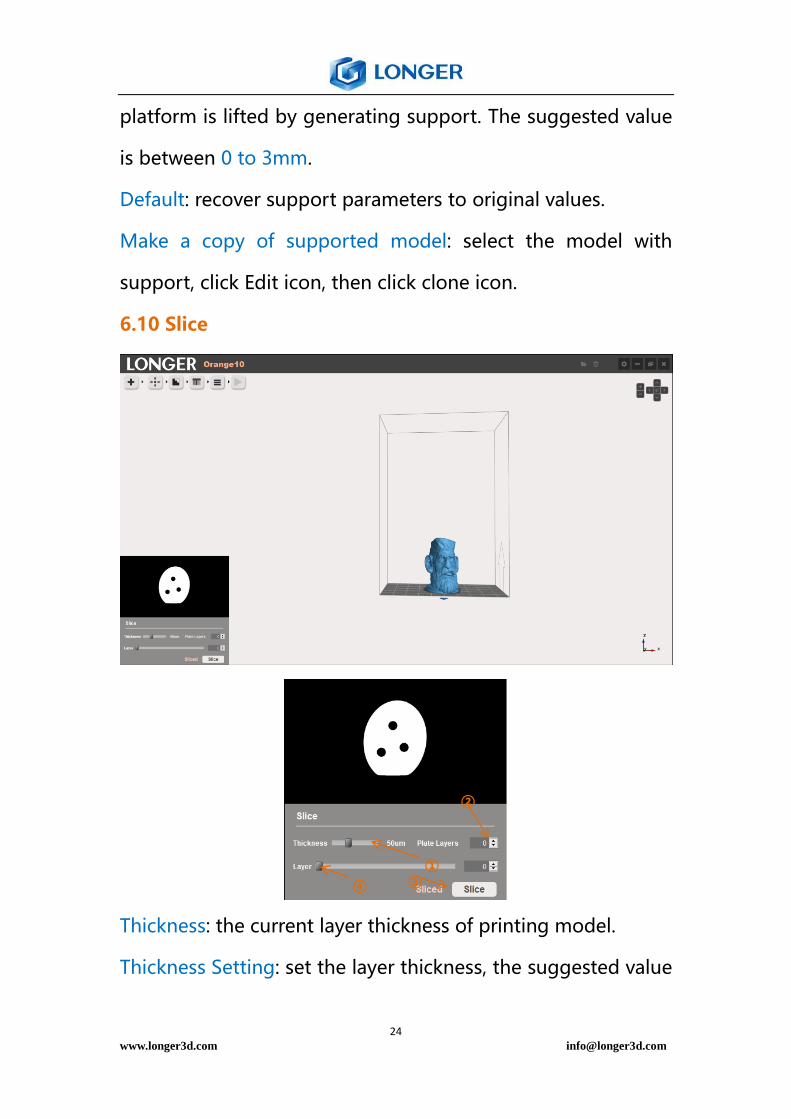
6.10 Slice
Thickness: the current layer thickness of printing model.
Thickness Setting: set the layer thickness, the suggested value
①
②
③ ④

25 www.longer3d.com [email protected]
is between 20 to 100μm.
Advanced Setting: set the layer number of base plate to strong
the adhesion between model and building platform, the
height of base is about 0.3mm, so the layer number is set to 6
when the layer thickness is 50μm; and sets to 3 layers when
layer thickness is 100μm. 5. It is recommended to add plate
players to facilitate removing the model. It has to add base
plate if the bottom surface of the model and the building
platform hasn’t an enough contact surface to cohere the
model or there are many support points on the building
platform.
Slice: slice the model with the setting layer thickness, “sliced”
will show when it is completed otherwise is shown “not slice”.
And there is a prompt of “slicing the scene” in the upper right
corner of the software when slice the model.
Slicing Image Preview: preview the image of sliced model by
drag the slider as shown in forth arrow.
Adjust the layer thickness to suitable value by clicking left and
right arrow , such as 50μm, click slice icon to slice the model
by setting layer-thickness. Every layer image can be previewed
in the window by dragging the slider in the bottom or input
the number of layer in the blank.

26 www.longer3d.com [email protected]
6.11 Generating Job File
Curing time: the exposure time to cure a layer thickness of
photopolymer resin except burn-in range. The default times
are 4000, 6000, 8000ms respectively for curing 25, 50, 100μm
layer thickness. But it needs to add the exposure time, such as
8000 to 12000ms, for the model with fine size.
Burn-in time: the exposure time for the bottom layers. The
longer the exposure time, the greater the adhesion between
①
②
③

27 www.longer3d.com [email protected]
the model and building platform. The default time is 80000ms.
Stable Time: the time between stop motion of Z axis and LCD
projection. The default time is 1000ms
Burn-in range: the height that is over cured for increasing the
adhesion between the models and building platform. The
default value is 0.3mm.
Lift Distance1: the slow motion distance for separation. The
default distance value is 2mm.
Lift Speed1: the separation speed for slow motion range. The
default speed is 48mm/min. It can decrease the separation
force by adjusting the value to 30mm/min for the model with
fine size.
Lift Distance2: the fast motion distance for separation, and it is
a relative distance to Lift Diantance1. Defaulted value is 2mm.
Lift Speed2: the separation speed for fast motion range,
Defaulted value is 300mm/min.
Select the corresponding printing parameters from the list
according to the layer thickness shown at the bottom. There
are three defaulted recipes respectively for 25, 50, 100μm layer

28 www.longer3d.com [email protected]
thickness which cannot be edit and deleted. Click save job
button to generate a printing job file with a file suffix of lgs.
The software generates and saves the printing job file to a
folder with the same name and directory with the model. And
there is a prompt of “saving slice file” in the upper right corner
of the software when save the job.
New/edit recipe: create or edit a new recipe and a recipe edit
menu appears as shown below. It can edit the parameters by
clicking the arrows or input the value in the blank directly.
Delete recipe: delete the selected recipe from the list.
Save: save the changes to the parameters of selected recipe,
then a new recipe will be added to the list.
6.12 Post-processing
After printing job finished, put on latex gloves, scrape the resin
on the building platform into resin vat with card attentionally,
hold the building platform and loose the fixed screw, take out
the platform carefully.
29 www.longer3d.com [email protected]
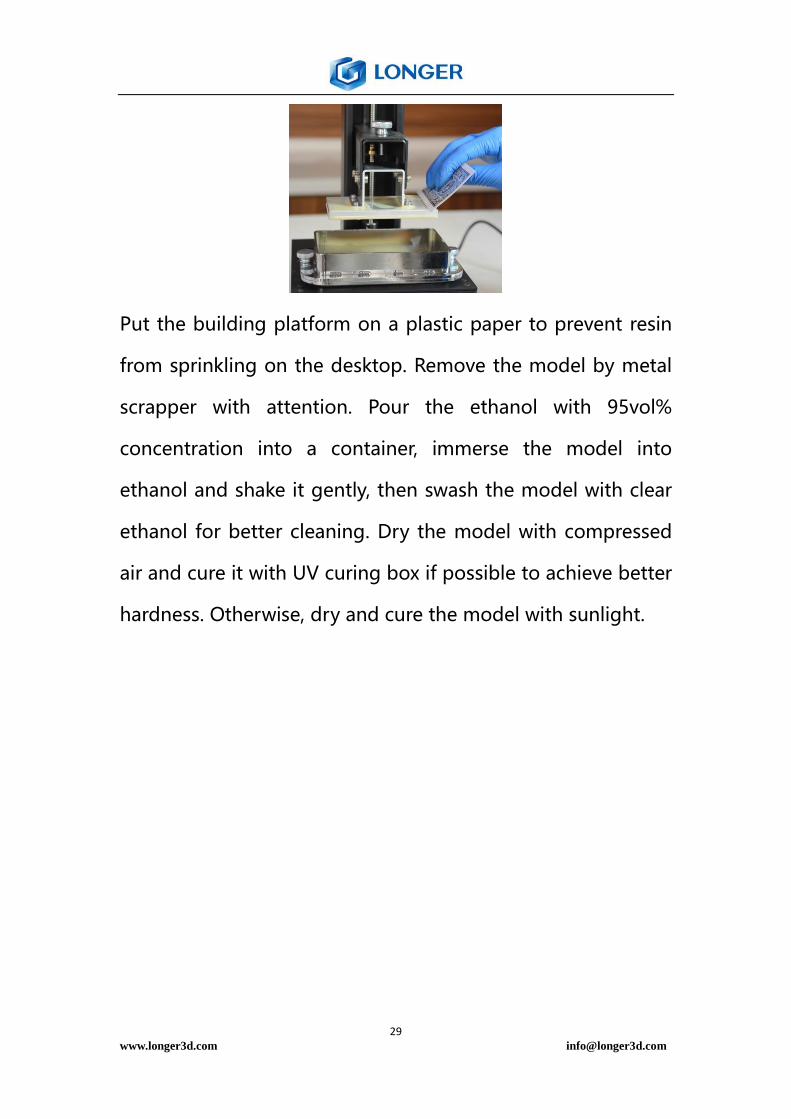
Put the building platform on a plastic paper to prevent resin
from sprinkling on the desktop. Remove the model by metal
scrapper with attention. Pour the ethanol with 95vol%
concentration into a container, immerse the model into
ethanol and shake it gently, then swash the model with clear
ethanol for better cleaning. Dry the model with compressed
air and cure it with UV curing box if possible to achieve better
hardness. Otherwise, dry and cure the model with sunlight.
30 www.longer3d.com [email protected]
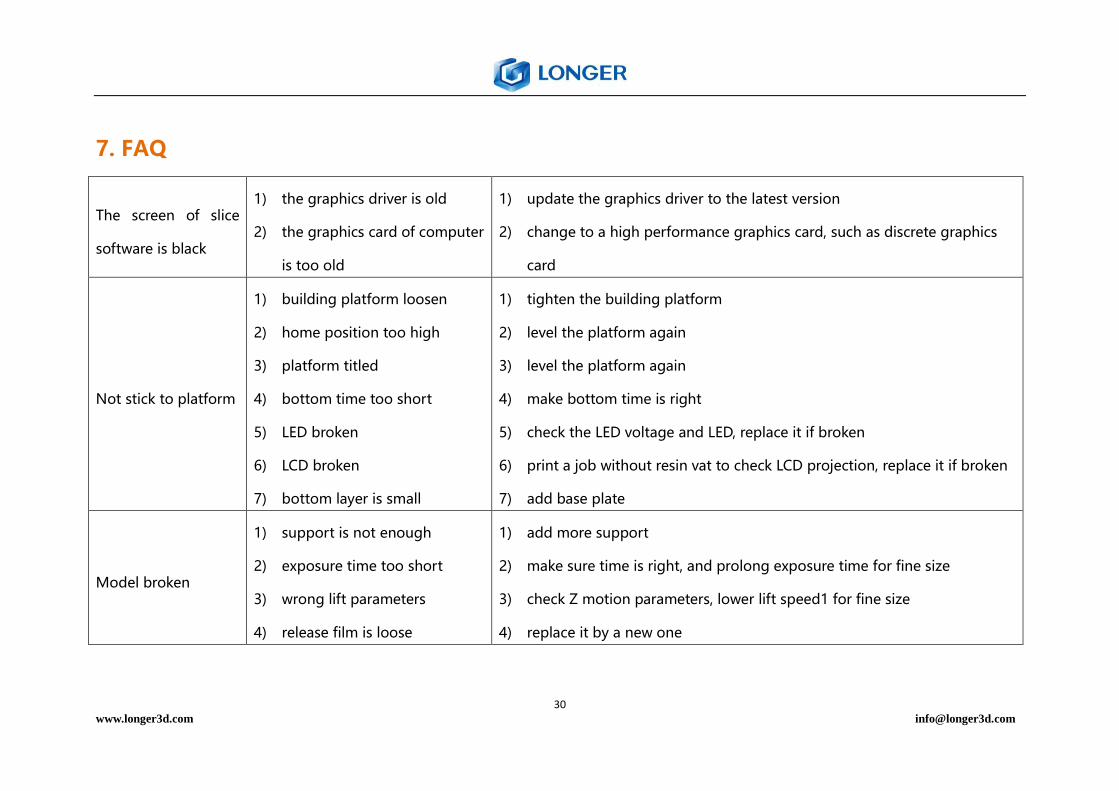
7. FAQ
The screen of slice
software is black
1) the graphics driver is old
2) the graphics card of computer
is too old
1) update the graphics driver to the latest version
2) change to a high performance graphics card, such as discrete graphics
card
Not stick to platform
1) building platform loosen
2) home position too high
3) platform titled
4) bottom time too short
5) LED broken
6) LCD broken
7) bottom layer is small
1) tighten the building platform
2) level the platform again
3) level the platform again
4) make bottom time is right
5) check the LED voltage and LED, replace it if broken
6) print a job without resin vat to check LCD projection, replace it if broken
7) add base plate
Model broken
1) support is not enough
2) exposure time too short
3) wrong lift parameters
4) release film is loose
1) add more support
2) make sure time is right, and prolong exposure time for fine size
3) check Z motion parameters, lower lift speed1 for fine size
4) replace it by a new one
31 www.longer3d.com [email protected]
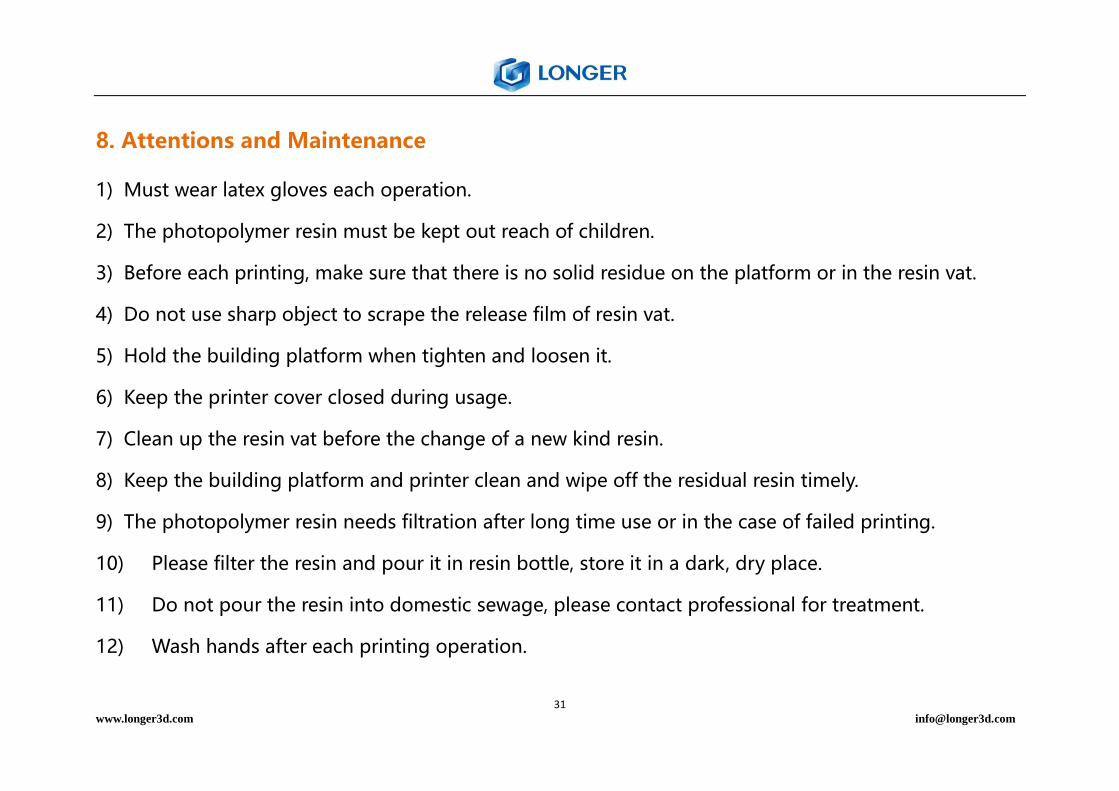
8. Attentions and Maintenance
1) Must wear latex gloves each operation.
2) The photopolymer resin must be kept out reach of children.
3) Before each printing, make sure that there is no solid residue on the platform or in the resin vat.
4) Do not use sharp object to scrape the release film of resin vat.
5) Hold the building platform when tighten and loosen it.
6) Keep the printer cover closed during usage.
7) Clean up the resin vat before the change of a new kind resin.
8) Keep the building platform and printer clean and wipe off the residual resin timely.
9) The photopolymer resin needs filtration after long time use or in the case of failed printing.
10) Please filter the resin and pour it in resin bottle, store it in a dark, dry place.
11) Do not pour the resin into domestic sewage, please contact professional for treatment.
12) Wash hands after each printing operation.