low voltage varplus logic vl series - id- · pdf file1 r 7en02-0376-00 varplus logic vl series...
TRANSCRIPT

VarPlus Logic VL series
Low Voltage
Modbus user manual
PF Correction Controller

VarPlus Logic VL6 / VL12 PFC controller: to download the user manual or other documentation visit www.schneider-electric.com. Type the device model (e.g., VarPlusLogic VL12) in the search field.
1
FR
7EN02-0376-00
VarPlus Logic VL series Modbus user manual
Contents
Safety instructions 2
Overview 4Characteristics for connection to RS485 Bus 4Modbus network standard diagram 4VarPlus Logic connection 4Open style connector wiring rules 5VarPlus Logic Modbus setup 5The Modbus protocol 6Modbus table 7
Troubleshooting 15

2 7EN02-0376-00
VarPlus Logic VL series Modbus user manual
Safety instructions
Important informationPlease read these instructions carefully and examine the equipment to become familiar with its operation before installing or servicing it. The following special messages that you will come across in this document or on the device are designed to warn you about poten-tial hazards or draw your attention to information that will clarify or simplify a procedure.
The addition of one of these two symbols to a "Danger" or "Warning" safety label indicates that there is an electrical hazard that can result in injury if the instructions are not followed.
This is the safety warning symbol. It warns you of potential risks of personal injury. You must comply with all safety messages that follow this symbol in order to avoid the risk of injury or death.
DANGERDANGER indicates an imminently hazardous situation which, if not avoided, will result in death or serious injury.
WARNINGWARNING indicates a potentially hazardous situation which, if not avoided, could result in death or serious injury.
CAUTIONCAUTION indicates a potentially hazardous situation which, if not avoided, could result in minor or moderate injury or equipment damage.
NOTICENOTICE is used to address practices not related to physical injury. The safety alert symbol is not used with this signal word.
NOTE: Provides additional information to clarify or simply a procedure.
Please noteElectrical equipment should be installed, operated, serviced and maintained only by qualified personnel. Schneider Electric will not accept any liability for consequences arising from the use of this material.
A qualified person is one who has skills and knowledge related to the construction, installation, and operation of electrical equipment and has received safety training to recognize and avoid the hazards involved.
37EN02-0376-00
VarPlus Logic VL series Modbus user manual
Safety instructions
Before you begin• This manual cannot be used to define or determine the suitability
or reliability of these products for specific user applications. It is the duty of any such user or integrator to perform the appropriate and complete risk analysis, evaluation and testing of the products with respect to the relevant specific application or use thereof.
• When devices are used for applications with technical safety requirements, the relevant instructions must be followed.
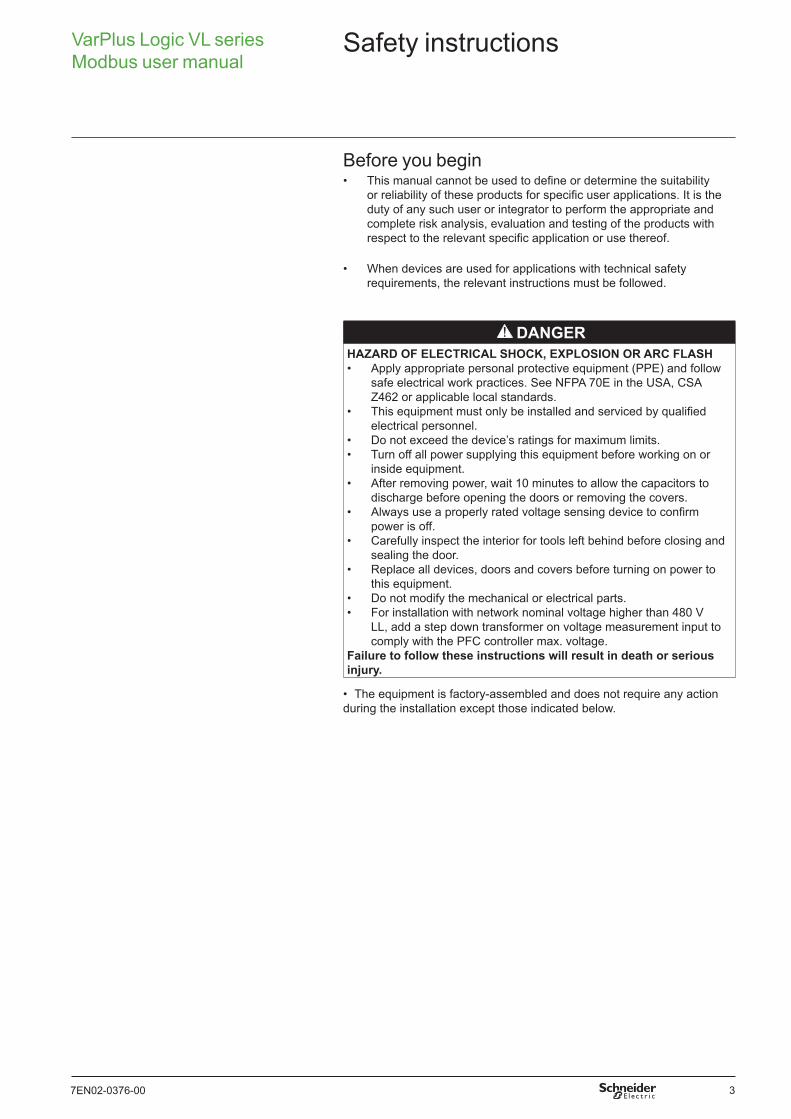
DANGERHAZARD OF ELECTRICAL SHOCK, EXPLOSION OR ARC FLASH• Apply appropriate personal protective equipment (PPE) and follow
safe electrical work practices. See NFPA 70E in the USA, CSA Z462 or applicable local standards.
• This equipment must only be installed and serviced by qualified electrical personnel.
• Do not exceed the device’s ratings for maximum limits.• Turn off all power supplying this equipment before working on or
inside equipment.• After removing power, wait 10 minutes to allow the capacitors to
discharge before opening the doors or removing the covers. • Always use a properly rated voltage sensing device to confirm
power is off.• Carefully inspect the interior for tools left behind before closing and
sealing the door. • Replace all devices, doors and covers before turning on power to
this equipment.• Do not modify the mechanical or electrical parts.• For installation with network nominal voltage higher than 480 V
LL, add a step down transformer on voltage measurement input to comply with the PFC controller max. voltage.
Failure to follow these instructions will result in death or serious injury.
• The equipment is factory-assembled and does not require any action during the installation except those indicated below.

4 7EN02-0376-00
VarPlus Logic VL series Modbus user manual
Overview
Characteristics for connection to RS485 BusThe RS 485 standards allows variants of some characteristics:• polarization• line terminator• number of slaves• bus lengthCharacteristics Standard value VarPlus Logic VL
Maximum of number of slaves (without repeater)
32 slaves 32 slaves
Type of trunk cable Single, shielded, twisted-pair cable, with 120 Ω characteristics impedance, and at least a third conductor
Same as standard value
Maximum bus length 1300 m (4300 ft) at 192 kBaud
1000 m (3300 ft) at 115 kBaud
Maximum length of tap-offs
Depends on the transmission rate
• 20 m (66 ft) for 1 tap-off • 40 m (131 ft) divided by the number of tap-offs on the multiple junction box
Bus polarization • A 450... 650 Ω pull-up resistor at 5 V• A 450...650 Ω pull-down resistor at the common
• Same as standard value• Same as standard valueNote: these resistors are not integrated in the VarPlus Logic VL.
Line terminator A 120 Ω line terminator at both ends of the bus
Same as standard value
Common polarity The common polarity is connected to the protective ground in at least one point on the bus.
Same as standard value
Modbus network standard diagramThe standard diagram corresponds to the Modbus specification on the www.modbus.org site and, in particular, to the 2-wire multidrop serial bus diagram. The simplified diagram is as follows:
Slave 1 Slave 2
D1
D00V
400 -650Ω
Master
400 -650Ω
120Ω120Ω
VarPlus Logic connectionTwo different types of RS485 connection are available:• 2-wire RS485: this type uses only two data wires, which form one data channel. This means that, after sending a request, the bus master has to deactivate its transmitter to make the data line free for the answering device (Half-duplex mode),• 4-wire RS485: this types uses one data line (two wires) for the master to slave direction and another one (two more wires) for the slave to master direction. Note: The VarPlus Logic VL does not support 4-wire RS485.
The VarPlus Logic VL offers the ability to read values from the device and modify the settings of the device by use of the Modbus protocol. RS485 is used on the physical layer. As this is a bus-capable interface, it is possible to connect more than one VarPlus Logic VL to a single pair of wires and access the units by use of an ID number.Additional documentation for the Modbus protocol can be found at www.modbus.org.The Modbus standards are also available there.
57EN02-0376-00
VarPlus Logic VL series Modbus user manual
Overview
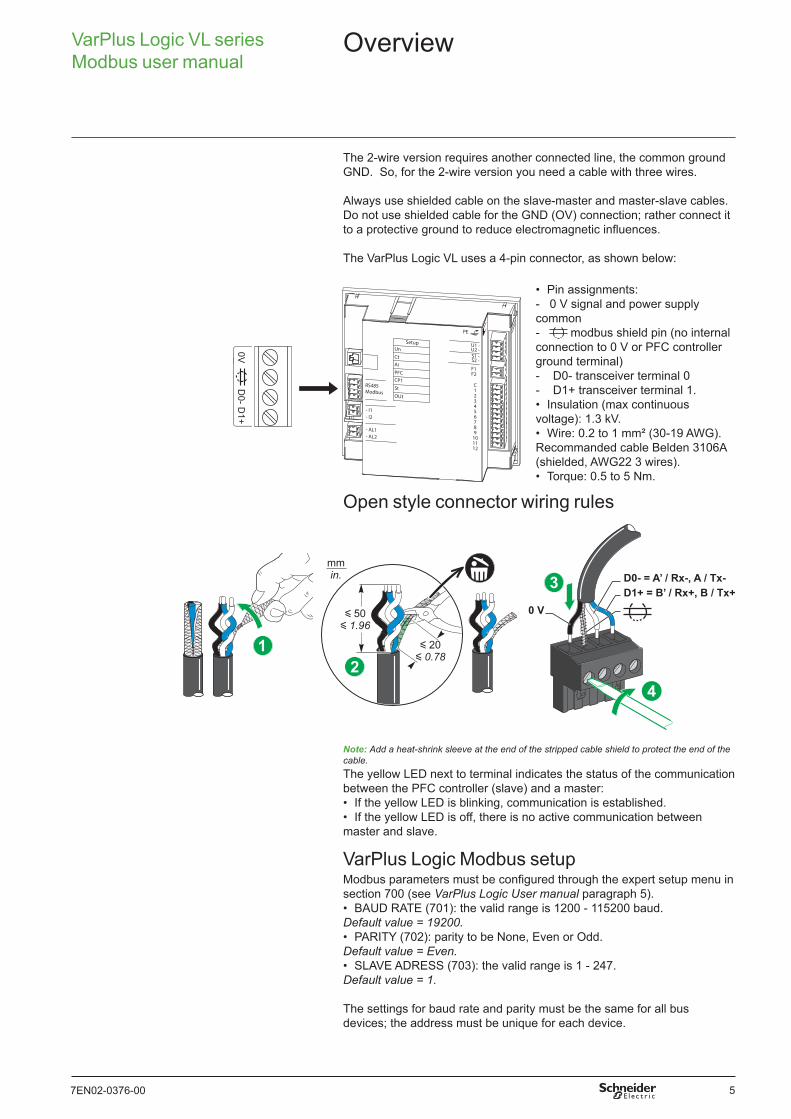
The 2-wire version requires another connected line, the common ground GND. So, for the 2-wire version you need a cable with three wires.
Always use shielded cable on the slave-master and master-slave cables. Do not use shielded cable for the GND (OV) connection; rather connect it to a protective ground to reduce electromagnetic influences.
The VarPlus Logic VL uses a 4-pin connector, as shown below:
Open style connector wiring rules
D0- = A’ / Rx-, A / Tx-D1+ = B’ / Rx+, B / Tx+
0 V
3
4
y 20 y 0.78
y 50 y 1.96
21
mmin.
Note: Add a heat-shrink sleeve at the end of the stripped cable shield to protect the end of the cable.The yellow LED next to terminal indicates the status of the communication between the PFC controller (slave) and a master: • If the yellow LED is blinking, communication is established.• If the yellow LED is off, there is no active communication between master and slave.
VarPlus Logic Modbus setupModbus parameters must be configured through the expert setup menu in section 700 (see VarPlus Logic User manual paragraph 5).• BAUD RATE (701): the valid range is 1200 - 115200 baud. Default value = 19200. • PARITY (702): parity to be None, Even or Odd. Default value = Even. • SLAVE ADRESS (703): the valid range is 1 - 247. Default value = 1.
The settings for baud rate and parity must be the same for all bus devices; the address must be unique for each device.
• Pin assignments:- 0 V signal and power supply common- modbus shield pin (no internal connection to 0 V or PFC controller ground terminal)- D0- transceiver terminal 0 - D1+ transceiver terminal 1.• Insulation (max continuous voltage): 1.3 kV. • Wire: 0.2 to 1 mm² (30-19 AWG). Recommanded cable Belden 3106A (shielded, AWG22 3 wires).• Torque: 0.5 to 5 Nm.
- I1- I2
- AL1- AL2
SetupUnCtAiPFCCP1StOUt
U1 -U2 -
C 1 23456789
101112
PE
S1 -S2 -
RS485Modbus
F1F2
D0-
0VD
1+

6 7EN02-0376-00
VarPlus Logic VL series Modbus user manual
Modbus / RS485
The Modbus protocolSerial transmission modesThe VarPlus Logic VL always uses the RTU mode. ASCII mode is not implemented.
Function codesThe table below describes function codes supported by VarPlus Logic VL.
Function code Hexadecimal DescriptionDecimal
03 0x03 Read holding register04 0x04 Read input register06 0x06 Write single register08 0x08 Diagnostic functions16 0x10 Write multiple register43/14 0x2B/0x0E Product identification100/4 0x64/0x04 Read scattered holding register
Exception codesIf a slave is not able to execute a command that was sent by the master, it answers with exception codes. See the Modbus specification for a full list of codes. We do not include this list here, because the master software will be able to handle most exceptions automatically. If you must program the Modbus master stack, you will need the full specifications (which include the error codes).
Master-Slave protocolFor communication, a master-slave protocol is used. Only the bus master can initiate a transfer. The master begins by sending a command to a slave. The command includes a data frame with the corresponding function code. The slave then executes the command.• The unicast mode is normally used to communicate on a Modbus system. One single slave is addressed by the slave number in the master’s data packet. The valid address range is between 1 and 246. The slave then executes the command and answers by sending an acknowledge data packet back to the master.• The master cannot receive an answer to a query in multicast mode. The command is executed in parallel by all slaves, and there is no acknowledgment.The master initiates a multicast transfer by using "0" as slave number.Address spaceThe data in the VarPlus Logic VL is organized and accessed by means of addresses. Each address accesses one data word. The data words are always 16 bits long. The VarPlus Logic VL does not differentiate the addresses between the function codes. There is one address space available. To access each address's data, any valid function code can be used. The units included in the Modbus table are:Type Description Windows
Float32 32-bit floating-point number. as defined in IEEE Standard 754.Uint16 Unsigned 16-bit integer value. 0 – 65 535Uint32 Unsigned 32-bit integer value 0 – 4 294 967 295Sint16 Signed 32-bit integer value. - 32768 – +32767Sint32 Signed 32-bit integer value. - 2 147 483 648 – +2 147 483 647Bitmap / /
As the data is organized in 16-bit words, a set of sequential addresses has to be read for longer data items. For these, the base address is given in the tables. To read a Float32 with base address 12, you need to read two 16-bit words from addresses 12 and 13. These values are concatenated (big Endian format) to form the needed 32-bit result.Note: For data encoded in one word (16 bits), the Modbus standard specifies that the Most
Significant Byte (MSB) is transmitted first and the Least Significant Byte (LSB) second. For data encoded in two words (32 bits), Most Significant Word is transmitted first and Least Significant Word second.
All registers corresponding to the value that is not applicable contain value 0x8000..

77EN02-0376-00
VarPlus Logic VL series Modbus user manual
Modbus tableMeasurement valuesThe measured values are available beginning from address 0 in intervals of two data words.If voltage is too small to calculate valid harmonics from it, the value at the base address (= the fundamental) reads 0.0 %. This indicates that the higher harmonics for the voltage are also invalid. The values Apparent power Ssum, Active power P-sum, Reactive power Q-sum, Lacking reactive power ∆Q and Power factor (P/S) relate to a symmetrical three-phase power system. See the VarPlus Logic VL User Manual for detailed explanation on all these measurement values. All these values can be accessed with function codes 03hex, 04hex and 64/4hex.Address Register Value Words Type Unit
0x001F4 501 U LL 2 Float32 V0x001F6 503 U LN 2 Float32 V0x001F8 505 Current: see note 2 Float32 A0x001FA 507 Frequency 2 Float32 Hz0x001FC 509 Active power P-sum 2 Float32 W0x001FE 511 Reactive power Q-sum:
see note2 Float32 VAr
0x00200 513 Apparent power S-sum: see note
2 Float32 VA
0x00202 515 Lacking reactive power ΔQ: see note
2 Float32 VAr
0x00204 517 Cos φ: see note 2 Float32 -0x00206 519 Power factor (P/S) 2 Float32 -0x00208 521 Average Power factor APF 2 Float32 -0x0020A 523 Tan φ 2 Float32 -0x0020C 525 Ambient temperature 2 Float32 °C0x0020E 527 Maximum temperature 2 Float32 °C0x00210 529 Total harmonic distortion
THD U2 Float32 %
0x00212 531 Capacitor overload current ratio
2 Float32 %
0x00214 533 Harmonics U 3. order 2 Float32 %0x00216 535 Harmonics U 5. order 2 Float32 %0x00218 537 Harmonics U 7. order 2 Float32 %0x0021A 539 Harmonics U 9. order 2 Float32 %0x0021C 541 Harmonics U 11. order 2 Float32 %0x0021E 543 Harmonics U 13. order 2 Float32 %0x00220 545 Harmonics U 15. order 2 Float32 %0x00222 547 Harmonics U 17. order 2 Float32 %0x00224 549 Harmonics U 19. order 2 Float32 %0x00226 551 Operation hours 2 Uint32 s
Note: when the user parameter Q offset is entered, this value is added to the Current, Apparent Power, Reactive Power, lacking Reactive Power (∆Q), Cosφ: see VarPlus Logic user manual (Transformer compensation) for more detailed explanation.
Modbus / RS485

8 7EN02-0376-00
VarPlus Logic VL series Modbus user manual
User Parameter settingsParameters set by the user are stored in different data types. The base addresses and the data type are in the table below.See VarPlus Logic VL User Manual for detailed explanation on all these parameters.All these values can be accessed with function codes 03hex, 04hex, 06hex, 10hex and 64/4hex.
Address Register Value Words Type Unit0x0064 101 See table below 1 Uint16 -0x0065 102 See table below 1 Uint16 -0x0066 103 See next page 1 Uint16 -0x0067 104 See next page 1 Uint16 -0x0068 105 Phase offset 1 Uint16 °0x0069 106 Temperature offset 1 Sint16 °C0x006A 107 Asymmetry Factor 1 Sint16 -0x006B 108 Limit for Hunting alarm 1 Uint16 -0x006C 109 Nominal Voltage L - L 2 Float32 V0x006E 111 CT ratio 2 Float32 -0x0070 113 PT ratio 2 Float32 -0x0072 115 Tolerance nominal voltage 2 Float32 -0x0074 117 Control sensitivity 2 Float32 -0x0076 119 Target cos φ1 (-0.7…1.0…0.7= 0.70cap…1.00…0.70ind) 2 Float32 -0x0078 121 Target cos φ2 (-0.7…1.0…0.7= 0.70cap…1.00…0.70ind) 2 Float32 -0x007A 123 Switching Time interval 2 Float32 s0x007C 125 Step Exchange interval 2 Float32 s0x007E 127 Q offset (-9999kvar…9999kvar) 2 Float32 VAr0x0080 129 Discharge Time 2 Float32 s0x0082 131 Limit for THDU alarm 2 Float32 -0x0084 133 Delay Time for (THDU, Overload, Temp.) alarm 2 Float32 s0x0086 135 Limit for Max. Switching cycles alarm 2 Uint32 -0x0088 137 Limit for Max. Operation time alarm 2 Uint32 s0x008A 139 Limit for capacitor overload current ratio 2 Float32 -0x008C 141 Limit for temp 1 (Fan relay) 2 Float32 °C0x008E 143 Limit for temp 2 (Alarm relay) 2 Float32 °C
Addresses 100 through 103 are user parameter settings that are not numeric values. At this point, all user parameters are coded binary. Each single bit represents an adjustment available in menu "Measurement" or "Control." For these addresses, the UINT 16 value is coded as follows:
Address Register Value Words Type Unit0x0064 101 Validity for flags 1 1 Uint16 - 0x0065 102 User parameter flags 1 1 Uint16 -
User parameter flags 1
Bit15 Bit0
Bit0 (1) = Connection Measurement L- L (0) = Connection measurement L- NBit1 (1) = Measurement FIX 50 Hz If bit1 and bit2 both set to zero
measurement is set to Auto-synchronization frequencyBit2 (1) = Measurement FIX 60 HzBit3 ReservedBit4 ReservedBit5 (1) = Switch to cos φ2 if Power export (0) = Do not switch to cos φ2 if Power exportBit6 (1) = Step exchange on (0) = Step exchange offBit7 (1) = Step recognition on (0) = Step recognition offBit8 (1) = Lock faulty steps (0) = Do not lock faulty stepsBit9 (1) = Start control, see note (0) = Stop or hold control (depending bit 10 selection)Bit10 (1) = Hold control (0) = Stop controlBit11 (1) = LIFO algorithm If bit11 and bit12 are both set to zero, the control
algorithm is set to AUTO.Bit12 (1) = PROGRESSIVE algorithmBit13 (1) = Steps off if Q capacitive (0) = No action on steps if Q is cap.Bit14 ReservedBit15 Reserved
Note: If bit9=1, the PFC controller starts whatever the bit10.
Modbus / RS485

97EN02-0376-00
VarPlus Logic VL series Modbus user manual
Modbus / RS485
Adress Register Value Words Type Unit0x0066 103 Validity for flags 2 1 Uint16 - 0x0067 104 User parameter flags 2 1 Uint16 -
User parameter flags 2
Bit15 Bit0
Bit0 (1) = Reset Alarms manually (0) = Reset Alarms automaticallyBit1 (1) = Switch steps off if THDU &
Capacitor overload current ratio & Temperature alarms occur.
(0) = No action on step control if THDU & Capacitor overload current ratio & Temperature alarms occur.
Bit2 (1) = Freeze control if I is lower than the limit
(0) = Normal operation if I is lower than the limit
Bit3 (1) = Enable service alarm (0) = Disable service alarmBit4 (1) = Enable control alarm (0) = Disable control alarmBit5 (1) = Enable faulty step alarm (0) = Disable faulty step alarmBit6 (1) = Enable step power lost alarm (0) = Disable step power lost alarmBit7 (1) = Enable hunting alarm (0) = Disable hunting alarmBit8 ReservedBit9 (1) = DI active on positive edge (0) = DI active on negative edgeBit10 ReservedBit11 ReservedBit12 ReservedBit13 ReservedBit14 ReservedBit15 Reserved
Output Relay statusThe state of the used relay outputs, fan relay and alarm relay can be seen in the bit mask below. If the referring bit = 1, the relay is closed.All these values can be accessed with function codes 03hex, 04hex and 64/4hex.
Adress Register Value Words Type Unit0x12C 301 Validity for Output Relay bitmask 1 Uint16 - 0x12D 302 Output Relay bitmask 1 Uint16 -
Ouput relay bitmask
Bit15 Bit0
Bit0 (1) = Relay output 1 closed (0) = Relay output 1 openBit1 (1) = Relay output 2 closed (0) = Relay output 2 openBit2 (1) = Relay output 3 closed (0) = Relay output 3 openBit3 (1) = Relay output 4 closed (0) = Relay output 4 openBit4 (1) = Relay output 5 closed (0) = Relay output 5 openBit5 (1) = Relay output 6 closed (0) = Relay output 6 openBit6 (1) = Relay output 7 closed (0) = Relay output 7 openBit7 (1) = Relay output 8 closed (0) = Relay output 8 openBit8 (1) = Relay output 9 closed (0) = Relay output 9 openBit9 (1) = Relay output 10 closed (0) = Relay output 10 openBit10 (1) = Relay output 11 closed (0) = Relay output 11 openBit11 (1) = Relay output 12 closed (0) = Relay output 12 openBit12 (1) = Fan relay closed (0) = Fan relay openBit13 (1) = Alarm relay closed (0) = Alarm relay openBit14 ReservedBit15 Reserved
Note: on VL6, bit6 to bit11 always zero. Validity bitmask then is 0x303F. On VL12, 0x3FFF.

10 7EN02-0376-00
VarPlus Logic VL series Modbus user manual
Modbus / RS485
Steps databaseThe base addresses and the data types can be found in the table below.See VarPlus Logic VL User Manual for detailed explanation on all these values. All these values can be accessed with function codes 03hex, 04hex,and 64/4hex.Adress Register Value Words Type Unit
0x0C8 201 Validity of fix steps mask 1 Uint16 - 0x0C9 202 Fix steps (1 = fix) 1 Uint16 -0x0CA 203 Validity of fix steps on / off
mask1 Uint16 -
0x0CB 204 Fix steps on / off (1 = on) 1 Uint16 -0x0CC 205 Validity of defective
steps mask1 Uint16 -
0x0CD 206 Defective steps (1 = defective)
1 Uint16 -
[bit0 = output 1] to [bit11 = output 12]
All further addresses and data types for the other step information can be found in the table below. The values for the step sizes are based on nominal voltage.Adress Register Value Words Type Unit
0x0CE 207 Current step size step 1 2 Sint32 VAr 0x0D0 209 Current step size step 2 2 Sint32 VAr 0x0D2 211 Current step size step 3 2 Sint32 VAr 0x0D4 213 Current step size step 4 2 Sint32 VAr 0x0D6 215 Current step size step 5 2 Sint32 VAr 0x0D8 217 Current step size step 6 2 Sint32 VAr 0x0DA 219 Current step size step 7 2 Sint32 VAr 0x0DC 221 Current step size step 8 2 Sint32 VAr 0x0DE 223 Current step size step 9 2 Sint32 VAr 0x0E0 225 Current step size step 10 2 Sint32 VAr 0x0E2 227 Current step size step 11 2 Sint32 VAr 0x0E4 229 Current step size step 12 2 Sint32 VAr 0x0E6 231 Initial step size step 1 2 Sint32 VAr0x0E8 233 Initial step size step 2 2 Sint32 VAr0x0EA 235 Initial step size step 3 2 Sint32 VAr0x0EC 237 Initial step size step 4 2 Sint32 VAr0x0EE 239 Initial step size step 5 2 Sint32 VAr0x0F0 241 Initial step size step 6 2 Sint32 VAr0x0F2 243 Initial step size step 7 2 Sint32 VAr0x0F4 245 Initial step size step 8 2 Sint32 VAr
0x0F6 247 Initial step size step 9 2 Sint32 VAr0x0F8 249 Initial step size step 10 2 Sint32 VAr0x0FA 251 Initial step size step 11 2 Sint32 VAr0x0FC 253 Initial step size step 12 2 Sint32 VAr0x0FE 255 Switching cycles step 1 2 Uint32 -0x100 257 Switching cycles step 2 2 Uint32 -0x102 259 Switching cycles step 3 2 Uint32 -0x104 261 Switching cycles step 4 2 Uint32 -0x106 263 Switching cycles step 5 2 Uint32 -0x108 265 Switching cycles step 6 2 Uint32 -0x10A 267 Switching cycles step 7 2 Uint32 -0x10C 269 Switching cycles step 8 2 Uint32 -0x10E 271 Switching cycles step 9 2 Uint32 -0x110 273 Switching cycles step 10 2 Uint32 -0x112 275 Switching cycles step 11 2 Uint32 -0x114 277 Switching cycles step 12 2 Uint32 -
Example: 6 steps with folllowing configuration:• step 1: Fix off • step 2 and 3: Fix on • step 4, 5 and 6: Auto
• Register 202: x000111 because: - steps 1, 2, 3 are Fix (on or off), - steps 4, 5, 6 are in auto.
• Register 204: x000110, from right to left: - 0: for step 1 in Fix off - 1: for step 2 in Fix on - 1: for step 3 in Fix on - 0: for step 4 in Auto - 0: for step 5 in Auto - 0: for step 6 in Auto.
117EN02-0376-00
VarPlus Logic VL series Modbus user manual
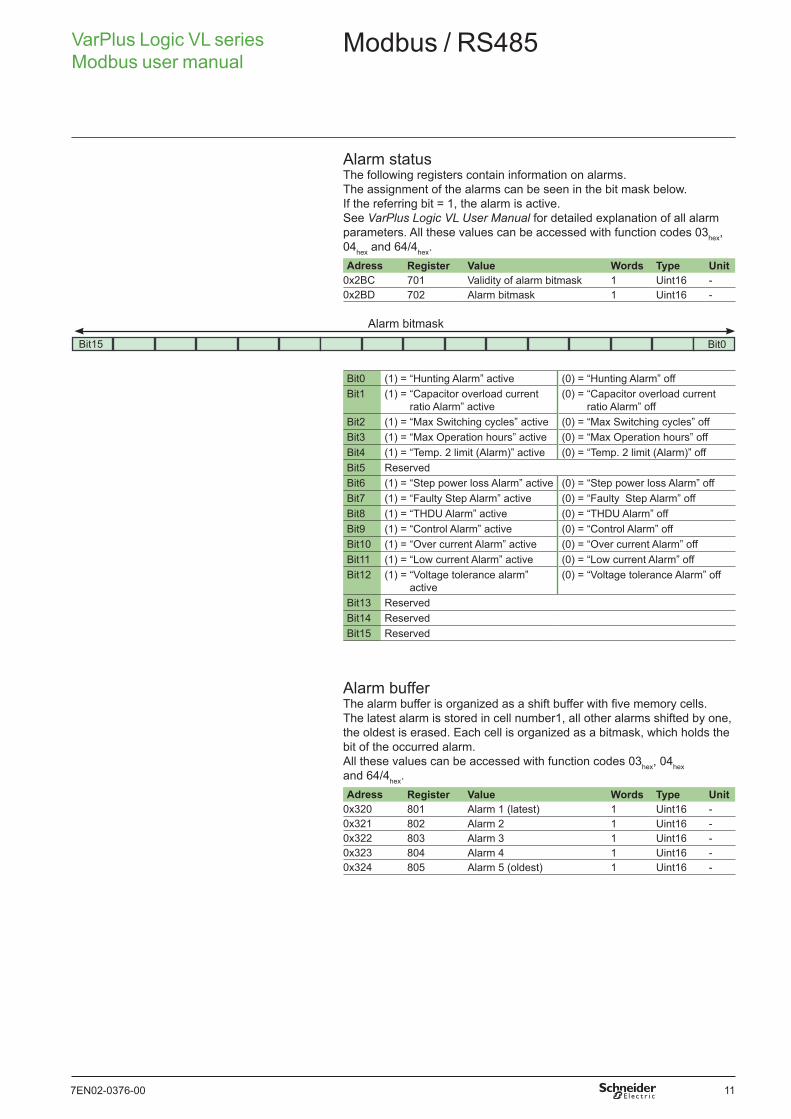
Alarm statusThe following registers contain information on alarms. The assignment of the alarms can be seen in the bit mask below. If the referring bit = 1, the alarm is active. See VarPlus Logic VL User Manual for detailed explanation of all alarm parameters. All these values can be accessed with function codes 03hex, 04hex and 64/4hex.Adress Register Value Words Type Unit
0x2BC 701 Validity of alarm bitmask 1 Uint16 - 0x2BD 702 Alarm bitmask 1 Uint16 -
Alarm bitmask
Bit15 Bit0
Bit0 (1) = “Hunting Alarm” active (0) = “Hunting Alarm” offBit1 (1) = “Capacitor overload current
ratio Alarm” active(0) = “Capacitor overload current
ratio Alarm” offBit2 (1) = “Max Switching cycles” active (0) = “Max Switching cycles” offBit3 (1) = “Max Operation hours” active (0) = “Max Operation hours” offBit4 (1) = “Temp. 2 limit (Alarm)” active (0) = “Temp. 2 limit (Alarm)” offBit5 ReservedBit6 (1) = “Step power loss Alarm” active (0) = “Step power loss Alarm” offBit7 (1) = “Faulty Step Alarm” active (0) = “Faulty Step Alarm” offBit8 (1) = “THDU Alarm” active (0) = “THDU Alarm” offBit9 (1) = “Control Alarm” active (0) = “Control Alarm” offBit10 (1) = “Over current Alarm” active (0) = “Over current Alarm” offBit11 (1) = “Low current Alarm” active (0) = “Low current Alarm” offBit12 (1) = “Voltage tolerance alarm”
active(0) = “Voltage tolerance Alarm” off
Bit13 ReservedBit14 ReservedBit15 Reserved
Alarm bufferThe alarm buffer is organized as a shift buffer with five memory cells. The latest alarm is stored in cell number1, all other alarms shifted by one, the oldest is erased. Each cell is organized as a bitmask, which holds the bit of the occurred alarm. All these values can be accessed with function codes 03hex, 04hex and 64/4hex.Adress Register Value Words Type Unit
0x320 801 Alarm 1 (latest) 1 Uint16 - 0x321 802 Alarm 2 1 Uint16 - 0x322 803 Alarm 3 1 Uint16 -0x323 804 Alarm 4 1 Uint16 - 0x324 805 Alarm 5 (oldest) 1 Uint16 -
Modbus / RS485

12 7EN02-0376-00
VarPlus Logic VL series Modbus user manual
Modbus / RS485
Device identification 16-bit registersThese values can be accessed with function codes 03hex and 04hex and 64/4hex.Address Register Value Words Type Unit Value (VL6/
VL12)0x190 401 Product Identifier 1 Uint16 - 17170/171710x191 402 FW [X,X] 1 Uint16 -0x192 403 FW [X,’.’] 1 Uint16 -0x193 404 FW [Y,Y] 1 Uint16 -0x194 405 FW [Y,‘.’] 1 Uint16 -0x195 406 FW [Z,Z] 1 Uint16 -0x196 407 FW [Z,0x00] 1 Uint16 -0x197 408 Product Family
[‘C’,’o’]1 Uint16 - Co
0x198 409 Product Family [‘n’,’t’]
1 Uint16 - nt
0x199 410 Product Family [‘r’,’o’]
1 Uint16 - ro
0x19A 411 Product Family [‘l’,’l’]
1 Uint16 - II
0x19B 412 Product Family [‘e’,’r’]
1 Uint16 - er
0x19C 413 User Application [‘O’,’t’]
1 Uint16 - Ot
0x19D 414 User Application [‘h’,’e’]
1 Uint16 - he
0x19E 415 User Application [‘r’,0x00]
1 Uint16 - r
0x19F 416 Serial Number DateCode WW
1 Uint16 - w
0x1A0 417 Serial Number DateCode YY
1 Uint16 - y
0x1A1 418 Serial Number first two digits
1 Uint16 -
0x1A2 419 Serial Number second two digits
1 Uint16 -
0x1A3 420 Serial Number third two digits
1 Uint16 -
0x1A4 421 Serial Number fourth two digits
1 Uint16 -
0x1A5 422 HW [X,X] 1 Uint16 -0x1A6 423 HW [X,'.'] 1 Uint16 -0x1A7 424 HW [Y,Y] 1 Uint16 -0x1A8 425 HW [Y,'.'] 1 Uint160x1A9 426 HW [Z,Z] 1 Uint16 -0x1AB 427 HW [Z,0x00] 1 Uint16 -
Function Code 43 MEI Type 14The VarPlus Logic controller fulfills conformity level 0x82: extended identification (stream and individual access)• Vendor Name• Product Code• Major Minor Revision• Vendor URL• Product Name• Product Model• User Application Name

137EN02-0376-00
VarPlus Logic VL series Modbus user manual
Modbus / RS485
Read Device Identification request for VarPlus Logic: Read DevID 01.Query ResponseDescription Data Description Data
Function Code 0x2B Function code 0x2BMEI Type 0x0E MEI Type 0x0ERead DevID code 01 Read DevID code 01Object ID 00 Conformity Level 0x82
More Follows 00Next ObjectID 00Number Of Objects 07Object0.ID 00Object0.Length 0x12Object0.Value “Schneider Electric”Object1.ID 01Object1.Length 0x0EObject1.Value VPL06N or VPL12NObject2.ID 02Object2.Length 0x0BObject2.Value “XXX.YYY.ZZZ”
Read Device Identification request for VarPlus Logic: Read DevID 02, Read DevID 03.
Query ResponseDescription Data Description Data
Function Code 0x2B Function code 0x2BMEI Type 0x0E MEI Type 0x0ERead DevID code
02,03 Read DevID code 02,03
Object ID 00 Conformity Level 0x82More Follows 00Next Object ID 00Number Of Objects 06Object0.ID 00Object0.Length 0x12Object0.Value “Schneider Electric”Object1.ID 01Object1.Length 0x0EObject1.Value “VPL06N”or“VPL12N”Object2.ID 02Object2.Length 0x0BObject2.Value “XXX.YYY.ZZZ”Object3.ID 03Object3.Length 0x21Object3.Value “http://www.schneider-
electric.com”Object4.ID 04Object4.Length 0x0DObject4.Value “VarPlus Logic”Object5.ID 05Object5.Length 0x03 or 0x04Object5.Value “VL6” or “VL12”Object6.ID 06Object6.Length 0x05Object6.Value “Other”
14 7EN02-0376-00
VarPlus Logic VL series Modbus user manual
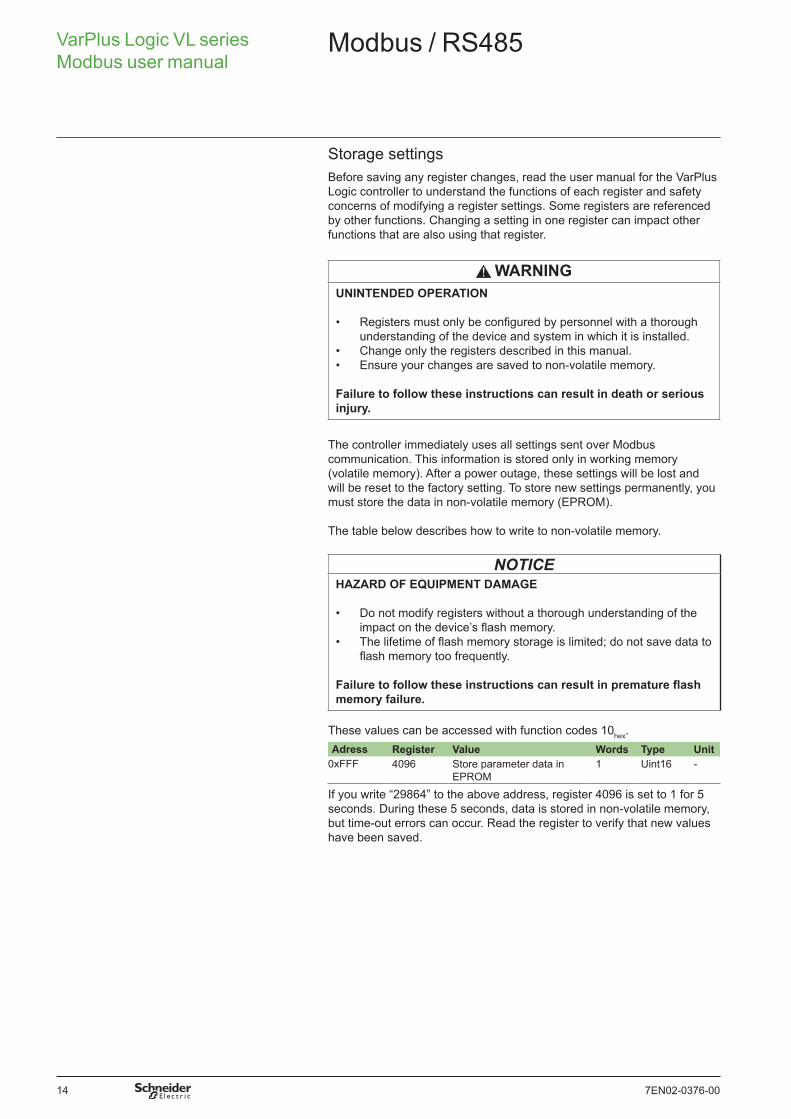
Storage settingsBefore saving any register changes, read the user manual for the VarPlus Logic controller to understand the functions of each register and safety concerns of modifying a register settings. Some registers are referenced by other functions. Changing a setting in one register can impact other functions that are also using that register.
WARNINGUNINTENDED OPERATION
• Registers must only be configured by personnel with a thorough understanding of the device and system in which it is installed.
• Change only the registers described in this manual. • Ensure your changes are saved to non-volatile memory.
Failure to follow these instructions can result in death or serious injury.
The controller immediately uses all settings sent over Modbus communication. This information is stored only in working memory (volatile memory). After a power outage, these settings will be lost and will be reset to the factory setting. To store new settings permanently, you must store the data in non-volatile memory (EPROM).
The table below describes how to write to non-volatile memory.
NOTICEHAZARD OF EQUIPMENT DAMAGE
• Do not modify registers without a thorough understanding of the impact on the device’s flash memory.
• The lifetime of flash memory storage is limited; do not save data to flash memory too frequently.
Failure to follow these instructions can result in premature flash memory failure.
These values can be accessed with function codes 10hex.Adress Register Value Words Type Unit
0xFFF 4096 Store parameter data in EPROM
1 Uint16 -
If you write “29864” to the above address, register 4096 is set to 1 for 5 seconds. During these 5 seconds, data is stored in non-volatile memory, but time-out errors can occur. Read the register to verify that new values have been saved.
Modbus / RS485

157EN02-0376-00
VarPlus Logic VL series Modbus user manual
Troubleshooting
If the Modbus connection is not working correctly, check the following points:1. If there is no communication at all, look for the error between the VarPlus Logic VL and the master.Possible causes are:• Check adjustment of baud rate, parity, and address at the Varlogic Plus Logic VL; possibly make changes in the configuration.• The Modbus lines D0- and D1+ might be interchanged. If necessary, correct them.• Verify the settings of the RS485/RS232 converter. If needed, use the converter data sheet.• Verify that the port is not being used by another application. If it is, use a different port.• Check the termination and polarization resistors. If necessary, rectify.
2. Is the cable of the Modbus connection damaged? All plug connections are correct? If necessary, replace.
3. Is the pin assignment of the RS485 connection correct? If necessary, correct the pin assignment.
4. The shielding of the Modbus line must not be connected with the ground of the Modbus; but the shielding should be connected to protective ground. If necessary, correct the issue.
5. If communication is possible, but there are problems with the customer software, check the following points:• Check adjustment of Modbus address, parity, and baud rate in the software.• Check data format.

7EN02-0376-00
Schneider Electric35, rue Joseph Monier92500 Rueil Malmaison - Francewww.schneider-electric.com© 2015 Schneider Electric. All Rights Reserved.
Schneider Electric is the trademark or registered trademark of Schneider Electric in France, the USA and other countries. Other trademarks used are the property of their respective owners.