ltib quick start: targeting the mpc8548e cds...
TRANSCRIPT

Freescale SemiconductorApplication Note
© Freescale Semiconductor, Inc., 2006. All rights reserved.
To take advantage of the Freescale Linux target image builder (LTIB), you can use the PowerQUICC™ MPC8548E Linux board support package (BSP) with the LTIB to develop an embedded Linux solution with kernel 2.6. The MPC8548E configurable development system (CDS) environment features a Freescale PowerQUICC III MPC8548E high-performance integrated processor.
This document summarizes the features of the MPC8548E Linux BSP and provides instructions on how to accomplish the following tasks:
• Install the LTIB-based BSP on a host development system.
• Run LTIB to build target images needed for deployment.
• Deploy the built image to the MPC8548CDS board.
• Boot Linux on the MPC8548CDS board.
Document Number: AN3094Rev. 0, 11/2006
Contents1 System and BSP Overview . . . . . . . . . . . . . . . . . . . . . .22 BSP and Target System Requirements . . . . . . . . . . . . .23 Installing/Uninstalling the BSP to the Host System . . .24 Running LTIB . . . . . . . . . . . . . . . . . . . . . . . . . . . . . . . 3
4.1 Building the Image Files with the Default Configurations . . . . . . . . . . . . . . . . . . . . . . . . . . . . . . .34.2 Reconfiguring and Recompiling the Images . . . . . 44.3 Changing the Target Image Configuration Without distclean . . . . . . . . . . . . . . . . . . . . . . . . . . . . . . . . . . . .64.4 Debugging U-Boot and the Kernel . . . . . . . . . . . . .6
5 Running the Target Image on the MPC8548E CDS Board . . . . . . . . . . . . . . . . . . . . . . . . . . . . . . . . . . . . . . 7
LTIB Quick Start:Targeting the MPC8548E CDS System
Targeting the MPC8548E CDS System, Rev. 0
2 Freescale Semiconductor
System and BSP Overview
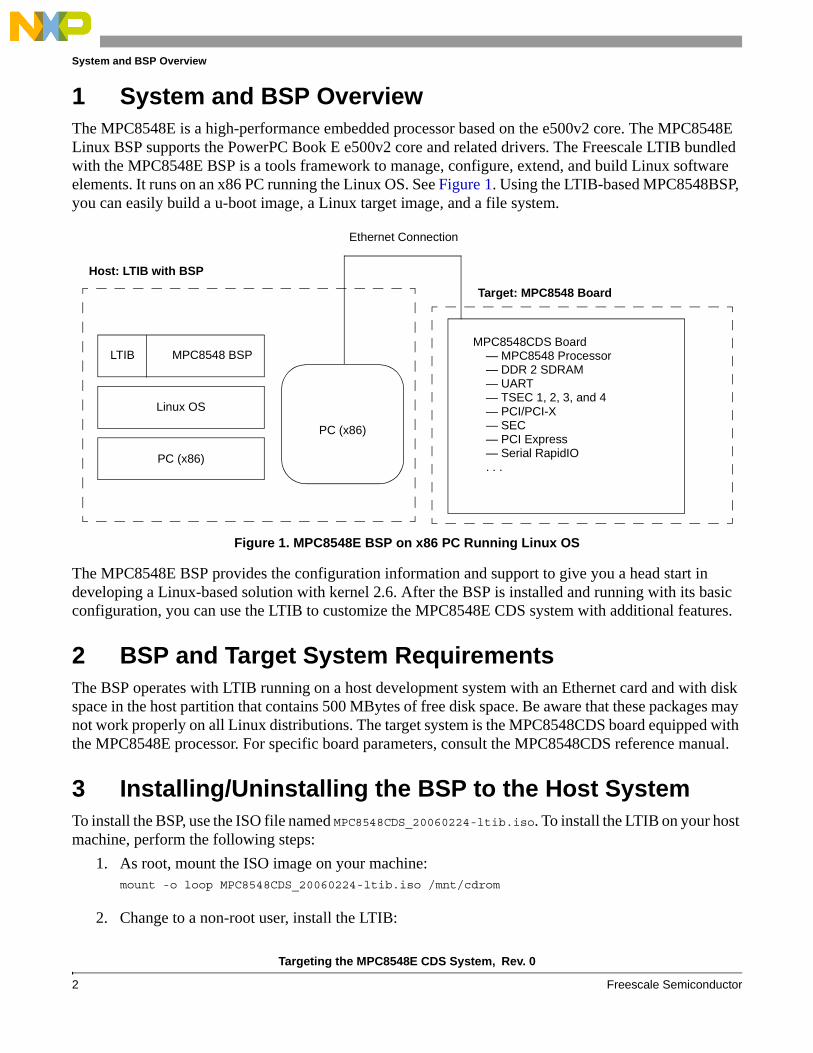
1 System and BSP OverviewThe MPC8548E is a high-performance embedded processor based on the e500v2 core. The MPC8548E Linux BSP supports the PowerPC Book E e500v2 core and related drivers. The Freescale LTIB bundled with the MPC8548E BSP is a tools framework to manage, configure, extend, and build Linux software elements. It runs on an x86 PC running the Linux OS. See Figure 1. Using the LTIB-based MPC8548BSP, you can easily build a u-boot image, a Linux target image, and a file system.
Figure 1. MPC8548E BSP on x86 PC Running Linux OS
The MPC8548E BSP provides the configuration information and support to give you a head start in developing a Linux-based solution with kernel 2.6. After the BSP is installed and running with its basic configuration, you can use the LTIB to customize the MPC8548E CDS system with additional features.
2 BSP and Target System RequirementsThe BSP operates with LTIB running on a host development system with an Ethernet card and with disk space in the host partition that contains 500 MBytes of free disk space. Be aware that these packages may not work properly on all Linux distributions. The target system is the MPC8548CDS board equipped with the MPC8548E processor. For specific board parameters, consult the MPC8548CDS reference manual.
3 Installing/Uninstalling the BSP to the Host SystemTo install the BSP, use the ISO file named MPC8548CDS_20060224-ltib.iso. To install the LTIB on your host machine, perform the following steps:
1. As root, mount the ISO image on your machine:mount -o loop MPC8548CDS_20060224-ltib.iso /mnt/cdrom
2. Change to a non-root user, install the LTIB:
LTIB MPC8548 BSP
Linux OS
PC (x86)
PC (x86)
Host: LTIB with BSP
Target: MPC8548 Board
Ethernet Connection
MPC8548CDS Board— MPC8548 Processor— DDR 2 SDRAM— UART— TSEC 1, 2, 3, and 4— PCI/PCI-X— SEC— PCI Express— Serial RapidIO. . .

Targeting the MPC8548E CDS System, Rev. 0
Freescale Semiconductor 3
Running LTIB
/mnt/cdrom/install
3. Input the desired LTIB install_path to install.
The script installs LTIB into two different directories on your machine. The /opt/freescale/pkgs directory contains all the packages, including the Linux kernel, u-boot, and the application packages. The install_path/ltib directory contains the main LTIB scripts and specification files for the MPC8548CDS BSP.
There are no BSP uninstall scripts. To uninstall the LTIB, manually remove the /opt/freescale/pkgs, /opt/freescale/ltib, and install_path/ltib directories.
4 Running LTIBTo run the LTIB, you must complete the following tasks:
1. Build the image files with the default configurations.
2. Fully reconfigure and recompile all the images.
3. Change the target image configuration.
4. Debug u-boot and the kernel.
The remainder of this section discusses each of these tasks in detail.
4.1 Building the Image Files with the Default ConfigurationsTo run LTIB, change into the directory where LITB is installed and then run ./ltib. For example, the sequence could be:
cd install_path/ltib
./ltib
If you have never installed a copy of LTIB on your machine before, a number of host packages are built and installed to help support LTIB. This may take a few minutes. Note that LTIB can be run only by a non-root user.
Because the pre-built RPM packages are included in the BSP, LTIB installs them to the root file system without recompiling them. When the installation of the packages is complete, the following directory/image files are available on your system:
• rootfs. Directory, the root file system to be deployed on your board.
• vmlinux.gz.u-boot. Kernel image that can be loaded with u-boot.
• rootfs.ext2.gz.uboot. Ramdisk image that can be loaded with u-boot.
• rootfs.ext2.gz. gzipped ramdisk image
• rootfs/boot/u-boot.bin. u-boot binary image that can be programmed into MPC8548CDS Flash memory.
For a description of the usage of these image files, refer to Section 5, “Running the Target Image on the MPC8548E CDS Board.”

Targeting the MPC8548E CDS System, Rev. 0
4 Freescale Semiconductor
Running LTIB
4.2 Reconfiguring and Recompiling the ImagesTo reconfigure and recompile all the packages, perform the following steps:
1. Clean up all the configure files and objects thoroughly:
./ltib -m distclean
2. Run LITB:./ltib
A blue screen appears, similar to the kernel’s menuconfig. From this screen, choose the platform for which to install a target image. As shown in Figure 2, select Freescale MPC8548CDS PPC development board and then exit and save.
Figure 2. Platform Select Screen
After you save, the platform configuration menu appears, as shown in Figure 3. If the default is acceptable, simply exit and save. Your target images is then built and installed.

Targeting the MPC8548E CDS System, Rev. 0
Freescale Semiconductor 5
Running LTIB
Figure 3. Platform Configuration Menu
Configuration settings for the options listed in Figure 3 are as follows:
• C library type (glibc). Select glibc for MPC8548CDS.
• Toolchain. Select gcc-3.4/glibc-2.3.4 e500(DPFP) for the MPC8548CDS.
• Build a boot loader. Build a u-boot or not. You can enable/disable CodeWarrior debugging support in u-boot options.
• Include kernel headers. Selecting this option copies the kernel headers to rootfs/usr/src/linux/include
• Configure the kernel. Run kernel menuconfig when processing the kernel package.
• Leave the sources after building. This option can be used to build the kernel and leave the build source tree in rpm/BUILD in place.
• Package list. Select the packages to include in the file system.
• Target System Configuration. Configure the board information and startup daemons.
• Target Image Generation. Options for deployment

Targeting the MPC8548E CDS System, Rev. 0
6 Freescale Semiconductor
Running LTIB
NOTE:The default Allocate extra space is 0. You need to set this value if you want to allocate extra free space on your target root file system.
4.3 Changing the Target Image Configuration Without distcleanTo modify the configuration without distclean, simply run the following command:
./ltib --configure
The system re-prompts you for the platform/board configuration. In the board configuration screens, change settings and select packages as appropriate. When you exit the configuration screen, your target image is adjusted accordingly.
4.4 Debugging U-Boot and the KernelBecause CodeWarrior needs the entire source directory and ELF file for debugging, you must manually extract the u-boot/kernel and compile them. The LTIB auto-build removes the source directory when finished.
4.4.1 Debugging U-Boot
To debug u-boot, perform the following steps:
1. Extract u-boot:./ltib -p u-boot-fsl-pq3 -m prep
2. Enable CodeWarrior support in the LTIB menu:
Run ./ltib -configure and choose U-BOOT OPTIONS → CODEWARRIOR SUPPORT in the LTIB menu. Save and exit.
3. LTIB may return an error message to prompt you to remove the ltib/rpm/BUILD/u-boot-cvs-20050607 directory. Ignore it, and run the following command:./ltib -p u-boot-fsl-pq3 -m scbuild
The u-boot begins compiling.
The u-boot source is in ltib/rpm/BUILD/u-boot-cvs-20050607. The size of the ELF file u-boot is approximately 500 Kbytes. The u-boot is now ready for CodeWarrior debugging.
4.4.2 Debugging the Kernel
To debug the kernel, perform the following steps:
1. Extract the kernel as follows:./ltib -p kernel-2.6.11-pq3 -m prep
2. Run ./ltib -configure and choose CONFIGURE THE KERNEL in the LTIB menu. Save and exit.
3. LTIB may return an error message prompting you to remove the ltib/rpm/BUILD/linux-2.6.10 directory. Ignore it, and run the following command:./ltib -p kernel-2.6.11-pq3 -m scbuild

Targeting the MPC8548E CDS System, Rev. 0
Freescale Semiconductor 7
Running the Target Image on the MPC8548E CDS Board
4. Now you can configure the kernel menuconfig. From the menu, select KERNEL HACKING → KERNEL DEBUGGING → INCLUDE CODEWARRIOR KERNEL DEBUGGINg. Save and exit.
The kernel begins compiling.
The kernel source is in the ltib/rpm/BUILD/linux-2.6.10 directory. The size of the ELF file, vmlinux, is approximately 20 Mbytes. The kernel is now ready for CodeWarrior debugging.
5 Running the Target Image on the MPC8548E CDS BoardTo run the target image on the CDS board, perform the following steps:
1. Use CodeWarrior for PPC version 8.6 + PowerTAP Pro to program the u-boot image into Flash memory, starting from 0xFFF80000.
2. Ramdisk deployment. The images generated by LTIB allow you perform ramdisk deployment, as follows:
a) At the u-boot prompt, set u-boot environments as shown here:=>setenv ipaddr board_ipaddress
=>setenv serverip tftp_serverip
=>setenv gatewayip your_gatewayip
=>setenv bootargs root=/dev/ram rw console=ttyS1,115200
=>saveenv
3. tftp images to the MPC8548E CDS system, then boot up the MPC8548E CDS system.=>tftp 1000000 vmlinux.gz.uboot
=>tftp 2000000 rootfs.ext2.gz.uboot
=>bootm 1000000 2000000
Now that your board is booted up with the ramdisk file system, you are ready to perform NFS deployment using the NFS file system generated by LTIB, as follows:
1. Set the host NFS server environments:
a) On the Linux host NFS server, add the following line in the file: /etc/exports:nfs_root_path board_ipaddress(rw,no_root_squash,async)
Note that nfs_root_path is the NFS root directory path on the NFS server.
b) Restart the NFS service:/etc/init.d/nfs restart
2. According to Section 4.3, “Changing the Target Image Configuration Without distclean, modify the configuration of LTIB:./ltib --configure
Figure 3 appears on the screen.
3. Select TARGET SYSTEM CONFIGURATION → OPTIONS → NETWORK SETUP.
The network setup menu shown in Figure 4 appears on the screen.
4. Modify the items in the network setup menu according to your network configuration. If there is any problem, get help from your IT.

Targeting the MPC8548E CDS System, Rev. 0
8 Freescale Semiconductor
Running the Target Image on the MPC8548E CDS Board
Figure 4. Network Setup Menu
5. At the u-boot prompts, set the u-boot environment as follows:=>setenv ipaddr board_ipaddress
=>setenv serverip tftp_serverip
=>setenv gatewayip your_gatewayip
=>setenv bootargs root=/dev/nfs rw nfsroot=tftp_serverip:nfs_root_path ip=board_ipaddress:tftp_serverip:your_gatewayip:your_netmask:mpc8548cds:eth0:off console=ttyS1,115200
=>saveenv
Note that your_netmask is the network netmask address.
6. tftp the kernel image to the board and then boot it up, as follows:=>tftp 1000000 vmlinux.gz.uboot
=>bootm 1000000
Now your board is booted up with NFS file system.

Targeting the MPC8548E CDS System, Rev. 0
Freescale Semiconductor 9
Running the Target Image on the MPC8548E CDS Board
THIS PAGE INTENTIONALLY LEFT BLANK

Targeting the MPC8548E CDS System, Rev. 0
10 Freescale Semiconductor
Running the Target Image on the MPC8548E CDS Board
THIS PAGE INTENTIONALLY LEFT BLANK

Targeting the MPC8548E CDS System, Rev. 0
Freescale Semiconductor 11
Running the Target Image on the MPC8548E CDS Board
THIS PAGE INTENTIONALLY LEFT BLANK
Document Number: AN3094Rev. 011/2006
Freescale™, the Freescale logo, and CodeWarrior are trademarks of Freescale Semiconductor, Inc. The Power Architecture and Power.org word marks and the Power and Power.org logos and related marks are trademarks and service marks licensed by Power.org. The PowerPC name is a trademark of IBM Corp. and is used under license. All other product or service names are the property of their respective owners.
© Freescale Semiconductor, Inc., 2006.
Information in this document is provided solely to enable system and software
implementers to use Freescale Semiconductor products. There are no express or
implied copyright licenses granted hereunder to design or fabricate any integrated
circuits or integrated circuits based on the information in this document.
Freescale Semiconductor reserves the right to make changes without further notice to
any products herein. Freescale Semiconductor makes no warranty, representation or
guarantee regarding the suitability of its products for any particular purpose, nor does
Freescale Semiconductor assume any liability arising out of the application or use of
any product or circuit, and specifically disclaims any and all liability, including without
limitation consequential or incidental damages. “Typical” parameters which may be
provided in Freescale Semiconductor data sheets and/or specifications can and do
vary in different applications and actual performance may vary over time. All operating
parameters, including “Typicals” must be validated for each customer application by
customer’s technical experts. Freescale Semiconductor does not convey any license
under its patent rights nor the rights of others. Freescale Semiconductor products are
not designed, intended, or authorized for use as components in systems intended for
surgical implant into the body, or other applications intended to support or sustain life,
or for any other application in which the failure of the Freescale Semiconductor product
could create a situation where personal injury or death may occur. Should Buyer
purchase or use Freescale Semiconductor products for any such unintended or
unauthorized application, Buyer shall indemnify and hold Freescale Semiconductor
and its officers, employees, subsidiaries, affiliates, and distributors harmless against all
claims, costs, damages, and expenses, and reasonable attorney fees arising out of,
directly or indirectly, any claim of personal injury or death associated with such
unintended or unauthorized use, even if such claim alleges that Freescale
Semiconductor was negligent regarding the design or manufacture of the part.
How to Reach Us:
Home Page: www.freescale.com
email: [email protected]
USA/Europe or Locations Not Listed: Freescale Semiconductor Technical Information Center, CH3701300 N. Alma School Road Chandler, Arizona 85224 [email protected]
Europe, Middle East, and Africa:Freescale Halbleiter Deutschland GmbHTechnical Information CenterSchatzbogen 781829 Muenchen, Germany+44 1296 380 456 (English) +46 8 52200080 (English)+49 89 92103 559 (German)+33 1 69 35 48 48 (French) [email protected]
Japan: Freescale Semiconductor Japan Ltd. HeadquartersARCO Tower 15F1-8-1, Shimo-Meguro, Meguro-ku Tokyo 153-0064, Japan 0120 191014+81 3 5437 [email protected]
Asia/Pacific: Freescale Semiconductor Hong Kong Ltd. Technical Information Center2 Dai King Street Tai Po Industrial Estate, Tai Po, N.T., Hong Kong +800 2666 [email protected]
For Literature Requests Only:Freescale Semiconductor
Literature Distribution Center P.O. Box 5405Denver, Colorado 80217 1-800-441-2447303-675-2140Fax: 303-675-2150LDCForFreescaleSemiconductor
@hibbertgroup.com