ludlum model 5 geiger counter -...
TRANSCRIPT

LUDLUM MODEL 5 GEIGER COUNTER
May 2014
Serial Number 236626 and Succeeding
Serial Numbers
LUDLUM MODEL 5 GEIGER COUNTER
May 2014
Serial Number 236626 and Succeeding
Serial Numbers

STATEMENT OF WARRANTY Ludlum Measurements, Inc. warrants the products covered in this manual to be free of defects due to workmanship, material, and design for a period of twelve months from the date of delivery. The calibration of a product is warranted to be within its specified accuracy limits at the time of shipment. In the event of instrument failure, notify Ludlum Measurements to determine if repair, recalibration, or replacement is required. This warranty excludes the replacement of photomultiplier tubes, G-M and proportional tubes, and scintillation crystals which are broken due to excessive physical abuse or used for purposes other than intended. There are no warranties, express or implied, including without limitation any implied warranty of merchantability or fitness, which extend beyond the description of the face there of. If the product does not perform as warranted herein, purchaser’s sole remedy shall be repair or replacement, at the option of Ludlum Measurements. In no event will Ludlum Measurements be liable for damages, lost revenue, lost wages, or any other incidental or consequential damages, arising from the purchase, use, or inability to use product.
RETURN OF GOODS TO MANUFACTURER If equipment needs to be returned to Ludlum Measurements, Inc. for repair or calibration, please send to the address below. All shipments should include documentation containing return shipping address, customer name, telephone number, description of service requested, and all other necessary information. Your cooperation will expedite the return of your equipment. LUDLUM MEASUREMENTS, INC. ATTN: REPAIR DEPARTMENT 501 OAK STREET SWEETWATER, TX 79556
800-622-0828 325-235-5494 FAX 325-235-4672

Ludlum Measurements, Inc. May 2014
Table of Contents Introduction 1
Getting Started 2 Unpacking and Repacking 2-1
Battery Installation 2-1
Battery Test 2-2
Instrument Test 2-2
Reading the Meter Face Dial 2-2
Operational Check 2-3
Specifications 3
Identification of Controls and Functions 4
Safety Considerations 5 Environmental Conditions for Normal Use 5-1
Warning Markings and Symbols 5-1
Cleaning and Maintenance Precautions 5-2
Maintenance 6 Recalibration 6-1
Batteries 6-1
Troubleshooting 7 Troubleshooting Electronics which utilize GM Detectors 7-1
Troubleshooting GM Detectors 7-3
Recycling 8
Parts List 9 Model 5 Geiger Counter 9-1
Main Board, Drawing 464 × 272 9-1
HV Power Supply Board, Drawing 464 × 249 9-3
Drawings and Diagrams 10

Model 5 Geiger Counter Technical Manual Section 1
Ludlum Measurements, Inc. Page 1-1 May 2014
Introduction
he Model 5 is a self-contained portable Geiger Counter with two internal Geiger-Mueller (GM) tubes and five linear ranges used in combination with exposure rate or CPM meter dials. The first three ranges use an LND 71210 (or equivalent), while the lower two
ranges use an LND 71412 (or equivalent). Both have 1/32-inch cadmium shields to attenuate low-energy response.
The instrument features a regulated high-voltage power supply, overload circuitry, unimorph speaker with audio ON-OFF capability, fast-slow meter response, meter reset button, battery check button and a six-position switch for selecting range multiples of ×0.1, ×1, ×10, ×100 and ×1000. Each range multiplier has its own calibration potentiometer located under a protective cover on the front panel. The unit body and meter housing are made of cast aluminum and the can is 0.23 cm (0.090 in.) thick aluminum.
The unit is operated with two ˝D˝ cell batteries for operation from -20° to 50°C (-4° to 122° F). For instrument operation below 0°C (32°F), either very fresh alkaline or rechargeable NiCd batteries should be used.
Section
1 T

Model 5 Geiger Counter Technical Manual Section 2
Ludlum Measurements, Inc. Page 2-1 May 2014
Getting Started Unpacking and Repacking Remove the calibration certificate and place it in a secure location. Remove the instrument and accessories (batteries, cable, etc.) and ensure that all of the items listed on the packing list are in the carton. Check individual item serial numbers and ensure calibration certificates match. The Model 5 serial number is located on the front panel below the battery compartment.
To return an instrument for repair or calibration, provide sufficient packing material to prevent damage during shipment.
Every returned instrument must be accompanied by an Instrument Return Form, which can be downloaded from the Ludlum website at www.ludlums.com. Find the form by clicking the “Support” tab and selecting “Repair and Calibration” from the drop-down menu. Then choose the appropriate Repair and Calibration division where you will find a link to the form.
Battery Installation Ensure the Model 5 range selector switch is in the OFF position. Open the battery lid by pushing down and turning the quarter-turn thumbscrew counterclockwise a quarter of a turn. Install two ˝D˝ size batteries in the compartment.
Note the (+) and (-) marks inside the battery door. Match the battery polarity to these marks. Close the battery box lid, and then push down and turn the quarter-turn thumb screw clockwise a quarter of a turn.
Note:
The center post of a “D” size battery is positive.
Section
2

Model 5 Geiger Counter Technical Manual Section 2
Ludlum Measurements, Inc. Page 2-2 May 2014
Battery Test Check the batteries daily or prior to use, whichever is less frequent, to assure proper operation of the instrument. Move the range multiplier switch to the ×1000 position and press the BAT button. Ensure that the meter needle deflects to the battery check portion on the meter scale. If the meter does not respond, check to see if the batteries have been correctly installed. Replace the batteries if necessary.
Instrument Test After checking the batteries, place the AUD ON-OFF switch in the ON position. Expose the internal detectors to a check source. The instrument speaker should emit ˝clicks˝ relative to the rate of counts detected. The AUD ON/OFF switch will silence the audible clicks if in the OFF position. It is recommended that the AUD ON/OFF switch be kept in the OFF position when not needed in order to preserve battery life.
Warning:
A low-battery condition results in a steady audio tone regardless of the position of the AUD ON/OFF switch.
Check the meter reset function by depressing the RES pushbutton switch and ensuring the meter needle drops to ˝0˝.
Once this procedure has been completed, the instrument is ready for use.
Reading the Meter Face Dial Reading the meter face is very important for consistent measurements. The Model 5 typically has an exposure rate 0-2.0 mR/hr meter face. The following examples are intended to help the user interpret the correct reading.
The normal procedure is to turn the range selector switch to the highest range, and if no readings are seen on the meter, turn the selector switch down to the lower scales until a reading is seen. The ranges on the instrument selector switch are multipliers for the meter reading. A typical single scale (one arc) meter face with mR/hr dial is shown on the following page.

Model 5 Geiger Counter Technical Manual Section 2
Ludlum Measurements, Inc. Page 2-3 May 2014
The count rate scale reads 0-2.0mR/hr and has BAT OK on the dial.
If the needle is pointing as indicated above and the instrument range selection switch is on the ×0.1 scale multiple, then the reading is 1.5 mR/hr (multiplied by) ×0.1 = .00015 R/hr.
The same needle indications on successive ranges would be:
×1 = 1.5 mR/hr (or .0015 R/hr)
×10 = 15 mR/hr (or .0.15 R/hr)
×100 = 150 mR/hr (or .15 R/hr)
×1000 = 1500 mR/hr (or 1.5 R/hr)
Operational Check To assure proper operation of the instrument and the detector(s) between calibrations, an instrument operational check including battery test and instrument should be performed at least daily or prior to use, whichever is less frequent. A reference reading (or readings) with a check source should be obtained with the detector(s) in a constant and reproducible manner at the time of calibration or at the time the instrument is received in the field.
If at any time the instrument fails to read within 20% of the reference reading when using the same check source, it should be sent to a calibration facility for recalibration and/or repair. If desired, multiple readings may be taken at different distances and/or with different sources so that other ranges or scales are checked.

Model 5 Geiger Counter Technical Manual Section 3
Ludlum Measurements, Inc. Page 3-1 May 2014
Specifications
Indicated Use: gamma survey
Detectors: two internal, energy-compensated GM tubes
Multipliers: ×0.1, ×1, ×10, ×100 and ×1000 selected by a front-panel range selector switch
High Voltage: fixed at 540 ± 25 Vdc.
Input Sensitivity: 100 ± 30 mV for the low range detector; 425 ± 75 mV for the high range detector
Energy Response: within 15% of true value from 60 keV - 3 MeV
Saturation: in excess of 1000 R/hr
Meter: 6.4 cm (2.5 inch) arc, 1 mA, pivot-and-jewel suspension
Meter Dial: 0-2 mR/hr, BAT TEST (others available)
Range: typically 0-2000 mR/hr
Linearity: reading within 10% of true value
Calibration Controls: individual potentiometers for each range; accessible from the front cover while in operational status
Audio: built-in unimorph speaker with ON-OFF switch (greater than 60 dB at 2 feet)
Section
3

Model 5 Geiger Counter Technical Manual Section 3
Ludlum Measurements, Inc. Page 3-2 May 2014
Response: toggle switch for FAST (4 seconds) or SLOW (22 seconds) from 10% to 90% of final reading
Reset: pushbutton to ˝zero˝ the meter.
Overload: holds the meter needle at full-scale in high radiation fields.
Power: two ˝D˝ cell batteries housed in a sealed externally accessible compartment
Battery Life: typically greater than 2000 hours (battery condition may be checked on the meter face)
Battery Dependence: instrument calibration change less than 3% within battery check limits on the meter
Temperature Range: -20 to 50 ˚C (-4 to 122 ˚F)
Size: 24.1 x 8.9 x 21.6 cm (9.5 x 3.5 x 8.5 inch) (H x W x L), including instrument handle
Weight: 2 kg (4.4 lb) including batteries and detectors
Construction: cast and drawn aluminum with beige powder-coating.

Model 5 Geiger Counter Technical Manual Section 4
Ludlum Measurements, Inc. Page 4-1 May 2014
Identification of Controls and Functions
Meter: 6.4cm (2.5 inch) arc, 1 mA analog type with pivot-and-jewel suspension. Typical meter dial is 0-2 mR/hr and BAT TEST.
Range Selector Switch: A six-position switch marked OFF, ×1000, ×100, ×10, ×1, ×0.1. Turning the range selector switch to one of the range multiplier positions (×1000, ×100, ×10, ×1, or ×0.1) provides the operator with an overall range of 0 to 2000 mR/hr. Multiply the scale reading by the multiplier to determine the actual scale reading.
Range Calibration Adjustment: Recessed potentiometers located under the calibration cover, on the right side of the front panel. These adjustment controls allow individual calibration for each range multiplier.
Battery Compartment: Sealed compartment to house two ˝D˝ cell batteries.
RES Pushbutton: When depressed, this switch provides a rapid means of driving the meter needle to zero.
AUD ON-OFF Toggle Switch: In the ON position, operates the unimorph speaker, located on the left side of the instrument. The frequency of the clicks is relative to the rate of the incoming pulses. The higher the rate, the higher the audio frequency. The audio should be turned OFF when not required to reduce battery drain.
Warning:
A low-battery condition results in a steady audio tone, regardless of the position of the AUD ON/OFF switch.
Section
4

Model 5 Geiger Counter Technical Manual Section 4
Ludlum Measurements, Inc. Page 4-2 May 2014
F-S Toggle Switch: Provides meter response. Selecting the fast, ˝F˝ position, of the toggle switch provides 90% of full-scale meter deflection in four seconds. In the slow, ˝S˝ position, 90% of full-scale meter deflection takes 22 seconds. In the ˝F˝ position, there is fast response and large meter deviation. The ˝S˝ position should be used for slow response and damped meter deviation.
Over range adjustment (Internal HV Board, R3): This potentiometer is utilized in the calibration of the instrument only.

Model 5 Geiger Counter Technical Manual Section 5
Ludlum Measurements, Inc. Page 5-1 May 2014
Safety Considerations Environmental Conditions for Normal Use Indoor or outdoor use
No maximum altitude
Temperature range of -20 to 50 °C (-4 to 122 °F); may be certified for operation from -40 to 65 °C (-40 to 150 °F)
Maximum relative humidity of less then 95% (non-condensing)
Pollution Degree 1 (as defined by IEC 664)
Warning Markings and Symbols
Caution!
The operator or responsible body is cautioned that the protection provided by the equipment may be impaired if the equipment is used in a manner not specified by Ludlum Measurements, Inc.
The Model 5 Geiger Counter is marked with the following symbols:
CAUTION (per ISO 3864, No. B.3.1) – designates hazardous live voltage and risk of electric shock. During normal use, internal components are hazardous live. This instrument must be isolated or disconnected from the hazardous live voltage before accessing the internal components. This symbol appears on the front panel. Note the precautions on the following page:
Section
5

Model 5 Geiger Counter Technical Manual Section 5
Ludlum Measurements, Inc. Page 5-2 May 2014
Warning!
The operator is strongly cautioned to take the following precautions to avoid contact with internal hazardous live parts that are accessible using a tool: 1. Turn the instrument power OFF and remove the batteries. 2. Allow the instrument to sit for 1 minute before accessing internal components.
The “crossed-out wheelie bin” symbol notifies the consumer that the product is not to be mixed with unsorted municipal waste when discarding; each material must be separated. The symbol is placed on the battery compartment lid. See section 8, “Recycling,” for further information.
The “CE” mark is used to identify this instrument as being acceptable for use within the European Union.
Cleaning and Maintenance Precautions The Model 5 may be cleaned externally with a damp cloth, using only water as the wetting agent. Do not immerse the instrument in any liquid. Observe the following precautions when cleaning or performing maintenance on the instrument:
1. Turn the instrument OFF and remove the batteries.
2. Allow the instrument to sit for 1 minute before cleaning the exterior or accessing any internal components for maintenance.

Model 5 Geiger Counter Technical Manual Section 6
Ludlum Measurements, Inc. Page 6-1 May 2014
Maintenance
Instrument maintenance consists of keeping the instrument clean and periodically checking the batteries and the calibration. The Model 5 instrument may be cleaned with a damp cloth (using only water as the wetting agent). Do not immerse instrument in any liquid. Observe the following precautions when cleaning:
1. Turn the instrument OFF and remove the batteries.
2. Allow the instrument to sit for 1 minute before accessing internal components.
Recalibration Recalibration should be accomplished after maintenance or adjustments have been performed on the instrument. Recalibration is not normally required following instrument cleaning or battery replacement.
Note:
Ludlum Measurements, Inc. recommends recalibration at intervals no greater than one year. Check the appropriate regulations to determine required recalibration intervals.
Ludlum Measurements offers a full-service repair and calibration department. We not only repair and calibrate our own instruments but most other manufacturer’s instruments. Detailed calibration procedures are available upon request for customers who choose to calibrate their own instruments.
Batteries The batteries should be removed any time the instrument is placed into storage. Battery leakage may cause corrosion on the battery contacts, which
Section
6

Model 5 Geiger Counter Technical Manual Section 6
Ludlum Measurements, Inc. Page 6-2 May 2014
must be scraped off and/or washed using a paste solution made from baking soda and water. Use a spanner wrench to unscrew the battery contact insulators, exposing the internal contacts and battery springs. Removal of the handle will facilitate access to these contacts.
Note:
Never store the instrument over 30 days without removing the batteries. Although this instrument will operate at very high ambient temperatures, battery seal failure may occur at temperatures as low as 38°C (100°F).

Model 5 Geiger Counter Technical Manual Section 7
Ludlum Measurements, Inc. Page 7-1 May 2014
Troubleshooting
ccasionally, you may encounter problems with your LMI instrument or detector that may be repaired or resolved in the field, saving turn-around time and expense in returning the instrument to us for repair. Toward that end, LMI electronics
technicians offer the following tips for troubleshooting the most common problems. Where several steps are given, perform them in order until the problem is corrected. Keep in mind that with this instrument, the most common problems encountered are: (1) sticky meters, (2) battery contacts.
Note that the first troubleshooting tip is for determining whether the problem is with the electronics or with the detector. A Ludlum Model 500 Pulser is invaluable at this point, because of its ability to simultaneously check high voltage, input sensitivity or threshold, and the electronics for proper counting.
We hope these tips will prove to be helpful. As always, please call if you encounter difficulty in resolving a problem or if you have any questions.
Troubleshooting Electronics which utilize GM Detectors
SYMPTOM
No power (or meter does not reach BAT
TEST or BAT OK mark)
POSSIBLE SOLUTION
1. Check batteries and replace if weak. 2. Check polarity (See marks inside
batter lid). Are the batteries installed backwards?
3. Check battery contacts. Clean them
with rough sandpaper or use an engraver to clean the tips.
Section
7 O

Model 5 Geiger Counter Technical Manual Section 7
Ludlum Measurements, Inc. Page 7-2 May 2014
SYMPTOM Nonlinear Readings Meter goes full scale or “Pegs Out” No Response to Radiation No Audio
POSSIBLE SOLUTION 1. Check the high voltage (HV) using a
Ludlum Model 500 Pulser (or equivalent). If a multimeter is used to check the HV, ensure that one with high impedance is used, as a standard multimeter could be damaged in this process.
2. Check for “sticky” meter movement.
Does the reading change when you tap the meter? Does the meter needle “stick” at any spot?
3. Check the “meter zero.” Turn the
power OFF. The meter should come to rest on “0”.
1. Check the HV and, if possible, the
input threshold for proper setting. 2. Ensure that the instrument’s ˝can˝ is
properly attached. When attached properly, the speaker will be located on the left side of the instrument. If the can is on backwards, interference between the speaker and the input preamplifier may cause noise.
1. Substitute a “known good” detector. 2. Has the correct operating voltage
been set? Refer to the calibration certificate or detector instruction manual for correct operating voltage. If the instrument uses multiple detectors, confirm that the high voltage is matched to the current detector being used.
1. Ensure that the AUD ON-OFF switch
is in the ON position.

Model 5 Geiger Counter Technical Manual Section 7
Ludlum Measurements, Inc. Page 7-3 May 2014
SYMPTOM No Audio (Continued)
POSSIBLE SOLUTION
2. Remove the instrument housing and check the connection between the circuit board and the speaker. Plug in the 2-pin connector if necessary.
Troubleshooting GM Detectors 1. If the tube has a thin mica window, check for window breakage.
If damage is evident, the tube must be replaced.
2. Check the HV. For most GM tubes, the voltage is normally 900 Vdc, or 460-550 Vdc for “peanut” tubes (Ludlum Model 133 series).
3. Wires to the tube may be broken or the crimped connector could have a loose wire.

Model 5 Geiger Counter Technical Manual Section 8
Ludlum Measurements, Inc. Page 8-1 May 2014
Recycling
udlum Measurements, Inc. supports the recycling of the electronics products it produces for the purpose of protecting the environment and to comply with all regional, national and international agencies that promote economically and environmentally sustainable
recycling systems. To this end, Ludlum Measurements, Inc. strives to supply the consumer of its goods with information regarding reuse and recycling of the many different types of materials used in its products. With many different agencies - public and private - involved in this pursuit, it becomes evident that a myriad of methods can be used in the process of recycling. Therefore, Ludlum Measurements, Inc. does not suggest one particular method over another, but simply desires to inform its consumers of the range of recyclable materials present in its products, so that the user will have flexibility in following all local and federal laws.
The following types of recyclable materials are present in Ludlum Measurements, Inc. electronics products, and should be recycled separately. The list is not all-inclusive, nor does it suggest that all materials are present in each piece of equipment:
Batteries Glass Aluminum and Stainless Steel
Circuit Boards Plastics Liquid Crystal Display (LCD)
Ludlum Measurements, Inc. products, which have been placed on the market after August 13, 2005 have been labeled with a symbol recognized internationally as the “crossed-out wheelie bin.” This notifies the consumer that the product is not to be mixed with unsorted municipal waste when discarding; each material must be separated. The symbol will be placed near the AC receptacle, except for portable equipment where it will be placed on the battery lid.
The symbol appears as such:
Section
8 L

Model 5 Geiger Counter Technical Manual Section 9
Ludlum Measurements, Inc. Page 9-1 May 2014
Parts List Reference Description Part Number UNIT Completely Assembled Model 5 Geiger Counter 48-1607 BOARD Main Circuit Board 5464-272
C1 470pF, 100V 04-5668 C2 0.1µF, 35V-T 04-5755 C3 0.0047µF, 100V 04-5669 C4-C5 470pF, 100V 04-5668 C6 10uF, 10V-DT 04-5766 C7 0.022µF, 50V 04-5667 C9 10µF, 10V-DT 04-5766 C10 100pF, 100V 04-5661 C11-C13 68µF, 10V 04-5654 C14 470pF, 100V 04-5668 C15 100pF, 100V 04-5661 C16 10µF, 10V-DT 04-5766 C17 47µF, 10V 04-5666 C18-C19 470pF, 100V 04-5668 C30 10µF, 10V-DT 04-5766 C31 1µF, 16V 04-5701
Q1 MMBT3904LT1 05-5841 Q2 MMBT4403LT1 05-5842 Q3-Q6 2N7002L 05-5840 Q7 MMBT3904LT1 05-5841
VR2 TPS76038 05-5912 U1-U3 MAX4542EKA-T 06-6638 U4 MAX986EUK-T 06-6601
Section
9 Model 5 Geiger Counter
Main Board, Drawing 464 × 272
CAPACITORS
TRANSISTORS
VOLTAGE REGULATOR
INTEGRATED CIRCUITS
Model 5 Geiger Counter Technical Manual Section 9
Ludlum Measurements, Inc. Page 9-2 May 2014
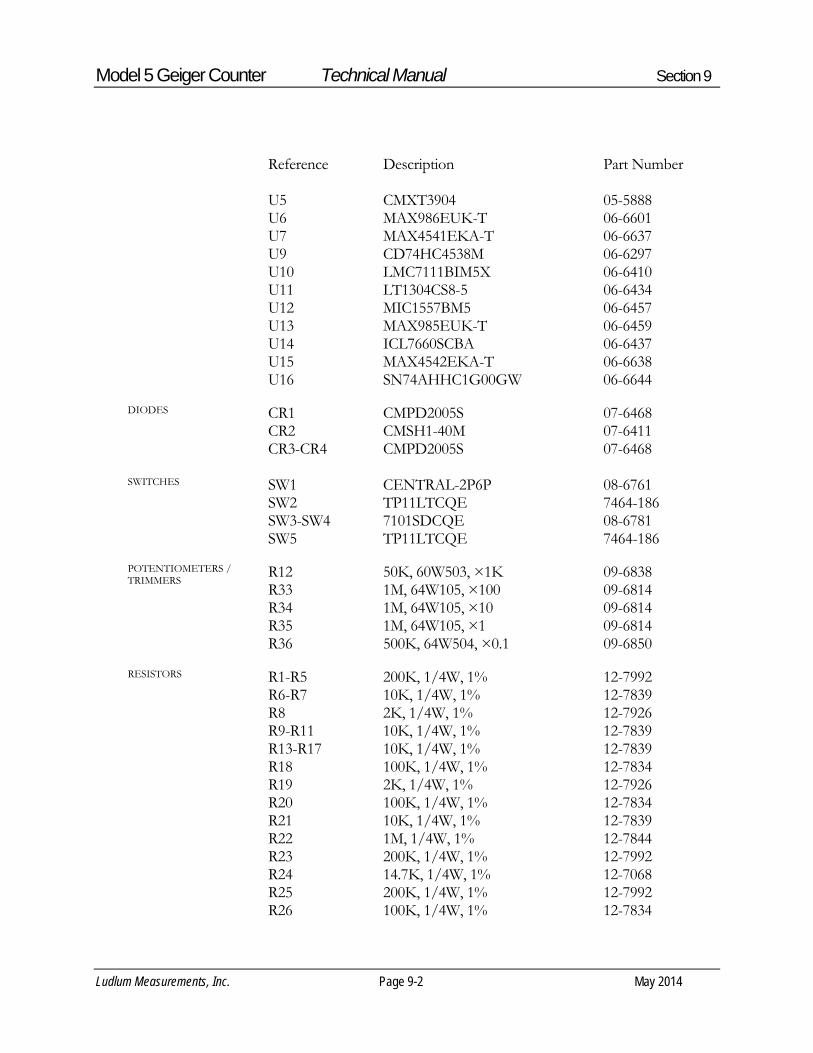
Reference Description Part Number U5 CMXT3904 05-5888 U6 MAX986EUK-T 06-6601 U7 MAX4541EKA-T 06-6637 U9 CD74HC4538M 06-6297 U10 LMC7111BIM5X 06-6410 U11 LT1304CS8-5 06-6434 U12 MIC1557BM5 06-6457 U13 MAX985EUK-T 06-6459 U14 ICL7660SCBA 06-6437 U15 MAX4542EKA-T 06-6638 U16 SN74AHHC1G00GW 06-6644 CR1 CMPD2005S 07-6468 CR2 CMSH1-40M 07-6411 CR3-CR4 CMPD2005S 07-6468 SW1 CENTRAL-2P6P 08-6761 SW2 TP11LTCQE 7464-186 SW3-SW4 7101SDCQE 08-6781 SW5 TP11LTCQE 7464-186 R12 50K, 60W503, ×1K 09-6838 R33 1M, 64W105, ×100 09-6814 R34 1M, 64W105, ×10 09-6814 R35 1M, 64W105, ×1 09-6814 R36 500K, 64W504, ×0.1 09-6850 R1-R5 200K, 1/4W, 1% 12-7992 R6-R7 10K, 1/4W, 1% 12-7839 R8 2K, 1/4W, 1% 12-7926 R9-R11 10K, 1/4W, 1% 12-7839 R13-R17 10K, 1/4W, 1% 12-7839 R18 100K, 1/4W, 1% 12-7834 R19 2K, 1/4W, 1% 12-7926 R20 100K, 1/4W, 1% 12-7834 R21 10K, 1/4W, 1% 12-7839 R22 1M, 1/4W, 1% 12-7844 R23 200K, 1/4W, 1% 12-7992 R24 14.7K, 1/4W, 1% 12-7068 R25 200K, 1/4W, 1% 12-7992 R26 100K, 1/4W, 1% 12-7834
DIODES
SWITCHES
POTENTIOMETERS / TRIMMERS
RESISTORS

Model 5 Geiger Counter Technical Manual Section 9
Ludlum Measurements, Inc. Page 9-3 May 2014
Reference Description Part Number R27 68.1K, 1/4W, 1% 12-7881 R28 100K, 1/4W, 1% 12-7834 R29 1K, 1/4W, 1% 12-7832 R30 1M, 1/4W, 1% 12-7844 R31 475K, 1/4W, 1% 12-7859 R32 100K, 1/4W, 1% 12-7834 R37 100K, 1/4W, 1% 12-7834 R38 90.9K, 1/4W, 1% 12-7224 R39-R42 100K, 1/4W, 1% 12-7834 R43 4.75K, 1/4W, 1% 12-7858 R44 2K, 1/4W, 1% 12-7926 R45 200K, 1/4W, 1% 12-7992 R46 14.7K, 1/4W, 1% 12-7222 R47 1M, 1/4W, 1% 12-7844 R48 100K, 1/4W, 1% 12-7834 R49 10K, 1/4W, 1% 12-7839 R50-R51 1M, 1/4W, 1% 12-7844
P1 640456-4 - MTA100x4 13-8088 P2 640456-6 - MTA100x6 13-8095 (OPTIONAL) P3 640456-2 - MTA100x2 13-8073 P4 640456-5 - MTA100x5 13-8057 L1 22 µH 21-9808 BOARD Completely Assembled HV Power Supply Board 5464-249 V1 LND 71412 01-5306 V2 LND 71210 01-5295 C1 10µF, 25V 04-5655 C2 100PF, 3KV 04-5735 C3 0.01µF, 3KV, 2% 04-5762 C6 100PF, 3KV 04-5735 C7-C12 0.01µF, 500V 04-5696 C13 68µF, 10V 04-5654 C14 0.1µF, 50V 04-5663 U1 LT1304CS8 06-6394
CONNECTORS
INDUCTORS
HV Power Supply Board, Drawing 464 × 249
DETECTORS
CAPACITORS
INTEGRATED CIRCUITS

Model 5 Geiger Counter Technical Manual Section 9
Ludlum Measurements, Inc. Page 9-4 May 2014
Reference Description Part Number CR1-CR3 CMSD2004S 07-6417 CR7 CMSH1-40M 07-6411 R3 25K, 8026EKX-253, OJ ADJ. 09-6832 R8 NOT USED N/A R1-R2 1M, 1/4W, 1% 12-7844 R4 1M, 1/4W, 1% 12-7844 R5 4.75K, 1/4W, 1% 12-7858 R6 500M, 3KV, 2% 12-7031 R7 4.75K, 1/4W, 1% 12-7858 R9 2.2M, 1/8W, 5% 12-7002 R10 10M, 1/4W, 5% 12-7955 R11 10K, 1/4W, 1% 12-7839 R12 150K, 1/4W, 1% 12-7833 P6 640456-5 MTA100×5 13-8057 T1 31032R 21-9925
DIODES
POTENTIOMETER
RESISTORS
CONNECTOR
TRANSFORMER

Model 5 Geiger Counter Technical Manual Section 10
Ludlum Measurements, Inc. Page 10-1 May 2014
Drawings
MAIN CIRCUIT BOARD, Drawing 464 × 272 (3 sheets)
MAIN CIRCUIT BOARD LAYOUT, Drawing 464 × 273 (2 sheets)
HV POWER SUPPLY BOARD, Drawing 464 × 249
HV POWER SUPPLY BOARD LAYOUT, Drawing 464 × 250 (2 sheets)
WIRING DIAGRAM, Drawing 464 × 351
ENERGY RESPONSE for LMI Model 5
Section
10


0.1
1
10
10 100 1000 10000
Nor
mal
ized
to C
s-13
7
Gamma Energy (keV)
Energy Response for LMI Model 5
Low Range
High RangeCs-137