mainestreet financials 8.4 general ledger · a journal entry is used to update the general ledger...
TRANSCRIPT

8/29/20131
General Ledger
Excel Journal Entry
MaineStreet Financials 8.4

8/29/20132
Overview
� A Journal Entry is used to update the General Ledger for many types of transactions, including cash receipts, transfers of revenue or expense, and budget changes
� PeopleSoft’s custom Excel interface provides an easy-to-follow menu for entering data and specifying defaults

8/29/20133
Excel Journal Entry Process

8/29/20134
PeopleSoft Delivered Excel Files
� PeopleSoft provides the following required Excel files for files:
� JRNLUMS.xls – Excel workbook you will use to create and maintain journal sheets
� JRNLMCRO.xla –macro file that supports your activities when creating and importing Excel Journal entries (will not open)
� GLLOG.xlt – Message log template that assists in writing Excel Journal Entries to PeopleSoft (will not open)

8/29/20135
� Files can be downloaded fromhttp://www.maine.edu/system/oft/psfinancial/journal_entry.php
� Need to be installed locally on your computer
� We recommend saving them in a single folder on your computer’s C: drive
PeopleSoft Delivered Excel Files

8/29/20136
� Excel Macro Security Level must be set to “Medium” rather than “High”
� From Excel menu, select Tools > Macro > Security
Macro Security Level

8/29/20137
� Medium security level will allow you to open macros that support Excel JE process
� Set level to Medium and then select OK
Macro Security Level

8/29/20138
� From Excel menu select File > Open� Locate file JRNLUMS.xls and open it
� Dialog box regarding macros will appear
� Select Enable Macros� Spreadsheet Journal Importscreen opens
Setup Excel Journal Entry File

8/29/20139
Spreadsheet Journal Import Screen
� Will need to adjust the window to view entire screen

8/29/201310
Spreadsheet Journal Import Screen
� Provides links to other screens used to setup of Excel Journal worksheet
� Comprised of three main sections:
- General
- Journal Sheets
- Import Journals

8/29/201311
� Each section provides different options
� Let’s review the options in each section…
Spreadsheet Journal Import Screen

8/29/201312
� Used to setup general defaults for your workbook (Business Unit, Ledger Group, Source and User ID)
� Worksheet you can use for miscellaneous notes or calculations
� Not linked to any specific Journal Sheet
Setup -
Notes -
General Options

8/29/201313
New –Inserts a new journal sheet
Edit –Enables you to edit selected journal sheet
Delete–Enables you to delete selected journal sheet/s
Copy –Copies selected journal worksheet to a new worksheet with new name
Journal Sheets Options

8/29/201314
Import Now –We will not use this option
Write File –Will use this option to save Journal Sheets files that will be uploaded to PeopleSoft
Import Journals Options

8/29/201315
� From the Spreadsheet Journal Importscreen, select the Setupbutton
� Define Options and Defaultsscreen appears
General Defaults

8/29/201316
General Defaults -Header
Header Defaults
•This is where you set header defaults that will appear on Excel Journal Entries
•Header contains information that uniquely Journal Entry

8/29/201317
General Defaults –General Options
General Options
•Sets English as default language
8/29/201318
General Defaults –Message Options
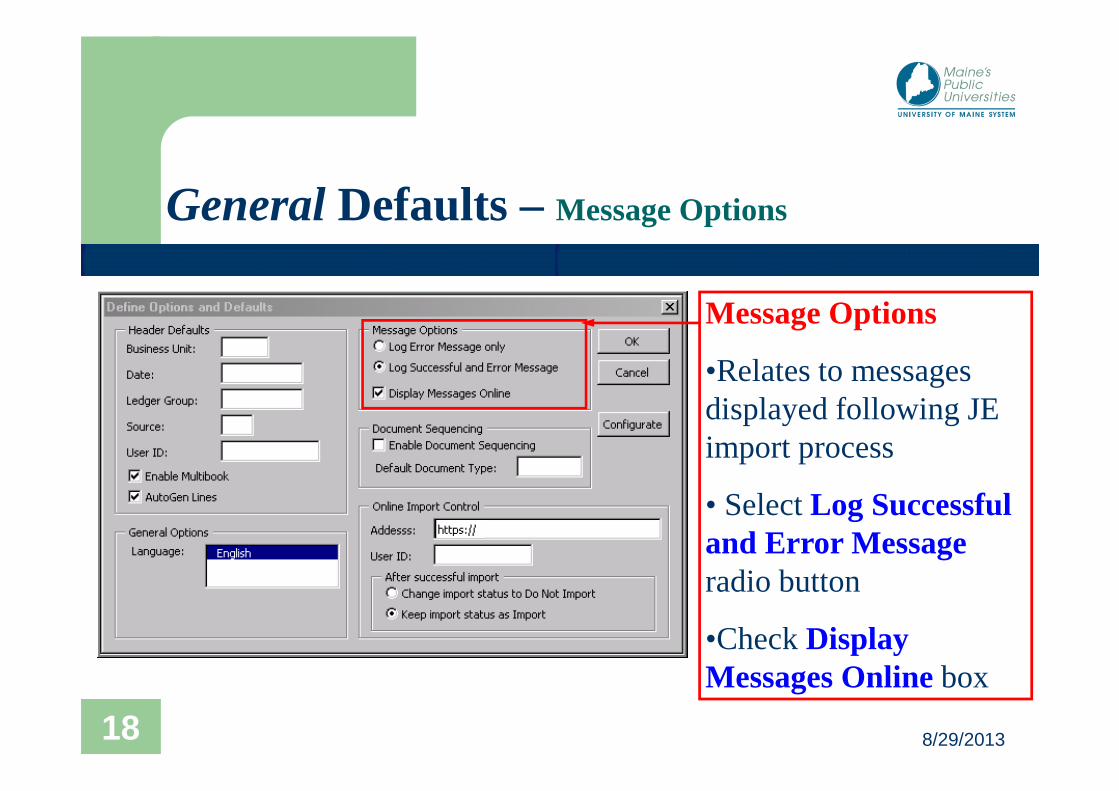
Message Options
•Relates to messages displayed following JE import process
• SelectLog Successful and Error Messageradio button
•CheckDisplay Messages Onlinebox
8/29/201319
General Defaults –Document Sequencing
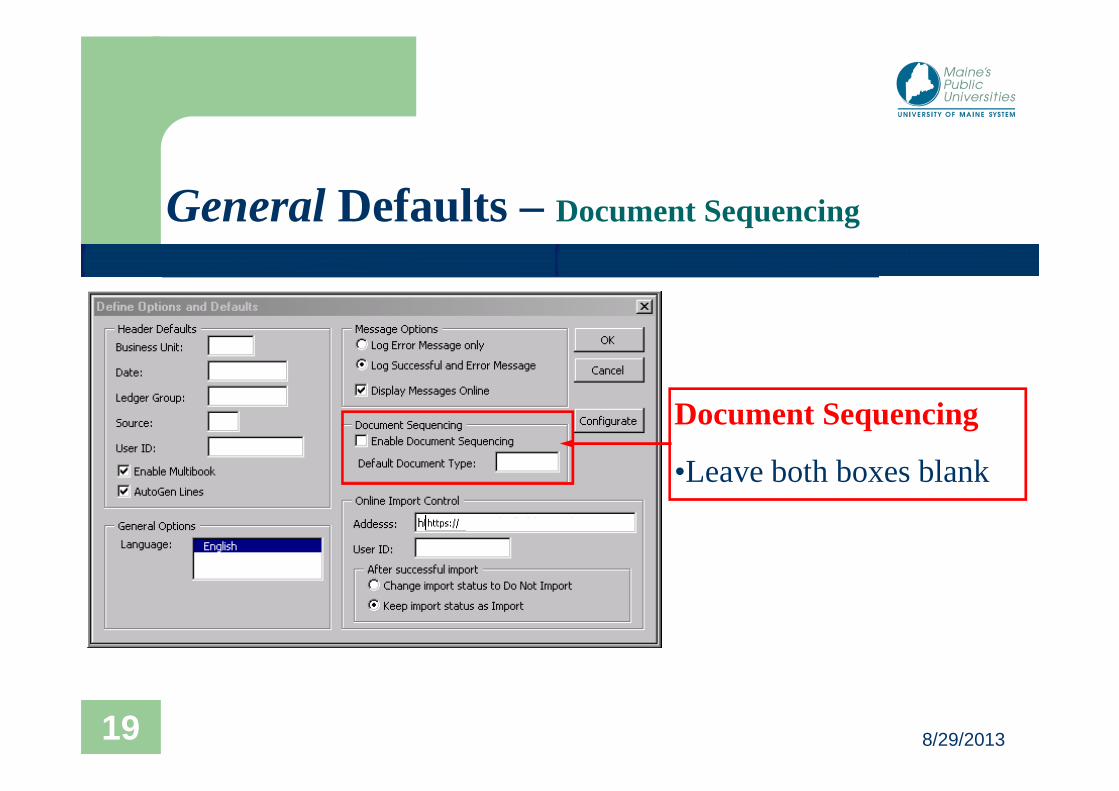
Document Sequencing
•Leave both boxes blank

8/29/201320
General Defaults –Online Import Control
Online Import Control•Settings determine how Excel Journal Entries are delivered to PeopleSoft•Will be pre-set

8/29/201321
Journal Sheets Defaults
� Now let’s set defaults for our Journal worksheets
� SelectConfigurate

8/29/201322
Journal Sheets Defaults
� Two items open:� A ChartField configuration
dialog box
� An empty Journal sheet

8/29/201323
� ChartField configuration screen assists in re-ordering Excel Journal Sheet columns
� Project Enterprise technical team configured Journal Sheet columns for you
� Can adjust column order to suit your needs further� Changes to configuration settings apply to all Journal
Sheets opened after the configuration is set
Journal Sheets Defaults

8/29/201324
� ChartField configuration box� Buttons on Columnscreen work
as follows:
Journal Sheets Defaults
- Moves blue highlight vertical selection bar to the LEFT- Moves blue highlight vertical selection bar to the RIGHT- Moves blue highlighted column to the LEFT of the column on its LEFT- Moves blue highlighted column to the Right of the column on its RIGHT- Inserts New column to the LEFT of blue highlighted column- Deletes highlighted column

8/29/201325
� Field Format screen shows Field Name, Label and Format of each column description required to properly transfer Excel Journal Entries to PeopleSoft
� Do Not Make Any Changes to Field Format Settings!
Journal Sheets Defaults

8/29/201326
� To return to ChartField configurationscreen, select Column tab on ChartField configuration box and then select Exit
� After you return to Spreadsheet Journal Import screen, save work by selecting icon Excel toolbar
Journal Sheets Defaults

8/29/201327
� From your Spreadsheet Journal Import screen selectNew
� New Journal Sheetdialog box appears
New Journal Sheet

8/29/201328
� Each Journal Sheet represents a Journal Entry (JE)
� Journal Sheet name should be same as required 10-character (or less) Journal ID you will apply to JE
� Do not enter more than 10 characters or include blank spaces in your Journal ID!
� Will prevent successful import of Journal Sheet to PeopleSoft
New Journal Sheet Info

8/29/201329
� Enter your Journal SheetName
� SelectOK
New Journal Sheet

8/29/201330
� Journal Sheet is wide so need to scroll right to view entire sheet
� Columns appear in the default order or order set during ChartField configuration process
� Journal Sheet name does not display on Journal Sheet
Journal Sheet

8/29/201331
Journal Sheet
Left-End of Journal Sheet
Right-end of Journal Sheet
8/29/201332
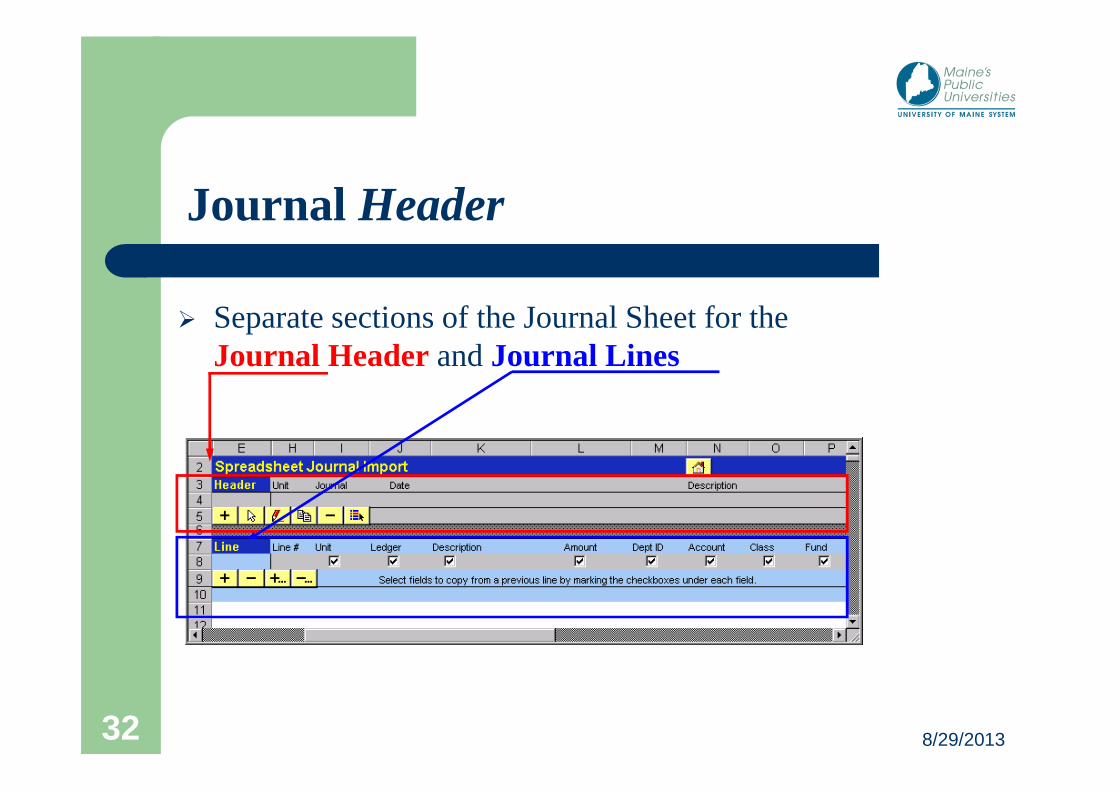
Journal Header
� Separate sections of the Journal Sheet for the Journal Header and Journal Lines

8/29/201333
� The following control buttons are available to you on Row 5:
Journal Control Buttons
Edit HeaderOpens Edit Header selection box
Add HeaderOpens New Journal Header screen
We recommend you not use these buttons except for the Add Header & Edit Header button

8/29/201334
� Now we can edit the Journal Header� In the Header section of your Journal Sheet, select the
button in Row 5
Journal Header

8/29/201335
� New Journal Headerscreen appears
� Displays the default items you previously entered
Journal Header
� Enter name you applied to Journal Sheetinto Journal IDbox

8/29/201336
� Journal Date defaults to today’s date. You may use default date or enter a different date
� LeaveJournal Classbox blank
Journal Header

8/29/201337
Journal Header
� Foreign Currency, Rate Type & Exchange Rateboxes remain blank in Currency Informationsection
� Leave blank

8/29/201338
� Enter same date entered for Journal Date inEffective Datebox
Journal Header

8/29/201339
� Leave Adjustment Typebox blank
Journal Header

8/29/201340
� Adjusting Entries and Reversalsprimarily handled by Campus Accounting Office, so will not cover those tasks here
Journal Header

8/29/201341
� In Description box, enter header description for JE
� Can enter up to 254 alpha/numeric characters
Journal Header

8/29/201342
� After entering all information on Journal Header, select OK
� Will return to Journal Sheet and see information you entered into Header
Journal Header

8/29/201343
� Select Journal Sheet & Edit Journal Header box appears
Edit Journal Header
� If you need to change Journal Header, select icon in Row 5
� Edit Journal Header selection box appears

8/29/201344
Journal Lines
� In Row 9 of Journal Sheet Lines, select button to add first line of JE
� Journal Header Descriptionappears in first line of JE

8/29/201345
� Enter 5-digit Business Unit for first line of JE in Unit column
� Must enter Business Unit in UPPER-CASE text
� Enter ACTUALS into Ledger column in UPPER-CASE text
Journal Line Business Unit & Ledger

8/29/201346
� In Descriptioncolumn, briefly but precisely explain what this line JE
Journal Line Description
� Supervisor and others will refer to information
� Limit Description to thirty alpha/numeric characters

8/29/201347
� Enter all credit values as negative numbers (include -sign before number) and all debit values as positive numbers (do not enter + sign before number)
� Do not enter dollar signs or commas
� If cents are other than zero, enter a period after the dollar amount
Journal Line Amount

8/29/201348
Journal Line Dept ID
� Every line of every a JE requires Department� Enter 7-digit Department for first line of JE into
Dept IDcolumn
8/29/201349
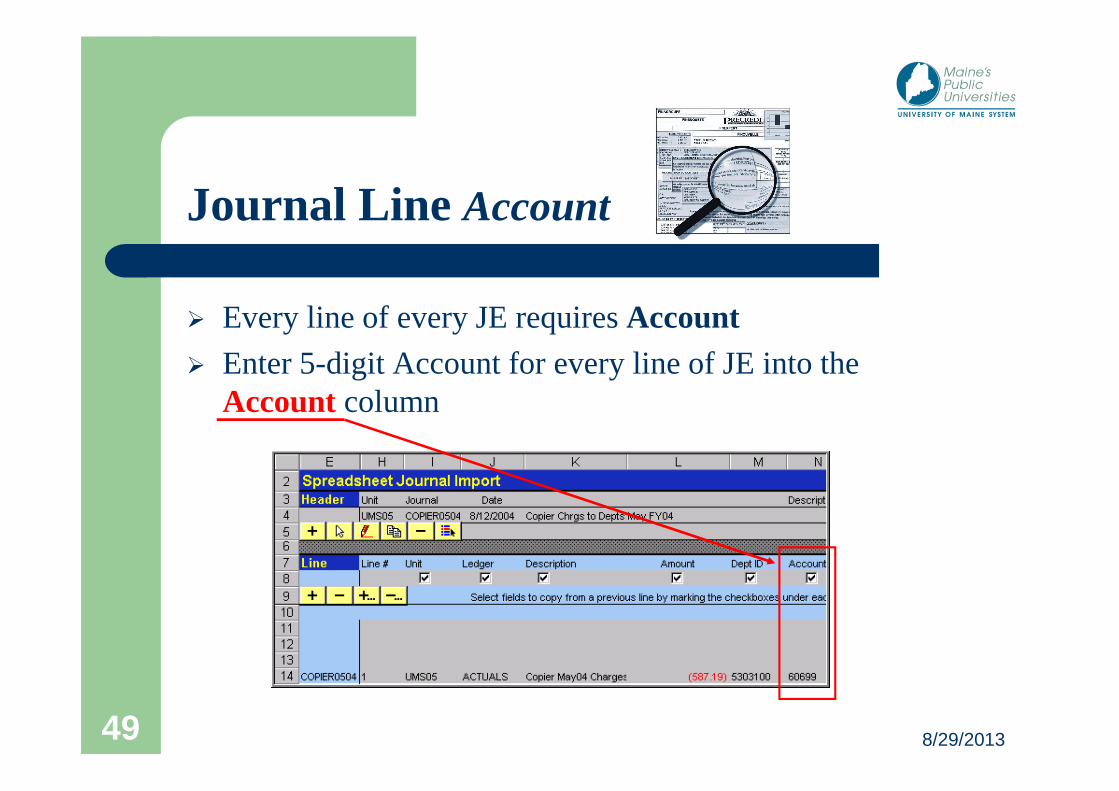
� Every line of every JE requiresAccount� Enter 5-digit Account for every line of JE into the
Account column
Journal Line Account

8/29/201350
Journal Line Class
� If using 2-digitClass ChartField in JE, enter number in Class column

8/29/201351
� Every line of every JE requiresFund� Enter 2-digit Fund for first line of JE in
Fund column
Journal Line Fund

8/29/201352
� If using 5-digitProgram code, enter it into Program column
Journal Line Program

8/29/201353
Journal Line Project
� If using 7-digitProject code, enter it into Project column

8/29/201354
� If using 3-digitOperating Unit code in addition to Department, enter it into Oper Unit column
Journal Line Operating Unit

8/29/201355
Journal Line Reference
� Reference will be helpful in tracking source of JE line
� Can enter up to ten alpha/numeric characters Referencecolumn

8/29/201356
� LeaveOpen Item Keycolumn blank
Journal Line Open Item Key

8/29/201357
Journal Line Currency, Rate, Rate Type & Base Amount
� Do not need to enter information into last four columns of Journal Line, so leave columns blank

8/29/201358
Save Your Work!
� Remember to save your work by selecting theSAVE button on your Excel menu bar

8/29/201359
Add Journal Lines
� Two options to add lines to JE:
� Add One Line at a Time: In Line section of Journal sheet, select button in Row 9 to add one line
� Information from previous line copies into new line for those columns checked in Row 8

8/29/201360
� Add More than One Line at a Time: In Lines section of your journal sheet, click button to open Insert Multiple Linesdialog box
� Enter number of lines you wish to add
� By default, new lines will add under existing lines
� May not add lines between existing lines
Add Journal Lines

8/29/201361
Add Journal Lines
� New lines will be blank unless you check the Copy data from line box
� Another box will appear where you enter the number of the lines you want to copy
� Select Insert to add new lines

8/29/201362
� Now ready to prepare JE for upload to PeopleSoft� From the Journal Spreadsheet Importscreen, select
the Write File button
� Write Journal to File dialog box opens
Upload Journal Entry - Write File

8/29/201363
Upload Journal Entry - Write File
� Select Journal Sheet you want to upload
� In File namesection, enter path and file name of file you will upload
� Files uploaded to PeopleSoft should be in .xml format
� Take note of information entered into File name section since you will refer to it later

8/29/201364
Upload Journal Entry – PeopleSoft Login
� Click OK� Excel JE is now saved to
computer and is ready for upload to PeopleSoft
� Must access MaineStreet Financials to upload Excel JE
� After login, follow this path:Enterprise Applications > Financials > General Ledger >
Journals > Journal Entry > Import Journals > Spreadsheet Journals
8/29/201365
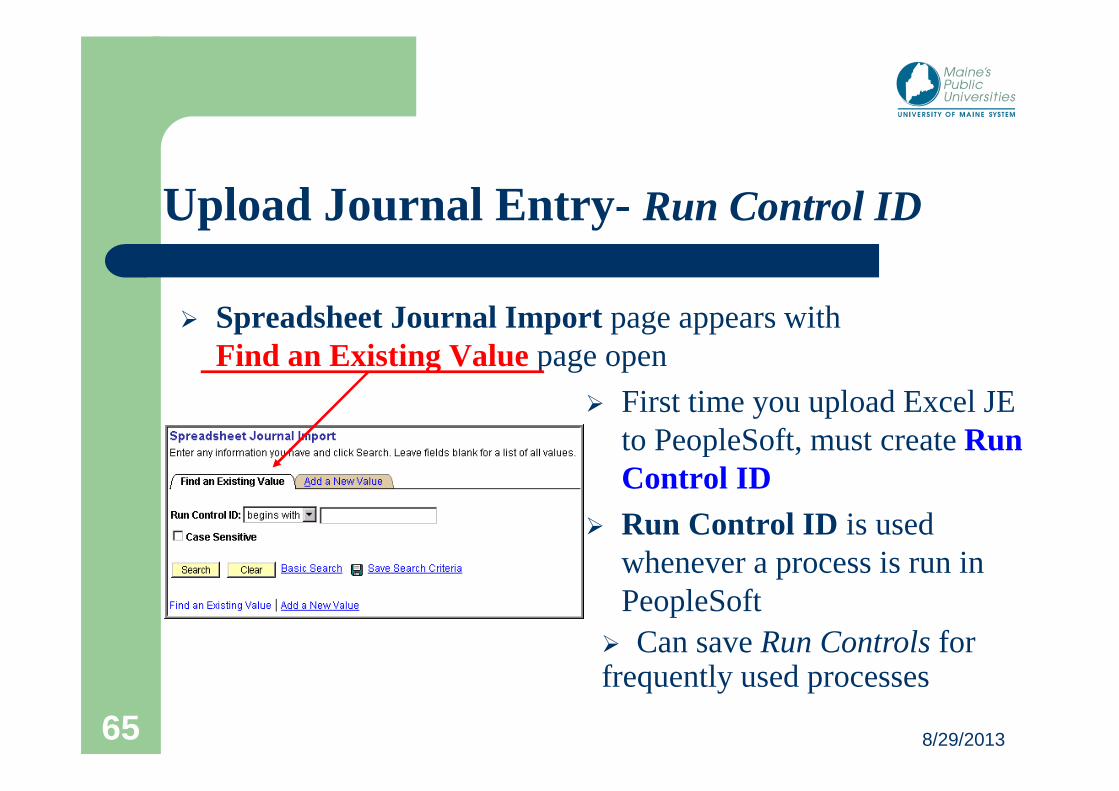
� Spreadsheet Journal Importpage appears with Find an Existing Valuepage open
� First time you upload Excel JE to PeopleSoft, must create Run Control ID
� Run Control ID is used whenever a process is run in PeopleSoft
Upload Journal Entry- Run Control ID
� Can save Run Controls for frequently used processes

8/29/201366
� To create Run Control ID, select Add a New Valuepage
� Enter name for Run Control ID
� Helps to apply name that relates to process
� Will only see Run Control Ids you create
� SelectAdd
Upload Journal Entry-Run Control ID

8/29/201367
� When you add new Run Control ID, Spreadsheet Journal Importpage opens
� In the future, will select Run Control ID from Find An Existing Value page
Upload Journal Entry- Run Control ID

8/29/201368
� All necessary information will appear on page
� In Attached File section, select icon to browse for file you saved to computer
Upload Journal Entry – Attach File

8/29/201369
� When icon selected, following dialog box opens:
� Select Browse to open Choose Filedialog box to browse your computer for previously saved JE file
Upload Journal Entry - Browse

8/29/201370
� File name will appear in Browse box
� Select Upload button to return to Spreadsheet Journal Import page
Upload Journal Entry - Upload

8/29/201371
� SelectRun and Process Scheduler Requestpage opens
Upload Journal Entry - Run

8/29/201372
� Complete Process Scheduler Requestpage as follows:
Upload Journal Entry – Process Scheduler
� Do not need to enter any information on this page
� Select OK button when ready

8/29/201373
� Spreadsheet Journal Importpage opens with Process Instancenumber assigned
� Number indicates JE file has been submitted to run
� Do not need to select Run button. When Process Instancenumber appears, file is already in process queue
Upload Journal Entry – Process Scheduler

8/29/201374
� SelectProcess Monitorlink to check progress
� Process Listpage opens
Upload Journal Entry – Process Monitor

8/29/201375
Upload Journal Entry – Process List
Initially, Run Statuswill display as Queued
** If all goes well, Run Statuswill display as Posted and then asSuccess
Find Process Instancenumber listed
SelectRefreshbutton to update Run Status display

8/29/201376
� A Run Status ofSuccessrefers to Run process
� Does not necessarily mean Excel Journal successfully imported into PeopleSoft
Upload Journal Entry – Process List
�Select Details link on Process Listpage

8/29/201377
� Process Detailpage opens
� SelectMessage Loglink to find out if Journal imported
Upload Journal Entry – Process List

8/29/201378
� Message Log page provides details of process
� Verify process completed successfully with 1 journals imported
Upload Journal Entry – Message Log
� SelectExplain button for additional details

8/29/201379
� If Excel Journal did not import, following message will appear:
Possible errors might include:• Invalid ChartField errors
• Invalid User ID
• Already existing Journal Entry with same Business Unit/Journal ID/ Journal Date combination
� To identify errors, return to Process Detail page and select View Log/Trace link
Upload Journal Entry – Errors

8/29/201380
Upload Journal Entry – View Log/Trace
� Message opens that describes error/s in Excel JE
� On View Log/Trace page, select secondMessage Loglink

8/29/201381
� In this example, there was an User ID error
� To correct error/s, return to Excel JE, correct error, save file and then initiate file upload process starting with Write Filefrom Spreadsheet Journal Importscreen
Upload Journal Entry – View Log/Trace
Incorrect text case
8/29/201382
Edit & Submit Journal Entry
� After Excel Journal Entry successfully imports into PeopleSoft, run it through same processes used for Journal Entries created online
� Edit process� Submit for Approval

8/29/201383
Edit Journal Sheet
� To edit an existing Excel JE, open PeopleSoft Excel file and select Edit button from Spreadsheet Journal Import screen
� When Edit Journal Sheetdialog opens, select Journal sheet file and chooseOK

8/29/201384
� After your Journal Sheet opens, select the button
� You can now apply changes to your Journal Header and Journal Lines
� Make certain to Save your changes!
Edit Journal Sheet

8/29/201385
� To delete a Journal Sheet, open the Spreadsheet Journal Import screen and select theDeletebutton
� The Delete Journal Sheetsdialog box will open
Delete Journal Sheet

8/29/201386
Delete Journal Sheet
� To delete one Journal Sheet, select sheet you want to delete and then select Deletebutton
� Hold Ctrl key down on keyboard to select multiple files
� To delete all Journal Sheets, selectAll and thenDelete

8/29/201387
Copy Journal Sheet
� To copy a Journal Sheet, open Spreadsheet Journal Import screen and select Copy button
� Copy Journal Sheetdialog box opens
� Copy option enables you to copy an existing Journal Sheet and use it to set up new worksheet with a new name

8/29/201388
Copy Journal Sheet
� Select Journal Sheet you want to copy
� Enter a new name in New Journal Sheetbox
� Select Copy and a new Journal Sheet opens
8/29/201389
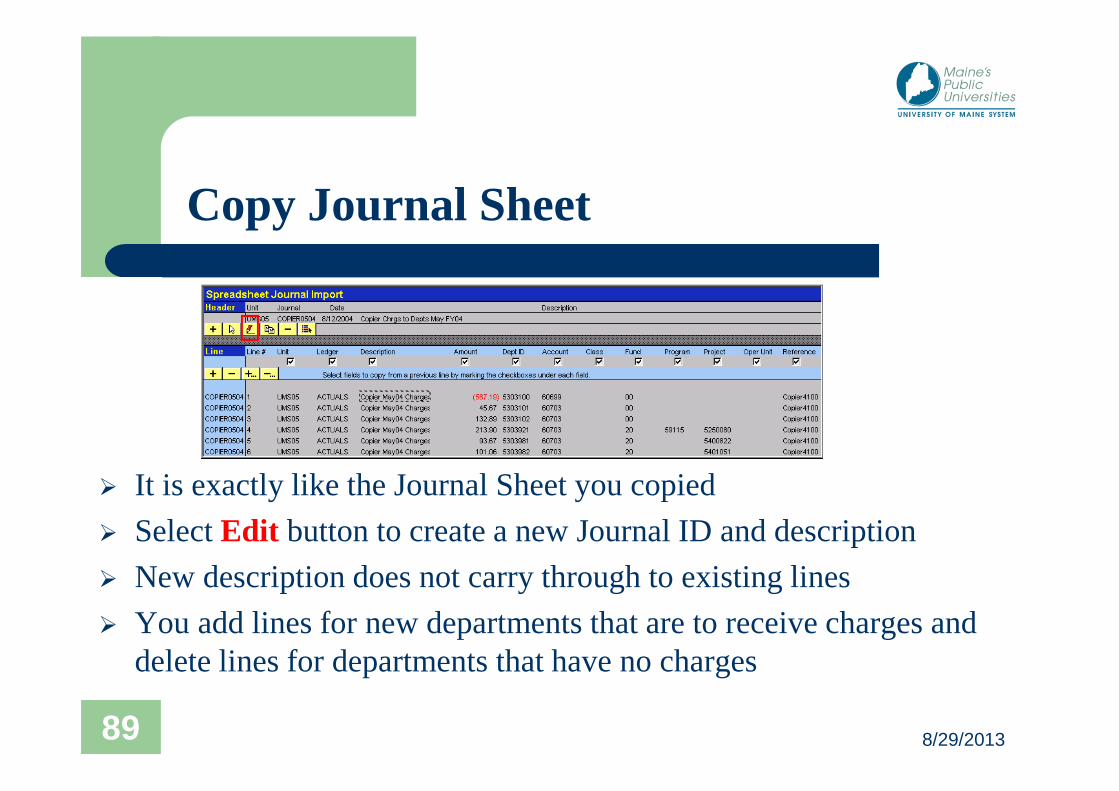
Copy Journal Sheet
� It is exactly like the Journal Sheet you copied
� Select Edit button to create a new Journal ID and description
� New description does not carry through to existing lines
� You add lines for new departments that are to receive charges and delete lines for departments that have no charges