maintenance manual - k-z rvmaintenance manual this booklet has been designed and written to supply...
TRANSCRIPT
GUIDEBOOK TO ENJOYMENT OF YOUR KZRV
RECREATIONAL VEHICLE
Maintenance Manual
PDF created with pdfFactory trial version www.pdffactory.com

THE PURPOSE OF THE MAINTENANCE MANUAL IS TO PROVIDE THE MOST UPDATED MATERIAL CONCERNING THE CARE FOR ALL PRODUCTS BUILT BY KZRV. AS THE OWNER OF A NEW R.V. PRODUCT IT IS IMPORTANT TO RECOGNIZE THE IMPORTANCE ROUTINE CARE OF THIS COACH DURING WARRNTY PERIOD AND FUTURE TIME IN YEARS TO COME. MAINTENANCE OF YOUR RECREATIONAL VEHICLE IS IMPORTANT TO KEEPING YOUR COACH IN GOOD CONDITION. FAILING TO PROVIDE MAINTENANCE, AS SUGGESTED, COULD RESULT IN LOSS OF WARRANTY COVERAGE. FAMILIARIZE YOURSELF WITH THIS MANUAL AND USE THE MAINTENANCE CHART IN BACK TO KEEP RECORD OF ANY AND ALL REPAIRS NEEDED , WARRANTY OR OTHER WISE. INCLUDED IS SPACE FOR NORMAL SCHEDULED DUTYS, REQUIRMENTS AND COMPLETIONS.
LITHO U.S.A. 01-2017
Conventional Travel Trailer
Fifth Wheel
Hybrid Travel Trailer
Toy Hauler Fifth Wheel
Toy Hauler Travel Trailer
PDF created with pdfFactory trial version www.pdffactory.com
KZRV, L.P. “BUILDING QUALITY AND FUN FOR OVER 40
YEARS”
We congratulate you on your purchase of a KZRV, recreational vehicle. You have chosen a quality built RV which should provide you with many years of camping memories and fun. The recreational vehicle you have purchased has been inspected by our trained inspectors and fully meets our high quality standards. As the owner of a new KZRV, RV you can rest assured that we will do all we can to keep you a “happy camper”. Naturally, your selling dealership is always happy to help you with any questions you may have or service you may need. And should you need assistance when traveling, with over 200 KZRV, dealers nationwide, assistance is usually just minutes away.
KZRV 0985 n 900w
Shipshewana, IN 46565
PDF created with pdfFactory trial version www.pdffactory.com
Maintenance Manual
This booklet has been designed and written to supply infor-mation regarding maintenance requirements for all makes and mod-els built by KZRV. As the owner of a new KZRV product it is important to recognize the importance of performing routine maintenance during the war-ranty period. Just like oil changes in your tow vehicle—if proper maintenance is not performed the warranty coverage can be denied; this also applies to your recreational vehicle. On the reverse side of the customer delivery sheet is the war-ranty coverage information. Note the twelve (12) exclusions, espe-cially items four, five, six and seven, which are maintenance items. Familiarizing yourself with this manual and using the mainte-nance chart in the back of the manual will help you make sure that proper maintenance is performed. But remember, maintenance is routine service and is not covered by warranty. With proper and scheduled maintenance on your KZRV we be-lieve you will enjoy your RV for many years to come.
Happy Camping, KZRV, LP
PDF created with pdfFactory trial version www.pdffactory.com
TABLE OF CONTENTS
Chapter I—Undercarriage Frame…………………………………………………………….1 Coupler…………………………………………………………..1 Jacks……………………………………………………………..1 Stabilizer Jacks……………...………………….…………….2 Jacks………………………………….………………………..2 Tires………………………………………………………………2 Wheels…………………………………………………………...3 Axles..…………………………………………………………....4 Bearings…………………………………………………………4 Brakes...................................................................................6 Springs/Shackles..................................................................9 Steps...................................................................................10 Chapter II—Exterior Metal...................................................................................11 Fiberglass...........................................................................11 ABS Plastics.......................................................................11 Exterior Roof.......................................................................11 Extrusions and Vents.........................................................13 Vinyl Tire Co-vers.................................................................14 Slide-outs............................................................................14 Toy Haul Rear Doors..........................................................15 Tents...................................................................................15 Chapter III—Systems Propane System.................................................................17 Plumbing System................................................................18 Electrical System................................................................19 Chapter IV—Appliances Furnace...............................................................................21 Water Heat-er.......................................................................22 Winterization Hot Water Heater……………………………..23 Stove, Range, Cook Top....................................................23
PDF created with pdfFactory trial version www.pdffactory.com
Refrigerator.........................................................................24 Air Conditioner....................................................................26 Chapter V—Interior Paneling..............................................................................28 Linoleum / Vinyl Floor.........................................................28 Carpet.................................................................................28 Counter Tops......................................................................28 Solid Surface Counter Tops................................................28 Window Mini Blinds.............................................................30 Day Fabric Shades.............................................................30 ABS Plastic Components....................................................30 Drapes................................................................................30 Cushion Covers..................................................................30 Furniture............................................................................ 30 Windows............................................................................ 31 Smoke-Alarm......................................................................31 Propane and CO Detector................................................. 32
PDF created with pdfFactory trial version www.pdffactory.com
1
Your KZRV recreational vehicle is designed to be as maintenance free as possible. However, all moveable vehicles require some care to reduce the possibility of unwanted breakdowns during travel. Maintenance of your RV may not seem necessary at the time of pur-chase, yet it is very important to keep your coach in it’s best condi-tion for your enjoyment. Normal maintenance is required to maintain warranty coverage, reduce wear, and prolong the life of your coach. 1. FRAME The steel frame on your KZ recreational vehicle is cleaned with a high pressure phosphate spray wash that removes oils, dirt, and residue. After cleaning, the frame is placed in an oven at 200°F, high quality water borne paint is then applied. A final curing process is then applied to produce a quality paint application. No matter what quality or type of paint process is used, we must remember that during travel the frame is exposed to stones, sand, road debris, and any other objects found on the road. These items will cause scratching and chipping of the paint inviting rust to begin from moisture. Your frame needs to be inspected and examined every year to touch up or repaint as normal maintenance. We sug-gest this be performed each fall before storage to guard against win-ter moisture. The paint to use is a gloss black, ozone safe exterior paint with no fluorocarbon, in a spray can. You may wish to purchase a commercial rust proof undercoating treatment, such as, Ziebart®, etc. However, even such higher priced treatments are subject to road debris and damage. 2. COUPLER (Travel Trailers) For the ball on your hitch use a light amount of chassis grease. Lubricate the coupler’s pivot points with silicone spray. Avoid grease or oil as they will draw dirt, potentially damaging the coupler. 3. JACKS— FOR RAISING/LOWERING/SUPPORTS Numerous types of jacks are used in constructing a recreational vehicle, such as stabilizer, tongue on travel trailer, landing gear, and formally on the truck campers. Most of these have 12 volt D.C. power motors available, saving manual labor as an option. Should any frame parts of these jacks become dirty and rusty, first clean all parts and then paint as needed, to improve appearance DO NOT paint any moving parts.
Chapter I — Undercarriage
PDF created with pdfFactory trial version www.pdffactory.com
2
A. STABILIZER JACKS Being on the outside and under frame, this item is subject to all kinds of dirt and grim from the road. Clean all parts from dirt, dry out and then lubricate with silicone spray, all pivot points and center main operating screw. DO NOT use oil or grease as it will attract dirt and grit causing gradual deterioration. Same instructions for power jacks. Weight rating on stabilizer jacks range from 1500 lbs. to 5000 lbs. per jack. They are NOT made to raise a side or corner of a trailer. B. JACKS A. Travel Trailers Tongue jacks, truck camper and landing gear jacks, extend to full length, clean all parts and spray silicone lubricant on inner tubes. On the top of the jack is a metal cover attached with a wire spring clip or a screw Remove cover and inspect gears for grease. Re-grease if there is none there or it has dried out. Add only if no grease is visible. Some brands of jacks have a hole placed just be-low these gears to insert oil for lubrication of the ram so it will move smoothly, ten to twenty drops annually will do the job. All jacks listed above have12 volt D.C. motors available as an option for them and need no maintenance. All motors are pre-lubed and should not be taken apart. Be-sure to inspect electrical connections for corrosion and loose-ness as loose terminals cause excessive heat, a potential problem. All motors are protected by a 30 amp fuse or circuit breaker lo-cated at various places. If replacement is required, use only equally rated item. Hydraulic jack or rams when parked or unused for 30 days or more, it is strongly suggested, to lubricate cylinder rods with sili-cone spray to prevent rust, once per month, plus operate them to lubricant seals and internal parts. 4. TIRES Tires installed on your RV are matched to the weight of your coach plus allowed cargo according to the rating of the tires. The most important item in tires is to inspect and test air pressure no less than once per week, perhaps daily during travel. Correct PSI air pressure is listed on each tire as per rating. When air pressure is not maintained as specified tires will run hot, especially in summer months, and blow outs can occur. Pressure must be always be checked when tires are cold, preferably in the morning. DO NOT adjust or lower tire pressure when warm as it will be too low when
PDF created with pdfFactory trial version www.pdffactory.com
3
cool. All tire pressures rise when tires are moving on roadway. A tire is considered cold after 3 hours of not moving. Beginning in 2017 model coaches most tires have nitrogen in them instead of air. A green stem cap will indicate these contents. Air may be mixed with nitrogen with no difficulties. 5. WHEELS Wheels are manufactured with steel or aluminum material meeting the load rating of the tires. Steel wheels are powder coated paint and should be cleaned and polished yearly to maintain its pleasing appearance. Should you find scratches or chips in the paint, clean and paint to protect against rust and further damage. Aluminum wheels require the same cleaning treatment, wash with mild soap and water, no paint. DO NOT use harsh soap or chemicals as they may discolor the wheel’s finish. When changing a tire and wheel, always start the attaching nuts by hand before using any power wrenches to avoid cross threading. Wheel torque must be 85 to 120 maximum foot lbs, 95 lbs is pre-ferred. Tighten lugs as listed below. Re-torque wheels at 100 miles and 300 miles. Do this each time a wheel is removed and reinstalled. Trim rings and center caps may be plastic or metal. Both require cleaning and polishing, as plastic will tarnish and metal will rust if care is not performed.
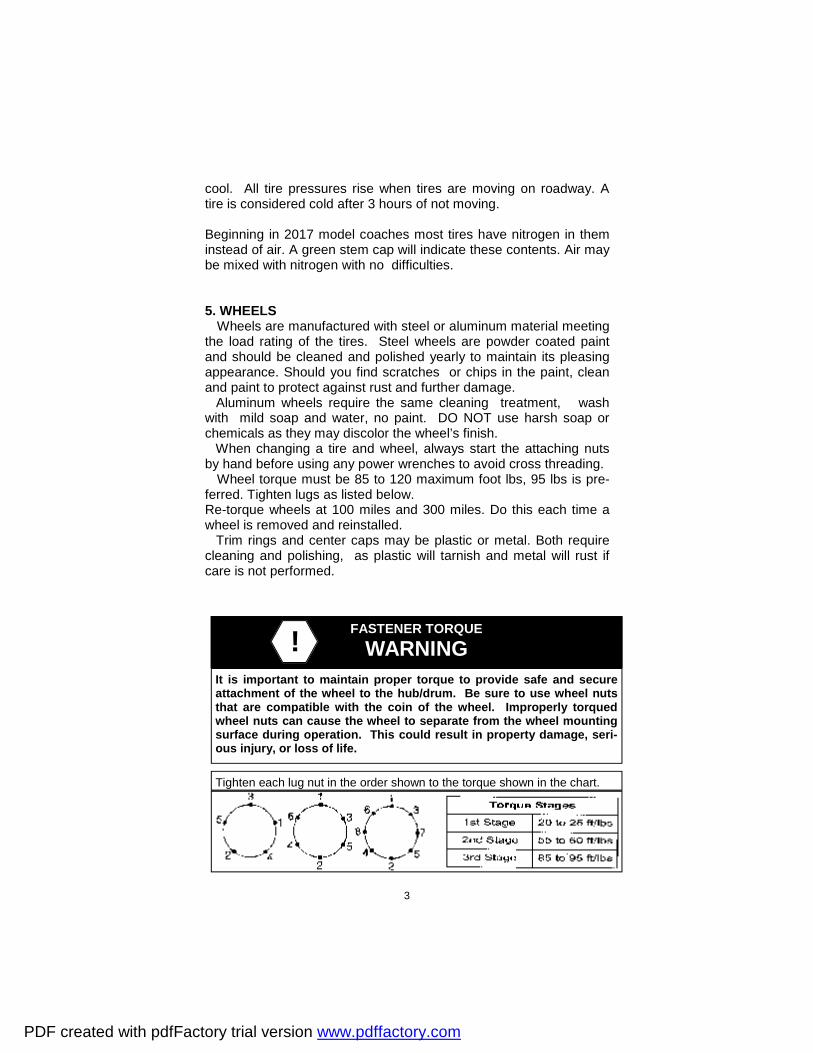
It is important to maintain proper torque to provide safe and secure attachment of the wheel to the hub/drum. Be sure to use wheel nuts that are compatible with the coin of the wheel. Improperly torqued wheel nuts can cause the wheel to separate from the wheel mounting surface during operation. This could result in property damage, seri-ous injury, or loss of life.
FASTENER TORQUE WARNING !
Tighten each lug nut in the order shown to the torque shown in the chart.
PDF created with pdfFactory trial version www.pdffactory.com
4
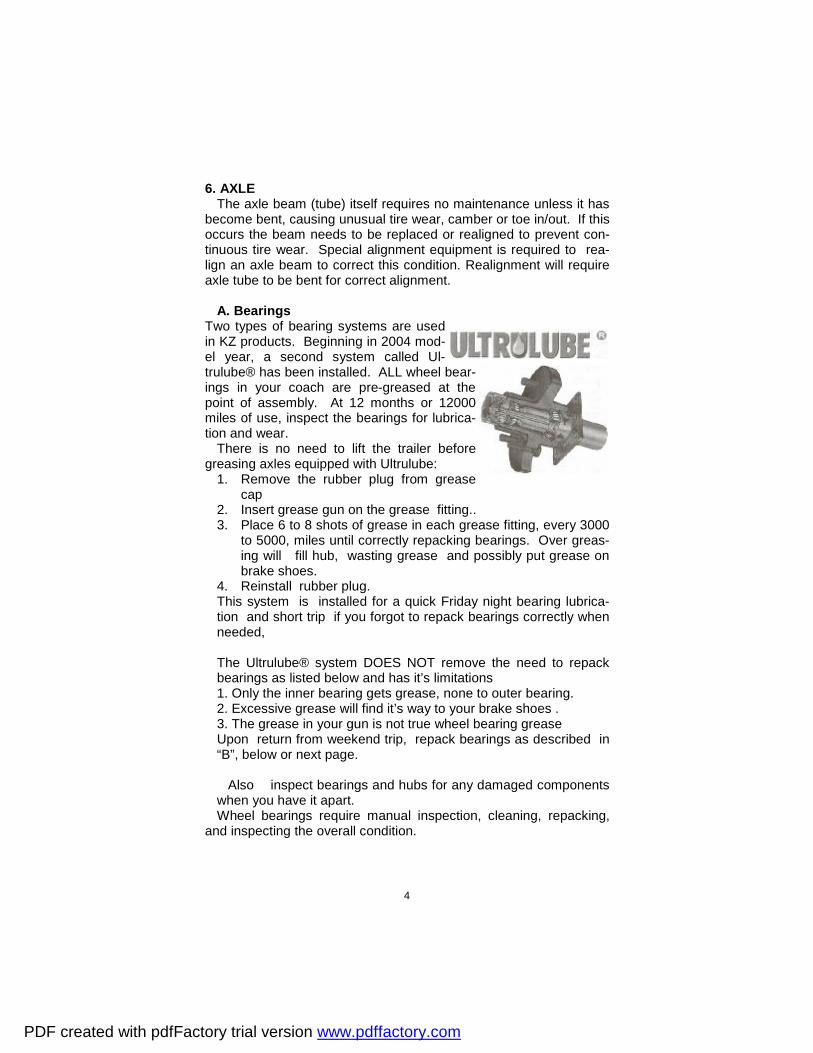
6. AXLE The axle beam (tube) itself requires no maintenance unless it has become bent, causing unusual tire wear, camber or toe in/out. If this occurs the beam needs to be replaced or realigned to prevent con-tinuous tire wear. Special alignment equipment is required to rea-lign an axle beam to correct this condition. Realignment will require axle tube to be bent for correct alignment. A. Bearings Two types of bearing systems are used in KZ products. Beginning in 2004 mod-el year, a second system called Ul-trulube® has been installed. ALL wheel bear-ings in your coach are pre-greased at the point of assembly. At 12 months or 12000 miles of use, inspect the bearings for lubrica-tion and wear. There is no need to lift the trailer before greasing axles equipped with Ultrulube:
1. Remove the rubber plug from grease cap
2. Insert grease gun on the grease fitting.. 3. Place 6 to 8 shots of grease in each grease fitting, every 3000
to 5000, miles until correctly repacking bearings. Over greas-ing will fill hub, wasting grease and possibly put grease on brake shoes.
4. Reinstall rubber plug. This system is installed for a quick Friday night bearing lubrica-tion and short trip if you forgot to repack bearings correctly when needed, The Ultrulube® system DOES NOT remove the need to repack bearings as listed below and has it’s limitations 1. Only the inner bearing gets grease, none to outer bearing. 2. Excessive grease will find it’s way to your brake shoes . 3. The grease in your gun is not true wheel bearing grease Upon return from weekend trip, repack bearings as described in “B”, below or next page. Also inspect bearings and hubs for any damaged components when you have it apart.
Wheel bearings require manual inspection, cleaning, repacking, and inspecting the overall condition.
PDF created with pdfFactory trial version www.pdffactory.com
5
B. Repack Bearings Before repacking bearings, take bearings out of hub and wash all old grease and grim out of bearings and hub with solvent cleaner. You may use compressed air to blow out all old grease and grime. DO NOT use compressed air to spin bearing during cleanout. It will damage both casing and bearings. Inspect all cleaned parts for wear, pitting and blue color indicating heat. If such conditions are found, replace the bearing and cup. Now, using a high temperature automotive type wheel bearing grease, you may carefully pack bearings by hand or use a “bearing packer.” Grease must be fully forced into ALL cavities between roll-ers, cone, and cage of bearings. Use a high temperature, automotive type wheel bearing grease produced by a reputable manufacturer. The soap type should be lithium complex or equivalent. Use NLGI Grade 2 product with a minimum dropping point of 440°F. Always replace bearings and races as a set. Install races (new hub/drums may have races already installed) using a mild steel drift
Over packing the hub results in grease seeping out of the dust cap and wheel seal, onto brake pads.
CAUTION !
WARNING ! Improper bearing adjustment can lead to wheel bearing failure which could cause the hub/drum and wheel to separate from the axle during operation. This could result in property damage, serious personal injury, or loss of life.
WARNING ! Improper seal or bearing installation or adjustment or insufficient maintenance can lead to wheel bearing failure which could cause the hub/drum and wheel to separate from the axle during operation re-sulting in property damage, serious personal injury, or loss of life.
PDF created with pdfFactory trial version www.pdffactory.com

6
punch or bar. Do not use hardened steel or brass bars as they may damage, chip or leave deposits on the races. Final setting of the race against the shoulder should be checked with feeler gauges and be within 0.002” of the shoulder in the hub/drum. After bearings have been packed with grease, place inner bear-ings into correct position, seated into race or cup. Place a new seal over bearing (NEVER reuse previous seal). Use a seal driver or hard rubber mallet and tap gently. Be sure seal is seated fully and completely. 1. To get the proper “feel” for bearing clearance, the spindle nut
must turn freely on the spindle and the brake must be readjusted so that there is no drag on the drum.
2. While slowly turning the hub/drum tighten the spindle nut to ap-proximately 20 ft/lbs then loosen to first notch in nut. This is especially important if new bearing races have been installed.
3. With drum stationary (do not rotate), retighten the spindle nut to 7 ft/lbs (zero clearance) then back off one slot (0.001”-0.010” end play) and align cotter pin hole. Insert cotter pin and bend both ends over end of spindle.
4. Install grease cap
7. BRAKES The brakes on your coach are 10” or 12” in diameter depending on the weight of the trailer. They function from 12 volt DC power sup-plied through brake control from your tow vehicle. Brakes on models 2012 and older are NOT self-adjusting. You will need to adjust brakes manually as outlined in the next several
WARNING ! Improper brake adjustment can result in reduced brake performance or loss of brakes. Reduced brake performance can lead to property damage, serious personal injury, or loss of life.
CAUTION ! Always place stationary jack stands or blocks under frame to guard against jack failure.
PDF created with pdfFactory trial version www.pdffactory.com
7
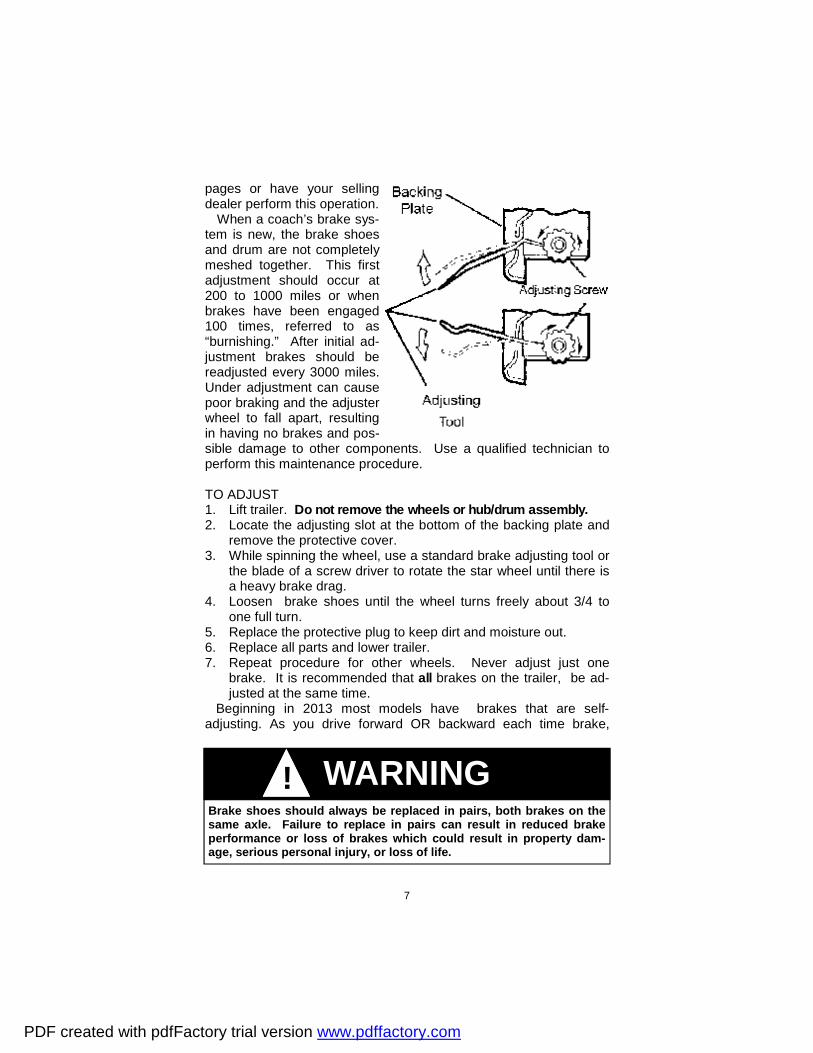
pages or have your selling dealer perform this operation. When a coach’s brake sys-tem is new, the brake shoes and drum are not completely meshed together. This first adjustment should occur at 200 to 1000 miles or when brakes have been engaged 100 times, referred to as “burnishing.” After initial ad-justment brakes should be readjusted every 3000 miles. Under adjustment can cause poor braking and the adjuster wheel to fall apart, resulting in having no brakes and pos-sible damage to other components. Use a qualified technician to perform this maintenance procedure. TO ADJUST 1. Lift trailer. Do not remove the wheels or hub/drum assembly. 2. Locate the adjusting slot at the bottom of the backing plate and
remove the protective cover. 3. While spinning the wheel, use a standard brake adjusting tool or
the blade of a screw driver to rotate the star wheel until there is a heavy brake drag.
4. Loosen brake shoes until the wheel turns freely about 3/4 to one full turn.
5. Replace the protective plug to keep dirt and moisture out. 6. Replace all parts and lower trailer. 7. Repeat procedure for other wheels. Never adjust just one
brake. It is recommended that all brakes on the trailer, be ad-justed at the same time.
Beginning in 2013 most models have brakes that are self-adjusting. As you drive forward OR backward each time brake,
WARNING ! Brake shoes should always be replaced in pairs, both brakes on the same axle. Failure to replace in pairs can result in reduced brake performance or loss of brakes which could result in property dam-age, serious personal injury, or loss of life.
PDF created with pdfFactory trial version www.pdffactory.com

8
these brake assemblies will adjust automatically and keep your brake system at the best stopping ability. Axles and brake systems are from 2 different suppliers. Be sure parts are from same supplier as original manufacture. A. Brake Shoes While the hub/drum is removed the brake shoes also require full inspection for:
1. Normal wear - 1/16” is minimum. 2. Cracking from heat - Hairline heat fissures are not uncommon
in bonded shoes and pose no cause for concern. If there are any questions concerning the severity of cracking, consult with an expert. If the lining is worn to 1/16” or less, or shows irreg-ular wear or contamination from foreign substances, the shoes should be replaced with original parts. If cracking is severe, replace the shoes, both sides—not one side only.
3. Dirt and other contaminants. 4. The springs are secure and have good tension.
Brake shoes as a component are subject to daily use absorbing normal wear. Shoes are warranted for workmanship but not for nor-mal wear or failure to maintain.
B. Brake - Hub/Drum While the hub/drum is removed for other service work be sure to inspect the drum for :
1. Cracks in casting, inside or outside. 2. Rough spots, may require sanding. 3. Heat distortion (bluish color). 4. Out of round drums (high spots). 5. Deep scoring of 0.030” and over.
Items 4 and 5 require use of a brake drum micrometer. Resurfacing of the drum may be required or replacement. Resurfacing the Brake Drum A standard drum lathe may be used to machine the shoe surface. Do not exceed the maximum diameter cast into the brake drum.
WARNING ! Heavily scored, worn or oversized drums can result in reduced brake performance or loss of brakes. This could result in property damage, serious personal injury, or loss of life.
PDF created with pdfFactory trial version www.pdffactory.com
9
The drum should be replaced if it must be bored more than the max-imum diameter cast in the brake drum. Armature surface machining is a difficult process with most drum lathes and is not recommended. If it is resurfaced it should be ma-chined to a 120 micro inch finish and must have 0.060” above the stud heads. Do not remove more than 0.030” of material. Be sure to remove any metallic chips and contamination resulting from drum machining. C. Brake Magnets This component transfers the 12 volt power into action by engaging itself to the armature causing the brake to engage with drum sur-face. Inspect the magnet for standard or abnormal wear. Generally a magnet “works” or it is “dead” requiring replacement. Should a magnet be worn on a slant or angle and still works, replace it as it’s life is short. Each magnet draws about 3.0 amps.
8. SPRINGS / SHACKLES All suspension components should be visually inspected at least every 6 months or 6,000 miles. Check for loose fasteners and torque to proper values. A. Springs Springs themselves require no maintenance other than inspection for breakage or cracks. Painting springs and other components re-tards rust, improving the appearance of the items. If spring (s) are broken replace immediately as driving will cause additional strain on the other springs B. Shackles Bolts and shackle plates need to be inspected once per travel sea-son or if you are traveling many miles. On the inside of shackle bolts there are serrations intended for bolt head not to turn or move. Should these serrations become dam-aged or wore flat, bolt will turn, wearing the nylon bushing and then
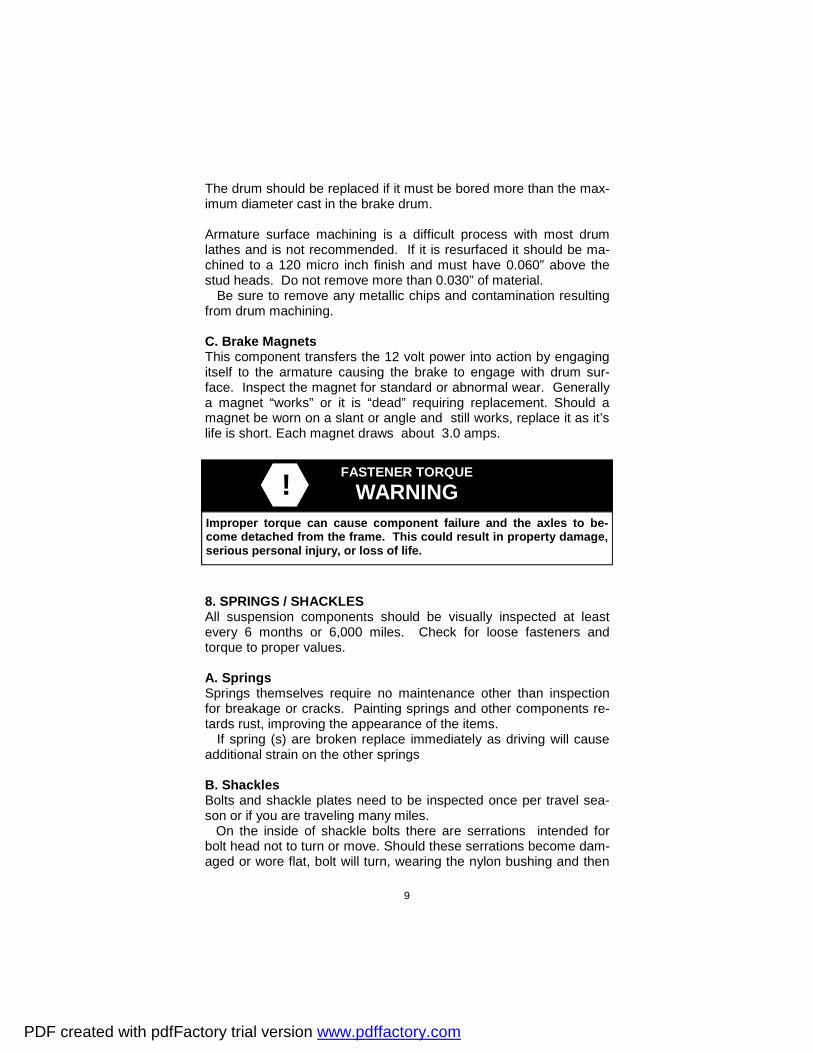
FASTENER TORQUE WARNING !
Improper torque can cause component failure and the axles to be-come detached from the frame. This could result in property damage, serious personal injury, or loss of life.
PDF created with pdfFactory trial version www.pdffactory.com
10
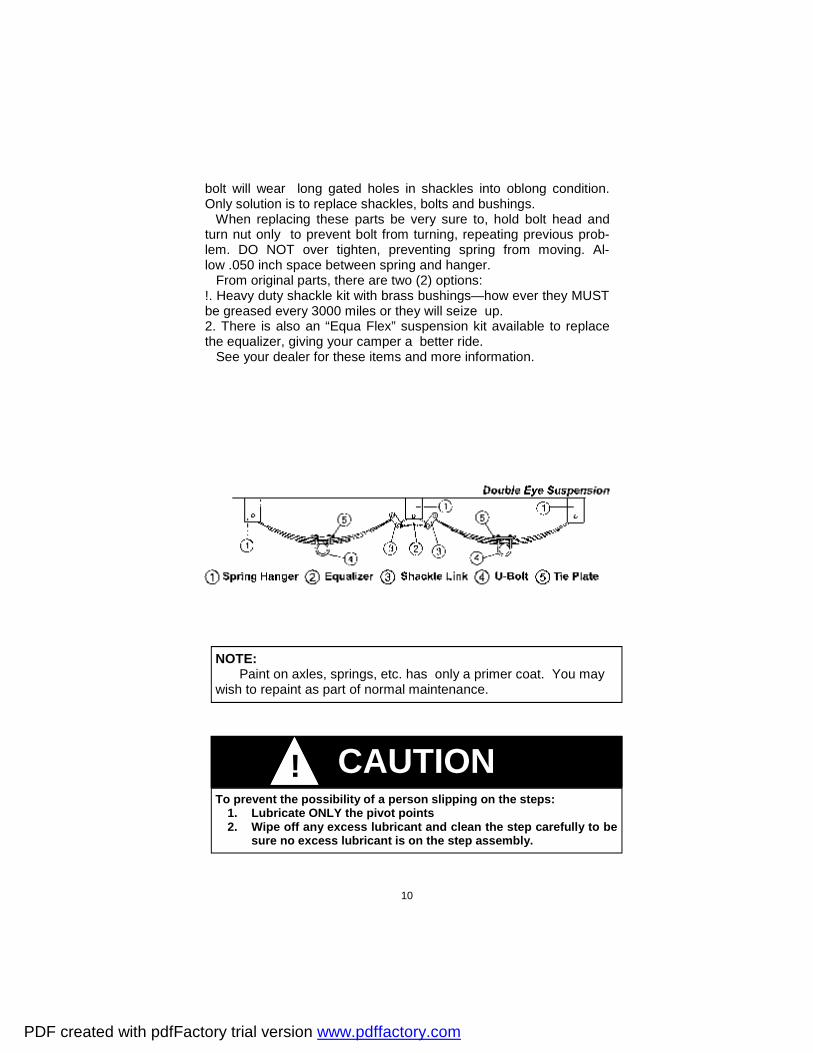
bolt will wear long gated holes in shackles into oblong condition. Only solution is to replace shackles, bolts and bushings. When replacing these parts be very sure to, hold bolt head and turn nut only to prevent bolt from turning, repeating previous prob-lem. DO NOT over tighten, preventing spring from moving. Al-low .050 inch space between spring and hanger. From original parts, there are two (2) options: !. Heavy duty shackle kit with brass bushings—how ever they MUST be greased every 3000 miles or they will seize up. 2. There is also an “Equa Flex” suspension kit available to replace the equalizer, giving your camper a better ride. See your dealer for these items and more information.
CAUTION ! To prevent the possibility of a person slipping on the steps:
1. Lubricate ONLY the pivot points 2. Wipe off any excess lubricant and clean the step carefully to be
sure no excess lubricant is on the step assembly.
NOTE: Paint on axles, springs, etc. has only a primer coat. You may wish to repaint as part of normal maintenance.
PDF created with pdfFactory trial version www.pdffactory.com

11
9. STEPS The step assembly is subject to all types of weather elements and requires the following maintenance: Covering nicks and scratches : 1. Seal any nicks or scratches with an automotive grade primer to
prevent rust. 2. Once the nick or scratch has been sealed, cover the damaged
area with an automotive grade high-gloss paint. Lubricating the mechanism (every 30 to 60 days) 1. Carefully clean the area around the pivot points (the rivets in-
volved in the motion of the mechanism). 2. After cleaning, lubricate the pivot points (to pinpoint this area,
locate the washer between the parts). An automotive grade, non-staining lubricant is recommended. Silicone spray or dry lubri-cant, is also good, use it monthly during travel use.
We suggest lubricating the mechanism once each spring and fall plus at least once during summer use. 10. Tire Repair Tires which have a puncture, take them to a repair center which is fully equipped to repair them correctly by plugging the hole and patching the inside as well. Just plugging the hole with string or plug and not repairing the in-side may not hold.
PDF created with pdfFactory trial version www.pdffactory.com
11
1. METAL Aluminum skin is pre-painted as it arrives preformed from suppli-er with polyester automotive paint finish. To clean, use a mild deter-gent and water. Use an automotive type of wax or polish, same as you may use on your tow vehicle. By waxing your KZRV once per year, it retains its nice, new appearance. 2. FIBERGLASS Fiberglass components used in KZRV coaches are several dif-ferent type:
a. Front and rear caps are built in a mold, using gel type of fi-berglass components.
b. For sidewalls, there are two types used, “Gel coat” and “Lami plast.”
Cleaning on all fiberglass materials, use a mild detergent and warm water using a soft brush or rag. For tougher stains such as found around drip rails, awning rails, or windows, a special cleaner may be required. Waxing on Gel Coat Material As the gel coat begins to lose its gloss from constant exposure to the natural environment and pollutants, it will require some special attention to restore the original gloss and color. Good polishing with a self-cleaning automotive wax will restore most of the original gloss. A fall and spring wax job is generally all that is needed to maintain the original appearance. If the surface has been allowed to weather badly, and cleaning and wax polishing does not restore the finish satisfactorily, then compounding will be necessary. The finish is totally impervious to chemicals and weathering. Imagine what a brand new car could look like if allowed to sit outside for years with no cover and no washing or waxing. With the same minimum maintenance you would ordinarily give your new automobile’s finish, your RV gel coat finish will retain its depth of color and gloss for years. 3. ABS PLASTICS Older Frontier and Ultra Lite lower fronts and fenders will retain their original condition with general washing and polishing. These surfac-es are not as hard as fiberglass and can scratch. DO NOT use abrasive soaps or polishes on ABS plastics. Most plastic components have no UV inhibitors to prevent sun rays from causing plastic to turn yellowish in years to come.
Chapter II — Exterior
PDF created with pdfFactory trial version www.pdffactory.com
12
4. EXTERIOR ROOF Three types of roof material are used on KZRV products. Aluminum material is a smooth mill-finish requiring little care. Wash-ing with soap and water plus rinsing should suffice. There is no hard substrate material underneath and aluminum, will show slight waves due to sun and heat causing expansion of the aluminum material. Second, a full roof of fiberglass is used on one model with out any roof seams. Roof begins at front bottom, goes all the way across roof and ends at rear bottom. Moldings will screw on top of material just like front and backs. Third, A soft fabric is glued onto a substrate OSB board, which is attached to roof frame work. Three types of material have been used: EPDM full rubber cover, TPO (Thermo Plastic Olefins) and SUPER FLEX system, The proper care, cleaning and maintenance of your SUPER FLEX AND TPO roofing is quite simple because of the basic proper-ties and longevity of the material itself. Periodic cleaning is the primary maintenance. Alpha Systems suggests using Murphy’s Oil Soap, Top Job, or Spic and Span with a soft nylon brush or sponge. DO NOT USE solid or granulated cleaners, as they will mar the natural finish. DO NOT USE Armor-All or other oil/solvent base cleaners as they will leave a slick surface. A good thorough cleaning with some elbow grease and the sug-gestions above should keep your roof looking good and remove most stains. For more stubborn stains, you should contact your au-thorized dealer. If you keep your soft fabric roof clean, you will be performing the primary maintenance necessary to keep it looking good and extend its longevity. Annual inspection of the roof is suggested. Check the mem-brane for possible damage and check the caulk/lap sealant used in all termination vent areas, around roof vents and any other attach-ments. Be sure sealant is fully attached to roof membrane and not coming loose. Royal Tuff-Ply and Super Flex are UV resistant. It will not re-tain odors or rot. There are one or two seams on top of the roof, front and rear, attaching the front and/or rear panel to the roof material. A putty tape seals the seam, which is covered with a flat extrusion plus roof sealant, to be inspected and resealed as required. This needs to be done twice per year, spring and fall. Sealant to use is Alpha Systems 1010 over seams which is re-quired for full sealing seams.
PDF created with pdfFactory trial version www.pdffactory.com
13
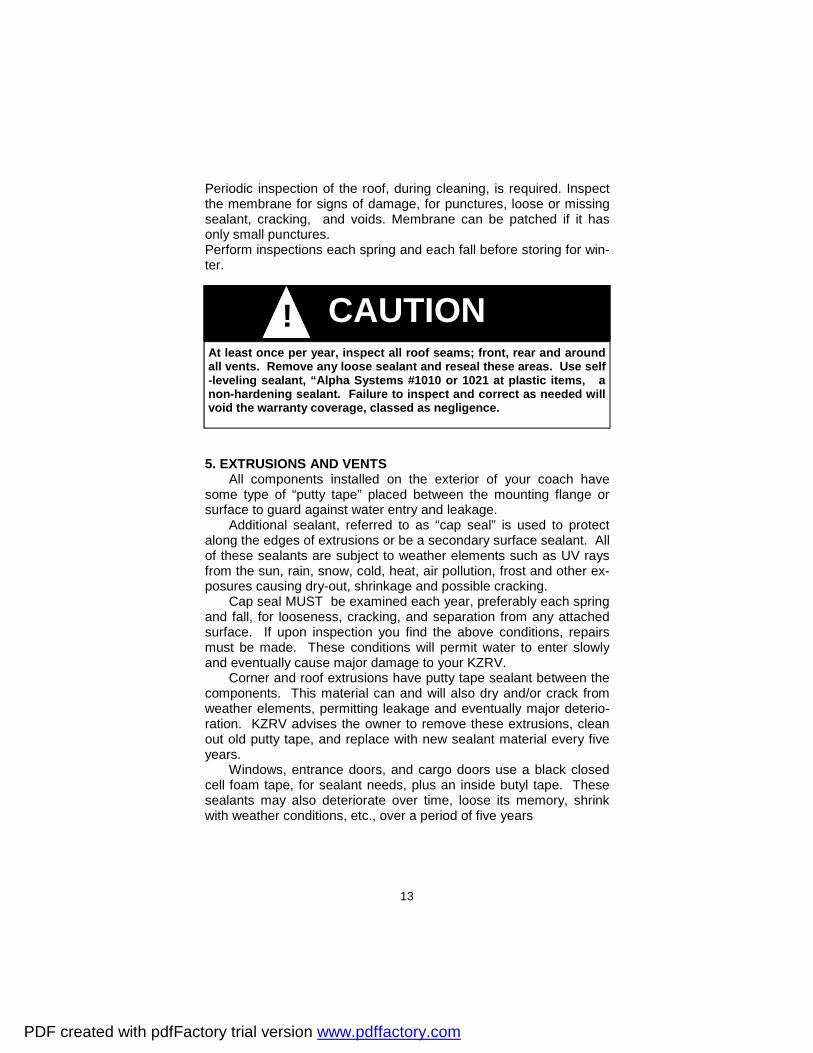
Periodic inspection of the roof, during cleaning, is required. Inspect the membrane for signs of damage, for punctures, loose or missing sealant, cracking, and voids. Membrane can be patched if it has only small punctures. Perform inspections each spring and each fall before storing for win-ter.
5. EXTRUSIONS AND VENTS All components installed on the exterior of your coach have some type of “putty tape” placed between the mounting flange or surface to guard against water entry and leakage. Additional sealant, referred to as “cap seal” is used to protect along the edges of extrusions or be a secondary surface sealant. All of these sealants are subject to weather elements such as UV rays from the sun, rain, snow, cold, heat, air pollution, frost and other ex-posures causing dry-out, shrinkage and possible cracking. Cap seal MUST be examined each year, preferably each spring and fall, for looseness, cracking, and separation from any attached surface. If upon inspection you find the above conditions, repairs must be made. These conditions will permit water to enter slowly and eventually cause major damage to your KZRV. Corner and roof extrusions have putty tape sealant between the components. This material can and will also dry and/or crack from weather elements, permitting leakage and eventually major deterio-ration. KZRV advises the owner to remove these extrusions, clean out old putty tape, and replace with new sealant material every five years. Windows, entrance doors, and cargo doors use a black closed cell foam tape, for sealant needs, plus an inside butyl tape. These sealants may also deteriorate over time, loose its memory, shrink with weather conditions, etc., over a period of five years
CAUTION ! At least once per year, inspect all roof seams; front, rear and around all vents. Remove any loose sealant and reseal these areas. Use self-leveling sealant, “Alpha Systems #1010 or 1021 at plastic items, a non-hardening sealant. Failure to inspect and correct as needed will void the warranty coverage, classed as negligence.
PDF created with pdfFactory trial version www.pdffactory.com
14
Types of sealant to use: (suggested sealant)
• Extrusions: Putty tape with butyl content • Doors & Windows: Putty tape with butyl content or closed cell
foam tape with butyl liner on inside • Cap Seal: This sealant must have good adhesive qualities
along with expansion and contractions capabilities. Silaprene—Royal 1000 all have color choices: clear, white, etc. TremPro 645 Geo Cell 2300 Roofs;; TPO —use Alpha 1010 or 1021 when in contact with plas tic. Super Flex— Use Alphatrane, sealant and also primer be fore installing sealant. Use 1021 when connecting alumi num extrusions and roof membrane. 6. VINYL TIRE COVERS (OPTIONAL) To clean vinyl tire covers use the same soap and water as used for washing your coach. Sun rays may cause “bleed through” on the cover from the black rubber in the tire. To minimize this condition use a separator such as a garbage bag, thin vinyl, etc. between the tire and cover. 7. SLIDEOUTS KZRV uses many variations for slide-out systems, most have power (12 volt) power operation. 1. Below and Above Floor System: This system uses a rack
and pinion system which means it runs on a cog track matched to a gear on the motor shaft. To lubricate the track: a) run room out fully, b) spray silicone spray or dry Moly lubricant onto track, .
2. Bedroom System: This system uses a similar system with complete assembly inside of coach under bed. Raise bed board and mattress to gain access to lubricate track as described above (#1). Lubricate slide in bedroom two times per year and the exterior system (#1) one time per month, especially during full use.
Gear box on above slides requires no additional lubrication. As with all slide outs, a hole is cut into sidewall to accept this mova-ble room. With this convenience it gives another chance for moisture entry. Please pay attention to this potential problem.
PDF created with pdfFactory trial version www.pdffactory.com
15
Seals on extrusions need to be inspected for proper fit, no cuts or snags. Such imperfections may permit water to enter causing moisture damage. Inspect these seals two times per year. Be sure slide outs fit well as some times additional adjustments need to be made. Contact your dealer for such adjustments on all slide outs. Ignoring any leakage will void and nullify warranty coverage. SCHWINTEK Four tracks, two at top and two at the bottom, MUST be keep free from dirt, causing operation difficulties. After cleaning, spray “silicone lubricant on all four tracks. Lower than 12 volts you may have difficulty to operate system. Keep voltage at 12.6 if at all possible, for both motor and module board 8. TOY HAULER DOORS On the rear door hinge assembly there may be a grease fitting which requires grease gun lubrication. Failure to keep this hinge from rust and seizing up, causing the hinge to break, is responsibility of the owner. Grease this monthly to keep the hinge lubed and op-erating freely. Early models had a steel hinge, requiring grease. Second type of hinge is all aluminum materials and requires only silicone spray for lubrication. 9. TENT(S) The tent( s) on your KZ hybrid trailer is manufactured with most-ly vinyl and polyester fabric laminated, with vinyl exterior in areas where there is vinyl only. Two tendencies that you may discover in any tent assembly are condensation and possible minor leakage on the first several times the tent is used. A. Condensation Since this material can’t breath you may—depending on weather conditions, temperature variance, and furnace usage—experience some condensation inside of the coach, more so at night than day time. Such condensation can be reduced or possibly eliminated by opening the upper corner of bunk end panel, 1/2” to 1”, folded over to allow a small quantity of air to move across the roof panel, at the end which has the head of the sleeping person. B. Leakage ALL VINYL TENTS NEED TO GET WET ONE OR MORE TIMES TO SEAL THE NEEDLE HOLES. Your tent may leak the first time it
PDF created with pdfFactory trial version www.pdffactory.com
16
gets wet. Do not be alarmed. The tent is sewn with special thread that swells up and seals the needle holes after it has been wet. Rubbing a wax candle over sewn seams after the first rain may also assist in quicker sealing. Preventing Leakage During Use
• Do not rub against walls, roof or canvas windows when wet or when raining.
• Do not place objects against tent walls. • Do not over extend or over stretch your tent. • Do not spray insect repellant or hair spray on fabric as these
items may destroy water repellency of this fabric. • Do not put tent away in wet conditions. This might be difficult
when leaving campsite in raining conditions. Within 48 hours, be sure to open the tents and set them up completely so they can dry out.
ALWAYS VENTILATE AND DRY THE TENT WITH BOWS AND BRACES IN PLACE as soon as possible after each exposure to moisture. Mildew is always the result of negligence. The plastic windows have a 0° cold crack rating. Do not raise the tent to maximum height in extreme (0 degree) weather as the windows may shatter. .. CLEANING To clean your tent use mild soapy water and a soft bristle brush. Rinse with hose using spray nozzle. Repeat if necessary. Do not use solvents, detergents or aerosol cleaners on or close to unit. An agent used in most sprays as a propellant will damage or destroy water finishes (hair sprays, deodorants, in-sect sprays, etc). If you have a stain or specific problem contact your dealer before trying any solvents and cleaners that may damage your tent and void your warranty. Vinyl bunk ends may be cleaned with an automotive vinyl cleaner.
PDF created with pdfFactory trial version www.pdffactory.com
17
1. PROPANE SYSTEM Your system to feed propane fuel thru your piping system needs to be inspected for leakage at least once per year, preferably in the spring before you begin your camping season. The best method to test the system is to use a manometer, an instrument used to measure the operating pressure at 11” of w.c., as well as leak testing. You may also use soapy water that does not contain chlorine or ammonia, applied on the brass fittings looking for bubbles indicating leakage. If LEAK IS FOUND, repairs MUST be made before using your coach for safety reasons. This system includes all copper lines, brass fittings to each ap-pliance, hoses, regulator, and steel manifold lines with attached brass fittings. As a manufacturer we suggest you have your selling dealer’s service center perform this test unless you have the proper equip-ment and full understanding of how to perform this test. You may also wish to use a local reputable RV service center to perform this function, such as a” spring maintenance” special at dealership. Tests and inspections to be performed: 1. Propane regulators MUST have vent installed down at 6:00 o’clock position and regulator MUST be able to breath. 2. Pressure needs to be set at 11”wc (water column). A manome-ter or u-tube MUST be used to perform this test and adjustment. 3. Should flame on your stove flutter, goes high and drops down, your regulator may have contamination inside, caused by fuel sedi-ments. Replacement is your only solution. 4. If pressure is to high, it affects performance, efficiency and safety. If setting is too low your appliances will not operate correct-ly,. Adjustment is needed same as in # 2. Proper equipment and knowledge is of the up most importance to perform these tests. NOTE; Use “ pipe dope “ on steel threads-on pipes. Use “Teflon” tape on brass treads and fittings.
Chapter III—Systems
PDF created with pdfFactory trial version www.pdffactory.com

18
2. PLUMBING SYSTEM Maintenance to plumbing system is minor, however there are several items of importance. 1. Instructions to sanitize your portable water systems are found in your owners manual. This request may not appear to be very im-portant, yet the longer period of time you don’t use the water tank the more important it becomes. 2.. Fresh water lines and tanks can also pick up bacteria easier than most people think. Mold appears at places people don’t realize especially in moist areas. 3. Finding water leaks and continuing to search for them seems time consuming and difficult. A good method to search for a leak is to:
• Place water into fresh water tank. • Fill the system with water. • Start the 12 volt water pump to full pressure till pump shuts
off. • If pump cycles within five to ten minutes, search for a water
leak. If the coach is equipped with an ice maker and/or water filter, don’t forget to review these connections as well. Connections such as elbows and tees under cabinets, behind cabinets, under faucets, etc. Many faucets have “water saver” restriction washers in the spouts causing various problems, reducing flow. 4. Toilet Stools A. Valve may be leaking. B. Gasket at bottom of bowl may be allowing water to keep draining into tank. C. Deodorizing is needed occasionally to guard against offend-ing odors. D. Cleaning—Use Thetford Aqua-Clean non-abrasive cleaner with a soft bristle brush. DO NOT use any scouring powders, acids, or concentrated cleaners, which can damage surfaces 5. Maintenance for your holding tanks is found in your owners manual and need not be repeated here. 6. Flush kits are available to clean black holding tank on many applications and models. They are designed to rinse and clean your tank. NEVER attempt to flush tank with out draining tank first.
PDF created with pdfFactory trial version www.pdffactory.com
19
3. ELECTRICAL SYSTEM A. 120 Volt AC Turn off all breakers, plug coach into 120 volt AC, shore power, turn on 30 or 50 amp main breaker and then each breaker following. This procedure indicates your 120V system is working correctly and feeding power throughout your coach unless there is an open circuit somewhere. GFCI This device is designed to protect individuals from improper ground-ed conditions, especially on the outside while touching exterior components. To test this receptacle press the test button two times per camping season to assure proper operation. Now press the “Reset” button. Should you not be able to reset this device, re-place the receptacle or find an electrical technician. B. 12 Volt DC As a manufacturer, we suggest that each spring you inspect for any loose wires and/or loose connections in the load center and tighten if loose. Loose wire connections cause high heat and potential fire problem especially in and around circuit boxes. Inspect all fuses and be sure they are good for continuity and oper-ation. There are 2-40 amp fuses or 4-20 amp fuses in your conver-tor to protect the convertor should some one hook up the battery backwards. Be sure these are in good condition and not blown. Torque tightness on screws holding wire connectors and terminals, using torque wrench with 1/4 inch socket or screws. Battery—Not OEM Supplied A 12 volt battery (deep cycle preferred), supplied by dealer, require constant inspection and maintenance. To preserve long life in any battery three important functions are required:
a. Charge battery every 30-60 days to keep fully charged dur-ing non use, especially during winter months.
b. Certain types require water to be checked and added as necessary. Keep water above cell mass to avoid permanent damage.
c. Store battery in a cool place when not in use, around 40°F. A fully charged battery will measure at 1.265 specific gravity. A discharged battery will measure at 1.120 specific gravity or 11.7
PDF created with pdfFactory trial version www.pdffactory.com

20
volts DC. A hydrometer is required to measure “specific gravity.” Most batteries with deep cycle rating require water to be added as needed. This depends on the amount of draw time that your converter is in operation. Use distilled water if at all possible as it is nearly mineral free. Not keeping batteries charged will result in shorter life expectancy. Should distilled water or rain water, not be available, well water is better than no water at all. Allowing a battery to drop below 10.5 volts, it will begin permanently damage to cells. Be sure to keep ALL terminals clean at all times to ensure good contact. . .
PDF created with pdfFactory trial version www.pdffactory.com
21
1. FURNACE The furnace in your KZRV does need some normal maintenance attention, preferably once each spring, just before you begin your summer camping season. It’s best to have your selling dealer or a qualified service techni-cian perform such an inspection. Your dealer may have a “spring special” to perform such inspections. Particular attention needs to be given to the following items: 1. Exterior vents must be free from obstructions and properly vent-
ed to the atmosphere.
Examine also for any insects which may have entered, built nests which will cause improper operation. When you find “soot” around your vent it indicates incomplete combustion or contami-nated fuel. If such soot is present contact a qualified service center.
2. Inside the furnace cabinet: (a) Inspect areas around combustion chamber for any cracks or
leaks causing the flow of exhaust gas being expelled into coach.
(b) Inspect and test any propane connections and lines for signs of leakage.
(c) Inspect any and all gaskets for leakage or deterioration. Replace if damaged. Any furnace is safe only when there is no leakage from heat chamber.
(d) Inspect return air inlet openings to furnace compartment. The furnace cannot operate if return air is restricted from air flow. DO NOT store any items around furnace. Return air panel is installed in front of furnace to prevent storage around furnace. DO NOT BLOCK this panel.
You, as the owner/user, should inspect the furnace monthly during the heating season for presence of soot on vent. Oper-
Chapter IV—Appliances
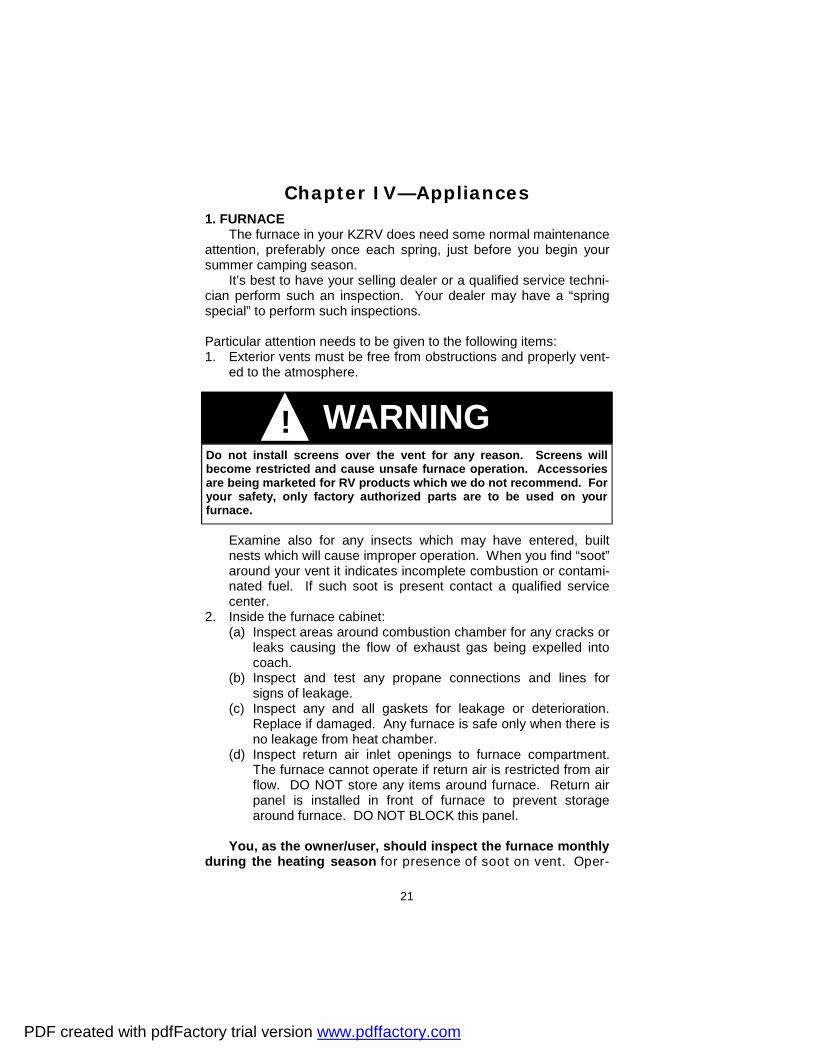
WARNING ! Do not install screens over the vent for any reason. Screens will become restricted and cause unsafe furnace operation. Accessories are being marketed for RV products which we do not recommend. For your safety, only factory authorized parts are to be used on your furnace.
PDF created with pdfFactory trial version www.pdffactory.com
22
ating the furnace under this condition could lead to serious insuffi-cient operation. If soot is observed on the vent, immediately shut the furnace down and contact a qualified service agency for repairs. 2. WATER HEATER Since this appliance has burner and pilot assemblies located in an exterior chamber, they are subject to insects and moisture con-tacts. Spiders especially enjoy propane smell and may build a web across orifices of pilot assembly and in main burner tube. This causes back flashes and sooty conditions of exterior wall and vent assembly. Should this occur, you must shut system down and clean out any obstructions before continuing to operate.
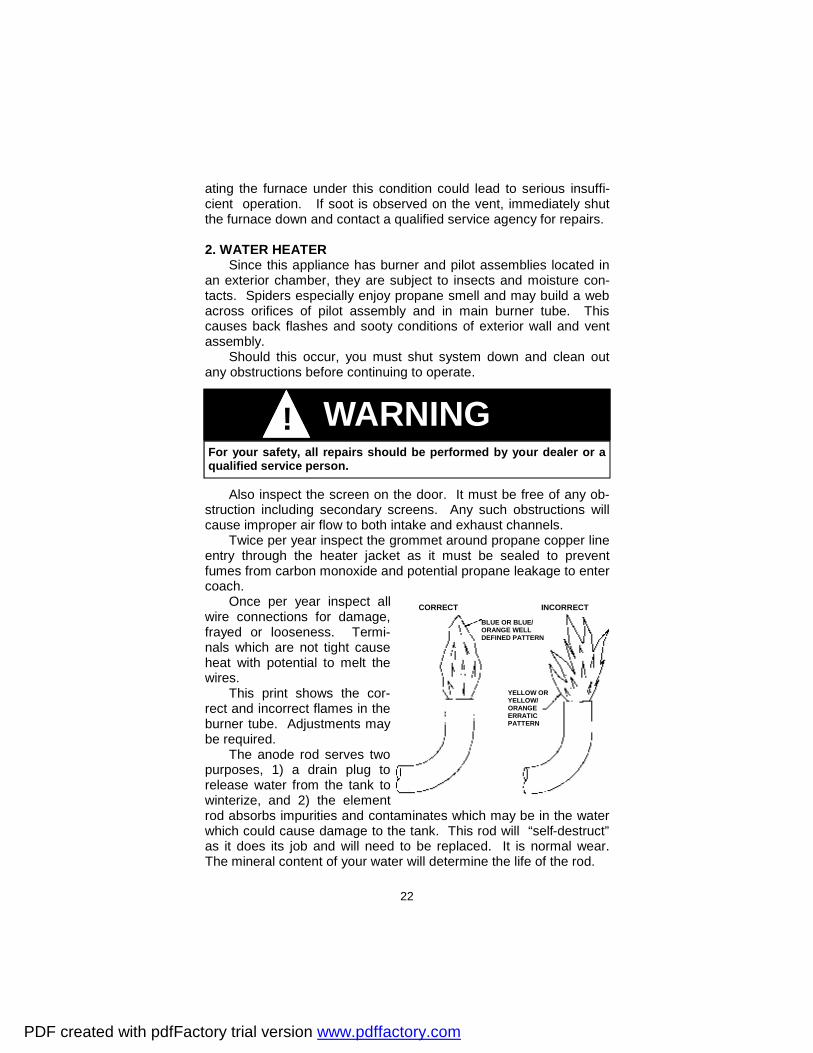
Also inspect the screen on the door. It must be free of any ob-struction including secondary screens. Any such obstructions will cause improper air flow to both intake and exhaust channels. Twice per year inspect the grommet around propane copper line entry through the heater jacket as it must be sealed to prevent fumes from carbon monoxide and potential propane leakage to enter coach. Once per year inspect all wire connections for damage, frayed or looseness. Termi-nals which are not tight cause heat with potential to melt the wires. This print shows the cor-rect and incorrect flames in the burner tube. Adjustments may be required. The anode rod serves two purposes, 1) a drain plug to release water from the tank to winterize, and 2) the element rod absorbs impurities and contaminates which may be in the water which could cause damage to the tank. This rod will “self-destruct” as it does its job and will need to be replaced. It is normal wear. The mineral content of your water will determine the life of the rod.
WARNING ! For your safety, all repairs should be performed by your dealer or a qualified service person.
BLUE OR BLUE/ORANGE WELL DEFINED PATTERN
CORRECT INCORRECT
YELLOW OR YELLOW/ORANGE ERRATIC PATTERN
PDF created with pdfFactory trial version www.pdffactory.com

23
WARNING !
Photo shows what a new and full rod should be plus a 75% deteriorated rod now requiring it to be replaced. Iron and mineral content levels in the water will determine the life of the anode rod. Operating the water heater with out proper anode protection will de-crease tank life and will void warranty on the tank, NOTE : Tank is drained by removing anode rod. To extend life of anode rod, drain the water from tank when ever RV is not being used. Also refer to the section on winterizing. This is actually a “sacrificial” item to save tank life. Rod should be removed for 2 reasons—for inspection and draining water heater. Winterizing your Hot Water Heater When winterizing your hot water heater, you must first be sure that your water heater has not been in operation for 24-48 hours prior to the start of the winterization process. If your unit is equip with a DSI model water heater, make sure that you turn the ignition switch in the off position. To drain the hot water heater, remove the anode rod from the water heater and allow the water heater to drain complete. 3. STOVE—RANGE—COOK TOP Each spring before camping season is the best time to inspect your propane consuming appliances for correct operation, plus test all fittings for any possible propane leaks. You may prefer to have your selling dealer or a good reputable dealer do a “spring checkup” on your coach.
DO NOT replace the anode rod with any non– Suburban accessory part, such as an “add-on” electric heating element. Items such as these are not approved to be installed in Suburban products. They could cause an unsafe condition and will also void all warranties.
PDF created with pdfFactory trial version www.pdffactory.com

24
During the usage of your stove and oven it is important to keep your equipment clean for beauty, longer lasting appearance, and operational condition. 1. Should you experience an overflow accident, be sure to clean
up as quickly as possible. 2. Use warm water with a mild soap to clean grates, cook top, and
painted or porcelain surfaces. DO NOT use a soap which con-tains ammonia.
3. DO NOT use abrasive cleaning pads, steel wool or abrasive soap, to clean any surface because of potential scratching of these items.
4. Should any burner parts or orifice become plugged up, use spe-cial care: (a) If you use a brush, be sure the bristles do not come loose
and lodge in a burner or orifice, later causing more clogging and a fire hazard.
(b) Avoid using a wire brush or wire needles. The ends could break off, causing a worse situation. Steel items could also enlarge the holes causing excess fuel usage, raising BTU’s, higher heat, and possibly a fire.
Soap and warm water are your best solution.
The oven door in the open position is not in a place to permit much weight on it. Excessive weight will cause hinges to bend, springs to stretch, and will prevent the door from closing correctly and sealing when in use. 10 pounds maximum. 4. REFRIGERATOR Maintenance issues on the refrigerator require the following three items to be performed every fall, in preparing your coach for winter. Also, you may wish to repeat each spring as needed. A. Fall
1. Defrost It is normal for frost to collect on cooling fins inside of the refrig-erator. Too much frost, however, decreases cooling efficiency. Defrost as often as desired during summer usage.
WARNING ! Be sure all controls are turned off and cooled down before cleaning to avoid burns.
PDF created with pdfFactory trial version www.pdffactory.com
25
After turning off the refrigerator for the winter, remove all food and allow time for defrosting. Then remove any water from the refrigerator using pots, pans and towel from defrosting. 2. Clean Now wash the refrigerator completely to a nice clean condition. You may wish to allow the door to remain open slightly to com-plete the drying process and to prevent any mildew or mold to grow. Keeping the refrigerator clean will help to avoid any food odors. NOTE: Do not use abrasive cleaners, chemicals, or scouring
pads, because they can damage the interior of the re-frigerator. “Dawn,” “Fantastic,” and “Formula 409” are the brand names of three products that are recommend-ed for use.
3. Ice Maker To prepare and winterize your ice maker for storage:
1. Close the vehicle water supply valve to the ice maker. 2. Push the ice maker arm up until it locks into the OFF
position. 3. Remove the garden hose adapter from the water sole-
noid valve. 4. Remove the ice maker water line from the water sole-
noid valve. DO NOT unwrap the water line heater wires from around the water solenoid valve.
5. Drain all of the water from both the water supply line and the ice maker water line.
6. Put the end of the water supply line, the end of the ice maker water line, and the water solenoid valve each into a clean plastic bag.
7. Use tape to close each plastic bag around the water lines and the water solenoid valve.
To use the ice maker after seasonal storage, reverse the proce-dure above. Be sure to water test the system and fittings. During winter or any prolonged period of non-use you may want to unplug the 120 volt plug (if possible) and the 12 volt DC terminals. Removing the on board 12 volt battery will serve the same purpose for the 12 volt part.
B. Spring
In the spring or fresh startup, it is highly suggested to spend some time preparing the refrigerator for use
PDF created with pdfFactory trial version www.pdffactory.com
26
1. Reconnect the 12 volt DC battery, deep cycle suggested, and make sure it is fully charged.
2. Plug in 120 volt AC plug into receptacle. 3. Door seal should always be tight and not leak air. Place a
piece of paper (or a dollar bill) between the door gasket and frame. Close the door and pull the paper out. You should feel a slight drag between the gasket and cabinet. Do this on all four sides, both top and bottom door. • If you do not feel a slight drag on the paper, the door
does not seal correctly. • Have your dealer or an authorized Norcold Service Cen-
ter correct the seal of the door. 4. Perform a leak test on the propane system (see Chapter 3)
to be sure you have no leaks. Inspect the burner tube area to be sure there are no obstructions in this area. Do pres-sure and operating tests on the propane system.
5. Venting: Before startup, inspect the venting channels, back side of refrigerator service vent, and be sure there are no obstructions in the roof vent, such as a bird’s nest. If air cannot move freely from lower service vent to the roof vent, your refrigerator will not operate, and it has the potential of damaging the cooling unit.
6. Burner: The burner assembly located under the boiler needs to be inspected annually. After opening the burner box door, examine the flame during operation. Flame should be a darker blue inside and a lighter blue outside, and be in a constant, steady shape. If the flame is yellow and/or erratic, your dealer needs to be notified. The burner assembly needs to be clean to operate correctly and efficiently.
Additional maintenance instructions are found in the manual supplied by Norcold, the manufacturer of your refrigerator. Many of these inspections may be performed by the owner, however most dealers will do “spring specials” for their custom-ers. Contact your dealer for such services to prepare your coach for spring and summer weather.
PDF created with pdfFactory trial version www.pdffactory.com
27
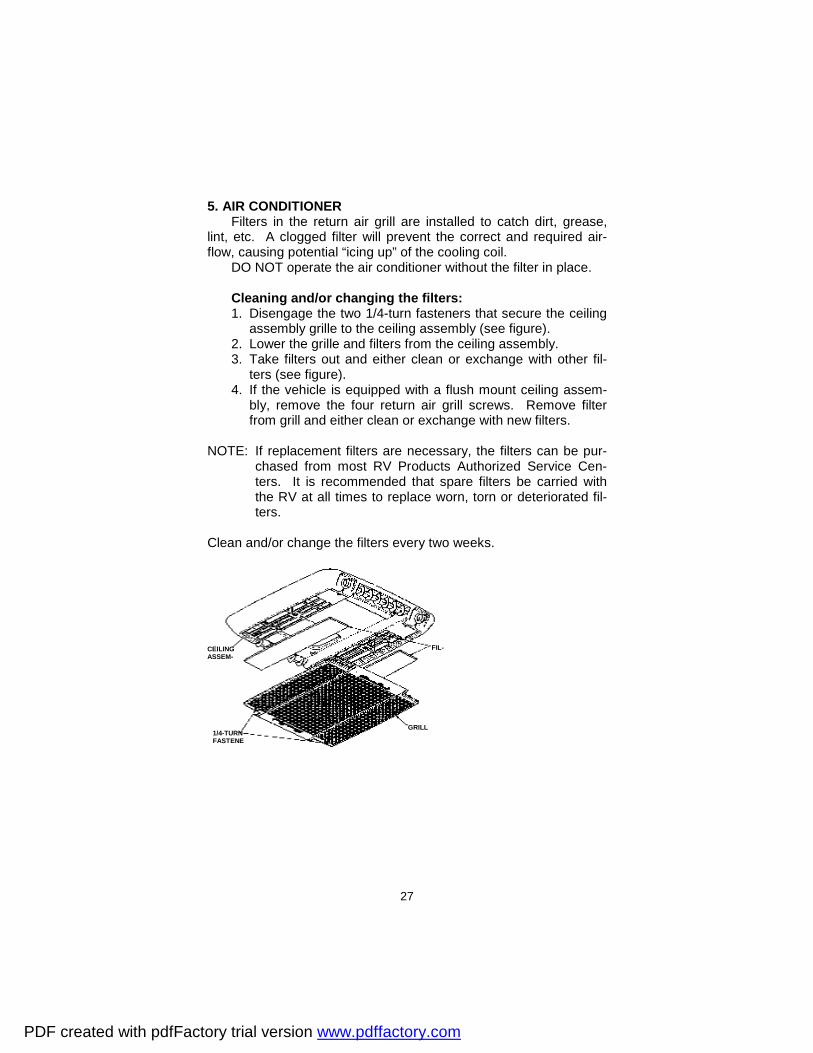
CEILING ASSEM-
FIL-
GRILL1/4-TURN FASTENE
5. AIR CONDITIONER Filters in the return air grill are installed to catch dirt, grease, lint, etc. A clogged filter will prevent the correct and required air-flow, causing potential “icing up” of the cooling coil. DO NOT operate the air conditioner without the filter in place. Cleaning and/or changing the filters:
1. Disengage the two 1/4-turn fasteners that secure the ceiling assembly grille to the ceiling assembly (see figure).
2. Lower the grille and filters from the ceiling assembly. 3. Take filters out and either clean or exchange with other fil-
ters (see figure). 4. If the vehicle is equipped with a flush mount ceiling assem-
bly, remove the four return air grill screws. Remove filter from grill and either clean or exchange with new filters.
NOTE: If replacement filters are necessary, the filters can be pur-
chased from most RV Products Authorized Service Cen-ters. It is recommended that spare filters be carried with the RV at all times to replace worn, torn or deteriorated fil-ters.
Clean and/or change the filters every two weeks.
PDF created with pdfFactory trial version www.pdffactory.com
28
Chapter V—Interior 1. PANELING Wall panels in your KZRV are manufactured with vinyl glued to luan panels. To clean, use a mild solution of soap and water with a sponge or soft cloth. DO NOT use any abrasive cleaner as scratching of vinyl could occur, causing dull colors and scratches. Avoid cleaners with bleach. For stubborn dirt and stains you may need a stronger all-purpose spray cleaner. Should deep scratches occur, you may wish to use putty sticks, polish and furniture wax to cover them. Use with care, knowing such repairs cannot completely restore original conditions. 2. LINOLEUM / VINYL FLOOR To care for and clean vinyl, use a mild soap in water and a damp mop. DO NOT pour water on floor as it may seep under cabi-net frames and panels, absorbing water and damaging wood materi-als. Treat this vinyl as you would in your home. 3. CARPET Treat your carpet in your recreational vehicle the same as in your home by vacuuming frequently. For tough and deep stains you may need to use a professional cleaning service. Pretest carpet for colorfastness in an inconspicuous area such as under a cabinet. 4. COUNTER TOPS The surface material is laminated to a substrate wood composite material. A damp cloth or sponge will generally cleanup most food or water spills. Stubborn stains can be removed with general all-purpose cleaners. Be careful to not permit liquid to seep under fau-cets and sinks potentially causing damage to the substrate material. 5. SOLID SURFACE COUNTER TOPS While solid surface material is highly heat resistant, an extreme-ly hot pan or baking dish could scorch or crack your counter top. Treat this top the same as your home by using a hot pad or heat absorbing pad to place under your hot dishes. To clean your tops use cleaning detergents, such as, 409, Fan-tastic or a bleach-water solution. DO NOT use any abrasive cleaner on the top. When pouring boiling or scalding water into sink we suggest running cold water at the same time to avoid too much heat in the sink.
PDF created with pdfFactory trial version www.pdffactory.com
29
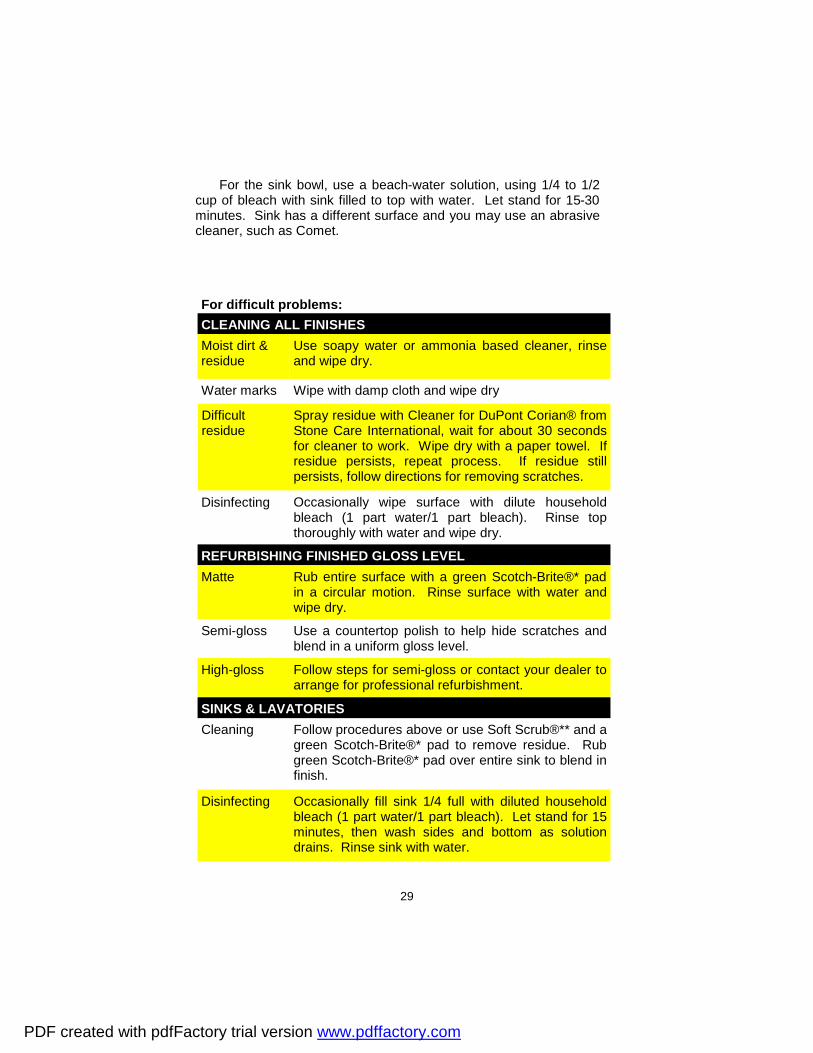
For the sink bowl, use a beach-water solution, using 1/4 to 1/2 cup of bleach with sink filled to top with water. Let stand for 15-30 minutes. Sink has a different surface and you may use an abrasive cleaner, such as Comet.
For difficult problems: CLEANING ALL FINISHES Moist dirt & residue
Use soapy water or ammonia based cleaner, rinse and wipe dry.
Water marks
Difficult residue
Disinfecting
Wipe with damp cloth and wipe dry
Spray residue with Cleaner for DuPont Corian® from Stone Care International, wait for about 30 seconds for cleaner to work. Wipe dry with a paper towel. If residue persists, repeat process. If residue still persists, follow directions for removing scratches.
Occasionally wipe surface with dilute household bleach (1 part water/1 part bleach). Rinse top thoroughly with water and wipe dry.
REFURBISHING FINISHED GLOSS LEVEL Matte Rub entire surface with a green Scotch-Brite®* pad
in a circular motion. Rinse surface with water and wipe dry.
Semi-gloss Use a countertop polish to help hide scratches and blend in a uniform gloss level.
Follow steps for semi-gloss or contact your dealer to arrange for professional refurbishment.
High-gloss
SINKS & LAVATORIES Cleaning Follow procedures above or use Soft Scrub®** and a
green Scotch-Brite®* pad to remove residue. Rub green Scotch-Brite®* pad over entire sink to blend in finish.
Disinfecting Occasionally fill sink 1/4 full with diluted household bleach (1 part water/1 part bleach). Let stand for 15 minutes, then wash sides and bottom as solution drains. Rinse sink with water.
PDF created with pdfFactory trial version www.pdffactory.com
30
6. WINDOW MINI BLINDS (Kitchen Window) Blinds and rails are made of pre-painted aluminum metal. Clean these blinds by using a soft damp cloth or sponge to remove dust. Blind can be removed from mounting brackets for additional or ex-tensive washing. Some professional dry cleaners have equipment to clean these shades and immerse them in a liquid cleaner. 7. DAY FABRIC SHADES To clean pleated day-night fabric shades of dust, use a soft-attachment of a vacuum cleaner. To remove solid spots on fabric use clear Ivory dishwashing liquid and water. For aluminum rails use “409” cleaner. 8. ABS PLASTIC COMPONENTS Bath tub, shower wall, toilet and the lavatory sink are made from ABS plastic. DO NOT use any type of abrasive type cleaner as it will scratch the plastic. Use only mild detergent with warm water for cleaning. 9. DRAPES Materials used in the drapes of your recreational vehicle consist of different cotton and polyester combinations. Frequent vacuuming is recommended as the first choice of cleaning. Using a damp cloth in warm water with detergent soap to spot clean soiled spots. 10. CUSHION COVERS Any fabric cushion covers with vinyl on the bottom side should not be dry cleaned. Dry cleaning could cause the vinyl to become hard and crack, and could also remove the stain retardant placed into the fabric. Vacuum the cushion covers whenever the need aris-es. For difficult spots may need to remove covers and contact a professional cleaning service. DO NOT dry clean covers as they may shrink. 11. FURNITURE Upholstered items such as recliners, swivel rockers, rocker re-cliners, sofas and other free standing pieces may be cleaned by fre-quent vacuuming or light brushing to remove dust and to prevent overall soiling. On some spots you may wish to use a detergent soap and water to attempt to clean a spot. If it fails you may need to seek the ser-vice of a professional cleaner.
PDF created with pdfFactory trial version www.pdffactory.com
31
12. WINDOWS On window (s) which have opening sliders or awning panel, there are “weep or drain” holes at lower sections of frame extru-sions, generally at the end of each movable panel. Dirt, debris, in-sects, etc. can and will accumulate, potentially plugging up these weep holes. Should water accumulate, stand in threshold of win-dow, your weep holes and / or channels in window have become plugged. Be sure to keep these drainage areas open at all times. Should water be draining out and window still runs over to in-side, you have a leak problem or excessive condensation problem. See Chapter 1 in owners manual for condensation concerns and solutions. 13.SMOKE ALARM Maintenance: This smoke alarm has been designed to be as maintenance free as possible, but there are a few simple things you must do to keep it working properly • Test each smoke alarm at least once a week. • Keep a supply of approved 9-volt replacement batteries on
hand. • Test each smoke alarms used in RVs after vehicle has been in
storage, before each trip and at least once per week during use. Failure to test smoke alarm used in RV’s as described may re-move your protection.
• Gently vacuum off any dust on your cover of the smoke alarm monthly with your vacuum’s soft brush attachment. Test unit once you have vacuumed the cover.
• Never use water, cleaners or solvents since they may damage the smoke alarm.
• Relocate the smoke alarm if it sounds frequently with unwanted alarms. See section “Locations Where Smoke Alarms Should NOT be installed”.
• When the battery becomes weak, the unit will “beep” about once a minute (the low battery warning). This, low battery warning should last for 30 days, but you should replace the battery im-mediately once the unit starts “beeping” (“the low battery warn-ing).
• Replace your Smoke Alarms at least every 5 years. This in-cludes models with 5-year batteries (SA-668LL and SA-668SLL). Manufactured date code is on the back of the alarm.
PDF created with pdfFactory trial version www.pdffactory.com
32
14.PROPANE AND C.O. DETECTOR—COMBO: HOW TO TAKE CARE OF YOUR ALARM This CO/Propane Gas Alarm is designed to be as maintenance free as possible. To keep your alarm in good working order, you must: TEST THE ALARM WEEKLY. See the section, Test Procedure, in manual supplied by manufacture for further information. VACCUM THE DUST OFF THE ALARM COVER. At least once a year (more frequently in dusty locations), use the soft brush attach-ment of your vacuum to clean the alarm cover. CLEAN THE ALARM COVER WHEN DIRTY. Wash the alarm cov-er by hand. Use a cloth dampened in clean water. Dry with a soft cloth. DO NOT SPRAY CLEANING AGENTS OR WAXES DIRECTLY ONTO THE FRONT PANEL. This action may damage the sensor, cause an alarm or cause an alarm malfunction. OBSERVE THE COLOR OF THE INDICATOR LIGHT. At frequent intervals and during your weekly test, check the indicator light on the front panel of the alarm. See section, Operation, in the manual for further information. DO NOT attempt to test the alarm by any other means than by using the TEST/RESET button. DO NOT attempt to produce CO—to test the alarm. The TEST/RESET button tests all functions of the alarm and is the ONLY safe way to be sure the alarm is working properly. IMPORTANT— If this alarm does not test properly return it im-mediately for repair or replacement.
PDF created with pdfFactory trial version www.pdffactory.com

33
! TO REDUCE THE RISK OF CARBON MONOXIDE POISONING OR PROPANE GAS EXPLOSION, TEST THIS ALARM’S OPERA-TION AFTER THE RV HAD BEEN IN STORAGE, BEFORE EACH TRIP AND AT LEAST ONCE PER WEEK DURING USE.
TEST PROCEDURE WARNING
WARNING !
DO NOT USE A CIGARETTE LIGHTER TO TEST THE CO/ PRO-PANE GAS ALARM. Butane gas may damage the sensors.
WARNING
PDF created with pdfFactory trial version www.pdffactory.com