maintenance of track in ghat section (ksr section)
TRANSCRIPT

GOVERNMENT OF INDIA
MINISTRY OF RAILWAYS
Quality Assurance
for
Tiling on Floors & Walls
CAMTECH/2006/C/TILE/1.0
February - 2006
Centre
for
Advanced
Maintenance
TECHnology
Excellence in Maintenance
Maharajpur, GWALIOR - 474 020
(For official use only)

Quality Assurance
for
Tiling on Floors & Walls

Foreword
The finishing of floors and walls is an important aspect of interior
architecture. The interior décor of the building highly depends on the material
used in floor and wall finish. Tiles are most widely used material for this
purpose. It offers an attractive, durable, hardwearing, pleasing and hygienic
finish. They are also economic and easy to install with least maintenance. The
important characteristics are their availability in various shades, colour, texture
and designs, which result in unlimited unique patterns.
Through this handbook CAMTECH has made a nice attempt to provide
the latest know-how about tiles specification, selection and installation
procedure as well as its maintenance and repairs. All topics are described in
user-friendly step-by-step manner with pictorial presentation.
I hope this handbook will certainly prove to be a valuable source of
technical knowledge and will be quite helpful for civil engineering personnel in
railways.
CAMTECH/Gwalior R.N.Misra
Date : 21 .02.2006 Executive Director

Preface
The sequential development of human civilization can directly be co-related
with the architecture of that era. With growth of civilization, the architecture became
more gorgeous and modernized. The architecture of building is mirrored through its
interior and exterior appearance and also through its stability & utility.
The interior of the building is reflected by the materials used for floor/wall
finishes, as these are the most appeared and utilised part of the building. The increased
uses of tiles in interior décor also emphasize the same. These are very attractive and
durable alternative for floor and wall finishes. Now a days, the tiles are available in
various design, colour, shade, size and texture. By applying various combinations of
these tiles, limitless patterns and designs in floor and wall finish can be achieved.
These are resistant to moisture and staining; and also provide more hygienic surface in
comparison to other floor/wall finishes. Apart of all their good qualities, it has a major
pre-requisite that it requires correct practice and workmanship for satisfactory
performance and eye-pleasant appearance.
This handbook is prepared with the objective to provide informative technical
details on a “Quality assurance for Tiling on floors and walls” for the guidance of
civil engineering personnel involved in planning, designing, construction and
maintenance of buildings. It covers detailed description of various tiles, their uses and
pictorial step-by-step installation procedure as well as their maintenance and repair
aspects.
This handbook does not supersede any existing instructions and specifications
from Railway Board, RDSO and zonal Railways and the provisions of IRWM, BIS
Codes & report on the subject. This handbook is not statutory & contents are for the
purpose of guidance only. Most of the data and information mentioned herein are
available in some form or the other in various books and other printed matter.
I am grateful for the assistance given by Shri Anupam Sharma,
CTA/Civil/CAMTECH, who went through the complete text, collected information,
data etc. Nice data entry has been done by Shri Ramesh Bhojwani, Console Operator,
CAMTECH.
We welcome valuable suggestions from our readers for further improvements.
CAMTECH/Gwalior Manoj K. Agarwal
Date : 21.02.2006 Director/Civil
CONTENTS
Sr.
No.
Description/Topic Page
Nos.
Foreword i
Preface ii
Content iii
Correction Slip iv
1.0 Introduction 01
2.0 Tools and preparatory works required for tiling 02
3.0 Laying of Mosaic tiles 06
4.0 Laying of Ceramic tiles 14
5.0 Maintenance and replacement of tiles 22
6.0 Specification of mosaic tiles (Annexure – A) 25
7.0 Specification of ceramic tiles (Annexure – B) 27
Notes 29
***
ISSUE OF CORRECTION SLIPS
The correction slips to be issued in future for this handbook will be numbered as
follows:
CAMTECH/2006/C/TILE/1.0/CS. # XX date ……
Where “XX” is the serial number of the concerned correction slip (starting from 01
onwards).
CORRECTION SLIPS ISSUED
Sr. No.
of C.Slip
Date
of
issue
Page no. & Item no. modified Remarks
CAMTECH/C/2006/TILE/1.0
Quality Assurance for Tiling on Floors & Walls February - 2006
1
Go to index
CHAPTER - 1
Introduction
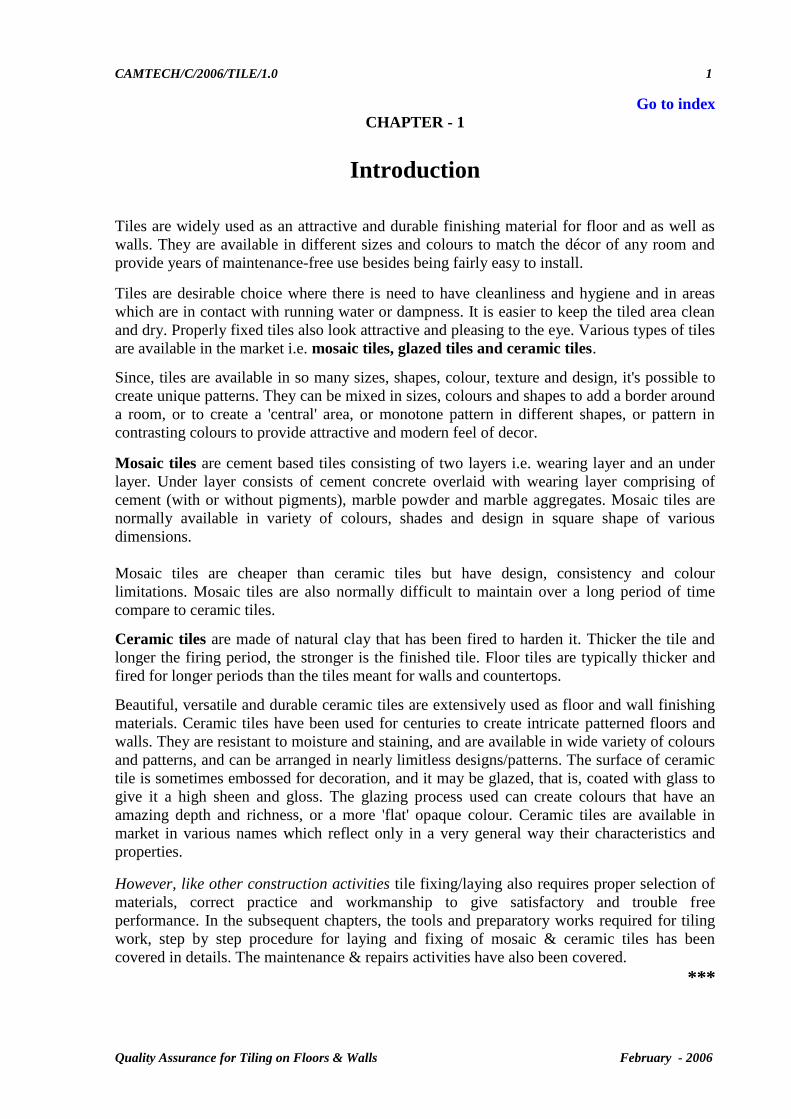
Tiles are widely used as an attractive and durable finishing material for floor and as well as
walls. They are available in different sizes and colours to match the décor of any room and
provide years of maintenance-free use besides being fairly easy to install.
Tiles are desirable choice where there is need to have cleanliness and hygiene and in areas
which are in contact with running water or dampness. It is easier to keep the tiled area clean
and dry. Properly fixed tiles also look attractive and pleasing to the eye. Various types of tiles
are available in the market i.e. mosaic tiles, glazed tiles and ceramic tiles.
Since, tiles are available in so many sizes, shapes, colour, texture and design, it's possible to
create unique patterns. They can be mixed in sizes, colours and shapes to add a border around
a room, or to create a 'central' area, or monotone pattern in different shapes, or pattern in
contrasting colours to provide attractive and modern feel of decor.
Mosaic tiles are cement based tiles consisting of two layers i.e. wearing layer and an under
layer. Under layer consists of cement concrete overlaid with wearing layer comprising of
cement (with or without pigments), marble powder and marble aggregates. Mosaic tiles are
normally available in variety of colours, shades and design in square shape of various
dimensions.
Mosaic tiles are cheaper than ceramic tiles but have design, consistency and colour
limitations. Mosaic tiles are also normally difficult to maintain over a long period of time
compare to ceramic tiles.
Ceramic tiles are made of natural clay that has been fired to harden it. Thicker the tile and
longer the firing period, the stronger is the finished tile. Floor tiles are typically thicker and
fired for longer periods than the tiles meant for walls and countertops.
Beautiful, versatile and durable ceramic tiles are extensively used as floor and wall finishing
materials. Ceramic tiles have been used for centuries to create intricate patterned floors and
walls. They are resistant to moisture and staining, and are available in wide variety of colours
and patterns, and can be arranged in nearly limitless designs/patterns. The surface of ceramic
tile is sometimes embossed for decoration, and it may be glazed, that is, coated with glass to
give it a high sheen and gloss. The glazing process used can create colours that have an
amazing depth and richness, or a more 'flat' opaque colour. Ceramic tiles are available in
market in various names which reflect only in a very general way their characteristics and
properties.
However, like other construction activities tile fixing/laying also requires proper selection of
materials, correct practice and workmanship to give satisfactory and trouble free
performance. In the subsequent chapters, the tools and preparatory works required for tiling
work, step by step procedure for laying and fixing of mosaic & ceramic tiles has been
covered in details. The maintenance & repairs activities have also been covered.
***

CAMTECH/C/2006/TILE/1.0
Quality Assurance for Tiling on Floors & Walls February - 2006
2
Go to index
CHAPTER - 2
Tools and Preparatory Works required for Tiling
2.0 Tools required for tiling work
Different types of tools required for fixing/laying of tiles on floors/walls are:
a) Floats
b) Plumb Bob
c) Floating rule
d) Tile cutter
It is used for spreading the mortar on the surface
of the concrete slab. The size of float is about 30
cm x 10 cm and thickness is about 10 mm.
It is used to check the verticality of the surface
in case of fixing tiles on vertical surfaces.
This tool has markings, which are used to
check the level of mortar.
It is used to cut the tiles manually
wherever odd size gaps are required to be
filled.

CAMTECH/C/2006/TILE/1.0
Quality Assurance for Tiling on Floors & Walls February - 2006
3
e) Cutting Machine
f) Chisels and Hammers
g) Wooden Mallet
h) Skirting Farma
i) Polishing Machine
This electrically operated equipment is
used for cutting the tile.
They are used for cutting and dressing
the natural or manufactured tiles, which
have larger thickness.
It is used for hammering the tile in
proper line and level.
It is used to measure proper line and level
of skirting.
This electrically operated machine is
used for polishing the cement-based tiles
i.e. mosaic tiles or natural stone tiles
fixed on the floor.

CAMTECH/C/2006/TILE/1.0
Quality Assurance for Tiling on Floors & Walls February - 2006
4
j) Polishing stones
k) Other Tools
In addition to the above, tools such as straight edge, set square, spirit level, water tube,
drum for wetting the tiles, trowels and threads are also used during different stages of
tiling.
These stones are used for polishing the
cement-based tiles or natural stone tiles.
They are available in various grades.

CAMTECH/C/2006/TILE/1.0
Quality Assurance for Tiling on Floors & Walls February - 2006
5
2.1 Operations required before taking up tiling work
Before taking up tiling work following operations should be completed:
(i) Laying of services like cables, pipes, conduits etc.
(ii) All the concealed plumbing and electric conduiting works.
All plumbing joints should be tested for leakproofness and pipes and joints
covered with thick coat of bitumen paint and hessain cloth. Care should be taken
that entire surface of the pipeline and fittings are uniformly and adequately coated.
Thereafter, chased areas in walls/floors should be adequately filed with rich
mortar and base coat of plaster applied after 3 to 7 days curing over the chased
area.
(iii) Plastering of all inside walls, ceiling, outside walls and fixing of door and window
frames in place.
(iv) Whenever slope in finished floors is desired, points of level and outlets shall be
correctly marked and outlet opening made before flooring is taken up.
***

CAMTECH/C/2006/TILE/1.0
Quality Assurance for Tiling on Floors & Walls February - 2006
6
Go to index
CHAPTER - 3
Laying of Mosaic Tiles
Mosaic tiles are cement based tiles consisting of two layers i.e. wearing layer and an under
layer. Under layer consists of cement concrete of specified specification, overlaid with
wearing layer comprising of cement (with or without pigments), marble powder and marble
aggregates. Normally, mosaic tiles are available in square shape of various dimensions as
under:
Size (cm) Thickness (mm)
Modular size 19.85 x 19.85
29.85 x 29.85
20
25
Non-Modular size 24.85 x 24.85 22
Other sizes 20 x 20
25 x 25
30 x 30
22 to 25
3.1 Quality of mosaic tiles
The size of tiles to be used for the work shall be as laid down in the drawing or as specified.
The colour and texture of the wearing layer of the tiles shall be uniform throughout its
thickness. The wearing face of the terrazzo tile shall be free from projections/depressions and
cracks. The angles shall be right angles and all arises shall be straight and true. The wearing
layer shall be of required thickness consisting of marble chips, marble powder and cement
(with or without pigment) as specified.
Tiles used for the work shall also conform the physical properties as specified. Properties
normally to be checked are specified in IS:1237-1980 (Annexure – A).
3.1.1 Cement
Cement used for the work shall be as specified. Normally, all types or grades of cement can
be used in tiling as cracks do not occurs due to use of any specific grade or type of cement.
3.2 Laying of floors
Laying of tiles in floor involves following operations:
Marking of reference and level lines
Preparation of sub-grade
Laying of mortar bed
Laying of tiles
Fixing of dado and skirting tiles
Curing
Grinding and polishing

CAMTECH/C/2006/TILE/1.0
Quality Assurance for Tiling on Floors & Walls February - 2006
7
3.2.1 Marking of reference and level lines
After completing the preparatory activities as mentioned in para 2.1, a reference line is
marked on room walls. On the basis of this reference line, a level for sub grade, mortar bed
and the tile-finished surface are established taking into consideration the slope required &
their thickness. Thereafter, respective level lines are transferred/marked on the walls with the
use of line thread and indigo (Neel).
3.2.2 Preparation of sub-grade
The sub-grade, for flooring laid on the ground floor is known as “Base Concrete” whereas
flooring laid over structural slabs, is known as “Cushioning layer”. The base concrete shall
be either lime concrete or cement concrete of specified mix. The thickness of base concrete
shall be as specified (normally 100 mm). For flooring laid over structural slabs, the
cushioning layer, if required, shall be of specified mix & thickness (normally 40 mm).
The sub-grade shall be finished to a reasonably true plane surface about 35 to 50 mm below
the level of the finished floor, properly graded and free from loose earth, dirt or dust and
lumps.
(i) For laying base concrete, the ground or earth filling shall be thoroughly compacted by
watering and ramming in 15 cm layers. This shall then normally covered with clean
coarse well consolidated sand layer of thickness not less than 10 cms and the sand
layer is well wetted before laying concrete for the sub-grade.
For laying the cushioning layer, the surface of sub floor shall be thoroughly cleaned
of dirt, loose particles and laitance by scrubbing with steel wire brush. The surface
then shall be thoroughly cleaned and soaked with water over night and surplus water
removed by mopping immediately before cushioning layer is laid in position. On the
clean damp surface of the sub floor cushioning layer shall be evenly spread between
forms and if necessary, thoroughly tamped and leveled.

CAMTECH/C/2006/TILE/1.0
Quality Assurance for Tiling on Floors & Walls February - 2006
8
(ii) Slope desired in the floor finish shall be provided in the sub-grade concrete. For this
base concrete shall be laid with top level corresponding to reference line marked on
the wall.
(iii) Laitance, scum and inadequately embedded aggregate shall be removed and the
surface of base concrete or cushioning layer, shall be roughened with wire brushes
while the concrete is still green, taking care that not to disturb the concrete.
3.2.3 Laying of mortar bed
Over properly laid sub-grade, the mortar layer is evenly and smoothly spread with the use of
screed battens/floats for preparation of bed for laying of tiles. Both cement mortar as well as
lime mortar can be used for this purpose.
(i) Preparation of mortar for bedding
Cement mortar used shall be of specified mix (normally 1:6). Cement and coarse sand shall
be thoroughly mixed in required proportion by volume either manually or by mechanical
mixer. The quantity of water added should be the minimum necessary to give sufficient
plasticity and workability for laying, as high water-cement ratio will produce a bleeding bed
with high drying shrinkage.
(ii) Spreading of mortar
The sub-grade shall be cleaned of all scum, laitance or plaster droppings or any other loose
foreign matter. It shall be properly wetted without allowing any water pools on the surface.
(a) For laying of mortar bed, first of all the level stubs corresponding to mortar bed level
are provided on the floor area with the help of reference line.
(b) Then, mortar is evenly spreaded over the sub-grade starting from the side of the wall
with thread level fixed at both ends to act as guide. The mortar shall be spread and
levelled with the help of screeding board/float in such a manner that a slightly rough
surface is left, so as to permit absorbsion of cement slurry for satisfactory keying of
the tiles.
Some time a level
stubs (thiyyas)
corresponding to top
of the base concrete is
also built on the floor
area for the guidance
during concreting.
CAMTECH/C/2006/TILE/1.0
Quality Assurance for Tiling on Floors & Walls February - 2006
9
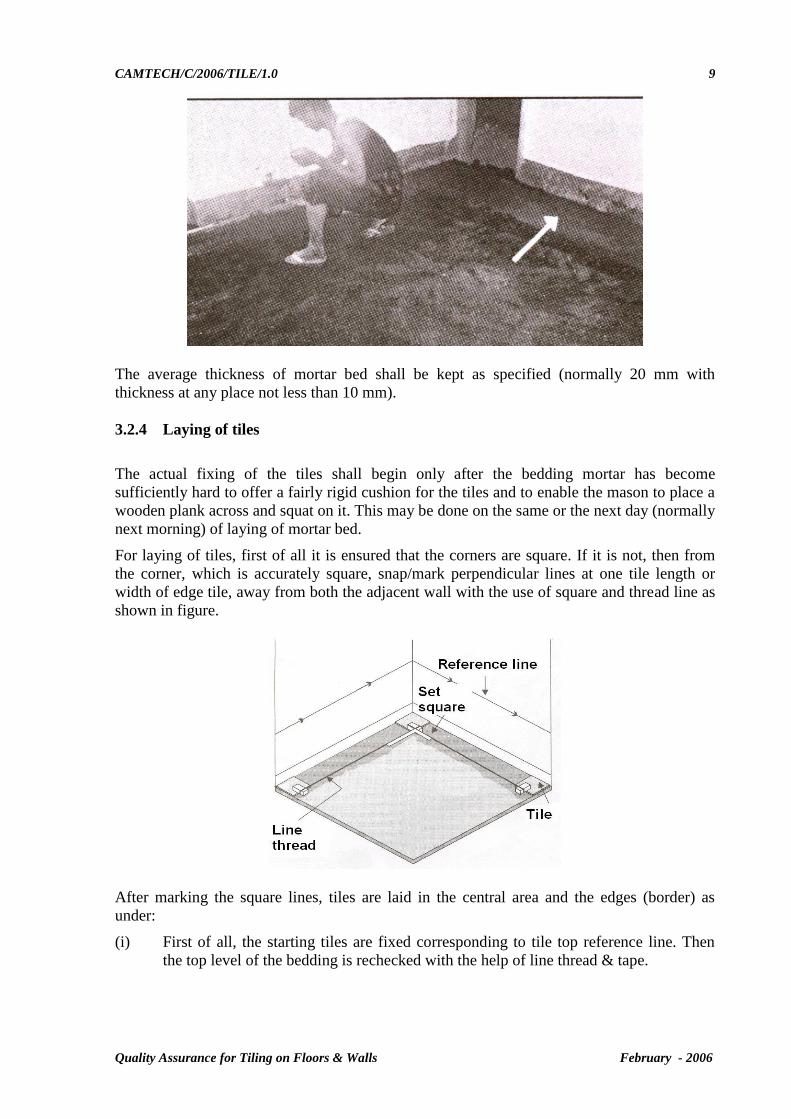
The average thickness of mortar bed shall be kept as specified (normally 20 mm with
thickness at any place not less than 10 mm).
3.2.4 Laying of tiles
The actual fixing of the tiles shall begin only after the bedding mortar has become
sufficiently hard to offer a fairly rigid cushion for the tiles and to enable the mason to place a
wooden plank across and squat on it. This may be done on the same or the next day (normally
next morning) of laying of mortar bed.
For laying of tiles, first of all it is ensured that the corners are square. If it is not, then from
the corner, which is accurately square, snap/mark perpendicular lines at one tile length or
width of edge tile, away from both the adjacent wall with the use of square and thread line as
shown in figure.
After marking the square lines, tiles are laid in the central area and the edges (border) as
under:
(i) First of all, the starting tiles are fixed corresponding to tile top reference line. Then
the top level of the bedding is rechecked with the help of line thread & tape.

CAMTECH/C/2006/TILE/1.0
Quality Assurance for Tiling on Floors & Walls February - 2006
10
(ii) Now, neat cement slurry of honey-like consistency (normally @ 4.5 kg/sq. m) shall be
spread over the mortar bed, over such an area at a time as would accommodate about
20 tiles.
(iii) Then, tiles soaked in water for about 15 minutes and then dried for the same period
(so as to ensure that tiles are damp but not wet when they are laid) are fixed in this
grout one after the other, each tile being gently tapped with a wooden mallet till it is
properly bedded and in level with the adjoining tiles. The joints shall be kept as close
as possible and in straight lines. The joints between the tiles shall normally be 1·5
mm wide.
The surface of the flooring during laying shall be frequently checked with the straight
edge, so as to obtain a true surface of required slope.
(iv) After the tiles have been laid in a room or the day's laying work is completed, the
surplus cement slurry shall be cleaned and the joints shall be cleaned and washed
fairly deep with the help of a broomstick. The cement slurry shall be cleaned before it
sets hard preferably with the use of saw-dust.

CAMTECH/C/2006/TILE/1.0
Quality Assurance for Tiling on Floors & Walls February - 2006
11
(v) The day after the tiles have been laid, all joints shall be cleaned of the cement grout
with a wire brush or with the point of trowel to a depth of 5 mm and any loose
cement, dirt or dust in the joints shall be removed. The joints shall then be filled with
cement grout of the same shade as the colour of the matrix of the tile. The same
cement slurry shall be applied to the entire surface of the tiles in a thin coat with a
view to protect the surface from abrasive damage and fill the pin holes that may exist
on the surface.
(vi) Tiles, which are fixed in the floor adjoining the wall shall go about 10 mm under the
plaster, skirting or dado as may be required or specified. For this purpose, the wall
plaster may be left unfinished by about 50mm above the level of the proposed
finished flooring and the unfinished strip may be plastered later on after the tiles are
fixed.
In odd situations where a full tile cannot be provided, tiles shall be cut to size and
then fixed.
Wherever big areas of floor are to be tiled, the level of the central portion of the floor
shall be kept about 10 mm higher than the level marked at the walls unless specified
otherwise. This is normally done to avoid the optical illusion of a depression in the
central portion of the tiled hall.
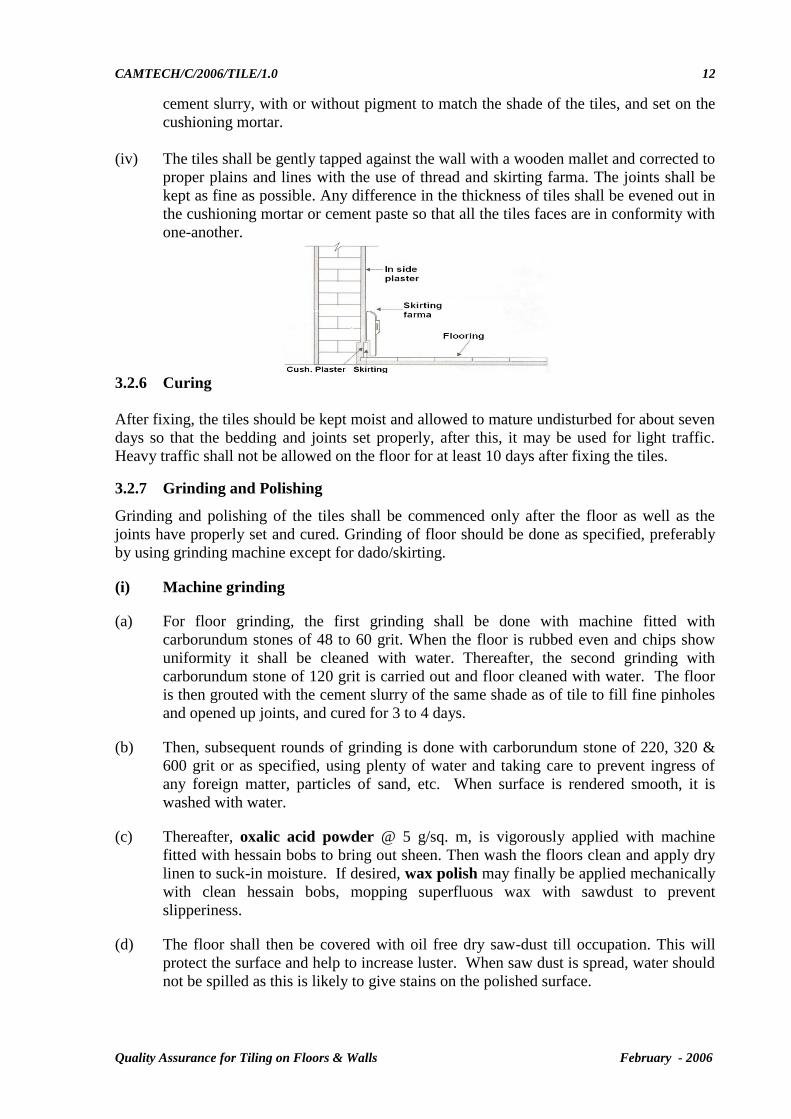
3.2.5 Fixing of skirting or dado tiles
Skirting and dado tiles shall be fixed after the laying of the floor tiles. The portion of the wall
to be tiled shall be left un-plastered.
(i) The masonry joints shall be raked out to a depth of 13 mm in case of brick masonry,
and cement concrete surface shall be hacked and roughened with wire brushes. The
surface shall be cleaned thoroughly and washed with water & kept wet for fixing the
tiles.
(ii) Then, cushioning plaster of cement sand mortar of specified mix (normally1:4) &
thickness (normally 10 mm) shall be evenly and uniformly applied on wall surface &
allowed to be hardened. The plaster shall then be roughened with wire brushes or by
scratching diagonal lines 1.5 mm deep at approximately 8 cms apart both ways.
(iii) Before the cushioning mortar has hardened, the back of tiles to be fixed shall be
buttered with a thin layer of grey cement slurry, and the edges with grey or white
CAMTECH/C/2006/TILE/1.0
Quality Assurance for Tiling on Floors & Walls February - 2006
12
cement slurry, with or without pigment to match the shade of the tiles, and set on the
cushioning mortar.
(iv) The tiles shall be gently tapped against the wall with a wooden mallet and corrected to
proper plains and lines with the use of thread and skirting farma. The joints shall be
kept as fine as possible. Any difference in the thickness of tiles shall be evened out in
the cushioning mortar or cement paste so that all the tiles faces are in conformity with
one-another.
3.2.6 Curing
After fixing, the tiles should be kept moist and allowed to mature undisturbed for about seven
days so that the bedding and joints set properly, after this, it may be used for light traffic.
Heavy traffic shall not be allowed on the floor for at least 10 days after fixing the tiles.
3.2.7 Grinding and Polishing
Grinding and polishing of the tiles shall be commenced only after the floor as well as the
joints have properly set and cured. Grinding of floor should be done as specified, preferably
by using grinding machine except for dado/skirting.
(i) Machine grinding
(a) For floor grinding, the first grinding shall be done with machine fitted with
carborundum stones of 48 to 60 grit. When the floor is rubbed even and chips show
uniformity it shall be cleaned with water. Thereafter, the second grinding with
carborundum stone of 120 grit is carried out and floor cleaned with water. The floor
is then grouted with the cement slurry of the same shade as of tile to fill fine pinholes
and opened up joints, and cured for 3 to 4 days.
(b) Then, subsequent rounds of grinding is done with carborundum stone of 220, 320 &
600 grit or as specified, using plenty of water and taking care to prevent ingress of
any foreign matter, particles of sand, etc. When surface is rendered smooth, it is
washed with water.
(c) Thereafter, oxalic acid powder @ 5 g/sq. m, is vigorously applied with machine
fitted with hessain bobs to bring out sheen. Then wash the floors clean and apply dry
linen to suck-in moisture. If desired, wax polish may finally be applied mechanically
with clean hessain bobs, mopping superfluous wax with sawdust to prevent
slipperiness.
(d) The floor shall then be covered with oil free dry saw-dust till occupation. This will
protect the surface and help to increase luster. When saw dust is spread, water should
not be spilled as this is likely to give stains on the polished surface.
CAMTECH/C/2006/TILE/1.0
Quality Assurance for Tiling on Floors & Walls February - 2006
13
(ii) Hand grinding
When hand grinding and polishing has to be adopted for dado and skirting the various
processes in the same sequence shall be carried out as described above except that
carborundum stone of coarse grade (no. 60) shall be used for first rubbing, stone of medium
grade (no. 80) for second rubbing and stone of fine grade (no. 120) for final rubbing.
***
CAMTECH/C/2006/TILE/1.0
Quality Assurance for Tiling on Floors & Walls February - 2006
14
Go to index
CHAPTER - 4
Laying of Ceramic Tiles
Today ceramic tiles are widely used throughout the home, in the living rooms, corridors and
passages, fireplaces, as decorative elements on walls, and of course, the bathrooms and
kitchens. Ceramic tiles are also used widely in commercial places for office floors, shopping
malls, cinemas, hospitals and hotels and also as exterior cladding on walls of commercial
buildings. In essence, the usage is only limited by ones own imagination. They come in many
different sizes and colours to match the décor of any room.
(a) The ceramic tiles are now available:
In various surface textures like Luster, Satin Matt, Rusticos, Mirror Finish, Raindrop
effect, Water resistant, Glaze Polish, Antiskid, Cobblestone, etc.
In designs emulating, Natural Stone designs like Italian Marble, Indian Marble &
Granite.
In concept based pattern & large format type.
Also as Vitrified & Porcelain tiles.
Today, Lusters and/or a combination of Luster with Satin Matt effects are almost common.
Many new surface textures like Rusticos, Satin Matt, etc. are also now available.
Another feature of recent trends is Natural surface effects i.e. having surface effect similar to
natural stones design such as Italian Marble or Indian Marble or Granite. New natural stone
effects such as Rusticos & Cobblestone are also fast catching attention.
Trends is also to have a design that break the monotony i.e. Concept tiles. Concept tiles are
designs made using a combination of two or more tiles. The entire set together form a
complete design. Most modern houses are nowadays opting for such designs.
On size aspects, trend is to go for large Format tiles. The conventional 12" x 12" floor tiles
are loosing out to the 18" x 18" & 24" x 24" sized tiles. These tiles reduce the number of gaps
that are created by installing the conventional floor tiles.
Vitrified tiles are products that possess water absorption below 0.05% and Porcelain tiles are
products that possess water absorption below 0.5%. They come in Natural designs (Marble,
Granite, etc), in polished and unpolished finishes. They can be laid joint-free, are easy to
maintain and pre-sized & ready to lay products. These features are far superior to the existing
features provided by ordinary ceramic tiles.
The manufacturing process of the Vitrified tiles is far more superior to ceramic tiles. The
Vitrified tiles are also homogeneous and consistent in composition, whereas ceramic tiles
have merely a decorative coat on the top and hence their composition is not consistent.

CAMTECH/C/2006/TILE/1.0
Quality Assurance for Tiling on Floors & Walls February - 2006
15
(b) Ceramic tile come in different types suited for different uses e.g. wall tiles and floor
tiles. A wall tile typically has a high gloss and lustrous finish that makes them easier
to clean since they are traditionally used mainly in bathrooms and kitchens, whereas
the floor tile is heavier and thicker than the wall tile, and traditionally has a matt
finish to allow for abrasion resistance and anti-skid properties.
Therefore, care should be taken to ensure that the floor tiles are not applied on walls.
The chances of floor tiles to adhere to the vertical surface are lesser than wall tiles,
and may result easily dislodging from the surface and also cracking. However it is an
individual's choice if he is still ready to take risks, he can use the floor tiles on the
wall.
Ceramic tiles are available in market in various grades/groups (Annexure - B) based
on their abrasive resistance and anti-skid properties, suitable for particular
applications. Therefore, tile used shall be of proper grade corresponding to area of
applications.
(c) Ceramic tiles have one major prerequisite for laying i.e. a smooth and rigid sub-floor
to support the installation. Ceramic tiles are not flexible, so they can crack if installed
over a rough surface or thin sub-floor. Therefore, the importance of correct tile fixing
cannot be ignored because everything else that goes into choosing a tile, be it the
quality, size, design, colour, etc., all becomes useless, when the fixing is not done
properly.
4.1 Quality of ceramic tiles
The size, design, colour and texture of ceramic tiles to be used for the work shall be as laid
down in the drawing or as specified. Tile used for the work shall be of appropriate grade/
group and shall conform to surface quality, dimensions, physical, chemical & thermal
properties as specified. Properties normally to be checked are specified in BIS:13753-56 of
1993 (Annexure – B).
4.1.1 Cement
Cement used for the work shall be as specified. Normally, all grade of cement are generally
used for fixing the tiles. It is preferable to use cement sand paste than to use neat cement
paste, as it can cause shrinkage problems leading to cracking of tiles and leaching of lime.
Sand used for fixing the tile shall be of passing 100 microns.
4.2 Laying of floor
It involve following operations:
Marking of reference and level lines
Preparation of sub-grade
Laying of mortar bed
Laying of tiles
Curing

CAMTECH/C/2006/TILE/1.0
Quality Assurance for Tiling on Floors & Walls February - 2006
16
4.2.1 Marking of reference and level lines
After completing the preparatory activities as mentioned in para 2.1, the marking of reference
and level lines shall be carried out as mentioned in para 3.2.1 for mosaic tiles.
4.2.2 Preparation of sub-grade
It shall be carried out as mentioned in para 3.2.2 for mosaic tiles.
4.2.3 Laying of mortar bed
It shall be carried out as mentioned in para 3.2.3 for mosaic tiles except that the surface shall
be wood finished, and the rendering and curing completed at least two weeks prior tiling. In
no case tiles shall be fixed on fresh floor.
4.2.4 Laying of tiles
It consists of following operations:
Marking of layout lines
Plan/pattern for the tile application
Fixing of tiles
(i) Marking of layout line
To ensure attractive quality work it is essential that the tiles are laid so that there are full size
tiles in highly visible areas and all edge (border) tiles are of atleast half tile width or more.
Accordingly, layout is planned as under:
(a) Marking of exact center
8' 16'
Locate the exact center on each wall and
mark that center spot. In rooms with
offsets or irregularities, ignore the
irregularities in the measuring process.
Hold a chalk line at the center position on
facing walls, as marked and snap it on the
floor. The exact center will be marked at
the point where the two lines cross.
To check for accuracy, measure 3' in one
direction and 4' in the opposite (90°)
direction. When measured from true
center, the distance from the 3' marking to
the 4' point will be exactly 5'. If not, re-
measure and re-chalk each wall to find the
true center.
4'
3' 5'
16'
8'
20'
10'
centre
CAMTECH/C/2006/TILE/1.0
Quality Assurance for Tiling on Floors & Walls February - 2006
17
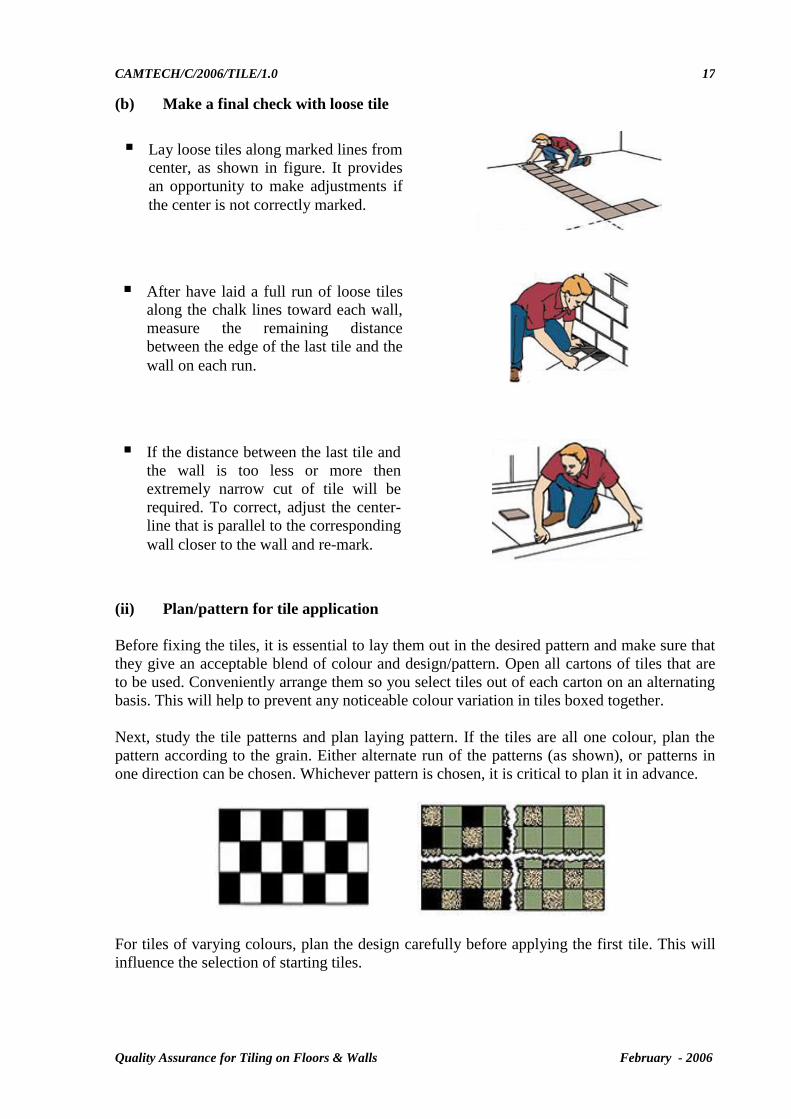
(b) Make a final check with loose tile
(ii) Plan/pattern for tile application
Before fixing the tiles, it is essential to lay them out in the desired pattern and make sure that
they give an acceptable blend of colour and design/pattern. Open all cartons of tiles that are
to be used. Conveniently arrange them so you select tiles out of each carton on an alternating
basis. This will help to prevent any noticeable colour variation in tiles boxed together.
Next, study the tile patterns and plan laying pattern. If the tiles are all one colour, plan the
pattern according to the grain. Either alternate run of the patterns (as shown), or patterns in
one direction can be chosen. Whichever pattern is chosen, it is critical to plan it in advance.
For tiles of varying colours, plan the design carefully before applying the first tile. This will
influence the selection of starting tiles.
Lay loose tiles along marked lines from
center, as shown in figure. It provides
an opportunity to make adjustments if
the center is not correctly marked.
After have laid a full run of loose tiles
along the chalk lines toward each wall,
measure the remaining distance
between the edge of the last tile and the
wall on each run.
If the distance between the last tile and
the wall is too less or more then
extremely narrow cut of tile will be
required. To correct, adjust the center-
line that is parallel to the corresponding
wall closer to the wall and re-mark.

CAMTECH/C/2006/TILE/1.0
Quality Assurance for Tiling on Floors & Walls February - 2006
18
(iii) Fixing of tiles
The tiles can be fixed either by dry or wet fixing. In dry fixing the tiles are fixed by using
conventional cement mortar. In wet fixing this is done by using special adhesives that can fix
tiles directly on the existing flooring.
For fixing of tiles, first of all, it is ensured that the corners are square. If it is not, then from
the corner, which is accurately square, snap/mark perpendicular lines at one tile length or
width of edge tile as decided above, away from both the adjacent wall with the use of square
and thread line as shown in figure.
After marking the square lines tiles are laid in the central area and the edges (border) in
following sequence.
(a) For wet fixing, using tile-fixing adhesives, for best results, follow the instruction
provided along with the adhesives by the manufacturers. For dry fixing, using sand
and cement paste, following sequence shall be observed:
Use cement and sand mortar in the ratio of 1:1 or 1:2 or as specified. Add some water
to create a consistent paste. Do not use neat cement for fixing tiles.
Once the mixing has been completed, do not add any further water and use the same
within one hour.
Soak the tiles in clean water for at least 30 minutes before fixing.
Remove the tiles from water and allow them to drain to ensure that there is no film of
water on the tile surface.
Apply the bedding material evenly and tap the tile firmly into position to ensure
proper contact between the tile and floor.
Backing material between tile joints should be cleaned before the tile is fixed. It is
advisable to maintain a gap of 1.5 mm between two tiles to allow for possible
expansion. Remove all excess cement from joints.
The surface of the flooring during laying/fixing shall be frequently checked with the
straight edge, so as to obtain a true surface of required slope.
(b) Wait for adequate time after fixing the tiles preferably for 24 hours. For wet fixing,
after this period, fill the joints with the grout as specified or recommended by
manufacturer. Fifteen minutes after the grouting process, wipe off the excess grout
with a damp sponge and polish the tiles with a soft & dry cloth. For dry fixing, after
waiting period clean all joints and refill the joints with white or coloured cement paste

CAMTECH/C/2006/TILE/1.0
Quality Assurance for Tiling on Floors & Walls February - 2006
19
neatly. Press the paste with finger, so that cement paste is pressed within the joints
properly. After removing excess paste & cleaning the tiles, curing should be done
thoroughly for about 15 days.
(c) For cleaning tiles, use water or dilute soap solution followed by water with soft, moist
cloth or sponge, do not scrub or scratch. Do not use acid/alkali/solvent/oils/
cleaning powders etc for cleaning tiles.
4.3 Fixing on walls
It involves following operations:
Preparation of surface
Marking of reference and level lines
Fixing of tiles
Curing
4.3.1 Preparation of surface
After completing the preparatory activities as mentioned in para 2.1, plastering of the wall
surface to be tiled shall be completed to a wood finish and cured for at least two weeks prior
tiling. Do not fix tiles on fresh wall.
4.3.2 Marking of reference and level line
Before fixing up the tiles, check right angles of all corners and the verticality of the plaster
with the help of square and plumb bob.
Then, decide from where to begin fixing the tiles on the wall depending on the general design
and the shape of the tiles. This will avoid an enforced cut, which would cause critical points
in the laying of the tiles and would give a strange effect when looking at the overall design.
Based on the proposed layout and with the help of a rule, measure where to begin tiling (the
border). Then, mark on the wall the total measurement for the border. With this measurement,
mark the levels on all the walls with the help of water tube, to ensure that there is no
deviation in the height of the border, as the border itself will be the starting point for all the
wall tiling from the bottom towards the top, until the end.
4.3.3 Fixing of tiles
After marking the starting line as above, provide levelling markers (thiyyas) on the top
portion of the wall and with plumb bob & string (line dori) at few more level as shown in
figure.

CAMTECH/C/2006/TILE/1.0
Quality Assurance for Tiling on Floors & Walls February - 2006
20
The tiles are then fixed by wet or dry method as under:
(a) For wet fixing, using tile-fixing adhesives, for best results, follow the instruction
provided along with the adhesives by the manufacturers. For dry fixing, using sand
and cement paste, following sequence shall be observed:
Use cement and sand mortar in the ratio of 1:1 or 1:2 or as specified. Add some water
to create a consistent paste. Do not use neat cement for fixing tiles.
Once the mixing has been completed, do not add any further water and use the same
within one hour.
Soak the tiles in clean water for at least 30 minutes before fixing.
Remove the tiles from water and allow them to drain to ensure that there is no film of
water on the tile surface.
Cover the tile back uniformly with cement mortar paste. The tile should then be
pressed gently on the plastered base and fixed into position by tapping the tile into
correct position. All corners should not sound hollow when gently stroked with mallet
on the tile. Hollow sound is the indication of voids due to bad workmanship. It is
necessary to match vertical and horizontal lines of the tiles. If any corner of a tile is
projecting out, then tap the tile with the help of wooden mallet to remove the
projection.
Backing material between tile joints should be cleaned before the tiles are fixed. It is
advisable to maintain a gap of 1.5 mm between two tiles to allow for possible
expansion. Remove all excess cement from joints.

CAMTECH/C/2006/TILE/1.0
Quality Assurance for Tiling on Floors & Walls February - 2006
21
The surface of the wall during fixing shall be frequently checked with the plumb bob
& straight edge, so as to obtain a true vertical surface.
(b) Wait for adequate time after fixing the tiles preferably for 24 hours. For wet fixing,
after this period, fill the joints with grout. Fifteen minutes after the grouting process,
wipe off the excess grout with a damp sponge and polish the tiles with a soft & dry
cloth. For dry fixing, after waiting period clean all joints and refill the joints with
white or coloured cement paste neatly. Press the paste with finger, so that cement
paste is pressed within the joints properly. After removing excess paste & cleaning the
tiles, curing should be done thoroughly for about 15 days.
(c) For cleaning tiles, use water or dilute soap solution followed by water with soft, moist
cloth or sponge, do not scrub or scratch. Do not use acid/alkali/solvent/oils/
cleaning powders etc for cleaning tiles.
***
CAMTECH/C/2006/TILE/1.0
Quality Assurance for Tiling on Floors & Walls February - 2006
22
Go to index
CHAPTER - 5
Maintenance and Replacement of Tiles
5.0 Maintenance of mosaic tiles
After laying, mosaic floor shall be kept clean and free from cement, oil, paint, distemper,
plaster droppings and all materials likely to stain or spoil the tiles. If appliances, such as
trestles, ladders, steps, etc, have to be used for electricians, plumbers and other light work, it
shall be ensured that parts in contact with the flooring are padded and no sliding of the
appliances on the finished flooring occurs.
Stair finishes, particularly nosing, are liable to be damaged by dragging or dropping of
articles up or down the stairs. It is, therefore, necessary to protect the stairs against such
causes of damage.
Polished tile-floors shall be regularly swabbed with clean water followed by brisk rubbing
with dry linen. If they are very dirty, water and soap may be used. Care shall be taken to
remove any soap film deposited in washing, as failure to do so will result in the floor
becoming slippery and dull-looking. Use of soda, acid, etc, shall be avoided.
Resistance to staining, to a great extent, depends upon the degree of maintenance.
5.1 Maintenance of ceramic tiles
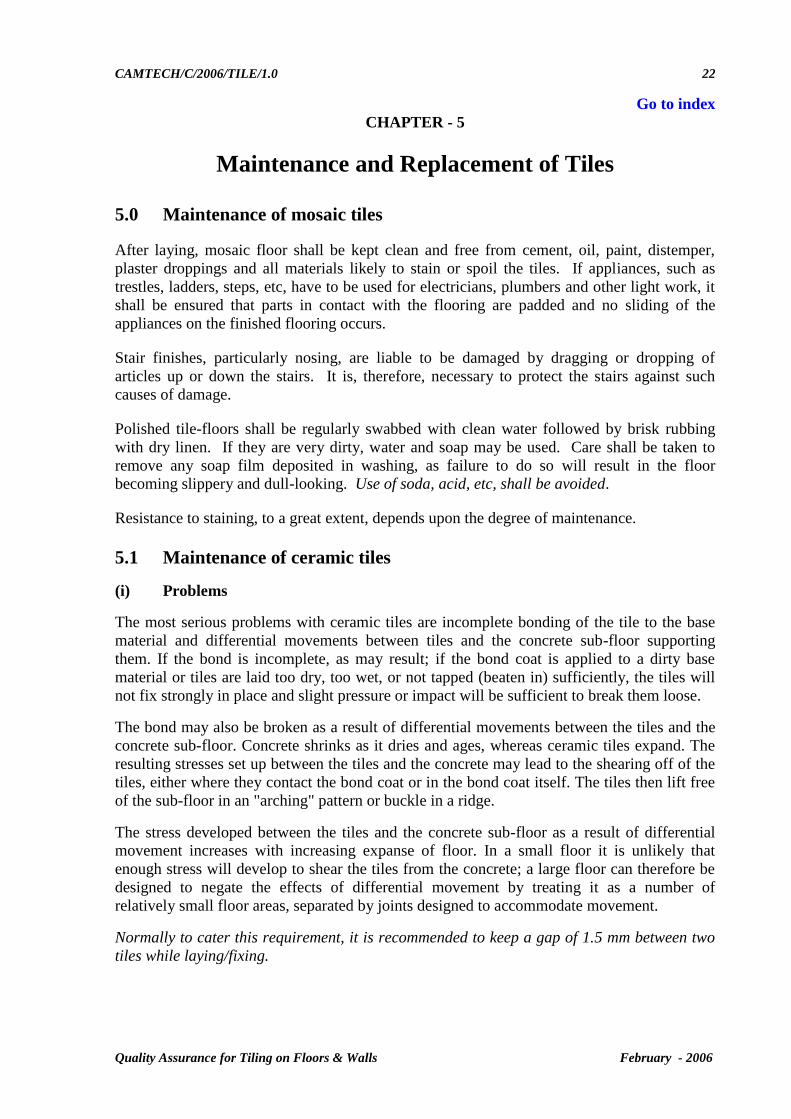
(i) Problems
The most serious problems with ceramic tiles are incomplete bonding of the tile to the base
material and differential movements between tiles and the concrete sub-floor supporting
them. If the bond is incomplete, as may result; if the bond coat is applied to a dirty base
material or tiles are laid too dry, too wet, or not tapped (beaten in) sufficiently, the tiles will
not fix strongly in place and slight pressure or impact will be sufficient to break them loose.
The bond may also be broken as a result of differential movements between the tiles and the
concrete sub-floor. Concrete shrinks as it dries and ages, whereas ceramic tiles expand. The
resulting stresses set up between the tiles and the concrete may lead to the shearing off of the
tiles, either where they contact the bond coat or in the bond coat itself. The tiles then lift free
of the sub-floor in an "arching" pattern or buckle in a ridge.
The stress developed between the tiles and the concrete sub-floor as a result of differential
movement increases with increasing expanse of floor. In a small floor it is unlikely that
enough stress will develop to shear the tiles from the concrete; a large floor can therefore be
designed to negate the effects of differential movement by treating it as a number of
relatively small floor areas, separated by joints designed to accommodate movement.
Normally to cater this requirement, it is recommended to keep a gap of 1.5 mm between two
tiles while laying/fixing.

CAMTECH/C/2006/TILE/1.0
Quality Assurance for Tiling on Floors & Walls February - 2006
23
However, for application on large areas, for detailed information on the need for control
joints and their design, the recommendations of the supplier of particular floor tile materials
should be sought and followed.
(ii) Maintenance
Ceramic tiles are easy to maintain and normally require little maintenance efforts. A tile
surface may be washed with warm water to remove minor soiling or with warm water
containing detergent when soiling is heavy. Mildly abrasive scouring powder can be used on
unglazed tiles but not on glazed ones. A cleaning solution should not be left on the surface
any longer than is necessary; and after cleaning, the surface should be rinsed thoroughly and
the water mopped up to leave the surface as dry as possible.
Heavy stains are usually not difficult to remove. Stains of ink, blood, coffee, mustard oil and
food juice may be taken off by the use of household bleach; the surface is washed for 5 to 10
minutes then rinsed with water. Grease and fat, can be removed by washing with a solution of
10 per cent sodium carbonate in water or 5 per cent caustic soda, allowing the solution to be
in contact with the surface for about an hour, then rinsing thoroughly. Wax, tar and asphalt
can be loosened and scraped off by applying kerosene, naptha or carbon tetrachloride. Iron
stains such as rust stains and tool marks may be removed by washing with a 5 per cent
solution of hydrochloric acid in water; the same remedy is used for the removal of hard water
deposits and efflorescence of calcium or magnesium carbonate. This solution or other acid
should not be used on glazed tile, and when used on other tiles must be rinsed thoroughly.
The application of linseed oil or a polish to ceramic tile floors is not recommended. Such
treatments not only make the surface slippery and dangerous to walk on but also make the
tiles more difficult to clean.
5.3 Reasons for cracks in tiles
Cracks are often observed on tiles and they can occurs due to several reasons, such as:
(a) Uneven settlement of the wall backing the tiled work.
(b) Rusting of concealed pipelines or reinforcement causes spalling of concrete or
masonry leading to cracks in concrete or masonry base as well as on the tiled work
over it.
(c) Expansive chemical reaction due to use of poor quality neeroo or any other material
mixed with cement can cause tiles to crack.
(d) Excessive thickness of paste used to fix the tile, which often shrinks and cracks the
tile.
(e) Uneven application of adhesive paste leaving voids. If load or impact is given on this
hollow area it will cause the tile to crack.
(f) Poor quality of tiles can also crack easily.

CAMTECH/C/2006/TILE/1.0
Quality Assurance for Tiling on Floors & Walls February - 2006
24
5.4 Replacement of broken tiles
Replacement of damaged files shall be carried out as under:
(a) First of all, broken tile shall be removed with the use of chisel and hammer, taking
care that not to damage the adjoining tiles or their bond. To provide required space to
set the new tiles in level with the floor surface, enough of the bed, beneath the
damaged tiles shall be removed.
(b) Then, after cleaning and wetting of bedding, fix new tile with cement sand paste or
cement slurry, tapping the tile gently with a wooden mallet till it is properly bedded
and in level with the adjoining tiles.
(c) After filling the joints, tile shall be cured, cleaned and polished.
***

CAMTECH/C/2006/TILE/1.0
Quality Assurance for Tiling on Floors & Walls February - 2006
25
Go to index
Annexure – A
Specification of Mosaic Tiles
1.0 Wearing layer
Minimum thickness of wearing layer shall be as under:
S. No. Class of tile Min. thickness of
wearing layer (mm)
1 Plain cement and plain coloured tiles for general
purpose
5
2 Plain cement and plain coloured tiles for heavy duty 6
3 For general purpose tarrazo tiles with chips of size
varying from the smallest up to 6 mm
5
4 For general purpose tarrazo tiles with chips of size
varying from the smallest up to 12 mm
5
5 For general purpose tarrazo tiles with chips of size
varying from the smallest up to 20 mm
6
2.0 Quality requirement
The dimensions and other physical properties of mosaic tiles shall be as under :
Sr.
No.
Properties Remarks
1 Dimensions All dimensions should be within + 1 mm for length
and breadths and + 0.5 mm for thickness.
2 Flatness of surface The amount of convexity and concavity should not
be more than 1 mm.
3 Perpendicularity The longest gap between the arm of the square and
the edge of the tile should not be more than 2% of
the length of the edge.
4 Straightness The gap between the thread and the surface of the
tile should not be more than 1% of the length of the
edge.
5 Water absorption The average water absorption should not exceed
10%.
6 Wet transverse strength The average wet transverse strength should be more
than 3N/mm2.
7 Resistance to wear The wear should be less than the specified value -
(a) For general purpose tiles
- Average wear - 3.5 mm
- Wear on individual specimen - 4.0 mm
(b) For heavy duty floor tiles
- Average wear - 2.0 mm
- Wear on individual specimen - 2.5 mm

CAMTECH/C/2006/TILE/1.0
Quality Assurance for Tiling on Floors & Walls February - 2006
26
3.0 Sampling and Testing
Testing and checking of tiles shall be carried out as under:
(i) Sample collection
The consignment of tiles should be divided into number of lots. Each lot should be inspected
separately for ascertaining its conformity to the requirement of the specifications.
The tiles selected should be of same type, class, shape and size and from a single
manufacturer. For inspection and testing tiles should be chosen randomly.
(ii) Sample size
The number of tiles to be selected out of each consignment of 2000 tiles or a part thereof, for
testing of various properties shall be as under:
(a) For conformity to requirements of shape and dimensions, wearing layer
and general quality
12 Nos.
(b) For transverse strength test (wet) 6 Nos.
(c) For water absorption test 6 Nos.
***

CAMTECH/C/2006/TILE/1.0
Quality Assurance for Tiling on Floors & Walls February - 2006
27
Go to index
Annexure – B
Specification for Ceramic Tiles
1.0 Specification
Specification for ceramic tiles with different water absorption (E) are covered in the
following BIS standards:
(a) E > 10% - BIS - 13753 of 1993
(b) 6% < E < 10% - BIS - 13754 of 1993
(c) 3% < E < 6% - BIS - 13755 of 1993
(d) E < 3% - BIS - 13756 of 1993
2.0 Properties of tiles
Besides shape, size and surface quality following properties are normally checked:
(a) Friction Coefficient is the relative slip resistance of a Ceramic Tile. The friction test
is a laboratory or field test to provide comparable slip resistance values for floor tiles.
The measurements provide a valuable insight in evaluating slip resistance. The higher
the friction coefficient more is the slip resistance of the tile.
(b) Abrasion Resistance measures the hardness of the glaze and the overall durability of
the tile. Based on the results of this test and anti-skid properties, tiles are graded in
various groups/grade as per Porcelain Enamel Institute (P.E.I.) rating with their
recommended areas of use, as under.
Group Recommended applications
I Light traffic areas – residential rooms, bedrooms, living, drawing rooms.
II Medium- light traffic areas - residential rooms, bedrooms, kitchen,
living, drawing rooms.
III Medium – heavy traffic areas with low abrasion – bathrooms, lobbies,
balconies and all rooms in private residences.
IV
Medium- heavy traffic areas with high abrasion – offices, classrooms,
hospital rooms, hotel rooms, showrooms, banks, and all heavy foot
traffic interiors.
V
Intense and heavy traffic areas having intensive foot traffic – office
lobbies, schools, hospitals, hotels, supermarkets, commercial complexes,
all reception areas, corridors, gymnasiums, parking, and heavy traffic
exteriors.
(c) Scratch hardness of a tile refers to the exterior surface of the tile and how easily it
will mar. It is important for floor tiles. Higher the number the better is the tile. A
value of 7 or greater is normally recommended for commercial applications.

CAMTECH/C/2006/TILE/1.0
Quality Assurance for Tiling on Floors & Walls February - 2006
28
(d) Water Absorption measures the susceptibility of the body of the tile to absorb water.
Tiles range from impervious (less than 0.5%) to Non-Vitreous (more than 7.0%).
Exterior applications will require an impervious tile. The water absorption may
impact the installation method, as well. It is also used as a measure of stain resistance
of unglazed tiles. Generally, for unpolished, unglazed tile, lower is the water
absorption the greater is the stain resistance.
(e) Bending/Breaking Strength measures the expected load bearing capacity. The
higher the breaking strength, the stronger and more durable is the tile.
(f) Chemical Resistance measures the resistance of the tile to various chemicals. An
application where there is exposure to staining chemicals and substances, tiles
resistant to them, shall be used.
3.0 Quality requirement
Normally tiles used for the work shall satisfy following surface quality & dimensional
requirements, physical, chemical and thermal properties.
Sr. Characteristics Wall Tile Floor Tile Vitrified Tile
EN159 BIII,
BIS13753, ISO13006 BIII
EN177 BIIa,
BIS13755, ISO13006 BIIa
EN176 BI, ,
BIS13756, ISO13006 BIa
A Dimension & Surface Quality
1 Deviation in length +/- 0.5% +/- 0.5% +/- 0.6%
2 Deviation in thickness +/- 0.5% +/- 0.5% +/- 0.5%
3 Straightness of sides +/- 0.3% +/- 0.5% +/- 0.5%
4 Rectangularity +/- 0.5% +/- 0.5% +/- 0.6%
5 Surface flatness (warpage) +/- 0.5% +/- 0.5% +/- 0.5%
6 Surface quality Min.95% free
from defects
Min.95% free
from defects
Min.95% free
from defects
B Physical Properties
1 Water absorption (%) >10% & < 20% 3% - 6% < 0.5%
2 Bending strength (N/sq.mm) > = 15 > = 22 >=27
3 Scratch hardness (Mohs) >= 3 Min. 3 Min. 5 Min. 6
4 Resistance to surface abrasion Grade II To be specified
by manufacturer.
To be specified
by manufacturer.
5 Crazing resistance Min. 2 cycles Min. 2 cycles Required
C Chemical Properties
1 Resistance to staining Min. class 2 Min. class 2 --
2 Resistance to household
chemicals
Min. class B Min. class B Required
D Thermal Properties
1 Thermal shock resistance
Resistance to 10
cycles
Resistance to 10
cycles
No damage
2 Thermal expansion Max. 9 x 10⁻⁶
K-1
at 1000C
Max. 9 x 10⁻⁶
K-1
at 1000C
Max. 9 x 10⁻⁶
K-1
at 1000C
***
CAMTECH/C/2006/TILE/1.0
Quality Assurance for Tiling on Floors & Walls February - 2006
29
NOTES
1.
2.
3.
4.
5.
6.
7.
8.
9.
10.
11.
12.
13.
14.
15.
16.
17.
18.

CAMTECH/C/2006/TILE/1.0
Quality Assurance for Tiling on Floors & Walls February - 2006
30
OUR OBJECTIVE
To upgrade Maintenance
Technologies and Methodologies
and achieve improvement in
productivity and performance
of all Railway assets and manpower
which inter-alia would cover
Reliability, Availability,
and Utilisation.
The contents of this handbook are for guidance only & are not
statutory. It also does not supersede any existing specification
and instructions from Railway Board, RDSO, and Zonal
Railways & the provisions of IRWM, BIS Codes/Reports on the
subject. If you have any suggestion & any specific comments,
please write to us :
Contact person : Director (Civil)
Postal Address : Centre for Advanced
Maintenance Technology,
Maharajpur, Gwalior (M.P.)
Pin code – 474 020
Phone : (0751) - 2470869, 2470803
Fax : (0751) - 2470841