manager self-service training manual · employee peoplesoft login ... manager self service is a...
TRANSCRIPT
Manager Self-Service Training Manual
A User’s Guide for UND Managers and Supervisor created by Joanne Barstad
Revised 6/28/2018
Contents Introduction ..................................................................................................................................................................... 1
I-9’s .................................................................................................................................................................................. 1
Manager Self Service Hire Process .................................................................................................................................. 4
New Hire Approve/Review .............................................................................................................................................. 8
Navigation New Hire Request ....................................................................................................................................... 13
Initiate/Submit New Hire Request ................................................................................................................................ 15
Add Approvers/Reviewers ............................................................................................................................................. 23
Employee Process Part 1 ............................................................................................................................................... 25
Employee PeopleSoft Login ........................................................................................................................................... 26
Personal Data ................................................................................................................................................................ 27
Employee Process Part 2 ............................................................................................................................................... 31
New Employee On-boarding Activity Guide .................................................................................................................. 34
Affordable Care Act ....................................................................................................................................................... 36
Add/Update Biographical Information .......................................................................................................................... 40
Disability Status ............................................................................................................................................................. 42
Veteran Status ............................................................................................................................................................... 46
Ethnic Group .................................................................................................................................................................. 49
Add/Update Addresses ................................................................................................................................................. 51
Add/Update Phone ........................................................................................................................................................ 53
Add/Update Email Addresses ........................................................................................................................................ 54
Add/Update Emergency Contact................................................................................................................................... 56
Data Privacy ................................................................................................................................................................... 60
Designated Medical Provider ........................................................................................................................................ 61
W-4 Tax Information ..................................................................................................................................................... 64
NDWR Form ................................................................................................................................................................... 68
I-9 Section 1 ................................................................................................................................................................... 69
Direct Deposit ................................................................................................................................................................ 74
Benefits Forms ............................................................................................................................................................... 78
SafeColleges .................................................................................................................................................................. 78
Approval Process for Approvers .................................................................................................................................... 79
References ..................................................................................................................................................................... 85

1
Introduction
Manager Self Service is a module in HRMS for electronic Work Flow of employee hire, change and termination information. Work Flow will streamline the way employee information is managed in HR by ensuring accurate data, initiating and tracking approvals, and limiting mistakes that can be made with manual data entry. Work Flow uses pre-approved workflow paths. All workflows are routed automatically after the event has been submitted by a Supervisor. The initiating Supervisor will receive an email alert when the event has been denied or pending their approval. These items still need to be completed as before:
Applitrack process remains the same
Criminal History Records Check (CHRC) completed (if needed) – HR will call department
when it is approved
Complete JobX (if needed)
Remind employee to visit a Financial Institution to setup an account for direct deposit
I-9’s
1. We will be using Paper I-9’s. If unsure whether the employee needs to complete an I-9 call Human Resources (7-4890). If a new I-9 is needed the department should submit the new online I-9 Request for Payroll form to Human Resources. Direct the new employee to Human Resources (Twamley Hall Room 312) or the department’s E-Verify site immediately with their original unexpired documents.
2. E-Verify sites that are using the online process and feel that it is working well can continue with the online I-9’s if they prefer. E-Verify sites do NOT need to fill out the online I-9 request form (except for international employees) if they choose to revert to paper I-9’s or if they continue with online I-9’s.
3. Once the I-9 is complete Human Resources will send an email to the Department Hire Initiator with the I-9 completion date and the earliest estimated start date possible for the employee.
4. When the Department Hire Initiator receives the email, the hire can then be entered
in MSS. The hire date entered into MSS should be the date listed in the email or later, no date prior may be used. This email is to be attached to the hire and in the comments enter I-9 and the date completed. Please note you will still need to enter the hire a minimum of 4 business days prior to the start date.

2
5. The employee will complete Section 1 of the I-9 again in Step 2 but they will not need to come back to Human Resources.
6. Department hire initiators will continue to be asked to watch hires to make sure new employees are completing all required steps.
7. The process for additional items such as benefit enrollment will remain the same.
**Please submit an I-9 request form for all hires. Including hires for a secondary job and for those that complete the Remote
Hire Form. We need a 4 day lead time on all hires.
Guidance regarding “I-9 Request for Payroll” form:
The Department Hire Initiator should submit the online I-9 Request form.
Human Resources will send an email to the Department Hire Initiator with the I-9 completion date and the earliest estimated start date possible for the employee. (the start date will usually be 4 days from the date the I-9 is completed if the hire is entered the same day).
The hire can be entered into the system as soon as the Department Hire Initiator receives the email from Human Resources.
The I-9 Request form can be found at http://und.edu/finance-operations/human-resources-payroll/human-resources/i-9-request-form.cfm.
Steps for E-Verify Sites:
Changes:
E-Verify Sites can choose to continue the electronic process for the I-9’s if this is working well. If they
choose to go back to the paper I-9 that is also acceptable. It will be left to each E-Verify site to choose
which is preferred.
All Internationals will need to come to Payroll and a paper I-9 will be completed. The department will need
to complete the online I-9 Request form for these employees. Payroll will send an email back to the
department with the correct start date. The hire will now only need a 4 day lead time.
Electronic Process:
Review the Welcome and Instructions page to verify all Activity Guide items are completed. If Activity
Guide is not complete or they don’t have the print out, have employee login to PS and verify it is complete
or have employee finish any item not finished
Once that is verified, complete Section 2 of the I-9 in the following screen in PS HRMS with the documents
they provide.
o Main Menu>ND HE Applications>Manager Self Service>I-9 Extension/E-Verify
o Enter name or empl to pull up the employee
o Click on the View PeopleSoft I-9 to open I-9

3
o Click the arrow by Section 1 to open and review entries by the employee
o If no errors in entry by employee, go to Section 2, if errors a new I-9 will need to be requested
(contact Payroll for direction)
o In Section 2, enter the provided document information into the appropriate places on the screen.
Use the drop down to choose document name, enter the issuing authority name, document
number, and expiration date. (Receipt box should not be used unless it is a receipt, contact Payroll
before using this field)
o Once all document information is entered, verify the start date in the Certification section, if all is
correct, choose your name from the drop down and click Submit
o Complete the E-Verify process and return to the I-9 Extension/E-Verify page and enter the Case
Number in the Case Verification Number box.
Make a color copy of the photo id and follow the steps below:
o Write the empl id and the case verification number at the top of the copy of the photo id
o Send the copy of the photo id by email to Payroll, do not wait
Note: Internationals, without a SS #, will need to complete a paper I-9 and complete the FNIS paperwork
at Payroll. Complete and submit the online I-9 Request form. The Hire will be entered through the MSS
Online system and not on paper anymore. The employee will receive the appropriate emails to complete
like any other employee. They will complete Section 1 of the I-9 online but Section 2 will not need to be
completed online. Continue to send ALL internationals, to Payroll to complete the I-9.

4
LISTS OF ACCEPTABLE DOCUMENTS
All documents must be UNEXPIRED
Employees may present one selection from List A
or a combination of one selection from List B and one selection from List C.
LIST A
Documents that Establish
Both Identity and
Employment Authorization O
OR
LIST B LIST C
Documents that Establish Documents that Establish
Identity Employment Authorization
AND
1. U.S. Passport or U.S. Passport Card
1. Driver's license or ID card issued by a
State or outlying possession of the
United States provided it contains a
photograph or information such as
name, date of birth, gender, height, eye
color, and address
1. A Social Security Account Number
card, unless the card includes one of
the following restrictions:
(1) NOT VALID FOR EMPLOYMENT
(2) VALID FOR WORK ONLY WITH
INS AUTHORIZATION
(3) VALID FOR WORK ONLY WITH
DHS AUTHORIZATION
2. Permanent Resident Card or Alien
Registration Receipt Card (Form I-551)
3. Foreign passport that contains a
temporary I-551 stamp or temporary
I-551 printed notation on a machine-
readable immigrant visa 2. ID card issued by federal, state or local
government agencies or entities,
provided it contains a photograph or
information such as name, date of birth,
gender, height, eye color, and address
4. Employment Authorization Document
that contains a photograph (Form
I-766)
2. Certification of Birth Abroad issued
by the Department of State (Form
FS-545)
3. School ID card with a photograph 5. For a nonimmigrant alien authorized
to work for a specific employer
because of his or her status:
a. Foreign passport; and
b. Form I-94 or Form I-94A that has
the following:
(1) The same name as the passport;
and
(2) An endorsement of the alien's
nonimmigrant status as long as
that period of endorsement has
not yet expired and the
proposed employment is not in
conflict with any restrictions or
limitations identified on the form.
3. Certification of Report of Birth
issued by the Department of State
(Form DS-1350) 4. Voter's registration card
5. U.S. Military card or draft record 4. Original or certified copy of birth
certificate issued by a State,
county, municipal authority, or
territory of the United States
bearing an official seal
6. Military dependent's ID card
7. U.S. Coast Guard Merchant Mariner
Card
8. Native American tribal document 5. Native American tribal document
9. Driver's license issued by a Canadian
government authority
6. U.S. Citizen ID Card (Form I-197)
7. Identification Card for Use of
Resident Citizen in the United
States (Form I-179)
For persons under age 18 who are
unable to present a document
listed above: 8. Employment authorization
document issued by the
Department of Homeland Security
6. Passport from the Federated States of
Micronesia (FSM) or the Republic of the
Marshall Islands (RMI) with Form
I-94 or Form I-94A indicating
nonimmigrant admission under the
Compact of Free Association Between
the United States and the FSM or RMI
10. School record or report card
11. Clinic, doctor, or hospital record
12. Day-care or nursery school record

4
Manager Self Service Hire Process
Due to the TLAB (Time and Labor/Absence Management Module) implementation in PS, the time frame
of when recruiting, CHRC’s, and when a hire needs to be submitted into HRMS is all changing. A hire will
now need to be submitted into the system 4 days prior to the employees start date. They will not be
allowed to work prior to start date and they may only start if/when all paperwork is completed.
These changes will affect the timeline for recruitment and all steps prior to submitting the hire.
Everything will need to be moved up far enough to allow the hire to be entered and fully approved prior
to the date the employee is to start working (4 day processing time). It will be up to each
department/college to decide what and how long that timeframe will be to ensure all steps prior to
hiring someone are completed.
As far as entering the hire and the employee emails, this process is all the same except for the I-9.
Initiators of the hire will only need to wait for the CHRC to be approved and the I-9 to be completed
before initiating the hire. (Except for E-Verify site continuing the electronic I-9.)
All internationals will be processed through the online system, so those with no social security number will now be entered online. A paper I-9 will continue to be completed with them right away as we do now and the employee will need to come back with the card once they have it. So the process for internationals with no social security number:
1. When the records check is done department will submit the I-9 Request form and the employee will come to Payroll to complete the I-9. Give them the social security letter (if department gives that out or employee will receive from whomever gave it out in the past, no change in that process) Direct employee to the social security office and apply for a card. Payroll will provide the information on what a SSN is and the address of the Social Security Office. Employee will need to bring the social security letter stating that they will be working and all of their documents. (Department should follow up with employee and make sure a social security card was applied for)
2. Once department receives the email with the start date from Payroll the hire can be entered into the system.
3. The employee will need to return to Payroll with the Social Security Number when it is received. The department should make note of those employees and follow up in a couple of weeks with the employee to see if employee has received the number. Employee will see Kevin for the tax treaty portion when here to complete the I-9 Form.

5
Below are the steps to complete the hire process:
All appropriate recruitment procedures must be followed prior to entering a hire into Manager
Self Service. This includes:
a. Position Description should be reviewed and updated if necessary-If just updates HR
must approve, if salary change, band change, etc. must go to the VP for approval then to
HR.
b. Enter requisition in AppliTrack for benefited hires and attach Position Description
c. Requisition will route to VP for approval then to Affirmative Action for benefited faculty
and staff positions
d. Temporary positions can be put in Applitrack but if the department already knows who
they want to hire they can just hire
e. When applicant is selected they must fill out a selection form and indicate who they
choose and why and who they didn’t and why
f. All will be sent to Affirmative Action for approval. Once approved department will get a
letter and they can start the background check if required (All benefited positions
require one)
g. JobX for student positions
Prior to entering hire into Manager Self Service:
1. Submit an I-9/CHBC form online
Only fill out the CHBC funding if a CHBC is needing to be initiated 2. Receive email stating CHBC is Clear (if one was needed) 3. Receive email that I-9 is completed and the hire date has been approved
Receive email that hire can be submitted
OR
4. Receive email to send the employee to Payroll to complete the I-9 (give them the list of
acceptable documents)
Once I-9 completed receive email that hire can be submitted
Entering the hire into Manager Self Service:
1. Payroll will send department hire initiator an email indicating the I-9 is complete and will give
the correct start date for the employee. Another email will be sent indicating the CHBC is
complete. The initiator may then enter the hire and submit into the system.
a. Attach the email from Payroll with the start date to the hire and the CHBC email.
b. For benefited employees make sure to attach the Offer Letter and the Position
Description to the hire before submitting.
2. If a brand new employee, they will receive: a. Personal Data email - Employee uses temporary id and password to login and complete
the Personal Data information.
6
b. New Employee Onboarding email – Explain to watch for an email from [email protected] and to complete the 2 steps listed in it. (If employee is a student they can skip step 1 as they already created their account as a student)
Step 2 is the Activity Guide which needs to be fully completed (employee will complete I-9 section 1 again but can ignore email about Section 2)
Online benefit email (for benefited employees only) 3. Active or Inactive Rehires will receive:
a. No emails if they are an Active hire unless moving to a benefited position
b. If moving to a benefited position from a non-benefited position will receive the Online benefit email
c. If they are an Inactive rehire will receive the New Employee Onboarding to review and update information
d. If benefited the Online benefit email
***If employee is benefited, once the hire is approved by HR, an email will be sent with the
Offer Letter, Position Description (PD)
i. Employee needs to print off, read and sign the Offer Letter. (PD will be signed
with the supervisor and returned to HR at a later date)
Payroll or the E-Verify Site will give all employees the packet of hardcopy Payroll forms, which
cannot be completed online, when they complete the I-9.
Payroll will provide the benefit forms to benefited employees.
Items to be completed after completing the I-9:
4. New benefited employees will also receive an email (from [email protected]) with
instructions on how to complete benefit forms online. They need to complete this within 31
days of the hire date.
5. After all department approvers and HR approve the hire, an overnight process will run to
generate an email (from [email protected]) this is the Onboarding email (Employee usually
receive email the next morning (after HR has approved the hire) directing them to complete
these steps as soon as possible:
a. Step 1-Create NDUS account (students have already done this)
b. Step 2-Complete the Activity Guide.
6. About a week after the employees hire date, an email from SafeColleges will be sent with links
to the required trainings that the employee will need to complete. The employee should
complete these as soon as possible. The employee will receive an email once each week until all
trainings are completed.
How departments can verify all hire paperwork has been completed:
1. Use the New Hire Approve/Review (see page 8 for more information) screen to see if
the Personal Data email has been completed.

7
2. Also use this to know when the hire has been processed into Job Data. Once you no
longer see it on the list and a denied email has not been received, this means the hire
has been approved by HR.
3. Hardcopy paper packets (taken care of in Payroll or at E-Verify site)
a. Students fill out and leave this with the E-Verify Site or Payroll
b. Benefited employees – E-Verify Site or Payroll will have the employee complete
the benefit forms when completing Section 2
4. Online training
a. This will all be tracked through SafeColleges

8
New Hire Approve/Review
To follow the activity on a hire go to New Hire Approve/Review.
Click Search.

9
Transaction #. Start Date
Empl ID Temp ID
Used to log into the Personal Data
email link. User ID TMP#####,
Password tmp#####
This screen shows all pending hires. The hire is either waiting for the employee to do the Personal Data
email or it is waiting for one of the Approvers to work the hire.
Candidate status – has personal data
been completed?
Pending – has not completed personal
data email
Completed – personal data email
completed
N/A – did not receive the personal data
emailemail

10
Information to get from this screen is: The Transaction number, Empl ID, Start Date, Temp ID, Candidate
Status.
Click on one of the links in the list and will open the hire.

11

12
Scroll to the bottom of the hire. Use the Submitted by and Last Updated by names and dates to see how
long it has been pending.
Use the automatic workflow to find the information of approver if needing to contact with a reminder to
process the hire. Click the link with the approvers name or multiple approvers. Following screen will
open.
This gives all contact information of the approvers.

13
Navigation New Hire Request
From Home screen, click the New Hire Request link.
Can also navigate to the New Hire Request page by following this navigation:
Main Menu > Manager Self Service > Job and Personal Information > New Hire Request
Click on the New Hire Request link.

14

15
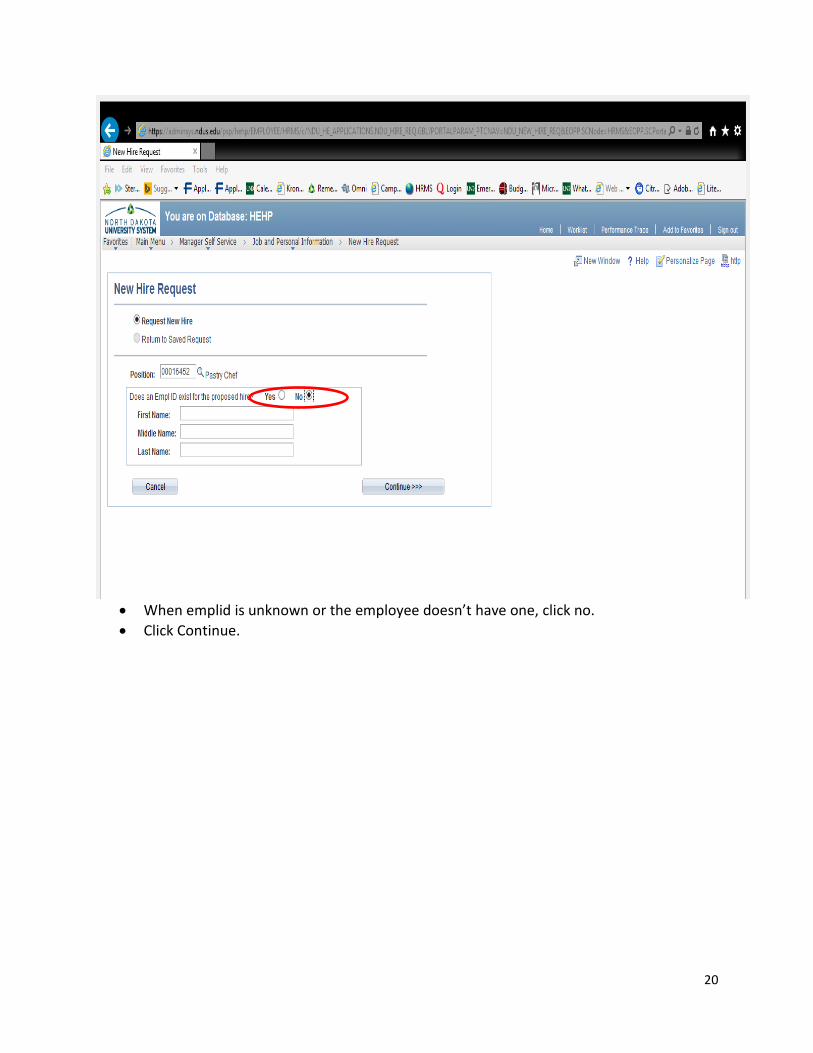
Initiate/Submit New Hire Request On the next screen click the radio button in front of Request New Hire. (Also, where to go to
return to saved hires.)
This screen will come up, enter the position number of the position the employee will be hired
into.

16
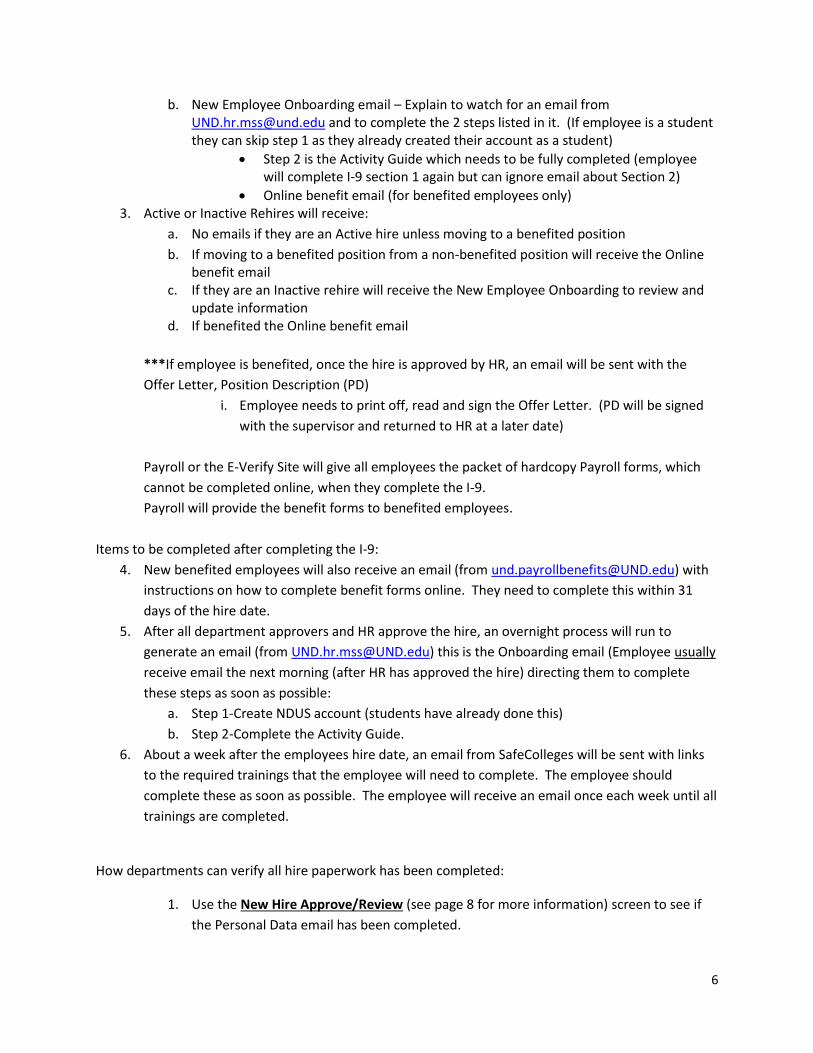
If needed, the eyeglass next to the position number box may be clicked and a list of the hiring
departments’ position numbers will show.
17
Select position number by double clicking.

18
When emplid of employee is known, click yes and enter the emplid in the box. Click
Continue.

19
• Emplid and name will populate if emplid was known. • Enter start date and employees email address. (required) • Click Continue.
20
When emplid is unknown or the employee doesn’t have one, click no.
Click Continue.

21
Enter start date, name, and email address. (All required)
Click Continue.

22
Most of the information on this page
will populate based on the position
number that was entered on the
prior screen. The following need to
be filled in:
Enter correct standard hours
Enter Campus Address and
contact phone number for
the employee
Fill in (only if applicable)
contract length, tenure
accrual, kronos employee,
labor agreement, comp freq,
comprate
Select any departmental
approvers
o Use the eyeglass to
search for the
approvers dotted
identifier
(firstname.lastname)
Add any comments in the
Request Comments box
If any attachment, click Add
Attachment and browse to
find
When everything has been
completed click Submit.
**Workflow status, in right hand
corner, indicates where initiator is at
in the process. Not Submitted will
change to pending once the hire has
been submitted.
**Funding section is not active,
shows funding that is on the DBT but
it may not all show here, so still refer
to the DBT for complete information.
1st line-Department name-
use list from manager’s toolbox
“Department Names”
2nd line-Building Name &
Room #
3rd line-Street address &
Stop #
Enter stop # in zip code line
Items to enter: CHRC with date
approved or N/A and I-9 and
completed date
You can save hire for
later if needing more
information. Hire can be
withdrawn if it has been
saved.
Attach: contracts, offer letters, PD’s, letters of understanding, etc.

23
Workflow status, top right hand corner, changes to “Pending” once submitted and a transaction number is assigned.
Transaction number and Pending will show above the workflow at bottom of screen also.
The initiator of hire shows in the area below the Add Attachment link.
The workflow will populate with anyone added as approvers (2 dept approvers are still required). The other approvers are programmed into the workflow and will automatically populate. These are determined by the type of employee and the department.
Add Approvers/Reviewers. Before leaving this page, add any
additional reviewers that may need to know of this hire. Click the green plus sign, at the bottom of the screen in the workflow box. There will be a pop-up box that will default automatically to reviewer; it will need to be changed to Approver if that is the action role for the added person. Enter dotted identity (firstname.lastname) or use the eyeglass to search.

24
Initiator may add a Reviewer and/or Approver only after the hire is submitted. DO NOT leave
this page until after all Reviewers and/or Approvers are added as required/desired. Once page
is left, approvers and/or reviewers cannot be added.
To add a Reviewer and/or Approver, click the “plus” sign near the bottom of the screen.
After the “plus” sign has been clicked this page shows up.
Deans/AVP, VP, Provost, Grad School, Career Services, and HR Payroll are automatically added when
submit is clicked. **Remember to add any approvers/reviewers at this point before leaving the page.

25
Employee Process Part 1 Employee Email with Instructions
Once hire is submitted by the initiator, the employee will instantly receive this email from [email protected]. Employee needs to click the link in the email and use the Temporary User ID and Password provided in the email to login in to PeopleSoft. If employee is an active Rehire, they will not get this email as their account should already be claimed.
First Employee Email

26
Employee PeopleSoft Login
Employee will use the temporary User ID and Password from the email, to login to enter
needed personal data.
Employee will click on New Employee Personal Data link.
27
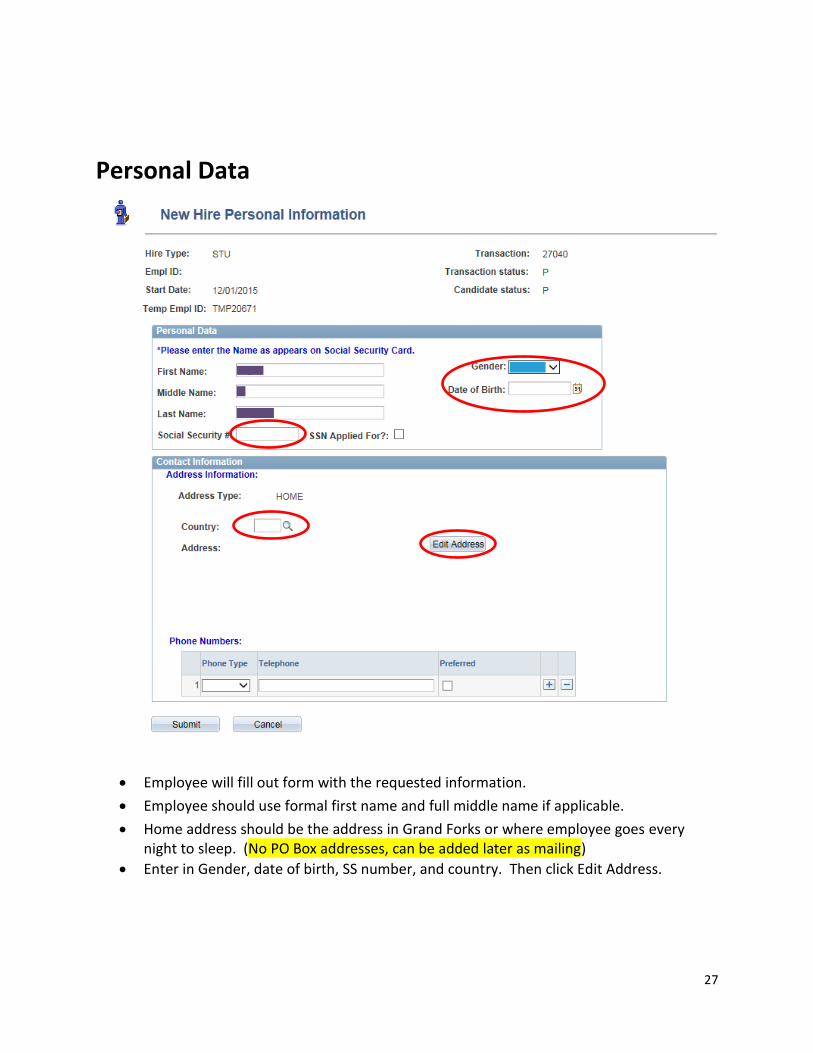
Personal Data
Employee will fill out form with the requested information.
Employee should use formal first name and full middle name if applicable.
Home address should be the address in Grand Forks or where employee goes every night to sleep. (No PO Box addresses, can be added later as mailing)
Enter in Gender, date of birth, SS number, and country. Then click Edit Address.

28
Employee should verify that all entries on this page are accurate. If so, click Confirmed,
otherwise click Go Back and make any corrections that may be needed.
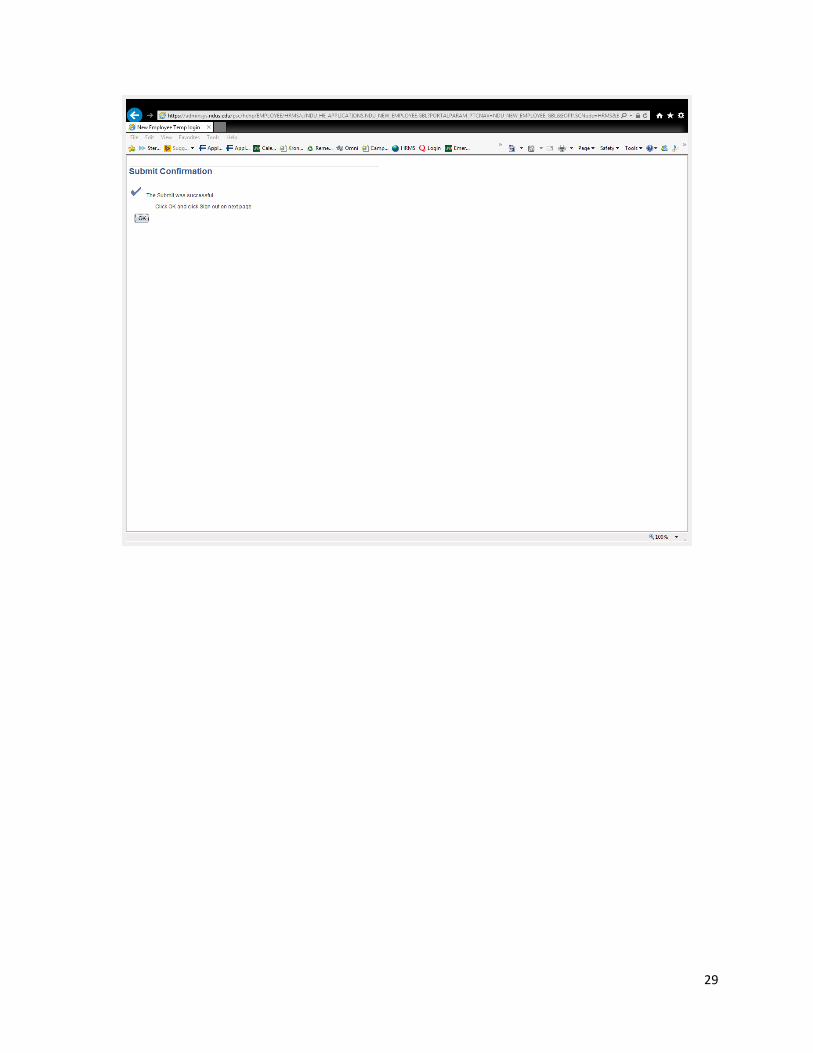
If everything is correct, Click Ok.
29

30
This screen comes up. Employee will click the Sign Out in the upper right corner.
**The hire information will now go to HR for their approval.

31
Employee Process Part 2
After HR approves the hire, the employee will receive another email from
[email protected] (will take overnight for it to be received). Employee should
click on the Login Information link in the email. This will take them to a Claim Your Account
page.
**Employee will need to return to this email after completing the Login Information section
and click on the New Employee On-boarding link.

32
Employee will click on the Claim an NDUS Account button.
Employee will go back into the email and click on the new Employee On-boarding link.

33
Will go to this screen. Employee will login with firstname.lastname and the password they
setup.

34
New Employee On-boarding Activity Guide
Employee will click on the New Employee On-boarding link.
35
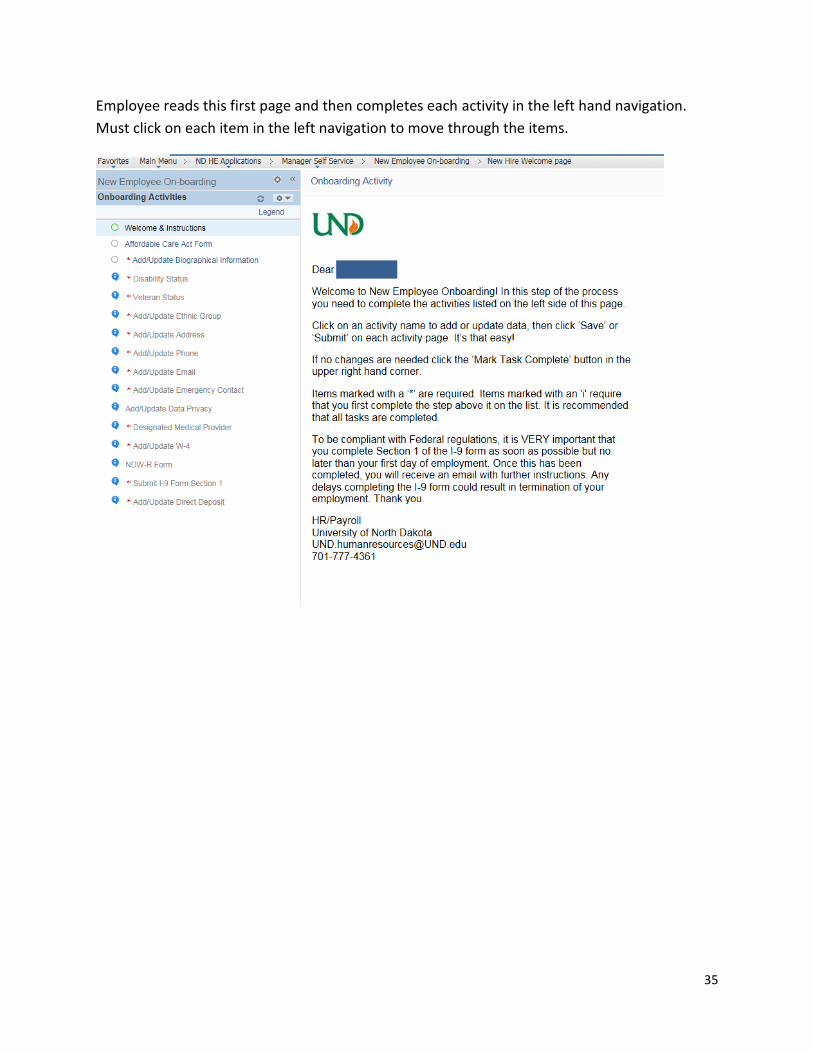
Employee reads this first page and then completes each activity in the left hand navigation.
Must click on each item in the left navigation to move through the items.

36
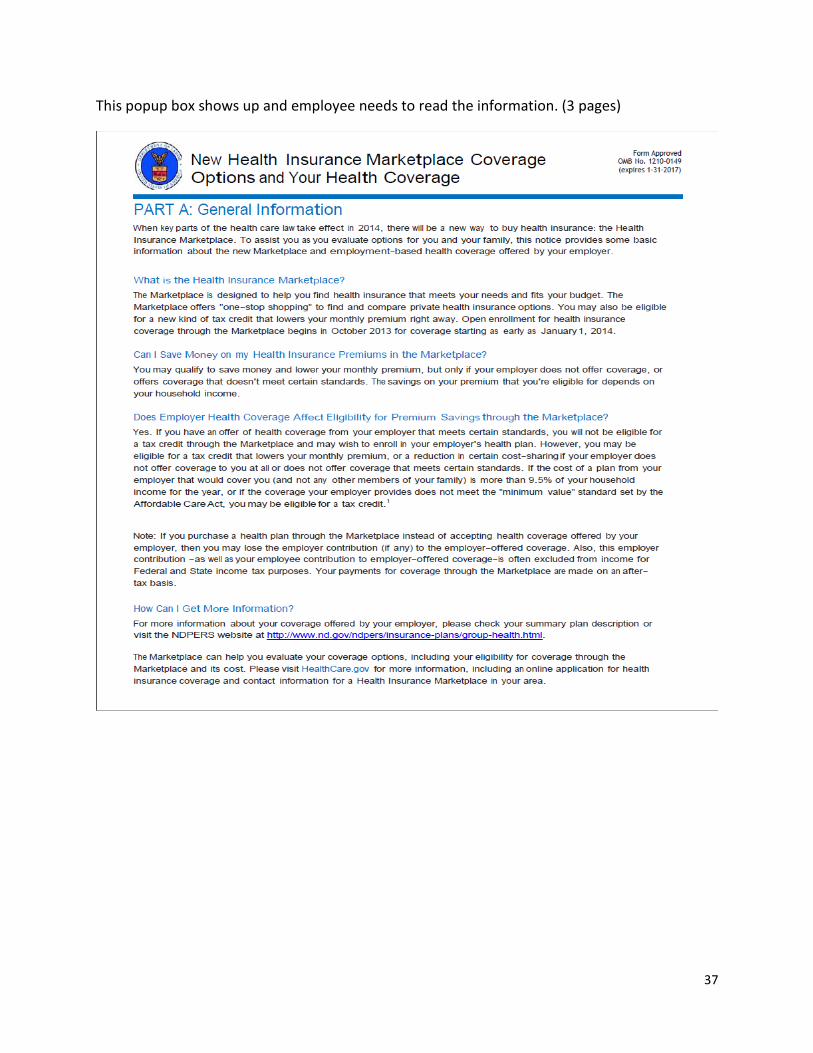
Affordable Care Act
37
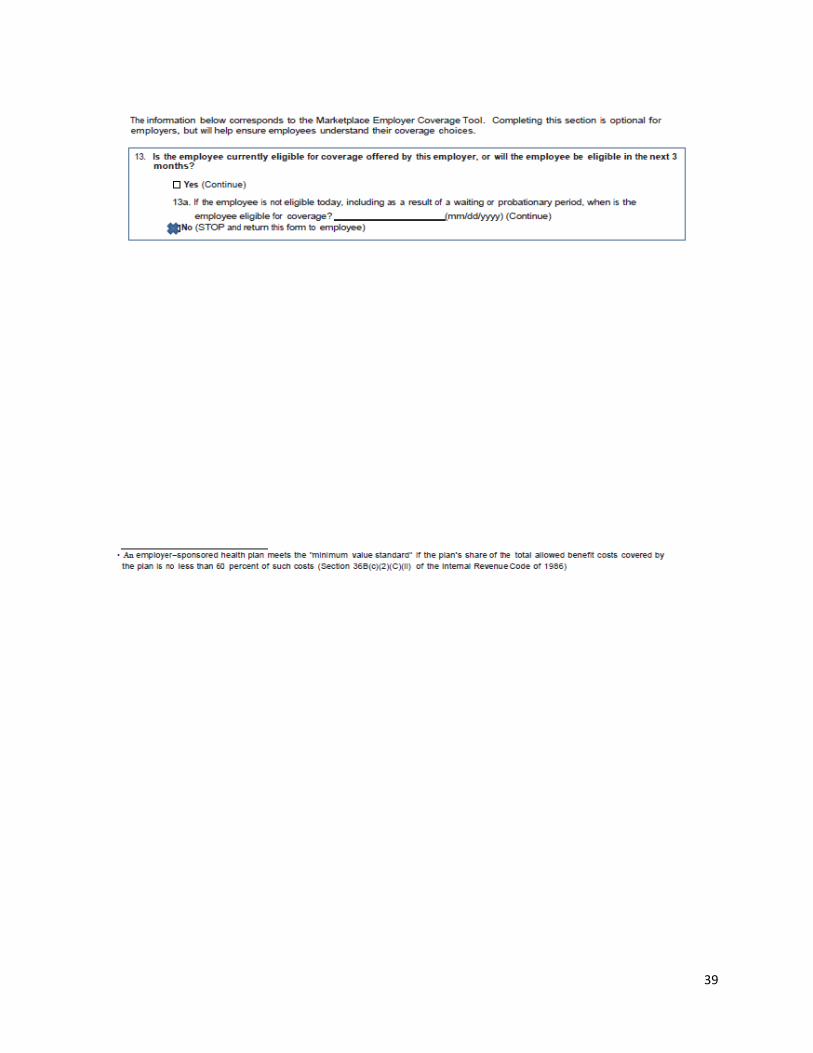
This popup box shows up and employee needs to read the information. (3 pages)

38
39
40
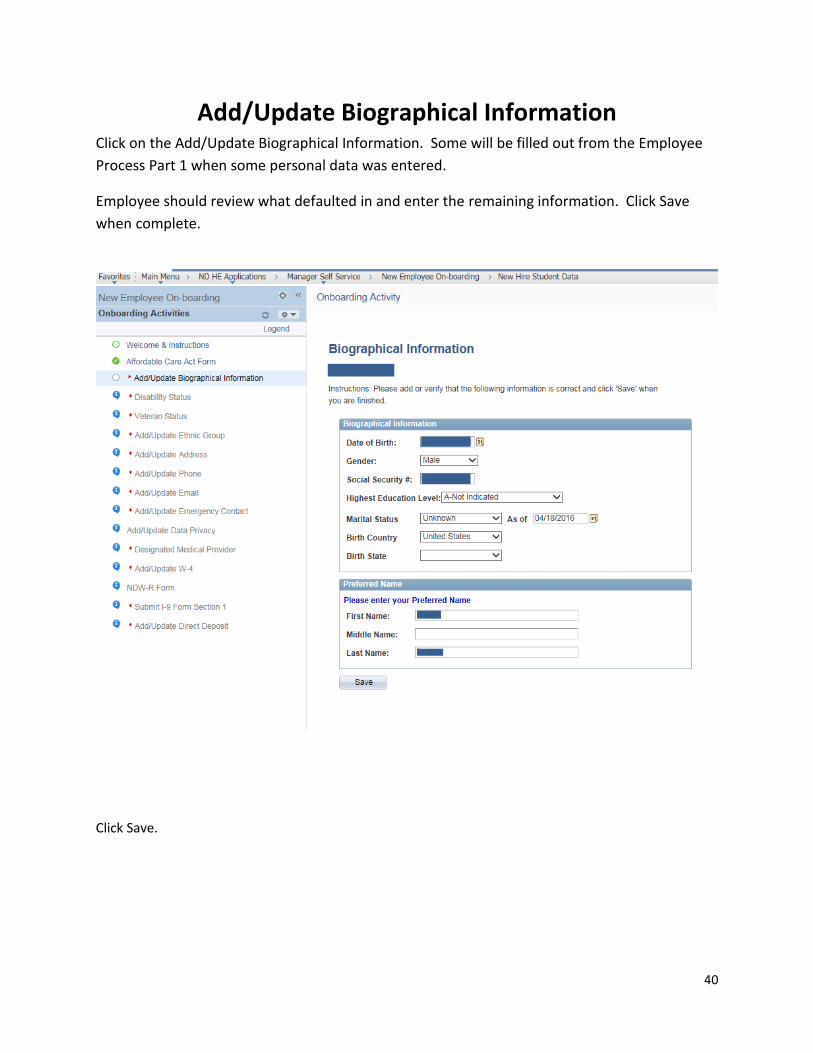
Add/Update Biographical Information Click on the Add/Update Biographical Information. Some will be filled out from the Employee
Process Part 1 when some personal data was entered.
Employee should review what defaulted in and enter the remaining information. Click Save
when complete.
Click Save.

41
A save confirmation page will come up. Click ok and the screen will return to the Biographical
Information page.

42
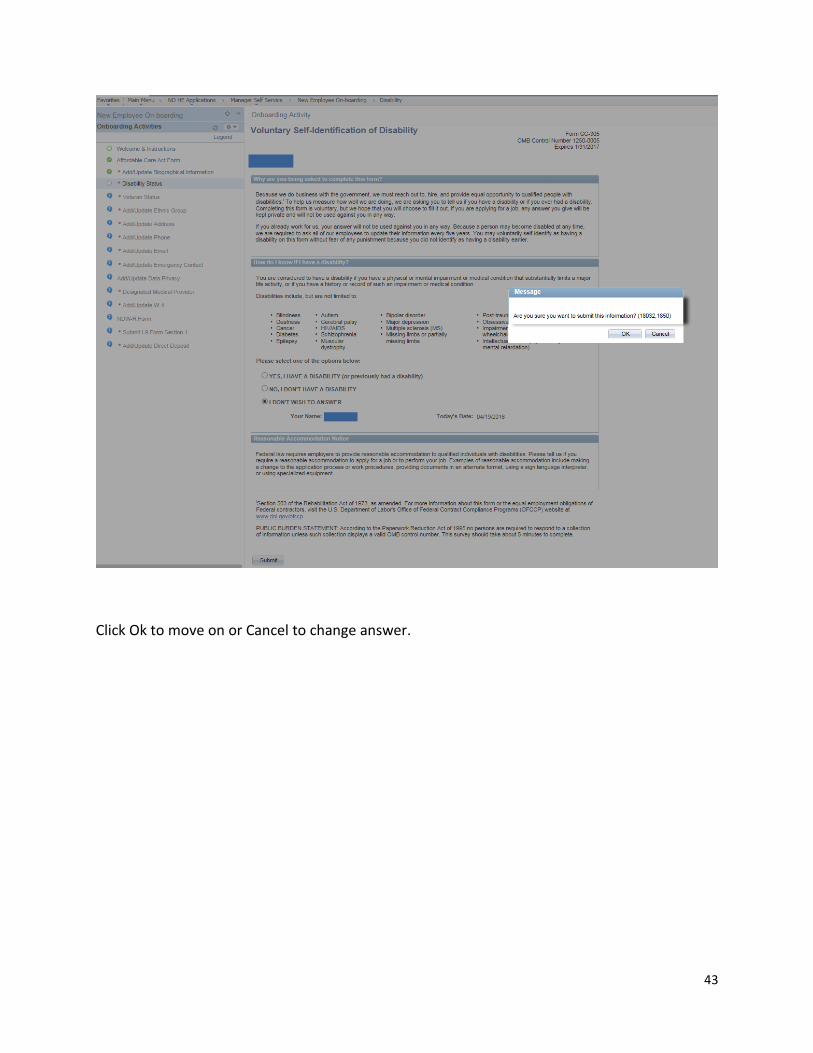
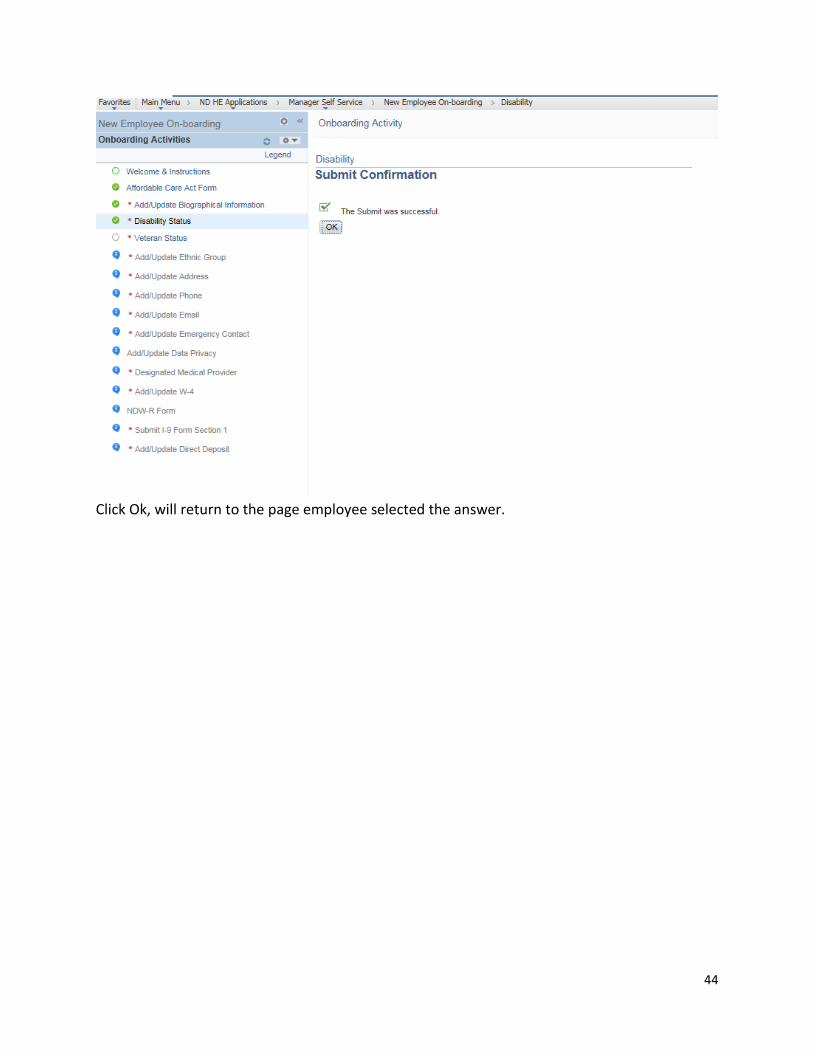
Disability Status
Employee reads the information and selects an answer. Click Submit.
43
Click Ok to move on or Cancel to change answer.
44
Click Ok, will return to the page employee selected the answer.

45

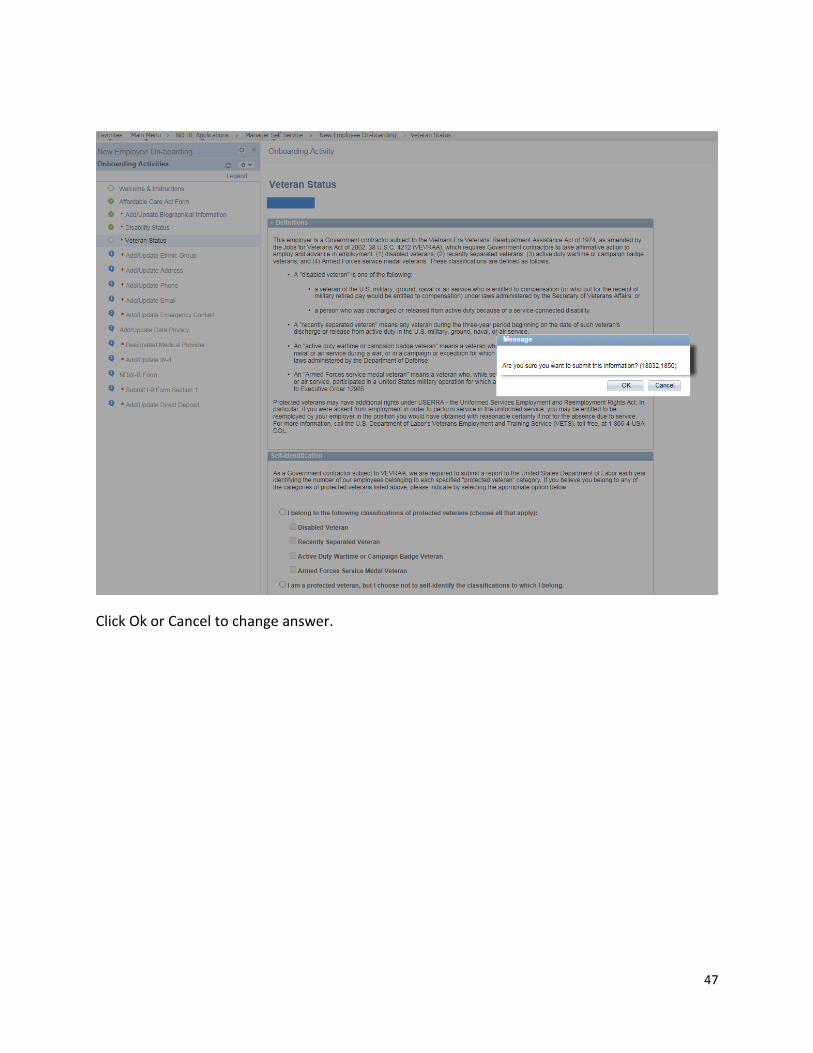
46
Veteran Status Employee will read the information and then select the correct answer and provide any other
pertinent information. Then click Submit.
47
Click Ok or Cancel to change answer.

48
Click Ok. Returns to page employee selected answer.

49
Ethnic Group
Click on the Add/Update Ethnic Group in the left navigation.
Read the paragraph and answer the questions appropriately and click Save.

50
A save confirmation page will come up. Click Ok and screen will return to the Ethnicity page.
51
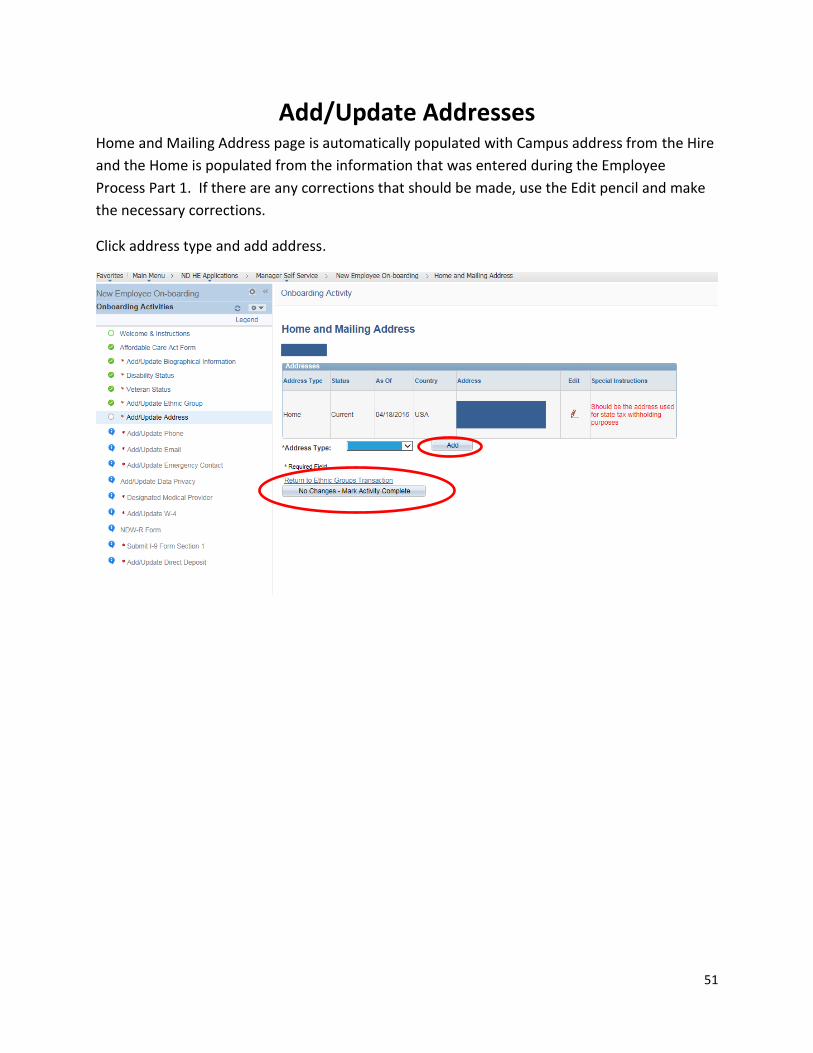
Add/Update Addresses Home and Mailing Address page is automatically populated with Campus address from the Hire
and the Home is populated from the information that was entered during the Employee
Process Part 1. If there are any corrections that should be made, use the Edit pencil and make
the necessary corrections.
Click address type and add address.

52
Enter address information and click Save. A save confirmation page comes up, click ok.
When everything is entered and correct, click the No Changes-Mark Activity Complete button.

53
Add/Update Phone Click on the Add/Update Phone in the left navigation. Phone numbers will automatically
populate with any that were entered in the Employee Process Part 1.
Click the Add Phone Number button to add any additional phone numbers. Click Save when
complete.
A save confirmation page comes up, click Ok. Screen will return to the Phone Numbers page.

54
Add/Update Email Addresses Email address that was entered by department at the time the Hire was submitted will populate
into the email address. Add any additional email addresses, if more than one, select which is
the preferred.
To add an email address, click the Add Email Address button and enter the correct information.
Click Save.

55
A save confirmation page comes up, click Ok. Screen will return to the Email Addresses page.

56
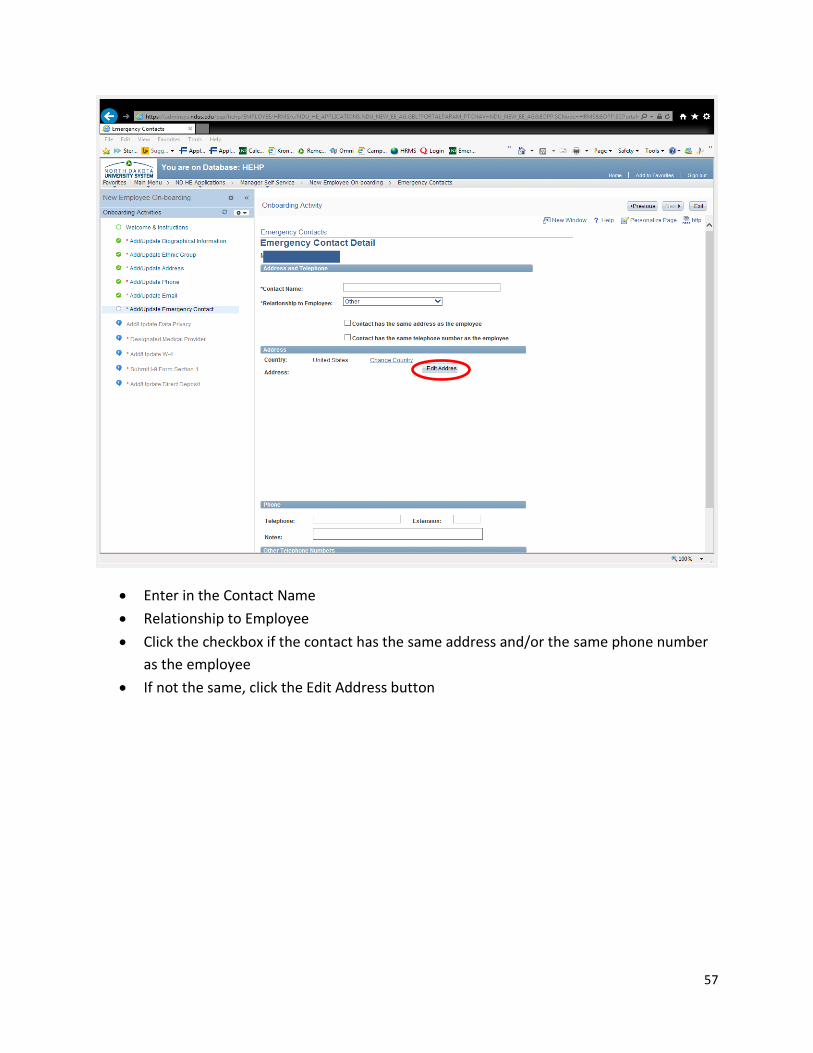
Add/Update Emergency Contact Click on Add/Update Emergency Contact in the left navigation. Click on the Add Emergency
Contact button.
57
Enter in the Contact Name
Relationship to Employee
Click the checkbox if the contact has the same address and/or the same phone number
as the employee
If not the same, click the Edit Address button

58
Click Save and a save confirmation page comes up.

59
Click OK.

60
Data Privacy
Select whether information can or cannot be shared on the directory.
Click Save.
61
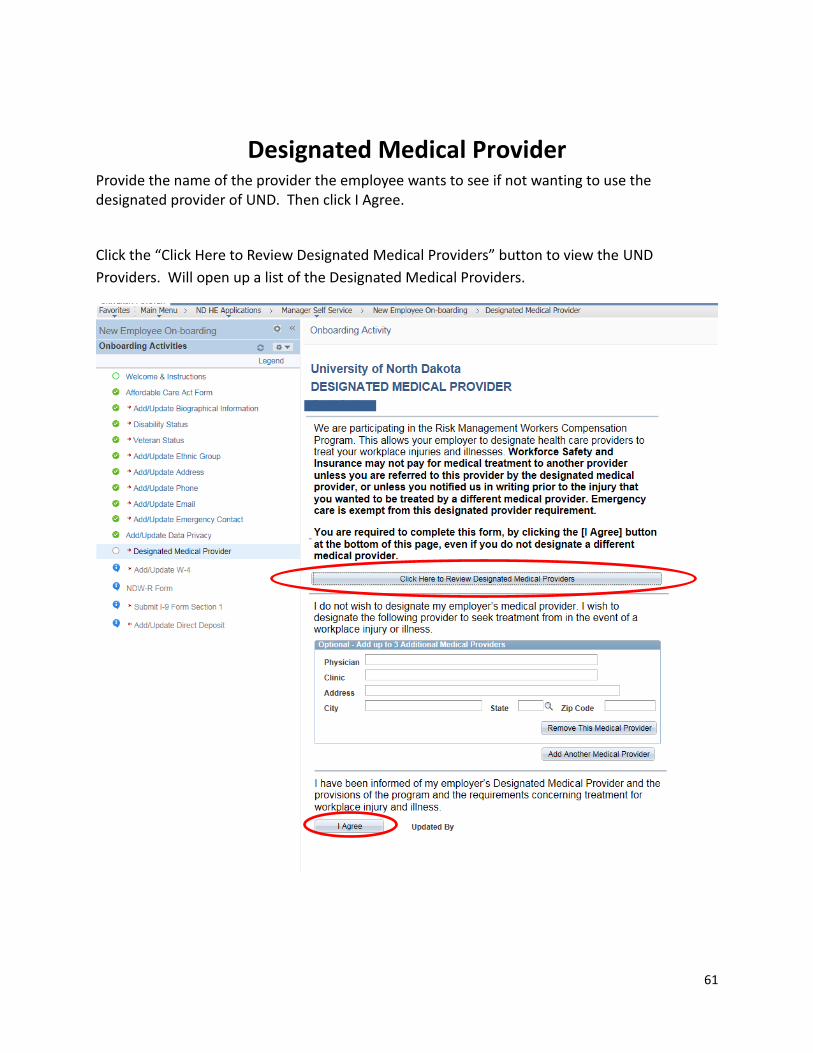
Designated Medical Provider Provide the name of the provider the employee wants to see if not wanting to use the designated provider of UND. Then click I Agree.
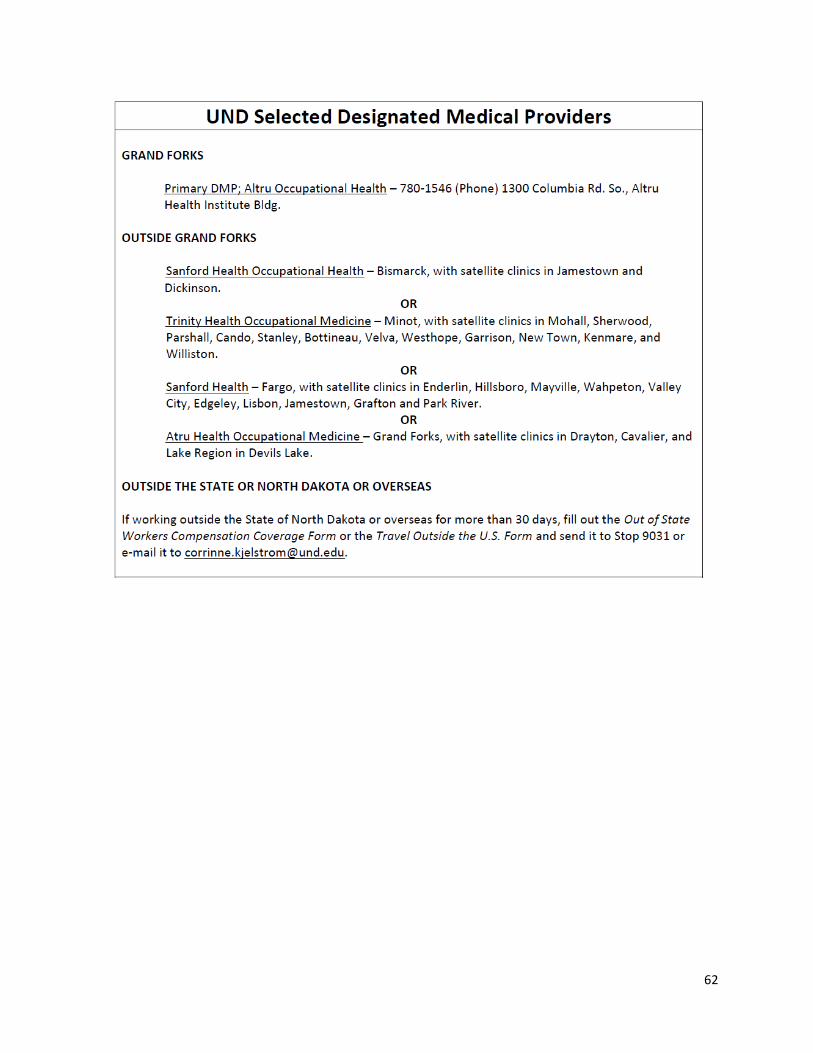
Click the “Click Here to Review Designated Medical Providers” button to view the UND
Providers. Will open up a list of the Designated Medical Providers.
62

63
This screen shows up after clicking I Agree. It will show the provider added, if any, otherwise will be blank. Bottom of screen shows who updated it and the date and time.

64
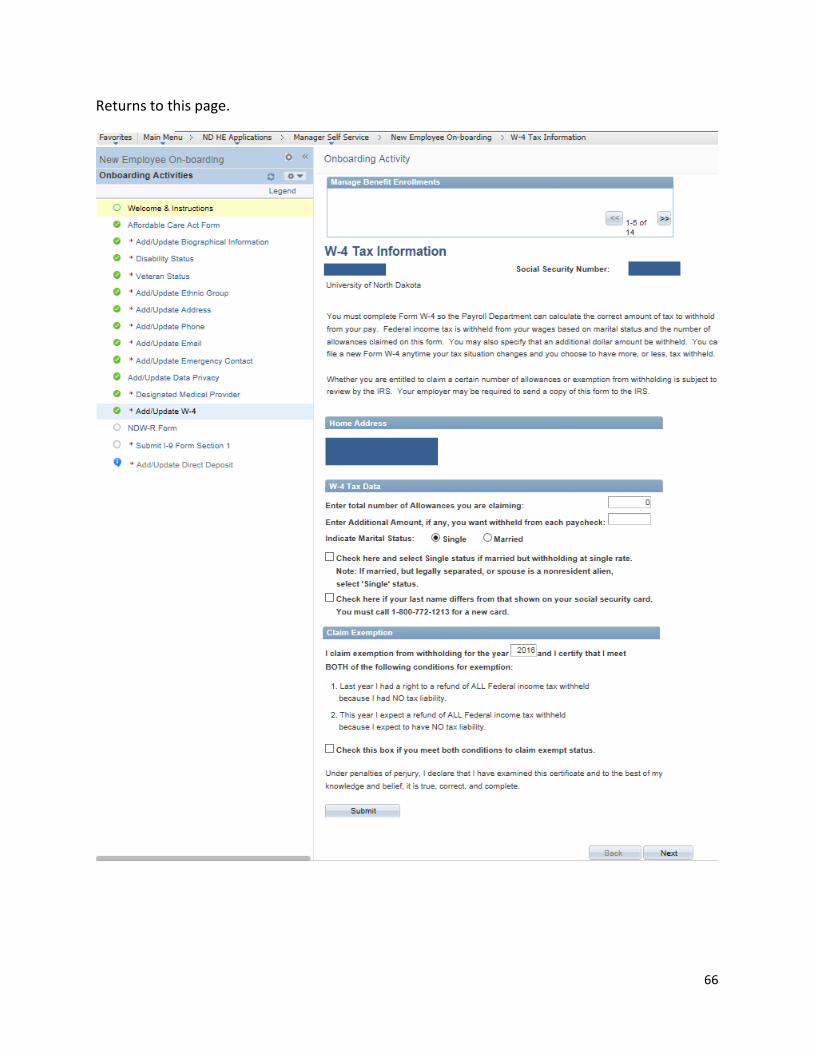
W-4 Tax Information Fill out the W-4 information that is applicable and click Submit.

65
Confirmation page for W-4 information comes up. Click Ok.
Message stating that tax data has synced to match federal tax data. If changes need to be
made then employee must contact the Payroll Office.
Click OK.
66
Returns to this page.
67
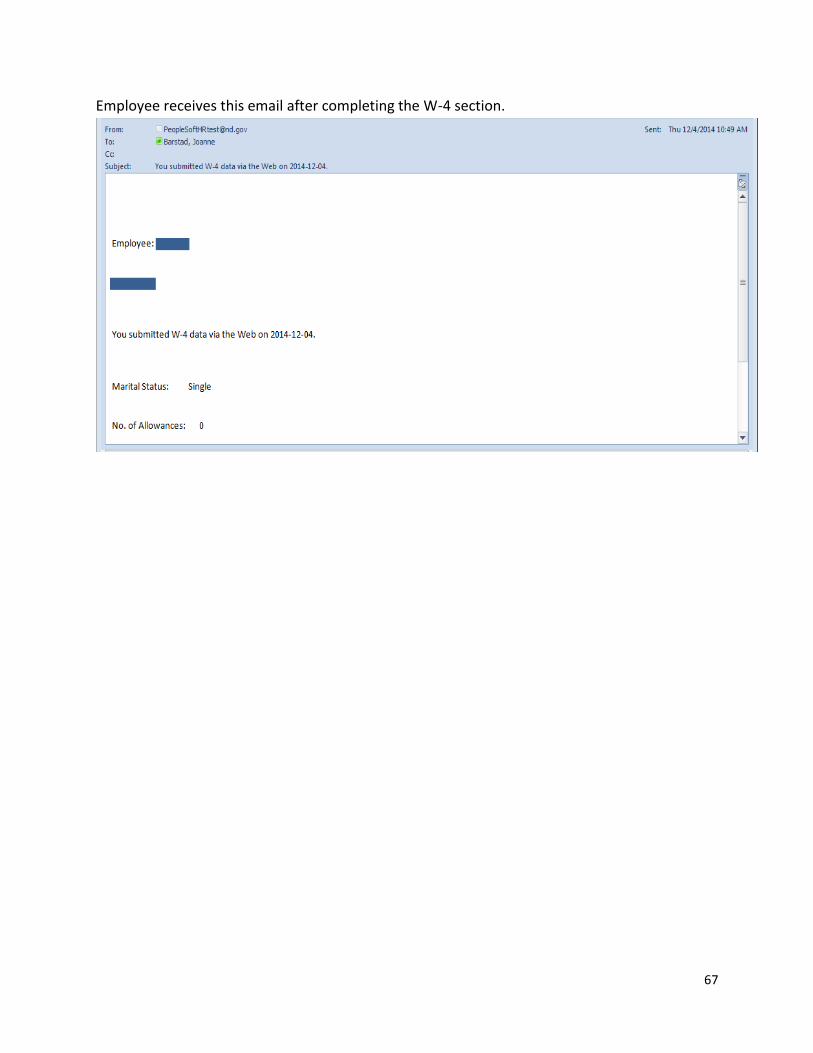
Employee receives this email after completing the W-4 section.

68
NDWR Form Click on the NDWR Form. Item will not mark as complete if form is not needed. Fill out if form is
appropriate, print and return to Payroll.
If you need to complete the NDW-R Form Read the instructions, open and complete the form and print
it. Return the form to Payroll.

69
I-9 Section 1
Complete the information in Section 1 of the I-9. When complete click Next in the top right
hand corner.

70
71
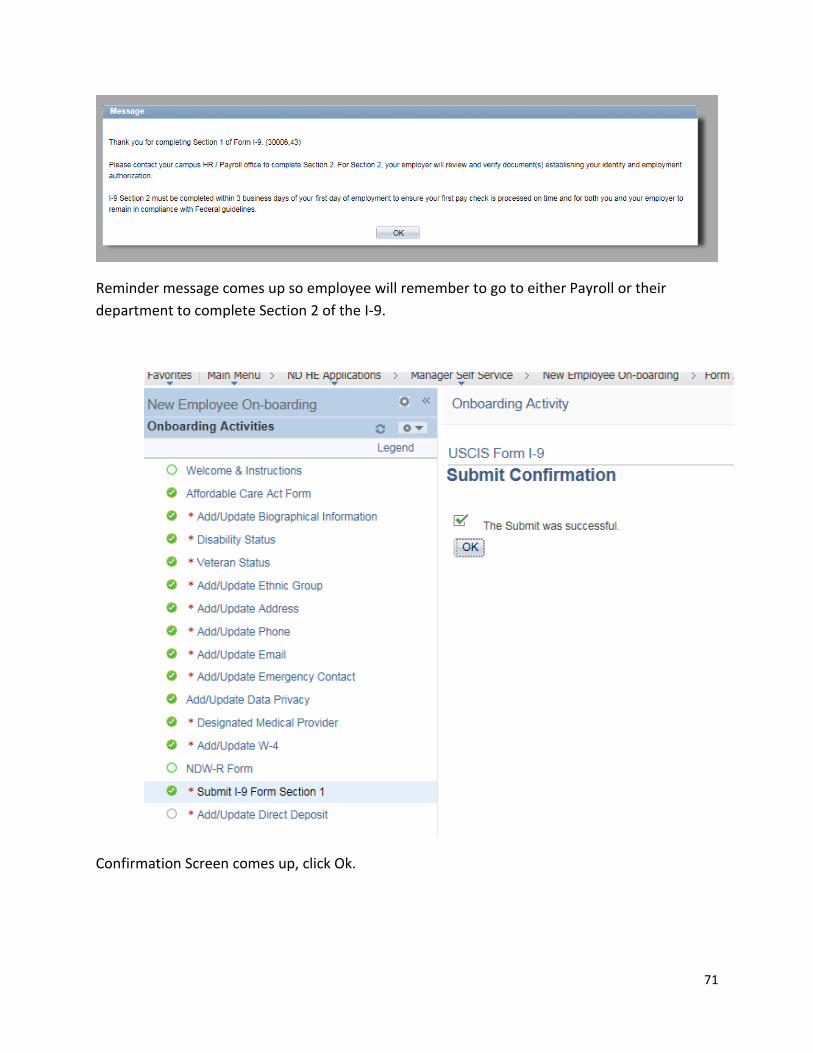
Reminder message comes up so employee will remember to go to either Payroll or their
department to complete Section 2 of the I-9.
Confirmation Screen comes up, click Ok.

72

73
After completing the I-9 Section 1, employee receives this email and can disregard.

74
Direct Deposit
Click on Add/Update Direct Deposit to add direct deposit information. Click Add Account.
Enter routing number, account number and choose account type. When done click Submit.

75
Verify the information entered, and then click OK.
Message stating Activity Guide is complete will pop up, click OK.
Congratulations! You have completed the UND Onboarding Activity Guide. Please print the welcome and
instructions page and return it to your department or Payroll. Thank you and welcome!!

76
Confirmation page will come up. Click Ok.
Goes back to this page.

77
If you are a returning user or you go back into the DD screen, a validation box appears.
Click Exit in the top right hand corner.

78
Benefits Forms
Benefited employees, once the hire is approved by HR, receive an email with the Offer Letter
and Position Description (PD).
Employee needs to print off, read and sign the Offer Letter, the PD will be signed with the
supervisor and returned to HR at a later date. The Offer Letter can be emailed back to HR. The
paper benefit forms will be completed when employee completes the I-9.
SafeColleges
About a week after the employees hire date, an email from SafeColleges will be sent with links
to the required trainings that the employee will need to complete. The employee should
complete these as soon as possible. The employee will receive an email once each week until
all trainings are completed.
79
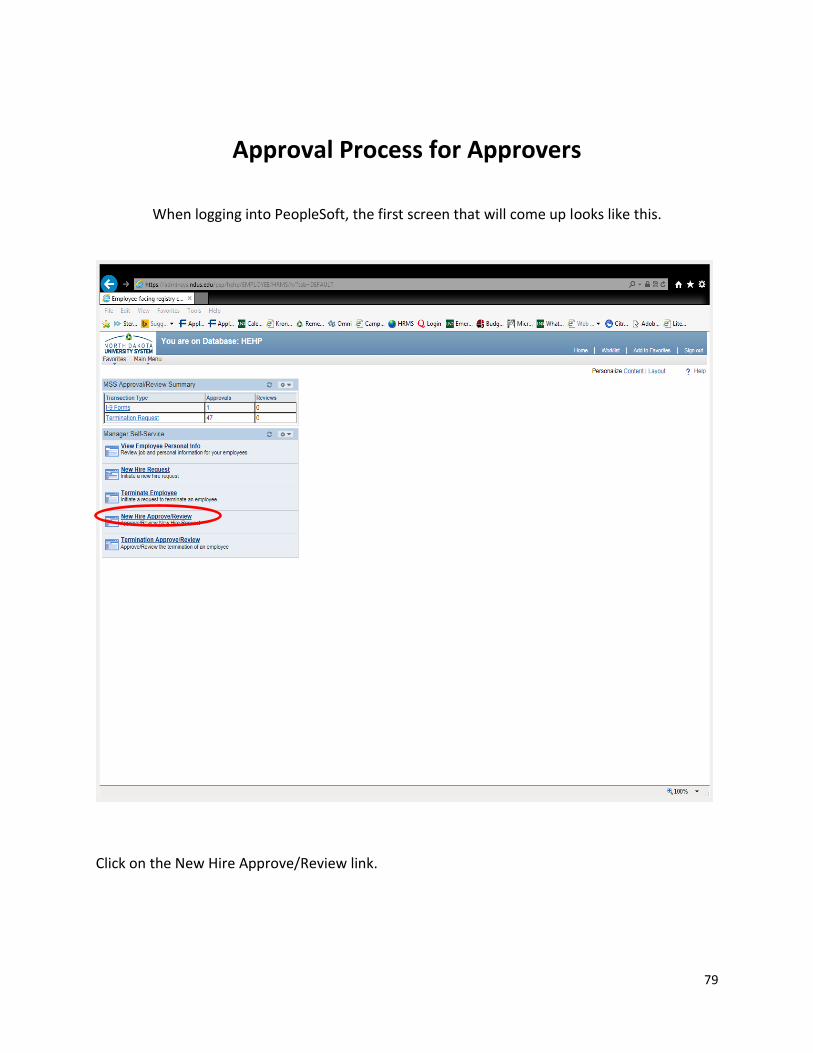
Approval Process for Approvers
When logging into PeopleSoft, the first screen that will come up looks like this.
Click on the New Hire Approve/Review link.

80
Leave “pending” in the workflow status box and click Search. Will bring up a list of all Hires pending approval.

81
Click on a name in list and work through them.
82
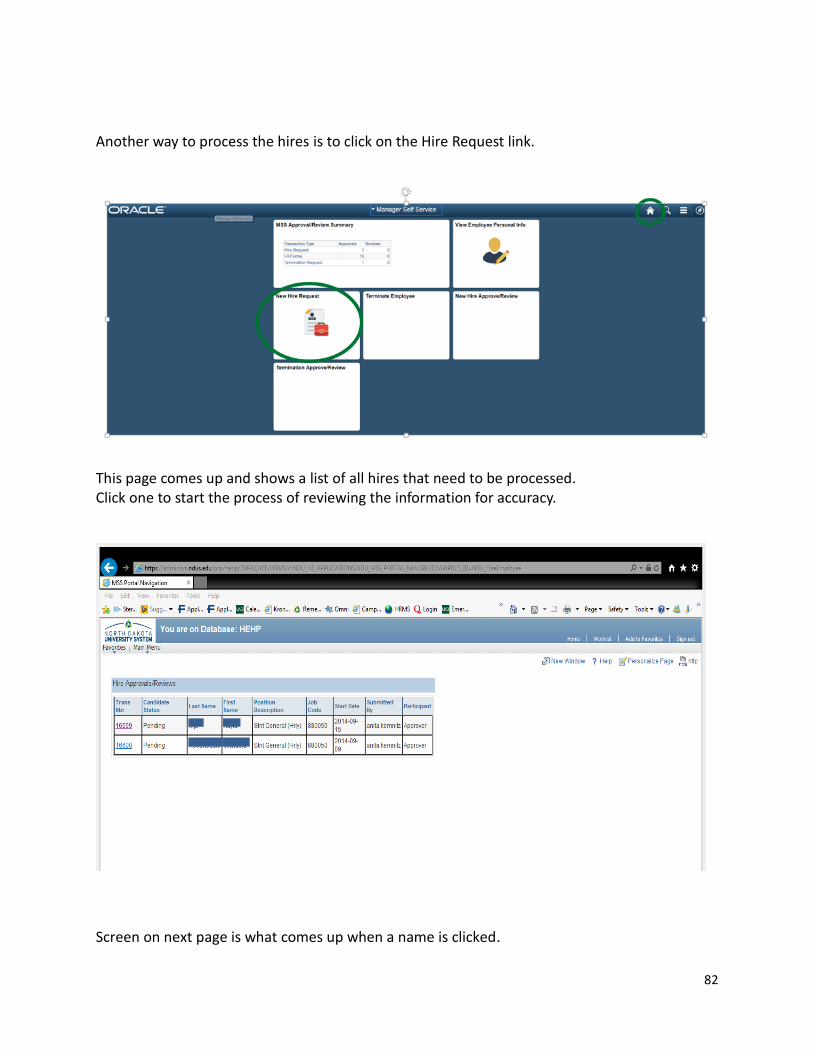
Another way to process the hires is to click on the Hire Request link.
This page comes up and shows a list of all hires that need to be processed. Click one to start the process of reviewing the information for accuracy.
Screen on next page is what comes up when a name is clicked.

83
Review all information and if correct, click Approve. If something is incorrect you can deny and
type the reason for the denial in the Additional Comments box. An email will be sent to the
initiator and they can resubmit the hire (by starting over). If it is a change to standard hours or
comp rate, you can make a note in the Additional Information box of the change and then send
an email or call HR and we can make those changes before we approve. By clicking Exit, you

84
will leave the page without approving it. It will stay in your queue until you go back in and
approve it. Remember, the process is stopped with each Approver. So make sure to check
often to see if you have any Hires pending that you will need to approve.

85
References
Below is a quick reference to the HRMS paths to the pages you will be accessing to complete
these processes.
New Hire Approve/Review – on home page, used to track hires and activity on the
Personal Data Email
These links and all guides and forms are found on our Manager Self Service page on our
website at: http://und.edu/finance-operations/human-resources-payroll/managers-
toolbox/manager-self-service.cfm
Personal Data Login - https://adminsys.ndus.edu/psp/hehp/?cmd=login
Claim Account Login - https://helpdesk.ndus.edu/ndusaccount/
Activity Guide Login - https://adminsys.ndus.edu/psp/hehp/?cmd=login/&languageCd=ENG&