manual barista milk mate - maxicoffee · the barista milk mate is a simple beverage system for 2...
TRANSCRIPT

Manual Barista Milk Mate 1.5
© La Cultura Del Caffè GesmbH 04.09.2015 Page 1 | 36
Barista
Milk Mate
Manual
© La Cultura Del Caffè GesmbH, subject to change without notice - errors and omissions excepted

Manual Barista Milk Mate 1.5
© La Cultura Del Caffè GesmbH 04.09.2015 Page 2 | 36
Index
1 General ___________________________________________________________________ 4
1.1 Introduction ___________________________________________________________ 4 1.2 Memory ______________________________________________________________ 4
2 Installation ________________________________________________________________ 5
2.1 Top view of the electronics board __________________________________________ 5 2.2 Connection of the supply _________________________________________________ 5 2.3 Connection of the valves _________________________________________________ 5 2.4 Connection of a PC ______________________________________________________ 5 2.5 Connection of a cash register ______________________________________________ 6
2.5.1 Bottom view of the electronics board ______________________________________ 6
3 Operation _________________________________________________________________ 7
3.1 General operation ______________________________________________________ 7 3.2 Switching on the device __________________________________________________ 7 3.3 Standby ______________________________________________________________ 7 3.4 Desktop ______________________________________________________________ 7
3.4.1 Dispensing of portions _________________________________________________ 8 3.4.2 Reporting at the buttons _______________________________________________ 9
3.5 Code input ____________________________________________________________ 9 3.6 Main menu ___________________________________________________________ 10 3.7 Reporting menu _______________________________________________________ 10 3.8 Event memory menu ___________________________________________________ 12 3.9 Settings menu ________________________________________________________ 13
3.9.1 General ____________________________________________________________ 13
3.9.1.1 Login code _____________________________________________________ 13 3.9.1.2 Backlight timeout ________________________________________________ 14 3.9.1.3 Standby timeout _________________________________________________ 14 3.9.1.4 Language ______________________________________________________ 14 3.9.1.5 Display ________________________________________________________ 15 3.9.1.6 Display - General ________________________________________________ 15 3.9.1.7 Display – Title bar ________________________________________________ 15 3.9.1.8 Display – Background color ________________________________________ 17
3.9.2 Operation __________________________________________________________ 17 3.9.3 Texts _____________________________________________________________ 18 3.9.4 Standby image ______________________________________________________ 19 3.9.5 Buttons Portions _____________________________________________________ 20 3.9.6 Buttons Design ______________________________________________________ 21 3.9.7 Date & time ________________________________________________________ 22 3.9.8 Serial interface ______________________________________________________ 23
3.10 Service menu _________________________________________________________ 24
3.10.1 Calibrate touch ______________________________________________________ 24 3.10.2 Display test ________________________________________________________ 24 3.10.3 I/O test ____________________________________________________________ 25
3.10.3.1 Valves _________________________________________________________ 25 3.10.3.2 Serial interface __________________________________________________ 26
3.10.4 Clear databuffer _____________________________________________________ 27 3.10.5 Reset _____________________________________________________________ 27
4 Configuration program at the PC _______________________________________________ 28
4.1 General _____________________________________________________________ 28
4.1.1 File format _________________________________________________________ 28 4.1.2 Device connection ___________________________________________________ 28
4.2 Functions ____________________________________________________________ 29
4.2.1 Check _____________________________________________________________ 29 4.2.2 Transfer ___________________________________________________________ 29 4.2.3 Readout ___________________________________________________________ 29 4.2.4 Send time __________________________________________________________ 29

Manual Barista Milk Mate 1.5
© La Cultura Del Caffè GesmbH 04.09.2015 Page 3 | 36
4.3 Special functions ______________________________________________________ 29
4.3.1 Firmware update ____________________________________________________ 29 4.3.2 Bootloader update ___________________________________________________ 29 4.3.3 Clear databuffer _____________________________________________________ 30
4.4 General settings _______________________________________________________ 30
4.4.1 General ____________________________________________________________ 30 4.4.2 Display ____________________________________________________________ 31 4.4.3 Operation __________________________________________________________ 31 4.4.4 Serial interface ______________________________________________________ 31 4.4.5 Device connection ___________________________________________________ 31
4.5 Images ______________________________________________________________ 32 4.6 Texts _______________________________________________________________ 34 4.7 Buttons ______________________________________________________________ 35
5 Technical data _____________________________________________________________ 36

Manual Barista Milk Mate 1.5
© La Cultura Del Caffè GesmbH 04.09.2015 Page 4 | 36
1 General
1.1 Introduction
The Barista Milk Mate is a simple beverage system for 2 lines that is usually used to dispense different sizes of milk portions.
It is operated by using a graphical user interface with a touch screen.
An ergonomic PC application, the X5M MM Konfiguration, is supplied to conveniently configure the controller unit. All necessary configurations can also be made directly at the controller unit via a service menu.
The configuration of the device isn’t easily available for the customers. Only authorized persons may change the settings: an adjustable, predefined code has to be entered for authentication.
1.2 Memory
A counter for each portion and some other events are logged in the background.
All data is stored in special non-volatile memory and thus can’t get lost even after a loss of power.

Manual Barista Milk Mate 1.5
© La Cultura Del Caffè GesmbH 04.09.2015 Page 5 | 36
2 Installation
2.1 Top view of the electronics board
Number Description
1 Connector for supply and valves:
7: Valve2+ (switched)
6: Valve1–, Valve2– (ground)
5: Valve1+ (switched)
4: Valve0b+ (switched)
3: Valve0a+ (switched)
2: +VDC, output
1: -VDC, output, ground for Valve0a- and Valve0b-
+, -: VDC (Supply)
2 USB interface to connect the device to a PC
3 Connector for LCD
4 LED for internal supply
2.2 Connection of the supply
For supplying the device only direct current (DC) in the range of 12-24VDC may be used. This voltage is also used to supply the valves!
2.3 Connection of the valves
Commonly available DC-valves or -pumps may be connected to the according outputs. Only valves or pumps with a nominal voltage of 12 - 24VDC (according to the supply voltage) are to be used!
2.4 Connection of a PC
The device may be connected to a PC via USB for configuration purposes. Therefore the
configuration program has to be installed on the according PC.
A cable of type "USB-Mini-B <-> USB-A" has to be used for this connection!
1
2 3
4
7 6
5
4 3 2
1
+
-
Manual Barista Milk Mate 1.5
© La Cultura Del Caffè GesmbH 04.09.2015 Page 6 | 36
2.5 Connection of a cash register
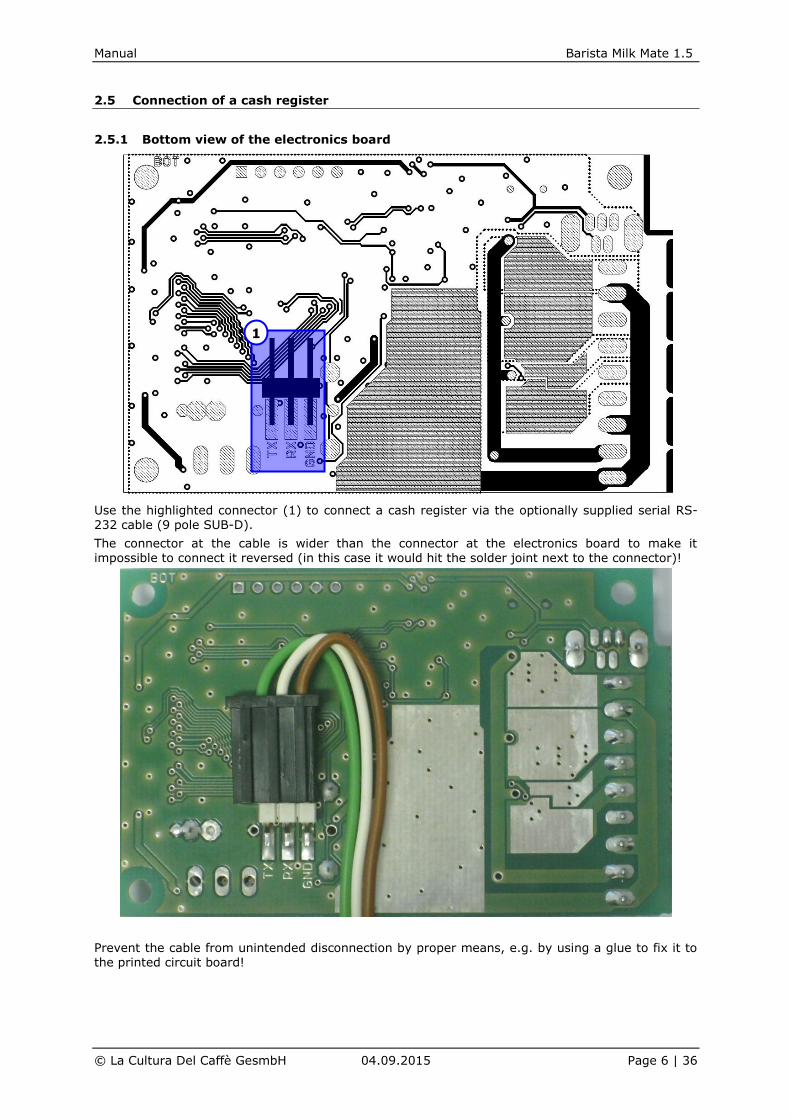
2.5.1 Bottom view of the electronics board
Use the highlighted connector (1) to connect a cash register via the optionally supplied serial RS-232 cable (9 pole SUB-D).
The connector at the cable is wider than the connector at the electronics board to make it
impossible to connect it reversed (in this case it would hit the solder joint next to the connector)!
Prevent the cable from unintended disconnection by proper means, e.g. by using a glue to fix it to the printed circuit board!
1

Manual Barista Milk Mate 1.5
© La Cultura Del Caffè GesmbH 04.09.2015 Page 7 | 36
3 Operation
3.1 General operation
The operation of the Barista Milk Mate is solely done via the touchscreen.
The main menu can only be entered when using a proper code (see chapter "3.5 Code input")!
3.2 Switching on the device
The Barista Milk Mate is switched on by connecting the power supply unit to the power grid.
3.3 Standby
The standby screen shows the chosen picture (menu "Settings"
– "Standby image").
Normally the standby screen is shown after a certain amount of time (see general setting "Standby timeout" in the configuration) when no action happens meanwhile.
If the standby screen is touched then the desktop is shown (see below).
3.4 Desktop
At the Barista Milk Mate a maximum of 4 portions may be stored, which are chosen via the 4 product buttons.

Manual Barista Milk Mate 1.5
© La Cultura Del Caffè GesmbH 04.09.2015 Page 8 | 36
3.4.1 Dispensing of portions
By touching a button the according portion is dispensed. During this action a "Play"-sign is shown at the button.
If the parameter "Aborting possible" is set to "yes", the actual dispensing of a portion (even if it is paused at this moment) may be stopped by touching the title bar (see the blue framed area at the picture to the right). Even when a portion is stopped this way the reporting counter for this portion is incremented!
ATTENTION: If "General settings – Serial interface – Type" is set to be a cash register interface, the dispensing of a portion only starts if the cash register allows the request. In the meanwhile the button is shown as being pressed, but without the “Play”-sign mentioned
above! If the cash register denies the request, the button is
again shown in its normal state.
If a button is touched again while a portion is dispensed (the "Play"-sign is shown) and if the parameter "Pausing possible" is set to yes, a "Pausing"-sign is shown at the button and the portion is paused.
If the parameter "End pause automatically" is set to be 0, the pause needs to be ended manually by touching the button again – then the "Play"-sign is shown and the portion is resumed.
If the parameter "End pause automatically" is greater than 0, the pause will be ended automatically after the given time expires. During this time the "Pausing"-sign is filled up slowly with the color of the "Play"-sign.
Manual Barista Milk Mate 1.5
© La Cultura Del Caffè GesmbH 04.09.2015 Page 9 | 36
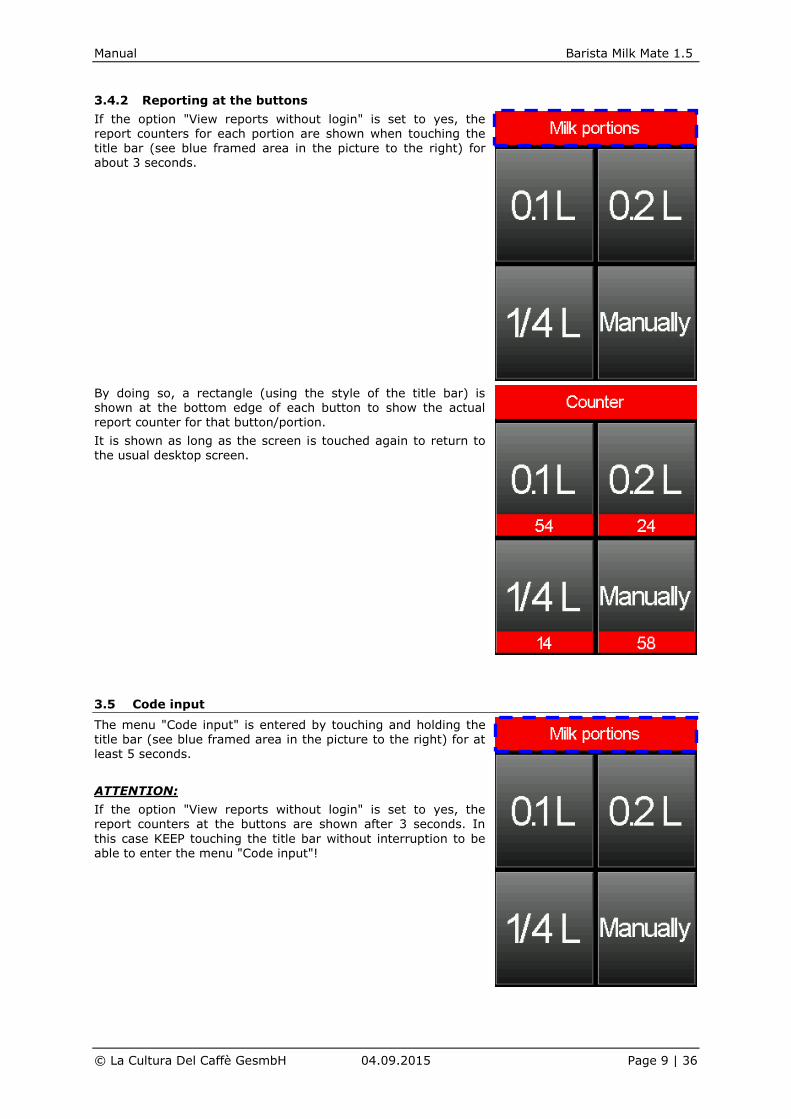
3.4.2 Reporting at the buttons
If the option "View reports without login" is set to yes, the report counters for each portion are shown when touching the title bar (see blue framed area in the picture to the right) for about 3 seconds.
By doing so, a rectangle (using the style of the title bar) is shown at the bottom edge of each button to show the actual report counter for that button/portion.
It is shown as long as the screen is touched again to return to the usual desktop screen.
3.5 Code input
The menu "Code input" is entered by touching and holding the title bar (see blue framed area in the picture to the right) for at least 5 seconds.
ATTENTION:
If the option "View reports without login" is set to yes, the report counters at the buttons are shown after 3 seconds. In
this case KEEP touching the title bar without interruption to be able to enter the menu "Code input"!
Manual Barista Milk Mate 1.5
© La Cultura Del Caffè GesmbH 04.09.2015 Page 10 | 36
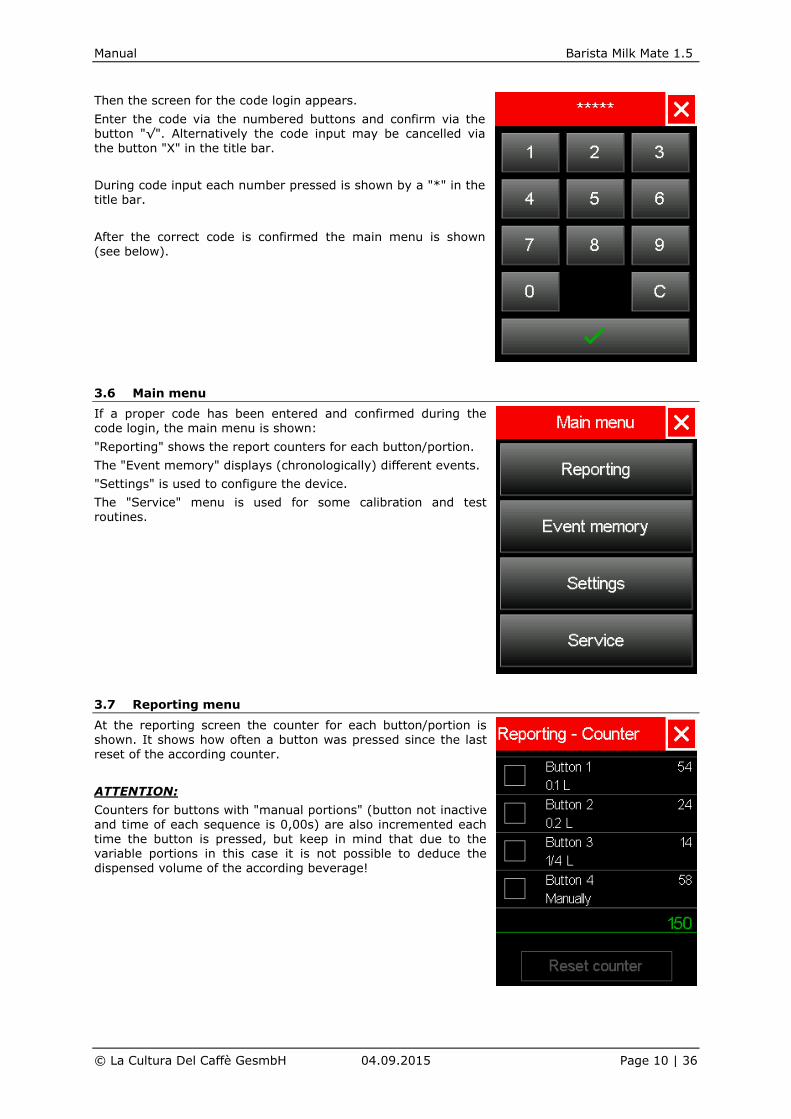
Then the screen for the code login appears.
Enter the code via the numbered buttons and confirm via the button "√". Alternatively the code input may be cancelled via the button "X" in the title bar.
During code input each number pressed is shown by a "*" in the title bar.
After the correct code is confirmed the main menu is shown (see below).
3.6 Main menu
If a proper code has been entered and confirmed during the code login, the main menu is shown:
"Reporting" shows the report counters for each button/portion.
The "Event memory" displays (chronologically) different events.
"Settings" is used to configure the device.
The "Service" menu is used for some calibration and test routines.
3.7 Reporting menu
At the reporting screen the counter for each button/portion is shown. It shows how often a button was pressed since the last reset of the according counter.
ATTENTION:
Counters for buttons with "manual portions" (button not inactive and time of each sequence is 0,00s) are also incremented each time the button is pressed, but keep in mind that due to the variable portions in this case it is not possible to deduce the dispensed volume of the according beverage!

Manual Barista Milk Mate 1.5
© La Cultura Del Caffè GesmbH 04.09.2015 Page 11 | 36
To reset a counter choose the according button/portion in the
menu (it is marked with a red sign then, see picture).
The button "Reset counter" will become active if at least one counter is chosen to be reset!
After pressing the button "Reset counter" a new pop-up window
appears to either confirm or cancel the procedure.
If the reset procedure is confirmed, the chosen counters are
reset to 0 and again all counters are shown in the menu.
In the example shown to the right the counters for button 1 and button 2 were reset.

Manual Barista Milk Mate 1.5
© La Cultura Del Caffè GesmbH 04.09.2015 Page 12 | 36
3.8 Event memory menu
The last 100 events are shown chronologically in a list.
Select an entry by touching it.
If details are stored for the selected event, the button "Details" is activated to allow the user to see further, detailed data.
Events with additional details are "Date/time changed".
The details for the event "Date/time changed" show the exact date and time (when the event occurred) at first. After that the old and the new date/time are displayed.

Manual Barista Milk Mate 1.5
© La Cultura Del Caffè GesmbH 04.09.2015 Page 13 | 36
3.9 Settings menu
Due to extensive options this menu is separated into further submenus which are described below.
3.9.1 General
This submenu is used to adjust the login code, the backlight and
standby timeout, the language and the display options (see the according parameters in the configuration program).
3.9.1.1 Login code
To change the login code it is necessary to first enter the old code and confirm with "√".
After that enter the new code (2 to 9 digits), confirm it, repeat the new code and confirm again.
Manual Barista Milk Mate 1.5
© La Cultura Del Caffè GesmbH 04.09.2015 Page 14 | 36
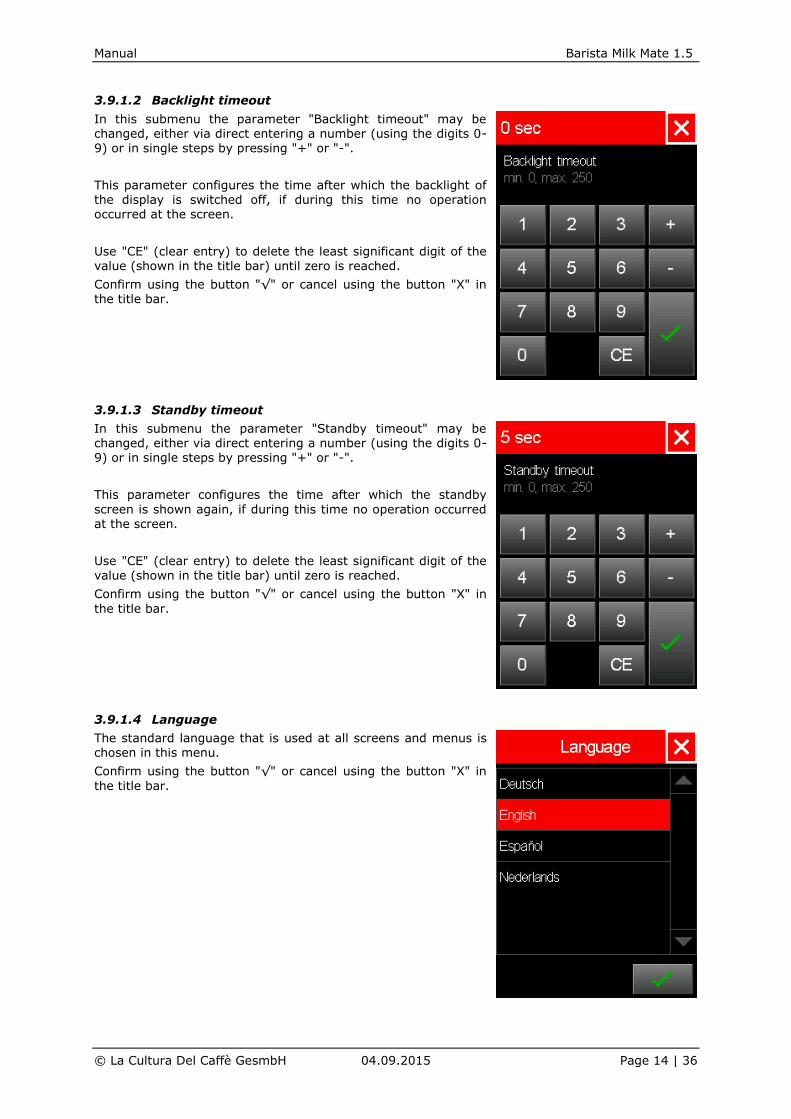
3.9.1.2 Backlight timeout
In this submenu the parameter "Backlight timeout" may be changed, either via direct entering a number (using the digits 0-9) or in single steps by pressing "+" or "-".
This parameter configures the time after which the backlight of the display is switched off, if during this time no operation occurred at the screen.
Use "CE" (clear entry) to delete the least significant digit of the value (shown in the title bar) until zero is reached.
Confirm using the button "√" or cancel using the button "X" in the title bar.
3.9.1.3 Standby timeout
In this submenu the parameter "Standby timeout" may be changed, either via direct entering a number (using the digits 0-9) or in single steps by pressing "+" or "-".
This parameter configures the time after which the standby
screen is shown again, if during this time no operation occurred at the screen.
Use "CE" (clear entry) to delete the least significant digit of the value (shown in the title bar) until zero is reached.
Confirm using the button "√" or cancel using the button "X" in
the title bar.
3.9.1.4 Language
The standard language that is used at all screens and menus is chosen in this menu.
Confirm using the button "√" or cancel using the button "X" in
the title bar.

Manual Barista Milk Mate 1.5
© La Cultura Del Caffè GesmbH 04.09.2015 Page 15 | 36
3.9.1.5 Display
Due to the amount of different options this menu is separated into further submenus which are described below.
3.9.1.6 Display - General
If "Wall fastening" is chosen, the display content is rotated by 180°.
If "Buttons with color gradient" is chosen, all buttons are shown with a kind of 3D effect (by getting darker towards the bottom).
If not, the buttons appear flat (single color).
Confirm using the button "√" or cancel using the button "X" in the title bar.
3.9.1.7 Display – Title bar
Use this submenu to adopt the appearing of the title bar of the desktop screen to your needs.
Choose a text for the title bar from the list. If NO text should be
shown, choose <inactive>.
... set the background color of the title bar
... set the text color of the title bar
... set the font size of text in the title bar
Confirm using the button "√" or cancel using the button "X" in the title bar.

Manual Barista Milk Mate 1.5
© La Cultura Del Caffè GesmbH 04.09.2015 Page 16 | 36
Background color of the title bar:
Use one of the 15 colored buttons to preselect a color.
By using the 3 fields below those buttons it is possible to adjust each color channel (red, green and blue) by using the buttons "+" or "-".
The area in the bottom left corner of the screen ("ABC") shows how the title bar will look like – the chosen colors are applied to this area!
Confirm using the button "√" or cancel using the button "X" in the title bar.
Text color of the title bar:
Use one of the 15 colored buttons to preselect a color.
By using the 3 fields below those buttons it is possible to adjust each color channel (red, green and blue) by using the buttons "+" or "-".
The area in the bottom left corner of the screen ("ABC") shows how the title bar will look like – the chosen colors are applied to this area!
Confirm using the button "√" or cancel using the button "X" in the title bar.
Font size of the title bar:
Choose the font size for the text of the title bar by pressing the appropriate radio button.
Confirm using the button "√" or cancel using the button "X" in the title bar.

Manual Barista Milk Mate 1.5
© La Cultura Del Caffè GesmbH 04.09.2015 Page 17 | 36
3.9.1.8 Display – Background color
This submenu is used to set the background color for the desktop screen:
Use one of the 15 colored buttons to preset a color.
By using the 3 fields below those buttons it is possible to adjust each color channel (red, green and blue) by using the buttons "+" or "-".
The area in the bottom left corner of the screen ("ABC") shows
how the title bar will look like – the chosen color is applied to this area!
Confirm using the button "√" or cancel using the button "X" in the title bar.
3.9.2 Operation
A list of all configurable operation parameters is shown.
All parameters which can be found in the configuration program (see "General settings" – "Operation") may also be changed in this submenu.
For that purpose select the parameter in the list (so that it is marked) and afterwards touch this parameter again.
Parameters with numerical value:
The according parameter may be adjusted, either via direct entering a number (using the digits 0-9) or in single steps by pressing "+" or "-".
Use "CE" (clear entry) to delete the least significant digit of the value shown in the title bar.
Values that are not allowed cannot be entered.
Confirm using the button "√" or cancel using the button "X" in
the title bar.
Manual Barista Milk Mate 1.5
© La Cultura Del Caffè GesmbH 04.09.2015 Page 18 | 36
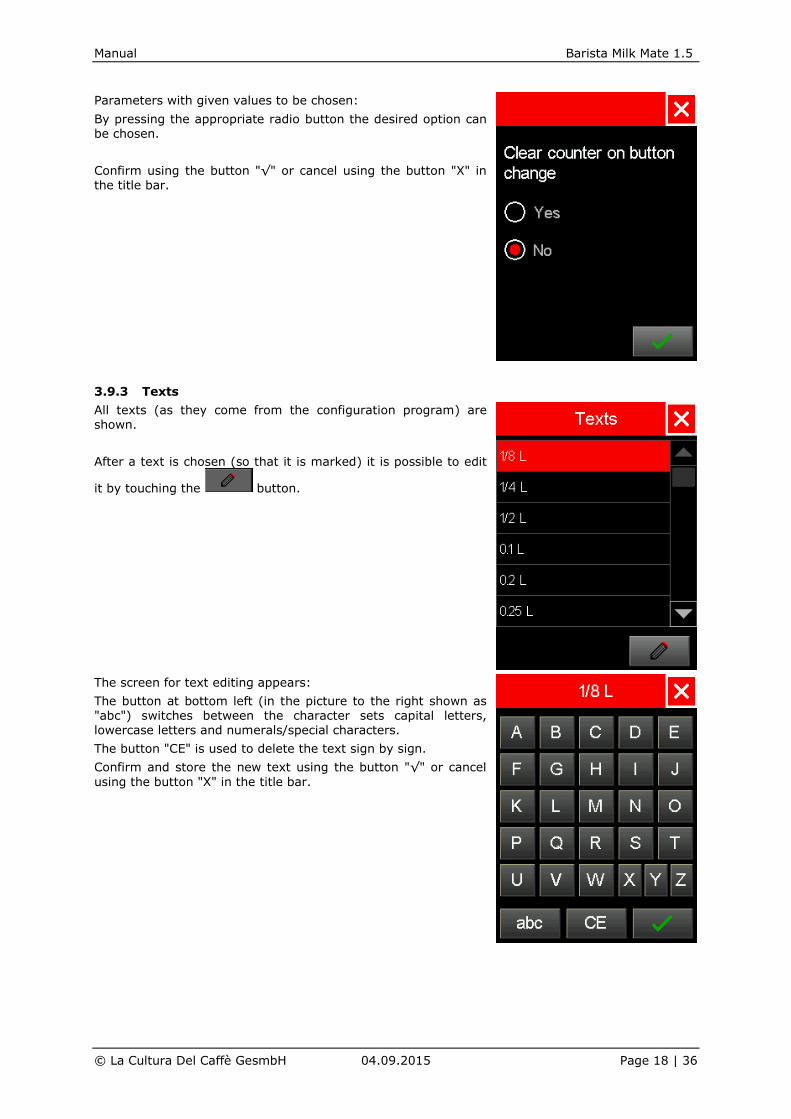
Parameters with given values to be chosen:
By pressing the appropriate radio button the desired option can be chosen.
Confirm using the button "√" or cancel using the button "X" in the title bar.
3.9.3 Texts
All texts (as they come from the configuration program) are shown.
After a text is chosen (so that it is marked) it is possible to edit
it by touching the button.
The screen for text editing appears:
The button at bottom left (in the picture to the right shown as "abc") switches between the character sets capital letters, lowercase letters and numerals/special characters.
The button "CE" is used to delete the text sign by sign.
Confirm and store the new text using the button "√" or cancel
using the button "X" in the title bar.
Manual Barista Milk Mate 1.5
© La Cultura Del Caffè GesmbH 04.09.2015 Page 19 | 36
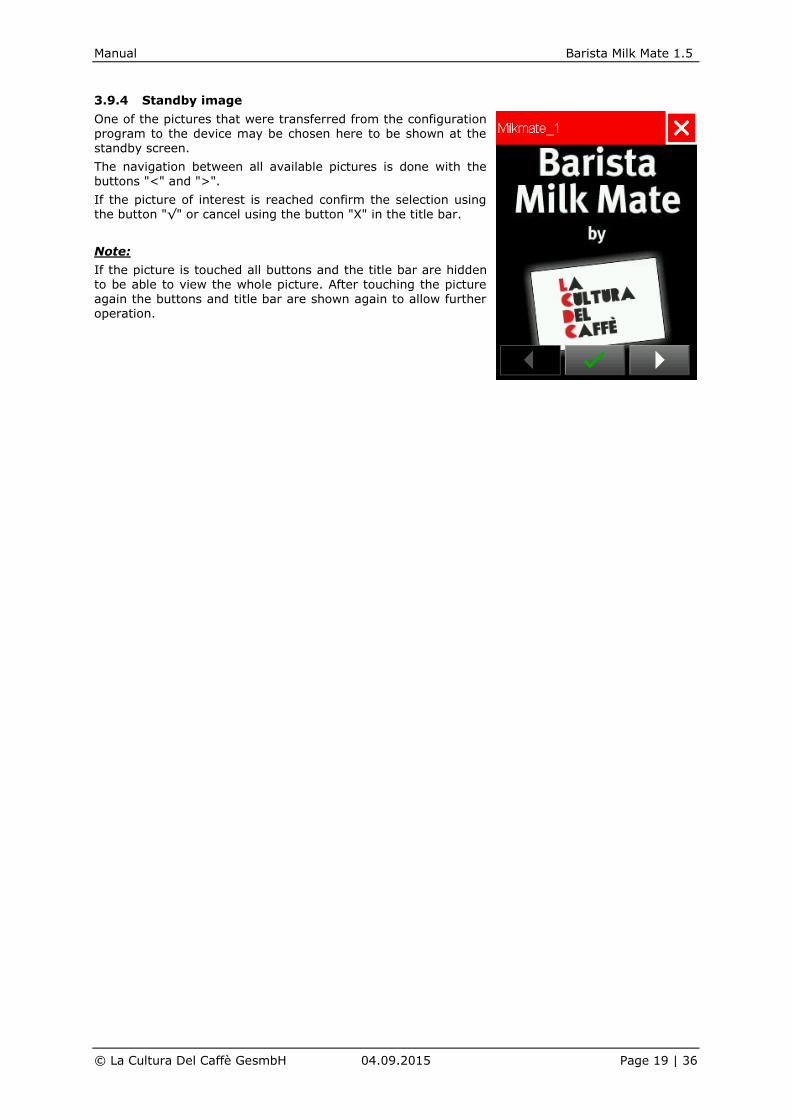
3.9.4 Standby image
One of the pictures that were transferred from the configuration program to the device may be chosen here to be shown at the standby screen.
The navigation between all available pictures is done with the buttons "<" and ">".
If the picture of interest is reached confirm the selection using the button "√" or cancel using the button "X" in the title bar.
Note:
If the picture is touched all buttons and the title bar are hidden to be able to view the whole picture. After touching the picture again the buttons and title bar are shown again to allow further operation.

Manual Barista Milk Mate 1.5
© La Cultura Del Caffè GesmbH 04.09.2015 Page 20 | 36
3.9.5 Buttons Portions
By using this menu each one of the 4 possible portions may be set.
Press one of the buttons to set its portion.
Each portion consists of 2 sequences. The sequences may follow each other sequentially or may run simultaneously. Every sequence opens its valves for the time set.
Usually the portioning for each sequence is done by first choosing the valves for this sequence (they are marked red
then). Then press & hold the button to coarsely set the
time for this sequence. Then the time may further be adjusted by using the buttons "+" or "-".
If the function "1=2" is set (marked red), both sequences will start simultaneously. If "1=2" is inactive, at first sequence 1 is
started, afterwards sequence 2 is started.
By pressing the "Test" button, the actual portion is dispensed for verification purposes.
Confirm and store the new portion using the button "√" or cancel using the button "X" in the title bar.
The example shown in the picture at the right hand side means
that the sequences are started simultaneously ("1=2" is activated), so valve V1 and valve V2 are opened at once. After 1,00s V1 is closed, 0,30s later V2 is also closed (it is opened for 1,30s overall).
Manual portion:
If the valve time of both sequences is set to 0,00s and the according button is not inactive, the dispensing lasts as long as the button at the desktop screen is pressed. The according valves may be set either in sequence 1 or sequence 2
Note:
If during portioning via the button no valve is chosen
(neither area "V1" nor area "V2" activated), the portioning can be done without opening a valve. In this case at first the time is set and afterwards the according valves for each sequence are chosen.
Manual Barista Milk Mate 1.5
© La Cultura Del Caffè GesmbH 04.09.2015 Page 21 | 36
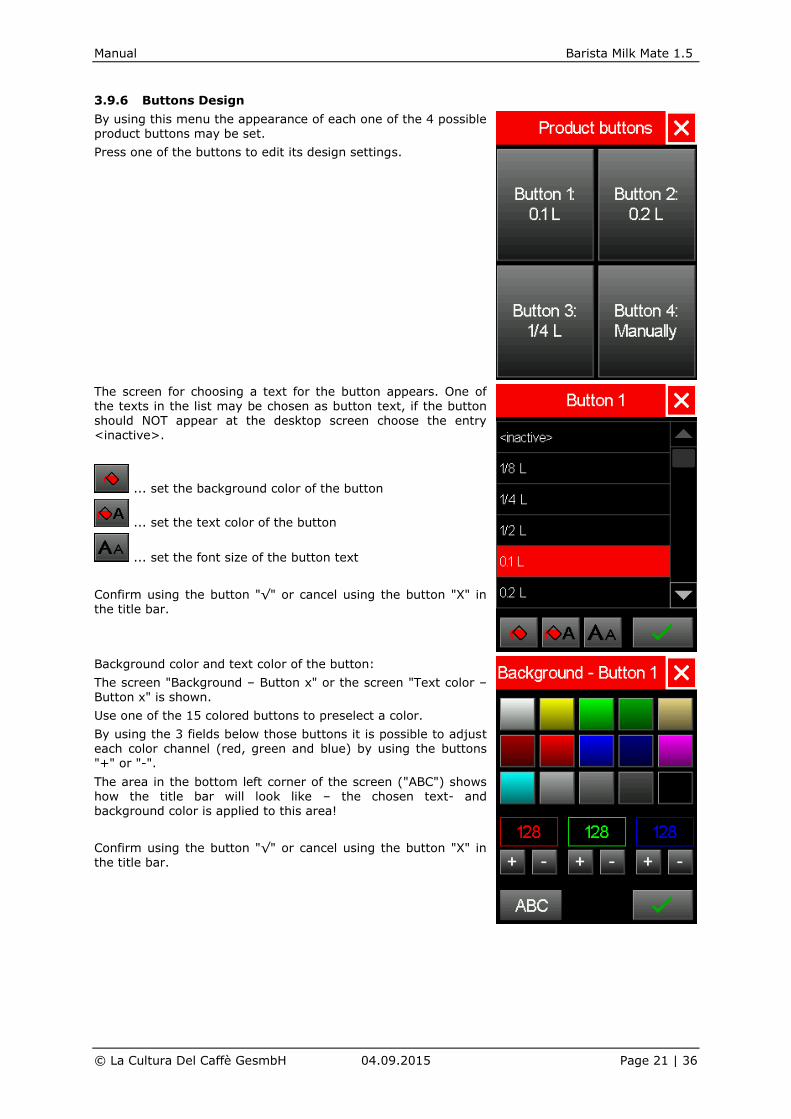
3.9.6 Buttons Design
By using this menu the appearance of each one of the 4 possible product buttons may be set.
Press one of the buttons to edit its design settings.
The screen for choosing a text for the button appears. One of the texts in the list may be chosen as button text, if the button should NOT appear at the desktop screen choose the entry <inactive>.
... set the background color of the button
... set the text color of the button
... set the font size of the button text
Confirm using the button "√" or cancel using the button "X" in the title bar.
Background color and text color of the button:
The screen "Background – Button x" or the screen "Text color – Button x" is shown.
Use one of the 15 colored buttons to preselect a color.
By using the 3 fields below those buttons it is possible to adjust each color channel (red, green and blue) by using the buttons "+" or "-".
The area in the bottom left corner of the screen ("ABC") shows how the title bar will look like – the chosen text- and background color is applied to this area!
Confirm using the button "√" or cancel using the button "X" in the title bar.

Manual Barista Milk Mate 1.5
© La Cultura Del Caffè GesmbH 04.09.2015 Page 22 | 36
Font size of the button text:
By pressing the appropriate radio button the font size for the text on the product button is chosen.
Confirm using the button "√" or cancel using the button "X" in the title bar.
3.9.7 Date & time
At first you can see date and time when this menu was entered. Use the buttons "+" and "-" to adjust the data.
Confirm using the button "√" or cancel using the button "X" in the title bar.
If an invalid date is entered (e.g. like shown the 31st of November or the 29th of February although the year is not a leap year), the confirm button "√" is deactivated. The invalid value therefore cannot be stored.

Manual Barista Milk Mate 1.5
© La Cultura Del Caffè GesmbH 04.09.2015 Page 23 | 36
3.9.8 Serial interface
This submenu may be used to configure the serial connection to a cash register.
By touching the button "Type" the screen to the right is displayed.
If the type is set to "none" the device works without connection to a cash register. If a product button (at the desktop) is pressed the according portion is dispensed immediately.
If type is set to "CSI" an inquiry at the cash register is started after a portion is requested – only if the cash register allows the
portion to be dispensed this action is performed by the device.
CSI:
In this case the device works as "CSI KM" with connection to a cash register. The article number during an inquiry at the cash register is the number of the button pressed (1 … 4).
Via the button "Baud rate" the speed of the serial communication may be set – the screen to the right is shown.
The serial bit stream always consists of 8 data bits, no parity bit and 1 stop bit.
Manual Barista Milk Mate 1.5
© La Cultura Del Caffè GesmbH 04.09.2015 Page 24 | 36
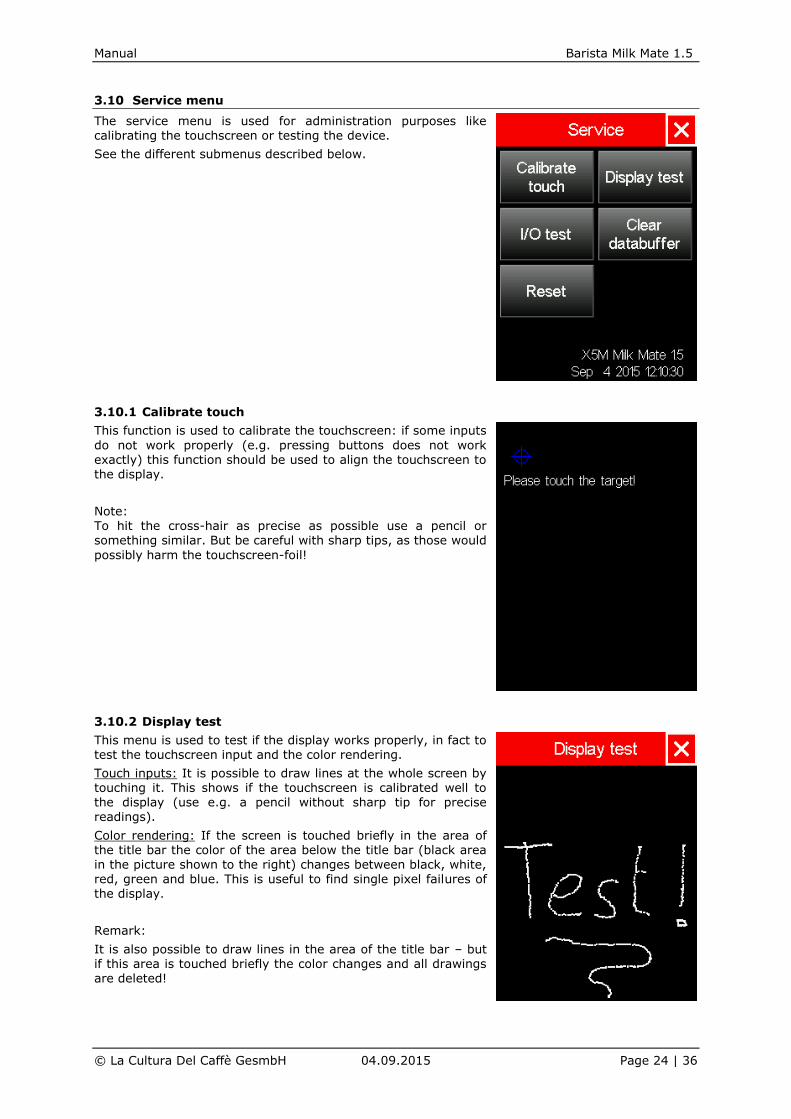
3.10 Service menu
The service menu is used for administration purposes like calibrating the touchscreen or testing the device.
See the different submenus described below.
3.10.1 Calibrate touch
This function is used to calibrate the touchscreen: if some inputs
do not work properly (e.g. pressing buttons does not work exactly) this function should be used to align the touchscreen to the display.
Note: To hit the cross-hair as precise as possible use a pencil or something similar. But be careful with sharp tips, as those would
possibly harm the touchscreen-foil!
3.10.2 Display test
This menu is used to test if the display works properly, in fact to test the touchscreen input and the color rendering.
Touch inputs: It is possible to draw lines at the whole screen by touching it. This shows if the touchscreen is calibrated well to the display (use e.g. a pencil without sharp tip for precise readings).
Color rendering: If the screen is touched briefly in the area of the title bar the color of the area below the title bar (black area in the picture shown to the right) changes between black, white, red, green and blue. This is useful to find single pixel failures of the display.
Remark:
It is also possible to draw lines in the area of the title bar – but if this area is touched briefly the color changes and all drawings are deleted!

Manual Barista Milk Mate 1.5
© La Cultura Del Caffè GesmbH 04.09.2015 Page 25 | 36
3.10.3 I/O test
This function is used to check the operation of the electronics and other connected devices.
In this case the valves as well as the serial interface.
3.10.3.1 Valves
Use this to check the operation of the valve drivers and the connected valves.
By pressing a valve button the according valve is activated (powered) and the button appears red.
By pressing the button again the valve is deactivated and the button becomes grey again.
ATTENTION:
For safety reasons the maximum time for activating (powering) a valve in this menu is 5 minutes. This means that 5 minutes after a valve is activated with one of the buttons it is automatically deactivated! Also when this menu is left all valves will be deactivated automatically!

Manual Barista Milk Mate 1.5
© La Cultura Del Caffè GesmbH 04.09.2015 Page 26 | 36
3.10.3.2 Serial interface
Use this to check the serial connection to the cash register.
If no cash register interface is configured the "State" is shown as "Not used", colored grey. If a cash register interface is configured, the text shown for the actual state is colored red, orange or green (according to a traffic light):
State Description
Not used Serial interface type set to "none"
Not OK! Connection not established (no
cable connected or cable defective, wrong baud rate, ...)
OK - Connected Connection established, dispensing of a portion not possible
OK - Polling, No action Connection established, dispensing
of a portion not possible (e.g. because no waiter logged in to the cash register or no credit available
at the cash register)
OK - Polling, Ready Connection established, dispensing of a portion possible
OK - Inquiry Connection established, at the
moment an inquiry is going on
Bytes received:
The sum of all received data bytes is displayed, regardless if they were erroneous or not.
Byte errors - Parity, Framing, ...:
The amount of erroneously received data bytes is shown (the sum of parity-, framing- and break-errors).
Byte errors - RxBuffer overflow:
The number of bytes NOT copied to the receive buffer (e.g. because the system was overloaded) is shown.
Packets rcvd.:
Displays the sum of all correctly received data packets
(completed error-free telegrams).
Packet errors - Checksum wrong:
Shows the amount of received data packets with wrong checksum. Such data packets are discarded.
All counters listed above are reset to zero with every power-up
cycle of the device and if a parameter of the serial interface (like the baud rate) is changed while the type of the serial interface is not set to "none".
The error counters (counters for "Byte errors" or for "Packet errors") should stay below 0.1‰ (100ppm) of the according receive counters. So, e.g. per 10000 received packets only one
error "Checksum wrong" should occur.
If the error rate is higher than that it is likely that the data cable is too long or that external disturbances occur during communications, like electromagnetic disruption. In such cases a reduction of the baud rate might help, also the data cable should always be kept as short as possible!

Manual Barista Milk Mate 1.5
© La Cultura Del Caffè GesmbH 04.09.2015 Page 27 | 36
3.10.4 Clear databuffer
This menu is used to delete all data stored in the non-volatile memory like the report counters and the event memory.
After pushing the button "Clear databuffer" a new pop-up window appears to either confirm or cancel the procedure.
ATTENTION:
When clearing the databuffer the report counters and the event
memory are DELETED PERMANENTLY and can never be restored!
3.10.5 Reset
This menu may be used to restart the device without disconnecting it from the power supply.
After pushing the button "Reset" a new pop-up window appears to either confirm or cancel the procedure.

Manual Barista Milk Mate 1.5
© La Cultura Del Caffè GesmbH 04.09.2015 Page 28 | 36
4 Configuration program at the PC
The configuration program X5M MM Konfiguration is used for the basic configuration of each Barista
Milk Mate.
The general settings, the images and texts as well as the button design and portions can be configured and transferred to the device. Altogether results in the complete configuration of the device.
4.1 General
The program can use German and English language which is easily switched in the menu "File" (see screenshot above). The language selected here has no direct effect on the language at the device.
This can be adjusted separately in the general settings ("Device language").
4.1.1 File format
This program uses a proprietary file type with ending ".mmcfg". After installation, files with that ending can directly be opened with this configuration program by double clicking the file.
4.1.2 Device connection
The Barista Milk Mate can be connected via a virtual COM port (which is created by the device on the USB). The necessary driver is included in the setup package and installed automatically during
the setup process.
NOTE: During driver installation Windows possibly shows a safety warning because the driver has not been verified as being compatible with Microsoft. Anyway the installation has to be resumed so you can connect to the device.
The configuration program then automatically detects if a Barista Milk Mate is connected to the PC and shows this by the identified COM port.

Manual Barista Milk Mate 1.5
© La Cultura Del Caffè GesmbH 04.09.2015 Page 29 | 36
4.2 Functions
Besides the basic functions like starting a new file, opening and saving a file, additional icons (shortcuts) are:
4.2.1 Check
The program tries to communicate to the device connected via the COM port specified under "Device connection" and verifies the device type as well as the device version. You can see the result of this check in the status field.
4.2.2 Transfer
The present configuration (general settings, images and text as well as button design and portions) is transferred to the device.
4.2.3 Readout
The configuration (general settings, images and text as well as button design and portions) is read out from the device.
4.2.4 Send time
Send current date and time to the device in the current time zone of the PC (converted to standard time during daylight-saving time).
4.3 Special functions
Besides the basic and standard functions shown above, there are some functions which should only be used by extra trained users.
4.3.1 Firmware update
The integrated firmware is loaded into the device and the application on the device becomes up to date thereby.
4.3.2 Bootloader update
The integrated device bootloader is loaded into the device.
The bootloader starts the device, loads the drivers for display and internal hardware and then starts the application.
Manual Barista Milk Mate 1.5
© La Cultura Del Caffè GesmbH 04.09.2015 Page 30 | 36
Usually it is not necessary to update the bootloader. The update involves certain risks (e.g. at loss
of power during the update) and so this should only be done when absolutely required!
4.3.3 Clear databuffer
In some situations it may make sense to clear all data (event memory and product counters) in the non-volatile memory of the device. This can be done here.
4.4 General settings
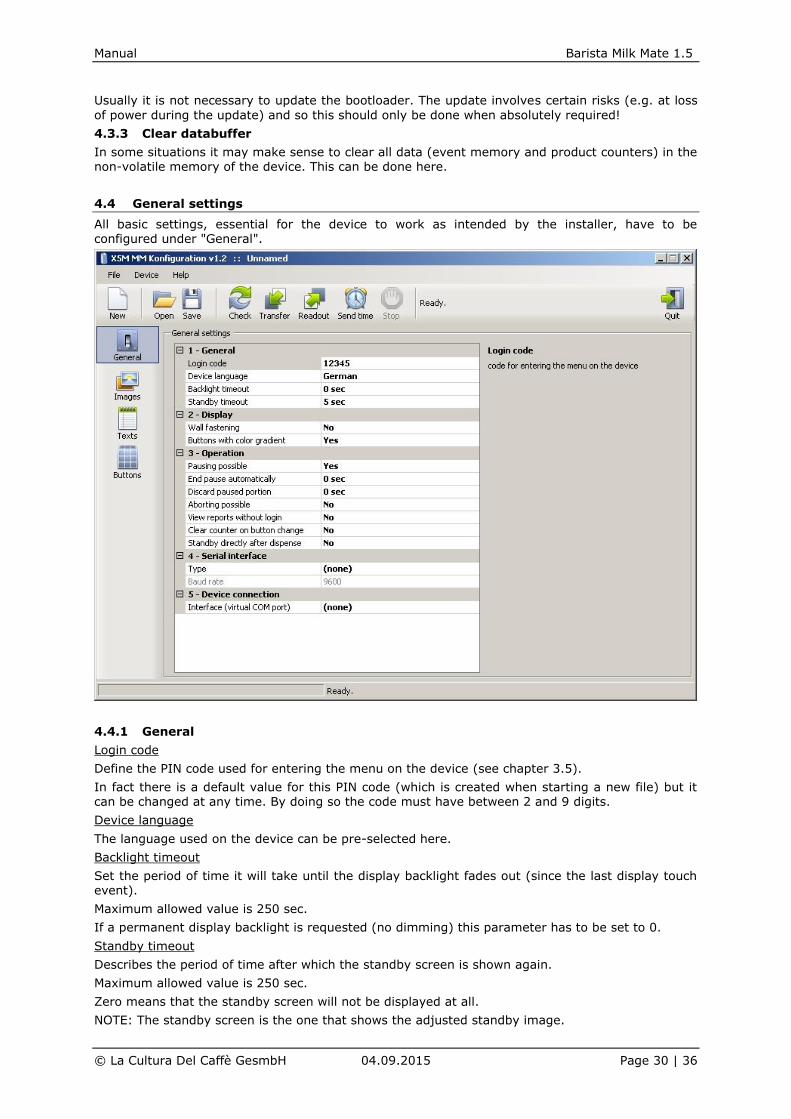
All basic settings, essential for the device to work as intended by the installer, have to be configured under "General".
4.4.1 General
Login code
Define the PIN code used for entering the menu on the device (see chapter 3.5).
In fact there is a default value for this PIN code (which is created when starting a new file) but it can be changed at any time. By doing so the code must have between 2 and 9 digits.
Device language
The language used on the device can be pre-selected here.
Backlight timeout
Set the period of time it will take until the display backlight fades out (since the last display touch event).
Maximum allowed value is 250 sec.
If a permanent display backlight is requested (no dimming) this parameter has to be set to 0.
Standby timeout
Describes the period of time after which the standby screen is shown again.
Maximum allowed value is 250 sec.
Zero means that the standby screen will not be displayed at all.
NOTE: The standby screen is the one that shows the adjusted standby image.
Manual Barista Milk Mate 1.5
© La Cultura Del Caffè GesmbH 04.09.2015 Page 31 | 36
4.4.2 Display
Wall fastening
Depending on this setting the display content is rotated by 180°.
So the device can be adapted to different mounting options, e.g. on a table (Wall fastening = No) or on a wall (Wall fastening = Yes).
Buttons with color gradient
This option defines if all buttons are displayed with a color gradient on it. The gradient makes the buttons look convex (3D effect).
4.4.3 Operation
Pausing possible
It defines if the portions (triggered by the buttons on the desktop) can be paused and resumed again.
End pause automatically
Paused products will be continued automatically when the given time has elapsed.
Maximum allowed value is 250 sec.
Zero means that pauses will not be ended automatically.
Discard paused portions
Paused products will be discarded automatically when the given time has elapsed.
Maximum allowed value is 3600 sec.
In this case zero means that a paused portion will never be discarded.
Aborting possible
Defines if the portions can be aborted (regardless of whether they are paused).
View reports without login
Here you can adjust if the reports can be displayed directly on the product buttons without input of
the login code.
Clear counter on button change
This setting defines if the product counters are reset automatically when the button assignment
(i.e. the text) changes.
Standby directly after dispense
It defines if the standby screen is to be shown immediately after product dispensing, regardless of the standby timeout.
4.4.4 Serial interface
Type
Defines the usage of the serial interface (cash register connection) on the device (none, CSI).
Baud rate
The baud rate of the serial interface (cash register connection) on the device (1200 - 57600).
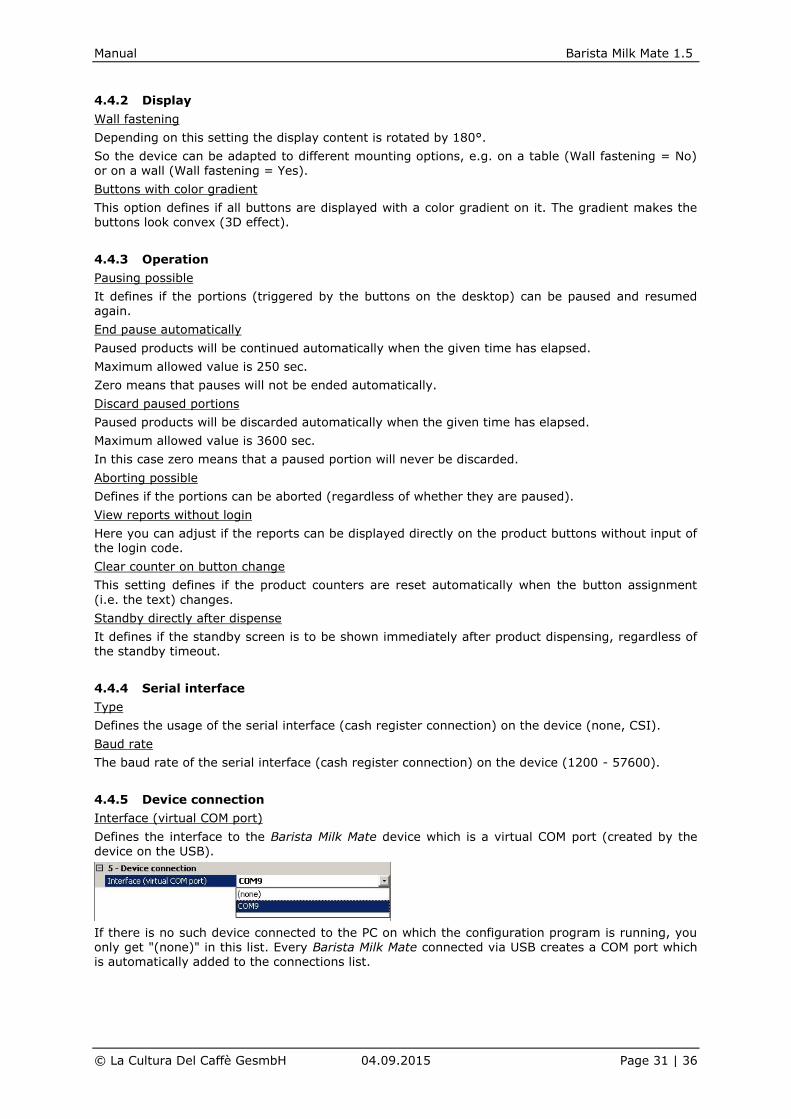
4.4.5 Device connection
Interface (virtual COM port)
Defines the interface to the Barista Milk Mate device which is a virtual COM port (created by the device on the USB).
If there is no such device connected to the PC on which the configuration program is running, you only get "(none)" in this list. Every Barista Milk Mate connected via USB creates a COM port which is automatically added to the connections list.

Manual Barista Milk Mate 1.5
© La Cultura Del Caffè GesmbH 04.09.2015 Page 32 | 36
4.5 Images
The images collected here can be selected as standby image on the device after transferring them. The selected image is then shown in the standby screen of the device.
The names may freely be edited, however you have to take care of the maximum text length of 30
characters.
The number of the image is assigned automatically when added, but can be changed freely in the range from 1 to 20. This number is used for the mapping on the device.
In the column "Standby" you can define which image shall be displayed on the standby screen. Only one can be chosen – a multiple selection is prevented here.
ATTENTION: Every single image must have a unique number. Therefore repeated usage of the same number is already prevented when typing.
The following functions are available via the buttons next to the table:
...
add an image via a dialog box (if required, image size and color depth are automatically adjusted to values needed at the device)
Supported image types are BMP, JPEG, GIF, TIFF und PNG files.
...
delete the selected image(s) from the configuration
...
remove all images from the configuration

Manual Barista Milk Mate 1.5
© La Cultura Del Caffè GesmbH 04.09.2015 Page 33 | 36
When the mouse is moved over a thumbnail, the related image is displayed in original size within a
pop-up window:

Manual Barista Milk Mate 1.5
© La Cultura Del Caffè GesmbH 04.09.2015 Page 34 | 36
4.6 Texts
The texts collected here can be used on all product buttons and at the title bar on the device.
The texts can freely be edited (even on the device) and may have a maximum length of 30 characters.
The text number is assigned automatically when added, but can be changed freely in the range from 1 to 50. This number is used for the mapping on the device.
ATTENTION: Every single text must have a unique number. Therefore repeated usage of the same number is already prevented when typing.
The following functions are available via the buttons next to the table:
...
remove currently existing texts and load default texts in the active language
...
delete the selected text(s) from the configuration
...
remove all texts from the configuration
NOTE: If the language is changed, those texts are consciously not reloaded automatically in the
new language in order to prevent overwriting already edited texts. Reloading the texts must be done via the button mentioned above.
Manual Barista Milk Mate 1.5
© La Cultura Del Caffè GesmbH 04.09.2015 Page 35 | 36
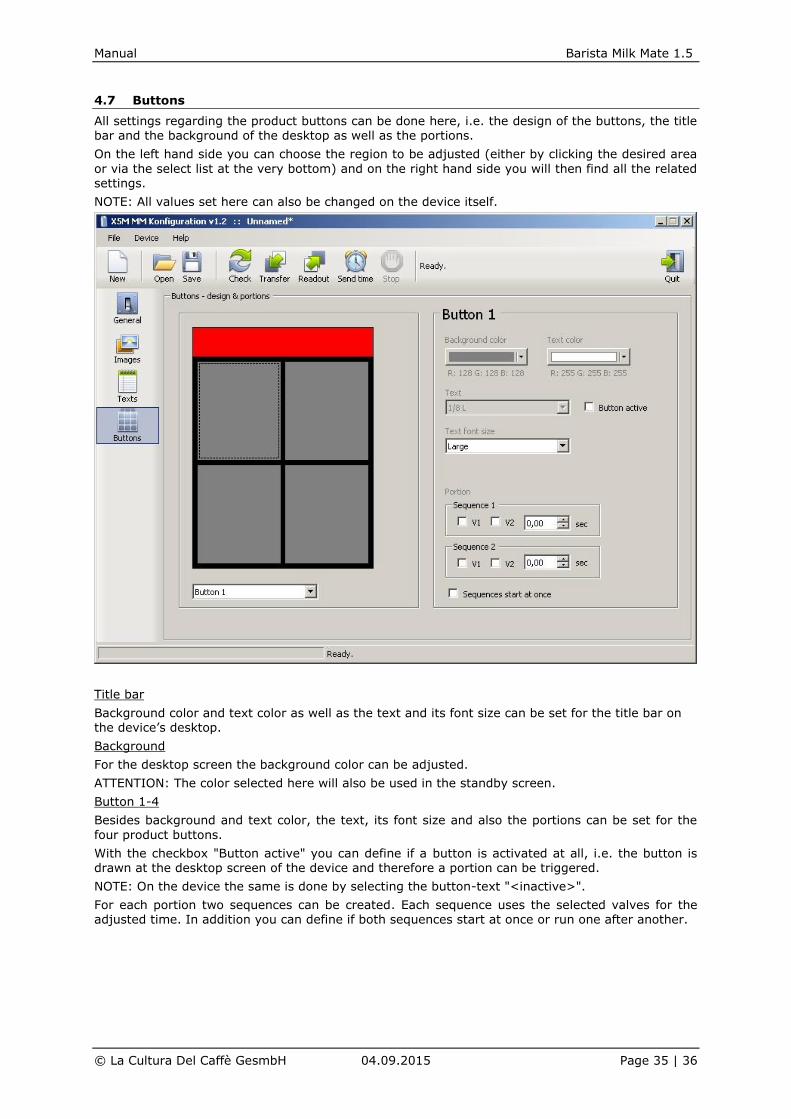
4.7 Buttons
All settings regarding the product buttons can be done here, i.e. the design of the buttons, the title bar and the background of the desktop as well as the portions.
On the left hand side you can choose the region to be adjusted (either by clicking the desired area
or via the select list at the very bottom) and on the right hand side you will then find all the related settings.
NOTE: All values set here can also be changed on the device itself.
Title bar
Background color and text color as well as the text and its font size can be set for the title bar on the device’s desktop.
Background
For the desktop screen the background color can be adjusted.
ATTENTION: The color selected here will also be used in the standby screen.
Button 1-4
Besides background and text color, the text, its font size and also the portions can be set for the
four product buttons.
With the checkbox "Button active" you can define if a button is activated at all, i.e. the button is drawn at the desktop screen of the device and therefore a portion can be triggered.
NOTE: On the device the same is done by selecting the button-text "<inactive>".
For each portion two sequences can be created. Each sequence uses the selected valves for the adjusted time. In addition you can define if both sequences start at once or run one after another.

Manual Barista Milk Mate 1.5
© La Cultura Del Caffè GesmbH 04.09.2015 Page 36 | 36
5 Technical data
Description Value
Supply min. 10VDC, max. 24VDC
Current consumption max. 80mA @ 12VDC, ca. 1VA
Max. valve current 2ARMS @ 100% ED
Max. valve power 12VDC 24VA @ 100% ED
Max. valve power 24VDC 48VA @ 100% ED
Cash register interface CSI RS232, 1200-57600bps, 8 data bits, no parity, 1 stop bit
Ambient temperature Frost-free, min. 5°C – max. 50°C
Humidity maximum 90% rH, non-condensing
Processor 32Bit Microcontroller
Memory, non-volatile 32MBit + 256kBit
Display 2,4" AM-TFT LCD with touchscreen
NOTE: Given specifications are valid for the valves 1 and 2. The valves 0a and 0b are not used in this application.