manual base - gbedv gmbh & co....
TRANSCRIPT
Manual Base
Prepared for
Customers and Partners
Project
OPplus
Prepared by
gbedv

manual_opp_base_en.docx
gbedv
Documentation
Manual OPplus Base
2 of 136
Contents General Information ................................................................................................................................ 6
Manual Structure................................................................................................................................. 6
Description of Icons ............................................................................................................................. 6
OPplus Navigation Area ........................................................................................................................... 7
OPplus License Information module ....................................................................................................... 8
Setup Configuration ............................................................................................................................ 9
OPplus Base module .............................................................................................................................. 12
OPplus Setup ..................................................................................................................................... 12
Generate OPplus Setup Entries ..................................................................................................... 12
Ext. Application tab ....................................................................................................................... 13
Auto Application I tab .................................................................................................................... 15
Auto Application II tab ................................................................................................................... 17
Bank Import tab ............................................................................................................................. 23
Texts tab ........................................................................................................................................ 24
Currency tab .................................................................................................................................. 25
Accounting Hint Texts........................................................................................................................ 27
BC Code Accounting Rules ................................................................................................................. 28
Accounting Rules ............................................................................................................................... 28
Line 1 tab ....................................................................................................................................... 30
Line 2 tab ....................................................................................................................................... 32
Line 3 tab ....................................................................................................................................... 34
Line 4 tab ....................................................................................................................................... 36
Options tab .................................................................................................................................... 37
Customer Card ................................................................................................................................... 39
Vendor Card....................................................................................................................................... 40
Bank Accounts ................................................................................................................................... 41
Ext. Customer Bank Accounts............................................................................................................ 41
Blocking Customer Bank Account for the Import .......................................................................... 41
Ext. Vendor Bank Accounts ............................................................................................................... 42
Blocking Vendor Bank Account for the Import.............................................................................. 42
Ext. General Journal Templates ......................................................................................................... 44
Ext. General Journal Templates ..................................................................................................... 44
Ext. General Journal Batches ......................................................................................................... 45
manual_opp_base_en.docx
gbedv
Documentation
Manual OPplus Base
3 of 136
Pmt. Import Interfaces ...................................................................................................................... 45
Pmt. Import Directories ..................................................................................................................... 50
Payment Terms.................................................................................................................................. 52
CSV Ports ........................................................................................................................................... 52
General tab .................................................................................................................................... 53
Import tab ...................................................................................................................................... 55
Export tab ...................................................................................................................................... 56
CSV Port Line Fields ....................................................................................................................... 57
Mapping button ............................................................................................................................. 61
CSV Port Functions ........................................................................................................................ 62
CSV Port Line ................................................................................................................................. 65
Step-by-Step: Setting up a CSV Port for the Bank Import ............................................................. 67
Note on “Direct CSV Port Import into a Gen. Journal“ .................................................................. 69
Importing Pmt. Files (Account Transactions) .................................................................................... 69
Pmt. Import via CSV Port (with Standard Interface) ..................................................................... 69
Pmt. Import via CSV Port (without Standard Interface) ................................................................ 70
Pmt. Import via MT 940 ................................................................................................................. 71
Pmt. Import via BESR (Payment Import CH) .................................................................................. 72
Pmt. Import via CAMT ................................................................................................................... 72
Pmt. Import via CREMUL (Payment Import AT) ............................................................................ 73
Pmt. Import via REMADV .............................................................................................................. 74
Pmt. Import via REMADV and PI ................................................................................................... 75
Pmt. Import via REMADV as CSV ................................................................................................... 78
Pmt. Import via CC (EPA) ............................................................................................................... 79
Open Pmt. Import Registers .............................................................................................................. 80
Actions & Navigate tabs ................................................................................................................ 81
Deleting the Pmt. Import Register ................................................................................................ 83
All Pmt. Import Registers ............................................................................................................... 84
Trasferring Imported Pmt. Files to Gen. Journals ............................................................................. 84
Pmt. Import to Gen. Jnl. Line ......................................................................................................... 84
Journal, Functions button → Pmt. Import ..................................................................................... 85
Pmt. Import -> Logfile .................................................................................................................... 86
Ext. Cash Receipt Journal (Journal Functionalities) ........................................................................... 88
Additional Columns ....................................................................................................................... 88
manual_opp_base_en.docx
gbedv
Documentation
Manual OPplus Base
4 of 136
Actions tab ..................................................................................................................................... 89
Payment Transactions ....................................................................................................................... 90
Easy Match window........................................................................................................................... 91
Navigate tab .................................................................................................................................. 93
Extended Application window........................................................................................................... 94
Navigate tab .................................................................................................................................. 97
Pre-Accounting/Open Entry Application during Pmt. Import to Gen. Jnl ......................................... 99
Pre-Accounting during Pmt. Import to Gen. Jnl. Lines .................................................................. 99
Open Entry Application during Pmt. Import to Gen. Jnl. Lines ................................................... 101
‘Payback‘ feature (= Return Debit Notes) ................................................................................... 102
SEPA Payback Enhancement ....................................................................................................... 106
Practical Tips for the Use of the OPplus Extended Application....................................................... 109
Pmt. Disc. Given and/or. Keep Pmt. Discount ............................................................................. 109
Pmt. Discount for Partial Payments ............................................................................................ 109
Display of Dimension for Pmt. Disc. Correction .......................................................................... 109
Display of Split Posting when Leaving the Extended Application ............................................... 110
Process Flow Examples for Pmt. Imports with the Base module .................................................... 111
Export of Statement Data from Bank Software .......................................................................... 111
Basic Process Flow – General Requirements ............................................................................... 111
Process Flow – Example: Import MT940 (Single File) .................................................................. 112
Process Flow – Example: Import MT940 (Several Files) .............................................................. 113
Process Flow – Example: Import CSV Port (Standard Interface) ................................................. 113
Currency Tool .................................................................................................................................. 114
Currency tab ................................................................................................................................ 114
Currency Setup ............................................................................................................................ 114
Currency Exchange Rates Import ................................................................................................ 115
Updating Currency Exchange Rates Automatically ..................................................................... 116
Cash Book Journal ........................................................................................................................... 117
G/L Register Cash Book ............................................................................................................... 119
Foreign Currency Cash Books ...................................................................................................... 119
Check Receipt Journal ..................................................................................................................... 120
Base/Payment/G/L Account – Open Entries → Foreign Currency .................................................. 122
Currency tab ................................................................................................................................ 122
Example “Exch. Rate LCY applies FCY” ........................................................................................ 124
manual_opp_base_en.docx
gbedv
Documentation
Manual OPplus Base
5 of 136
Example “Exch. Rate FCY applies FCY” ........................................................................................ 128
Example “Calc Gain/Loss on G/L Account“ .................................................................................. 132
manual_opp_base_en.docx
gbedv
Documentation
Manual OPplus Base
6 of 136
General Information
Manual Structure This manual describes the following modules and functionalities of the certified vertical solution OPplus:
OPplus Base In the application menu, the functionalities of these modules are available via the "Base" menu group within the OPplus navigation area. The manual describes the relevant fields and functions as well as procedures exemplifying the use of OPplus. For help about a specific field, click the field and press F1. Please note that OPplus modules may be purchased individually, therefore descriptions, menu items and illustrations of cross-module functionalities are not necessarily available to all users. The following modules of the certified vertical solution OPplus are described in separate manuals: OPplus Payments, OPplus G/L Open Entries, OPplus Extended Lists & Reports and OPplus Ext. Analysis (Trial Balance and Affiliation).
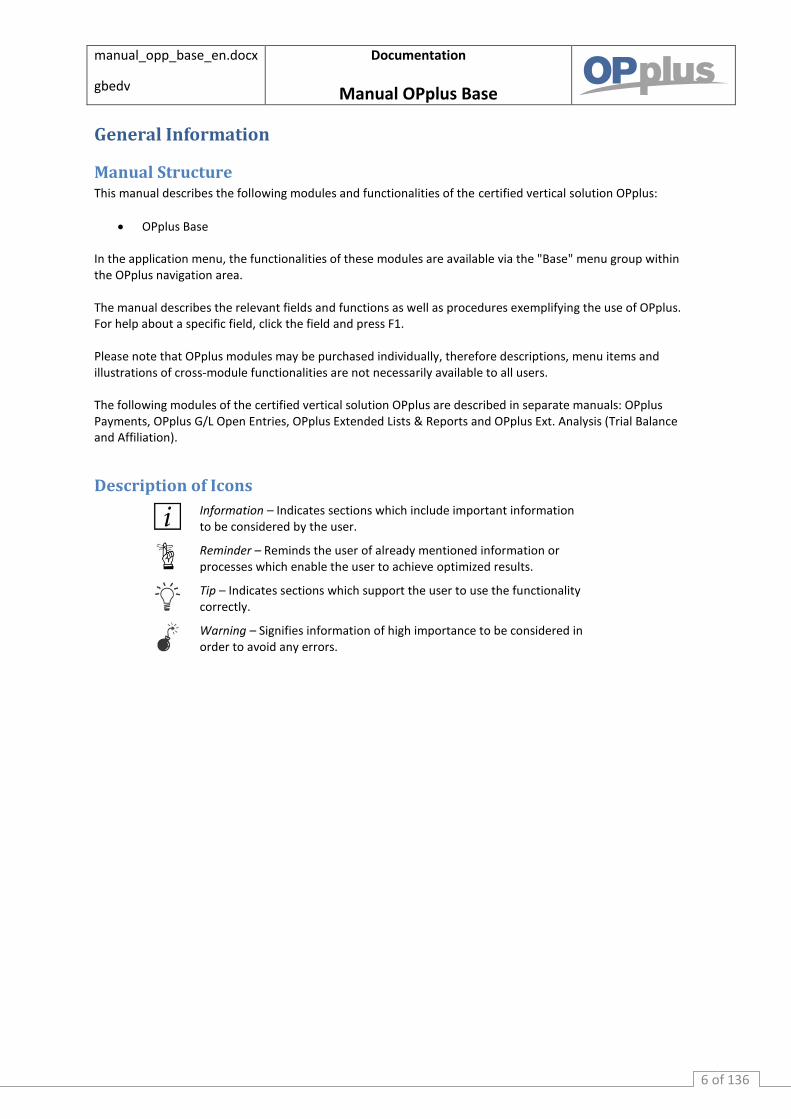
Description of Icons
Information – Indicates sections which include important information to be considered by the user.
Reminder – Reminds the user of already mentioned information or processes which enable the user to achieve optimized results.
Tip – Indicates sections which support the user to use the functionality correctly.
Warning – Signifies information of high importance to be considered in order to avoid any errors.
manual_opp_base_en.docx
gbedv
Documentation
Manual OPplus Base
7 of 136
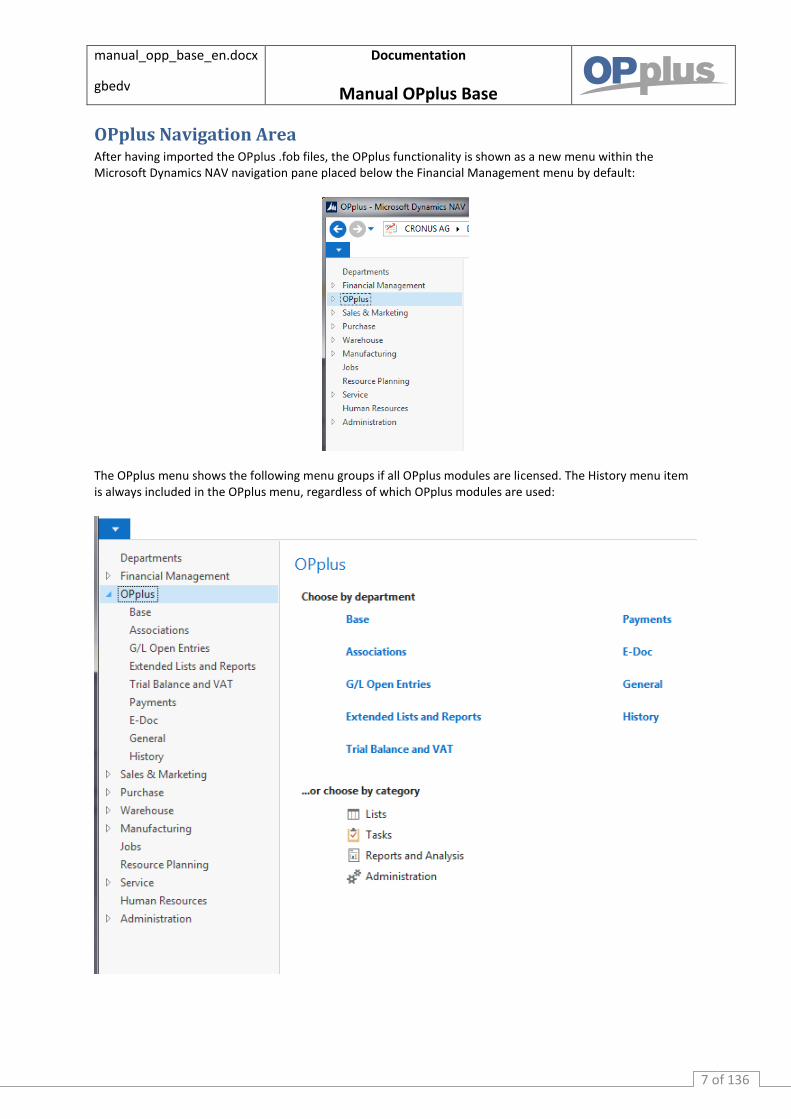
OPplus Navigation Area After having imported the OPplus .fob files, the OPplus functionality is shown as a new menu within the Microsoft Dynamics NAV navigation pane placed below the Financial Management menu by default:
The OPplus menu shows the following menu groups if all OPplus modules are licensed. The History menu item is always included in the OPplus menu, regardless of which OPplus modules are used:
manual_opp_base_en.docx
gbedv
Documentation
Manual OPplus Base
8 of 136
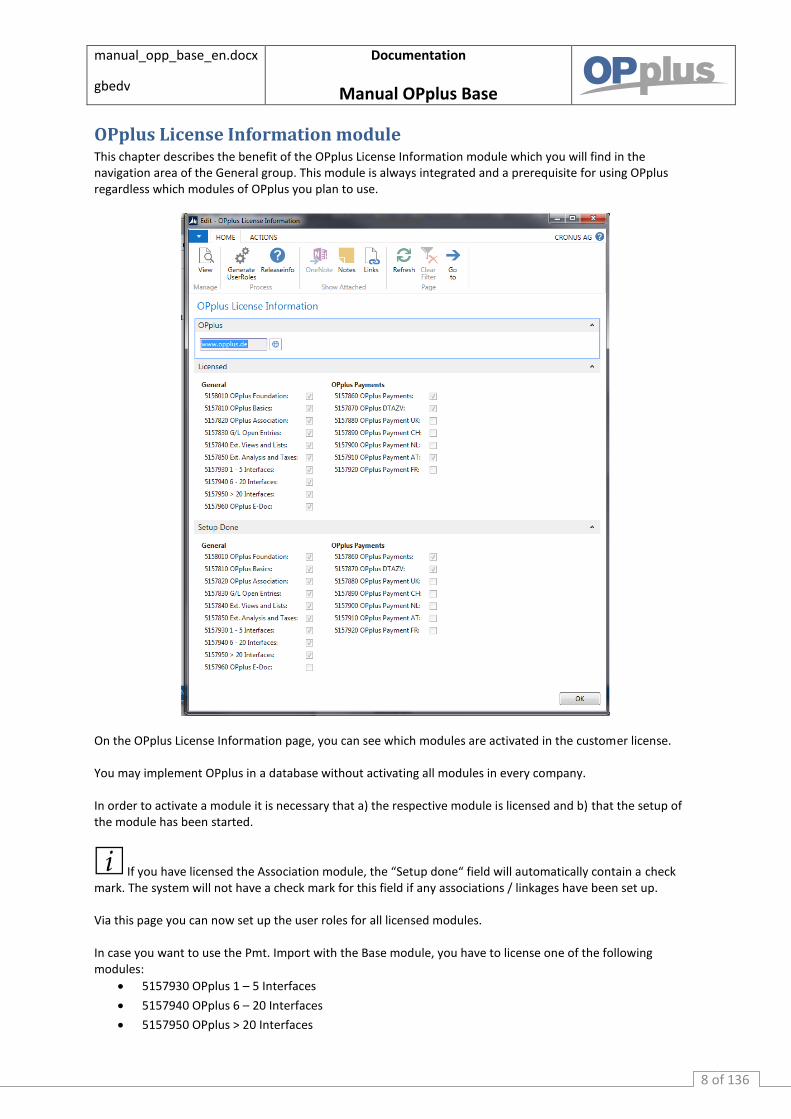
OPplus License Information module This chapter describes the benefit of the OPplus License Information module which you will find in the navigation area of the General group. This module is always integrated and a prerequisite for using OPplus regardless which modules of OPplus you plan to use.
On the OPplus License Information page, you can see which modules are activated in the customer license. You may implement OPplus in a database without activating all modules in every company. In order to activate a module it is necessary that a) the respective module is licensed and b) that the setup of the module has been started.
If you have licensed the Association module, the “Setup done“ field will automatically contain a check mark. The system will not have a check mark for this field if any associations / linkages have been set up. Via this page you can now set up the user roles for all licensed modules. In case you want to use the Pmt. Import with the Base module, you have to license one of the following modules:
5157930 OPplus 1 – 5 Interfaces
5157940 OPplus 6 – 20 Interfaces
5157950 OPplus > 20 Interfaces
manual_opp_base_en.docx
gbedv
Documentation
Manual OPplus Base
9 of 136
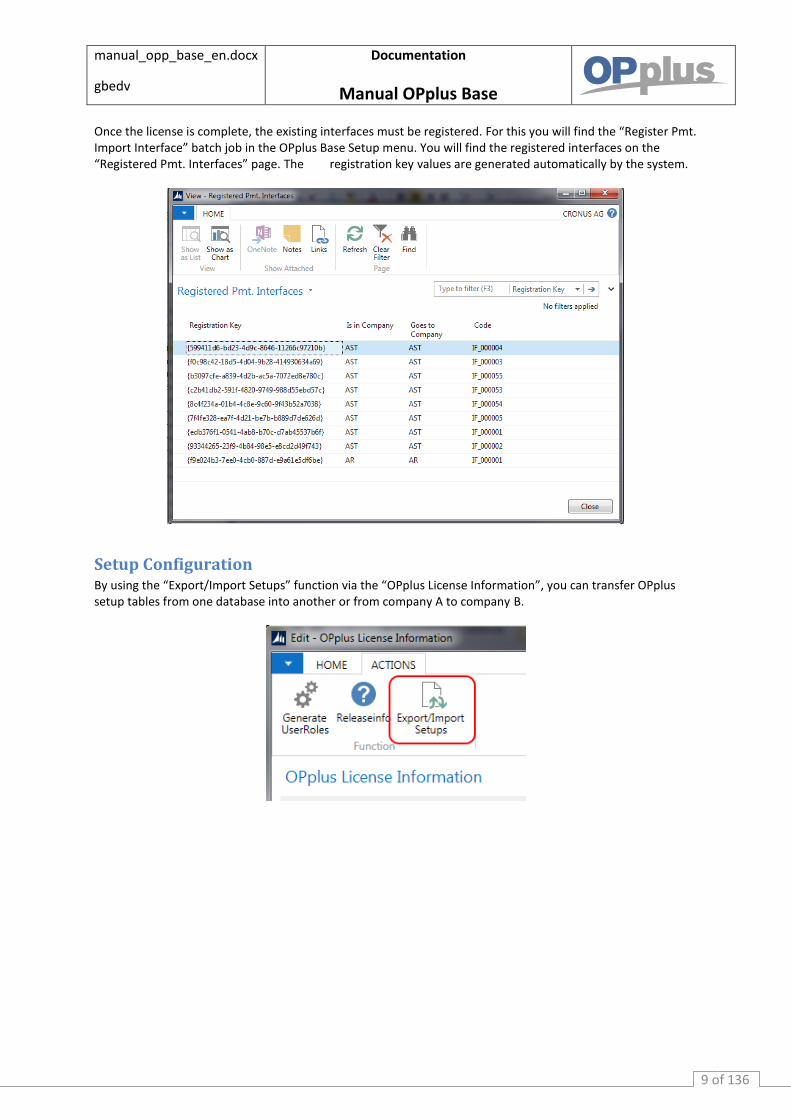
Once the license is complete, the existing interfaces must be registered. For this you will find the “Register Pmt. Import Interface” batch job in the OPplus Base Setup menu. You will find the registered interfaces on the “Registered Pmt. Interfaces” page. The registration key values are generated automatically by the system.
Setup Configuration By using the “Export/Import Setups” function via the “OPplus License Information”, you can transfer OPplus setup tables from one database into another or from company A to company B.
manual_opp_base_en.docx
gbedv
Documentation
Manual OPplus Base
10 of 136
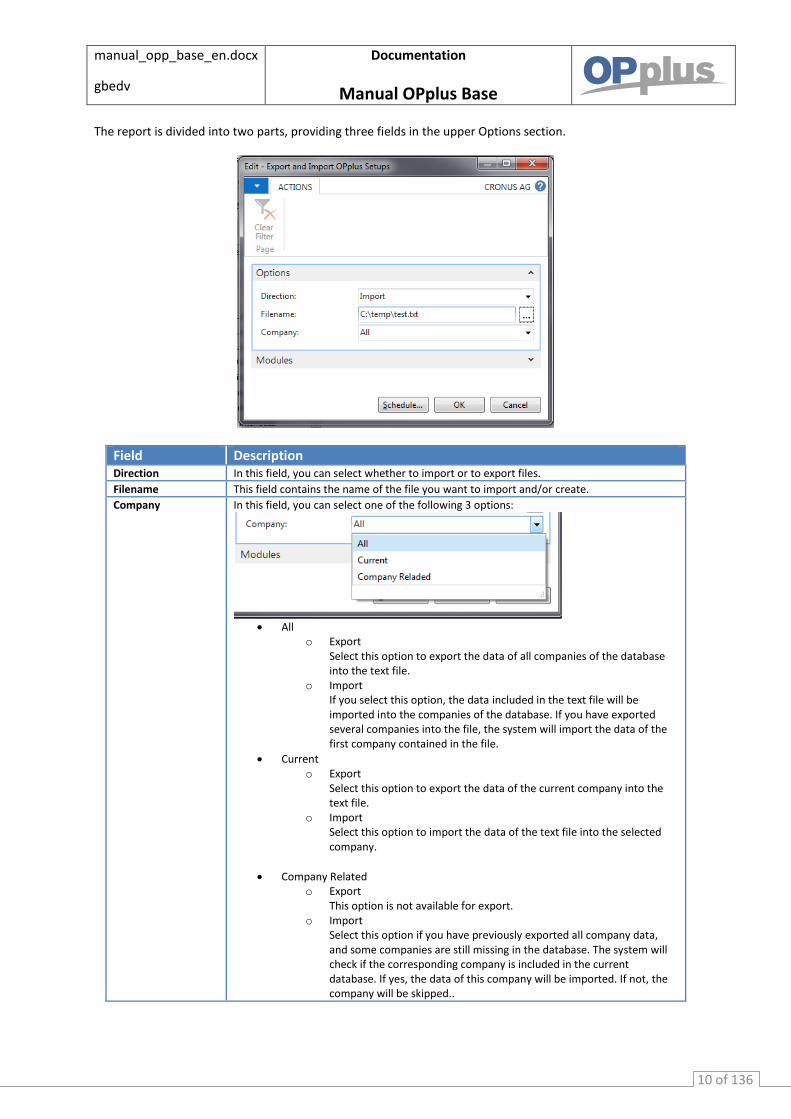
The report is divided into two parts, providing three fields in the upper Options section.
Field Description Direction In this field, you can select whether to import or to export files.
Filename This field contains the name of the file you want to import and/or create.
Company
In this field, you can select one of the following 3 options:
All
o Export Select this option to export the data of all companies of the database into the text file.
o Import If you select this option, the data included in the text file will be imported into the companies of the database. If you have exported several companies into the file, the system will import the data of the first company contained in the file.
Current o Export
Select this option to export the data of the current company into the text file.
o Import Select this option to import the data of the text file into the selected company.
Company Related o Export
This option is not available for export. o Import
Select this option if you have previously exported all company data, and some companies are still missing in the database. The system will check if the corresponding company is included in the current database. If yes, the data of this company will be imported. If not, the company will be skipped..
manual_opp_base_en.docx
gbedv
Documentation
Manual OPplus Base
11 of 136
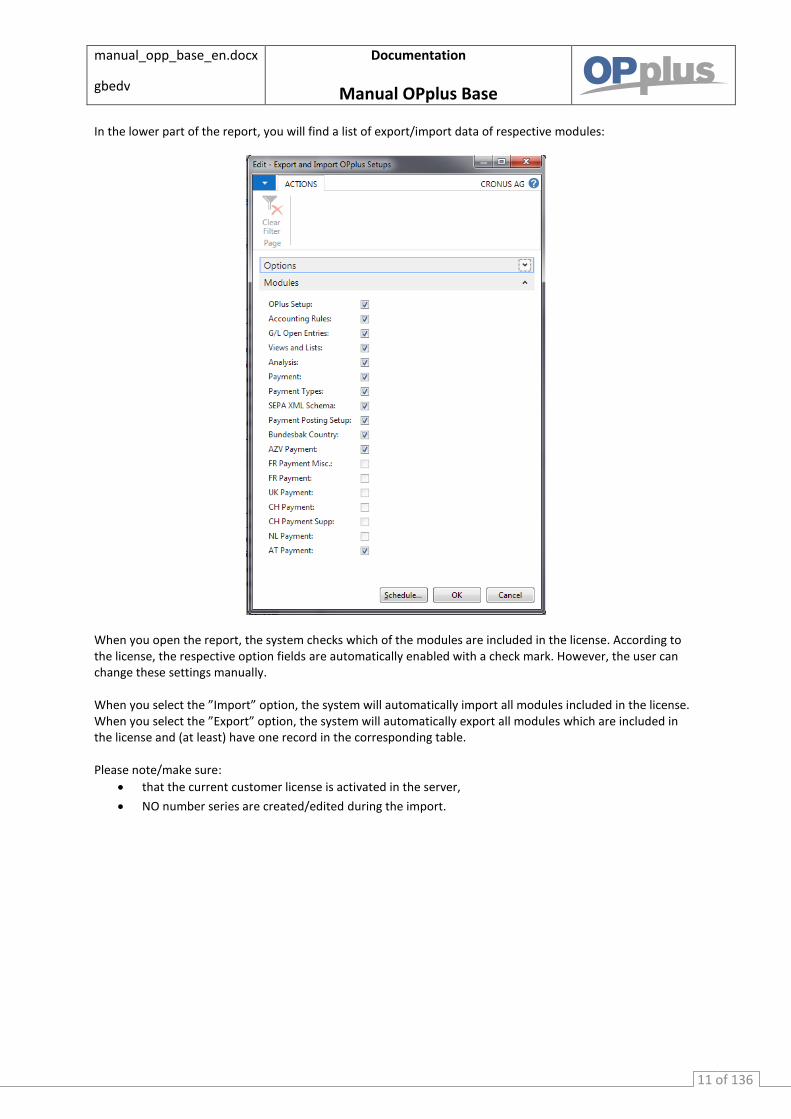
In the lower part of the report, you will find a list of export/import data of respective modules:
When you open the report, the system checks which of the modules are included in the license. According to the license, the respective option fields are automatically enabled with a check mark. However, the user can change these settings manually. When you select the ”Import” option, the system will automatically import all modules included in the license. When you select the ”Export” option, the system will automatically export all modules which are included in the license and (at least) have one record in the corresponding table. Please note/make sure:
that the current customer license is activated in the server,
NO number series are created/edited during the import.

manual_opp_base_en.docx
gbedv
Documentation
Manual OPplus Base
12 of 136
OPplus Base module This chapter describes how to set up and to use the OPplus Base module which is available via the Base menu group within the navigation pane.
OPplus Setup The OPplus Setup window is used to set up the initial settings (to be set up once), the bank import and the association default values. You must fill in the fields of the OPplus Setup window for each company you manage with Microsoft Dynamics™ NAV. This section describes the tabs and fields of the OPplus Setup window. To open the OPplus Setup window from the navigation pane, click OPplus → Base → Setup → OPplus Setup.
Generate OPplus Setup Entries
Before you can use the Base module, it is necessary to specify the initial settings. To For this, select OPplus → Base → Setup → OPplus Setup → Function button → Create OPplus Setup Entries The message which appears is shown for each company of your database, regardless from which company this menu item is selected. Based on these initial settings, specific setup fields are filled, among others, with default values as well as the general journals which are used by this module.
The setup data is created only the first time you select this function thus ensuring that any existing configuration data is not overwritten.
OPplus roles are set up automatically when creating the OPplus setup data. The OPplus Roles must be assigned to the respective users to enable them to work with the relevant OPplus modules.
manual_opp_base_en.docx
gbedv
Documentation
Manual OPplus Base
13 of 136
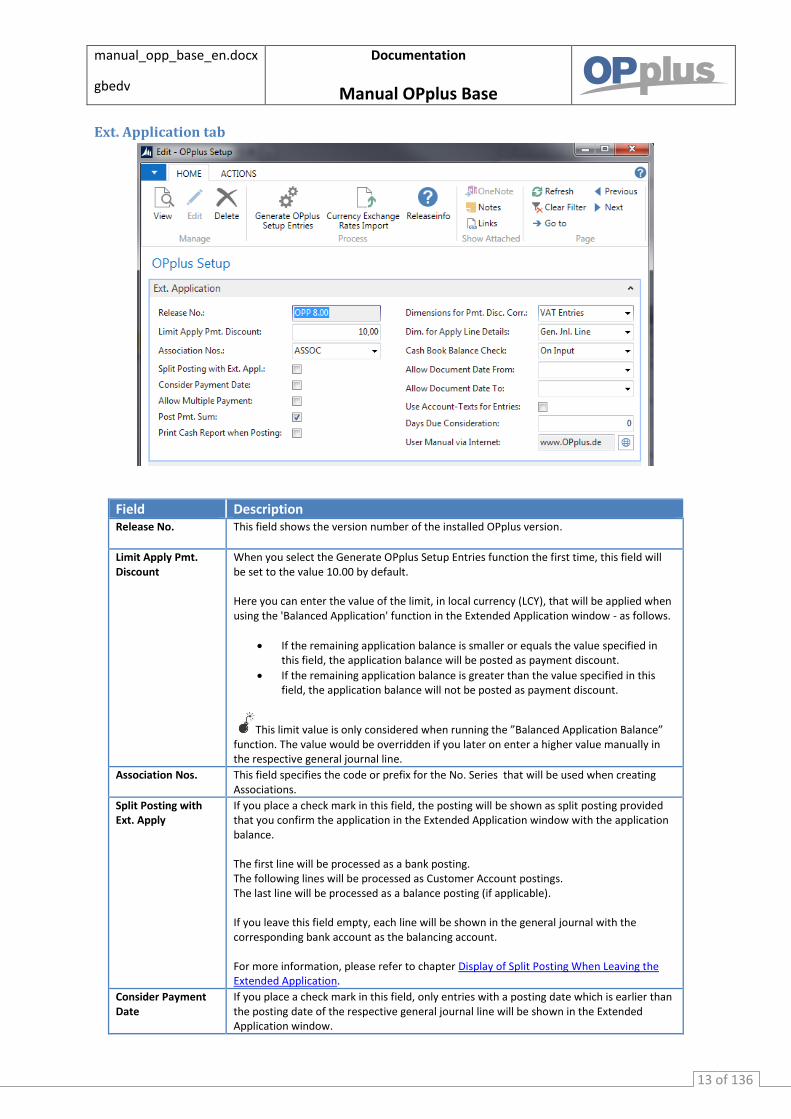
Ext. Application tab
Field Description Release No. This field shows the version number of the installed OPplus version.
Limit Apply Pmt. Discount
When you select the Generate OPplus Setup Entries function the first time, this field will be set to the value 10.00 by default. Here you can enter the value of the limit, in local currency (LCY), that will be applied when using the 'Balanced Application' function in the Extended Application window - as follows.
If the remaining application balance is smaller or equals the value specified in this field, the application balance will be posted as payment discount.
If the remaining application balance is greater than the value specified in this field, the application balance will not be posted as payment discount.
This limit value is only considered when running the ”Balanced Application Balance” function. The value would be overridden if you later on enter a higher value manually in the respective general journal line.
Association Nos. This field specifies the code or prefix for the No. Series that will be used when creating Associations.
Split Posting with Ext. Apply
If you place a check mark in this field, the posting will be shown as split posting provided that you confirm the application in the Extended Application window with the application balance. The first line will be processed as a bank posting. The following lines will be processed as Customer Account postings. The last line will be processed as a balance posting (if applicable). If you leave this field empty, each line will be shown in the general journal with the corresponding bank account as the balancing account. For more information, please refer to chapter Display of Split Posting When Leaving the Extended Application.
Consider Payment Date
If you place a check mark in this field, only entries with a posting date which is earlier than the posting date of the respective general journal line will be shown in the Extended Application window.
manual_opp_base_en.docx
gbedv
Documentation
Manual OPplus Base
14 of 136
Allow Multiple Payment
Place a check mark in this field if you want to apply an invoice/credit memo within a general journal with multiple (partial) payments.
Post Pmt. Sum If multiple entries have been marked in the Extended Application window, the payment will be posted as follows if you place a check mark in this field. The system will first post the total sum of the payment on the relevant customer account and immediately post the reversal of this entry. The individual applications will then be posted against each applied transaction.
Print Cash Report when Posting
Check this field if the system is required to automatically print the cash report when posting journal which use the CASH general journal template.
Dimensions for Pmt. Disc. Corr.
The following parameters are available for payment discount correction: VAT Entries
The dimensions of the payment discount correction are created based on the dimensions of the VAT entries.
Gen. Jnl. Line (Always) The dimensions of the payment discount correction are created based on the dimensions of the general journal line.
Not Empty Gen. Jnl. Line The dimensions of the payment discount correction are created based on the dimensions of the general journal line if they explicitly include any values.
G/L Account (Always) The dimensions of the payment discount correction are created based on the dimension default values of the payment discount account.
Gen. Jnl. Line (if empty VAT Entry) The dimensions of the payment discount correction are created based on the dimensions of the VAT entries. If the VAT entries are empty, the dimensions of the payment discount correction from the general journal line will be used instead.
G/L Account (if empty VAT Entry) The dimensions of the payment discount correction are copied from the dimension default values of the VAT entries. If the VAT entries are empty, the dimensions of the payment discount correction from the dimension default values of the payment discount account will be used instead.
Dim. for Apply Line Details
The following two parameters are available for the dimension of application line details: Gen. Jnl. Line
The dimensions will be copied from the dimensions of the general journal line. Applied Entry
The dimensions will be copied from the applied entries.
Cash Book Balance Check
In this field, you can determine if and when to perform a cash book balance check. The following options are available:
On Input On Post None
“On Input“ means that a balance check is performed each time you enter a journal line where the daily balance must be above zero. ”On Post” means that the cash book balance check is performed once only at time of posting. Select the “None” option if do not want the system to perform any cash book balance checks.
Allow Document Date From
In the NAV standard application you can set a time interval to indicate when posting to a company is allowed. If you want a plausibility check on the document date as well you can
enter here the earliest document date to be allowed. Allow Document Date To
In the NAV standard application you can set a time interval to indicate when posting to a company is allowed. If you want a plausibility check on the document date as well you can enter here the last document date to be allowed.
Use Account-Texts for Entries
If you place a check mark in this field, the contents of the Description field will be copied into the general ledger entries when posting purchase and sales documents. The NAV standard always copies the posting text when posting. For fixed asset postings, the system will use the descriptions of the asset’s related documents as the description in the ledger entries.
Days Due Consideration
If you have specified a value in the “Days Due Consideration” field in the OPplus Setup, the system will set a filter on the due date during automatic balancing of entries. Example:
manual_opp_base_en.docx
gbedv
Documentation
Manual OPplus Base
15 of 136
Setup: 14 Posting Date: 01-01-14 (1st Jan 2014) The system sets the filter “..01-15-14“ on the due date. Only entries which are due on 01-15-14 (15th Jan 2014) will be considered for application. This is useful, for example, with instalment payments and specifying the same document number. The NAV system offers different document numbers for installment payments, such as “RATE_001“,“Rate_002“,“Rate_003“. The import only transfers the term “RATE“. The system was not able to perform automatic application since it found all 3 entries and the amount did not match. If you specify a monthly rate and consider the next 14 days, only one rate will be due. The amount is matched and automatic application can be performed.
User Manual via Internet
This field shows the homepage URL of OPplus. To download the current user manual, click the hyperlink icon to the right of the field.
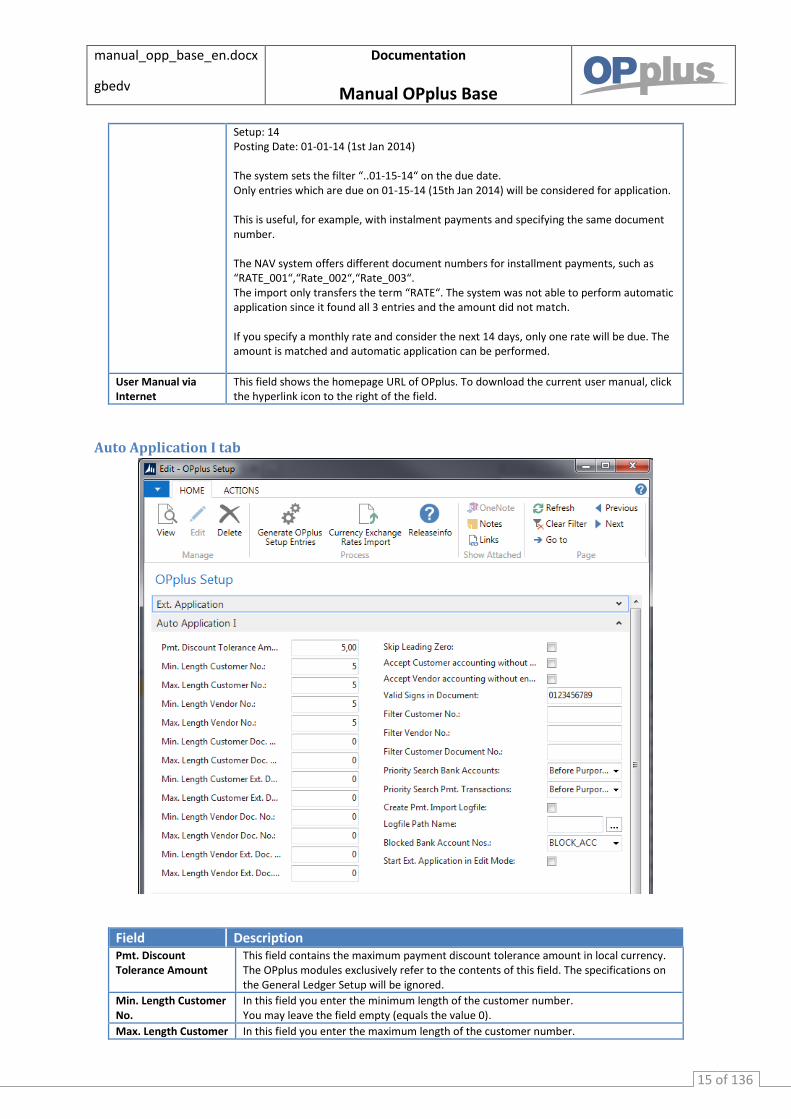
Auto Application I tab
Field Description Pmt. Discount Tolerance Amount
This field contains the maximum payment discount tolerance amount in local currency. The OPplus modules exclusively refer to the contents of this field. The specifications on the General Ledger Setup will be ignored.
Min. Length Customer No.
In this field you enter the minimum length of the customer number. You may leave the field empty (equals the value 0).
Max. Length Customer In this field you enter the maximum length of the customer number.
manual_opp_base_en.docx
gbedv
Documentation
Manual OPplus Base
16 of 136
No. You may leave the field empty (equals the value 0). Together with the field “Min. Length Customer No.” you get a range which will be validated against the customer table upon running the import
Min. Length Vendor No.
In this field you enter the minimum length of the vendor number. You may leave the field empty (equals the value 0).
Max. Length Vendor No.
In this field you enter the maximum length of the vendor number. You may leave the field empty (equals the value 0). Together with the field “Min. Length Vendor No.” you get a range which will be validated against the vendor table upon running the import.
Min. Length Customer Doc. No.
In this field you enter the minimum length of your customer document number. You may leave the field empty (equals the value 0).
Max. Length Customer Doc. No.
In this field you enter the maximum length of your customer document number.
You may leave the field empty (equals the value 0). Min. Length Customer Ext. Doc. No.
In this field you enter the minimum length of your customer external document number. You may leave the field empty (equals the value 0).
Max. Length Customer Ext. Doc. No.
In this field you enter the maximum length of your customer external document number. You may leave the field empty (equals the value 0).
Min. Length Vendor Doc. No.
In this field you enter the minimum length of your vendor document number. You may leave the field empty (equals the value 0).
Max. Length Vendor Doc. No.
In this field you enter the maximum length of your vendor document number. You may leave the field empty (equals the value 0).
Min. Length Vendor Ext. Doc. No.
In this field you enter the minimum length of your vendor external document number. You may leave the field empty (equals the value 0).
Max. Length Vendor Ext. Doc. No.
In this field you enter the maximum length of your vendor external document number. You may leave the field empty (equals the value 0).
Skip Leading Zero If you activate this field, leading zeros of the reference (remittance information) will not be considered during the payment import.
This field should be activated for example, if your document numbers or customer/vendor numbers start with multiple zeroes. These leading zeroes will be skipped when performing transfers.
Accept Customer accounting without entries
If this field is checked, customer accounting will be done even if there are no open entries. You should check this field, if you work frequently with prepayments.
Accept Vendor accounting without entries
If this field is checked, vendor accounting will be done even if there are no open entries.
Valid Signs in Document
Here you can enter all letters and numerals which can be used in your document numbers or in your customer/vendor numbers. You can enter up to 20 characters, both numbers and letters.
The content of this field is used by the Pmt. Import function in the following way: First, all purpose lines will be combined into one line. Then all characters of the bank document which are specified in the Valid Signs in Document field will be substituted with space characters. Finally, the remaining characters will be used to identify and to propose applications.
Filter Customer No. If you enter a Navision compliant filter in this field, the automatic application of open entries will be optimized. When searching for customers, only search strings which comply with the filter criteria will be considered.
Filter Vendor No. If you enter a Navision compliant filter in this field, the automatic application of open entries will be optimized. When searching for vendors only search strings which comply with the filter criteria will be considered.
Filter Customer Document. No.
If you enter a Navision compliant filter in this field, the automatic application of open entries will be optimized. When searching for customer document numbers, only search strings which comply with the filter criteria will be considered.
Priority Search Bank Accounts
This field allows you to choose whether to perform the search of bank accounts either before or after the search of references (remittance informations)
Priority Search Pmt. Transactions
This field allows you to choose whether to perform the search of payment transactions either before or after the search of references (remittances informations)
manual_opp_base_en.docx
gbedv
Documentation
Manual OPplus Base
17 of 136
Create Pmt. Import Logfile
Place a check mark in this field if you want the system to create a log file under C:\Temp\LOG.TXT during the import. This log file includes the steps performed to find account + document. It only makes sense to activate this field, if it is unclear why certain documents are not found. This way, you can check which search routines have been run by the system. After having checked the log file it is recommended to deactivate this field. Otherwise, this may affect the performance of the system.
Logfile Pathname Here you need to enter the path and the file name if you have specified to create a log file.
Blocked Bank Account Nos.
If you want to block a bank account for the bank import, you need to specify a number series in this field to be used as code.
Start Ext. Application in Edit Mode
Place a check mark in this field, if you want to start the Ext. Application in the edit mode. If this field is not activated, you need to select the “Edit List” button in the Ext. Application before you can start applying entries.
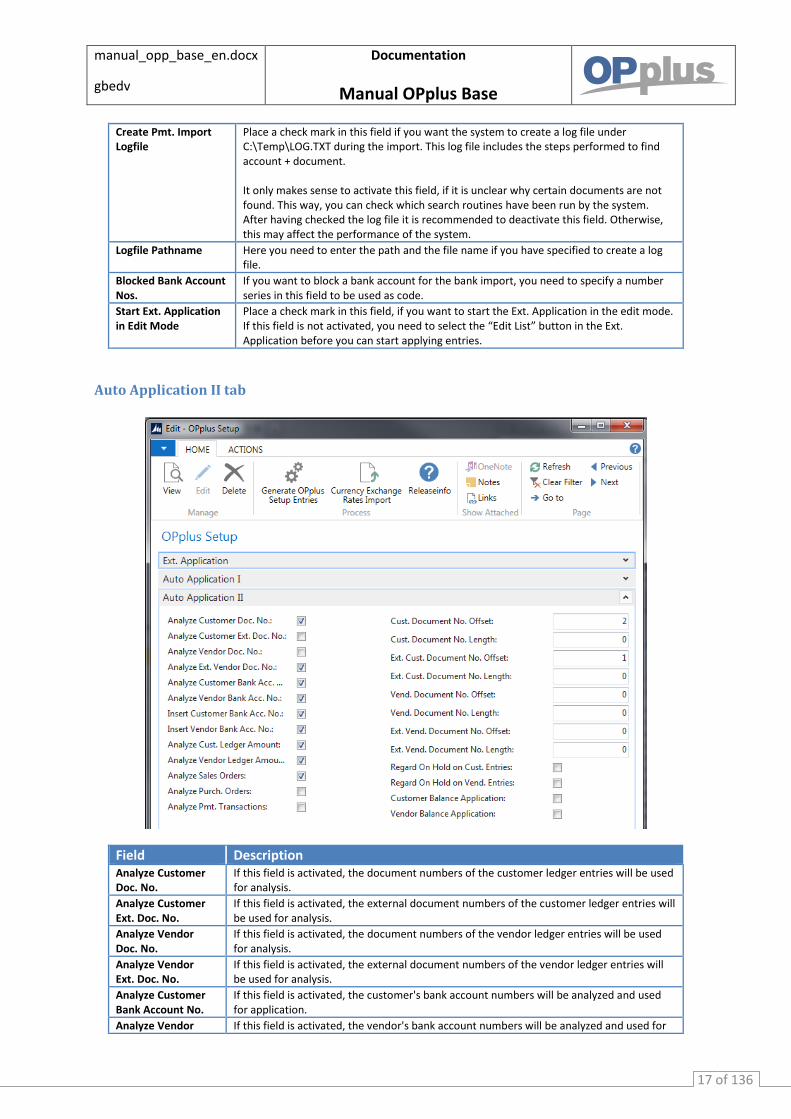
Auto Application II tab
Field Description Analyze Customer Doc. No.
If this field is activated, the document numbers of the customer ledger entries will be used for analysis.
Analyze Customer Ext. Doc. No.
If this field is activated, the external document numbers of the customer ledger entries will be used for analysis.
Analyze Vendor Doc. No.
If this field is activated, the document numbers of the vendor ledger entries will be used for analysis.
Analyze Vendor Ext. Doc. No.
If this field is activated, the external document numbers of the vendor ledger entries will be used for analysis.
Analyze Customer Bank Account No.
If this field is activated, the customer's bank account numbers will be analyzed and used for application.
Analyze Vendor If this field is activated, the vendor's bank account numbers will be analyzed and used for
manual_opp_base_en.docx
gbedv
Documentation
Manual OPplus Base
18 of 136
Bank Account No. application.
Insert Customer Bank Acc. No.
If this field is activated, non-existent customer bank account numbers will be created automatically. This bank account number will be marked accordingly and will be used only for bank imports. You may deactivate this functionality for each customer. [chapter Customer Card]
Insert Vendor Bank Acc. No.
If this field is activated, non-existent vendor bank account numbers will be created automatically. This bank account number will be marked accordingly and will be used only for bank imports. You may deactivate this functionality for each vendor. [chapter Vendor Card]
Analyze Cust. Ledger Amount
If this field is activated, a customer ledger entry will be applied even if there is no document number in the purpose text but exactly one open entry with an amount which matches the payment amount.
Analyze Vend. Ledger Amount
If this field is activated, a vendor ledger entry will be applied even if there is no document number in the purpose text but exactly one open entry with an amount which matches the payment amount
Analyze Sales Orders
If this field is activated, all open sales orders will be analyzed and used for application upon running the import in the general journals.
Analyze Purch. Orders
If this field is activated, all open purchase orders will be analyzed and used for application upon running the import in the general journals.
Analyze Pmt. Transactions
If this field is activated, the Pmt. Transactions table will be analyzed and used for application upon running the import in the general journals.
Cust. Document No. Offset
In this field you enter the starting point of the customer document number in the purpose text. You may use positive as well as negative integers. This field indicates the starting point from which onwards the stated document number will be checked against the document numbers in the open entries (because e. g. all invoices start with the same character) when searching for open entries during the import. You will find examples in chapter Automatic Application II – Examples Document Number
Offset/Length. Cust. Document No. Length
In this field you enter the length of the customer document number in the purpose text. A value in this field will enforce the minimum value of 1 in the field “Cust. Document No. Offset“. You can only use positive integers. This field indicates how many digits of the stated document number in the purpose text will be checked against the document numbers in the open entries when searching for open entries during the import. You will find examples in chapter Automatic Application II – Examples Document Number Offset/Length.
Ext. Cust. Document No. Offset
In this field you enter the starting point of the external customer document number in the purpose text. You may use positive as well as negative integers. This field indicates the starting point from which the stated external document number will be checked against the external document numbers in the open entries (because e. g. all invoices start with the same character) when searching for open entries during the import. You will find examples in chapter Automatic Application II – Examples Document Number Offset/Length.
Ext. Cust. Document No. Length
In this field you enter the length of the external customer document number in the purpose text. A value in this field will enforce the minimum value of 1 in the field “Ext. Cust. Document No. Offset“. You can only use positive integers. This field indicates how many digits of the stated document number in the purpose text will be checked against the document numbers in the open entries when searching for open entries during the import. You will find examples in chapter Automatic Application II – Examples Document Number Offset/Length.
Vend. Document No. Offset
In this field you enter the starting point of the vendor document number in the purpose text. You may use positive as well as negative integers. This field indicates the starting point from which the stated document number will be checked against the document numbers in the open entries (because e. g. all invoices start with the same character) when searching for open entries during the import. You will find examples in chapter Automatic Application II – Examples Document Number Offset/Length.
Vend. Document No. Length
In this field you enter the length of the vendor document number in the purpose text. A value in this field will enforce the minimum value of 1 in the field “Vend. Document No.
manual_opp_base_en.docx
gbedv
Documentation
Manual OPplus Base
19 of 136
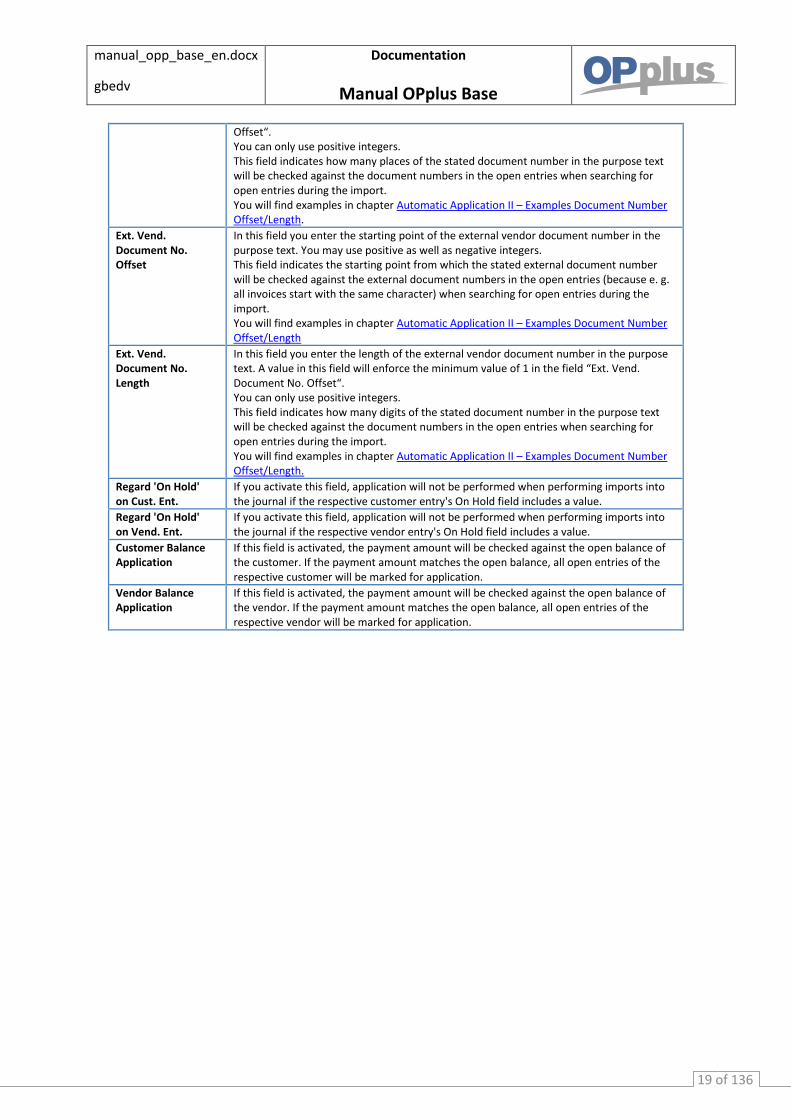
Offset“. You can only use positive integers. This field indicates how many places of the stated document number in the purpose text will be checked against the document numbers in the open entries when searching for open entries during the import. You will find examples in chapter Automatic Application II – Examples Document Number Offset/Length.
Ext. Vend. Document No. Offset
In this field you enter the starting point of the external vendor document number in the purpose text. You may use positive as well as negative integers. This field indicates the starting point from which the stated external document number will be checked against the external document numbers in the open entries (because e. g. all invoices start with the same character) when searching for open entries during the import. You will find examples in chapter Automatic Application II – Examples Document Number Offset/Length
Ext. Vend. Document No. Length
In this field you enter the length of the external vendor document number in the purpose text. A value in this field will enforce the minimum value of 1 in the field “Ext. Vend. Document No. Offset“. You can only use positive integers. This field indicates how many digits of the stated document number in the purpose text will be checked against the document numbers in the open entries when searching for open entries during the import. You will find examples in chapter Automatic Application II – Examples Document Number Offset/Length.
Regard 'On Hold' on Cust. Ent.
If you activate this field, application will not be performed when performing imports into the journal if the respective customer entry's On Hold field includes a value.
Regard 'On Hold' on Vend. Ent.
If you activate this field, application will not be performed when performing imports into the journal if the respective vendor entry's On Hold field includes a value.
Customer Balance Application
If this field is activated, the payment amount will be checked against the open balance of the customer. If the payment amount matches the open balance, all open entries of the respective customer will be marked for application.
Vendor Balance Application
If this field is activated, the payment amount will be checked against the open balance of the vendor. If the payment amount matches the open balance, all open entries of the respective vendor will be marked for application.

manual_opp_base_en.docx
gbedv
Documentation
Manual OPplus Base
20 of 136
Automatic Application II – Example Scenarios for Document No. Offset/Length
You can use these fields to specify a certain starting point as well as length for customer document numbers, customer external document numbers, vendor document numbers and vendor external document numbers. These values have an impact on how the system will search for open entries and application in the purpose text. In the “Offset” field, you can use positive as well as negative integers. In the “Length” field, you can use only positive integers. Examples The following examples will show you how the various setups interact. Positive Value in “Offset“ and “Length” = 0 This example is based on the document number “GB-12345678“. The first 3 digits should be skipped as they do not represent the significant part of the document number but the identification code of the subsidiary. Accordingly, in the setup you will enter “Offset” = 4.
Setup
Offset 4
Length 0
Impact
Doc. No. in purpose text GB-12345678
Doc. No. for application 12345678
For the application only the search string “12345678“will be used.
manual_opp_base_en.docx
gbedv
Documentation
Manual OPplus Base
21 of 136
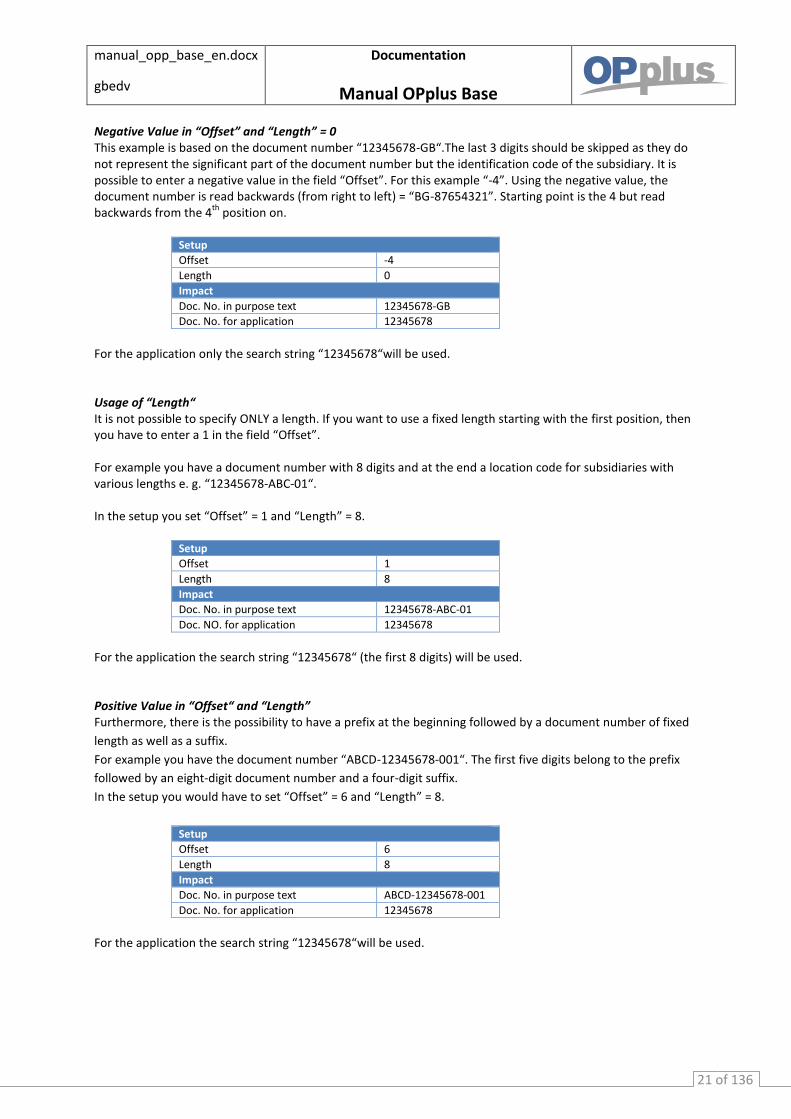
Negative Value in “Offset” and “Length” = 0 This example is based on the document number “12345678-GB“.The last 3 digits should be skipped as they do not represent the significant part of the document number but the identification code of the subsidiary. It is possible to enter a negative value in the field “Offset”. For this example “-4”. Using the negative value, the document number is read backwards (from right to left) = “BG-87654321”. Starting point is the 4 but read backwards from the 4
th position on.
Setup
Offset -4
Length 0
Impact
Doc. No. in purpose text 12345678-GB
Doc. No. for application 12345678
For the application only the search string “12345678“will be used. Usage of “Length“
It is not possible to specify ONLY a length. If you want to use a fixed length starting with the first position, then you have to enter a 1 in the field “Offset”. For example you have a document number with 8 digits and at the end a location code for subsidiaries with various lengths e. g. “12345678-ABC-01“. In the setup you set “Offset” = 1 and “Length” = 8.
Setup
Offset 1
Length 8
Impact
Doc. No. in purpose text 12345678-ABC-01
Doc. NO. for application 12345678
For the application the search string “12345678“ (the first 8 digits) will be used. Positive Value in “Offset“ and “Length” Furthermore, there is the possibility to have a prefix at the beginning followed by a document number of fixed
length as well as a suffix.
For example you have the document number “ABCD-12345678-001“. The first five digits belong to the prefix
followed by an eight-digit document number and a four-digit suffix.
In the setup you would have to set “Offset” = 6 and “Length” = 8.
Setup
Offset 6
Length 8
Impact
Doc. No. in purpose text ABCD-12345678-001
Doc. No. for application 12345678
For the application the search string “12345678“will be used.

manual_opp_base_en.docx
gbedv
Documentation
Manual OPplus Base
22 of 136
Negative Value in “Offset“ with “Length” In this example we have a prefix with an unknown length and a three-digit suffix at the end. The length of the document number is 8. In this case you have to set “Offset” = -4 and “Length” = 8. Example 1 document number: “111-12345678-GB“
Setup
Offset -4
Length 8
Impact
Doc. No. in purpose text 111-12345678-GB
Doc. No. for application 12345678
Example 2 document number: “99999-12345678-GB“
Setup
Offset -4
Length 8
Impact
Doc. No. in purpose text 99999-12345678-GB
Doc. No. for application 12345678
In both cases, the document number “12345678“will be used for application. The string will be rotated by OPplus “BG-87654321-111“ and read from the fourth digit onwards -> 87654321
and subsequently used in the original order -> 12345678.
The string will be rotated by OPplus “BG-87654321-99999“ and read from the 4th
digit onwards -> 87654321
and subsequently used in the original order -> 12345678.
What happens if search strings come out too short? The minimum length which will be used as search string by OPplus is four.
If a search string will end up too short due to the settings in “Offset” and/or “Length” then the document
number will be used as it is stated in the purpose text.
Example 1 - Document number is stated with 9 digits in the purpose text
Setup
Offset 7
Length 0
Impact
Doc. No. in purpose text 123456789
Doc. No. for application 123456789 As only 3 digits would remain, the document number will be used as stated.
Example 2 - Document number is stated with 8 digits in the purpose text
Setup
Offset -5
Length 6
Impact
Doc. No. in purpose text 12345678
Doc. No. for application 12345678
manual_opp_base_en.docx
gbedv
Documentation
Manual OPplus Base
23 of 136
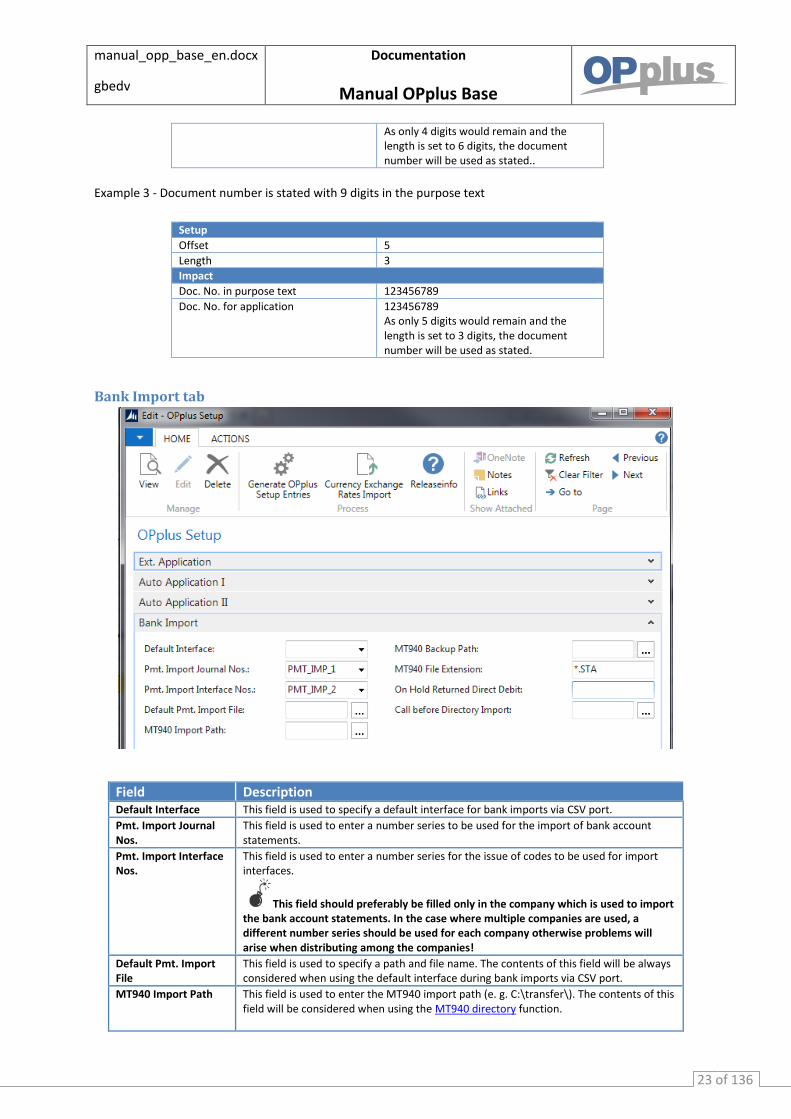
As only 4 digits would remain and the length is set to 6 digits, the document number will be used as stated..
Example 3 - Document number is stated with 9 digits in the purpose text
Setup
Offset 5
Length 3
Impact
Doc. No. in purpose text 123456789
Doc. No. for application 123456789 As only 5 digits would remain and the length is set to 3 digits, the document number will be used as stated.
Bank Import tab
Field Description Default Interface This field is used to specify a default interface for bank imports via CSV port.
Pmt. Import Journal Nos.
This field is used to enter a number series to be used for the import of bank account statements.
Pmt. Import Interface Nos.
This field is used to enter a number series for the issue of codes to be used for import interfaces.
This field should preferably be filled only in the company which is used to import the bank account statements. In the case where multiple companies are used, a different number series should be used for each company otherwise problems will arise when distributing among the companies!
Default Pmt. Import File
This field is used to specify a path and file name. The contents of this field will be always considered when using the default interface during bank imports via CSV port.
MT940 Import Path This field is used to enter the MT940 import path (e. g. C:\transfer\). The contents of this field will be considered when using the MT940 directory function.

manual_opp_base_en.docx
gbedv
Documentation
Manual OPplus Base
24 of 136
MT940 Backup Path This field is used to enter the path if you want to save and store the import file (e. g. C:\transfer\backup). The contents of this field will be considered when using the MT940 directory function.
MT940 File Extension Here you can enter the file extension (e. g. * .sta) for the MT940 file. The contents of this field will be considered when using the MT940 directory function.
On Hold Returned Direct Debit
If this field is filled and, during import a return debit note is recognized then the original entry will be set to “On Hold” and be filled with the value from the setup (3-digit code) thus preventing that the original entry will be collected again.
Call before Directory Import
Here you can enter a batch file which is called prior to the directory import. Here it is useful to specify a file that automatically retrieves and saves the bank files in the corresponding directory. A recommendable software solution is offered by Windata. The files are automatically retrieved and saved on the file system without the user’s intervention. Then, the OPplus default directory import is called to process the files.
Texts tab
Field Description Text Pmt. Application Posting
Here you can specify the text to be copied into the Description field of the general journal line when applying an open entry if the Payment document type is selected in the general journal line.
Text Application Posting
Here you can specify the text to be copied into the Description field of the general journal line when applying an open entry if no document type (= blank) is selected in the general journal line.
Text Balance Posting Here you can specify the text to be copied into the Description field of the general journal line when selecting the Balanced Application function in the Extended Application window.
Text Pmt. Sum Posting
Here you can specify the text to be copied into the Description field of the general journal line if the "Post Pmt. Sum" option is activated [to be found on the Ext. Application tab of the OPplus Setup].
Text Rounding Posting
Here you can specify the text to be copied into the Description field for any rounding postings performed by the system.
Use App. Texts in Single Application
If this field is activated, the texts will also be used during manual application if application is performed from the Extended Application window.
manual_opp_base_en.docx
gbedv
Documentation
Manual OPplus Base
25 of 136
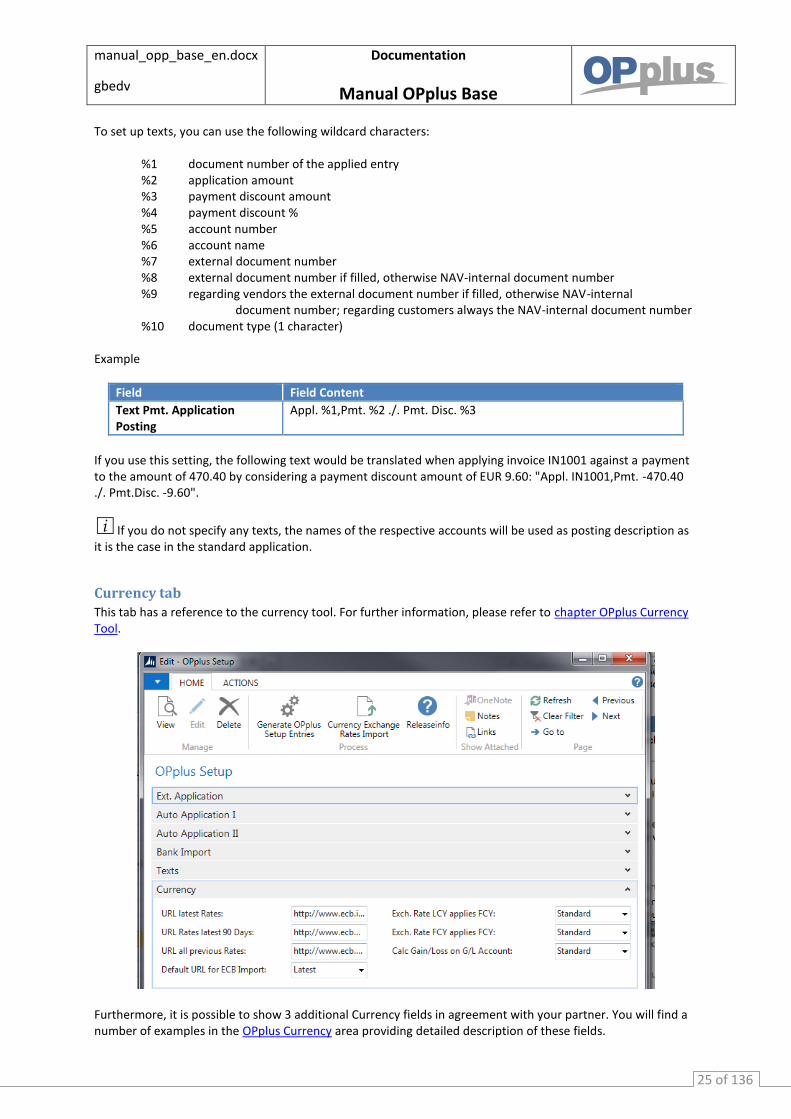
To set up texts, you can use the following wildcard characters:
%1 document number of the applied entry %2 application amount %3 payment discount amount %4 payment discount % %5 account number %6 account name %7 external document number %8 external document number if filled, otherwise NAV-internal document number %9 regarding vendors the external document number if filled, otherwise NAV-internal document number; regarding customers always the NAV-internal document number %10 document type (1 character)
Example
Field Field Content
Text Pmt. Application Posting
Appl. %1,Pmt. %2 ./. Pmt. Disc. %3
If you use this setting, the following text would be translated when applying invoice IN1001 against a payment to the amount of 470.40 by considering a payment discount amount of EUR 9.60: "Appl. IN1001,Pmt. -470.40 ./. Pmt.Disc. -9.60".
If you do not specify any texts, the names of the respective accounts will be used as posting description as it is the case in the standard application.
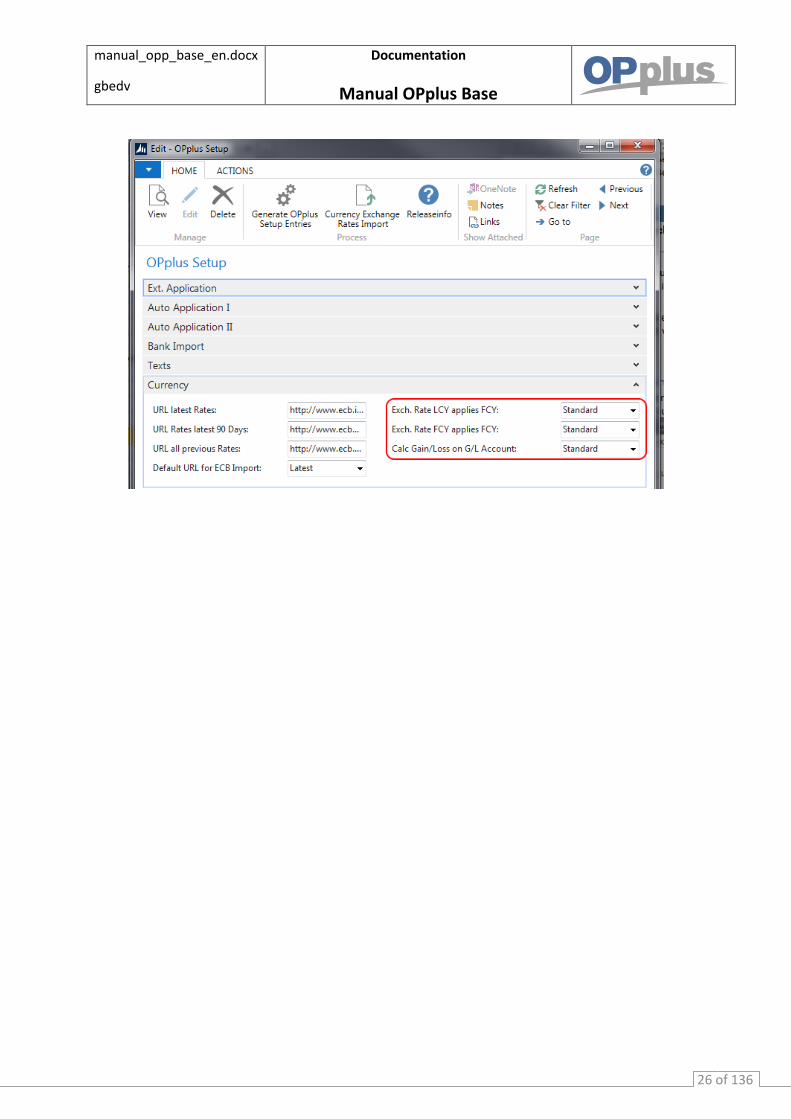
Currency tab
This tab has a reference to the currency tool. For further information, please refer to chapter OPplus Currency Tool.
Furthermore, it is possible to show 3 additional Currency fields in agreement with your partner. You will find a number of examples in the OPplus Currency area providing detailed description of these fields.
manual_opp_base_en.docx
gbedv
Documentation
Manual OPplus Base
26 of 136

manual_opp_base_en.docx
gbedv
Documentation
Manual OPplus Base
27 of 136
Accounting Hint Texts The Accounting Hint Texts table is used for the evaluation of the reference (remittance information) during bank imports.
Field Description Type In this field, you can select the type (Customer No., Vendor No. or Document No.).
Hint Text This field is used to specify the abbreviations used by the customers or vendors (e. g. CU. or CU.NO.).
Prefix Here you can enter a prefix (see example 1).
Suffix Here you can enter a suffix (see example 2).
Offset If this field contains a value, evaluation will be started from a specific position.
Length In this field, you can enter the length of the document number.
Example 1: account no. with a prefix Your customer numbers always start with the prefix "C" followed by a 5-digit number ("C12345"). Customers sometimes use for their payments the number indicating the prefix and in some cases without the prefix. Create a line with the Account No. type. Leave the Hint Text column empty and enter the value "C" into the Prefix column: The application now tries to search for the variant including the prefix (C12345) as well as for the variant without the prefix (12345). Example 2: document no. with a suffix Your sales invoice numbers always start with 6-digit number followed by the abbreviation "SI" ("123456SI"). Some customer use the suffix and others do not. Create a line with the Document No. type. Leave the Hint Text Column empty and enter the value "SI" into the Suffix column: The application now tries to search for the variant including the suffix (123456SI) as well as for the variant without the suffix (123456).
manual_opp_base_en.docx
gbedv
Documentation
Manual OPplus Base
28 of 136
BC Code Accounting Rules The BC Code Accounting Rules table is used for the evaluation of the purpose during bank imports.
In this view, only the accounting rules for the business case code (BC code) of the bank documents are shown (which means that a predefined filter with the value 42 is set in the Field No. field).
In OPplus Base, this table will be filled with values for the BC codes 004 (direct debiting), 005 (collection), 009 (charge back), 051 (transfer) and 052 (standing order) when running the Generate OPplus Setup Entries function.
If the BC Code field in the import file lines has other values, the application will automatically copy them into this table as new catchwords 1. Here the Document Type field is always set to the Payment option and the Account Type field respectively to the Customer option.
Here you can account for fees (e. g. PayPal – import via csv port). Setup of fees is done via the options (“Fees from CSV-Port”, “Amount without Fees” and “Draw Sign of Fees”).
Further accounting rules can be displayed by selecting Base → Setup > Accounting Rules.
For a description of individual fields, please refer to chapter Accounting Rules.
You can also specify accounting rules for other fields of the bank document. If you enter another value (other than 42) in the Field No. field, the record will be filtered out by the predefined filter. However, you can display/change it by selecting Accounting Rules.
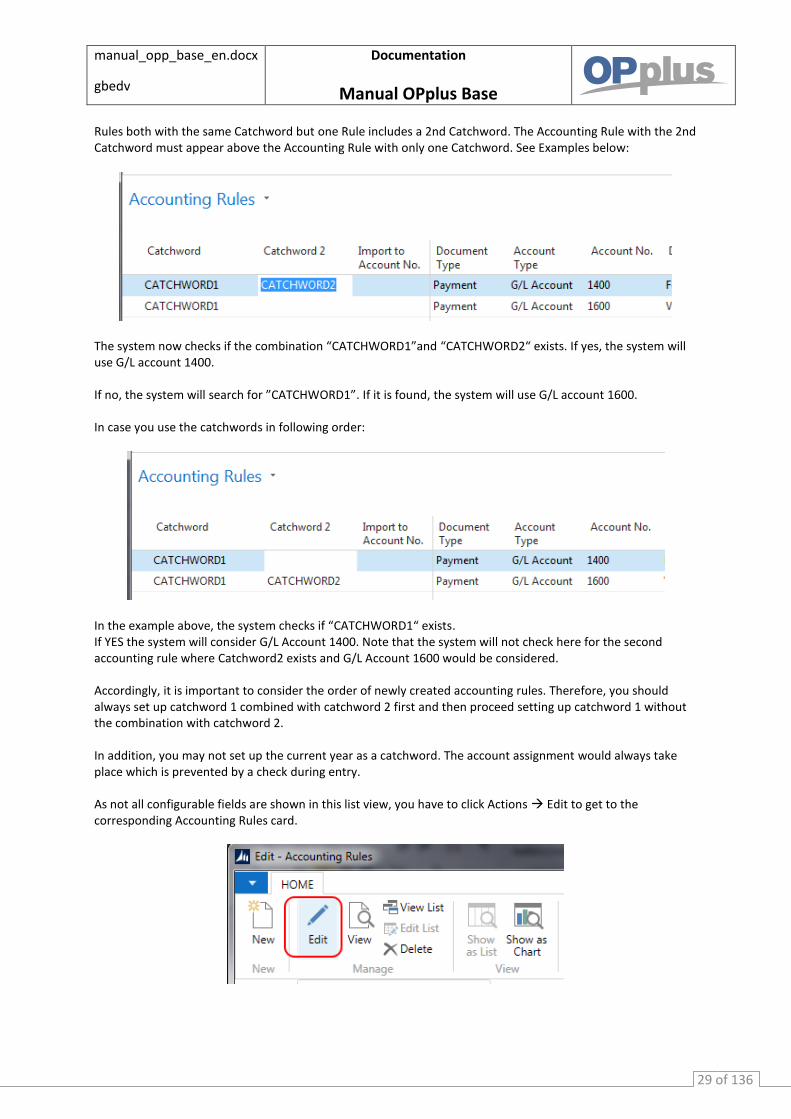
Accounting Rules The Accounting Rules window shows all account rules of the bank document – except for those of the BC Code field which can be displayed by selecting BC Code Accounting Rules. The Accounting Rules table is used for the evaluation of the purpose during bank imports.
Note: The graphic does not show all columns/fields. To show further options, click Actions -> Edit.
Please note that only 1 Accounting Rule is used for account assignment and the system will use the first Rule it finds in the list. The order of the Accounting Rules therefore is important if there are two Accounting
manual_opp_base_en.docx
gbedv
Documentation
Manual OPplus Base
29 of 136
Rules both with the same Catchword but one Rule includes a 2nd Catchword. The Accounting Rule with the 2nd Catchword must appear above the Accounting Rule with only one Catchword. See Examples below:
The system now checks if the combination “CATCHWORD1”and “CATCHWORD2“ exists. If yes, the system will use G/L account 1400. If no, the system will search for ”CATCHWORD1”. If it is found, the system will use G/L account 1600. In case you use the catchwords in following order:
In the example above, the system checks if “CATCHWORD1“ exists. If YES the system will consider G/L Account 1400. Note that the system will not check here for the second accounting rule where Catchword2 exists and G/L Account 1600 would be considered. Accordingly, it is important to consider the order of newly created accounting rules. Therefore, you should always set up catchword 1 combined with catchword 2 first and then proceed setting up catchword 1 without the combination with catchword 2. In addition, you may not set up the current year as a catchword. The account assignment would always take place which is prevented by a check during entry. As not all configurable fields are shown in this list view, you have to click Actions Edit to get to the corresponding Accounting Rules card.
manual_opp_base_en.docx
gbedv
Documentation
Manual OPplus Base
30 of 136
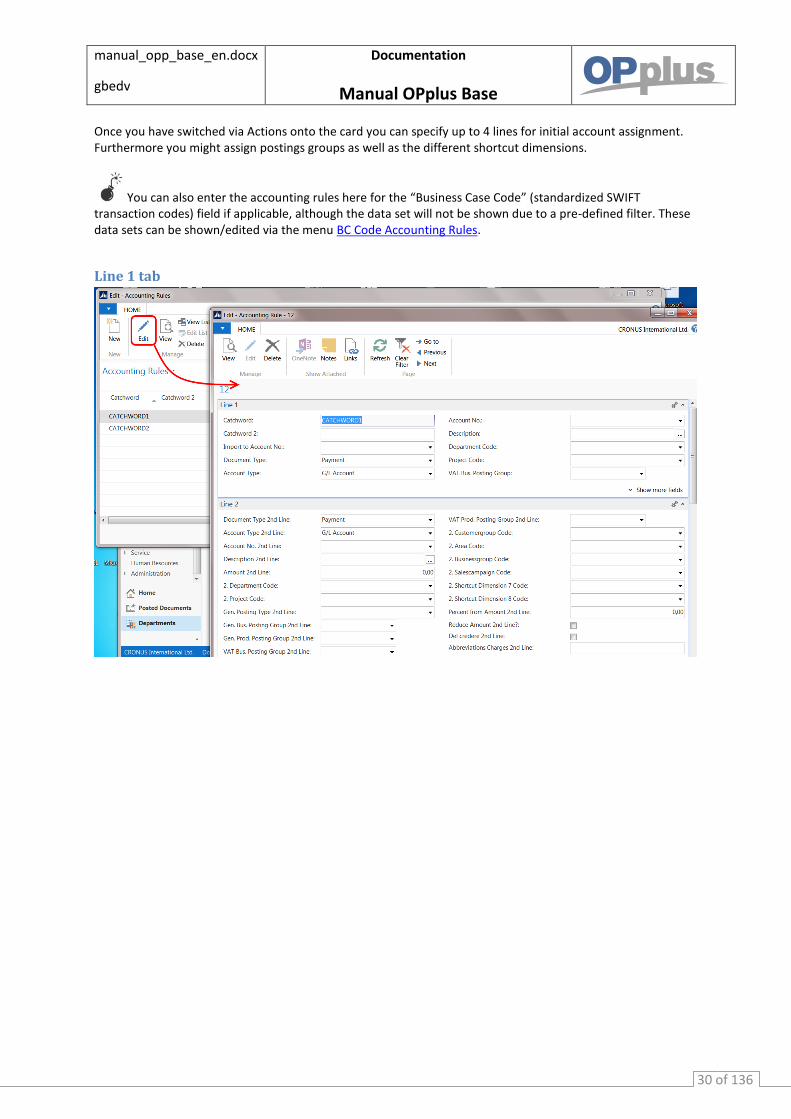
Once you have switched via Actions onto the card you can specify up to 4 lines for initial account assignment. Furthermore you might assign postings groups as well as the different shortcut dimensions.
You can also enter the accounting rules here for the “Business Case Code” (standardized SWIFT transaction codes) field if applicable, although the data set will not be shown due to a pre-defined filter. These data sets can be shown/edited via the menu BC Code Accounting Rules.
Line 1 tab
manual_opp_base_en.docx
gbedv
Documentation
Manual OPplus Base
31 of 136
Field Description Catchword This field can be used for accounting in order to use a text key (e. g. 070 for checks) or in
the purpose or in the Orderer field for an accounting proposal. Upon Pmt. Import via REMADV the accounting rules will be used to assign accounts to the deduction types. The located deduction types will be inserted in the ”Catchword“ field when importing REMADV.
Catchword 2 This field can be used during accounting in addition to catchword 1. In case you have entered a partner upon importing REMADV, this partner will be entered in the field “Catchword 2”giving you the possibility to have per partner equal deduction types with different accounting rules.
If you have specified a value in the Catchword 2 field, accounting will only be suggested if both catchword 1 and catchword 2 exist.
Import in Acc. No. If you enter a NAV bank account number here, the accounting will only be proposed if catchword 1 (and catchword 2 if applicable) is found in relation to this bank account.
Document Type Here you can select a document type for pre-accounting.
Account Type Here you can specify an account type if the bank documents with this text key are generally posted by using a specific account.
Account No. Here you can specify an account number if the bank documents with this text key are generally posted by using a specific account. The list which is shown when selecting the AssistButton depends on the option selected in the Account Type field: G/L Account, Customer, Vendor or Bank Account
Description Here you can enter a description (posting description) to be used in the accounting proposal (e.g. "Tenancy Agreement Company Smith"). The account name is used for the description of the general journal line. Here you can use wildcard characters – as it is the case for recurring journals of the standard application:
%1 Current day as name (e. g. Monday) %2 Current week as number (e. g. 47) %3 Current month as digit (e. g. 11) %4 Current month as name (e. g. November) %5 Name of the current accounting period (e. g. November) %6 Current year as number (e. g. 2007) %7 Previous month as number (e. g. 10) %8 Previous month as text %9 Previous year as number
Gen. Posting Type Here you enter the general posting type for the account type. If there is already a default value in the account number, the value will be inserted here accordingly.
Gen. Bus. Posting Group
Here you enter the general business posting group for the account type. If there is already a default value in the account number, the value will be inserted here accordingly
Gen. Prod. Posting Group
Here you enter the general product posting group for the account type. If there is already a default value in the account number, the value will be inserted here accordingly.
VAT Bus. Posting Group
Here you enter the VAT business posting group for the account type. If there is already a default value in the account number, the value will be inserted here accordingly
VAT Prod. Posting Group
Here you enter the VAT product posting group for the account type. If there is already a default value in the account number, the value will be inserted here accordingly.
Shortcut Dimension Code 1 to 8
Here you enter the shortcut dimensions for the account type. If there is already a default value in the account number, the value will be inserted here accordingly.
manual_opp_base_en.docx
gbedv
Documentation
Manual OPplus Base
32 of 136
Line 2 tab
Option Description Document Type 2nd Line
In this field you select the document type for account assignment of the 2nd
line.
Account Type 2nd Line
Here you can specify an account type if the amount entered in the Difference Amount field in bank documents which include this key is generally to be posted on a specific account.
Account No. 2nd Line
Here you can specify an account number if the amount entered in the Difference Amount field in bank documents which include this key is generally to be posted on a specific account The system will automatically create a second line with this accounting for the bank document during the import process. The list which is shown when selecting the AssistButton depends on the option selected in the Account Type 2 field: G/L Account, Customer, Vendor, or Bank Account.
In connection with activated payback in this accounting rule, the 2nd
line will only be created if you have stated as account no. 2
nd line either G/L account or account type 2
nd
line = customer and the field “Account No. 2nd
Line” is empty. Please find further details regarding payback in chapter Functionality, Payback (=Return
Debit Note) upon Pmt. Import in General Journals. Description 2nd Line
In this field you enter a description (posting text) which will be used in the accounting proposal (e. g. “Rental Agreement Company Meyer”). The description of the journal line is taken from the account name. Here you might use wildcards (as in the recurring journals in the NAV standard). You might use the following wildcards: %1 Current day as name (e. g. Monday) %2 Current week as number (e. g. 47) %3 Current month as number (e. g. 11) %4 Current month as name (e. g. November) %5 Name of current accounting period (e. g. November) %6 Current year as number (e. g. 2007) %7 Previous month as number (e. g. 10)

manual_opp_base_en.docx
gbedv
Documentation
Manual OPplus Base
33 of 136
%8 Previous month as text %9 Previous year as number
Amount 2nd Line
If you enter an amount in this field and the accounting rule applies, then a second journal posting line will be created where the amount including sign will be inserted. Please note the dependence to the setup of the field “Reduce Amount 2
nd Line.
In case this field is filled, the field “Percent from Amount 2nd
Line” will be set to 0.00 automatically.
Gen. Posting Type 2nd Line
Here you enter the general posting type for the account type. In case there already is a default in the account number, the value will be inserted here accordingly.
Gen. Bus. Posting Group 2nd Line
Here you enter the general business posting group for the account type. In case there already is a default in the account number, the value will be inserted here accordingly.
Gen. Prod. Posting Group 2nd Line
Here you enter the general product posting group for the account type. In case there already is a default in the account number, the value will be inserted here accordingly.
VAT Bus. Posting Group 2nd Line
Here you enter the VAT business posting group for the account type. In case there already is a default in the account number, the value will be inserted here accordingly.
VAT Prod. Posting Group 2nd Line
Here you enter the VAT product posting group for the account type. In case there already is a default in the account number, the value will be inserted here accordingly.
Shortcut Dimension Code 1 to 8 2nd Line
Here you enter the shortcut dimensions for the account type. In case there already is a default in the account number, the value will be inserted here accordingly.
Percent from Amount 2nd Line
Via this field you can set up a percentage for the amount of the 2nd line. The percentage will be calculated from the amount of the original line. Please note the dependence to the setup of the field “Reduce Amount 2nd Line. In case this field is filled, the field “Amount 2nd Line” will be set to 0.00 automatically.
Reduce Amount 2nd Line?
If this field is checked, then the original amount of the 1st line will be reduced by the amount of the field “Amount 2nd Line“.
Del credere 2nd Line Here you can enter if this line is for “del credere” commission or not.
Abbreviations Charges 2nd Line
Here you can set up the abbreviation to search for the fee in the purpose. All fees found will be entered in the journal line as a total, e. g. FOREIGN. It is also possible to enter several abbreviations by separating them with semicolons (e. g. FOREIGN;OWN). In this case, the system will enter a sum of all FOREIGN and OWN fees.
Suppress Zero Lines 2nd Line
If activated, this field will be considered during fee search. If no fee is found, the system will usually create a line with the amount of “€ 0.00”. Place a check mark in this field, if you want to suppress and omit this zero line.

manual_opp_base_en.docx
gbedv
Documentation
Manual OPplus Base
34 of 136
Line 3 tab
Field Description Document Type 3rd Line
In this field you select the document type for account assignment of the 3rd
line.
Account Type 3rd Line
Here you can specify an account type if the amount entered in the Difference Amount field in bank documents which include this key is generally to be posted on a specific account.
Account No. 3rd Line
Here you can specify an account number if the amount entered in the Difference Amount field in bank documents which include this key is generally to be posted on a specific account The system will automatically create a second line with this accounting for the bank document during the import process. The list which is shown when selecting the AssistButton depends on the option selected in the Account Type 2 field: G/L Account, Customer, Vendor, or Bank Account.
Description 3rd Line In this field you enter a description (posting text) which will be used in the accounting proposal (e. g. “Rental Agreement Company Meyer”). The description of the journal line is taken from the account name. Here you might use wildcards (as in the recurring journals in the NAV standard). You might use the following wildcards: %1 Current day as name (e. g. Monday) %2 Current week as number (e. g. 47) %3 Current month as number (e. g. 11) %4 Current month as name (e. g. November) %5 Name of current accounting period (e. g. November) %6 Current year as number (e. g. 2007) %7 Previous month as number (e. g. 10) %8 Previous month as text %9 Previous year as number
Amount 3rd Line If you enter an amount in this field and the accounting rule applies, then a second journal posting line will be created where the amount including sign will be inserted. Please note the dependence to the setup of the “Reduce Amount 3
rd Line” field.
In case this field is filled, the field “Percent from Amount 3rd
Line” will be set to 0.00 automatically.

manual_opp_base_en.docx
gbedv
Documentation
Manual OPplus Base
35 of 136
Gen. Posting Type 3rd Line
Here you enter the general posting type for the account type. In case there already is a default in the account number, the value will be inserted here accordingly
Gen. Bus. Posting Group 3rd Line
Here you enter the general business posting group for the account type. In case there already is a default in the account number, the value will be inserted here accordingly.
Gen. Prod. Posting Group 3rd Line
Here you enter the general product posting group for the account type. In case there already is a default in the account number, the value will be inserted here accordingly.
VAT Bus. Posting Group 3rd Line
Here you enter the VAT business posting group for the account type. In case there already is a default in the account number, the value will be inserted here accordingly.
VAT Prod. Posting Group 3rd Line
Here you enter the VAT product posting group for the account type. In case there already is a default in the account number, the value will be inserted here accordingly
Percent from Amount 3rd Line
In case this field is filled, the “Amount 3rd
Line” field will be set to 0.00 automatically. Via this field you can set up a percentage for the amount of the 3
rd line. The base for the
calculation is defined in the “Basis of Percent Calculating” field. Please note the dependence to the setup of the “Reduce Amount 3
rd Line” field.
Reduce Amount 3rd Line?
If this field is checked, then the original amount of the 1st
line will be reduced by the amount of the “Amount 3
rd Line“ field.
Basis of Percent Calculating 3rd Line
Reduced Amount: In case previous lines have already reduced the original amount. Orig. Amount: Calculated from the original amount
Shortcut Dimension Code 1 to 8 3rd Line
Here you enter the shortcut dimensions for the account type. In case there already is a default in the account number, the value will be inserted here accordingly.
Del credere 3rd Line Here you can enter if this line is for “del credere” commission or not.
Abbreviations Charges 3rd Line
Here you can set up the abbreviation to search for the fee in the purpose. All fees found will be entered in the journal line as a total, e. g. FOREIGN. It is also possible to enter several abbreviations by separating them with semicolons (e. g. FOREIGN;OWN). In this case, the system will enter a sum of all FOREIGN and OWN fees.
Suppress Zero Lines 3rd Line
If activated, this field will be considered during fee search. If no fee is found, the system will usually create a line with the amount of “€ 0.00”. Place a check mark in this field, if you want to suppress and omit this zero line.
manual_opp_base_en.docx
gbedv
Documentation
Manual OPplus Base
36 of 136
Line 4 tab
Field Description Document Type 4th Line
In this field you select the document type for account assignment of the 4th
line.
Account Type 4th Line
Here you can specify an account type if the amount entered in the Difference Amount field in bank documents which include this key is generally to be posted on a specific account.
Account No. 4th Line
Here you can specify an account number if the amount entered in the Difference Amount field in bank documents which include this key is generally to be posted on a specific account The system will automatically create a second line with this accounting for the bank document during the import process. The list which is shown when selecting the AssistButton depends on the option selected in the Account Type 2 field: G/L Account, Customer, Vendor, or Bank Account.
Description 4th Line In this field you enter a description (posting text) which will be used in the accounting proposal (e. g. “Rental Agreement Company Meyer”). The description of the journal line is taken from the account name. Here you might use wildcards (as in the recurring journals in the NAV standard). You might use the following wildcards: %1 Current day as name (e. g. Monday) %2 Current week as number (e. g. 47) %3 Current month as number (e. g. 11) %4 Current month as name (e. g. November) %5 Name of current accounting period (e. g. November) %6 Current year as number (e. g. 2007) %7 Previous month as number (e. g. 10) %8 Previous month as text %9 Previous year as number
Amount 4th Line If you enter an amount in this field and the accounting rule applies, then a second journal posting line will be created where the amount including sign will be inserted. Please note the dependence to the setup of the “Reduce Amount 4th Line” field. In case this field is filled, the “Percent from Amount 4
th Line” field will be set to 0.00
automatically.
Gen. Posting Type 4th Line
Here you enter the general posting type for the account type. In case there already is a default in the account number, the value will be inserted here accordingly.
manual_opp_base_en.docx
gbedv
Documentation
Manual OPplus Base
37 of 136
Gen. Bus. Posting Group 4th Line
Here you enter the general business posting group for the account type. In case there already is a default in the account number, the value will be inserted here accordingly.
Gen. Prod. Posting Group 4th Line
Here you enter the general product posting group for the account type. In case there already is a default in the account number, the value will be inserted here accordingly.
VAT Bus. Posting Group 4th Line
Here you enter the VAT business posting group for the account type. In case there already is a default in the account number, the value will be inserted here accordingly.
VAT Prod. Posting Group 4th Line
Here you enter the VAT product posting group for the account type. In case there already is a default in the account number, the value will be inserted here accordingly.
Percent from Amount 4th Line
In case this field is filled, the “Amount 4th Line” field will be set to 0.00 automatically. Via this field you can set up a percentage for the amount of the 4th line. The base for the calculation is defined in the “Basis of Percent Calculating” field. Please note the dependence to the setup of the “Reduce Amount 4th Line” field.
Reduce Amount 4th Line?
If this field is checked, then the original amount of the 1st line will be reduced by the amount of the “Amount 4th Line“ field.
Basis of Percent Calculating 4th Line
Reduced Amount: In case previous lines have already reduced the original amount. Orig. Amount: Calculated from the original amount
Shortcut Dimension Code 1 to 8 4th Line
Here you enter the shortcut dimensions for the account type. In case there already is a default in the account number, the value will be inserted here accordingly.
Del credere 4th Line Here you can enter if this line is for “del credere” commission or not.
Abbreviations Charges 4th Line
Here you can set up the abbreviation to search for the fee in the purpose. All fees found will be entered in the journal line as a total, e. g. FOREIGN. It is also possible to enter several abbreviations by separating them with semicolons (e. g. FOREIGN;OWN). In this case, the system will enter a sum of all FOREIGN and OWN fees.
Suppress Zero Lines 4th Line
If activated, this field will be considered during fee search. If no fee is found, the system will usually create a line with the amount of “€ 0.00”. Place a check mark in this field, if you want to suppress and omit this zero line.
Options tab
Field Description Disable Import Activate this field if you do not want to import bank account statements with this kind of
text code.
For example for payments (checks, transfers) which have been already posted directly to the bank account.
manual_opp_base_en.docx
gbedv
Documentation
Manual OPplus Base
38 of 136
Disable Application If this field is checked, then account assignment will be carried out but potential application will not be carried out.
Check only Account Type
If this field is checked, then automatic application upon importing is only carried out for accounts of the preset account type.
Transfer Posting The transfer posting functionality between OPplus and the (discontinued) German Payments add on module has been enhanced so that if you setup an accounting rule on a bank account which is marked for transfer posting this will result in a two-line posting where the first line is not marked as transfer posting and the second line is marked as transfer posting.
Amount Filter Here you can define for which amount the application rule should apply. You have the following options: Blank - this rule applies for positive and negative amounts. That is the default. Positive - this rule applies only if the amount of the Pmt. Import Line is positive. Negative - this rule applies only if the amount of the Pmt. Import Line is negative.
BC Code Filter If you enter a value in this field, then the accounting rule applies only for import lines which contain this BC Code Filter (BC = SWIFT Bank Transaction Code)
Factor Factor can be used e. g. to switch signs (as in CSV ports). This applies according to the setup per BC-Code/Accounting Rule when the import data contains only absolute values and has to be transformed into positive or negative values according to BC Code.
Analyze Amount If this field is checked, then the accounting rule applies only if the payment amount matches this field.
Payback If this field is checked, then you may use the customer payback function with this accounting rule. Please find more details in chapter Functionality “Payback” (= Return Debit Note) upon Pmt. Import in General Journals.
Field Separator This field is connected to the 3 “Abbreviations Charges” fields (2nd
, 3rd
Line or 4th
line). Here you enter the field separator your bank uses as a field separator in the reference texts of the import line. This is used to determine where the search of the possible abbreviations, which may be used by the employed banks to indicate that some kind of additional charge or fee follows, starts.
Decimal Separator Charges
This field is connected to the 3 “Abbreviations Charges” fields (2nd
, 3rd
Line or 4th
line). In this field, you select the decimal separator comma or period. The default is set to comma.
Mark as Finished If this field is checked, then the application status is set to “Finished” instead of “Automatic” if this accounting rule applies.
Mark as Discount in REMADV
If this field is activated, then upon importing REMADV the corresponding import line will be processed as discount with this accounting rule.
Fees from CSV-Port If this field is checked, then the value of the “Fees“ column from the “Pmt. Import Line” is being used as the amount for the new fee posting journal line. Fee lines with an amount of zero will not be displayed. If the field is not checked, then the amount from the “BC-Code Accounting Rule” will be taken.
Amount without Fees
If this field is checked, then the amount will be transferred without changes from the “Pmt. Import Line”. If this field is not checked, than the amount will be reduced by the fees
Draw Sign of Fees If this field is checked, then the sign of the transferred amount will be reversed.
Del credere If this field is checked, this posting line will be posted as “del credere” commission with respect to REMADV imports.
REMADV Debit If this field is checked, this line will be marked as debit for the REMADV import.
Insert per Document If this field is checked, a debit in the REMADV import will be inserted per document and not posted as a total in the end.
manual_opp_base_en.docx
gbedv
Documentation
Manual OPplus Base
39 of 136
Customer Card You can open the customer card in the edit mode from the customer list by pressing CTRL+SHIFT+E. If you use the Base module, the customer card will be supplemented with the OPplus tab:
Field Description Association No. In this field, you can enter the number of the customer association to which the customer
belongs. To see the available association numbers, click the AssistButton to the right of the field. For more information on how to set up an association, please refer to the OPplus Association manual.
Association Sort Code
This field is associated with the Association No. field. Here you can optionally enter an association key which can be used for sorting in the Extended Application window.
Min. Pos. Payment Note
This field is used by the OPplus Payment module. Here you can enter the number of entries from which a payment note is to be created. This field is set to zero by default. If you leave this field empty (value zero), the application will consider the settings of the OPplus Payment Setup window.
New Head per Entry This field is used by the OPplus Payment module.
Default Charges This field is used by the OPplus Payment module.
Balance Acknowledgement Code
This field is used by the OPplus Extended Lists & Reports module.
Skip Bank Account in Bank Import
This field indicates if imported bank accounts are automatically considered or skipped for this customer. In addition, the associated bank accounts of person accounts which have an activated “Skip Bank Account in Bank Import” field will not be considered for accounting. This field is deactivated by default.
Disable Auto Application
This field shows if automatic application is disabled or not. This field is deactivated by default.
Electronic Document Dispatch
This field is used by the OPplus E-Doc module.
Trading Type This field is used by the OPplus Payment module.
manual_opp_base_en.docx
gbedv
Documentation
Manual OPplus Base
40 of 136
Service No. This field is used by the OPplus Payment module.
Vendor Card You can open the vendor card in the edit mode from the vendor list by pressing CTRL+SHIFT+E. If you use the Base module, the vendor card will be supplemented with the OPplus tab.
Field Description Association No. In this field, you can enter the number of the vendor association to which the vendor
belongs.To see the available association numbers, click the AssistButton to the right of the field. For more information on how to set up an association, please refer to the OPplus Association manual.
Association Sort Code
This field is associated with the Association No. field. Here you can optionally enter an association key which can be used for sorting in the Extended Application window.
Min. Pos. Payment Note
Here you can enter the number of entries from which a payment note is to be created. This field is set to zero by default. If you leave this field empty (value zero), the application will consider the settings of the OPplus Payment Setup window.
New Head per Entry This field is used by the OPplus Payment module.
Default Charges This field is used by the OPplus Payment module.
Balance Acknowledgement Code
This field is used by the OPplus Extended Lists & Reports module.
Skip Bank Account in Bank Import
This field indicates if imported bank accounts are automatically considered or skipped for this vendor. This field is deactivated by default.
Disable Auto Application
This field shows if automatic application is disabled or not. This field is deactivated by default.
Electronic Document Dispatch
This field is used by the OPplus E-Doc module.
manual_opp_base_en.docx
gbedv
Documentation
Manual OPplus Base
41 of 136
Trading Type This field is used by the OPplus Payment module.
Service No. This field is used by the OPplus Payment module.
Bank Accounts By selecting this menu item, you can open the bank account list which is the same object form available in the Financial Management area of the standard application.
Ext. Customer Bank Accounts With the OPplus Base module, the following options are available for the customer bank account:
Blocking bank account for the import
Blocking Customer Bank Account for the Import
In some cases, it might be useful to block a customer bank account for the import. Cash deposits, for example, are always performed by using the same orderer bank account. In order to avoid that a wrong bank account number is suggested by the system (which might be the bank account of the first customer who has made a cash deposit by using OPplus), this account needs to be blocked for the bank import.
If you have blocked a customer bank account for the import, it can no longer be unblocked. In such cases, you must create a new bank account. To block a customer's bank account for the import, click Base → Setup → Ext. Customer Bank Accounts. The Ext. Customer Bank Account List appears. You can now block the selected bank account by selecting the Blocked for Import menu item from the Bank Acc. menu button:
If you block a customer's bank account for the import, the Name field will be overwritten by the text "Blocked for BI" followed by the current date, e. g. "Blocked for BI 11 30 08". The code represents the number series specified in the OPplus Setup. By selecting the List Blocked Accounts menu item via the Bank Acc. menu button, you can open the list of all blocked customer bank accounts:
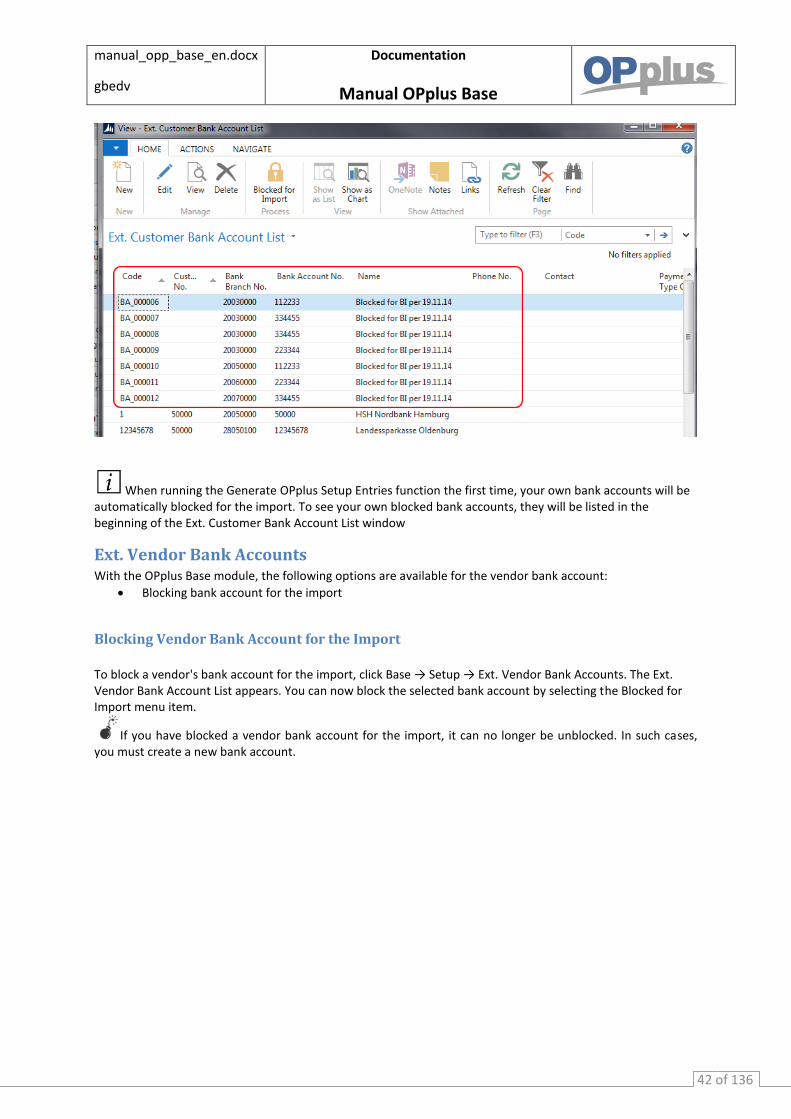
manual_opp_base_en.docx
gbedv
Documentation
Manual OPplus Base
42 of 136
When running the Generate OPplus Setup Entries function the first time, your own bank accounts will be automatically blocked for the import. To see your own blocked bank accounts, they will be listed in the beginning of the Ext. Customer Bank Account List window
Ext. Vendor Bank Accounts With the OPplus Base module, the following options are available for the vendor bank account:
Blocking bank account for the import
Blocking Vendor Bank Account for the Import
To block a vendor's bank account for the import, click Base → Setup → Ext. Vendor Bank Accounts. The Ext. Vendor Bank Account List appears. You can now block the selected bank account by selecting the Blocked for Import menu item.
If you have blocked a vendor bank account for the import, it can no longer be unblocked. In such cases, you must create a new bank account.

manual_opp_base_en.docx
gbedv
Documentation
Manual OPplus Base
43 of 136
If you block a vendor's bank account for the import, the Name field will be overwritten by the text "Blocked for BI" followed by the current date, e. g. "Blocked for BI 11 30 08". The code represents the number series specified in the OPplus Setup. By selecting the List Blocked Accounts menu item via the Bank Acc. menu button, you can open the list of all blocked vendor bank accounts:
When running the Generate OPplus Setup Entries function the first time, your own bank accounts will be automatically blocked for the import. To see your own blocked bank accounts, they will be listed in the beginning of the Ext. Vendor Bank Account List window.
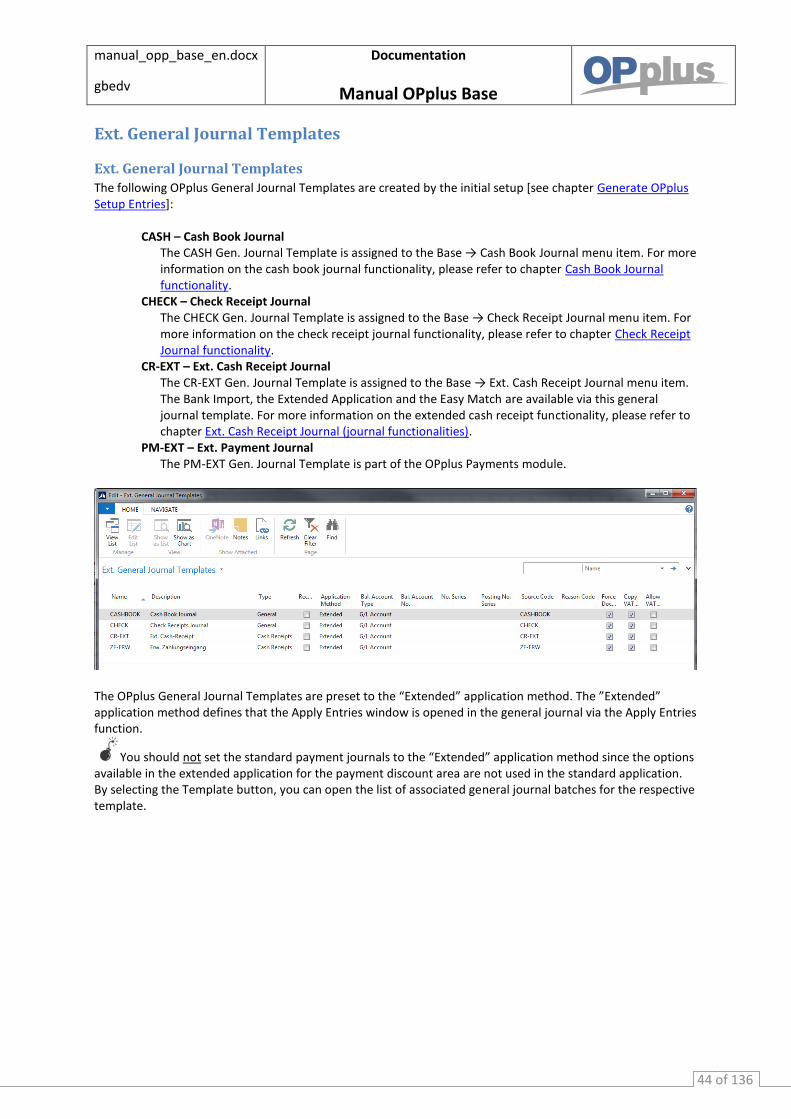
manual_opp_base_en.docx
gbedv
Documentation
Manual OPplus Base
44 of 136
Ext. General Journal Templates
Ext. General Journal Templates
The following OPplus General Journal Templates are created by the initial setup [see chapter Generate OPplus Setup Entries]:
CASH – Cash Book Journal
The CASH Gen. Journal Template is assigned to the Base → Cash Book Journal menu item. For more information on the cash book journal functionality, please refer to chapter Cash Book Journal functionality.
CHECK – Check Receipt Journal The CHECK Gen. Journal Template is assigned to the Base → Check Receipt Journal menu item. For more information on the check receipt journal functionality, please refer to chapter Check Receipt Journal functionality.
CR-EXT – Ext. Cash Receipt Journal The CR-EXT Gen. Journal Template is assigned to the Base → Ext. Cash Receipt Journal menu item. The Bank Import, the Extended Application and the Easy Match are available via this general journal template. For more information on the extended cash receipt functionality, please refer to chapter Ext. Cash Receipt Journal (journal functionalities).
PM-EXT – Ext. Payment Journal The PM-EXT Gen. Journal Template is part of the OPplus Payments module.
The OPplus General Journal Templates are preset to the “Extended” application method. The ”Extended” application method defines that the Apply Entries window is opened in the general journal via the Apply Entries function.
You should not set the standard payment journals to the “Extended” application method since the options available in the extended application for the payment discount area are not used in the standard application. By selecting the Template button, you can open the list of associated general journal batches for the respective template.
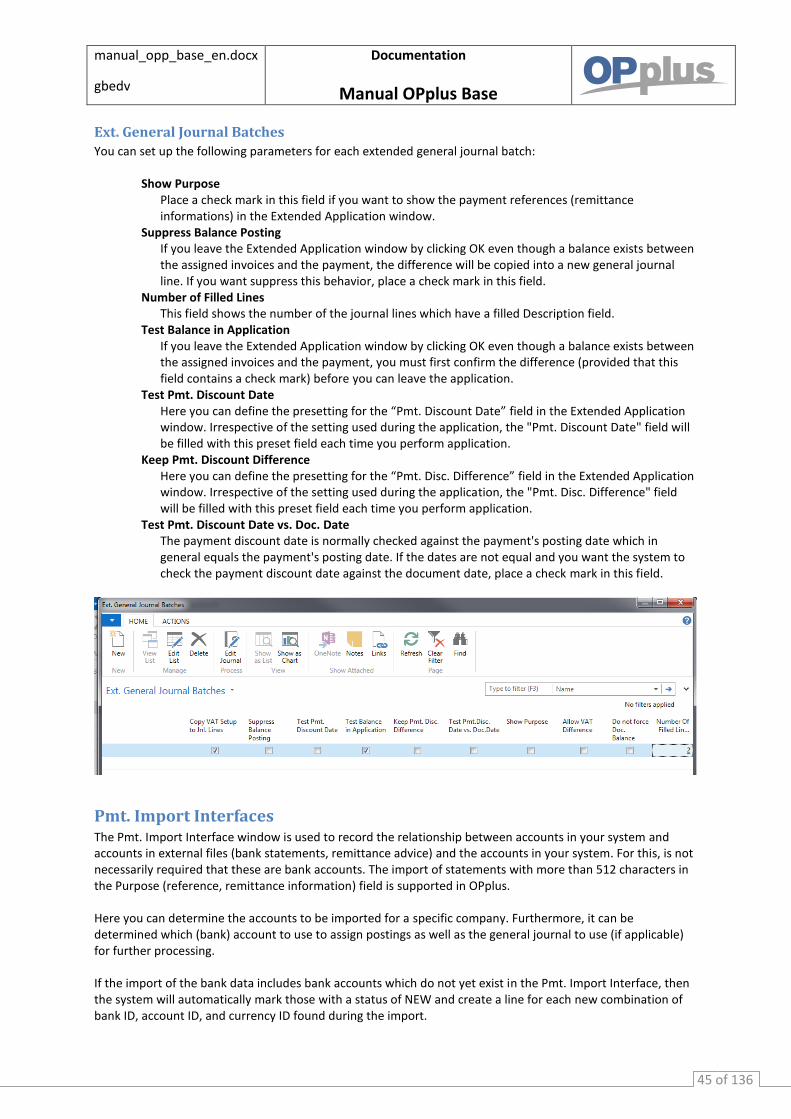
manual_opp_base_en.docx
gbedv
Documentation
Manual OPplus Base
45 of 136
Ext. General Journal Batches
You can set up the following parameters for each extended general journal batch:
Show Purpose Place a check mark in this field if you want to show the payment references (remittance informations) in the Extended Application window.
Suppress Balance Posting If you leave the Extended Application window by clicking OK even though a balance exists between the assigned invoices and the payment, the difference will be copied into a new general journal line. If you want suppress this behavior, place a check mark in this field.
Number of Filled Lines This field shows the number of the journal lines which have a filled Description field.
Test Balance in Application If you leave the Extended Application window by clicking OK even though a balance exists between the assigned invoices and the payment, you must first confirm the difference (provided that this field contains a check mark) before you can leave the application.
Test Pmt. Discount Date Here you can define the presetting for the “Pmt. Discount Date” field in the Extended Application window. Irrespective of the setting used during the application, the "Pmt. Discount Date" field will be filled with this preset field each time you perform application.
Keep Pmt. Discount Difference Here you can define the presetting for the “Pmt. Disc. Difference” field in the Extended Application window. Irrespective of the setting used during the application, the "Pmt. Disc. Difference" field will be filled with this preset field each time you perform application.
Test Pmt. Discount Date vs. Doc. Date The payment discount date is normally checked against the payment's posting date which in general equals the payment's posting date. If the dates are not equal and you want the system to check the payment discount date against the document date, place a check mark in this field.
Pmt. Import Interfaces The Pmt. Import Interface window is used to record the relationship between accounts in your system and accounts in external files (bank statements, remittance advice) and the accounts in your system. For this, is not necessarily required that these are bank accounts. The import of statements with more than 512 characters in the Purpose (reference, remittance information) field is supported in OPplus. Here you can determine the accounts to be imported for a specific company. Furthermore, it can be determined which (bank) account to use to assign postings as well as the general journal to use (if applicable) for further processing. If the import of the bank data includes bank accounts which do not yet exist in the Pmt. Import Interface, then the system will automatically mark those with a status of NEW and create a line for each new combination of bank ID, account ID, and currency ID found during the import.
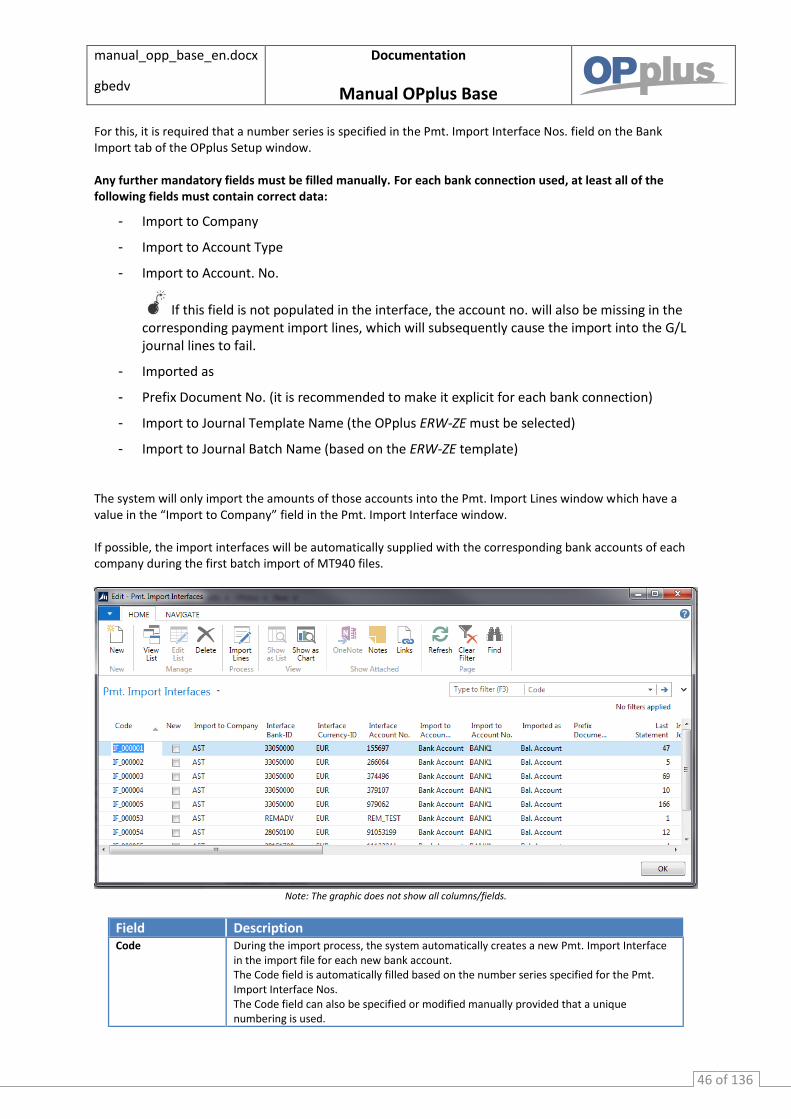
manual_opp_base_en.docx
gbedv
Documentation
Manual OPplus Base
46 of 136
For this, it is required that a number series is specified in the Pmt. Import Interface Nos. field on the Bank Import tab of the OPplus Setup window. Any further mandatory fields must be filled manually. For each bank connection used, at least all of the following fields must contain correct data:
- Import to Company
- Import to Account Type
- Import to Account. No.
If this field is not populated in the interface, the account no. will also be missing in the corresponding payment import lines, which will subsequently cause the import into the G/L journal lines to fail.
- Imported as
- Prefix Document No. (it is recommended to make it explicit for each bank connection)
- Import to Journal Template Name (the OPplus ERW-ZE must be selected)
- Import to Journal Batch Name (based on the ERW-ZE template) The system will only import the amounts of those accounts into the Pmt. Import Lines window which have a value in the “Import to Company” field in the Pmt. Import Interface window. If possible, the import interfaces will be automatically supplied with the corresponding bank accounts of each company during the first batch import of MT940 files.
Note: The graphic does not show all columns/fields.
Field Description Code During the import process, the system automatically creates a new Pmt. Import Interface
in the import file for each new bank account. The Code field is automatically filled based on the number series specified for the Pmt. Import Interface Nos. The Code field can also be specified or modified manually provided that a unique numbering is used.
manual_opp_base_en.docx
gbedv
Documentation
Manual OPplus Base
47 of 136
New This is a marker for an interface which is not released yet. If a new interface is created via the import, it will be marked as "New". This field can be modified manually or by setting up a company.
Import to Company Here you can enter the company for which you want to import the payment data. In this field, you can only enter values from the Company table. To see the available values, click the AssistButton to the right of the field.
If you enter a value into this field, the local currency code must be set up in the respective company. Otherwise, the system will show an error message, since this value is a prerequisite for the import of payment files.
If you leave this field empty, the selected account will be ignored during the import. Furthermore, the account will not be considered when the import interfaces are checked.
Interface Bank-ID This field is used to identify a bank: For the interface it is irrelevant if this is done by indicating a regular bank code number, a BIC or the like. You can also leave this field empty. In order to identify an account in an external payment information file (statement, remittance advice), a unique combination of account, bank and currency is required (at least the account must be specified).
Interface Currency-ID
This field is used to enter the currency code of the external account. The value must correspond to the currency code included in the external file (e. g. EUR for euro, USD for US dollar).
Interface Account No.
This field is used to identify account numbers in external files.
Import to Account Type
Here you can select the account type to use for pre-accounting payment information of the selected import interface when performing the import into a general journal. The following options are available: G/L Account, Customer, Vendor, and Bank Account.
Import to Account No.
Here you can select the account number to use for pre-accounting payment information of the selected import interface when performing the import into a general journal. The list which is shown when selecting the AssistButton depends on the option selected in the Account Type field: G/L Account, Customer, Vendor, or Bank Account.
The lookup in the Import to Account No. field is always performed for the respective company specified in the Import to Company field. If you change the entry in the Import to Company field, the contents of the Import to Account No. will be removed.
Imported as This field is used to determine whether the account should be imported as account or as balancing account into the general journal lines being defined as import in account number in the import interface.
Please keep in mind that the selection has an effect on whether the amounts are shown as positive or negative figures in the journal.
If the import in account is written into the Account No. field, and e. g. the person account (customer/vendor) thus is written into the Bal. Account field, the effect that the posting description is changed when changing the balancing account will be suppressed.
If the import in account is imported into the Bal. Account field and the accounting of the Account No. field is changed, the existing posting description will NOT be overwritten by the respective account name as it is the case for the standard application.
Prefix Document No.
Here you can enter a prefix to be used to generate a document number during the import of bank documents into the posting line according to the following pattern: document no. prefix + statement no. + statement line no
If you enter the prefix document number in a descriptive way (e.g. by indicating the year or information on the bank), you can later on see at a glance the statement where the payment can be found. Example : Entry in "Prefix Document No." field: SPK10-
manual_opp_base_en.docx
gbedv
Documentation
Manual OPplus Base
48 of 136
Generated Doc. No.: SPK10-016-007 Corresponds to line 7 on statement no. 016 at the Sparkasse in 2010
Last Statement No. This field shows the last statement number which was used by the selected interface.
Import to Journal Template Name e
This field is used to determine the journal template to be used to further process the selected interface. To see the available values, click the lookup button to the right of the field.
Import to Journal Batch Name
This field is used to determine the journal batch to be used to further process the selected interface. To see the available values, click the lookup button to the right of the field. The list which is shown by selecting the AssistButton depends on the journal template specified in the Import to Journal Template Name field.
Fill Description with Here you can determine the payment import line information to be used to fill in the Description field in the general journal line. The following options are available:
Blank
(the Description field will be filled with the name of the specified account number as it is the case in the standard application)
Orderer
Posting Description
Purpose (Reference / Remittance Information)
One Bal. Account per Register
“One Bal. Account per Register“ means that the balance account will not be entered into each line during the payment import, but as an offset or balance posting entry in the last line. This feature is often used for the import of payment advices.
Disable Auto Application
You can use the “Disable Auto Application” if you want to import entries to be accepted from the payment import entries without making use of application routines.
Check Payment Sign This field turns off the accumulation of invoices and credit memos in order to consider them individually.
Import via MT940 The system will place a check mark in this field if the import of statements was done by using interface MT940.
Use “Declared“ Amounts
The system will not perform a pmt. discount check if this field contains a check mark. The amounts will be copied 1:1 from the import line.
Delete Entries after Posting
The “Delete Entries after Posting“ field is used to delete the payment import entries after posting.
Treat as Bank Statement
If you use the “Treat as Bank Statement“ field, the imported payments will be treated as bank statements as it is the case for the standard application. This way, the Navision standard bank statement application is simulated.
Mark MT942 as Statement
The “Mark as MT942 as Statement“ field is to include the MT942 which is the interim statement produced between the MT940 statements, e.g. the MT940 may be imported in the morning but in the afternoon there will be an MT942 to import which contains interim entries since the morning import. The MT942 entries will be included in the MT940 statement imported the next morning.
Import Interim Entries
The “Import Interim Entries“ field is used to indicate if you want to process these interim entries as real payment entries.
Process 940b/CAMT54 Files
If you place a check mark in this field, the import will be processed as MT940b file. This file is normally imported via the Business Line program and has another name syntax (“.zus” extension) than MT940 files. If this field is activated and the file is not available (when e. g. the transmission of a file MT940b file did not take place), no error message will appear. Then the import will be performed without the MT940b file.
Convert ANSI to ASCII
Here you can indicate whether you want the system to convert the external file from the Windows character format (ANSI) into the application's character format (ASCII) or not.
Import in Two Lines Here you can specify that the bank import is not filled in one line with account/balancing account, but shown as a split posting comprised of 2 lines
Use Orig. Curr. Code in Bank Import
If this field is activated, the original currency code and the corresponding foreign currency amount will be used in the journal. The amount (LCY) and thus the currency factor result from the import values transferred from the Amount and Amount (LCY) field. This function is only permissible on bank accounts in local currency.
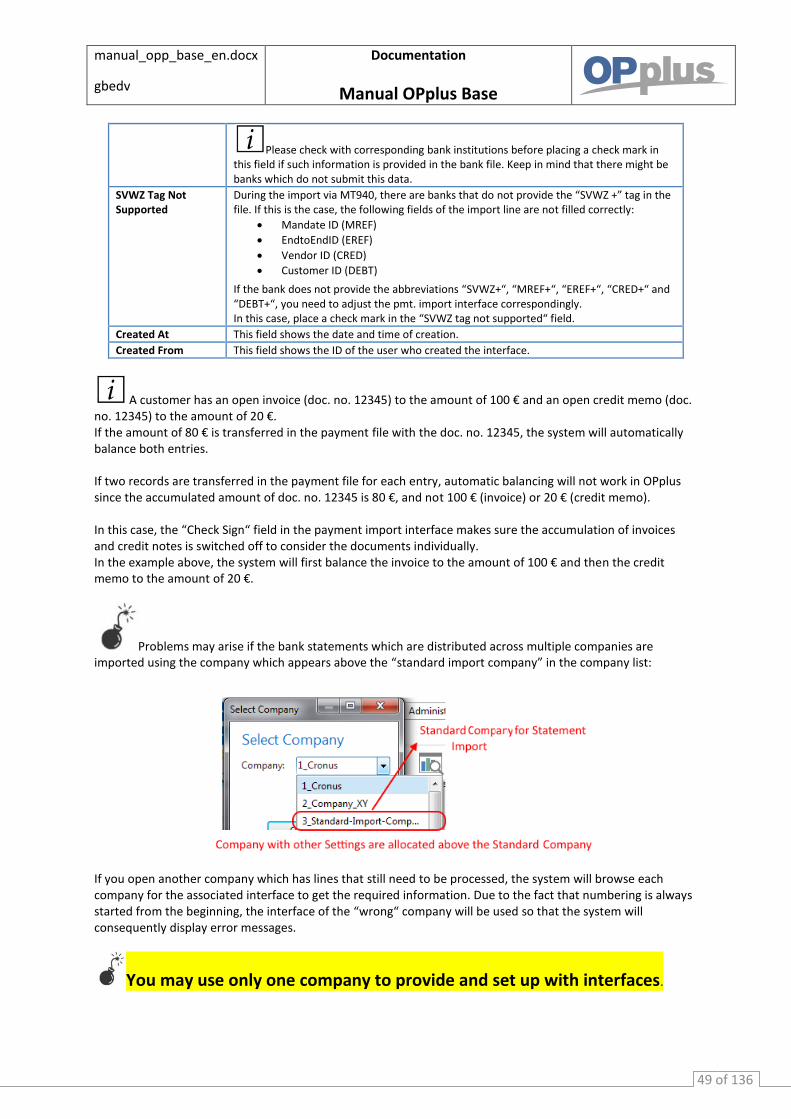
manual_opp_base_en.docx
gbedv
Documentation
Manual OPplus Base
49 of 136
Please check with corresponding bank institutions before placing a check mark in this field if such information is provided in the bank file. Keep in mind that there might be banks which do not submit this data.
SVWZ Tag Not Supported
During the import via MT940, there are banks that do not provide the “SVWZ +” tag in the file. If this is the case, the following fields of the import line are not filled correctly:
Mandate ID (MREF)
EndtoEndID (EREF)
Vendor ID (CRED)
Customer ID (DEBT)
If the bank does not provide the abbreviations “SVWZ+“, “MREF+“, “EREF+“, “CRED+“ and “DEBT+“, you need to adjust the pmt. import interface correspondingly. In this case, place a check mark in the “SVWZ tag not supported“ field.
Created At This field shows the date and time of creation.
Created From This field shows the ID of the user who created the interface.
A customer has an open invoice (doc. no. 12345) to the amount of 100 € and an open credit memo (doc. no. 12345) to the amount of 20 €. If the amount of 80 € is transferred in the payment file with the doc. no. 12345, the system will automatically balance both entries. If two records are transferred in the payment file for each entry, automatic balancing will not work in OPplus since the accumulated amount of doc. no. 12345 is 80 €, and not 100 € (invoice) or 20 € (credit memo). In this case, the “Check Sign“ field in the payment import interface makes sure the accumulation of invoices and credit notes is switched off to consider the documents individually. In the example above, the system will first balance the invoice to the amount of 100 € and then the credit memo to the amount of 20 €.
Problems may arise if the bank statements which are distributed across multiple companies are imported using the company which appears above the “standard import company” in the company list:
If you open another company which has lines that still need to be processed, the system will browse each company for the associated interface to get the required information. Due to the fact that numbering is always started from the beginning, the interface of the “wrong“ company will be used so that the system will consequently display error messages.
You may use only one company to provide and set up with interfaces.
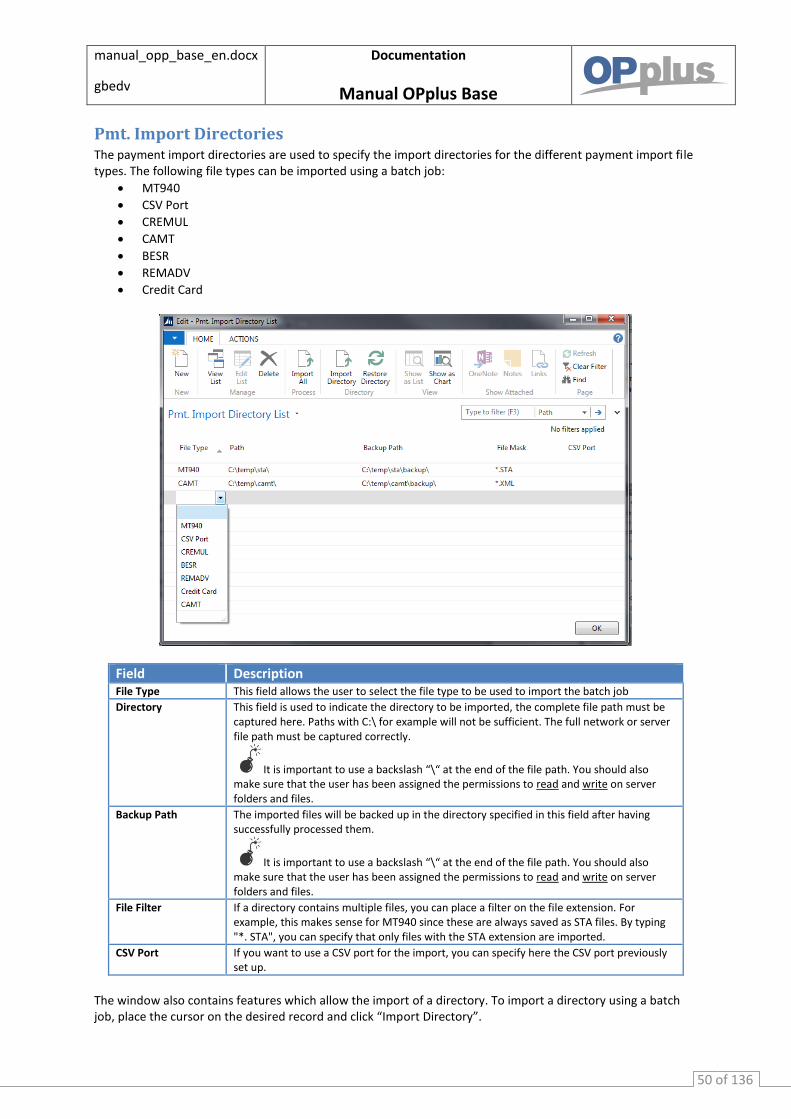
manual_opp_base_en.docx
gbedv
Documentation
Manual OPplus Base
50 of 136
Pmt. Import Directories The payment import directories are used to specify the import directories for the different payment import file types. The following file types can be imported using a batch job:
MT940
CSV Port
CREMUL
CAMT
BESR
REMADV
Credit Card
Field Description File Type This field allows the user to select the file type to be used to import the batch job
Directory This field is used to indicate the directory to be imported, the complete file path must be captured here. Paths with C:\ for example will not be sufficient. The full network or server file path must be captured correctly.
It is important to use a backslash “\“ at the end of the file path. You should also make sure that the user has been assigned the permissions to read and write on server folders and files.
Backup Path The imported files will be backed up in the directory specified in this field after having successfully processed them.
It is important to use a backslash “\“ at the end of the file path. You should also make sure that the user has been assigned the permissions to read and write on server folders and files.
File Filter If a directory contains multiple files, you can place a filter on the file extension. For example, this makes sense for MT940 since these are always saved as STA files. By typing "*. STA", you can specify that only files with the STA extension are imported.
CSV Port If you want to use a CSV port for the import, you can specify here the CSV port previously set up.
The window also contains features which allow the import of a directory. To import a directory using a batch job, place the cursor on the desired record and click “Import Directory”.
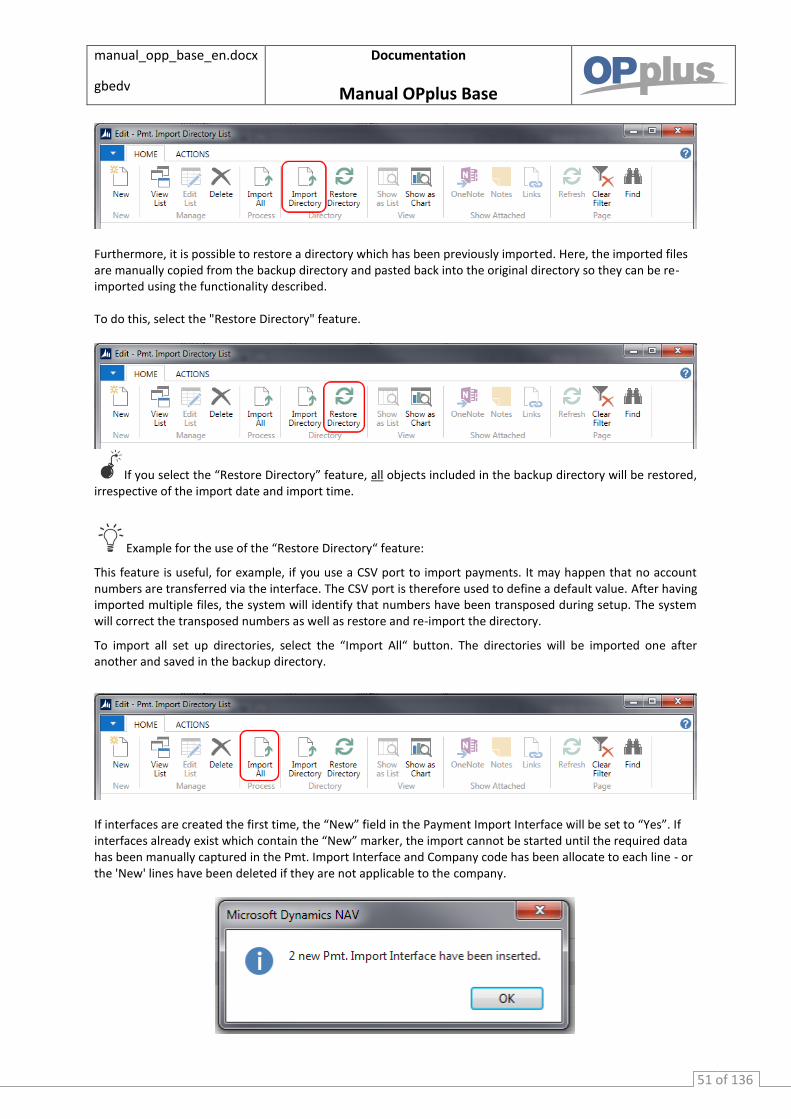
manual_opp_base_en.docx
gbedv
Documentation
Manual OPplus Base
51 of 136
Furthermore, it is possible to restore a directory which has been previously imported. Here, the imported files are manually copied from the backup directory and pasted back into the original directory so they can be re-imported using the functionality described. To do this, select the "Restore Directory" feature.
If you select the “Restore Directory” feature, all objects included in the backup directory will be restored, irrespective of the import date and import time.
Example for the use of the “Restore Directory“ feature:
This feature is useful, for example, if you use a CSV port to import payments. It may happen that no account numbers are transferred via the interface. The CSV port is therefore used to define a default value. After having imported multiple files, the system will identify that numbers have been transposed during setup. The system will correct the transposed numbers as well as restore and re-import the directory.
To import all set up directories, select the “Import All“ button. The directories will be imported one after another and saved in the backup directory.
If interfaces are created the first time, the “New” field in the Payment Import Interface will be set to “Yes”. If interfaces already exist which contain the “New” marker, the import cannot be started until the required data has been manually captured in the Pmt. Import Interface and Company code has been allocate to each line - or the 'New' lines have been deleted if they are not applicable to the company.
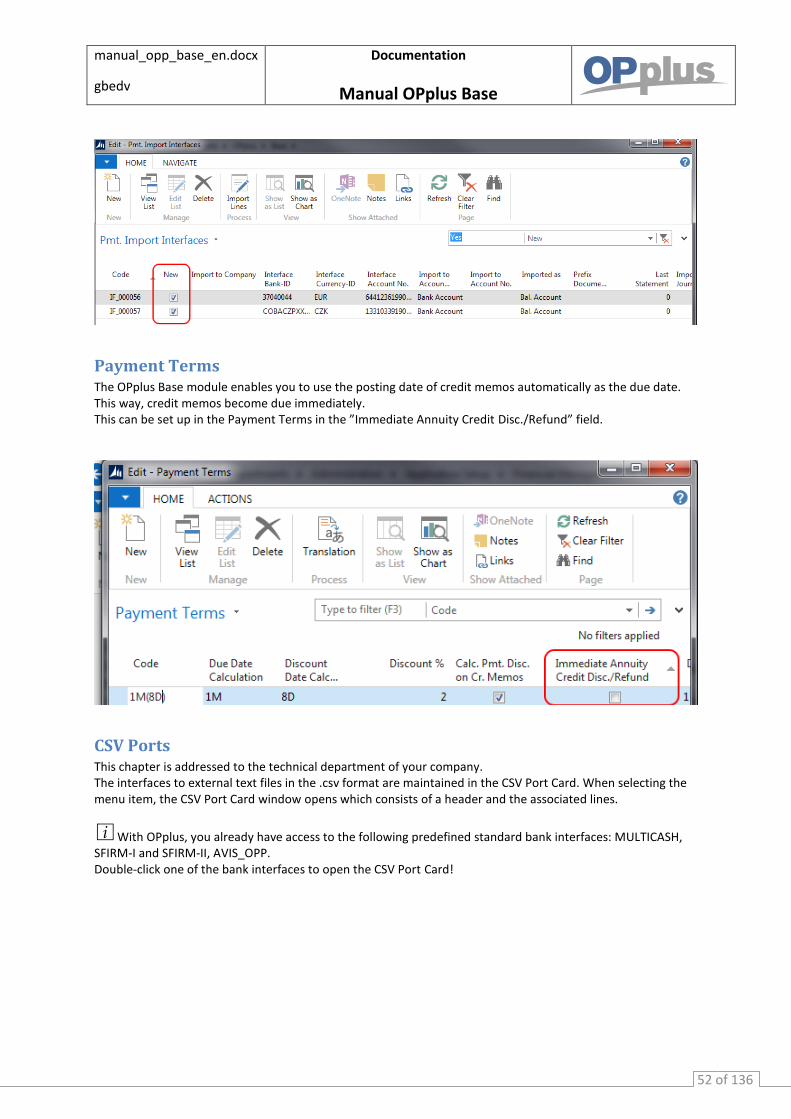
manual_opp_base_en.docx
gbedv
Documentation
Manual OPplus Base
52 of 136
Payment Terms The OPplus Base module enables you to use the posting date of credit memos automatically as the due date. This way, credit memos become due immediately. This can be set up in the Payment Terms in the ”Immediate Annuity Credit Disc./Refund” field.
CSV Ports This chapter is addressed to the technical department of your company. The interfaces to external text files in the .csv format are maintained in the CSV Port Card. When selecting the menu item, the CSV Port Card window opens which consists of a header and the associated lines.
With OPplus, you already have access to the following predefined standard bank interfaces: MULTICASH, SFIRM-I and SFIRM-II, AVIS_OPP. Double-click one of the bank interfaces to open the CSV Port Card!
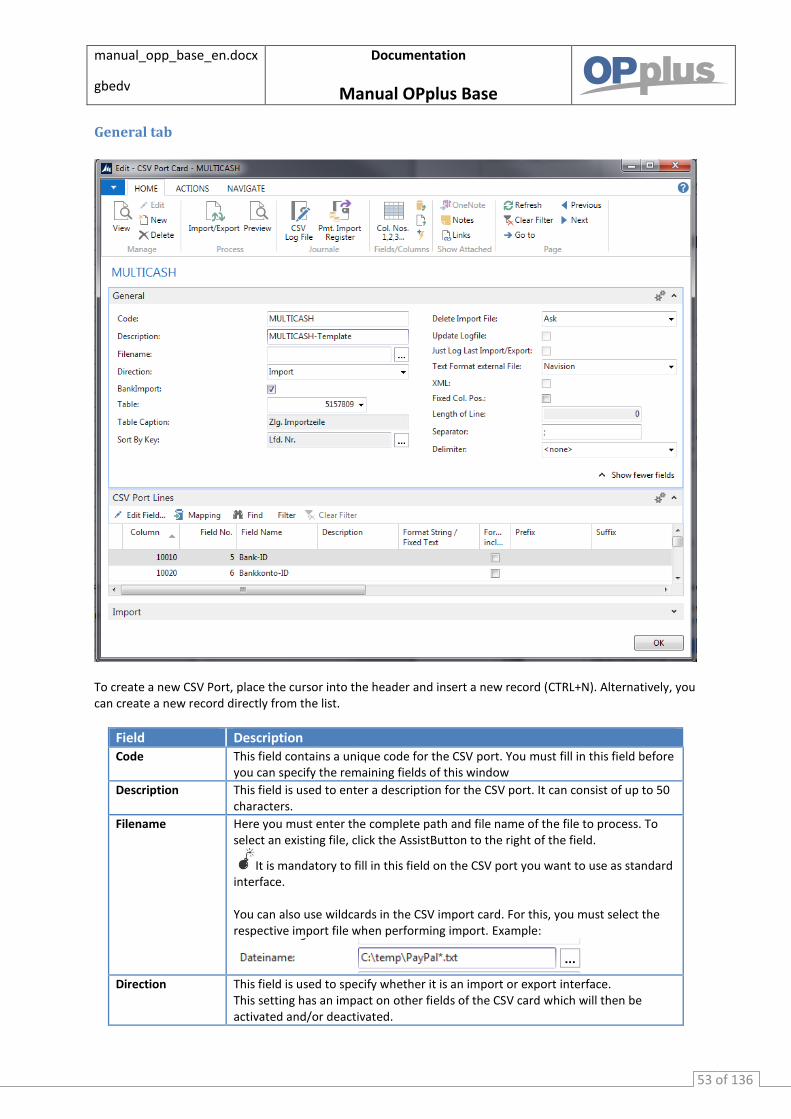
manual_opp_base_en.docx
gbedv
Documentation
Manual OPplus Base
53 of 136
General tab
To create a new CSV Port, place the cursor into the header and insert a new record (CTRL+N). Alternatively, you can create a new record directly from the list.
Field Description Code This field contains a unique code for the CSV port. You must fill in this field before
you can specify the remaining fields of this window
Description This field is used to enter a description for the CSV port. It can consist of up to 50 characters.
Filename Here you must enter the complete path and file name of the file to process. To select an existing file, click the AssistButton to the right of the field.
It is mandatory to fill in this field on the CSV port you want to use as standard interface. You can also use wildcards in the CSV import card. For this, you must select the respective import file when performing import. Example:
Direction This field is used to specify whether it is an import or export interface.
This setting has an impact on other fields of the CSV card which will then be activated and/or deactivated.

manual_opp_base_en.docx
gbedv
Documentation
Manual OPplus Base
54 of 136
BankImport If you place a check mark in this field, the interface will be connected with the payment import file. The imported data is always imported into the Payment Entries table. If activated, make sure that at least the Bank-ID, Account-ID and Currency-ID fields are specified
Table This field is used to enter the table number of the NAV database to be read or processed by the current interface. To see the available values, click the lookup button to the right of the field
Sort by Key This field is only active for the EXPORT direction and defines the export sorting. To see the available keys for the selected table, click the AssistButton to the right of the field.
Delete Import File You can use this field to indicate if you want the system to delete the import file (e.g. sales.txt) after the import or not. Following options are available: Ask – After having imported the file, a dialog box appears asking if you want to delete the file. Yes – If you select this option, the file will be deleted after the import. A dialog box does not appear. No – If you select this option, the file will be deleted after the import. A dialog box does not appear.
Text Format external File
This field is used to specify the text format of the target and/or source file: NAV (ASCII) or Windows (ANSI).
Separator This field is used to specify the separator of the target and/or source file. If you leave this field empty, the tab character will be used.
Delimiter Import: This field is used to determine whether to include field contents in delimiters. The following options are available: <none> = no delimiters ‘‘ = double ‘ = single Export: Any field contents which contain characters defined as separators are always placed into double quotes.
Fixed Col. Pos. If you place a check mark in this field, you can enter a value into the Length of Line field.
Length of Line This field is only activated if the Fixed Col. Pos. = Yes. The fixed value can be entered here.
Update Logfile This field specified if the imports and/or exports performed via the selected interface shall be logged. This field has no impact on the processing of statements and payment advices. These are automatically logged in the payment register.
Just Log Last Import/Export
This field is only activated if Update Logfile = Yes. If you place a check mark in this field, only the last import/export will be logged in the CSV log file.
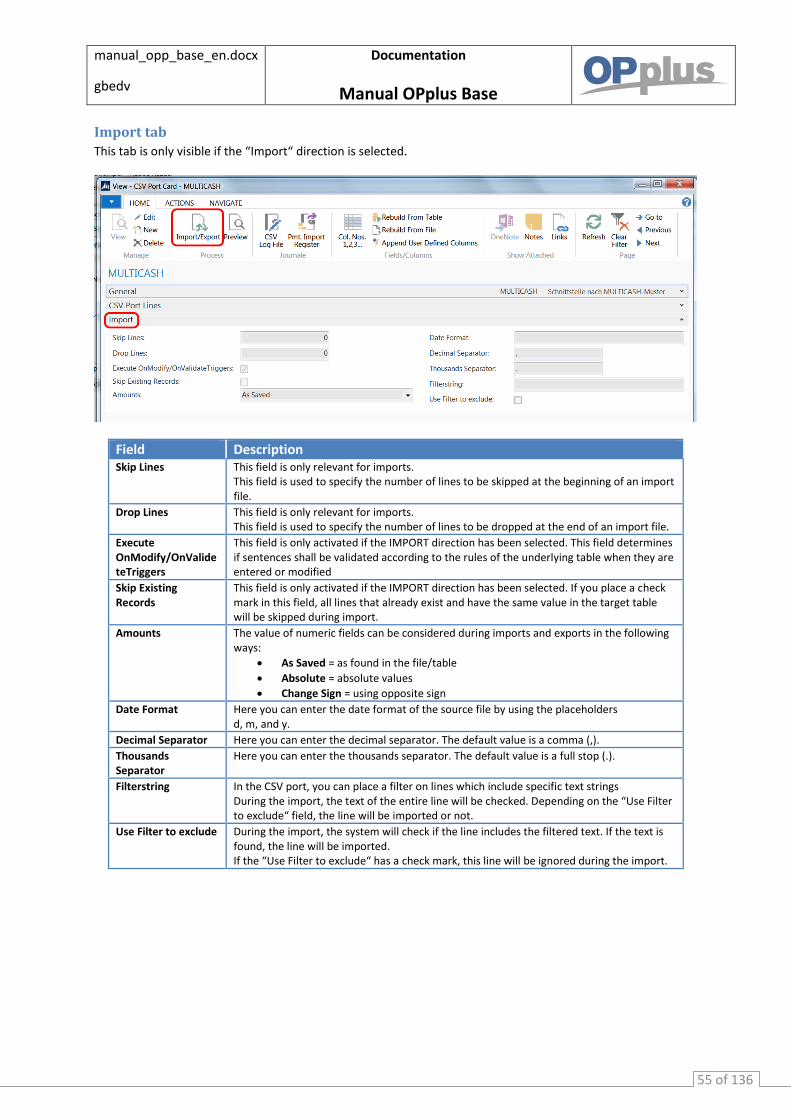
manual_opp_base_en.docx
gbedv
Documentation
Manual OPplus Base
55 of 136
Import tab
This tab is only visible if the “Import“ direction is selected.
Field Description Skip Lines This field is only relevant for imports.
This field is used to specify the number of lines to be skipped at the beginning of an import file.
Drop Lines This field is only relevant for imports. This field is used to specify the number of lines to be dropped at the end of an import file.
Execute OnModify/OnValideteTriggers
This field is only activated if the IMPORT direction has been selected. This field determines if sentences shall be validated according to the rules of the underlying table when they are entered or modified
Skip Existing Records
This field is only activated if the IMPORT direction has been selected. If you place a check mark in this field, all lines that already exist and have the same value in the target table will be skipped during import.
Amounts The value of numeric fields can be considered during imports and exports in the following ways:
As Saved = as found in the file/table
Absolute = absolute values
Change Sign = using opposite sign
Date Format Here you can enter the date format of the source file by using the placeholders d, m, and y.
Decimal Separator Here you can enter the decimal separator. The default value is a comma (,).
Thousands Separator
Here you can enter the thousands separator. The default value is a full stop (.).
Filterstring In the CSV port, you can place a filter on lines which include specific text strings During the import, the text of the entire line will be checked. Depending on the “Use Filter to exclude“ field, the line will be imported or not.
Use Filter to exclude During the import, the system will check if the line includes the filtered text. If the text is found, the line will be imported. If the “Use Filter to exclude“ has a check mark, this line will be ignored during the import.
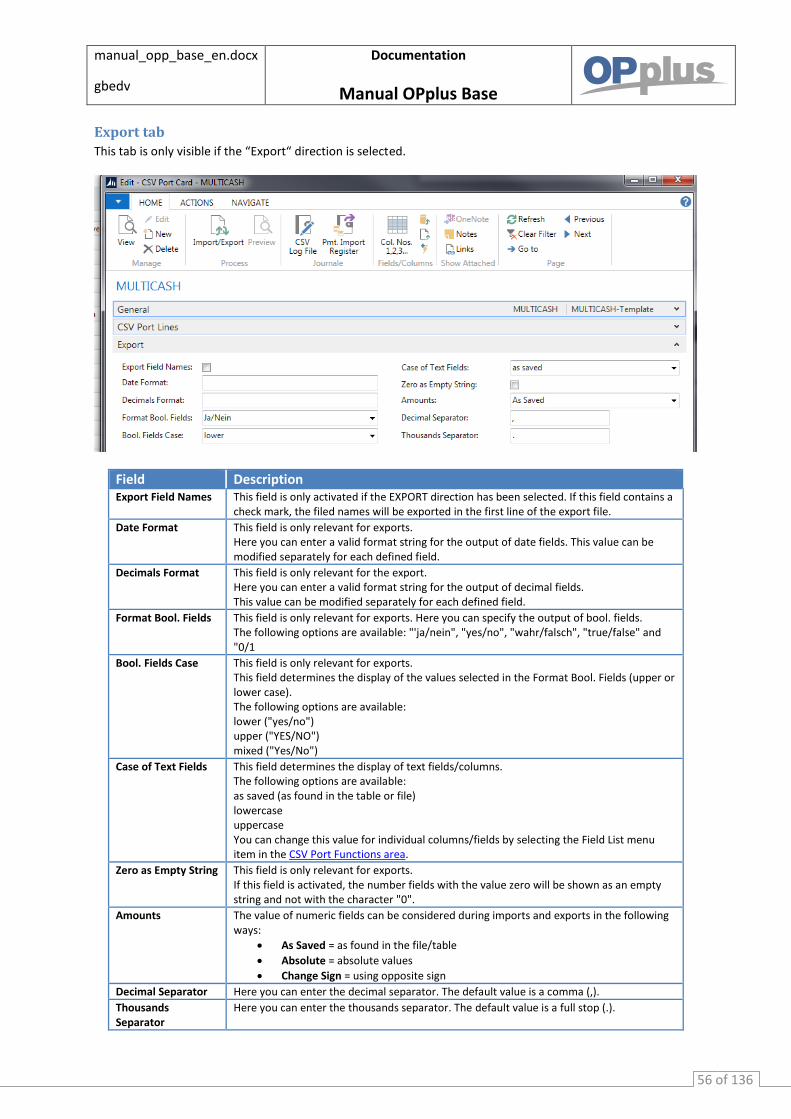
manual_opp_base_en.docx
gbedv
Documentation
Manual OPplus Base
56 of 136
Export tab
This tab is only visible if the “Export“ direction is selected.
Field Description Export Field Names This field is only activated if the EXPORT direction has been selected. If this field contains a
check mark, the filed names will be exported in the first line of the export file.
Date Format This field is only relevant for exports. Here you can enter a valid format string for the output of date fields. This value can be modified separately for each defined field.
Decimals Format This field is only relevant for the export. Here you can enter a valid format string for the output of decimal fields. This value can be modified separately for each defined field.
Format Bool. Fields This field is only relevant for exports. Here you can specify the output of bool. fields. The following options are available: "'ja/nein", "yes/no", "wahr/falsch", "true/false" and "0/1
Bool. Fields Case This field is only relevant for exports. This field determines the display of the values selected in the Format Bool. Fields (upper or lower case). The following options are available: lower ("yes/no") upper ("YES/NO") mixed ("Yes/No")
Case of Text Fields This field determines the display of text fields/columns. The following options are available: as saved (as found in the table or file) lowercase uppercase You can change this value for individual columns/fields by selecting the Field List menu item in the CSV Port Functions area.
Zero as Empty String This field is only relevant for exports. If this field is activated, the number fields with the value zero will be shown as an empty string and not with the character "0".
Amounts The value of numeric fields can be considered during imports and exports in the following ways:
As Saved = as found in the file/table
Absolute = absolute values
Change Sign = using opposite sign
Decimal Separator Here you can enter the decimal separator. The default value is a comma (,).
Thousands Separator
Here you can enter the thousands separator. The default value is a full stop (.).
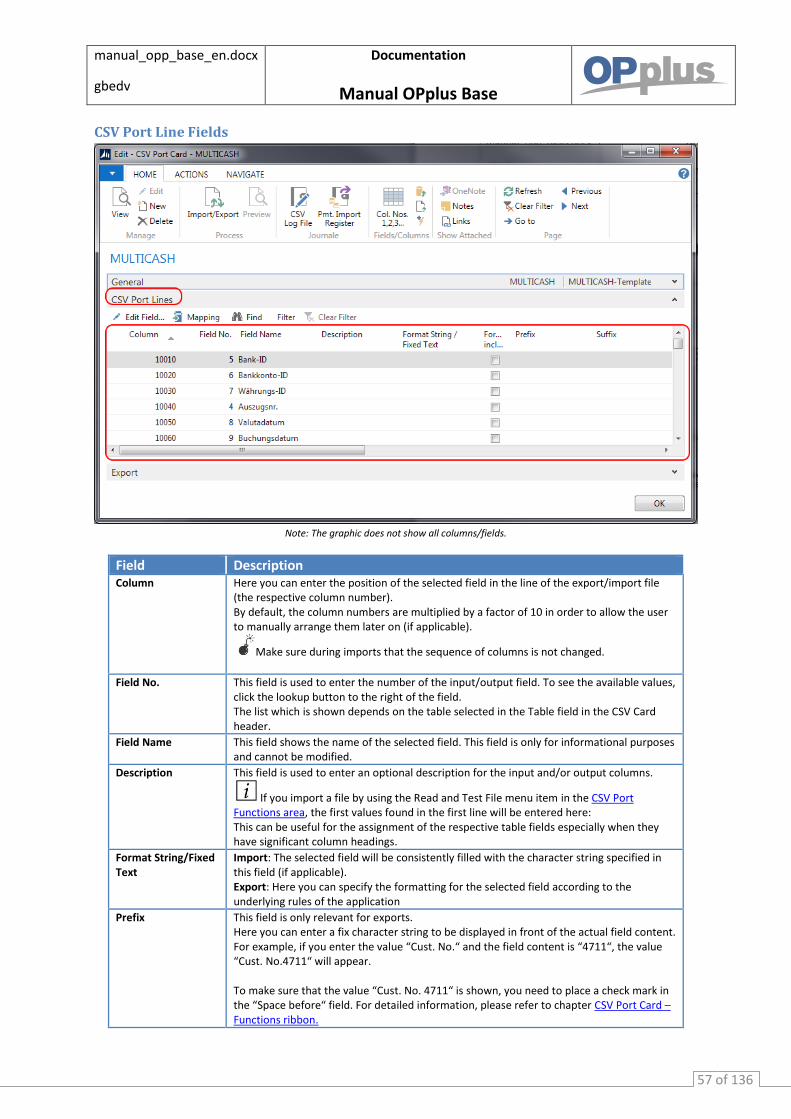
manual_opp_base_en.docx
gbedv
Documentation
Manual OPplus Base
57 of 136
CSV Port Line Fields
Note: The graphic does not show all columns/fields.
Field Description Column Here you can enter the position of the selected field in the line of the export/import file
(the respective column number). By default, the column numbers are multiplied by a factor of 10 in order to allow the user to manually arrange them later on (if applicable).
Make sure during imports that the sequence of columns is not changed.
Field No. This field is used to enter the number of the input/output field. To see the available values, click the lookup button to the right of the field. The list which is shown depends on the table selected in the Table field in the CSV Card header.
Field Name This field shows the name of the selected field. This field is only for informational purposes and cannot be modified.
Description This field is used to enter an optional description for the input and/or output columns.
If you import a file by using the Read and Test File menu item in the CSV Port Functions area, the first values found in the first line will be entered here: This can be useful for the assignment of the respective table fields especially when they have significant column headings.
Format String/Fixed Text
Import: The selected field will be consistently filled with the character string specified in this field (if applicable). Export: Here you can specify the formatting for the selected field according to the underlying rules of the application
Prefix This field is only relevant for exports. Here you can enter a fix character string to be displayed in front of the actual field content. For example, if you enter the value “Cust. No.“ and the field content is “4711“, the value “Cust. No.4711“ will appear. To make sure that the value “Cust. No. 4711“ is shown, you need to place a check mark in the “Space before“ field. For detailed information, please refer to chapter CSV Port Card –Functions ribbon.

manual_opp_base_en.docx
gbedv
Documentation
Manual OPplus Base
58 of 136
Suffix This field is only relevant for exports. Here you can enter a fix character string to be displayed after the actual field content. For example, if you enter the value “EUR“ and the field content is “22.54“, the value “22.54EUR“ will appear. To make sure that the value “22.54 EUR“ is shown, you need to place a check mark in the “Space after“ field. For detailed information, please refer to chapter CSV Port Card –Functions ribbon.
Filter This field is only relevant for the export. Here you can specify a filter for the selected field according to the underlying rules of the application.
Fieldlength If you enter a value in this field, the field contents will be limited to the number of characters. If the field content is larger, the last characters will be truncated accordingly.
Factor If you enter a factor, the numerical values are multiplied by this factor. For example, you can reverse the sign of the factor “-1”.
From Column If you need only a certain part of a value, you can use the “From Column” field. You can enter a value to consider the value starting from this position. Example:
From Column = 5
Text = 1234TestTest1234
The text “TestTest1234“ will be considered.
To Column If you need only a certain part of a value, you can use the “To Column” field. You can enter a value to consider the value ending at this position. Example:
To Column = 12
Text = 1234TestTest1234 The text “1234TestTest“ will be considered.
Column Width If you need only a certain part of a value, you can use the “From Column” and “To Column” fields. This way, you get the column width. Example:
From Column = 5
To Column = 12
Text = 1234TestTest1234 The text “TestTest“ will be used.
Don´t Validate If this field contains a check mark, the value in NAV will be imported without validate.
Filter to ignore Record
If you do not want to transfer certain values, you can enter a filter text here. If you have specified a filter text, the line will not be imported or exported..
Custom. Proc. ID In this field, the customer can enter a specific function number, which must be then re-programmed during processing.
For example, you have the predefined function ”999”. When performing a bank import in the CSV import, the references can also be imported. Now it happens that there are files that have a lot of text in one line – more than it is possible in NAV for each field. If you enter the function “999”, the system makes sure that the complete text is shown in the existing purpose lines preventing them from being truncated.
Used for Fieldlink If this field contains a check mark, you need to provide a link in the CSV Port Mapping.
Formula included If this field contains a check mark, then the ”Format String/Fixed Text” field contains a formula which is to be analyzed. The system initiates a calculation of this formula instead of showing the fix text of the field.
Suppress Import: This column will be skipped during import even though it is included in the file. Export: This field will be excluded during export.
If required, the user can make further specifications for each line by selecting the Function button → Field List menu item. For more information, please refer to chapter CSV Port Card – Functions ribbon.
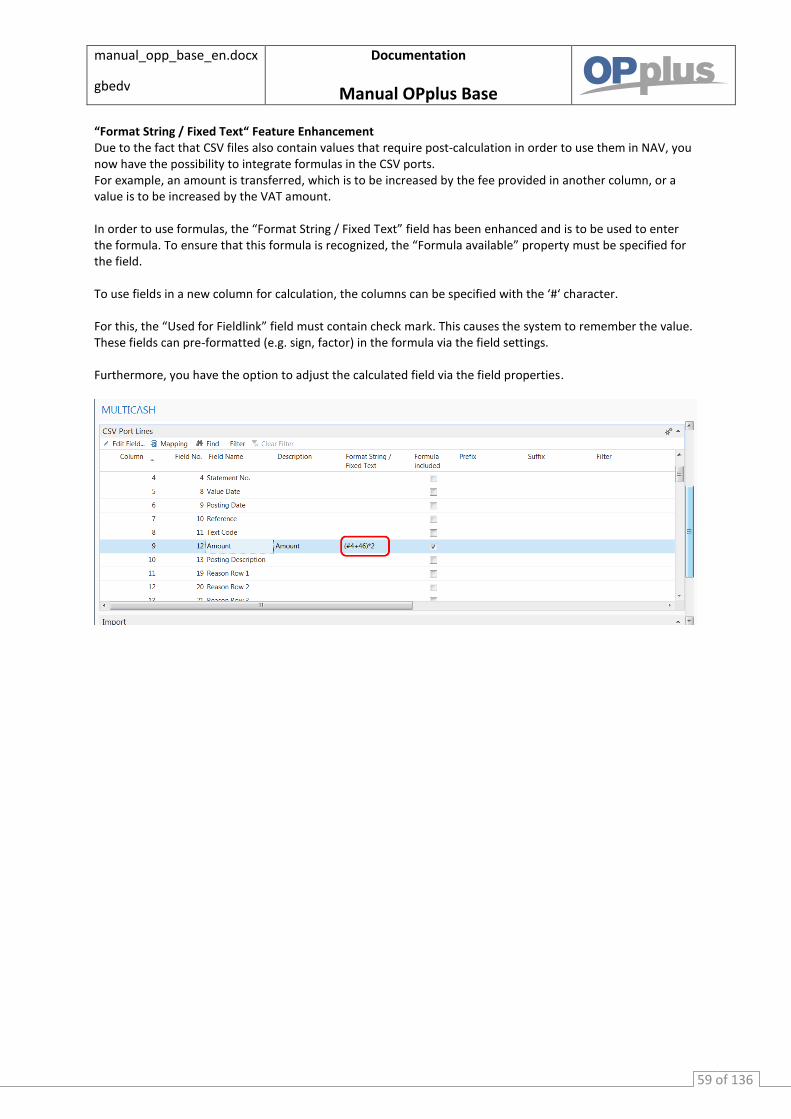
manual_opp_base_en.docx
gbedv
Documentation
Manual OPplus Base
59 of 136
“Format String / Fixed Text“ Feature Enhancement Due to the fact that CSV files also contain values that require post-calculation in order to use them in NAV, you now have the possibility to integrate formulas in the CSV ports. For example, an amount is transferred, which is to be increased by the fee provided in another column, or a value is to be increased by the VAT amount. In order to use formulas, the “Format String / Fixed Text” field has been enhanced and is to be used to enter the formula. To ensure that this formula is recognized, the “Formula available” property must be specified for the field. To use fields in a new column for calculation, the columns can be specified with the ‘#‘ character. For this, the “Used for Fieldlink” field must contain check mark. This causes the system to remember the value. These fields can pre-formatted (e.g. sign, factor) in the formula via the field settings. Furthermore, you have the option to adjust the calculated field via the field properties.
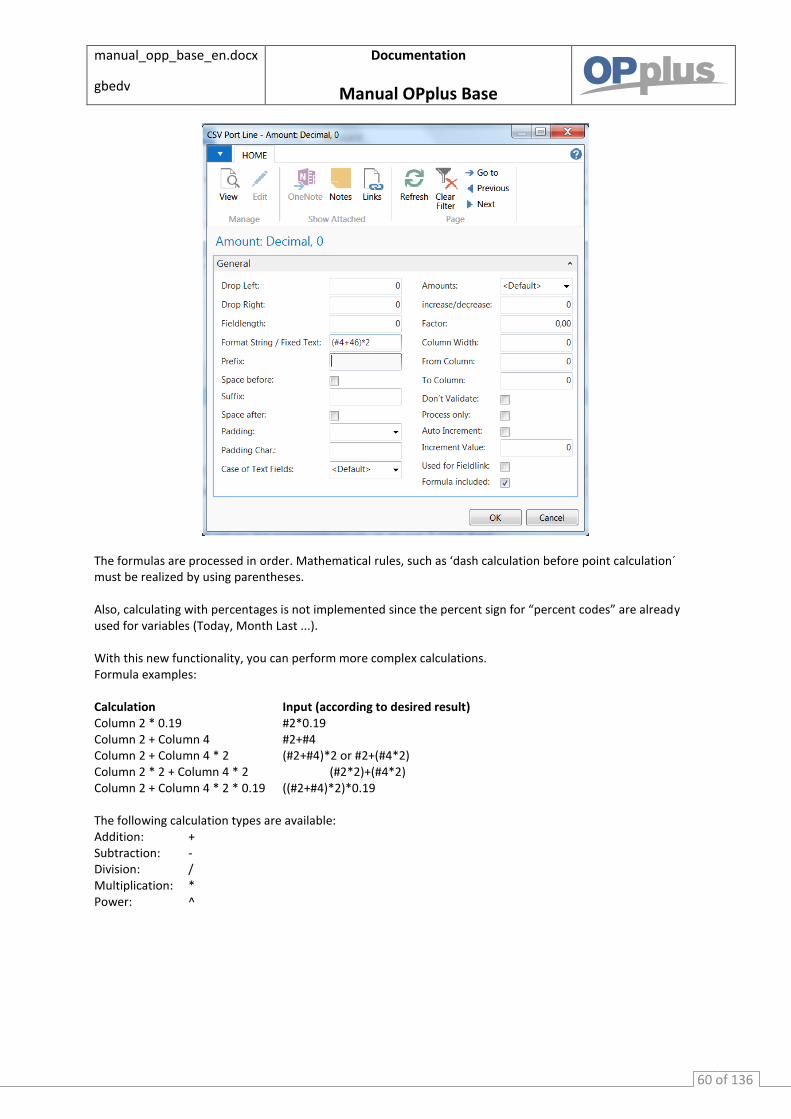
manual_opp_base_en.docx
gbedv
Documentation
Manual OPplus Base
60 of 136
The formulas are processed in order. Mathematical rules, such as ‘dash calculation before point calculation´ must be realized by using parentheses. Also, calculating with percentages is not implemented since the percent sign for “percent codes” are already used for variables (Today, Month Last ...). With this new functionality, you can perform more complex calculations. Formula examples: Calculation Input (according to desired result) Column 2 * 0.19 #2*0.19 Column 2 + Column 4 #2+#4 Column 2 + Column 4 * 2 (#2+#4)*2 or #2+(#4*2) Column 2 * 2 + Column 4 * 2 (#2*2)+(#4*2) Column 2 + Column 4 * 2 * 0.19 ((#2+#4)*2)*0.19 The following calculation types are available: Addition: + Subtraction: - Division: / Multiplication: * Power: ^
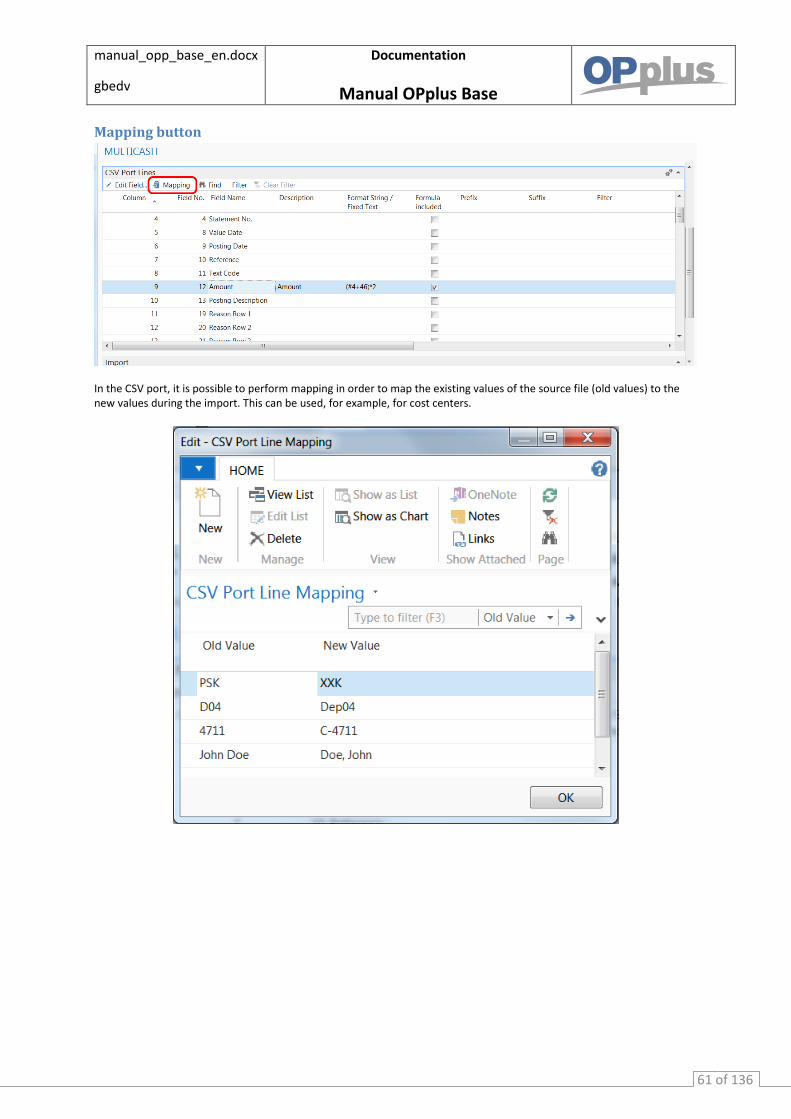
manual_opp_base_en.docx
gbedv
Documentation
Manual OPplus Base
61 of 136
Mapping button
In the CSV port, it is possible to perform mapping in order to map the existing values of the source file (old values) to the new values during the import. This can be used, for example, for cost centers.
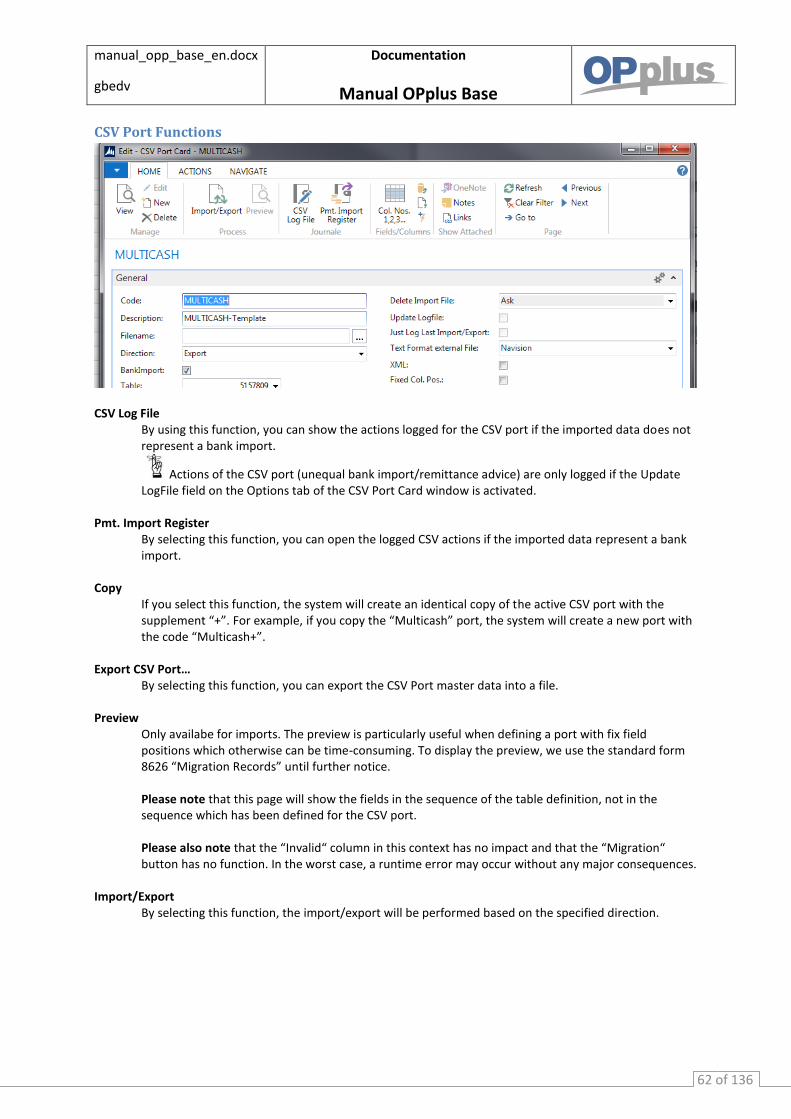
manual_opp_base_en.docx
gbedv
Documentation
Manual OPplus Base
62 of 136
CSV Port Functions
CSV Log File
By using this function, you can show the actions logged for the CSV port if the imported data does not represent a bank import.
Actions of the CSV port (unequal bank import/remittance advice) are only logged if the Update LogFile field on the Options tab of the CSV Port Card window is activated.
Pmt. Import Register
By selecting this function, you can open the logged CSV actions if the imported data represent a bank import.
Copy
If you select this function, the system will create an identical copy of the active CSV port with the supplement “+”. For example, if you copy the “Multicash” port, the system will create a new port with the code “Multicash+”.
Export CSV Port…
By selecting this function, you can export the CSV Port master data into a file. Preview
Only availabe for imports. The preview is particularly useful when defining a port with fix field positions which otherwise can be time-consuming. To display the preview, we use the standard form 8626 “Migration Records” until further notice. Please note that this page will show the fields in the sequence of the table definition, not in the sequence which has been defined for the CSV port. Please also note that the “Invalid“ column in this context has no impact and that the “Migration“ button has no function. In the worst case, a runtime error may occur without any major consequences.
Import/Export By selecting this function, the import/export will be performed based on the specified direction.

manual_opp_base_en.docx
gbedv
Documentation
Manual OPplus Base
63 of 136
Fields/Columns
All active placing the “Process only” field for all lines to NO
Mark all columns processing only placing the “Process only“ field or all lines to YES
Validate All Columns placing the “Don’t validate“ field for all lines to NO
Validate No Column placing the “Don’t validate“ field for all lines to YES
Col. Nos. 1,2,3… numbering the “Column“ field starting with 1. The shown sorting will remain.
Col. Nos. 10,20,30… numbering the “Column“ field starting with 10. The shown sorting will remain.
Fields/Columns New The menu options of the “Fields/Columns New“ menu can be used to rebuild the definition of the fields/columns for the CSV port.
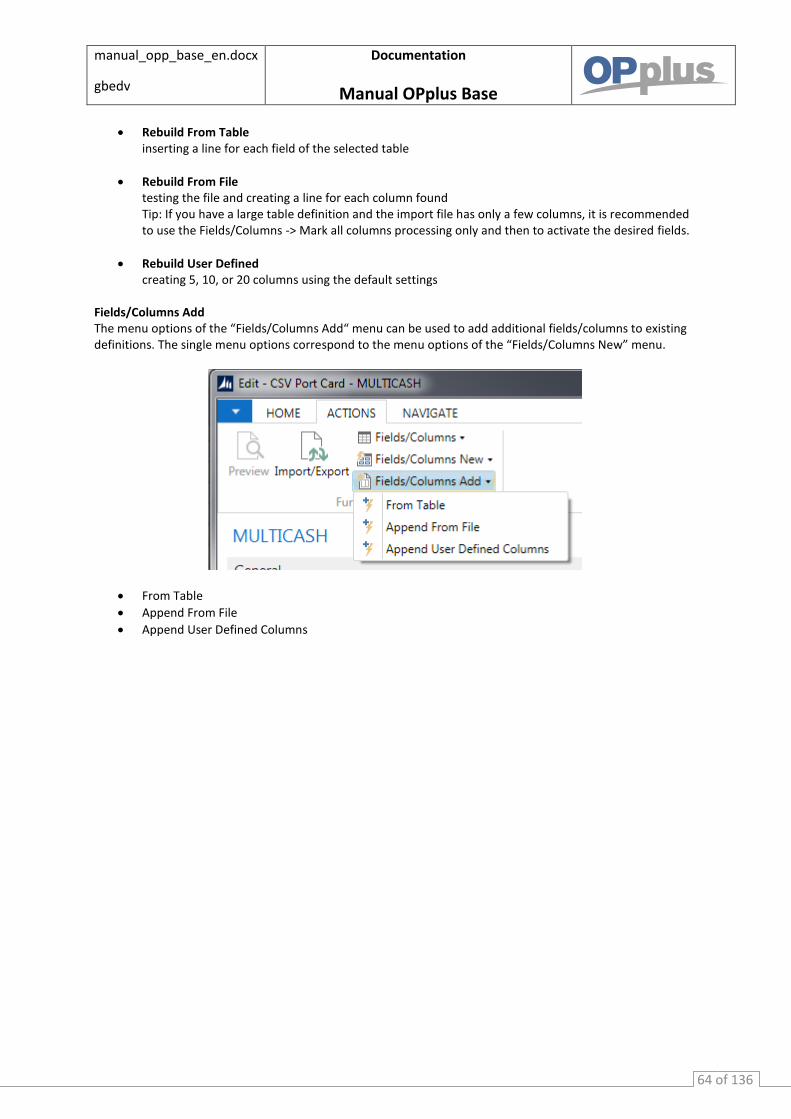
manual_opp_base_en.docx
gbedv
Documentation
Manual OPplus Base
64 of 136
Rebuild From Table inserting a line for each field of the selected table
Rebuild From File testing the file and creating a line for each column found Tip: If you have a large table definition and the import file has only a few columns, it is recommended to use the Fields/Columns -> Mark all columns processing only and then to activate the desired fields.
Rebuild User Defined creating 5, 10, or 20 columns using the default settings
Fields/Columns Add The menu options of the “Fields/Columns Add“ menu can be used to add additional fields/columns to existing definitions. The single menu options correspond to the menu options of the “Fields/Columns New” menu.
From Table
Append From File
Append User Defined Columns
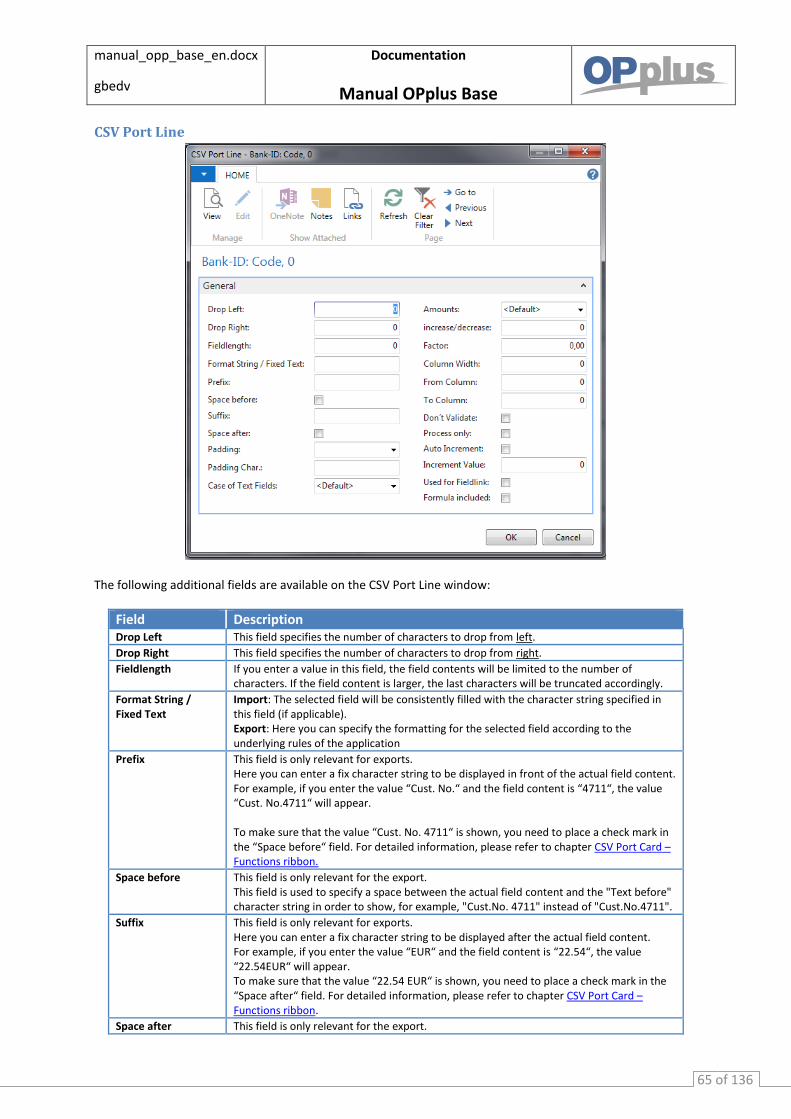
manual_opp_base_en.docx
gbedv
Documentation
Manual OPplus Base
65 of 136
CSV Port Line
The following additional fields are available on the CSV Port Line window:
Field Description Drop Left This field specifies the number of characters to drop from left.
Drop Right This field specifies the number of characters to drop from right.
Fieldlength If you enter a value in this field, the field contents will be limited to the number of characters. If the field content is larger, the last characters will be truncated accordingly.
Format String / Fixed Text
Import: The selected field will be consistently filled with the character string specified in this field (if applicable). Export: Here you can specify the formatting for the selected field according to the underlying rules of the application
Prefix This field is only relevant for exports. Here you can enter a fix character string to be displayed in front of the actual field content. For example, if you enter the value “Cust. No.“ and the field content is “4711“, the value “Cust. No.4711“ will appear. To make sure that the value “Cust. No. 4711“ is shown, you need to place a check mark in the “Space before“ field. For detailed information, please refer to chapter CSV Port Card –Functions ribbon.
Space before This field is only relevant for the export. This field is used to specify a space between the actual field content and the "Text before" character string in order to show, for example, "Cust.No. 4711" instead of "Cust.No.4711".
Suffix This field is only relevant for exports. Here you can enter a fix character string to be displayed after the actual field content. For example, if you enter the value “EUR“ and the field content is “22.54“, the value “22.54EUR“ will appear. To make sure that the value “22.54 EUR“ is shown, you need to place a check mark in the “Space after“ field. For detailed information, please refer to chapter CSV Port Card –Functions ribbon.
Space after This field is only relevant for the export.
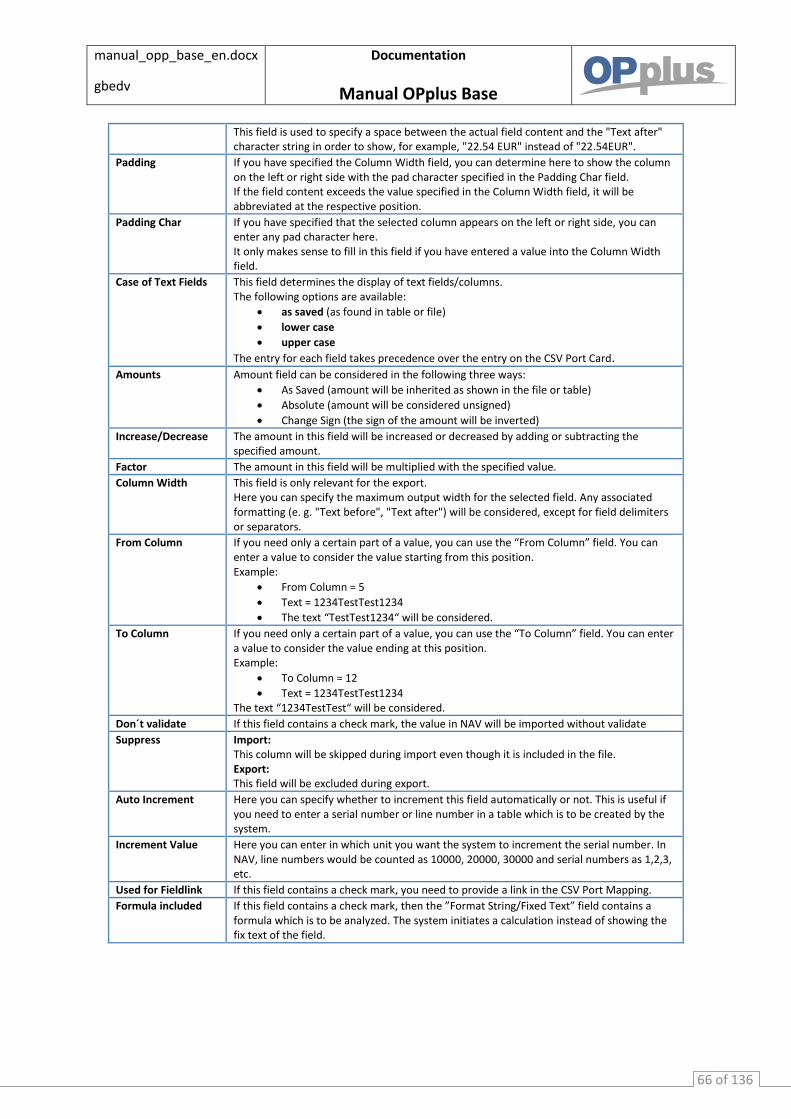
manual_opp_base_en.docx
gbedv
Documentation
Manual OPplus Base
66 of 136
This field is used to specify a space between the actual field content and the "Text after" character string in order to show, for example, "22.54 EUR" instead of "22.54EUR".
Padding If you have specified the Column Width field, you can determine here to show the column on the left or right side with the pad character specified in the Padding Char field. If the field content exceeds the value specified in the Column Width field, it will be abbreviated at the respective position.
Padding Char If you have specified that the selected column appears on the left or right side, you can enter any pad character here. It only makes sense to fill in this field if you have entered a value into the Column Width field.
Case of Text Fields This field determines the display of text fields/columns. The following options are available:
as saved (as found in table or file)
lower case
upper case
The entry for each field takes precedence over the entry on the CSV Port Card. Amounts Amount field can be considered in the following three ways:
As Saved (amount will be inherited as shown in the file or table)
Absolute (amount will be considered unsigned)
Change Sign (the sign of the amount will be inverted)
Increase/Decrease The amount in this field will be increased or decreased by adding or subtracting the specified amount.
Factor The amount in this field will be multiplied with the specified value.
Column Width This field is only relevant for the export. Here you can specify the maximum output width for the selected field. Any associated formatting (e. g. "Text before", "Text after") will be considered, except for field delimiters or separators.
From Column If you need only a certain part of a value, you can use the “From Column” field. You can enter a value to consider the value starting from this position. Example:
From Column = 5
Text = 1234TestTest1234
The text “TestTest1234“ will be considered.
To Column If you need only a certain part of a value, you can use the “To Column” field. You can enter a value to consider the value ending at this position. Example:
To Column = 12
Text = 1234TestTest1234 The text “1234TestTest“ will be considered.
Don´t validate If this field contains a check mark, the value in NAV will be imported without validate
Suppress Import: This column will be skipped during import even though it is included in the file. Export: This field will be excluded during export.
Auto Increment Here you can specify whether to increment this field automatically or not. This is useful if you need to enter a serial number or line number in a table which is to be created by the system.
Increment Value Here you can enter in which unit you want the system to increment the serial number. In NAV, line numbers would be counted as 10000, 20000, 30000 and serial numbers as 1,2,3, etc.
Used for Fieldlink If this field contains a check mark, you need to provide a link in the CSV Port Mapping.
Formula included If this field contains a check mark, then the ”Format String/Fixed Text” field contains a formula which is to be analyzed. The system initiates a calculation instead of showing the fix text of the field.
manual_opp_base_en.docx
gbedv
Documentation
Manual OPplus Base
67 of 136
Step-by-Step: Setting up a CSV Port for the Bank Import
Analyzing Statement File Open a sample of the external statement file by using an editor or a spreadsheet. Get an overview to see which field delimiters and character sets are used and if any superfluous headers and footers are included.
For this example, we assume that you have a CSV file in the ANSI character set with semicolons used as field delimiters. The first line shows the column headings whereas the last line includes the balance. Between these two lines, the amounts of an accounts are listed which is unknown to your bank import up to now.
It is recommended to use a copy of the statement file during setup since the system normally does not allow access to a CSV file which is already opened by showing an error message. This may also happen during regular operation if the file has been opened elsewhere for any reason.
manual_opp_base_en.docx
gbedv
Documentation
Manual OPplus Base
68 of 136
Creating CSV Port
Open OPplus → Base → Setup → CSV Port.
Enter a code and a description.
Specify the path and the name of the statement file.
Place a check mark in the "BankImport" field. The Direction, Table, and Sort By Key fields will be automatically filled with the required values.
Specify the Text Format External File field (by selecting the "Windows" option) and the Separator field (by entering a semicolon).
Creating CSV Port Lines
Now you must create a CSV Port line for each column of the statement file. This can be simply done by selecting the Read and Test File function (via the Function button). If the statement does not meet the technical requirements for the performance of a bank import, the system will stop the process and issue an error message.
If the process is performed successfully, the system will create a CSV Port line for each column of the statement file by filling in the Position and Description fields. The position number sequence is generously spaced which allows the user to enter additional fields subsequently. The values in the Description field originate from the first line of statement file. In this example, you will find the statement file's column headings listed one after another.
Assigning Lines and Columns In the following, you will have to assign the corresponding fields of the Pmt. Import Line table to the columns you want to inherit.
For this, click the lookup button in the Field No. field to open the CSV Port Field Selection window. The fields which have already been selected are shown in bold characters. Click the field you want to consider and then confirm and close the window by clicking the OK button.
Now you can see the number and the name of the field (in the Description field) in the CSV Port line.
Proceed the same way as described for the remaining lines.
It is not necessary to expressively mark any columns you want to skip with Suppress = Yes. As long as no field has been assigned to a line/column, it will be ignored during import. However, it is required to keep the exact column sorting of the statement file in the CSV Port lines. For the sake of completeness it should be mentioned that any columns which are located to the right of the last column to import may be deleted in your port without any damage. Please check if the Bank-ID (bank identification number), Bank Account-ID (bank account) and Currency-ID (currency code) fields which are mandatory for the bank import have been assigned. If not, you must manually adjust the content of these fields and then add the missing fields.
If the file does not include any bank account data, e. g. for payment advices, use a dummy value for the bank account and bank ID or enter the customer number instead.
Now you can start the import process by selecting the Import/Export menu item via the Function button.
Due to the column headings in the first line of our imaginary file, an error message appears. Now you must enter the value "1" into the Skip Lines field in the CSV Port header. The last line of the statement with the balance can be ignored as well. Therefore you can enter the value "1" into the Drop Lines field. Now the new CSV Port should meet the technical requirements.

manual_opp_base_en.docx
gbedv
Documentation
Manual OPplus Base
69 of 136
Setting Up the Pmt. Import Interface Now start the import process a second time and you will get the message “1 Pmt. Import Interface created”. This interface now needs to be released for further processing. For this, open the payment import interface list: Pmt. Import Interfaces. You will find the new created bank account in the end of the list.
First of all, fill in the "Import to Company" field only (you will find more information on the interface fine tuning options later on in this manual). Close the window, go back to the CSV Port Card window, select the Import/Export function for the last time, and close the CSV Port Card.
Checking the Import
You can see the import results in the payment import register: Pmt. Import Register.
Note on “Direct CSV Port Import into a Gen. Journal“
If you want to import a file directly into a general journal by using a CSV port, you need to consider the following:
Make sure that the “Bank Import” field is not activated so that the target table can be selected. If the field contains a check mark, the import table will be directly set to 5157809 “Pmt. Import Line”.
To import the data into a journal, you need to select table 81 “Gen. Journal Line”.
If the key fields (Jnl. Template Name, Journal Batch Name, Line Number) are not imported via the file, you need to append them below the field assignments.
To make sure that the line number is incremented and entered automatically, you can use the “Auto Increment” and “Increment Value” fields to specify the intervals.
Importing Pmt. Files (Account Transactions) This chapter describes the import process of account transactions from external files. Depending on the respective format as well as on the OPplus Setup values, the import process is performed via a number of different menu items.
Pmt. Import via CSV Port (with Standard Interface) If you have specified a standard interface with a valid file name, the following dialog box appears when you open the Pmt. Import via CSV Port:
Yes = The file specified in the standard interface will be imported. The corresponding entries will be logged in the Pmt. Import Register.
No = The list of available CSV Ports opens.
For the next steps to be performed, please refer to section Pmt. Import via CSV Port (without Standard Interface).
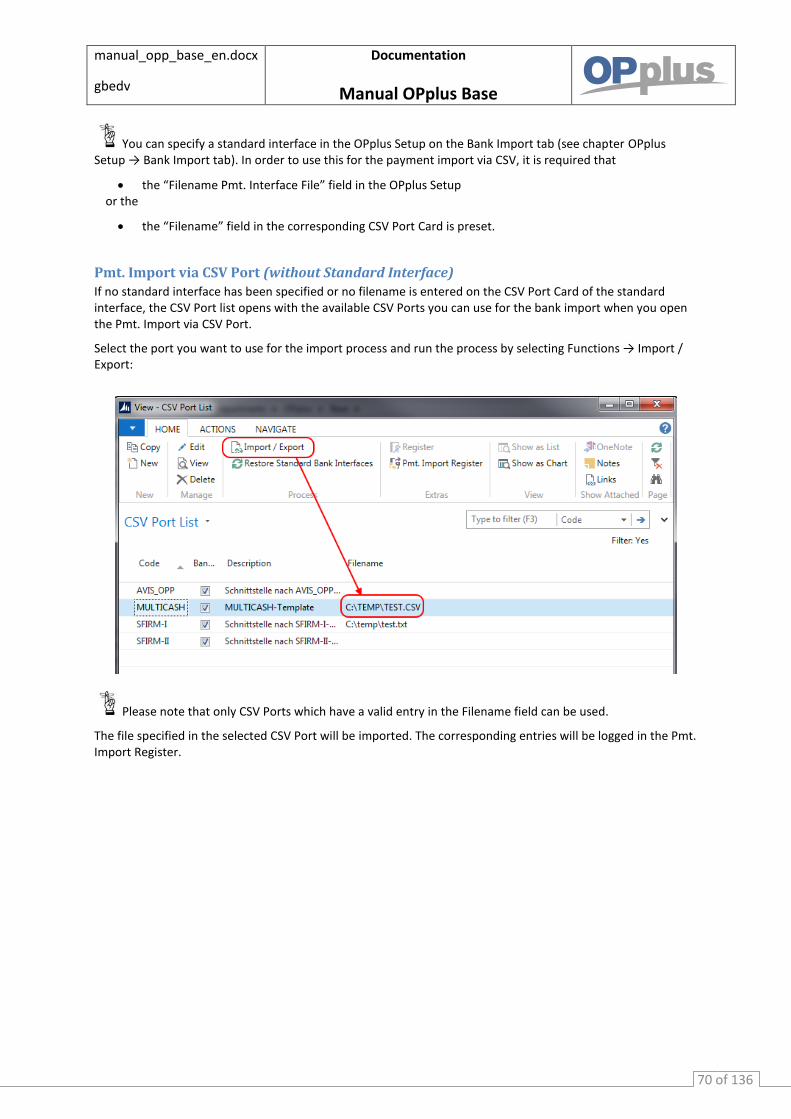
manual_opp_base_en.docx
gbedv
Documentation
Manual OPplus Base
70 of 136
You can specify a standard interface in the OPplus Setup on the Bank Import tab (see chapter OPplus Setup → Bank Import tab). In order to use this for the payment import via CSV, it is required that
the “Filename Pmt. Interface File” field in the OPplus Setup or the
the “Filename” field in the corresponding CSV Port Card is preset.
Pmt. Import via CSV Port (without Standard Interface) If no standard interface has been specified or no filename is entered on the CSV Port Card of the standard interface, the CSV Port list opens with the available CSV Ports you can use for the bank import when you open the Pmt. Import via CSV Port.
Select the port you want to use for the import process and run the process by selecting Functions → Import / Export:
Please note that only CSV Ports which have a valid entry in the Filename field can be used.
The file specified in the selected CSV Port will be imported. The corresponding entries will be logged in the Pmt. Import Register.
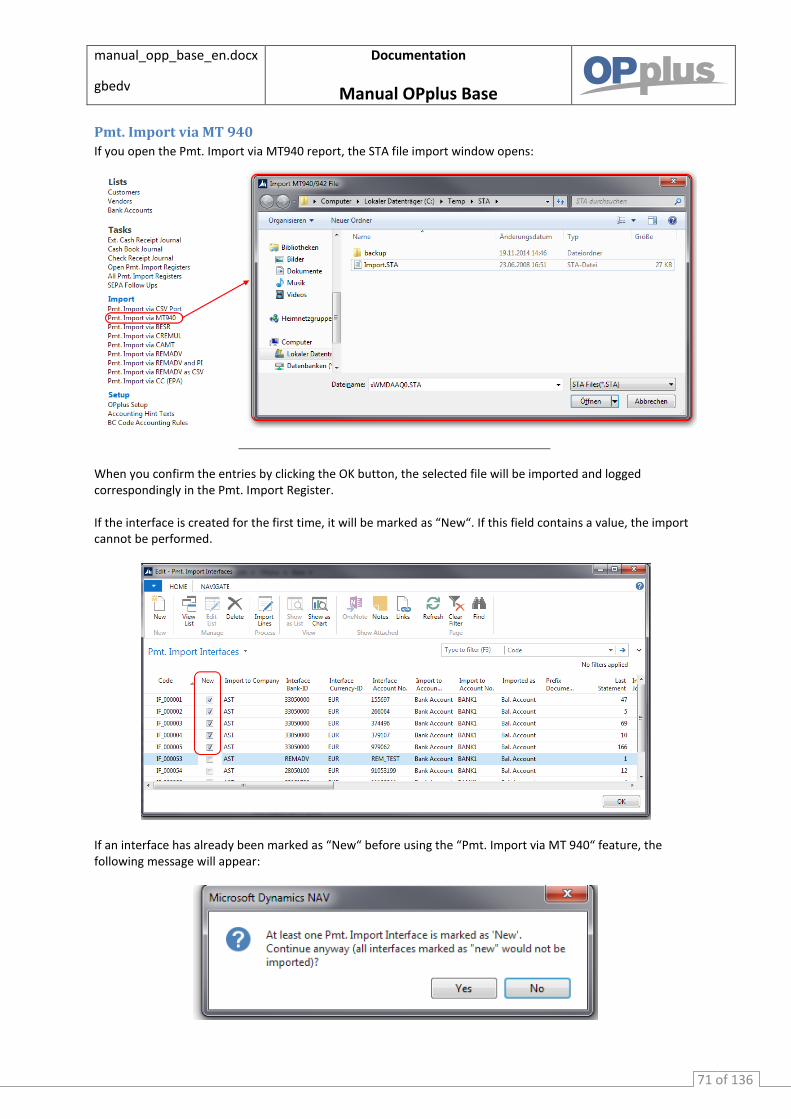
manual_opp_base_en.docx
gbedv
Documentation
Manual OPplus Base
71 of 136
Pmt. Import via MT 940
If you open the Pmt. Import via MT940 report, the STA file import window opens:
When you confirm the entries by clicking the OK button, the selected file will be imported and logged correspondingly in the Pmt. Import Register. If the interface is created for the first time, it will be marked as “New“. If this field contains a value, the import cannot be performed.
If an interface has already been marked as “New“ before using the “Pmt. Import via MT 940“ feature, the following message will appear:

manual_opp_base_en.docx
gbedv
Documentation
Manual OPplus Base
72 of 136
If you select “Yes“, the import will be performed. All interfaces already marked as “New“ will be skipped by the system. If you select “No“, the import will be stopped.
Background: If you want to import a company‘s bank data first and postpone the import of other banks, then the bank data of the correctly defined interface will be processed only. This field is only relevant for the MT940 import.
With the "Import MT940 Directory" function, you can import MT940 files of a complete directory in a single step. This function can be selected in the Pmt. Journal Register window. For a detailed description, please refer to section Import MT940 Directory.
Pmt. Import via BESR (Payment Import CH)
If you open the Pmt. Import via BESR report, the V11 file import window opens:
If you confirm with “Open“, the selected file will be imported and logged in the Pmt. Import Register.
Pmt. Import via CAMT
CAMT stands for “Cash Management” and is a messaging format of ISO 20022 UNIFI (Universal financial industry message scheme). If you open the Pmt. Import via CAMT report, the STA file import window opens:
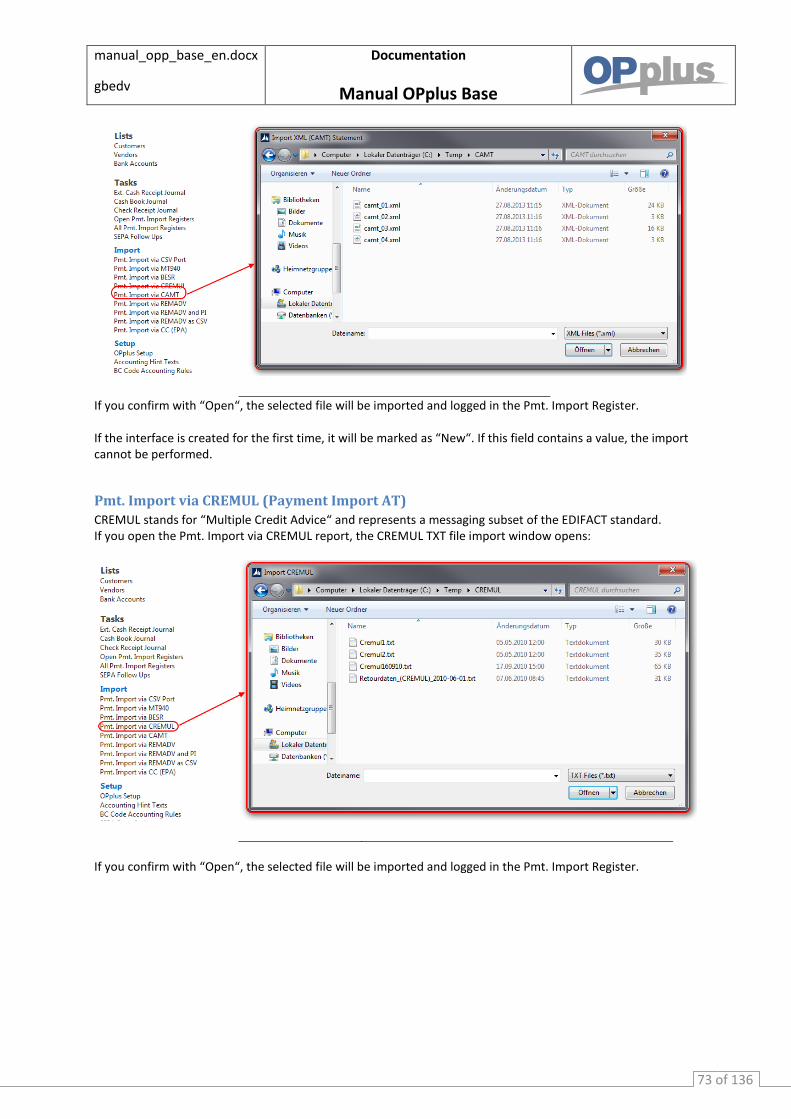
manual_opp_base_en.docx
gbedv
Documentation
Manual OPplus Base
73 of 136
If you confirm with “Open“, the selected file will be imported and logged in the Pmt. Import Register. If the interface is created for the first time, it will be marked as “New“. If this field contains a value, the import cannot be performed.
Pmt. Import via CREMUL (Payment Import AT)
CREMUL stands for “Multiple Credit Advice“ and represents a messaging subset of the EDIFACT standard. If you open the Pmt. Import via CREMUL report, the CREMUL TXT file import window opens:
If you confirm with “Open“, the selected file will be imported and logged in the Pmt. Import Register.
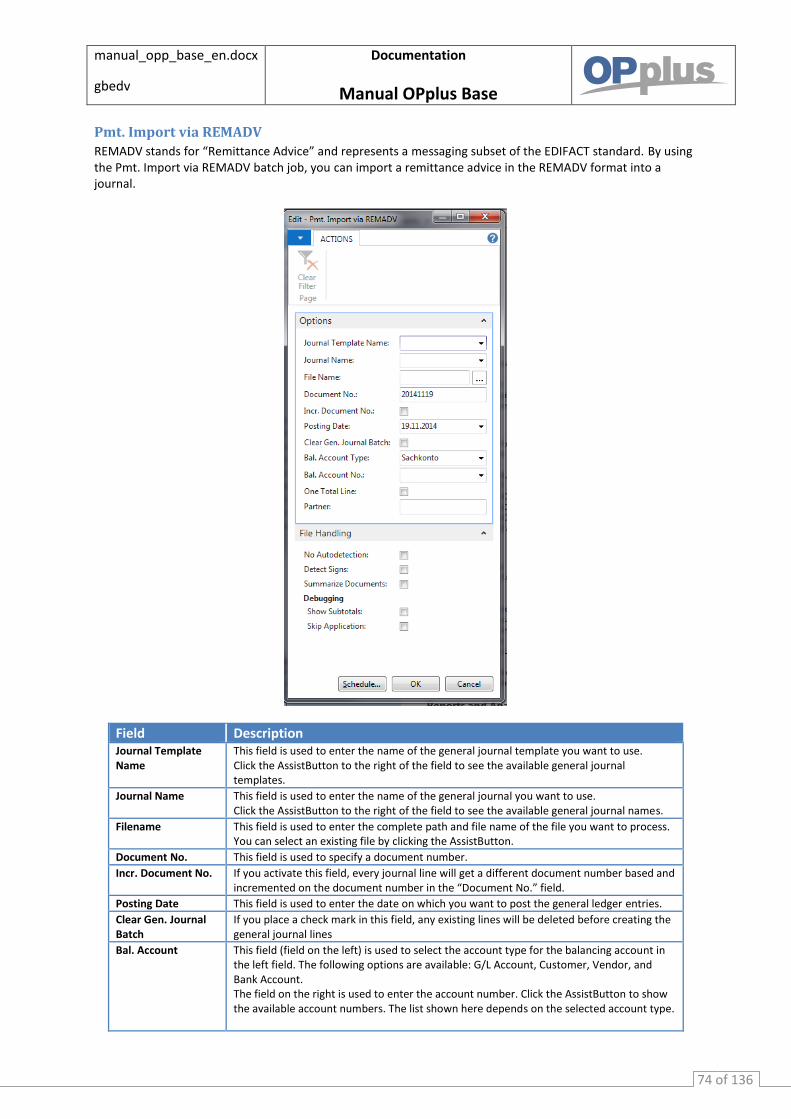
manual_opp_base_en.docx
gbedv
Documentation
Manual OPplus Base
74 of 136
Pmt. Import via REMADV
REMADV stands for “Remittance Advice” and represents a messaging subset of the EDIFACT standard. By using the Pmt. Import via REMADV batch job, you can import a remittance advice in the REMADV format into a journal.
Field Description Journal Template Name
This field is used to enter the name of the general journal template you want to use. Click the AssistButton to the right of the field to see the available general journal templates.
Journal Name This field is used to enter the name of the general journal you want to use. Click the AssistButton to the right of the field to see the available general journal names.
Filename This field is used to enter the complete path and file name of the file you want to process. You can select an existing file by clicking the AssistButton.
Document No. This field is used to specify a document number.
Incr. Document No. If you activate this field, every journal line will get a different document number based and incremented on the document number in the “Document No.” field.
Posting Date This field is used to enter the date on which you want to post the general ledger entries.
Clear Gen. Journal Batch
If you place a check mark in this field, any existing lines will be deleted before creating the general journal lines
Bal. Account This field (field on the left) is used to select the account type for the balancing account in the left field. The following options are available: G/L Account, Customer, Vendor, and Bank Account. The field on the right is used to enter the account number. Click the AssistButton to show the available account numbers. The list shown here depends on the selected account type.
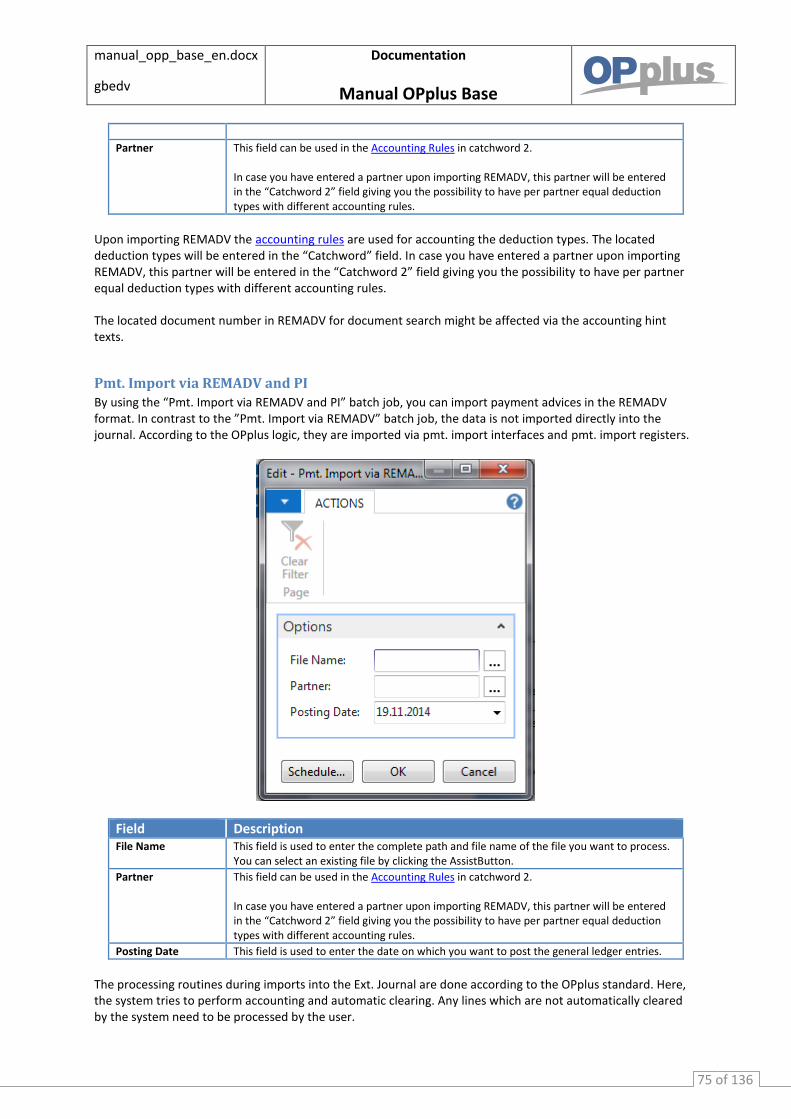
manual_opp_base_en.docx
gbedv
Documentation
Manual OPplus Base
75 of 136
Partner This field can be used in the Accounting Rules in catchword 2. In case you have entered a partner upon importing REMADV, this partner will be entered in the “Catchword 2” field giving you the possibility to have per partner equal deduction types with different accounting rules.
Upon importing REMADV the accounting rules are used for accounting the deduction types. The located deduction types will be entered in the “Catchword” field. In case you have entered a partner upon importing REMADV, this partner will be entered in the “Catchword 2” field giving you the possibility to have per partner equal deduction types with different accounting rules. The located document number in REMADV for document search might be affected via the accounting hint texts.
Pmt. Import via REMADV and PI
By using the “Pmt. Import via REMADV and PI” batch job, you can import payment advices in the REMADV format. In contrast to the ”Pmt. Import via REMADV” batch job, the data is not imported directly into the journal. According to the OPplus logic, they are imported via pmt. import interfaces and pmt. import registers.
Field Description File Name This field is used to enter the complete path and file name of the file you want to process.
You can select an existing file by clicking the AssistButton.
Partner This field can be used in the Accounting Rules in catchword 2. In case you have entered a partner upon importing REMADV, this partner will be entered in the “Catchword 2” field giving you the possibility to have per partner equal deduction types with different accounting rules.
Posting Date This field is used to enter the date on which you want to post the general ledger entries.
The processing routines during imports into the Ext. Journal are done according to the OPplus standard. Here, the system tries to perform accounting and automatic clearing. Any lines which are not automatically cleared by the system need to be processed by the user.
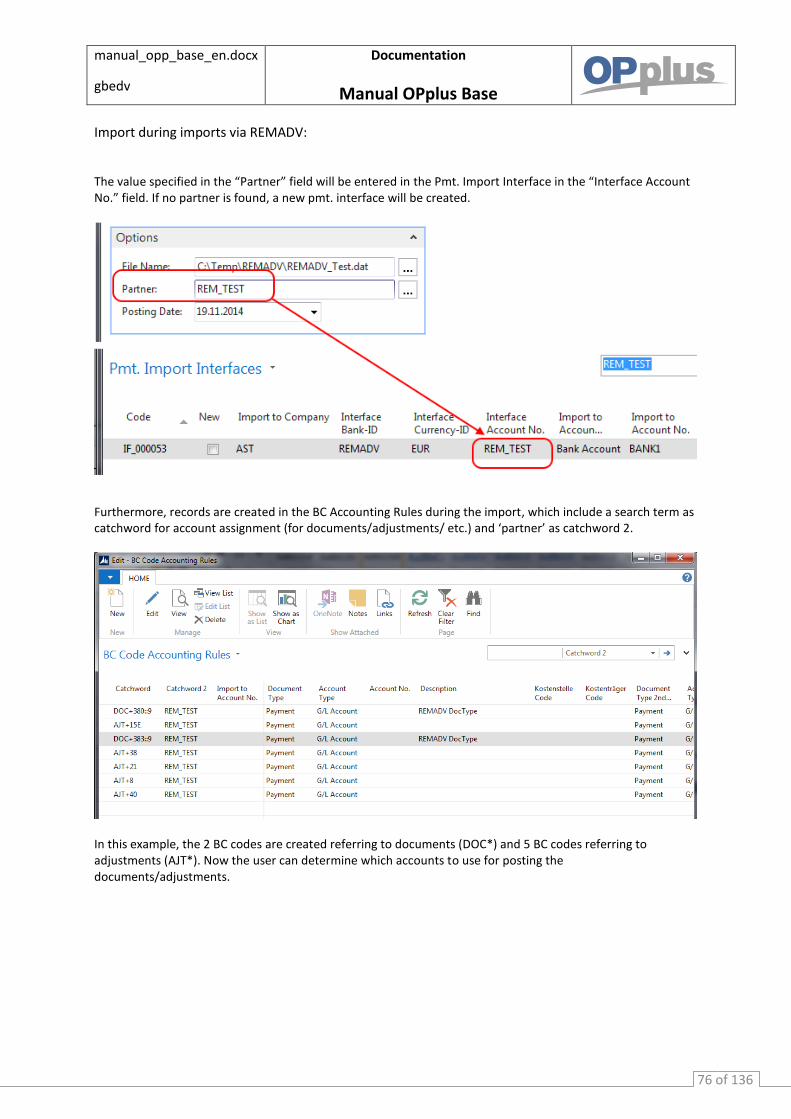
manual_opp_base_en.docx
gbedv
Documentation
Manual OPplus Base
76 of 136
Import during imports via REMADV:
The value specified in the “Partner” field will be entered in the Pmt. Import Interface in the “Interface Account No.” field. If no partner is found, a new pmt. interface will be created.
Furthermore, records are created in the BC Accounting Rules during the import, which include a search term as catchword for account assignment (for documents/adjustments/ etc.) and ‘partner’ as catchword 2.
In this example, the 2 BC codes are created referring to documents (DOC*) and 5 BC codes referring to adjustments (AJT*). Now the user can determine which accounts to use for posting the documents/adjustments.
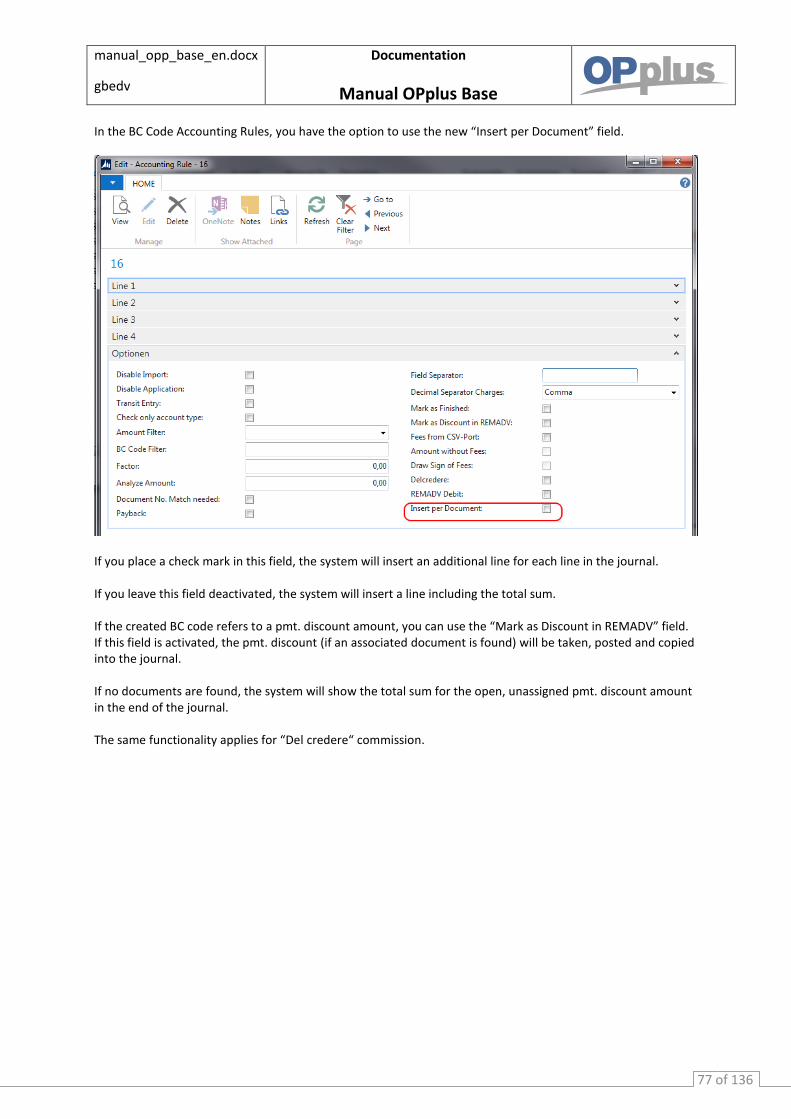
manual_opp_base_en.docx
gbedv
Documentation
Manual OPplus Base
77 of 136
In the BC Code Accounting Rules, you have the option to use the new “Insert per Document” field.
If you place a check mark in this field, the system will insert an additional line for each line in the journal. If you leave this field deactivated, the system will insert a line including the total sum. If the created BC code refers to a pmt. discount amount, you can use the “Mark as Discount in REMADV” field. If this field is activated, the pmt. discount (if an associated document is found) will be taken, posted and copied into the journal. If no documents are found, the system will show the total sum for the open, unassigned pmt. discount amount in the end of the journal. The same functionality applies for “Del credere“ commission.
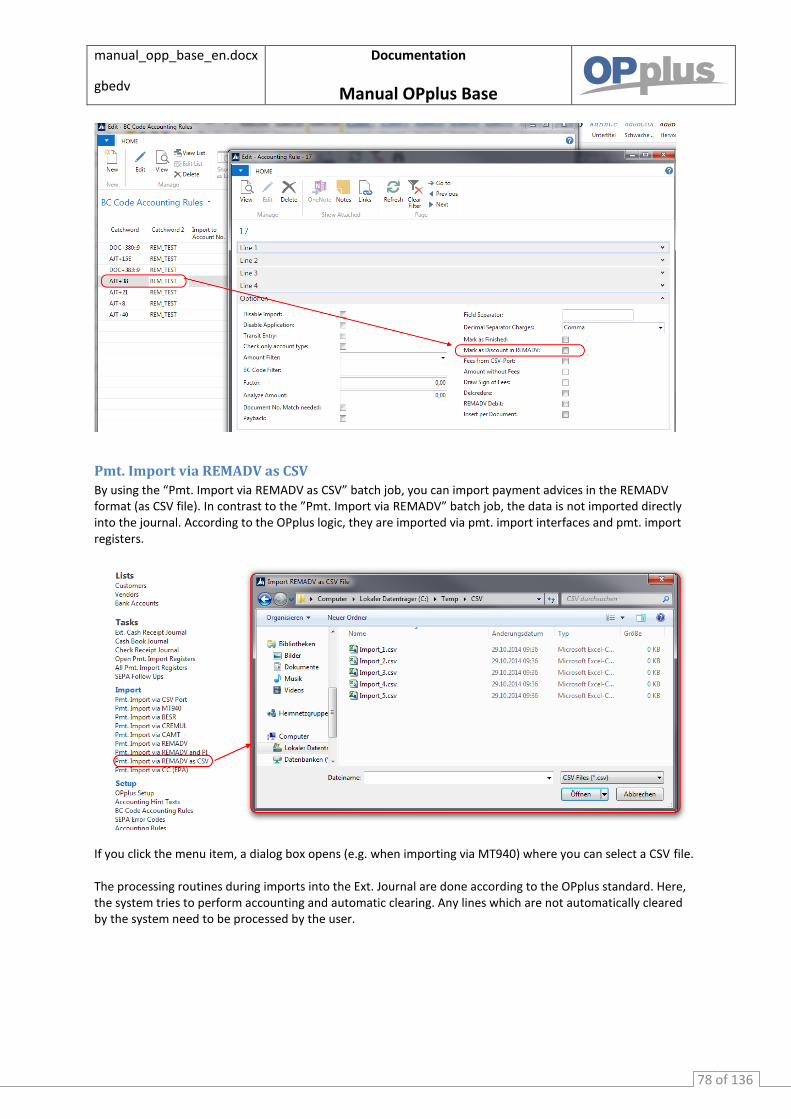
manual_opp_base_en.docx
gbedv
Documentation
Manual OPplus Base
78 of 136
Pmt. Import via REMADV as CSV
By using the “Pmt. Import via REMADV as CSV” batch job, you can import payment advices in the REMADV format (as CSV file). In contrast to the ”Pmt. Import via REMADV” batch job, the data is not imported directly into the journal. According to the OPplus logic, they are imported via pmt. import interfaces and pmt. import registers.
If you click the menu item, a dialog box opens (e.g. when importing via MT940) where you can select a CSV file. The processing routines during imports into the Ext. Journal are done according to the OPplus standard. Here, the system tries to perform accounting and automatic clearing. Any lines which are not automatically cleared by the system need to be processed by the user.
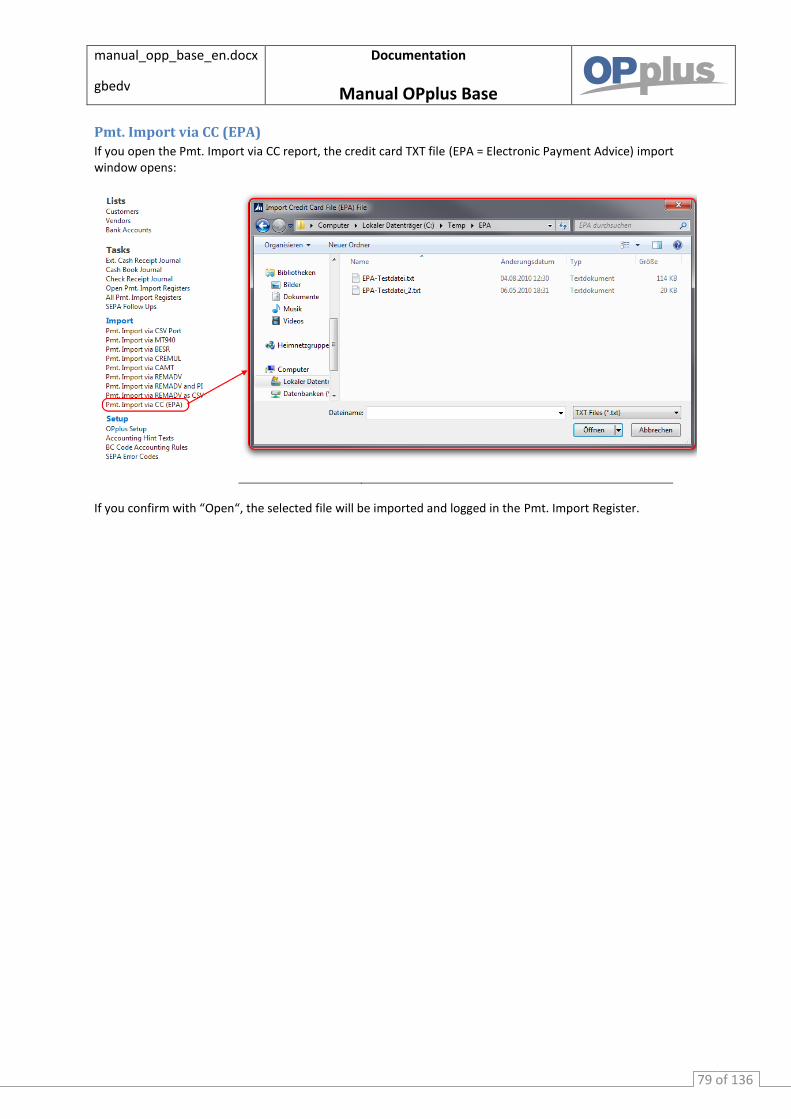
manual_opp_base_en.docx
gbedv
Documentation
Manual OPplus Base
79 of 136
Pmt. Import via CC (EPA)
If you open the Pmt. Import via CC report, the credit card TXT file (EPA = Electronic Payment Advice) import window opens:
If you confirm with “Open“, the selected file will be imported and logged in the Pmt. Import Register.

manual_opp_base_en.docx
gbedv
Documentation
Manual OPplus Base
80 of 136
Open Pmt. Import Registers By using the Open Pmt. Import Registers table, you can show all imported open files of the CSV ports for bank import /advice as well as all imported files of the MT940 format. Pmt. import registers are considered as “open” where the “No. of not posted Lines” field is not “0”. For each account number, you will find a separate entry in the external file. It is also possible to import several MT940 files in one step by clicking the Function button. For more details, see below.
Note: The graphic does not show all columns/fields.
Field Description No. The number of the pmt. import register is used for unique identification. The value is filled
by the system and cannot be modified later on.
The value originates from the number series which has been assigned for pmt. import registers in the OPplus Setup before using them the first time.
File Format Shows the related file format during the import The value is filled by the system and cannot be modified later on.
Filename Original path and name of the file processed by the import
Pmt. Import Interface
Displays the associated pmt. import interface You can browse into the details of the pmt. import interface by clicking the AssistButton to the right of the field.
No. of Lines imported
Number of entries which have been imported during the import into the Pmt. Import Line table. You can display the pmt. import lines which have been considered for calculation by clicking the AssistButton to the right of the field.
No. of posted Lines Shows the number of associated lines which have been posted
Amount Total of entries which have been entered during the import into the Pmt. Import Line table. You can display the pmt. import lines which have been considered for calculation by clicking the AssistButton to the right of the field
Import in Account No.
Number of bank account to which the associated lines have been imported
Statement No. Associated bank account statement number of the import file
Total No. of Entries Total number of entries which have been found in the external file during the import
Import Date Date of the shown import process
Time Time of the shown import process
User ID Identifies the user who initiated the shown import process
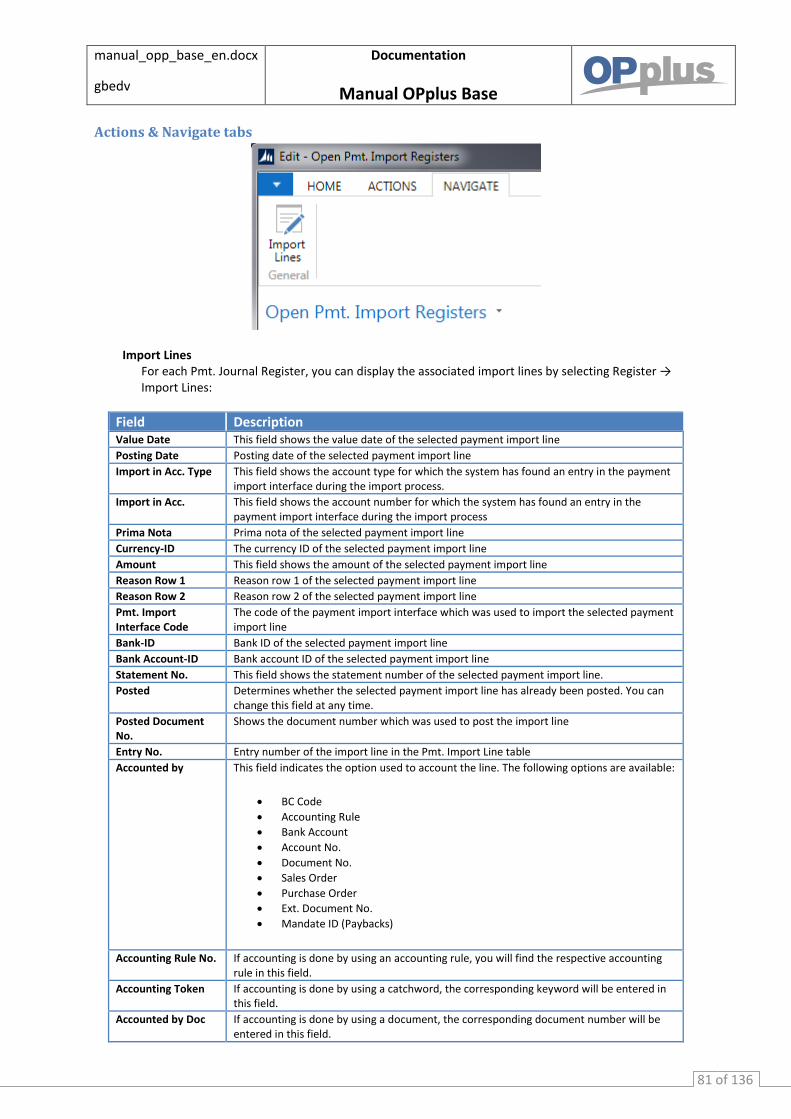
manual_opp_base_en.docx
gbedv
Documentation
Manual OPplus Base
81 of 136
Actions & Navigate tabs
Import Lines For each Pmt. Journal Register, you can display the associated import lines by selecting Register → Import Lines:
Field Description Value Date This field shows the value date of the selected payment import line
Posting Date Posting date of the selected payment import line
Import in Acc. Type This field shows the account type for which the system has found an entry in the payment import interface during the import process.
Import in Acc. This field shows the account number for which the system has found an entry in the payment import interface during the import process
Prima Nota Prima nota of the selected payment import line
Currency-ID The currency ID of the selected payment import line
Amount This field shows the amount of the selected payment import line
Reason Row 1 Reason row 1 of the selected payment import line
Reason Row 2 Reason row 2 of the selected payment import line
Pmt. Import Interface Code
The code of the payment import interface which was used to import the selected payment import line
Bank-ID Bank ID of the selected payment import line
Bank Account-ID Bank account ID of the selected payment import line
Statement No. This field shows the statement number of the selected payment import line.
Posted Determines whether the selected payment import line has already been posted. You can change this field at any time.
Posted Document No.
Shows the document number which was used to post the import line
Entry No. Entry number of the import line in the Pmt. Import Line table
Accounted by This field indicates the option used to account the line. The following options are available:
BC Code
Accounting Rule
Bank Account
Account No.
Document No.
Sales Order
Purchase Order
Ext. Document No.
Mandate ID (Paybacks)
Accounting Rule No. If accounting is done by using an accounting rule, you will find the respective accounting rule in this field.
Accounting Token If accounting is done by using a catchword, the corresponding keyword will be entered in this field.
Accounted by Doc If accounting is done by using a document, the corresponding document number will be entered in this field.

manual_opp_base_en.docx
gbedv
Documentation
Manual OPplus Base
82 of 136
Mandate ID (MREF) This field shows the MREF (mandate reference) if provided.
EndToEndID (EREF) This field shows the EREF (End-To-End ID) if provided.
Creditor ID(CRED) This field shows the CRED (Creditor ID) if provided.
Debitor ID (DEBT) This field shows the DEBT (Debitor ID) if provided.
SEPA Error Code This field shows the SEPA error code (for paybacks) if provided.
SEPA Return Reason This field shows the SEPA return reason (for paybacks) which appears behind the SEPA error code.
Fee 1 Declared This field shows the fee 1, if it is explicitly shown in the file. The respective abbreviation in the file is “CHGS+”.
Fee 2 Declared This field shows the fee 2, if it is explicitly shown in the file. The respective abbreviation in the file is “COAM+”.
Fee 3 Declared This field shows the fee 3, if it is explicitly shown in the file. This is already implemented for other abbreviations.
It is important that balancing in OPplus is performed in two steps. In the first step, the system will simply try to perform accounting by using accounting rules, accounting notes and settings. If an account is found, the system will start a completely different program part. This part is responsible to search documents and to analyze the different texts again based on the document settings in the OPplus Setup.
With this accounting reference, the system already knows how to find the account. If payment assignment is done by matching the payment document number with the document number available the system, it is possible that the document is already found by simply using a filter. In this case, the system no longer needs to look up all entries to find the document.
Mark as posted
The system will mark the import lines as "posted" if the associated general journal lines are posted. The user also has the option to manually mark associated import lines as posted.
This can be done either
for a complete import register by selecting Register button → Mark as posted or
for each import line by selecting Register button → Import Lines → Posted field.
Any import lines which are not marked as posted will be automatically considered during the import of the Pmt. Import Register into a general journal.
Import to Ext. Cash Receipt Journal
By selecting this menu item, you can import the current payment import register into the journal specified in the associated payment import interface.
Open Ext. Cash Receipt Journal
By selecting this menu item, you can open the journal specified in the associated payment import interface.
Import MT940 Directory The following fields of the OPplus Setup must be specified for the Import MT940 Directory function:
MT940 Import Path
MT940 Backup Path
MT940 File Extension If you select the Import MT940 Directory menu item, the system will import all files with the MT940 file extension specified in the corresponding field from the MT940 import path. The system will create a set in the Pmt. Import Register table for each bank account found during this process. At the same time, the imported files are copied from the MT940 import path to the MT940 backup path.
manual_opp_base_en.docx
gbedv
Documentation
Manual OPplus Base
83 of 136
MT940...
By selecting this function, the user can import single MT940 files by using the Pmt. Import via MT940 report. For more details on the report, please refer to chapter Pmt. Import via MT 940 (single file).
CSV Port… If you select this function (if available), the user will be asked whether to use the default CSV port. If not, the CSV port list will be shown. For more information, please refer to chapter Pmt. Import via CSV Port.
BESR... This feature allows the user to import a single V1 file by using the Pmt. Import via BESR report. For more information, please refer to chapter Pmt. Import via BESR.
CREMUL… This feature allows the user to import a single CREMUL TXT file by using the Pmt. Import via CREMUL report. For more information, please refer to chapter Pmt. Import via CREMUL.
CAMT… This feature allows the user to import a single CAMT XML file by using the Pmt. Import via CAMT report. For more information, please refer to chapter Pmt. Import via CAMT.
REMADV… This feature allows the user to import a single payment advice by using the Pmt. Import via REMADV report. For more information, please refer to chapter Pmt. Import via REMADV.
CC (EPA)… This feature allows the user to import a single EPA file by using the Pmt. Import via CC (EPA) report. For more information, please refer to chapter Pmt. Import via CC (EPA).
Pmt. Import Interfaces With this feature, you can open the payment import interfaces. For more information about interfaces, please refer to chapter Pmt. Import Interface.
Pmt. Import Directories With this feature, you can open the payment directory list. You can specify the directories to be used for file imports. For more information about payment import directories, please refer to chapter Pmt. Import Directories.
Deleting the Pmt. Import Register
The user has the option to delete any existing payment import registers. This functionality not only supports the user during the initial phase in the event in the event that data is imported twice but it can also be useful for the following scenario: The user imports a file for which the application makes a new entry in the Pmt. Import Interface table for a new bank which exists in the file. The associated lines in the file are skipped during this import process. The user now has the possibility to enter the missing data manually into the Pmt. Import Interface table. The user then deletes the original Pmt. Import Register and runs the import again. Based on the data which the user has manually entered the associated lines will be imported as well.
If you have performed the original import by selecting the Import MT940 Directory function, you must first restore the file (see section Pmt. Import Register).
You can also delete import registers even if the associated import lines are marked as posted. Please note that in this case the value of the “Pmt. Import Entry No.” field (“Entry No.” of the import line) will be lost for the associated entry posted.
manual_opp_base_en.docx
gbedv
Documentation
Manual OPplus Base
84 of 136
All Pmt. Import Registers
In addition to the ”Open Pmt. Import Registers”, you can also use the list of all import registers which you will find under the “All Pmt. Import Registers” menu. It is an unfiltered list of all registers providing the same functions described above.
Trasferring Imported Pmt. Files to Gen. Journals The process of transferring imported payment entries (account transactions and remittance advices) into general journals can be, depending on the applied procedure, performed by a number of different menu items:
Base → Pmt. Import to Gen. Jnl. Line If you run this batch job directly, the payment import lines will be transferred to the general journals specified in the payment import interfaces.
Base → Ext. Cash Receipt Journal → Journal, Functions button → Pmt. Import menu item If you run this batch job by selecting it from a general journal, the payment import lines will always be transferred to this general journal, which means that it takes precedence over the entry of the payment import interface.
For information on how to import remittance advices of the REMADV format, please refer to chapter Pmt. Import via REMADV.
Pmt. Import to Gen. Jnl. Line
If you run the Pmt. Import to Gen. Jnl. Line batch job by selecting Base → Pmt. Import to Gen. Jnl. Line, the general journal lines will be created based on the payment import lines.
The payment import lines are copied into the general journal specified in the associated payment import interfaces.
The following field entries of the payment import interfaces will be considered when creating the general journal lines:
Import to Account Type
Import to Account No.
Prefix Document No.
Import to Journal Template Name
Import to Journal Batch Name For more information on these fields, please refer to chapter Pmt. Import Interface.
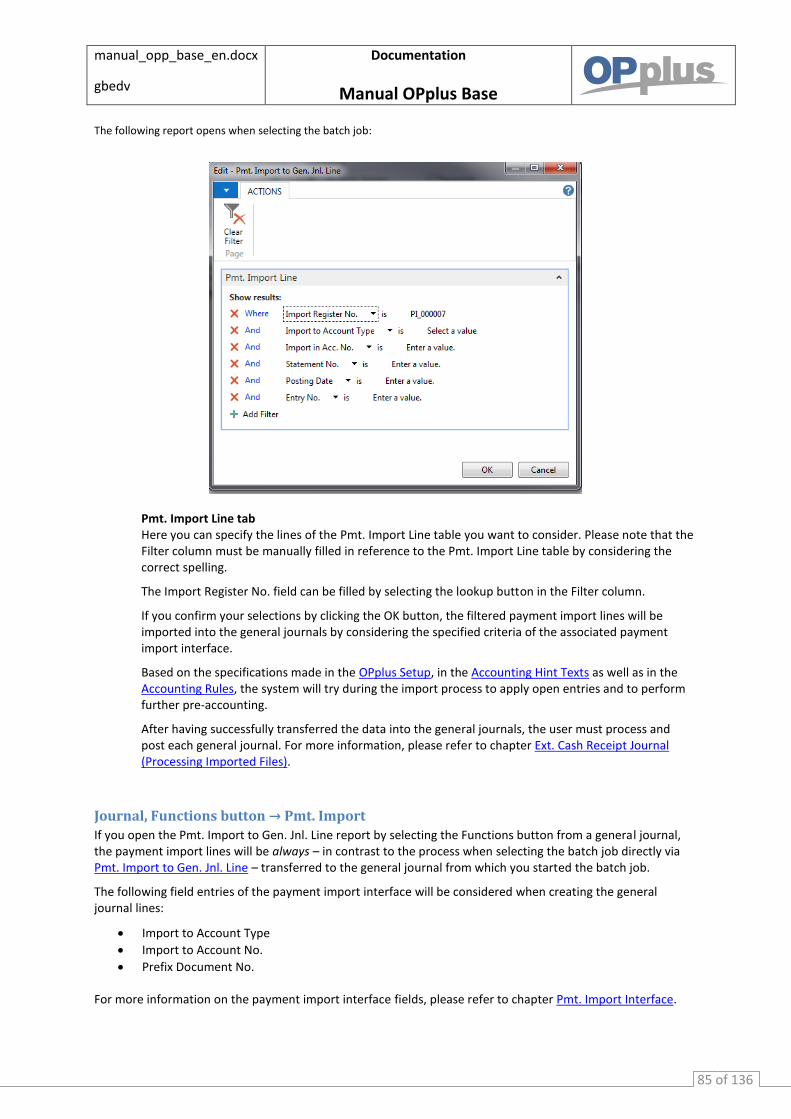
manual_opp_base_en.docx
gbedv
Documentation
Manual OPplus Base
85 of 136
The following report opens when selecting the batch job:
Pmt. Import Line tab Here you can specify the lines of the Pmt. Import Line table you want to consider. Please note that the Filter column must be manually filled in reference to the Pmt. Import Line table by considering the correct spelling.
The Import Register No. field can be filled by selecting the lookup button in the Filter column.
If you confirm your selections by clicking the OK button, the filtered payment import lines will be imported into the general journals by considering the specified criteria of the associated payment import interface.
Based on the specifications made in the OPplus Setup, in the Accounting Hint Texts as well as in the Accounting Rules, the system will try during the import process to apply open entries and to perform further pre-accounting.
After having successfully transferred the data into the general journals, the user must process and post each general journal. For more information, please refer to chapter Ext. Cash Receipt Journal (Processing Imported Files).
Journal, Functions button → Pmt. Import
If you open the Pmt. Import to Gen. Jnl. Line report by selecting the Functions button from a general journal, the payment import lines will be always – in contrast to the process when selecting the batch job directly via Pmt. Import to Gen. Jnl. Line – transferred to the general journal from which you started the batch job.
The following field entries of the payment import interface will be considered when creating the general journal lines:
Import to Account Type
Import to Account No.
Prefix Document No. For more information on the payment import interface fields, please refer to chapter Pmt. Import Interface.
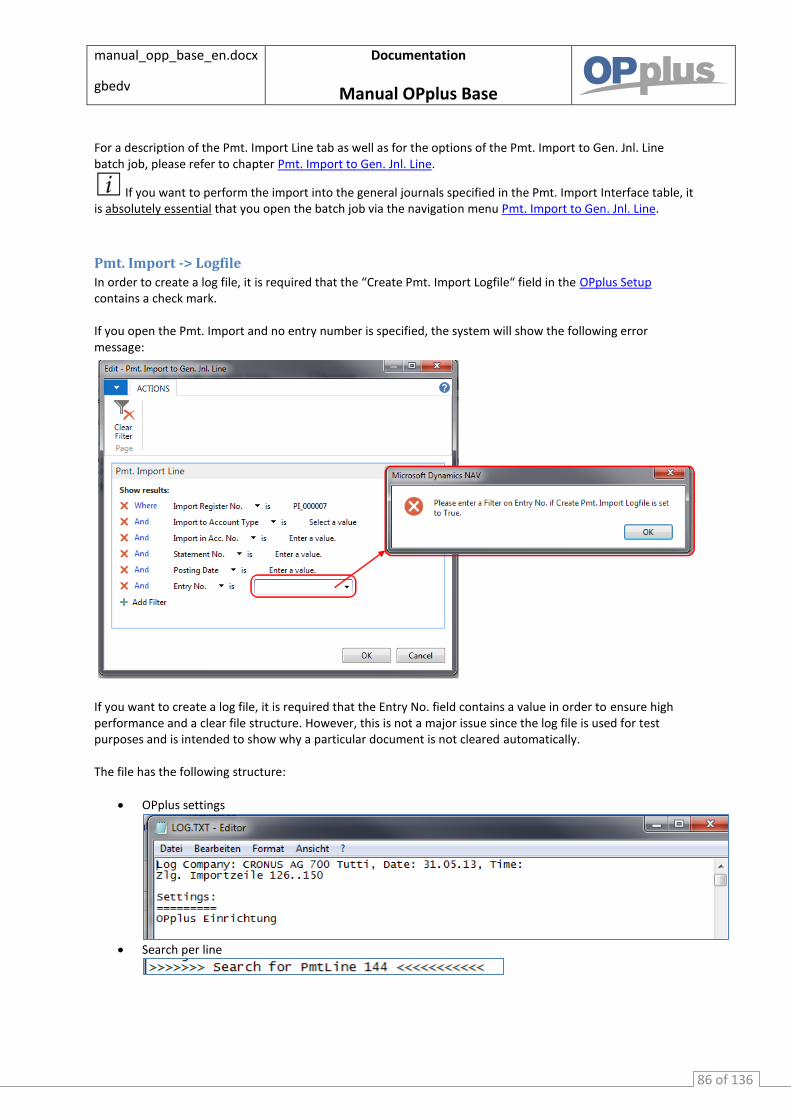
manual_opp_base_en.docx
gbedv
Documentation
Manual OPplus Base
86 of 136
For a description of the Pmt. Import Line tab as well as for the options of the Pmt. Import to Gen. Jnl. Line batch job, please refer to chapter Pmt. Import to Gen. Jnl. Line.
If you want to perform the import into the general journals specified in the Pmt. Import Interface table, it is absolutely essential that you open the batch job via the navigation menu Pmt. Import to Gen. Jnl. Line.
Pmt. Import -> Logfile
In order to create a log file, it is required that the “Create Pmt. Import Logfile“ field in the OPplus Setup contains a check mark. If you open the Pmt. Import and no entry number is specified, the system will show the following error message:
If you want to create a log file, it is required that the Entry No. field contains a value in order to ensure high performance and a clear file structure. However, this is not a major issue since the log file is used for test purposes and is intended to show why a particular document is not cleared automatically. The file has the following structure:
OPplus settings
Search per line
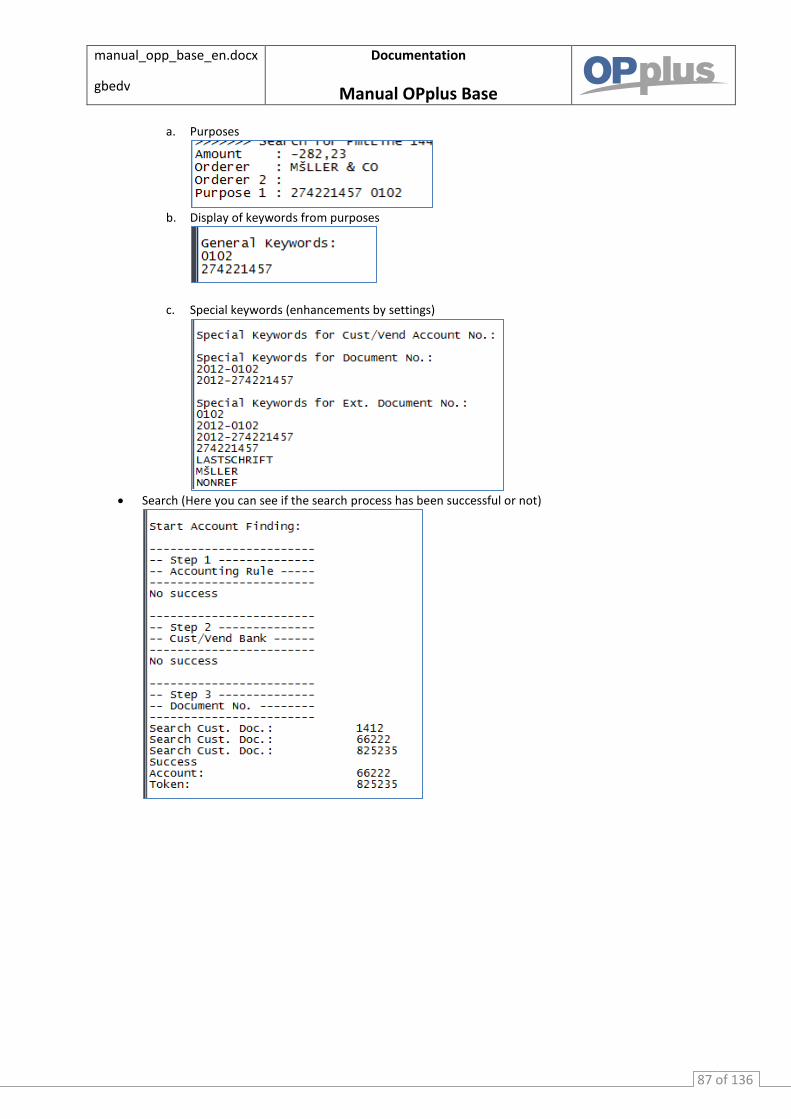
manual_opp_base_en.docx
gbedv
Documentation
Manual OPplus Base
87 of 136
a. Purposes
b. Display of keywords from purposes
c. Special keywords (enhancements by settings)
Search (Here you can see if the search process has been successful or not)
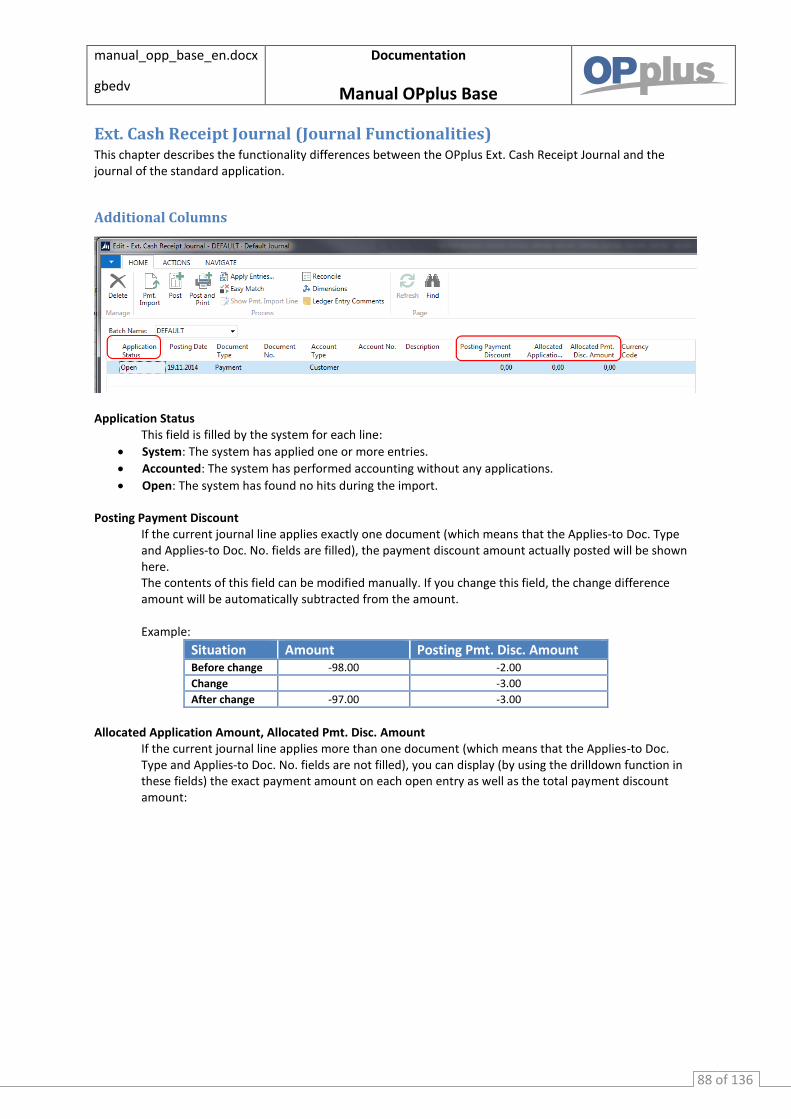
manual_opp_base_en.docx
gbedv
Documentation
Manual OPplus Base
88 of 136
Ext. Cash Receipt Journal (Journal Functionalities) This chapter describes the functionality differences between the OPplus Ext. Cash Receipt Journal and the journal of the standard application.
Additional Columns
Application Status This field is filled by the system for each line:
System: The system has applied one or more entries.
Accounted: The system has performed accounting without any applications.
Open: The system has found no hits during the import. Posting Payment Discount
If the current journal line applies exactly one document (which means that the Applies-to Doc. Type and Applies-to Doc. No. fields are filled), the payment discount amount actually posted will be shown here. The contents of this field can be modified manually. If you change this field, the change difference amount will be automatically subtracted from the amount. Example:
Situation Amount Posting Pmt. Disc. Amount Before change -98.00 -2.00
Change -3.00
After change -97.00 -3.00
Allocated Application Amount, Allocated Pmt. Disc. Amount
If the current journal line applies more than one document (which means that the Applies-to Doc. Type and Applies-to Doc. No. fields are not filled), you can display (by using the drilldown function in these fields) the exact payment amount on each open entry as well as the total payment discount amount:

manual_opp_base_en.docx
gbedv
Documentation
Manual OPplus Base
89 of 136
The “Payback” and “Reopen-to ID” columns are available enabling the Payback feature. For more information, please refer to chapter ‘Payback‘ feature (= Return Debit Notes) during Pmt. Imports into Gen. Journals.
Actions tab
G/L Entry Application [SHIFT+F11]
The Extended Application window opens which is required when applying several invoices with one payment.
Insert Conv. LCY Rndg. Lines You can use the “Insert Conv. LCY Rndg. Lines“ feature to insert a rounding correction line into the general journal line. This line will apply the local currency if also the foreign amount has been applied. You can then post the journal.
Search Ledger Entries [CTRL+SHIFT+L] If the Customer account type (or Customer balance account type) is selected in the journal line, you can open the list of all customer entries by pressing CTRL+SHIFT+L. If you leave this view by clicking the OK button, the respective customer number will be copied into the Account No. field (or into the Bal. Account No. field). The same applies for the Vendor account type (or Vendor balance account type). The cursor will be automatically positioned into the Amount field.
manual_opp_base_en.docx
gbedv
Documentation
Manual OPplus Base
90 of 136
Pmt. Import For a description of this menu item, please refer to chapter Base → Ext. Cash Payment Journal → Journal, Functions button → Pmt. Import
Easy Match Due to the complexity of the Easy Match window, please refer to chapter Easy Match window for a detailed description
Show Pmt. Import Line [Ctrl+F3] By selecting this menu item, the user can open the associated payment import line
Process Paybacks This menu item is part of the Payback feature. For more information, please refer to chapter ‘Payback‘ feature (= Return Debit Notes) during Pmt. Imports into Gen. Journals.
Payment Transactions You can make use of payment transactions, a feature which is not integrated into the OPplus menu. This feature is comprised of a table which considers the automatic application in order to enable e.g. better web shop integration. In OPplus, this table is only provided as a template and analyzed for account determination. It is not used to be provided with data. The provision of data needs to be done by the customer individually. Example Case: You are the owner of a web shop which is used to provide and import data, without the automatic application via the Navision application. If the “Payment Transactions” table is filled by imports, the table will be considered during automatic application and (if applicable) documents will be directly applied.
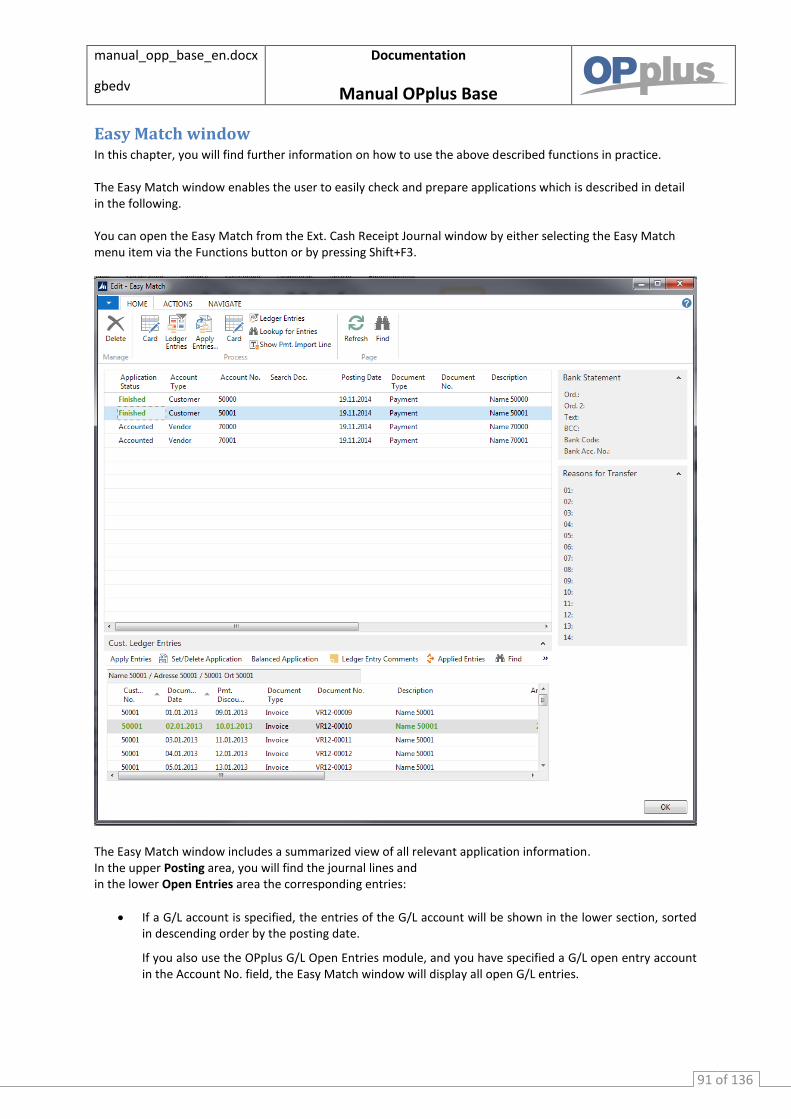
manual_opp_base_en.docx
gbedv
Documentation
Manual OPplus Base
91 of 136
Easy Match window In this chapter, you will find further information on how to use the above described functions in practice. The Easy Match window enables the user to easily check and prepare applications which is described in detail in the following. You can open the Easy Match from the Ext. Cash Receipt Journal window by either selecting the Easy Match menu item via the Functions button or by pressing Shift+F3.
The Easy Match window includes a summarized view of all relevant application information. In the upper Posting area, you will find the journal lines and in the lower Open Entries area the corresponding entries:
If a G/L account is specified, the entries of the G/L account will be shown in the lower section, sorted in descending order by the posting date.
If you also use the OPplus G/L Open Entries module, and you have specified a G/L open entry account in the Account No. field, the Easy Match window will display all open G/L entries.
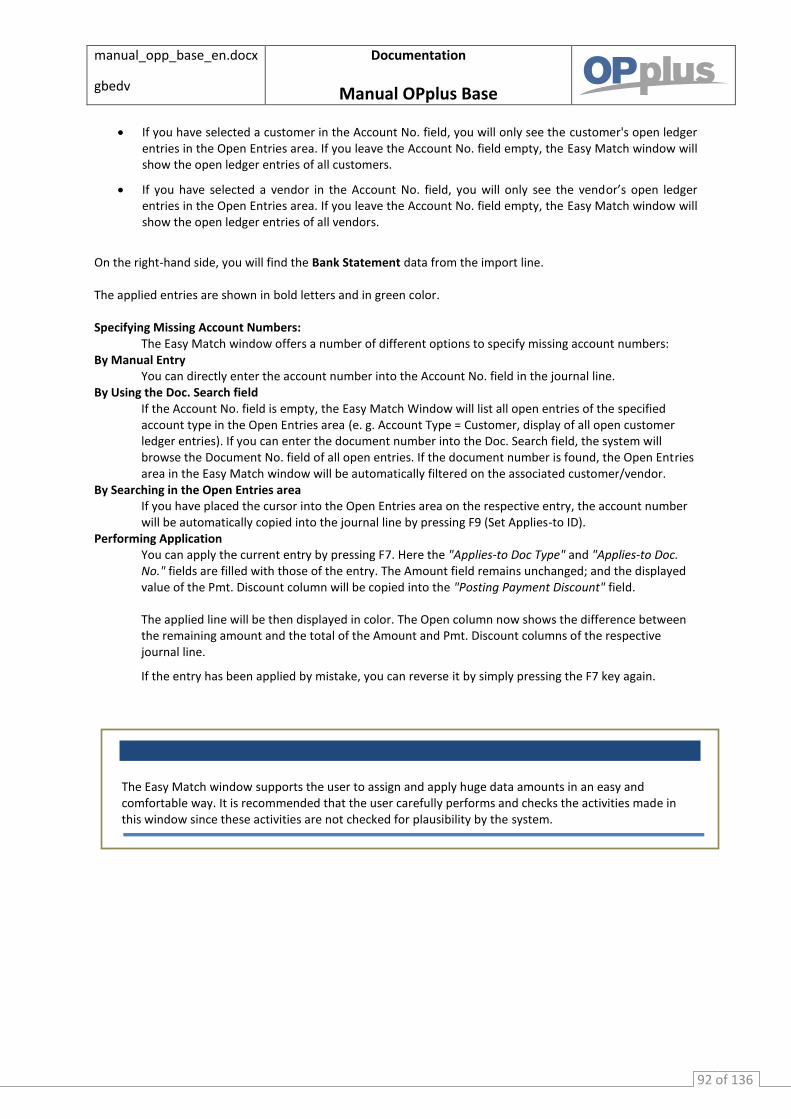
manual_opp_base_en.docx
gbedv
Documentation
Manual OPplus Base
92 of 136
If you have selected a customer in the Account No. field, you will only see the customer's open ledger entries in the Open Entries area. If you leave the Account No. field empty, the Easy Match window will show the open ledger entries of all customers.
If you have selected a vendor in the Account No. field, you will only see the vendor’s open ledger entries in the Open Entries area. If you leave the Account No. field empty, the Easy Match window will show the open ledger entries of all vendors.
On the right-hand side, you will find the Bank Statement data from the import line. The applied entries are shown in bold letters and in green color. Specifying Missing Account Numbers:
The Easy Match window offers a number of different options to specify missing account numbers: By Manual Entry
You can directly enter the account number into the Account No. field in the journal line. By Using the Doc. Search field
If the Account No. field is empty, the Easy Match Window will list all open entries of the specified account type in the Open Entries area (e. g. Account Type = Customer, display of all open customer ledger entries). If you can enter the document number into the Doc. Search field, the system will browse the Document No. field of all open entries. If the document number is found, the Open Entries area in the Easy Match window will be automatically filtered on the associated customer/vendor.
By Searching in the Open Entries area If you have placed the cursor into the Open Entries area on the respective entry, the account number will be automatically copied into the journal line by pressing F9 (Set Applies-to ID).
Performing Application You can apply the current entry by pressing F7. Here the "Applies-to Doc Type" and "Applies-to Doc. No." fields are filled with those of the entry. The Amount field remains unchanged; and the displayed value of the Pmt. Discount column will be copied into the "Posting Payment Discount" field.
The applied line will be then displayed in color. The Open column now shows the difference between the remaining amount and the total of the Amount and Pmt. Discount columns of the respective journal line.
If the entry has been applied by mistake, you can reverse it by simply pressing the F7 key again.
The Easy Match window supports the user to assign and apply huge data amounts in an easy and comfortable way. It is recommended that the user carefully performs and checks the activities made in this window since these activities are not checked for plausibility by the system.
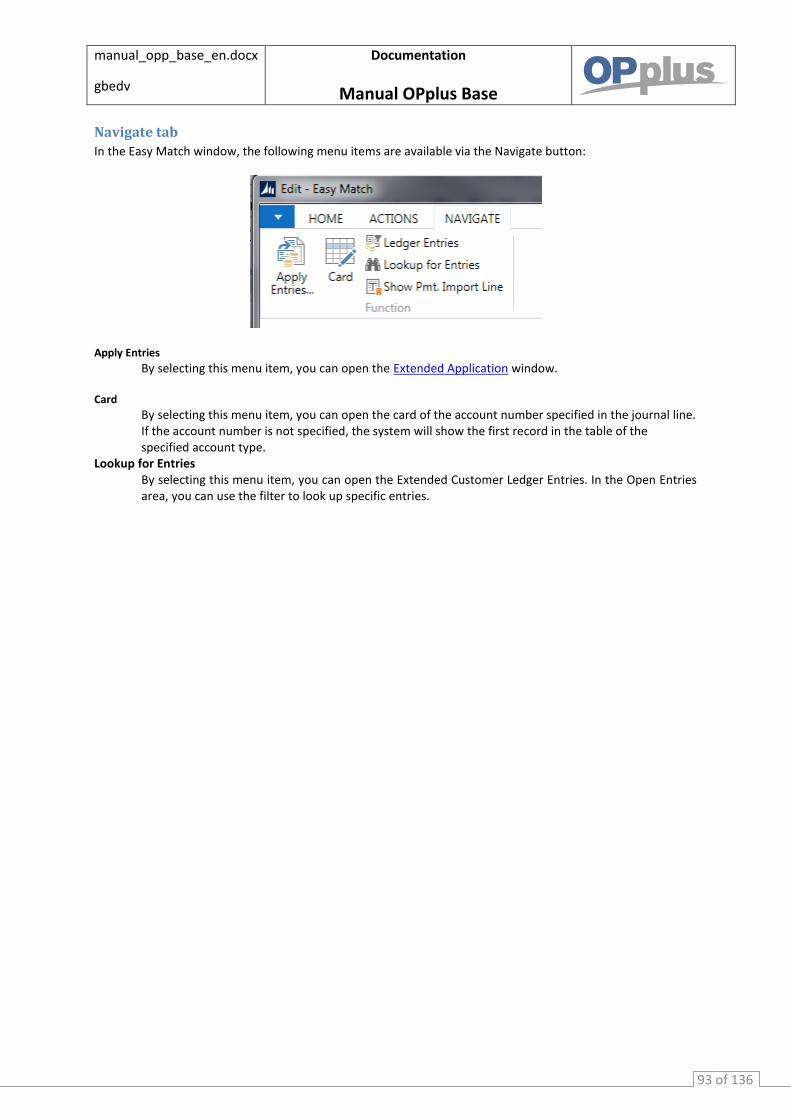
manual_opp_base_en.docx
gbedv
Documentation
Manual OPplus Base
93 of 136
Navigate tab
In the Easy Match window, the following menu items are available via the Navigate button:
Apply Entries
By selecting this menu item, you can open the Extended Application window.
Card
By selecting this menu item, you can open the card of the account number specified in the journal line. If the account number is not specified, the system will show the first record in the table of the specified account type.
Lookup for Entries By selecting this menu item, you can open the Extended Customer Ledger Entries. In the Open Entries area, you can use the filter to look up specific entries.
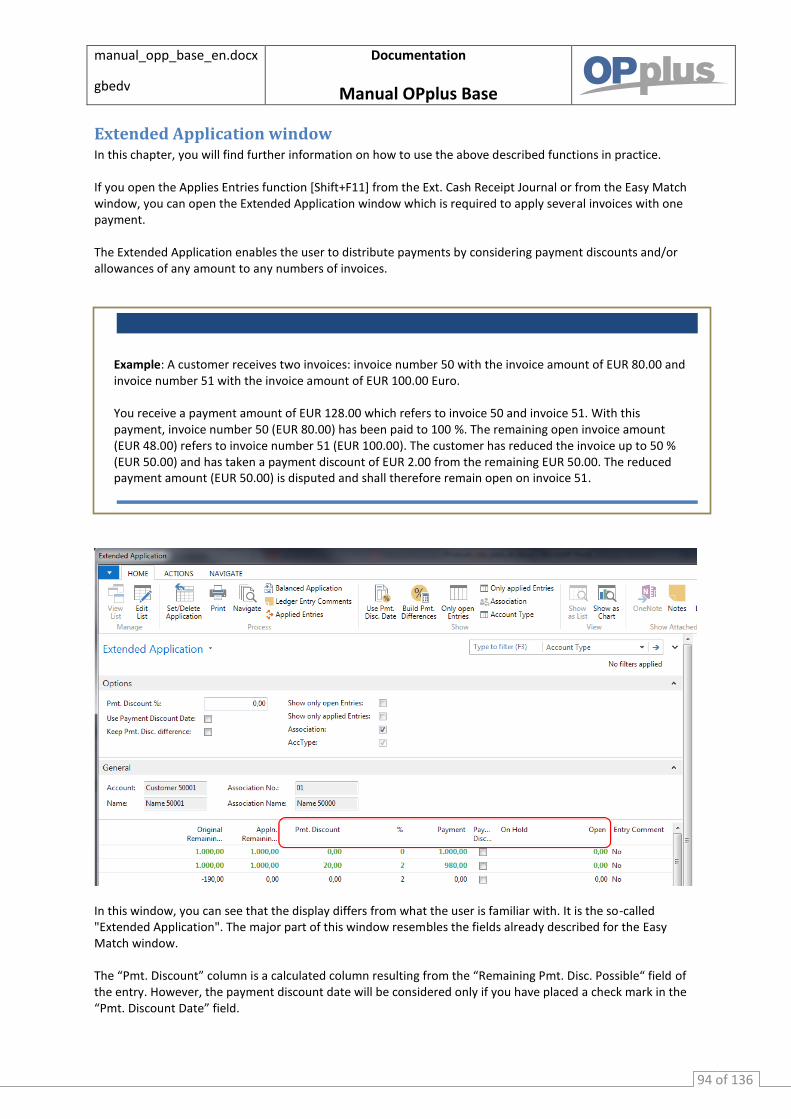
manual_opp_base_en.docx
gbedv
Documentation
Manual OPplus Base
94 of 136
Extended Application window In this chapter, you will find further information on how to use the above described functions in practice. If you open the Applies Entries function [Shift+F11] from the Ext. Cash Receipt Journal or from the Easy Match window, you can open the Extended Application window which is required to apply several invoices with one payment. The Extended Application enables the user to distribute payments by considering payment discounts and/or allowances of any amount to any numbers of invoices.
In this window, you can see that the display differs from what the user is familiar with. It is the so-called "Extended Application". The major part of this window resembles the fields already described for the Easy Match window. The “Pmt. Discount” column is a calculated column resulting from the “Remaining Pmt. Disc. Possible“ field of the entry. However, the payment discount date will be considered only if you have placed a check mark in the “Pmt. Discount Date” field.
Example: A customer receives two invoices: invoice number 50 with the invoice amount of EUR 80.00 and invoice number 51 with the invoice amount of EUR 100.00 Euro. You receive a payment amount of EUR 128.00 which refers to invoice 50 and invoice 51. With this payment, invoice number 50 (EUR 80.00) has been paid to 100 %. The remaining open invoice amount (EUR 48.00) refers to invoice number 51 (EUR 100.00). The customer has reduced the invoice up to 50 % (EUR 50.00) and has taken a payment discount of EUR 2.00 from the remaining EUR 50.00. The reduced payment amount (EUR 50.00) is disputed and shall therefore remain open on invoice 51.
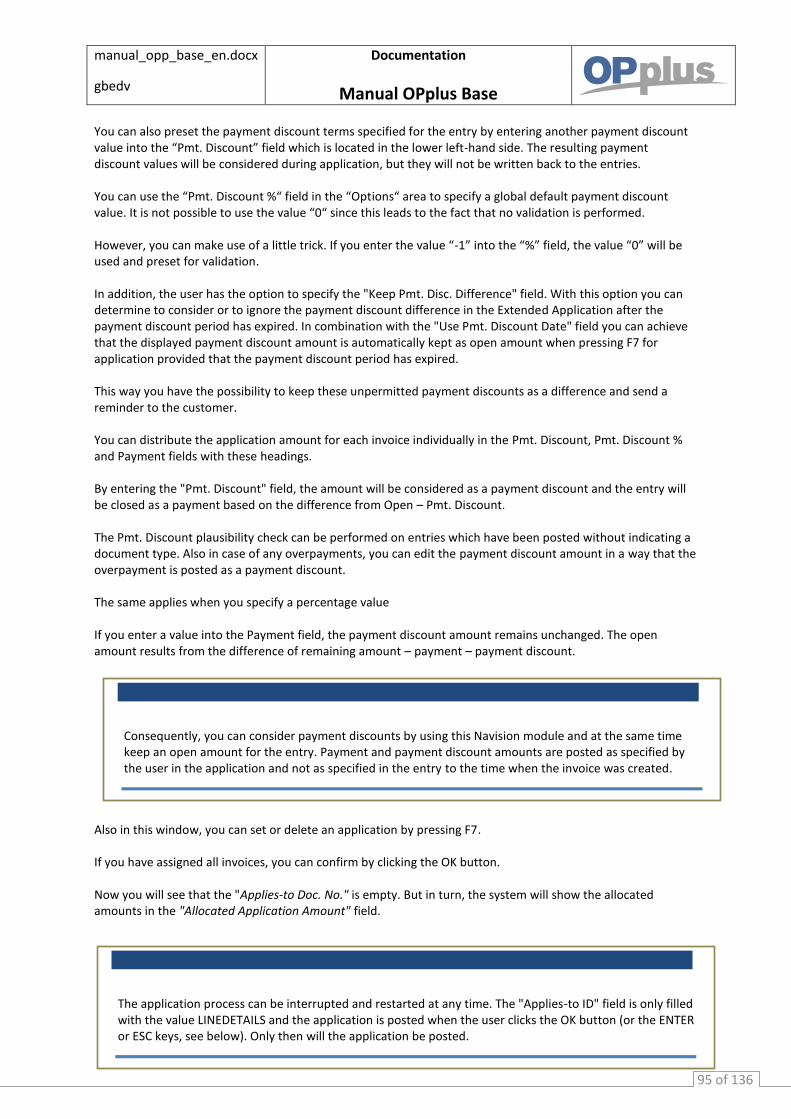
manual_opp_base_en.docx
gbedv
Documentation
Manual OPplus Base
95 of 136
You can also preset the payment discount terms specified for the entry by entering another payment discount value into the “Pmt. Discount” field which is located in the lower left-hand side. The resulting payment discount values will be considered during application, but they will not be written back to the entries. You can use the “Pmt. Discount %“ field in the “Options“ area to specify a global default payment discount value. It is not possible to use the value “0“ since this leads to the fact that no validation is performed. However, you can make use of a little trick. If you enter the value “-1” into the “%” field, the value “0” will be used and preset for validation. In addition, the user has the option to specify the "Keep Pmt. Disc. Difference" field. With this option you can determine to consider or to ignore the payment discount difference in the Extended Application after the payment discount period has expired. In combination with the "Use Pmt. Discount Date" field you can achieve that the displayed payment discount amount is automatically kept as open amount when pressing F7 for application provided that the payment discount period has expired. This way you have the possibility to keep these unpermitted payment discounts as a difference and send a reminder to the customer. You can distribute the application amount for each invoice individually in the Pmt. Discount, Pmt. Discount % and Payment fields with these headings. By entering the "Pmt. Discount" field, the amount will be considered as a payment discount and the entry will be closed as a payment based on the difference from Open – Pmt. Discount. The Pmt. Discount plausibility check can be performed on entries which have been posted without indicating a document type. Also in case of any overpayments, you can edit the payment discount amount in a way that the overpayment is posted as a payment discount. The same applies when you specify a percentage value If you enter a value into the Payment field, the payment discount amount remains unchanged. The open amount results from the difference of remaining amount – payment – payment discount. Also in this window, you can set or delete an application by pressing F7. If you have assigned all invoices, you can confirm by clicking the OK button. Now you will see that the "Applies-to Doc. No." is empty. But in turn, the system will show the allocated amounts in the "Allocated Application Amount" field.
Consequently, you can consider payment discounts by using this Navision module and at the same time keep an open amount for the entry. Payment and payment discount amounts are posted as specified by the user in the application and not as specified in the entry to the time when the invoice was created.
The application process can be interrupted and restarted at any time. The "Applies-to ID" field is only filled with the value LINEDETAILS and the application is posted when the user clicks the OK button (or the ENTER or ESC keys, see below). Only then will the application be posted.
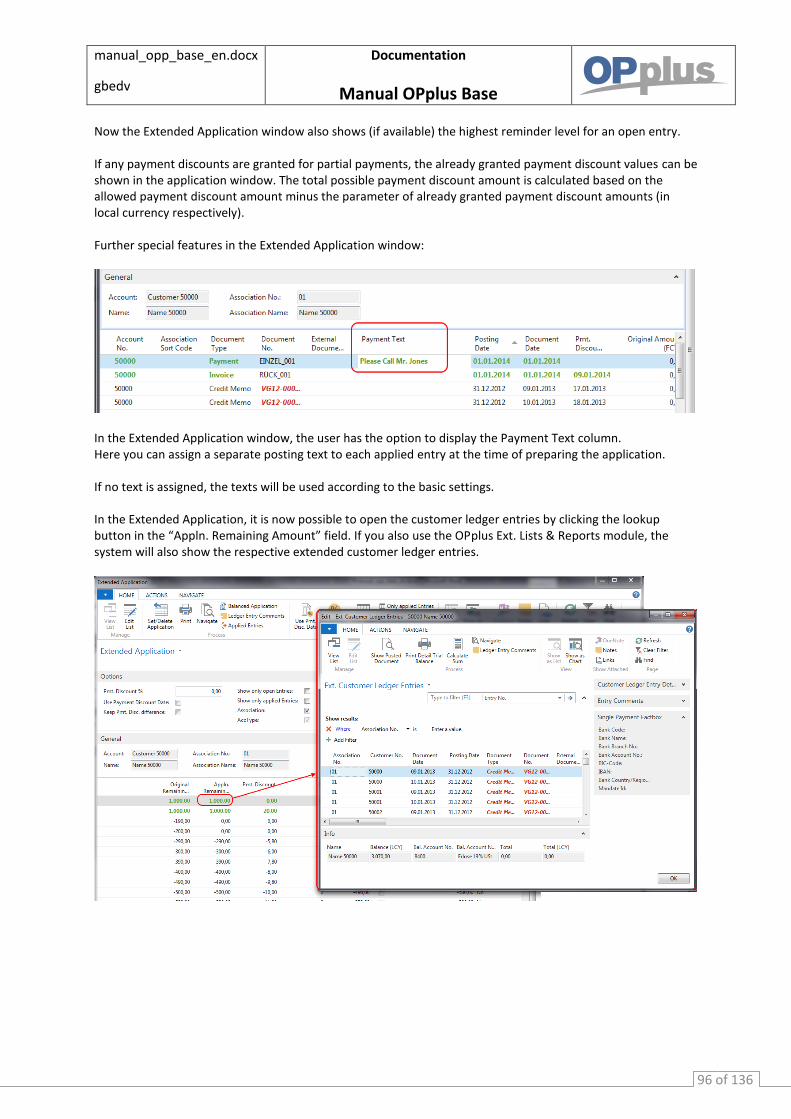
manual_opp_base_en.docx
gbedv
Documentation
Manual OPplus Base
96 of 136
Now the Extended Application window also shows (if available) the highest reminder level for an open entry. If any payment discounts are granted for partial payments, the already granted payment discount values can be shown in the application window. The total possible payment discount amount is calculated based on the allowed payment discount amount minus the parameter of already granted payment discount amounts (in local currency respectively). Further special features in the Extended Application window:
In the Extended Application window, the user has the option to display the Payment Text column. Here you can assign a separate posting text to each applied entry at the time of preparing the application. If no text is assigned, the texts will be used according to the basic settings. In the Extended Application, it is now possible to open the customer ledger entries by clicking the lookup button in the “Appln. Remaining Amount” field. If you also use the OPplus Ext. Lists & Reports module, the system will also show the respective extended customer ledger entries.
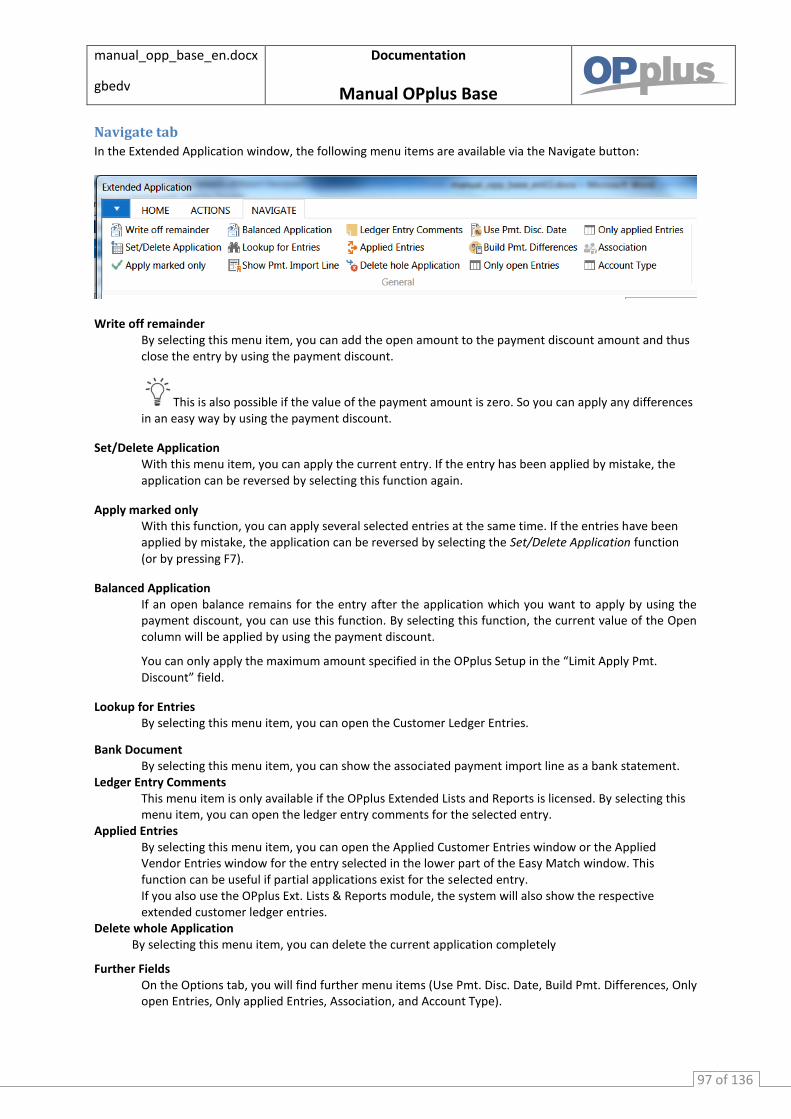
manual_opp_base_en.docx
gbedv
Documentation
Manual OPplus Base
97 of 136
Navigate tab
In the Extended Application window, the following menu items are available via the Navigate button:
Write off remainder By selecting this menu item, you can add the open amount to the payment discount amount and thus close the entry by using the payment discount.
This is also possible if the value of the payment amount is zero. So you can apply any differences in an easy way by using the payment discount.
Set/Delete Application With this menu item, you can apply the current entry. If the entry has been applied by mistake, the application can be reversed by selecting this function again.
Apply marked only With this function, you can apply several selected entries at the same time. If the entries have been applied by mistake, the application can be reversed by selecting the Set/Delete Application function (or by pressing F7).
Balanced Application If an open balance remains for the entry after the application which you want to apply by using the payment discount, you can use this function. By selecting this function, the current value of the Open column will be applied by using the payment discount.
You can only apply the maximum amount specified in the OPplus Setup in the “Limit Apply Pmt. Discount” field.
Lookup for Entries By selecting this menu item, you can open the Customer Ledger Entries.
Bank Document By selecting this menu item, you can show the associated payment import line as a bank statement.
Ledger Entry Comments This menu item is only available if the OPplus Extended Lists and Reports is licensed. By selecting this menu item, you can open the ledger entry comments for the selected entry.
Applied Entries By selecting this menu item, you can open the Applied Customer Entries window or the Applied Vendor Entries window for the entry selected in the lower part of the Easy Match window. This function can be useful if partial applications exist for the selected entry. If you also use the OPplus Ext. Lists & Reports module, the system will also show the respective extended customer ledger entries.
Delete whole Application By selecting this menu item, you can delete the current application completely
Further Fields On the Options tab, you will find further menu items (Use Pmt. Disc. Date, Build Pmt. Differences, Only open Entries, Only applied Entries, Association, and Account Type).
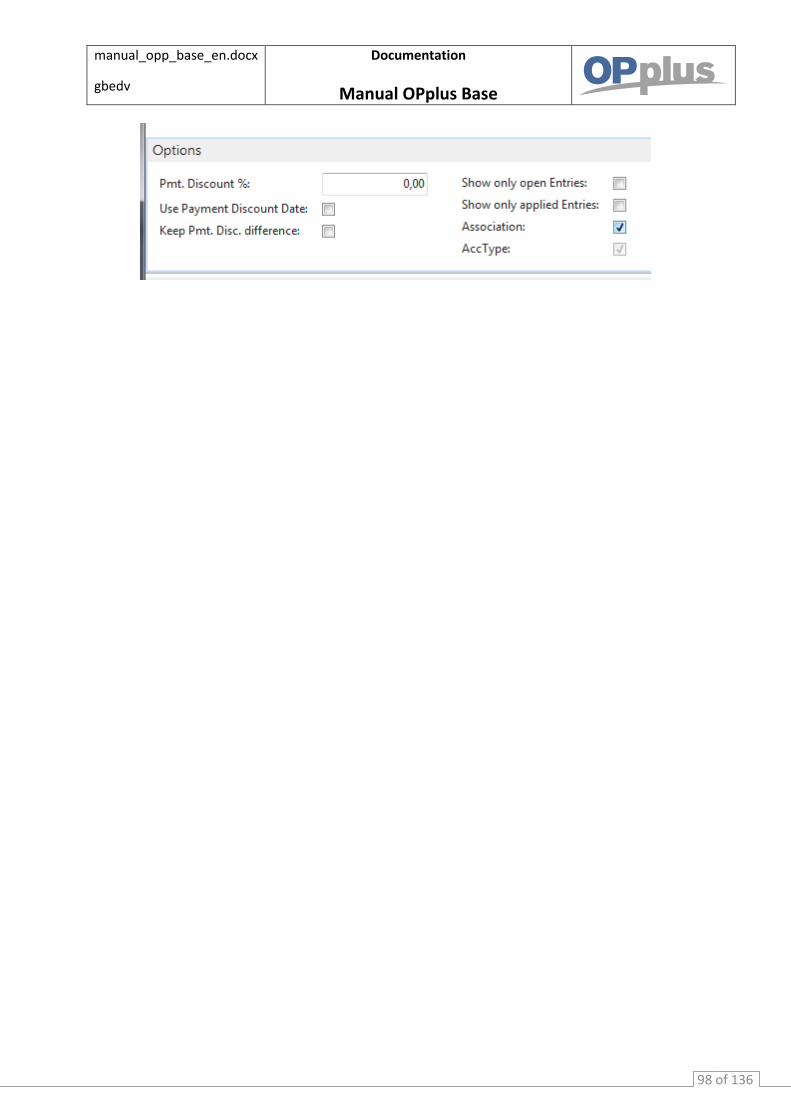
manual_opp_base_en.docx
gbedv
Documentation
Manual OPplus Base
98 of 136

manual_opp_base_en.docx
gbedv
Documentation
Manual OPplus Base
99 of 136
Pre-Accounting/Open Entry Application during Pmt. Import to Gen. Jnl
Pre-Accounting during Pmt. Import to Gen. Jnl. Lines
The process of filling in account number is performed in four steps which have to be performed as long as no account numbers have been assigned.
1. Step: Accounting Rules If an account number has been assigned in the accounting rules, this account number will be used.
The assignment based on the accounting rules can be very useful. For example, it is possible to perform pre-accounting for the respective account if the text "Debit Interest" shall appear in the purpose.
If in addition to a catchword a "catchword 2" is used in the accounting rules table, both catch words must be found in the bank document in order to trigger accounting.
The settings for each bank account can be done separately. Also the pre-accounting can be filled with the global dimensions 1 and 2 (which are normally department and project) as well as with the shortcut dimensions and posting groups. In addition, the user has the possibility to specify settings for a transit posting or for a second, third or fourth posting line.
Example: On 11-01-2014, the bank debits the amount of EUR 25.00 for debit interest 10/2014 and only indicates "debit interest" in the purpose. You want to post it on the G/L account no. 2110 by using the text "Interest Cost 10/2014".
For more information on the accounting rules, please refer to chapter Base → Setup → Accounting Rules.
2. Step: Bank Account If it is no cash payment, the user can identify based on the bank account to which customer or vendor it refers if this bank account is available in your system.
Your system can learn! If you assign a posting line to a customer or vendor, the corresponding bank account will be automatically copied into the Customer Bank Account or Vendor Bank Account table. You can recognize any automatically created bank accounts. They always show the note on the respective customer/vendor bank account card from which statement they have been imported. In this case, the “Inserted by Bank Import field on the “OPplus“ tab will contain a check mark.
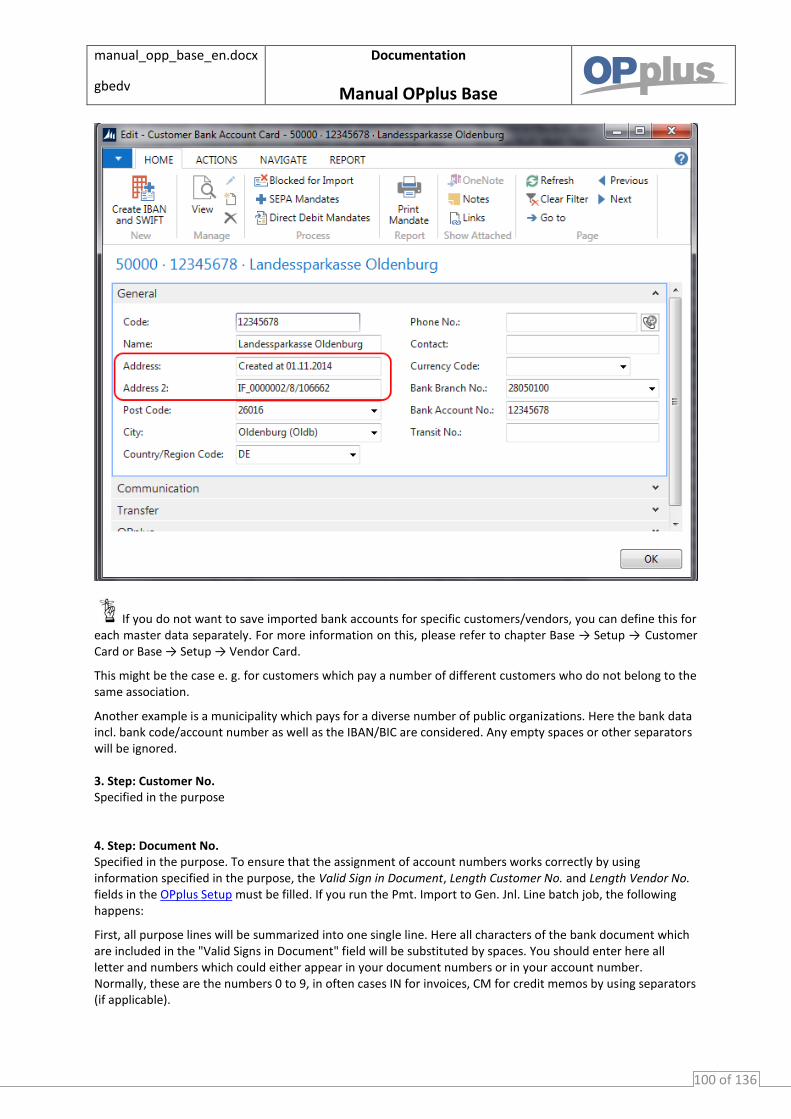
manual_opp_base_en.docx
gbedv
Documentation
Manual OPplus Base
100 of 136
If you do not want to save imported bank accounts for specific customers/vendors, you can define this for each master data separately. For more information on this, please refer to chapter Base → Setup → Customer Card or Base → Setup → Vendor Card.
This might be the case e. g. for customers which pay a number of different customers who do not belong to the same association.
Another example is a municipality which pays for a diverse number of public organizations. Here the bank data incl. bank code/account number as well as the IBAN/BIC are considered. Any empty spaces or other separators will be ignored. 3. Step: Customer No. Specified in the purpose
4. Step: Document No. Specified in the purpose. To ensure that the assignment of account numbers works correctly by using information specified in the purpose, the Valid Sign in Document, Length Customer No. and Length Vendor No. fields in the OPplus Setup must be filled. If you run the Pmt. Import to Gen. Jnl. Line batch job, the following happens:
First, all purpose lines will be summarized into one single line. Here all characters of the bank document which are included in the "Valid Signs in Document" field will be substituted by spaces. You should enter here all letter and numbers which could either appear in your document numbers or in your account number. Normally, these are the numbers 0 to 9, in often cases IN for invoices, CM for credit memos by using separators (if applicable).
manual_opp_base_en.docx
gbedv
Documentation
Manual OPplus Base
101 of 136
In this case, you would enter the following into the "Valid Signs in Document" field: "0123456789INCM
You can leave this field empty if your account numbers include letters and numbers.
Now specific terms remain in the purpose which only consists of the specified characters. All these terms which include the maximum number of characters as specified in the Length Customer No. field (or in the Length Vendor No. field) will be checked if they represent valid account numbers. If they are not identified as valid account numbers, it is checked whether an open customer entry or an open vendor entry exists with a document number which corresponds to the searched term. The identification of accounts via the document number is based on the following fields:
Analyze Customer Doc. No. Analyze Vendor Doc. No. Analyze Customer Ext. Doc. No. Analyze Vendor Ext. Doc. No.
as well as Min. Length Customer Doc. No. Max. Length Customer Doc No. Min. Length Customer Ext. Doc. No. Max. Length Customer Ext. Doc. No. Min. Length Vendor Doc. No. Max. Length Vendor Doc. No. Min. Length Vendor Ext. Doc. No. Max. Length Vendor Ext. Doc. No.
All analyze fields which have been activated will be analyzed. According to the application's presetting, the system will search the Document No. field for customer entries and the Ext. Document No. for vendor entries. If you specify the field lengths, only the terms of document texts will be analyzed which meet the specified length. These fields are not filled by default. Therefore you should only fill in these fields if your document numbers always have a specific length. Accounting Hint Texts The system will also process the Accounting Hint Texts table during Pmt. Import to Gen. Jnl. Line batch job. For more information, please refer to chapter Accounting Hint Texts.
If you use the Gen. Ledger Open Entries module, these open entries will be considered for automatic application during the import into Gen. Journals.
Open Entry Application during Pmt. Import to Gen. Jnl. Lines
In order to apply open entries it is required that the Account No. field is filled in the pre-accounting.
The system will only try to apply open entries if the system finds an account number by using one of the four steps described in chapter Pre-accounting during Pmt. Import to Gen. Jnl. Lines.
For this, the contents of the following fields play an important role: Poole Position Document No., Start Position Ext. Document No., Pmt. Discount Tolerance Days and Pmt. Discount Tolerance Amount.
The application of open entries is performed in several steps:
1. Step: Balance Method The balance of the account corresponds to the payment. In this case, all open entries on the account will be closed by using this payment.
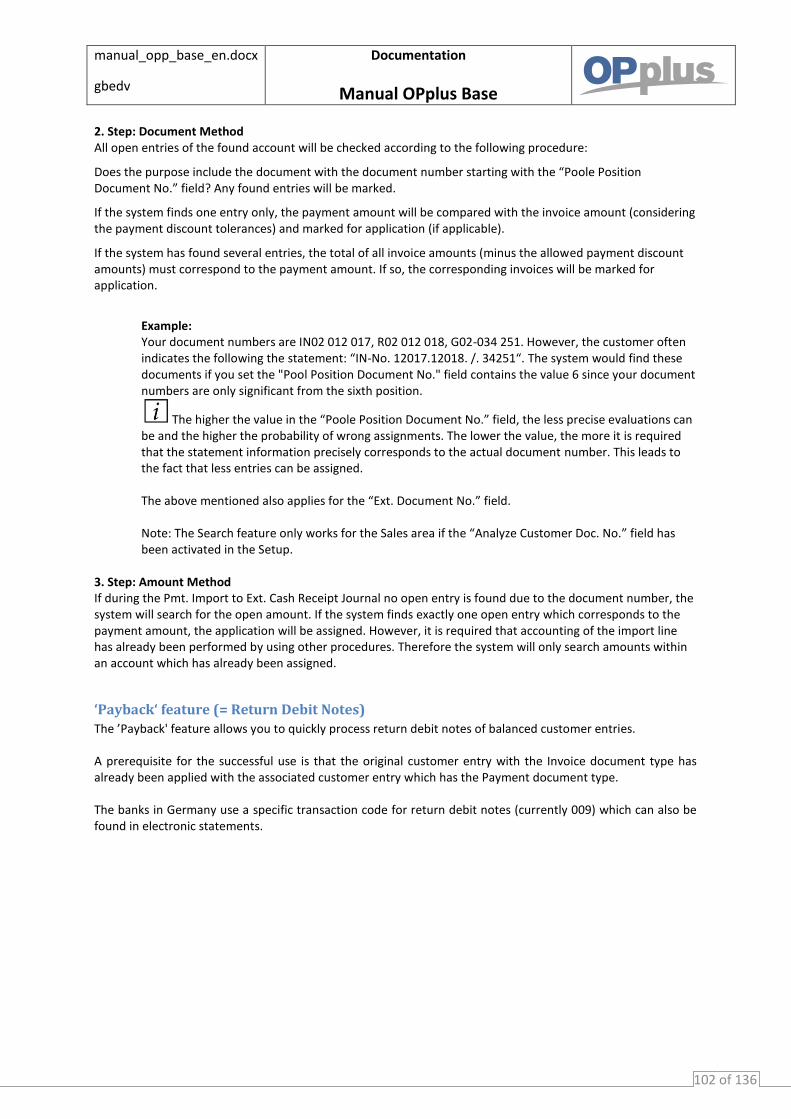
manual_opp_base_en.docx
gbedv
Documentation
Manual OPplus Base
102 of 136
2. Step: Document Method All open entries of the found account will be checked according to the following procedure:
Does the purpose include the document with the document number starting with the “Poole Position Document No.” field? Any found entries will be marked.
If the system finds one entry only, the payment amount will be compared with the invoice amount (considering the payment discount tolerances) and marked for application (if applicable).
If the system has found several entries, the total of all invoice amounts (minus the allowed payment discount amounts) must correspond to the payment amount. If so, the corresponding invoices will be marked for application.
Example: Your document numbers are IN02 012 017, R02 012 018, G02-034 251. However, the customer often indicates the following the statement: “IN-No. 12017.12018. /. 34251“. The system would find these documents if you set the "Pool Position Document No." field contains the value 6 since your document numbers are only significant from the sixth position.
The higher the value in the “Poole Position Document No.” field, the less precise evaluations can be and the higher the probability of wrong assignments. The lower the value, the more it is required that the statement information precisely corresponds to the actual document number. This leads to the fact that less entries can be assigned. The above mentioned also applies for the “Ext. Document No.” field. Note: The Search feature only works for the Sales area if the “Analyze Customer Doc. No.” field has been activated in the Setup.
3. Step: Amount Method If during the Pmt. Import to Ext. Cash Receipt Journal no open entry is found due to the document number, the system will search for the open amount. If the system finds exactly one open entry which corresponds to the payment amount, the application will be assigned. However, it is required that accounting of the import line has already been performed by using other procedures. Therefore the system will only search amounts within an account which has already been assigned.
‘Payback‘ feature (= Return Debit Notes)
The ’Payback' feature allows you to quickly process return debit notes of balanced customer entries. A prerequisite for the successful use is that the original customer entry with the Invoice document type has already been applied with the associated customer entry which has the Payment document type. The banks in Germany use a specific transaction code for return debit notes (currently 009) which can also be found in electronic statements.

manual_opp_base_en.docx
gbedv
Documentation
Manual OPplus Base
103 of 136
The ‘Payback‘ feature
reverses application by marking the original payment (a process which reopens the invoice and the original payment)
sets the application of the return debit note to the original payment and
creates a 2. line in the Gen. Journal for the fees indicated in the Purpose field, already accounted using the accounting rule for the BC Code 009 and the fee amount as amount. In the accounting rule, you can select whether to post the 2. line (= fee amount) to an expense account or to the corresponding customer so that the return debit note can be found there as a receivable (= open entry).
The consequence is that the original invoice is open again to be considered during the next payment proposal. The following settings and menus are relevant for this feature:
Line: “Abbreviations Charges” field‚ ”Field Separator” field, “Decimal Separator” field
Ext. Cash Rcpt. Journal Line: “Payback” and “Reopen-to ID” fields
Ext. Cash Rcpt. Journal Line – Function button -> “Process Paybacks“ menu
BC Accounting Rules: “Catchword 1“ field, “Payback“ = Yes, “Account No. 2” field Note:
A second line will not be created for return debit notes if the account type of the second line is G/L Account and if no account number has been specified. So the line is only created if a G/L account number (if applicable for fees) is specified.
If the Customer or Vendor account type is selected and no account number is specified, the account number of the previous line will be used.
Example Accounting Rule BC Code 009 – Return Debit Note with the G/L Account type and Additional Cost Transactions as Account No. 2. Line
For the return debit BC Code 009, activate the “Payback” field in BC Accounting Rules and in the “Account No. 2. Line” field select the G/L account to be used to post the fees incurred.
If you know the abbreviation used for the fees, enter it into the accounting rule and specify the field and decimal separator (if applicable). Example:
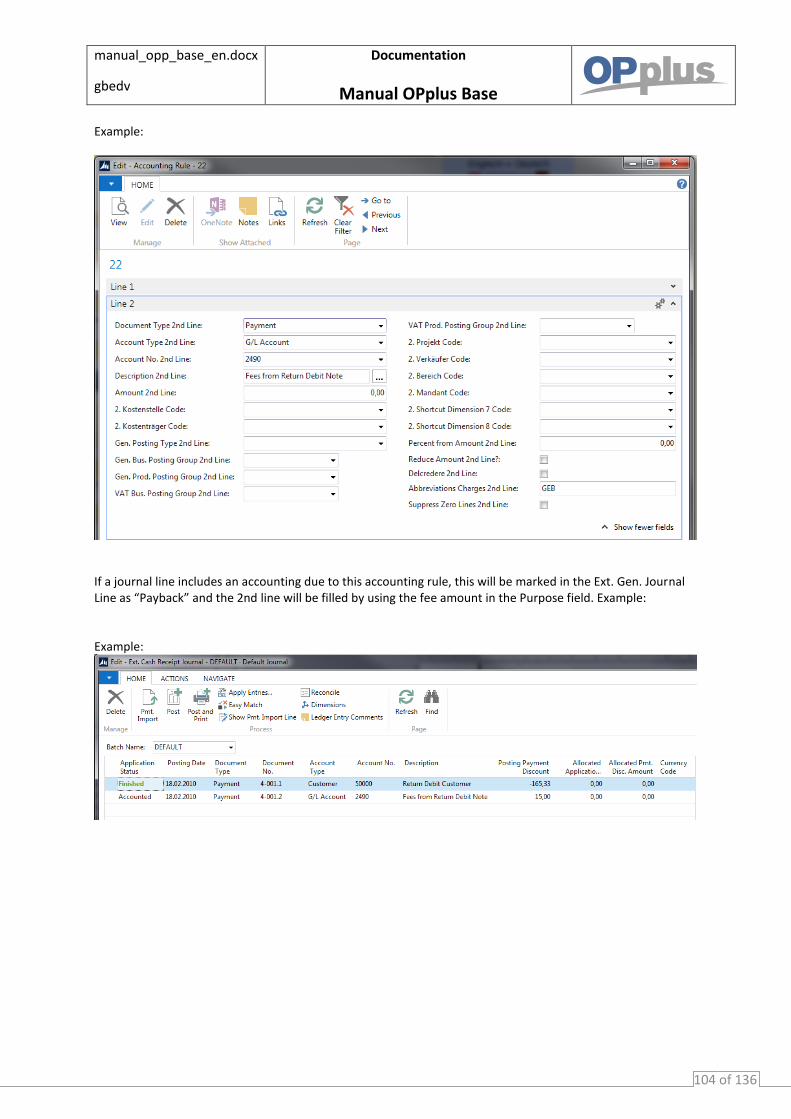
manual_opp_base_en.docx
gbedv
Documentation
Manual OPplus Base
104 of 136
Example:
If a journal line includes an accounting due to this accounting rule, this will be marked in the Ext. Gen. Journal Line as “Payback” and the 2nd line will be filled by using the fee amount in the Purpose field. Example: Example:
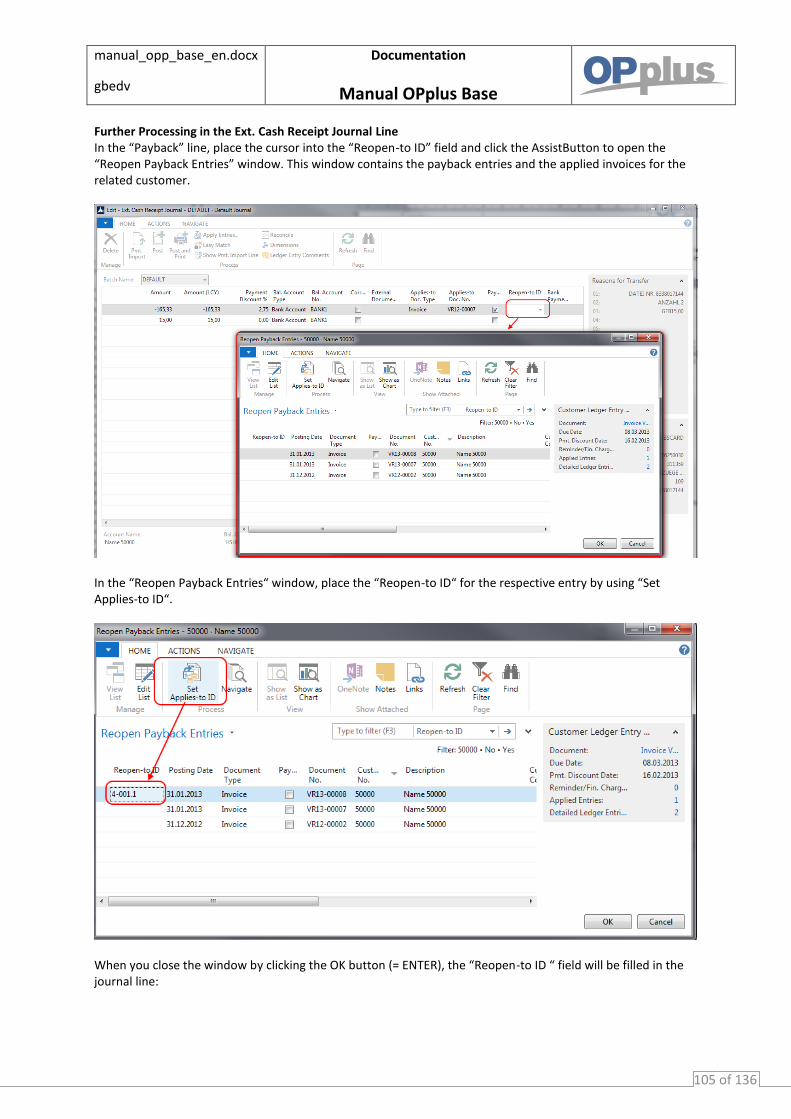
manual_opp_base_en.docx
gbedv
Documentation
Manual OPplus Base
105 of 136
Further Processing in the Ext. Cash Receipt Journal Line In the “Payback” line, place the cursor into the “Reopen-to ID” field and click the AssistButton to open the “Reopen Payback Entries” window. This window contains the payback entries and the applied invoices for the related customer.
In the “Reopen Payback Entries“ window, place the “Reopen-to ID“ for the respective entry by using “Set Applies-to ID“.
When you close the window by clicking the OK button (= ENTER), the “Reopen-to ID “ field will be filled in the journal line:
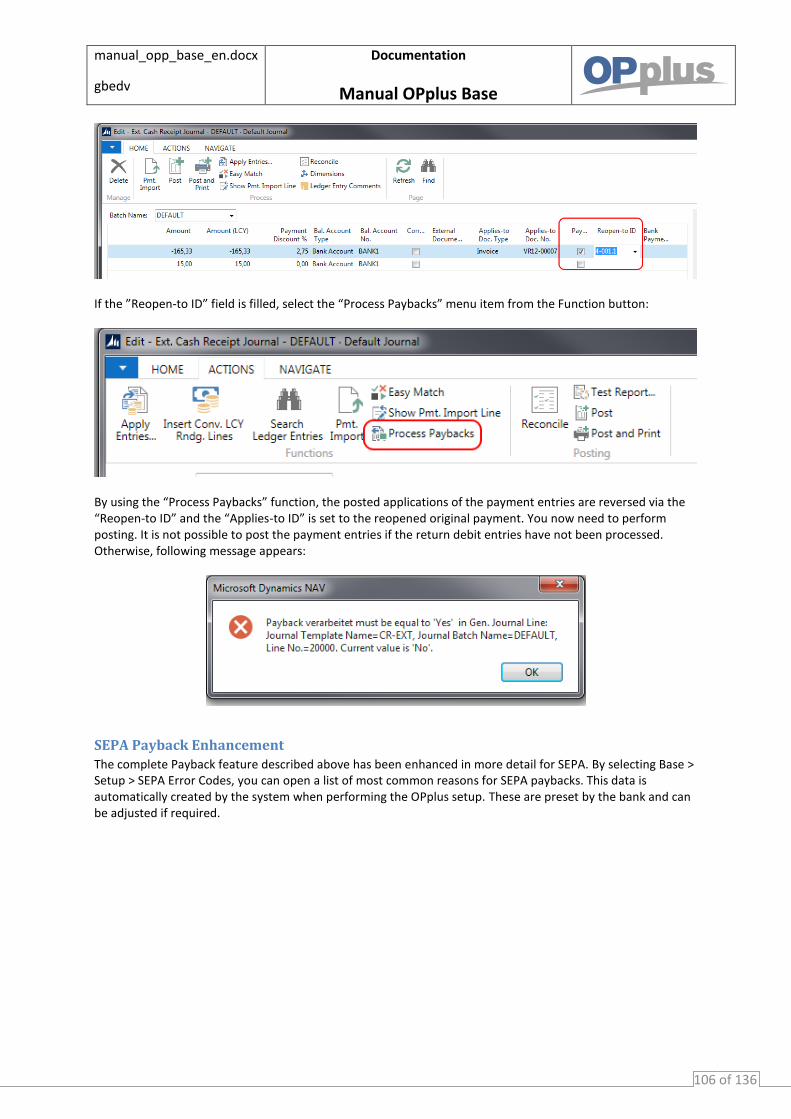
manual_opp_base_en.docx
gbedv
Documentation
Manual OPplus Base
106 of 136
If the ”Reopen-to ID” field is filled, select the “Process Paybacks” menu item from the Function button:
By using the “Process Paybacks” function, the posted applications of the payment entries are reversed via the “Reopen-to ID” and the “Applies-to ID” is set to the reopened original payment. You now need to perform posting. It is not possible to post the payment entries if the return debit entries have not been processed. Otherwise, following message appears:
SEPA Payback Enhancement
The complete Payback feature described above has been enhanced in more detail for SEPA. By selecting Base > Setup > SEPA Error Codes, you can open a list of most common reasons for SEPA paybacks. This data is automatically created by the system when performing the OPplus setup. These are preset by the bank and can be adjusted if required.
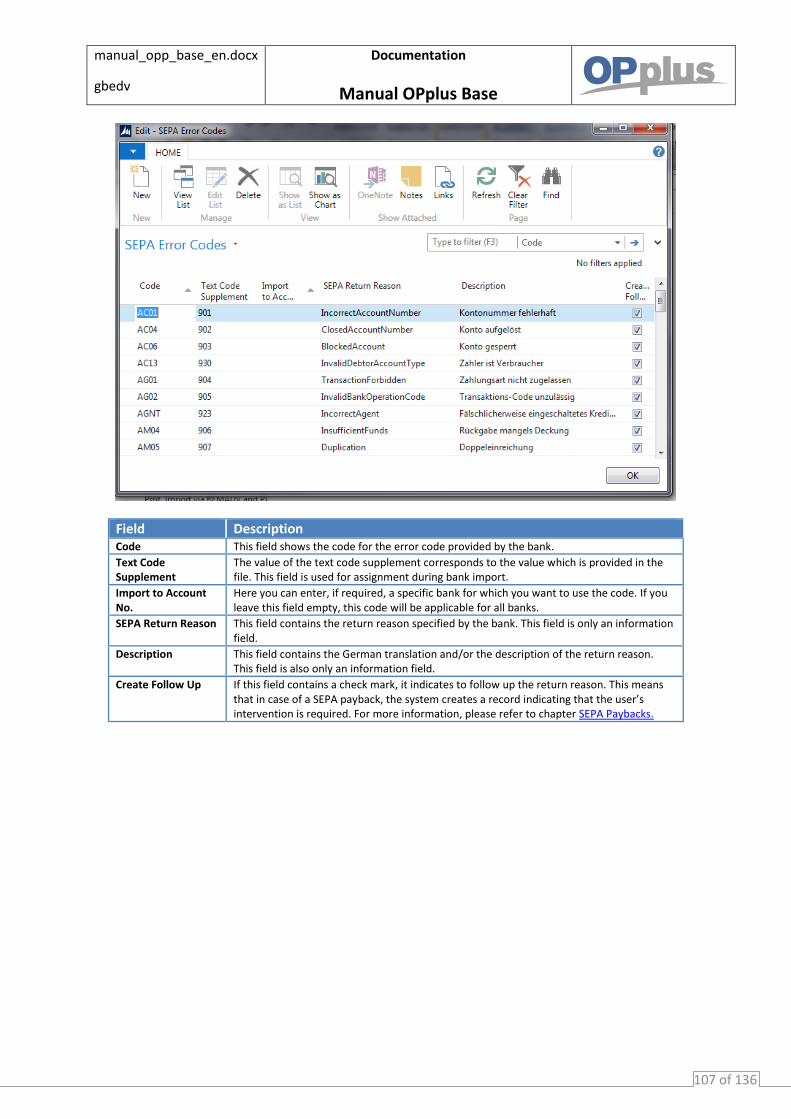
manual_opp_base_en.docx
gbedv
Documentation
Manual OPplus Base
107 of 136
Field Description Code This field shows the code for the error code provided by the bank.
Text Code Supplement
The value of the text code supplement corresponds to the value which is provided in the file. This field is used for assignment during bank import.
Import to Account No.
Here you can enter, if required, a specific bank for which you want to use the code. If you leave this field empty, this code will be applicable for all banks.
SEPA Return Reason This field contains the return reason specified by the bank. This field is only an information field.
Description This field contains the German translation and/or the description of the return reason. This field is also only an information field.
Create Follow Up If this field contains a check mark, it indicates to follow up the return reason. This means that in case of a SEPA payback, the system creates a record indicating that the user’s intervention is required. For more information, please refer to chapter SEPA Paybacks.
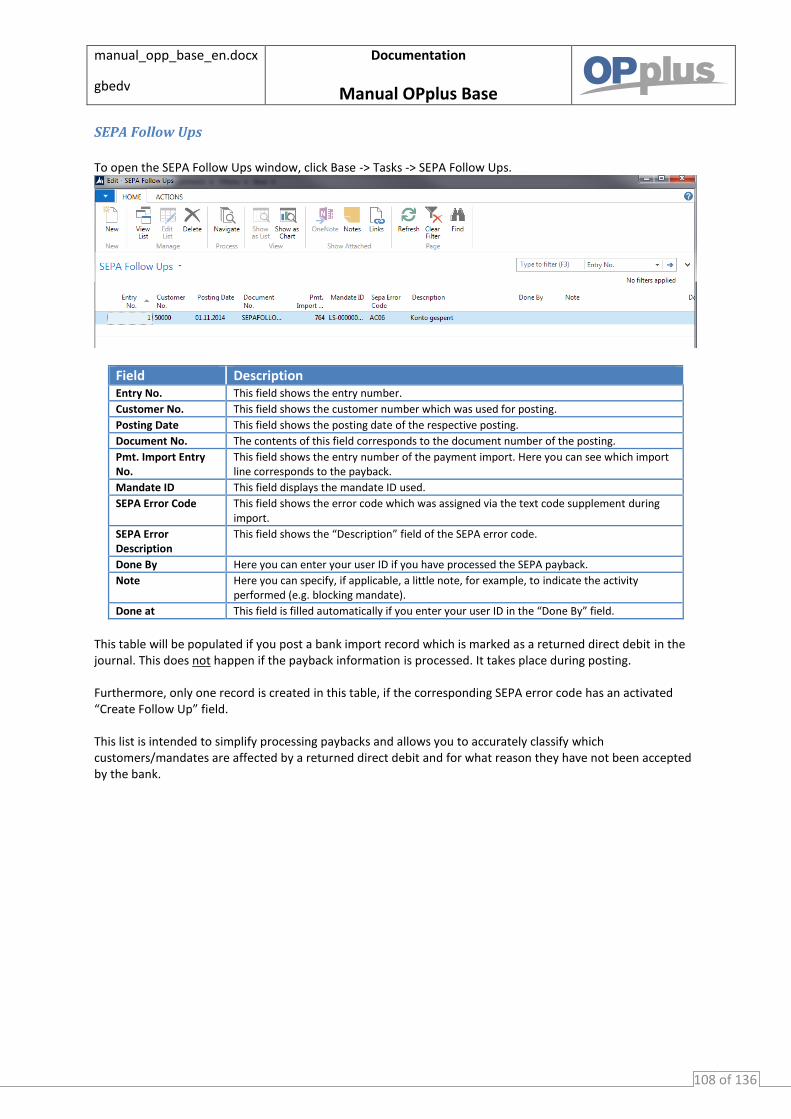
manual_opp_base_en.docx
gbedv
Documentation
Manual OPplus Base
108 of 136
SEPA Follow Ups
To open the SEPA Follow Ups window, click Base -> Tasks -> SEPA Follow Ups.
Field Description Entry No. This field shows the entry number.
Customer No. This field shows the customer number which was used for posting.
Posting Date This field shows the posting date of the respective posting.
Document No. The contents of this field corresponds to the document number of the posting.
Pmt. Import Entry No.
This field shows the entry number of the payment import. Here you can see which import line corresponds to the payback.
Mandate ID This field displays the mandate ID used.
SEPA Error Code This field shows the error code which was assigned via the text code supplement during import.
SEPA Error Description
This field shows the “Description” field of the SEPA error code.
Done By Here you can enter your user ID if you have processed the SEPA payback.
Note Here you can specify, if applicable, a little note, for example, to indicate the activity performed (e.g. blocking mandate).
Done at This field is filled automatically if you enter your user ID in the “Done By” field.
This table will be populated if you post a bank import record which is marked as a returned direct debit in the journal. This does not happen if the payback information is processed. It takes place during posting. Furthermore, only one record is created in this table, if the corresponding SEPA error code has an activated “Create Follow Up” field. This list is intended to simplify processing paybacks and allows you to accurately classify which customers/mandates are affected by a returned direct debit and for what reason they have not been accepted by the bank.
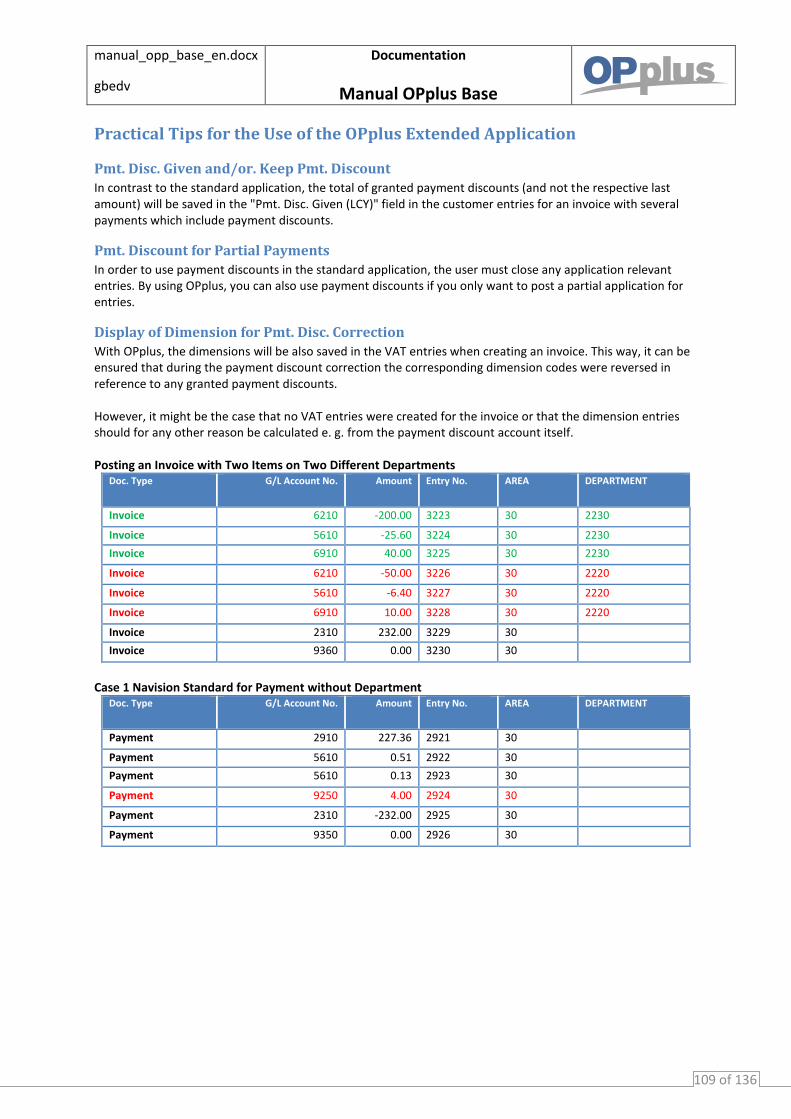
manual_opp_base_en.docx
gbedv
Documentation
Manual OPplus Base
109 of 136
Practical Tips for the Use of the OPplus Extended Application
Pmt. Disc. Given and/or. Keep Pmt. Discount
In contrast to the standard application, the total of granted payment discounts (and not the respective last amount) will be saved in the "Pmt. Disc. Given (LCY)" field in the customer entries for an invoice with several payments which include payment discounts.
Pmt. Discount for Partial Payments
In order to use payment discounts in the standard application, the user must close any application relevant entries. By using OPplus, you can also use payment discounts if you only want to post a partial application for entries.
Display of Dimension for Pmt. Disc. Correction
With OPplus, the dimensions will be also saved in the VAT entries when creating an invoice. This way, it can be ensured that during the payment discount correction the corresponding dimension codes were reversed in reference to any granted payment discounts. However, it might be the case that no VAT entries were created for the invoice or that the dimension entries should for any other reason be calculated e. g. from the payment discount account itself. Posting an Invoice with Two Items on Two Different Departments
Doc. Type G/L Account No. Amount Entry No. AREA DEPARTMENT
Invoice 6210 -200.00 3223 30 2230
Invoice 5610 -25.60 3224 30 2230
Invoice 6910 40.00 3225 30 2230
Invoice 6210 -50.00 3226 30 2220
Invoice 5610 -6.40 3227 30 2220
Invoice 6910 10.00 3228 30 2220
Invoice 2310 232.00 3229 30
Invoice 9360 0.00 3230 30
Case 1 Navision Standard for Payment without Department
Doc. Type G/L Account No. Amount Entry No. AREA DEPARTMENT
Payment 2910 227.36 2921 30
Payment 5610 0.51 2922 30
Payment 5610 0.13 2923 30
Payment 9250 4.00 2924 30
Payment 2310 -232.00 2925 30
Payment 9350 0.00 2926 30
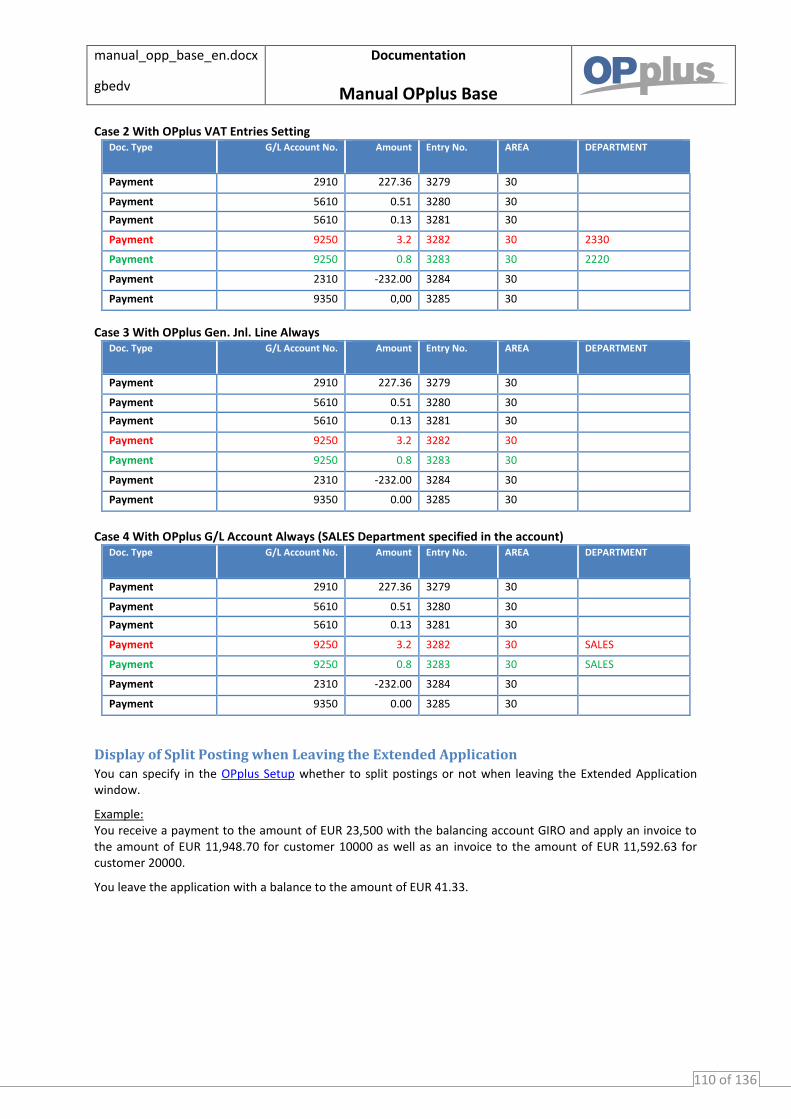
manual_opp_base_en.docx
gbedv
Documentation
Manual OPplus Base
110 of 136
Case 2 With OPplus VAT Entries Setting Doc. Type G/L Account No. Amount Entry No. AREA DEPARTMENT
Payment 2910 227.36 3279 30
Payment 5610 0.51 3280 30
Payment 5610 0.13 3281 30
Payment 9250 3.2 3282 30 2330
Payment 9250 0.8 3283 30 2220
Payment 2310 -232.00 3284 30
Payment 9350 0,00 3285 30
Case 3 With OPplus Gen. Jnl. Line Always Doc. Type G/L Account No. Amount Entry No. AREA DEPARTMENT
Payment 2910 227.36 3279 30
Payment 5610 0.51 3280 30
Payment 5610 0.13 3281 30
Payment 9250 3.2 3282 30
Payment 9250 0.8 3283 30
Payment 2310 -232.00 3284 30
Payment 9350 0.00 3285 30
Case 4 With OPplus G/L Account Always (SALES Department specified in the account)
Doc. Type G/L Account No. Amount Entry No. AREA DEPARTMENT
Payment 2910 227.36 3279 30
Payment 5610 0.51 3280 30
Payment 5610 0.13 3281 30
Payment 9250 3.2 3282 30 SALES
Payment 9250 0.8 3283 30 SALES
Payment 2310 -232.00 3284 30
Payment 9350 0.00 3285 30
Display of Split Posting when Leaving the Extended Application
You can specify in the OPplus Setup whether to split postings or not when leaving the Extended Application window.
Example: You receive a payment to the amount of EUR 23,500 with the balancing account GIRO and apply an invoice to the amount of EUR 11,948.70 for customer 10000 as well as an invoice to the amount of EUR 11,592.63 for customer 20000.
You leave the application with a balance to the amount of EUR 41.33.
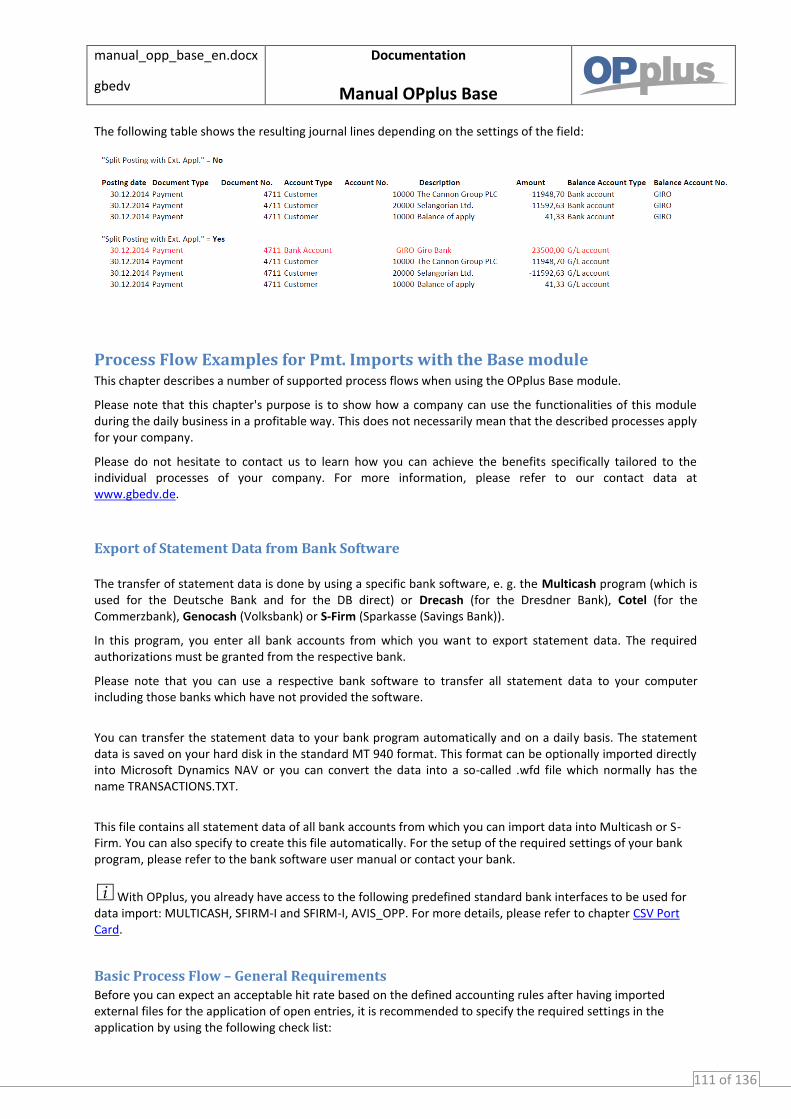
manual_opp_base_en.docx
gbedv
Documentation
Manual OPplus Base
111 of 136
The following table shows the resulting journal lines depending on the settings of the field:
Process Flow Examples for Pmt. Imports with the Base module This chapter describes a number of supported process flows when using the OPplus Base module.
Please note that this chapter's purpose is to show how a company can use the functionalities of this module during the daily business in a profitable way. This does not necessarily mean that the described processes apply for your company.
Please do not hesitate to contact us to learn how you can achieve the benefits specifically tailored to the individual processes of your company. For more information, please refer to our contact data at www.gbedv.de.
Export of Statement Data from Bank Software
The transfer of statement data is done by using a specific bank software, e. g. the Multicash program (which is used for the Deutsche Bank and for the DB direct) or Drecash (for the Dresdner Bank), Cotel (for the Commerzbank), Genocash (Volksbank) or S-Firm (Sparkasse (Savings Bank)).
In this program, you enter all bank accounts from which you want to export statement data. The required authorizations must be granted from the respective bank.
Please note that you can use a respective bank software to transfer all statement data to your computer including those banks which have not provided the software.
You can transfer the statement data to your bank program automatically and on a daily basis. The statement data is saved on your hard disk in the standard MT 940 format. This format can be optionally imported directly into Microsoft Dynamics NAV or you can convert the data into a so-called .wfd file which normally has the name TRANSACTIONS.TXT.
This file contains all statement data of all bank accounts from which you can import data into Multicash or S-Firm. You can also specify to create this file automatically. For the setup of the required settings of your bank program, please refer to the bank software user manual or contact your bank.
With OPplus, you already have access to the following predefined standard bank interfaces to be used for data import: MULTICASH, SFIRM-I and SFIRM-I, AVIS_OPP. For more details, please refer to chapter CSV Port Card.
Basic Process Flow – General Requirements Before you can expect an acceptable hit rate based on the defined accounting rules after having imported external files for the application of open entries, it is recommended to specify the required settings in the application by using the following check list:
manual_opp_base_en.docx
gbedv
Documentation
Manual OPplus Base
112 of 136
Areas Checkpoint Run the Generate OPplus Setup Entries batch job
Required
Specify Pmt. Import Interfaces Required depending on the import interface: minimum requirement: specify "Import to Company" field
Specify configuration data, which is among others OPplus Setup/Auto Application tab Accounting Hint Texts Accounting Rules
depending on the company (optional)
Create Association depending on the company (optional)
Create Customer/Vendor Association depending on the company (optional)
Suppress Customer/Vendor Bank Account – Import depending on the company (optional)
Suppress Customer/Vendor Bank Account – Application
depending on the company (optional)
Individually Define Customer/Vendor – Remittance Advice Entries
depending on the company (optional)
Create CSV Ports depending on the company (optional)
To increase the hit rate it is recommended to maintain the following OPplus tables on a regular basis based on your current data:
Base → Setup → Accounting Hint Texts Base → Setup → BC Code Accounting Rules Base → Setup → Accounting Rules
Process Flow – Example: Import MT940 (Single File)
A) Process flow if new payment import interfaces have been created during the file import and the corresponding account transactions are to be imported into a company:
1. Base → Pmt. Import Register → Function button → Import MT940 File 2. In the Pmt. Import via MT940 window, enter the file name (manually or by using the AssistButton
to the right of the field), select the import direction, and confirm by clicking the OK button. 3. The file will be imported creating a log in the Pmt. Import Register. 4. Base → Pmt. Import Register → Function button → Pmt. Import Interfaces → manually update the
newly created payment import interfaces 5. Base → Pmt. Import Register → select Pmt. Import Register of step 1 → mark and delete 6. After having successfully deleted the record, import the MT940 file of step 1 again (Base → Pmt.
Import Register → Function button → Import MT940 File) 7. Transfer the imported files to general journal lines.
B) Process flow if no new payment import interfaces have been created:
1. Base → Pmt. Import Register → Function button → Import MT940 File 2. In the Pmt. Import via MT940 window, enter the file name (manually or by using the AssistButton
to the right of the field), select the import direction, and confirm by clicking the OK button. 3. The file will be imported creating a log in the Pmt. Import Register. 4. Base → Pmt. Import Register → Function button → Pmt. Import Interfaces → double check to
ensure that no new payment import interfaces exist 5. Transfer the imported files to general journal lines.
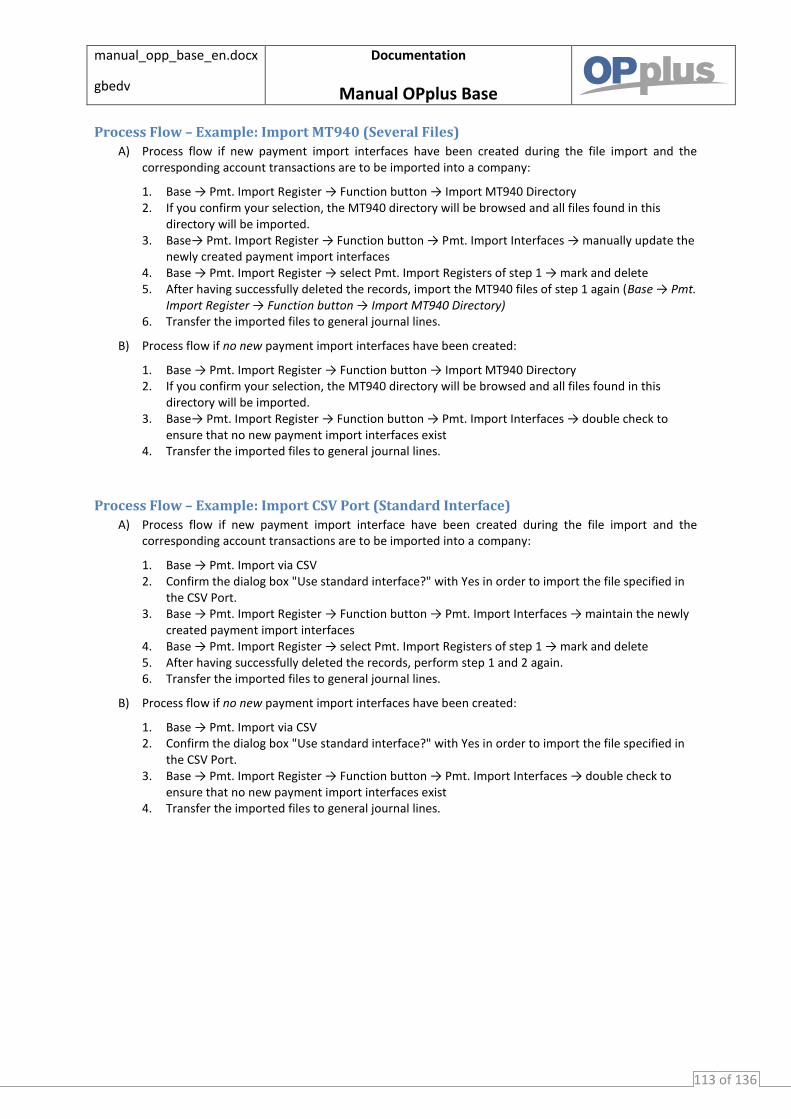
manual_opp_base_en.docx
gbedv
Documentation
Manual OPplus Base
113 of 136
Process Flow – Example: Import MT940 (Several Files)
A) Process flow if new payment import interfaces have been created during the file import and the corresponding account transactions are to be imported into a company:
1. Base → Pmt. Import Register → Function button → Import MT940 Directory 2. If you confirm your selection, the MT940 directory will be browsed and all files found in this
directory will be imported. 3. Base→ Pmt. Import Register → Function button → Pmt. Import Interfaces → manually update the
newly created payment import interfaces 4. Base → Pmt. Import Register → select Pmt. Import Registers of step 1 → mark and delete 5. After having successfully deleted the records, import the MT940 files of step 1 again (Base → Pmt.
Import Register → Function button → Import MT940 Directory) 6. Transfer the imported files to general journal lines.
B) Process flow if no new payment import interfaces have been created:
1. Base → Pmt. Import Register → Function button → Import MT940 Directory 2. If you confirm your selection, the MT940 directory will be browsed and all files found in this
directory will be imported. 3. Base→ Pmt. Import Register → Function button → Pmt. Import Interfaces → double check to
ensure that no new payment import interfaces exist 4. Transfer the imported files to general journal lines.
Process Flow – Example: Import CSV Port (Standard Interface)
A) Process flow if new payment import interface have been created during the file import and the corresponding account transactions are to be imported into a company:
1. Base → Pmt. Import via CSV 2. Confirm the dialog box "Use standard interface?" with Yes in order to import the file specified in
the CSV Port. 3. Base → Pmt. Import Register → Function button → Pmt. Import Interfaces → maintain the newly
created payment import interfaces 4. Base → Pmt. Import Register → select Pmt. Import Registers of step 1 → mark and delete 5. After having successfully deleted the records, perform step 1 and 2 again. 6. Transfer the imported files to general journal lines.
B) Process flow if no new payment import interfaces have been created:
1. Base → Pmt. Import via CSV 2. Confirm the dialog box "Use standard interface?" with Yes in order to import the file specified in
the CSV Port. 3. Base → Pmt. Import Register → Function button → Pmt. Import Interfaces → double check to
ensure that no new payment import interfaces exist 4. Transfer the imported files to general journal lines.
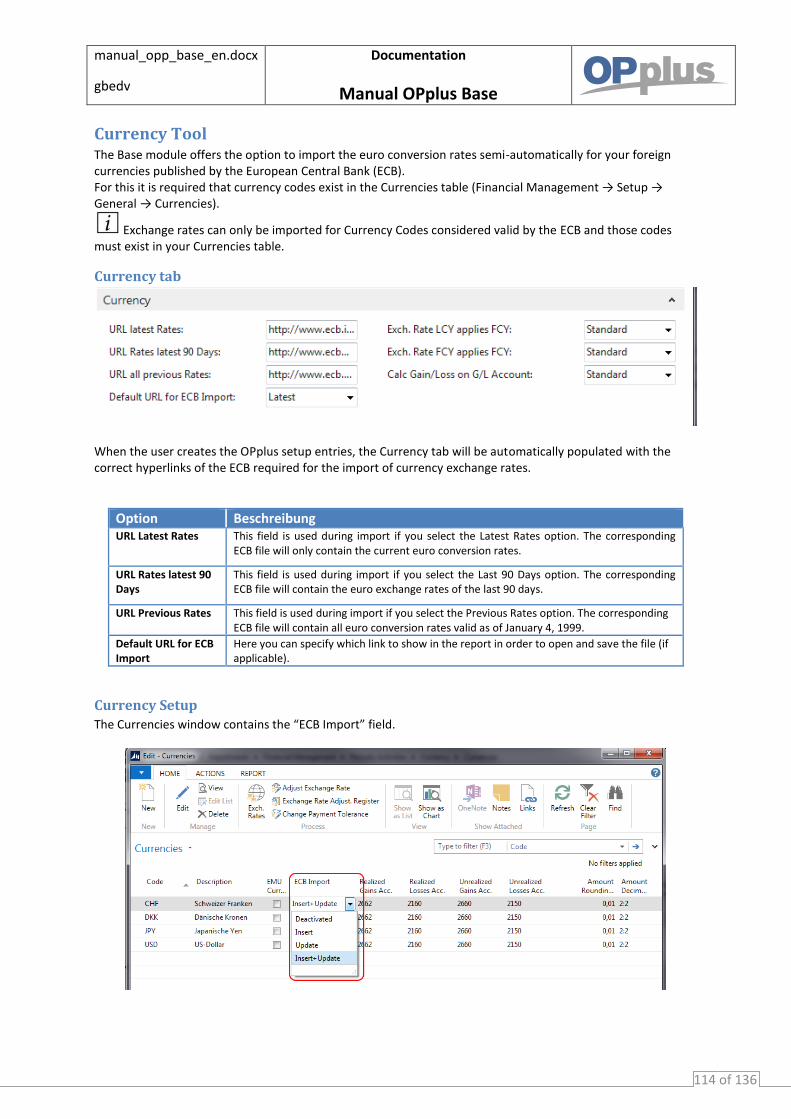
manual_opp_base_en.docx
gbedv
Documentation
Manual OPplus Base
114 of 136
Currency Tool The Base module offers the option to import the euro conversion rates semi-automatically for your foreign currencies published by the European Central Bank (ECB). For this it is required that currency codes exist in the Currencies table (Financial Management → Setup → General → Currencies).
Exchange rates can only be imported for Currency Codes considered valid by the ECB and those codes must exist in your Currencies table.
Currency tab
When the user creates the OPplus setup entries, the Currency tab will be automatically populated with the correct hyperlinks of the ECB required for the import of currency exchange rates.
Option Beschreibung URL Latest Rates This field is used during import if you select the Latest Rates option. The corresponding
ECB file will only contain the current euro conversion rates.
URL Rates latest 90 Days
This field is used during import if you select the Last 90 Days option. The corresponding ECB file will contain the euro exchange rates of the last 90 days.
URL Previous Rates This field is used during import if you select the Previous Rates option. The corresponding ECB file will contain all euro conversion rates valid as of January 4, 1999.
Default URL for ECB Import
Here you can specify which link to show in the report in order to open and save the file (if applicable).
Currency Setup
The Currencies window contains the “ECB Import” field.
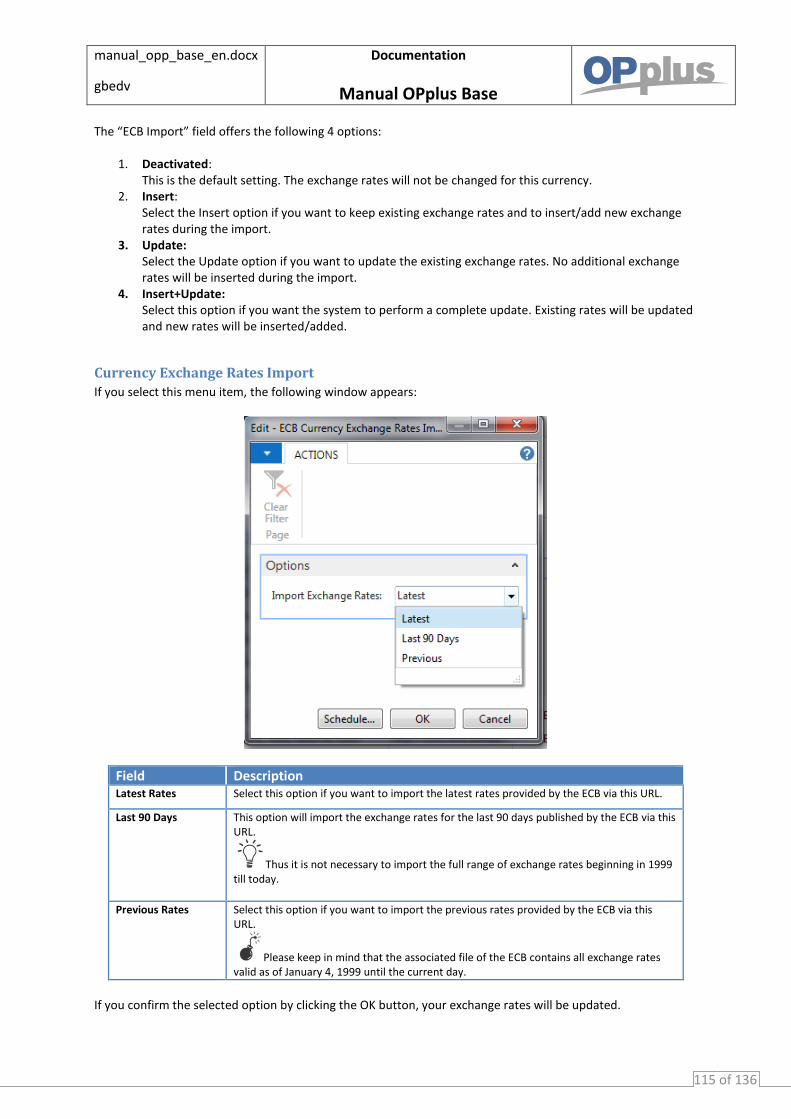
manual_opp_base_en.docx
gbedv
Documentation
Manual OPplus Base
115 of 136
The “ECB Import” field offers the following 4 options:
1. Deactivated: This is the default setting. The exchange rates will not be changed for this currency.
2. Insert: Select the Insert option if you want to keep existing exchange rates and to insert/add new exchange rates during the import.
3. Update: Select the Update option if you want to update the existing exchange rates. No additional exchange rates will be inserted during the import.
4. Insert+Update: Select this option if you want the system to perform a complete update. Existing rates will be updated and new rates will be inserted/added.
Currency Exchange Rates Import
If you select this menu item, the following window appears:
Field Description Latest Rates Select this option if you want to import the latest rates provided by the ECB via this URL.
Last 90 Days This option will import the exchange rates for the last 90 days published by the ECB via this URL.
Thus it is not necessary to import the full range of exchange rates beginning in 1999 till today.
Previous Rates Select this option if you want to import the previous rates provided by the ECB via this URL.
Please keep in mind that the associated file of the ECB contains all exchange rates valid as of January 4, 1999 until the current day.
If you confirm the selected option by clicking the OK button, your exchange rates will be updated.
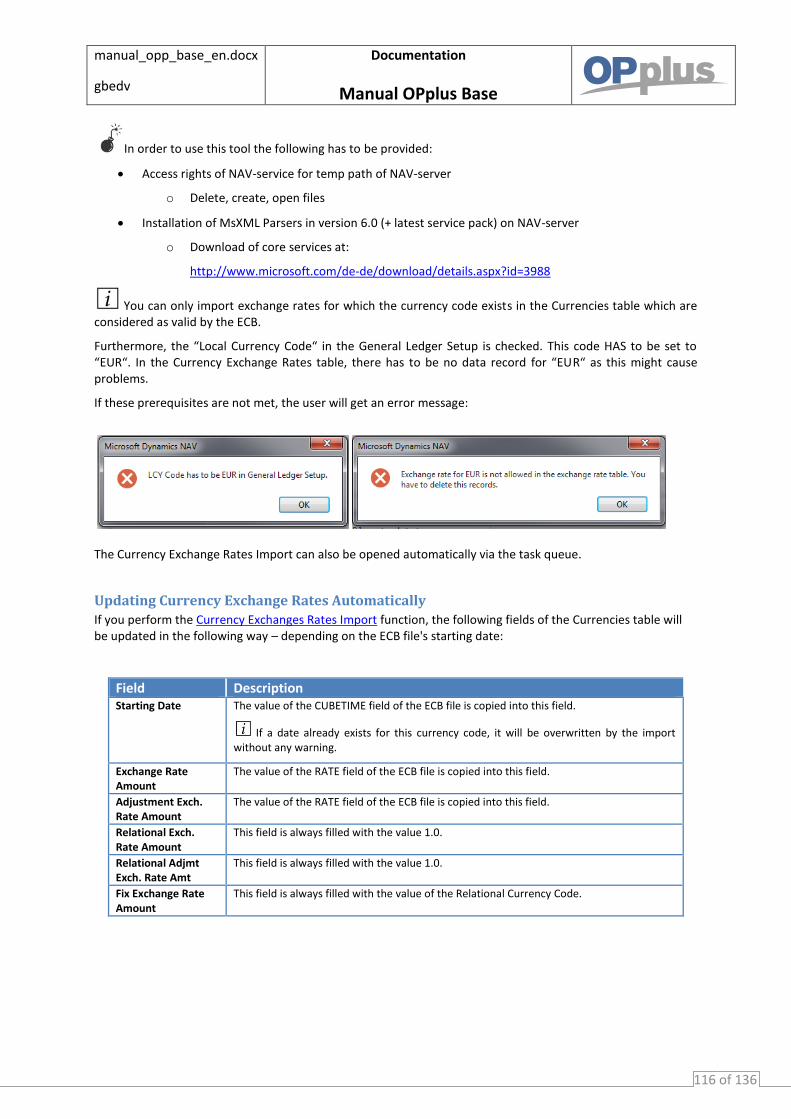
manual_opp_base_en.docx
gbedv
Documentation
Manual OPplus Base
116 of 136
In order to use this tool the following has to be provided:
Access rights of NAV-service for temp path of NAV-server
o Delete, create, open files
Installation of MsXML Parsers in version 6.0 (+ latest service pack) on NAV-server
o Download of core services at:
http://www.microsoft.com/de-de/download/details.aspx?id=3988
You can only import exchange rates for which the currency code exists in the Currencies table which are considered as valid by the ECB.
Furthermore, the “Local Currency Code“ in the General Ledger Setup is checked. This code HAS to be set to “EUR“. In the Currency Exchange Rates table, there has to be no data record for “EUR“ as this might cause problems.
If these prerequisites are not met, the user will get an error message:
The Currency Exchange Rates Import can also be opened automatically via the task queue.
Updating Currency Exchange Rates Automatically
If you perform the Currency Exchanges Rates Import function, the following fields of the Currencies table will be updated in the following way – depending on the ECB file's starting date:
Field Description Starting Date The value of the CUBETIME field of the ECB file is copied into this field.
If a date already exists for this currency code, it will be overwritten by the import without any warning.
Exchange Rate Amount
The value of the RATE field of the ECB file is copied into this field.
Adjustment Exch. Rate Amount
The value of the RATE field of the ECB file is copied into this field.
Relational Exch. Rate Amount
This field is always filled with the value 1.0.
Relational Adjmt Exch. Rate Amt
This field is always filled with the value 1.0.
Fix Exchange Rate Amount
This field is always filled with the value of the Relational Currency Code.
manual_opp_base_en.docx
gbedv
Documentation
Manual OPplus Base
117 of 136
Cash Book Journal The Cash Book Journal functionality offers the new general journal template CASH BOOK as well as the cash book G/L register. This function enables the user to maintain the cash book directly in OPplus and to print any required reports by using the system.
In comparison to the journal of the standard application, the Cash Book Journal allows the user to get a quick overview of the current balance of the cash account as well as of the balance after posting. In addition, a plausibility check is offered by this module to ensure that no negative cash values exist.
You can open the standard cash book journal by selecting Base → Cash Book Journal.
Before you can use the Cash Book Journal functionality, a batch name must be specified for each cash book with at least one balancing account indicated.
In the footer of the Cash Book Journal, the Currency, Start Balance and End Balance values of the specified balancing account are displayed – as shown in the following example:
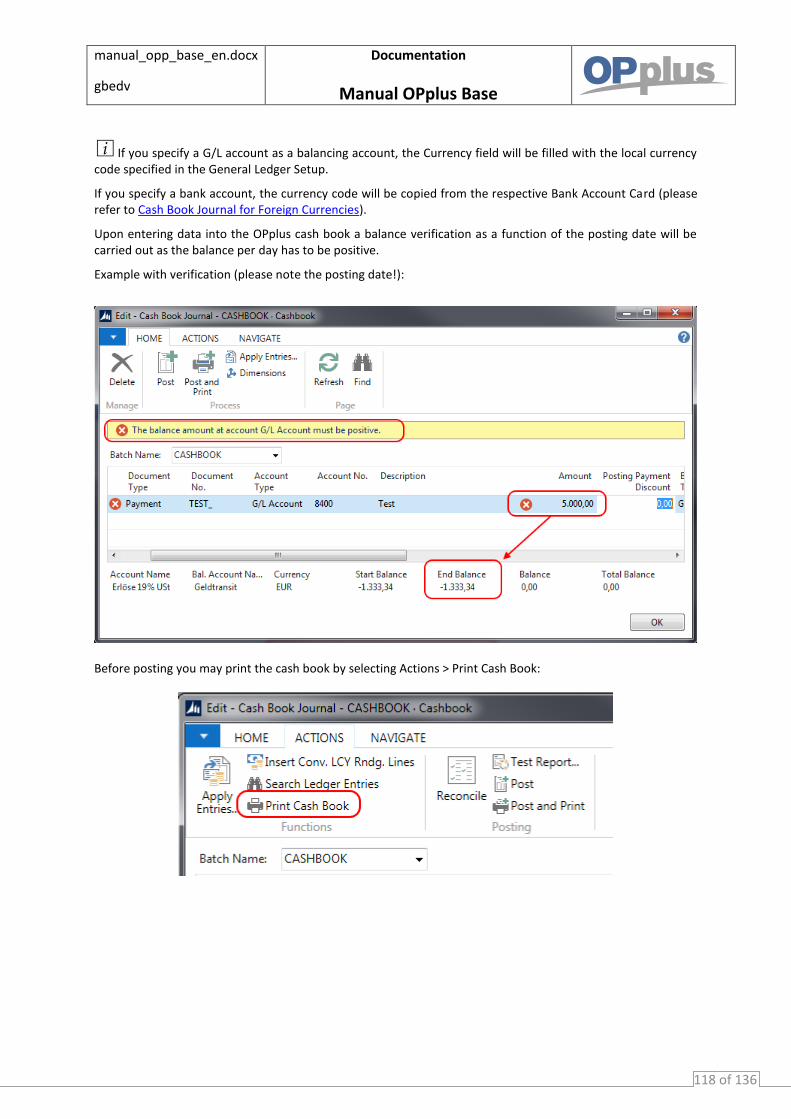
manual_opp_base_en.docx
gbedv
Documentation
Manual OPplus Base
118 of 136
If you specify a G/L account as a balancing account, the Currency field will be filled with the local currency code specified in the General Ledger Setup.
If you specify a bank account, the currency code will be copied from the respective Bank Account Card (please refer to Cash Book Journal for Foreign Currencies).
Upon entering data into the OPplus cash book a balance verification as a function of the posting date will be carried out as the balance per day has to be positive.
Example with verification (please note the posting date!):
Before posting you may print the cash book by selecting Actions > Print Cash Book:

manual_opp_base_en.docx
gbedv
Documentation
Manual OPplus Base
119 of 136
The Cash Book Journal layout corresponds to the structure of usual cash books in the Avery Zweckform format.
If the "Print Cash Report when Posting" field is activated in the OPplus Setup, the Cash Book Journal report will be printed automatically when posting.
G/L Register Cash Book
This report is based on a general journal. For this reason, it can only be used as a cash book if none! of the following scenarios exist in the cash book journal in the requested period:
Collective payments (application for more than one document)
Payments with payment discount / payment tolerances
Exchange Rate Adjustment
Foreign Currency Cash Book Also note that the Report Balance column reflects the balance in reference to the document number and not the balance for each report line.
Foreign Currency Cash Books
Foreign currency cash books can be used in OPplus. For this, you can create a NAV bank account for each foreign currency and specify it in the respective cash book journal.
The balance can only be checked and the cash book be printed correctly if you create a separate journal for each currency code.
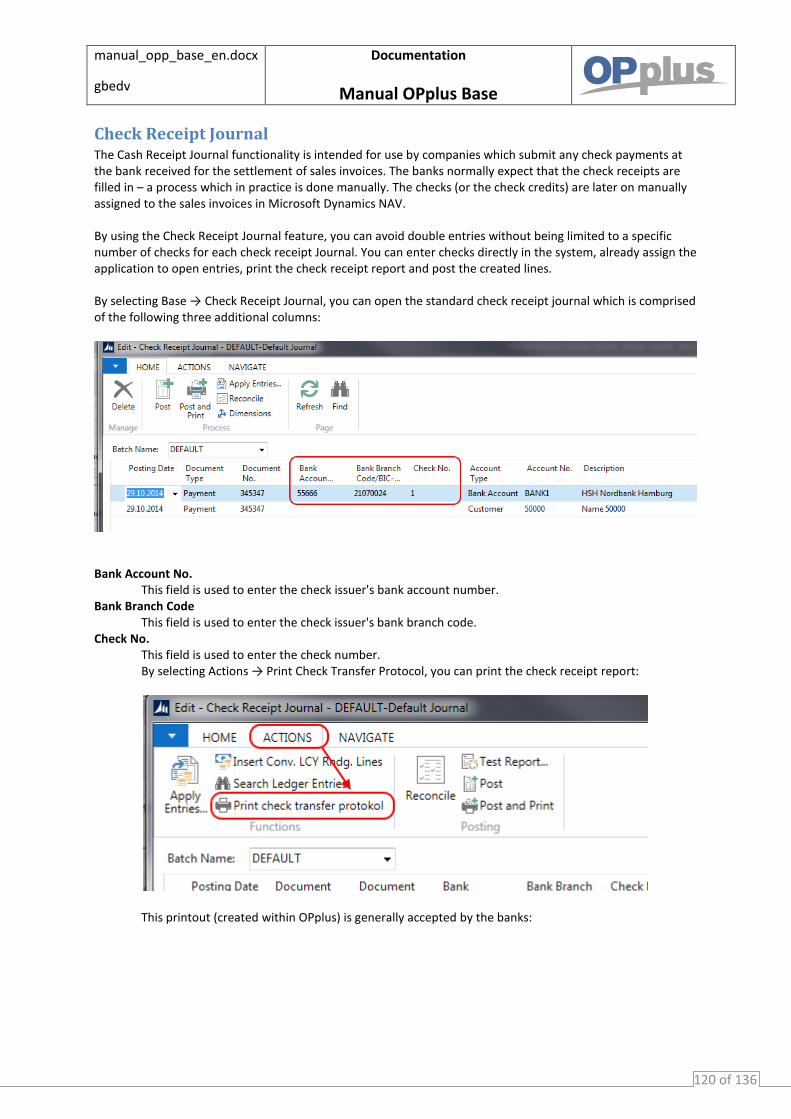
manual_opp_base_en.docx
gbedv
Documentation
Manual OPplus Base
120 of 136
Check Receipt Journal The Cash Receipt Journal functionality is intended for use by companies which submit any check payments at the bank received for the settlement of sales invoices. The banks normally expect that the check receipts are filled in – a process which in practice is done manually. The checks (or the check credits) are later on manually assigned to the sales invoices in Microsoft Dynamics NAV. By using the Check Receipt Journal feature, you can avoid double entries without being limited to a specific number of checks for each check receipt Journal. You can enter checks directly in the system, already assign the application to open entries, print the check receipt report and post the created lines. By selecting Base → Check Receipt Journal, you can open the standard check receipt journal which is comprised of the following three additional columns:
Bank Account No.
This field is used to enter the check issuer's bank account number. Bank Branch Code
This field is used to enter the check issuer's bank branch code. Check No.
This field is used to enter the check number. By selecting Actions → Print Check Transfer Protocol, you can print the check receipt report:
This printout (created within OPplus) is generally accepted by the banks:
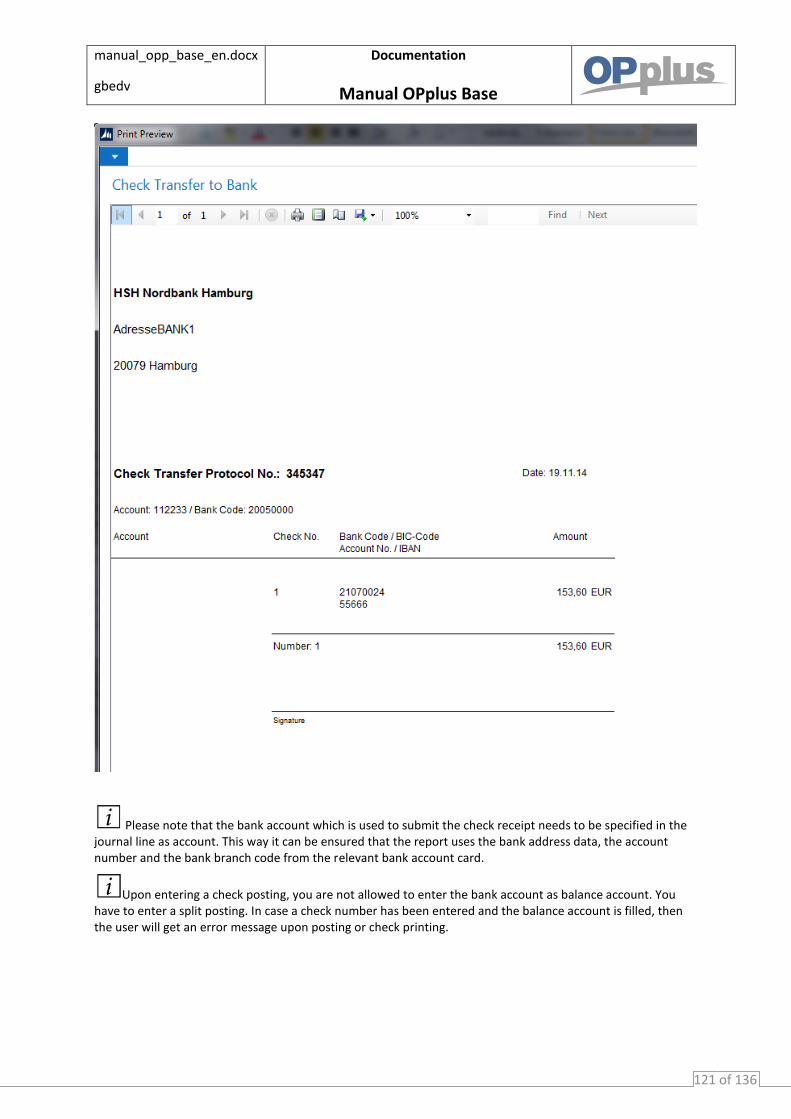
manual_opp_base_en.docx
gbedv
Documentation
Manual OPplus Base
121 of 136
Please note that the bank account which is used to submit the check receipt needs to be specified in the journal line as account. This way it can be ensured that the report uses the bank address data, the account number and the bank branch code from the relevant bank account card.
Upon entering a check posting, you are not allowed to enter the bank account as balance account. You have to enter a split posting. In case a check number has been entered and the balance account is filled, then the user will get an error message upon posting or check printing.
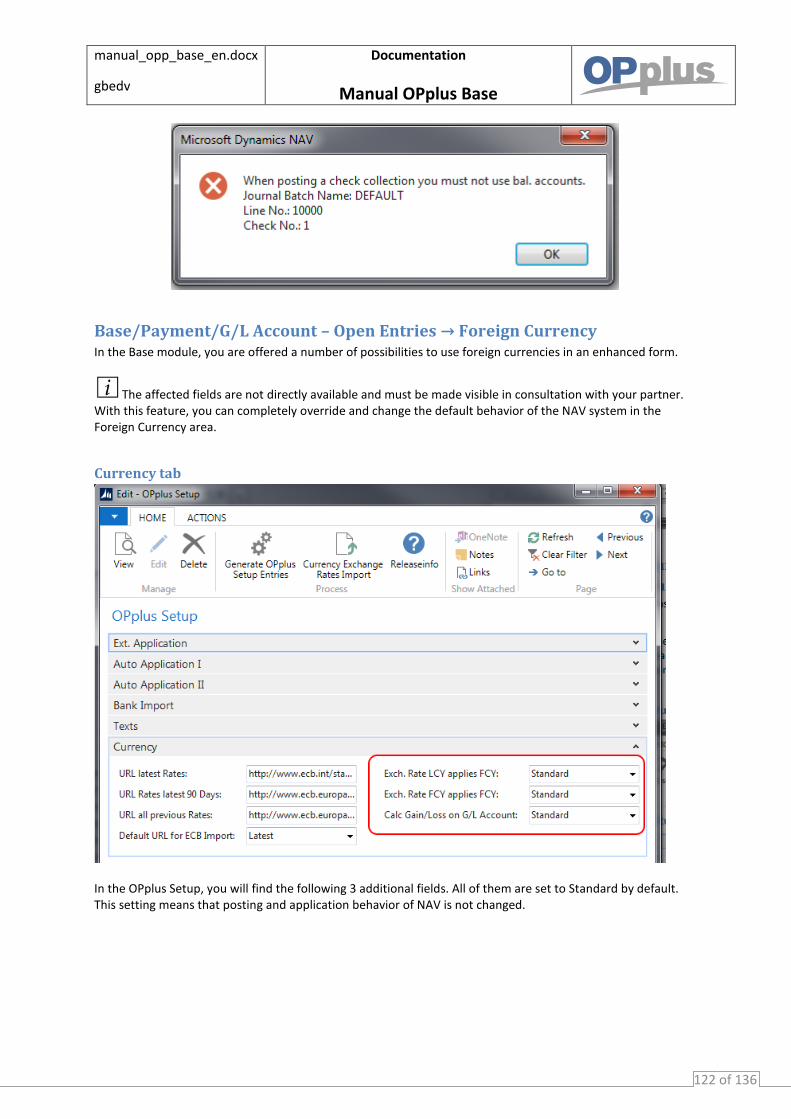
manual_opp_base_en.docx
gbedv
Documentation
Manual OPplus Base
122 of 136
Base/Payment/G/L Account – Open Entries → Foreign Currency In the Base module, you are offered a number of possibilities to use foreign currencies in an enhanced form.
The affected fields are not directly available and must be made visible in consultation with your partner. With this feature, you can completely override and change the default behavior of the NAV system in the Foreign Currency area.
Currency tab
In the OPplus Setup, you will find the following 3 additional fields. All of them are set to Standard by default. This setting means that posting and application behavior of NAV is not changed.
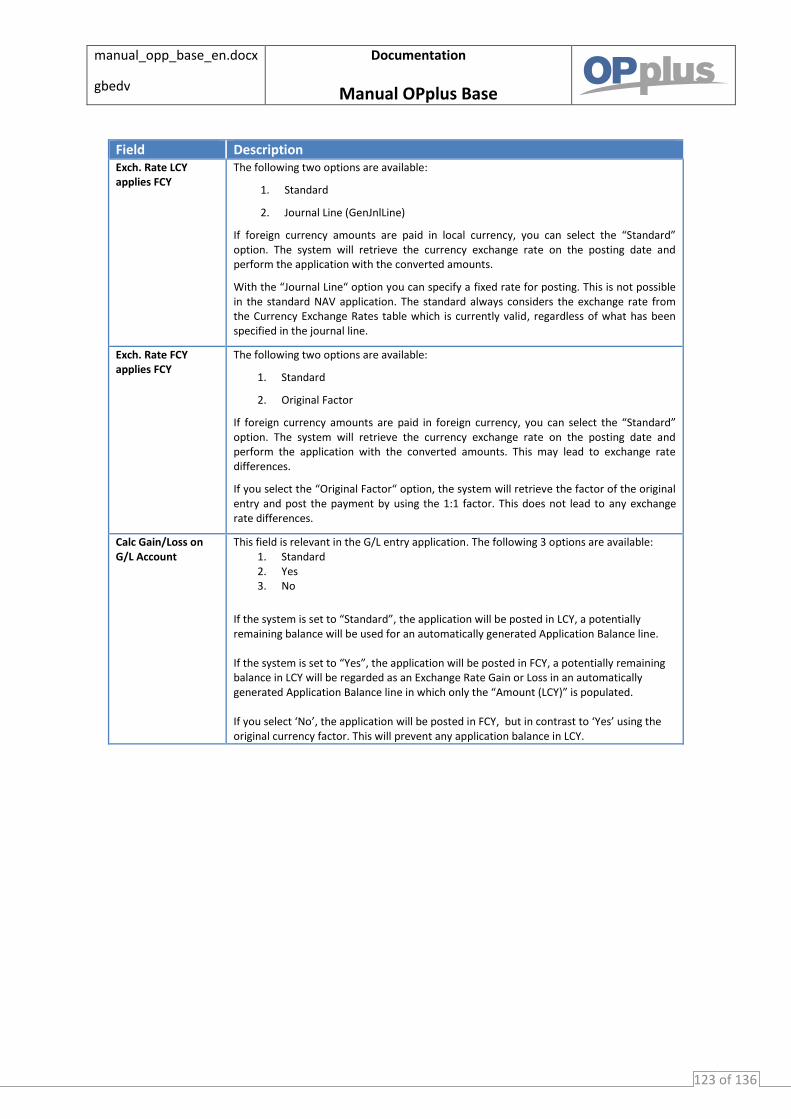
manual_opp_base_en.docx
gbedv
Documentation
Manual OPplus Base
123 of 136
Field Description Exch. Rate LCY applies FCY
The following two options are available:
1. Standard
2. Journal Line (GenJnlLine)
If foreign currency amounts are paid in local currency, you can select the “Standard” option. The system will retrieve the currency exchange rate on the posting date and perform the application with the converted amounts.
With the “Journal Line“ option you can specify a fixed rate for posting. This is not possible in the standard NAV application. The standard always considers the exchange rate from the Currency Exchange Rates table which is currently valid, regardless of what has been specified in the journal line.
Exch. Rate FCY applies FCY
The following two options are available:
1. Standard
2. Original Factor
If foreign currency amounts are paid in foreign currency, you can select the “Standard” option. The system will retrieve the currency exchange rate on the posting date and perform the application with the converted amounts. This may lead to exchange rate differences.
If you select the “Original Factor“ option, the system will retrieve the factor of the original entry and post the payment by using the 1:1 factor. This does not lead to any exchange rate differences.
Calc Gain/Loss on G/L Account
This field is relevant in the G/L entry application. The following 3 options are available: 1. Standard 2. Yes 3. No
If the system is set to “Standard”, the application will be posted in LCY, a potentially remaining balance will be used for an automatically generated Application Balance line. If the system is set to “Yes”, the application will be posted in FCY, a potentially remaining balance in LCY will be regarded as an Exchange Rate Gain or Loss in an automatically generated Application Balance line in which only the “Amount (LCY)” is populated. If you select ‘No’, the application will be posted in FCY, but in contrast to ‘Yes’ using the original currency factor. This will prevent any application balance in LCY.

manual_opp_base_en.docx
gbedv
Documentation
Manual OPplus Base
124 of 136
Example “Exch. Rate LCY applies FCY”
Select the “Standard“ option.
Post an invoice with an amount of USD 1,000 with an exchange rate of 1.5, this corresponds to 666.67 in LCY.
On the day of the payment the exchange rate has changed to 2.0.
The payment amount in LCY (here 800.00) is taken e.g. from the bank account statement. Afterwards click on “Apply entries…”. The invoice application amount in the Extended Application Page will be calculated using the exchange rate on the posting date of the payment.

manual_opp_base_en.docx
gbedv
Documentation
Manual OPplus Base
125 of 136
The calculated balance of 300.00 is carried over to a new line in the journal.
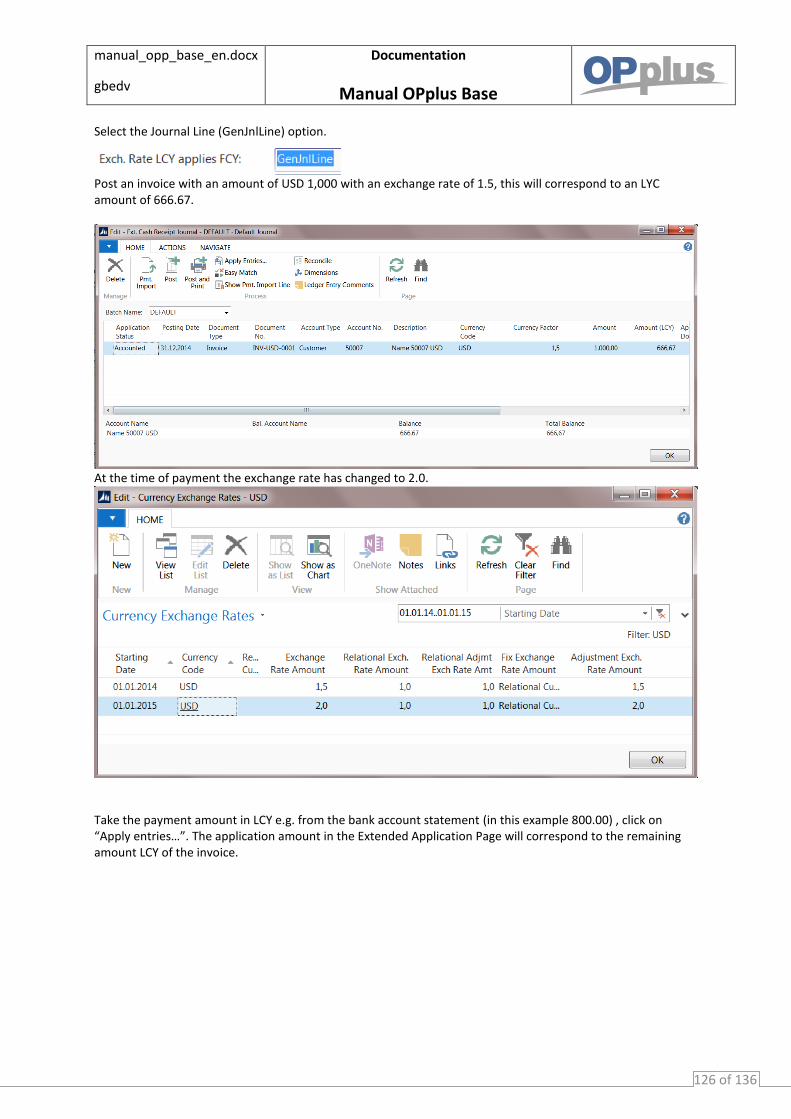
manual_opp_base_en.docx
gbedv
Documentation
Manual OPplus Base
126 of 136
Select the Journal Line (GenJnlLine) option.
Post an invoice with an amount of USD 1,000 with an exchange rate of 1.5, this will correspond to an LYC amount of 666.67.
At the time of payment the exchange rate has changed to 2.0.
Take the payment amount in LCY e.g. from the bank account statement (in this example 800.00) , click on “Apply entries…”. The application amount in the Extended Application Page will correspond to the remaining amount LCY of the invoice.
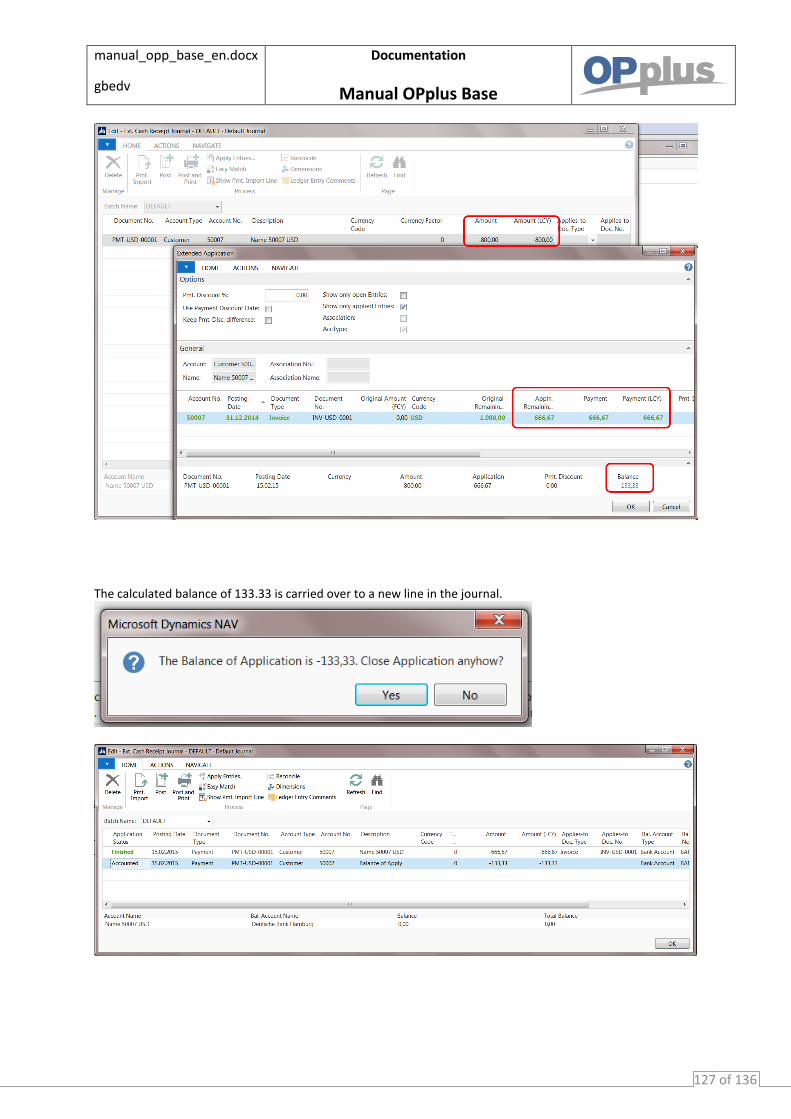
manual_opp_base_en.docx
gbedv
Documentation
Manual OPplus Base
127 of 136
The calculated balance of 133.33 is carried over to a new line in the journal.

manual_opp_base_en.docx
gbedv
Documentation
Manual OPplus Base
128 of 136
Example “Exch. Rate FCY applies FCY”
Select the “Standard“ option.
Post an invoice with an amount of USD 1,000 with an exchange rate of 1.5.
Posting of payment with amount of USD 1,000, on the posting day the exchange rate has changed to 2.
The application takes place using the exchange rate valid on the posting day,
manual_opp_base_en.docx
gbedv
Documentation
Manual OPplus Base
129 of 136
The calculated Exchange Rate difference is posted to the currencies’ Realized Gains or Realized Loss account.

manual_opp_base_en.docx
gbedv
Documentation
Manual OPplus Base
130 of 136
Select the “Original Factor” option.
Post an invoice with an amount of USD 1,000 with an exchange rate of 1.5.
Posting of payment to the amount of USD 1,000, on the posting day the exchange rate has changed to 2.
Settle the invoice with “Apply entries…” and close with OK to return to the journal. The “Amount (LCY)” is taken directly from the invoice as the payment amount. The currency factor is recalculated. Note that the currency factors of the invoice and payment may differ slightly when rounding residuals remain as result of the recalculation.
manual_opp_base_en.docx
gbedv
Documentation
Manual OPplus Base
131 of 136
Since the invoice and payment were posted with an identical exchange rate, Realized Gains or Losses will not arise.
This setup is only evaluated in the Ext. Cash Receipt Journal if the currency codes in the journal line and the balancing account match, and also generally in the Create Payment Suggestion batches.
manual_opp_base_en.docx
gbedv
Documentation
Manual OPplus Base
132 of 136
Example “Calc Gain/Loss on G/L Account“
Post a payment proposal with an amount of 2,000 USD:
The system creates an open entry (cash transit) for 2,000 USD (with an exchange rate of 2, this corresponds to 1,000 in LCY) on the G/L account 1360 Cash transfer, which shall be used to describe the behavior of the field. The open item is settled on 1 Mar 2015, in the meantime the exchange rate has changed to 1.8.
Posting with “Standard“ option When the application amount USD (2,000) is entered, the exchange rate of 1.8 will correspond to 1,111.11 in LCY.

manual_opp_base_en.docx
gbedv
Documentation
Manual OPplus Base
133 of 136
The application will now check if the application from the LCY perspective can be regarded as settled.
If a balance remains in LCY, this amount will be used to generate a new line in the journal. In this example, a line with an LCY amount of 1111.11 is created, the amount in FCY results accordingly.

manual_opp_base_en.docx
gbedv
Documentation
Manual OPplus Base
134 of 136
Posting with “Yes“ option When the application amount USD 2,000 is entered, the exchange rate of 1.8 will correspond to 1,111.11 in LCY.
The application will now check if the application from the FCY perspective can be regarded as settled. If a balance remains in LCY, this amount will be used to generate a new line in the journal. In this example, a line with an amount of 111.11 is created, the amount in FCY is 0.
Posting with “No“ option When the application amount USD (2,000) is entered, the exchange rate of 1.8 will correspond to 1,111.11 in LCY.
manual_opp_base_en.docx
gbedv
Documentation
Manual OPplus Base
135 of 136
The application will now check if the application from the FCY perspective can be regarded as settled, but in contrast to the “Yes” option it will use the original currency factor of the application entry.
If you perform the application by clicking on OK, the system will use the “Amount (LCY)” of the application entry for the journal line, the currency factor will be recalculated by comparing “Amount” to “Amount (LCY)”.
manual_opp_base_en.docx
gbedv
Documentation
Manual OPplus Base
136 of 136
For more information about OPplus please refer to http://www.opplus.de and http://www.gbedv.de
gbedv GmbH & Co. KG Loger Straße 22b 27711 Osterholz-Scharmbeck/Germany Phone: + 49 (0) 4791 / 96 525 0 Fax: + 49 (0) 4791 / 96 525 20
Email: [email protected] Internet: http://www.gbedv.de
This document is for informational purpose only. Its contents may be changed at any time without prior notice if required for technical or content-related reasons. This document may not be reproduced or transferred, partially or in full, in any form or by any means without the prior written permission of gbedv GmbH & Co. KG. gbedv GmbH & Co. KG shall not be liable for any errors and omissions which may exist in the document. © gbedv 2015. All rights reserved. Last Update: 15 April 2015 The software mentioned in this document may only be used or copied according to the licensing terms. All product names, trademarks and logos used are property of the respective owners.