manual g/l open entries - gbedv gmbh & co....
TRANSCRIPT
Manual G/L Open Entries
Prepared for
Customers and Partners
Project
OPplus
Prepared by
gbedv

manual_opp_glopen_entry_en.docx
gbedv
Documentation
G/L Open Entries
2 of 22
Contents General Information ................................................................................................................................ 3
Manual Structure................................................................................................................................. 3
Description of Icons ............................................................................................................................. 3
OPlus Navigation Area ............................................................................................................................. 4
OPplus License Information module ....................................................................................................... 6
Setup Configuration ............................................................................................................................ 7
OPplus G/L Open Entries module .......................................................................................................... 10
G/L Open Entries Setup ..................................................................................................................... 10
G/L Account Card............................................................................................................................... 12
Build Open Entries check box ........................................................................................................ 12
Build Open Entries check box ........................................................................................................ 14
Application Bal. Credit Account | Application Bal. Debit Account ................................................ 14
Dimension for System Posting ....................................................................................................... 14
Balance field .................................................................................................................................. 15
Entries incl. Rem. Amount ............................................................................................................. 15
Open G/L Accounts ............................................................................................................................ 18
G/L Account – Open Entries .............................................................................................................. 20
Using the G/L Open Entries and Extended Lists & Reports modules ................................................ 21

manual_opp_glopen_entry_en.docx
gbedv
Documentation
G/L Open Entries
3 of 22
General Information
Manual Structure This manual describes the following modules of the certified vertical solution OPplus:
OPplus G/L Open Entries
In the application menu, the functionality of this module is available via the “G/L Open Entries” menu group. The manual describes the relevant fields and functions and includes procedures and illustrations to demonstrate the use of OPplus. For help about a specific field, click the field and press F1. Please note that OPplus modules may be purchased individually, therefore descriptions, menu items, and illustrations of cross-module functionalities are not necessarily available to all users. The following modules of the certified vertical solution OPplus are described in separate manuals: OPplus Base, OPplus Payments, OPplus Ext. Lists and Reports, OPplus Analysis (Trial Balance & VAT).
Description of Icons
Information – Indicates sections which include important information to be considered by the user.
Reminder – Reminds the user of already mentioned information or processes which enable the user to achieve optimized results.
Tip – Indicates sections which assist the user to apply the functionality correctly.
Warning – Signifies information of high importance to be considered in order to avoid any errors.

manual_opp_glopen_entry_en.docx
gbedv
Documentation
G/L Open Entries
4 of 22
OPlus Navigation Area After having imported the OPplus .fob files, the OPplus functionality is shown as a new menu within the Microsoft Dynamics NAV navigation pane placed below the Financial Management menu by default:
The OPplus menu shows the following menu groups if all OPplus modules are used. The History menu item is always included in the OPplus menu, regardless of which OPplus modules are used:

manual_opp_glopen_entry_en.docx
gbedv
Documentation
G/L Open Entries
5 of 22

manual_opp_glopen_entry_en.docx
gbedv
Documentation
G/L Open Entries
6 of 22
OPplus License Information module This chapter describes the benefit of the OPplus License Information module which you will find in the navigation area of the General group. This module is always integrated and a prerequisite for using OPplus regardless which modules of OPplus you plan to use.

manual_opp_glopen_entry_en.docx
gbedv
Documentation
G/L Open Entries
7 of 22
On the OPplus License Information page, you can see which modules are activated in the customer license. You may implement OPplus in a database without activating all modules in every company. In order to activate a module it is necessary that a) the respective module is licensed and b) that the setup of the module has been started.
If you have licensed the Association module, the “Setup done“ field will automatically contain a check mark. The system will not have a check mark for this field if any associations / linkages have been set up. Via this page you can now set up the user roles for all licensed modules.
Setup Configuration By using the “Export/Import Setups” function via the “OPplus License Information”, you can transfer OPplus setup tables from one database into another or, from company A to company B.
The report is divided into two parts, providing three fields in the upper Options section.
manual_opp_glopen_entry_en.docx
gbedv
Documentation
G/L Open Entries
8 of 22
Field Description Direction In this field, you can select whether to import or to export files.
Filename This field contains the name of the file you want to import and/or create.
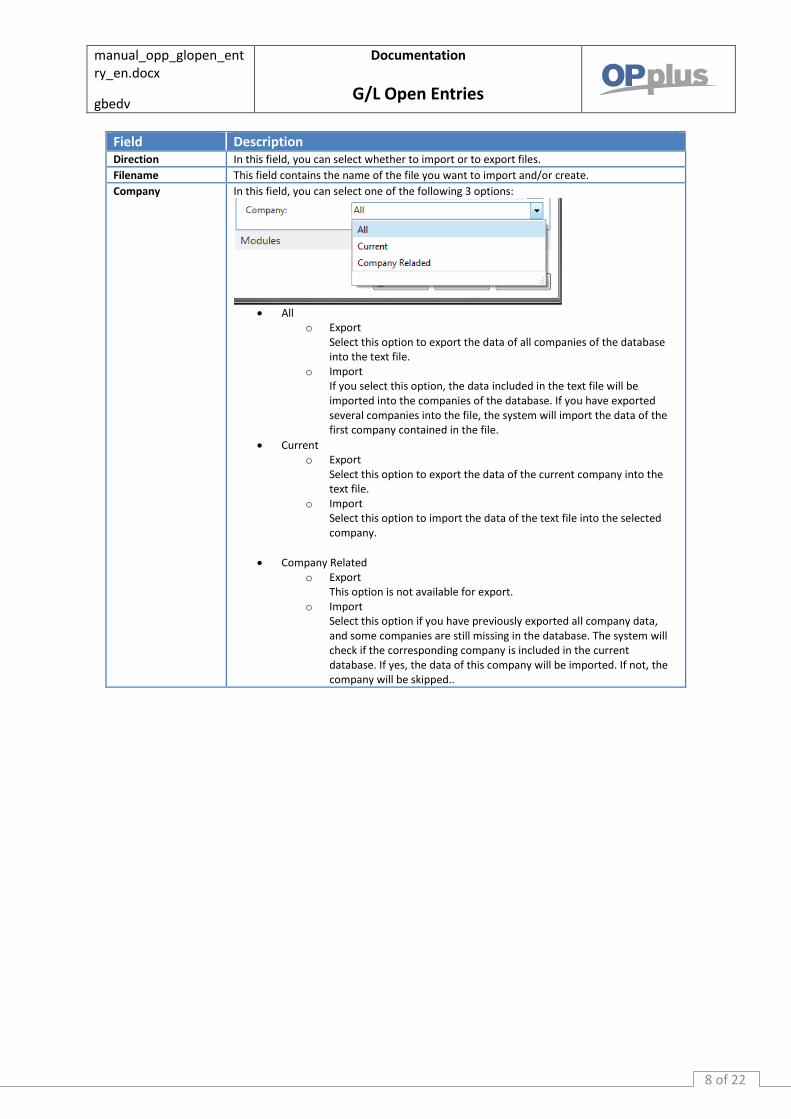
Company
In this field, you can select one of the following 3 options:
All
o Export Select this option to export the data of all companies of the database into the text file.
o Import If you select this option, the data included in the text file will be imported into the companies of the database. If you have exported several companies into the file, the system will import the data of the first company contained in the file.
Current o Export
Select this option to export the data of the current company into the text file.
o Import Select this option to import the data of the text file into the selected company.
Company Related o Export
This option is not available for export. o Import
Select this option if you have previously exported all company data, and some companies are still missing in the database. The system will check if the corresponding company is included in the current database. If yes, the data of this company will be imported. If not, the company will be skipped..
manual_opp_glopen_entry_en.docx
gbedv
Documentation
G/L Open Entries
9 of 22
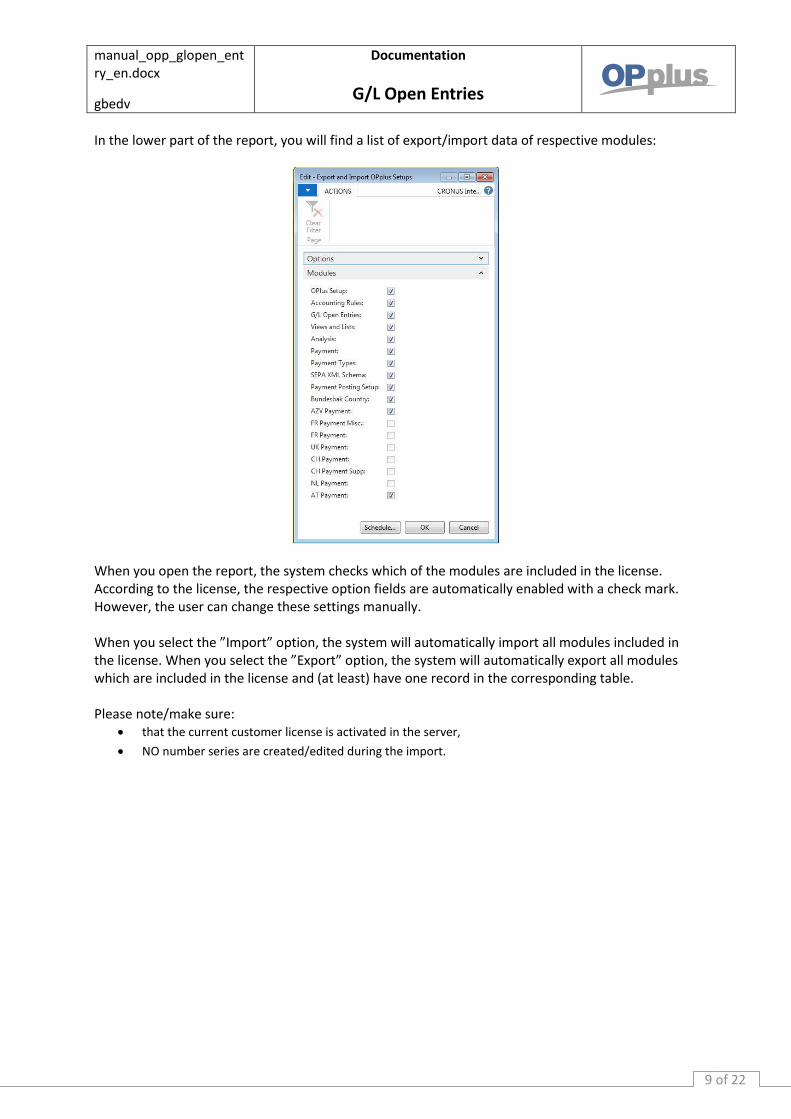
In the lower part of the report, you will find a list of export/import data of respective modules:
When you open the report, the system checks which of the modules are included in the license. According to the license, the respective option fields are automatically enabled with a check mark. However, the user can change these settings manually. When you select the ”Import” option, the system will automatically import all modules included in the license. When you select the ”Export” option, the system will automatically export all modules which are included in the license and (at least) have one record in the corresponding table. Please note/make sure:
that the current customer license is activated in the server,
NO number series are created/edited during the import.
manual_opp_glopen_entry_en.docx
gbedv
Documentation
G/L Open Entries
10 of 22
OPplus G/L Open Entries module This chapter describes how to set up and use the G/L Open Entries module (G/L Open Entries menu group). You can use this module to create open entries for G/L accounts in the same way it is possible for customers and vendors. This can be especially useful when using or carrying costs such as "Money Transfer", "Transit Entries" or "Social Insurance Payables" accounts.
G/L Open Entries Setup
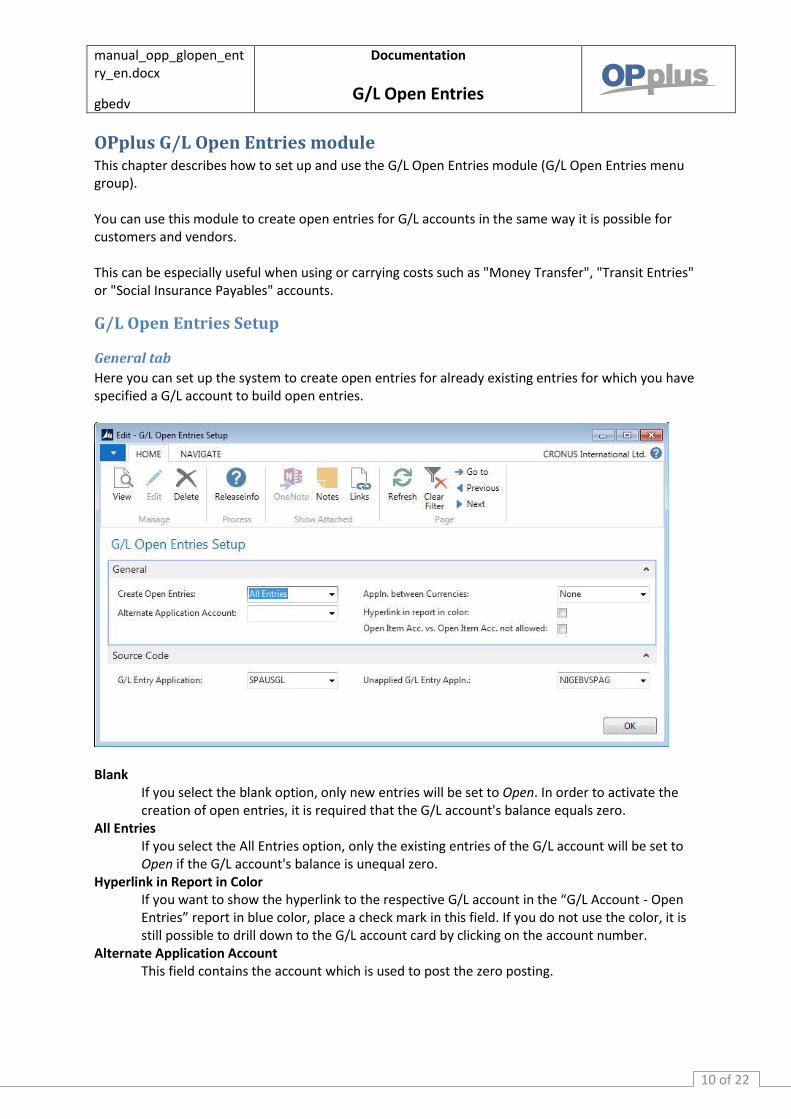
General tab
Here you can set up the system to create open entries for already existing entries for which you have specified a G/L account to build open entries.
Blank
If you select the blank option, only new entries will be set to Open. In order to activate the creation of open entries, it is required that the G/L account's balance equals zero.
All Entries If you select the All Entries option, only the existing entries of the G/L account will be set to Open if the G/L account's balance is unequal zero.
Hyperlink in Report in Color If you want to show the hyperlink to the respective G/L account in the “G/L Account - Open Entries” report in blue color, place a check mark in this field. If you do not use the color, it is still possible to drill down to the G/L account card by clicking on the account number.
Alternate Application Account This field contains the account which is used to post the zero posting.

manual_opp_glopen_entry_en.docx
gbedv
Documentation
G/L Open Entries
11 of 22
Appln. between Currencies Here you can either select the “None“ or “All“ option. If you select “All”, all entries within one application will be in the same currency.
Open Item Acc. vs. Open Item Acc. not allowed If you place a check mark in this field, you may not use two G/L open accounts for application. Otherwise, you will receive the following error message:
Source Code tab
This tab is used to specify the source codes for the following:
G/L Entry Application (set to GLOEAPPL by default)
Unapplied G/L Entry Appln. (set to UNAPPGLOE by default) It is recommended to keep the default values.
manual_opp_glopen_entry_en.docx
gbedv
Documentation
G/L Open Entries
12 of 22
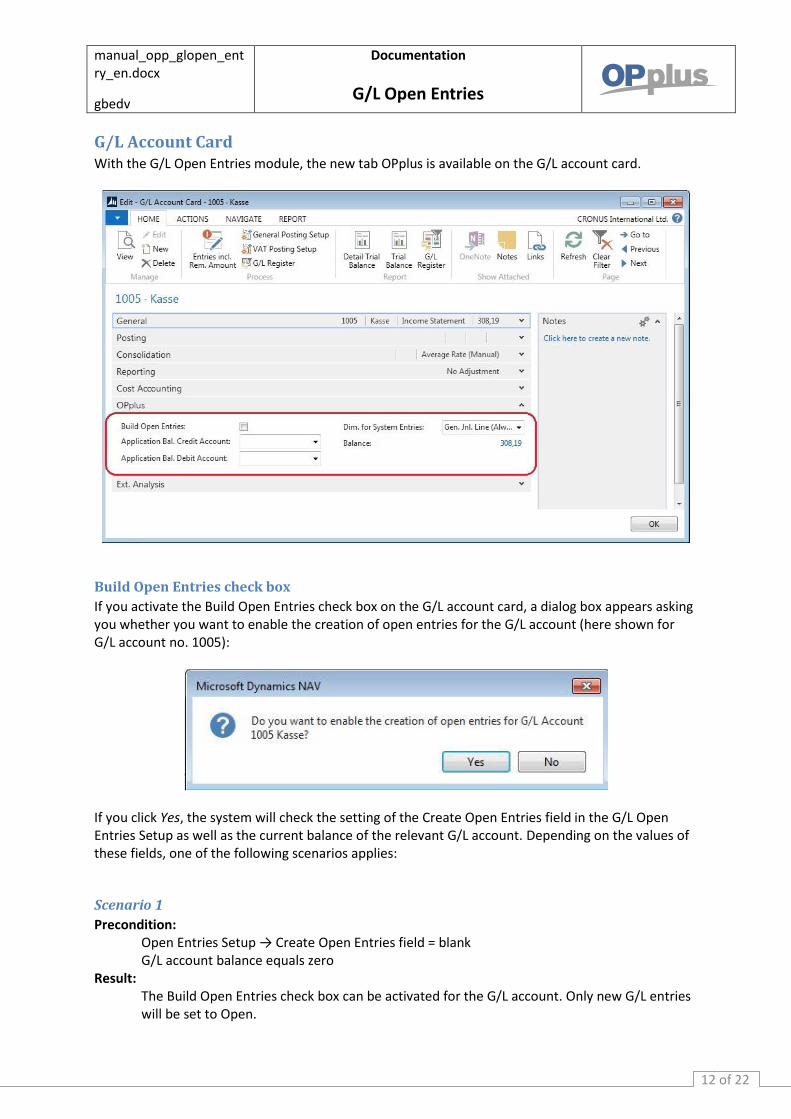
G/L Account Card With the G/L Open Entries module, the new tab OPplus is available on the G/L account card.
Build Open Entries check box
If you activate the Build Open Entries check box on the G/L account card, a dialog box appears asking you whether you want to enable the creation of open entries for the G/L account (here shown for G/L account no. 1005):
If you click Yes, the system will check the setting of the Create Open Entries field in the G/L Open Entries Setup as well as the current balance of the relevant G/L account. Depending on the values of these fields, one of the following scenarios applies:
Scenario 1
Precondition: Open Entries Setup → Create Open Entries field = blank G/L account balance equals zero
Result: The Build Open Entries check box can be activated for the G/L account. Only new G/L entries will be set to Open.
manual_opp_glopen_entry_en.docx
gbedv
Documentation
G/L Open Entries
13 of 22
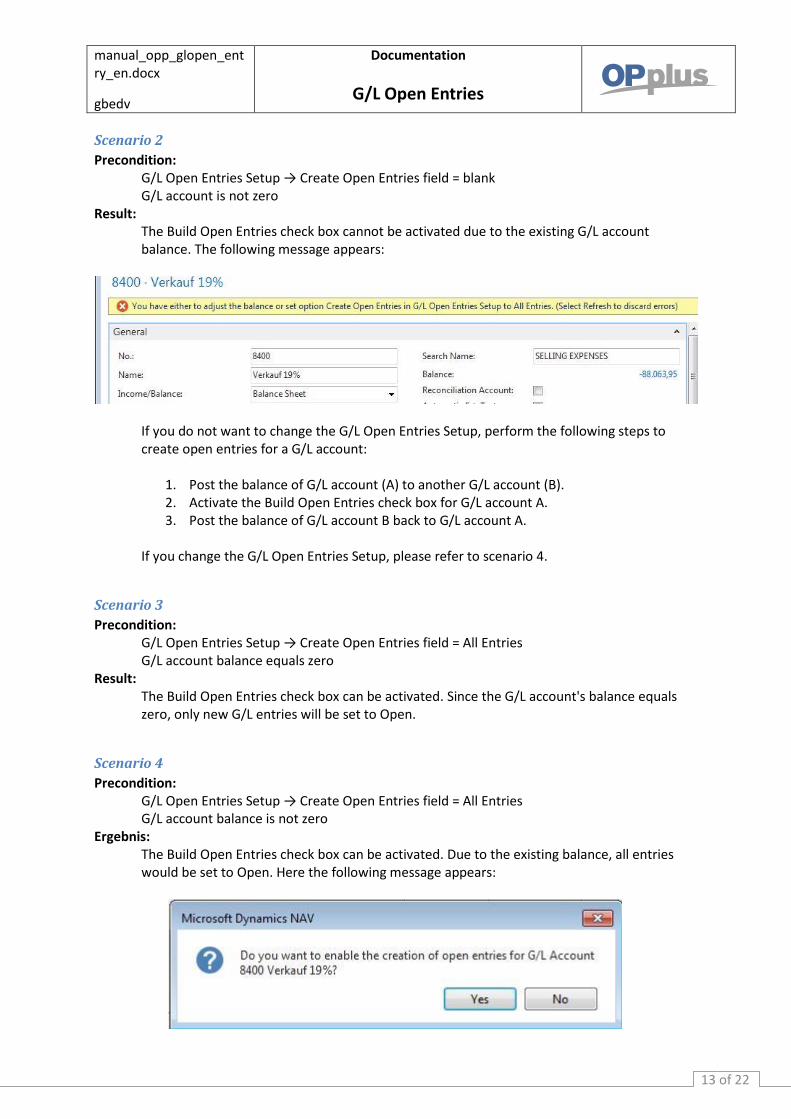
Scenario 2
Precondition: G/L Open Entries Setup → Create Open Entries field = blank G/L account is not zero
Result: The Build Open Entries check box cannot be activated due to the existing G/L account balance. The following message appears:
If you do not want to change the G/L Open Entries Setup, perform the following steps to create open entries for a G/L account:
1. Post the balance of G/L account (A) to another G/L account (B). 2. Activate the Build Open Entries check box for G/L account A. 3. Post the balance of G/L account B back to G/L account A.
If you change the G/L Open Entries Setup, please refer to scenario 4.
Scenario 3
Precondition: G/L Open Entries Setup → Create Open Entries field = All Entries G/L account balance equals zero
Result: The Build Open Entries check box can be activated. Since the G/L account's balance equals zero, only new G/L entries will be set to Open.
Scenario 4
Precondition: G/L Open Entries Setup → Create Open Entries field = All Entries G/L account balance is not zero
Ergebnis: The Build Open Entries check box can be activated. Due to the existing balance, all entries would be set to Open. Here the following message appears:

manual_opp_glopen_entry_en.docx
gbedv
Documentation
G/L Open Entries
14 of 22
If you click Yes, all entries of the G/L account will be set to Open.
If the G/L Open Entries account is a G/L account which is posted indirectly via a bank account, the assigned bank G/L account and/or the bank transit G/L account will be considered for the application of entries.
Build Open Entries check box
If the Build Open Entries option on the G/L account card contains a check mark, and you want to deactivate it, the following dialog box appears asking you if you want to deactivate the creation of open entries (here shown for G/L account no. 8400):
If you click Yes, the system will check if the remaining amount of all entries equals zero. If yes, the check box will be deactivated.
Remaining amount equals zero in all entries→ The check box will be deactivated.
Remaining amount does not equal zero at least in one of the entries → The following message appears:
Application Bal. Credit Account | Application Bal. Debit Account
These fields are used if you have an application balance for a G/L open account and you want to leave the Ext. Application. If no account is specified here, the G/L account number of the original journal line will be entered into the second line as usual.
Dimension for System Posting
The following options are available in this field:
manual_opp_glopen_entry_en.docx
gbedv
Documentation
G/L Open Entries
15 of 22
If a system posting takes place (e. g. exchange rate regulation), you can specify the dimensions to use in the corresponding account. If you select “Gen. Jnl. Line (Always)”, you will get standard NAV behaviour. If you select “G/L Account (Always)”, the default dimensions of the G/L account will be used. If you select “G/L Account (if empty Gen. Jnl. Line), the dimensions of the G/L account will be used if there is no dimension value in the journal line.
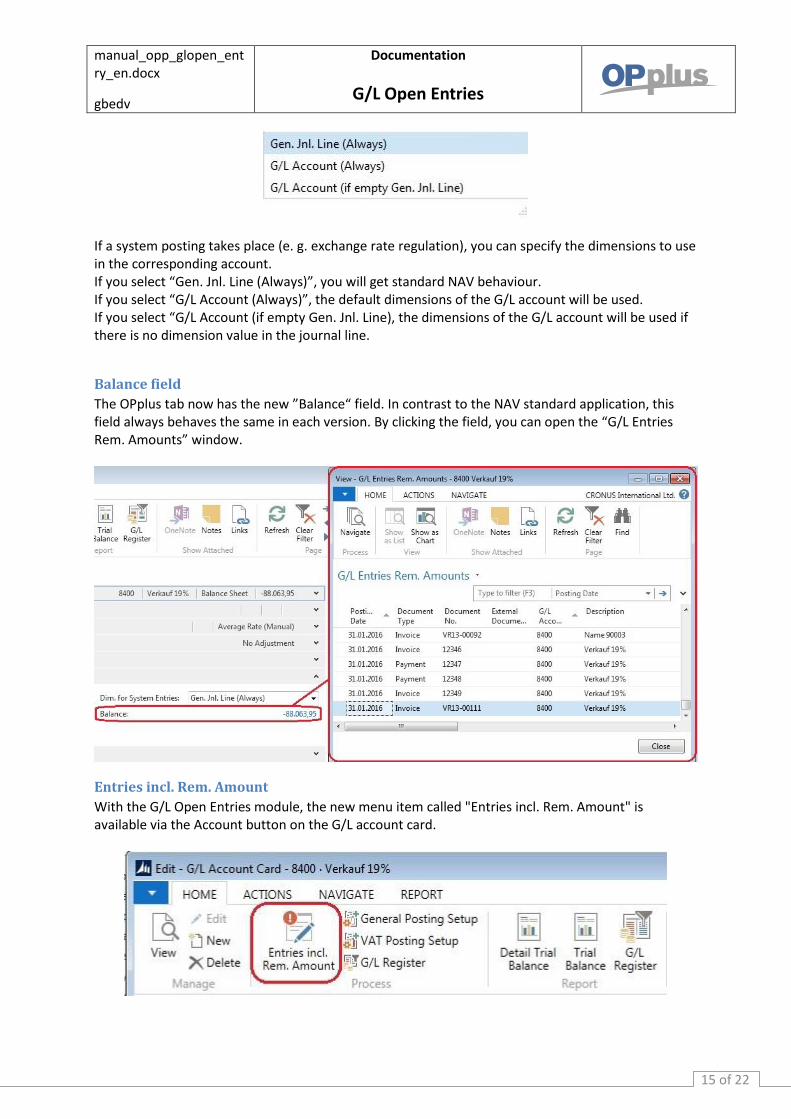
Balance field
The OPplus tab now has the new ”Balance“ field. In contrast to the NAV standard application, this field always behaves the same in each version. By clicking the field, you can open the “G/L Entries Rem. Amounts” window.
Entries incl. Rem. Amount
With the G/L Open Entries module, the new menu item called "Entries incl. Rem. Amount" is available via the Account button on the G/L account card.
manual_opp_glopen_entry_en.docx
gbedv
Documentation
G/L Open Entries
16 of 22
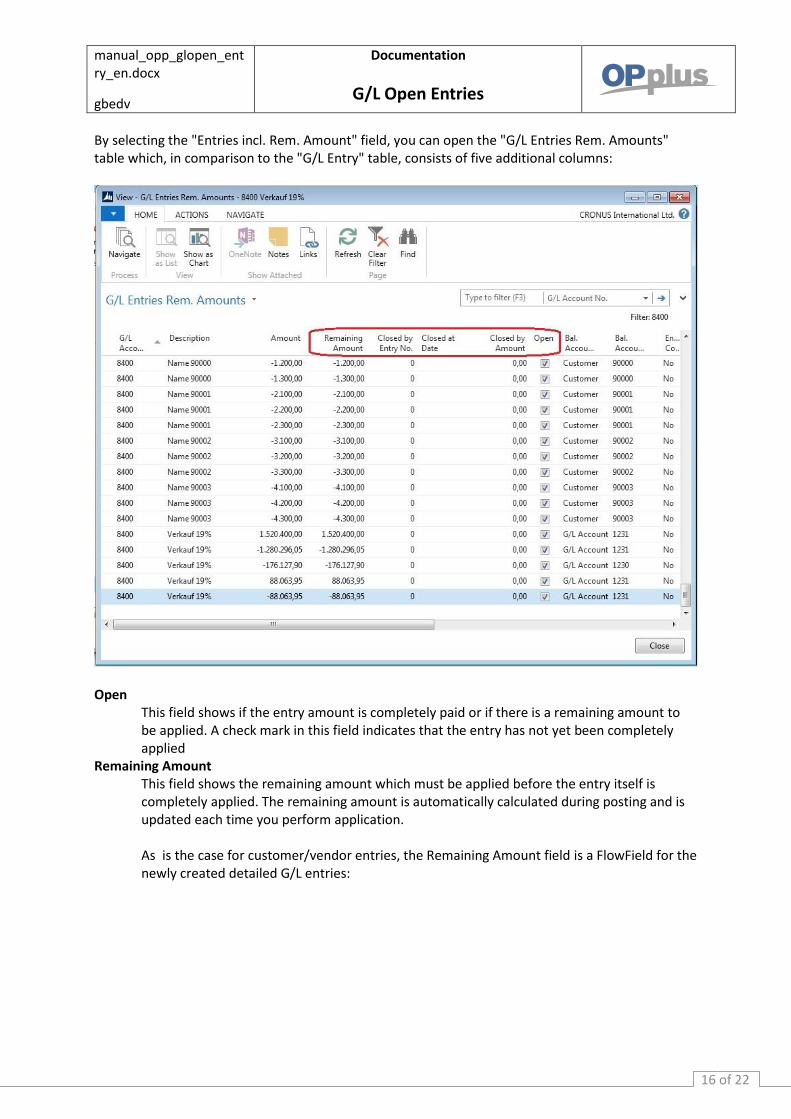
By selecting the "Entries incl. Rem. Amount" field, you can open the "G/L Entries Rem. Amounts" table which, in comparison to the "G/L Entry" table, consists of five additional columns:
Open This field shows if the entry amount is completely paid or if there is a remaining amount to be applied. A check mark in this field indicates that the entry has not yet been completely applied
Remaining Amount This field shows the remaining amount which must be applied before the entry itself is completely applied. The remaining amount is automatically calculated during posting and is updated each time you perform application. As is the case for customer/vendor entries, the Remaining Amount field is a FlowField for the newly created detailed G/L entries:

manual_opp_glopen_entry_en.docx
gbedv
Documentation
G/L Open Entries
17 of 22
Closed by Entry No., Closed at Date, Closed by Amount These fields indicate the entry and the amount which were used to completely apply a specific entry (and to close it).
Apply Entries
In the "G/L Entries Rem. Amounts" window, you can open the application page by selecting Action > Function > Apply Entries which resembles the application window of the standard Navision system. The application of open G/L entries is performed the same way it is done for person accounts. In addition, you can use this window to open the Detailed Gen. Ledg. Entries window.
Please note the following if the OPplus Base module is licensed: If the application method of the Ext. Gen. Journal Template is set to "Extended", the entry application is performed in the "Easy Match" and "Extended Application" forms. Otherwise, it is performed in an application window which resembles the application of the standard Navision system.
Application of Open Entries including Customer and/or Vendor Entries
If you want to apply a G/L entry and a customer or vendor entry during posting, you must enter separate lines in the Gen. Journal Line.
manual_opp_glopen_entry_en.docx
gbedv
Documentation
G/L Open Entries
18 of 22
If you just enter the posting in one line (by filling in the Account No. and Bal. Account No. fields), only the customer and/or vendor entry will be applied. This is due to the program logic specifying that within one-line posting the application of a customer or vendor entry takes precedence. In this case, you need to perform the application on the G/L Open Entries account subsequently.
Detailed Entries
In the "G/L Entries Rem. Amounts" window, you can drill down to the related detailed G/L entries by selecting Action > Function or by pressing CTRL + F5.
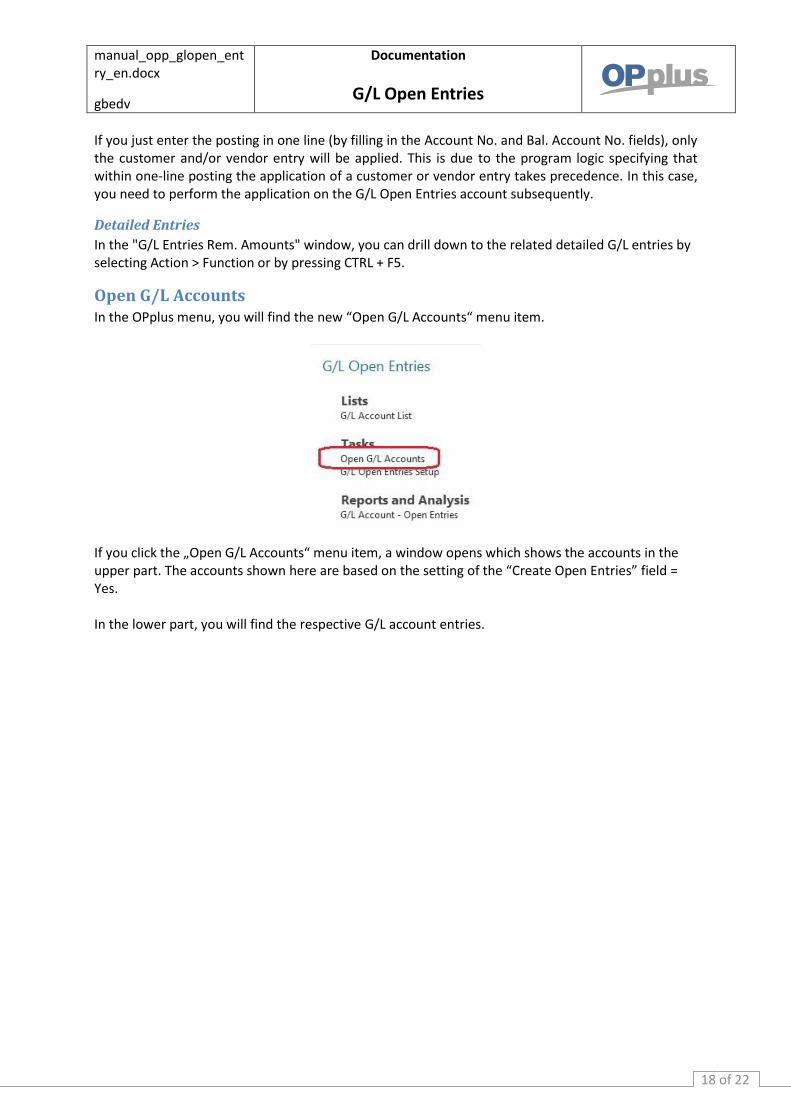
Open G/L Accounts In the OPplus menu, you will find the new “Open G/L Accounts“ menu item.
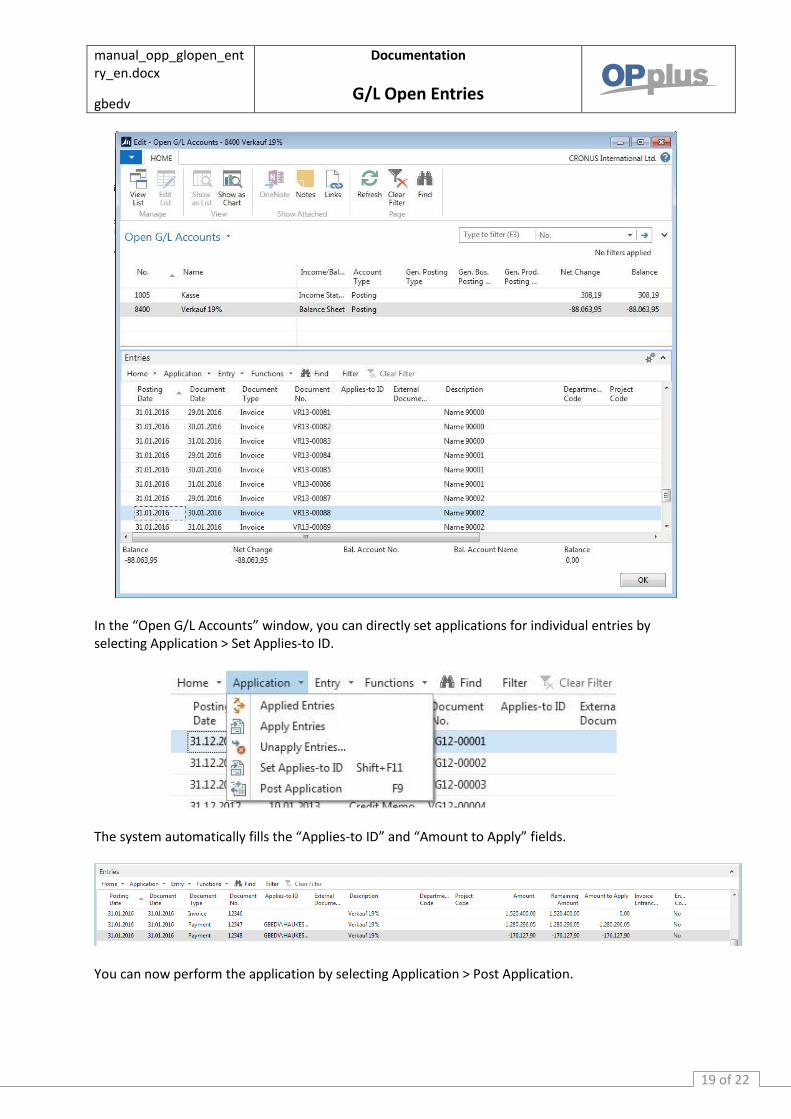
If you click the „Open G/L Accounts“ menu item, a window opens which shows the accounts in the upper part. The accounts shown here are based on the setting of the “Create Open Entries” field = Yes. In the lower part, you will find the respective G/L account entries.
manual_opp_glopen_entry_en.docx
gbedv
Documentation
G/L Open Entries
19 of 22
In the “Open G/L Accounts” window, you can directly set applications for individual entries by selecting Application > Set Applies-to ID.
The system automatically fills the “Applies-to ID” and “Amount to Apply” fields.
You can now perform the application by selecting Application > Post Application.

manual_opp_glopen_entry_en.docx
gbedv
Documentation
G/L Open Entries
20 of 22
G/L Account – Open Entries By selecting G/L Accounts → Open Entries → G/L Account – Open Entries, you can print the open G/L entries or export them to Excel:
Options tab
Here you can place a check mark in the Output to Excel field if you want to export the report contents to Excel.
G/L Account tab
Here you can indicate the G/L accounts you want to consider in the report. In addition, a date filter must be specified.
If this report is opened e. g. by using a To Date filter, the Open Entries List will be printed based on an effective date (e. g. date filter ..12/31/2015 => all open G/L entries due as of 12/31/2015).

manual_opp_glopen_entry_en.docx
gbedv
Documentation
G/L Open Entries
21 of 22
G/L Entry tab
Here you can indicate the G/L entries to be included in the report.
If you want to export the report without printing it, you must at least open the report by clicking the Preview button.
Using the G/L Open Entries and Extended Lists & Reports modules If you use both the G/L Open Entries and the Extended Lists and Reports modules, the Entry Comment field will also be available in the G/L Entries Rem. Amounts table. For more information, please refer to chapter “Ledger Entry Comments“ of the “Ext. Lists and Reports” manual.

manual_opp_glopen_entry_en.docx
gbedv
Documentation
G/L Open Entries
22 of 22
http://www.opplus.de and http://www.gbedv.de
gbedv GmbH & Co. KG Loger Straße 22b 27711 Osterholz-Scharmbeck/Germany Phone: + 49 (0) 4791 / 96 525 0 Fax: + 49 (0) 4791 / 96 525 20
Email: [email protected] Internet: http://www.gbedv.de
This document is for informational purpose only. Its contents may be changed at any time without prior notice if required for technical or content-related reasons. This document may not be reproduced or transferred, partially or in full, in any form or by any means without the prior written permission of gbedv GmbH & Co. KG. gbedv GmbH & Co. KG shall not be liable for any errors and omissions which may exist in the document. © gbedv 2015. All rights reserved. Last Update: 15 April 2015 The software mentioned in this document may only be used or copied according to the licensing terms. All product names, trademarks and logos used are property of the respective owners.