manual - distecmanual marsrover version 1.8 29.03.2019 page 5 of 30 2 overview marsrover is a tool...
TRANSCRIPT

The information contained in this document has been carefully researched and is, to the best of our knowledge, accurate. However, we assume no liability for any product failures or damages, immediate or consequential, resulting from the use of the information provided herein. Our products are not intended for use in systems in which failures of product could result in personal injury. All trademarks mentioned herein are property of their respective owners. All specifications are subject to change without notice.
Manual
Distec
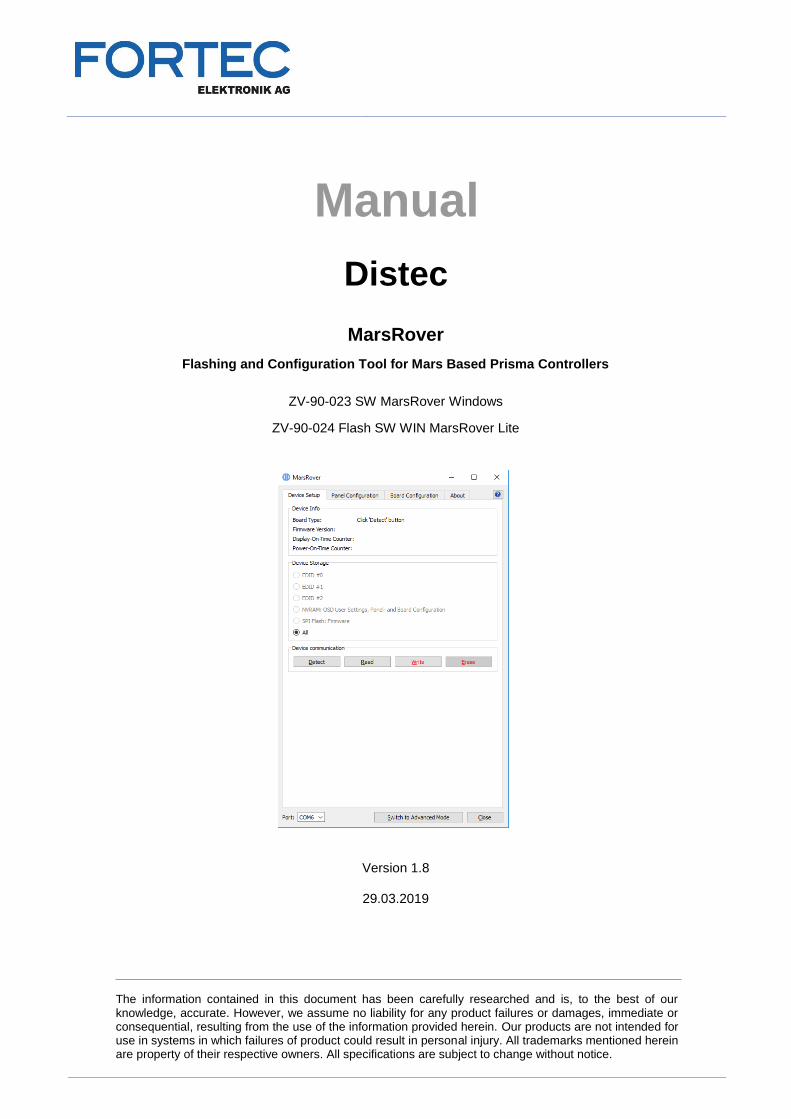
MarsRover
Flashing and Configuration Tool for Mars Based Prisma Controllers
ZV-90-023 SW MarsRover Windows
ZV-90-024 Flash SW WIN MarsRover Lite
Version 1.8
29.03.2019

Manual
MarsRover Version 1.8 29.03.2019
Page 3 of 30
Table of Contents
1 Revision History ...................................................................... 4
2 Overview .............................................................................. 5
2.1 Supported Prisma Boards .......................................................................... 5
2.2 Supported Features .................................................................................. 6 2.2.1 Panel Configuration ..................................................................................... 6 2.2.2 OSD User Settings ...................................................................................... 6 2.2.3 Firmware Update ......................................................................................... 6 2.2.4 EDID Programming ...................................................................................... 6 2.2.5 Board Configuration ..................................................................................... 6
2.3 Block Diagram .......................................................................................... 7
3 System Requirements ............................................................... 8
3.1 Hardware Requirements ............................................................................ 8
3.2 Supported Operating Systems .................................................................... 8
4 Installation ............................................................................. 8
5 Hardware Setup ...................................................................... 9
6 Graphical User Interface (GUI) .................................................. 10
6.1 Simple Mode .......................................................................................... 10
6.2 Advanced Mode (full version only) ............................................................ 10
6.3 Device Setup ......................................................................................... 11 6.3.1 Device Info .............................................................................................. 11 6.3.2 Device Storage ......................................................................................... 11 6.3.3 Creating User Specific Archives ..................................................................... 13 6.3.4 Workflow Creating Firmware Packages ............................................................ 13
6.4 Panel Configuration ................................................................................. 14 6.4.1 Buttons .................................................................................................. 15 6.4.2 Tabs ...................................................................................................... 15 6.4.2.1 Configuration ..................................................................................................... 15 6.4.2.2 Timing ............................................................................................................. 16 6.4.2.3 LVDS .............................................................................................................. 18 6.4.2.4 Power Sequencing .............................................................................................. 20 6.4.2.5 Backlight .......................................................................................................... 22
6.5 Board Configuration ................................................................................ 24 6.5.1 Buttons .................................................................................................. 25 6.5.2 Configuration Tab ...................................................................................... 25 6.5.3 Tabs „Mode 1“ and „Mode 2“ ........................................................................ 27
7 Command Line Interface ......................................................... 29

Manual
MarsRover Version 1.8 29.03.2019
Page 4 of 30
1 Revision History
Date Rev.No. Description Page
11.03.2013 1.0 Initial version all
13.03.2013 1.1 Added note about min. timing values 11
28.05.2013 1.2 Added timing diagram; added note about board detection functionality 7,12
27.08.2013 1.3 Added board configuration 17,18
13.11.2013 1.4 Added detailed NVRAM OSD description 5,8,9
19.11.2013 1.5 Added firmware download link 4
28.01.2014 1.6 MarsRover 1.6: Extended board config, added LVDS channel swap,
new snapshots
all
04.02.2014 1.6.1 Corrected firmware download link 4
04.02.2014 1.6.2 Added en firmware download link 4
25.07.2014 1.8 MarsRover 1.8: Added note fields to config files 12,21,23
29.03.2019 1.8 General update of this manual all
Manual
MarsRover Version 1.8 29.03.2019
Page 5 of 30
2 Overview
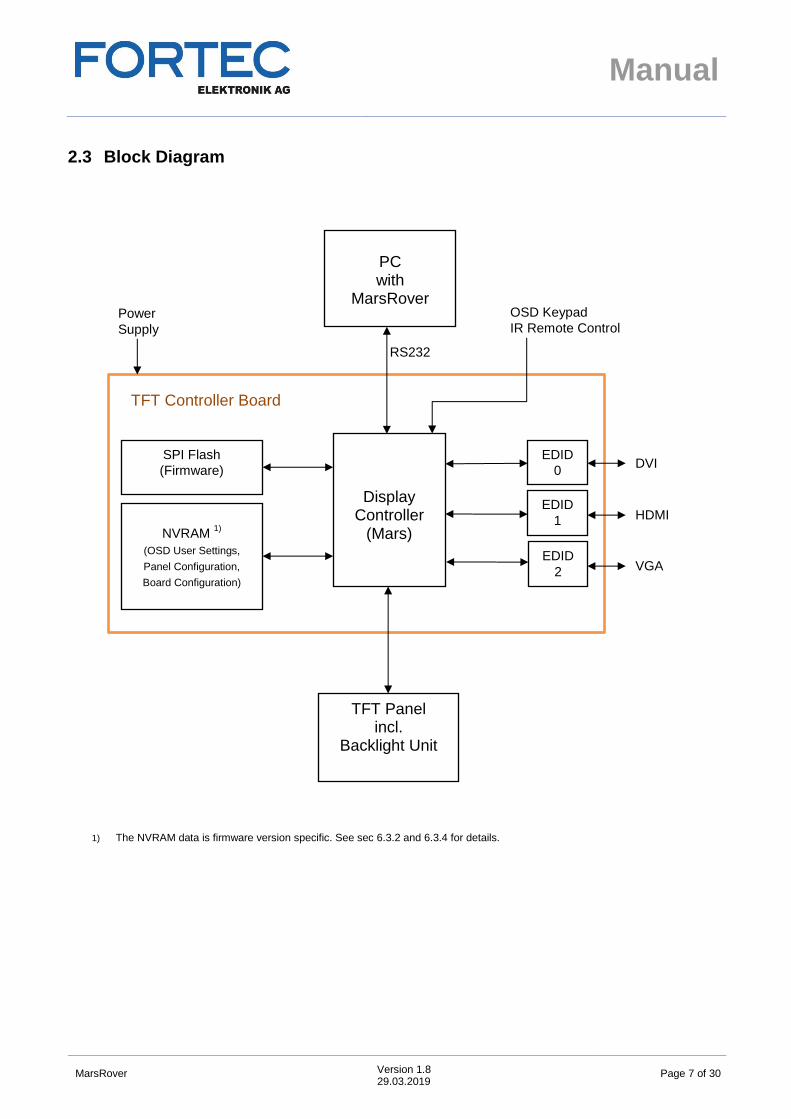
MarsRover is a tool that allows the programming and configuration of the Distec TFT controller board family called Prisma. These controller boards basically consist of a video controller called Mars. This video controller is responsible for scaling and converting the video input signal (e.g. DVI, HDMI or VGA) to an LVDS output format which fits to the attached panel.
2.1 Supported Prisma Boards
The following Prisma boards are supported by MarsRover:
Product Part # Board Name
Prisma-IIIA with 12V input voltage PR-01-320 PrismaIIIA-00-12RVD
Prisma-IIIA with 24V input voltage PR-01-321 PrismaIIIA-01-24RVD
Prisma-IIIE with 12V input voltage PR-01-322 PrismaIIIE-00-12RVD
Detailed information about Prisma-IIIA firmware features:
Prisma-IIIA with firmware version 2.2.2 – 2.3.0: o Supports panel configuration (without LVDS channels swap) o Does not support board configuration
Prisma-IIIA with firmware version 2.4.0 – 2.5.0: o Supports panel configuration (without LVDS channels swap) o Supports board configuration (without Mode Tables, without keypad selection)
Prisma-IIIA with firmware version 2.6.0 and higher: o Supports all features listed in this document
Manual
MarsRover Version 1.8 29.03.2019
Page 6 of 30
2.2 Supported Features
2.2.1 Panel Configuration
Many different panels can be connected to the controller boards but every panel needs a specific configuration (LVDS-, timing-, power- and backlight configuration). MarsRover provides a GUI to generate a complete configuration for the desired panel and backlight unit. This configuration can be loaded to the controller board or read back from the controller board. The panel configuration is stored on the controller board in a dedicated EEPROM called NVRAM. MarsRover also allows saving of the configuration to an xml-file and loading of a configuration from an xml-file.
2.2.2 OSD User Settings
After the controller board is configured for a specific panel the user can adjust detailed image settings like brightness, colour temperature or RGB-gain with the help of an OSD menu. This OSD menu can be controlled by IR remote control or a multi button keypad. MarsRover provides functionality to read back these OSD settings from the board, store them in a binary file and load them to other boards - thus allowing the production of multiple boards with exactly the same settings. OSD user settings are stored on the controller board in the NVRAM together with the panel and board configuration.
2.2.3 Firmware Update
MarsRover can load firmware updates to the controller board and read firmware back from the board. The file
format of the firmware is Intel-Hex. The firmware is stored on the board in an SPI flash. You can get the latest
firmware from Distec on request.
2.2.4 EDID Programming
EDIDs are EEPROMs which store the Extended Display Identification Data as defined by VESA. MarsRover
can read and write all EDIDs on the controller board.
2.2.5 Board Configuration
MarsRover provides a GUI that allows configuring your board according to your special requirements. For example this gives you the possibility to switch on or off single input ports or switch on or off additional firmware features like the Power-On-Time Counter. This configuration can be loaded to the controller board or read back from the controller board. The board configuration is stored on the controller board in the NVRAM. MarsRover also allows saving of the configuration to an xml-file on your PC and loading of a configuration from an xml-file.
Manual
MarsRover Version 1.8 29.03.2019
Page 7 of 30
2.3 Block Diagram
1) The NVRAM data is firmware version specific. See sec 6.3.2 and 6.3.4 for details.
Display Controller
(Mars)
SPI Flash
(Firmware)
EDID
0
EDID
1
NVRAM 1)
(OSD User Settings,
Panel Configuration,
Board Configuration)
PC with
MarsRover
RS232
EDID
2
DVI
HDMI
VGA
TFT Panel incl.
Backlight Unit
TFT Controller Board
Power
Supply
OSD Keypad
IR Remote Control
Manual
MarsRover Version 1.8 29.03.2019
Page 8 of 30
3 System Requirements
3.1 Hardware Requirements
PC System: Standard PC with Windows operating system
COM port (RS-232)
Serial adapter cable for the Prisma-IIIA/E to program the firmware and configuration:
Part # Part Description Additional Info
KA-30-002 Cable Prisma Remote RS232 30cm RS-232 adapter cable for Prisma board
N/A Standard RS-232 Extension Cable (1:1) Optional to connect KA-30-002 to the PC
+12V power supply unit for Prisma boards PR-01-320 and PR-01-322:
Part # Part Description Additional Info
NT-01-062 AC Adapter CWT KPL-060F-VI(C14/12V5A)2,1 Standard +12V power supply unit
+24V power supply unit for Prisma board PR-01-321:
Part # Part Description Additional Info
NT-01-052 AC Adapter RS-150-24 (24V/6,5A) Standard +24V power supply unit
3.2 Supported Operating Systems
Windows 7 SP1 (32-bit, 64-bit)
Windows 8.1 (32-bit, 64-bit)
Windows 10 (32-bit, 64-bit)
4 Installation
Double click on “MarsRover_x.y.z_Setup.exe” and follow the installation wizard.
Manual
MarsRover Version 1.8 29.03.2019
Page 9 of 30
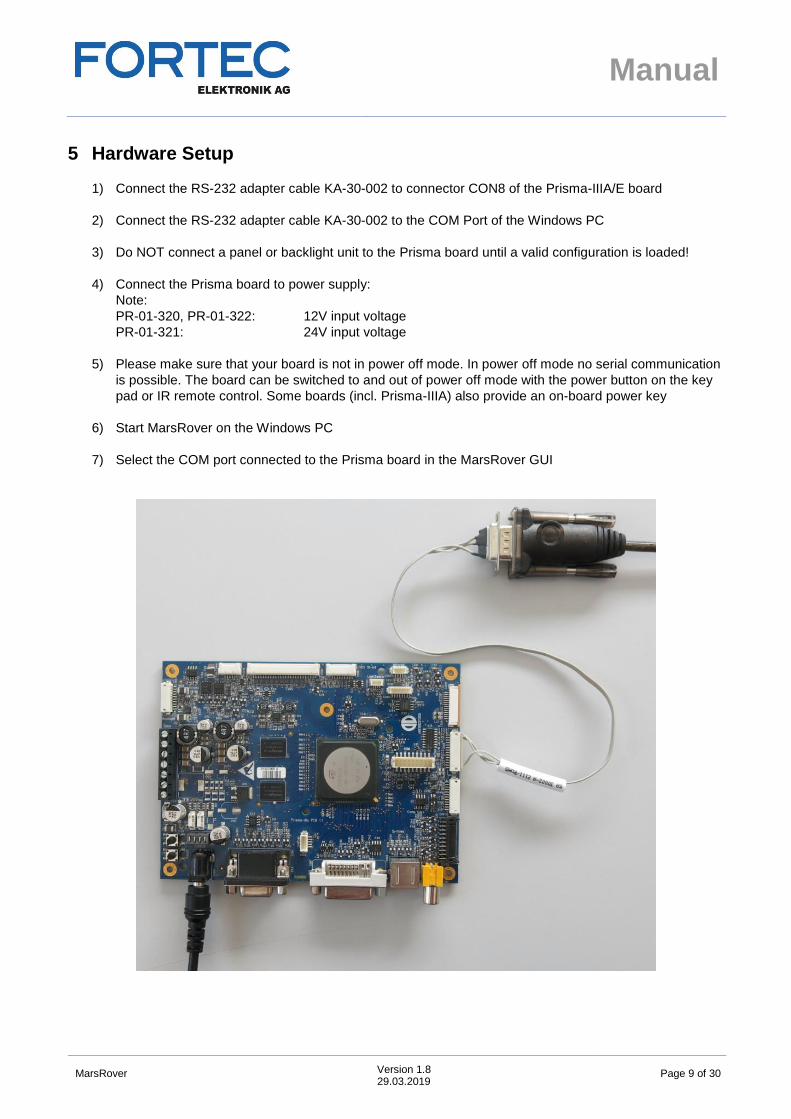
5 Hardware Setup
1) Connect the RS-232 adapter cable KA-30-002 to connector CON8 of the Prisma-IIIA/E board
2) Connect the RS-232 adapter cable KA-30-002 to the COM Port of the Windows PC
3) Do NOT connect a panel or backlight unit to the Prisma board until a valid configuration is loaded!
4) Connect the Prisma board to power supply:
Note:
PR-01-320, PR-01-322: 12V input voltage
PR-01-321: 24V input voltage
5) Please make sure that your board is not in power off mode. In power off mode no serial communication
is possible. The board can be switched to and out of power off mode with the power button on the key
pad or IR remote control. Some boards (incl. Prisma-IIIA) also provide an on-board power key
6) Start MarsRover on the Windows PC
7) Select the COM port connected to the Prisma board in the MarsRover GUI
Manual
MarsRover Version 1.8 29.03.2019
Page 10 of 30
6 Graphical User Interface (GUI)
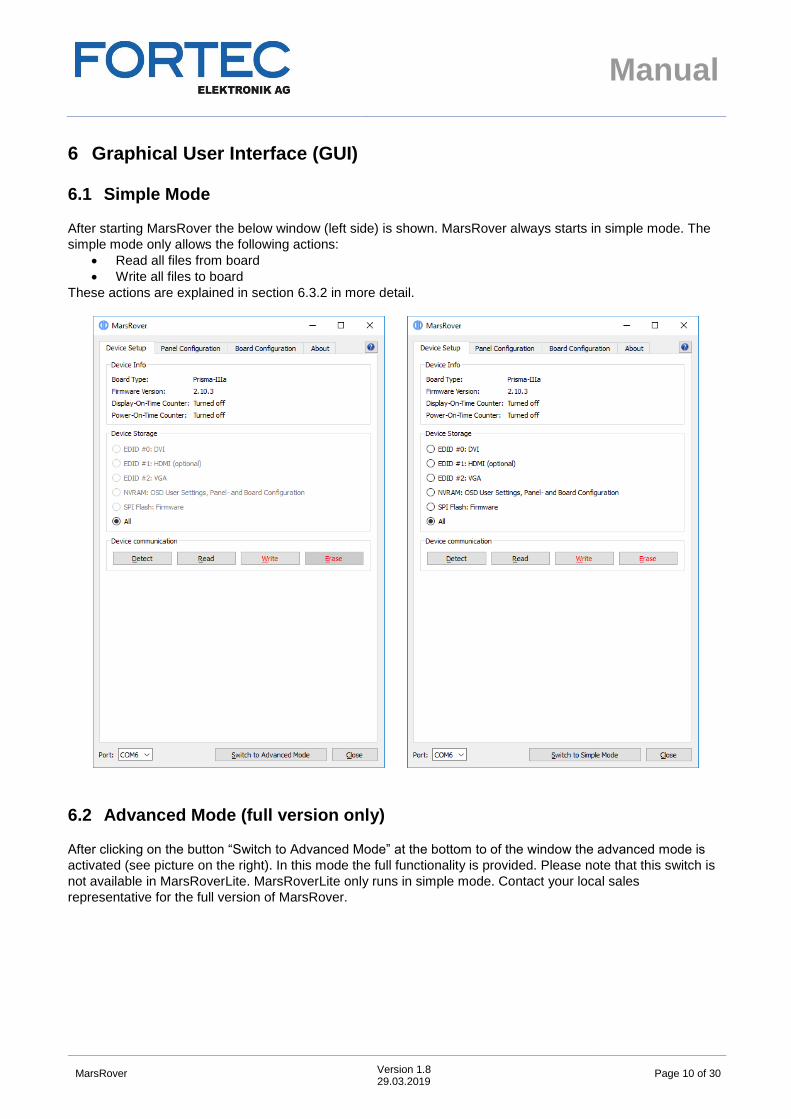
6.1 Simple Mode
After starting MarsRover the below window (left side) is shown. MarsRover always starts in simple mode. The
simple mode only allows the following actions:
Read all files from board
Write all files to board
These actions are explained in section 6.3.2 in more detail.
6.2 Advanced Mode (full version only)
After clicking on the button “Switch to Advanced Mode” at the bottom to of the window the advanced mode is
activated (see picture on the right). In this mode the full functionality is provided. Please note that this switch is
not available in MarsRoverLite. MarsRoverLite only runs in simple mode. Contact your local sales
representative for the full version of MarsRover.
Manual
MarsRover Version 1.8 29.03.2019
Page 11 of 30
6.3 Device Setup
6.3.1 Device Info
First choose the appropriate serial port from the drop-down box at the bottom of the window. To test if the
communication with the board is working, click on the “Detect” button. If the connection is OK the Board Type
and the Firmware Version is shown in the “Device Info” section. Note that board detection is only possible if a
valid firmware is running on the board. On a new and empty board this operation will time out - in this case
flash a firmware first.
6.3.2 Device Storage
The radio buttons allow selecting the storage device you want to read, write or erase:
EDID #0: DVI (on Prisma-IIIA)
EDID #1: HDMI (on Prisma-IIIA)
EDID #2: VGA (on Prisma-IIIA)
NVRAM: ROSD User Settings, Panel- and Board Configuration
SPI Flash: Firmware
All: All the devices above
After clicking on the “Read”- button you will be asked to choose an output file name where the content of the
selected storage device will be saved. After clicking on the “Write”-button you will be asked to choose an input
file which will be written to the selected storage device. Section 2.2 explains in more detail which data are
stored in which device.
EDIDs
Note that after clicking on the “Detect” button the port is shown to which the particular EDID is connected (DVI,
HDMI or VGA). Please be aware that not all EDIDs are available on all boards - there might be assembly
variants where not all EDIDs are populated even if they are shown in MarsRover. Access to the EDIDs is only
possible if a valid firmware is running on the board.
Input and output file type: Binary
File size: 256 Bytes
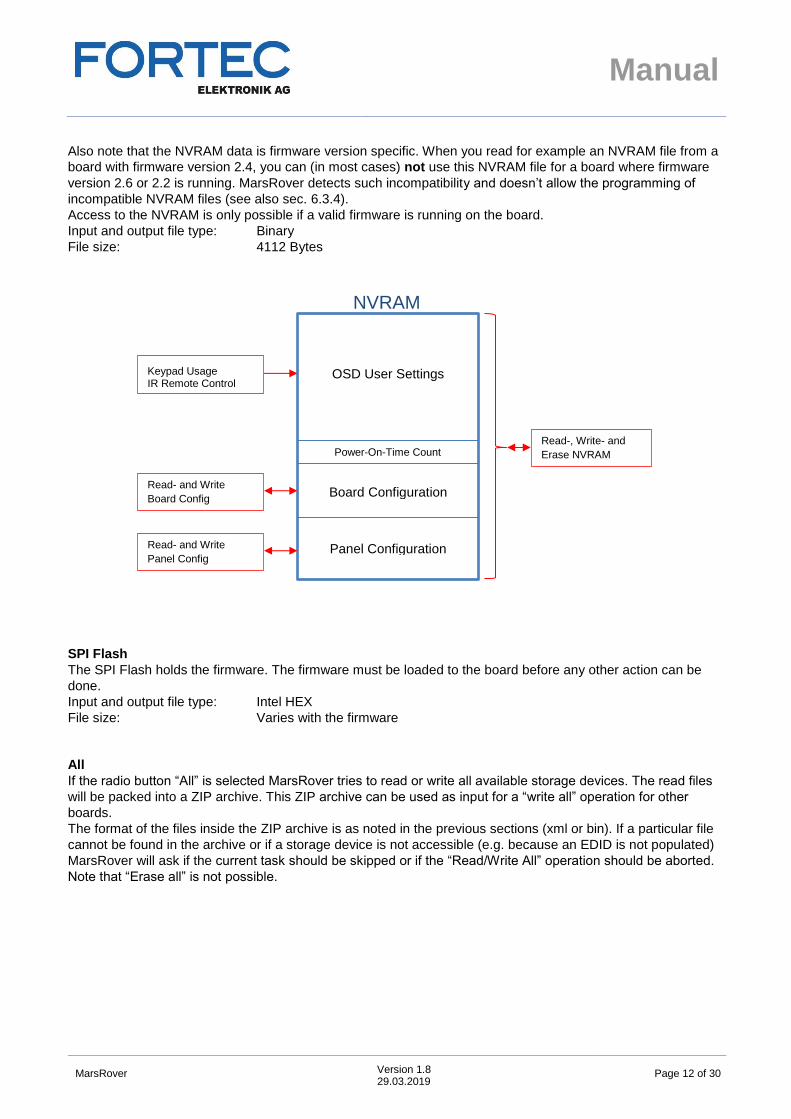
NVRAM
OSD user settings, the panel configuration and the board configuration are stored in the NVRAM. Note that the
NVRAM is always written and read completely. This is important to understand because the panel- and board
configuration can be loaded separately to the NVRAM (see section 6.4 and 6.5). Writing the NVRAM will
therefore always overwrite the previously loaded panel- and board configuration, on the other hand the read
NVRAM-file will always include the currently loaded panel- and board configuration. There are two possible
scenarios the user must be aware of when the NVRAM has to be written:
The provided NVRAM file already includes a valid panel- and board configuration: In this case there is
no need to separately load the panel- and board configuration after writing the NVRAM.
The provided NVRAM file does not include a valid panel- and board configuration: In this case the
NVRAM file must be written first, after this the panel- and board configuration can be written.
In case the Power-On-Time counters are enabled (see sec. 6.5.2), then these counter values are also stored in
the NVRAM. This has the consequence that erasing the NVRAM also erases the counter values and resets
them to zero.
Manual
MarsRover Version 1.8 29.03.2019
Page 12 of 30
Also note that the NVRAM data is firmware version specific. When you read for example an NVRAM file from a
board with firmware version 2.4, you can (in most cases) not use this NVRAM file for a board where firmware
version 2.6 or 2.2 is running. MarsRover detects such incompatibility and doesn’t allow the programming of
incompatible NVRAM files (see also sec. 6.3.4).
Access to the NVRAM is only possible if a valid firmware is running on the board.
Input and output file type: Binary
File size: 4112 Bytes
SPI Flash
The SPI Flash holds the firmware. The firmware must be loaded to the board before any other action can be
done.
Input and output file type: Intel HEX
File size: Varies with the firmware
All
If the radio button “All” is selected MarsRover tries to read or write all available storage devices. The read files
will be packed into a ZIP archive. This ZIP archive can be used as input for a “write all” operation for other
boards.
The format of the files inside the ZIP archive is as noted in the previous sections (xml or bin). If a particular file
cannot be found in the archive or if a storage device is not accessible (e.g. because an EDID is not populated)
MarsRover will ask if the current task should be skipped or if the “Read/Write All” operation should be aborted.
Note that “Erase all” is not possible.
NVRAM
OSD User Settings
Panel Configuration
Board Configuration
Power-On-Time Count
Read- and Write
Panel Config
Read- and Write
Board Config
Keypad Usage IR Remote Control
Read-, Write- and
Erase NVRAM

Manual
MarsRover Version 1.8 29.03.2019
Page 13 of 30
6.3.3 Creating User Specific Archives
The user can create own ZIP archives which can be used as input for a “write all” operation. The filenames in
the archive must have special prefixes, this allows MarsRover to identify the files. What follows after the prefix
can be freely chosen. The following prefixes must be used:
FW_ for firmware files
EDID0_ for EDID #0 files
EDID1_ for EDID #1 files
EDID2_ for EDID #2 files
NVRAM_ for NVRAM files
CONFIG_ for panel configuration files
BOARD_ for board configuration files
Example: The archive “My_Prisma-IIIA_Files.zip” could consist of the following files:
FW_Prisma-IIIA_2.2.2.8475.hex
EDID0_DVI_PIIIA_1920x1080.bin
EDID1_HDMI_PIIIA_1920x1080.bin
EDID2_VGA_PIIIA_1920x1080.bin
NVRAM_Prisma-IIIA_OSDsettings.bin
CONFIG_Panel_G240HW01V0.xml BOARD_Prisma-IIIA_PortConfiguration.xml
6.3.4 Workflow Creating Firmware Packages
To avoid incompatibility between firmware, NVRAM and configuration files it is recommended to create a new
archive for the “write all” operation in the following sequence:
1. Flash the newest firmware to the board
2. Flash the EDIDs
3. Write your panel configuration to the board
4. Write your board configuration to the board
5. Adjust the picture settings with the OSD (brightness, contrast, sharpness, etc.)
6. Start “read-all” => This stores the complete configuration of steps 1-5 into a ZIP archive
Note that after a firmware update you have to do these steps again since the new firmware may be
incompatible with your old NVRAM or configuration files.

Manual
MarsRover Version 1.8 29.03.2019
Page 14 of 30
6.4 Panel Configuration
The panel configuration holds all parameters needed by the controller board to drive a TFT panel and its
associated backlight unit.

Manual
MarsRover Version 1.8 29.03.2019
Page 15 of 30
6.4.1 Buttons
Four buttons at the bottom of the window provide the following functions:
Load from File
Read panel configuration parameters from an xml file and display them in the MarsRover GUI.
Save to File
Save the configuration parameters currently shown in the GUI to an xml file.
Read from Device
Read panel configuration parameters via serial port from the connected controller board (NVRAM) and show
them in the MarsRover GUI. For this a powered board with running firmware must be connected to your PC.
Write to Device
Load the configuration parameters currently shown in the GUI to the connected controller board (NVRAM). For
this a powered board with running firmware must be connected to your PC.
6.4.2 Tabs
The following five tabs provide a user interface to set all configuration parameters.
6.4.2.1 Configuration
Configuration ID:
This string with max. 20 characters identifies the panel configuration (e.g. panel type, product number etc.). The
ID can be chosen freely.
Configuration Version:
This string with max. 16 characters identifies the version of the panel configuration. There might be different
configurations for the same panel, they can be differentiated by the version number. The version can be chosen
freely.
Panel Voltage:
Our controller boards support panels with 3.3V, 5V and 12V supply voltage. Attention: Selecting the wrong
voltage can damage your panel!
Configuration Note:
Any information about your panel which might be important or useful can be written into this text field. The
content of this field is only saved to the xml file via the “Save to File” button, it is not written to the device when
clicking on the “Write to Device” button and consequently cannot be read from the device.
Manual
MarsRover Version 1.8 29.03.2019
Page 16 of 30
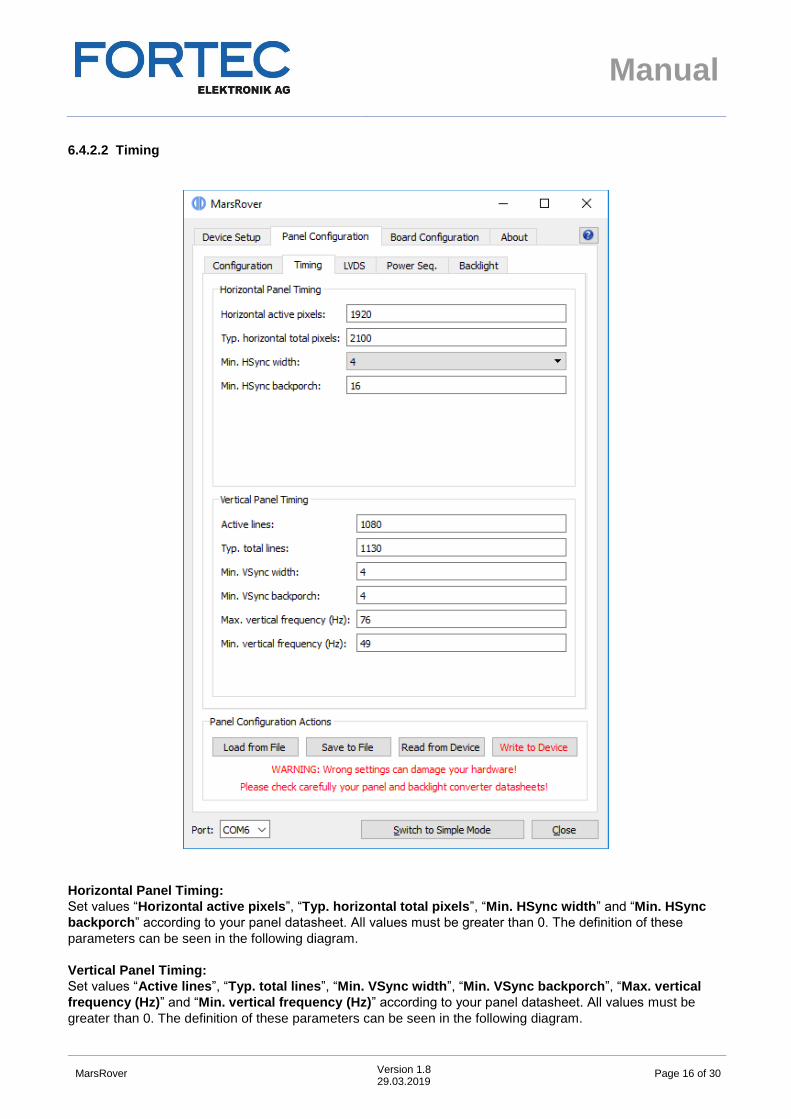
6.4.2.2 Timing
Horizontal Panel Timing:
Set values “Horizontal active pixels”, “Typ. horizontal total pixels”, “Min. HSync width” and “Min. HSync
backporch” according to your panel datasheet. All values must be greater than 0. The definition of these
parameters can be seen in the following diagram.
Vertical Panel Timing:
Set values “Active lines”, “Typ. total lines”, “Min. VSync width”, “Min. VSync backporch”, “Max. vertical
frequency (Hz)” and “Min. vertical frequency (Hz)” according to your panel datasheet. All values must be
greater than 0. The definition of these parameters can be seen in the following diagram.

Manual
MarsRover Version 1.8 29.03.2019
Page 17 of 30

Manual
MarsRover Version 1.8 29.03.2019
Page 18 of 30
6.4.2.3 LVDS
Manual
MarsRover Version 1.8 29.03.2019
Page 19 of 30
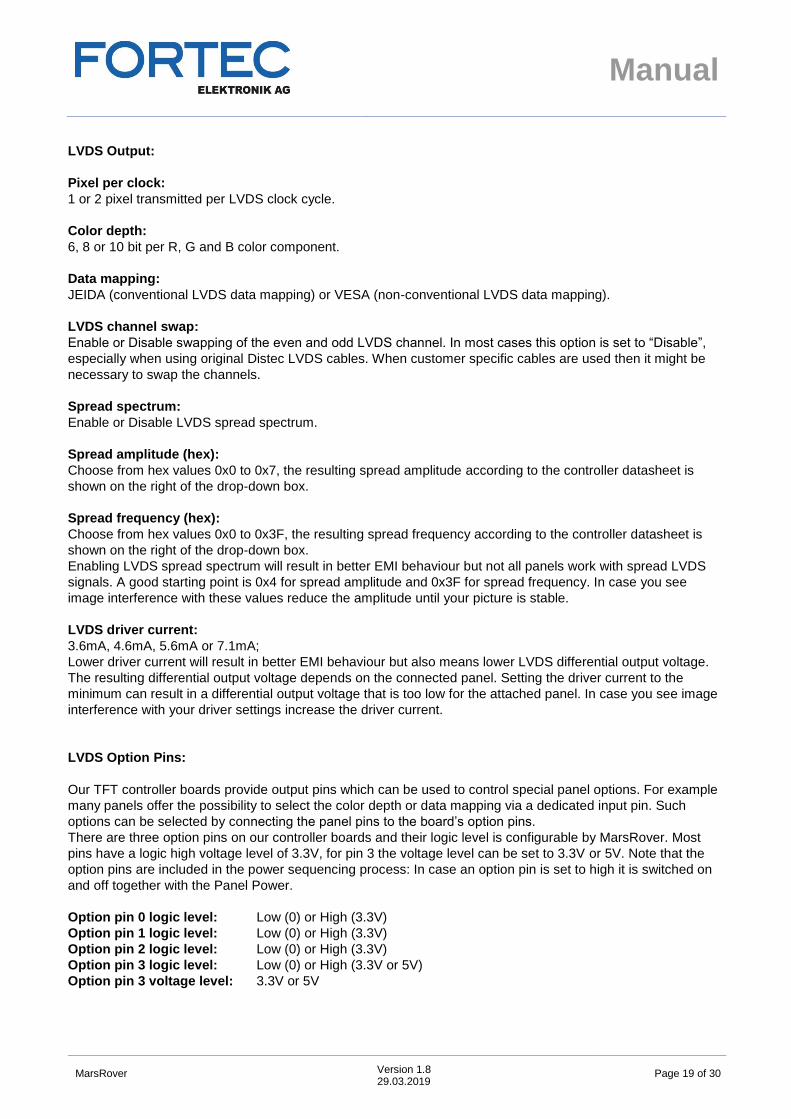
LVDS Output:
Pixel per clock:
1 or 2 pixel transmitted per LVDS clock cycle.
Color depth:
6, 8 or 10 bit per R, G and B color component.
Data mapping:
JEIDA (conventional LVDS data mapping) or VESA (non-conventional LVDS data mapping).
LVDS channel swap:
Enable or Disable swapping of the even and odd LVDS channel. In most cases this option is set to “Disable”,
especially when using original Distec LVDS cables. When customer specific cables are used then it might be
necessary to swap the channels.
Spread spectrum:
Enable or Disable LVDS spread spectrum.
Spread amplitude (hex):
Choose from hex values 0x0 to 0x7, the resulting spread amplitude according to the controller datasheet is
shown on the right of the drop-down box.
Spread frequency (hex):
Choose from hex values 0x0 to 0x3F, the resulting spread frequency according to the controller datasheet is
shown on the right of the drop-down box.
Enabling LVDS spread spectrum will result in better EMI behaviour but not all panels work with spread LVDS
signals. A good starting point is 0x4 for spread amplitude and 0x3F for spread frequency. In case you see
image interference with these values reduce the amplitude until your picture is stable.
LVDS driver current:
3.6mA, 4.6mA, 5.6mA or 7.1mA;
Lower driver current will result in better EMI behaviour but also means lower LVDS differential output voltage.
The resulting differential output voltage depends on the connected panel. Setting the driver current to the
minimum can result in a differential output voltage that is too low for the attached panel. In case you see image
interference with your driver settings increase the driver current.
LVDS Option Pins:
Our TFT controller boards provide output pins which can be used to control special panel options. For example
many panels offer the possibility to select the color depth or data mapping via a dedicated input pin. Such
options can be selected by connecting the panel pins to the board’s option pins.
There are three option pins on our controller boards and their logic level is configurable by MarsRover. Most
pins have a logic high voltage level of 3.3V, for pin 3 the voltage level can be set to 3.3V or 5V. Note that the
option pins are included in the power sequencing process: In case an option pin is set to high it is switched on
and off together with the Panel Power.
Option pin 0 logic level: Low (0) or High (3.3V)
Option pin 1 logic level: Low (0) or High (3.3V)
Option pin 2 logic level: Low (0) or High (3.3V)
Option pin 3 logic level: Low (0) or High (3.3V or 5V)
Option pin 3 voltage level: 3.3V or 5V

Manual
MarsRover Version 1.8 29.03.2019
Page 20 of 30
6.4.2.4 Power Sequencing
Five signals are part of the power sequencing process:
Panel power (3.3V, 5V or 12V)
LVDS data
Backlight power
Brightness control (PWM signal or analog DC voltage)
Backlight enable signal

Manual
MarsRover Version 1.8 29.03.2019
Page 21 of 30
The following diagram shows the definition of the sequencing values:
The unit of all sequencing values is milli seconds. The request to switch the panel on or off can come from the
power button of the OSD keypad, IR remote control or by the controller itself when a valid input signal is found
(switch on) or the signal is lost (switch off).
In most cases the panel power will be switched on first and the “Panel power ON delay” value can be set to 0.
Similar, in most cases the backlight enable signal will be switched off first and the “Backlight enable OFF delay”
value can be set to 0.
Panel power
LVDS data
Backlight power
Backlight enable
Brightness control
Request to switch panel ON
Panel power ON
delay
Backlight enable OFF
delay
LVDS data ON
delay Backlight power ON
delay Brightness control ON
delay Backlight enable ON
delay
Request to switch panel OFF
LVDS data OFF
delay
Backlight power OFF
delay
Brightness control OFF
delay
Panel power OFF
delay
Min. wait time
between OFF and ON
Manual
MarsRover Version 1.8 29.03.2019
Page 22 of 30
6.4.2.5 Backlight

Manual
MarsRover Version 1.8 29.03.2019
Page 23 of 30
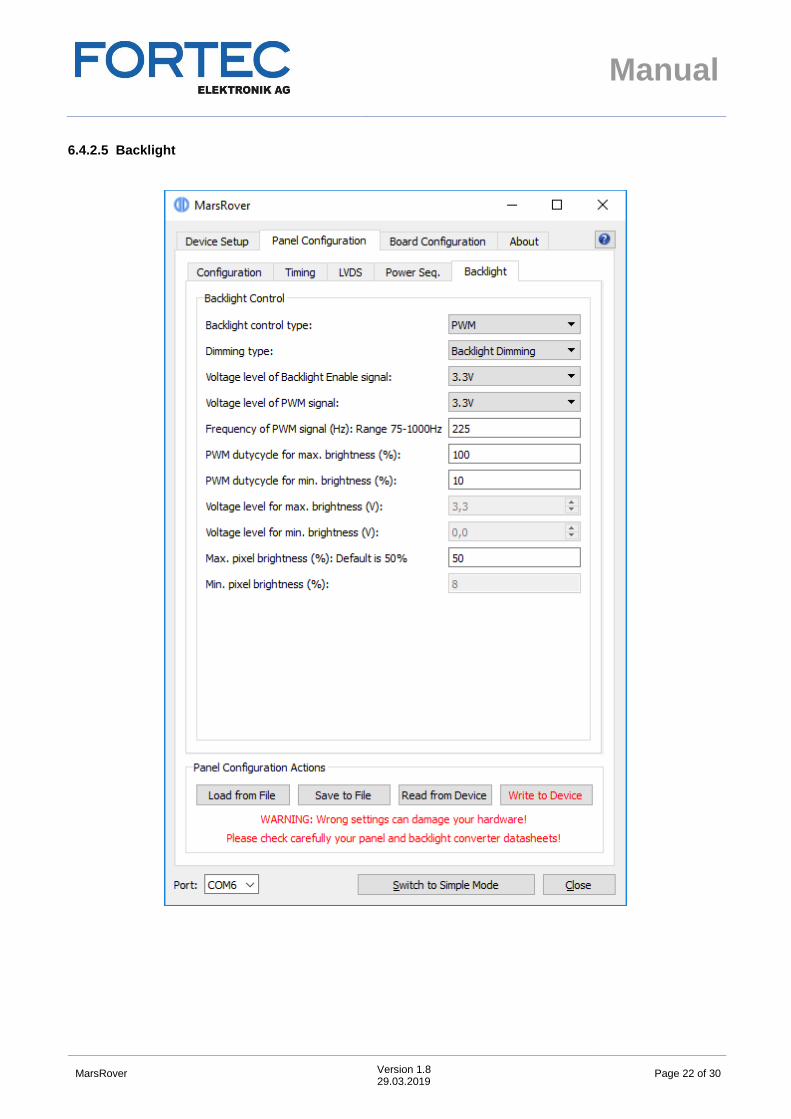
Backlight control type:
Analog (variable DC voltage is used to control the brightness) or PWM (brightness is controlled by the duty
cycle of a PWM signal).
Dimming type:
Backlight Dimming (brightness is controlled by electrically changing the backlight), Pixel Dimming (brightness is
controlled by changing the pixel color) or a combination of both; If combined is selected the lower 50% of the
brightness range is controlled by pixel dimming and the upper 50% is controlled by backlight dimming.
Voltage level of Backlight Enable signal:
3.3V or 5V
Voltage level of PWM signal:
3.3V or 5V
Frequency of PWM signal (Hz):
The range for the PWM frequency is 75Hz to 1000Hz
PWM dutycycle for max. brightness (%):
Enter the duty cycle of the PWM signal at which the backlight unit has its highest brightness.
PWM dutycycle for min. brightness (%):
Enter the duty cycle of the PWM signal at which the backlight unit has its lowest brightness.
Voltage level for max. brightness (V):
Enter the voltage level of the brightness control signal at which the backlight unit has its highest brightness.
Voltage level for min. brightness (V):
Enter the voltage level of the brightness control signal at which the backlight unit has its lowest brightness.
Max. pixel brightness (%):
Relative value with range 0% to 100%; This value is usually set to 50% for best picture quality. Higher values
than 50% will have the result that black is becoming grey. If “Backlight Dimming” is selected as dimming type
then the pixel brightness is always set to “Max. pixel brightness”.
Min. pixel brightness (%):
Relative value with range 0% to 100%; This value should be set to 8% or lower for best picture quality.

Manual
MarsRover Version 1.8 29.03.2019
Page 24 of 30
6.5 Board Configuration
With the board configuration the user can enable or disable special hardware or firmware features.

Manual
MarsRover Version 1.8 29.03.2019
Page 25 of 30
6.5.1 Buttons
Four buttons at the bottom of the window provide the following functions:
Load from File
Read board configuration parameters from an xml file and display them in the MarsRover GUI.
Save to File
Save the configuration parameters currently shown in the GUI to an xml file.
Read from Device
Read board configuration parameters via serial port from the connected controller board (NVRAM) and show
them in the MarsRover GUI. For this a powered board with running firmware must be connected to your PC.
Write to Device
Load the configuration parameters currently shown in the GUI to the connected controller board (NVRAM). For
this a powered board with running firmware must be connected to your PC.
6.5.2 Configuration Tab
Configuration ID:
This string with max. 20 characters identifies the board configuration (e.g. product number). The ID can be
chosen freely without one exception: The string “DEFAULT_ROM_CONFIG” is reserved for a configuration
which is compiled into the firmware instead of loaded to the NVRAM. Whenever the firmware doesn’t find a
valid board configuration in the NVRAM, it loads the default ROM configuration. Therefore MarsRover does not
allow writing a configuration with ID “DEFAULT_ROM_CONFIG” to the board.
Configuration Version:
This string with max. 16 characters identifies the version of the board configuration. There might be different
configurations for the same board, they can be differentiated by the version number. The version can be
chosen freely.
Enable Display-On-Time and Power-On-Time counters:
Tick this box to enable the following two timers.
Display-On-Time counter: This counter shows how long the display has been switched on. If for example no
valid input signal is found the display is switched off automatically - during this time this timer is not increased.
Power-On-Time counter: This counter shows how long the board has been switched on. This counter increases
as long as the board is powered and not switched to full power off mode by pressing the power key on the IR
remote control or on the OSD keypad. This counter also increases when no valid input signal is found and the
board is in sleep mode.
The current values of both counters can be seen with MarsRover in the ”Device Info” section on the “Device
Setup” tab. Click on the “Detect” button to read the newest values from the firmware. Both timer values are also
shown in the OSD: Open the OSD with your keypad and go to the Setup Menu to see the current values.
Important Note:
Since the timer values are stored in the NVRAM both timers are reset to zero when erasing the NVRAM!
Manual
MarsRover Version 1.8 29.03.2019
Page 26 of 30
4-/6-Button keypad:
Two keypads are available for Prisma-IIIA, one with 4 buttons and one with 6 buttons. With this radio button the
default keypad configuration can be set accordingly.
Note: The user can still change the keypad configuration directly with the OSD (see sub menu “OSD Setup”).
However after writing a new board config to the NVRAM and after a factory reset the keypad is always set to
the value defined in the board config.
Configuration Note:
Any information about your board which might be important or useful can be written into this text field. The
content of this field is only saved to the xml file via the “Save to File” button, it is not written to the device when
clicking on the “Write to Device” button and consequently cannot be read from the device.
Enabled Input Ports:
Tick all the input ports you want to enable. At least one port must be enabled. The disabled ports are not
scanned by the firmware for a valid signal, therefore switching off unused ports minimizes the time to detect a
valid input signal on the other ports.
Analog Input Modes:
All analog input ports (VGA, CVBS, S-Video, Component) use mode tables to determine details of the currently
connected input signal. An input signal can only be processed by the controller if its corresponding mode is
added to the mode table. With MarsRover the customer can add up to two additional modes to the mode table
of the analog input ports (see sec. 6.5.3 for details).
With a drop down box the user can select which modes will be used by the controller:
Standard only: Only the standard mode table which is compiled into the firmware is used. Customer
specific modes (defined with MarsRover) will be ignored.
Custom only: Only the custom mode table is used. The custom mode table consists of two customer
specific modes which are defined in MarsRover tabs “Mode 1” and “Mode 2”. Note that if the connected
analog input signal doesn’t fit to any of the two custom modes then no picture will be shown.
All: If “All” is selected then the controller first searches the custom mode table for a matching mode, if
no match is found then the standard mode table is searched. The custom modes therefore always have
priority over the standard modes.
Enable Sync-On-Green on VGA port:
If this box is ticked the controller scans the VGA port for signals where sync is combined with the green
component of the RGB signal. If this box is not ticked Sync-On-Green is not supported.
Manual
MarsRover Version 1.8 29.03.2019
Page 27 of 30
6.5.3 Tabs „Mode 1“ and „Mode 2“
Up to two analog input modes can be defined by the user in tabs “Mode 1” and “Mode 2”. Please note that
these two modes are only used if “Custom only” or “All” is selected in the according drop down box on tab
“Configuration”.
As soon as a sync signal is detected on any of the analog input ports (VGA, CVBS, S-Video, Component) the
controller searches through the mode tables to find a matching set of parameters. This section describes the
parameters which must be defined by the user for every mode.
Manual
MarsRover Version 1.8 29.03.2019
Page 28 of 30
Mode type:
If “Graphic” is selected then the controller expects an input signal that is encoded in RGB (as used in computer
VGA ports). If your signal is encoded in YUV (e.g. PAL or NTSC on CVBS and S-Video) or YPbPr (Component
Video) then you have to select “Video”.
If your video signal is interlaced, tick the box “Interlaced”, otherwise the controller expects a progressive input.
Note that when you have an interlaced input mode the number of lines you have to enter in the mode table is
only half the number of lines of your screen (or TFT panel).
Horizontal active pixels:
Number of horizontal active pixels.
Horizontal total pixels: Total number of horizontal pixels (including horizontal sync pulse, front- and back porch).
Horizontal start position:
Number of pixels after which the active pixels start, measured from the beginning of the horizontal sync pulse.
Horizontal start position is equal to sync width plus back porch (see drawing in sec.6.4.2.2).
Horizontal frequency (kHz):
Frequency of the horizontal sync pulse in 0.1kHz units.
Tolerance of H frequency (kHz):
Accepted tolerance of the horizontal frequency in 0.1kHz units. Any frequency within the range of
“H frequency” – “Tolerance of H frequency” … “H frequency” + “Tolerance of H frequency” will be regarded as
fitting to this mode.
Active lines:
Number of active horizontal lines.
Total lines:
Total number of horizontal lines (including vertical sync pulse, front- and back porch).
Tolerance of total lines:
Accepted tolerance (in line units) of the total line count. Any total line count within the range of
“Total lines” – “Tolerance of total lines” … “Total lines” + “Tolerance of total lines” will be regarded as fitting to
this mode.
Vertical start position:
Number of lines after which the active lines start, measured from the beginning of the vertical sync pulse.
Vertical start position is equal to sync width plus back porch (see drawing in sec.6.4.2.2).
Vertical frequency (Hz):
Frame rate in 0.1Hz units.
Tolerance of V frequency (Hz):
Accepted tolerance of the frame rate in 0.1Hz units.

Manual
MarsRover Version 1.8 29.03.2019
Page 29 of 30
7 Command Line Interface
MarsRover can also be started from a command line in command line mode. Most options provided by the GUI
(without creating a panel or board configuration) are available in command line mode. Open a DOS box or
shell, go to your installation directory and type the following command for help:
MarsRover -?
This prints the following help screen:

Our company network supports you worldwide with offices in Germany, Austria, Switzerland, the UK and the
USA. For more information please contact:
Headquarters
Germany
FORTEC Elektronik AG
Lechwiesenstr. 9
86899 Landsberg am Lech
Phone: +49 8191 91172-0
E-Mail: [email protected]
Internet: www.fortecag.de
Fortec Group Members
Austria
FORTEC Elektronik AG
Office Vienna
Nuschinggasse 12
1230 Wien
Phone: +43 1 8673492-0
E-Mail: [email protected]
Internet: www.fortec.at
Germany
Distec GmbH
Augsburger Str. 2b
82110 Germering
Phone: +49 89 894363-0
E-Mail: [email protected]
Internet: www.distec.de
Switzerland
ALTRAC AG
Bahnhofstraße 3
5436 Würenlos
Phone: +41 44 7446111
E-Mail: [email protected]
Internet: www.altrac.ch
United Kingdom
Display Technology Ltd.
Osprey House, 1 Osprey Court
Hichingbrooke Business Park
Huntingdon, Cambridgeshire, PE29 6FN
Phone: +44 1480 411600
E-Mail: [email protected]
Internet: www. displaytechnology.co.uk
USA
Apollo Display Technologies, Corp.
87 Raynor Avenue,
Unit 1Ronkonkoma,
NY 11779
Phone: +1 631 5804360
E-Mail: [email protected]
Internet: www.apollodisplays.com