manual for kendo manager use
TRANSCRIPT

1
Manual for Kendo Manager use
Software for managing projects and project management
www.kendomanager.com
Version 1.0
2
TABLE OF CONTENTS
Ord.num. Title Page 1. Creation a user 2
2. My dashboard 4
3. Creation a project 7
4. Project options 15
5. Shortcuts in Kendo manager 33
6. Kendo manager basic options 34
7. Reports 34
8. Messages 37
9. Search 37
10. User options 38
3
KENDO ADMINISTRATION
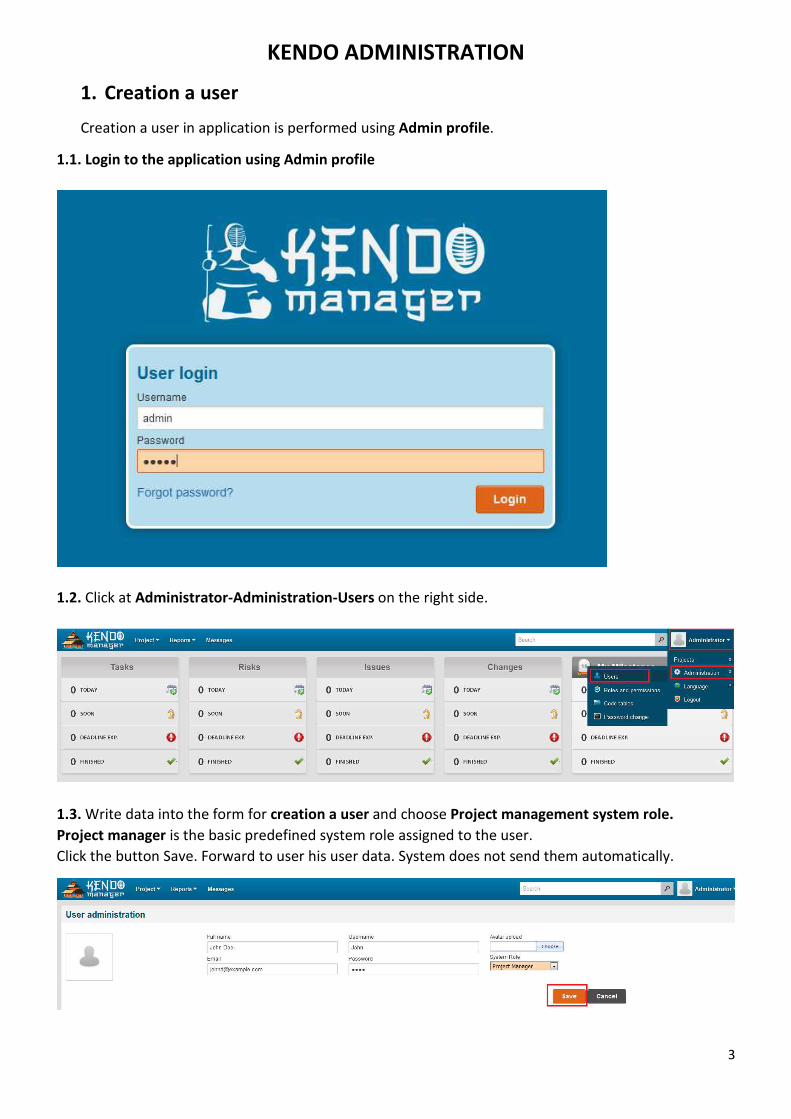
1. Creation a user
Creation a user in application is performed using Admin profile.
1.1. Login to the application using Admin profile
1.2. Click at Administrator-Administration-Users on the right side.
1.3. Write data into the form for creation a user and choose Project management system role.
Project manager is the basic predefined system role assigned to the user.
Click the button Save. Forward to user his user data. System does not send them automatically.

4
2. My dashboard
2.1. Login to the application with users data . Click the button Login.
2.2. When you signed up using your user data , you will get your dashboard (My Dashboard).
My dashboard – shows you all the tasks that are assigned to you and all the active projects you work on.
Dashboard provides you quick and simple overview of all your tasks on your projects.
Within the section My projects on the right side, are shown all projects you are working on.
Note : When we finish the project and archive it, all your project-related processes disappear from your
dashboard. If we activate the project again, all the processes previously assigned to you will appear on
your dashboard. When we deactivate (delete) the project, all processes will be disappeared from your
dashboard.

5
2.2.1. To easier access and inspection to your assignements, dashboard itself is divided into the sections.
Sections My tasks, My risks, My problems, My changes and My milestones represent the overview of all
the processes assigned to you to solve them, independent from deadline for solving. Each list can be
searched.
Sections Tasks, Risks, Issues, Changes, My Milestones represent the quick overview of all processes and
tasks on your projects based on defined deadline for their solving. The processes are automatically shown
on the lists i.e. processes move from one list to another depending on current date comparing to defined
deadline for their solving.
Note: Kendo manager logo, on the left corner, serves in favour of quick return to your dashboard
from any part of the application.
Each box contains 4 lists :
Today – Planned deadline for solving of certain process expires today
Soon- Planned deadline for solving of certain process expires in period of seven days or less comparing
with due date.

6
Deadline expired – Planned deadline for solving is expired.
Finished– Task or process is finished. Every finished task or process move to the list Finished if is
marked option Finished (image 2).
Note: When the checked box is marked as finished on the basic form (task, issue, milestone, change
and risk) and clicking on the button Save, automatically is entered today's date in Finished.
Note : When you change planned deadline or check box Finished and delete the date Finished at task,
this will be shown in the list (soon, today,finished and deadline expired) depending on new date you
enter. This rule applies to all the options the project.

7
3.Creation a project
3.1. Login to Kendo Manger with user data
3.2 To create the new project choose menu Project and click the item New project .
3.3. Fill the tab Basic data and click the button Save to create the new project.

8
Note: Upon finsihing the project mark the option Archived. Then, all the assigned processes relating to
project won't be shown at Dashboard (paragraph 2. My Dashboard). When project is activated again,
all the items will appear again at Dashboard. Project manager,authorized for project realization,
archives the project.
3.4. After you created new project on the left side, you get Project menu with additional options and
top menu with project options (dashboard, tasks, milestones, costs, issues, risks, changes, used time, files
and project settings.
3.5. In case that you do not need certain options from project menu on the left side, click the option
project settings to remove them from project. Mark the checkbox you wish to be visible on project and
click the button Save.
3.6. The next step is creation of project team. Click the card Project team.

9
After you created project, you are automatically added to project as Project manager and basic system
role project manager is assigned to you and gives you in advance predefined rights over the project.
Note: Project manager can create any item or process on project, to make the changes and delete the
items at project.
When for certain reason the project has more project managers or the actual project manager must be
replaced, add user previously created in the application (Art.1. Creation a user) and assign him/her the
role project manager.
Note: This application defined up to 6 users in project with assigned function Project Manager.
3.6.1. Creating a project team- defining of members and their role/function in project
Click the tab Project team.
In the box Select team members and select the person you add to team. It is enough to just enter one
letter to the box and previously created users will appear.
Select user or users and click in box Project role and assign the role Team member which offers them
certain predefined rights on project.
Note: Team members can perform the tasks in project depending on privileges defined by assigned role.

10
There are five predefined project roles in Kendo manager :
• Project manager- holds the full rights over the project and all the processes within. He can create,
modify and delete all the project processes (tasks, resources, issues, changes, risks, documents,
costs and used time, to post the comments...)
• Team member - the most often assigned role to users. Team member can search the contents at
project,to add or delete his comments,to upload documents in project processes.
Note: User defined as team member can add and delete his comments and to upload documents.
Other tabs (basic data, team member and resources) he can see but he can't change or delete the content posted by project manager.
• Project preview – assigned to people who are not directly involved in project realization (e.g. client, director, Mayor of the Municipality...). The person can view the content but can not modify or delete it.
• Team leader – has the same function as project manager except the right to change the items in the left project menu. Team leader can create, modify and delete all the project processes (tasks, resources, issues, changes, risks, documents, costs and to post comments)
Team leader is usually applied in larger projects and this function is assigned to person who performs the part of the tasks in domain of project manager or deputy project manager.
• Software tester – used at software projects. This role is assigned to persons who tests the accuracy of application within software development process.
• Software tester has the same rights as team member and also can create issue (bug) and assign it to the person (the most often to the programmer) to correction.

11
3.7. Budget of the project – in basic menu we define the item Budget. The following fields in the
form should be filled:
• Institution or organisation –from drop menu choose the organisation,institution and company
which funded the project
• In the field put the project value
• Field Converted amount and converted currency – serves in the case that project is funded
from foreign sources (e.g. funds in USD but basic currency is BAM).
• Click the button Save
• Note:
• If project is funded by means in basic (domestic) currency , then in the field converted amount
enter identical sum and choose the same currency as at the basic currency (image 2)
• Click to + button if you wish to add new Organization/company. The data are saved for further
use.
Image 2. Creating a budget- converted sum
3.8. Calendar – Project calendar is visual overview of project tasks at daily, weekly, monthly or annual
level.

12
3.9. Project location – Define the geographical location where the project is implemented.
Note:
• It is necessary to previously create Project location Click to + button if you wish to add new Project
location .. Project location is inserted for the first time. The data are saved for further use.
3.10. Project applied –define the project owner and who initiated the project (company title,
organisation title,department title...). Fill the data and click the button Save.
Note:
• The item Project applied need to be previously created. Click to + button if you wish to add new
Project applied .. Project applied is inserted for the first time. The data are saved for further use.
3.11. Project target users – with assistance of this option we define who the project target users are
and which target group will benefit from project (Example : Support to Roma people through increasing
of energy efficiency of Roma settlements). Enter the data and click the button Save.
Note:
• The item Project target users need to be previously created. Click to + button if you wish to add
new Project Target user. Project target users is inserted for the first time. These data are saved
for further use.
13
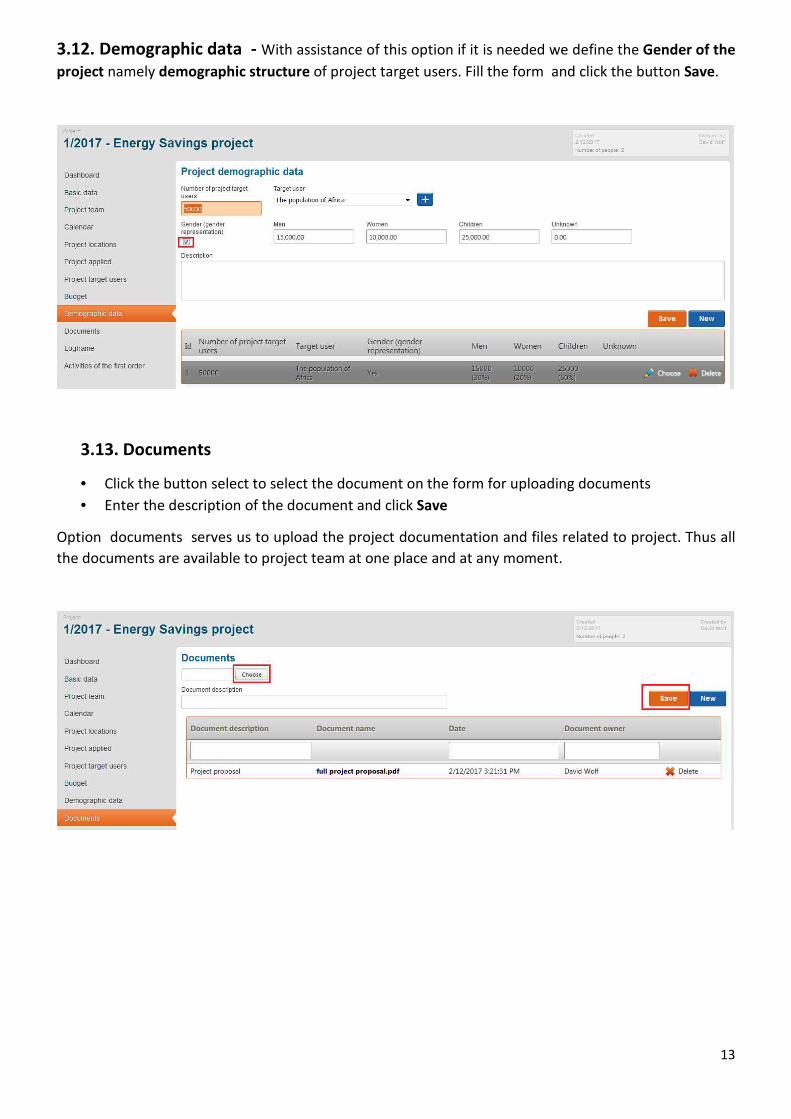
3.12. Demographic data - With assistance of this option if it is needed we define the Gender of the
project namely demographic structure of project target users. Fill the form and click the button Save.
3.13. Documents
• Click the button select to select the document on the form for uploading documents
• Enter the description of the document and click Save
Option documents serves us to upload the project documentation and files related to project. Thus all
the documents are available to project team at one place and at any moment.
14
3.14. Logical framework matrix
The option logical framework matrix is an auxiliary instrument used when we manage EU-funded
project. Click the tab Logical framework matrix on the left project menu. Fill the form of matrix and
click the button Save.
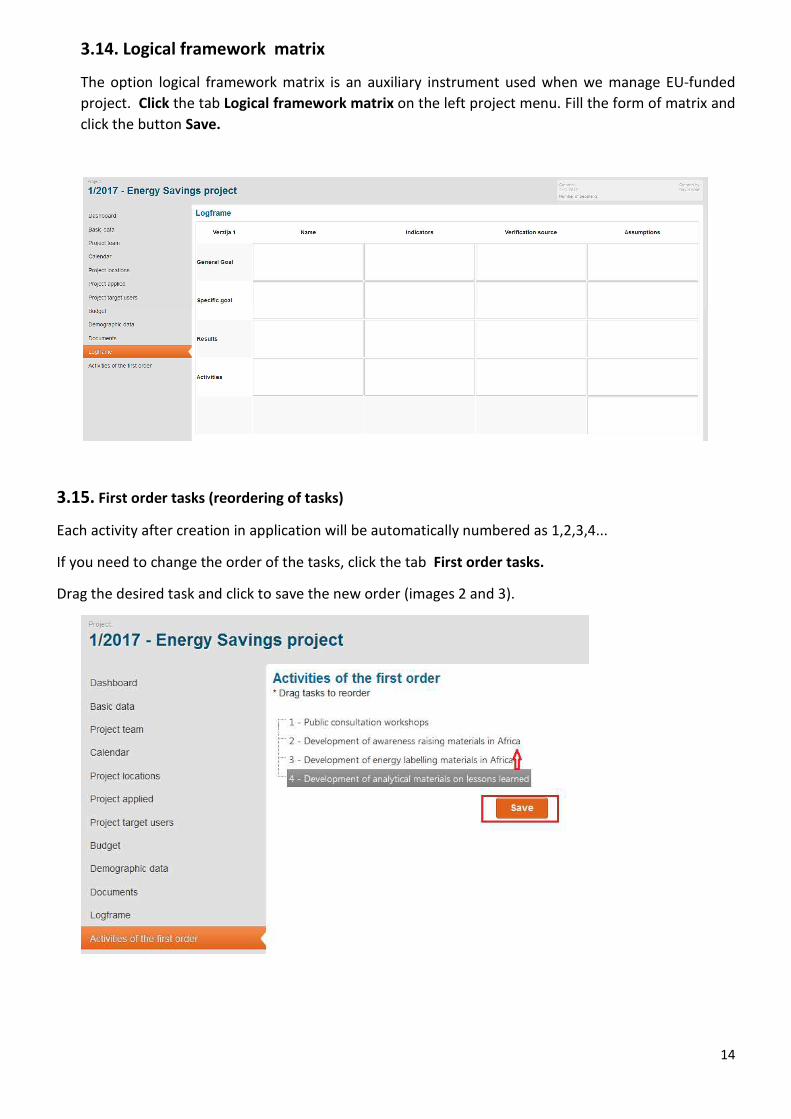
3.15. First order tasks (reordering of tasks)
Each activity after creation in application will be automatically numbered as 1,2,3,4...
If you need to change the order of the tasks, click the tab First order tasks.
Drag the desired task and click to save the new order (images 2 and 3).
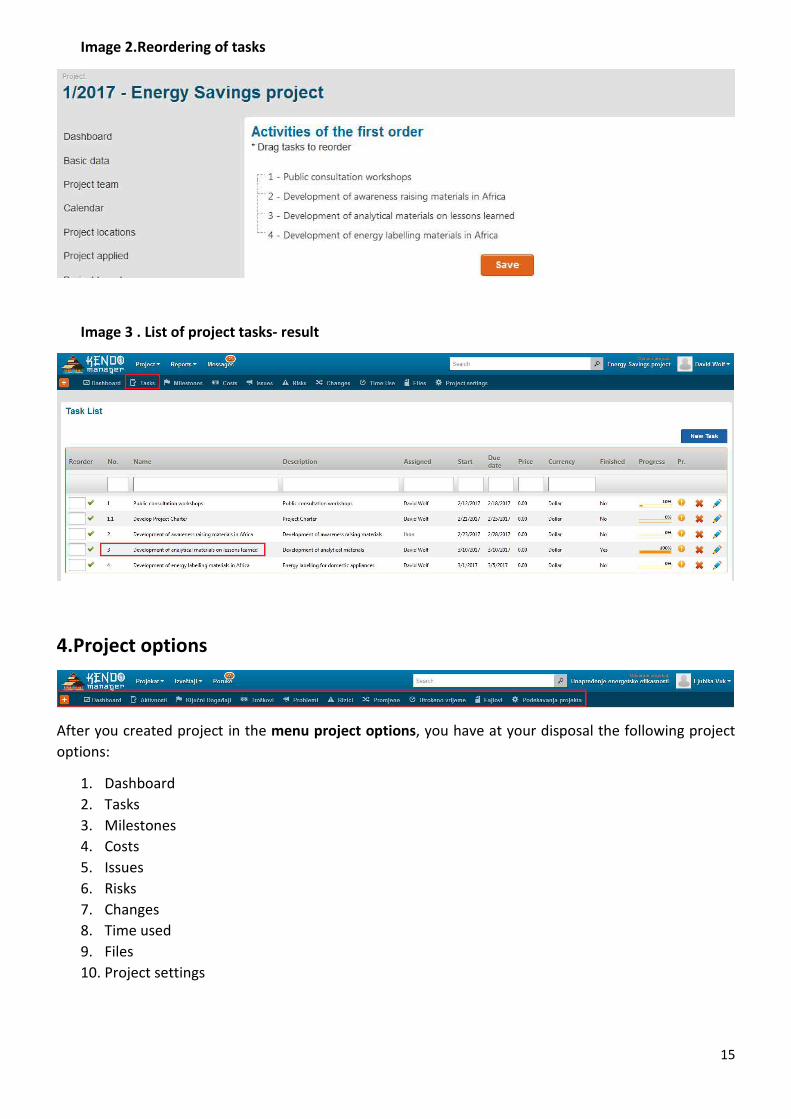
15
Image 2.Reordering of tasks
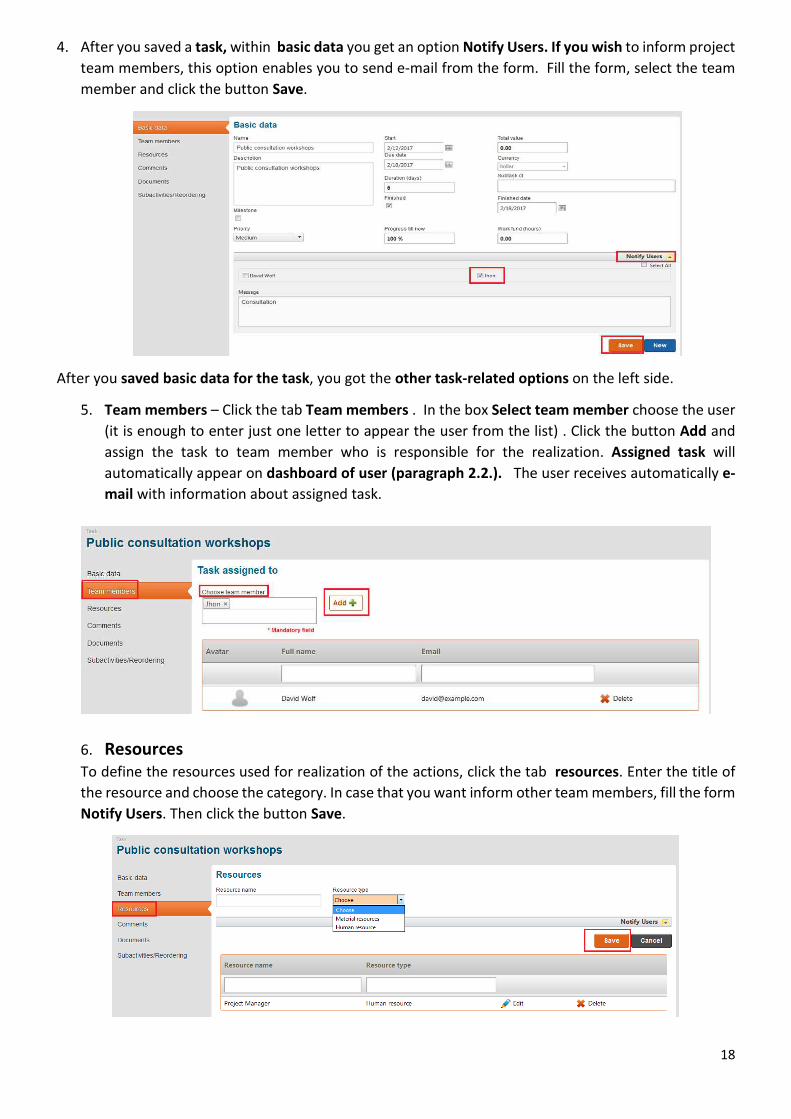
Image 3 . List of project tasks- result
4.Project options
After you created project in the menu project options, you have at your disposal the following project
options:
1. Dashboard
2. Tasks
3. Milestones
4. Costs
5. Issues
6. Risks
7. Changes
8. Time used
9. Files
10. Project settings

16
4.1. Project dashboard
Project dashboard provides us quick overview of current project phase. Dashboard of the project shows
all the processes realized within the project. The processes are sorted per priorities and costs, time and
project status are presented graphical.
Note : When you click on lists per priorities inside the boxes (tasks, issues, changes, risks, milestones),
you may search the list or sort processes within the selected project.
4.2.Tasks
1. In order to create new task on project, click the item tasks and you see the list of project tasks
which you can sort, search and reorder the tasks.
2. Click the button New task from the list of tasks to create the new task .

17
3. Fill the form Basic data and click the button Save to get the other options within the new task.
Note : Upon finishing the assigned task, team member informs project manager via message (inform
the user) and post a comment. After prepared information,project manager performs the control,select
check box finished and enter the date in the box finished if the task was successfully finished. On the
basis of this action the process will automatically move at user's dashboard on the list of finished tasks
(Manual, Art.2 My dashboard).
If Project manager wish to reactivate the task, it is necessary to deselect check box finished, delete the
date in box solved, change deadline if it is expired, save the change and inform the team member by
message (option notify users).
18
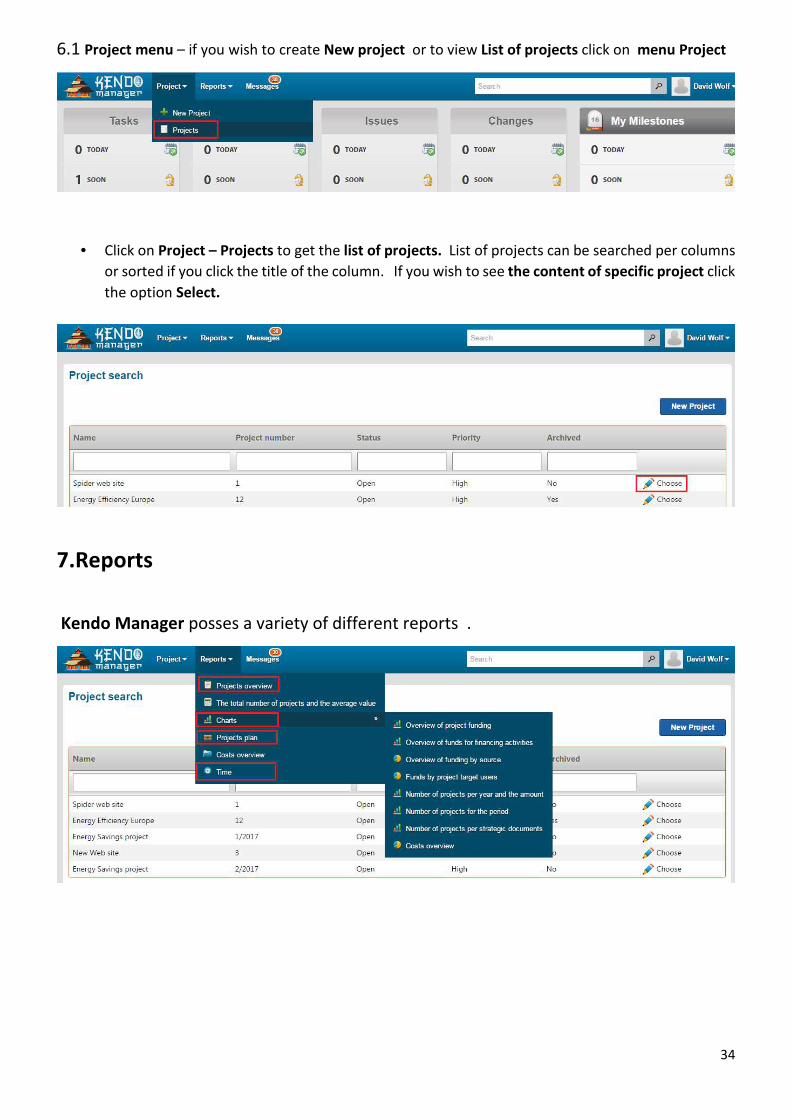
4. After you saved a task, within basic data you get an option Notify Users. If you wish to inform project
team members, this option enables you to send e-mail from the form. Fill the form, select the team
member and click the button Save.
After you saved basic data for the task, you got the other task-related options on the left side.
5. Team members – Click the tab Team members . In the box Select team member choose the user
(it is enough to enter just one letter to appear the user from the list) . Click the button Add and
assign the task to team member who is responsible for the realization. Assigned task will
automatically appear on dashboard of user (paragraph 2.2.). The user receives automatically e-
mail with information about assigned task.
6. Resources
To define the resources used for realization of the actions, click the tab resources. Enter the title of
the resource and choose the category. In case that you want inform other team members, fill the form
Notify Users. Then click the button Save.

19
7. Comments
Option comments serves for discussion of project team members i.e. to post comments regarding the
task progress. Click on option comments. Fill the form comments. Upload the document if you have it at
your disposal. If you want to inform the other team members click on the Notify Users. After you filled
the form click the button Save.
Note :
• Each member of project team can delete just own comments .
8. Documents
The option Documents is aimed to store the documents and files relating to realization of specific
task.
Click the button Select. Choose document- enter the description of document and click the button
Save.
Note : Users who hold the project role Team member (3.6. Project team) can put the documents but they
do not have the permission to delete the documents or to make changes. Those rights are predefined to
project manager.

20
9. Subtasks (reordering )
When a task consists of subtasks (1.1., 1.2, 1.3, 1.3.1) you can make the reordering using this option.
Kendo Manager supports existing of up to 4 sublevels in activity.
Image 1. Creating a subtasks
Image 2 . List of tasks
Image 3. Reordering of tasks

21
4.3 Milestones
Milestones in project are the events (tasks) of great importance for project.
1. Select project and click the option Milestones- New Milestones
2. Fill the form and select check box Milestone to give the status Milestone to the task.
Click the button Save .
3. Marked task will be shown on the list Milestones .

22
4. In the tab Team members assign the Milestone to member who is responsible for realization.
Note :
Usage of other options (Resources, Comments, Documents,Subtasks) in the task defined as Milestone, is
the same as in ordinary task.
4.4 Costs
The option Costs serves to record the costs during the implementation of project.
1. Click on Costs in menu project options-New cost
2. Fill the form Costs and click the button Save.

23
If project requires expressing of the costs in other currency, select Cost in other currency on the
form Costs to fill the auxiliary form.
3. Select Currency on the form to get automatically converted amount in selected currency
4. Click the button Save
5. If you wish to view the converted values click the option Alternative costs
Note :
Exchange rates comparing to main currency in application can be inserted using Admin profil
(Administration-Codebooks –Currencies). Exchange rate value can be changed depending on need.

24
4.5 Issues
Otion Issues serves to register the issues, assignig to project team members to solve them and to create
the connection with certain project task .
1. Select project – Click at Issues – New issue to receive the form for creating an issue
2. Fill the form and click the button Save. When you create an issue, you will get other options in
menu on the left.
3. Click the tab Team members. Select the user in the box Select team member (just enter one letter
and the user from the list will appear). Click the button Add and assign the issue to project team
member responsible for issue solving. Assigned issue will automatically appear on dashboard of
the user (paragraph 2.2.). The user automatically receives e-mail with information about the
assigned issue.

25
4. When the issue is connected to specific task , click the option Tasks and add task .
5. The option Comments serves for discussion between Project manager and project team member
who is responsible for solving of an issue. Also, and other project team members can post the
comments. Posted comment can be deleted just by person who posted it.

26
Note:
When assigned issue is finished, team member post a comment and inform project
manager via message (inform the user). Then project manager carries out the control,
select check box finished and enter the date in box finished if the Issue is successfully
finished. On the basis of this action, the process on dashboard will automatically move
on list Issue Finished (Manual, Art.2.My Dashboard).
If Project manager wants to reactivate the Issue, it is necessary to deselect check box finished, delete
the date in the box solved, change the deadline if it is expired, save the change and inform the team
member by message (option Inform the user).
4.6 Risks
The option Risks allows us the opportunity to register project risks, to define time frame, influence to
project as well as the possibility to happen.
1. Choose Project –Click the Risks-New Risk to receive the form for creating of risk.

27
2. Fill the form and click the button Save. After you create Risk you can get other options in the left
menu.
3. Klick on tab Team members . In the field Select team member choose the user (just enter one
letter and the user from the list will appear) Click the button Add and deliver risk to project team
member who has to solve it . Assigned risk is automatically appeared on dashboard of the user
( paragraph 2.2). The user automatically receives e-mail with notification on assigned risk.
4. If the Risk is connected to certain task , click on option Tasks and add Task.

28
5. The option Comments serves to discussion between Project Managera and Project team member
who is responsible for solving of the Risk . Also, the comments can be posted by other team
members. . Posted comment can be deleted only by a person who posted a comment.
Note:
When assigned risk is solved. Team member post a comment and inform Project manager via message
(Notify Users). Then, upon receiving the information project manager carries out the control, select
check box finished and enters date in the field solved if the risk was successfully finished. Based on his
action, the process on dashboard will automatically move to the list Risk Finished (Manual, Art. 2.My
Dashboard).
When Project manager wants to reactivate the Risk you have to deselect check box finished, to delete
the date in the field solved, to change the deadline if it is expired, to save the change and inform team
member via message (option Notify Users).
4.7 Changes
Managing changes in project or Change management aims to continually creating of positive changes in
project. Managing changes is the part of assignments performed by Project manager.
You can register the changes using the option Changes, to deliver the changes to team members and to
define time frame for their solving.

29
1. Choose Project –Click on Changes – New Change to receive the form for creating of Change.
2. Fill the form and click the button Save. After you created Change, you will get and other options
in the left menu.
3. Click on tab Team members. In the field Select team member choose the user (just one letter to insert
and the list with user is appeared). Click the button Add and assign Change to team member who has to
solve it . Assigned change is automatically appeared on dashboard of the user ( paragraph 2.2). The user
automatically receives an e-mail with notification on assigned change.

30
4. If the Change is connected to certain task, click the option Tasks and add task.
6. The option Comments serves to discussion between Project Managera and Project team member who is
responsible for realisation of the Change . Also, the comments can be posted by other team members. .
Posted comment can be deleted only by a person who posted a comment.
Note:
The assigned change is solved. Team member post a comment and informs project manager via
message(Notify Users). After receiving the information, project manager carries out the control, select
check box finished and enter the date in the field solved if the Change was successfully finished. .
Based on his action, the process on dashboard will automaticallymove to the list Changes Finished
(Manual , Art.2 My Dashboard).

31
If Project manager wants to reactivate the change , you have to deselect check box finished, to delete
the date in the field solved , to change the deadline if it is expired, to save the change and inform the
team member via message (option Inform the user).
4.8 Time used
The option Used time helps to register used time in project.
1. Select Project –Click on Time Use – New time use to get the form for creation of Used time
2. Fill the form and click the button Save.

32
Note :
• At registering of time used in the field Price enter the total Value of Used time expressed in the
currency (example: project team member- David Wolf spent 10h in total value of 10($) for the
task Project preparation. Used time is payable service in project)
Used time in project is registered by Project manager.
Image 1. List of Time used in project
4.9 Files
The option Files represents the list of all documents and files uploaded on project through the project
options.
The list can be searched.
1. Select Project –Click on Files to view the list with files and project documents.

33
5. Shortcuts in Kendo manager
• Creating of new process in selected project– After you selected the project, in the menu project
options click on + to open quick menu with options for fast creating of new processes in project.
• My dashboard– When you wish to return quickly on your dashboard from any part of the
application click the logo of Kendo maager in the upper left corner.
• Dashboard of the project (control table of the project) – If you want to return quickly to
dashboard of selected project click on the project title in the upper right corner.
6. Kendo manager basic options
When you login on the application using user data in top menu you get the options as follows:
• Project
• Reports
• Messages
34
6.1 Project menu – if you wish to create New project or to view List of projects click on menu Project
• Click on Project – Projects to get the list of projects. List of projects can be searched per columns
or sorted if you click the title of the column. If you wish to see the content of specific project click
the option Select.
7.Reports
Kendo Manager posses a variety of different reports .

35
Basic reports in Kendo Manager:
• Project overview – offers us the possibility to create the list of projects. Report contains different
options that enable generating of list of projects sccording to the requirements. Report can be
printed or exported in different formats (word,excel,pdf..).
• Project Plan – is flexible report which you can customize to your requirements. Choose project
and select the options you wish to be shown within the report. Click on Generate Report. Report
can be printed or exported in different formats(word,excell,pdf...).

36
• Costs overview – represents detailed overview of the costs in selected project. Report on costs is
flexible report. If you want to see selected data on costs in selected project, only mark the option
you need.
Note :
If you want to see the the graphic representation of the costs click on Reports – Charts – Costs overview
37
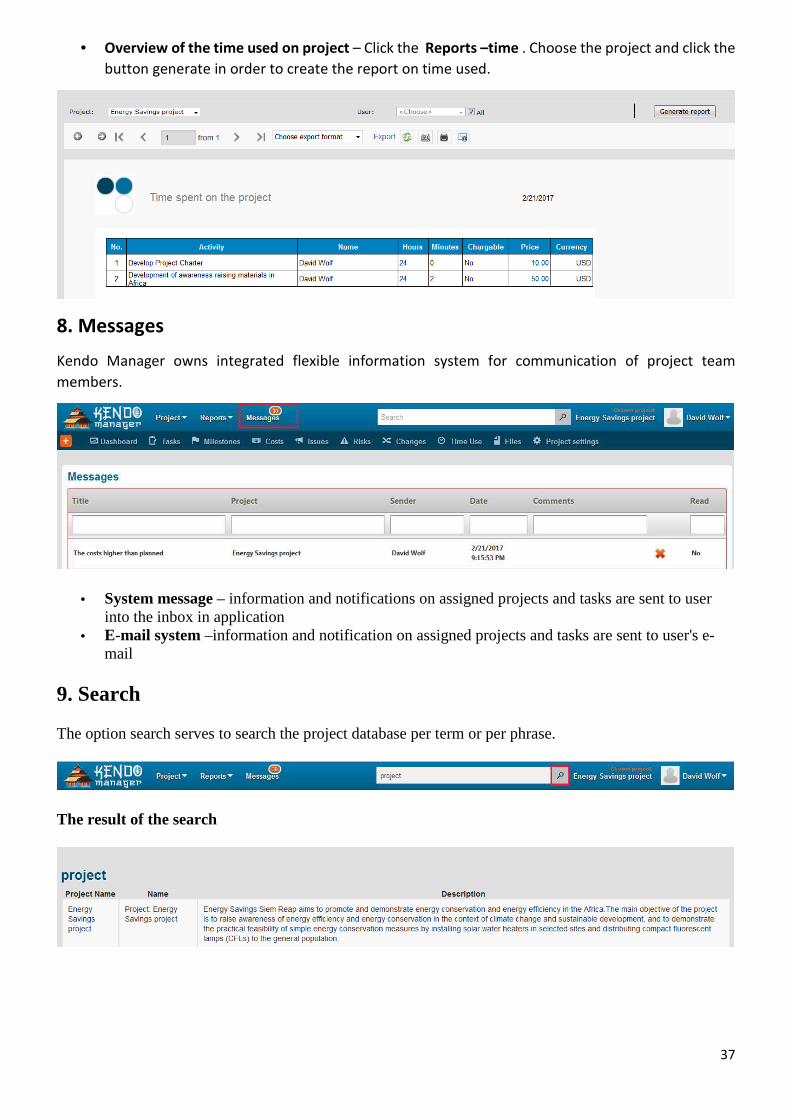
• Overview of the time used on project – Click the Reports –time . Choose the project and click the
button generate in order to create the report on time used.
8. Messages
Kendo Manager owns integrated flexible information system for communication of project team
members.
• System message – information and notifications on assigned projects and tasks are sent to user into the inbox in application
• E-mail system –information and notification on assigned projects and tasks are sent to user's e-mail
9. Search
The option search serves to search the project database per term or per phrase.
The result of the search

38
10. User options
The following options are available :
• Change of password –If you wish, this option lets you change own password. When you forgot your password, click on login page option Password forgotten
• Language – Kendo Manager currently supports English and Serbian (Latin alphabet) language
• Sign out – option serves to user to sign out from the application