manual for using the uc-client as a cti client / softphone
TRANSCRIPT

Manual for using the UC-Client as a CTI client / softphone Version 3.0
Edition 5.2016, document version 3.0
© 2016 UPC Schweiz GmbH

2
Contents
1. Overview ..................................................................................................................................................... 3
2. Login ........................................................................................................................................................... 3
3. Displays and control elements .................................................................................................................... 4
4. Basic functions ............................................................................................................................................ 5
5. Client settings .............................................................................................................................................. 9
6. Address books / contact database ............................................................................................................ 14
7. Appearance ............................................................................................................................................... 17
8. Keyboard ................................................................................................................................................... 17
9. Softphone .................................................................................................................................................. 18
10. My person ............................................................................................................................................... 19
11. Partner bar .............................................................................................................................................. 19
12. Interfaces ................................................................................................................................................ 20
Note
The UC-Client is a product distributed by Caseris GmbH with the name CAESAR and has been integrated
into our platform and modified to fit in with our corporate identity. These instructions are based on the
original description from the manufacturer and have been adapted for UPC Business’s product set-up.
3
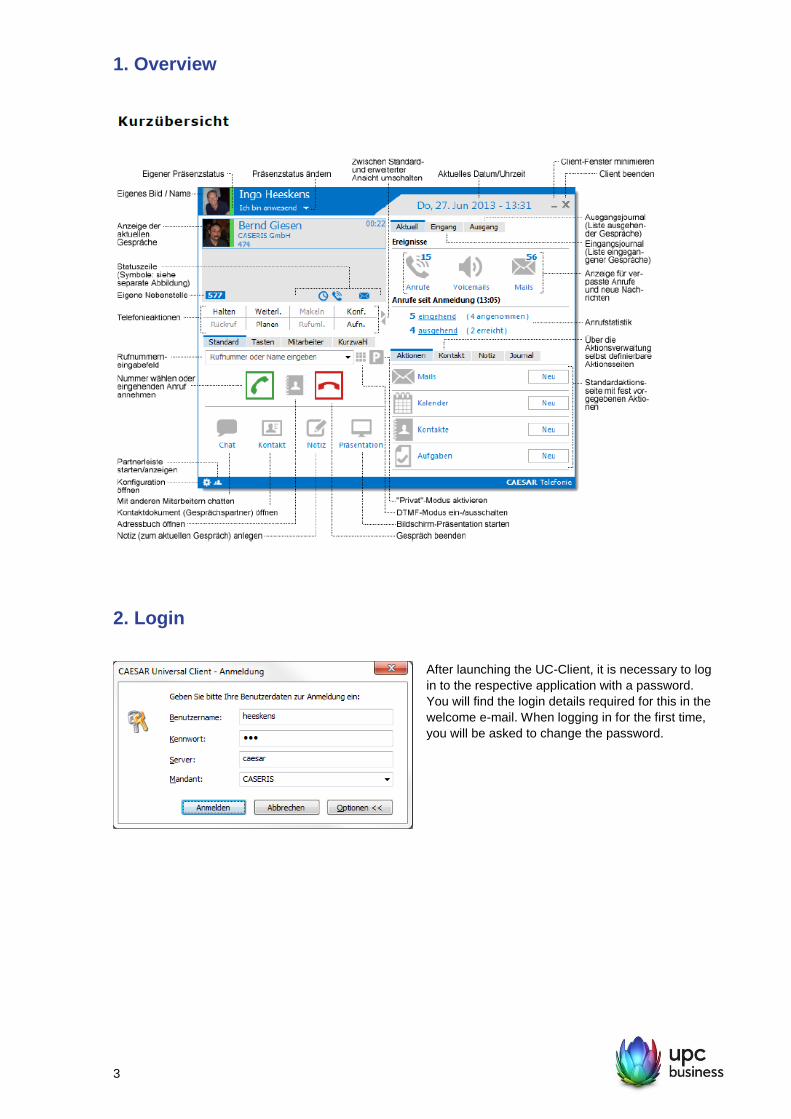
1. Overview
2. Login
After launching the UC-Client, it is necessary to log
in to the respective application with a password.
You will find the login details required for this in the
welcome e-mail. When logging in for the first time,
you will be asked to change the password.

4
2.1 Selecting the operation mode
If you have ordered a combination of softphone and
CTI client, a dialogue window for selecting the
operation mode will appear after you have logged
in. If the checkbox for "Don’t ask me again" is
checked, the dialogue will not be shown again
when the application is next started. This setting
can subsequently be reset at any time in the
settings.
3. Displays and control elements
The standard view offers a space-saving display. In the standard view, only the left half with the most
important features is visible. There is also the expanded view.
3.1 Call display
In the upper area is the call display with the subscriber/connection status. All currently initiated and existing
connections are shown here with a corresponding symbol.
3.2 Status bar
In the lower line of the call display on the left, the user’s own phone number is displayed and next to it a
status display. Possible symbols are displayed for "Missed calls", "Answering machine", "New mails",
"Planned calls" and "Call forwarding".
3.3 Current/journals
In the journals area, incoming and outgoing calls
can be logged. After clicking the "Current" tab,
"Missed calls", "Answering machine", "New mails"
and the various calls since the last login will be
displayed.

5
3.4 Actions
In the "Actions" area (section 2.12), various
features are shown to simplify the work flow and the
interaction with the respective application. Up to a
maximum of 3 user-defined action pages can also
be added here and customized with user-defined
actions.
4. Basic functions
4.1 Making calls
4.1.1 Direct dial
A subscriber can be called by lifting the receiver
and dialing the number with the telephone keypad
or by entering the telephone number via the keypad
in the call number input field.
4.1.2 Dialing from the address book
Instead of the number, a name can also be entered
from an address book. The connection is set up
immediately after exiting the address book by
clicking "OK".

6
4.1.3 Hotkey / speed dial
To dial a telephone number from an external
application (e.g. web browser), the relevant
sequence of numbers can be highlighted in the text
and the button CTRL+F11 (standard value) can be
pressed as a hotkey.
The hotkey button can be changed in the client
settings on the "Keyboard" tab.
For an incoming call, the hotkey can be used to
accept the call if no call number is highlighted.
4.2 Call forwarding
4.2.1 Call forwarding with enquiry (transfer)
First set up a second connection to the person to whom you wish to transfer the call.
After consulting them, press the "Transfer" button to transfer the call.
4.2.2 Call forwarding without enquiry (blind transfer)
Select a subscriber by entering their phone number or from your contacts.
Instead of setting up a call, press the "Transfer" button directly.
4.2.3 Call forwarding for incoming call (redirect)
Select a subscriber by entering their phone number or from your contacts.
Instead of setting up a call, press the "Transfer" button directly.
4.2.4 Switch between 2 connections (toggle)
Set up first connection or accept an incoming call.
Set up second connection or accept an incoming call.
By pressing the "Toggle" button, it is now possible to switch between the two connections alternately.
4.3 Extra features
4.3.1 Conference call (max. 3 participants)
Set up first connection or accept an incoming call.
Set up second connection or accept an incoming call.
Press the "Conf." button.
Conference calls with dial-in numbers and up to 10 subscribers can be ordered by UPC as an
option for the telephony solution.
4.3.2 Hold active connection (park)
Hold: During an active connection, press the "Hold" button in the main window. The button text will change
to "Resume".
Resume: Press the "Resume" button in the main window and you are now connected with the caller again.
Hold music can be ordered by UPC as an option ("Music on Hold") for the telephony solution.
4.3.3 Call reminders
Call reminders remind the user about a call to be held at a defined time and provide additional information.
At the time of the reminder, the user can decide whether the call should be made immediately, delayed or
whether the reminder should be deleted. Call reminders can be created at any time by the user via the

7
"Schedule" button (cf. fig. 2-21). Existing call reminders will be shown in the main window by a clock
symbol (see section 2.2.1 - Status bar). The colour of the symbol indicates whether the call reminders are
generally deactivated (red clock) or activated. After clicking on the symbol, the existing call reminders will
be displayed.
4.3.4 Phone memo
The phone memo function allows you to create a memo for a current call, print it out, forward it as an e-mail
and to create a task or appointment from it. For an ongoing call, the address details of the contact partner
will automatically be transferred to the phone memo, if they are available.
4.3.5 Chat function
After selecting a chat participant, the chat will be started and a new window opened. In the upper area, the
text messages will be displayed in the form of a conversation. In the lower area is a text input field. Text
entered there will be sent to the other participant after the enter key or the "Send" button is pressed.
Several chat conversations can be held in parallel
with various participants. Each conversation will be
displayed in a separate tab with the name of
participant as the title. The current presence or
telephone status of the participant will also be
displayed in the title of the tab, provided that the
participant has authorised this in his privacy
settings.
In the default setting, a message entered will be
sent when the enter key is pressed. A line break
can be achieved by pressing Shift + Enter key. This
configuration (see below) can also be reversed,
however, so that Shift + Enter sends the message
and a line break is achieved by pressing the Enter
key.
The following actions are possible by pressing the relevant buttons:
Select emoticon
A list of the available emoticons will be displayed. After an emoticon has been selected, it will be
inserted in the text to be sent (as text). The recipient of the message sees the emoticon as the
corresponding symbol again.

8
Save conversation
The current conversation can be saved in a file, the name and storage location of which can be
determined in the "Save as..." dialogue which appears. The following formats are available: HTML,
TXT, XML
Delete conversation
This deletes the messages exchanged so far with the current chat partner and clears the chat window.
Change settings
A menu appears in which various settings for the chat can be made:
Display time in messages:
Shows the time when every message was sent.
Signal incoming messages acoustically:
Plays the sound that is configured in the general settings for the telephony client under "Sounds" – "Chat
request". If this option is not activated, messages will only be signaled acoustically if a message arrives
from a chat participant with whom no conversation has previously been started.
Save chat when exiting:
Saves the messages exchanged with the chat participant when exiting the chat, as long as the telephony
client is running. If a new chat is started with the participant, the previous messages will be displayed again.
In the foreground for incoming messages:
If this option is activated, the chat window will be brought in front of all other windows in the system for an
incoming message. This means that the new message is directly visible. Since other windows are covered
by this, it may be desirable to deactivate this option. For an incoming message, the entry then only flashes
in the Windows task bar. To view the message, the chat window must be brought to the front manually.
Use different colours for tabs:
After activating this option, each chat tab is given a different colour. If the option is not activated, the tabs
have the standard colour of the selected design.
Send message with:
Messages are usually sent by pressing the Enter key and a line break can be achieved by pressing Shift +
Enter key. This can be reversed, however, so that Shift + Enter key sends the message and the Enter
button inserts a line break.
Views:
In this sub-menu, the conversation view can be changed.
Open another chat with a new participant
The dialogue for selecting a chart participant appears (see fig. 2-49). By selecting the next participant,
a further chat session is opened on a new tab in the same window.
End chat
Ends the chat with the current participant. The corresponding tab is closed. If the chat with the last
participant is ended, the complete chat window also closes.
Send e-mail
Opens the e-mail programme to send an e-mail to the current participant.
Share screen
Opens the dialogue to share the user’s own screen with the current participant.

9
Call chat participant
Here, a new telephone call is set up with the current chat participant. If a telephone call is already in
progress, a second call will be started.
End call
Ends the current call being held in the telephony client (irrespective of the current chat participant!).
5. Client settings
Opens the settings
5.1 General settings
In this area, the number of phone number list
entries and the behaviour of the CAESAR
telephony client when starting or exiting can be
adjusted. If several groupware systems are
registered/installed for the telephony client, the
desired application module can also be selected
here and configured by clicking the "Advanced
settings" button.
5.2 Call diversion
Here it is possible to determine whether and to
which number incoming calls should be diverted.
WARNING:
Call diversion on the terminal may collide with
call diversion in the voice portal.
My telephone should: not be diverted
If the field is activated, no calls will be diverted. Any existing call diversion will be cancelled.
My telephone should: be diverted to
If the field is activated, incoming calls are diverted by setting a call diversion. The destination number must
be entered in the field. The 5 destination numbers used last will be saved in the list. Pressing the "Delete"

10
button deletes the list; exception: if a call diversion is currently active, the destination number will NOT be
deleted from the list.
5.3 Call reminder
In the following dialogue, the behaviour of the telephony client with regard to call reminders can be defined.
5.3.1 Enable call reminder
If this selection box is checked, the user will be reminded automatically about outstanding calls. The
configuration of such reminders can either be carried out manually at any time via the "Schedule" button in
the main window or automatically after ending a call. In both cases, a dialogue window opens in which the
various parameters for the call reminder can be adjusted.
5.3.2 Start automatically after disconnecting a call
If the selection box is checked, the call reminder will be started automatically after a call is ended.
5.3.3 Only for failed calls
This setting can be used to determine whether the dialogue window for configuring call reminders should be
opened automatically after every terminated call, or only when the other person could not be reached.
5.3.4 Time interval for call reminding
The standard value for new call reminders is 10 minutes. This can be changed when creating a new call
reminder.

11
5.4 Tab pages
In this dialogue, the user can specify which tabs should be displayed in the lower half of the main window in
standard mode by using the corresponding arrow button. He can also define the order of the tabs displayed
there. The tab for the uppermost entry in the list of "Visible tab pages:" will be displayed on the far left in
the window group.
5.5 Sounds
Here, sounds can be defined to signal various events.
The following events exist:
Bell signal:
Will be played for an incoming call. Different sound files can be selected here to distinguish between
internal and external calls.
Call reminder:
Will be played when a call reminder falls due (see section 2.4.3).
Chat request:

12
Will be played when another used sends a new chat message.
New e-mail:
Will be played for an incoming new e-mail.
To assign a sound file to one of these events, the checkbox in front of the corresponding event must be
selected. In the field after the event, the file name of the file to be played (WAV) must be entered. Clicking
the "..." button will take you to the file selection dialogue. You can listen to the selected sound file by
clicking the "Play sound" button.
5.6 Absence
In this dialogue, you can configure your own presence status for the internal display. Depending on which of
the three selection fields is checked, the presence status will be switched automatically from "present" to
"absent".
5.7 Journals
Here, the display for the incoming and outgoing journals in the CAESAR telephony client window can be
configured.
Under "Time period", the number of days (including the current day) that should be logged in the journals
can be entered. Note: It should be noted that a large number of days will also result in a long loading time
for the journal lists!

13
5.8 Privacy
In this dialogue, the user can define what other users are able to see about him (presence/telephone
status). Furthermore, rights for actions such as call pick-up can be assigned.
Other users or groups can be added to the “Authorized partner” list using the “Add” button. For the user
selected in this list (or for the selected group):
Phone:
Here, it can be specified how exactly the status of the telephone should be displayed for other users:
No display:
The telephone status will not be displayed.
State (idle/busy):
It will only be shown whether the user is currently on the phone (or the exact call status such as "dialling" or
"in a call" will be shown). Information about the call partner is not available.
Status & abbreviated call numbers:
The telephone status and the abbreviated call numbers of contact partners will be displayed. Abbreviated
call numbers means that the last 3 digits of the telephone number are hidden.
Status & call numbers:
The telephone status and the call numbers of contact partners will be displayed. Displaying numbers in full
also means that phone number resolution, i.e. displaying contact partners’ names is also possible.
Call diversion:
Here, it can be determined how the status of the call divert for the telephone should be displayed to other
users.
No display:
The status of the call divert will not be displayed to other users.
Status:
It will be displayed that the telephone is diverted. The call diversion destination will not be displayed.
Status & destination:
It will be displayed that the telephone is diverted. If the telephone is diverted, the destination number for the
call diversion will also be displayed.

14
Presence:
Here, the display of presence information (present, absent, don’t disturb, break) is authorised.
No display:
Other users cannot see the user’s presence status.
Status:
This presence status is displayed to other users. The presence status also includes the freely definable
status text that can be entered when setting the status.
State & offline duration:
Like for “Status”, here the presence status will be displayed to other users. In addition, if the user is not
logged on, it will be displayed for how long the user has not been logged on (“Since today”, “Since
yesterday”, “For x days”).
Restrictions
Incoming: Display phone numbers only while ringing
This allows the currently configured partner to decide in his partner bar whether he wishes to accept the call
or forward it. Only the status will be displayed during the call. The participant’s details are no longer visible.
Outgoing: Don’t display phone number
If the partner makes a call himself, the caller’s number will not be displayed. The other rights apply for
incoming calls.
Hide call duration
Normally, the duration will be shown in the status bar on a continuous basis. The display can be hidden
using this restriction.
Reject all chat requests in state "Don't disturb"
If this checkbox is checked and the user is currently in the "Don't disturb" state, all new chat requests from
other users will be rejected with a message in the other user’s chat window stating that the user does not
want to be disturbed. Existing chat sessions are not affected. Messages can continue to be exchanged
here.
6. Address books / contact database
6.1 Address books
Here, the address books selected by the user for name and phone number resolution will be displayed in
the order in which they should be searched for look-up purposes.
Search settings
The feature is described in detail in section 3.11.2.
Identify caller
When this function is selected, the address books already set up will be searched through for an incoming
call with call number transmission. If the number is available here, the relevant name will be added to the
display of the caller’s number. If a name is entered for dialling in the telephony client, the corresponding
telephone number can be searched for in defined address books. If a telephone number is entered and if
there is a name entry in the specified address books, the name will be displayed in the telephony client.
Open contact document automatically
If the Identify caller feature is activated, it is possible to define whether the contact document for the caller
should be opened automatically from the address book during a call by selecting Open contact document
automatically.

15
Show caller’s picture
If the user is in a call with another user of the telephony client who has uploaded a picture of himself, this
will be displayed when this option is selected. During calls with other people, a standard picture will be
displayed. If the option is not used, larger symbols will be displayed for the call status.
Show additional information in the call display
If this checkbox is marked, accordingly configured additional information for an identified participant will be
shows as a line of text in the call display.
6.2 Editing address books
6.2.1 Outlook address book
After clicking the "Edit" button, a dialogue appears
for adding new address books and defining the
search order to be used for phone number
resolution and name searching. An address book
can be deleted from the list by selecting it and then
clicking the “Remove” button.
The search order is defined via Drag&Drop. In
addition, the address book type is displayed in the
list of selected address books. The icon means that
this is an ODDB address book. The other address
books are standard Outlook address books.
After clicking "Add..." a list of address books that
can be added appears.
6.2.2 Universal client address books
After clicking the "Edit" button, in the following list
it can be defined which of the available address
books should be used for resolution. The list
includes the Windows standard address book as
well as available address books from DataConnect
sources. If MAPI address books are available and
Outlook is activated as the standard e-mail
application, these will also be offered in the list. If
the Windows address book is not yet shown in the
list, press the Windows start button once, then
enter "wab" in the "Search programs and files" field
and press the ENTER key. The Windows address
book which opens can be closed again
immediately. Then restart the telephony client.
Desired address books can be selected by
checking the respective checkbox. The order in
which the selected address books are searched
through can be defined by the user by changing the
order in which the books are shown (the uppermost
selected address book will be searched through
first). An address book can be moved up or down
by selecting an individual address book row and
pressing one of the two arrow buttons.

16
6.3 Search settings in the address book
After "Search settings..." is pressed, the following
dialogue appears which defines how the search for
particular names or the resolution of phone
numbers is to take place in address books and how
the search result is to be used if several
possibilities are found.
6.3.1 Name search
Search for...
In this area, the search for an exact match, start of a word or substring can be defined. If "begin of word" is
selected, searching for "Beck" will find the names Beckham, Beckford etc. If "substring" is selected,
searching for "ham" will find the names Beckham, Graham etc.
If more than one match is found...
Here it can be defined what should happen if several possible matches are found during a search. If "use
first match" is selected, the first match will be used automatically, whereas "display all matches for
selection" first displays a dialogue window with all matches, so that the correct one can be selected.
Always confirm dial attempt to found subscriber
If this checkbox is selected, a dial attempt to a number found by entering a name must always be confirmed
first in a dialogue window, even if only one (1) unique call number was found for the name or part of name
entered. If more than one possible telephone number is found for a named entered, a confirmation dialogue
will always be shown, regardless of this checkbox setting.
Show all matches at several options to choose from
If this checkbox is selected and several possible
contacts were found in the configured address
books during phone number resolution for a
currently active call, "Several contacts found..." will
appear in the call display.
If the user now presses the left mouse button when
the mouse pointer is over this link, a dialogue
window will open in which all found contacts are
listed, so that the user can select the contact to
whom he wishes to assign this phone call. If he
does not select a contact here, the phone call will
subsequently be treated as if no successful phone number resolution had taken place. If the checkbox is

17
not selected, the first match according to the configured search order of the address books will always be
used as the contact.
7. Appearance
Here, the appearance of the user interface for the
telephony client can be adjusted. By selecting a
predefined colour scheme ("skin"), the telephony
client appears in a different look.
7.1 Adjust colors
For skins which allow the colours to be adjusted, a background and a foreground colour can be specified
here. Almost all other colours are then derived from these two. A very pale colour should be used for the
background colour and a very strong colour should be used for the foreground colour, since otherwise the
display is not ideal.
7.2 Layout
The layout of the client determines where the browser window should be displayed.
8. Keyboard
In this dialogue window, the predefined keyboard
shortcuts for the listed actions can be changed.

18
8.1 Select shortcut keys for actions
Select the desired telephony action for which you want to change the shortcut in the list with the mouse.
Activate the "Press shortcut keys" input field with the mouse: Press the desired shortcut which is
subsequently displayed in the input field. If the combination is not already in use, the "Assign" button will
be activated. Press the "Assign" button. By pressing the "Reset all" button, all keyboard shortcuts will be
reset to their default values after a security question has been answered.
9. Softphone
In this dialogue, some settings for softphone (SIP) operation can adjusted.
Only available if the "Softphone" operating mode was selected when the client was started.
Softphone can be ordered by UPC as an option for the telephony solution.
Voice playback device:
Here, the output device ("soundcard") for the playback of voice data transmitted via the SIP protocol can be
selected.
Voice recording device:
Here, the input device ("soundcard") for the recording of voice data transmitted via the SIP protocol can be
selected. If the PC has several input/output devices, different input/output devices can be configured for
"Voice recording device" and "Voice playback device"! Connecting or removing a USB headset during
operation requires the softphone to be restarted for the change to become effective.
From Windows 7:
If a device is connected with the softphone for the first time, this device should be configured as the
"standard communication device" both for playback and for recording in the "System settings" dialogue
window!

19
10. My person
Here, each user can upload their own picture. This picture is displayed to other users in the partner bar,
during calls and when searching for employees.
11. Partner bar
11.1 Introduction
The partner bar allows you to observe the line status of the telephone connections entered there
(monitoring). The partner bar can be positioned anywhere on the screen or docked to the edge of the
screen. Depending on the settings, it can be launched together with the telephony client or separately. For
each entry in the partner bar, specific display and action rights are assigned which are granted by the
respective partner or by the administrator in the configuration profile.
11.2 Start
The partner bar can be opened by clicking on the symbol with the two people at the bottom left or by
selecting "Show partner bar" in the client context menu or by pressing the ALT-P shortcut in the client
window. The names and the number of tabs available can be customised.
11.3 Layout
Below the tabs for the various groups, buttons with names for each of the partners are shown in the figure.
Your own status on the right-hand side shows the current status of your own telephone. Above your own
status, the current time is shown if no connection is active. Below your own status, up to five different icons
are displayed, depending on your status.
– On the left, for example, a green or red dot shows your own presence status. Green means "Present"
and red means "Absent". In the event of a fault (no connection to the CTI server), the dot flashes
red/green.
– On the right next to this is an arrow symbol if your own telephone is currently diverted.
– A small calendar symbol is shown next to this for calendar appointments.
– The pin indicates whether the partner bar is always displayed in the foreground.
– The partner bar can be closed by clicking on the cross.
If the mouse pointer is moved over one of the symbols, a tooltip will appear with further information.
11.4 Adding a new partner
Right-clicking on a partner or on the empty space on a tab displays a menu which contains two items for
adding a new partner. "New person" allows one or more internal users to be selected from the internal
address book.

20
11.5 Rights
For each entry in the partner bar, specific display and action rights are assigned which are granted by the
respective partner or by the administrator in the configuration profile for the respective application.
Depending on these rights, the information that is displayed to a partner is restricted to a greater or lesser
degree.
11.6 Creating a new group
Within the partner bar, the individual partners can be added to groups that are shown by different tabs. The
individual partners can be moved within the groups via the context menu or sorted via Drag&Drop and
moved to other groups.
11.7 Size and position
The size of the partner bar can be altered in stages via a Drag&Drop function on the frame. The partner bar
can be moved in the same way via Drag&Drop on the coloured background. The partner bar can be
positioned anywhere on the screen or, like the Windows taskbar, docked to any of the four sides of the
screen.
12. Interfaces
12.1. TAPI integration into applications via TAPI
The UC-Client provides a driver (telephone service provider, TSP) that allows TAPI-capable applications to
use CTI functionality even without the telephone client having been launched. The driver supports the
dialling and accepting of calls, as well as call forwarding prior to call acceptance and hanging up. To use the
driver, the corresponding line must be selected in the TAPI-capable application (e.g. Outlook). This is called
"CAESAR CTI". Further configuration is not necessary if the telephony client is installed.
If the telephone service provider is installed without the telephony client, the server and an extension may
need to be configured during initial use. In this case, a corresponding input mask appears.
Applications that do not have full TAPI integration sometimes still support simple dialling
(tapiRequestMakeCall). This is also supported on single workstation systems, but not for terminal
server/Citrix environments.
12.1.2 Advanced settings for TAPI integration
Depending on the environment (connection to CRM systems), it may be necessary to make advanced
settings for the TAPI connection. These mainly concern the call number format. All settings are configured
in the Windows Registry under the following key:
HKEY_LOCAL_MACHINE\Software\CAESAR\caesarTSP

21
The settings are summarised in the following table:
Name Type Meaning
UseDialRules DWORD This setting determines how call numbers are dialled for
outgoing calls.
- Value 0:
The call number will be converted in the CTI server using the
rules stored there.
- Value 1:
The call number will not be converted in the CTI server. The
application from which the number is dialled must already
supply a dialable number (outside line etc.) with the help of the
settings from "Telephone and modem options".
This switch can also be set for each user under
HKEY_CURRENT_USER and configured via the TSP interface.
RuleGlobal REG_SZ Global formatting rules for call numbers that are reported to
applications. Normally, all call numbers are reported in
canonical format (example: +49 (2402) 7654321). Depending on
the application, different formatting may be desired so that
contact documents can be opened automatically, for example.
RuleInternal REG_SZ Formatting rule for internal call numbers. If not set, the global
rule will be used for internal call numbers.
RuleSameArea REG_SZ Formatting rule for call numbers in the same local network. If not
set, the global rule will be used. The syntax of the rule is
described behind this table.
RuleLongDistance REG_SZ Formatting rule for call numbers in other local networks. If not
set, the global rule will be used.
RuleInternational REG_SZ Formatting rule for call numbers in countries. If not set, the
global rule will be used.
ExtendedCallOrigin DWORD Determines how the TSP reports the origin of a call.
Value 0: (standard, TAP-compliant)
Calls are either reported as incoming internal, incoming external
or outgoing.
Value 1: (not TAPI-compliant)
Calls are reported as incoming or outgoing and internal or
external (combined). Although this method of reporting is not
TAPI-compliant, it is understood by some application programs.
The advantage is that internal and external calls can be
distinguished between for outgoing calls.

22
Name Type Meaning
ForceMode DWORD Defines the operating mode for the TSP.
Value 0: (standard)
The mode will be determined automatically.
Value 1:
Operation without CTI client installed.
Value 2:
Operation with CTI client installed.
Value 3:
Operation on terminal server/Citrix for several users.
This value should normally be set to 0 or not set. A restart is
required after making a change.
SynchronizeCalls DWORD Determines how commands (dial, hang up etc.) are executed.
Value 0:
The commands are executed asynchronously. This mode works
faster. This may be advantageous for operation on terminal
servers/Citrix. However, in certain applications (e.g. Microsoft
Outlook), dialling will no longer work correctly.
Value 1: (standard)
The commands are executed synchronously. This is somewhat
slower than the asynchronous mode. For certain applications
(e.g. Microsoft Outlook), this mode is required for fault-free
operation, however.
FakeRemoteNumber REG_SZ A call number can be entered here for test purposes. This call
number will then be reported as the receiver for all calls as it is
entered.
FakeLocalNumber REG_SZ A call number can be entered here for test purposes. This call
number will then be reported as the user’s own call number as it
is entered.
SafeProviderID DWORD Should not be changed!
Exception for versions <= 10.05 00:
For an installation on a terminal server/Citrix farm, this value
must be set to the same value for all computers in the farm.

23
12.2 LDAP database connections
Exchanges and quick access to LDAP directories and ODBC-capable databases for resolving phone
numbers or names. The access was optimised for applications that require an extremely short response
time and is particularly suitable for use with CTI and ACD solutions.
The CTI client is prepared for use with the Data Connect and can thus use any LDAP directory or any
ODBC-capable database for phone number or name resolution.
Thanks to an intelligent cache mechanism and an indexed search, the retrieved up-to-date data can be
provided quickly.
A form for displaying data can be defined centrally, so that it is addressed for every enquiry and can be
displayed in a browser window with the data obtained.
Supported data sources
– LDAP directories (Active Directory, eDirectory, Cisco etc.)
– ODBC-capable databases (Oracle, DB2, MS SQL Server etc.)
12.3 Support of headsets with EHS in softphone mode
The UC-Client supports some headsets with a button for call acceptance (EHS = Electronic Hook Switch) in
softphone mode.
For example, the following headsets from Jabra are supported:
– GN 9350e USB
– LINK 350 OC Bluetooth-adapter with GO 6400
To be able to use the headset, the following steps must be carried out:
1. The headset must be installed in accordance with the manufacturer’s instructions. After installation, a
short functionality check should be carried out by playing a media file (e.g. Windows Shutdown.wav).
2. Other important drivers must be installed by starting the program “JabraPcSui-teSetup.exe”. This
program can be found on the CAESAR installation DVD in the directory "Third Party\Drivers\Jabra" or on
the Internet at http://www.jabra.com.de/Support/jabra-PC-suite.
3. When using the Jabra headset "GN 9350e USB", this must be switched to PC mode (telephone mode is
standard). For this, the PC mode switch on the left side of the base station must be pressed for approx. 5
seconds until the blue indicator light below the switch is lit permanently
4. After starting the CAESAR telephony client, the headset can be selected for voice playback and voice
recording under "Preferences" => "Softphone".