mapmarker plus canada - pitney...
TRANSCRIPT
MapMarker Plus CanadaVersion 8
DEVELOPER GUIDE

Information in this document is subject to change without notice and does not represent a commitment on the part of the vendor or its representatives. No part of this document may be reproduced or transmitted in any form or by any means, electronic or mechanical, including photocopying, without the written permission of v, Pitney Bowes MapInfo Corporation, One Global View, Troy, New York 12180-8399.© 2007 Pitney Bowes MapInfo Corporation. All rights reserved. MapInfo, the MapInfo logo, MapXtreme, J Server, Envinsa, and MapMarker Plus Canada are trademarks of Pitney Bowes MapInfo Corporationand/or its affiliates. Java and all Java-based trademarks and logos are trademarks or registered trademarks of Sun Microsystems, Inc. in the United States and other countries.Portions © Copyright 1991-2006 Data Direct Technologies, Inc.Portions © 2006 Tele Atlas, Inc. (GDT, Inc.). Portions© HER MAJESTY THE QUEEN IN RIGHT OF CANADA as represented by the Minister of Industry Statistics Canada 1996—MapInfo Canada Inc. is an Authorized User and Distributor of selected Statistics Canada Computer Files under Licensing Agreement 6065.
Corporate Headquarters:Voice: (518) 285-6000Fax: (518) 285-6070Sales Info Hotline: (800) 327-8627Government Sales Hotline: (800) 619-2333Technical Support Hotline: (518) 285-7283Technical Support Fax: (518) 285-6080Contact information for all corporate offices is located at: http://www.mapinfo.com/contactus.Adobe Acrobat® is a registered trademark of Adobe Systems Incorporated in the United States.Products named herein may be trademarks of their respective manufacturers and are hereby recognized. Trademarked names are used editorially, to the benefit of the trademark owner, with no intent to infringe on the trademark.October 2007
Table of Contents
Chapter 1: Introduction. . . . . . . . . . . . . . . . . . . . . . . . . . . . . . . . . . . . . . . . . . . . . . . 9What Is MapMarker Plus Canada?. . . . . . . . . . . . . . . . . . . . . . . . . . . . . . . . . . . . . . . . . .10MapMarker Developer Product . . . . . . . . . . . . . . . . . . . . . . . . . . . . . . . . . . . . . . . . . . . .10
MapMarker Server and Developer Tools . . . . . . . . . . . . . . . . . . . . . . . . . . . . . . . . . . . .10MapMarker Desktop Application . . . . . . . . . . . . . . . . . . . . . . . . . . . . . . . . . . . . . . . . . .11
New in This Release . . . . . . . . . . . . . . . . . . . . . . . . . . . . . . . . . . . . . . . . . . . . . . . . . . . . .11What’s Included With MapMarker Plus Canada . . . . . . . . . . . . . . . . . . . . . . . . . . . . . . .12Getting Technical Support . . . . . . . . . . . . . . . . . . . . . . . . . . . . . . . . . . . . . . . . . . . . . . . .12
Customer Service—Your Non-Technical Support . . . . . . . . . . . . . . . . . . . . . . . . . . . . .15
Chapter 2: Installing MapMarker . . . . . . . . . . . . . . . . . . . . . . . . . . . . . . . . . . . . . . 17Installation Overview . . . . . . . . . . . . . . . . . . . . . . . . . . . . . . . . . . . . . . . . . . . . . . . . . . . .18
Installation Components. . . . . . . . . . . . . . . . . . . . . . . . . . . . . . . . . . . . . . . . . . . . . . . . .18Shared Install . . . . . . . . . . . . . . . . . . . . . . . . . . . . . . . . . . . . . . . . . . . . . . . . . . . . . . . . .19About the Address Dictionary. . . . . . . . . . . . . . . . . . . . . . . . . . . . . . . . . . . . . . . . . . . . .19
Operating Requirements and Performance Recommendations. . . . . . . . . . . . . . . . . .19Operating Requirements . . . . . . . . . . . . . . . . . . . . . . . . . . . . . . . . . . . . . . . . . . . . . . . .20Optimizing Performance. . . . . . . . . . . . . . . . . . . . . . . . . . . . . . . . . . . . . . . . . . . . . . . . .21
Installing MapMarker. . . . . . . . . . . . . . . . . . . . . . . . . . . . . . . . . . . . . . . . . . . . . . . . . . . . .21Install Using the Graphical Interface . . . . . . . . . . . . . . . . . . . . . . . . . . . . . . . . . . . . . . .22Installing Silently . . . . . . . . . . . . . . . . . . . . . . . . . . . . . . . . . . . . . . . . . . . . . . . . . . . . . .27
Modifying the MapMarker Installation . . . . . . . . . . . . . . . . . . . . . . . . . . . . . . . . . . . . . . .28Modify Using the Graphical Interface . . . . . . . . . . . . . . . . . . . . . . . . . . . . . . . . . . . . . . .28Modify Silently . . . . . . . . . . . . . . . . . . . . . . . . . . . . . . . . . . . . . . . . . . . . . . . . . . . . . . . .29
Upgrading the MapMarker Installation . . . . . . . . . . . . . . . . . . . . . . . . . . . . . . . . . . . . . .29Upgrade Using the Graphical Interface . . . . . . . . . . . . . . . . . . . . . . . . . . . . . . . . . . . . .30Upgrade Silently. . . . . . . . . . . . . . . . . . . . . . . . . . . . . . . . . . . . . . . . . . . . . . . . . . . . . . .30
Uninstalling MapMarker . . . . . . . . . . . . . . . . . . . . . . . . . . . . . . . . . . . . . . . . . . . . . . . . . .30Uninstall Using the Graphical Interface . . . . . . . . . . . . . . . . . . . . . . . . . . . . . . . . . . . . .30Uninstall Silently. . . . . . . . . . . . . . . . . . . . . . . . . . . . . . . . . . . . . . . . . . . . . . . . . . . . . . .31
Client Workstation Install . . . . . . . . . . . . . . . . . . . . . . . . . . . . . . . . . . . . . . . . . . . . . . . . .31Starting MapMarker. . . . . . . . . . . . . . . . . . . . . . . . . . . . . . . . . . . . . . . . . . . . . . . . . . . . . .32
Developer Guide iii
Starting the Desktop Application . . . . . . . . . . . . . . . . . . . . . . . . . . . . . . . . . . . . . . . . . . 32Starting the MapMarker Server . . . . . . . . . . . . . . . . . . . . . . . . . . . . . . . . . . . . . . . . . . . 32
Chapter 3: Using C-Based Developer Tools . . . . . . . . . . . . . . . . . . . . . . . . . . . . . 35MapMarker Geocoding API Development. . . . . . . . . . . . . . . . . . . . . . . . . . . . . . . . . . . . 36
Java Developers . . . . . . . . . . . . . . . . . . . . . . . . . . . . . . . . . . . . . . . . . . . . . . . . . . . . . . 36Windows Developers . . . . . . . . . . . . . . . . . . . . . . . . . . . . . . . . . . . . . . . . . . . . . . . . . . . 37Database Developers . . . . . . . . . . . . . . . . . . . . . . . . . . . . . . . . . . . . . . . . . . . . . . . . . . 37
Compiling and Running Existing Applications . . . . . . . . . . . . . . . . . . . . . . . . . . . . . . . 38Windows Applications . . . . . . . . . . . . . . . . . . . . . . . . . . . . . . . . . . . . . . . . . . . . . . . . . . 38Other Configuration File Settings. . . . . . . . . . . . . . . . . . . . . . . . . . . . . . . . . . . . . . . . . . 39
Chapter 4: Client/Server Geocoding . . . . . . . . . . . . . . . . . . . . . . . . . . . . . . . . . . . . 41Client/Server Geocoding . . . . . . . . . . . . . . . . . . . . . . . . . . . . . . . . . . . . . . . . . . . . . . . . . 42MapMarker Server . . . . . . . . . . . . . . . . . . . . . . . . . . . . . . . . . . . . . . . . . . . . . . . . . . . . . . . 42Running MapMarker Server on Windows Systems . . . . . . . . . . . . . . . . . . . . . . . . . . . . 43
Windows Service . . . . . . . . . . . . . . . . . . . . . . . . . . . . . . . . . . . . . . . . . . . . . . . . . . . . . . 43Console Application . . . . . . . . . . . . . . . . . . . . . . . . . . . . . . . . . . . . . . . . . . . . . . . . . . . . 44
MapMarker Geocoder Control . . . . . . . . . . . . . . . . . . . . . . . . . . . . . . . . . . . . . . . . . . . . . 45Adding MapMarker OCX to Your Client Application . . . . . . . . . . . . . . . . . . . . . . . . . . . 46Canada/USA OCX Integration . . . . . . . . . . . . . . . . . . . . . . . . . . . . . . . . . . . . . . . . . . . . . 48Setting MapMarker Client Control Properties . . . . . . . . . . . . . . . . . . . . . . . . . . . . . . . . 50Geocoding via MapMarker Geocoder Control . . . . . . . . . . . . . . . . . . . . . . . . . . . . . . . . 51MapMarker Geocoder Control Events and Methods . . . . . . . . . . . . . . . . . . . . . . . . . . . 51Client/Server Geocoding and the Internet . . . . . . . . . . . . . . . . . . . . . . . . . . . . . . . . . . . 53
Chapter 5: OLE Automation API . . . . . . . . . . . . . . . . . . . . . . . . . . . . . . . . . . . . . . . 55MapMarker Plus Canada Notes on OLE Automation. . . . . . . . . . . . . . . . . . . . . . . . . . . 56Creating a Custom Geocoding Control. . . . . . . . . . . . . . . . . . . . . . . . . . . . . . . . . . . . . . 56VBScript Methods . . . . . . . . . . . . . . . . . . . . . . . . . . . . . . . . . . . . . . . . . . . . . . . . . . . . . . . 57Geocoder Control Properties, Events, and Methods. . . . . . . . . . . . . . . . . . . . . . . . . . . 57
Input Summary. . . . . . . . . . . . . . . . . . . . . . . . . . . . . . . . . . . . . . . . . . . . . . . . . . . . . . . . 57Event Summary . . . . . . . . . . . . . . . . . . . . . . . . . . . . . . . . . . . . . . . . . . . . . . . . . . . . . . . 60Method Summary. . . . . . . . . . . . . . . . . . . . . . . . . . . . . . . . . . . . . . . . . . . . . . . . . . . . . . 61VBScript Methods Summary . . . . . . . . . . . . . . . . . . . . . . . . . . . . . . . . . . . . . . . . . . . . . 63
OLE Automation Methods . . . . . . . . . . . . . . . . . . . . . . . . . . . . . . . . . . . . . . . . . . . . . . . . 65OLE Automation Objects . . . . . . . . . . . . . . . . . . . . . . . . . . . . . . . . . . . . . . . . . . . . . . . . . 88
Chapter 6: Using the MapMarker Plus Java API . . . . . . . . . . . . . . . . . . . . . . . . . . 89Overview . . . . . . . . . . . . . . . . . . . . . . . . . . . . . . . . . . . . . . . . . . . . . . . . . . . . . . . . . . . . . . 90
Using the MapMarker Plus Java Canada API . . . . . . . . . . . . . . . . . . . . . . . . . . . . . . . . 90Using the MapMarker Generic Java API . . . . . . . . . . . . . . . . . . . . . . . . . . . . . . . . . . . . 90
Developing Geocoding Applications in Java . . . . . . . . . . . . . . . . . . . . . . . . . . . . . . . . . 90
iv MapMarker Canada v.8
Creating a Geocoding Application in Java . . . . . . . . . . . . . . . . . . . . . . . . . . . . . . . . . . .90Creating a Web Geocoding Client in Java . . . . . . . . . . . . . . . . . . . . . . . . . . . . . . . . . . .96Sample Code . . . . . . . . . . . . . . . . . . . . . . . . . . . . . . . . . . . . . . . . . . . . . . . . . . . . . . . . .97
Browsing Addresses. . . . . . . . . . . . . . . . . . . . . . . . . . . . . . . . . . . . . . . . . . . . . . . . . . . .100Geocoding to Geographic Centroids . . . . . . . . . . . . . . . . . . . . . . . . . . . . . . . . . . . . . .101Address Point Interpolation . . . . . . . . . . . . . . . . . . . . . . . . . . . . . . . . . . . . . . . . . . . . . .102
Chapter 7: Using the XML API . . . . . . . . . . . . . . . . . . . . . . . . . . . . . . . . . . . . . . . 105MapMarker Plus XML Programming in .NET . . . . . . . . . . . . . . . . . . . . . . . . . . . . . . . .106Interacting with a MapMarker Plus Server . . . . . . . . . . . . . . . . . . . . . . . . . . . . . . . . . .106Using XSD Files to Create .NET Classes . . . . . . . . . . . . . . . . . . . . . . . . . . . . . . . . . . .107
Building a Sample Application . . . . . . . . . . . . . . . . . . . . . . . . . . . . . . . . . . . . . . . . . . .107Setting Up the Project . . . . . . . . . . . . . . . . . . . . . . . . . . . . . . . . . . . . . . . . . . . . . . . . .107Adding the Code . . . . . . . . . . . . . . . . . . . . . . . . . . . . . . . . . . . . . . . . . . . . . . . . . . . . .109Sample Application Code. . . . . . . . . . . . . . . . . . . . . . . . . . . . . . . . . . . . . . . . . . . . . . .111
Example Class Modifications. . . . . . . . . . . . . . . . . . . . . . . . . . . . . . . . . . . . . . . . . . . . .114Adding Objects to Collections in the Geocode Request . . . . . . . . . . . . . . . . . . . . . . .114Request Web Headers. . . . . . . . . . . . . . . . . . . . . . . . . . . . . . . . . . . . . . . . . . . . . . . . .115
Chapter 8: MapMarker Sample Application. . . . . . . . . . . . . . . . . . . . . . . . . . . . . 117Requirements and Setup . . . . . . . . . . . . . . . . . . . . . . . . . . . . . . . . . . . . . . . . . . . . . . . .118Using the Sample Application . . . . . . . . . . . . . . . . . . . . . . . . . . . . . . . . . . . . . . . . . . . .118
Testing the Server . . . . . . . . . . . . . . . . . . . . . . . . . . . . . . . . . . . . . . . . . . . . . . . . . . . .119Setting Preferences . . . . . . . . . . . . . . . . . . . . . . . . . . . . . . . . . . . . . . . . . . . . . . . . . . .119Setting Must Match Options . . . . . . . . . . . . . . . . . . . . . . . . . . . . . . . . . . . . . . . . . . . . .119Postal Geocoding. . . . . . . . . . . . . . . . . . . . . . . . . . . . . . . . . . . . . . . . . . . . . . . . . . . . .119Geographic Geocoding . . . . . . . . . . . . . . . . . . . . . . . . . . . . . . . . . . . . . . . . . . . . . . . .120Address Geocoding . . . . . . . . . . . . . . . . . . . . . . . . . . . . . . . . . . . . . . . . . . . . . . . . . . .120Viewing Candidates . . . . . . . . . . . . . . . . . . . . . . . . . . . . . . . . . . . . . . . . . . . . . . . . . . .120Candidate Statistics . . . . . . . . . . . . . . . . . . . . . . . . . . . . . . . . . . . . . . . . . . . . . . . . . . .120
Chapter 9: Deploying Applications . . . . . . . . . . . . . . . . . . . . . . . . . . . . . . . . . . . 121Deploying MapMarker Plus as a Servlet . . . . . . . . . . . . . . . . . . . . . . . . . . . . . . . . . . . .122
Using the Default Tomcat Servlet Container . . . . . . . . . . . . . . . . . . . . . . . . . . . . . . . .122Deploying MapMarker Server in Other Web Environments . . . . . . . . . . . . . . . . . . . . .122
Integration with MapMarker for Other Countries . . . . . . . . . . . . . . . . . . . . . . . . . . . . .122Canada/USA Server Integration . . . . . . . . . . . . . . . . . . . . . . . . . . . . . . . . . . . . . . . . . . .123
Prerequisite Steps . . . . . . . . . . . . . . . . . . . . . . . . . . . . . . . . . . . . . . . . . . . . . . . . . . . .124USA Server Integration . . . . . . . . . . . . . . . . . . . . . . . . . . . . . . . . . . . . . . . . . . . . . . . .124
Chapter 10: Using Custom User Dictionaries . . . . . . . . . . . . . . . . . . . . . . . . . . . 125User Dictionary Configuration . . . . . . . . . . . . . . . . . . . . . . . . . . . . . . . . . . . . . . . . . . . .126User Dictionary Preferences . . . . . . . . . . . . . . . . . . . . . . . . . . . . . . . . . . . . . . . . . . . . .126
Developer Guide v
Specifying Preferences on the Server . . . . . . . . . . . . . . . . . . . . . . . . . . . . . . . . . . . . . 126Specifying Preferences Using the MapMarker Java API . . . . . . . . . . . . . . . . . . . . . . . 127
Client Preferences. . . . . . . . . . . . . . . . . . . . . . . . . . . . . . . . . . . . . . . . . . . . . . . . . . . . . . 128
Appendix A: JNI Adapter Configuration File Settings . . . . . . . . . . . . . . . . . . . . 133JVM Settings . . . . . . . . . . . . . . . . . . . . . . . . . . . . . . . . . . . . . . . . . . . . . . . . . . . . . . . . . . 134Country Settings . . . . . . . . . . . . . . . . . . . . . . . . . . . . . . . . . . . . . . . . . . . . . . . . . . . . . . . 134
Appendix B: Error Messages. . . . . . . . . . . . . . . . . . . . . . . . . . . . . . . . . . . . . . . . . 135MapMarker Java API Errors . . . . . . . . . . . . . . . . . . . . . . . . . . . . . . . . . . . . . . . . . . . . . . 136
Engine Errors . . . . . . . . . . . . . . . . . . . . . . . . . . . . . . . . . . . . . . . . . . . . . . . . . . . . . . . . 136Parser Errors . . . . . . . . . . . . . . . . . . . . . . . . . . . . . . . . . . . . . . . . . . . . . . . . . . . . . . . . 136Data Access Exceptions . . . . . . . . . . . . . . . . . . . . . . . . . . . . . . . . . . . . . . . . . . . . . . . 136License Exceptions . . . . . . . . . . . . . . . . . . . . . . . . . . . . . . . . . . . . . . . . . . . . . . . . . . . 137General Geocoding Process Exceptions . . . . . . . . . . . . . . . . . . . . . . . . . . . . . . . . . . . 137Client Exceptions . . . . . . . . . . . . . . . . . . . . . . . . . . . . . . . . . . . . . . . . . . . . . . . . . . . . . 138Localization (Geocoder Construction Time) Exceptions . . . . . . . . . . . . . . . . . . . . . . . 138Server Exceptions . . . . . . . . . . . . . . . . . . . . . . . . . . . . . . . . . . . . . . . . . . . . . . . . . . . . 140
Geocoding Engine Errors. . . . . . . . . . . . . . . . . . . . . . . . . . . . . . . . . . . . . . . . . . . . . . . . 140Adapter Errors. . . . . . . . . . . . . . . . . . . . . . . . . . . . . . . . . . . . . . . . . . . . . . . . . . . . . . . . . 141
Index . . . . . . . . . . . . . . . . . . . . . . . . . . . . . . . . . . . . . . . . . . . . . . . . . . . . . . . . . . . . 143
vi MapMarker Canada v.8

Part I: Introduction
Topics:
Introduction . . . . . . . . . . . . . . . . . . . . . . . . . . . . . . . . . . . . . . . . . . . . . . . . . . . . . . . . . . . . . . . . . . . . . . 9Installing MapMarker . . . . . . . . . . . . . . . . . . . . . . . . . . . . . . . . . . . . . . . . . . . . . . . . . . . . . . . . . . . . . 17

1
IntroductionWelcome to MapMarker Plus Canada, the premier address matching product from Pitney Bowes MapInfo. MapMarker Plus Canada enables you to assign geographic coordinates to large tables of Canadian addresses in a single session.
MapMarker Plus Canada is more than just a geocoder. It is a suite of tools that allows you to standardize your Canadian addresses, add spatial information and create points for your records. The Developer Edition allows you to develop standalone or client/server custom geocoding applications and embed MapMarker functionality in existing applications.
In this chapter:
What Is MapMarker Plus Canada? . . . . . . . . . . . . . . . . . . . . . . . . .10New in This Release. . . . . . . . . . . . . . . . . . . . . . . . . . . . . . . . . . . . .11What’s Included With MapMarker Plus Canada. . . . . . . . . . . . . . .12Getting Technical Support. . . . . . . . . . . . . . . . . . . . . . . . . . . . . . . .12
What Is MapMarker Plus Canada?
What Is MapMarker Plus Canada?MapMarker Plus Canada is a powerful geocoding tool that provides the first step towards mapping and analyzing your business data. By geocoding, MapMarker Plus Canada adds geographic coordinates to every record in your database that it matches against its comprehensive Address Dictionary. The Address Dictionary is the name of the database included with MapMarker Plus Canada containing Canadian street addresses, street geometry, and the latest postal code centroids.
MapMarker Plus Canada allows a lot of flexibility in geocoding. With MapMarker Plus Canada you can:
• Geocode to both French and English street addresses, postal code centroids, and street intersections.
• Distinguish street address matches from postal code centroid matches at a glance by the type of match defined in the result code.
• Serve multiple simultaneous geocoding requests from a single MapMarker engine.
MapMarker Plus Canada Server includes the desktop application, as well as MapMarker server and several APIs to enable you to add geocoding functionality to your applications.
The MapMarker Plus Canada desktop application is simple to use. All you do is open your table, tell MapMarkerwhich columns contain address information and choose Table > Geocode. MapMarker automatically matches your records to those in the Address Dictionary, determines if there is a match, assigns the geographic coordinates, and optionally creates a point.
The MapMarker server enables multiple simultaneous geocoding requests to be served from a single MapMarker engine. Using the Java API, developers can write client/server or standalone geocoding applications. The MapMarker developer tools also include an OCX for adding geocoding functionality to your own applications. And if the OCX doesn’t provide exactly what you need, there is an OLE Automation API for creating one yourself. For those who work in Java or C, the complete geocoding engine API is provided as well.
The MapMarkerserver enables multiple simultaneous geocoding requests to be served from a single MapMarker engine. Using the Java API, developers can write client/server or standalone geocoding applications. An OCX is also included for adding geocoding functionality to your own applications. And if the OCX doesn’t provide exactly what you need, there is an OLE Automation API for creating one yourself. For those who work in Java or C, the complete geocoding engine API is provided as well.
MapMarker Developer ProductThe MapMarker Plus Canada Developer product includes the MapMarker server and developer tools, as well as the MapMarker Desktop product.
MapMarker Server and Developer ToolsThe MapMarker developer product is a server and a developer tool that allows you to add geocoding functionality to your Desktop or Web Application.
10 MapMarker Plus Canada 8
Chapter 1: Introduction
The MapMarker server enables multiple simultaneous geocoding requests to be served from a single MapMarker engine. Using the Java API, developers can write client/server or standalone geocoding applications. An OCX is also included for adding geocoding functionality to your own applications. And if the OCX doesn’t provide exactly what you need, there is an OLE Automation API for creating one yourself. For those who work in Java or C, the complete geocoding engine API is provided as well.
MapMarker Desktop ApplicationThe MapMarker Plus Canada Desktop Application can be installed on a single machine, or on a network to be shared by other users. The desktop application gives you a great deal of control over the geocoding process. For example, you can geocode a portion of your table using the Quick Geocode feature, or geocode a large database of addresses in batch mode.
Other features include the ability to:
• Geocode interactively (you make the final decision if it is a match) to maximize the number of matches and to control error rate.
• Geocode to street addresses, street intersections, postal code centroids, or geography.• Identify result codes by the type of match to tell at a glance the street address matches from the
postal code centroid matches.
New in This ReleaseSee the MapMarker Canada Release Notes for a summary of new features, address dictionary updates, and behavioral changes that you may notice with MapMarker. The Release Notes also describe fixes to customer-reported issues and known issues that customers must be aware of. The MapMarker Canada Release Notes are located at http://reference.mapinfo.com/.
The new features for MapMarker Plus Canada 8 are summarized below:
• The MapInfo User Dictionary Utility can be installed with MapMarker Server. This is a graphical utility that simplifies the steps for creating, configuring, and deploying custom User Dictionaries. Alternatively, this utility is available for download from the MapInfo Geododing web site. You can also download the documentation or this utility from http://reference.mapinfo.com/.
• The Address Browsing feature returns all potential candidates from just a few input characters. No geocoding occurs when you browse, but you are able to view the list of possible candidates.
• The Address Dictionary has been updated with the latest data vintages. The data vintage and version information has been added to the About MapMarker dialog (Help > About MapMarker). For complete data vintage compatibility information on related products, see the Data Vintage Chart on the Pitney Bowes MapInfo web site.
• MapMarker Plus Canada 8 provides improved geocoding accuracy by assigning relatively more weight to postal codes matches.
• Filtering has been improved to eliminate weaker matching candidates (false positive) candidates.
• Close matches in rural areas are identified more accurately.• Quebec (French) addresses are geocoded more accurately.• The MapMarker installer has been updated to simplify the installation and provide more
feedback during installation.
Developer Guide 11

What’s Included With MapMarker Plus Canada
• MapInfo Professional users can run MapMarker Plus Canada or Envinsa 4.0 as a geocoding service from within MapInfo Professional 8.5 or later. This direct connection enables users to take advantage of MapMarker geocoding capabilities within the powerful MapInfo Professional mapping and analysis environment.
• An Error Code reference is provided as an appendix in the documentation that documents the meaning of each error code.
What’s Included With MapMarker Plus CanadaYou are provided with a CD and this document to help you make the most of this geocoding product. This section outlines the components provided with the product:
• CD – This CD contains all the necessary program files you need to use MapMarker Plus Canada. It includes the MapMarker Plus Canada software and the Address Dictionary, which contains the data you need to run MapMarker Plus Canada. The amount of data you have on the CD depends on the amount that you purchased with the product. Options are available to purchase data for individual provinces, or for all of Canada.
• MapMarker Plus Canada Desktop User Guide – This document is designed to help you use MapMarker Plus Canada desktop application to its fullest potential. The guide takes you through the process of installing and configuring the desktop application and data. Additionally, you will learn how to geocode and obtain the most accurate possible results.
• MapMarker Plus Canada Developer Guide – This document explains the server and API components of the developer product. This guide takes you through the process of installing and configuring the desktop application, data, server, and developer tools.
• Online Help – This is provided on the CD. It is a help system developed specifically for the Canadian version of MapMarker Plus Canada.
• MapMarker Release Notes – The MapMarker Plus Canada Release Notes contain information on data vintages and data file sizes, as well as late-breaking information on the product.
Publications on the Web
The Desktop User Guide, Developer Guide, and Release Notes are available for download on the Pitney Bowes MapInfo Web site (http://www.mapinfo.com). To access them, from the MapInfo home page, click the Support and Training tab; click the Documentation link; and then click Publications.
Getting Technical SupportPitney Bowes MapInfo offers a free support period on all new software purchases and upgrades, so you can be productive from the start. Once the free period ends, MapInfo Corporation offers a broad selection of extended support services for individual, business, and corporate users.
Technical Support is here to help you, and your call is important. This section lists the information you need to provide when you call your local support center. It also explains some of the technical support procedures so that you will know what to expect about the handling and resolution of your particular issue.
12 MapMarker Plus Canada 8
Chapter 1: Introduction
MapInfo Corporation provides full technical support for MapMarker Plus Canada for versions 5.0 and later. Please remember to include your serial number, partner number or contract number when contacting Technical Support.
Contact the technical support personnel for your area:
The Americas
Phone: 518.285.7283
Fax: 518.285.6080
E-mail: [email protected]
Hours: Monday - Friday from 8:00am - 7:00pm EST, excluding company holidays.
Asia-Pacific Headquarters
Phone: 61.7.3844.7744
Fax: 61.7.3844.2400
E-mail: [email protected]
Hours: Monday - Friday from 9:00am and 5:00pm (EST) Australian Eastern Standard Time, excluding company holidays.
Europe/Middle East/Africa
Phone: 44.1753.848229
Fax: 44.1753.621140
E-mail: [email protected]
Hours: Monday - Friday from 8am to 5pm GMT, excluding company holidays.
Germany
Phone: +49 (0) 6142-203-400
Fax: +49 (0) 6142-203-444
E-mail: [email protected]
Hours: Monday - Friday from 9 am to 5 pm MEZ, excluding company holidays.
To use Technical Support, you must register your product. In the United States and Canada contact 1-800-552-2511, and follow the voicemail instructions, or send an e-mail to [email protected].
To to purchase technical support, renew your current contract, or receive more information on technical support programs, contact a Sales representative in your area. In the United States, call 1-800-FASTMAP.
Extended support options are available at each of our technical support centers in the United States, United Kingdom, and Australia.
Developer Guide 13
Getting Technical Support
Before You Call
Please have the following information ready when contacting us for assistance on MapMarker Plus Canada.
1. Serial Number. You must have a registered serial number to receive Technical Support.
2. Your name and organization. The person calling must be the contact person listed on the support agreement.
3. Version of the product you are calling about.
4. The operating system name and version.
5. A brief explanation of the problem. Some details that can be helpful in this context are:
• Error messages
• Context in which the problem occurs
• Consistency – is the problem reoccurring or occurring erratically?
The Support Tracking System
The Support Tracking System is used internally by the Technical Support department to manage and track customer issues. The system also provides the ability to track calls with accountability. This system helps Tech Support respond to all customer issues effectively, efficiently, and fairly.
Expected Response Time
Most issues can be resolved during the customer’s initial call. If this is not possible, a response will be issued before the end of the business day. A Technical Support representative will provide a status each business day until the issue is resolved.
Support requests submitted by e-mail are handled using the same guidelines as telephone support requests; however, there is an unavoidable delay of up to several hours for message transmission and recognition.
Exchanging Information
Occasionally a Technical Support representative will ask you to provide sample data in order to duplicate your scenario. In the case of our developer tools (such as MapXtreme), a small subset of sample code may be requested to help duplicate the issue.
The preferred method of exchanging information is either via e-mail or our FTP site. Use the following e-mail addresses:
• United States – [email protected]• Europe – [email protected]• Australia – [email protected]
Accessing the FTP site
For information regarding our FTP site, please contact Technical Support. If information cannot be provided electronically, we also accept information in the following media formats:
14 MapMarker Plus Canada 8
Chapter 1: Introduction
• 3.5” Floppy Disks• Zip Disks (100 MB format only)• CDs• Jaz Drives (1 gig format only)
Software Defects
If the issue is deemed to be a bug in the software, the representative will log the issue in our bug base and provide you with an incident number that can be used to track the bug. Future upgrades and patches have fixes for many of the bugs logged against the current version.
Customer Service—Your Non-Technical SupportTo receive resolve questions about the accounting of your Pitney Bowes MapInfo product, contact the Customer Service department. Keep in mind that this is not a technical support resource.
• Hours: Monday through Friday, 8AM to 7PM EST• Telephone Number: (800) 552–2511, Option 3• Internet address: [email protected]
Developer Guide 15

Getting Technical Support
16 MapMarker Plus Canada 8
2
Installing MapMarkerThis chapter contains instructions for installing MapMarker. Refer to this chapter for step-by-step instructions and other issues related to installation.
In this chapter:
Installation Overview . . . . . . . . . . . . . . . . . . . . . . . . . . . . . . . . . . . .18Operating Requirements and Performance Recommendations .19Installing MapMarker . . . . . . . . . . . . . . . . . . . . . . . . . . . . . . . . . . . .21Modifying the MapMarker Installation . . . . . . . . . . . . . . . . . . . . . .28Upgrading the MapMarker Installation . . . . . . . . . . . . . . . . . . . . . .29Uninstalling MapMarker. . . . . . . . . . . . . . . . . . . . . . . . . . . . . . . . . .30Client Workstation Install . . . . . . . . . . . . . . . . . . . . . . . . . . . . . . . .31Starting MapMarker . . . . . . . . . . . . . . . . . . . . . . . . . . . . . . . . . . . . .32

Installation Overview
Installation OverviewMapMarker is available in two configurations, Desktop Edition and Developer Edition. The features available for installation are determined by the edition that was purchased. The features available during installation are as follows:
MapMarker Desktop Edition The Desktop Edition includes the Desktop Application which includes the graphical user interface for geocoding addresses and the MapMarker Address Dictionary. You can purchase data for all Candian provinces or for individual provinces. Related documentation is also provided.
The Desktop Application runs on Microsoft Windows only.
MapMarker Developer Edition The Developer Edition includes the MapMarker Desktop Application and the tools necessary for developing MapMarker solutions using the popular Java programming language. These tools include the MapMarker SDK, native code libraries, and examples. A preconfigured Apache Tomcat servlet is provided to run MapMarker as a geocoding server.
MapMarker is delivered on one CD, which includes both the software and the data. An installer is provided to install and configure the product in one easy procedure.
The MapMarker installer program can be used for the following purposes:
• New installation. See Installing MapMarker on page 21.• Modifying existing installation to add or remove features. For example you could add new data or
add a feature to an existing installation. See Modifying the MapMarker Installation on page 28.
• Upgrading existing installation. For example, when a point release version of MapMarker is available, you could upgrade from version 8.0 to 8.1 with the same set of features that are already installed. See Upgrading the MapMarker Installation on page 29
• Uninstalling. See Uninstalling MapMarker on page 30.
Installation ComponentsAll the components you need for installing MapMarker Plus Canada are on the CD provided. This includes all the files you need to use the product along with the data you ordered, Jet Engine, and product documentation. This data is known as the Address Dictionary and allows you to geocode your records. The data is all provided on the CD, but unlocking codes are needed. The data can be purchased either as the entire country or by individual provinces and territories. The Canadian provinces and territories are:
• Alberta• British Columbia• Manitoba• New Brunswick• Newfoundland• North West Territories• Nova Scotia• Nunavut (Territory) There is FSA information for Nunavut, but no street information.• Ontario
18 MapMarker Plus Canada 8

Chapter 2: Installing MapMarker
• Prince Edward Island• Quebec• Saskatchewan• Yukon Territory
Note: To obtain your data unlocking code, please call the MapMarker License Authorization desk at (800) 627-4968, option 3, Monday through Friday, between 8 am and 7 pm EST. Have your product serial number ready when you call.
Shared InstallThe MapMarker data can be shared among a group of users who wish to run the MapMarker Desktop Application. To do so, the system administrator performs a shared installation of MapMarker. This must include the Desktop Application feature and the Address Dictionary in a common network location. Once the shared installation is complete, the system administrator must share the program folder and data folder across the network.
After the system administrator has made the shared program and data available across the network, client users can browse to the program location and run the Desktop Application installer (ClientSetup.exe) to install the MapMarker Desktop Application on their workstations. Client users can then run the MapMarker Desktop Application and access the shared Address Dictionary.
For instructions on installing the client Desktop Application for use with a shared installation, see Client Workstation Install on page 31.
About the Address DictionaryThe MapMarker Address Dictionary is installed during the installation of the MapMarker software. You can install data for individual provinces and territories, all of Canada, or postal centroids. The Address Dictionary must be stored on a local hard drive or a network drive. By default, the data resides in the data directory under the MapMarker program directory.
You may choose to install all or only a portion of the data set that you purchased. To install only a portion of the purchased data set, uncheck provinces that you do not want to install when you reach the Choose Install Set dialog box.
Operating Requirements and Performance RecommendationsNote the following recommendations in order to maximize the performance of your MapMarker installation.
Operating Requirements, p. 20
Optimizing Performance, p. 21
Developer Guide 19

Operating Requirements and Performance Recommendations
Operating RequirementsThis section describes the basic software and hardware requirements for MapMarker Plus Canada. See your version-specific Release Notes for more detailed descriptions and updated information on supported software and hardware.
Hardware and Memory Requirements
The minimum system requirements for MapMarker on a full installation of the Desktop Application and MapMarker SDK are:
• 800 Mhz Pentium® processor or equivalent• 256 MB RAM• Adequate disk space for the software and Canadian Address Dictionary. See the Release Notes
for details.
For optimal performance of a full installation of both the Desktop Application and MapMarker SDK we recommend:
• 1 Ghz processor or better• 512 MB RAM• 10 GB available disk space
Supported Operating Systems
MapMarker runs on:
• Microsoft Windows• Solaris• HP-UX• Red Hat Linux• SUSE Linux
See the product Release Notes for detailed information on supported operating systems for your specific version of MapMarker.
JVM Requirements
MapMarker requires a Java Virtual Machine (JVM) to run. MapMarker Plus Canada ships with:
• Sun JRE v. 1.5.0_09 (for Microsoft Windows and Sun Solaris)• HP JRE 1.5.0._04 (for HP-UX)• Sun JRE 1.5.0_11 (for Linux)
See the product Release Notes for detailed JVM support information for your specific version of MapMarker.
Database Requirements
MapMarker Plus Canada supports the following ODBC databases and drivers.
• SQL Server 2005
20 MapMarker Plus Canada 8
Chapter 2: Installing MapMarker
• SQL Server 2000• Microsoft Access 2007• Microsoft Access 2000• Oracle 10G Release 1and 2• Oracle 9i Release 2
See the product Release Notes for updated database support information for your specific version of MapMarker.
Web Server Requirements (Developer Edition Only)
MapMarker Plus Canada ships with:
• Apache Tomcat 5.5 (installed if the Web Application feature is selected during the Developer Product installation)
The following web application servers are also supported:
• Oracle 10G Application Server • BEA WebLogic• WebSphere
See the product Release Notes for detailed web server support information for your specific version of MapMarker.
Optimizing PerformanceTo get the greatest benefit from the MapMarker geocoding capabilities, consider these guidelines for optimizing performance.
• Use the fastest processor available to you. We recommend 2.5 Ghz dual processor or better• Have enough memory so that the operating system can allocate some memory to your disk
cache. We recommend 1 GB RAM or better• Have at least 10 GB available disk space• Sort your table by postal code before geocoding.• Choose exact match criteria for all (house number, street name, city name, postal code).• Do not create points automatically.• Remove indexes on any table output columns before geocoding.• Store the Address Dictionary on a local hard drive.
Installing MapMarkerThis section describes the typical MapMarker installation procedures for Microsoft Windows users and for UNIX/Linux users. The graphical installer interface guides you through the procedure. You can also install silently, without user interaction.
Install Using the Graphical Interface, p. 22
Installing Silently, p. 27
Developer Guide 21
Installing MapMarker
Install Using the Graphical InterfaceFollow these steps for typical installation using the graphical installer program:
1. Begin the installation procedure as follows, depending on whether you are installing on Windows or on UNIX/Linux:
• On Microsoft Windows, place the MapMarker CD into your drive. The installation should start automatically. Click Install Product in the list of options. In the Install Product dialog box, click Install MapMarker. Proceed to step 2.
If the installation does not automatically run, from the Windows 2000/2003/XP Start menu, choose Run. From the Run dialog, type D:\SETUP.EXE in the Open command box (where D is the drive letter of your CD drive). On Microsoft VISTA, from the Windows VISTA Start menu, type D:\SETUP.EXE in the search box provided, where D is the drive letter of your drive.
• On Solaris, Linux, or HP-UX, run the shell script from the root of the CD using the command: sh startinstall.sh
Proceed to step 2.
To bypass the startinstall.sh script, go to the /instdata folder of the CD, and run executable appropriate for your operating system. For example, on a Linux operating system:sh linux/install.bin
2. In the Introduction dialog, click Next to display the What’s New dialog box. This provides a brief summary of new features for MapMarker Plus Canada and provides data vintage information.
3. Click Next to display the License Agreement dialog box.
4. After reading the License Agreement, click the I accept the terms of the License Agreement button, and then click Next to display the Licensing dialog box.
5. In the Licensing dialog box, type your MapMarker serial number and unlocking code. The serial number is located on a sheet of stickers in the MapMarker package. The unlocking code enables the installer to create a license file for your system that gives you access to the MapMarker features and data you purchased. Call (800) 552-2511 option 3, between 8 am and 7 pm, EST, Monday through Friday, and the MapMarker License Authorization desk will provide your unlocking code. Have your product serial number ready when you call.
After entering the serial number and unlocking code, click Next.
If you entered valid serial number and unlocking codes, you will see the Choose Install Set dialog box. If you did not enter the correct codes, you will receive an error message and have the opportunity to re-enter the serial number and unlocking code.
22 MapMarker Plus Canada 8

Chapter 2: Installing MapMarker
6. In the Choose Install Set dialog box, the default Typical Install Set shows all the software and all the data you purchased. To see a description of each feature, click on the feature to highlight it. A description of the selected feature appears in the Description box.
Check the boxes for the features that you want to install and clear the check boxes of the features that you do not want to install. Product documentation is always installed.
Note The MapMarker SDK selections are available only for the Developer Edition.
After choosing the features to install, click Next to display the Choose Install Folders dialog box
7. In the Choose Install Folder dialog box, select the locations to install MapMarker software and data.
Developer Guide 23
Installing MapMarker
You can use the default locations or click Choose to display the Browse for Folder dialog, where you can navigate to the desired location. Click OK in the Browse for Folder dialog when you are finished.
If you decide after selecting an alternative location that you would prefer the default location, click Restore Default Folder in the Choose Install Folder dialog box.
When you have selected the software and data install folders, click Next.
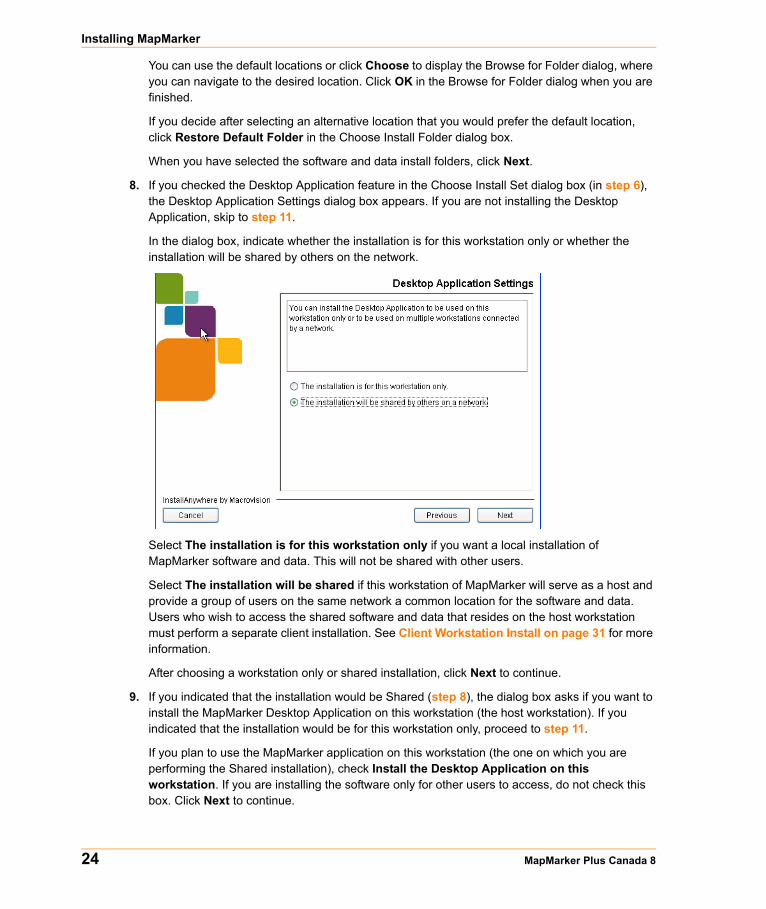
8. If you checked the Desktop Application feature in the Choose Install Set dialog box (in step 6), the Desktop Application Settings dialog box appears. If you are not installing the Desktop Application, skip to step 11.
In the dialog box, indicate whether the installation is for this workstation only or whether the installation will be shared by others on the network.
Select The installation is for this workstation only if you want a local installation of MapMarker software and data. This will not be shared with other users.
Select The installation will be shared if this workstation of MapMarker will serve as a host and provide a group of users on the same network a common location for the software and data. Users who wish to access the shared software and data that resides on the host workstation must perform a separate client installation. See Client Workstation Install on page 31 for more information.
After choosing a workstation only or shared installation, click Next to continue.
9. If you indicated that the installation would be Shared (step 8), the dialog box asks if you want to install the MapMarker Desktop Application on this workstation (the host workstation). If you indicated that the installation would be for this workstation only, proceed to step 11.
If you plan to use the MapMarker application on this workstation (the one on which you are performing the Shared installation), check Install the Desktop Application on this workstation. If you are installing the software only for other users to access, do not check this box. Click Next to continue.
24 MapMarker Plus Canada 8
Chapter 2: Installing MapMarker
10. In this dialog box, confirm or correct the path to the Shared Data Folder. Universal Naming Convention (UNC) paths are recommended (for example: \\ruready-W1\MapMarker_CAN_v8\Data). This ensures that users running MapMarker on other machines will be able to access the shared data. If the network share name or shared folder does not already exist, it must be created before you can use the MapMarker application.
Note The install program does not ensure that the data folder is shared to others on the network or is visible on the network. The person performing the installation is responsible for entering a valid path to the data folder and making this data folder accessible.
After you have confirmed the shared data folder, click Next to continue.
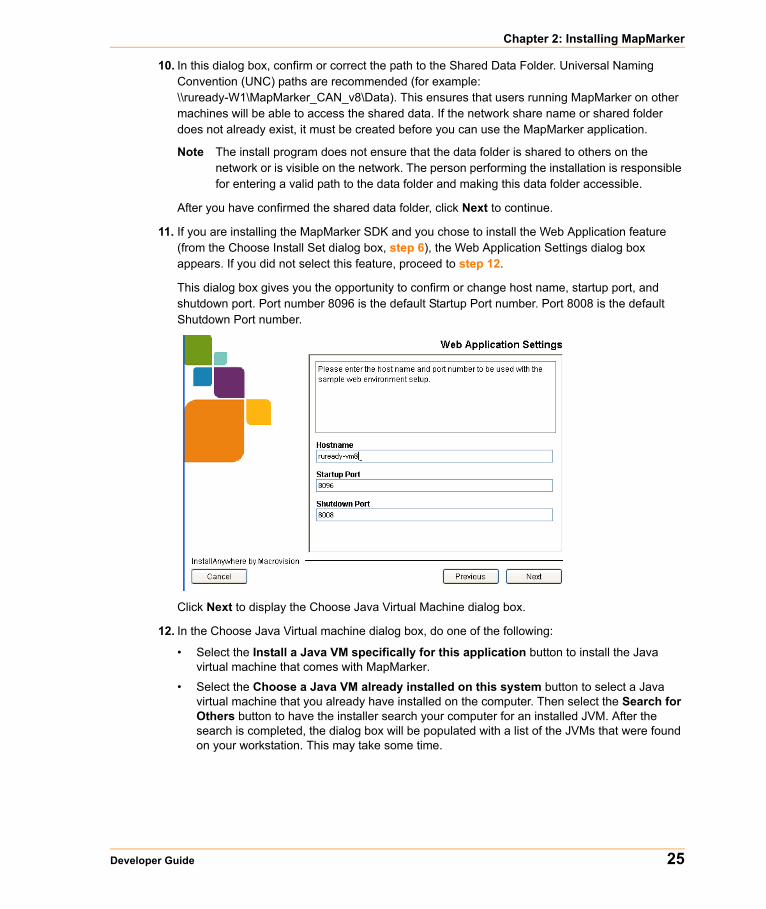
11. If you are installing the MapMarker SDK and you chose to install the Web Application feature (from the Choose Install Set dialog box, step 6), the Web Application Settings dialog box appears. If you did not select this feature, proceed to step 12.
This dialog box gives you the opportunity to confirm or change host name, startup port, and shutdown port. Port number 8096 is the default Startup Port number. Port 8008 is the default Shutdown Port number.
Click Next to display the Choose Java Virtual Machine dialog box.
12. In the Choose Java Virtual machine dialog box, do one of the following:
• Select the Install a Java VM specifically for this application button to install the Java virtual machine that comes with MapMarker.
• Select the Choose a Java VM already installed on this system button to select a Java virtual machine that you already have installed on the computer. Then select the Search for Others button to have the installer search your computer for an installed JVM. After the search is completed, the dialog box will be populated with a list of the JVMs that were found on your workstation. This may take some time.
Developer Guide 25

Installing MapMarker
The Choose Java Virtual Machine dialog box appears as follows.
Note See your MapMarker version-specific Release Notes for complete information on operating requirements and recommendations, including information on the supported and recommended JVMs.
After selecting the JVM, Click Next to display the Choose Shortcut Folder dialog box. If you select a JVM that is already installed on your system, and that JVM is invalid or cannot be found, you will receive an error message.
13. In the Choose Shortcut Folder dialog box, choose where you want to create the product icons. You can create a new Program Group, place the icons in an existing Program Group, or make other choices. After making your selection, click Next to continue.
14. In the Pre-Installation Summary dialog box, review the disk space requirements and your install selections. To edit any selections, click the Previous button to go back to the earlier dialogs.
15. When you are satisfied with your installation choices, click Install. A progress dialog reports progress as the software and data is installing.
An installation of MapMarker and the entire Address Dictionary may be time-consuming. The amount of time required to install depends on how much data you are installing and machine processing power. Do not cancel the install process the hard drive or CD drive is active. To verify that the installation is progressing, check the directory where the data is targeted to reside. You should see new files being added as the process continues.
16. When the installation is finished, the Install Complete message appears. Click Done to exit the installer.
26 MapMarker Plus Canada 8

Chapter 2: Installing MapMarker
Installing SilentlyYou can install MapMarker Plus Canada without using a graphical interface and without user interaction. This allows you to install MapMarker in environments that do not provide a graphical user interface.
To perform a silent install, use the properties file located in the root folder on the CD. This file defines the values for the installer to use when installing in silent mode. The file is named:
silentinstall.properties
You must edit the file to suit your particular needs. This file includes extensive comments to assist you in this process. The serial number and unlock code variables must be populated with valid values. By default, the file is initially configured to install the engine, web application, samples, additional tools, and licensed data. After editing this file, you can then launch the silent install and pass this properties file to the installer program.
To edit the silentinstall.properties file:
1. Copy the silentinstall.properties template file to a a location on the target machine and open the file in a text editor.
2. In the properties file, specify information for the install properties and set the software and data features that you want to install. The file contains instructions for changing each of the values. You must specify the following:
• Serial Number and Unlocking Code
• Install location of the application files and data
• Java Virtual Machine
• Shortcuts/links location
• Features to install
• Web Application configuration
• Desktop Application configuration
3. To launch the silent install, use the following command line arguments:
On Unix/Linux (where media/CDROM represents the location of the installation media and /tmp represents the location of the silentinstall.properties file)./media/CDROM/startinstall.sh -f /tmp/silentinsall.properties
On Windows operating systems (where D: represents the drive location of the installation media and C:\tmp represents the location of the silentinstall.properties file).start /w D:\instdata\install.exe -f C:\tmp\silentinstall.properties
Note You must use an absolute path for the properties file.
Developer Guide 27
Modifying the MapMarker Installation
Modifying the MapMarker InstallationAfter you have installed MapMarker, you can run the Install program to modify the MapMarker installation. For example, you may want to add data for provinces that you originally purchased but did not previously install. Or you may want to remove features that you had previously installed.
Note Some things cannot be modified, such as the paths for software and data.
If MapMarker is already installed on your system, the install program will open to the Introduction dialog. This bypasses the Licensing dialog box, since your you have already accepted the License Agreement. You can then proceed to modify your installation
Modify Using the Graphical Interface, p. 28
Modify Silently, p. 29
Modify Using the Graphical InterfaceTo modify your MapMarker Plus Canada installation, do the following:
1. Start the installer as described in step 1 of Install Using the Graphical Interface on page 22.
2. At the Introduction dialog box, click Next.
3. Enter or confirm your serial number and unlocking code. This information will already be populated in the dialog box. If you purchased new features (such as additional data), you will have a new unlocking code and must enter this in the Licensing dialog box.
4. The Install Set dialog box will appear and show a checked box for every MapMarker feature that is installed. This is where you can install licensed features that you previously chose not to install, or uninstall selected features. Do the following:
a. Uncheck any feature that you want to remove. For example you can uncheck and remove data for provinces that you previously installed. Click Next.
b. Check features that you want to install. You will see only features that are licensed to you, based on your unlocking code. Click Next.
5. You will see the Desktop Application Settings or Web Applications Settings dialog boxes if you chose to install the Desktop Application or Web Application. See step 8 (Desktop Application) and step 11 (Web Application) from the procedure for Install Using the Graphical Interface.
6. The Pre-installation Summary dialog box will show a list of product features that will be installed. If you chose to install new features, they will be listed. If you chose to uninstall any features, those features will be absent from the list of product features.
7. After verifying the product features, click Install.
8. The Install Complete dialog box will confirm your actions. Click Done.
28 MapMarker Plus Canada 8

Chapter 2: Installing MapMarker
Modify SilentlyYou can modify MapMarker Plus Canada without using a graphical interface and without user interaction. To perform a silent modify, edit the silentinstall.properties file to suit your needs. See Installing Silently on page 27 for information on the location and use of the properties file.
The FEATURE_LIST variable of the silentinstall.properties file must include all the MapMarker features that you want to install. For example, if you already had installed data for Quebec and Ontario and wanted to add data for Nova Scotia, New Brunswick, and Prince Edward Island , make sure that the FEATURE_LIST indicates all of those provinces – not just the provinces you are adding.
You cannot use the silent modify procedure to change any of the following settings.
• Program paths• JVM• Shortcuts and links
You cannot use the silent modify procedure to change the configuration of a previously installed Web Application (for Developer Edition). Similarly, you cannot change the shared/unshared configuration of the previously installed Desktop Application. If you want to make any of these changes in your installation, you must uninstall then reinstall MapMarker.
Upgrading the MapMarker InstallationMajor releases (such as 8.0) can be upgraded when point releases (such as 8.1) become available. Similarly, one point release can be upgraded to the next point release. When performing an upgrade, the installer updates all of the currently installed MapMarker features to the new version. All settings and configuration will remain unchanged.
If you want to add or remove features or change settings, you must first upgrade and then run the installer again to modify your installation (see Modifying the MapMarker Installation). Alternatively, you may uninstall and then re-install MapMarker if you have changes that cannot be performed using the Modify option.
Note You cannot upgrade from one major release to another. For example, you cannot upgrade from MapMarker 7.x to 8.0. You must perform a new installation of 0. You will be able to upgrade from version to 8.1 when the upgrade version is released.
You can have different versions of major releases on the same workstation (such as MapMarker Plus Canada v7. and v8), but you cannot have different point releases installed on the same workstation. We recommend that you contact Technical Support if you want to use more than one version of MapMarker.
Upgrade Using the Graphical Interface, p. 30
Upgrade Silently, p. 30
Developer Guide 29

Uninstalling MapMarker
Upgrade Using the Graphical InterfaceTo upgrade MapMarker Plus Canada to a point release (such as to from 8.0 to 8.1 when the upgrade is available), do the following:
1. Start the installer as described in step 1 of Install Using the Graphical Interface on page 22.
2. Continue with step 2 through step 4 as described in Install Using the Graphical Interface. In the Pre-Installation Summary dialog box, click Install to begin the upgrade.
3. When the Upgrade Complete dialog box appears, click Done.
Upgrade SilentlyYou can upgrade MapMarker Plus Canada to a point release without using a graphical interface and without user interaction. Start the silent installer as described in Installing Silently on page 27. Because this is an upgrade, If there are any changes to the installation reflected in the properties file they will be ignored.
Uninstalling MapMarkerWhen uninstalling MapMarker, you have two options, a complete uninstallation or removal of certain features only. A complete uninstall will remove the MapMarker program directories, groups, and icons. Files and folders created after the installation will not be removed or affected in any way.
You can uninstall specific features (rather than a complete uninstall) if you use the graphical interface uninstall. The silent uninstall always does a complete uninstall.
Uninstall must be done using the same mode (graphical interface or silent) as the previous installation, modify, or upgrade. So if your previous install, modify, or upgrade was performed using the graphical interface, then the uninstall will be run using the graphical interface.
Uninstall Using the Graphical Interface, p. 30
Uninstall Silently, p. 31
Uninstall Using the Graphical InterfaceIf MapMarker was installed as a shared installation, the uninstaller will remove the MapMarker Desktop Application if it was previously installed on that workstation. Each user who accesses the shared application must use Add/Remove Programs on their own workstation to remove MapMarker Desktop Application.
1. Begin the uninstall procedure as follows, depending on whether you are uninstalling on Windows or on UNIX/Linux:
• On Microsoft Windows, from the Control Panel Add or Remove Programs utility. Select MapMarker CAN v8 and click the Change/Remove button. Proceed to step 2.
30 MapMarker Plus Canada 8
Chapter 2: Installing MapMarker
• On Solaris, Linux, or HP-UX Run the shell script from the root of the CD using the command:
sh /opt/MMv8/Uninstall_MapMarker_CAN_v8/Uninstall_MapMarker_CAN_v8
where /opt/MMv8 is the directory into which MapMarker Plus Canada was installed.
2. In the Uninstall MapMarker CAN dialog box, click Next.
3. Select Complete Uninstall or Uninstall Specific Features, then click Next.
4. If you selected Complete Uninstall in step 3, the uninstall program will run immediately and MapMarker Plus Canada will be completely uninstalled.
If you selected Uninstall Selected Features in step 3, uncheck the product features that you want to uninstall, then click Uninstall to uninstall those features only.
5. When the uninstall completes, click Done.
Uninstall SilentlyIf your previous installation, modify, or upgrade of MapMarker was performed silently, the uninstall will run silently as well. Launch the uninstall by running the command appropriate for your operating system shown in step 1 of Uninstall Using the Graphical Interface. Remember, a silent uninstall will always perform a complete uninstall of MapMarker.
Client Workstation InstallIf the system administrator has performed a Shared installation of MapMarker and shared the program folder and data folder across the network, users on the network can run client installations on their local workstations. Client users can then run the MapMarker Desktop Application and access the shared Address Dictionary.
For instructions on performing a Shared installation, see Shared Install on page 19.
To set up a client workstation to access MapMarker from a shared installation, follow these steps:
1. Browse to the location of the shared installation of MapMarker on the network server. (You may need to check with the System Administrator for the location.)
2. From the shared machine, run the setup program (ClientSetup.exe) in the desktop folder of the MapMarker program directory. The Welcome dialog box appears.
3. In the Welcome dialog, click Next to display the Destination Folder dialog box.
4. You can click Next to accept the default destination folder or click the Change button to display the Change Current Destination Folder dialog and navigate to another location. Click OK in the Change Current Destination Folder dialog when you have specified the new location, then click Next to display the Ready to Install the Program dialog box.
5. At the Ready to Install the Program dialog, click Install.
6. When the installation wizard completes, click Finish.
Developer Guide 31

Starting MapMarker
All the components necessary to run the MapMarker Desktop Application using the shared Address Dictionary are now installed. This includes MDAC and the Microsoft Jet engine with their desktop ODBC drivers.
To uninstall the client application, from the Control Panel select the Add or Remove Programs utility. Select MapMarker 8 Desktop and click the Change/Remove button.
Starting MapMarkerAfter successfully installing MapMarker Plus Canada, you can start the Desktop Application, if you installed that feature on your workstation, or start the MapMarker Server if you installed the Web Application.
Starting the Desktop Application, p. 32
Starting the MapMarker Server, p. 32
Starting the Desktop ApplicationIf you installed the Desktop Application feature of MapMarker, you can start the MapMarker Desktop as follows:
• From the Start Menu or the program group where you installed the MapMarker icons, click the icon named MapMarker Desktop. The Desktop Application will now start.
If you chose not to install icons, open the directory where you installed MapMarker, and in the subdirectory named desktop double-click on the file mapmarkr.exe. The Desktop Application will now start.
Starting the MapMarker ServerIf you installed MapMarker Plus Canada Web Application feature (available with the Developer Edition), you can start the MapMarker server as follows, depending on whether you are installing on Windows or on UNIX/Linux:
• On Microsoft Windows, from the Start Menu or the program group where you installed the MapMarker icons, click the icon named Start MapMarker CAN v8 Server. The MapMarker Server will now start.
If you chose not to install icons, open the directory where you installed MapMarker, and in the subdirectory named sdk\tomcat\bin double-click on the file startup.bat. The MapMarker Server will now start.
• On Solaris, Linux, or HP-UX, from the directory where you installed the MapMarker icons, run:sh Start_MapMarker_CAN_v8_Server
If you chose not to install icons, run the following command from the installation directory:sh sdk/tomcat/bin/startup.sh
Note On all operating systems, Administrator privilege is required to start the MapMarker Server.
32 MapMarker Plus Canada 8
Part II: C API Reference
Topics:
Using C-Based Developer Tools. . . . . . . . . . . . . . . . . . . . . . . . . . . . . . . . . . . . . . . . . . . . . . . . . . . . . 35Client/Server Geocoding. . . . . . . . . . . . . . . . . . . . . . . . . . . . . . . . . . . . . . . . . . . . . . . . . . . . . . . . . . . 41OLE Automation API. . . . . . . . . . . . . . . . . . . . . . . . . . . . . . . . . . . . . . . . . . . . . . . . . . . . . . . . . . . . . . 55Using the MapMarker Plus Java API . . . . . . . . . . . . . . . . . . . . . . . . . . . . . . . . . . . . . . . . . . . . . . . . . 89


3
Using C-Based Developer ToolsThis chapter describes the support available for developers who use C-based developer tools and explains how to run existing C-based geocoding applications in MapMarker Plus Canada.
In this chapter:
MapMarker Geocoding API Development . . . . . . . . . . . . . . . . . . .36Compiling and Running Existing Applications . . . . . . . . . . . . . . .38
MapMarker Geocoding API Development
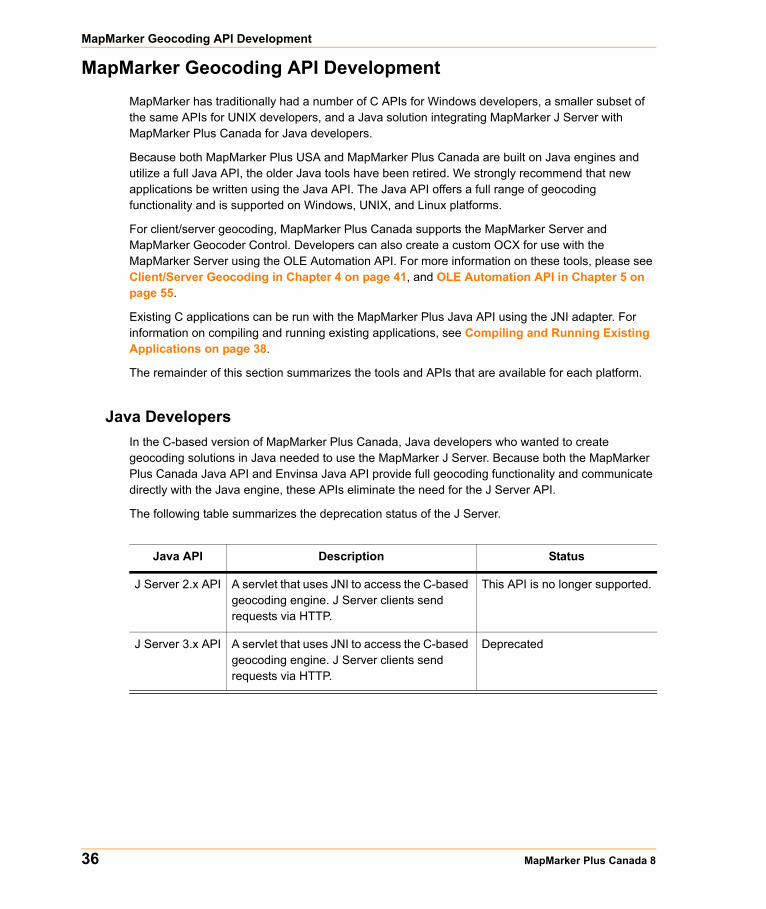
MapMarker Geocoding API DevelopmentMapMarker has traditionally had a number of C APIs for Windows developers, a smaller subset of the same APIs for UNIX developers, and a Java solution integrating MapMarker J Server with MapMarker Plus Canada for Java developers.
Because both MapMarker Plus USA and MapMarker Plus Canada are built on Java engines and utilize a full Java API, the older Java tools have been retired. We strongly recommend that new applications be written using the Java API. The Java API offers a full range of geocoding functionality and is supported on Windows, UNIX, and Linux platforms.
For client/server geocoding, MapMarker Plus Canada supports the MapMarker Server and MapMarker Geocoder Control. Developers can also create a custom OCX for use with the MapMarker Server using the OLE Automation API. For more information on these tools, please see Client/Server Geocoding in Chapter 4 on page 41, and OLE Automation API in Chapter 5 on page 55.
Existing C applications can be run with the MapMarker Plus Java API using the JNI adapter. For information on compiling and running existing applications, see Compiling and Running Existing Applications on page 38.
The remainder of this section summarizes the tools and APIs that are available for each platform.
Java DevelopersIn the C-based version of MapMarker Plus Canada, Java developers who wanted to create geocoding solutions in Java needed to use the MapMarker J Server. Because both the MapMarker Plus Canada Java API and Envinsa Java API provide full geocoding functionality and communicate directly with the Java engine, these APIs eliminate the need for the J Server API.
The following table summarizes the deprecation status of the J Server.
Java API Description Status
J Server 2.x API A servlet that uses JNI to access the C-based geocoding engine. J Server clients send requests via HTTP.
This API is no longer supported.
J Server 3.x API A servlet that uses JNI to access the C-based geocoding engine. J Server clients send requests via HTTP.
Deprecated
36 MapMarker Plus Canada 8
Chapter 3: Using C-Based Developer Tools
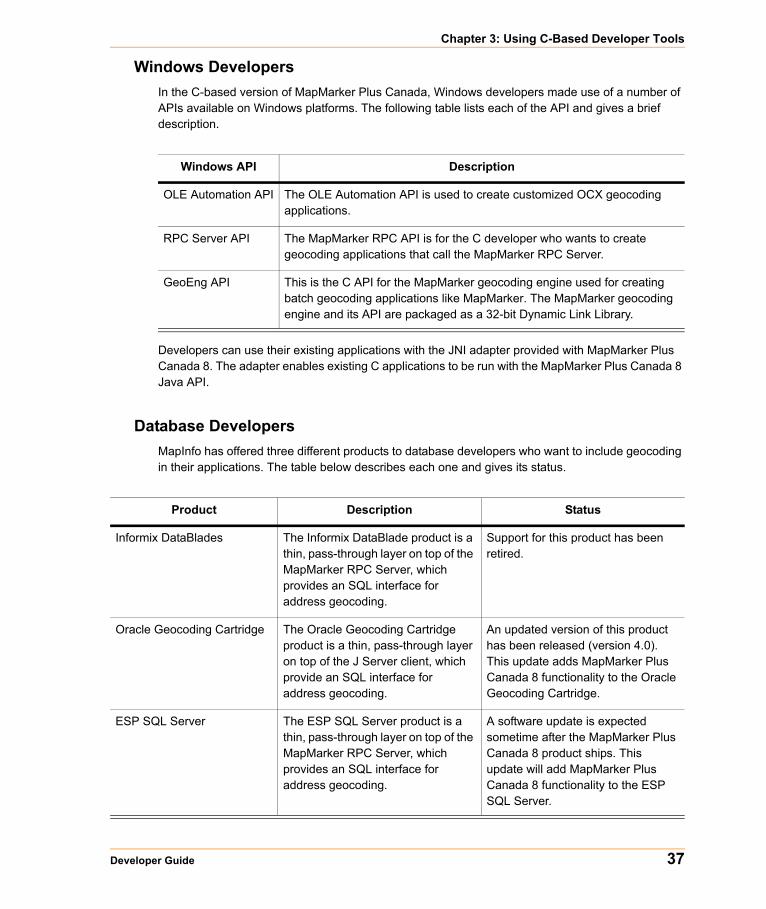
Windows DevelopersIn the C-based version of MapMarker Plus Canada, Windows developers made use of a number of APIs available on Windows platforms. The following table lists each of the API and gives a brief description.
Developers can use their existing applications with the JNI adapter provided with MapMarker Plus Canada 8. The adapter enables existing C applications to be run with the MapMarker Plus Canada 8 Java API.
Database DevelopersMapInfo has offered three different products to database developers who want to include geocoding in their applications. The table below describes each one and gives its status.
Windows API Description
OLE Automation API The OLE Automation API is used to create customized OCX geocoding applications.
RPC Server API The MapMarker RPC API is for the C developer who wants to create geocoding applications that call the MapMarker RPC Server.
GeoEng API This is the C API for the MapMarker geocoding engine used for creating batch geocoding applications like MapMarker. The MapMarker geocoding engine and its API are packaged as a 32-bit Dynamic Link Library.
Product Description Status
Informix DataBlades The Informix DataBlade product is a thin, pass-through layer on top of the MapMarker RPC Server, which provides an SQL interface for address geocoding.
Support for this product has been retired.
Oracle Geocoding Cartridge The Oracle Geocoding Cartridge product is a thin, pass-through layer on top of the J Server client, which provide an SQL interface for address geocoding.
An updated version of this product has been released (version 4.0). This update adds MapMarker Plus Canada 8 functionality to the Oracle Geocoding Cartridge.
ESP SQL Server The ESP SQL Server product is a thin, pass-through layer on top of the MapMarker RPC Server, which provides an SQL interface for address geocoding.
A software update is expected sometime after the MapMarker Plus Canada 8 product ships. This update will add MapMarker Plus Canada 8 functionality to the ESP SQL Server.
Developer Guide 37

Compiling and Running Existing Applications
Customers who currently use the Oracle Geocoding Cartridge should use the MapMarker Plus Canada 8 product.
Compiling and Running Existing ApplicationsGeocoding applications written in C can be run using a JNI adapter that communicates with the MapMarker Java engine. The JNI adapter acts as a translator for the C version of the GeoEngine API, and enables your existing applications to be run in MapMarker Plus Canada 8. This section explains how to compile and run Windows and UNIX applications.
Windows ApplicationsThe following files must be included in your application. These files are located in the SDK\AdditionalTools\geoeng\include folder where MapMarker Plus Canada is installed.
#include <geo.h>#include <geoerror.h>#include <geostd.h>
Link your application to mm32v11.lib. This file is located in the SDK\AdditionalTools\geoeng\lib folder where MapMarker Plus Canada is installed.
The adapter uses a configuration file, geojni.cfg, plus backward compatibility libraries. You must copy these files to your application directory in order for it to run. These files are located in the root MapMarker installation directory.
• geojni.cfg • mm32v11.dll• mm32v10.dll• mm32v9.dll• mm32v8.dll • mm32v7.dll• mm32v6.dll• mm32v5.dll
The classpath in geojni.cfg is set at install time. The classpath in geojni.cfg should be set to the location of the following files, which are located in the root MapMarker installation directory.
• MMCANLicenseProvider.config• MMCANLicenseFactory.config• CAN_DataManagerSettings.properties
Make sure the classpath in geojni.cfg is set to the following jar files, which are located in the root MapMarker installation directory.
• micsys.jar• miutil.jar• mmj.jar• mmjclient.jar• mmjjni_can.jar
38 MapMarker Plus Canada 8

Chapter 3: Using C-Based Developer Tools
• mmjclient_can.jar• mmj_can.jar• miscp.jar
Other Configuration File SettingsThe adapter configuration file contains some settings that enable you to change certain JVM settings. It also supplies country information, for those who are using multiple country geocoders, and the two coordinate systems in which point data can be returned. For more information on these settings, please see JNI Adapter Configuration File Settings in Appendix A on page 133.
Developer Guide 39

Compiling and Running Existing Applications
40 MapMarker Plus Canada 8
4
Client/Server GeocodingThe MapMarker Plus Canada geocoding environment extends itself beyond the single workstation to include client/server settings that serve a wide variety of geocoding needs. Everything from roadside assistance, where-is-the-nearest location, visual multiple listing services for real estate and telecom call-before-you-dig applications can put the power of MapMarker Plus Canada geocoding to practical use.
The MapMarker Plus Canada client/server tools include MapMarker Server (mm_serve.exe) and MapMarker Geocoder Control (mapmarkr.ocx). This chapter discusses how to use these tools in client/server geocoding. It also describes the support available for developers who want to use their C-based geocoding applications in MapMarker Plus Canada.
In this section:
Client/Server Geocoding . . . . . . . . . . . . . . . . . . . . . . . . . . . . . . . . .42MapMarker Server . . . . . . . . . . . . . . . . . . . . . . . . . . . . . . . . . . . . . .42Running MapMarker Server on Windows Systems. . . . . . . . . . . .43MapMarker Geocoder Control. . . . . . . . . . . . . . . . . . . . . . . . . . . . .45Adding MapMarker OCX to Your Client Application . . . . . . . . . . .46Canada/USA OCX Integration . . . . . . . . . . . . . . . . . . . . . . . . . . . . .48Geocoding via MapMarker Geocoder Control . . . . . . . . . . . . . . . .51MapMarker Geocoder Control Events and Methods. . . . . . . . . . .51Client/Server Geocoding and the Internet . . . . . . . . . . . . . . . . . . .53

Client/Server Geocoding
Client/Server GeocodingMapMarker Plus Canada provides a server and client OCX that allows MapMarker to geocode records from multiple users with a single geocoding engine. The components include MapMarker Server and MapMarker Client Geocoder Control. MapMarker Server can be run as a Windows service or in console mode.
For developers who are interested in creating a custom OCX for use with MapMarker Server, the OLE Automation API is provided on which the MapMarker Geocoder Control is based. The API is presented in Chapter 5: OLE Automation API.
MapMarker Server and the Geocoder Control are installed and registered on your system after you perform a full MapMarker Plus Canada installation or upgrade. The files mm_serve.exe and mapmarkr.ocx are installed to the C:\Program Files\Common Files\MapInfo\MMOCX folder.
Installing MapMarker Server Manually
If you need to install MapMarker Server manually, then at the DOS prompt from the MapMarker directory, run the following:
mm_serve -install
mm_serve.exe is located:
C:\Program Files\Common Files\MapInfo\MMOCX\
MapMarker ServerMapMarker Server is a layer on top of the MapMarker geocoding engine, and extends the engine’s functionality by providing a Remote Procedure Call (RPC) facility and a queuing/multi-threading function. The RPC interface of the MapMarker Server allows it to receive via TCP/IP geocoding requests from remote clients (such as the MapMarker Geocoder Control). Since the geocoding engine handles one request at a time, the MapMarker Server queues multiple requests until they can be fulfilled by the geocoding engine.
The MapMarker Server can handle a maximum of 1,024 simultaneous requests. In a typical customer service environment, a request might consist of an address being sent to the MapMarker Server and the best candidate being displayed.
Depending on your hardware and network environment, the geocoding engine geocodes as many as 25 to 100 records a second. So even though there is one geocoding engine, many users can be served simultaneously.
By default, MapMarker Server geocodes addresses to street level. It returns potential matches from the MapMarker Address Dictionary. MapMarker Plus Canada also allows you to geocode to postal code centroid by using the -ziponly option.
The MapMarker Server RPC interface ships with MapMarker Plus Canada, but most applications do not need to use this interface. Instead, we recommend that you use the MapMarker Geocoder Control, as described in Geocoding via MapMarker Geocoder Control on page 51 or modify the
42 MapMarker Plus Canada 8
Chapter 4: Client/Server Geocoding
OCX using the OLE Automation API, explained in OLE Automation API in Appendix 5 on page 55. Application development should be easier with the OCX since you probably have to use C or C++ to access the RPC interface.
Note The current implementation of the MapMarker Server does not support the Browse or GetNextRange features of the MapMarker geocoding engine. If you need these functions, you should use the MapMarker Geoengine API directly (see OLE Automation API in Appendix 5 on page 55).
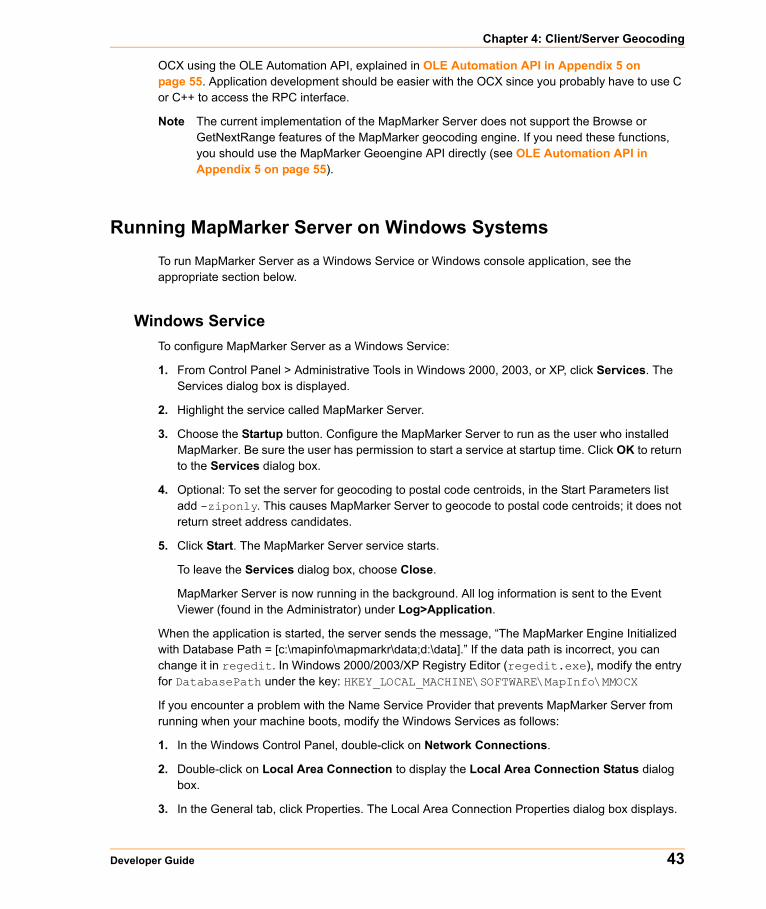
Running MapMarker Server on Windows SystemsTo run MapMarker Server as a Windows Service or Windows console application, see the appropriate section below.
Windows ServiceTo configure MapMarker Server as a Windows Service:
1. From Control Panel > Administrative Tools in Windows 2000, 2003, or XP, click Services. The Services dialog box is displayed.
2. Highlight the service called MapMarker Server.
3. Choose the Startup button. Configure the MapMarker Server to run as the user who installed MapMarker. Be sure the user has permission to start a service at startup time. Click OK to return to the Services dialog box.
4. Optional: To set the server for geocoding to postal code centroids, in the Start Parameters list add -ziponly. This causes MapMarker Server to geocode to postal code centroids; it does not return street address candidates.
5. Click Start. The MapMarker Server service starts.
To leave the Services dialog box, choose Close.
MapMarker Server is now running in the background. All log information is sent to the Event Viewer (found in the Administrator) under Log>Application.
When the application is started, the server sends the message, “The MapMarker Engine Initialized with Database Path = [c:\mapinfo\mapmarkr\data;d:\data].” If the data path is incorrect, you can change it in regedit. In Windows 2000/2003/XP Registry Editor (regedit.exe), modify the entry for DatabasePath under the key: HKEY_LOCAL_MACHINE\SOFTWARE\MapInfo\MMOCX
If you encounter a problem with the Name Service Provider that prevents MapMarker Server from running when your machine boots, modify the Windows Services as follows:
1. In the Windows Control Panel, double-click on Network Connections.
2. Double-click on Local Area Connection to display the Local Area Connection Status dialog box.
3. In the General tab, click Properties. The Local Area Connection Properties dialog box displays.
Developer Guide 43
Running MapMarker Server on Windows Systems
4. Click Client for Microsoft Networks to highlight it, and then click Properties.
5. In the RPC Service tab, change the Name service provider to DCE Cell Directory Service.
In the Network Address box, enter the machine’s IP address. If the machine is not on a network, leave this box blank.
6. Click OK.
To stop the MapMarker service:
1. Choose Control Panel > Administrative Tools > Services and highlight MapMarker Server.
2. Click Stop.
To remove the MapMarker service from Windows Services:
• At the DOS prompt, type mm_serve -delete.
Console ApplicationTo start MapMarker Server as a console application on Windows 2000//2003/XP:
• At the DOS prompt type mm_serve -console (or -ziponly).
Specify -ziponly to set MapMarker Server to match to postal code centroids.
When the application is started, the server sends the message, “The MapMarker Engine Initialized with Database Path = [c:\mapinfo\mapmarker\data;d:\data].” If the data path is incorrect, you can change it in regedit. In Windows 2000/2003/XP Registry Editor (regedit.exe), modify the entry for DatabasePath under the key: HKEY_LOCAL_MACHINE\SOFTWARE\MapInfo\MMOCX.
To stop the application:
1. From the console window, press Ctrl-C.
2. When the DOS prompt is displayed, type exit. The console window closes.
Alternatively, press Crtl-Alt-Del and select mm_serve from the Close Program dialog box.
Any error information that is generated when MapMarker Server is running is displayed in the console window. There is no log file when running MapMarker Server as a console application.
Geocoding Request Timed Out
If MapMarker Server receives more than 1,024 requests, (i.e., all 1,024 available threads are occupied with other requests waiting for the Server), it may block your geocoding request and cause your request to time out. At that time, MapMarker Server displays the error “32104: Mutex timed out.” In this case, resubmit your request.
This error may also occur if you have started two instances of MapMarker Server on the same machine. This commonly happens when you start the server as a Windows Service and as a console application. This error displays in the Windows Event View log under Log > Application.
44 MapMarker Plus Canada 8

Chapter 4: Client/Server Geocoding
MapMarker Geocoder ControlThe MapMarker Geocoder Control is a ready-made OLE control object for MapMarker Server. In the simplest case, you can use the control without any programming. It is designed for any application programming environment that can call OCXs such as Visual Basic or C++. To use the MapMarker Geocoder Control drag and drop the control onto your form. When you run your application, the MapMarker control object appears as shown below. Through the control an end user is able to connect to the MapMarker Server and send geocoding requests.
The MapMarker Geocoder Control uses the RPC API to communicate with MapMarker Server. The client control connects, geocodes and disconnects for each geocode request (e.g., when the user clicks the Geocode button). This ensures that the geocoding request uses one of the MapMarker Server’s 1,024 threads for the shortest time period, which reduces the time other geocoding requests wait for a thread.
If you would like more control over the MapMarker Geocoder Control, or wish to provide a different user interface, you can drive the control via the MapMarker OLE Automation interface. Since the OCX uses the same OLE Automation interface, a direct user of the Automation interface has access to the same methods and properties of the Geocoder Control. The OLE Automation API is discussed in OLE Automation API in Chapter 5 on page 55.
Developer Guide 45

Adding MapMarker OCX to Your Client Application
Adding MapMarker OCX to Your Client ApplicationWhen you install MapMarker Server, the MapMarker Geocoder Control is installed and registered as well. The file mapmarkr.ocx is located in the \sdk\additional_tools folder.
Note This discussion assumes that you are familiar with developing OCX applications.
With MapMarker Geocoder Control installed, you are ready to add it to your application. The steps are outlined below. In this case we are using Visual Basic as the development environment, but any tool that supports OLE Automation can be used.
1. In Visual Basic, add MapMarker Geocoder Control to the Toolbox by choosing Project > Components or by right-clicking on the Toolbox and selecting Components.
Check the box MapMarker Geocoder Control. Click OK. The icon for the MapMarker control displays in the Toolbox.
2. Highlight the MapMarker Geocoder Control icon and drag and drop it onto your design form, or double-click on the icon to add the control to the form.
46 MapMarker Plus Canada 8
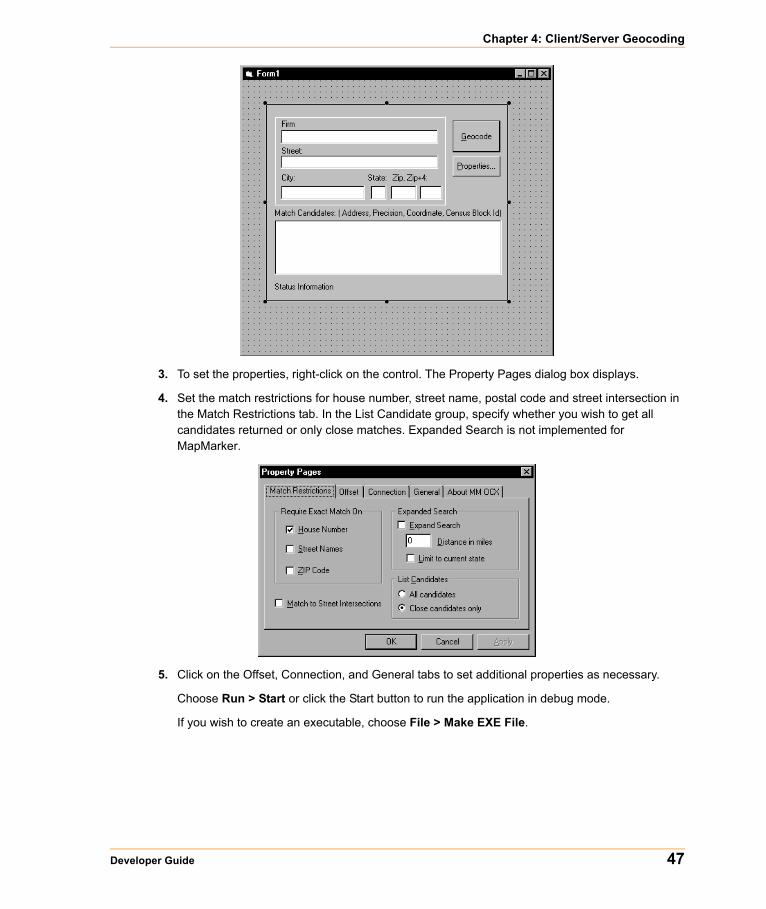
Chapter 4: Client/Server Geocoding
3. To set the properties, right-click on the control. The Property Pages dialog box displays.
4. Set the match restrictions for house number, street name, postal code and street intersection in the Match Restrictions tab. In the List Candidate group, specify whether you wish to get all candidates returned or only close matches. Expanded Search is not implemented for MapMarker.
5. Click on the Offset, Connection, and General tabs to set additional properties as necessary.
Choose Run > Start or click the Start button to run the application in debug mode.
If you wish to create an executable, choose File > Make EXE File.
Developer Guide 47
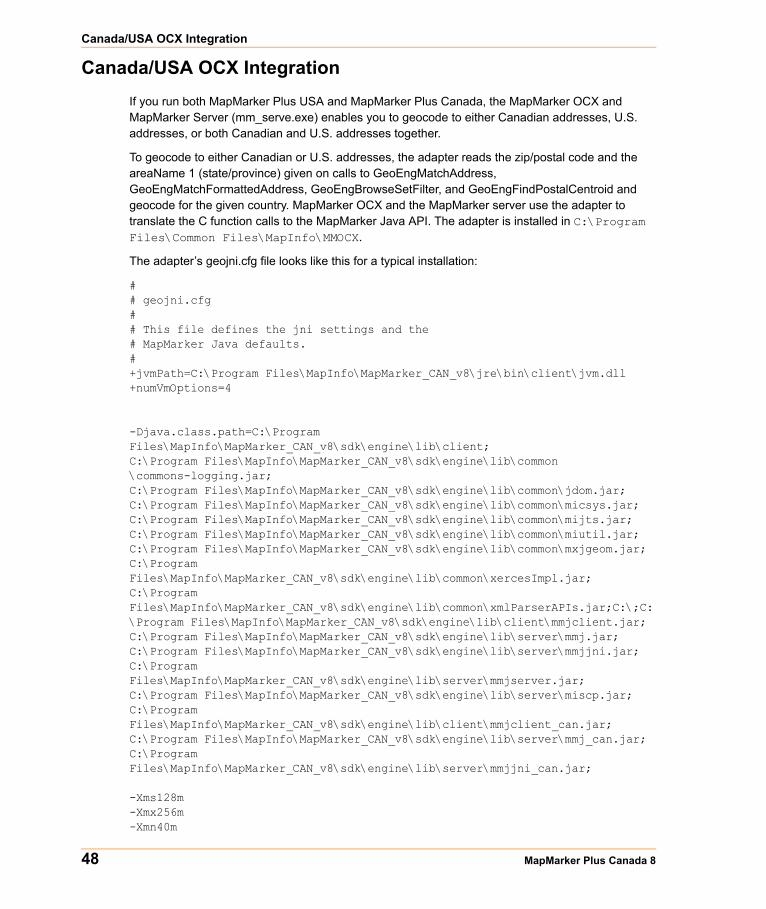
Canada/USA OCX Integration
Canada/USA OCX IntegrationIf you run both MapMarker Plus USA and MapMarker Plus Canada, the MapMarker OCX and MapMarker Server (mm_serve.exe) enables you to geocode to either Canadian addresses, U.S. addresses, or both Canadian and U.S. addresses together.
To geocode to either Canadian or U.S. addresses, the adapter reads the zip/postal code and the areaName 1 (state/province) given on calls to GeoEngMatchAddress, GeoEngMatchFormattedAddress, GeoEngBrowseSetFilter, and GeoEngFindPostalCentroid and geocode for the given country. MapMarker OCX and the MapMarker server use the adapter to translate the C function calls to the MapMarker Java API. The adapter is installed in C:\Program Files\Common Files\MapInfo\MMOCX.
The adapter’s geojni.cfg file looks like this for a typical installation:
## geojni.cfg## This file defines the jni settings and the# MapMarker Java defaults.# +jvmPath=C:\Program Files\MapInfo\MapMarker_CAN_v8\jre\bin\client\jvm.dll+numVmOptions=4
-Djava.class.path=C:\Program Files\MapInfo\MapMarker_CAN_v8\sdk\engine\lib\client;C:\Program Files\MapInfo\MapMarker_CAN_v8\sdk\engine\lib\common\commons-logging.jar;C:\Program Files\MapInfo\MapMarker_CAN_v8\sdk\engine\lib\common\jdom.jar;C:\Program Files\MapInfo\MapMarker_CAN_v8\sdk\engine\lib\common\micsys.jar;C:\Program Files\MapInfo\MapMarker_CAN_v8\sdk\engine\lib\common\mijts.jar;C:\Program Files\MapInfo\MapMarker_CAN_v8\sdk\engine\lib\common\miutil.jar;C:\Program Files\MapInfo\MapMarker_CAN_v8\sdk\engine\lib\common\mxjgeom.jar;C:\Program Files\MapInfo\MapMarker_CAN_v8\sdk\engine\lib\common\xercesImpl.jar;C:\Program Files\MapInfo\MapMarker_CAN_v8\sdk\engine\lib\common\xmlParserAPIs.jar;C:\;C:\Program Files\MapInfo\MapMarker_CAN_v8\sdk\engine\lib\client\mmjclient.jar;C:\Program Files\MapInfo\MapMarker_CAN_v8\sdk\engine\lib\server\mmj.jar;C:\Program Files\MapInfo\MapMarker_CAN_v8\sdk\engine\lib\server\mmjjni.jar;C:\Program Files\MapInfo\MapMarker_CAN_v8\sdk\engine\lib\server\mmjserver.jar;C:\Program Files\MapInfo\MapMarker_CAN_v8\sdk\engine\lib\server\miscp.jar;C:\Program Files\MapInfo\MapMarker_CAN_v8\sdk\engine\lib\client\mmjclient_can.jar;C:\Program Files\MapInfo\MapMarker_CAN_v8\sdk\engine\lib\server\mmj_can.jar;C:\Program Files\MapInfo\MapMarker_CAN_v8\sdk\engine\lib\server\mmjjni_can.jar;
-Xms128m-Xmx256m-Xmn40m
48 MapMarker Plus Canada 8

Chapter 4: Client/Server Geocoding
+jvmVersion=0x00010004+country=CAN
## NAD 83+clientCRS=epsg:4269## NAD 27+altClientCRS=epsg:4267
To geocode to both Canadian and U.S. addresses, you must make the following changes to the geojni.cfg file:
• Comment out the country line (using a ‘#’) • Include in the classpath all the directories and jar files needed to access the USA engine and
other classes. The USA jar files:
• mmj_usa.jar
• mmjclient_usa.jar
• mmjjni_usa.jar• Increase the maximum amount of memory to 512MB.
The following is an example of the modified geojni.cfg file:
## geojni.cfg## This file defines the jni settings and the# MapMarker Java defaults.# +jvmPath=C:\Program Files\MapInfo\MapMarker_CAN_v8\jre\bin\server\jvm.dll +numVmOptions=5-Djava.class.path=C:\Program Files\MapInfo\MapMarker_CAN_v8\Desktop\;C:\Program Files\MapInfo\MapMarker\MapMarker_USA\;C:\Program Files\MapInfo\MapMarker\MapMarker_USA\mmj_usa.jar;C:\Program Files\MapInfo\MapMarker\MapMarker_USA\mmjjni_usa.jar;C:\Program Files\MapInfo\MapMarker\MapMarker_USA\mmjclient_usa.jar;C:\Program Files\MapInfo\MapMarker_CAN_v8\Desktop\mmjclient.jar;C:\Program Files\MapInfo\MapMarker_CAN_v8\Desktop\mmjserver.jar;C:\Program Files\MapInfo\MapMarker_CAN_v8\Desktop\mmj.jar;C:\Program Files\MapInfo\MapMarker_CAN_v8\Desktop\miutil.jar;C:\Program Files\MapInfo\MapMarker_CAN_v8\Desktop\micsys.jar;C:\Program Files\MapInfo\MapMarker_CAN_v8\Desktop\mmj_can.jar;C:\Program Files\MapInfo\MapMarker_CAN_v8\Desktop\mmjclient_can.jar;C:\Program Files\MapInfo\MapMarker_CAN_v8\Desktop\miscp.jar;C:\Program Files\MapInfo\MapMarker_CAN_v8\Desktop\mmjjni.jar;C:\Program Files\MapInfo\MapMarker_CAN_v8\Desktop\commons-logging.jar;C:\Program Files\MapInfo\MapMarker_CAN_v8\Desktop\mxjgeom.jar;C:\Program Files\MapInfo\MapMarker_CAN_v8\Desktop\mijts.jar;C:\Program Files\MapInfo\MapMarker_CAN_v8\Desktop\jdom.jar-server-Xms128m-Xmx512m-Xmn40m
Developer Guide 49
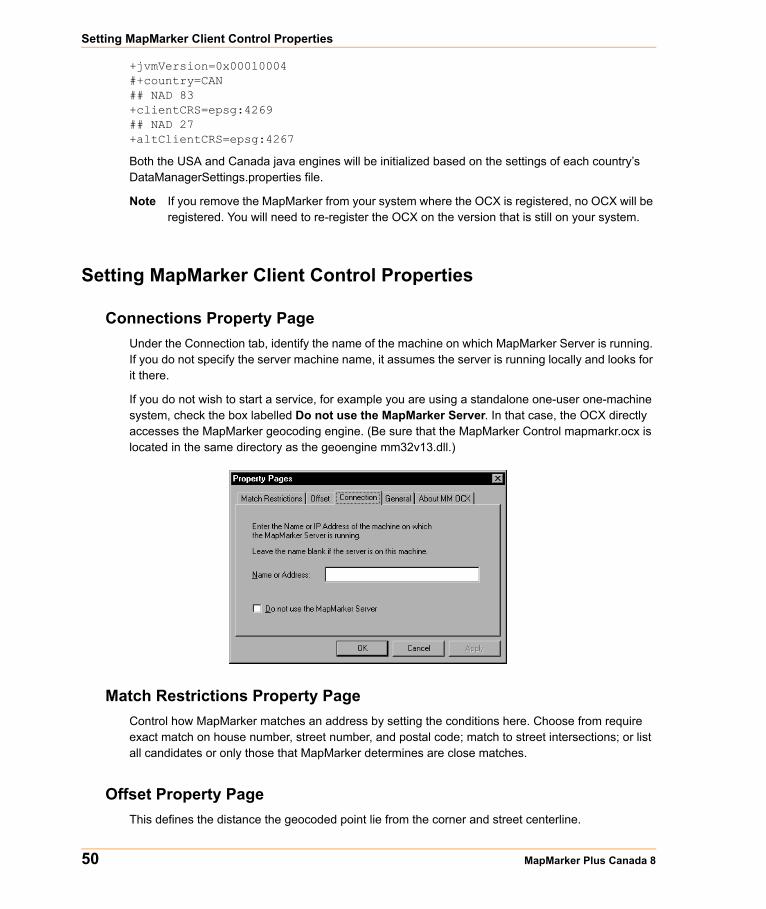
Setting MapMarker Client Control Properties
+jvmVersion=0x00010004#+country=CAN## NAD 83+clientCRS=epsg:4269## NAD 27+altClientCRS=epsg:4267
Both the USA and Canada java engines will be initialized based on the settings of each country’s DataManagerSettings.properties file.
Note If you remove the MapMarker from your system where the OCX is registered, no OCX will be registered. You will need to re-register the OCX on the version that is still on your system.
Setting MapMarker Client Control Properties
Connections Property PageUnder the Connection tab, identify the name of the machine on which MapMarker Server is running. If you do not specify the server machine name, it assumes the server is running locally and looks for it there.
If you do not wish to start a service, for example you are using a standalone one-user one-machine system, check the box labelled Do not use the MapMarker Server. In that case, the OCX directly accesses the MapMarker geocoding engine. (Be sure that the MapMarker Control mapmarkr.ocx is located in the same directory as the geoengine mm32v13.dll.)
Match Restrictions Property PageControl how MapMarker matches an address by setting the conditions here. Choose from require exact match on house number, street number, and postal code; match to street intersections; or list all candidates or only those that MapMarker determines are close matches.
Offset Property PageThis defines the distance the geocoded point lie from the corner and street centerline.
50 MapMarker Plus Canada 8

Chapter 4: Client/Server Geocoding
General Property PageYou can specify an address to geocode at design time by supplying it in this property page.
About MM OCX PageThis page identifies the version of the OCX and provides Pitney Bowes MapInfo contact information.
Geocoding via MapMarker Geocoder ControlWhen a user runs the executable, they send a request to MapMarker Server to geocode an address. The Server returns zero or one match candidate. Each candidate contains the firm, address, match precision (e.g., street level or postal add-on centroid match), latitude/longitude coordinates, and Census Block ID. The status line in the interface explains the type of match:
Bad Input Address ErrorBad Input Address error messages are generated in the status information field of the OCX if mistakes are made entering the input data. The following description shows the possible causes and indicates at which level they occur.
At the OCX level an error occurs if the city or state is misspelled or if the address field is empty. To avoid this situation, supply the address with the correct city and province information.
MapMarker Geocoder Control Events and MethodsWhen you use the supplied MapMarker Geocoder Control interface, certain events and methods from the OLE Automation API are called. They are included here as a summary. The full discussion of the OLE Automation API is found in OLE Automation API in Chapter 5 on page 55.
If the Server returns... the Status line displays...
SINGLE_MATCH Single close match
NO_CANDIDATES No candidates found
SINGLE_INTERSECT_MATCH Single intersection match
GEO_ENG_BAD_INPUT_ADDRESS Bad Input Address
Developer Guide 51

MapMarker Geocoder Control Events and Methods
Event Purpose
LatLongChanged() This event is triggered when the Geocode button is pressed, the DoGeocode() method is called, or when a different candidate is selected in the Match Candidates list box. This event updates the latitude, longitude, and precision properties.
GeocodeEvent() This event is triggered when the Geocode button is pressed and the whole geocoding process is completed.
Note: The DoGeocode() method does not trigger this event.
Method Purpose
ClearDialogText() Clears all visible text in the dialog box, as well as these properties: firm, street, city, state, postal codes, lastErrorCode, longitude, latitude, and precision
RefreshDialog() Tells the dialog box to repaint. MapMarker Client Control usually repaints automatically and you do not need to call it.
DoGeocode() This method is the same as using the Geocode button. It implies that you must initialize these properties: firm, street, city, state, postal codes, serverName.
GetCandidateAt() Returns the line of text in the Match Candidate list box.
GetCandidateFirmAt() Returns the firm portion of the address as a string.
GetCandidateStreetAt() Returns the street portion of the address as a string.
GetCandidateCityAt() Returns the city portion of the address as a string.
GetCandidateStateAt() Returns the state portion of the address as a string.
GetCandidateZIPAt() Returns the FSA portion of the address as a string.
GetCandidatePlus4At() Returns the LDU portion of the address as a string.
GetCandidatePrecisionAt() Returns the precision for the match as a string. Precision refers to the quality of the match: to street level, shape path, intersection, or postal code centroid.
GetCandidateLongitudeAt() Returns the longitude as a double.
GetCandidateLatitudeAt() Returns the latitude as a double.
GetCandidateCensusBlockIDAt() Returns the Enumeration area as a string.
DoSetProperties() Brings up a set of property pages for the Client Control.
52 MapMarker Plus Canada 8
Chapter 4: Client/Server Geocoding
Client/Server Geocoding and the InternetThe MapMarker Client/Server toolkit is an excellent way to create geocoding applications via the Internet. The most common configuration for use of the toolkit and a web server is to create a Common Gateway Interface (CGI) program that uses the MapMarker Geocoder Control. The MapMarker client then calls the MapMarker Server. As your web server gets geocoding requests it executes the CGI program for each request. The MapMarker Server gets the requests via the MapMarker Geocoder Control, queues them, and then serves each one in turn.
SelectCandidateAt() Highlights the candidate in the Match Candidate List box, if one exists.
GetName() Returns the application name.
GetFullName() Returns the full name and path of the application.
GeocodeCheckDbAvailability() Returns a number representing the type of database(s) available for geocoding.
GeocodeGetServerVersion() Returns the server version number.
GeocodeGetStatesLicensed() Returns a list of provinces found in the Address Dictionary.
GeocodeGetStatesFound() Returns a list of provinces found in the Address Dictionary.
Method Purpose
Developer Guide 53
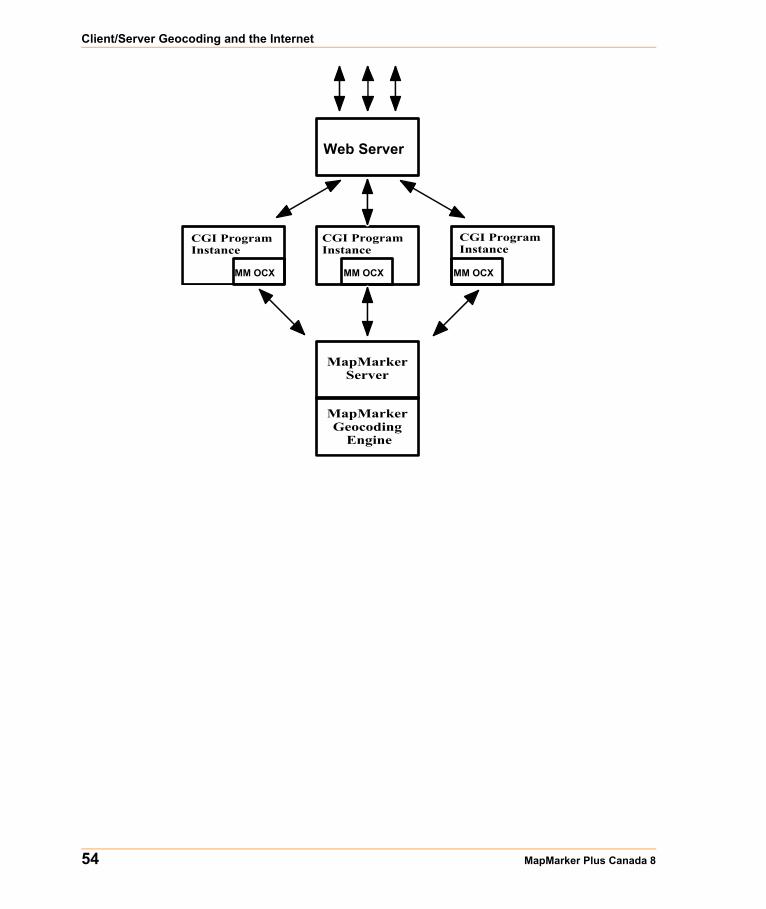
Client/Server Geocoding and the Internet
MapMarkerGeocoding
Engine
MM OCX
Web Server
MM OCX MM OCX
MapMarkerServer
CGI Program Instance
CGI Program Instance
CGI Program Instance
54 MapMarker Plus Canada 8

5
OLE Automation APIUse the OLE Automation API to build your own geocoding control for your client application instead of using the program-ready MapMarker Geocoder Control (OCX). This gives you more flexibility to build applications to suit your needs.
In this section:
MapMarker Plus Canada Notes on OLE Automation . . . . . . . . . .56Creating a Custom Geocoding Control . . . . . . . . . . . . . . . . . . . . .56VBScript Methods . . . . . . . . . . . . . . . . . . . . . . . . . . . . . . . . . . . . . .57Geocoder Control Properties, Events, and Methods . . . . . . . . . .57OLE Automation Methods . . . . . . . . . . . . . . . . . . . . . . . . . . . . . . . .65OLE Automation Objects. . . . . . . . . . . . . . . . . . . . . . . . . . . . . . . . .88
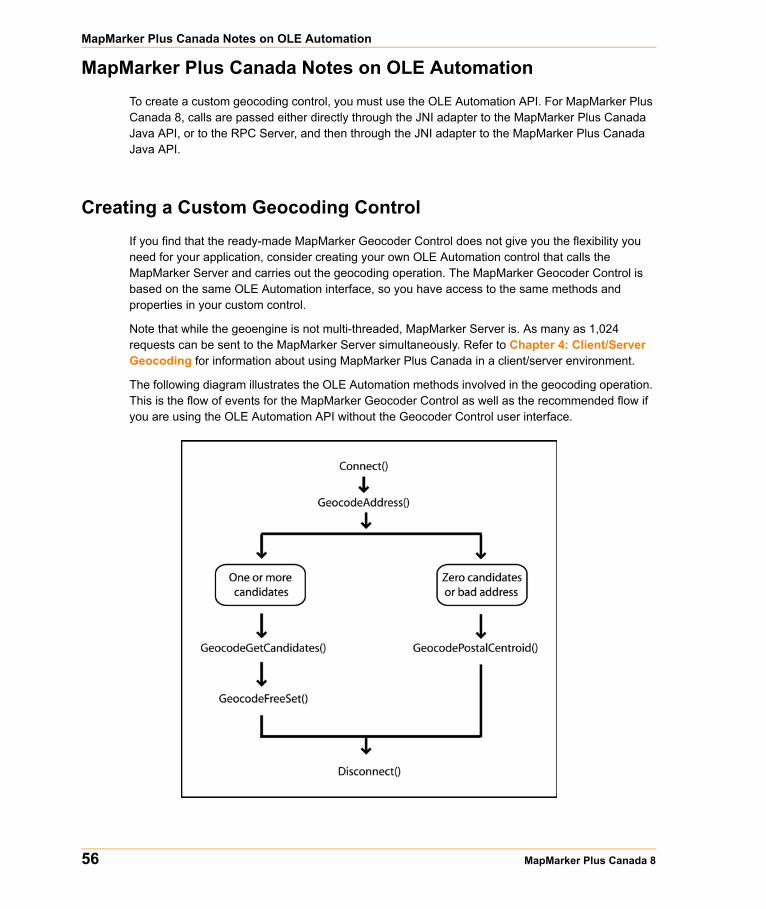
MapMarker Plus Canada Notes on OLE Automation
MapMarker Plus Canada Notes on OLE AutomationTo create a custom geocoding control, you must use the OLE Automation API. For MapMarker Plus Canada 8, calls are passed either directly through the JNI adapter to the MapMarker Plus Canada Java API, or to the RPC Server, and then through the JNI adapter to the MapMarker Plus Canada Java API.
Creating a Custom Geocoding ControlIf you find that the ready-made MapMarker Geocoder Control does not give you the flexibility you need for your application, consider creating your own OLE Automation control that calls the MapMarker Server and carries out the geocoding operation. The MapMarker Geocoder Control is based on the same OLE Automation interface, so you have access to the same methods and properties in your custom control.
Note that while the geoengine is not multi-threaded, MapMarker Server is. As many as 1,024 requests can be sent to the MapMarker Server simultaneously. Refer to Chapter 4: Client/Server Geocoding for information about using MapMarker Plus Canada in a client/server environment.
The following diagram illustrates the OLE Automation methods involved in the geocoding operation. This is the flow of events for the MapMarker Geocoder Control as well as the recommended flow if you are using the OLE Automation API without the Geocoder Control user interface.
56 MapMarker Plus Canada 8
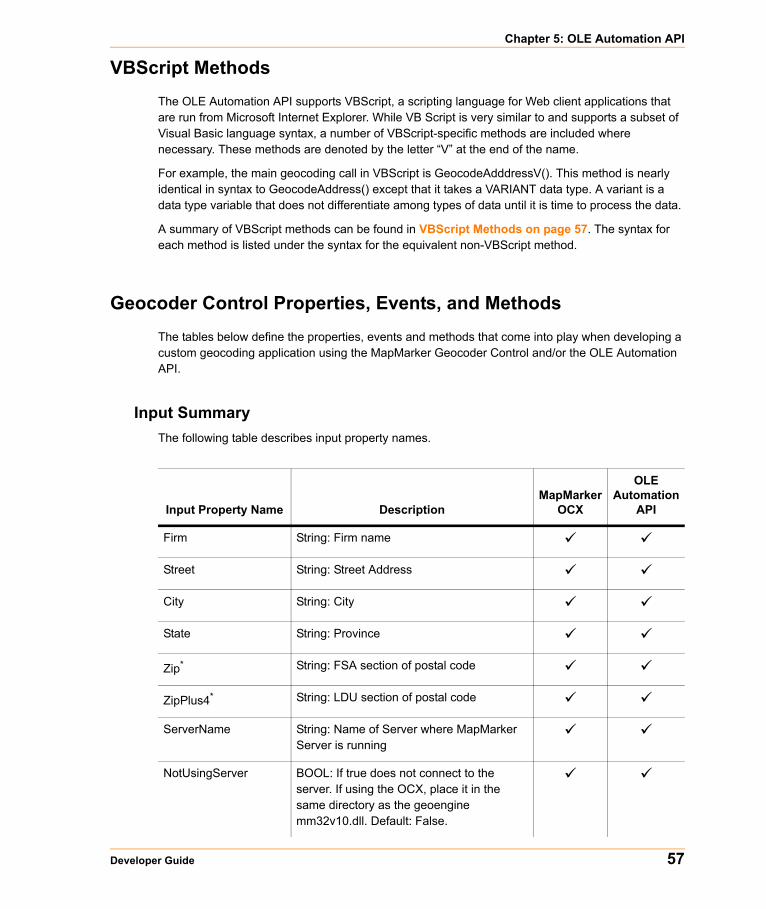
Chapter 5: OLE Automation API
VBScript MethodsThe OLE Automation API supports VBScript, a scripting language for Web client applications that are run from Microsoft Internet Explorer. While VB Script is very similar to and supports a subset of Visual Basic language syntax, a number of VBScript-specific methods are included where necessary. These methods are denoted by the letter “V” at the end of the name.
For example, the main geocoding call in VBScript is GeocodeAdddressV(). This method is nearly identical in syntax to GeocodeAddress() except that it takes a VARIANT data type. A variant is a data type variable that does not differentiate among types of data until it is time to process the data.
A summary of VBScript methods can be found in VBScript Methods on page 57. The syntax for each method is listed under the syntax for the equivalent non-VBScript method.
Geocoder Control Properties, Events, and MethodsThe tables below define the properties, events and methods that come into play when developing a custom geocoding application using the MapMarker Geocoder Control and/or the OLE Automation API.
Input SummaryThe following table describes input property names.
Input Property Name DescriptionMapMarker
OCX
OLEAutomation
API
Firm String: Firm name
Street String: Street Address
City String: City
State String: Province
Zip* String: FSA section of postal code
ZipPlus4* String: LDU section of postal code
ServerName String: Name of Server where MapMarker Server is running
NotUsingServer BOOL: If true does not connect to the server. If using the OCX, place it in the same directory as the geoengine mm32v10.dll. Default: False.
Developer Guide 57

Geocoder Control Properties, Events, and Methods
ExactHouse If TRUE, exact match on house number is required. Default: True.
ExactName If TRUE, exact match on street name is required. Default: False.
ExactZIP* If TRUE, exact match on postal code is required. Default: False.
ExpandSearch If TRUE, MapMarker expands the search area in which it looks for match candidates. Default: False. (Not implemented for MapMarker.)
ExpandSearchInState* If TRUE, the expanded search area is limited to the province. Default: False. (Not implemented for MapMarker.)
ExpandDistance If ExpandSearch is set to TRUE, this specifies the radius of the search in miles from the finance area centroid. Default: 0. (Not implemented for MapMarker.)
MatchIntersections If TRUE, street intersection matching is attempted. Default: False.
LinearOffset Double: defines the position of the geocoded point with respect to the corner. Default: 25.
PerpendicularSetback Double: defines the position of the geocoded point with respect to the centerline of the street as a percentage. Default: 2%
Units Integer: the units used in LinearOffset and PerpendicularSetback. Default: 0.
ShowPropertiesButton If TRUE, the Show Properties button is visible. Default: True.
ShowBorder If TRUE, the border around the control’s interface is visible. Default: True.
* Please substitute Canadian terminology when using this function.
Input Property Name DescriptionMapMarker
OCX
OLEAutomation
API
58 MapMarker Plus Canada 8

Chapter 5: OLE Automation API
Output SummaryThe following table describes output properties.
Output Property Name Description
MapMarkerOCX
OLEAutomation
API
Firm String: Firm name
Street String: Street Address
City String: City
State String: Province
Zip* String: postal code (FSA)
ZipPlus4* String: postal code (LDU)
Latitude Double: the latitude value for a match candidate.
Longitude Double: the longitude values for a match candidate.
Precision Integer: a number that identifies match precision (street level, shape path, intersection or postal code centroid).
NumCandidates Integer: the number of match candidates for the record. This is a maximum of one.
BCloseCandidates BOOL: If TRUE, shows close matches only; if FALSE shows all possible matches. Set this property on the Match Restrictions tab of the Property Pages dialog box. As MapMarker Plus Canada only returns a maximum of 1 candidate, either of these options yield the same results. Default: False.
StringBinding String: RPC binding string used to connect to the server.
LastErrorCode Long: last error code.
CensusBlockID* String: Dissemination Area tabulation number.
Developer Guide 59
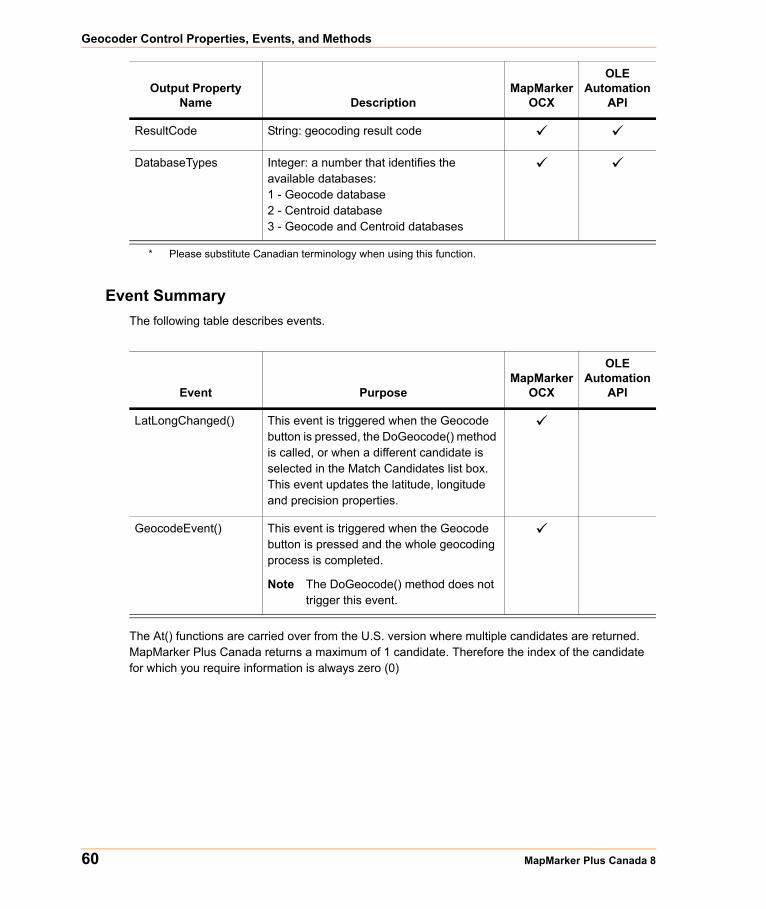
Geocoder Control Properties, Events, and Methods
Event SummaryThe following table describes events.
The At() functions are carried over from the U.S. version where multiple candidates are returned. MapMarker Plus Canada returns a maximum of 1 candidate. Therefore the index of the candidate for which you require information is always zero (0)
ResultCode String: geocoding result code
DatabaseTypes Integer: a number that identifies the available databases:1 - Geocode database2 - Centroid database3 - Geocode and Centroid databases
* Please substitute Canadian terminology when using this function.
Output Property Name Description
MapMarkerOCX
OLEAutomation
API
Event PurposeMapMarker
OCX
OLE Automation
API
LatLongChanged() This event is triggered when the Geocode button is pressed, the DoGeocode() method is called, or when a different candidate is selected in the Match Candidates list box. This event updates the latitude, longitude and precision properties.
GeocodeEvent() This event is triggered when the Geocode button is pressed and the whole geocoding process is completed.
Note The DoGeocode() method does not trigger this event.
60 MapMarker Plus Canada 8
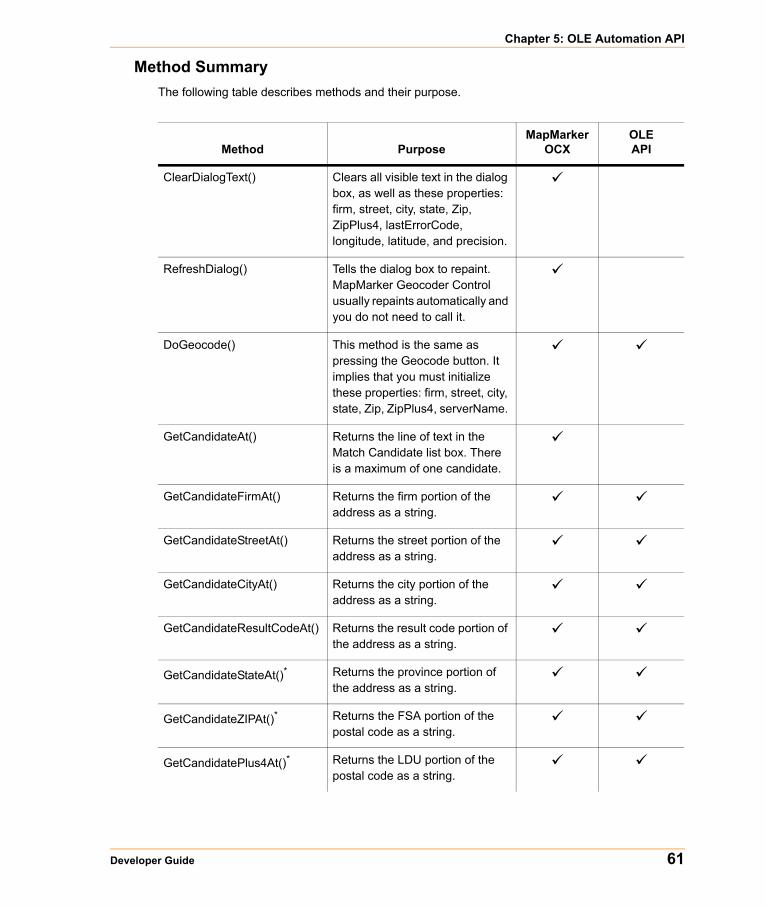
Chapter 5: OLE Automation API
Method SummaryThe following table describes methods and their purpose.
Method PurposeMapMarker
OCXOLE API
ClearDialogText() Clears all visible text in the dialog box, as well as these properties: firm, street, city, state, Zip, ZipPlus4, lastErrorCode, longitude, latitude, and precision.
RefreshDialog() Tells the dialog box to repaint. MapMarker Geocoder Control usually repaints automatically and you do not need to call it.
DoGeocode() This method is the same as pressing the Geocode button. It implies that you must initialize these properties: firm, street, city, state, Zip, ZipPlus4, serverName.
GetCandidateAt() Returns the line of text in the Match Candidate list box. There is a maximum of one candidate.
GetCandidateFirmAt() Returns the firm portion of the address as a string.
GetCandidateStreetAt() Returns the street portion of the address as a string.
GetCandidateCityAt() Returns the city portion of the address as a string.
GetCandidateResultCodeAt() Returns the result code portion of the address as a string.
GetCandidateStateAt()* Returns the province portion of the address as a string.
GetCandidateZIPAt()* Returns the FSA portion of the postal code as a string.
GetCandidatePlus4At()* Returns the LDU portion of the postal code as a string.
Developer Guide 61
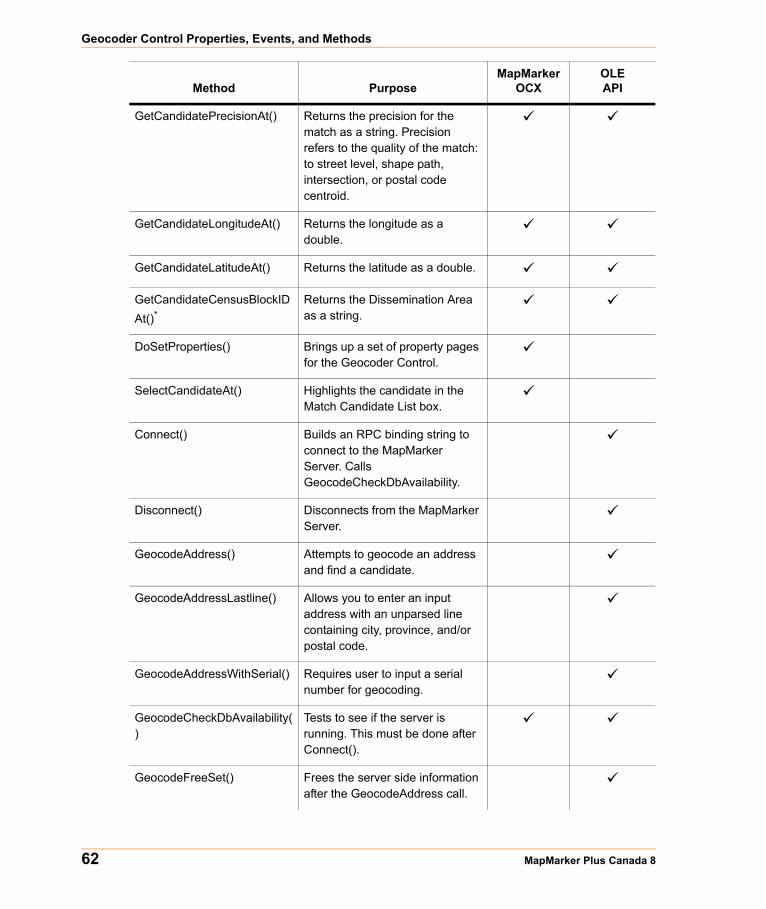
Geocoder Control Properties, Events, and Methods
GetCandidatePrecisionAt() Returns the precision for the match as a string. Precision refers to the quality of the match: to street level, shape path, intersection, or postal code centroid.
GetCandidateLongitudeAt() Returns the longitude as a double.
GetCandidateLatitudeAt() Returns the latitude as a double.
GetCandidateCensusBlockIDAt()*
Returns the Dissemination Area as a string.
DoSetProperties() Brings up a set of property pages for the Geocoder Control.
SelectCandidateAt() Highlights the candidate in the Match Candidate List box.
Connect() Builds an RPC binding string to connect to the MapMarker Server. Calls GeocodeCheckDbAvailability.
Disconnect() Disconnects from the MapMarker Server.
GeocodeAddress() Attempts to geocode an address and find a candidate.
GeocodeAddressLastline() Allows you to enter an input address with an unparsed line containing city, province, and/or postal code.
GeocodeAddressWithSerial() Requires user to input a serial number for geocoding.
GeocodeCheckDbAvailability()
Tests to see if the server is running. This must be done after Connect().
GeocodeFreeSet() Frees the server side information after the GeocodeAddress call.
Method PurposeMapMarker
OCXOLE API
62 MapMarker Plus Canada 8

Chapter 5: OLE Automation API
VBScript Methods SummaryThe following methods are for use with VBScript. These methods are variants of the At() methods described in the previous section. The AtV() functions are carried over from the U.S. version where multiple candidates are returned.
GeocodeGetServerVersion() Returns the server version number.
GeocodeGetStatesFound()* Returns a list of 2-character province abbreviations representing provinces found in the Address Dictionary.
GeocodeGetStatesLicensed()*†
Returns a list of 2-character province abbreviations representing provinces found in the Address Dictionary.
GeocodeGetCandidates() Gets the candidate information from the GeocodeAddress call.
GeocodePostalCentroid() Gets a postal code centroid.(FSA)
GeocodePostalCentroidWithSerial()‡
Requires a serial number for postal code geocoding.
GetName() Returns the application name.
GetFullName() Returns the full name and path of the application.
GetVersionNum() Returns the version number of the application.
* Please substitute Canadian terminology when using this function.† MapMarker Plus Canada data is sold via license by individual provinces or by the entire country. ‡ This function is not available in this version of MapMarker Plus Canada.
Method PurposeMapMarker
OCXOLE API
Developer Guide 63

Geocoder Control Properties, Events, and Methods
Method PurposeMapMarker
OCX OLE API
GetCandidateFirmAtV() Returns the firm portion of the address as a string.
GetCandidateStreetAtV() Returns the street portion of the address as a string.
GetCandidateCityAtV() Returns the city portion of the address as a string.
GetCandidateResultCodeAtV() Returns the result code portion of the address as a string.
GetCandidateStateAtV()* Returns the province portion of the address as a string.
GetCandidateZIPAtV()* Returns the FSA part of the postal code as a string.
GetCandidatePlus4AtV()* Returns the LDU part of the postal code as a string.
GetCandidatePrecisionAtV() Returns the precision for the match as a string. Precision refers to the quality of the match: to street level, shape path, intersection, or postal centroid.
GetCandidateLongitudeAtV() Returns the longitude as a double.
GetCandidateLatitudeAtV() Returns the latitude as a double.
GetCandidateCensusBlockIDAtV() Returns the Dissemination Area as a string.
GeocodeAddressV() Attempts to geocode an address and build a list of candidates. When used with the optional pSerialNumber, this method acts like GeocodeAdddressWithSerial.
64 MapMarker Plus Canada 8
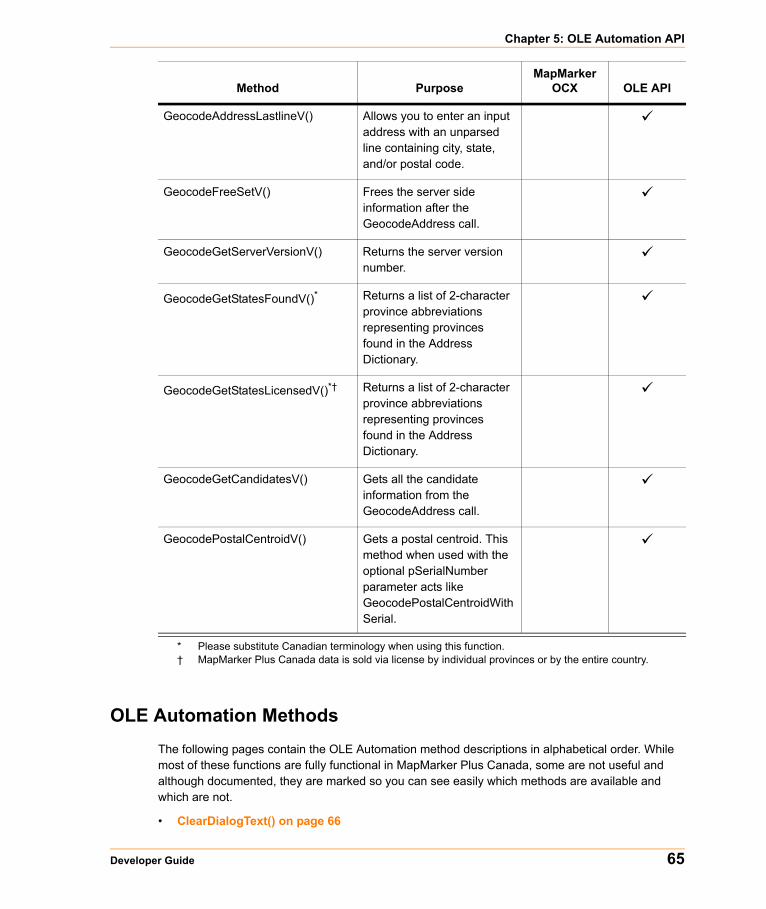
Chapter 5: OLE Automation API
OLE Automation MethodsThe following pages contain the OLE Automation method descriptions in alphabetical order. While most of these functions are fully functional in MapMarker Plus Canada, some are not useful and although documented, they are marked so you can see easily which methods are available and which are not.
• ClearDialogText() on page 66
GeocodeAddressLastlineV() Allows you to enter an input address with an unparsed line containing city, state, and/or postal code.
GeocodeFreeSetV() Frees the server side information after the GeocodeAddress call.
GeocodeGetServerVersionV() Returns the server version number.
GeocodeGetStatesFoundV()* Returns a list of 2-character province abbreviations representing provinces found in the Address Dictionary.
GeocodeGetStatesLicensedV()*† Returns a list of 2-character province abbreviations representing provinces found in the Address Dictionary.
GeocodeGetCandidatesV() Gets all the candidate information from the GeocodeAddress call.
GeocodePostalCentroidV() Gets a postal centroid. This method when used with the optional pSerialNumber parameter acts like GeocodePostalCentroidWithSerial.
* Please substitute Canadian terminology when using this function.† MapMarker Plus Canada data is sold via license by individual provinces or by the entire country.
Method PurposeMapMarker
OCX OLE API
Developer Guide 65

ClearDialogText()
• Connect() on page 67• Disconnect() on page 68• DoGeocode() on page 68• DoSetProperties() on page 68• GeocodeAddress() on page 68• GeocodeAddressWithSerial() on page 71• GeocodeAddressLastline() on page 73• GeocodeCheckDbAvailability() on page 74• GeocodeFreeSet() on page 75• GeocodeGetCandidates() on page 75• GeocodeGetServerVersion() on page 76• GeocodeGetStatesFound() on page 77• GeocodeGetStatesLicensed() on page 77• GeocodePostalCentroid() on page 78• GeocodePostalCentroidWithSerial() on page 79• GetCandidateAt() on page 80• GetCandidateCensusBlockIDAt() on page 81• GetCandidateCityAt() on page 82• GetCandidateFirmAt() on page 82• GetCandidateLatitudeAt() on page 83• GetCandidateLongitudeAt() on page 83• GetCandidatePlus4At() on page 84• GetCandidatePrecisionAt() on page 84• GetCandidateResultCodeAt() on page 85• GetCandidateStateAt() on page 86• GetCandidateStreetAt() on page 86• GetCandidateZIPAt() on page 87• GetFullName() on page 87• GetName() on page 87• RefreshDialog() on page 88• SelectCandidateAt() on page 88
ClearDialogText()
Purpose
This call clears all visible text in the MapMarker Geocoder Control’s interface. It also clears the Firm, Street, City, State, Zip, ZipPlus4, LastErrorCode, Latitude, Longitude, Precision, and NumCandidates properties. It also generates the LatLongChanged event.
Syntax
ClearDialogText()
66 MapMarker Plus Canada 8

Chapter 5: OLE Automation API
Connect()
Purpose
This call builds an RPC binding string to connect to the MapMarker Server and checks the type(s) of databases that are available for geocoding.
It attempts to connect to the MapMarker RPC server. If the server is NULL or is a local server, it attempts to establish a connection using LRPC. Otherwise it uses TCP/IP and dynamic endpoint binding to attempt a connection.
Syntax
Connect(NetworkAddress As String) As Boolean
Parameters
Returns
TRUE if successful, FALSE if not. The GetLastErrorCode property can be used to determine what error occurred.
Parameter Description
Network Address String: Identifies the name or IP Address of the machine on which MapMarker Server is running. NULL or an empty string assumes MapMarker Server is running locally, and attempts to use local RPC.
Value Description
GEO_ENG_BAD_PARAM_ERR NULL input parameter or invalid parameter values.
GEO_ENG_CORRUPTED_ERR Memory overwrite detected.
GEO_ENG_DATABASE_ACCESS_ERR Error accessing the Address Dictionary.
GEO_ENG_MISSING_DATABASE_ERR Address Dictionary file(s) not found.
GEO_ENG_ZIP_MASTER_ FILE_NOT_FOUND_ERR
Zipmastr.cdb or Zipmastr.jdx not found.
GEO_ENG_INVALID_ SERIAL_NUMBER Invalid serial number.
GEO_ENG_PARSE_INIT_ERR Parsing file (geo_usa.*) missing or bad.
GEO_ENG_MATCH_INIT_ERR Matching file (geo_usa.*) missing or bad.
GEO_ENG_NADCON_MISSING_FILE *.las/*.los files not found.
Developer Guide 67
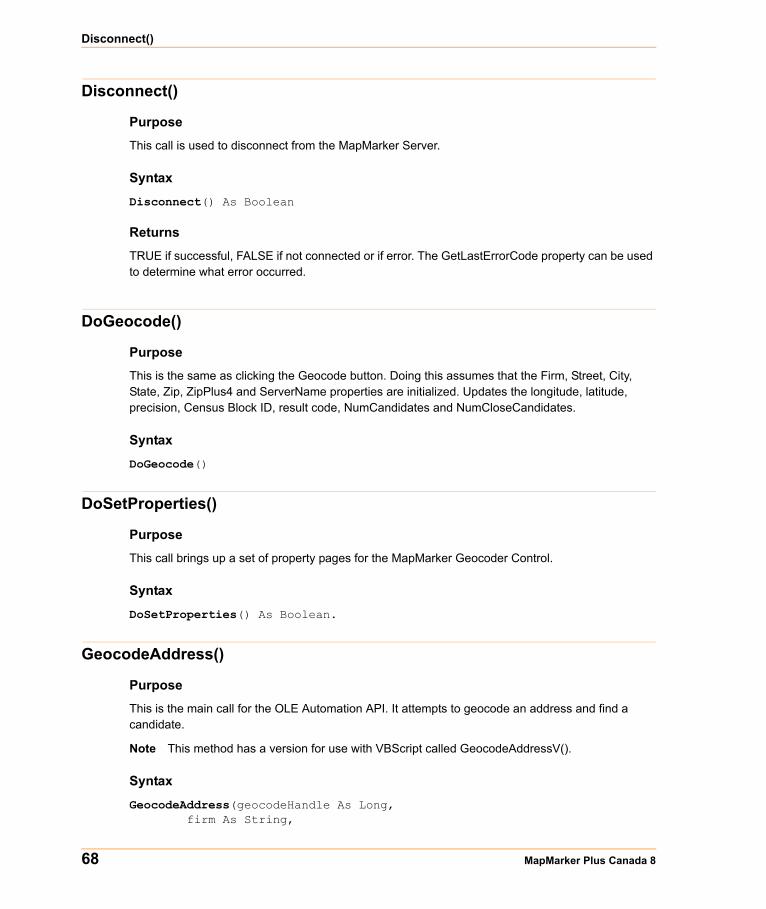
Disconnect()
Disconnect()
Purpose
This call is used to disconnect from the MapMarker Server.
Syntax
Disconnect() As Boolean
Returns
TRUE if successful, FALSE if not connected or if error. The GetLastErrorCode property can be used to determine what error occurred.
DoGeocode()
Purpose
This is the same as clicking the Geocode button. Doing this assumes that the Firm, Street, City, State, Zip, ZipPlus4 and ServerName properties are initialized. Updates the longitude, latitude, precision, Census Block ID, result code, NumCandidates and NumCloseCandidates.
Syntax
DoGeocode()
DoSetProperties()
Purpose
This call brings up a set of property pages for the MapMarker Geocoder Control.
Syntax
DoSetProperties() As Boolean.
GeocodeAddress()
Purpose
This is the main call for the OLE Automation API. It attempts to geocode an address and find a candidate.
Note This method has a version for use with VBScript called GeocodeAddressV().
Syntax
GeocodeAddress(geocodeHandle As Long,firm As String,
68 MapMarker Plus Canada 8
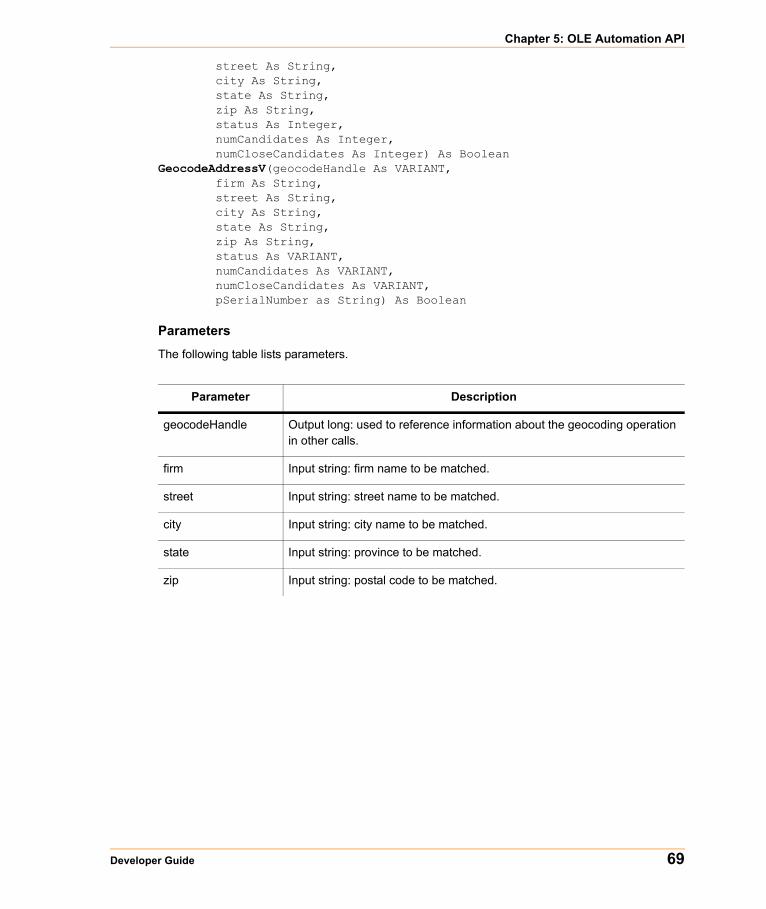
Chapter 5: OLE Automation API
street As String,city As String,state As String,zip As String,status As Integer,numCandidates As Integer,numCloseCandidates As Integer) As Boolean
GeocodeAddressV(geocodeHandle As VARIANT,firm As String,street As String,city As String,state As String,zip As String,status As VARIANT,numCandidates As VARIANT,numCloseCandidates As VARIANT,pSerialNumber as String) As Boolean
Parameters
The following table lists parameters.
Parameter Description
geocodeHandle Output long: used to reference information about the geocoding operation in other calls.
firm Input string: firm name to be matched.
street Input string: street name to be matched.
city Input string: city name to be matched.
state Input string: province to be matched.
zip Input string: postal code to be matched.
Developer Guide 69

GeocodeAddress()
Returns
TRUE if successful, FALSE if not. The GetLastErrorCode property can be used to determine what error occurred. Some common error codes include:
Usage Example
The following is a simplified version of a Visual Basic function for geocoding. UI handling, error handling and other details of coding are removed in order to show the processing flow more clearly.
Private Sub cmdGeocode_Click()Dim retVal As BooleanDim retCode
status Output integer: one of the following:
• (0) SINGLE_MATCH – a single close match was found for the input address.
• (1) MULTIPLE_MATCH – multiple match candidates were found and MapMarker could not choose between at least two of them.
• (2) NO_MATCHES – candidates found, but none considered a close match.
• (3) NO_CANDIDATES – no candidates found for the input address.• (4) SINGLE_INTERSECT_MATCH – an intersection match was found.• (5) MULTIPLE_INTERSECT_MATCH – more than one intersection
candidate was found.• (6) NO_INTERSECT_MATCHES – no close intersection candidates
found.• (7) NO_INTERSECT_CANDIDATES – no intersection candidates
found.• (8) POSSIBLE_INTERSECTION – possible close intersection match
found.
numCandidates Output integer: total number of candidates found. This is a maximum of 1.
numCloseCandidates Output integer: number of close candidates. This is always be blank.
pSerialNumber Input string: serial number required by server. Optional parameter. Causes the method to act like GeocodeAddressWithSerial.
Parameter Description
Error Description
Server not running error code
GEO_ENG_BAD_PARAM_ERR NULL input parameter or invalid parameter values.
GEO_ENG_MISSING_DATABASE_ERR Address Dictionary file(s) not found.
70 MapMarker Plus Canada 8
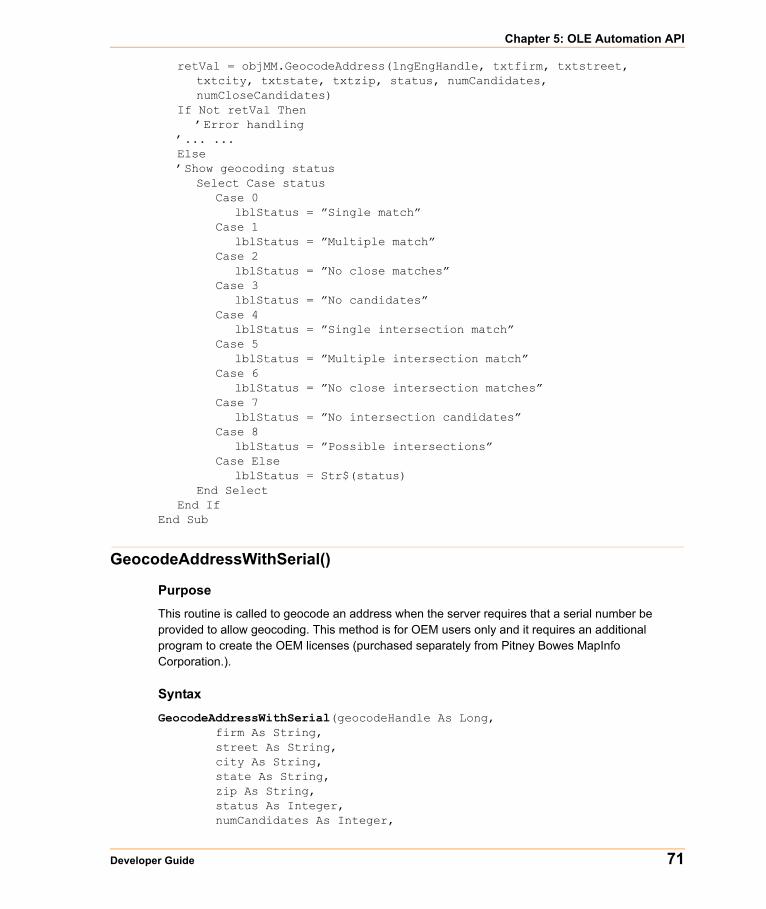
Chapter 5: OLE Automation API
retVal = objMM.GeocodeAddress(lngEngHandle, txtfirm, txtstreet,txtcity, txtstate, txtzip, status, numCandidates,numCloseCandidates)
If Not retVal Then’Error handling
’... ...Else’Show geocoding status
Select Case statusCase 0
lblStatus = ”Single match”Case 1
lblStatus = ”Multiple match”Case 2
lblStatus = ”No close matches”Case 3
lblStatus = ”No candidates”Case 4
lblStatus = ”Single intersection match”Case 5
lblStatus = ”Multiple intersection match”Case 6
lblStatus = ”No close intersection matches”Case 7
lblStatus = ”No intersection candidates”Case 8
lblStatus = ”Possible intersections”Case Else
lblStatus = Str$(status)End Select
End IfEnd Sub
GeocodeAddressWithSerial()
Purpose
This routine is called to geocode an address when the server requires that a serial number be provided to allow geocoding. This method is for OEM users only and it requires an additional program to create the OEM licenses (purchased separately from Pitney Bowes MapInfo Corporation.).
Syntax
GeocodeAddressWithSerial(geocodeHandle As Long,firm As String,street As String,city As String,state As String,zip As String,status As Integer,numCandidates As Integer,
Developer Guide 71
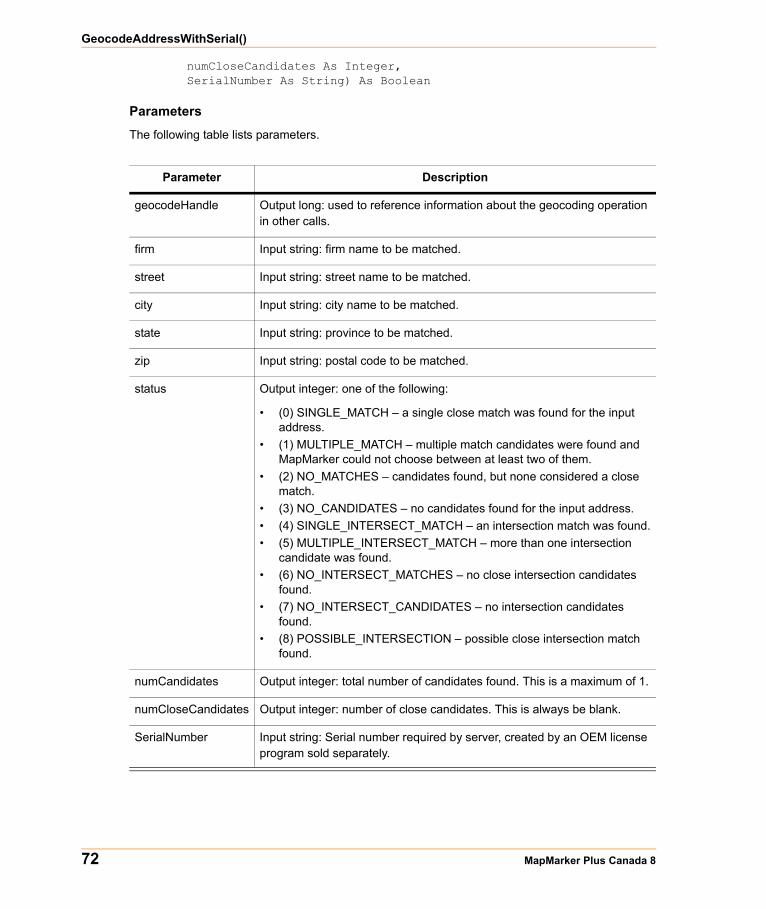
GeocodeAddressWithSerial()
numCloseCandidates As Integer,SerialNumber As String) As Boolean
Parameters
The following table lists parameters.
Parameter Description
geocodeHandle Output long: used to reference information about the geocoding operation in other calls.
firm Input string: firm name to be matched.
street Input string: street name to be matched.
city Input string: city name to be matched.
state Input string: province to be matched.
zip Input string: postal code to be matched.
status Output integer: one of the following:
• (0) SINGLE_MATCH – a single close match was found for the input address.
• (1) MULTIPLE_MATCH – multiple match candidates were found and MapMarker could not choose between at least two of them.
• (2) NO_MATCHES – candidates found, but none considered a close match.
• (3) NO_CANDIDATES – no candidates found for the input address.• (4) SINGLE_INTERSECT_MATCH – an intersection match was found.• (5) MULTIPLE_INTERSECT_MATCH – more than one intersection
candidate was found.• (6) NO_INTERSECT_MATCHES – no close intersection candidates
found.• (7) NO_INTERSECT_CANDIDATES – no intersection candidates
found.• (8) POSSIBLE_INTERSECTION – possible close intersection match
found.
numCandidates Output integer: total number of candidates found. This is a maximum of 1.
numCloseCandidates Output integer: number of close candidates. This is always be blank.
SerialNumber Input string: Serial number required by server, created by an OEM license program sold separately.
72 MapMarker Plus Canada 8
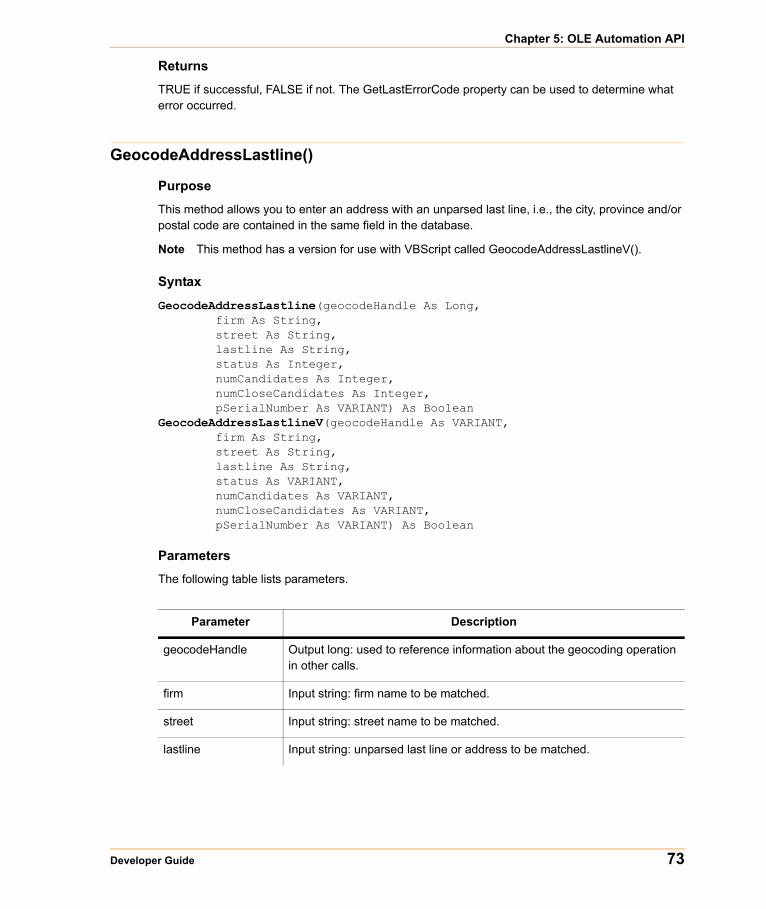
Chapter 5: OLE Automation API
Returns
TRUE if successful, FALSE if not. The GetLastErrorCode property can be used to determine what error occurred.
GeocodeAddressLastline()
Purpose
This method allows you to enter an address with an unparsed last line, i.e., the city, province and/or postal code are contained in the same field in the database.
Note This method has a version for use with VBScript called GeocodeAddressLastlineV().
Syntax
GeocodeAddressLastline(geocodeHandle As Long,firm As String,street As String,lastline As String,status As Integer,numCandidates As Integer,numCloseCandidates As Integer,pSerialNumber As VARIANT) As Boolean
GeocodeAddressLastlineV(geocodeHandle As VARIANT,firm As String,street As String,lastline As String,status As VARIANT,numCandidates As VARIANT,numCloseCandidates As VARIANT,pSerialNumber As VARIANT) As Boolean
Parameters
The following table lists parameters.
Parameter Description
geocodeHandle Output long: used to reference information about the geocoding operation in other calls.
firm Input string: firm name to be matched.
street Input string: street name to be matched.
lastline Input string: unparsed last line or address to be matched.
Developer Guide 73
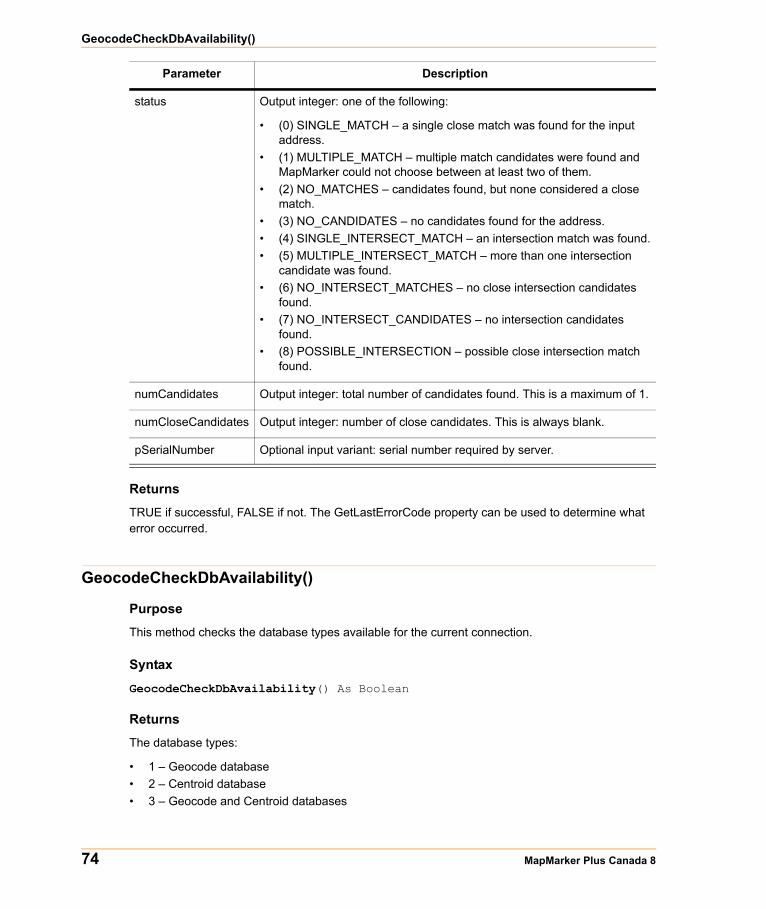
GeocodeCheckDbAvailability()
Returns
TRUE if successful, FALSE if not. The GetLastErrorCode property can be used to determine what error occurred.
GeocodeCheckDbAvailability()
Purpose
This method checks the database types available for the current connection.
Syntax
GeocodeCheckDbAvailability() As Boolean
Returns
The database types:
• 1 – Geocode database• 2 – Centroid database• 3 – Geocode and Centroid databases
status Output integer: one of the following:
• (0) SINGLE_MATCH – a single close match was found for the input address.
• (1) MULTIPLE_MATCH – multiple match candidates were found and MapMarker could not choose between at least two of them.
• (2) NO_MATCHES – candidates found, but none considered a close match.
• (3) NO_CANDIDATES – no candidates found for the address.• (4) SINGLE_INTERSECT_MATCH – an intersection match was found.• (5) MULTIPLE_INTERSECT_MATCH – more than one intersection
candidate was found.• (6) NO_INTERSECT_MATCHES – no close intersection candidates
found.• (7) NO_INTERSECT_CANDIDATES – no intersection candidates
found.• (8) POSSIBLE_INTERSECTION – possible close intersection match
found.
numCandidates Output integer: total number of candidates found. This is a maximum of 1.
numCloseCandidates Output integer: number of close candidates. This is always blank.
pSerialNumber Optional input variant: serial number required by server.
Parameter Description
74 MapMarker Plus Canada 8

Chapter 5: OLE Automation API
GeocodeFreeSet()
Purpose
This call frees all the server side information maintained after the GeocodeAddress call. The client should call this once they have finished with the address. Once the information is freed, the handle cannot be used again unless the same value is returned by a later call to GeocodeAddress.
FreeSet releases the memory structure allocated to hold the candidate list. Whenever GeocodeAddress is invoked, a memory structure is allocated, the structure is populated with a possible candidate, and a context handle to that structure is returned to the caller.
MapMarker can allocate a maximum of 1,024 of these structures. To avoid running out of memory or blocking the MapMarker Server, call GeocodeFreeSet as soon as you have finished evaluating the candidate.
Note This method has a version for use with VBScript called GeocodeFreeSetV().
Syntax
GeocodeFreeSet(geocodeHandle As Long) As BooleanGeocodeFreeSetV(geocodeHandle As VARIANT) As Boolean
Parameters
Returns
TRUE if successful, FALSE if not.
GeocodeGetCandidates()
Purpose
This call can be made to get all the candidate information from the GeocodeAddress call. This information is stored in a collection class.
Note This method has a version for use with VBScript called GeocodeGetCandidatesV().
Syntax
GeocodeGetCandidates(geocodeHandle As Long,numCandidates As Integer) As Object
GeocodeGetCandidatesV(geocodeHandle As VARIANT,numCandidates As VARIANT) As Object
Parameter Description
geocodeHandle Output long: used to reference information about the geocoding operation in other calls.
Developer Guide 75
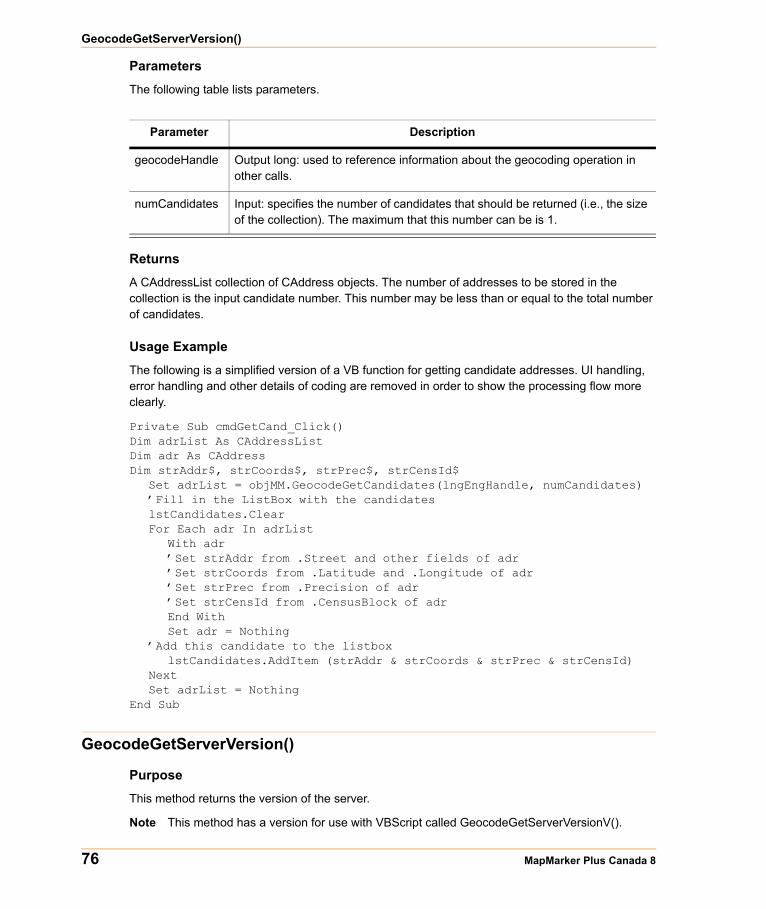
GeocodeGetServerVersion()
Parameters
The following table lists parameters.
Returns
A CAddressList collection of CAddress objects. The number of addresses to be stored in the collection is the input candidate number. This number may be less than or equal to the total number of candidates.
Usage Example
The following is a simplified version of a VB function for getting candidate addresses. UI handling, error handling and other details of coding are removed in order to show the processing flow more clearly.
Private Sub cmdGetCand_Click()Dim adrList As CAddressListDim adr As CAddressDim strAddr$, strCoords$, strPrec$, strCensId$
Set adrList = objMM.GeocodeGetCandidates(lngEngHandle, numCandidates)’Fill in the ListBox with the candidateslstCandidates.ClearFor Each adr In adrList
With adr’Set strAddr from .Street and other fields of adr’Set strCoords from .Latitude and .Longitude of adr’Set strPrec from .Precision of adr’Set strCensId from .CensusBlock of adrEnd WithSet adr = Nothing
’Add this candidate to the listboxlstCandidates.AddItem (strAddr & strCoords & strPrec & strCensId)
NextSet adrList = Nothing
End Sub
GeocodeGetServerVersion()
Purpose
This method returns the version of the server.
Note This method has a version for use with VBScript called GeocodeGetServerVersionV().
Parameter Description
geocodeHandle Output long: used to reference information about the geocoding operation in other calls.
numCandidates Input: specifies the number of candidates that should be returned (i.e., the size of the collection). The maximum that this number can be is 1.
76 MapMarker Plus Canada 8

Chapter 5: OLE Automation API
Syntax
GeocodeGetServerVersion(pVersionNum As Double) As BooleanGeocodeGetServerVersionV(VersionNum As VARIANT) As Boolean
Returns
”13.0” for MapMarker Plus Canada 9.0. This is because MapMarker Plus Canada is based on version 13.0 of MapMarker Plus U.S.
GeocodeGetStatesFound()
Purpose
This method returns a list of provinces in the Address Dictionary.
Note This method has a version for use with VBScript called GeocodeGetStatesFoundV().
Syntax
GeocodeGetStatesFound(pstateList As String) As BooleanGeocodeGetStatesFoundV(pstateList As VARIANT) As Boolean
Parameters
Returns
A list of space-separated 2-character province abbreviations.
GeocodeGetStatesLicensed()
Purpose
This method returns a list of provinces and returns the same output as GeocodeGetStates(). MapMarker Plus Canada data is sold via license, by individual province or the entire country.
Note This method has a version for use with VBScript called GeocodeGetStatesLicensedV().
Syntax
GeocodeGetStatesLicensed(pstateList As String) As BooleanGeocodeGetStatesLicensedV(pstateList As VARIANT) As Boolean
Parameter Description
pstateList Output string: List of provinces.
Developer Guide 77
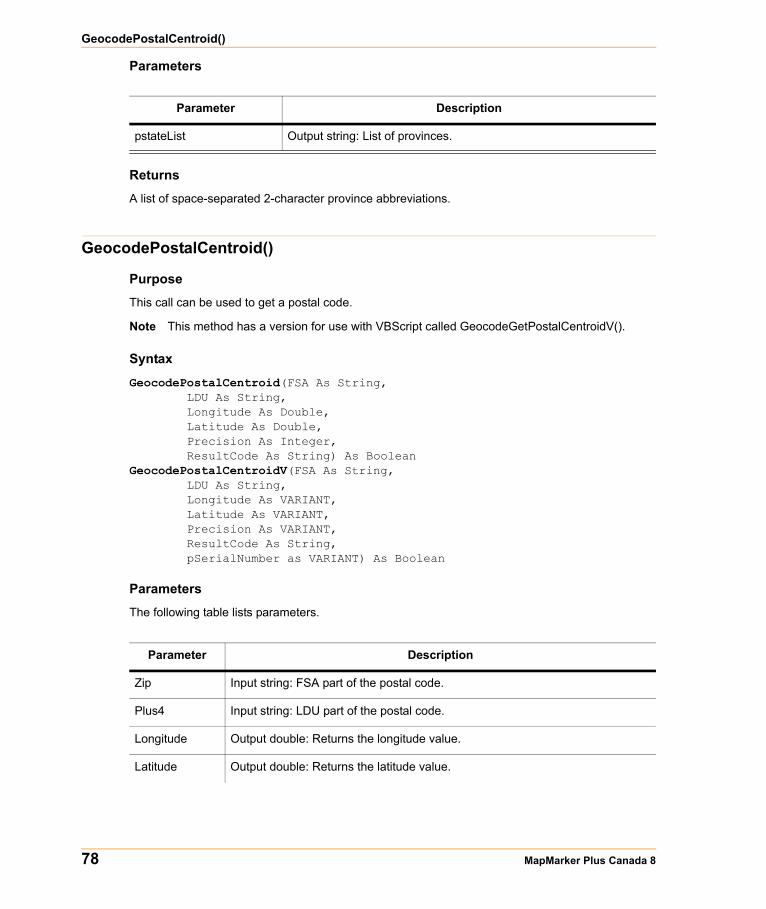
GeocodePostalCentroid()
Parameters
Returns
A list of space-separated 2-character province abbreviations.
GeocodePostalCentroid()
Purpose
This call can be used to get a postal code.
Note This method has a version for use with VBScript called GeocodeGetPostalCentroidV().
Syntax
GeocodePostalCentroid(FSA As String,LDU As String,Longitude As Double,Latitude As Double,Precision As Integer,ResultCode As String) As Boolean
GeocodePostalCentroidV(FSA As String,LDU As String,Longitude As VARIANT,Latitude As VARIANT,Precision As VARIANT,ResultCode As String,pSerialNumber as VARIANT) As Boolean
Parameters
The following table lists parameters.
Parameter Description
pstateList Output string: List of provinces.
Parameter Description
Zip Input string: FSA part of the postal code.
Plus4 Input string: LDU part of the postal code.
Longitude Output double: Returns the longitude value.
Latitude Output double: Returns the latitude value.
78 MapMarker Plus Canada 8

Chapter 5: OLE Automation API
Returns
TRUE if successful, FALSE if not. The GetLastError Code property can be used to determine what error occurred.
Note To return all 6 characters of the postal code after using this function, you should do the following: After calling GeocodePostalCentroid(), immediately call GeocodeGetCandidates() which returns a CAddressList collection of CAddress objects. This CAddressList contains two objects which together contain the 6 characters of the postal code: Zip As String (the matched FSA postal code) and plus4 As String (the matched LDU postal add-on code). By returning both these strings and concatenating them, you are able to form the full FSALDU. For more information about the CAddressList see OLE Automation Objects on page 88.
GeocodePostalCentroidWithSerial()
Purpose
This routine is called to geocode an address to a postal code when the server requires that a serial number be provided to allow geocoding. This method is for OEM users only and it requires an additional program to create the OEM licenses (purchased separately from Pitney Bowes MapInfo Corporation.).
Syntax
GeocodePostalCentroidWithSerial(FSA As String,LDU As String,Longitude As Double,Latitude As Double,Precision As Integer,ResultCode As String,SerialNumber As String) As Boolean
Precision Output integer: Returns one of the following:
30 – (street-level match for an intersection address)
20 – (street-level match for street address)
10 – (Shape Path centroid match)
3 – (LDU postal code centroid match)
1 – (FSA postal code centroid match).
ResultCode Output string: Returns a value that is analogous to the GeoResult codes returned by MapMarker.
pSerialNumber Input string: Serial number required by server, created by an OEM license program sold separately.
Parameter Description
Developer Guide 79
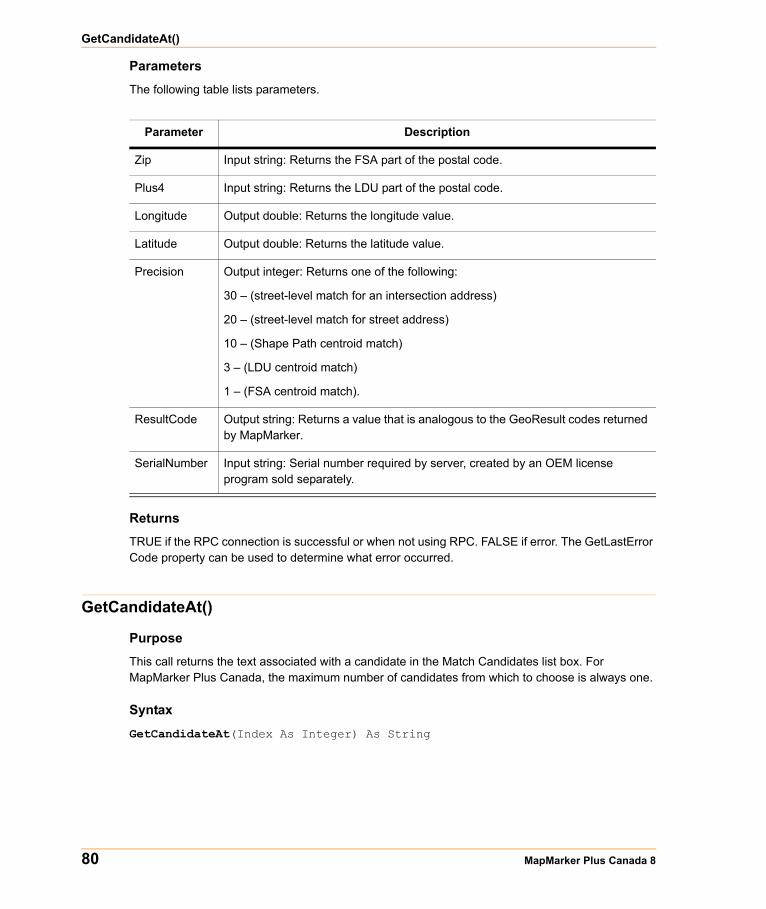
GetCandidateAt()
Parameters
The following table lists parameters.
Returns
TRUE if the RPC connection is successful or when not using RPC. FALSE if error. The GetLastError Code property can be used to determine what error occurred.
GetCandidateAt()
Purpose
This call returns the text associated with a candidate in the Match Candidates list box. For MapMarker Plus Canada, the maximum number of candidates from which to choose is always one.
Syntax
GetCandidateAt(Index As Integer) As String
Parameter Description
Zip Input string: Returns the FSA part of the postal code.
Plus4 Input string: Returns the LDU part of the postal code.
Longitude Output double: Returns the longitude value.
Latitude Output double: Returns the latitude value.
Precision Output integer: Returns one of the following:
30 – (street-level match for an intersection address)
20 – (street-level match for street address)
10 – (Shape Path centroid match)
3 – (LDU centroid match)
1 – (FSA centroid match).
ResultCode Output string: Returns a value that is analogous to the GeoResult codes returned by MapMarker.
SerialNumber Input string: Serial number required by server, created by an OEM license program sold separately.
80 MapMarker Plus Canada 8

Chapter 5: OLE Automation API
Parameters
Returns
The string of tab-delimited text associated with the candidate.
GetCandidateCensusBlockIDAt()
Purpose
This call returns the Dissemination Area of an address in the Match Candidates list box. The U.S. version of the product (for which the function is designed) returns the Census Block ID. There is no direct Canadian equivalent for Census Block ID for which data is available, so Dissemination Area has been substituted to provide some useful information. Please note these are NOT geographic equivalents.
For MapMarker Plus Canada, the maximum number of candidates from which to choose is always one.
Note This method has a version for use with VBScript called GeocodeGetCandidateCensusBlockIDAtV().
Syntax
GetCandidateCensusBlockIDAt(Index As Integer) As StringGetCandidateCensusBlockIDAtV(Index As VARIANT) As String
Parameters
Returns
The Dissemination Area of the candidate.
Parameter Description
Index The number from the zero-based index list that corresponds to the desired candidate. As zero or one candidate is returned, this number is a maximum of zero.
Parameter Description
Index The number from the zero-based index list that corresponds to the desired candidate. As zero or one candidate is returned, this number is a maximum of zero.
Developer Guide 81

GetCandidateCityAt()
GetCandidateCityAt()
Purpose
This call returns the city portion of an address in the Match Candidates list box. For MapMarker Plus Canada, the maximum number of candidates from which to choose is always one.
Note This method has a version for use with VBScript called GeocodeGetCandidateCityAtV().
Syntax
GetCandidateCityAt(Index As Integer) As StringGetCandidateCityAtV(Index As VARIANT) As String
Parameters
Returns
The city of the candidate.
GetCandidateFirmAt()
Purpose
This call returns the firm portion of an address to the Match Candidates list box. For MapMarker Plus Canada, the maximum number of candidates from which to choose is always one.
Note This method has a version for use with VBScript called GeocodeGetCandidateFirmAtV().
Syntax
GetCandidateFirmAt(Index As Integer) As StringGetCandidateFirmAtV(Index As VARIANT) As String
Parameters
Parameter Description
Index The number from the zero-based index list that corresponds to the desired candidate. As zero or one candidate is returned, this number is a maximum of zero.
Parameter Description
Index The number from the zero-based index list that corresponds to the desired candidate. As zero or one candidate is returned, this number is a maximum of zero.
82 MapMarker Plus Canada 8
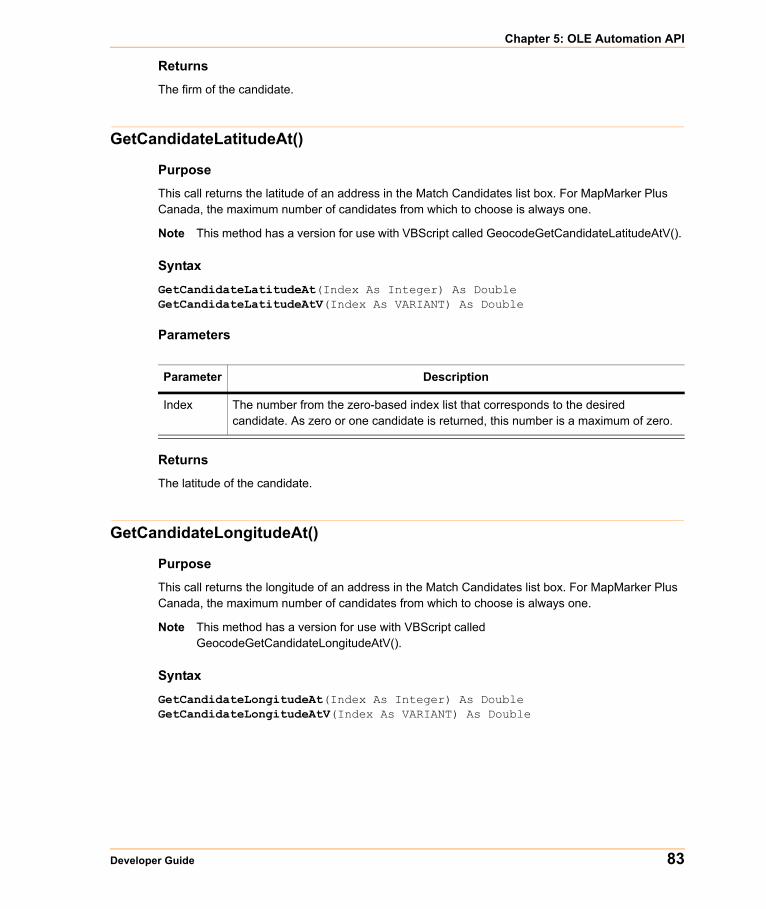
Chapter 5: OLE Automation API
Returns
The firm of the candidate.
GetCandidateLatitudeAt()
Purpose
This call returns the latitude of an address in the Match Candidates list box. For MapMarker Plus Canada, the maximum number of candidates from which to choose is always one.
Note This method has a version for use with VBScript called GeocodeGetCandidateLatitudeAtV().
Syntax
GetCandidateLatitudeAt(Index As Integer) As DoubleGetCandidateLatitudeAtV(Index As VARIANT) As Double
Parameters
Returns
The latitude of the candidate.
GetCandidateLongitudeAt()
Purpose
This call returns the longitude of an address in the Match Candidates list box. For MapMarker Plus Canada, the maximum number of candidates from which to choose is always one.
Note This method has a version for use with VBScript called GeocodeGetCandidateLongitudeAtV().
Syntax
GetCandidateLongitudeAt(Index As Integer) As DoubleGetCandidateLongitudeAtV(Index As VARIANT) As Double
Parameter Description
Index The number from the zero-based index list that corresponds to the desired candidate. As zero or one candidate is returned, this number is a maximum of zero.
Developer Guide 83
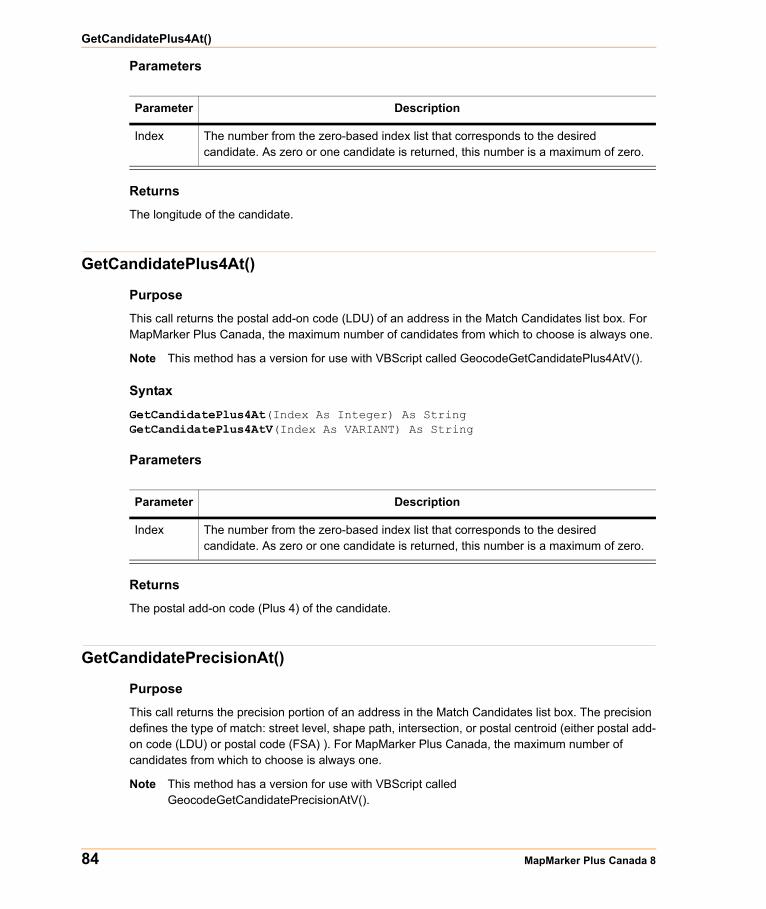
GetCandidatePlus4At()
Parameters
Returns
The longitude of the candidate.
GetCandidatePlus4At()
Purpose
This call returns the postal add-on code (LDU) of an address in the Match Candidates list box. For MapMarker Plus Canada, the maximum number of candidates from which to choose is always one.
Note This method has a version for use with VBScript called GeocodeGetCandidatePlus4AtV().
Syntax
GetCandidatePlus4At(Index As Integer) As StringGetCandidatePlus4AtV(Index As VARIANT) As String
Parameters
Returns
The postal add-on code (Plus 4) of the candidate.
GetCandidatePrecisionAt()
Purpose
This call returns the precision portion of an address in the Match Candidates list box. The precision defines the type of match: street level, shape path, intersection, or postal centroid (either postal add-on code (LDU) or postal code (FSA) ). For MapMarker Plus Canada, the maximum number of candidates from which to choose is always one.
Note This method has a version for use with VBScript called GeocodeGetCandidatePrecisionAtV().
Parameter Description
Index The number from the zero-based index list that corresponds to the desired candidate. As zero or one candidate is returned, this number is a maximum of zero.
Parameter Description
Index The number from the zero-based index list that corresponds to the desired candidate. As zero or one candidate is returned, this number is a maximum of zero.
84 MapMarker Plus Canada 8
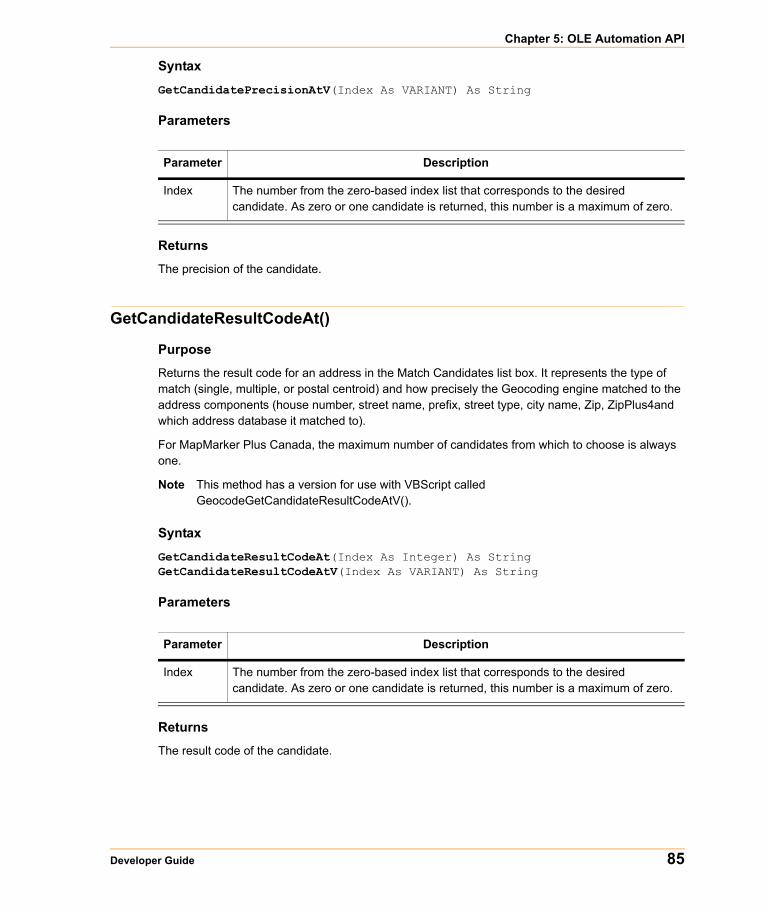
Chapter 5: OLE Automation API
Syntax
GetCandidatePrecisionAtV(Index As VARIANT) As String
Parameters
Returns
The precision of the candidate.
GetCandidateResultCodeAt()
Purpose
Returns the result code for an address in the Match Candidates list box. It represents the type of match (single, multiple, or postal centroid) and how precisely the Geocoding engine matched to the address components (house number, street name, prefix, street type, city name, Zip, ZipPlus4and which address database it matched to).
For MapMarker Plus Canada, the maximum number of candidates from which to choose is always one.
Note This method has a version for use with VBScript called GeocodeGetCandidateResultCodeAtV().
Syntax
GetCandidateResultCodeAt(Index As Integer) As StringGetCandidateResultCodeAtV(Index As VARIANT) As String
Parameters
Returns
The result code of the candidate.
Parameter Description
Index The number from the zero-based index list that corresponds to the desired candidate. As zero or one candidate is returned, this number is a maximum of zero.
Parameter Description
Index The number from the zero-based index list that corresponds to the desired candidate. As zero or one candidate is returned, this number is a maximum of zero.
Developer Guide 85
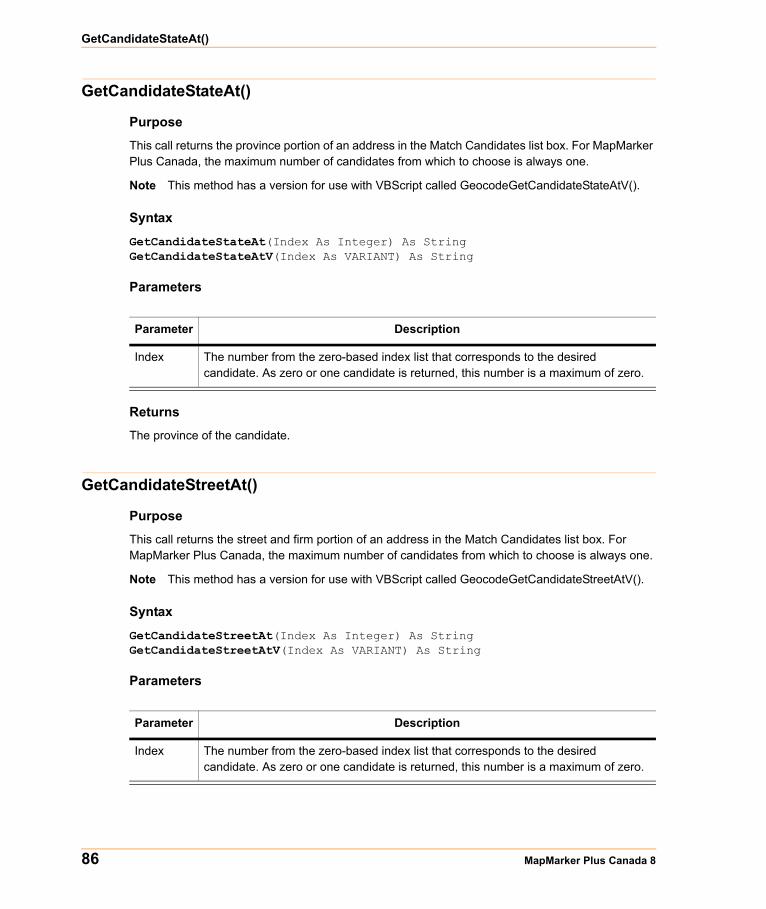
GetCandidateStateAt()
GetCandidateStateAt()
Purpose
This call returns the province portion of an address in the Match Candidates list box. For MapMarker Plus Canada, the maximum number of candidates from which to choose is always one.
Note This method has a version for use with VBScript called GeocodeGetCandidateStateAtV().
Syntax
GetCandidateStateAt(Index As Integer) As StringGetCandidateStateAtV(Index As VARIANT) As String
Parameters
Returns
The province of the candidate.
GetCandidateStreetAt()
Purpose
This call returns the street and firm portion of an address in the Match Candidates list box. For MapMarker Plus Canada, the maximum number of candidates from which to choose is always one.
Note This method has a version for use with VBScript called GeocodeGetCandidateStreetAtV().
Syntax
GetCandidateStreetAt(Index As Integer) As StringGetCandidateStreetAtV(Index As VARIANT) As String
Parameters
Parameter Description
Index The number from the zero-based index list that corresponds to the desired candidate. As zero or one candidate is returned, this number is a maximum of zero.
Parameter Description
Index The number from the zero-based index list that corresponds to the desired candidate. As zero or one candidate is returned, this number is a maximum of zero.
86 MapMarker Plus Canada 8
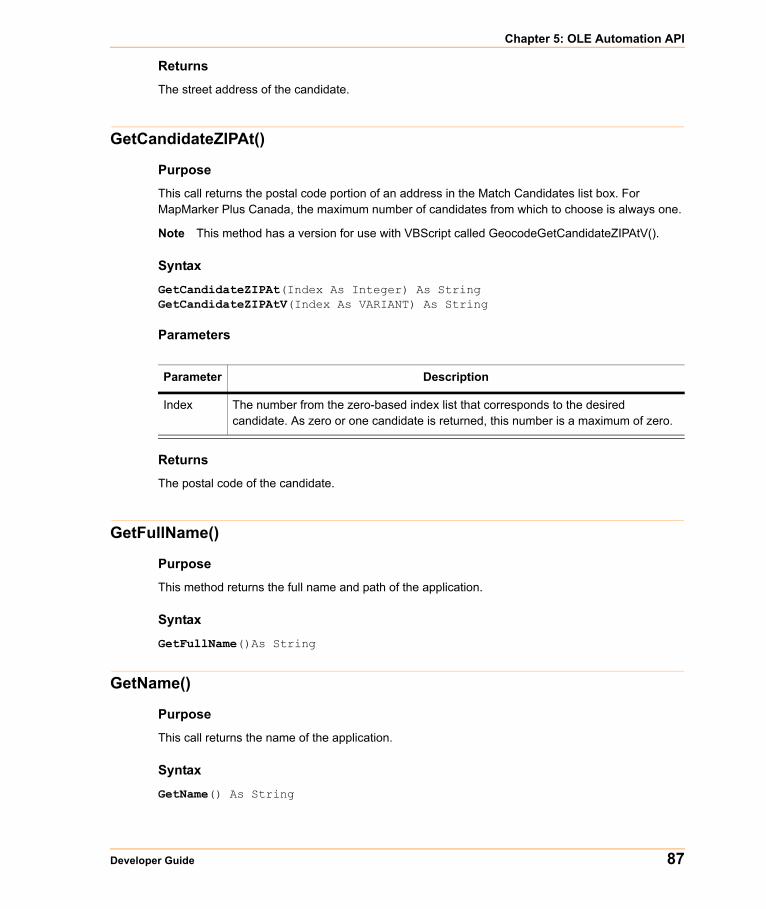
Chapter 5: OLE Automation API
Returns
The street address of the candidate.
GetCandidateZIPAt()
Purpose
This call returns the postal code portion of an address in the Match Candidates list box. For MapMarker Plus Canada, the maximum number of candidates from which to choose is always one.
Note This method has a version for use with VBScript called GeocodeGetCandidateZIPAtV().
Syntax
GetCandidateZIPAt(Index As Integer) As StringGetCandidateZIPAtV(Index As VARIANT) As String
Parameters
Returns
The postal code of the candidate.
GetFullName()
Purpose
This method returns the full name and path of the application.
Syntax
GetFullName()As String
GetName()
Purpose
This call returns the name of the application.
Syntax
GetName() As String
Parameter Description
Index The number from the zero-based index list that corresponds to the desired candidate. As zero or one candidate is returned, this number is a maximum of zero.
Developer Guide 87
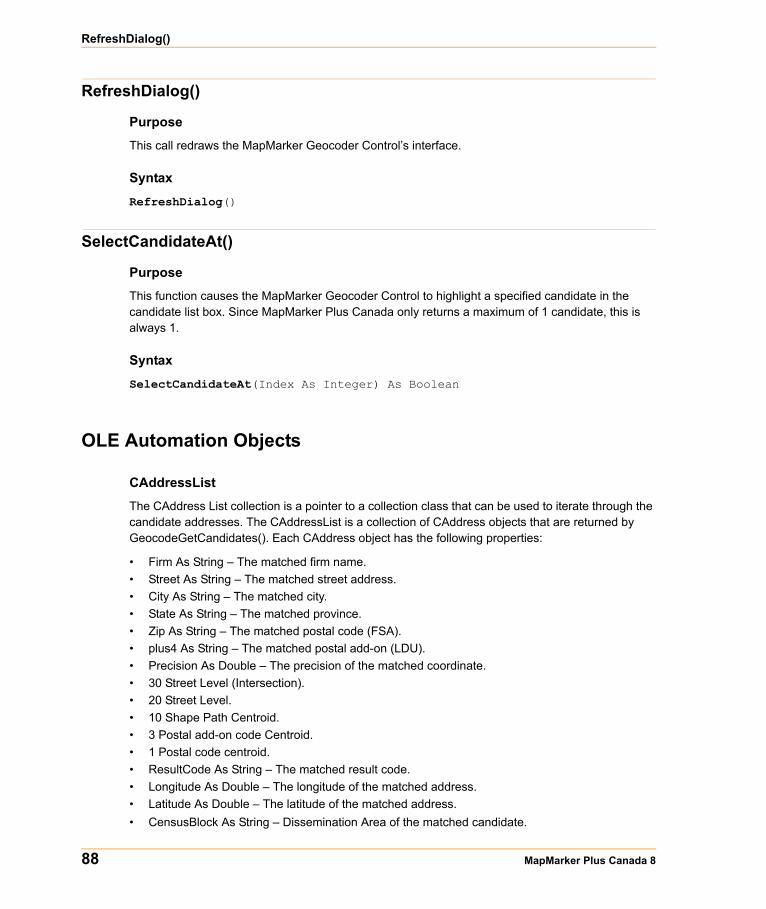
RefreshDialog()
RefreshDialog()
Purpose
This call redraws the MapMarker Geocoder Control’s interface.
Syntax
RefreshDialog()
SelectCandidateAt()
Purpose
This function causes the MapMarker Geocoder Control to highlight a specified candidate in the candidate list box. Since MapMarker Plus Canada only returns a maximum of 1 candidate, this is always 1.
Syntax
SelectCandidateAt(Index As Integer) As Boolean
OLE Automation Objects
CAddressList
The CAddress List collection is a pointer to a collection class that can be used to iterate through the candidate addresses. The CAddressList is a collection of CAddress objects that are returned by GeocodeGetCandidates(). Each CAddress object has the following properties:
• Firm As String – The matched firm name.• Street As String – The matched street address.• City As String – The matched city.• State As String – The matched province.• Zip As String – The matched postal code (FSA).• plus4 As String – The matched postal add-on (LDU).• Precision As Double – The precision of the matched coordinate. • 30 Street Level (Intersection).• 20 Street Level.• 10 Shape Path Centroid.• 3 Postal add-on code Centroid.• 1 Postal code centroid.• ResultCode As String – The matched result code.• Longitude As Double – The longitude of the matched address.• Latitude As Double – The latitude of the matched address.• CensusBlock As String – Dissemination Area of the matched candidate.
88 MapMarker Plus Canada 8

6
Using the MapMarker Plus Java APIThis chapter builds on the design principles discussed in the previous chapter and shows you how to build a geocoding application using the MapMarker Plus Canada Java API. It also discusses how to deploy your application, as well as some of the geocoding features available in the API such as geographic centroid geocoding, and street or place name browsing.
For detailed information on all classes, refer to the API documentation for MapMarker Plus Canada. The API documentation is located in the \docs\can\ folder under the directory where you installed the product. For example: C:\Program Files\MapInfo\MapMarker_CAN_v8\docs\can\.
In this section:
Overview . . . . . . . . . . . . . . . . . . . . . . . . . . . . . . . . . . . . . . . . . . . . . .90Developing Geocoding Applications in Java . . . . . . . . . . . . . . . .90Browsing Addresses . . . . . . . . . . . . . . . . . . . . . . . . . . . . . . . . . . .100Geocoding to Geographic Centroids . . . . . . . . . . . . . . . . . . . . . .101Address Point Interpolation . . . . . . . . . . . . . . . . . . . . . . . . . . . . .102

Overview
OverviewGeocoding turns ordinary data records containing address information into geographic objects that can be displayed on a map. This helps you to visualize the relationships between your data. You can display your geocoded records in MapInfo MapXtreme and add other map objects to give your data a geographic reference. You can then combine MapMarker, MapXtreme, and the MapInfo Routing J Server to create custom solutions to solve the needs of your organization.
Using the MapMarker Plus Java Canada APIThe MapMarker Plus Canada Java Canada API is used to create geocoding applications specifically for Canadian addresses. The API uses common Canadian address terminology and is a good choice for developers who are geocoding Canadian addresses.
Using the MapMarker Generic Java APIThe MapMarker Generic Java API is used to create international geocoding applications. The Generic API can be used with any MapMarker country geocoder. The API uses common universal address terminology and is a good choice for a developer whose requirement is to geocode addresses from many different countries. For more information on deploying MapMarker Plus Canada as a servlet along with other MapMarker countries see Integration with MapMarker for Other Countries on page 122.
For detailed information on all classes, refer to the API documentation for MapMarker Plus Canada. The API documentation is located in the \docs\can\ folder under the directory where you installed the product. For example: C:\Program Files\MapInfo\MapMarker_CAN_v8\docs\can\.
Developing Geocoding Applications in JavaUse either the MapMarker Plus Canada Java API or the MapMarker Generic API to develop custom geocoding applications in Java. See Using the MapMarker Plus Java Canada API on page 90 and Using the MapMarker Generic Java API on page 90 for more information on which API to use for your particular situation.
Creating a Geocoding Application in JavaMake sure that your application contains these import statements:
/* MapMarker Plus Canada Java API */import com.mapinfo.mapmarker.user.MapMarkerJavaAPIimport com.mapinfo.mapmarker.user.MMJEngine;import com.mapinfo.mapmarker.user.ClientGeocodeResponse;import com.mapinfo.mapmarker.CAN.CAN_GeocodeConstraints;import com.mapinfo.mapmarker.IGeocodeConstraints;import com.mapinfo.mapmarker.CAN.CAN_UserCandidateAddress;import com.mapinfo.mapmarker.CAN.CAN_UserInputAddress;
90 MapMarker Plus Canada 8

Chapter 6: Using the MapMarker Plus Java API
/* MapMarker Generic Java API */import com.mapinfo.mapmarker.user.MMJEngine;import com.mapinfo.mapmarker.client.ClientGeocodeResponse;import com.mapinfo.mapmarker.IGeocodeConstraints;import com.mapinfo.mapmarker.common.AddressImpl;import com.mapinfo.mapmarker.common.Address;
Make sure that the following jar files are in your classpath. You can find these files in the MapMarker Plus folder under the directory where you installed the product
• mmj.jar• mmj_can.jar• miscp.jar• mmjclient.jar• mmjclient_can.jar• micsys.jar• miutil.jar
Also, a copy of the CAN_DataManagerSettings.properties file must be in your classpath with the correct location of the MapMarker data.
Setting the Input Address
The first step in creating a geocoding application is setting the input address. Here is an example of how to set the input address if you were using the MapMarker Plus Canada Java API.
/* Input address example */String addr = "26 Wellington St W";String postcode = "M5E";String city = "Toronto";String province = "ON";CAN_UserInputAddress inpAddr = new CAN_UserInputAddress();/* Set the input Address */inpAddr.setStreet(addr);inpAddr.setCity(city);inpAddr.setProvince(province); inpAddr.setFSA(postcode);
If you were using the MapMarker Generic API, you would use the Address class implemented with AddressImpl.
AddressImpl = new AddressImpl();/* Set the input Address */inpAddr.setCountry(“CAN”);inpAddr.setMainAddress(addr); /* street */inpAddr.setAreaName3(city); /* city */inpAddr.setAreaName1(province); /* province' */inpAddr.setPostCode1(postcode); /* FSA */
Developer Guide 91

Developing Geocoding Applications in Java
Setting Geocoding Constraints
Next you need to set the geocoding constraints (or preferences). If no constraints are explicitly provided, MapMarker Plus Canada 8 uses default settings. Here is an example of how to set constraints using the MapMarker Plus Canada Java API.
CAN_GeocodeConstraints geoCon = new CAN_GeocodeConstraints();/* Geocode Constraints:* Review Java docs for a complete constraint list and* default values*/geoCon.setMustMatchAddressNumber(true);geoCon.setMaxCandidates(1);geoCon.setReturnCloseCandidatesOnly(true);geoCon.setFallbackToPostal(false);
If you are using the MapMarker Generic API you would use the GeocodeConstraints class:
GeocodeConstraints=new GeocodeConstraints();constraints.setMustMatchAddressNumber(true);constraints.setMaxCandidates(1);constraints.setReturnCloseCandidatesOnly(true);
constraints.setFallbackToPostal(true);
Geocoding constraints affect the conditions under which MapMarker Plus Canadaattempts to match a record. Changing settings can affect the time in which MapMarker takes to geocode a record. Choose matching conditions to fit your needs. Generic (GeocodeConstraints) and Canada (CAN_GeoodeConstraints) constraints are described as follows.
GeocodeConstraints
Key Description Default
KEY_CLIENT_CRS String describing the client coordinate system. Accepted values include EPSG SRS Names as well as MAPINFO MAPBASIC Projection String SRS Names. (see com.mapinfo.coordsys.CoordSys). Default uses WGS 84.
“epsg:4326”
KEY_CLOSEMATCHESONLY Only close matches are returned. “false”
KEY_MAXCANDIDATES Max candidates to be returned. (use "-1" to return all candidates)
“3”
KEY_MAXRANGES Max ranges per candidate to be returned (use "-1" to return all ranges)
“0”
KEY_MUST_MATCH_ADDRNUM Only candidates matching address number are considered close.
“false”
KEY_MUST_MATCH_MAINADDR Only candidates matching the main address are considered close.
“false”
92 MapMarker Plus Canada 8
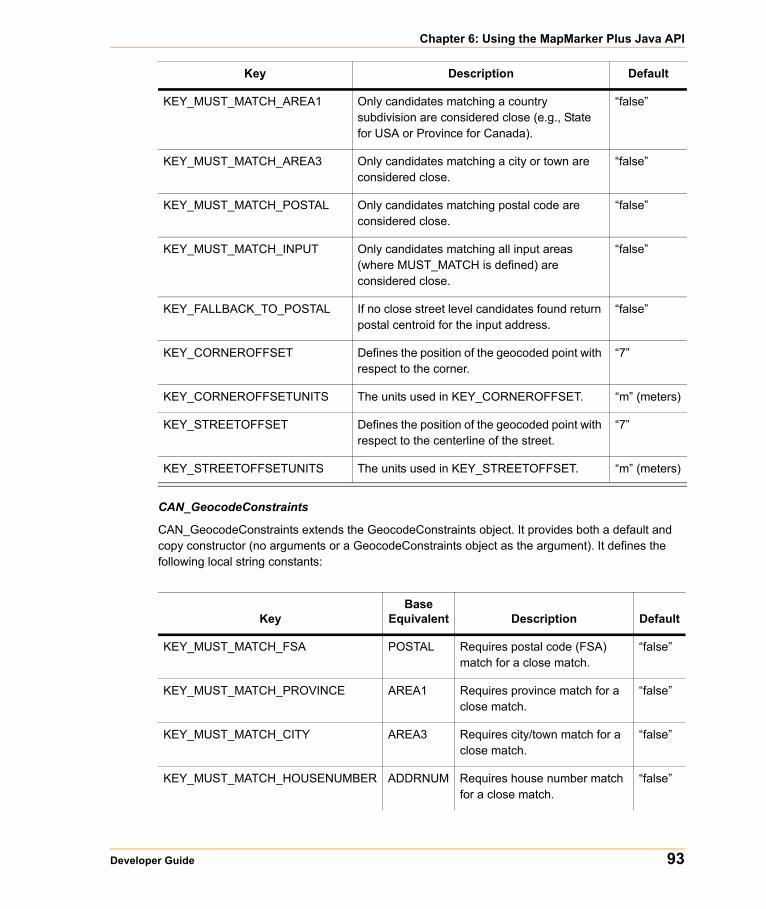
Chapter 6: Using the MapMarker Plus Java API
CAN_GeocodeConstraints
CAN_GeocodeConstraints extends the GeocodeConstraints object. It provides both a default and copy constructor (no arguments or a GeocodeConstraints object as the argument). It defines the following local string constants:
KEY_MUST_MATCH_AREA1 Only candidates matching a country subdivision are considered close (e.g., State for USA or Province for Canada).
“false”
KEY_MUST_MATCH_AREA3 Only candidates matching a city or town are considered close.
“false”
KEY_MUST_MATCH_POSTAL Only candidates matching postal code are considered close.
“false”
KEY_MUST_MATCH_INPUT Only candidates matching all input areas (where MUST_MATCH is defined) are considered close.
“false”
KEY_FALLBACK_TO_POSTAL If no close street level candidates found return postal centroid for the input address.
“false”
KEY_CORNEROFFSET Defines the position of the geocoded point with respect to the corner.
“7”
KEY_CORNEROFFSETUNITS The units used in KEY_CORNEROFFSET. “m” (meters)
KEY_STREETOFFSET Defines the position of the geocoded point with respect to the centerline of the street.
“7”
KEY_STREETOFFSETUNITS The units used in KEY_STREETOFFSET. “m” (meters)
Key Description Default
KeyBase
Equivalent Description Default
KEY_MUST_MATCH_FSA POSTAL Requires postal code (FSA) match for a close match.
“false”
KEY_MUST_MATCH_PROVINCE AREA1 Requires province match for a close match.
“false”
KEY_MUST_MATCH_CITY AREA3 Requires city/town match for a close match.
“false”
KEY_MUST_MATCH_HOUSENUMBER ADDRNUM Requires house number match for a close match.
“false”
Developer Guide 93
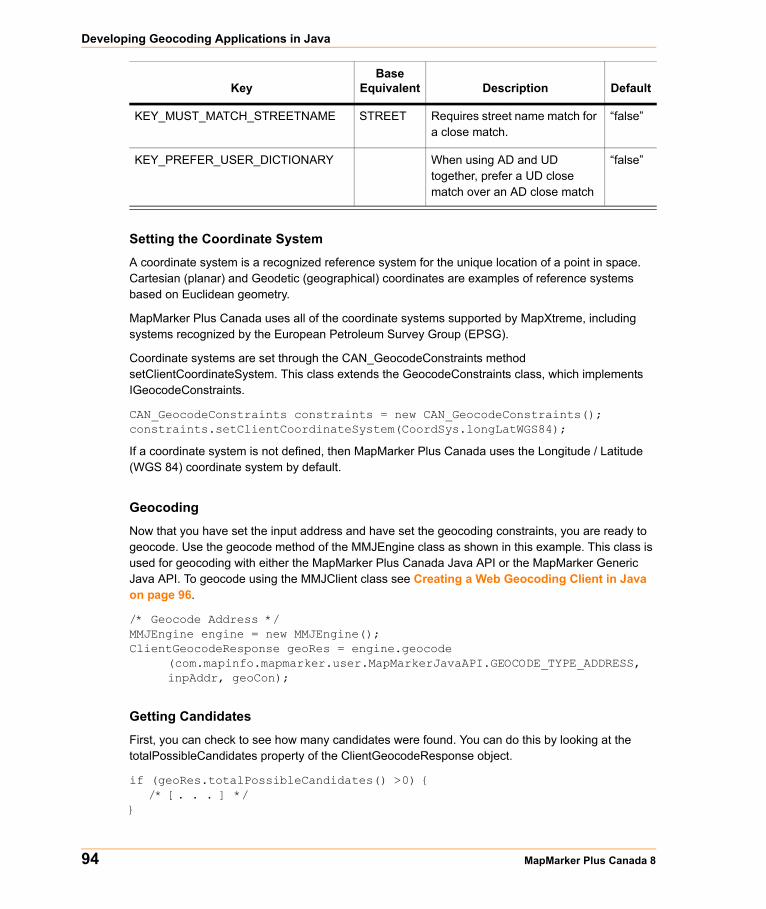
Developing Geocoding Applications in Java
Setting the Coordinate System
A coordinate system is a recognized reference system for the unique location of a point in space. Cartesian (planar) and Geodetic (geographical) coordinates are examples of reference systems based on Euclidean geometry.
MapMarker Plus Canada uses all of the coordinate systems supported by MapXtreme, including systems recognized by the European Petroleum Survey Group (EPSG).
Coordinate systems are set through the CAN_GeocodeConstraints method setClientCoordinateSystem. This class extends the GeocodeConstraints class, which implements IGeocodeConstraints.
CAN_GeocodeConstraints constraints = new CAN_GeocodeConstraints();constraints.setClientCoordinateSystem(CoordSys.longLatWGS84);
If a coordinate system is not defined, then MapMarker Plus Canada uses the Longitude / Latitude (WGS 84) coordinate system by default.
Geocoding
Now that you have set the input address and have set the geocoding constraints, you are ready to geocode. Use the geocode method of the MMJEngine class as shown in this example. This class is used for geocoding with either the MapMarker Plus Canada Java API or the MapMarker Generic Java API. To geocode using the MMJClient class see Creating a Web Geocoding Client in Java on page 96.
/* Geocode Address */MMJEngine engine = new MMJEngine();ClientGeocodeResponse geoRes = engine.geocode
(com.mapinfo.mapmarker.user.MapMarkerJavaAPI.GEOCODE_TYPE_ADDRESS,inpAddr, geoCon);
Getting Candidates
First, you can check to see how many candidates were found. You can do this by looking at the totalPossibleCandidates property of the ClientGeocodeResponse object.
if (geoRes.totalPossibleCandidates() >0) {/* [. . . ] */
}
KEY_MUST_MATCH_STREETNAME STREET Requires street name match for a close match.
“false”
KEY_PREFER_USER_DICTIONARY When using AD and UD together, prefer a UD close match over an AD close match
“false”
KeyBase
Equivalent Description Default
94 MapMarker Plus Canada 8
Chapter 6: Using the MapMarker Plus Java API
Out of all the candidates found, you can also see how many were close matches. You can do this by looking at the totalPossibleCloseMatchCandidates property and the of the ClientGeocodeResponse object.
if (geoRes.totalPossibleCloseMatchCandidates() >0) {/* [. . . ] */
}
MapMarker Plus Canada only returns a subset of the total possible candidates that it has found. As a default MapMarker returns the first three candidates that are found. If you would like to see more of the candidates, call setMaxCandidates(x) where x is the maximum number of candidates desired.
You can check to see how many candidates were actually returned by looking at the candidateCount property of the ClientGeocodeResponse object.
if (geoRes.candidateCount() >0) {/* [. . . ] */
}
Now you can use the CAN_UserCandidateAddress to obtain detailed candidate information.
/* Get candidate count */int candCount = geoRes.candidateCount();
/** Get returned candidates*/if (candCount > 0){
for (int i=0; i < candCount; i++){
/*Get candidate information */CAN_UserCandidateAddress canCand =
new CAN_UserCandidateAddress (geoRes.candidateAt(i));System.out.println(cancand.toString();System.out.println(cancand.getLocation().toString());
}
Getting the Result Code
As an output option, MapMarker returns a result code for every record it attempts to match. The code indicates the success or failure of the geocoding operation as well as conveys information about the quality of the match. Each character of the code tells how precisely MapMarker matched each address component. The result code is obtained using the getGeoResult method of the CAN_UserCandidateAddress object. Here is an example of how to get the result code:
String resultCode=cancand.getGeoResult()
For more information on interpreting the geocoding results, see the Result Codes chapter in the MapMarker Plus Canada Desktop User Guide.
Developer Guide 95
Developing Geocoding Applications in Java
Creating a Web Geocoding Client in JavaIf you have deployed MapMarker Plus Canada as a servlet, you need to develop a web client application to send geocoding requests to the server. Follow all of the steps under Creating a Geocoding Application in Java on page 90, except use the MMJClient class instead of the MMJEngine class. The MMJClient geocode method requires the URL of the servlet.
Note The default Tomcat server port number for MapMarker Plus Canada is 8096.
/* Geocode Address */String url = new String("http://localhost:8096/mapmarker40/servlet/mapmarker");MMJClient m_client;ClientGeocodeResponse geoRes = m_client.geocode
(MapMarkerJavaAPI.GEOCODE_TYPE_ADDRESS,inpAddr, geoCon, url);
Make sure that your application contains these import statements:
/* MapMarker Plus Canada Java API */import com.mapinfo.mapmarker.user.MapMarkerJavaAPIimport com.mapinfo.mapmarker.user.MMJClient;import com.mapinfo.mapmarker.user.ClientGeocodeResponse;import com.mapinfo.mapmarker.CAN.CAN_GeocodeConstraints;import com.mapinfo.mapmarker.IGeocodeConstraints;import com.mapinfo.mapmarker.CAN.CAN_UserCandidateAddress;import com.mapinfo.mapmarker.CAN.CAN_UserInputAddress;/* MapMarker Generic Java API */import com.mapinfo.mapmarker.client.MMJClient;import com.mapinfo.mapmarker.client.ClientGeocodeResponse;import com.mapinfo.mapmarker.GeocodeConstraints;import com.mapinfo.mapmarker.IGeocodeConstraints;import com.mapinfo.mapmarker.common.AddressImpl;import com.mapinfo.mapmarker.common.Address;
Make sure that these jar files are in your classpath. You can find these files in the \sdk\engine\lib\client and sdk\engine\lib\common folders under the directory where you installed the product.
• mmjclient.jar• mmjclient_can.jar• miutil.jar• micsys.jar• jdom.jar• commons-logging.jar• xercesImpl.jar• xmlParserAPIs.jar
Also make sure that the path to encoding-map.xml is in your classpath. You can find this file in the \sdk\engine\lib\client folder under the directory where you installed the product.
96 MapMarker Plus Canada 8

Chapter 6: Using the MapMarker Plus Java API
Sample CodeThe following usage example is a web client created using the MapMarker Plus Canada API.
/* MapInfo Imports */import com.mapinfo.mapmarker.CAN.CAN_GeocodeConstraints;import com.mapinfo.mapmarker.user.ClientGeocodeResponse;import com.mapinfo.mapmarker.user.MMJClient;import com.mapinfo.mapmarker.CAN.CAN_GeocodeConstraints;import com.mapinfo.mapmarker.CAN.CAN_UserCandidateAddress;import com.mapinfo.mapmarker.CAN.CAN_UserInputAddress;public class MMJ_CAN_Example {
private void geocode() {/* Set server url*/String url = "http://localhost:8096/mapmarker40/servlet/mapmarker";/* Input address example */String addr = "26 Wellington St W";String city = "TORONTO";String province = "ON";String postal = "M5E";CAN_GeocodeConstraints geoCon = new CAN_GeocodeConstraints();/* Geocode Constraints: * Review Java docs for a complete constraint list and * default values */geoCon.setMustMatchAddressNumber(true);geoCon.setMaxCandidates(1);geoCon.setReturnCloseCandidatesOnly(true);geoCon.setFallbackToPostal(false);CAN_UserCandidateAddress canAddr = null;CAN_UserInputAddress inpAddr = new CAN_UserInputAddress();/* Set the input Address */inpAddr.setStreet (addr); /*street*/inpAddr.setCity(city); /*city*/inpAddr.setProvince(province); /*province*/inpAddr.setFSA (postal); /*FSA*//*Geocode Address */MMJClient client = new MMJClient(url);ClientGeocodeResponse geoRes = client.geocode(
MapMarkerJavaAPI.GEOCODE_TYPE_ADDRESS, inpAddr, geoCon);/*Get candidate count*/int candCount = geoRes.candidateCount();/* *Get returned candidates */
if(candCount > 0){
for (int i=0; i< candCount; i++){
/* Get candidate information */CandidateAddress candAddr = geoRes.candidateAt(i);CAN_UserCandidateAddress canCand = new
CAN_UserCandidateAddress(candAddr);
Developer Guide 97

Developing Geocoding Applications in Java
System.out.println(canCand);System.out.println(canCand.getLocation());}
} /* End */public static void main(String[] args){
MMJ_CAN_Example geocodeTest = new MMJ_CAN_Example();geocodeTest.geocode();
}}
The following usage example is a web client created using the MapMarker Generic API.
/* MapInfo Imports */import com.mapinfo.mapmarker.CandidateAddress;import com.mapinfo.mapmarker.user.ClientGeocodeResponse;import com.mapinfo.mapmarker.user.MMJClient;import com.mapinfo.mapmarker.GeocodeConstraints;import com.mapinfo.mapmarker.IGeocodeConstraints;import com.mapinfo.mapmarker.common.AddressImpl;import com.mapinfo.mapmarker.common.Address;public class MMJ_Generic_Example{
private void geocodeGenericAddress() {/* Set server url*/String url =
"http://localhost:8096/mapmarker40/servlet/mapmarker";/* Input Address Example*/String addr = "330 Front St W";String areaname3 = “Toronto”;String areaname1 = “ON”;String postcode = "M5V";GeocodeConstraints geoCon = new GeocodeConstraints();/* Geocode Constraints: * Review Java docs for a complete constraint list * and default values */geoCon.setMustMatchAddressNumber(true);geoCon.setMaxCandidates(3);geoCon.setMaxRanges(5);geoCon.setReturnCloseCandidatesOnly(true);geoCon.setFallbackToPostal(false);Address inpAddr = new AddressImpl(); /* Set the input Address */inpAddr.setCountry (“CAN”);inpAddr.setMainAddress (addr); /*street*/inpAddr.setAreaName3 (areaname3); /*city*/inpAddr.setAreaName1 (areaname1); /*province*/inpAddr.setPostCode1(postcode); /*FSA*//* Geocode Address */MMJClient client = new MMJClient(url);ClientGeocodeResponse geoRes =
client.geocode(MapMarkerJavaAPI.GEOCODE_TYPE_ADDRESS, inpAddr,geoCon, url);
98 MapMarker Plus Canada 8

Chapter 6: Using the MapMarker Plus Java API
/* Get candidate count */int candCount = geoRes.candidateCount();/* * Get returned candidates */if(candCount > 0){
for (int i=0; i < candCount; i++) {/** Get candidate information * Review Java docs for a complete list of * candidate information */CandidateAddress canAddr = geoRes.candidate(i);System.out.println(candAddr);System.out.println(candAddr.getLocation());System.out.println(
“Precision Code:” + candAddr.getPrecisionCode());System.out.println();/** Get candidate range information * Review Java docs for a complete list of candidate range * information */for ( int k=0;
k<candAddr.getNumberOfCandidateRangesFound();k++){
CandidateRange range = cand.getRangeAt (k);System.out.println("Range Number:" + (k+1));System.out.println(Street Side:” +
range.getLeftRightIndicator ());System.out.println("Low Number:" +
range.getLowAddress());System.out.println("High Number:" +
range.getHighAddress());System.out.println();
}}
}}/* End */public static void main(String[] args){
MMJ_Generic_Example geocodeTest = new MMJ_Generic_Example();
geocodeTest.geocodeGenericAddress();}
}
Developer Guide 99

Browsing Addresses
Browsing AddressesBrowsing enables you to retrieve a list of possible address candidates from an address dictionary using a partial street or firm name with a city/province and/or Postal Code as input. No geocoding occurs when you browse, but you are able to view the list of possible candidates.
To browse an address, use MapMarker JavaAPI.GEOCODE_TYPE_BROWSE in the call. The candidates returned will be in the form of a UserCandidateAddress object, which will hold the street name information.
/* Input address example */CAN_UserInputAddress inpAddr = new CAN_UserInputAddress ();inpAddr.setStreet("G");inpAddr.setFSA("M5V");
If you were using the MapMarker Generic API, you would use the AddressImpl class.
AddressImpl inpAddr = new AddressImpl();inpAddr.setMainAddress("G");inpAddr.setPostCode1("M5V");inpAddr.setCountry("CAN");
To geocode, use the geocode method of the MMJEngine class as shown in this example. This class is used for geocoding with either the MapMarker Plus Canada Java API or the MapMarker Generic Java API. To geocode using the MMJClient class see Creating a Web Geocoding Client in Java on page 96.
/* Geocode Address */MMJEngine engine = new MMJEngine();ClientGeocodeResponse geoRes = null;geoRes = engine.geocode(MapMarkerJavaAPI.GEOCODE_TYPE_BROWSE,
inpAddr, geoCon);
All of the streets that begin with "G" in the Postal Code "M5V" will be returned. Now you can use the CAN_UserCandidateRange to obtain detailed candidate information.
/* Get candidate count */int candCount = geoRes.candidateCount();/* * Get returned candidates */if (candCount > 0){
for (int i=0; i < candCount; i++){
/*Get candidate information */CAN_UserCandidateAddress candAddr =
new CAN_UserCandidateAddress(geoRes.candidateAt(i));if (candAddr.getNumberOfCandidateRanges() > 0)
{CAN_UserCandidateRange candRange =
new CAN_UserCandidateRange(candAddr.getRangeAt(0));System.out.println("Candidate Range :" + candRange);}
100 MapMarker Plus Canada 8
Chapter 6: Using the MapMarker Plus Java API
}}
Geocoding to Geographic CentroidsThe MapMarker Java Canada API enables you to geocode records to geographic centroids.
To geocode your records to a geographic centroid, use MapMarkerJavaAPI.GEOCODE_TYPE_GEOGRAPHIC_CENTROID.
/* Input address example */CAN_UserInputAddress inpAddr = new CAN_UserInputAddress ();inpAddr.setCity("Toronto");inpAddr.setProvince("ON");
If you were using the MapMarker Generic API, you would use the AddressImpl class.
AddressImpl inpAddr = new AddressImpl();inpAddr.setAreaName3("Toronto");inpAddr.setAreaName1("ON");inpAddr.setCountry("CAN");
To geocode, use the geocode method of the MMJEngine class as shown in this example. This class is used for geocoding with either the MapMarker Plus Canada Java API or the MapMarker Generic Java API. To geocode using the MMJClient class see Creating a Creating a Web Geocoding Client in Java on page 96.
/* Geocode Address */MMJEngine engine = new MMJEngine();ClientGeocodeResponse geoRes = null;geoRes =
engine.geocode(MapMarkerJavaAPI.GEOCODE_TYPE_GEOGRAPHIC_CENTROID,inpAddr, geoCon);
You can also specify a preference to “fall back to geographic centroid” from a street-level geocode.
/*Set Fallback to Geographic */CAN_GeocodeConstraints geoCon = new CAN_GeocodeConstraints();geoCon.setFallbackToGeographicgeoRes = engine.geocode(MapMarkerJavaAPI.GEOCODE_TYPE_ADDRESS,
inpAddr, geoCon);
After the geocoding call you can use the CAN_UserCandidateAddress to obtain detailed candidate information.
/* Get candidate count */int candCount = geoRes.candidateCount();/* Get returned candidates*/if (candCount > 0){
for (int i=0; i < candCount; i++){/*Get candidate information */
CAN_UserCandidateAddress candAddr =
Developer Guide 101

Address Point Interpolation
new CAN_UserCandidateAddress(geoRes.candidateAt(i));}
}
Geographic centroid candidates may return values for the following:
• areaName1 (province)• areaName3 (city) • location• precision code G1/G3
• G1 – province centroid
• G3 – city centroid
For deciding close matches, preference is given to the candidate where the spelling of the city is closer to the input address.
Address Point InterpolationThis method of interpolation assigns coordinates to address records in relation to the position of address point candidates in the data, providing greater positional accuracy to the geocoded points. The geocoding engine can incorporate address point data in the position assignment and interpolation process.
MapMarker Plus Canada uses address point data that may be present in the Address Dictionary, or supplied by the user in a customized dictionary. The most consistent results will be achieved by using a customized dictionary that contains address points for the area you are geocoding.
To use address point interpolation, you must set the setAddressPointInterpolation method in the IGeocodeConstraints object to True.
The following types of candidates can be returned:
• The candidate to be returned is an address point candidate. If the candidate is itself an address point candidate, the unique point from the segment will be returned and the point precision will be set to 16 (CandidateAddress.ADDRESS_POINT_PRECISION).
• The candidate to be returned is not an address point candidate, but another candidate on the same street is an address point candidate and shares the same house number (e.g., the candidate to be returned was generated from the Address Dictionary and the other candidate from a user dictionary). In this case, the unique point from the second candidate is returned and the point precision is set to 16 (CandidateAddress.ADDRESS_POINT_PRECISION).
102 MapMarker Plus Canada 8
Chapter 6: Using the MapMarker Plus Java API
• The candidate to be returned is not an address point candidate and there are no address point candidates with a matching house number in the list of generated candidates.
In these cases, all of the address point candidates are filtered for the following information:
• A house number that is the same odd/even as the house number of the candidate to be returned.
• A point that intersects the segment of the candidate to be returned.
• A house number that is contained within the range defined for this candidate, e.g., one of this candidate’s ranges must intersect the address point candidate’s house number.
MapMarker then uses the filter information from the resulting list of address point candidates to interpolate the candidate’s point location. The precision for this type of interpolation is 17 (ADDRESS_POINT_INTERPOLATED).
If no address point candidates are returned, the point is interpolated as it would be without using address point interpolation.
Developer Guide 103

Address Point Interpolation
104 MapMarker Plus Canada 8
7
Using the XML APIMapMarker Plus Canada uses XML to communicate between clients and the MapMarker server. The MapMarker XML API allows developers access to MapMarker functionality from virtually any development platform. This chapter explains how you can you can use the XML API to add geocoding functionality to .NET applications.
In this chapter:
MapMarker Plus XML Programming in .NET . . . . . . . . . . . . . . . .106Interacting with a MapMarker Plus Server . . . . . . . . . . . . . . . . . .106Using XSD Files to Create .NET Classes . . . . . . . . . . . . . . . . . . .107Example Class Modifications . . . . . . . . . . . . . . . . . . . . . . . . . . . .114
MapMarker Plus XML Programming in .NET
MapMarker Plus XML Programming in .NETMapMarker Plus Canada Server operates using a standard XML request/response methodology. A client application is responsible for constructing a geocoding request, which must conform to the MapMarker Plus Canada request schema, and sends that request to an active MapMarker Plus Canada server via an HTTP Post. If the request message is valid MapMarker will attempt to carry out the requested operation, and if successful, will send an XML response message, which will conform to the MapMarker Plus Canada response schema.
Although MapMarker Plus Canada does not have a native .NET API, developers can still add geocoding functionality to their .NET applications via this XML API. The sections that follow provide a general outline of a number of different methods for interacting with MapMarker in this way and provide a set of detailed instructions for using some of the tools included with the .NET framework.
Interacting with a MapMarker Plus ServerThere are several methods you can use to interact with MapMarker Plus Canada as a server using the MapMarker Plus Canada XML API:
1. Build XML messages from scratch using string or StringBuilder objects.This method requires the programmer to be familiar with the structure of the request and response messages by studying the message schema. The programmer will then need to write code to build a string that contains all of the XML tags as well as any data that is required for a particular geocoding request. The programmer will also be required to write code to parse out the data from the XML response. In general this method is not recommended since it would require a significant amount of custom code to efficiently build the response message and parse the request message.
2. Create XML document and node objects. In this scenario the programmer can use the .NET XML document and node classes to construct an XML document that will contain all of the required information to generate an XML message or parse the results of a response. This method will require a fair amount of code to implement but should be fairly straightforward for a programmer that is familiar with the .NET XML document and node classes. Developers interested in this approach should refer to the documentation relating to these classes in Visual Studio .NET.
3. Generate .NET classes from MapMarker Plus Canada request and response schemas.This scenario involves generating .NET classes that are based on the message schemas and then incorporating those classes in a project to serialize and deserialize the request and response messages. This method offers a very high degree of flexibility and is easier to implement than the other two methods but the tools and methodology are not well documented. The remainder of this chapter will provide an overview of this approach as well as provide some practical examples.
106 MapMarker Plus Canada 8
Chapter 7: Using the XML API
Using XSD Files to Create .NET ClassesVisual Studio .NET ships with a tool (XSD.EXE) that can be used, among other things, to generate .NET class files from an XSD file. To use the XSD tool, do the following:
• Start the .NET command prompt, which can be found in Program Files under the Visual Studio .NET tools.
Note This will not work with the standard windows command prompt; the XSD utility must be run using the .NET command prompt.
• The syntax for viewing all of the input parameters for this tool is: xsd /?
• The syntax for generating .NET class files in C# is:xsd SchemaFileName.xsd /c
• The syntax for generating .NET class files in VB.NET is:xsd SchemaFileName.xsd /c /l:VB
The XSD tool will create a class file with the same name as the xsd input file but with a different extension, .cs for C# or .vb for VB.NET. This document uses C# for all examples. It will also overwrite an existing class file without any confirmation message. You will need to run the XSD tool against both the MMJRequest.xsd and MMJResponse.xsd schemas. Once the class files have been created they can be used with any .NET application that needs to integrate with MapMarker Plus Canada.
Building a Sample ApplicationThis sample application will allow a user to enter and geocode a street. It has a country input field to enable you to indicate the country of the address you are geocoding. It is assumed that the developer can connect to a running MapMarker Server.
Setting Up the ProjectTo set up the project, do the following:
1. Create a new Windows project in Visual Studio .NET.
2. Copy both of the class files created with the XSD tool to the project directory and add them to the project.
3. Edit the MMJResponse.cs class file to remove duplicate class definitions.The response and request schemas share a common set of schema definitions that are stored in the MMJCommon.xsd file. The XSD tool will put these common classes in both of the class files that it creates which will cause errors when the project is compiled. The easiest way to deal with this is to attempt to build the project and then delete all of the duplicate class definitions that are identified by Visual Studio.
Developer Guide 107

Using XSD Files to Create .NET Classes
4. Add the System.XML reference to the .NET namespaces, which is needed for XML serialization and HTTP communication. (It may be added by default when you create the Windows project.)
Three “Using” clauses must be added to the Form1.cs file:
Using System.XML.Serialization;
Using System.Net;
Using System.IO;
If “Using System.XML” is not already included, add it to the Form1.cs file now.
5. Add the following controls to the project’s form:
6. Add the following labels to identify the TextBox controls:
7. Add these additional labels for the geocoding output:
Control Type Name
TextBox txtAddress
TextBox txtCity
TextBox txtCountrySubDivision
TextBox txtPostcode
TextBox txtCountry
TextBox txtURL
Control Type Name
Label lblAddress
Label‘ lblCity
Label lblCountrySubDivision
Label lblPostcode
Label lblCountry
Label lblURL
Control Type Name
Label lblOutputAddress
Label lblAddOutput
108 MapMarker Plus Canada 8
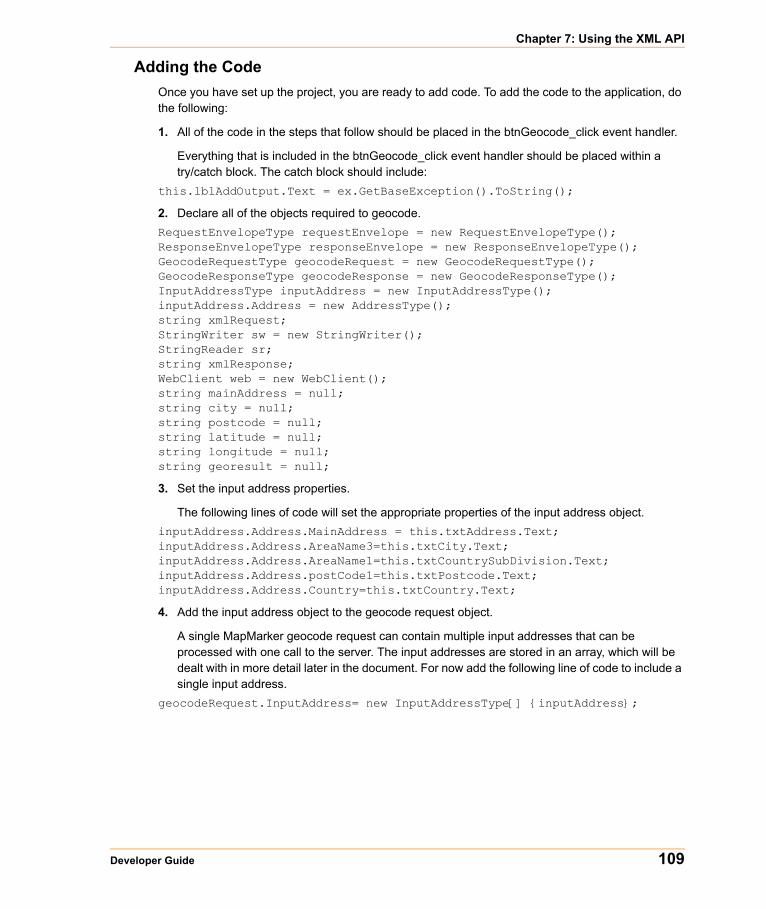
Chapter 7: Using the XML API
Adding the CodeOnce you have set up the project, you are ready to add code. To add the code to the application, do the following:
1. All of the code in the steps that follow should be placed in the btnGeocode_click event handler.
Everything that is included in the btnGeocode_click event handler should be placed within a try/catch block. The catch block should include:
this.lblAddOutput.Text = ex.GetBaseException().ToString();
2. Declare all of the objects required to geocode.RequestEnvelopeType requestEnvelope = new RequestEnvelopeType();ResponseEnvelopeType responseEnvelope = new ResponseEnvelopeType();GeocodeRequestType geocodeRequest = new GeocodeRequestType();GeocodeResponseType geocodeResponse = new GeocodeResponseType();InputAddressType inputAddress = new InputAddressType();inputAddress.Address = new AddressType();string xmlRequest;StringWriter sw = new StringWriter();StringReader sr;string xmlResponse;WebClient web = new WebClient();string mainAddress = null; string city = null;string postcode = null;string latitude = null; string longitude = null;string georesult = null;
3. Set the input address properties.
The following lines of code will set the appropriate properties of the input address object.inputAddress.Address.MainAddress = this.txtAddress.Text;inputAddress.Address.AreaName3=this.txtCity.Text;inputAddress.Address.AreaName1=this.txtCountrySubDivision.Text;inputAddress.Address.postCode1=this.txtPostcode.Text;inputAddress.Address.Country=this.txtCountry.Text;
4. Add the input address object to the geocode request object.
A single MapMarker geocode request can contain multiple input addresses that can be processed with one call to the server. The input addresses are stored in an array, which will be dealt with in more detail later in the document. For now add the following line of code to include a single input address.
geocodeRequest.InputAddress= new InputAddressType[] {inputAddress};
Developer Guide 109

Using XSD Files to Create .NET Classes
5. Instantiate the request constraints and add the geocode request to the request envelope.
The MapMarker server supports a number of different types of requests. The following lines of code will add the geocode request to the request envelope and set the request type appropriately. In addition, the geocoding constraints will be set to the default settings. Geocoding constraints will be covered in more detail later.
geocodeRequest.GeocodeConstraints= new GeocodeConstraintsType();geocodeRequest.GeocodeConstraints.BaseConstraints= new BaseConstraintsType();requestEnvelope.Item= geocodeRequest;requestEnvelope.ItemElementName=ItemChoiceType.GeocodeRequest;
6. Serialize the request envelope object to XML
The next step is to convert the request envelope object into an XML representation, which is accomplished using the .NET XML serialization namespace. The process involves defining a default namespace for the serializer, instantiating a serializer object, serializing the request envelope to a string writer, and then extracting the contents of the string writer to a string variable, which will contain our XML. The following lines of code will carry out these steps.
XmlSerializerNamespaces ns = new XmlSerializerNamespaces();ns.Add("", "");
XmlSerializer serializer = new XmlSerializer(requestEnvelope.GetType());
serializer.Serialize(sw,requestEnvelope,ns);xmlRequest = sw.ToString();
7. Convert the XML to a Byte array.
The XML string data must be converted to a byte array to be posted to the MapMarker server, using the following line of code.
Byte[] requestStream = System.Text.Encoding.Unicode.GetBytes(xmlRequest);
8. Set the appropriate HTTP headers.
There are a set of HTTP headers that are associated with each MapMarker request. The following lines of code show the required headers for a geocoding request.
web.Headers.Add("Content-Type", "text/xml");web.Headers.Add("MI_XMLProtocolRequest", "GeocodeRequest");web.Headers.Add("MI_XMLProtocolVersion", "MI_XML_Protocol_GeocodeRequestAndResponse_1_0");web.Headers.Add("MI_XMLProtocolTransactionId", "0000");
9. Post the XML request to MapMarker.
The geocoding request can now be passed to an active MapMarker server, which if successful will send back a response in XML format. The following code will carry out the operation, but the first parameter will have to be modified to point to an active MapMarker server. The data will be returned as a Byte array that can be converted to a string variable.
Byte[] responseStream = web.UploadData("this.txtURL.Text", "POST",requestStream);
xmlResponse = System.Text.Encoding.ASCII.GetString(responseStream);
110 MapMarker Plus Canada 8
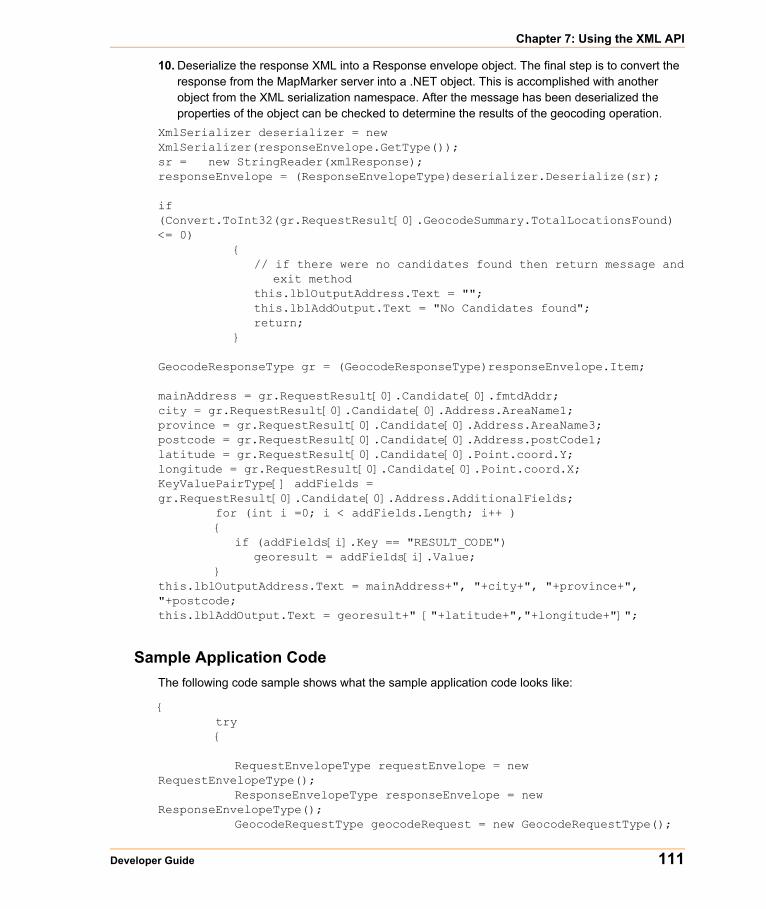
Chapter 7: Using the XML API
10. Deserialize the response XML into a Response envelope object. The final step is to convert the response from the MapMarker server into a .NET object. This is accomplished with another object from the XML serialization namespace. After the message has been deserialized the properties of the object can be checked to determine the results of the geocoding operation.
XmlSerializer deserializer = new XmlSerializer(responseEnvelope.GetType());sr = new StringReader(xmlResponse);responseEnvelope = (ResponseEnvelopeType)deserializer.Deserialize(sr);
if (Convert.ToInt32(gr.RequestResult[0].GeocodeSummary.TotalLocationsFound) <= 0)
{// if there were no candidates found then return message and
exit methodthis.lblOutputAddress.Text = "";this.lblAddOutput.Text = "No Candidates found";return;
}
GeocodeResponseType gr = (GeocodeResponseType)responseEnvelope.Item;
mainAddress = gr.RequestResult[0].Candidate[0].fmtdAddr; city = gr.RequestResult[0].Candidate[0].Address.AreaName1;province = gr.RequestResult[0].Candidate[0].Address.AreaName3;postcode = gr.RequestResult[0].Candidate[0].Address.postCode1;latitude = gr.RequestResult[0].Candidate[0].Point.coord.Y;longitude = gr.RequestResult[0].Candidate[0].Point.coord.X;KeyValuePairType[] addFields = gr.RequestResult[0].Candidate[0].Address.AdditionalFields;
for (int i =0; i < addFields.Length; i++ ){
if (addFields[i].Key == "RESULT_CODE") georesult = addFields[i].Value;
}this.lblOutputAddress.Text = mainAddress+", "+city+", "+province+", "+postcode;this.lblAddOutput.Text = georesult+" ["+latitude+","+longitude+"]";
Sample Application CodeThe following code sample shows what the sample application code looks like:
{try{
RequestEnvelopeType requestEnvelope = new RequestEnvelopeType();
ResponseEnvelopeType responseEnvelope = new ResponseEnvelopeType();
GeocodeRequestType geocodeRequest = new GeocodeRequestType();
Developer Guide 111
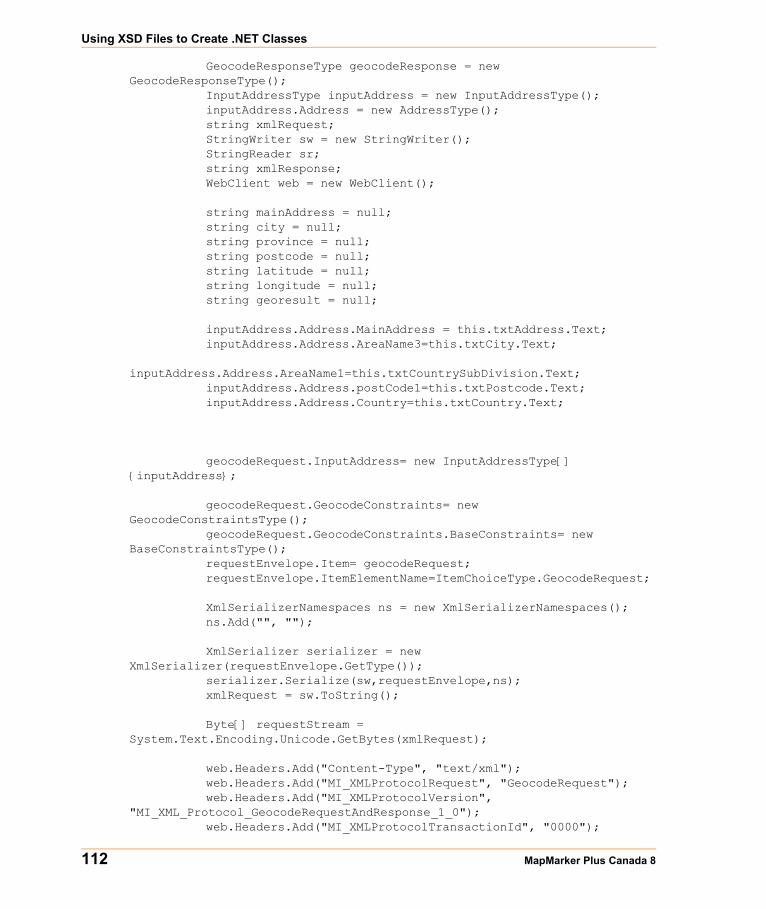
Using XSD Files to Create .NET Classes
GeocodeResponseType geocodeResponse = new GeocodeResponseType();
InputAddressType inputAddress = new InputAddressType();inputAddress.Address = new AddressType();string xmlRequest;StringWriter sw = new StringWriter();StringReader sr;string xmlResponse;WebClient web = new WebClient();
string mainAddress = null;string city = null;string province = null;string postcode = null;string latitude = null;string longitude = null;string georesult = null;
inputAddress.Address.MainAddress = this.txtAddress.Text;inputAddress.Address.AreaName3=this.txtCity.Text;
inputAddress.Address.AreaName1=this.txtCountrySubDivision.Text;inputAddress.Address.postCode1=this.txtPostcode.Text;inputAddress.Address.Country=this.txtCountry.Text;
geocodeRequest.InputAddress= new InputAddressType[] {inputAddress};
geocodeRequest.GeocodeConstraints= new GeocodeConstraintsType();
geocodeRequest.GeocodeConstraints.BaseConstraints= new BaseConstraintsType();
requestEnvelope.Item= geocodeRequest;requestEnvelope.ItemElementName=ItemChoiceType.GeocodeRequest;
XmlSerializerNamespaces ns = new XmlSerializerNamespaces();ns.Add("", "");
XmlSerializer serializer = new XmlSerializer(requestEnvelope.GetType());
serializer.Serialize(sw,requestEnvelope,ns);xmlRequest = sw.ToString();
Byte[] requestStream = System.Text.Encoding.Unicode.GetBytes(xmlRequest);
web.Headers.Add("Content-Type", "text/xml");web.Headers.Add("MI_XMLProtocolRequest", "GeocodeRequest");web.Headers.Add("MI_XMLProtocolVersion",
"MI_XML_Protocol_GeocodeRequestAndResponse_1_0");web.Headers.Add("MI_XMLProtocolTransactionId", "0000");
112 MapMarker Plus Canada 8
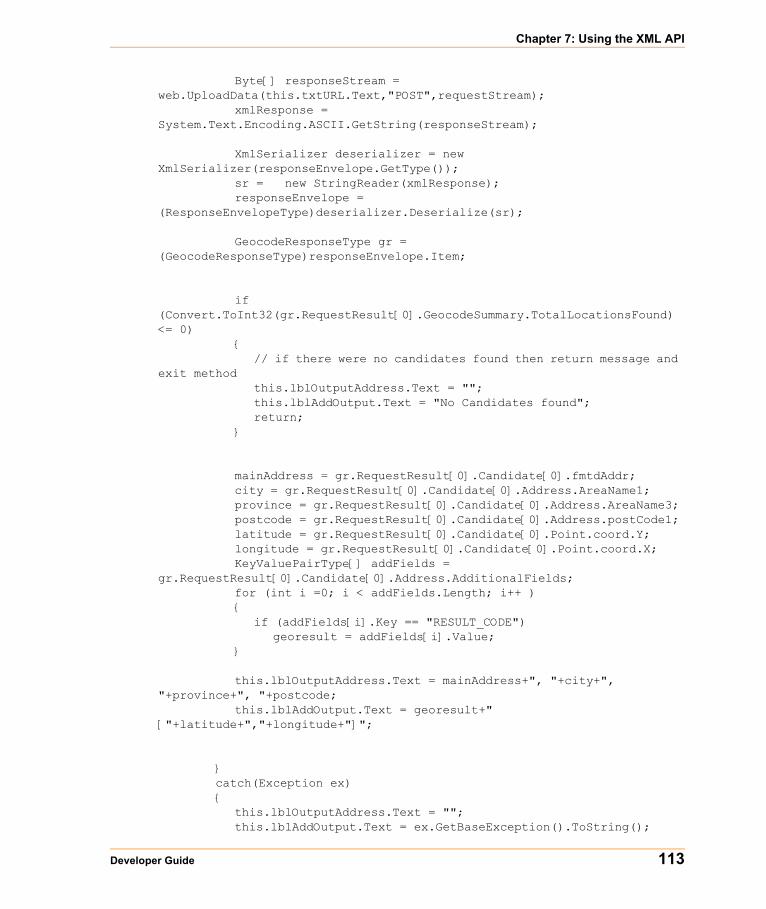
Chapter 7: Using the XML API
Byte[] responseStream = web.UploadData(this.txtURL.Text,"POST",requestStream);
xmlResponse = System.Text.Encoding.ASCII.GetString(responseStream);
XmlSerializer deserializer = new XmlSerializer(responseEnvelope.GetType());
sr = new StringReader(xmlResponse);responseEnvelope =
(ResponseEnvelopeType)deserializer.Deserialize(sr);
GeocodeResponseType gr = (GeocodeResponseType)responseEnvelope.Item;
if (Convert.ToInt32(gr.RequestResult[0].GeocodeSummary.TotalLocationsFound) <= 0)
{// if there were no candidates found then return message and
exit methodthis.lblOutputAddress.Text = "";this.lblAddOutput.Text = "No Candidates found";return;
}
mainAddress = gr.RequestResult[0].Candidate[0].fmtdAddr;city = gr.RequestResult[0].Candidate[0].Address.AreaName1;province = gr.RequestResult[0].Candidate[0].Address.AreaName3;postcode = gr.RequestResult[0].Candidate[0].Address.postCode1;latitude = gr.RequestResult[0].Candidate[0].Point.coord.Y;longitude = gr.RequestResult[0].Candidate[0].Point.coord.X;KeyValuePairType[] addFields =
gr.RequestResult[0].Candidate[0].Address.AdditionalFields;for (int i =0; i < addFields.Length; i++ ){
if (addFields[i].Key == "RESULT_CODE") georesult = addFields[i].Value;
}
this.lblOutputAddress.Text = mainAddress+", "+city+", "+province+", "+postcode;
this.lblAddOutput.Text = georesult+" ["+latitude+","+longitude+"]";
}catch(Exception ex){
this.lblOutputAddress.Text = "";this.lblAddOutput.Text = ex.GetBaseException().ToString();
Developer Guide 113
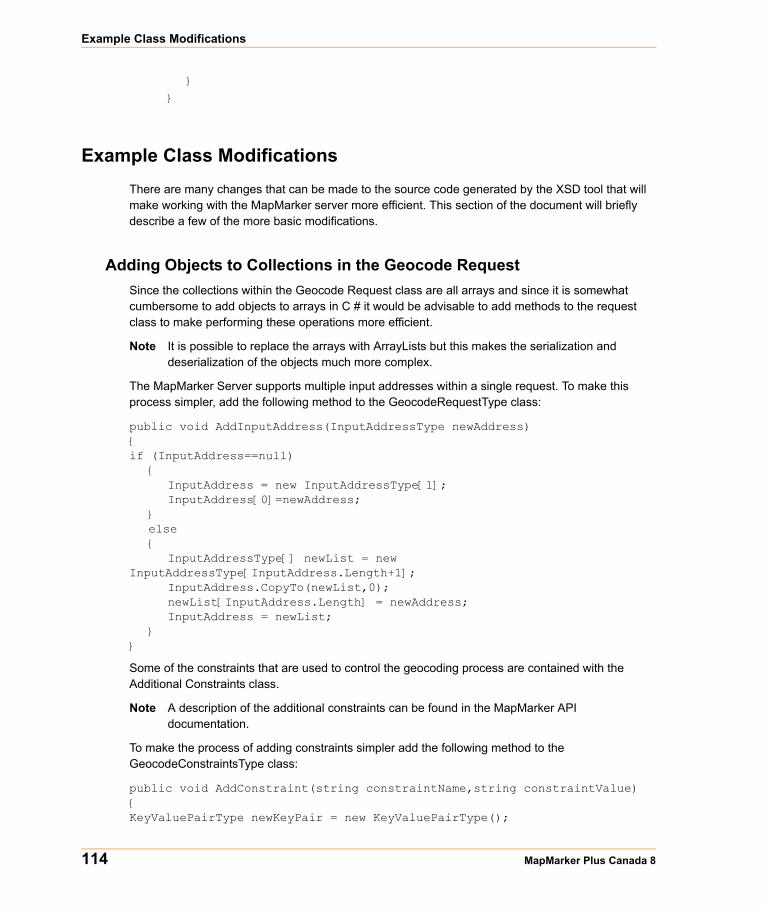
Example Class Modifications
}
}
Example Class ModificationsThere are many changes that can be made to the source code generated by the XSD tool that will make working with the MapMarker server more efficient. This section of the document will briefly describe a few of the more basic modifications.
Adding Objects to Collections in the Geocode RequestSince the collections within the Geocode Request class are all arrays and since it is somewhat cumbersome to add objects to arrays in C # it would be advisable to add methods to the request class to make performing these operations more efficient.
Note It is possible to replace the arrays with ArrayLists but this makes the serialization and deserialization of the objects much more complex.
The MapMarker Server supports multiple input addresses within a single request. To make this process simpler, add the following method to the GeocodeRequestType class:
public void AddInputAddress(InputAddressType newAddress){if (InputAddress==null)
{InputAddress = new InputAddressType[1];InputAddress[0]=newAddress;
}else{
InputAddressType[] newList = new InputAddressType[InputAddress.Length+1];
InputAddress.CopyTo(newList,0);newList[InputAddress.Length] = newAddress;InputAddress = newList;
}}
Some of the constraints that are used to control the geocoding process are contained with the Additional Constraints class.
Note A description of the additional constraints can be found in the MapMarker API documentation.
To make the process of adding constraints simpler add the following method to the GeocodeConstraintsType class:
public void AddConstraint(string constraintName,string constraintValue){KeyValuePairType newKeyPair = new KeyValuePairType();
114 MapMarker Plus Canada 8

Chapter 7: Using the XML API
newKeyPair.Key=constraintName;newKeyPair.Value=constraintValue;
if (AdditionalConstraints==null){
AdditionalConstraints = new KeyValuePairType[1];AdditionalConstraints[0]= newKeyPair;
}else{
KeyValuePairType[] newList = new
KeyValuePairType[AdditionalConstraints.Length+1];AdditionalConstraints.CopyTo(newList,0);newList[AdditionalConstraints.Length]=newKeyPair;AdditionalConstraints = newList;
}}
Request Web HeadersEach type of MapMarker request has its own set of HTTP headers that must be specified before sending the request to the MapMarker server. The following code snippets illustrate the required headers for each type of supported request.
Geocode Requestweb.Headers.Clear();web.Headers.Add("Content-Type", "text/xml");web.Headers.Add("MI_XMLProtocolRequest", "GeocodeRequest");web.Headers.Add("MI_XMLProtocolVersion", "MI_XML_Protocol_GeocodeRequestAndResponse_1_0");web.Headers.Add("MI_XMLProtocolTransactionId", "0000");
Get Versions Requestweb.Headers.Clear();web.Headers.Add("Content-Type", "text/xml");
Get License Information Requestweb.Headers.Clear();web.Headers.Add("Content-Type", "text/xml");web.Headers.Add("MI_XMLProtocolRequest", "LicenseInformationRequest");
Get Dictionary Search Order Requestweb.Headers.Clear();web.Headers.Add("Content-Type", "text/xml");web.Headers.Add("MI_XMLProtocolRequest", "DictionarySearchOrderRequest");
Get Constraints Requestweb.Headers.Clear();
Developer Guide 115

Example Class Modifications
web.Headers.Add("Content-Type", "text/xml");web.Headers.Add("MI_XMLProtocolRequest", "ConstraintsRequest");
116 MapMarker Plus Canada 8
8
MapMarker Sample ApplicationThe MapMarker sample application is a Java client that illustrates how to geocode Canadian addresses using the MapMarker Plus Canada developer product.
In this chapter:
Requirements and Setup . . . . . . . . . . . . . . . . . . . . . . . . . . . . . . . .118Using the Sample Application. . . . . . . . . . . . . . . . . . . . . . . . . . . .118

Requirements and Setup
Requirements and SetupBefore you try to geocode an address using the application, make sure that you have access to a MapMarker Plus Canada server. To start the server, run the startup.bat (Windows) or startup.sh (UNIX) from the \sdk\additional_tools directory in the path where you installed MapMarker. Windows users may also use the program shortcut in the Start menu.
Be sure that your classpath is modified to include path(s) to the following list of jar files.
• mmjclient.jar• mmjclient_can.jar• micsys.jar• miutil.jar• xercesImpl.jar• jdom.jar• mmjsample_can.jar
Using the Sample ApplicationRun the sample application (MMJE_CAN_Sample.class) from the \sdk\examples-can directory where you installed MapMarker. Windows users may also use the Start menu program shortcut.
118 MapMarker Plus Canada 8
Chapter 8: MapMarker Sample Application
Testing the ServerThe server must be running properly before you can perform any successful geocoding. To test the server, use the sample application's URL server test area. The URL to the MapMarker Plus Canada server is already filled in. You can change the URL to the location of a different server. Click the Test button. If you have successfully connected to a MapMarker Plus Canada server, the text under the URL displays Server: VALID. If the connection is not successful, then the text under the URL displays Server: INVALID.
Setting PreferencesThere are a number of preferences you can set that modifies the results of the geocode process.
• Close Match Only – specifies the geocoder return only those candidates that have been flagged as close matches to the input address.
• Fall Back to Postal – the geocoder attempts to geocode to the postal centroid if no candidates were returned from an address geocode and a postal code was supplied.
• Fall Back to Geographic – the geocoder attempts to geocode to the urban area centroid or the province centroid, depending on the data available.
• Max Candidates – enables you to change the number of candidates returned from the server.• Dictionary Options – enables you to specify whether you want candidates to come from address
dictionaries, user dictionaries, or both. If using both, you can also give preference to candidates from either address dictionaries or user dictionaries.
• Geocode Type – enables you to specify whether to geocode to street, postal code, or geographic centroid.
Setting Must Match OptionsThere are also several must match options that you can select to change the number of candidates returned from the server. These options specify that the returned candidates must match certain parts of an address. These include:
• House Num (house number)• Street• Province• FSA• City• Input
Postal GeocodingIf you provide a postal code only, you can perform a postal geocode. To attempt a postal geocode, provide a valid postal code in the Postal Code text box and click Geocode Address at the bottom of the application.
Developer Guide 119
Using the Sample Application
Geographic GeocodingIf you provide a city or town name, you can geocode to the city or town. This is not very accurate and is useful only if none of the other geocoding options are available.
Address GeocodingIf you provide a street address, and either a town and state, or a postal code, you can perform an address geocode. To attempt an address geocode, use the Street Name text box to input the street, including a house number if available. Use the Postal Code text box to input the Postal Code and/or use the City Name text box to input the town. When geocoding an address you may change the preferences and must match options. To geocode the address, click Geocode Address at the bottom of the application.
Note MapMarker allows you to geocode to street intersections. The two streets must be separated by an "&&" for MapMarker to recognize them as a street intersection.
Viewing CandidatesIf there are any candidates returned from the server, they are displayed in the Candidates section of the application. This table includes the following columns of information:
• CloseMatch (True or False) • Street• City• Province• FSA• LDU
The following information is also displayed in the application.
• DA (Dissemination Area)• Long (Longitude)• Lat (Latitude)• Result• CSD (Census Subdivision)• CD (Census Division)• CMA (Census Metropolitan Area)• CT (Census Tract)• Pr Code
Candidate StatisticsThe Candidate Statistics frame displays the number of possible candidates, close match candidates, and total returned candidates.
120 MapMarker Plus Canada 8
9
Deploying ApplicationsThis chapter discusses how to deploy your application as a Web servlet and how you can integrate MapMarker Plus Canada with other MapMarker country geocoders.
In this chapter:
Deploying MapMarker Plus as a Servlet . . . . . . . . . . . . . . . . . . .122Integration with MapMarker for Other Countries . . . . . . . . . . . .122Canada/USA Server Integration . . . . . . . . . . . . . . . . . . . . . . . . . .123

Deploying MapMarker Plus as a Servlet
Deploying MapMarker Plus as a ServletA servlet is a Java program that runs as part of a network service, typically an HTTP server. The most common use for a servlet is to extend a web server by generating web content dynamically. MapMarker Plus Canada extends the Java servlet class which provides all of the necessary functionality for acting as a web server. MapMarker is J2EE compliant making it easy to deploy in most available application server software.
Using the Default Tomcat Servlet ContainerMapMarker Plus Canada is installed in the Tomcat Servlet Container 5.5.9. The installer provides this example environment so that you can run the servlet and sample application immediately after finishing the installation. Simply use the default shortcut to start the server.
On Windows platforms the default shortcut is located under the Windows Start menu, Programs > MapMarker Plus > Start Server.
On UNIX platforms the default shortcut is installed in your home directory and is called Start_Server.
Deploying MapMarker Server in Other Web EnvironmentsMapMarker Plus Canada is verified and supported on Sun One 9.0, WebLogic 9.0, and WebSphere 5.1 and 6.0.
For information about deploying servlet applications and for information on servlet container specific requirements, see the documentation that was delivered with your servlet container.
For information about servlet technology and creating a war file, read the documentation on the Sun Web site, http://java.sun.com/products/servlet/product.html
Sun also provides a list of servlet containers on the following Web site, including links to those products, http://java.sun.com/products/servlet/industry.html
More information about the Tomcat Servlet Container can be found online at http://jakarta.apache.org/tomcat/index.html
Integration with MapMarker for Other CountriesIf you plan on using multiple countries with MapMarker, you have several integration options. The following options are discussed:
• Running one Tomcat web server for each country.• Integrating multiple countries in one servlet context.
Running One Tomcat Web Server for Each Country
The default HTTP port for MapMarker Plus Canada is 8096. You may use the default port for each country you install. If this is the case, the same URL is used for all Tomcat web servers. Therefore, only one Tomcat (country) web server may run at a time, since each Tomcat web server would be
122 MapMarker Plus Canada 8

Chapter 9: Deploying Applications
using the same port. To allow multiple Tomcat web servers to run simultaneously, you must specify a unique installation directory and unique HTTP startup and shutdown ports for each Tomcat web server. You can specify the installation directory and the HTTP startup and shutdown ports during installation.
To alter the ports after installation, modify server.xml in $TOMCAT_HOME/ conf. This scenario allows unique URLs for each Tomcat web server. Note that running multiple web servers simultaneously may decrease performance.
Integrating Multiple Countries in One Servlet Context
In order to allow multiple countries to run under one URL, you need to do the following:
1. Install the first country. Expand the mapmarker war file created by the installer into the proper location for servlet contexts. Consult the Application Server's documentation for the proper servlet context location on the file system.
2. Install the subsequent countries. You must install, as a minimum, the MapMarker server component and country data.
3. For each country you wish to integrate into the existing servlet context, copy the country specific jar files and properties files from the server installation in the previous step into the servlet context for the first country.
Country specific jar files are found under the lib directory in the servlet context; country specific property files can be found under the classes directory. Ensure the directory structure is maintained under the classes directory when copying files to a new location. If it is necessary to move the country data to a different location, you must update the property file path information located in the classes directory.
4. Verify settings (such as MapMarker data location, and library location) in the country specific properties files are appropriate for the given Application Server.
5. Restart the Application Server.
Note MapMarker Plus Canada 8 is built upon the MapMarker Java core version 4.0. Older core versions (2.0 and 3.0) cannot be integrated into one servlet context with MapMarker Plus Canada 8.
Canada/USA Server IntegrationThe primary advantage of integrating USA and CAN geocoders into one Tomcat instance is to allow the ability to geocode using one URL. It is still possible to geocode USA and CAN addresses with two instances of Tomcat (USA uses port 8095; CAN uses port 8096) or with one instance of Tomcat with two contexts.
Developer Guide 123
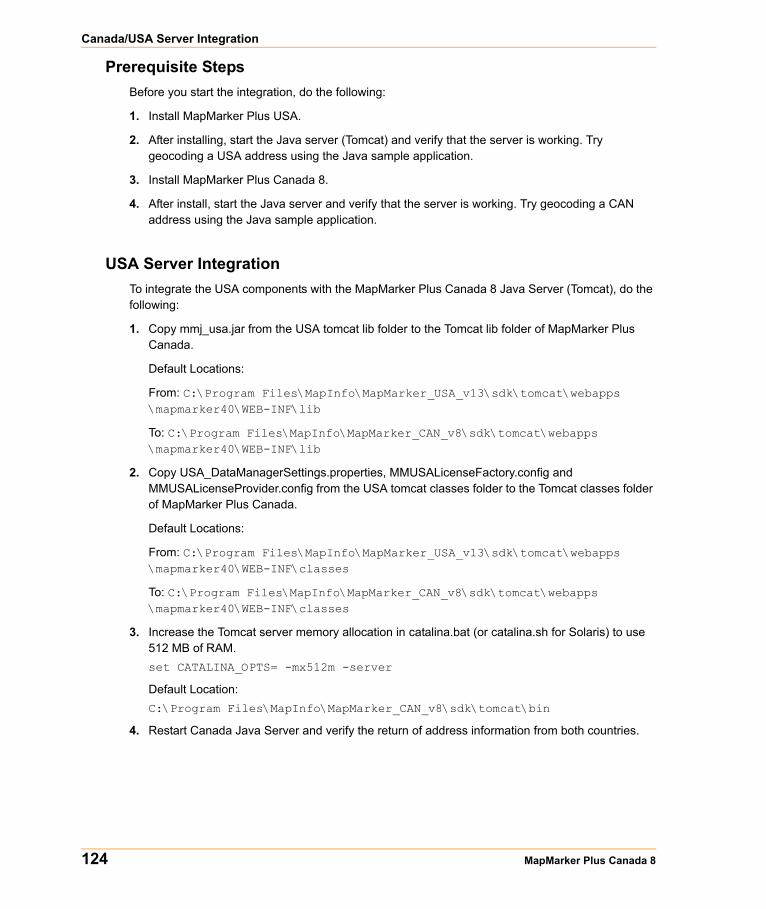
Canada/USA Server Integration
Prerequisite StepsBefore you start the integration, do the following:
1. Install MapMarker Plus USA.
2. After installing, start the Java server (Tomcat) and verify that the server is working. Try geocoding a USA address using the Java sample application.
3. Install MapMarker Plus Canada 8.
4. After install, start the Java server and verify that the server is working. Try geocoding a CAN address using the Java sample application.
USA Server IntegrationTo integrate the USA components with the MapMarker Plus Canada 8 Java Server (Tomcat), do the following:
1. Copy mmj_usa.jar from the USA tomcat lib folder to the Tomcat lib folder of MapMarker Plus Canada.
Default Locations:
From: C:\Program Files\MapInfo\MapMarker_USA_v13\sdk\tomcat\webapps\mapmarker40\WEB-INF\lib
To: C:\Program Files\MapInfo\MapMarker_CAN_v8\sdk\tomcat\webapps\mapmarker40\WEB-INF\lib
2. Copy USA_DataManagerSettings.properties, MMUSALicenseFactory.config and MMUSALicenseProvider.config from the USA tomcat classes folder to the Tomcat classes folder of MapMarker Plus Canada.
Default Locations:
From: C:\Program Files\MapInfo\MapMarker_USA_v13\sdk\tomcat\webapps\mapmarker40\WEB-INF\classes
To: C:\Program Files\MapInfo\MapMarker_CAN_v8\sdk\tomcat\webapps\mapmarker40\WEB-INF\classes
3. Increase the Tomcat server memory allocation in catalina.bat (or catalina.sh for Solaris) to use 512 MB of RAM.set CATALINA_OPTS= -mx512m -server
Default Location:C:\Program Files\MapInfo\MapMarker_CAN_v8\sdk\tomcat\bin
4. Restart Canada Java Server and verify the return of address information from both countries.
124 MapMarker Plus Canada 8

10
Using Custom User DictionariesThis chapter describes how to can configure and set preferences for User Dictionaries using the MapMarker API.
In this chapter:
User Dictionary Configuration . . . . . . . . . . . . . . . . . . . . . . . . . . .126User Dictionary Preferences . . . . . . . . . . . . . . . . . . . . . . . . . . . . .126Client Preferences . . . . . . . . . . . . . . . . . . . . . . . . . . . . . . . . . . . . .128
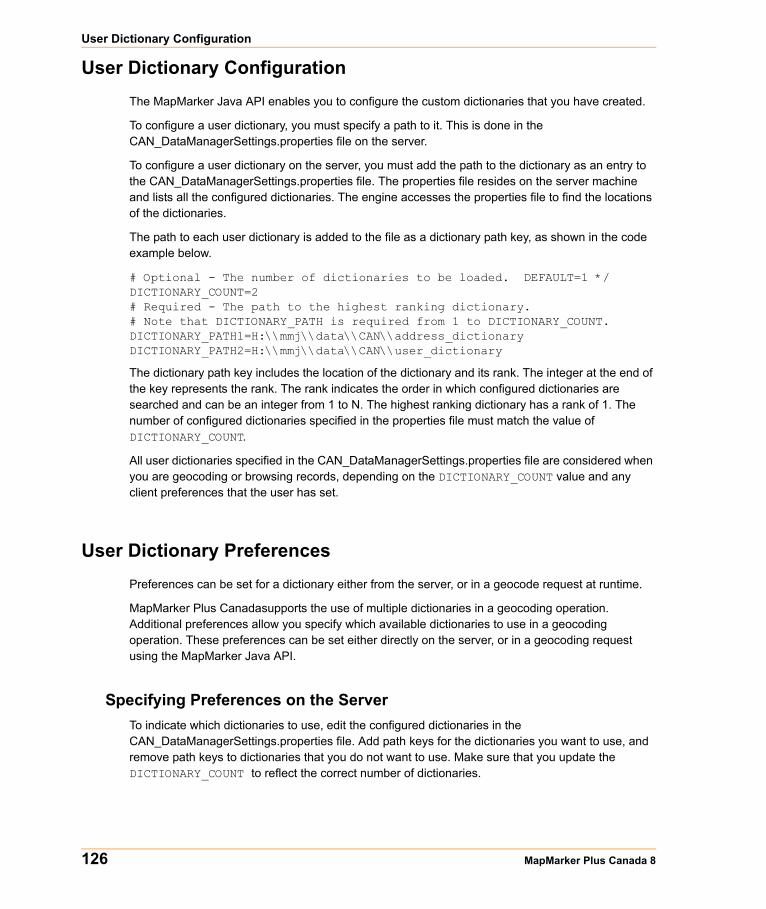
User Dictionary Configuration
User Dictionary ConfigurationThe MapMarker Java API enables you to configure the custom dictionaries that you have created.
To configure a user dictionary, you must specify a path to it. This is done in the CAN_DataManagerSettings.properties file on the server.
To configure a user dictionary on the server, you must add the path to the dictionary as an entry to the CAN_DataManagerSettings.properties file. The properties file resides on the server machine and lists all the configured dictionaries. The engine accesses the properties file to find the locations of the dictionaries.
The path to each user dictionary is added to the file as a dictionary path key, as shown in the code example below.
# Optional - The number of dictionaries to be loaded. DEFAULT=1 */DICTIONARY_COUNT=2# Required - The path to the highest ranking dictionary.# Note that DICTIONARY_PATH is required from 1 to DICTIONARY_COUNT.DICTIONARY_PATH1=H:\\mmj\\data\\CAN\\address_dictionaryDICTIONARY_PATH2=H:\\mmj\\data\\CAN\\user_dictionary
The dictionary path key includes the location of the dictionary and its rank. The integer at the end of the key represents the rank. The rank indicates the order in which configured dictionaries are searched and can be an integer from 1 to N. The highest ranking dictionary has a rank of 1. The number of configured dictionaries specified in the properties file must match the value of DICTIONARY_COUNT.
All user dictionaries specified in the CAN_DataManagerSettings.properties file are considered when you are geocoding or browsing records, depending on the DICTIONARY_COUNT value and any client preferences that the user has set.
User Dictionary PreferencesPreferences can be set for a dictionary either from the server, or in a geocode request at runtime.
MapMarker Plus Canadasupports the use of multiple dictionaries in a geocoding operation. Additional preferences allow you specify which available dictionaries to use in a geocoding operation. These preferences can be set either directly on the server, or in a geocoding request using the MapMarker Java API.
Specifying Preferences on the ServerTo indicate which dictionaries to use, edit the configured dictionaries in the CAN_DataManagerSettings.properties file. Add path keys for the dictionaries you want to use, and remove path keys to dictionaries that you do not want to use. Make sure that you update the DICTIONARY_COUNT to reflect the correct number of dictionaries.
126 MapMarker Plus Canada 8
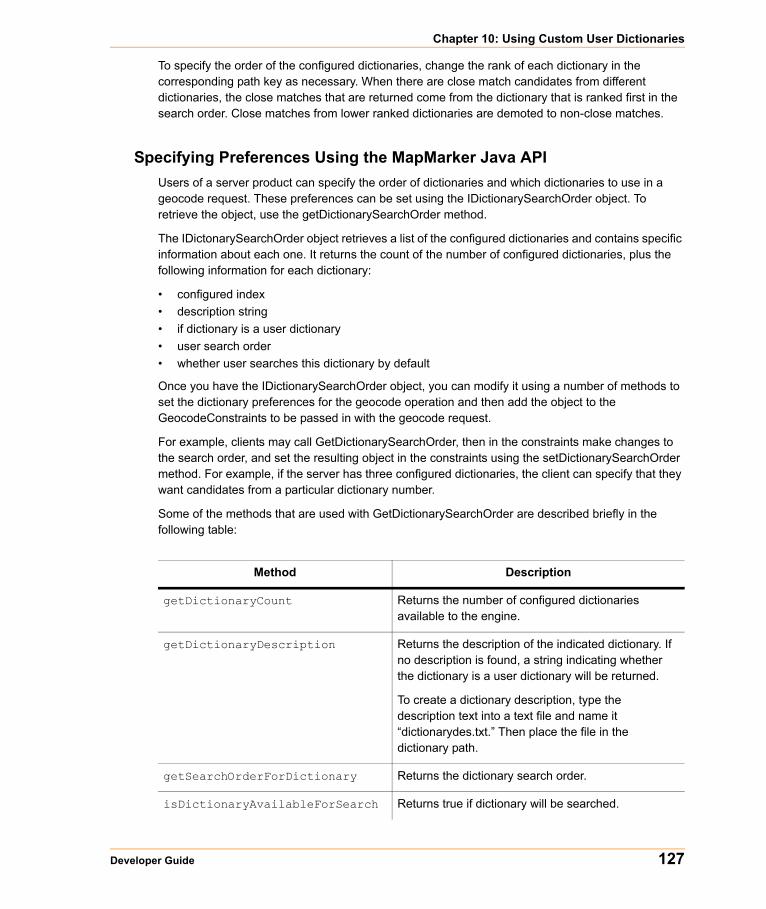
Chapter 10: Using Custom User Dictionaries
To specify the order of the configured dictionaries, change the rank of each dictionary in the corresponding path key as necessary. When there are close match candidates from different dictionaries, the close matches that are returned come from the dictionary that is ranked first in the search order. Close matches from lower ranked dictionaries are demoted to non-close matches.
Specifying Preferences Using the MapMarker Java APIUsers of a server product can specify the order of dictionaries and which dictionaries to use in a geocode request. These preferences can be set using the IDictionarySearchOrder object. To retrieve the object, use the getDictionarySearchOrder method.
The IDictonarySearchOrder object retrieves a list of the configured dictionaries and contains specific information about each one. It returns the count of the number of configured dictionaries, plus the following information for each dictionary:
• configured index• description string• if dictionary is a user dictionary• user search order• whether user searches this dictionary by default
Once you have the IDictionarySearchOrder object, you can modify it using a number of methods to set the dictionary preferences for the geocode operation and then add the object to the GeocodeConstraints to be passed in with the geocode request.
For example, clients may call GetDictionarySearchOrder, then in the constraints make changes to the search order, and set the resulting object in the constraints using the setDictionarySearchOrder method. For example, if the server has three configured dictionaries, the client can specify that they want candidates from a particular dictionary number.
Some of the methods that are used with GetDictionarySearchOrder are described briefly in the following table:
Method Description
getDictionaryCount Returns the number of configured dictionaries available to the engine.
getDictionaryDescription Returns the description of the indicated dictionary. If no description is found, a string indicating whether the dictionary is a user dictionary will be returned.
To create a dictionary description, type the description text into a text file and name it “dictionarydes.txt.” Then place the file in the dictionary path.
getSearchOrderForDictionary Returns the dictionary search order.
isDictionaryAvailableForSearch Returns true if dictionary will be searched.
Developer Guide 127
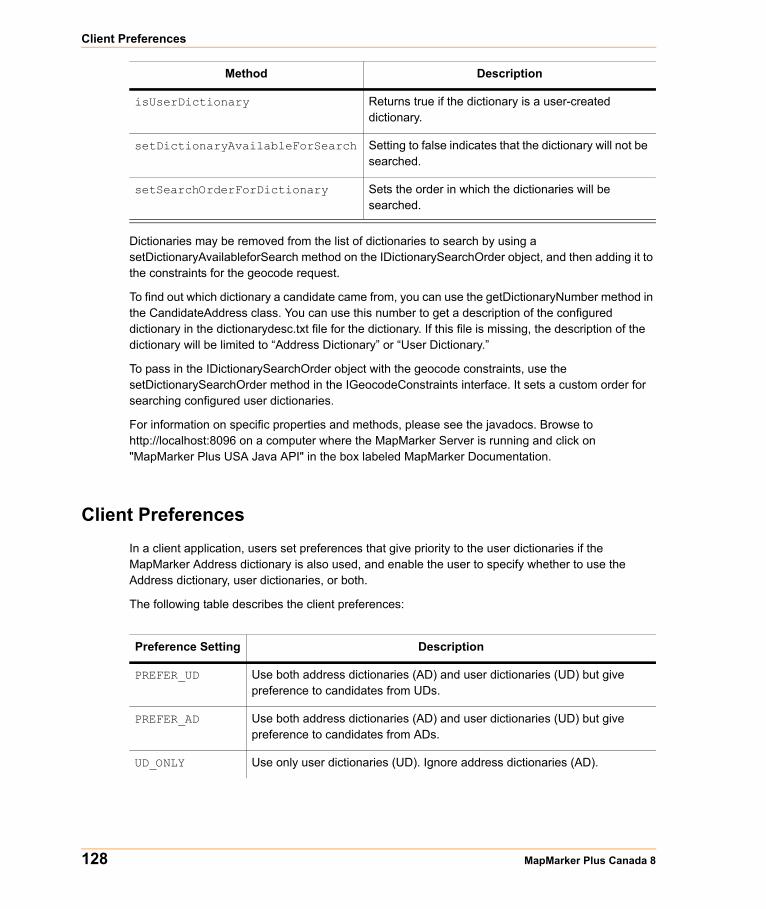
Client Preferences
Dictionaries may be removed from the list of dictionaries to search by using a setDictionaryAvailableforSearch method on the IDictionarySearchOrder object, and then adding it to the constraints for the geocode request.
To find out which dictionary a candidate came from, you can use the getDictionaryNumber method in the CandidateAddress class. You can use this number to get a description of the configured dictionary in the dictionarydesc.txt file for the dictionary. If this file is missing, the description of the dictionary will be limited to “Address Dictionary” or “User Dictionary.”
To pass in the IDictionarySearchOrder object with the geocode constraints, use the setDictionarySearchOrder method in the IGeocodeConstraints interface. It sets a custom order for searching configured user dictionaries.
For information on specific properties and methods, please see the javadocs. Browse to http://localhost:8096 on a computer where the MapMarker Server is running and click on "MapMarker Plus USA Java API" in the box labeled MapMarker Documentation.
Client PreferencesIn a client application, users set preferences that give priority to the user dictionaries if the MapMarker Address dictionary is also used, and enable the user to specify whether to use the Address dictionary, user dictionaries, or both.
The following table describes the client preferences:
isUserDictionary Returns true if the dictionary is a user-created dictionary.
setDictionaryAvailableForSearch Setting to false indicates that the dictionary will not be searched.
setSearchOrderForDictionary Sets the order in which the dictionaries will be searched.
Method Description
Preference Setting Description
PREFER_UD Use both address dictionaries (AD) and user dictionaries (UD) but give preference to candidates from UDs.
PREFER_AD Use both address dictionaries (AD) and user dictionaries (UD) but give preference to candidates from ADs.
UD_ONLY Use only user dictionaries (UD). Ignore address dictionaries (AD).
128 MapMarker Plus Canada 8

Chapter 10: Using Custom User Dictionaries
AD_ONLY Use only address dictionaries (AD). Ignore user dictionaries (UD).
AD_AND_UD Use both address dictionaries (AD) and user dictionaries (UD) with no special preference to candidates. This is the default.
Preference Setting Description
Developer Guide 129

Client Preferences
130 MapMarker Plus Canada 8
Part III: Appendices
Topics:
Updating Older MapMarker Plus Canada Applications . . . . . . . . . . . . . . . . . . . . . . . . . . . . . . . . . . 129JNI Adapter Configuration File Settings . . . . . . . . . . . . . . . . . . . . . . . . . . . . . . . . . . . . . . . . . . . . . . 133Error Messages . . . . . . . . . . . . . . . . . . . . . . . . . . . . . . . . . . . . . . . . . . . . . . . . . . . . . . . . . . . . . . . . 135

A
JNI Adapter Configuration File SettingsThis appendix explains the settings you can modify in the configuration file of the JNI adapter.
In this appendix:
JVM Settings. . . . . . . . . . . . . . . . . . . . . . . . . . . . . . . . . . . . . . . . . .134Country Settings . . . . . . . . . . . . . . . . . . . . . . . . . . . . . . . . . . . . . .134

Country Settings
JVM SettingsThe configuration file controls the creation of the JVM in which the Java engine runs. The JVM settings are useful for changing the amount of memory used by the JVM.
Here are the settings:
+numVmOptions=<the number of settings for the JVM>-Djava.class.path=<the series of jar files required to geocode addresses in the selected country>-server–causes a server JVM to be created (Windows only)-Xms128m–minimum heap size for JVM to create when initialized (128 M)-Xmx256m–maximum size JVM heap can grow to (256 M)-Xmn40m–another memory related setting for the JVM
In this example, the +numVmOptions setting would be set to 5.
The following options are used to create the JVM but are not strictly JVM settings:
+jvmVersion=0x00010004–the version of JVM to create, in this case 1.4+jvmPath–the full file path to the jvm.dll (including the filename jvm.dll) (Windows only)
Country SettingsThe following setting indicates the country that the adapter is going to use for geocoding.
+country=<the country this configuration file is for geocoding>
All classes for this country must be given in the –Djava.class.path setting in the JVM settings described in the previous section.
134 MapMarker Canada v.8
B
Error MessagesThis appendix provides a reference to error messages you may receive in the course of using MapMarker Canada.
In this appendix:
MapMarker Java API Errors, p. 136Geocoding Engine Errors, p. 140Adapter Errors, p. 141
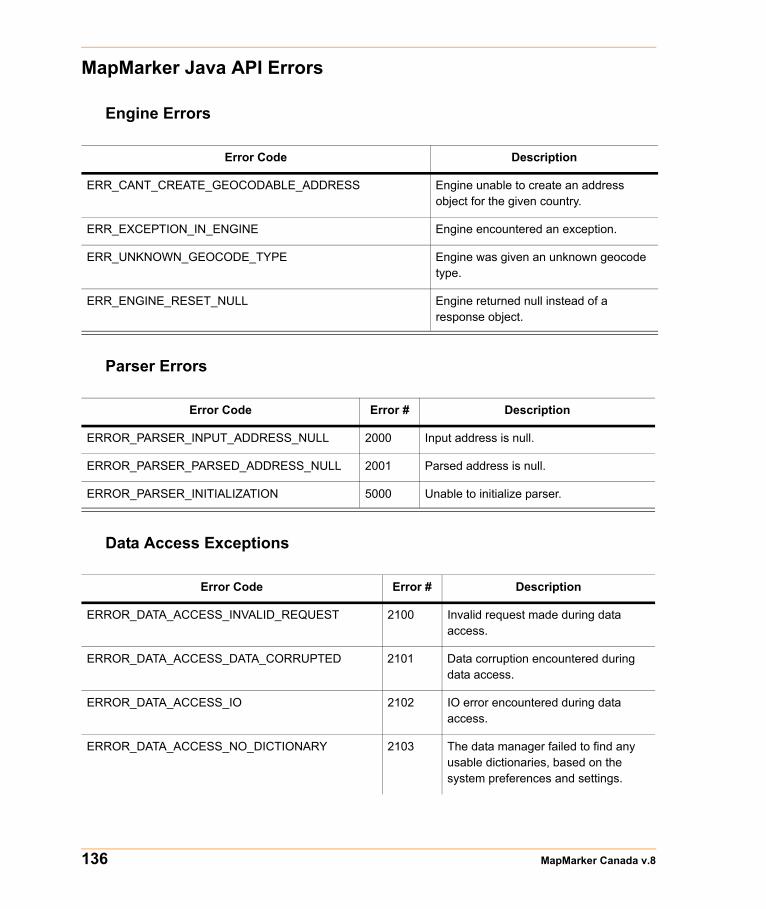
MapMarker Java API Errors
Engine Errors
Parser Errors
Data Access Exceptions
Error Code Description
ERR_CANT_CREATE_GEOCODABLE_ADDRESS Engine unable to create an address object for the given country.
ERR_EXCEPTION_IN_ENGINE Engine encountered an exception.
ERR_UNKNOWN_GEOCODE_TYPE Engine was given an unknown geocode type.
ERR_ENGINE_RESET_NULL Engine returned null instead of a response object.
Error Code Error # Description
ERROR_PARSER_INPUT_ADDRESS_NULL 2000 Input address is null.
ERROR_PARSER_PARSED_ADDRESS_NULL 2001 Parsed address is null.
ERROR_PARSER_INITIALIZATION 5000 Unable to initialize parser.
Error Code Error # Description
ERROR_DATA_ACCESS_INVALID_REQUEST 2100 Invalid request made during data access.
ERROR_DATA_ACCESS_DATA_CORRUPTED 2101 Data corruption encountered during data access.
ERROR_DATA_ACCESS_IO 2102 IO error encountered during data access.
ERROR_DATA_ACCESS_NO_DICTIONARY 2103 The data manager failed to find any usable dictionaries, based on the system preferences and settings.
136 MapMarker Canada v.8
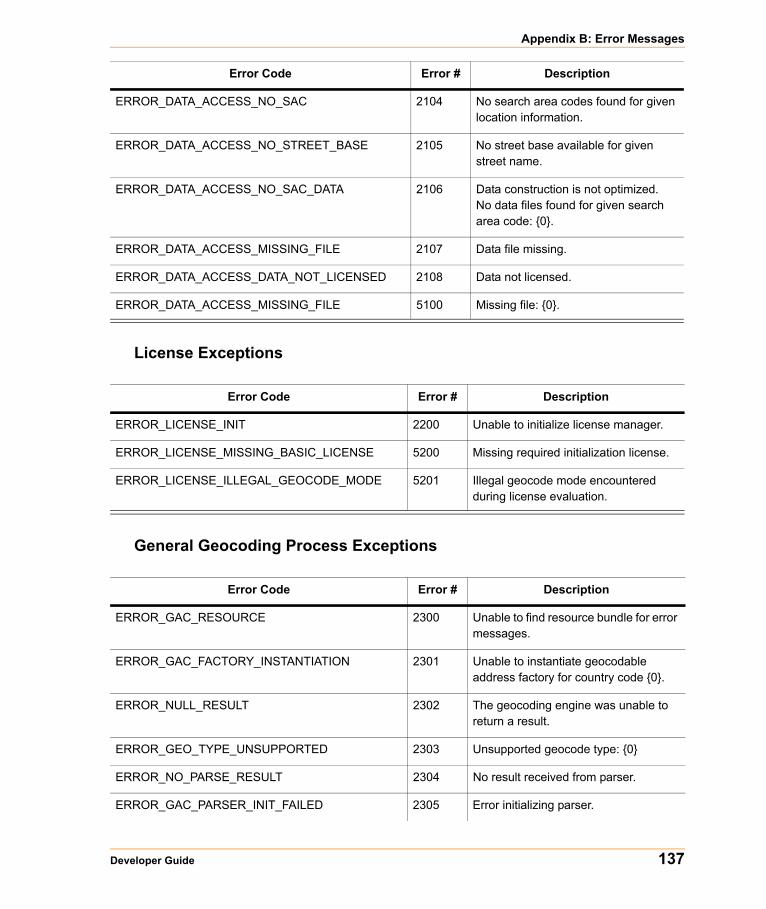
Appendix B: Error Messages
License Exceptions
General Geocoding Process Exceptions
ERROR_DATA_ACCESS_NO_SAC 2104 No search area codes found for given location information.
ERROR_DATA_ACCESS_NO_STREET_BASE 2105 No street base available for given street name.
ERROR_DATA_ACCESS_NO_SAC_DATA 2106 Data construction is not optimized. No data files found for given search area code: {0}.
ERROR_DATA_ACCESS_MISSING_FILE 2107 Data file missing.
ERROR_DATA_ACCESS_DATA_NOT_LICENSED 2108 Data not licensed.
ERROR_DATA_ACCESS_MISSING_FILE 5100 Missing file: {0}.
Error Code Error # Description
ERROR_LICENSE_INIT 2200 Unable to initialize license manager.
ERROR_LICENSE_MISSING_BASIC_LICENSE 5200 Missing required initialization license.
ERROR_LICENSE_ILLEGAL_GEOCODE_MODE 5201 Illegal geocode mode encountered during license evaluation.
Error Code Error # Description
ERROR_GAC_RESOURCE 2300 Unable to find resource bundle for error messages.
ERROR_GAC_FACTORY_INSTANTIATION 2301 Unable to instantiate geocodable address factory for country code {0}.
ERROR_NULL_RESULT 2302 The geocoding engine was unable to return a result.
ERROR_GEO_TYPE_UNSUPPORTED 2303 Unsupported geocode type: {0}
ERROR_NO_PARSE_RESULT 2304 No result received from parser.
ERROR_GAC_PARSER_INIT_FAILED 2305 Error initializing parser.
Error Code Error # Description
Developer Guide 137
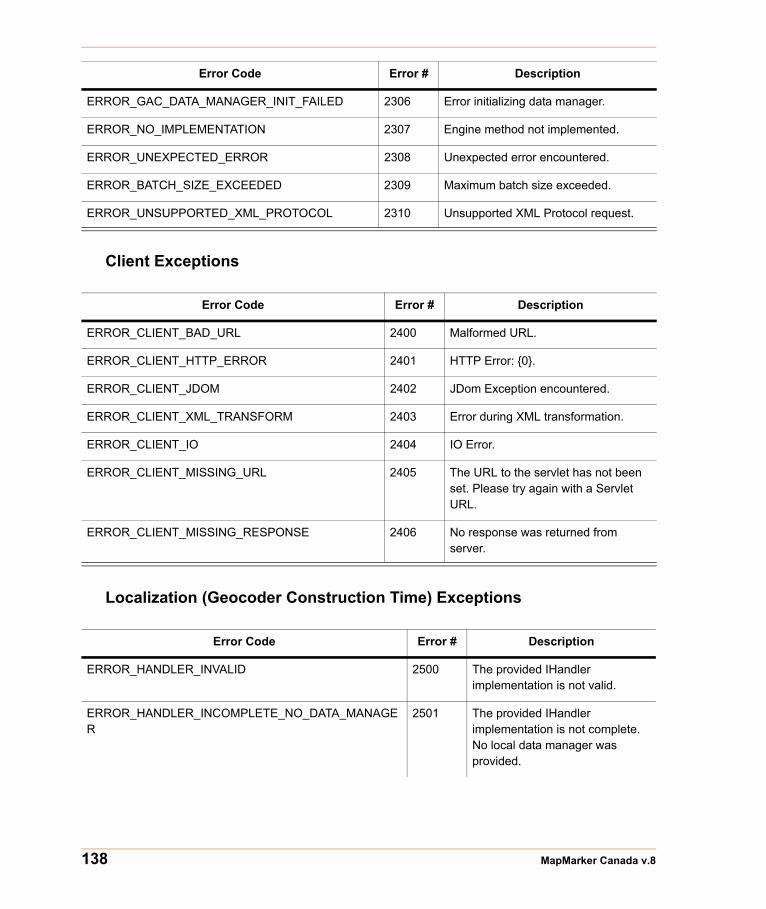
Client Exceptions
Localization (Geocoder Construction Time) Exceptions
ERROR_GAC_DATA_MANAGER_INIT_FAILED 2306 Error initializing data manager.
ERROR_NO_IMPLEMENTATION 2307 Engine method not implemented.
ERROR_UNEXPECTED_ERROR 2308 Unexpected error encountered.
ERROR_BATCH_SIZE_EXCEEDED 2309 Maximum batch size exceeded.
ERROR_UNSUPPORTED_XML_PROTOCOL 2310 Unsupported XML Protocol request.
Error Code Error # Description
ERROR_CLIENT_BAD_URL 2400 Malformed URL.
ERROR_CLIENT_HTTP_ERROR 2401 HTTP Error: {0}.
ERROR_CLIENT_JDOM 2402 JDom Exception encountered.
ERROR_CLIENT_XML_TRANSFORM 2403 Error during XML transformation.
ERROR_CLIENT_IO 2404 IO Error.
ERROR_CLIENT_MISSING_URL 2405 The URL to the servlet has not been set. Please try again with a Servlet URL.
ERROR_CLIENT_MISSING_RESPONSE 2406 No response was returned from server.
Error Code Error # Description
ERROR_HANDLER_INVALID 2500 The provided IHandler implementation is not valid.
ERROR_HANDLER_INCOMPLETE_NO_DATA_MANAGER
2501 The provided IHandler implementation is not complete. No local data manager was provided.
Error Code Error # Description
138 MapMarker Canada v.8

Appendix B: Error Messages
ERROR_HANDLER_INCOMPLETE_NO_PARSER_RULES
2502 The provided IHandler implementation is not complete. No local address parsing rules were provided.
ERROR_HANDLER_INVALID_ADDRESS_GEOCODER 2503 The IAddressGeocoder provided in the IHandler implementation is required but not valid.
ERROR_HANDLER_INVALID_POSTAL_GEOCODER 2504 The IPostalGeocoder provided in the IHandler implementation is required but not valid.
ERROR_HANDLER_INVALID_GEOGRAPHIC_GEOCODER
2505 The IGeographicGeocoder provided in the IHandler implementation is required but not valid.
ERROR_HANDLER_INVALID_BROWSE_GEOCODER 2506 The IBrowseGeocoder provided in the IHandler implementation is required but not valid.
ERROR_HANDLER_INVALID_STANDARDIZE_GEOCODER
2507 The IStandardizeGeocoder provided in the IHandler implementation is required but not valid.
ERROR_HANDLER_INVALID_CUSTOM_GEOCODER 2508 The ICustomGeocoder provided in the IHandler implementation is required but not valid.
ERROR_HANDLER_INVALID_POSTAL_FILTER 2509 The IPostalCentroidFilter provided in the IHandler implementation is not valid.
ERROR_HANDLER_INVALID_GEOGRAPHIC_FILTER 2510 The IGeographicCentroidFilter provided in the IHandler implementation is not valid.
ERROR_HANDLER_INVALID_PARSER 2511 The parser provided in the IHandler implementation is not valid.
Error Code Error # Description
Developer Guide 139
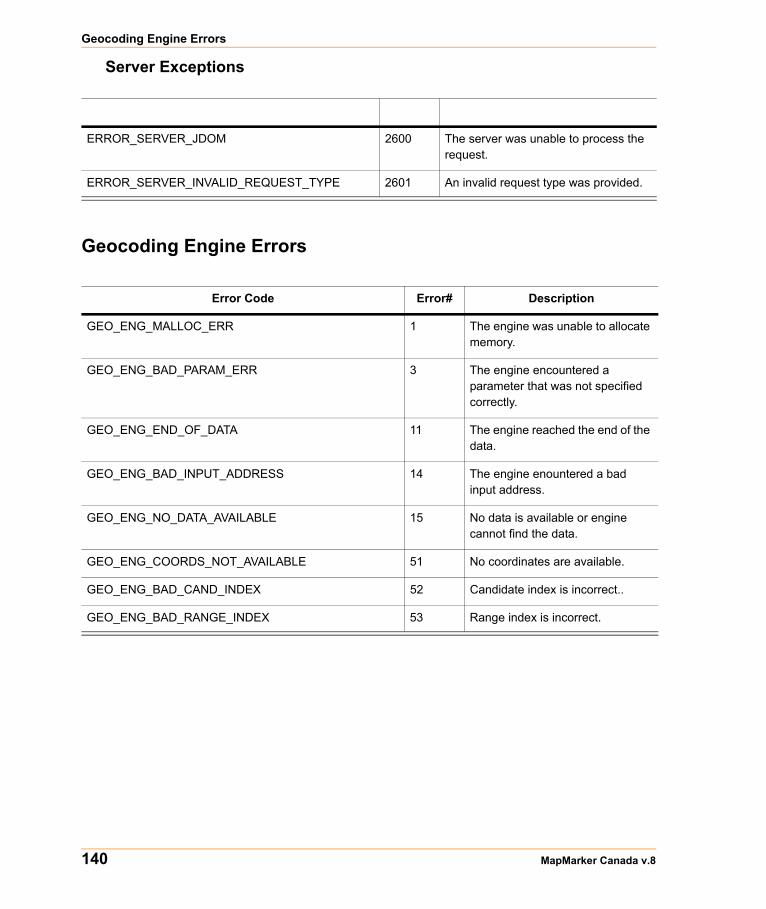
Geocoding Engine Errors
Server Exceptions
Geocoding Engine Errors
ERROR_SERVER_JDOM 2600 The server was unable to process the request.
ERROR_SERVER_INVALID_REQUEST_TYPE 2601 An invalid request type was provided.
Error Code Error# Description
GEO_ENG_MALLOC_ERR 1 The engine was unable to allocate memory.
GEO_ENG_BAD_PARAM_ERR 3 The engine encountered a parameter that was not specified correctly.
GEO_ENG_END_OF_DATA 11 The engine reached the end of the data.
GEO_ENG_BAD_INPUT_ADDRESS 14 The engine enountered a bad input address.
GEO_ENG_NO_DATA_AVAILABLE 15 No data is available or engine cannot find the data.
GEO_ENG_COORDS_NOT_AVAILABLE 51 No coordinates are available.
GEO_ENG_BAD_CAND_INDEX 52 Candidate index is incorrect..
GEO_ENG_BAD_RANGE_INDEX 53 Range index is incorrect.
140 MapMarker Canada v.8

Appendix B: Error Messages
Adapter Errors
Error Code Error # Description
ADAPTER_NO_CONFIG 1793 Could not find or open the config file.
ADAPTER_EXCEEDED_OPTIONS 1794 Number of options exceeds number of options specified in config file.
ADAPTER_NO_ENGINE_CLASS 1797 Unable to find mmjni.jar in classpath.
ADAPTER_NO_HELPER_CLASS 1801 Unable to find mmjni.jar in classpath.
ADAPTER_GEOCODE_RESULT_NO_CLASS 1804 Unable to find mmjni.jar in classpath.
ADAPTER_CANDIDATE_NO_CLASS 1806 Unable to find mmjni.jar in classpath.
ADAPTER_RANGE_NO_CLASS 1808 Unable to find mmjni.jar in classpath.
ADAPTER_JNI_CFG_PARMS_NO_CLASS 1810 Unable to find mmjni.jar in classpath.
ADAPTER_DOUBLE_POINT_NO_CLASS 1814 Unable to find miutil.jar in classpath.
ADAPTER_MAPMARKER_EXCEPTION_NO_CLASS 1820 Unable to find mmj.jar in classpath.
ADAPTER_MAPMARKER_FATAL_EXCEPTION_NO_CLASS
1822 Unable to find mmj.jar in classpath.
ADAPTER_NO_CONSTRAINTS_NO_CLASS 1824 Unable to find mmj.jar in classpath.
ADAPTER_NO_MM_EXCEPTION_CODES_CLASS 1826 Unable to find mmj.jar in classpath.
ADAPTER_RUNTIME_ERR 1841 Runtime error occurred.
ADAPTER_OUT_OF_MEMORY 1842 Memory exceeded. Check memory specified in config file.
ADAPTER_RUNTIME 1843 Runtime exception occurred.
Developer Guide 141
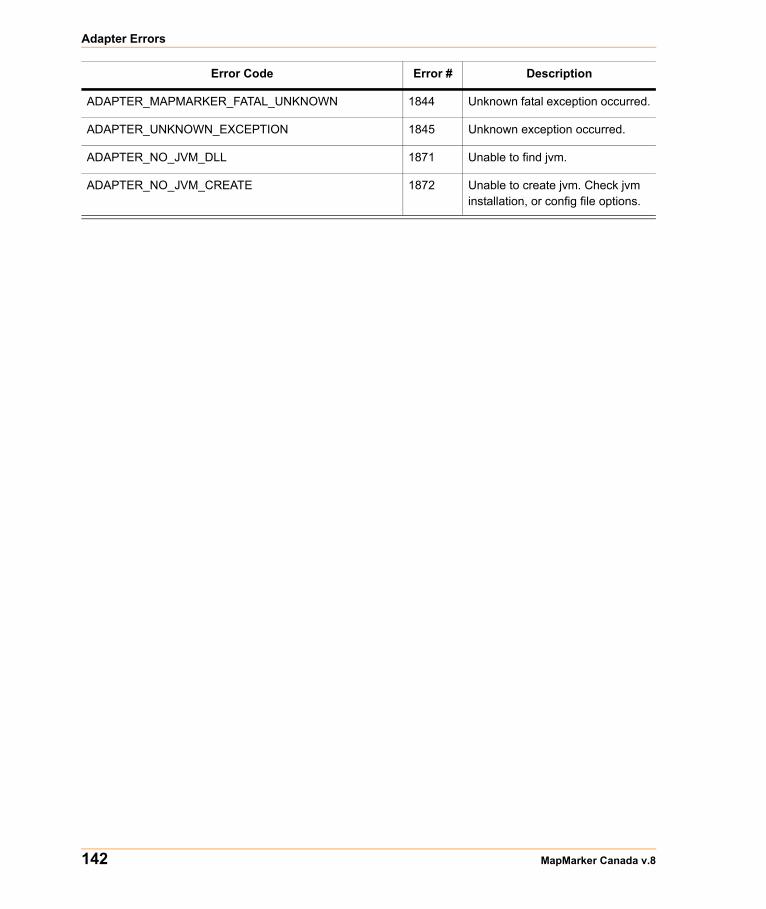
Adapter Errors
ADAPTER_MAPMARKER_FATAL_UNKNOWN 1844 Unknown fatal exception occurred.
ADAPTER_UNKNOWN_EXCEPTION 1845 Unknown exception occurred.
ADAPTER_NO_JVM_DLL 1871 Unable to find jvm.
ADAPTER_NO_JVM_CREATE 1872 Unable to create jvm. Check jvm installation, or config file options.
Error Code Error # Description
142 MapMarker Canada v.8
Index
Aaddress browsing 100address dictionary
installing 19storing on hard drive 19
address point interpolation 102
Bbrowsing addresses 100building .NET sample application 107–114
CCAddressList
OLE Automation objects 88CAddressList object 88Canada/USA OCX integration 48–50candidates
retrieving 94C-based developer tools 36ClearDialogText()
OLE Automation method 66client installation 31client/server geocoding
components 42Internet 53–54MapMarker Geocoder Control (OCX) 45–51MapMarker Server 42–44
compiling C applications 38–39configuration file
JNI adapter 134Connect()
OLE Automation method 67coordinate systems
JNI adapter configuration file settings 134setting in applications 94
country settings 134creating .NET classes 107creating Web client 96–99custom control 56
Customer service 15
Ddata
installing 19storing 19
database development tools 37deployment as servlet 122dictionary ordering 127Disconnect()
OLE Automation method 68DoGeocode()
OLE Automation method 68DoSetProperties()
OLE Automation method 68
Eerror message reference 136, 142ESP SQL Server 37
Ggeocode method 94geocode requests
adding objects to collections in XML API 114–115
HTTP header 115GeocodeAddress()
OLE Automation method 68–71GeocodeAddressLastline()
OLE Automation method 73GeocodeAddressWithSerial()
OLE Automation method 71GeocodeCheckDbAvailability()
OLE Automation method 74GeocodeFreeSet()
OLE Automation method 75GeocodeGetCandidate()
OLE Automation method 75–76GeocodeGetServerVersion()
Developer Guide 143
Index
OLE Automation method 76GeocodeGetStatesFound()
OLE Automation method 77GeocodeGetStatesLicensed()
OLE Automation method 77GeocodePostalCentroid()
OLE Automation method 78–79GeocodePostalCentroidWithSerial()
OLE Automation method 79geocoding applications
MapMarker Geocoder Control 45XML programming in .NET 106–116
Geocoding Cartridge 37geocoding constraints 92–94geocoding to multiple countries
Canada/USA Java server integration 123–124Canada/USA OCX integration 48–50deployment options 122–123
geographic centroid geocoding 101–102GetCandidateAt()
OLE Automation method 80GetCandidateCensusBlockIDAt()
OLE Automation method 81GetCandidateCityAt()
OLE Automation method 82GetCandidateFirmAt()
OLE Automation method 82GetCandidateLatitudeAt()
OLE Automation method 83GetCandidateLongitudeAt()
OLE Automation method 83GetCandidatePlus4At()
OLE Automation method 84GetCandidatePrecisionAt()
OLE Automation method 84GetCandidateResultCodeAt()
OLE Automation method 85GetCandidateStateAt()
OLE Automation method 86GetCandidateStreetAt()
OLE Automation method 86GetCandidateZIPAt()
OLE Automation method 87GetFullName()
OLE Automation method 87GetName()
OLE Automation method 87
HHTTP headers 110, 115–116
IInformix DataBlades 37input address setup for applications 91installation
client 31multiple versions of MapMarker 29new installation 21removing MapMarker 30shared 19silent install 27UNIX/Linux 21upgrading 29Windows procedure 21
installation components 18integrating multiple country geocoders 122–123
JJ Server
deprecation status 36JNI adapter
configuration file settings 134running C applications 38–39
JVM settings 134
MMapInfo FTP Site 14MapMarker Geocoder Control (OCX)
adding to client applications 46–47Canada/USA integration 48–50events and methods 51–53geocoding return values 51OLE control object 45setting properties 50–51
MapMarker J Serverdeprecation status 36
MapMarker Plus Canadanew features 11product components 12product overview 10sample application 118–120
MapMarker requestsHTTP headers 110, 115–116
MapMarker serveras console application 44as Windows service 43–44deploying in Web environments 122geocoding via MapMarker OCX 51handling requests 42installing manually 42request HTTP headers 115–116request time outs 44
144 MapMarker Plus Canada 8

Index
with XML API 106–116modify
silent 29multiple countries
Canada/USA Java server integration 123–124Canada/USA OCX integration 48–50server integration options 122–123
NNET class creation 107NET sample application 107–114network installation 19new in this release 11
OOLE Automation API
CAddressList object 88creating a custom control 56geocoding diagram 56properties, events, methods 57–65VBScript methods 57
Oracle Geocoding Cartridge 37
Pperformance
optimizing 21preferences
sample application 119user dictionary 126–128
provincesinstallation 18
RRefreshDialog()
OLE Automation method 88removing MapMarker from your system 30result code retrieval 95return values
geographic centroid candidates 102running C applications 38–39
Ssample application 118–120SelectCandidateAt()
OLE Automation method 88servlet deployment 122setting
geocoding constraints 92–94input address 91
silent install 27silent modify 29
silent uninstall 31silent upgrade 30starting MapMarker Desktop Application 32Sun One 9.0 122
Ttechnical support 12, 15Tomcat Servlet Container 122–124
Uuninstall 30
silently 31upgrade
silently 30upgrading your installation 29user dictionaries
configuring 126preferences 126–128
VVBScript methods
OLE Automation API 57, 63–65
Wwar files 122Web environments 122Web geocoding client 96–99WebLogic 9.0 122WebSphere 5.1 and 6.0 122Windows console application
running MapMarker server 44Windows geocoding applications
JNI adapter 38Windows service
running MapMarker server 43–44
XXML API 106–116XSD files
creating .NET classes 107
Developer Guide 145

Index
146 MapMarker Plus Canada 8