mariefred 1:32
TRANSCRIPT

MARIEFRED 1:32 Wh�te
Black
Red
Gray
Brown
Green
Gold
MARIEFRED
MARIEFRED

Wh�te
Black
Red
Gray
Brown
Green
Gold
MARIEFRED 1:32


MARIEFRED PART LIST PAGE 1.
NO DESCRIPTION SIZE PART TYPE QUANTITY
1-2-3 Keels 4 mm Plywood 34 … 17 Frames 4 mm Plywood 16
18 Keel immobilizer parts 4 mm Plywood 819 Back deck 1,3 mm Plywood 120 Front deck 1,3 mm Plywood 121 Bottom cabine front wall 1,3 mm Plywood 122 Bottom cabine back wall 1,3 mm Plywood 1
23-24 Back deck parts 1,3 mm Plywood 225 Bottom cabine side walls 1,3 mm Plywood 226 Back rail 1,3 mm Plywood 127 Front rails 1,3 mm Plywood 228 Nose deck 1,3 mm Plywood 1
29 … 34 Back cabine parts 1,3 mm Plywood 635 … 40 Front cabinet parts 1,3 mm Plywood 6
42 Rudder immobilizer bar 4x170 mm Metal 143 Rudder 4 mm Plywood 1
44-45-46 Base plate parts 4 mm Plywood 447-48-49 Main hold parts 1,3 mm Plywood 550-51-52 Front hold parts 1,3 mm Plywood 5
53 Side rail top parts 1,3 mm Plywood 254-55 Back rail top parts 1,3 mm Plywood 3
56 Lifeboat platforms 1,3 mm Plywood 257 Lifeboat base plates 1,3 mm Plywood 458 Top deck 1,3 mm Plywood 1
59-60 Top deck cabine side walls 1,3 mm Plywood 261-62-63 Captain cabine parts 1,3 mm Plywood 464 … 67 Cabine parts 1,3 mm Plywood 468 … 71 Top deck back cabine parts 1,3 mm Plywood 472 … 77 Top deck roof windows parts 1,3 mm Plywood 12
78-79-80 Top deck balcony parts 1,3 mm Plywood 481 Step hole frame 1,3 mm Plywood 182 Seat legs-with back supporters 1,3 mm Plywood 4483 Seat legs-without back supporters 1,3 mm Plywood 1084 Step railing bottom part 1,3 mm Plywood 185 Step railing top part 1,3 mm Plywood 186 Ventilations deep part 1,3 mm Plywood 1
87-88-89 Board light parts 1,3 mm Plywood 690-91-92 Seat parts 1,3 mm Plywood 6
93 Top deck side rail parts 1,3 mm Plywood 294 Top deck back rail part 1,3 mm Plywood 195 Top deck vertical bar guide parts 1,3 mm Plywood 296 Bottom deck vertical bar guide parts 1,3 mm Plywood 298 Propeller main part - 3D Print-out 199 Propeller pals - 3D Print-out 3
100 Windows - Clear Sheet 1101 Strip 1x2.2x500 mm Baswood 40102 Window brows - Plexyglass 20103 Strip 1,5x1,5x500 mm Baswood 12
104A Step sides 4 mm Plywood 2104B Step sides 4 mm Plywood 2105 Steps 1x4x500 mm Baswood 1

MARIEFRED PART LIST PAGE 2.
NO DESCRIPTION SIZE PART TYPE QUANTITY
106 Front rail vertical bars - 3D Print-out 10107 Railing bar-vertical 0,8x500 mm Flat Wire 6108 Railing bar-horizantal 0,5x5000 mm Wire 1109 Rudder wheel legs 1 mm Plexyglass 2110 Rudder wheel - 3D Print-out 1111 Folio 130x170 mm Aluminium Folio 4
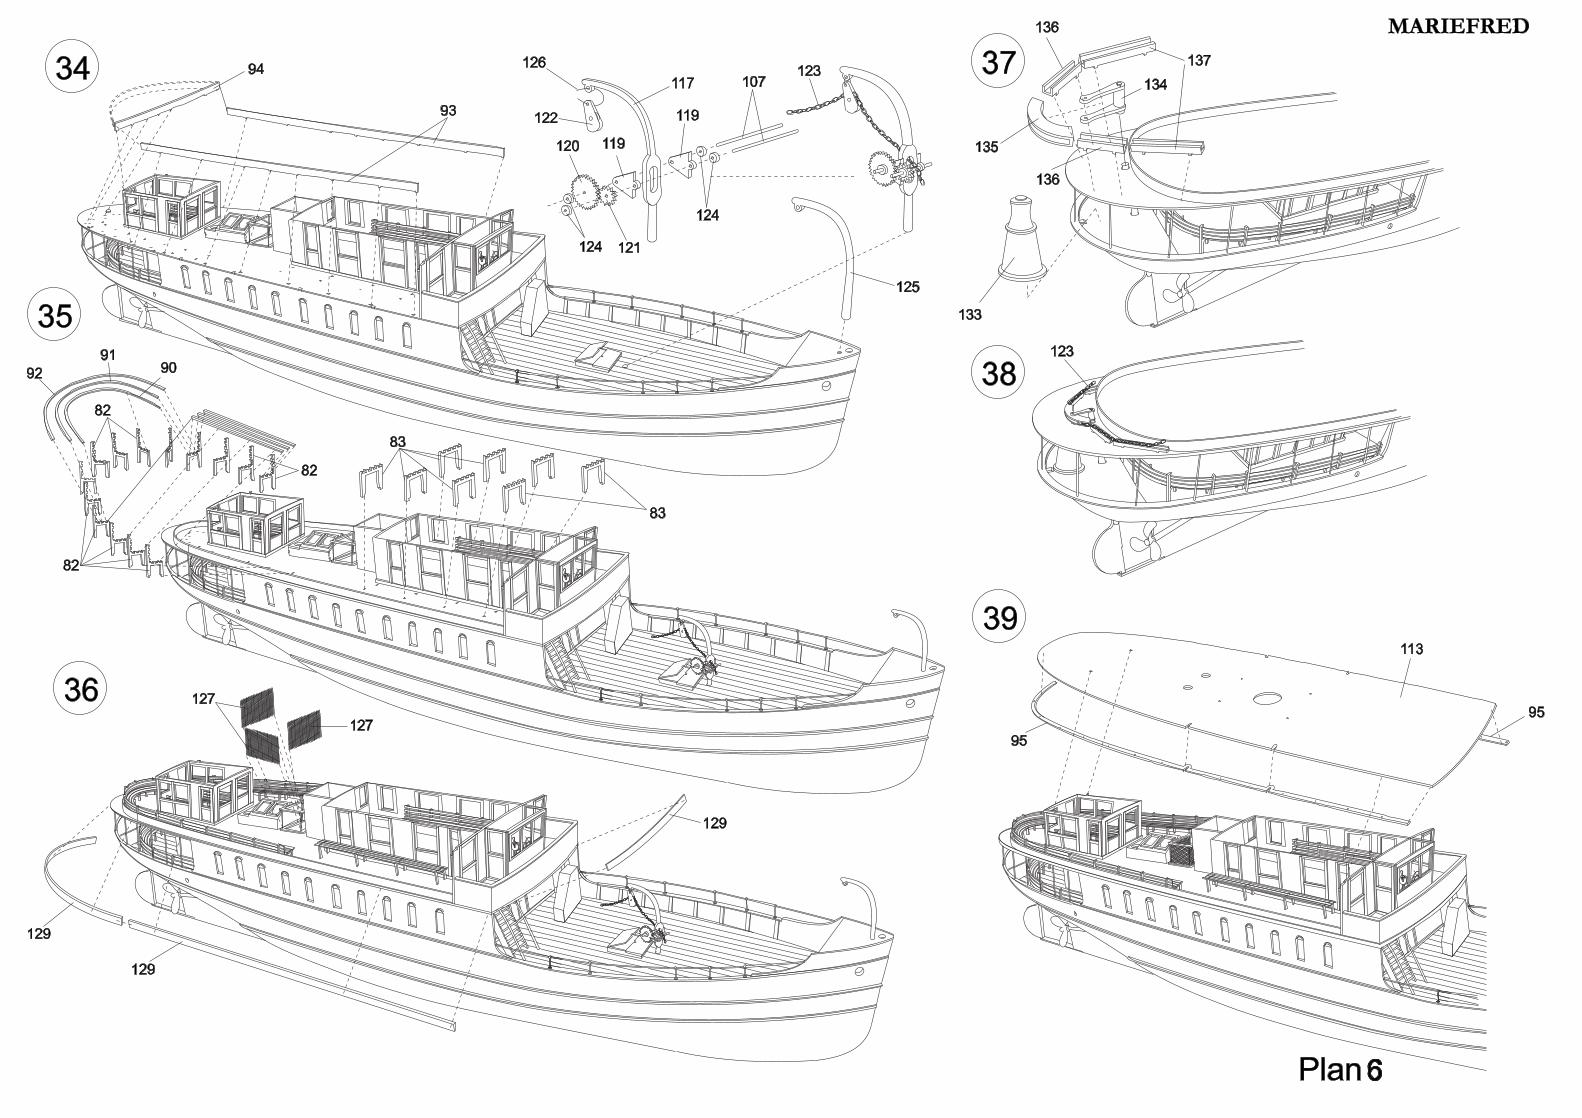
112-112A Light bottom part 1 mm Plexyglass 2113 Top 1,3 mm Plywood 1114 Telegraph machine - 3D Print-out 1117 Winch hanger part - 3D Print-out 2119 Winch supporter parts 1 mm Plexyglass 2120 Winch large gear 1 mm Plexyglass 1121 Winch small gear 1 mm Plexyglass 1122 Winch single reel 1 mm 3D Print-out 1123 Winch chain 500 mm Metal 1124 Winch bars immobilezers 1 mm Plexyglass 4125 Front hanger - 3D Print-out 1126 Docking supporter rope 2000 mm Waxed rope 1127 Stair wire mesh 40x150 mm Metal Mesh 1128 Funnel filter 40x40 mm Metal Mesh 1129 Top side edge parts 1x4x700 mm Baswood 5130 Deck cover strips 0,5x4x550 mm Ayous 40131 Shaft pipe 6x100 mm Metal pipe 1132 Body planking strips 1,6x5x500 mm Ayous 104133 Giant bollard - Wooden 1
134 … 137 Wheel chain bed parts - 3D Print-out 6138 Ventilation parts 10x60 mm Metal 2139 Ventilation - 3D Print-out 2142 Funnel bottom part - 3D Print-out 1143 Funnel 30x135 mm Metal pipe 1144 Funnel ring 1 mm Plexyglass 1145 Funnel lid - 3D Print-out 1146 Funnel front part 3x135 mm Metal stick 1147 Eyebolts - Metal 8148 Life rings - 3D Print-out 8151 Life ring hangers 1 mm Plexyglass 8152 Bell - 3D Print-out 1153 Front deck tiny funnel bottom side 10x50 mm Metal pipe 1154 Front deck tiny funnel bottom side connecting part - 3D Print-out 1155 Front deck tiny funnel 6x130 mm Metal pipe 1156 Front deck tiny funnel lid - 3D Print-out 1157 Lifeboat hangers 2 mm Plexyglass 4158 Single reels - 3D Print-out 4159 Board lights - 3D Print-out 4160 Flag post 2 mm Metal 1161 Flag - Sticker 1162 Double-head bollard - 3D Print-out 6163 Fairlead - 3D Print-out 2164 Docking supporters 4x60 mm Dovel strip 14
165-A-B Ship name and logos - Decal 4166 Pennant - Sticker 1167 Front post 230 mm Dovel stick 1168 Frame immobilizer parts 4 mm Plywood 2169 Rudder axle house 4 mm Plywood 1

❖ Please read the instructions carefully before you start to build your model. Take notes if needed. So, you may find out the materials and the tools those you need.
❖ Use model knife to take out the parts the plywood sheets. Do not take them out with hand! ❖ Change of temperature effects on plywoods quickly. So that, do not release the plywoods. Keep them on a
flat surface by putting weight on them. ❖ You may stick together the wooden parts easily if you sand the brown areas caused by laser with sand paper.
❖ You should use super glue and white glue to stick together the wooden parts and use the super glue for metal
parts. ❖ Building the keel of your model, before stick the frames, be sure the frames properly seated on the keel.
Otherwise you can’t build the body of the model rightly. Exactly be sure that left and right side of the frames are compatible and symmetrical.
❖ After building the keel of your model, before the covering, you should test the frame edges by a cover strip.
You should sand with a piece of sandpaper the frame edges at the right degree to touch the strips on to the surface exactly. The curves are mostly the front and back side of the body.
❖ You should keep the strip tips in the bowl filled with water approximately one hour. So that you may curve
the strips on the curves easily these are mostly at the end and the front of the hull. ❖ You should cover the strip starting from the top for each side symmetrically. ❖ You should cut the upper side of the strip when overlap occurs especially at the front curve of the body. ❖ To make equal the surface of the body that caused by planking, you should sand with a piece of sandpaper
(Firstly you should use thick sandpaper, then you can apply thin sandpaper), . You should fill the gaps after this processing. You may use leftover strips for wide gaps and model putty for small gaps.
❖ If you don’t want to appear wooden tissue of the body of your model body; first, apply filler undercoat then
sand with a thin sandpaper to make it ready to apply putty. Apply putty whole body and sandpaper again. Apply one more coat filler undercoat and sandpaper. You should not use very thick sandpaper to sand the putty and filler undercoat. You should repeat this process until you get the results as you want. You should apply undercoat paint to find out if any mistake appears at the body. The body gets ready for painting after these applications. You may use model brushes for filler coating. In order to understand whether the materials (such paint, filler, undercoat, varnish, etc.) are compatible with each other, you should test on the unnecessary parts.
❖ Some of the model’s logo, name or the number are produced from decal paper. You should keep them in a
bowl filled with warm water for two or three minutes. You should apply them to their places while releasing from their paper. You may attach easily If you apply gloss varnish to the place before applying the decals. You may apply matt, gloss or satin varnish after this application preferably.
❖ You should keep your model away from direct sunlight, heat and moist to avoid deformation in the course of
time.
www.turkmodel.net
www.facebook.com/turkmodel

❖ Maketinizin yapımına başlamadan önce planı ve plandaki yazıları dikkatlice gözden geçiriniz. Gerekli gördüğünüz yerlere notlar alınız. İhtiyacınız olan yardımcı malzeme ve aletleri de bu şekilde tespit edebilirsiniz.
❖ Kontraplak üzerindeki parçaları çıkartmak için mutlaka maket bıçağı kullanınız, el ile kopartmayınız! ❖ Kontraplaklar hava ısısı ve neme karşı çok çabuk reaksiyon gösterirler. Bu yüzden modelin yapımı sırasında
kontraplak parçaları serbest durumda bırakmayınız. Üzerine ağırlık koyarak düz bir satıh üzerinde muhafaza ediniz.
❖ Maketin üretiminde kullanılan lazer kesimden kaynaklanan, ahşap üzerindeki kahverengi kısımları zımpara ile
temizlerseniz daha iyi yapışmasını sağlarsınız. ❖ Ahşap parçaları yapıştırmak için beyaz ağaç tutkalı ve hızlı yapıştırıcı, metal parçalar için de hızlı yapıştırıcı
kullanabilirsiniz. ❖ Maketin iskeletini oluştururken postaların omurga üzerine tam ve doğru bir biçimde oturduğundan emin
olmadan yapıştırmayınız. Aksi halde gövdeyi düzgün bir şekilde oluşturamazsınız. Postaların birbirleri ile uyumlu bir şekilde sağ ve sol taraflarının simetrik olarak oturduğundan kesinlikle emin olunuz.
❖ Omurga iskeletini oluşturduktan sonra, çıta sarma işlemine geçmeden önce, posta kenarlarını bir sarma çıtası
ile prova edip, sarma çıtasının özellikle maketin kavis alan ön ve arka kısımlarına doğru posta kenarlarının yüzeyine tam olarak temas etmesini sağlamak için uygun açıda zımparalayınız.
❖ Maketin gövde kısmını oluşturmak için çıtaları postalar üzerine sarma işlemine başlamadan önce çıtaları su
dolu bir kapta bir saat kadar tutunuz. Böylelikle sarma işlemini yaparken uç kısımlara doğru artan kavisleri rahatlıkta dönebilirsiniz.
❖ Sarma çıtalarını her defasında sağ ve sol taraftan birer kez simetrik olarak üstten başlayarak sarınız. Sarma
çıtaları özellikle ön kısımda birbirlerinin üzerine binmeye başladıklarında üst kısımlarından tıraşlayarak inceltiniz.
❖ Sarma işlemi bittikten sonra öncelikle kalın ve ince zımpara ile yüzeyini çıtalardan kaynaklı taşmaları
düzeltmek için zımparalayınız. Bu işlemden sonra, gövdede oluşan boşluklar var ise; büyük boşlukları atık çıtalara şekil vererek, daha küçük boşlukları da dolgu malzemeleri ile kapatınız.
❖ Maketin gövdesinde ahşap doku izleri görünmemesi gerekiyorsa; önce dolgu astarı ardından ince bir zımpara
ile zımparalayarak gövdenin tamamını macun çekmeye hazır hale getiriniz ve gövdeye macun çekip tekrar zımparalayınız. Üzerine bir kat daha dolgu astarı atarak tekrar zımparalayınız. Dolgu astarı ve macunu zımparalarken çok kalın zımpara kullanmayınız. Gövde istediğiniz gibi olana kadar bu işlemleri tekrarlayınız. Kusur olup olmadığını anlamak için en son olarak astar boya atınız. Ondan sonra gövde boyanmaya hazır hale gelmiştir. Dolgu astarını fırça ile atabilirsiniz. Kullanacağınız kimyasal içeren maddelerin ( boya, vernik, dolgu macunu, astar boya, vs. gibi ) birbiri ile uyuşup uyuşmadığını anlamak için ayrı bir yerde deneme yapınız.
❖ Modellerin üzerindeki logo, isim ya da numaraların bazıları suda çözünen çıkartmalardan üretilmektedir.
Bunları çok küçük bir kabın içindeki ılık suda iki-üç dakika bekleterek kağıtlarından ayrılmalarını sağlayıp dikkatli bir biçimde uygulanacağı bölgeye yerleştirebilirsiniz. Uygulanacak bölge temiz olmalı. Uygulamadan önce bölgeye parlak vernik atarsanız çıkartmanın çok daha iyi tutmasını sağlarsınız. Daha sonra tekrar üzerine tercihinize göre mat, parlak ya da saten vernik atabilirsiniz.
❖ Bitmiş modelinizi zamanla deforme olmaması için güneş ışığı, sıcaklık ve rutubet gibi etkenlerden uzak bir
yerde sergileyiniz. www.turkmodel.net
www.facebook.com/turkmodel