marketo data shield setup guide -...
TRANSCRIPT

[email protected] www.ringlead.com
Marketo Data Shield Setup Guide Page 1 of 20
888-240-8088
© Copyright 2015 RingLead, Inc.
Marketo Data Shield Setup Guide

[email protected] www.ringlead.com
Marketo Data Shield Setup Guide Page 2 of 20
888-240-8088
© Copyright 2015 RingLead, Inc.
Marketo Integration Diagram
A new prospect is created in Marketo.
1
The Marketo prospect flows through the RingLead Webhook.
2
3 RingLead transforms the data values as specified in your Data Shield settings.
Per your settings, First and Last names are changed to proper case, job titles are adjusted, state and country codes are applied, and more!
4 The updated field values are sent back to Marketo.
5 A Marketo flow step can be added to sync changes back to Salesforce or another CRM
2
5
1
R
Webhooks
New Record
or other CRM
3
Data Shield Admin Panel
Company Names
Case
Periods
Commas
Hyphens
Names
URLs
Convert to proper case
Remove
Single space after
Do nothing
?
?
?
?
4

[email protected] www.ringlead.com
Marketo Data Shield Setup Guide Page 3 of 20
888-240-8088
© Copyright 2015 RingLead, Inc.
Log in to RingLead’s Client Portal at https://login.ringlead.com/support/
Click on the Web-to-Lead tab
Pre-Setup Tasks
Username
Password
Login or press ‘Enter’
RingLead Login
Home Unique Upload Web-to-Lead Uniqu
Choose the appropriate Script from the drop down and select the “Go” button.
Contact Us form Go
Automate Lead Scoring, LView the Quickstart Guide
Unique Web-to-Lead for RingLead
Select a web form script:
Unique Web-to-Lead (fo

[email protected] www.ringlead.com
Marketo Data Shield Setup Guide Page 4 of 20
888-240-8088
© Copyright 2015 RingLead, Inc.
Set up your connection to Salesforce by providing your Salesforce Username and Password
General Information
Is this your first time using Unique Web-to-Lead?
Web Form Script #1
View the Quickstart Guide
Update the field actions to obtain the form action URL (View the Quickstart Guide)
Description:
Salesforce Username:
Salesforce Password:
Link to Salesforce Sandbox:
Form Action URL:
Declone Web-to-Lead Script (1)
A description of the web forms processed by this web form script.
Example: “Website marketing forms”
Login successful. User is valid.
Example: [email protected]
(enter the Salesforce login Username above, typically a Marketing User or System Administrator profile)
This Web form script is NOT configured to be connected with a Salesforce Snadbox organization.Learn how to point this to a Salesforce Sandbox
Update
After a successful attempt, you will see the “Login Successful”, message and you can continue to setting up the Marketo portion.`
Navigate to near the bottom of the page under Partner Integration and select the “Get Started with Marketo Integration”
Partner Integrations
R
Email Automation and Lead Management
Using RingLead de-duplication tools in
further streamline their management
Get Started with Eloqua Integration
Email Automation and Lead Management
Using RingLead de-duplication tools in
further streamline their management
Get Started with Marketo Integration

[email protected] www.ringlead.com
Marketo Data Shield Setup Guide Page 5 of 20
888-240-8088
© Copyright 2015 RingLead, Inc.
Connect to your Marketo Instance by filling in the form below on RingLead’s website.
You can find the details to fill into the above form after you have logged into Marketo and navigated to the Admin section .
Set up your Marketo API Connection
Marketo API Connection
Copy and paste the following fields from Marketo Admin:
SOAP endpoint
Access Status
User ID
Encryption Key
(be sure this is “Active)”
Login to Marketo > Admin > Integration > SOAP API
Verify Marketo Connection
Web Services
Manage Web Services
API Call Information
Daily Request Limit:
Requests in the Last 7 Days:
10000
0
Donato Diorlo Admin
Web Services
My Marketo Marketing Activities Design Studio Lead Database Analytics
SOAP API
Endpoint:
Access Status:
Status Reason:
User ID:
Encryption Key:
SOAP API documentation:
https:// .mktoapi.com/soap/mktows/2_4
Active
broadlock
61
http://developers.marketo.com/documentation/soap
Save Changes
REST API
Endpoint:
Identity:
REST API documentation:
http:// .mktorest.com/rest
http:// .mktorest.com/identity
http://developers.marketo.com/documentation/rest
Find
R
[email protected] www.ringlead.com
Marketo Data Shield Setup Guide Page 6 of 20
888-240-8088
© Copyright 2015 RingLead, Inc.
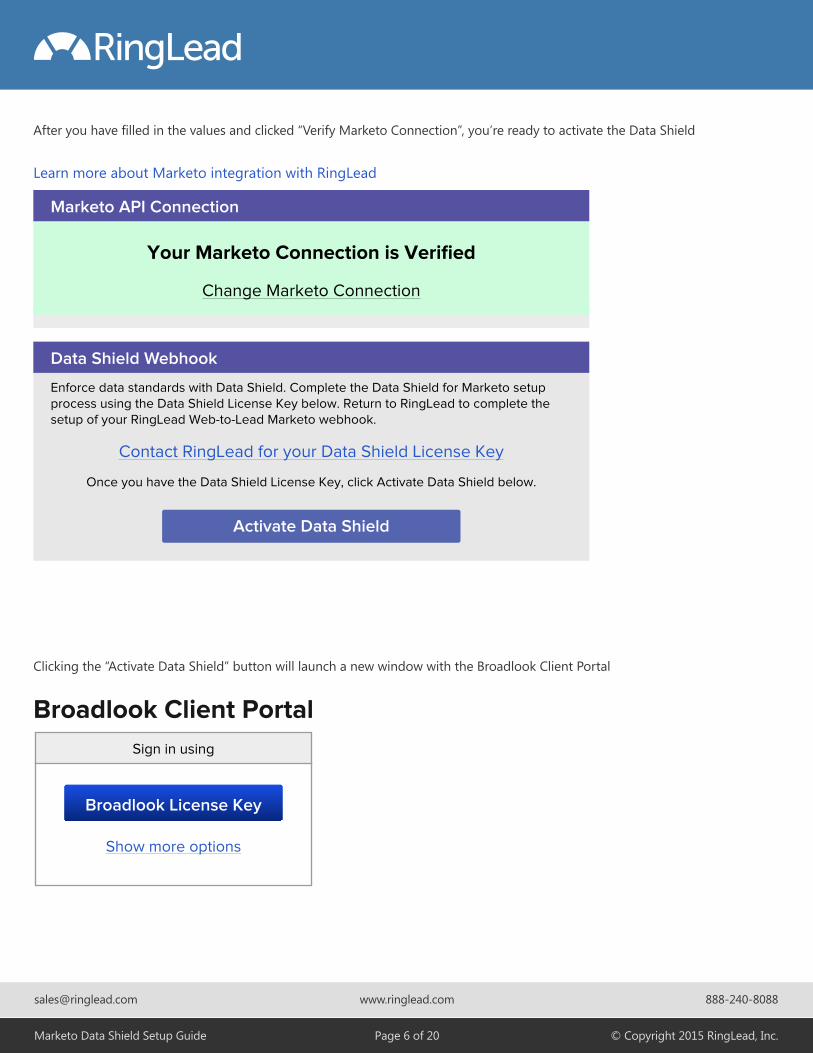
After you have filled in the values and clicked “Verify Marketo Connection”, you’re ready to activate the Data Shield
Clicking the “Activate Data Shield” button will launch a new window with the Broadlook Client Portal
Data Shield Webhook
Enforce data standards with Data Shield. Complete the Data Shield for Marketo setup process using the Data Shield License Key below. Return to RingLead to complete the setup of your RingLead Web-to-Lead Marketo webhook.
Once you have the Data Shield License Key, click Activate Data Shield below.
Contact RingLead for your Data Shield License Key
Activate Data Shield
Marketo API Connection
Change Marketo Connection
Your Marketo Connection is Verified
Learn more about Marketo integration with RingLead
Sign in using
Show more options
Broadlook License Key
Broadlook Client Portal

[email protected] www.ringlead.com
Marketo Data Shield Setup Guide Page 7 of 20
888-240-8088
© Copyright 2015 RingLead, Inc.
Click on the “Broadlook License Key” button, and paste in the Key provided by RingLead.
After Activated, you will see a screen like this (actual values have been blacked out here to preserve security for this customer):
1. Fill out the remaining fields on the left.
2. Verify that the fields on the right look correct. They should match the data you just provided.
3. Click “Register”
* It may take a few minutes to register
Register
Broadlook Client PortalHome
Data Shield for Marketo
EULA
Administrator
Company Name
Broadlook
Contact Name
Broadlook VirtualDesk
Contact Title
Contact Phone
Contact Email
Marketo Connection
SOAP Endpoint
https:// /soap/mktows/2_4
User ID
Broadlook
Encryption Key
Broadlook Data Shield Product Key
61
M35
Copy and paste the following fields from Marketo > Admin > Integration > SOAP API
I have read and agree to the terms and conditions
[email protected] www.ringlead.com
Marketo Data Shield Setup Guide Page 8 of 20
888-240-8088
© Copyright 2015 RingLead, Inc.
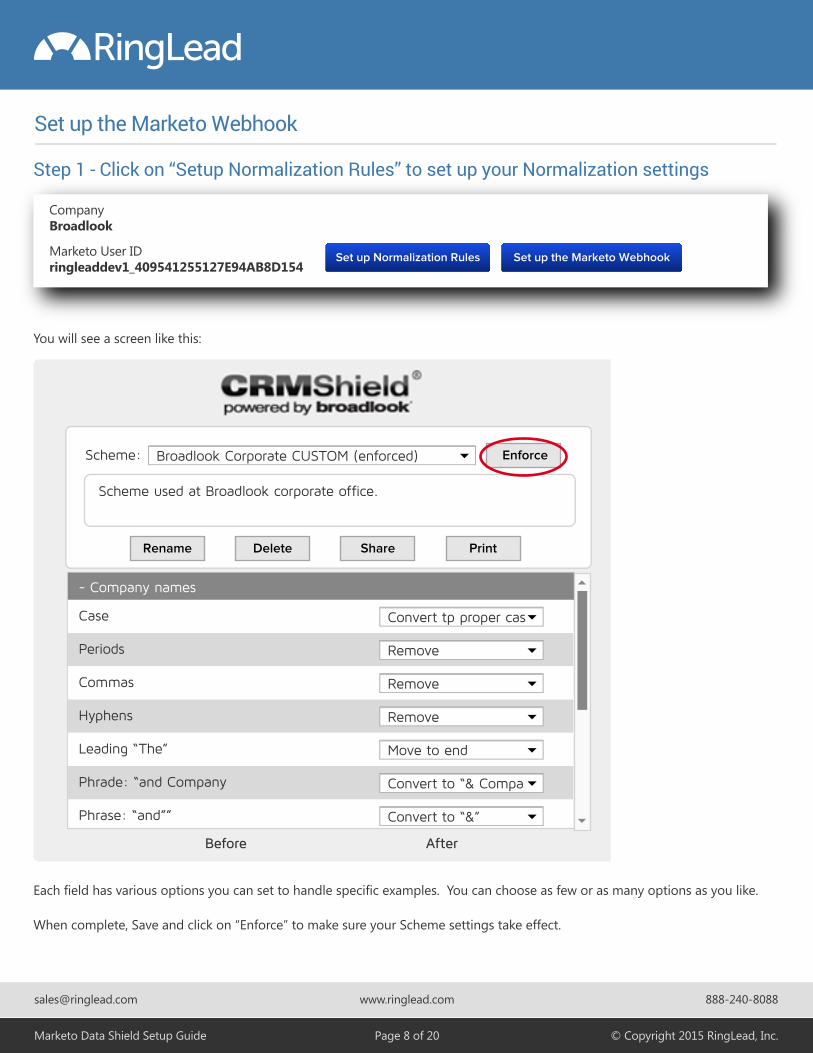
Set up Normalization Rules Set up the Marketo Webhook
CompanyBroadlook
Marketo User IDringleaddev1_409541255127E94AB8D154
Scheme: Broadlook Corporate CUSTOM (enforced) Enforce
Rename Delete Share Print
Scheme used at Broadlook corporate office.
- Company names
Case
Periods
Commas
Hyphens
Leading “The”
Phrade: “and Company
Phrase: “and””
Convert tp proper cas
Remove
Remove
Remove
Move to end
Convert to “& Compa
Convert to “&”
Before After
Each field has various options you can set to handle specific examples. You can choose as few or as many options as you like.
When complete, Save and click on “Enforce” to make sure your Scheme settings take effect.
You will see a screen like this:
Set up the Marketo Webhook
Step 1 - Click on “Setup Normalization Rules” to set up your Normalization settings
[email protected] www.ringlead.com
Marketo Data Shield Setup Guide Page 9 of 20
888-240-8088
© Copyright 2015 RingLead, Inc.
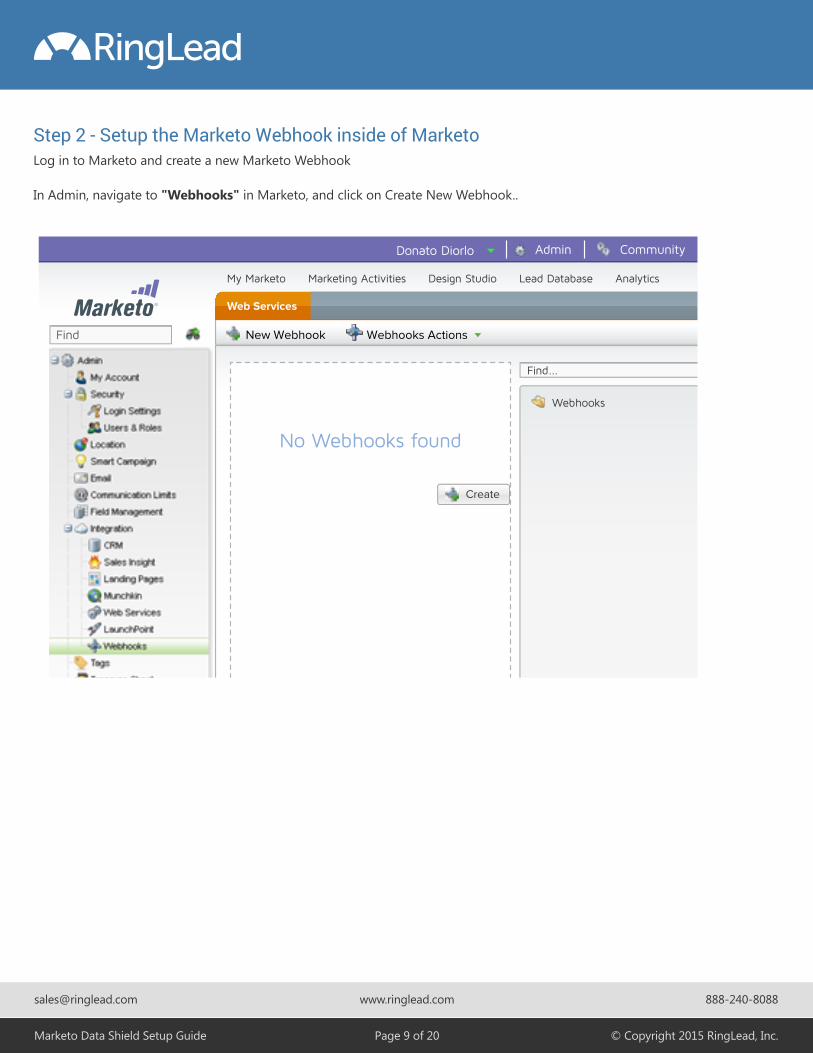
Log in to Marketo and create a new Marketo Webhook
In Admin, navigate to "Webhooks" in Marketo, and click on Create New Webhook..
Step 2 - Setup the Marketo Webhook inside of Marketo
No Webhooks found
Donato Diorlo Admin
Web Services
My Marketo Marketing Activities Design Studio Lead Database Analytics
Find
R
Webhooks ActionsNew Webhook
Create
Find...
Webhooks
Community
[email protected] www.ringlead.com
Marketo Data Shield Setup Guide Page 10 of 20
888-240-8088
© Copyright 2015 RingLead, Inc.
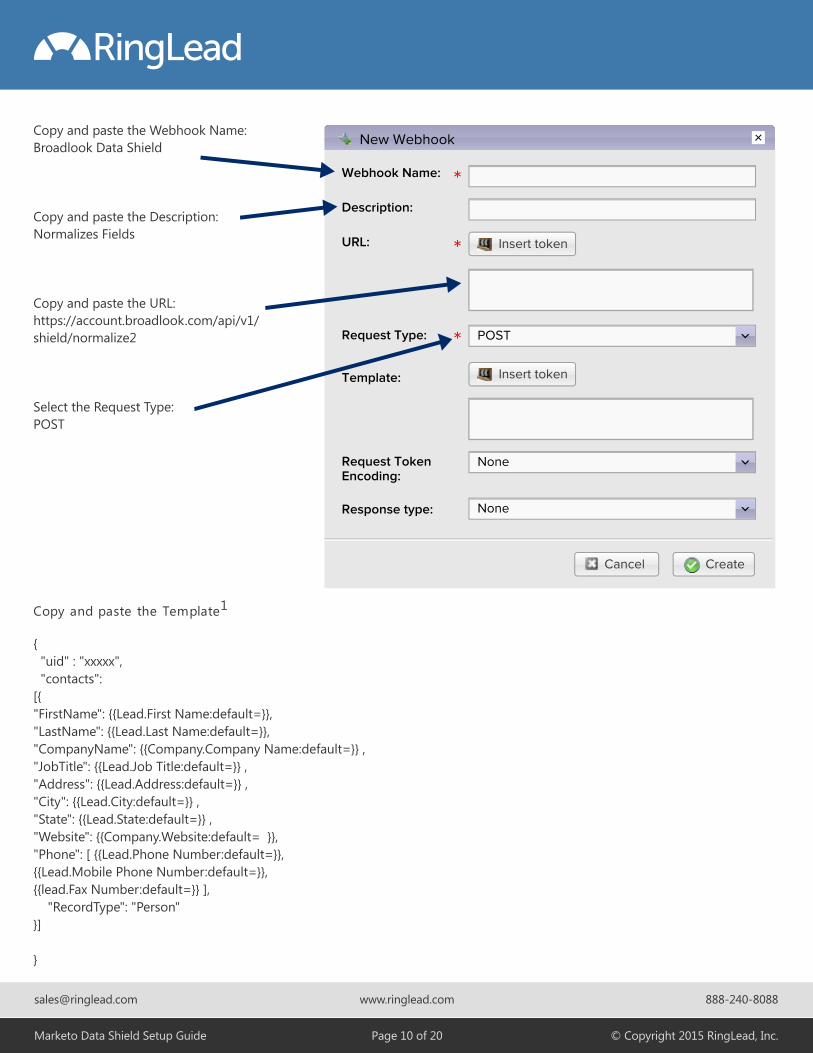
Copy and paste the Webhook Name:Broadlook Data Shield
Copy and paste the Description: Normalizes Fields
Copy and paste the URL: https://account.broadlook.com/api/v1/shield/normalize2
Select the Request Type: POST
Webhook Name:
Description:
URL:
Request Type:
Template:
Request TokenEncoding:
Response type:
New Webhook
*
*
*
Insert token
Insert token
None
None
POST
Cancel Create
Copy and paste the Template1
{ "uid" : "xxxxx", "contacts": [{ "FirstName": {{Lead.First Name:default=}}, "LastName": {{Lead.Last Name:default=}}, "CompanyName": {{Company.Company Name:default=}} , "JobTitle": {{Lead.Job Title:default=}} , "Address": {{Lead.Address:default=}} , "City": {{Lead.City:default=}} ,"State": {{Lead.State:default=}} ,"Website": {{Company.Website:default= }}, "Phone": [ {{Lead.Phone Number:default=}}, {{Lead.Mobile Phone Number:default=}}, {{lead.Fax Number:default=}} ], "RecordType": "Person" }] }

[email protected] www.ringlead.com
Marketo Data Shield Setup Guide Page 11 of 20
888-240-8088
© Copyright 2015 RingLead, Inc.
Select the Request Token Encoding =JSON
Select the Response Type = JSON
Click Create
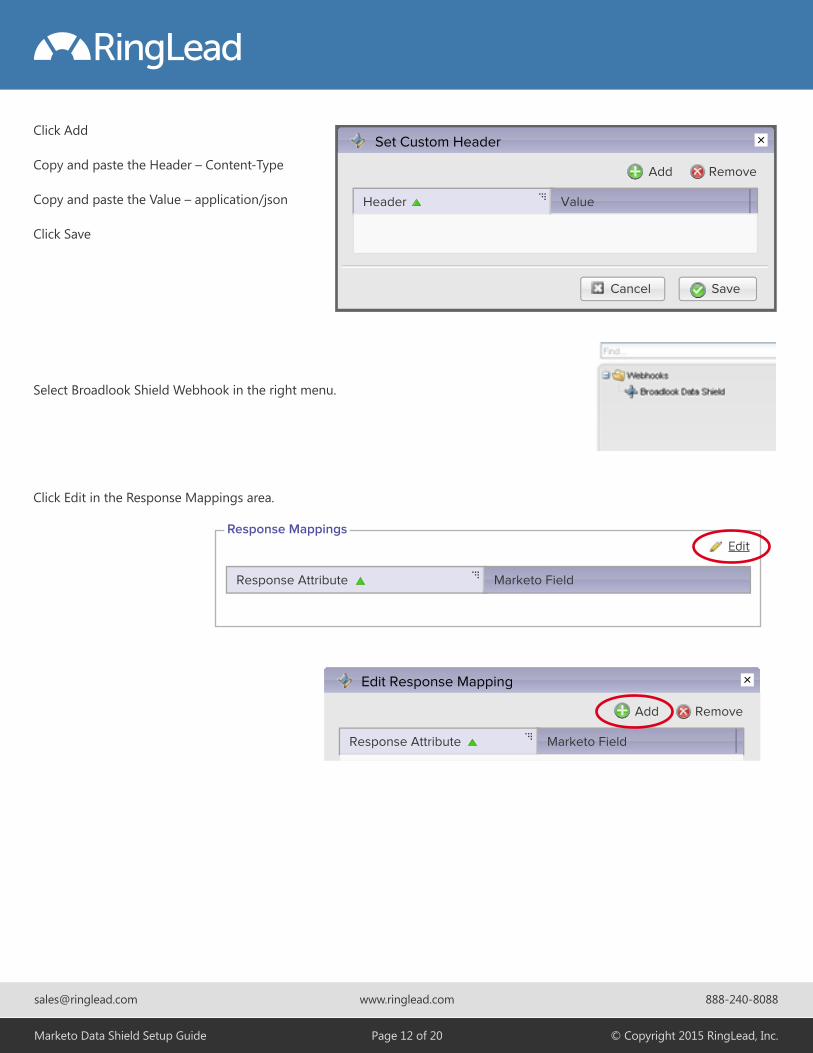
Select Broadlook Shield webhook in the right menu.
Go to Webhooks Actions in the top menu, then to “Set Custom Header”
Webhook Name:
Description:
URL:
Request Type:
Template:
Request TokenEncoding:
Response type:
New Webhook
*
*
*
Insert token
Insert token
None
None
POST
Cancel Create
[email protected] www.ringlead.com
Marketo Data Shield Setup Guide Page 12 of 20
888-240-8088
© Copyright 2015 RingLead, Inc.
Select Broadlook Shield Webhook in the right menu.
Click Edit in the Response Mappings area.
Click Add
Copy and paste the Header – Content-Type
Copy and paste the Value – application/json
Click Save
Set Custom Header
Cancel
Add Remove
Header Value
Save
Response Mappings
Response Attribute Marketo Field
Edit
Edit Response Mapping
Add Remove
Response Attribute Marketo Field

[email protected] www.ringlead.com
Marketo Data Shield Setup Guide Page 13 of 20
888-240-8088
© Copyright 2015 RingLead, Inc.
Click Add, and Copy and paste the Response Attribute – [0].LastName[0]Copy and paste the Marketo Field – LastName
Click Add, and Copy and paste the Response Attribute – [0].JobTitle[0]Copy and paste the Marketo Field – Title
Click Add, and Copy and paste the Response Attribute – [0].Phone[0]Copy and paste the Marketo Field – Phone
Click Add, and Copy and paste the Response Attribute – [0].Phone[1]Copy and paste the Marketo Field – MobilePhone
Click Add and Copy and paste the Response Attribute - [0].CompanyName[0]Copy and paste the Marketo Field – Company
Click Add, and Copy and paste the Response Attribute - [0].FirstName[0]Copy and paste the Marketo Field – FirstName
Click Add, and Copy and paste the Response Attribute – [0].Website[0]Copy and paste the Marketo Field – Website
Click Add, and Copy and paste the Response Attribute – [0].City[0]Copy and paste the Marketo Field – City
Click Add, and Copy and paste the Response Attribute – [0].State[0]Copy and paste the Marketo Field – State
Click Add, and Copy and paste the Response Attribute – [0].Address[0]Copy and paste the Marketo Field – Address

[email protected] www.ringlead.com
Marketo Data Shield Setup Guide Page 14 of 20
888-240-8088
© Copyright 2015 RingLead, Inc.
The Response Mapping window should end up looking very similar to the window below. If so, you are all set and can hit the “Save” button.
1 Customized Marketo fields can be substituted for the default fields listed. For example, if you have created a custom field for first name called firstname.marketo, you would use that instead of the “FirstName”.
Congratulations, the Webhook should now be setup.
Edit Response Mapping
Add Remove
Response Attribute
[0].Address[0]
[0].State[0]
[0].City[0]
[0].Website[0]
[0].Phone[0]
[0].Phone[0]
[0].JobTitle[0]
[0].LastName[0]
[0].FirstName[0]
[0].CompanyName[0]
Marketo Field
Address
State
City
Website
Phone
Phone
JobTitle
LastName
FirstName
CompanyName
CancelSave

[email protected] www.ringlead.com
Marketo Data Shield Setup Guide Page 15 of 20
888-240-8088
© Copyright 2015 RingLead, Inc.
To set up the Webhook process to run on new or changed leads, The Data Shield webhook must be placed into two separate Marketo Smart Campaigns.
To Normalize and Protect New Leads-Navigate to the existing the “Send Lead to RingLead” Smart Campaign in the RingLead Processing program. (If not using the RingLead Processing, see NOTE below).
Add the webhook to the “Send Lead to RingLead” flow, just before the RingLead Web-to-Lead webhook is called, per screen shot below.
Set up the triggers to run your new Data Shield Webhook
My Marketo Marketing Activities Design Studio Lead Database Analytics
Send Lead to RingLead Smart List Flow Schedule Results
New Campaign Actions View Campaign Members
Collapse All Expand All
Add Choice
1 - Call Webhook
Webhook: Data Shield
Add Choice
2 - Call Webhook
Webhook: RingLead Web-to-Lead

[email protected] www.ringlead.com 888-240-8088
© Copyright 2015 RingLead, Inc.Marketo Data Shield Setup Guide Page 16 of 20
To Normalize Modified Marketo Leads-Another Smart Campaign should be created in the RingLead Processing program, or in the Data Normalization program created above if you are not using RingLead Processing.
Name this Smart Campaign: Normalize Modified Leads
Fill in the Description:As leads change, send to Broadlook Data Shield to normalize Click Create
Navigate to the Smart List area for your Normalize Modified Leads Smart Campaign
NOTE: If you are not using the RingLead Processing, then create a new Program in your Data Management folder called “Data Normalization”. Create a new Smart List with “Lead is Created” as the trigger. Add “Call Webhook” (Broadlook Data Shield webhook) as the flow step. Schedule to run every time, and Activate the scheduler.
Program:
Name:
Description:
New Smart CampaignNew Smart Campaign
RingLead Processing
Normalize Modified Leads
As leads change, send to Broadlook Data Shield to normalize
+
CANCEL CREATE
Normalize Modified Leads Smart List Flow
New Campaign Actions View Campaign Members
Use ALL filters Collapse All Expand All
[email protected] www.ringlead.com 888-240-8088
© Copyright 2015 RingLead, Inc.Marketo Data Shield Setup Guide Page 17 of 20
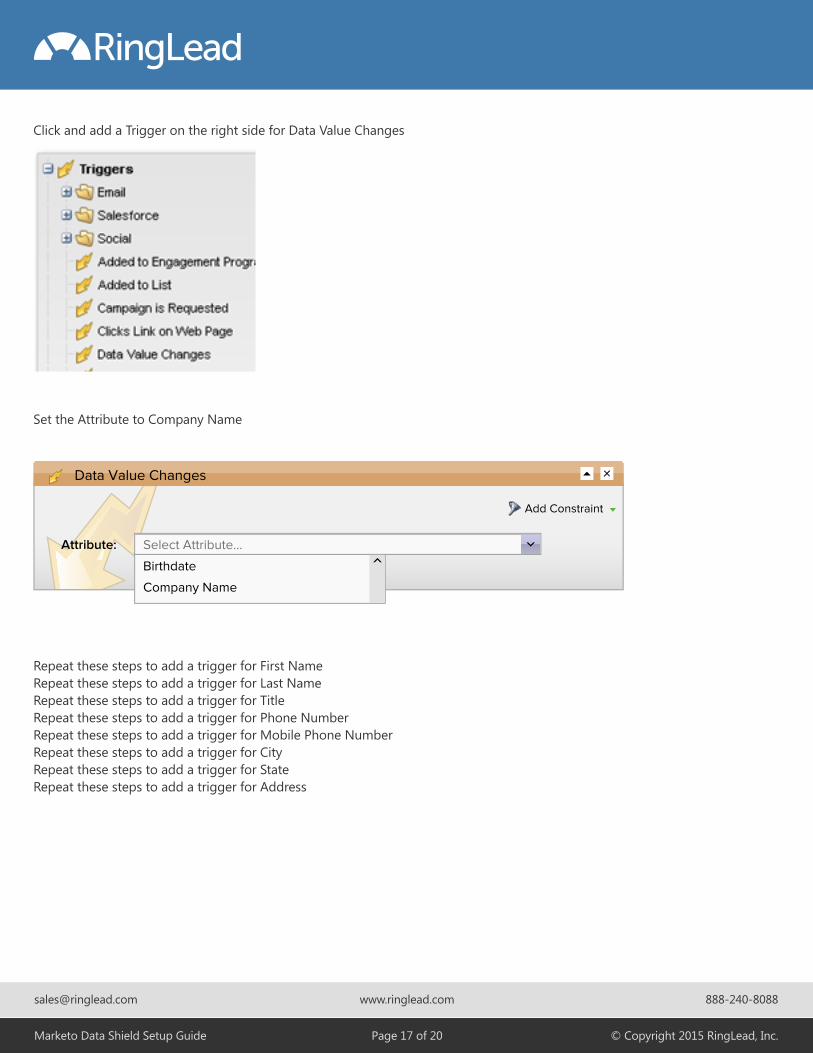
Click and add a Trigger on the right side for Data Value Changes
Set the Attribute to Company Name
Repeat these steps to add a trigger for First NameRepeat these steps to add a trigger for Last NameRepeat these steps to add a trigger for TitleRepeat these steps to add a trigger for Phone NumberRepeat these steps to add a trigger for Mobile Phone NumberRepeat these steps to add a trigger for CityRepeat these steps to add a trigger for StateRepeat these steps to add a trigger for Address
Add Constraint
Data Value Changes
Attribute: Select Attribute...
Birthdate
Company Name
[email protected] www.ringlead.com
Marketo Data Shield Setup Guide Page 18 of 20
888-240-8088
© Copyright 2015 RingLead, Inc.
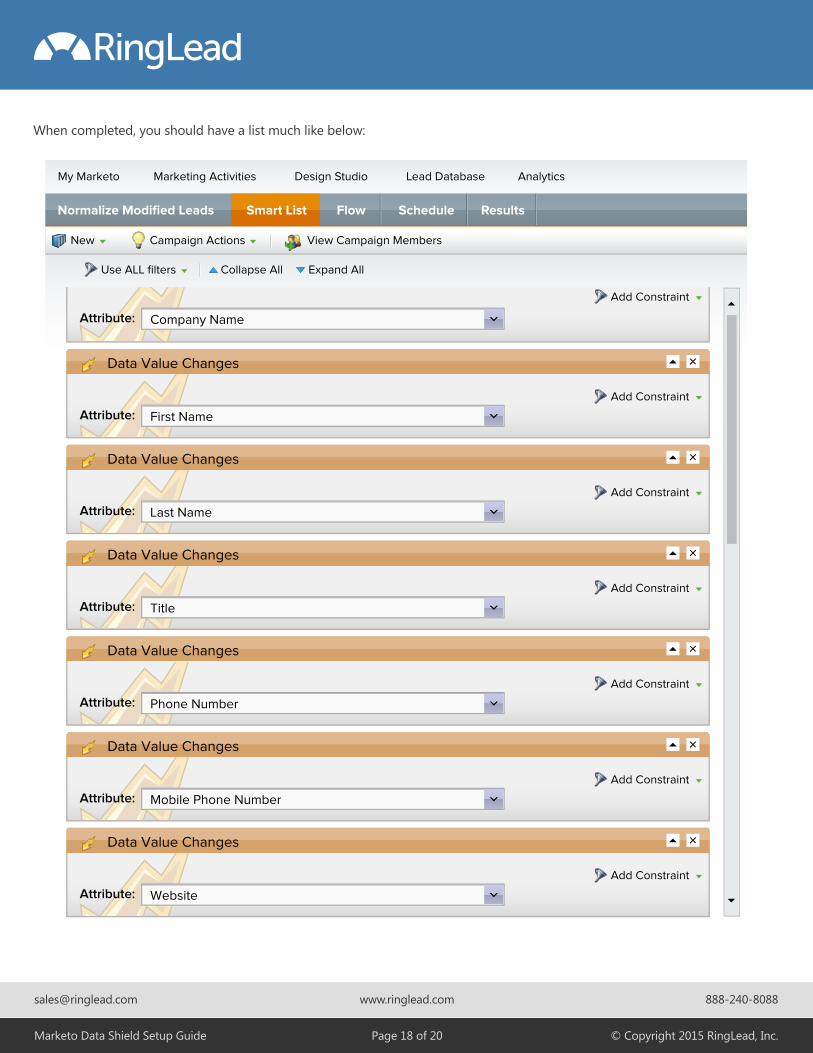
When completed, you should have a list much like below:
My Marketo Marketing Activities Design Studio Lead Database Analytics
New Campaign Actions View Campaign Members
Add Constraint
Attribute: Company Name
Normalize Modified Leads Smart List Flow Schedule Results
Add Constraint
Data Value Changes
Attribute: First Name
Add Constraint
Data Value Changes
Attribute: Last Name
Add Constraint
Data Value Changes
Attribute: Title
Add Constraint
Data Value Changes
Attribute: Phone Number
Add Constraint
Data Value Changes
Attribute: Mobile Phone Number
Add Constraint
Data Value Changes
Attribute: Website
Use ALL filters Collapse All Expand All

[email protected] www.ringlead.com
Marketo Data Shield Setup Guide Page 19 of 20
888-240-8088
© Copyright 2015 RingLead, Inc.
Go to the Flow step and add “Call Webhook”, and choose the Data Shield webhook.
Activate your new Smart Campaign and set the schedule to run every time.
My Marketo Marketing Activities Design Studio Lead Database Analytics
Normalize Modified Leads Smart List Flow Schedule Results
New Campaign Actions View Campaign Members
Collapse All Expand All
Add Choice
1 - Call Webhook
Webhook: Data Shield
Smart Campaign Settings
Inactive
Triggered
Campaign Status:
Smart List Mode:
Triggered Campaign Schedule
If lead has been in this Smart Campaign before
Each lead can run through the flow once
if lead has reached the communication limits
Ignore limit
Activate
Qualification Rules determine how many times each lead can run through the Smart Campaign flow
Edit Qualification Rules
Run each lead through the campaign flow:
only once
once every
every time
If lead is over communication limits
Block non-operational emails
Days
Cancel Save
Congratulations!
Marketo data is now protected by Broadlook Data Shield!
[email protected] www.ringlead.com
Marketo Data Shield Setup Guide Page 20 of 20
888-240-8088
© Copyright 2015 RingLead, Inc.
I am using the Spark version of Marketo and do not see API details to configure.Marketo’s spark version does not support API integration, and will not work with the Ringlead Data Shield. To take advantage of this integration, you need to have standard level or above.
I have custom Marketo fields, will Data shield protect those or just the default fields Marketo provides?Data Shield can normalize and protect custom fields, but you will need to customize your payload template to pass and accept your different values
I work with international data such as phones, will Data Shield help clean that?Data Shield currently only works with US formatted phones and addresses. If you have a large number of non- US data, you may wish to remove those fields from your payload and return mapping of the Marketo Webhook.
Frequently Asked Questions