maryland state board of elections - montgomery county … · electronic pollbooks start-up...
TRANSCRIPT

Maryland State Board of Elections
Electronic Pollbook
Step-by-Step Guide 2016
Presidential Election (Monday Night)
FOLLOW THIS GUIDE ON
PRE-ELECTION DAY
(Monday Night) Electronic Pollbook Set-Up Procedure…………….2
Printer Set-Up Procedure……………………………5
Electronic Pollbooks Start-Up Procedure………….8
Network Hub Set-Up Procedure…………………..10
Electronic Pollbook Opening Procedure………….15
Voter Name Search…………………………………18
Address Search……………………………………..19
Issuing a Standard Ballot………………………......20
Voter not Listed in the Precinct Register………….21
Finding a Polling Place……………………………..22
Issuing a Provisional Ballot………………………...23
Checking Synchronization………………………….24
Closing the Electronic Pollbook……………………25
Changing the Printer Paper………………………..27
Troubleshooting ………………………………….....28MD Electronic Pollbook Step-by-Step Guide 2016
This step–by-step guide provides Election Judges with a quick reference for the most commonly used Election Day procedures for the Electronic Pollbook(EPB).
Updated 8/17/2016
1

Electronic Pollbook Set-Up Procedure
1
MD Electronic Pollbook Step-by-Step Guide 2016
1 On Monday Night
Verify luggage tags on Pollbook cases have correct District and Precinct number.
Verify the outer red seal on each Pollbook case is intact. (There is no lock on printer case(s).
Open the printer case. Remove the Electronic Pollbook Integrity Report
.
Verify the outer red seal number matches the number
printed on the Electronic Pollbook Integrity Report
Opening, column #1). If numbers match, discard red
seal.
Remove the outer red seal from that Pollbook case (use
scissors if needed).
2
2

Detach the internal power
connection (if attached) from
the EPB.
Remove EPB and power cord
from case. Do NOT grab the
EPB by its legs! Use the
elastic strap.
MD Electronic Pollbook Step-by-Step Guide 2016
Electronic Pollbook Set-Up Procedure
Verify the State Asset Tag number on
the back of each EPB matches the
numbers in Column 2 of the Electronic
Pollbook Integrity Report
Verify that the inner seal on the top of
each Electronic Pollbook is NOT broken
and its number matches numbers in
Column 3 of the Electronic Pollbook
Integrity Report
3 4 5
3

Electronic Pollbook Set-Up Procedure
6 7 8 Check that the Power Switch on the
top is turned OFF.
Insert the power cord
(marked with yellow tape)
into the first connection
slot marked PWR and the
other end into a power
source. Do NOT turn on
the power switch yet!
located on the back of the Electronic Pollbook.
Take the printer’s USB cable from the printer case and
plug the larger end into either of the two USB ports
MD Electronic Pollbook Step-by-Step Guide 2016
Remove one printer, a power brick (identified with
a blue stripe), a power cord, and a Universal
Serial Bus (USB) cable from the printer case.
4

Printer Set-Up Procedure
Test the printer(If green light is on, press red button to turn off
printer)
by firmly holding down the power (round red button)and the paper feed
(triangular green button) at the same time. After a short delay; the light
near power button will flash.
Important Note: The printer end of power cord is bent 90 degrees
(elbow shaped). DO NOT connect an Electronic Pollbook power
cord to the printer. It will cause severe damage to the printer.
Plug the smaller end of the USB cable into the
printer.
1
2
3
Repeat Steps 1-9 for all Electronic Pollbooks
Do not plug the Electronic Pollbook’s power cord into the printer.
It will permantly damamge the printer.
MD Electronic Pollbook Step-by-Step Guide 2016
Plug one end of the printer’s power cord (marked with
blue tape) into the printer and the other end into a
power source
1 2 1
2
5

Top View of The Electronic Pollbook
The Compact Flash (CF) Card Slotcontains a compact flash card, a device used
in the electronic pollbook for storing election
information and a list of eligible voters. The
protective cover for the Compact Flash Card
Slot is to remain closed and sealed during an
election.
The Power Switch Cover can be opened to access
the on/off power switch.
The Stylus is the pen-shaped instrument with a
hard point stored in the top of the unit to be used
to navigate the electronic pollbook. You use the
stylus to “tap” commands on the screen.
MD Electronic Pollbook Step-by-Step Guide 2016 6

The Power Light is green when the unit is in use.
The Battery Light will flash green when the unit is
plugged into an electrical power source and is
charging. The light is off when there is no electrical
power.
MD Electronic Pollbook Step-by-Step Guide 2016 7
MD Electronic Pollbook Step-by-Step Guide 2016
Front View Of The Electronic Pollbook
7

1 Turn the power switch to ON. DO NOT
NETWORK THE POLLBOOKS YET.
MD Electronic Pollbook Step-by-Step Guide 2016
Electronic Pollbook Start-Up Procedure
A. Verify the date, time and,
that there is a date in the
Bulk Update Date field.
Notify the Chief Judge if any
discrepancies arise.
B. If the information on the
screen is correct, tap the
“Launch” button.
When the pollbook switch is ON, the “Launch” screen will appear2
3 Verify the poll name on the left side before
tapping the “OK This is Correct Poll” button at
the bottom of the screen.
4 The “Main Screen” will
appear with the “Manage
10/1/2016
8

5 Tap the “Ballots,” “Voters,” and “SDR Counts” tabs
under “Statistics” to verify that all thenumbers are set to zero. Alert a chief judge
immediately if any of these numbers are not zero.
Do not network the pollbooks if any number is
not zero.
Verify that the totals at the bottom of the screen are
zero.
MD Electronic Pollbook Step-by-Step Guide 2016
6
10/1/2016
Electronic Pollbook Start-Up Procedure
9
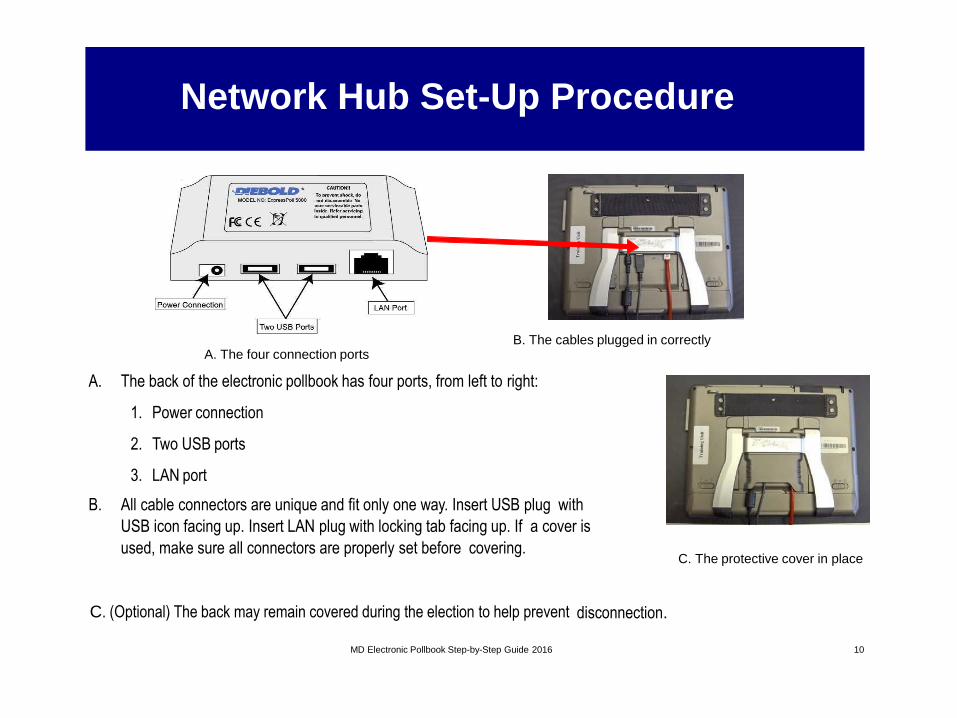
B. The cables plugged in correctlyA. The four connection ports
A. The back of the electronic pollbook has four ports, from left to right:
1. Power connection
2. Two USB ports
3. LAN port
B. All cable connectors are unique and fit only one way. Insert USB plug with
USB icon facing up. Insert LAN plug with locking tab facing up. If a cover is
used, make sure all connectors are properly set before covering.
MD Electronic Pollbook Step-by-Step Guide 2016
C. (Optional) The back may remain covered during the election to help prevent disconnection.
C. The protective cover in place
Network Hub Set-Up Procedure
10

MD Electronic Pollbook Step-by-Step Guide 2016 11

Connect one end of the red
crossover cable into the LAN port of
a Electronic Pollbook.
MD Electronic Pollbook Step-by-Step Guide 2016
1 2
Networking Two Electronic
Pollbooks
Connect the other end of the red
Crossover Cable into the other
Electronic Pollbook LAN Port
(Optional) Install protective cover as shown below to help prevent disconnection.
Network Hub Set-Up Procedure
12

MD Electronic Pollbook Step-by-Step Guide 2016
The Network Hub(or switch) connects the Electronic
Pollbooks and allows them to synchronize data when
more than two Electronic Pollbooks are being used.
There several models used and their appearance
may vary
1 2 Connect small round connector
of power cord into Hub and
other end into power strip.
.
Remove the Multi-Port Network Hub, LAN cables,
and power cord from printer case. Turn off power
strip for check-in area if it is on.
Plug an end of a LAN cable (telephone-
like plug) into the Multi-Port Network
Hub and the other end into LAN port on
the back of a Pollbook.
Do not use the Uplink slot in the
Network Hub
3 Follow Step 3 for each Pollbook. Turn on
power strip.
LED light on the Network Hub will come on.
Network Hub Set-Up Procedure
Networking Three or more Pollbooks
13

Under the “Network” tab on the left.
Look on the screen to confirm there is a line entry for each Pollbook,
identified by its State Tag Number.
Look at the “Synch” column for each Pollbook. All Pollbooks should
show “complete” except the one you are using. It will show “N/A". After
verifying that all EPB’s are synced.
Tap” Manage Polls” to return to the Main Screen of the EPB
1 Check the Pollbook network status: a blinking up arrow and
a blinking down arrow will appear at the bottom right if the
Pollbooks are correctly networked. Note: May take a few
seconds.
Tap the “Status” tab on the upper far right of the “Main
Screen”, to verify that the network is synched.
2
Replace the stylus in the top left compartment of the Pollbook
Turn off Pollbooks and printers .
Leave the power strip on so the Pollbooks and printers can charge overnight(In Preparation for Election Day).
3
MD Electronic Pollbook Step-by-Step Guide 2016
10/1/2016
Network Hub Set-Up Procedure
14