maryland state department of education and the johns
TRANSCRIPT

Maryland State Department of Education and
The Johns Hopkins University Center for Technology in Education
Early Childhood Accountability System Users Guide
Spring 2012
Johns Hopkins University Center for Technology in Education and Maryland State Department of Education © 2012
Page 2 of 40
Table of Contents
Pages
Getting Started .............................................................................................................. 4
Logging In ..................................................................................................................... 4
Navigation .................................................................................................................... 4
Student Interface ........................................................................................................... 5
Students ........................................................................................................................ 5
Search for a Student in System .................................................................................. 5
Add a Student in System ............................................................................................ 6
Remove a Student from System .............................................................................. 10
Inactivate a Student in System ................................................................................ 11
Students List ................................................................................................................ 12
Developmental Checklist........................................................................................... 13
Work Sampling Checklists ......................................................................................... 13
Import .......................................................................................................................... 14
Enter WSS Information into Checklist ...................................................................... 15
Print Checklist with MMSR K-Readiness Domain and Composite Levels .......... 16
Finalize Assessment Sheet ........................................................................................ 18
Student Information..................................................................................................... 20
Demographic Information ....................................................................................... 20
Manage Teachers ..................................................................................................... 21
Transfer Students from one Maryland County to another County .................... 22
Admin Interface .......................................................................................................... 23
User Level .................................................................................................................... 23
County-Level ........................................................................................................ 23
School-Level .......................................................................................................... 23
Teacher-Level ....................................................................................................... 23
User Access Rights ..................................................................................................... 23
Admin Rights ......................................................................................................... 23
Edit Rights .............................................................................................................. 23
School-wide Rights ............................................................................................... 23
List of Users .................................................................................................................. 23
Remove/Delete Users ............................................................................................... 24
Add or Edit Users ........................................................................................................ 25
Add a School for Teachers ...................................................................................... 26
Export Data ................................................................................................................. 27
Apply-All Option ........................................................................................................ 28
Reports Interface ......................................................................................................... 29
Exit Assessment Needed Report .............................................................................. 29
Progress at Exit Report............................................................................................... 30
Unfinalized Checklists ................................................................................................ 31
Returned to General Education ............................................................................. 32
MMSR Kindergarten Readiness Report .................................................................. 33

Johns Hopkins University Center for Technology in Education and Maryland State Department of Education © 2012
Page 3 of 40
Automated Monthly SSIS Integration ........................................................................ 35
Auto-Update Residence and Service Schools ..................................................... 35
Auto-Add New Students with Initial IEP In Effect .................................................. 35
Troubleshooting ........................................................................................................... 36
Printing Hints ............................................................................................................... 36
Technical Support ..................................................................................................... 39
Spring 2012 Release Notes (with page # references for each release item) ....... 40

Johns Hopkins University Center for Technology in Education and Maryland State Department of Education © 2012
Page 4 of 40
GETTING STARTED:
Logging In
Note: If you don't have a username, ask your county-based administrator to
generate one for you. If your username and/or password is lost or forgotten, see your
county-based administrator.
1. Go to http://mdecas.org (No need to type www. before this URL.)
2. Enter your assigned login name and password. The password is case
sensitive. To complete the login process, click on the Login button or press
Enter.
Navigation
1. Opening Screen - After logging into the Early Childhood Accountability
System (ECAS), a Welcome screen will appear. Click on the Students link
to add/edit Student information as described on page 5. If Admin option
is available, click on the Admin link to add/edit Teacher data as
described on page 25.

Johns Hopkins University Center for Technology in Education and Maryland State Department of Education © 2012
Page 5 of 40
2. Link to User Guide and Blank Checklists – When logged in a link in the
upper right hand corner is available on every screen in ECAS. Clicking the
User Guide & Blank Checklist link will allow users to download the most
recent version of the User Guide and/or Blank Checklists for 3, 4, and 5
year olds.
STUDENT INTERFACE:
Students
1. Click on the Student link to see a screen with the following link options:
A. Search for a Student – This link allows a user to locate a student who
already exists in the system and then to edit or complete a WSS
checklist for him/her.
B. Add Student - This link allows a user to add a student to this system
before completing the WSS checklist for him/her.
Search for a Student in System
1. Click on the Search link on the left Navigation Bar. This search checks the
WSS Database (the ECAS database) to see if the student's information
already exists in the System. Type the student's information - either the
State Assigned Student ID Number (SAS ID), the Local Student ID Number,

Johns Hopkins University Center for Technology in Education and Maryland State Department of Education © 2012
Page 6 of 40
or any of the Student Information fields. Click on the Search button.
NOTE: The search will look for only Active students by default. To find
students who are Inactive (see pages 11-12 for inactivating students) be
sure to check the Inactive filter before clicking Search.
2. If the student is not found in the WSS Database, click on the Add a
Student link on the left Navigation Bar and continue with Step #1 in the
section below. If the student is listed, click on the student's name to link to
his/her Work Sampling Checklists and View/Edit Demographic information.
Add a Student in System - when logged on as a County-Level or
School-Level User
Note: Teachers cannot add students to the Early Childhood Accountability System.
Only users with School-Level or County-Level rights can add a student to this System.
1. Add Student link - Click on the Add Student link to add a student who
does not already exist in the WSS database. The Add Student process will
first check against Maryland's SSIS Database to see if the student is
already receiving services as of the last Child Count. Type in a field or two
to filter for possible matches to the student's information and click on the
Search button.
Add Student search only returns SSIS records for children who are
less than 6.5 years old

Johns Hopkins University Center for Technology in Education and Maryland State Department of Education © 2012
Page 7 of 40
Tip: Using the Date Initial IEP is in Effect Range filter on the Search SSIS
Database screen allows the user to find students who recently
entered preschool education and are in need of having an Entry
WSS checklist submitted. Running an Add Student search on recent
Date Initial IEP is in Effect Range regularly is an effective method of ensuring that
all students who started preschool education are accounted for in ECAS and an
Entry WSS checklist completed.

Johns Hopkins University Center for Technology in Education and Maryland State Department of Education © 2012
Page 8 of 40
2. If the student is found in the SSIS Database, click his/her name to link to the
Student Detail page.
Users can tell at a glance whether students in the SSIS search results
have already been added to ECAS by referencing the In ECAS
column on the left.
Users can also see the Date Initial IEP is in Effect in the SSIS search
results.
3. After confirming on the Student Detail page that this is the correct student
to add to ECAS, click on the Add Student button. Clicking the Add
Student button will create a student in ECAS and automatically import the
demographic information and Initial IEP in Effect by date from SSIS into
ECAS. Skip ahead to step 6.
Demographic
information hidden for confidentiality.
Demographic information hidden for confidentiality.

Johns Hopkins University Center for Technology in Education and Maryland State Department of Education © 2012
Page 9 of 40
4. If the student doesn't exist in the SSIS Database either, click on the Add
New Student button.
5. Complete the form. Asterisked fields are required. Don't type any
punctuation such as apostrophes or dashes.
Details on SASID and Service County School are:
“SASID” – State Assigned Student Identification Number
a. This field is populated when a student is pulled in from SSIS or
when a student is created manually
b. School Level users will have the right to add a “SASID” to a
student
c. County Level User will have the right to add/edit a “SASID” for
a student
“Service County” and “Service School”
a. “Service County” and “Service School” are optional. They
are available so that preschoolers can be placed at a school

Johns Hopkins University Center for Technology in Education and Maryland State Department of Education © 2012
Page 10 of 40
where a provider assigned to a school other than the
students’ “Residence School” can edit checklists.
b. “Service County” and “Service School” will auto-populate
when a student is pulled in from SSIS
6. A Developmental Checklist screen for the new student will appear.
Remove a Student from System - when logged on as a County-Level or
School-Level User
Note: Teachers cannot remove students from the Early Childhood Accountability
System. Only users with School-Level or County-Level rights can remove a student
from this System.
1. A student can be removed from the ECAS Database if he/she does not
have a checklist associated with him/her. This permanently removes the
student from ECAS.
2. A County-Level or School-Level user will notice a “Remove” link in the far
right column of ECAS Database Search Results screen. Pressing this link will
warn the user that the student is about to be permanently deleted from
the ECAS database.

Johns Hopkins University Center for Technology in Education and Maryland State Department of Education © 2012
Page 11 of 40
Inactivate a Student in System - when logged on as a County-Level or
School-Level User
Note: Teachers cannot inactivate students in the Early Childhood Accountability
System. Only users with School-Level or County-Level rights can inactivate a student
in this System.
1. A student can be inactivated in the ECAS Database to prevent them from
appearing on the following reports: .
Exit Assessment Needed Report,
Unfinalized Checklists Report
NOTE: This functionality was introduced to allow ECAS Implementation
Leads to “hide” students that have missed the window of opportunity for
capturing an Exit Checklist, but cannot be removed from ECAS because
they have a finalized Entry checklist.
2. A County-Level or School-Level user will notice an “Activate/Inactive” link
in the Active/Inactive column of ECAS Database Search Results screen.
a. Students who are Active have an “Inactivate” link in this column.
b. Students who are Inactive have an “Activate” link in this column.
3. Inactivating and re-Activating students
a. Pressing the “Inactivate” link for an Active student will warn the user
that the student is about to be inactivated in the ECAS database.
Click OK to continue.
Demographic information hidden for confidentiality.

Johns Hopkins University Center for Technology in Education and Maryland State Department of Education © 2012
Page 12 of 40
b. Pressing the “Activate” link for an Inactive student will warn the user
that the student is about to be activated in the ECAS database.
Click OK to continue.
4. When a student has been inactivated they will only show up in search
results when the Inactive filter is checked as described on pages 5-6.
Students List - as logged on as a Teacher-Level User
1. If the user has Teacher-Level user access as described on page 23, he/she
will see a list of all students to whom he/she is assigned. In the screen print
shown below, the teacher has 5 students on her caseload. The teacher
can easily view and edit the students' WSS Checklists by clicking on the
student link in the Name column.
2. Students are added to a teacher's caseload or to his/her Student List by
following the directions listed on page 21. Only a user with County or
School-Level user access can add a student to the teacher's Student
List/caseload.
3. The yellow graphic ( ) next to a student's name indicates that the
student was not found in the SSIS database. Once the student's name is
verified against the SSIS database, the graphic will disappear. When
future Child Count data is linked to these students the yellow graphic will
disappear.
Demographic information hidden for confidentiality.
Johns Hopkins University Center for Technology in Education and Maryland State Department of Education © 2012
Page 13 of 40
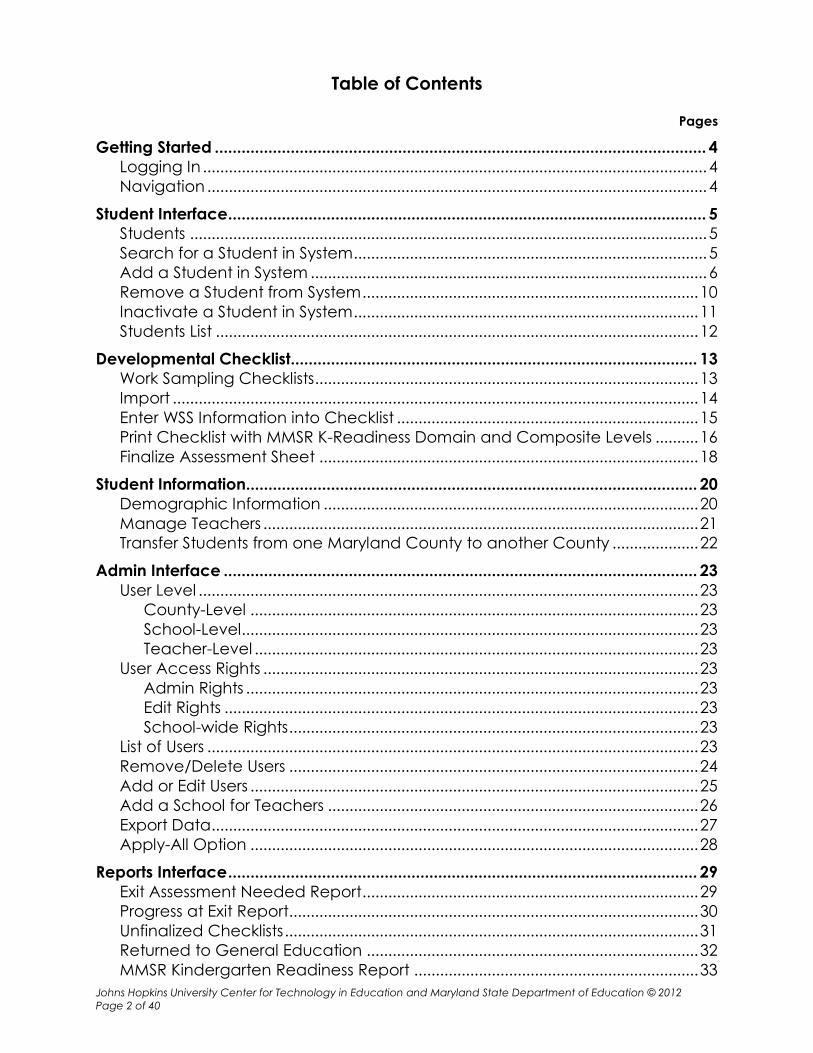
DEVELOPMENTAL CHECKLIST:
Work Sampling Checklists 1. After locating the student in ECAS, click on the link for the appropriate
student's name and then click on Work Sampling Checklist.
or
After adding the student, click on Work Sampling Checklist.
NOTE: If the student transitioned from the Extended Part C skip to the
Import "Online IFSP - Extended Part C Exit WSS Checklist" into "ECAS - WSS
Entry Checklist" section on page 14.
2. Make sure the student's age and checklist age are correct.
3. Choose Checklist Type - either Entry, Interim Full Battery, Interim VSC
Flagged, or Exit.
4. Click on the Add New Checklist button.
5. A screen with "Checklist added successful" message will appeared.
6. Checklist Types – Entry/Interim/Exit
a. Entry/Exit - Every student in ECAS must have an Entry and an Exit
checklist completed. These measures are used to determine
progress while in preschool special education
b. Interim – Interim checklists are optional. After an Entry checklist has
been completed and before an Exit checklist has been completed
users have the option of completing Interim Checklists. Students
can have as many Interim checklist ratings as needed between
Entry and Exit. There are two types of Interim Checklists:
i. Interim Full Battery – requires user to complete all age
appropriate indicators in a checklist before it can be finalized

Johns Hopkins University Center for Technology in Education and Maryland State Department of Education © 2012
Page 14 of 40
ii. Interim VCS Flagged – requires user to complete only
Maryland State Curriculum (VSC Flagged) cross-walked age
level indicators in a checklist before it can be finalized
Note: Interim Checklists are optional. They give users the opportunity to capture WSS
checklist ratings at points along the way between Entry and Exit. Users can choose
in an Interim Checklist whether they want to assess the student on all of the age
appropriate indicators in WSS or just the Maryland State Curriculum (VSC Flagged) cross-walked
indicators.
Import "Online IFSP - Extended Part C Exit WSS Checklist" into " ECAS -
WSS Entry Checklist"
1. If the student transitioned from the Extended Part C and had a finalized
Extended Part C Exit WSS Checklist in the Online IFSP, then this checklist
can be imported into ECAS to serve as the Entry WSS Checklist for
preschool special education.
2. When a student matches on demographic information in Online IFSP &
ECAS and has an Extended Part C Exit WSS Checklist in the Online IFSP, a
special link to “Import Extended Part C WSS Checklist” link will appear on
the active student’s Work Sampling Checklist screen.
3. Click this link to import checklist ratings from the Online IFSP in the
ECAS Entry WSS. When clicked a warning will pop up to remind
users that all checklist ratings will be imported but the ECAS Entry
Checklist will still need to be finalized.

Johns Hopkins University Center for Technology in Education and Maryland State Department of Education © 2012
Page 15 of 40
After clicking OK, users can edit the imported checklist items and/or go
ahead and Finalize the checklist as described on page 18.
Enter WSS Information into Checklist 4. Click on the blue "Age 3, 4 or 5 - Entry or Exit" link.
5. The WSS Checklist will appear.
6. Notice that the indicators on the checklist for the Personal and Social
Development Domain are displayed.
7. Notice that links to age appropriate Exemplars and Instructions are
available on each of the seven domain indicators screens.
8. The green flag ( ) indicates that it is a Kindergarten Readiness Indicator.
Performance indicators are aligned with those measuring baseline entry
into Kindergarten.
9. Complete the checklist by clicking on the appropriate radio buttons
below the P, I, or N at the top right side of the screen.
A. is Proficient = student can reliably demonstrate indicator
B. is In Process = student demonstrates indicator intermittently.
C. is Not Yet = student cannot demonstrate indicator.
10. Use the Apply-All buttons to have the System automatically complete the
indicators with that rating. For example, click on the "P" button ( ) to fill
in Proficient scores for all indicators in the current Domain/Screen. Then
make any necessary changes to any indicators in this Domain/Screen by

Johns Hopkins University Center for Technology in Education and Maryland State Department of Education © 2012
Page 16 of 40
clicking on the appropriate radio button.
If the Apply-All Feature is not active, click on the appropriate radio button
for each Indicator in each Domain.
Note: The Apply-All Feature listed in #7 above is turned off by default. Jurisdictions
are able to turn on/off this Apply-All Feature under their Admin Console. Instructions
for a County-Level User on how to disable/enable this feature are listed on page 28.
11. Click on the Save button at the bottom of the screen.
12. A confirmation message will appear at the bottom of the screen.
13. Continue completing the student's checklist by clicking on each Domain
on the left Navigation Bar. Click on each Domain (II. Language through
VII. Physical Development and Health) and record a rating for each
Indicator. For each indicator, click on the Save button at the bottom of
each screen. Every indicator must be marked in order to finalize the
checklist.
Print Checklist with MMSR K-Readiness Domain and Composite Levels
1. Click on the Print Checklist link on the left Navigation Bar.
2. The student's checklist will appear in a new window.
The Printed Checklist will display:
Demographic Information
MMSR K-Readiness levels definitions
Composite MMSR Readiness level
A legend for flagged indicators and P, I, and N definitions
The checklist ratings by domain
Domain MMSR Readiness levels

Johns Hopkins University Center for Technology in Education and Maryland State Department of Education © 2012
Page 17 of 40
3. Tips for adjusting Header/Footer and margin settings for your internet
browser can be found on pages 36-38.

Johns Hopkins University Center for Technology in Education and Maryland State Department of Education © 2012
Page 18 of 40
4. Go to File, Print.
Finalize Checklist
1. After scores for the indicators in all Domains/Screens have been marked,
the assessment can be finalized.
2. Click on the Finalize Checklist on the left Navigation Bar.
3. Enter the required dates.
A. For Entry checklists:
1. Enter the Least Restrictive Environment (LRE) at Entry.
2. Enter the Disability at Entry.
3. Enter the Date Initial IEP is in effect. This is the date that the
student’s Initial IEP went into effect. This date is listed on the
student's IEP. If the student was added to ECAS from a
matching SSIS record then this date may be prefilled.
4. Enter the Assessment Date. This is the date on which the WSS
Checklist Assessment was completed (typically 6-8 weeks
after the Date Initial IEP is in effect).
B. For Interim checklists:
1. Enter the Least Restrictive Environment (LRE) at Interim.
2. Enter the Disability at Interim.
3. The Date Initial IEP is in effect is prefilled with the date that
was entered in the student’s finalized Entry checklist. This is
the date that the student’s Initial IEP went into effect.
4. Enter the Assessment Date. This is the date on which the
Interim WSS Checklist Assessment was completed.
C. For Exit checklists:
1. Enter the Least Restrictive Environment (LRE) at Exit.
2. Enter the Disability at Exit.

Johns Hopkins University Center for Technology in Education and Maryland State Department of Education © 2012
Page 19 of 40
3. The Date Initial IEP is in effect is prefilled with the date that
was entered in the student’s finalized Entry checklist. This is
the date that the student’s Initial IEP went into effect.
4. Enter the Exit Date. This is typically the date that the child
exited Special Education OR the date that the child aged out
of Preschool, e.g. 6th birthday, last day of Kindergarten
school year.
5. Enter the Assessment Date. This is the date on which the WSS
Checklist Assessment was completed (typically within 6-8
weeks of Exit Date).
4. Click on the Finalize Checklist button.
5. If required ratings for the indicators in all Domains/Screens have not been
marked, an error message will appear stating that "the checklist cannot
be finalized. Please provide answers to all indicators." The list of
unmarked indicators will alert you to which areas need attention. If this
message appears, go back to the Domains and mark each unmarked
indicator.

Johns Hopkins University Center for Technology in Education and Maryland State Department of Education © 2012
Page 20 of 40
6. Once a checklist is successfully finalized a confirmation screen will appear
stating that "the checklist has been finalized."
7. Also, upon returning to the Developmental Checklist screen, the word
"finalized" will appear next to the Checklist.
STUDENT INFORMATION:
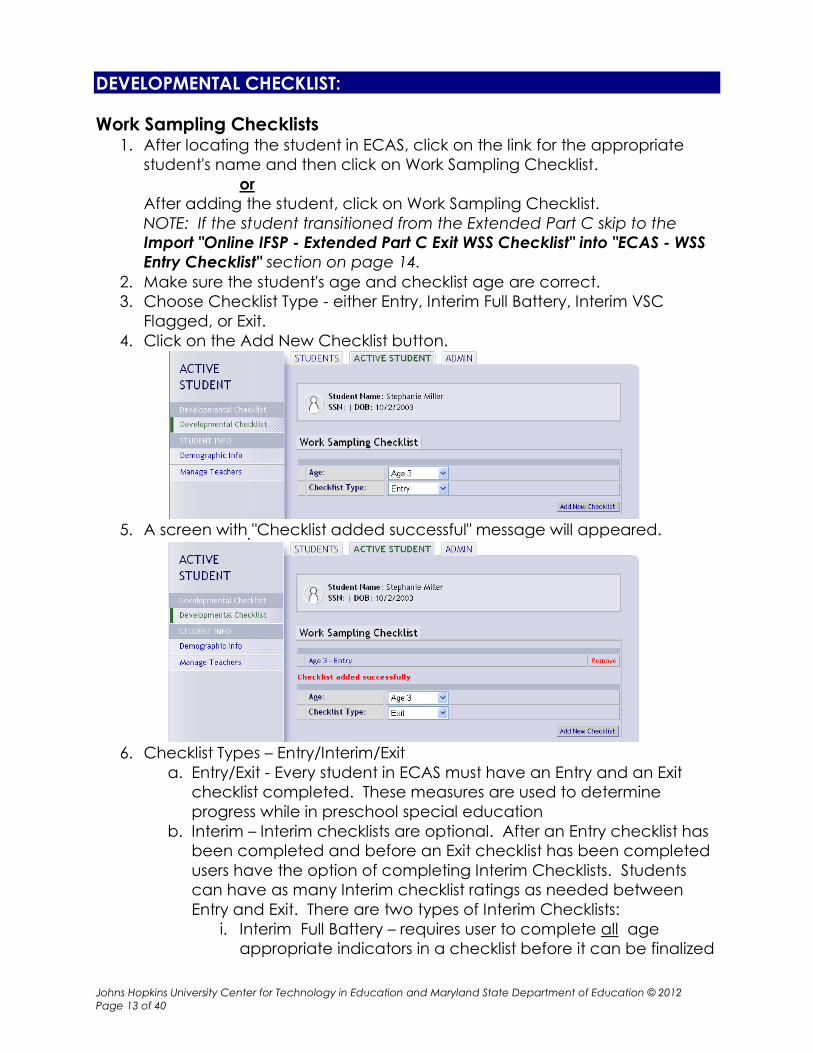
Demographic Info
1. Click on the Demographic Info link to revise or add student information.
Only County-Level and School-Level users can edit student
demographics. School Level users will have the right to add a “SASID” to
a student. County Level User will have the right to add/edit a “SASID” for
a student.
2. Type the revised or additional information.
Johns Hopkins University Center for Technology in Education and Maryland State Department of Education © 2012
Page 21 of 40
3. Click on the Save button.
4. A Confirmation Screen will be displayed stating that "demographic
information change has been saved successfully."
Manage Teachers
1. Students can be assigned to teachers and appear on teachers’
caseloads when they login to the ECAS application. Only County-Level
and School-Level users can assign students to teachers.
2. Click on Manage Teacher link.
3. Choose the teacher's name from the Add Teacher to Student drop-down
list. Only teachers that are in the ECAS database from that county or
school will appear. The names on the list are based on whether the user
has county-level or school-level rights as described on page 23.
4. Click on the Add Teacher to Student button.

Johns Hopkins University Center for Technology in Education and Maryland State Department of Education © 2012
Page 22 of 40
5. A screen showing that the teacher is assigned to this student will appear.
Notice that the student can be removed (or released) from the teacher's
caseload by clicking on the Remove button.
6. Repeat steps #3 and 4 listed above to add/assign another teacher to the
student.
Transfer Students from a Maryland School to another Maryland School
1. If a student who has already been added to ECAS transfers to another
Maryland school, the receiving school should notify/call the transferring
school and request that the student be transferred in ECAS.
2. The transferring School-Level or County-Level user should first check the
student’s Manage Teachers link and remove the teacher(s) assigned to
student - as described on page 22.
3. The transferring School-Level or County-Level user should then return to
the Student Demographic Info page - as described on pages 20-21 - and
release the student to the receiving school.
A. For a student who transfers to another school in the same county,
the transferring School-Level or County-Level user must change the
Residence School to the receiving school.
B. For a student who transfers to another school in a different county,
the transferring School-Level or County-Level user should remove
the Local Student ID, change the Residence County, and change
the Residence School to the receiving school. If Service County
and Service School information exists then it should be blanked out
before saving.
4. The receiving county/school should check the student’s information for accuracy.

Johns Hopkins University Center for Technology in Education and Maryland State Department of Education © 2012
Page 23 of 40
ADMIN INTERFACE:
User Levels
There are the following 3 levels of Users:
A. County-Level - These users work at the County level. They are
employees who supervise or work with students from the entire
county. They have rights to add/remove students to the system and
view data of any student in the county. They can add/edit a SASID
to student demographics.
B. School-Level - These users work at the School level. They are
administrators or teachers/providers who are working with students
within a particular school. They have rights to add/remove students
to the system and view data of any student in the school. They can
add a SASID to student demographics (but cannot edit a SASID that
has already been saved to a student).
C. Teacher-Level - These users work at the Classroom level. They are
teachers/providers who are working with students in one or more
schools. They have rights to view data for only students who are
assigned to their caseload. Teachers can be assigned to more than
one school/location. Teachers cannot add students to the System.
User Access Rights
In addition, these users are assigned different access rights – as determined by
their Local School System.
The following 3 access rights are also available:
A. Admin Rights – A user with Admin User Rights is able to use the
Admin Interface, so he/she can add other users at their same level
or below to the System.
B. Edit Rights – A user with Edit Rights is able to enter Indicator ratings
on a student's checklist.
C. School-wide Rights – A user with School-wide Rights can access any
student's information in his/her school. School-wide rights are
granted to teachers/providers who need the ability to edit and
view any student's checklist within his/her school.
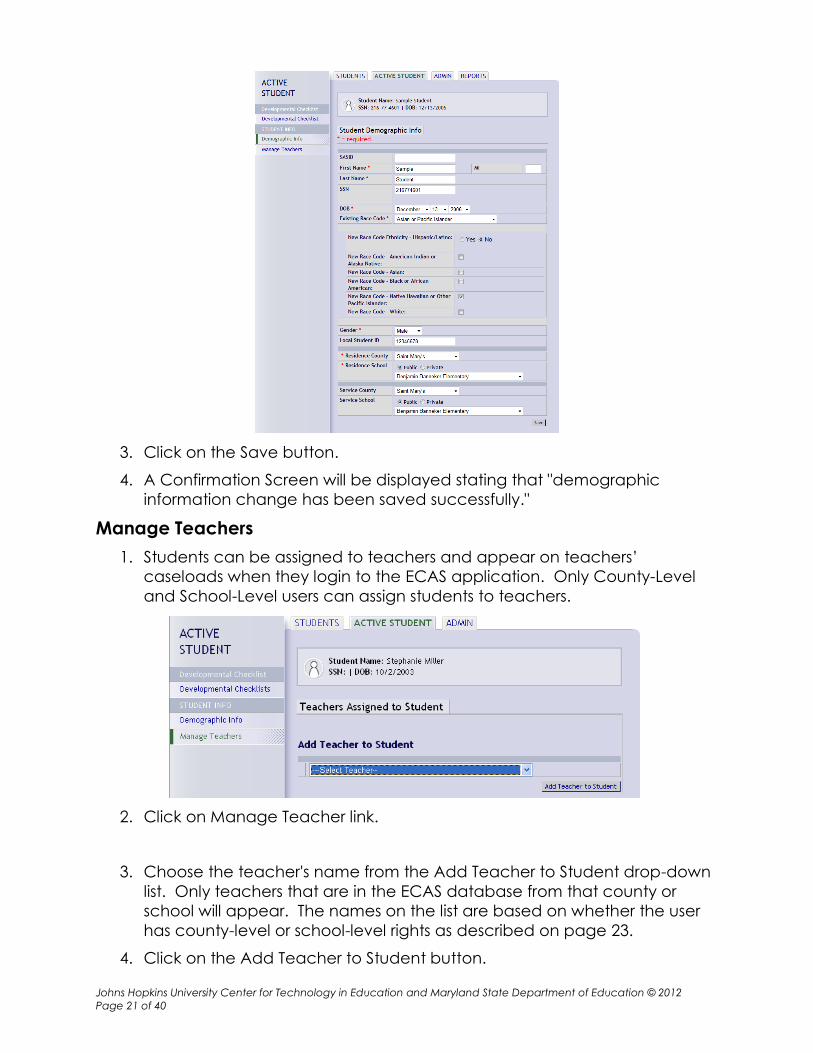
List of Users
This section allows Local School Systems to view, add, edit, and delete the ECAS
users. This is a list of users that the logged-in user is allowed to view - based on
his/her user level as described on page 23.
Johns Hopkins University Center for Technology in Education and Maryland State Department of Education © 2012
Page 24 of 40
1. Click on the List of Users link on the left Navigation Bar.
2. Click on the All link in the middle part of the screen to list all users that the
currently logged-in-user has rights to edit.
3. Notice that different access levels of users appear slightly different in the
table.
Tip: If a user's access rights are not correct, another user with higher level access rights
will have to change the rights of the incorrect user.
Remove/Delete Users
This section allows users to remove/delete ECAS users from the System.
1. Click on the Remove link next to the appropriate user.
2. Click on OK button on the dialog box. The user will be deleted.

Johns Hopkins University Center for Technology in Education and Maryland State Department of Education © 2012
Page 25 of 40
Add or Edit Users
This section allows users to add or edit information the ECAS users.
3. Click on the Add/Edit User link on the left Navigation Bar.
4. Complete the data carefully. The yellow fields are required.
A. User Name – must be between 4 and 20 alpha-numeric characters
B. Password – must contain at least 8 alpha-numeric characters (case-
sensistive)
5. There are 3 types of User Groups - County, School, and Teacher. Fewer
User Groups Types may be available depending upon the user's access
rights. Choose a level for this user.
A. County-Level User - These users work at the County level. They are
employees who supervise or work with students from the entire
county. They have rights to add students to the system and view
data of any student in the county.

Johns Hopkins University Center for Technology in Education and Maryland State Department of Education © 2012
Page 26 of 40
B. School-Level User - These users work at the School level. They are
administrators or teachers/providers who are working with students
within a particular school. They have rights to add students to the
system and view data of any student in the school.
C. Teacher-Level User - These users work at the Classroom level. They
are teachers/providers who are working with students in one or
more schools. They have rights to view data for only students who
are assigned to their caseload. Teachers can be assigned to more
than one school/location. Teachers cannot add students to the
System.
6. Specific rights can be given to each level of user. Click in the checkbox
next to the appropriate checkbox.
A. Admin Rights – A user with Admin User Rights is able to use the
Admin Interface, so he/she can add other users at their same level
or below to the System.
B. Edit Rights – A user with Edit Rights is able to enter Indicator ratings
on a student's checklist.
C. School-wide Rights – A user with School-wide Rights can access any
student's information in his/her school. School-wide rights are
granted to teachers/providers who need the ability to edit and
view any student's checklist within his/her school.
7. Click on the Save button after the screen has been completed.
Add a School for Teachers
Teacher Level User can be assigned to more than one school. This is good for
teachers who work at multiple schools.
1. Locate the Teacher's name on the List of Users screen.
2. Click on the Add School link.
3. If the teacher is already assigned to a second school, a list of schools for
which he/she works is shown at the top of the screen.
If the teacher is not already assigned to a second school, a message
stating that "No additional schools are currently associated with this user.
Use the form below to add more schools to user" will appear at the top of
the screen.
4. To assign the teacher to another school, choose a county and school
from the drop-down list at the bottom of the screen.
Johns Hopkins University Center for Technology in Education and Maryland State Department of Education © 2012
Page 27 of 40
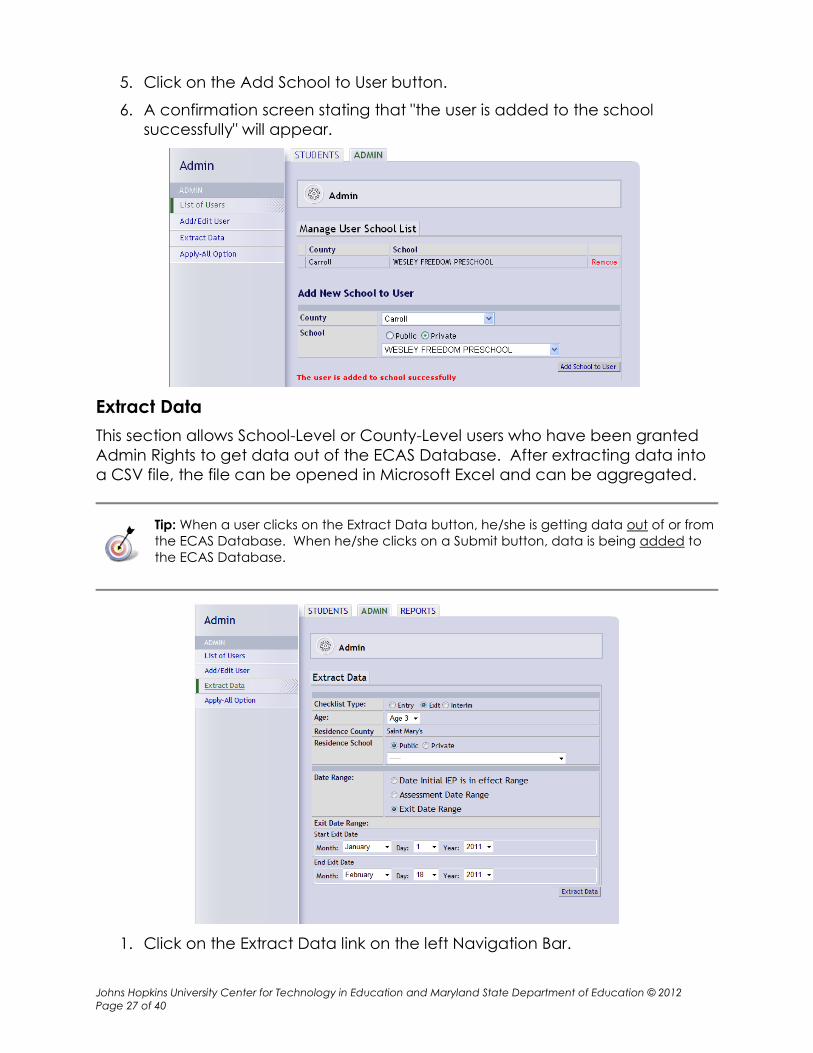
5. Click on the Add School to User button.
6. A confirmation screen stating that "the user is added to the school
successfully" will appear.
Extract Data
This section allows School-Level or County-Level users who have been granted
Admin Rights to get data out of the ECAS Database. After extracting data into
a CSV file, the file can be opened in Microsoft Excel and can be aggregated.
Tip: When a user clicks on the Extract Data button, he/she is getting data out of or from
the ECAS Database. When he/she clicks on a Submit button, data is being added to
the ECAS Database.
1. Click on the Extract Data link on the left Navigation Bar.

Johns Hopkins University Center for Technology in Education and Maryland State Department of Education © 2012
Page 28 of 40
2. Choose the appropriate type of checklist from the Checklist Type
checkboxes.
3. Complete the rest of the form appropriately. School-Level users can only
extract data for their own schools. County-Level users can extract all
county data by leaving the school dropdown blank or can extract
schools’ data individually.
4. Click on the Extract Data button.
5. Click on the Open or Save button in the File Download Screen.
6. Analyze the data or save it and give it to the appropriate person in a
secured manner.
Tip: This CSV file contains confidential and private student data. Don't simply e-mail the
file to someone else. Follow your county's procedures for sharing sensitive, confidential
student data with others.
Apply-All Option
This section allows users to toggle on/off the ability to use the Apply All Option
while completing student's WSS checklists as described on page 15. Only
County-Level users have rights to change this setting.
1. Click on the Apply-All Option link on the Left Navigation Bar.
2. Choose either On or Off from the drop-down list.
3. Click on the Reset button.

Johns Hopkins University Center for Technology in Education and Maryland State Department of Education © 2012
Page 29 of 40
REPORTS INTERFACE:
This tab is an area for reports that all users will be able to run.
Exit Assessment Needed Report
1. In the REPORTS tab click the link in the left hand navigation menu to Exit
Assessment Needed report.
2. This report will display students projected to be aging out of preschool
education appear if they meet ALL of the following criteria:
a. The student attends a “Resident School” or “Service School” that
the user can access
b. Student has a finalized ENTRY checklist
c. Student does not have a finalized EXIT checklist
d. Student is over 5 years old on the Fifth Birthday Cutoff date entered
in the report filter.
Tip: Children must be age 5 by September 1 of a school year. The Fifth Birthday Cutoff
filter allows users to enter the cutoff date for kindergarten enrollment eligibility. For
example, enter September 1, 2010 in the Fifth Birthday Cutoff filter to identify kindergarteners
who need exit assessments in school year 2010-2011. Running this report in the spring of a
kindergarten year helps users identify students who need an Exit WSS checklist entered into
ECAS.
3. School-Level or County-Level users will be able to filter report on
Residence and Service Schools. For a county level user, if no schools
chosen then report will run on the whole county.
4. Teacher-Level users will simply see the list of students who are projected to
be aging out of preschool Special Education.

Johns Hopkins University Center for Technology in Education and Maryland State Department of Education © 2012
Page 30 of 40
Progress at Exit Report
1. In the REPORTS tab click the link in the left hand navigation menu to
Progress at Exit Report.
2. Progress at Exit Report Functionality
a. The report is only available to County Level Users.
b. Filters
i. R-County
ii. R-School
iii. S-County
iv. S-School
v. Exit Date Range
vi. LRE
vii. Disability
viii. Progress
1. A (Did Not Improve Functioning) In Any Outcome
2. E (Maintained Functioning at Same-Aged Peer Level) In
All Outcomes
c. Filter Rules
i. If no schools chosen then report will run for the whole county.
ii. Only students who have a finalized entry and a finalized exit
checklist are included.
d. Extract Data button allows download as csv file functionality for the
student records in the results set..

Johns Hopkins University Center for Technology in Education and Maryland State Department of Education © 2012
Page 31 of 40
e. Run Report results screen shows the following
i. The filters chosen.
ii. The distribution of OSEP Progress Reporting Categories (A, B,
C, D, E) for the Three Broad Outcomes
iii. SPP Part B Indicator 7 Summary Statements
iv. Student Progress at Exit records include OSEP Reporting
Category (A, B, C, D, or E) for each the 3 broad outcomes.
Unfinalized Checklists
1. In the REPORTS tab click the link in the left hand navigation menu to
Unfinalized Checklists report.
2. Only students who have an unfinalized checklist will appear on the report
along with the checklist types of the unfinalized checklists (e.g. Entry, Exit,
Interim Full Battery, Interim VSC Flagged)

Johns Hopkins University Center for Technology in Education and Maryland State Department of Education © 2012
Page 32 of 40
3. School-Level or County-Level users will be able to filter report on
Residence and Service Schools. For a county level user, if no schools
chosen then report will run on the whole county.
Tip: Running Unfinalized Checklists reports regularly is an effective
method of ensuring that all students in ECAS have an Entry and Exit
WSS checklist completed.
Returned to General Education
1. In the REPORTS tab click the link in the left hand navigation menu to
Returned to General Education report.
2. This report is used to identify students with who have an SSIS Exit record
indicating that they have been returned to General Education. This is
particularly useful for determining which students need an Exit WSS
checklist entered into ECAS before the end of their kindergarten year.

Johns Hopkins University Center for Technology in Education and Maryland State Department of Education © 2012
Page 33 of 40
4. School-Level or County-Level users will be able to filter report on
Residence and Service Schools, and a Returned to General Education
Date Range. For a county level user, if no schools chosen then report will
run on the whole county.
5. Users are able to identify which students have ECAS Exit Checklists
Finalized by glancing at the Exit Checklist Finalized column in the report
results.
Tip: Running Returned to General Education reports regularly is an
effective method of ensuring that all students who leave preschool
education before aging out at the end of their kindergarten year have
an Exit WSS checklist completed.
MMSR Kindergarten Readiness Report
1. In the REPORTS tab click the link in the left hand navigation menu to MMSR
Kindergarten Readiness Report.
2. MMSR Kindergarten Readiness Report Functionality
Demographic information hidden for
confidentiality.
Demographic information hidden for confidentiality.

Johns Hopkins University Center for Technology in Education and Maryland State Department of Education © 2012
Page 34 of 40
a. Filters
i. R-County
ii. R-School
iii. S-County
iv. S-School
v. Assess Date Range
vi. Age (on checklist)
vii. LRE
viii. Disability
b. Filter Rules
i. If no schools chosen then report will run for the whole county.
ii. Only students who have a finalized checklist are included.
c. Extract Data button allows download as csv file functionality for the
student records in the results set.
d. Run Report results screen shows the following
i. The filters chosen.
ii. A summary table of Composite and Domain level Readiness
level distribution
iii. Student records including Composite and Domain level
Readiness.
Johns Hopkins University Center for Technology in Education and Maryland State Department of Education © 2012
Page 35 of 40
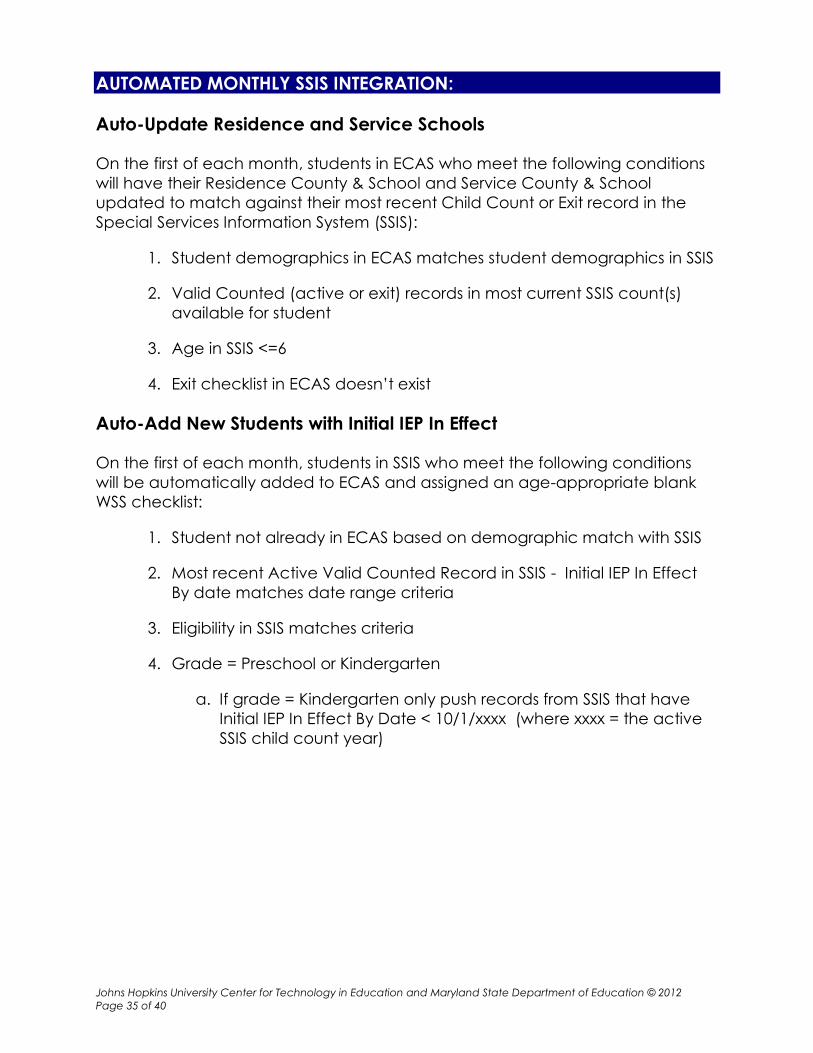
AUTOMATED MONTHLY SSIS INTEGRATION:
Auto-Update Residence and Service Schools
On the first of each month, students in ECAS who meet the following conditions
will have their Residence County & School and Service County & School
updated to match against their most recent Child Count or Exit record in the
Special Services Information System (SSIS):
1. Student demographics in ECAS matches student demographics in SSIS
2. Valid Counted (active or exit) records in most current SSIS count(s)
available for student
3. Age in SSIS <=6
4. Exit checklist in ECAS doesn’t exist
Auto-Add New Students with Initial IEP In Effect
On the first of each month, students in SSIS who meet the following conditions
will be automatically added to ECAS and assigned an age-appropriate blank
WSS checklist:
1. Student not already in ECAS based on demographic match with SSIS
2. Most recent Active Valid Counted Record in SSIS - Initial IEP In Effect
By date matches date range criteria
3. Eligibility in SSIS matches criteria
4. Grade = Preschool or Kindergarten
a. If grade = Kindergarten only push records from SSIS that have
Initial IEP In Effect By Date < 10/1/xxxx (where xxxx = the active
SSIS child count year)

Johns Hopkins University Center for Technology in Education and Maryland State Department of Education © 2012
Page 36 of 40
Identified LEA Implementation Leads receive notification email messages each
time new students are auto-added to ECAS from SSIS.
This monthly automation ensures that new Initial IEP students in SSIS are
represented in ECAS. It also greatly reduces burden County Level users who
had historically were required to manually identify and add students & Entry WSS
Checklists to ECAS.
County Level Users who receive the monthly email notification should log into
ECAS and run student Search(es) on SASIDs in the email and make sure that
teachers are completing the WSS checklists for ECAS Entry in the months after
the Initial IEP went into effect. They should also run Unfinalized Checklist
Report(s) regularly to determine which of these automatically added Entry
Checklists still need to be entered and finalized in ECAS.
TROUBLESHOOTING:
Printing Hints
When printing WSS checklists from ECAS, the print output is dependent on your
internet browser’s print settings. Directions for optimizing Internet Explorer 7+ and
Mozilla Firefox 3+ setting for WSS checklist printing are listed below. Follow these
steps below to remove the headers and footers and adjust margins when
printing a checklist.
Tip: The reports can be printed as shown on the screen without changing the settings.
If you do not want the headers & footers (URL, date/time, etc.) to appear on the
printed report, or if you have problems with the page breaking in printed checklists,
please follow the instructions below.

Johns Hopkins University Center for Technology in Education and Maryland State Department of Education © 2012
Page 37 of 40
1. For Internet Explorer 7+ Users -
A. Choose File>Print Preview.
B. Click the Turn Headers and Footers Off button.
C. Make sure that the Print Size dropdown is set the Shrink to Fit.
D. Click the Page Setup button and set all margins to 0.5 inches
E. Click OK and then click the Print button.

Johns Hopkins University Center for Technology in Education and Maryland State Department of Education © 2012
Page 38 of 40
2. For Mozilla Firefox 3+Users -
F. Choose File>Print Preview.
G. Make sure that the Scale dropdown is set the Shrink to Fit.
H. Click the Page Setup button and set all margins to 0.5 inches
I. Change all Headers & Footers dropdowns to --blank--
J. Click OK and then click the Print button.

Johns Hopkins University Center for Technology in Education and Maryland State Department of Education © 2012
Page 39 of 40
Technical Support
Call your County-Designated Person (Special Education Data Manager), if you
are experiencing technical problems with or have questions about the Early
Childhood Accountability System Application.
Call your Local Coordinator of Preschool Special Education Services, if you are
have questions about the Early Childhood data-collection and/or WSS process.
1. Before calling them, please reboot your computer and repeat the steps
you were attempting to do.
2. Write down any error messages you receive.
3. Remember other programs that were open at the time the problem
occurred.
4. Try to repeat your steps on another computer. Does it work on that
computer?
5. Think about the computer specifications of the computer you are using.
In other words, does the computer have a current Operating System and
browser?
6. What type of connection do you have? Is it through the telephone line,
cable, DSL, or LAN?

Johns Hopkins University Center for Technology in Education and Maryland State Department of Education © 2012
Page 40 of 40
SPRING 2012 RELEASE NOTES (with page # references):
Release Items
Update Checklist(s) Printout (pages 16-17)
o Add MMSR K-Readiness score categories and calculations (e.g. Full,
Approaching, Developing) by Domain and Composite
MMSR (Kindergarten Readiness) Reports (pages 33-34)
o Summary by Domain, Composite, and Readiness
o Child Details by Domain, Composite, and Readiness (exportable)
Inactivate Child Functionality (pages 11-12)
o Add ability for county level user to inactivate a child
o Inactivated children can be reactivated by a county level user
o Add new filters for Active/Inactive to Search Children
o Exclude inactivated children from Exit Assessment Needed Report
and Unfinalized Checklists report
Relax old-race requirement when adding new children (pages 9)
Ability to import "Online IFSP - Extended Part C Exit WSS Checklist" into
"Online ECAS - WSS Entry Checklist" (pages 14-15)
Monthly SSIS Integration to alleviate burden on county level ECAS
implementation leads (pages 35-36)
o Automatically add new children to ECAS who have child count
records in SSIS for brand new Initial IEPs
Automatically add a blank Age Appropriate Checklist for
these automatically added children
o Automatically update Residence and Service School in ECAS to
match the most recent child count record in SSIS