maya python introductionnccastaff.bournemouth.ac.uk/.../slides/introductiontomayapython.pdf · the...
TRANSCRIPT

Maya Python Introduction

The Maya Environment
• When maya starts up it reads a file called Maya.env this contains a number of environment variables for Maya.
• On a mac this is located in ~Library/Preferences/Autodesk/maya/[Version]
• Under Linux ~/maya/version/
• We are going to use this to setup some directories to use for the next few weeks Lectures
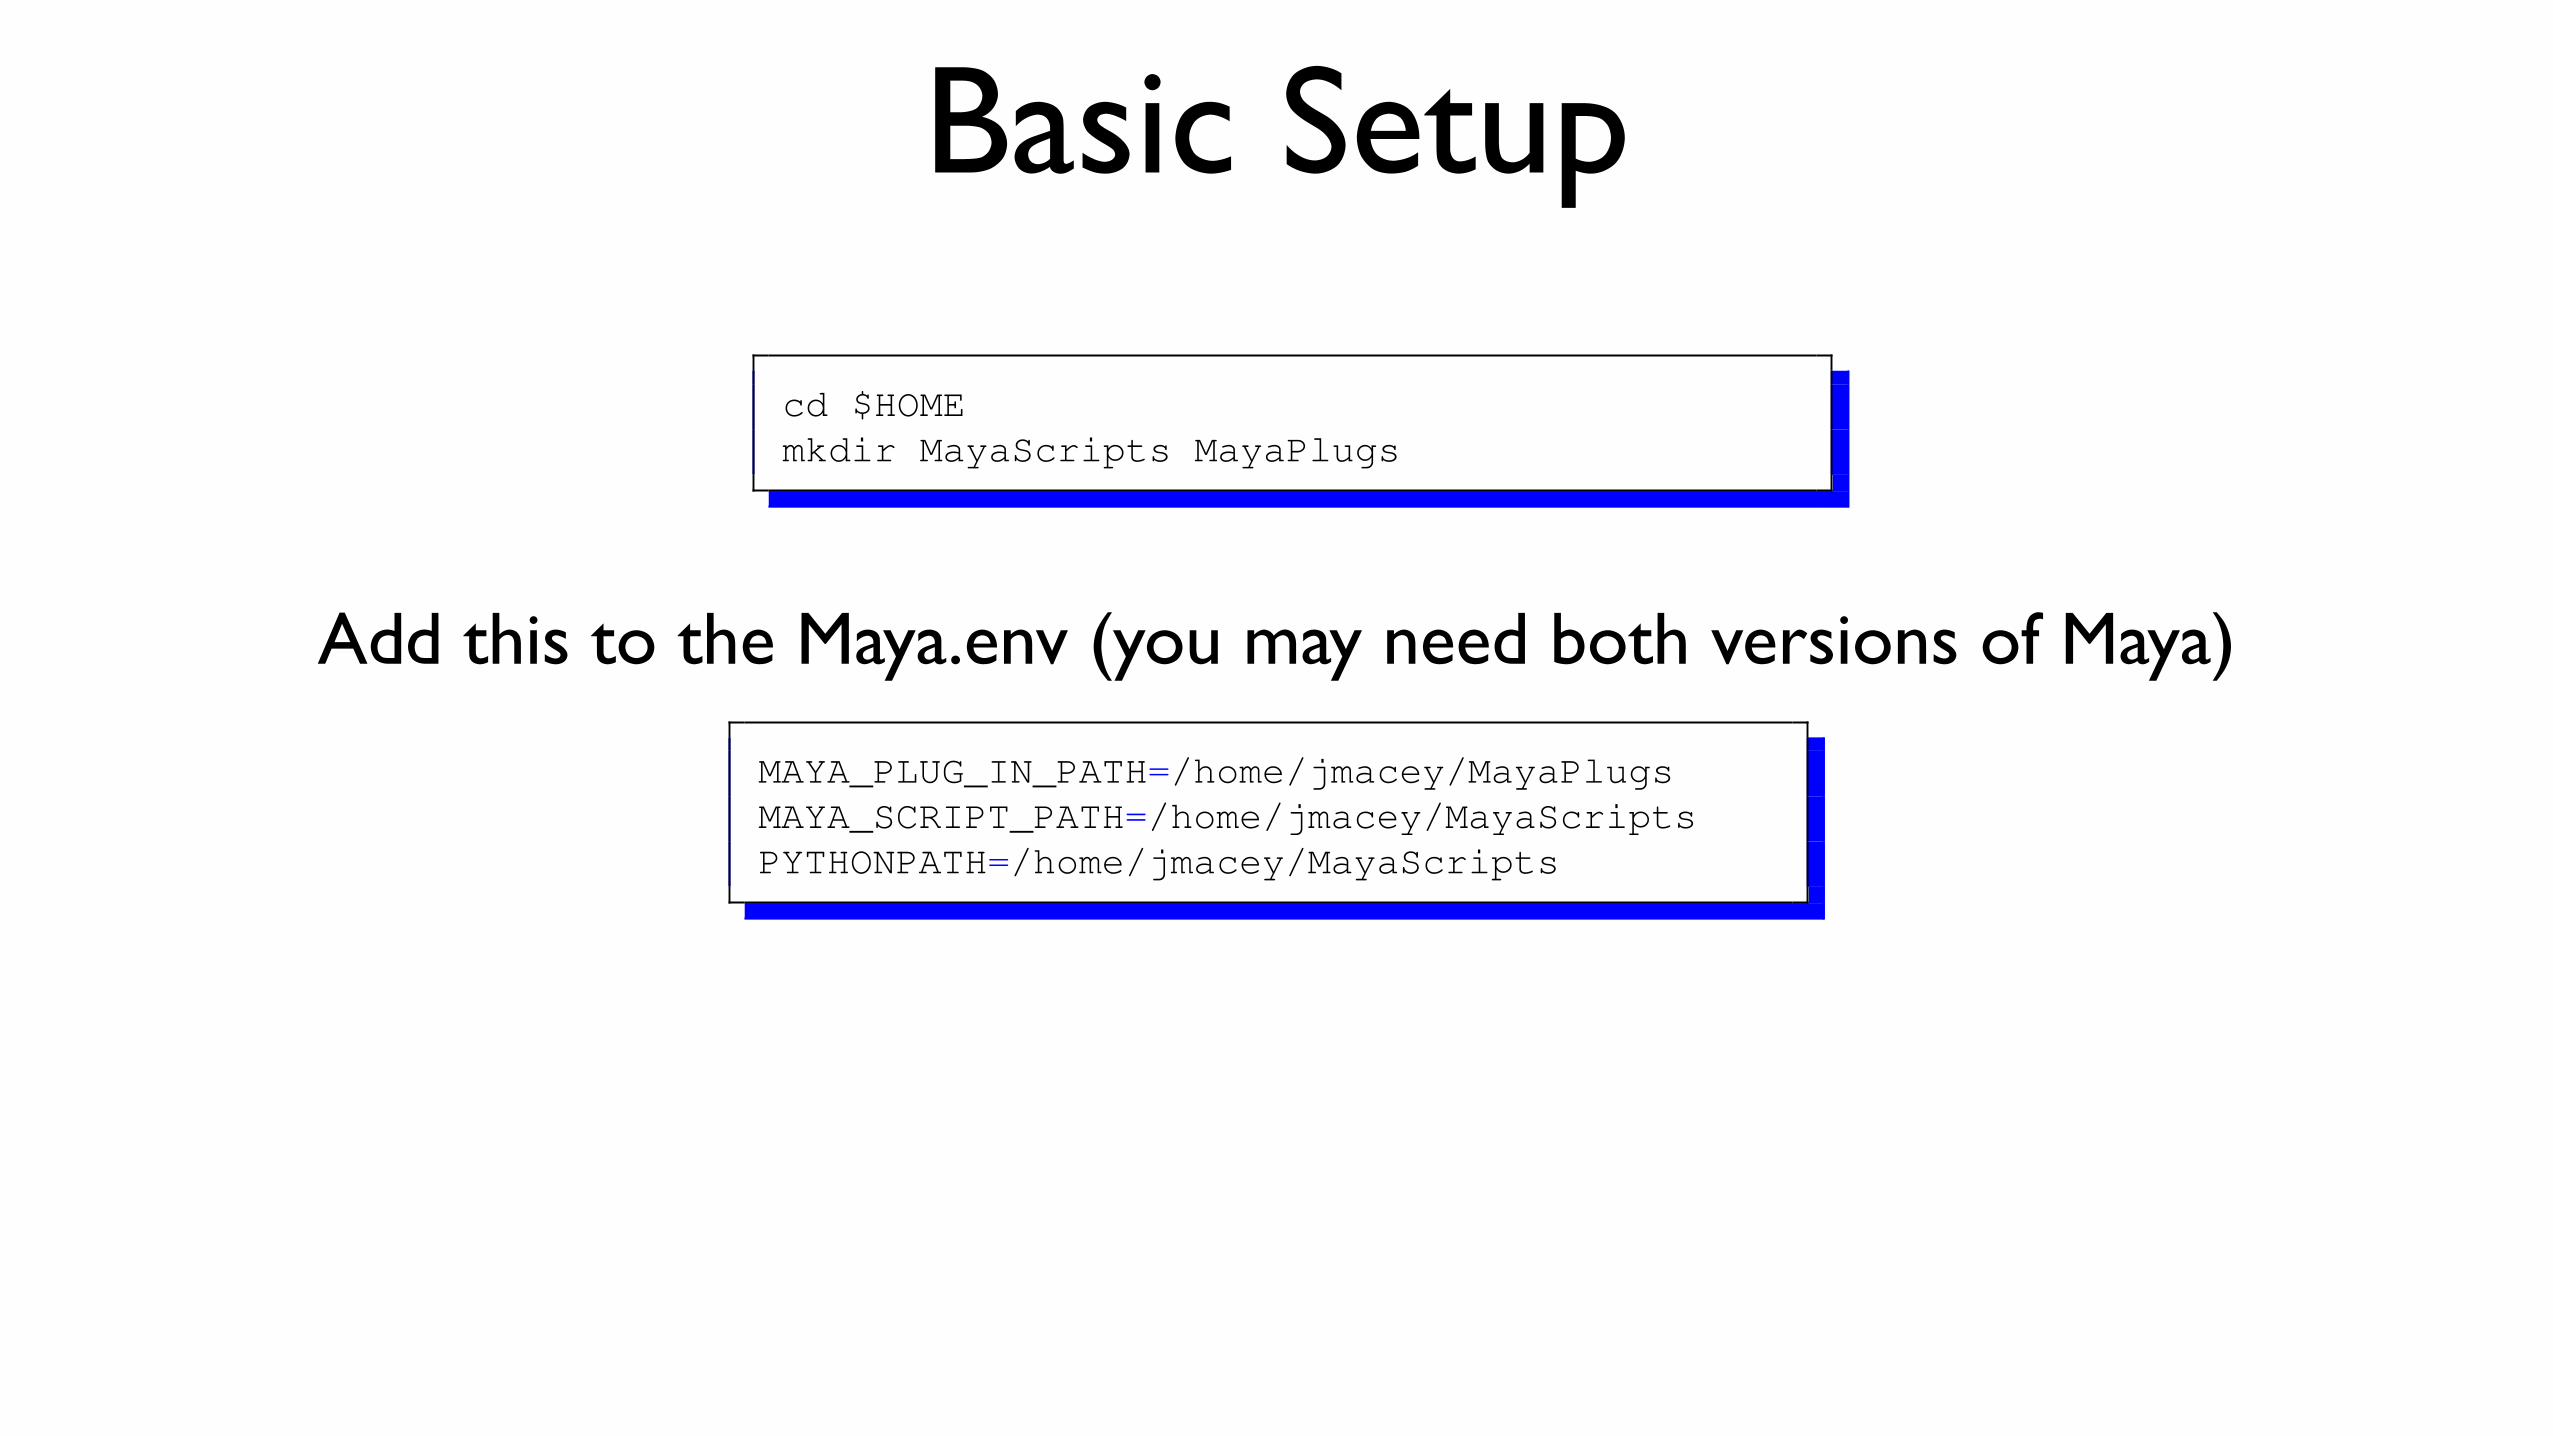
Basic Setup
MAYA_PLUG_IN_PATH=/home/jmacey/MayaPlugsMAYA_SCRIPT_PATH=/home/jmacey/MayaScriptsPYTHONPATH=/home/jmacey/MayaScripts
cd $HOMEmkdir MayaScripts MayaPlugs
Add this to the Maya.env (you may need both versions of Maya)

A simple Mel Script Test
• Save the file in the scripts directory as test.mel
• in the Mel window source “test.mel”
• then call foo()

A Simple Python Script
• Again save this script as foo.py in the Scripts directory
• We need to import the module before we use it so the following is needed

reload• To help the development cycle, we can easily modify the script and
call
• reload (Test)
• to reload the module from the source file, otherwise this will be the same module for the whole of the session.
• Also note that each tab of the script editor is also a different instance so each module is unique to the tab imported

Command Mode• The simplest way to use Python in maya is with the command
module
• This is very similar to the mel scripting language and allows access to most of the basic maya features
• To load the module we use the following import code
!
• We then use cmds.[function] to access the objects
1 import maya.cmds as cmds

1 # let's create a sphere
2 import maya.cmds as cmds
34 cmds.sphere(radius=2, name='Sphere1')
56 # query the radius of the sphere named Sphere1
7 radius = cmds.sphere('Sphere1', query=True, radius=True)
8 print 'The sphere radius =',radius
910 # modify the radius
11 print 'Increment the sphere\'s radius by one unit'
12 cmds.sphere('Sphere1', edit=True, radius=radius+1)
13 radius = cmds.sphere('Sphere1', query=True, radius=True)
14 print 'The new sphere radius =', radius
A simple example
Create a sphere called Sphere1
Use Query mode to get the radius
Use Edit mode to change the radius

moving objects
1 # let's create a sphere
2 import maya.cmds as cmds
34 # let's delete all objects
5 cmds.select(all=True)
6 cmds.delete()
7 #let's create a new torus
8 cmds.torus(r=4, hr=0.5, name='Torus1')
9 cmds.move(0, 0, 0, 'Torus1')
10 cmds.scale(0.5, 0.5, 0.5, 'Torus1')
11 cmds.rotate(0, '45deg', 0, 'Torus1')
select all and delete
Create a torus
use the affine transform commands

Setting Attributes1 # let's create a sphere
2 import maya.cmds as cmds
34 # lets delete all objects
5 cmds.select(all=True)
6 cmds.delete()
7 #lets create a nurb's cube
8 cmds.nurbsCube(w=3, name='Cube1')
9 cmds.getAttr('Cube1.tx')
10 cmds.getAttr('Cube1.ty')
11 cmds.getAttr('Cube1.tz')
1213 # let's make sure 'Cube1' is selected
14 cmds.select('Cube1', replace=True)
15 #let's change its translation attributes
16 cmds.setAttr('Cube1.tx', 1)
17 cmds.setAttr('Cube1.ty', 2)
18 cmds.setAttr('Cube1.tz', 3)
select all and delete
get attributes
set attributes

keyframes1 import maya.cmds as cmds
23 cmds.polySphere(name='ball', radius=2)
45 g = -0.04
6 yVelocity = 0.8
7 xVelocity = 0.2
8 initialYPos = 6
9 initialXPos = 0
10 cmds.move(initialXPos,initialYPos,0,"ball")
11 posy=initialYPos
12 timeMult=4
13 for bounces in range(0,6):
14 time=0
15 posy=initialYPos
16 while posy>0 :
17 posy = initialYPos + yVelocity
*
(time-1) + g
*
(time-1)
*
(time-1)/2
18 posx = initialXPos + xVelocity
*
((time) + time-1)
19 cmds.setKeyframe( 'ball', attribute='translateY', value=posy, t=time
*
timeMult )
20 cmds.setKeyframe( 'ball', attribute='translateX', value=posx, t=time
*
timeMult )
21 time+=1
22 yVelocity-=0.1

Accessing API Values• The Maya C++ api uses pass by reference to return variable values
• As python has no real way to access these values we need to use the MScriptUtil classes
• The MScriptUtil class is Utility class for working with pointers and references in Python
In Python parameters of class types are passed by reference but parameters of simple types, like integers and floats, are passed by value, making it impossible to call those API methods from Python. The MScriptUtil class bridges this gap by providing methods which return pointers to values of simple types and which can extract values from such pointers. These pointers can also be used wherever an API method requires a reference to a simple type or an array of a simple type.
This class is admittedly cumbersome to use but it provides a way of building parameters and accessing return values for methods which would not normally be accessible from Python.!
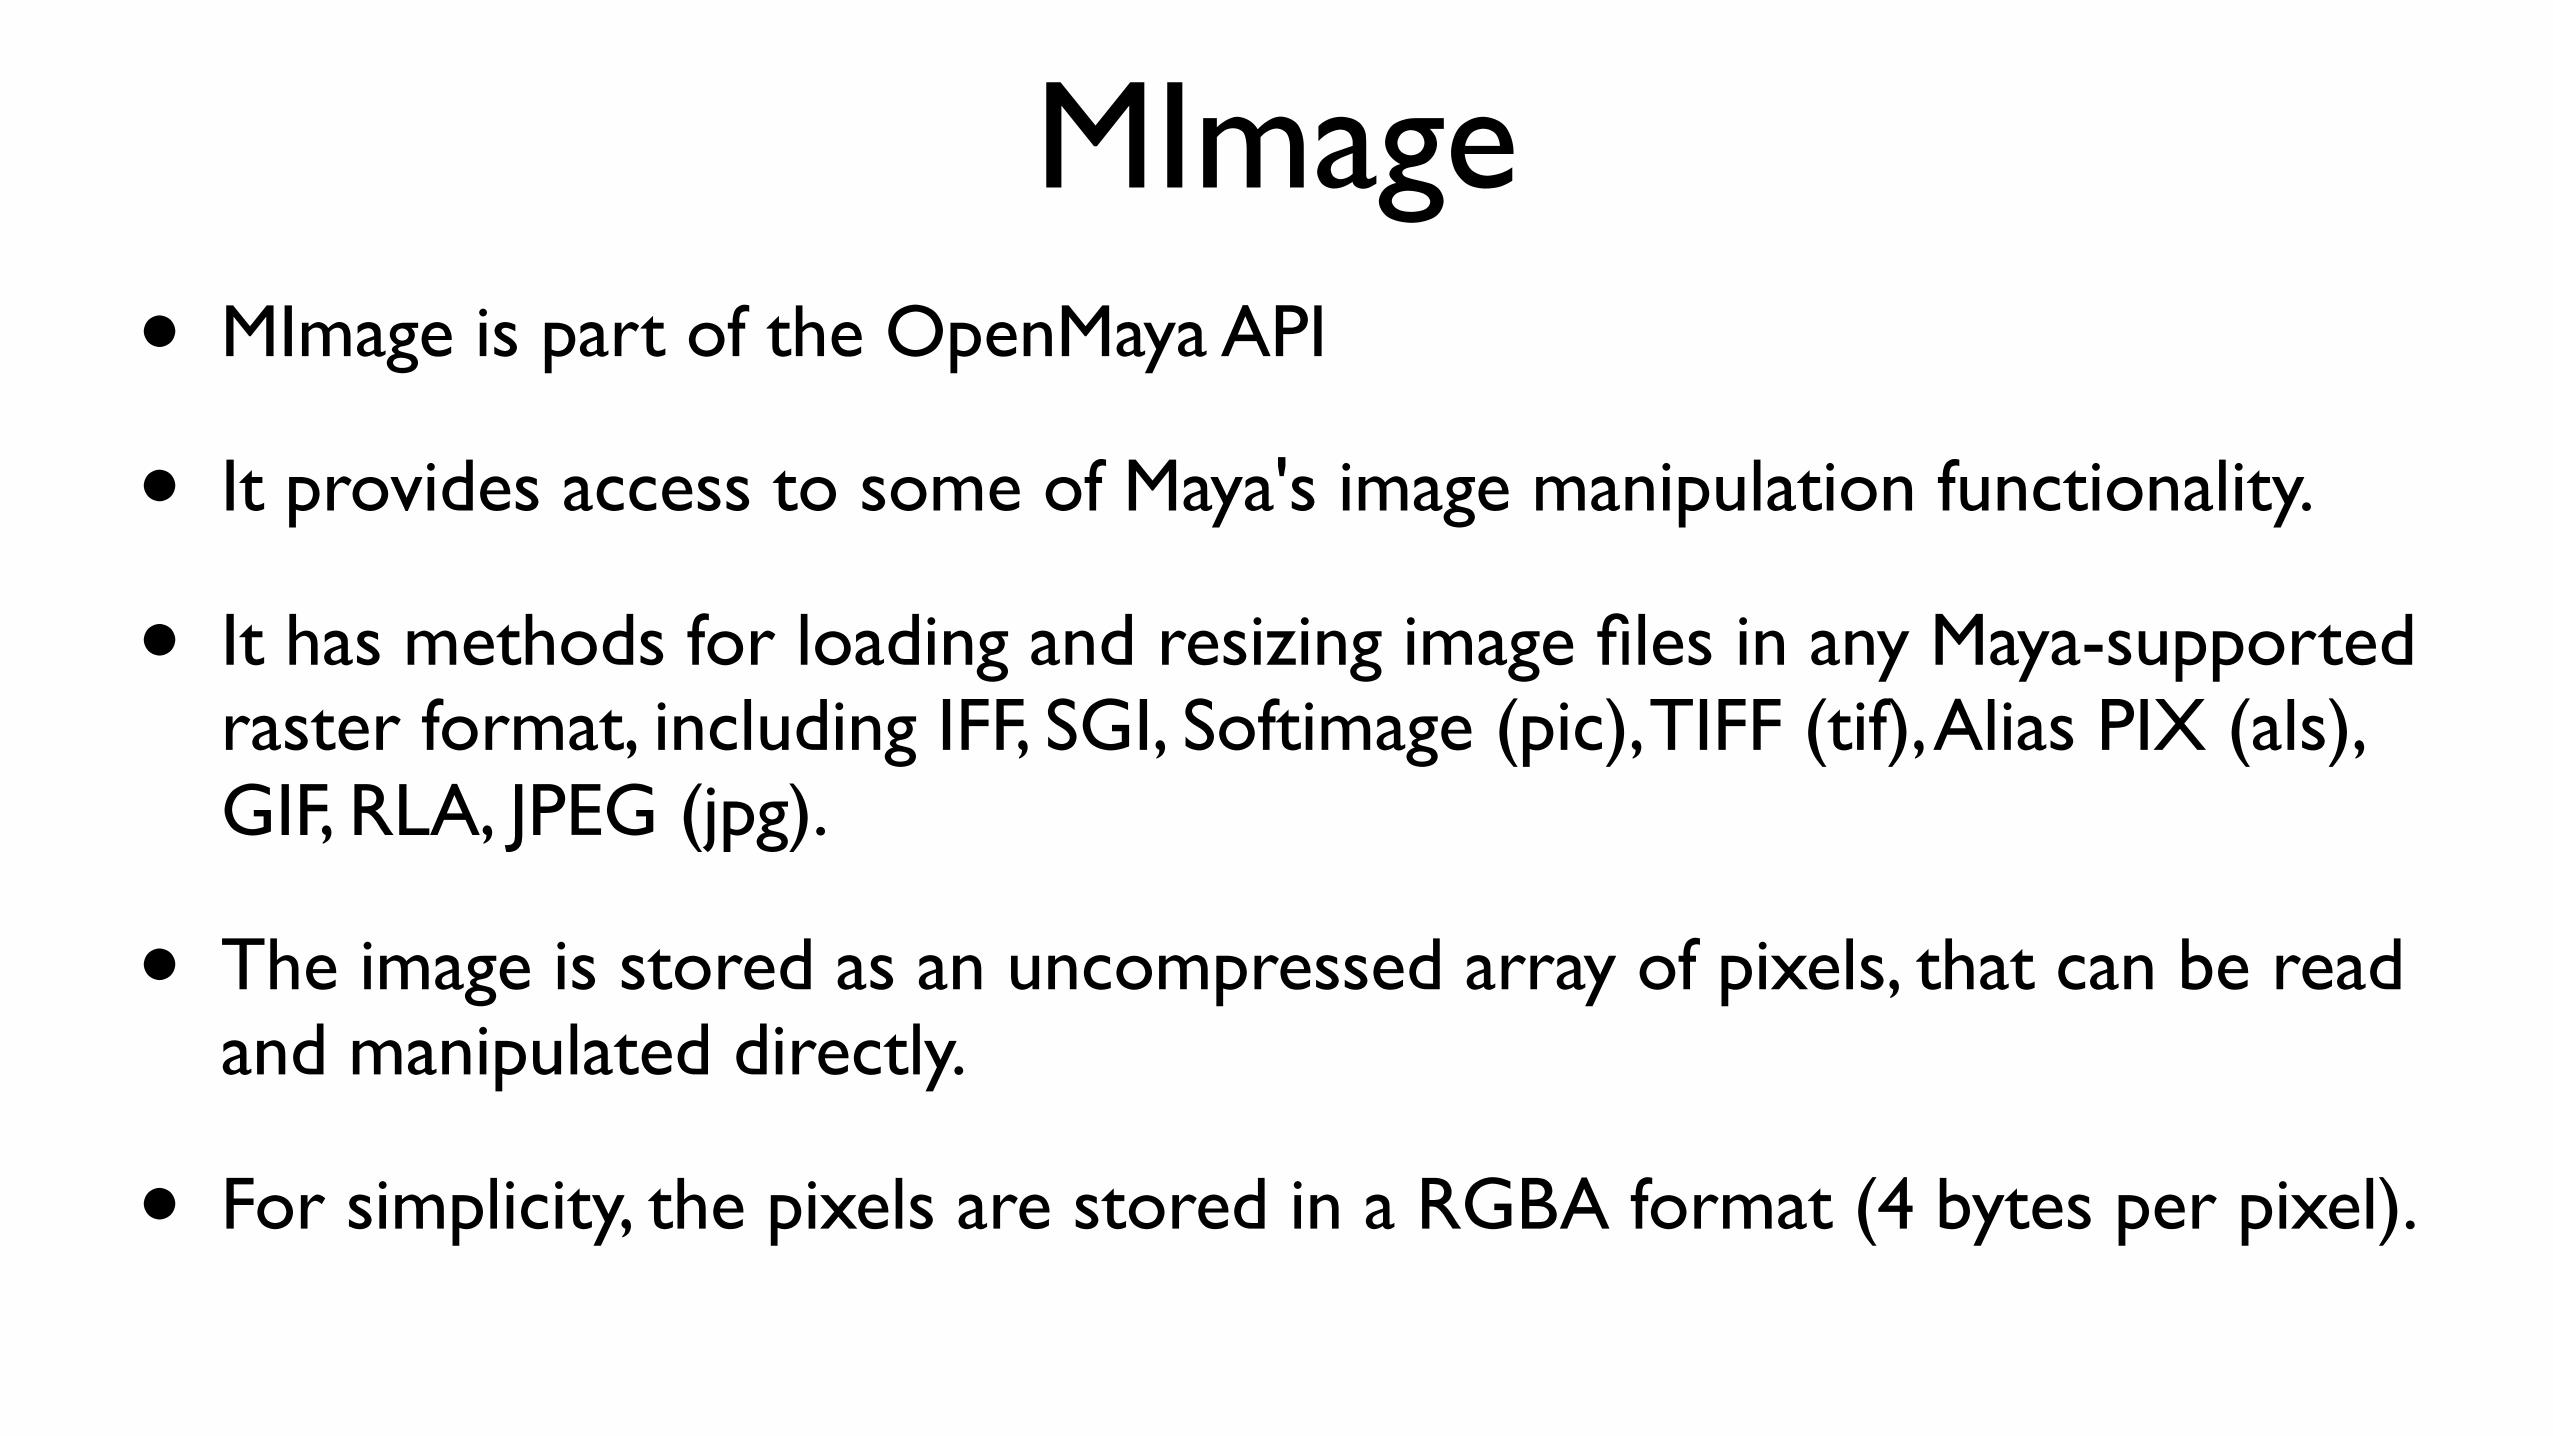
MImage• MImage is part of the OpenMaya API
• It provides access to some of Maya's image manipulation functionality.
• It has methods for loading and resizing image files in any Maya-supported raster format, including IFF, SGI, Softimage (pic), TIFF (tif), Alias PIX (als), GIF, RLA, JPEG (jpg).
• The image is stored as an uncompressed array of pixels, that can be read and manipulated directly.
• For simplicity, the pixels are stored in a RGBA format (4 bytes per pixel).


A Python Wrapper Class
• Most of the work in this class will be done in the ctor
• We will store values for width and height as well as a flag to indicate if we have alpha
• A pointer to the image data is also stored and we can access the pixel values using an index operator
__init__( filename) iwidth() : intheight() : inthasAlpha() : boolgetPixel(x :int, y : int) : tuplegetRGB(x : int y : int) : tuple
m_widthm_heightcharPixelPtrm_hasAlpha
MayaImage
http://jonmacey.blogspot.com/2011/04/using-maya-mscriptutil-class-in-python.html

1 import maya.OpenMaya as om2 import sys34 class MayaImage :5 """ The main class, needs to be constructed with a filename """
6 def __init__(self,filename) :7 """ constructor pass in the name of the file to load (absolute file
name with path) """
8 # create an MImage object
9 self.image=om.MImage()10 # read from file MImage should handle errors for us so no need to check
11 self.image.readFromFile(filename)12 # as the MImage class is a wrapper to the C++ module we need to access
data
13 # as pointers, to do this use the MScritUtil helpers
14 self.scriptUtilWidth = om.MScriptUtil()15 self.scriptUtilHeight = om.MScriptUtil()1617 # first we create a pointer to an unsigned in for width and height
18 widthPtr = self.scriptUtilWidth.asUintPtr()19 heightPtr = self.scriptUtilHeight.asUintPtr()20 # now we set the values to 0 for each
21 self.scriptUtilWidth.setUint( widthPtr, 0 )22 self.scriptUtilHeight.setUint( heightPtr, 0 )23 # now we call the MImage getSize method which needs the params passed
as pointers
24 # as it uses a pass by reference
25 self.image.getSize( widthPtr, heightPtr )26 # once we get these values we need to convert them to int so use the
helpers
27 self.m_width = self.scriptUtilWidth.getUint(widthPtr)28 self.m_height = self.scriptUtilHeight.getUint(heightPtr)29 # now we grab the pixel data and store
30 self.charPixelPtr = self.image.pixels()31 # query to see if it's an RGB or RGBA image, this will be True or False
32 self.m_hasAlpha=self.image.isRGBA()33 # if we are doing RGB we step into the image array in 3's34 # data is always packed as RGBA even if no alpha present
35 self.imgStep=436 # finally create an empty script util and a pointer to the function
37 # getUcharArrayItem function for speed
38 scriptUtil = om.MScriptUtil()39 self.getUcharArrayItem=scriptUtil.getUcharArrayItem

1 def width(self) :2 """ return the width of the image """
3 return self.m_width4 def height(self) :5 """ return the height of the image """
6 return self.m_height78 def hasAlpha(self) :9 """ return True is the image has an Alpha channel """
10 return self.m_hasAlpha
1 def getPixel(self,x,y) :
2 """ get the pixel data at x,y and return a 3/4 tuple
depending upon type """
3 # check the bounds to make sure we are in the correct area
4 if x<0 or x>self.m_width :
5 print "error x out of bounds\n"
6 return
7 if y<0 or y>self.m_height :
8 print "error y our of bounds\n"
9 return
10 # now calculate the index into the 1D array of data
11 index=(y
*
self.m_width
*
4)+x
*
4
12 # grab the pixels
13 red = self.getUcharArrayItem(self.charPixelPtr,index)
14 green = self.getUcharArrayItem(self.charPixelPtr,index+1)
15 blue = self.getUcharArrayItem(self.charPixelPtr,index+2)
16 alpha=self.getUcharArrayItem(self.charPixelPtr,index+3)
17 return (red,green,blue,alpha)
1819 def getRGB(self,x,y) :
20 r,g,b,a=getPixel(x,y)
21 return (r,g,b)

1 import maya.OpenMaya as om2 import maya.cmds as cmds345 basicFilter = "*.*"67 imageFile=cmds.fileDialog2(caption="Please select imagefile",8 fileFilter=basicFilter, fm=1)9
10 img=MayaImage(str(imageFile[0]))11 print img.width()12 print img.height()13 xoffset=-img.width()/214 yoffset=-img.height()/21516 for y in range (0,img.height()) :17 for x in range(0,img.width()) :18 r,g,b,a=img.getPixel(x,y)19 if r > 10 :20 cmds.polyCube(h=float(r/10))21 cmds.move(xoffset+x,float(r/10)/2,yoffset+y)

PointBake Animation• The following examples show how to export mesh data into our
own point baked format
• Point baking takes an original mesh (usually exported as an obj) and stores each vertex value for each frame as a relative value
• In this case we are going to write the data out as an XML file as this is easier to parse using python for the loader

1 <?xml version="1.0" encoding="UTF-8" ?>
2 <NCCAPointBake>
3 <MeshName> pCube1 </MeshName>
4 <NumVerts> 8 </NumVerts>
5 <StartFrame> 0 </StartFrame>
6 <EndFrame> 100 </EndFrame>
7 <NumFrames> 100 </NumFrames>
8 <TranslateMode> absolute </TranslateMode>
9 <Frame number="0">
10 <Vertex number="0" attrib="translate"> -7.478646 3.267710 5.018191 </Vertex>
11 <Vertex number="1" attrib="translate"> -4.407852 3.267710 5.018191 </Vertex>
12 <Vertex number="2" attrib="translate"> -7.478646 6.199014 5.018191 </Vertex>
13 <Vertex number="3" attrib="translate"> -4.407852 6.199014 5.018191 </Vertex>
14 <Vertex number="4" attrib="translate"> -7.478646 6.199014 2.284239 </Vertex>
15 <Vertex number="5" attrib="translate"> -4.407852 6.199014 2.284239 </Vertex>
16 <Vertex number="6" attrib="translate"> -7.478646 3.267710 2.284239 </Vertex>
17 <Vertex number="7" attrib="translate"> -4.407852 3.267710 2.284239 </Vertex>
18 </Frame>
19 </NCCAPointBake>

User Interface
• The user interface for the exported is created using the cmds.window() method
• The code on the next page show how the components are added to the window and callbacks are associated to the buttons
• The whole UI is wrapped into a single class with logic to ensure that things are selected before the system will run.

1 class PointBakeExport() :23 # @brief ctor
45 def __init__(self) :6 # get the currently selected objects and make sure we have only one object
7 selected = OM.MSelectionList()8 OM.MGlobal.getActiveSelectionList(selected)9 self.selectedObjects = []
10 selected.getSelectionStrings(self.selectedObjects)11 if len(self.selectedObjects) == 0 :12 cmds.confirmDialog( title='No objects Selected', message='Select a Mesh Object',
button=['Ok'], defaultButton='Ok', cancelButton='Ok', dismissString='Ok' )13 elif len(self.selectedObjects) > 1 :14 cmds.confirmDialog( title='Select One Object', message='Only One Mesh mat be
exported at a time', button=['Ok'], defaultButton='Ok', cancelButton='Ok',dismissString='Ok' )
15 # now we have the correct criteria we can proceed with the export
16 else :17 # get the start and end values for our UI sliders
18 anim=OMA.MAnimControl()19 minTime=anim.minTime()20 maxTime=anim.maxTime()21 self.m_start=int(minTime.value())22 self.m_end=int(maxTime.value())23 # now we create a window ready to populate the components
24 self.m_window = cmds.window( title='NCCA Pointbake Export' )25 # create a layout
26 cmds.columnLayout()27 # create two sliders for start and end we also attach methods to be called when
the slider
28 # changes
29 self.m_startSlider=cmds.intSliderGrp( changeCommand=self.startChanged,field=True,label='Start Frame', minValue=self.m_start, maxValue=self.m_end, fieldMinValue=self.m_start, fieldMaxValue=self.m_end, value=self.m_start )
30 self.m_endSlider=cmds.intSliderGrp( changeCommand=self.endChanged ,field=True,label='End Frame', minValue=self.m_start, maxValue=self.m_end, fieldMinValue=self.m_end, fieldMaxValue=self.m_end, value=self.m_end )
31 # create a button and add the method called when pressed
32 cmds.button( label='Export', command=self.export )33 # finally show the window
34 cmds.showWindow( self.m_window )

1 # @brief export method attached ot the button, this will be executed once every time
2 # the button is pressed
3 # @param *args the arguments passed from the button
45 def export(self,*args) :6 # get the file name to save too
7 basicFilter = "*.xml"8 file=cmds.fileDialog2(caption="Please select file to save",fileFilter=basicFilter, dialogStyle
=2)9 # check we get a filename and then save
10 if file !="" :11 if self.m_start >= self.m_end :12 cmds.confirmDialog( title='Range Error', message='start >= end', button=['Ok'],
defaultButton='Ok', cancelButton='Ok', dismissString='Ok' )13 else :14 NCCAPointBake(file,self.selectedObjects[0],self.m_start,self.m_end)15 # finally remove the export window
16 cmds.deleteUI( self.m_window, window=True )1718 # @brief this is called every time the slider is changed (i.e. a new value)
19 # @param *args the arguments passed from the button [0] is the numeric value
2021 def startChanged(self, *args) :22 self.m_start=args[0]2324 # @brief this is called every time the slider is changed (i.e. a new value)
25 # @param *args the arguments passed from the button [0] is the numeric value
2627 def endChanged(self, *args) :28 self.m_end=args[0]
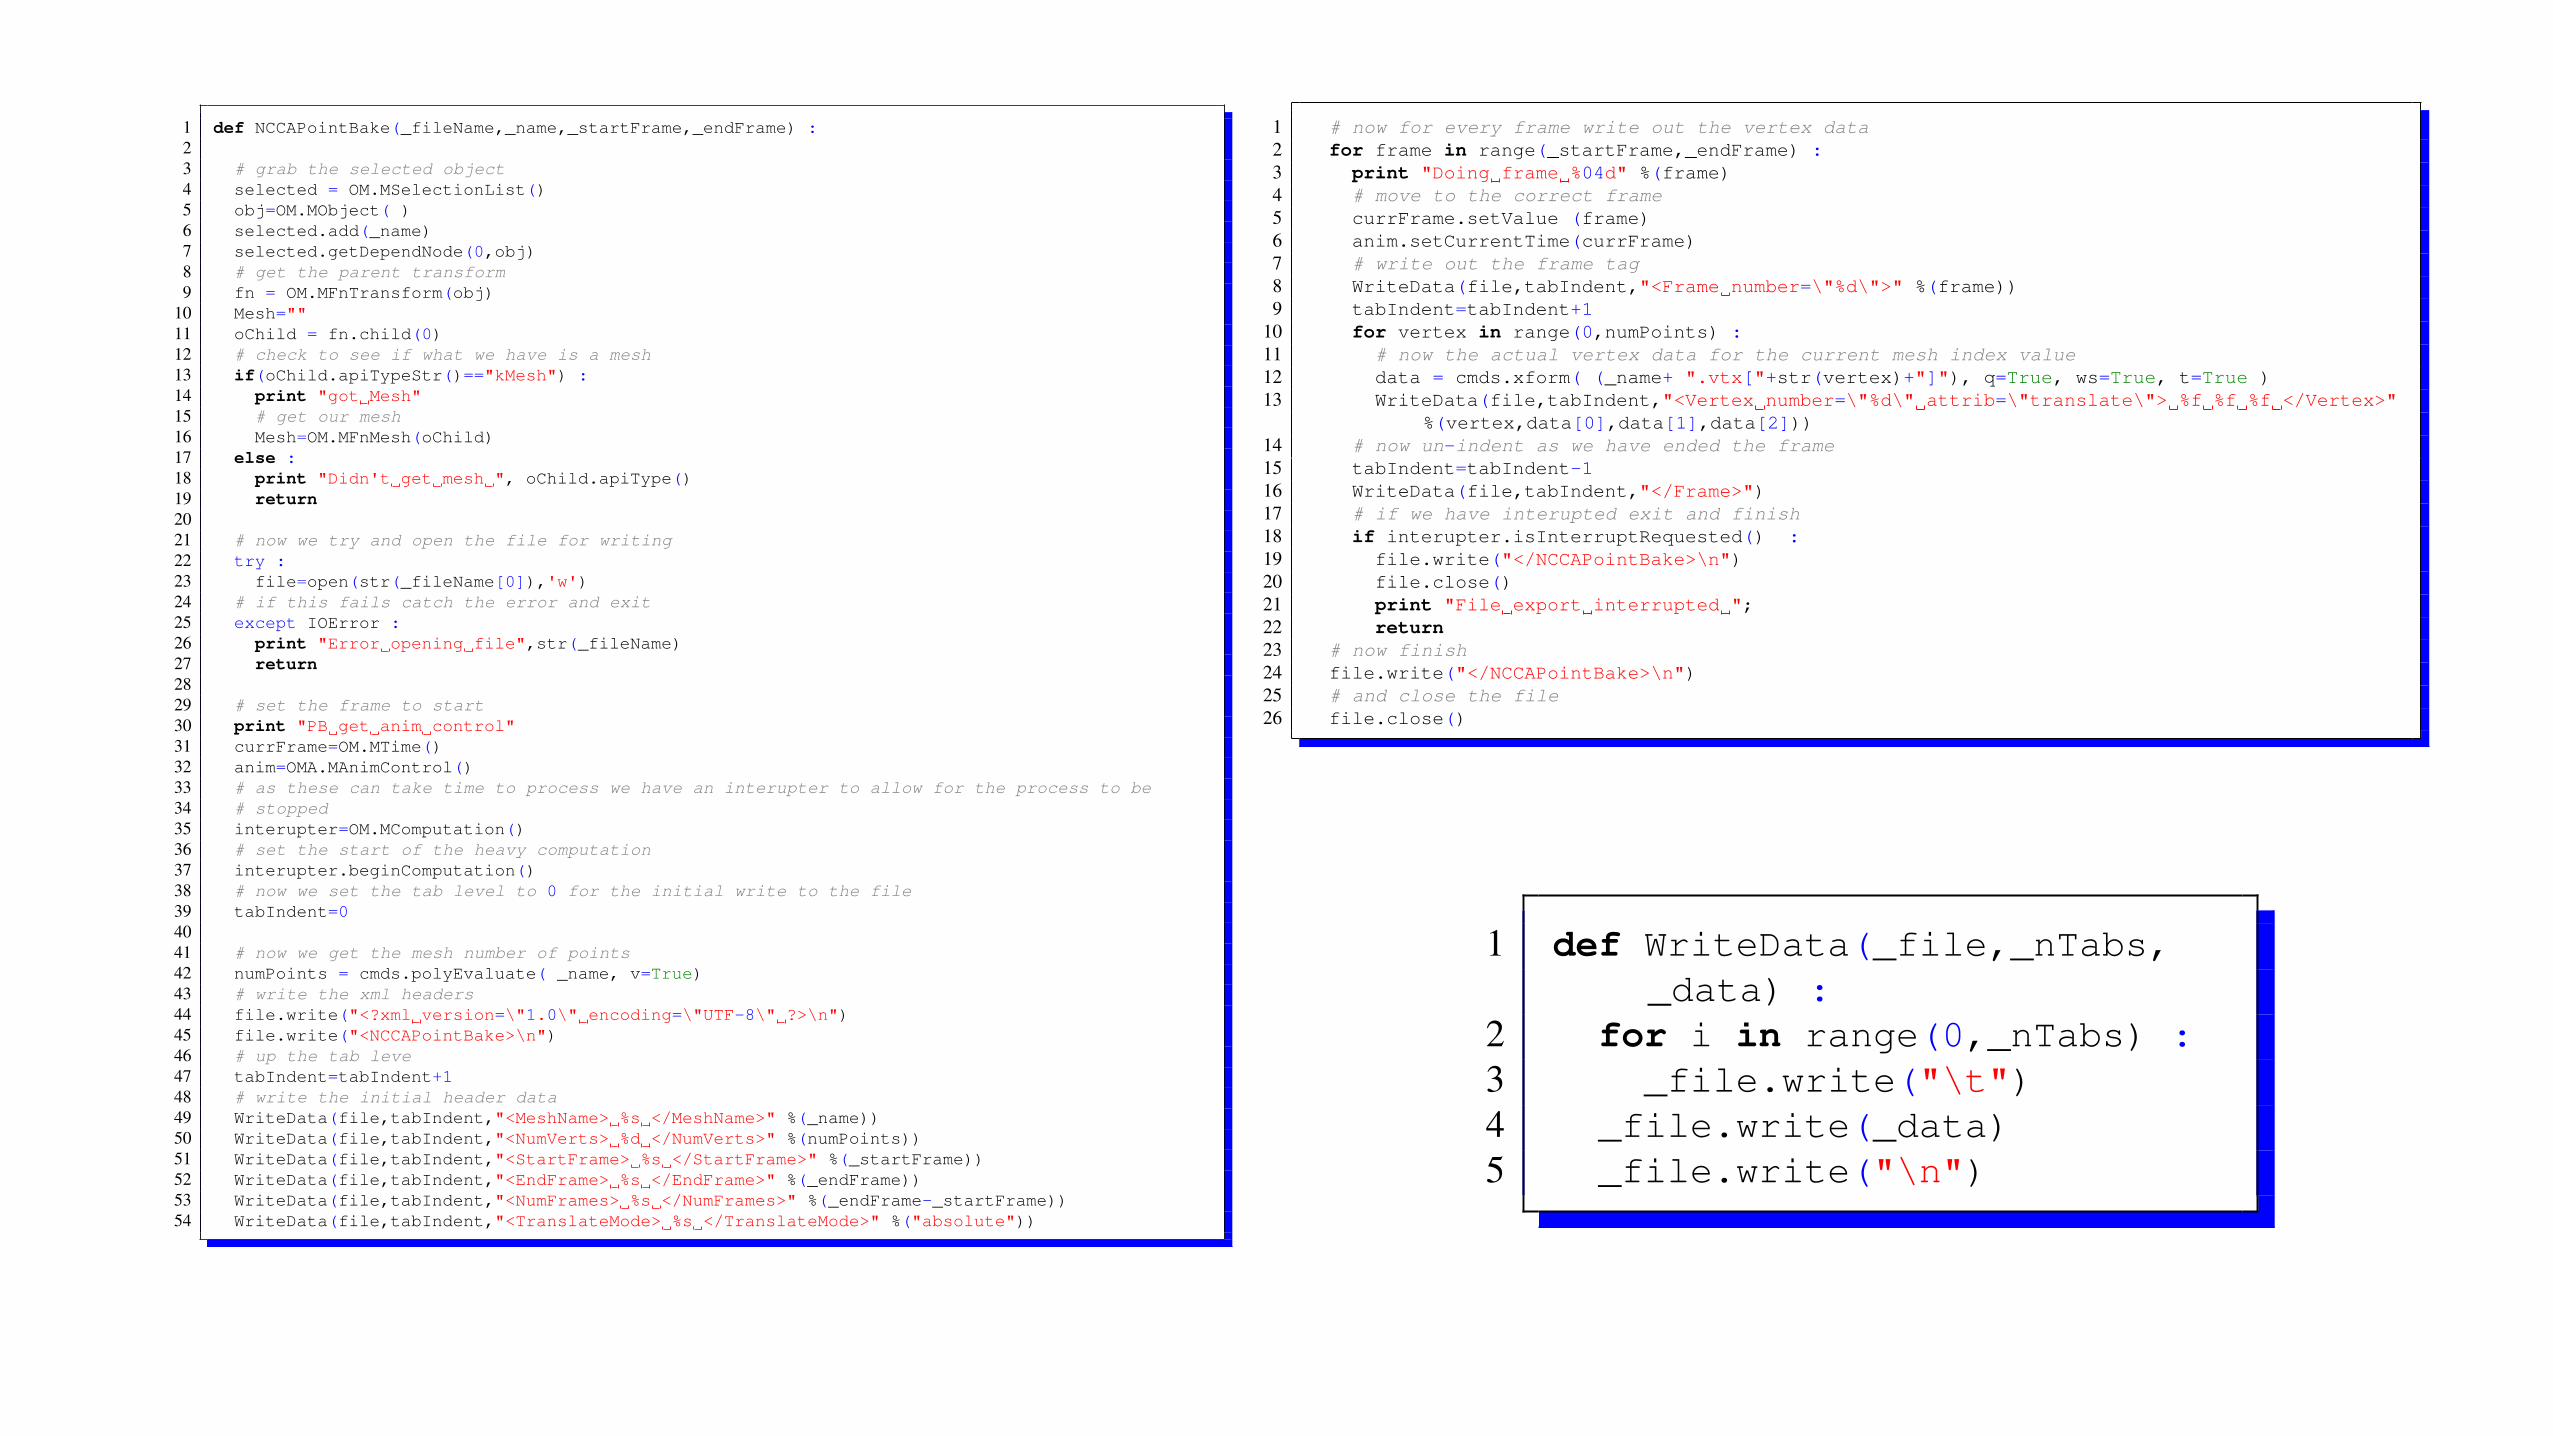
1 def NCCAPointBake(_fileName,_name,_startFrame,_endFrame) :23 # grab the selected object
4 selected = OM.MSelectionList()5 obj=OM.MObject( )6 selected.add(_name)7 selected.getDependNode(0,obj)8 # get the parent transform
9 fn = OM.MFnTransform(obj)10 Mesh=""11 oChild = fn.child(0)12 # check to see if what we have is a mesh
13 if(oChild.apiTypeStr()=="kMesh") :14 print "got Mesh"15 # get our mesh
16 Mesh=OM.MFnMesh(oChild)17 else :18 print "Didn't get mesh ", oChild.apiType()19 return2021 # now we try and open the file for writing
22 try :23 file=open(str(_fileName[0]),'w')24 # if this fails catch the error and exit
25 except IOError :26 print "Error opening file",str(_fileName)27 return2829 # set the frame to start
30 print "PB get anim control"31 currFrame=OM.MTime()32 anim=OMA.MAnimControl()33 # as these can take time to process we have an interupter to allow for the process to be
34 # stopped
35 interupter=OM.MComputation()36 # set the start of the heavy computation
37 interupter.beginComputation()38 # now we set the tab level to 0 for the initial write to the file
39 tabIndent=04041 # now we get the mesh number of points
42 numPoints = cmds.polyEvaluate( _name, v=True)43 # write the xml headers
44 file.write("<?xml version=\"1.0\" encoding=\"UTF-8\" ?>\n")45 file.write("<NCCAPointBake>\n")46 # up the tab leve
47 tabIndent=tabIndent+148 # write the initial header data
49 WriteData(file,tabIndent,"<MeshName> %s </MeshName>" %(_name))50 WriteData(file,tabIndent,"<NumVerts> %d </NumVerts>" %(numPoints))51 WriteData(file,tabIndent,"<StartFrame> %s </StartFrame>" %(_startFrame))52 WriteData(file,tabIndent,"<EndFrame> %s </EndFrame>" %(_endFrame))53 WriteData(file,tabIndent,"<NumFrames> %s </NumFrames>" %(_endFrame-_startFrame))54 WriteData(file,tabIndent,"<TranslateMode> %s </TranslateMode>" %("absolute"))
1 # now for every frame write out the vertex data
2 for frame in range(_startFrame,_endFrame) :
3 print "Doing frame %04d" %(frame)
4 # move to the correct frame
5 currFrame.setValue (frame)
6 anim.setCurrentTime(currFrame)
7 # write out the frame tag
8 WriteData(file,tabIndent,"<Frame number=\"%d\">" %(frame))
9 tabIndent=tabIndent+1
10 for vertex in range(0,numPoints) :
11 # now the actual vertex data for the current mesh index value
12 data = cmds.xform( (_name+ ".vtx["+str(vertex)+"]"), q=True, ws=True, t=True )
13 WriteData(file,tabIndent,"<Vertex number=\"%d\" attrib=\"translate\"> %f %f %f </Vertex>"
%(vertex,data[0],data[1],data[2]))
14 # now un-indent as we have ended the frame
15 tabIndent=tabIndent-1
16 WriteData(file,tabIndent,"</Frame>")
17 # if we have interupted exit and finish
18 if interupter.isInterruptRequested() :
19 file.write("</NCCAPointBake>\n")
20 file.close()
21 print "File export interrupted ";
22 return
23 # now finish
24 file.write("</NCCAPointBake>\n")
25 # and close the file
26 file.close()
1 def WriteData(_file,_nTabs,_data) :
2 for i in range(0,_nTabs) :3 _file.write("\t")4 _file.write(_data)5 _file.write("\n")

Maya PointBake Import
• This script imports both the obj and the pointbake file by poping up a dialog box for selection of the files
• It also demonstrates the input dialog box for text input
• As well as the xml.sax xml parser

1 class PointBakeImport() :2 # ctor
3 def __init__(self) :45 # create a promptDialog for the base group name of our mesh this will help to
6 # avoid name conflicts, may be good to modify this at some stage to check if mesh
7 # exists and prompt to replace data / key
8 result = cmds.promptDialog(9 title='Name',
10 message='Enter Name for import',11 button=['OK', 'Cancel'],12 defaultButton='OK',13 cancelButton='Cancel',14 dismissString='Cancel')1516 # if ok was pressed lets process the data
17 if result == 'OK':18 # first we get the text entered by the user
19 self.m_text = cmds.promptDialog(query=True, text=True)20 # now get the obj file to import
21 basicFilter = "*.obj"22 self.m_objFileName=cmds.fileDialog2(caption="Please select obj file to import",
fileFilter=basicFilter, fm=1)2324 cmds.file(self.m_objFileName,i=True,type="OBJ",ns=self.m_text)25 # now the xml file
26 basicFilter = "*.xml"27 self.m_pointBakeFile=cmds.fileDialog2(caption="Please select xml file to import",
fileFilter=basicFilter, fm=1)28 # select the object imported
29 print self.m_pointBakeFile30 cmds.select("%s:Mesh"%(self.m_text))31 # and pass control back to the parser
32 parser = xml.sax.make_parser()33 parser.setContentHandler(ParseHandler("%s:Mesh"%(self.m_text)))34 parser.parse(open(str(self.m_pointBakeFile[0]),"r"))

1 class ParseHandler(xml.sax.ContentHandler):23 ## @brief ctor for the class passing in the houdini channel we wish to load the4 ## PB data into5 ## @param[in] _selectedText the mesh the data is to be loaded too6 def __init__(self,_selectedText):7 ## @brief the object selected to load the data too.8 self.m_selectedObject=_selectedText9 ## @brief the Character Data stored as part of parsing
10 self.m_charData=""11 ## @brief the m_meshName extracted from the PointBake file12 self.m_meshName=""13 ## @brief number of vertices in the mesh, we will check this against the number of
points in14 ## the mesh / obj loaded as a basic compatibility check15 self.m_numVerts=016 ## @brief the Start frame for the data loaded17 self.m_startFrame=018 ## @brief m_endFrame of the data loaded19 self.m_endFrame=020 ## @brief number of frames stored in file not used in this example21 self.m_numFrames=022 ## @brief the Offset into the vertex list for the current data to be set too23 self.m_offset=None24 ## @brief the Current frame to be stored / keyed25 self.m_currentFrame=026 # the maya time control27 self.m_anim=OMA.MAnimControl()28 # a point array structure, we will load each frame's worth of data into this then29 # load it to the mesh point data each frame, once this is done we need to clear this
data for30 # the next frame31 self.m_vertData=OM.MFloatPointArray()32 # grab the object ready to set the point data33 selected = OM.MSelectionList()34 obj=OM.MObject( )35 selected.add(self.m_selectedObject)36 selected.getDependNode(0,obj)3738 fn = OM.MFnTransform(obj)39 self.m_mesh=""40 oChild = fn.child(0)4142 if(oChild.apiTypeStr()=="kMesh") :43 print "got Mesh"44 # get our mesh45 self.m_mesh=OM.MFnMesh(oChild)46 # set the frame to start

1 def __del__(self) :2 print "done"3 ## @brief here we trigger events for the start elements In this case we grab the Offset
and Frame4 ## @param[in] _name the name of the tag to process5 ## @param[in] _attrs the attribute associated with the current tag6 def startElement(self, _name, _attrs):7 # this is important the characters method may be called many times so we8 # clear the char data each start element then append each time we read it9 self.m_charData=""
10 # if we have a vertex start tag process and extract the offset11 if _name == "Vertex" :12 self.m_offset=int(_attrs.get("number"))13 # if we have the Frame we grab the number attribute14 elif _name == "Frame" :15 # set the frame here16 self.m_currentFrame=int(_attrs.get("number"))17 self.m_anim.setCurrentTime(OM.MTime(self.m_currentFrame))18 # we have a new frame so re-set the vertexPoint data ready to be filled19 # with the new dara20 self.m_vertData.clear()2122 ## @brief trigger method if we have data between the <> </> tags, copy it to the class
m_charData so23 ## we can re-use it later24 ## \param[in] _content the character string passed from the parser.25 def characters(self,_content):26 # here we append the content data passed into the method, we need to append27 # as this function may be called more than once if we have a long string28 self.m_charData += _content29

1 ## @brief most of the hard processing is done here. Once an end tag is encountered we2 ## process the current char data and add it to the channel created. This does3 ## rely on the order of the data but this is always machine generated so we should4 ## be safe if it does go wrong it will be this data ordering5 ## @brief[in] _name the name of the end element tag6 def endElement(self, _name):7 # extract the m_meshName and save it8 if _name == "MeshName":9 self.m_meshName=self.m_charData
10 # get the number of vertices and set this to the channel11 elif _name == "NumVerts" :12 # store value13 self.m_numVerts=int(self.m_charData)1415 # parse and sel the m_startFrame16 elif _name == "StartFrame" :17 self.m_startFrame=int(self.m_charData)18 # set the time control to this value19 self.m_anim.setMinTime(OM.MTime(self.m_startFrame))20 ## found an end frame value21 elif _name == "EndFrame" :22 self.m_endFrame=int(self.m_charData)23 # set the end animation time24 self.m_anim.setMaxTime(OM.MTime(self.m_endFrame))2526 ## found the number of frames27 elif _name == "NumFrames" :28 self.m_numFrames=int(self.m_charData)29 ## found the vertex30 elif _name =="Vertex" :31 self.m_charData=self.m_charData.strip()32 data=self.m_charData.split(" ")33 ## now we check to see if there are enough values to parse34 if len(data) == 3 :35 # append the vertex data to the array for later loading into the mesh36 self.m_vertData.append(float(data[0]),float(data[1]),float(data[2]))37 elif _name=="Frame" :38 # now we have the end of the frame we should have all the vertex data in the array39 # so we can set this point position for our mesh40 self.m_mesh.setPoints(self.m_vertData)41 # once we have done this we can set this as a keyframe42 cmds.setKeyframe(breakdown=0, hierarchy="none",controlPoints=0 ,shape=0,attribute="
vtx[*]")43 # now we clear the point data ready for the next frame to load hte data in44 self.m_vertData.clear()

References
• http://download.autodesk.com/us/maya/2011help/API/class_m_script_util.html
• http://download.autodesk.com/us/maya/2011help/API/class_m_image.html