merlin user guide 83-000041-01!05!00 release 3.5
DESCRIPTION
User doc for MerlinTRANSCRIPT
Merlin Comprehensive Utilities Tool 3.5.0 Page i User Guide - Version 5.0
MerlinTM
Comprehensive Utilities Tool – Release 3.5.0
User Guide - Version 5.0
Merlin Comprehensive Utilities Tool 3.5.0 Page ii User Guide - Version 5.0
NOTICE
This document contains confidential information, which is proprietary to DragonWave. No part of its contents can be used, copied, disclosed, or conveyed to any party in any manner whatsoever without prior written permission from DragonWave Inc.
Copyright © 2001-2011 DragonWave Inc.
Merlin Comprehensive Utilities Tool 3.5.0 Page iii User Guide - Version 5.0
Table of Contents
1.0 INTRODUCTION ............................................................................................. 1
1.1 DIAGNOSTICS ........................................................................................................................ 1
1.2 MONITORING TOOL ................................................................................................................ 1
1.3 NETWORK UTILITIES .............................................................................................................. 1
1.4 HORIZON SPEED UPGRADES .................................................................................................. 1
1.5 FTP SOFTWARE UPGRADES .................................................................................................. 1
1.6 DISCOVER UTILITIES .............................................................................................................. 1
1.7 RESET AND DEFAULT UNIT ..................................................................................................... 1
1.8 FIRMWARE UPGRADES........................................................................................................... 2
2.0 LOADING MERLIN ON A PC ........................................................................... 3
3.0 CONNECTING THE PC TO THE NETWORK ........................................................ 5
4.0 USING MERLIN ............................................................................................. 7
4.1 DIAGNOSTICS ........................................................................................................................ 8
4.1.1 SINGLE MODE DIAGNOSTICS ................................................................................................ 10 4.1.2 BATCH MODE DIAGNOSTICS ................................................................................................. 11 4.1.2.1. CREATING / EDITING AN IP ADDRESS BATCH FILE ................................................................. 12 4.1.3 AUTHENTICATING A DIAGNOSTICS FILE ................................................................................. 13
4.2 LINK MONITORING TOOL ...................................................................................................... 14
4.3 NETWORK UTILITIES ............................................................................................................ 16
4.4 HORIZON SPEED UPGRADES ................................................................................................ 17
4.5 FTP SOFTWARE UPGRADES ................................................................................................ 17
4.5.1 AIRPAIR SOFTWARE UPGRADES .......................................................................................... 18 4.5.2 HORIZON PRODUCTS SOFTWARE UPGRADES ........................................................................ 19
4.6 DISCOVER UTILITIES ............................................................................................................ 22
4.7 RESET AND DEFAULT THE UNIT ............................................................................................ 25
4.7.1 RECOVERING A NON-FUNCTIONING NODE ............................................................................. 26 4.7.2 SUPER USER FACTORY DEFAULT ......................................................................................... 26
4.8 FIRMWARE UPGRADES VIA LAYER 2 CONNECTIVITY .............................................................. 28
4.9 MERLIN BATCH COMMAND LINE PROCESSING ....................................................................... 30
4.9.1 COMMAND LINE MODE ......................................................................................................... 31 4.9.2 EXECUTION OF BATCH CLI COMMAND LIST ........................................................................... 31 4.9.3 MERLIN GUI COMMAND EXECUTION MODE ........................................................................... 32 4.9.4 MERLIN GUI COMMANDS IN SINGLE MODE ........................................................................... 32 4.9.5 MERLIN GUI COMMANDS IN BATCH MODE ............................................................................ 35 4.9.6 RESULTS OUTPUT FILE ........................................................................................................ 36 4.9.7 USING CUSTOMIZED USERNAMES AND PASSWORDS ............................................................. 37
APPENDIX A - EXAMPLE OF A DIAGNOSTICS FILE: .............................................................. 38
APPENDIX B – EXAMPLE OF A PERFORMANCE LOG FILE .................................................... 41

Merlin Comprehensive Utilities Tool 3.5.0 Page iv User Guide - Version 5.0
APPENDIX C – EXAMPLE OF AN EVENT LOG FILE ............................................................... 43
Using Merlin
Merlin Comprehensive Utilities Tool 3.5.0 Page 1 User Guide - Version 5.0
1.0 Introduction
Merlin is a PC based, Windows, application that supports the DragonWave AirPair and Horizon wireless Ethernet networking products and the APX104E and APX108E SDU/TDM over Ethernet products. It provides the user with a comprehensive, GUI presented, feature set designed to facilitate the management and troubleshooting of DragonWave product installations.
The following functions are available when using Merlin:
1.1 Diagnostics
This option allows the user to select one node, or a group of nodes, and generate a diagnostics report showing the current “snapshot” of system configuration and operational status for each node. The report can be in either a brief or verbose format. The “Brief Mode” returns the Warnings and Summary section only and the “Detailed Mode” returns the same as the Brief Mode plus sixteen sections of more detailed system information. Historical information can be found in the “Events Log” or “Performance Log” both of which may be accessed using the “Diagnostics” feature. Text file reports for each node are filed in the folder of your choice.
1.2 Monitoring Tool
Key system parameters (RSL, SNR, Eb/No, Equalizer stress, Block Errors, Ingress/Egress data rate) of up to five (5) links (10 nodes) can be monitored, at adjustable frequent intervals, over a selected time period and an Excel csv file created for reference purposes.
1.3 Network Utilities
Use this routine to record the configuration parameters of several system nodes. A text file having a batch of node IP addresses can be used to direct Merlin to each node, or a contiguous range of IP addresses can be entered directly into Merlin. The resulting record can be found in an Excel csv file.
1.4 Horizon Speed Upgrades
This feature is not currently active. All speed upgrades must be arranged through your DragonWave sales representative.
1.5 FTP Software Upgrades
System software upgrades can be facilitated by using this option.
1.6 Discover Utilities
To poll a network and discover all the Horizon Duo and Horizon Compact units on the network, use this routine. This routine uses network layer 2 protocols to communicate with any Horizon product on the network. The IP address parameters, the MAC address and the hardware serial numbers are returned.
1.7 Reset and Default Unit
If a node appears locked and management access to it is not possible, or if a Super User name and/or password has been lost, use this feature to guide you through the process to reset a system to factory default parameters.
Using Merlin
Merlin Comprehensive Utilities Tool 3.5.0 Page 2 User Guide - Version 5.0
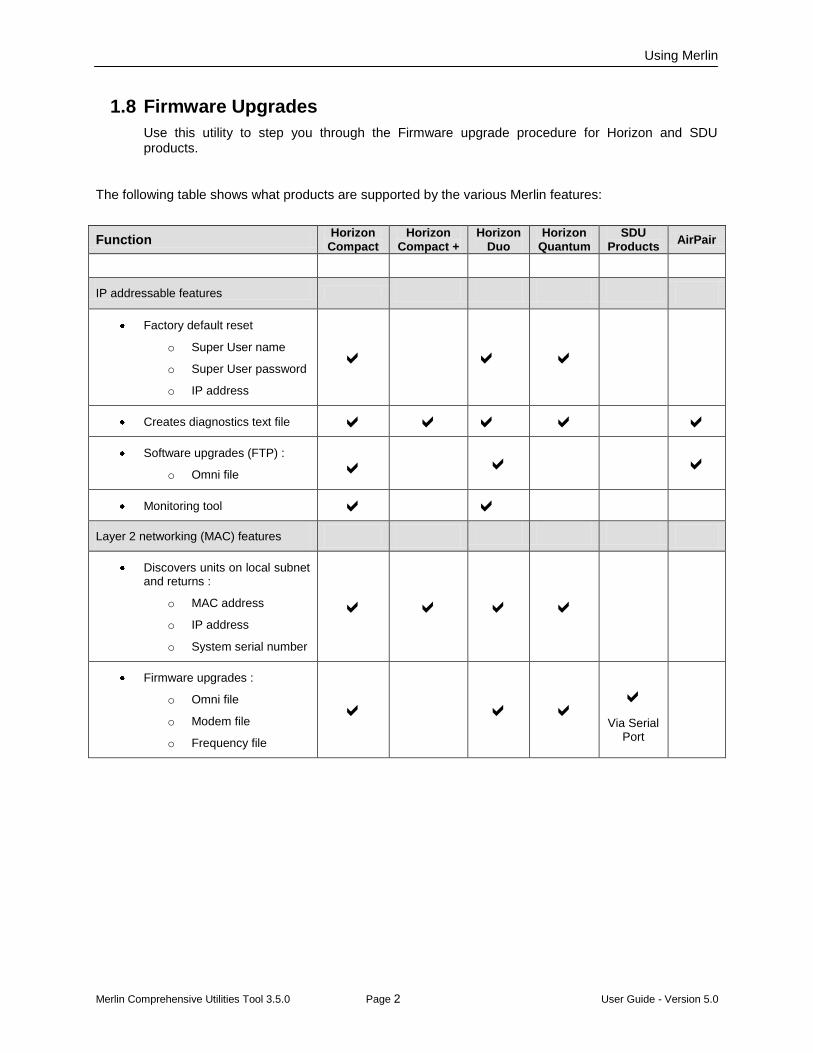
1.8 Firmware Upgrades
Use this utility to step you through the Firmware upgrade procedure for Horizon and SDU products.
The following table shows what products are supported by the various Merlin features:
Function Horizon
Compact Horizon
Compact + Horizon
Duo Horizon
Quantum SDU
Products AirPair
IP addressable features
Factory default reset
o Super User name
o Super User password
o IP address
Creates diagnostics text file
Software upgrades (FTP) :
o Omni file
Monitoring tool Layer 2 networking (MAC) features
Discovers units on local subnet and returns :
o MAC address
o IP address
o System serial number
Firmware upgrades :
o Omni file
o Modem file
o Frequency file
Via Serial Port
Using Merlin
Merlin Comprehensive Utilities Tool 3.5.0 Page 3 User Guide - Version 5.0
2.0 Loading Merlin on a PC
Merlin is available for download, free of charge, from the DragonWave Customer Support Web site :
http://support.dragonwaveinc.com/diagnostics
A user login is required to access the http://support.dragonwaveinc.com/diagnostics directory
Select “Merlin-v X.XX.change_me_to_exe” , where “X.XX” is the latest release number, and download it to your PC. Rename the file from Merlin-vx.xx.change_me_to_exe to Merlin-v.x.xx.exe
Unzip the folder and copy the Merlin-vX.XX application to a directory of your choice (avoid a path length of greater than 128 characters). When Merlin is running, all text files created by Merlin will be deposited in that same directory by default.
Merlin needs WinPcap version 3.1 or later to be installed on your PC before Layer 2 MAC connectivity features will work
Merlin requires the Windows Packet Capture Library (WinPcap version 3.1 or greater) to be installed on the user PC before the Layer 2 MAC connectivity features of Merlin can be used. Download WinPcap from the following url: http://www.winpcap.org/ and install it on your PC.
Once WinPcap has been installed the Layer 2 features of Merlin-vX.XX.exe can be run.
Note that for Microsoft Vista and Windows 7 operating systems Merlin must be run in “Administrator Mode”. To do this, right click on the Merlin software icon and select “Run as Administrator” from the menu. This needs only to be done once. Subsequent starting of Merlin will only require the left-clicking of the icon directly.
Note that the Layer 2 features are not supported in the Horizon Quantum product or the Horizon Compact+ product.
!
!

Using Merlin
Merlin Comprehensive Utilities Tool 3.5.0 Page 4 User Guide - Version 5.0
This page left blank intentionally
Using Merlin
Merlin Comprehensive Utilities Tool 3.5.0 Page 5 User Guide - Version 5.0
3.0 Connecting the PC to the Network
You may run Merlin when the PC is directly connected to any Ethernet port of the Horizon range of products or AirPair system or with the PC connected via a network. For functions that require IP connectivity (Diagnostics, Monitoring tool etc.), your PC must have its IP settings configured for the same subnet as that of the node or network to which you are connecting.
For Horizon Compact, either Port 1 or Port 2 can be used to retrieve discovery information, whichever one is configured for system management. However, Merlin Reset and Default Unit and Firmware Upgrades utilities both require that the unit be discovered in "boot mode" (within 10 seconds of power up). If the unit is not discoverable in boot mode on one port, switch to the other port. On newer product builds, either port can be used.
Merlin Reset and Default Unit and Firmware Upgrades utilities both require that the unit be discovered in "boot mode" (within 10 seconds of boot up). If the unit is not discoverable in boot mode on one port, switch to the other port. On newer product builds, either port can be used.
The Merlin features that apply to AirPair are supported in either in-band, or out-of-band, management modes.
For “Discover Utilities, “Reset and Default Unit” and Firmware Upgrades”, where Merlin relies on Layer 2 packets for its functionality, avoid connecting to a network having routers, as these may block Layer 2 packets. Ethernet switches pass Layer 2 packets, so it is generally acceptable to connect to Horizon nodes via a switch, or via multiple switches throughout a network, and run the Merlin utility.
For IP based information the above rules do not apply. As long as Telnet connectivity is available, IP based information will be accessible.
!

Using Merlin
Merlin Comprehensive Utilities Tool 3.5.0 Page 6 User Guide - Version 5.0
This page left blank intentionally
Using Merlin
Merlin Comprehensive Utilities Tool 3.5.0 Page 7 User Guide - Version 5.0
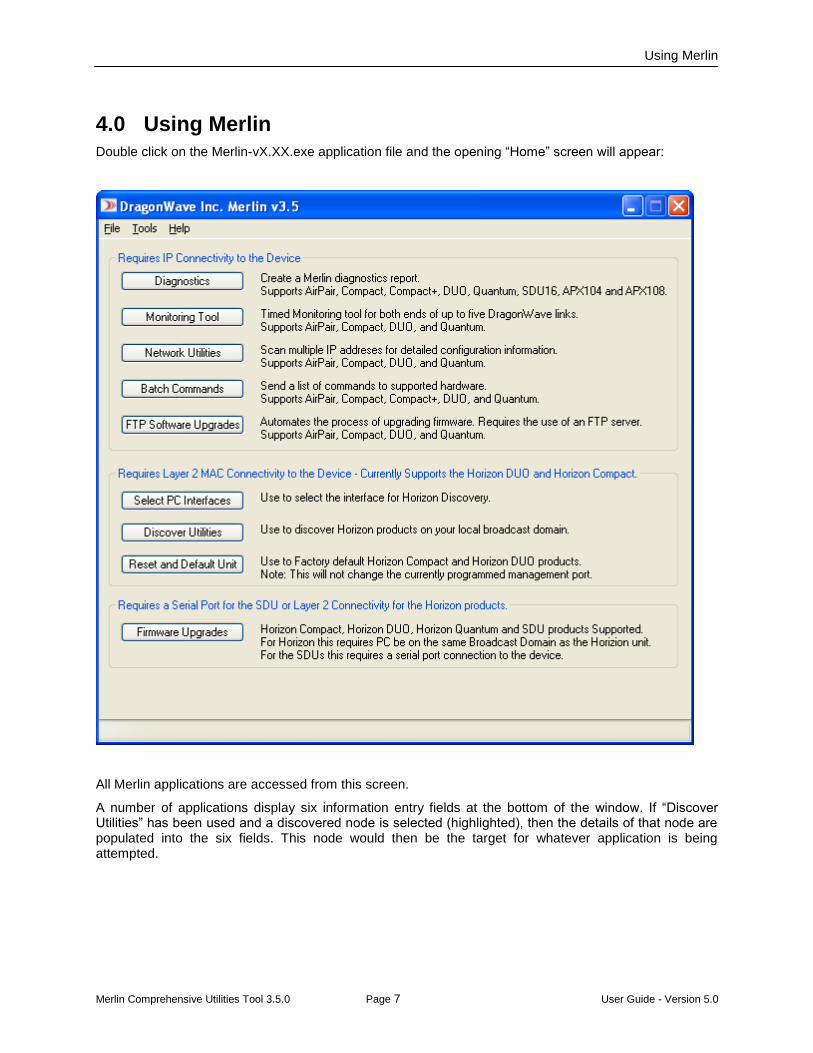
4.0 Using Merlin
Double click on the Merlin-vX.XX.exe application file and the opening “Home” screen will appear:
All Merlin applications are accessed from this screen.
A number of applications display six information entry fields at the bottom of the window. If “Discover Utilities” has been used and a discovered node is selected (highlighted), then the details of that node are populated into the six fields. This node would then be the target for whatever application is being attempted.
Using Merlin
Merlin Comprehensive Utilities Tool 3.5.0 Page 8 User Guide - Version 5.0
4.1 Diagnostics
All the Horizon products and AirPair systems can take advantage of the Diagnostics feature.
The very successful DragonWave Diagnostics Utilities software has been integrated into Merlin, providing a more convenient and user friendly way of generating a diagnostics text file. This file contains all the configuration and current status details, including any alarms and warnings, of the targeted Horizon or AirPair unit and may be written in the folder of your choice on your PC. An option is also available that will generate a separate text file of the contents of Event and/or Performance logs.
Beginning in Merlin Version 3.5.0, the Warnings section of the Diagnostics output has been enhanced to direct the user to the most critical fault or faults. There are 3 sections at the top of the output file, immediately after the header:
o Critical Issues
Hardware failures
Link down or link not passing traffic
o Major Issues
Link degradation in the form of
degraded RF parameters
significant data loss
o Minor Issues and Information Only Issues
RF parameters are approaching, but have not reached, levels that are cause for concern
Minor (trickling errors) data loss
Other pieces of information that may be of interest to the user
These 3 sections are hierarchical, meaning that if, for example, Critical issues exist, those issues will be displayed and must be dealt with first. Once Critical issues are addressed, then Major issues resulting from that correction, if any, are displayed. This approach reduces the amount of information provided and allows the user to focus on the top priority issues.
It is recommended that Brief Mode Diagnostics be used. This is the default setting. Detailed Mode Diagnostics are to be used when requested to do so by DragonWave Customer Support.
Examples of each report can be found in the Appendices. The Diagnostics report is shown in its “Brief Mode” with the “Warnings” section highlighted.
Either a single node, or a batch of several nodes can be queried for diagnostic information.
Selecting ‘Cal Table Correction” will update the Cal Tables in the modem if the diagnostics show require an update.
!
Using Merlin
Merlin Comprehensive Utilities Tool 3.5.0 Page 9 User Guide - Version 5.0
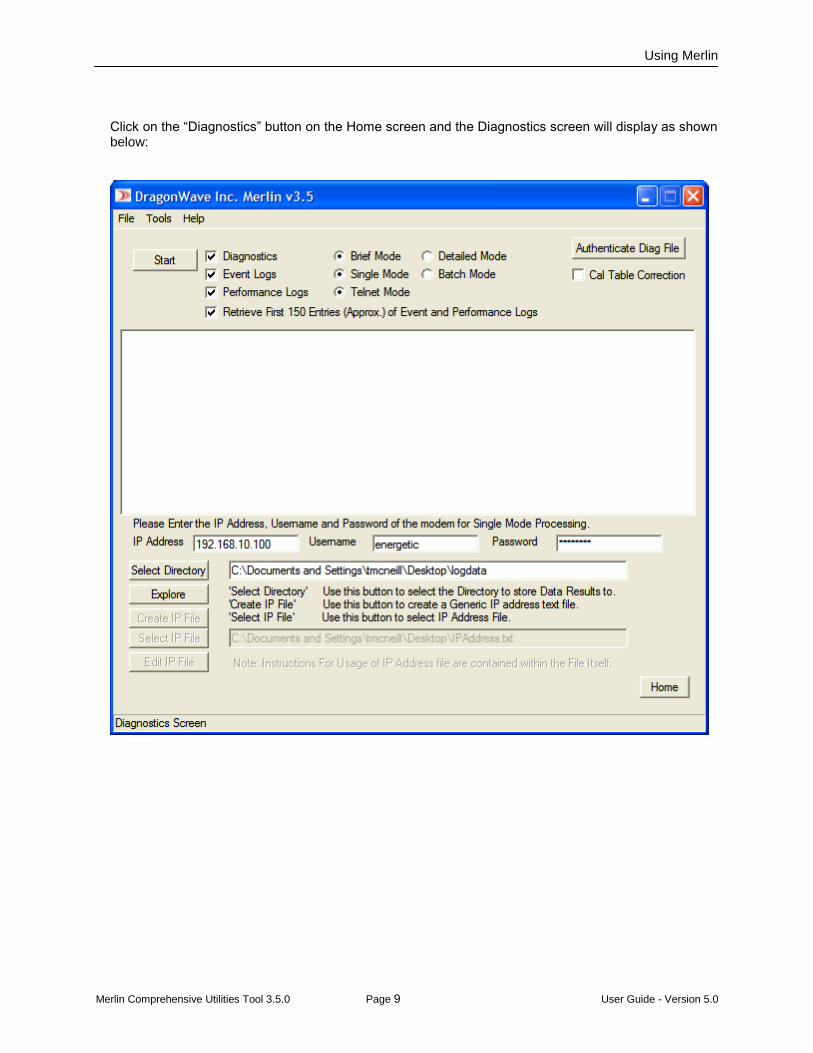
Click on the “Diagnostics” button on the Home screen and the Diagnostics screen will display as shown below:
Using Merlin
Merlin Comprehensive Utilities Tool 3.5.0 Page 10 User Guide - Version 5.0
4.1.1 Single Mode Diagnostics
To generate a diagnostics text file for a single unit:
1. ensure that the “Diagnostics” check box is checked
2. if desired, check the “Events Logs” and/or the “Performance Logs” check boxes to have the contents of the logs included in separate files
3. if either of the logs have been selected, checking the “Retrieve First 150” box will limit the log entry output to approximately 150 records. Note that the Events Log can store up to 17,500 event records and the Performance Log can store up to 8000 records.
4. click on the “Brief Mode” or “Detailed Mode” as required, to select the degree of detail in the report. The “Brief Mode” returns the Warnings and Summary section only and the “Detailed Mode” returns the same as the Brief Mode plus sixteen sections of more detailed system information.
5. click on the “Single Mode” radio button (set by default)
6. click on the “Telnet Mode” to use Telnet protocol to communicate via Ethernet (set by default)
7. enter the IP address of the system that you wish to interrogate in the IP Address field, followed by the log on user name and password
8. select the directory in which you wish the text file report to be deposited. By default the text files are deposited in a folder named “logdata” which is located in the same directory as the Merlin software. You may use the “Select Directory” button to change the default value, or use the “Explore” button to provide a more extensive view of directories in your PC system from which to select a suitable location
9. click on the “Start” button. Progress will be shown in the information window.
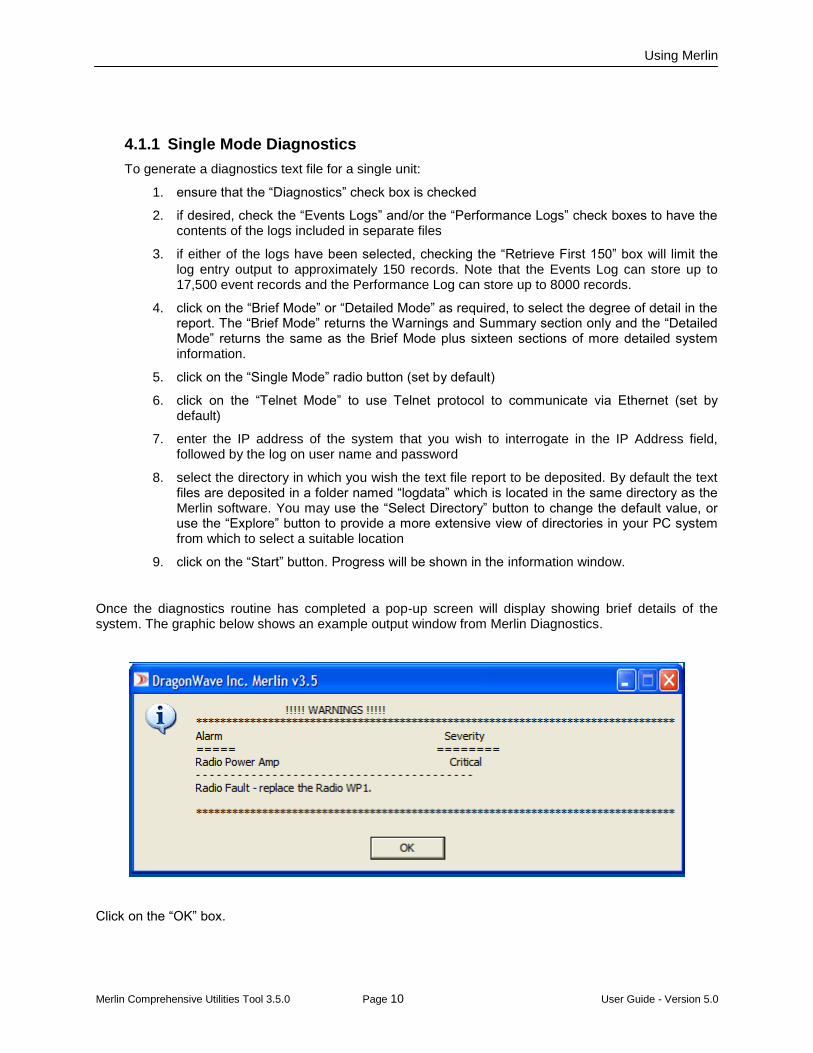
Once the diagnostics routine has completed a pop-up screen will display showing brief details of the system. The graphic below shows an example output window from Merlin Diagnostics.
Click on the “OK” box.
Using Merlin
Merlin Comprehensive Utilities Tool 3.5.0 Page 11 User Guide - Version 5.0
Once the diagnostics task is complete, “Closing Diagnostics Queue”” will be displayed in the information window. The report(s) will be found in the designated directory. File names will include the IP address with a date and time stamp and the unit type (AP, HC, HC_Duo, QT).
Example : - IP_192.168.255.50-Tue_Jun_1_16.06.20_2010.BM.diag.QT.txt
4.1.2 Batch Mode Diagnostics
To generate individual diagnostic, or log files for several systems on a network:
1. ensure that the “Diagnostics” check box is checked
2. if desired, check the “Events Logs” and/or the “Performance Logs” check boxes to have the contents of the logs included in separate files
3. if either of the logs have been selected, checking the “Retrieve First 150” box will limit the log entry output to approximately 150 records. Note that the Events Log can store up to 17,500 event records and the Performance Log can store up to 8000 records.
4. click on the “Brief Mode” or “Detailed Mode” as required, to select the degree of detail in the report. The “Brief Mode” returns the Warnings and Summary section only and the “Detailed Mode” returns the same as the Brief Mode plus sixteen sections of more detailed system information.
5. click on the “Batch Mode” radio button
6. click on the “Telnet Mode” to use Telnet protocol to communicate via Ethernet (set by default)
7. select the directory in which you wish the text file report to be deposited. By default the text files are deposited in a folder named “logdata” which is located in the same directory as the Merlin software. You may use the “Select Directory” button to change the default value, or use the “Explore” button to provide a more extensive view of directories in your PC system from which to select a suitable location
8. Merlin requires a list of IP addresses of the nodes in the network before it can proceed to gather information. If you do not yet have a list, click on the “Create IP File” button. Provide a name for the file. A text file, having the name that you have provided, will be opened. Follow the directions shown in the file and add the IP addresses, user names and passwords of the systems you wish to gather information from. Save the file. If a file already exists, you can select that file by clicking on the “Select IP File” button and selecting the desired file from the file select window. Once the file has been selected the path to the file will be displayed beside the button. If you wish to edit this file, click on the “Edit IP File” button and the file will be opened for editing as required.
9. Click on the “Start” button. Progress will be shown in the information window.
Once the diagnostics task is complete, “Closing Diagnostics Queue”” will be displayed in the information window. The report(s) will be found in the designated directory. File names will include the IP address with a date and time stamp and the unit type (AP, HC, HC_Duo, QT).
Example : - IP_192.168.255.50-Tue_Jun_1_16.06.20_2010.BM.diag.QT.txt
Using Merlin
Merlin Comprehensive Utilities Tool 3.5.0 Page 12 User Guide - Version 5.0
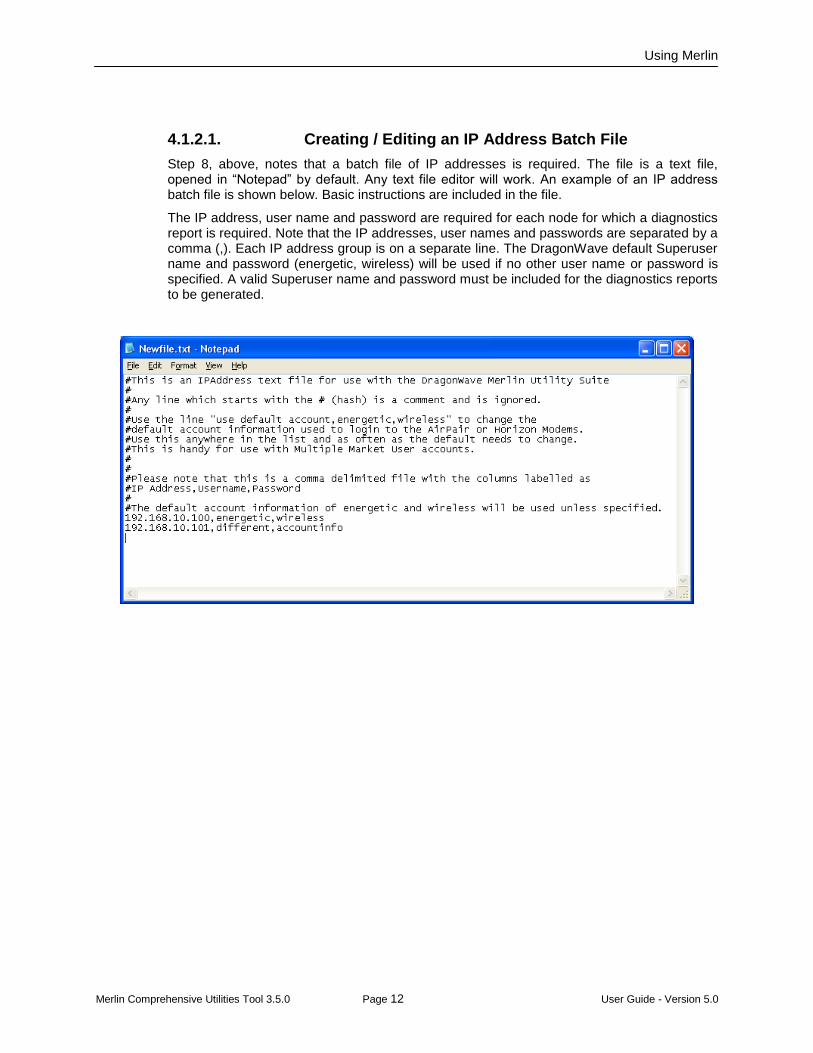
4.1.2.1. Creating / Editing an IP Address Batch File
Step 8, above, notes that a batch file of IP addresses is required. The file is a text file, opened in “Notepad” by default. Any text file editor will work. An example of an IP address batch file is shown below. Basic instructions are included in the file.
The IP address, user name and password are required for each node for which a diagnostics report is required. Note that the IP addresses, user names and passwords are separated by a comma (,). Each IP address group is on a separate line. The DragonWave default Superuser name and password (energetic, wireless) will be used if no other user name or password is specified. A valid Superuser name and password must be included for the diagnostics reports to be generated.
Using Merlin
Merlin Comprehensive Utilities Tool 3.5.0 Page 13 User Guide - Version 5.0
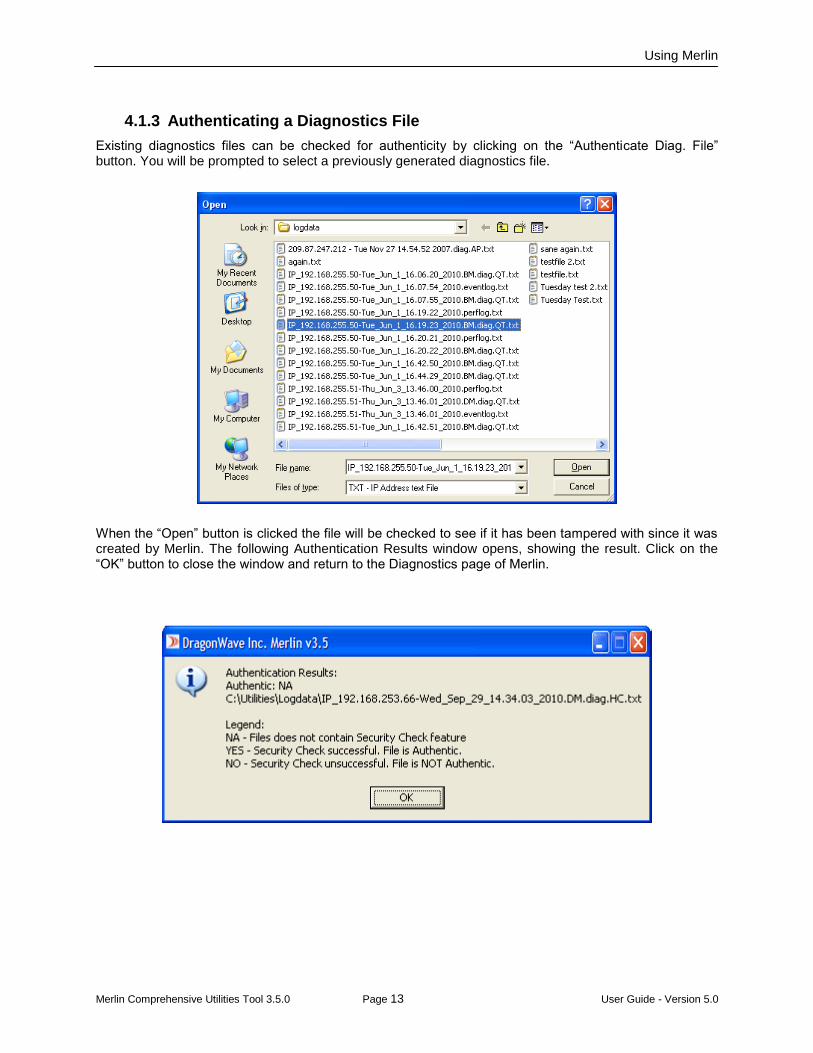
4.1.3 Authenticating a Diagnostics File
Existing diagnostics files can be checked for authenticity by clicking on the “Authenticate Diag. File” button. You will be prompted to select a previously generated diagnostics file.
When the “Open” button is clicked the file will be checked to see if it has been tampered with since it was created by Merlin. The following Authentication Results window opens, showing the result. Click on the “OK” button to close the window and return to the Diagnostics page of Merlin.

Using Merlin
Merlin Comprehensive Utilities Tool 3.5.0 Page 14 User Guide - Version 5.0
4.2 Link Monitoring Tool
Click on the “Monitoring Tool” button on the home page.
This tool provides a timed monitoring feature for both ends of up to five DragonWave links. It provides the ability to monitor the link’s
Wireless port errors
modem block receive errors
RF characteristics
The Link Monitoring Tool can be used for bench-top testing, and can be used for in-field monitoring of active links to determine if data loss is currently occurring. The Polling Interval and the duration of the link monitoring can be set by the user.
Using Merlin
Merlin Comprehensive Utilities Tool 3.5.0 Page 15 User Guide - Version 5.0
An Excel “csv” file is created for each node showing key system parameters (RSL, SNR, Eb/No, Equalizer stress, Block Errors, Ingress/Egress data rate) and how they have changed over time. The length of time to monitor the system(s) can be preset.
1. Enter the IP addresses of the two nodes in each link in the IP fields. Up to five links can be entered. Alternatively go to step 2.
2. click on the “Use this button to load the ipaddress.txt file” button to open a Windows explorer window. Locate the IP address text file you desire and click on the “Open” button. The IP addresses stored in the file will populate the IP address fields
3. set the time over which you want the systems to be monitored by clicking on the drop down time selection box and selecting the time.
4. enter the polling interval, in seconds, in the “Polling Interval (sec)” box
5. click on the “Start/Stop” buttons to start and stop the monitoring process. Each link can be independently started and stopped as desired.
The Excel “csv” file generated will be found in the default folder shown on the “Diagnostics” page.
Note: For Horizon Quantum, only Ethernet ports 1 and 2 (not 3 through 8) are supported in this release.
Using Merlin
Merlin Comprehensive Utilities Tool 3.5.0 Page 16 User Guide - Version 5.0
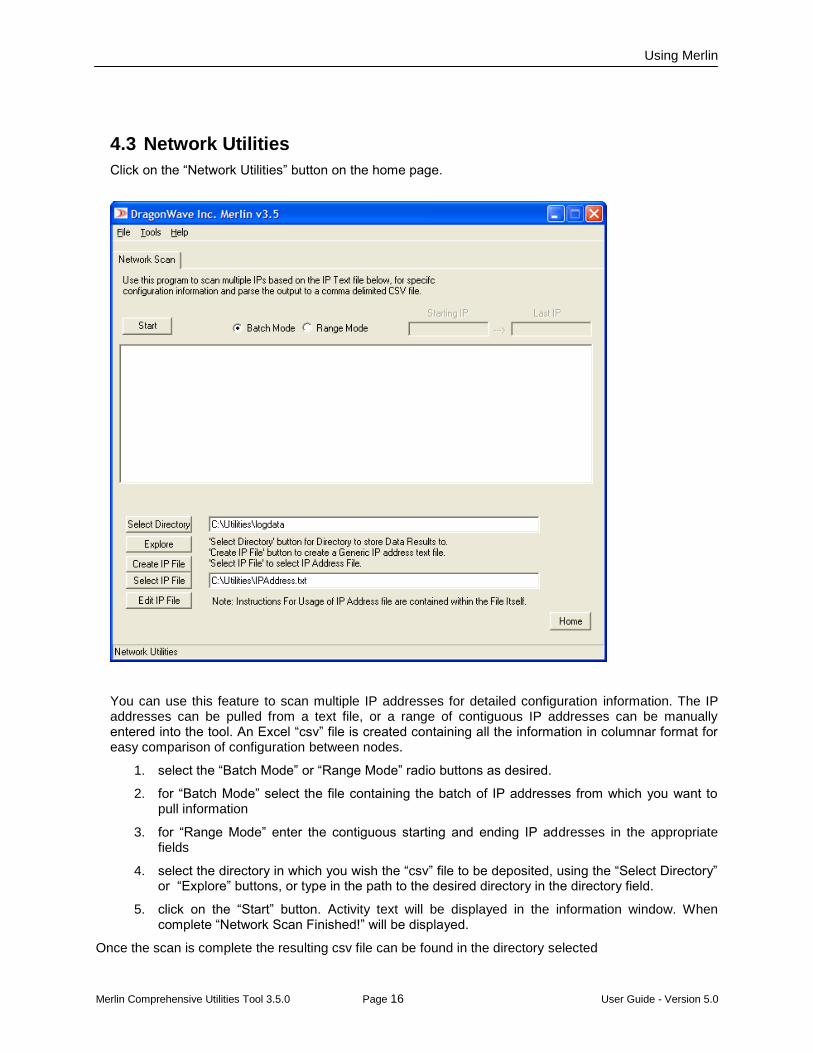
4.3 Network Utilities
Click on the “Network Utilities” button on the home page.
You can use this feature to scan multiple IP addresses for detailed configuration information. The IP addresses can be pulled from a text file, or a range of contiguous IP addresses can be manually entered into the tool. An Excel “csv” file is created containing all the information in columnar format for easy comparison of configuration between nodes.
1. select the “Batch Mode” or “Range Mode” radio buttons as desired.
2. for “Batch Mode” select the file containing the batch of IP addresses from which you want to pull information
3. for “Range Mode” enter the contiguous starting and ending IP addresses in the appropriate fields
4. select the directory in which you wish the “csv” file to be deposited, using the “Select Directory” or “Explore” buttons, or type in the path to the desired directory in the directory field.
5. click on the “Start” button. Activity text will be displayed in the information window. When complete “Network Scan Finished!” will be displayed.
Once the scan is complete the resulting csv file can be found in the directory selected
Using Merlin
Merlin Comprehensive Utilities Tool 3.5.0 Page 17 User Guide - Version 5.0
4.4 Horizon Speed Upgrades
This feature is not currently active. All speed upgrades must be arranged through your DragonWave sales representative.
4.5 FTP Software Upgrades
Click on the “FTP Software Upgrades” button on the home page.
Upgrading the software of an AirPair or Horizon product can be facilitated using this feature. Select the “AirPair” tab to upgrade AirPair software, or the “Horizon” tab to upgrade a Horizon product. Software can also be downgraded on an AirPair if necessary. For AirPair only one software file is required (OMNI).
For the Horizon products (Compact, Duo and Quantum) three files can be upgraded:
Application OMNI
Modem OMNI
Frequency File
The files must be located on an FTP server on the same network as the DragonWave systems. The name of the file(s) should include path information. The IP address of the FTP server is required, along with the FTP server log-on user name and password. A single node or multiple systems can be upgraded during a single upgrade session.
Using Merlin
Merlin Comprehensive Utilities Tool 3.5.0 Page 18 User Guide - Version 5.0
4.5.1 AirPair Software Upgrades
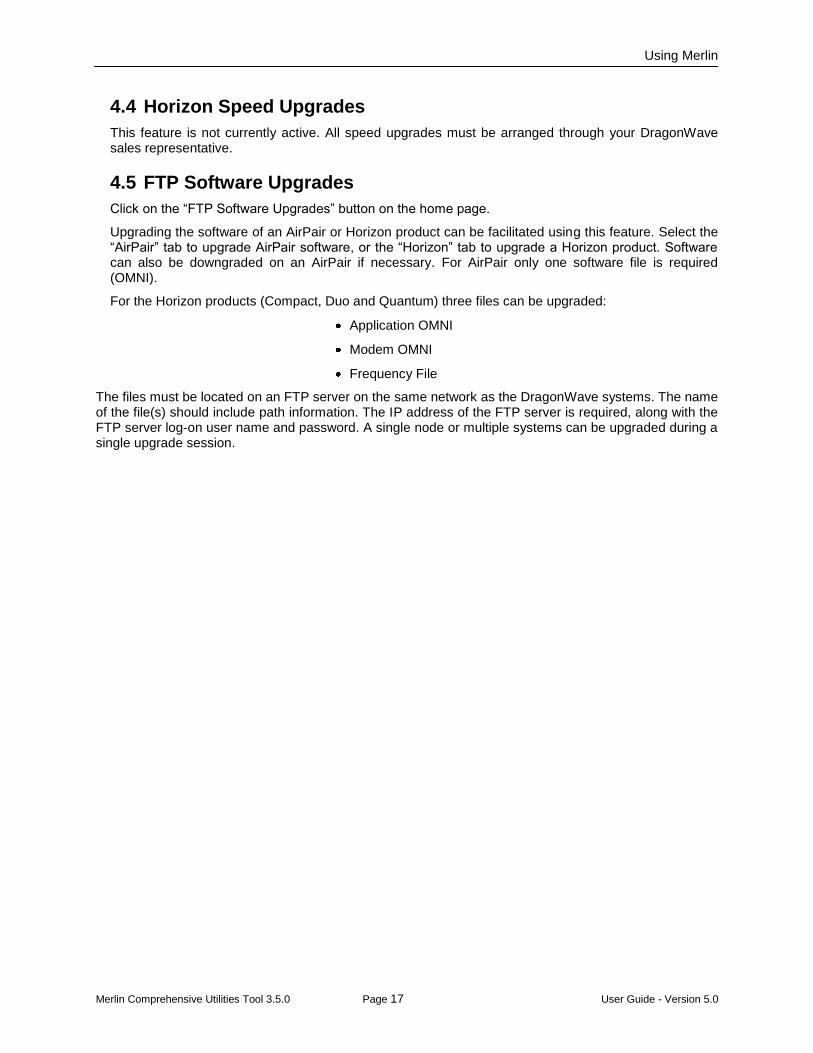
Click on the “FTP Software Upgrades” button on the home page. The FTP Software Upgrades page will open with a default of AirPair, which is the first Tab selection.
Follow this procedure to upgrade (or downgrade) an OMNI file load on an AirPair system:
1. if desired check the “Allow Downgrades” and “Commit New Load Once Completed” check boxes
2. enter the name of the OMNI file including the path to the file
3. enter the FTP Server IP Address, FTP Server Username and FTP Server Password in their respective entry fields
Using Merlin
Merlin Comprehensive Utilities Tool 3.5.0 Page 19 User Guide - Version 5.0
4. using the radio buttons, select either “Batch Mode” or “Single Mode” as desired
5. if “Single Mode”, enter the IP address of the node concerned, along with username and password.
6. if “Batch Mode” Merlin requires a list of IP addresses of nodes in the network before it can proceed to upgrade software. If you do not yet have a list, click on the “Create IP File” button. Provide a name for the file. A text file, having the name that you have provided, will be opened. Follow the directions shown in the file and add the IP addresses, user names and passwords of the systems you wish to upgrade. Save the file. If a file already exists, you can select that file by clicking on the “Select IP File” button and selecting the desired file from the file select window. Once the file has been selected the path to the file will be displayed beside the button. If you wish to edit this file, click on the “Edit IP File” button and the file will be opened for editing as required.
7. click on “Start Upgrade” button. Progress text will be displayed in the window. A single Excel “csv” file is created containing the results of all the upgrades and a separate text file is created for each device showing the communication between the program and the device. The information in the text file is the same seen scrolling in the activity window.
4.5.2 Horizon Products Software Upgrades
Click on the “FTP Software Upgrades” button on the home page. Once the FTP Software Upgrades page opens, click on the “Horizon” button.
The program does NOT perform a software upgrades on Horizon Compact+. Use the FTP method as described in the Horizon Compact+ Product Manuals.
!

Using Merlin
Merlin Comprehensive Utilities Tool 3.5.0 Page 20 User Guide - Version 5.0
A Warning page will open indicating that it is up to the user to select the proper file for transfer. An additional warning appears indicating that in Horizon Quantum, the newly downloaded file must be made active by switching to the inactive Flash memory bank.
Follow this procedure to upgrade the Application OMNI, Modem OMNI and Frequency File loads on Horizon Compact and Horizon Duo products:
1. enter the name of the Application OMNI, Modem OMNI and/or Frequency File, including the path to the file, in their respective fields. You do not have to upgrade all the files at the same
Using Merlin
Merlin Comprehensive Utilities Tool 3.5.0 Page 21 User Guide - Version 5.0
time. Note: The program does not check for system type (Horizon Duo, Horizon Compact). You must select the correct file(s) for the system(s) that you are upgrading.
The program does not check for system type (Horizon Duo, Horizon Compact). You must select the correct file(s) for the system(s) that you are upgrading.
In order to make the newly downloaded software “active”, the user must switch to the Flash Memory Bank into which the software was loaded. This is accomplished through the use of the “switch bank [a|b] “ CLI command
2. enter the FTP Server IP Address, FTP Server Username and FTP Server Password in their respective entry fields
3. using the radio buttons, select either “Batch Mode” or “Single Mode” as desired
4. if “Single Mode”, enter the IP address, username and password of the node being upgraded.
5. if “Batch Mode” Merlin requires a list of IP addresses of nodes to be upgraded in the network before it can proceed to upgrade software. If you do not yet have an IP address list (the same file that may have been used in the batch Diagnostics routine can be used), click on the “Create IP File” button. Provide a name for the file. A text file, having the name that you have provided, will be opened. Follow the directions shown in the file and add the IP addresses, user names and passwords of the systems you wish to upgrade. Save the file. If a file already exists, you can select that file by clicking on the “Select IP File” button and selecting the desired file from the file select window. Once the file has been selected the path to the file will be displayed beside the button. If you wish to edit this file, click on the “Edit IP File” button and the file will be opened for editing as required.
6. If ‘Cal Table Correction’ box is selected and APP OMNI 1.2.2 is being uploaded to the device Merlin will verify the existing modem cal table and correct if required.
7. click on “Start Upgrade” button. Progress text will scroll in the window. A single Excel “csv” file is created containing the results of all the upgrades and a separate text file is created for each device showing the communication between the program and the device. The information in the text file is the same seen scrolling in the activity window.
!
!

Using Merlin
Merlin Comprehensive Utilities Tool 3.5.0 Page 22 User Guide - Version 5.0
4.6 Discover Utilities
This feature only supports the Horizon Compact, Horizon Duo and the Horizon Quantum products.
Should a customer lose any Horizon product Ethernet or Hardware Identification information, Merlin will allow the user to find :
IP addressing information
Hardware serial numbers
MAC addresses
of any Horizon product node on the network (up to 30 nodes in total).
Before you can run the Discover Utilities, you must let the system know which network interface your PC will be using. Follow this procedure to select your PC network interface:
1. From the Home Page, click on the “Select PC Interfaces” button
2. Click on the “List Available Interfaces” button
3. highlight the network connect adapter used by your PC. The graphic below is an example but it may be different for your PC.
Using Merlin
Merlin Comprehensive Utilities Tool 3.5.0 Page 23 User Guide - Version 5.0
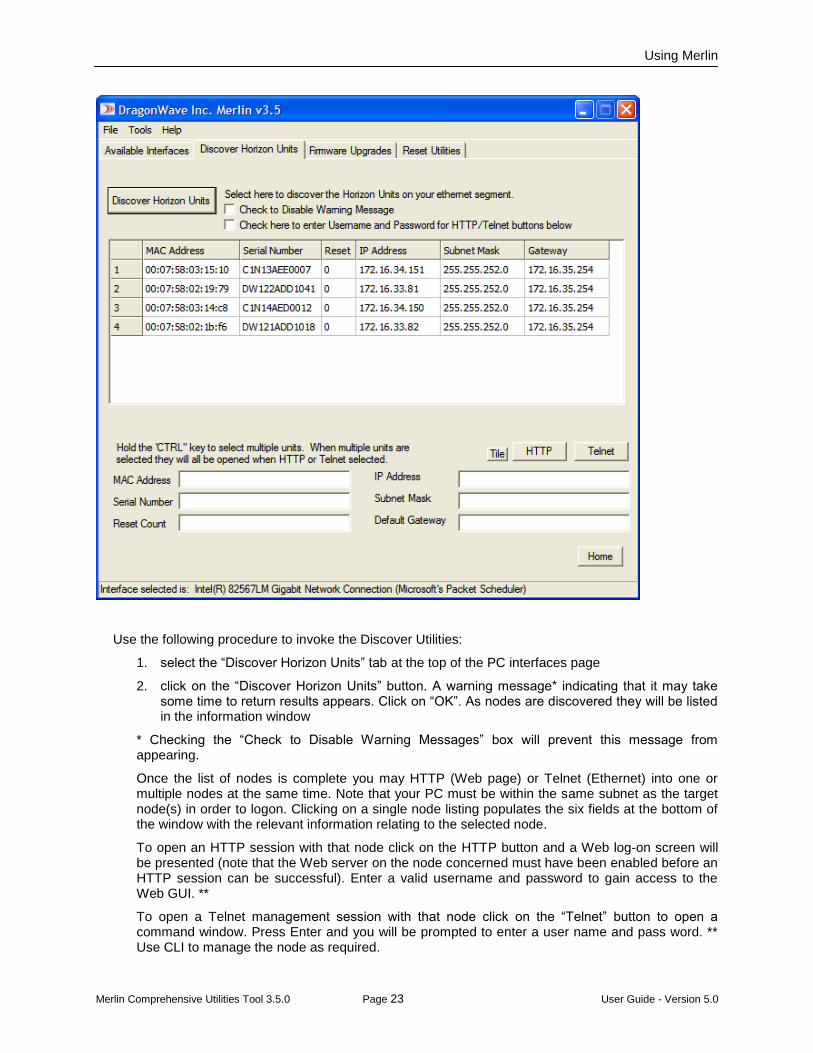
Use the following procedure to invoke the Discover Utilities:
1. select the “Discover Horizon Units” tab at the top of the PC interfaces page
2. click on the “Discover Horizon Units” button. A warning message* indicating that it may take some time to return results appears. Click on “OK”. As nodes are discovered they will be listed in the information window
* Checking the “Check to Disable Warning Messages” box will prevent this message from appearing.
Once the list of nodes is complete you may HTTP (Web page) or Telnet (Ethernet) into one or multiple nodes at the same time. Note that your PC must be within the same subnet as the target node(s) in order to logon. Clicking on a single node listing populates the six fields at the bottom of the window with the relevant information relating to the selected node.
To open an HTTP session with that node click on the HTTP button and a Web log-on screen will be presented (note that the Web server on the node concerned must have been enabled before an HTTP session can be successful). Enter a valid username and password to gain access to the Web GUI. **
To open a Telnet management session with that node click on the “Telnet” button to open a command window. Press Enter and you will be prompted to enter a user name and pass word. ** Use CLI to manage the node as required.

Using Merlin
Merlin Comprehensive Utilities Tool 3.5.0 Page 24 User Guide - Version 5.0
** Checking the “Check here to enter Username and Password for HTTP/Telnet buttons below” check box will provide Username and Password entry fields populated with the DragonWave default Superuser name and password. This will provide automatic login for any node having a username and password matching those entered.
More than one node may be accessed at the same time if you hold down the “CTRL” key while making node selections. When you click on the “HTTP” or “Telnet” buttons, as many instances of the Web GUI or CLI command windows as selected nodes will be displayed. Node management may take place in any one of the presented windows.
Using Merlin
Merlin Comprehensive Utilities Tool 3.5.0 Page 25 User Guide - Version 5.0
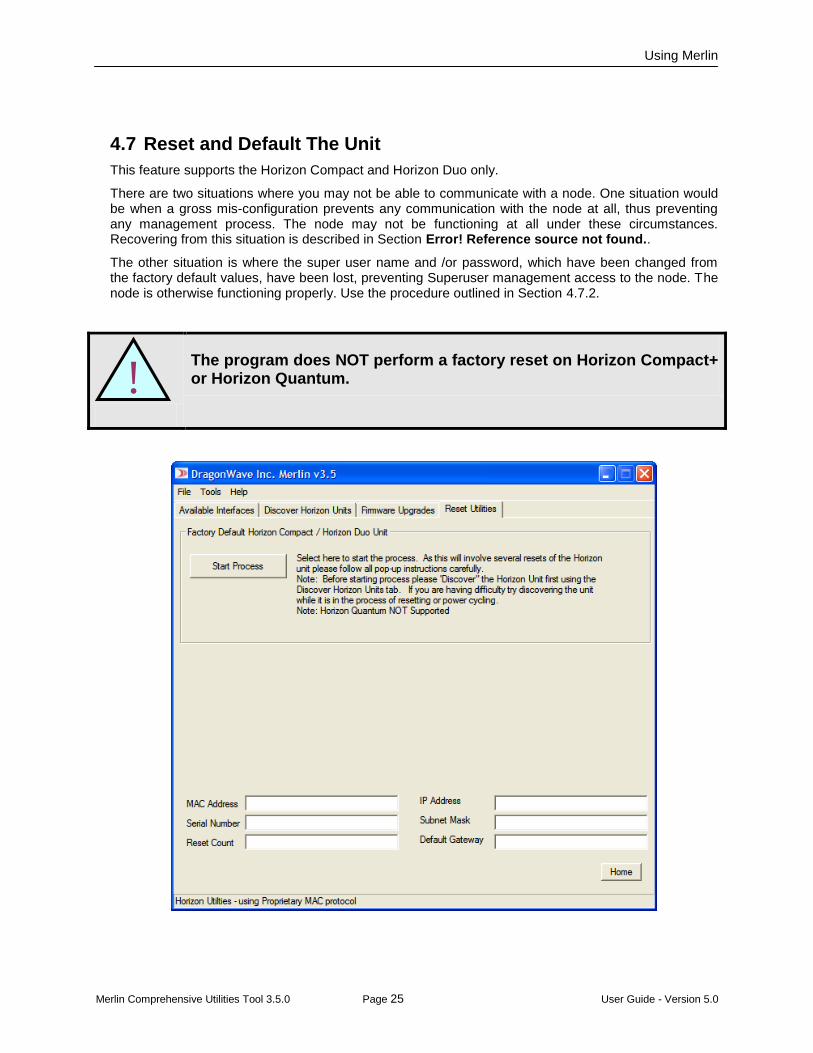
4.7 Reset and Default The Unit
This feature supports the Horizon Compact and Horizon Duo only.
There are two situations where you may not be able to communicate with a node. One situation would be when a gross mis-configuration prevents any communication with the node at all, thus preventing any management process. The node may not be functioning at all under these circumstances. Recovering from this situation is described in Section Error! Reference source not found..
The other situation is where the super user name and /or password, which have been changed from the factory default values, have been lost, preventing Superuser management access to the node. The node is otherwise functioning properly. Use the procedure outlined in Section 4.7.2.
The program does NOT perform a factory reset on Horizon Compact+ or Horizon Quantum.
!
Using Merlin
Merlin Comprehensive Utilities Tool 3.5.0 Page 26 User Guide - Version 5.0
4.7.1 Recovering a Non-functioning Node
Use the following procedure to reset a node:
1. click on the “Select PC Interfaces” button
2. click on “List Available Interfaces” button. A list of network interfaces on your PC is displayed.
3. select your particular network connection interface
4. click on the “Discover Horizon Units” button on the home page. You will need to run the “Discover Horizon Units” application and select the node for which you require the reset**
** If you are unable to discover the unit normally, try power cycling it and discovering within the first 10 seconds of boot up (boot mode). In boot mode the unit will have an IP/Subnet Mask/Default Gateway of 255.255.255.255 . Select it to populate the fields at the bottom of the window.
5. click on the “Reset and Default Unit” button. The six fields at the bottom of the window will be populated with the details of the selected node
6. click on the “Start Process” button.
7. a warning appears “This will Factory Reset this Horizon Unit! Please Select: “OK” to continue “Cancel” to abort. Select OK
8. you will be prompted to reboot the system (power cycle the system). Click OK within 5 seconds of power cycling. A console screen will appear, showing progress of the defaulting process.
9. once the process completes, “Press any key to continue.” appears on the screen. Press any key. You will be prompted to “Reset” (power cycle) the system once more
10. power cycle the system once more and hit OK within 5 seconds. A console screen will appear, showing progress of the defaulting process.
11. once the process completes, “Press any key to continue.” appears on the screen. Press any key to close the window.
12. you will be prompted to power cycle the system once more. Power cycle the system and wait until the boot process has completed (at least 15 seconds)
13. After the system has finished the boot process, discover the unit again and log in using the default username and password
4.7.2 Super User Factory Default
This method allows a user to recover a node for which the user-configured Superuser name and/or password have been lost, thus preventing any super user access to the node. The process allows the system to be reset to the factory default settings, where the Superuser name is “energetic” and the Password is “wireless”. In addition the IP address configuration will be reset to the factory defaults.
This feature is restricted! Proof of ownership and the appropriate authorization from within your organization must
be provided before a reset key will be issued. !
Using Merlin
Merlin Comprehensive Utilities Tool 3.5.0 Page 27 User Guide - Version 5.0
The Horizon Quantum and Horizon Compact + products do not support this feature.
Use the following procedure to return the Superuser name and password to the default values of “energetic” and “wireless” :
1. click on the “Select PC Interfaces” button
2. click on “List Available Interfaces” button. A list of network interfaces on your PC is displayed.
3. select your particular network connection interface
4. click on the “Discover Horizon Units” button on the home page. You will need to run the “Discover Horizon Units” application and select the node for which you wish to default the Superuser.
5. click on the “Submit File to Support” button. A file of relevant information is created and saved in the folder selected in the “Diagnostics” screen. Submit this file to DragonWave. DragonWave will provide another file containing a reset key.
6. once DragonWave provides the file containing the reset key, enter the key into the field below the “Reset” button and click on the “Reset” button, or click on the “Reset” button and locate and select the file. The system will be reset.
The issued reset key is valid for only one reset.
Note: to avoid possible security breaches to your network, the reset key is valid for only one reset. Subsequent reset attempts, with the same key, to the same or another unit will fail.
!
!
Using Merlin
Merlin Comprehensive Utilities Tool 3.5.0 Page 28 User Guide - Version 5.0
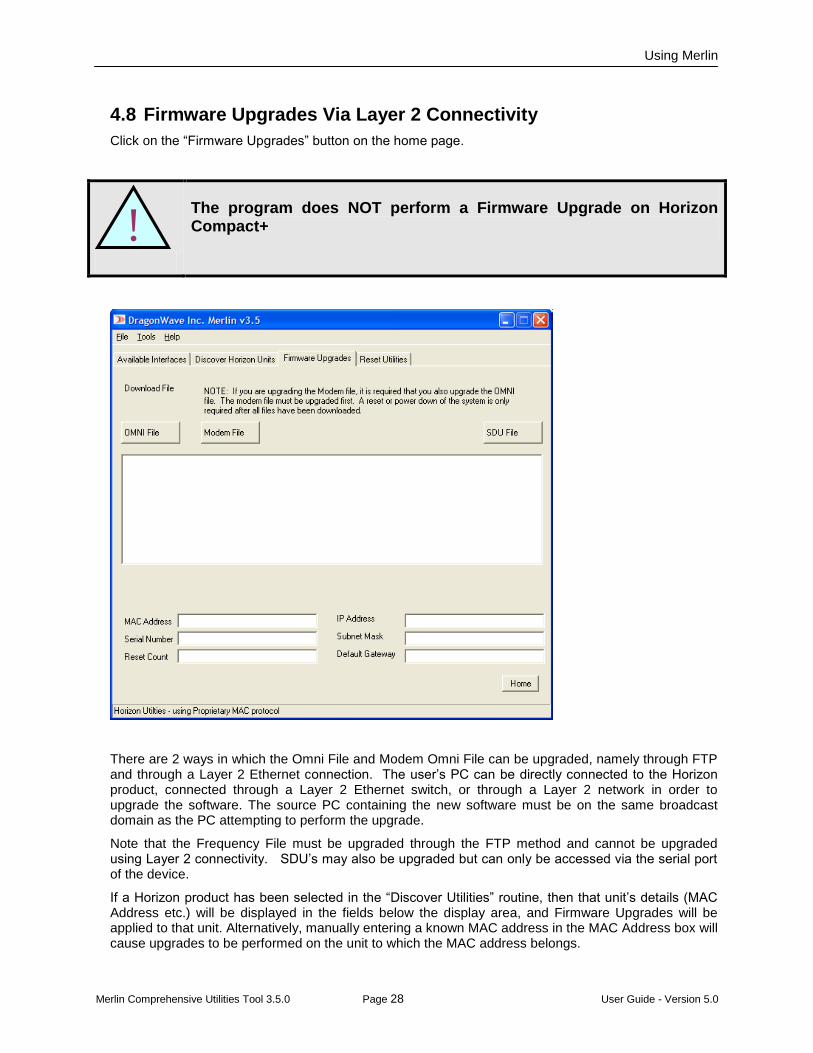
4.8 Firmware Upgrades Via Layer 2 Connectivity
Click on the “Firmware Upgrades” button on the home page.
The program does NOT perform a Firmware Upgrade on Horizon Compact+
There are 2 ways in which the Omni File and Modem Omni File can be upgraded, namely through FTP and through a Layer 2 Ethernet connection. The user’s PC can be directly connected to the Horizon product, connected through a Layer 2 Ethernet switch, or through a Layer 2 network in order to upgrade the software. The source PC containing the new software must be on the same broadcast domain as the PC attempting to perform the upgrade.
Note that the Frequency File must be upgraded through the FTP method and cannot be upgraded using Layer 2 connectivity. SDU’s may also be upgraded but can only be accessed via the serial port of the device.
If a Horizon product has been selected in the “Discover Utilities” routine, then that unit’s details (MAC Address etc.) will be displayed in the fields below the display area, and Firmware Upgrades will be applied to that unit. Alternatively, manually entering a known MAC address in the MAC Address box will cause upgrades to be performed on the unit to which the MAC address belongs.
!
Using Merlin
Merlin Comprehensive Utilities Tool 3.5.0 Page 29 User Guide - Version 5.0
You can download the Modem File, OMNI File and Frequency File from the DragonWave Customer Support website: http://support.dragonwaveinc.com/ . When downloading Merlin Software, you must save each file into its own directory (folder) on your PC. After clicking on the “OMNI File”, ”Modem File”, or ”Frequency File” button, you will be prompted to select the appropriate file from its own directory on your PC. Once entered, you will be prompted to power cycle the unit and hit the “OK” button. Follow the on screen instruction through the rest of the upgrade process.
Note: You must be connected to Port 2 on the Horizon Compact (out-of-band management) in order to upgrade firmware.
The OMNI File or the Frequency File can be upgraded individually at anytime. If you require to upgrade the Modem File, note that the OMNI File must also be upgraded, with the Modem File being upgraded first.
The Frequency File can only be upgraded using the FTP method. !

Using Merlin
Merlin Comprehensive Utilities Tool 3.5.0 Page 30 User Guide - Version 5.0
4.9 Merlin Batch Command Line Processing
Merlin supports batch command processing against network elements both in Merlin Command Line Mode operation and through the Merlin GUI. For example, should a configuration setting require a change on multiple network elements then the same command(s) can be executed against the group of target elements.
The commands can be a single CLI command, or can be multiple CLI commands with each listed on a new line.
Multi-response commands can be entered on a single line, with parameters being comma-separated. For example: In Horizon Quantum, the set enet config command is performed through a wizard and requires multiple responses
->set enet config #Press 'Ctrl-X' to exit config process #Press 'Enter' to retain previous value Port [1 - 8] (1) ? 1 Port Name (p1):P1 Pause Frame Enable [tx(1) | rx(2) | both(3) | off(4)] (off):off Maximum Frame Size (1600):9600 Admin State [on(1) | off(2)] (on):on Apply the above settings ? Enter yes(y) or no(n)y ------------------------------------------ ETHERNET PORT CONFIGURATION ========================================== Enet Port ID p1 Port Name P1 Auto Negotiation on Duplex Status full Port Media fiber Speed 1000 Mdix Status auto Pause Frame Enable off Max. Frame Size 9600 Admin State on
In order to invoke this configuration through the Batch Command Line Processing, enter the CLI command followed by each parameter on one line, with each parameter being comma-separated.
set enet config 1,P1,off,9600,on,y
!
Using Merlin
Merlin Comprehensive Utilities Tool 3.5.0 Page 31 User Guide - Version 5.0
4.9.1 Command Line Mode
In this mode of operation, Merlin is executed through the use of a command line entry. This is performed from the directory in which Merlin exists and takes the form of “merlin –batch ipaddress.txt cmd.txt”.
The user creates a text file containing the target CLI commands and an associated text file containing the list of target IP address against which the commands are to be run. In other words, it is a method to “run this set of commands against that set of IP addresses”.
There are two text files required in order to accomplish batch command processing:
1. A list of CLI commands that are to be executed against the target elements
a. The filename can be chosen by the user. The filename cmd.txt is used in the examples
2. A list of IP addresses for the target elements
a. The filename can be chosen by the user. The filename ipaddress.txt is used in the examples.
Notes:
1. The batch command set must be executed from within the same directory in which Merlin.exe exists
2. Enter one CLI command per line within the command list text file.
3. Verify each CLI command by connecting to a target element via Telnet and manually issuing the command.
4. Enter one IP address per line within the IP address text file.
5. The default username and password of “energetic” “wireless” is used. If a different username and password is required, please refer to section 0 Using Customized Usernames and Passwords
6. Prior to execution of the batch commands, ensure IP connectivity exists to the target elements by issuing a Ping command to each of the elements or to a subset of elements.
4.9.2 Execution of Batch CLI Command List
Ensure the CLI command list, one per line, has been created in a text file (cmd.txt) and the target list of IP addresses has been created in a text file (ipaddress.txt). From the directory in which Merlin.exe exists issue the following command:
Merlin –batch ipaddress.txt cmd.txt
This will run all commands listed in cmd.txt against the list of ip addresses listed in ipaddress.txt. The filenames can be changed to the user’s selection.
Examples:
1. Change the SNMP Manager settings on a group of elements
a. The file cmd.txt may contain the following commands
set snmp manager 2 192.168.100.53 enable public
save mib
b. The ipaddress.txt file would create a list of IP addresses
Using Merlin
Merlin Comprehensive Utilities Tool 3.5.0 Page 32 User Guide - Version 5.0
192.168.10.100
192.168.10.101
192.168.10.102
192.168.10.103
2. Enable bandwidth logging on a group of elements
a. The file cmd.txt could contain the following command
set bandwidth record logging on
set syslog forwarding on
set syslog forwarding host 192.168.10.1
save mib
b. The ipaddress.txt file would create a list of IP addresses
4.9.3 Merlin GUI Command Execution Mode
Merlin’s GUI provides a means of executing multiple CLI commands against a single DragonWave node or multiple DragonWave nodes. The Merlin GUI command execution mode supports both a Single Mode to run against a single node or network element, or can be run in batch command mode in order to run against a list of nodes or network elements.
4.9.4 Merlin GUI Commands in Single Mode
The Merlin GUI can be used in two ways in Single Mode
The user enters the CLI commands directly into the commands window and enters the target IP address in the IP Address field
Create a text file containing CLI commands, and use the “Load CMD File” button to load the commands into the window. The command text file can be created manually using a text editor, or can be created using the Create Cmd File button within the GUI.
The target IP address is entered into the IP Address field.
In both cases, the default username of energetic and default password of wireless is used. If this is not appropriate, the user can enter the correct username and password into the designated fields.
Click on the “Batch Commands” button on the home page.
Using Merlin
Merlin Comprehensive Utilities Tool 3.5.0 Page 33 User Guide - Version 5.0
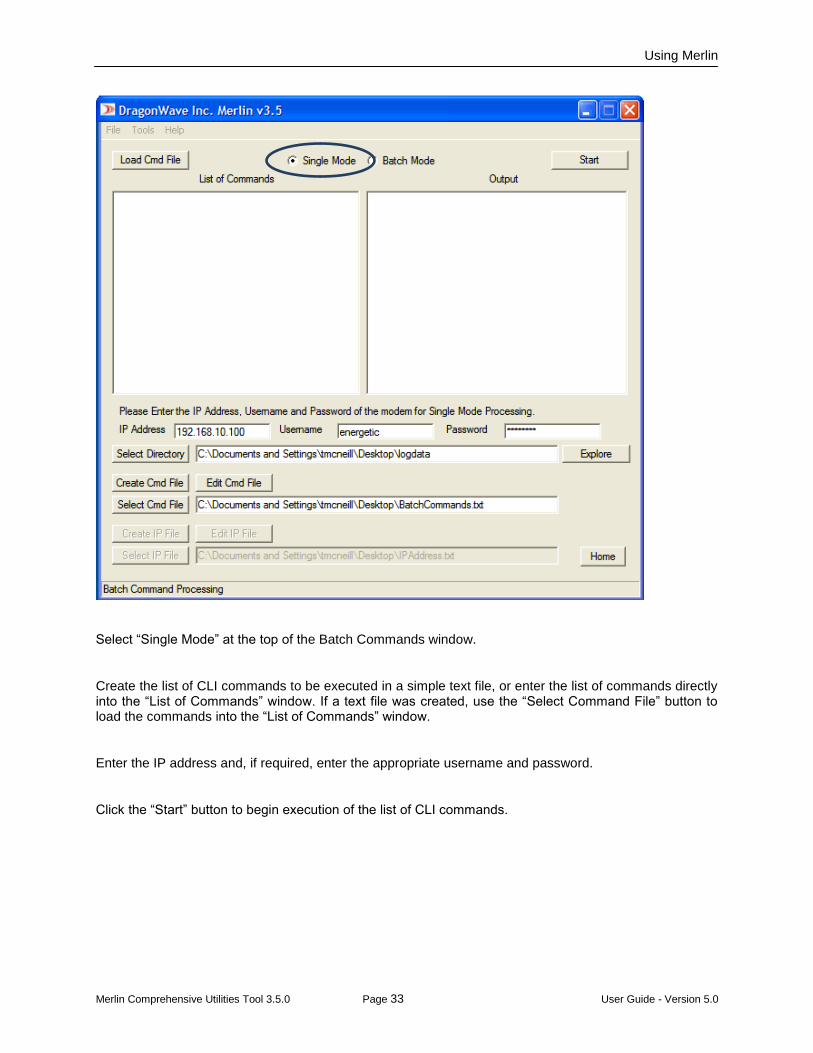
Select “Single Mode” at the top of the Batch Commands window.
Create the list of CLI commands to be executed in a simple text file, or enter the list of commands directly into the “List of Commands” window. If a text file was created, use the “Select Command File” button to load the commands into the “List of Commands” window.
Enter the IP address and, if required, enter the appropriate username and password.
Click the “Start” button to begin execution of the list of CLI commands.
Using Merlin
Merlin Comprehensive Utilities Tool 3.5.0 Page 34 User Guide - Version 5.0
Notes:
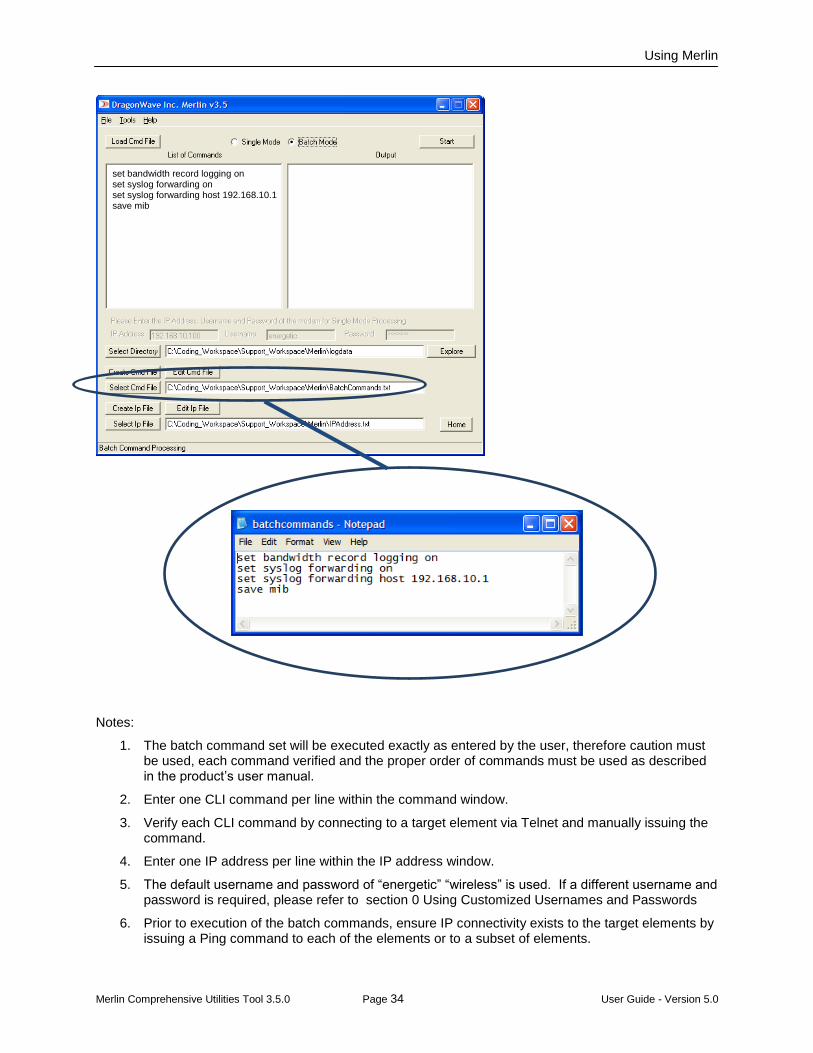
1. The batch command set will be executed exactly as entered by the user, therefore caution must be used, each command verified and the proper order of commands must be used as described in the product’s user manual.
2. Enter one CLI command per line within the command window.
3. Verify each CLI command by connecting to a target element via Telnet and manually issuing the command.
4. Enter one IP address per line within the IP address window.
5. The default username and password of “energetic” “wireless” is used. If a different username and password is required, please refer to section 0 Using Customized Usernames and Passwords
6. Prior to execution of the batch commands, ensure IP connectivity exists to the target elements by issuing a Ping command to each of the elements or to a subset of elements.
set bandwidth record logging on set syslog forwarding on set syslog forwarding host 192.168.10.1 save mib
Using Merlin
Merlin Comprehensive Utilities Tool 3.5.0 Page 35 User Guide - Version 5.0
4.9.5 Merlin GUI Commands in Batch Mode
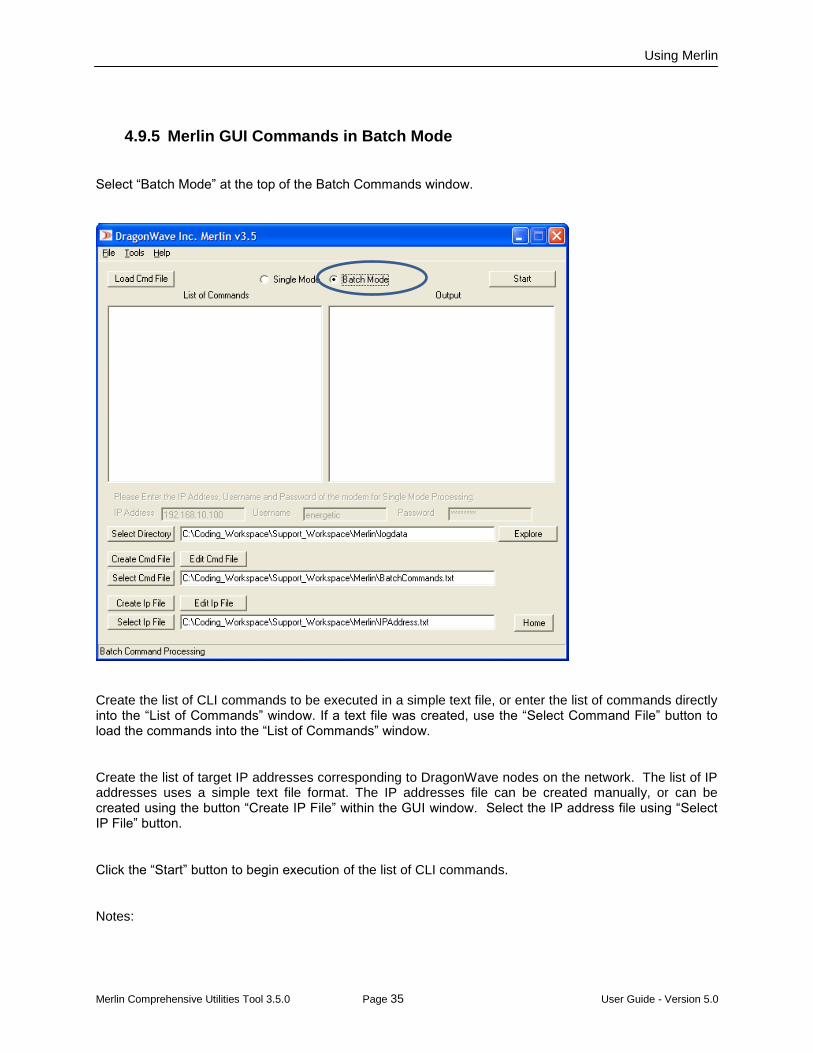
Select “Batch Mode” at the top of the Batch Commands window.
Create the list of CLI commands to be executed in a simple text file, or enter the list of commands directly into the “List of Commands” window. If a text file was created, use the “Select Command File” button to load the commands into the “List of Commands” window.
Create the list of target IP addresses corresponding to DragonWave nodes on the network. The list of IP addresses uses a simple text file format. The IP addresses file can be created manually, or can be created using the button “Create IP File” within the GUI window. Select the IP address file using “Select IP File” button.
Click the “Start” button to begin execution of the list of CLI commands.
Notes:
Using Merlin
Merlin Comprehensive Utilities Tool 3.5.0 Page 36 User Guide - Version 5.0
1. The batch command set will be executed exactly as entered by the user, therefore caution must be used, each command verified and the proper order of commands must be used as described in the product’s user manual.
2. Enter one CLI command per line within the command window.
3. Verify each CLI command by connecting to a target element via Telnet and manually issuing the command.
4. Enter one IP address per line within the IP address text file.
5. The default username and password of “energetic” “wireless” is used. If a different username and password is required, please refer to section 0 Using Customized Usernames and Passwords
4.9.6 Results Output File
The results, or system response, from the execution of the commands will be written into a text file, one per IP address. The CLI command which was issued along with the response will be written to the file. For example, if the command “get programmed frequency” were issued, then the response written to the results output file would be:
get programmed frequency
Index TX RF RX RF
C1 21225000 22425000All Frequency in KHz
The text file will exist in the directory in which Merlin.exe was executed. The name format is as follows:
<ipaddress>-<date time year>.CMD.Output.txt
For example:
192.168.255.30 - Mon Oct 18 11.45.27 2010.CMD.Output.txt
Using Merlin
Merlin Comprehensive Utilities Tool 3.5.0 Page 37 User Guide - Version 5.0
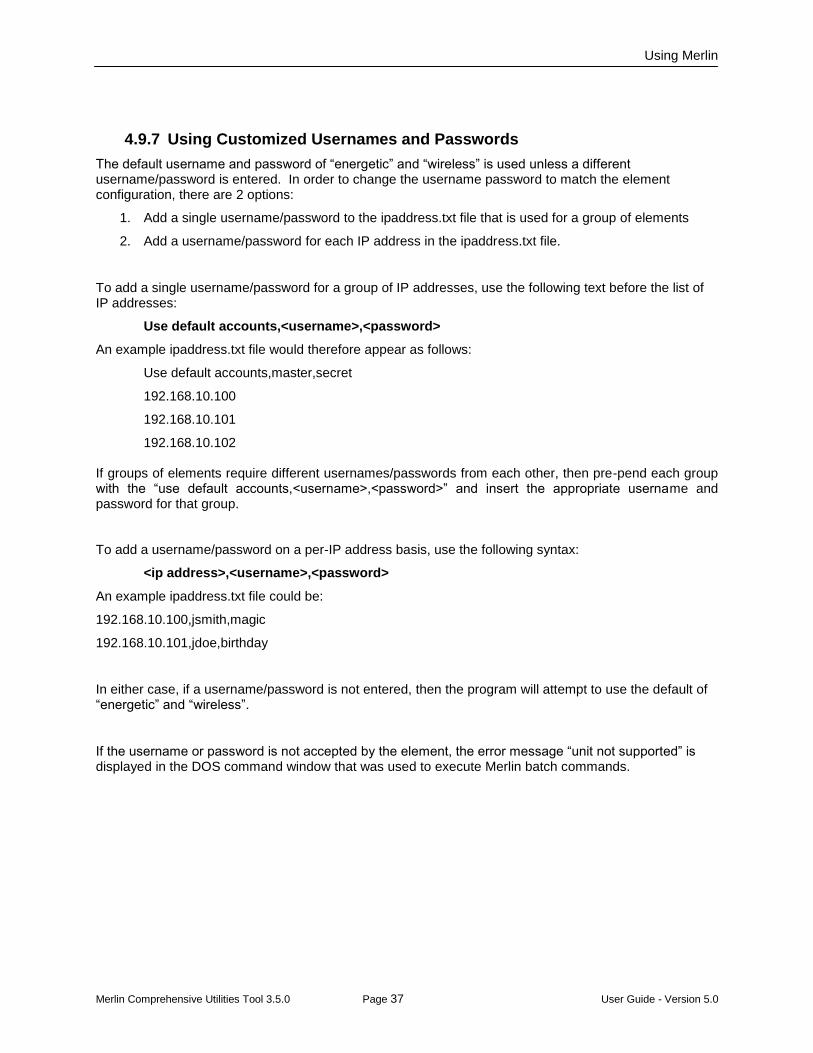
4.9.7 Using Customized Usernames and Passwords
The default username and password of “energetic” and “wireless” is used unless a different username/password is entered. In order to change the username password to match the element configuration, there are 2 options:
1. Add a single username/password to the ipaddress.txt file that is used for a group of elements
2. Add a username/password for each IP address in the ipaddress.txt file.
To add a single username/password for a group of IP addresses, use the following text before the list of IP addresses:
Use default accounts,<username>,<password>
An example ipaddress.txt file would therefore appear as follows:
Use default accounts,master,secret
192.168.10.100
192.168.10.101
192.168.10.102 If groups of elements require different usernames/passwords from each other, then pre-pend each group with the “use default accounts,<username>,<password>” and insert the appropriate username and password for that group. To add a username/password on a per-IP address basis, use the following syntax:
<ip address>,<username>,<password>
An example ipaddress.txt file could be:
192.168.10.100,jsmith,magic
192.168.10.101,jdoe,birthday
In either case, if a username/password is not entered, then the program will attempt to use the default of “energetic” and “wireless”.
If the username or password is not accepted by the element, the error message “unit not supported” is displayed in the DOS command window that was used to execute Merlin batch commands.
Appendix A
Merlin Comprehensive Utilities Tool 3.5.0 Page 38 User Guide - Version 5.0
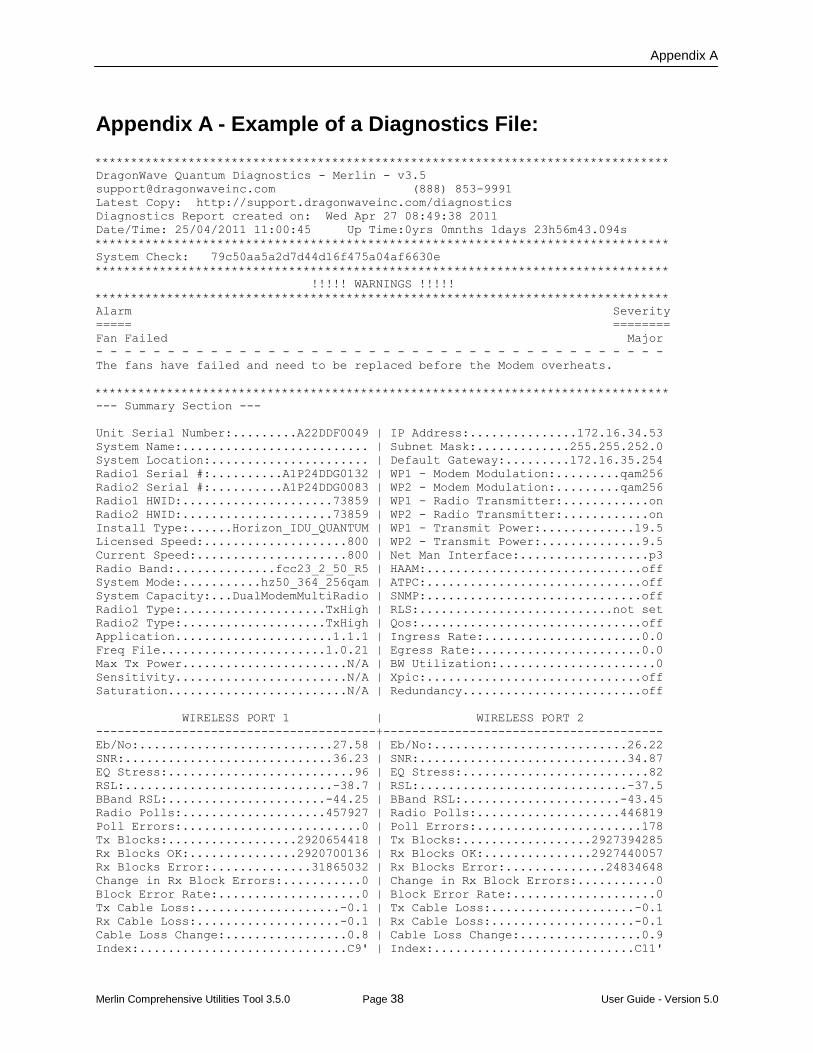
Appendix A - Example of a Diagnostics File: ********************************************************************************
DragonWave Quantum Diagnostics - Merlin - v3.5
[email protected] (888) 853-9991
Latest Copy: http://support.dragonwaveinc.com/diagnostics
Diagnostics Report created on: Wed Apr 27 08:49:38 2011
Date/Time: 25/04/2011 11:00:45 Up Time:0yrs 0mnths 1days 23h56m43.094s
********************************************************************************
System Check: 79c50aa5a2d7d44d16f475a04af6630e
********************************************************************************
!!!!! WARNINGS !!!!!
********************************************************************************
Alarm Severity
===== ========
Fan Failed Major
- - - - - - - - - - - - - - - - - - - - - - - - - - - - - - - - - - - - - - - -
The fans have failed and need to be replaced before the Modem overheats.
********************************************************************************
--- Summary Section ---
Unit Serial Number:.........A22DDF0049 | IP Address:...............172.16.34.53
System Name:.......................... | Subnet Mask:.............255.255.252.0
System Location:...................... | Default Gateway:.........172.16.35.254
Radio1 Serial #:..........A1P24DDG0132 | WP1 - Modem Modulation:.........qam256
Radio2 Serial #:..........A1P24DDG0083 | WP2 - Modem Modulation:.........qam256
Radio1 HWID:.....................73859 | WP1 - Radio Transmitter:............on
Radio2 HWID:.....................73859 | WP2 - Radio Transmitter:............on
Install Type:......Horizon_IDU_QUANTUM | WP1 - Transmit Power:.............19.5
Licensed Speed:....................800 | WP2 - Transmit Power:..............9.5
Current Speed:.....................800 | Net Man Interface:..................p3
Radio Band:..............fcc23_2_50_R5 | HAAM:..............................off
System Mode:...........hz50_364_256qam | ATPC:..............................off
System Capacity:...DualModemMultiRadio | SNMP:..............................off
Radio1 Type:....................TxHigh | RLS:...........................not set
Radio2 Type:....................TxHigh | Qos:...............................off
Application......................1.1.1 | Ingress Rate:......................0.0
Freq File.......................1.0.21 | Egress Rate:.......................0.0
Max Tx Power.......................N/A | BW Utilization:......................0
Sensitivity........................N/A | Xpic:..............................off
Saturation.........................N/A | Redundancy.........................off
WIRELESS PORT 1 | WIRELESS PORT 2
---------------------------------------+---------------------------------------
Eb/No:...........................27.58 | Eb/No:...........................26.22
SNR:.............................36.23 | SNR:.............................34.87
EQ Stress:..........................96 | EQ Stress:..........................82
RSL:.............................-38.7 | RSL:.............................-37.5
BBand RSL:......................-44.25 | BBand RSL:......................-43.45
Radio Polls:....................457927 | Radio Polls:....................446819
Poll Errors:.........................0 | Poll Errors:.......................178
Tx Blocks:..................2920654418 | Tx Blocks:..................2927394285
Rx Blocks OK:...............2920700136 | Rx Blocks OK:...............2927440057
Rx Blocks Error:..............31865032 | Rx Blocks Error:..............24834648
Change in Rx Block Errors:...........0 | Change in Rx Block Errors:...........0
Block Error Rate:....................0 | Block Error Rate:....................0
Tx Cable Loss:....................-0.1 | Tx Cable Loss:....................-0.1
Rx Cable Loss:....................-0.1 | Rx Cable Loss:....................-0.1
Cable Loss Change:.................0.8 | Cable Loss Change:.................0.9
Index:.............................C9' | Index:............................C11'
Appendix A
Merlin Comprehensive Utilities Tool 3.5.0 Page 39 User Guide - Version 5.0
TX IF:..........................550000 | TX IF:..........................550000
RX IF:.........................1875000 | RX IF:.........................1875000
TX RF:........................22825000 | TX RF:........................22925000
RX RF:........................21625000 | RX RF:........................21725000
Queue Frames In | Queue Discards | Aggregated Wireless Port
Qc:............N/A | Qc:...........N/A | Tx Frames:...........................0
Q1:..............0 | Q1:.............0 | Rx Frames OK:........................0
Q2:..............0 | Q2:.............0 | Rx Frames Errors:....................0
Q3:..............0 | Q3:.............0 | Rx Queue Discards:.................127
Q4:..............0 | Q4:.............0 |
Aggregation Ports | Rx Frames OK:........................0
Tx Frames:...........................0 | Rx Bytes OK:.........................0
Tx Bytes:............................0 | Rx Frames Error:.....................0
IPG Status | LAG Status
Name Status Port List | Name Status Port List
---- ------- ------------------ | ---- ------- ------------------
ipg1 enable p5,dp1 | lag1 disable
ipg2 enable p6,dp2 | lag2 disable
ipg3 enable p7,dp3 | lag3 disable
ipg4 enable p8,dp4 |
ipg5 enable p3 |
Enet Port ID |p1 p2 p3 p4 p5 p6 p7 p8
----------------+--------------------------------------------------------------
Link Status |down down up down down down down down
Port Media |invalid invalid copper copper copper copper copper copper
Auto Negotiation|on on on on on on off on
Duplex Status |full full full half half half full half
Speed |none none 1000 none none none 10 none
Mdix Status |normal normal normal normal normal normal xover normal
Pause Frm Enable|both on both on off both on both on both on both on both on
Max Frm Size |1600 1600 1600 1600 1600 1600 9612 1600
Vlan Access Port Status:
VlanId Port List
------ ------------------------------
1 p1, p2, p3, p4, p5, p6
Vlan Trunk Port Status:
Port Default Vlan Allowed Vlan List
---- ------------ ---------------------------------------------
p7 1 2-4095
p8 1 2-4095
Licensed Feature Group | Is Licensed Upgrade Count Downgrade Count
XPIC | Yes 0 0
BAC | Yes 0 0
RLS,ECFM(802.1ag/Y.1731) | Yes 0 0
HAAM | Yes 0 0
DualWirelessPorts | Yes 0 N/A
Performance Log Analysis
Mean Mode Min Max | RSL >= ±6dB: 0 | Logging Interval: 0:0:10
RSL -38 -39 -39 -37 | diff > -10dB: 0 |
SNR 36 35 35 36 | from > -20dB: 0 | RSL below -80 dB: 0
Eb/NO 27 26 26 28 | Avg. > -30dB: 0 | # of logs used: 150
Event Log Analysis
Endpoint Restarts: 2
Count | Log entry
1 | port 1: Modem transmitter loss of sync alarm

Appendix A
Merlin Comprehensive Utilities Tool 3.5.0 Page 40 User Guide - Version 5.0
2 | Modem muted
2 | port 2: Modem receiver loss of signal alarm
3 | port 1: Modem receiver loss of signal alarm
2 | port 2: Modem SNR below threshold alarm
********************************************************************************
Brief Mode Enabled
Appendix A
Merlin Comprehensive Utilities Tool 3.5.0 Page 41 User Guide - Version 5.0
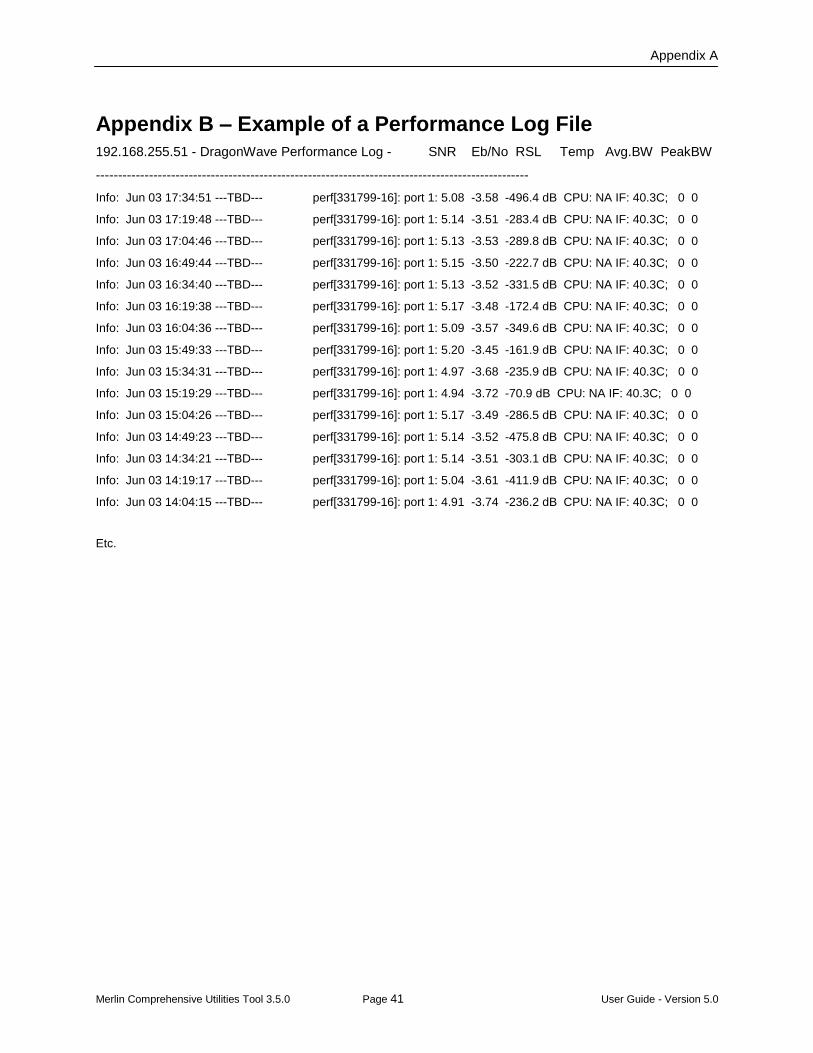
Appendix B – Example of a Performance Log File
192.168.255.51 - DragonWave Performance Log - SNR Eb/No RSL Temp Avg.BW PeakBW
--------------------------------------------------------------------------------------------------
Info: Jun 03 17:34:51 ---TBD--- perf[331799-16]: port 1: 5.08 -3.58 -496.4 dB CPU: NA IF: 40.3C; 0 0
Info: Jun 03 17:19:48 ---TBD--- perf[331799-16]: port 1: 5.14 -3.51 -283.4 dB CPU: NA IF: 40.3C; 0 0
Info: Jun 03 17:04:46 ---TBD--- perf[331799-16]: port 1: 5.13 -3.53 -289.8 dB CPU: NA IF: 40.3C; 0 0
Info: Jun 03 16:49:44 ---TBD--- perf[331799-16]: port 1: 5.15 -3.50 -222.7 dB CPU: NA IF: 40.3C; 0 0
Info: Jun 03 16:34:40 ---TBD--- perf[331799-16]: port 1: 5.13 -3.52 -331.5 dB CPU: NA IF: 40.3C; 0 0
Info: Jun 03 16:19:38 ---TBD--- perf[331799-16]: port 1: 5.17 -3.48 -172.4 dB CPU: NA IF: 40.3C; 0 0
Info: Jun 03 16:04:36 ---TBD--- perf[331799-16]: port 1: 5.09 -3.57 -349.6 dB CPU: NA IF: 40.3C; 0 0
Info: Jun 03 15:49:33 ---TBD--- perf[331799-16]: port 1: 5.20 -3.45 -161.9 dB CPU: NA IF: 40.3C; 0 0
Info: Jun 03 15:34:31 ---TBD--- perf[331799-16]: port 1: 4.97 -3.68 -235.9 dB CPU: NA IF: 40.3C; 0 0
Info: Jun 03 15:19:29 ---TBD--- perf[331799-16]: port 1: 4.94 -3.72 -70.9 dB CPU: NA IF: 40.3C; 0 0
Info: Jun 03 15:04:26 ---TBD--- perf[331799-16]: port 1: 5.17 -3.49 -286.5 dB CPU: NA IF: 40.3C; 0 0
Info: Jun 03 14:49:23 ---TBD--- perf[331799-16]: port 1: 5.14 -3.52 -475.8 dB CPU: NA IF: 40.3C; 0 0
Info: Jun 03 14:34:21 ---TBD--- perf[331799-16]: port 1: 5.14 -3.51 -303.1 dB CPU: NA IF: 40.3C; 0 0
Info: Jun 03 14:19:17 ---TBD--- perf[331799-16]: port 1: 5.04 -3.61 -411.9 dB CPU: NA IF: 40.3C; 0 0
Info: Jun 03 14:04:15 ---TBD--- perf[331799-16]: port 1: 4.91 -3.74 -236.2 dB CPU: NA IF: 40.3C; 0 0 Etc.

Appendix A
Merlin Comprehensive Utilities Tool 3.5.0 Page 42 User Guide - Version 5.0
This page left blank intentionally
Appendix A
Merlin Comprehensive Utilities Tool 3.5.0 Page 43 User Guide - Version 5.0
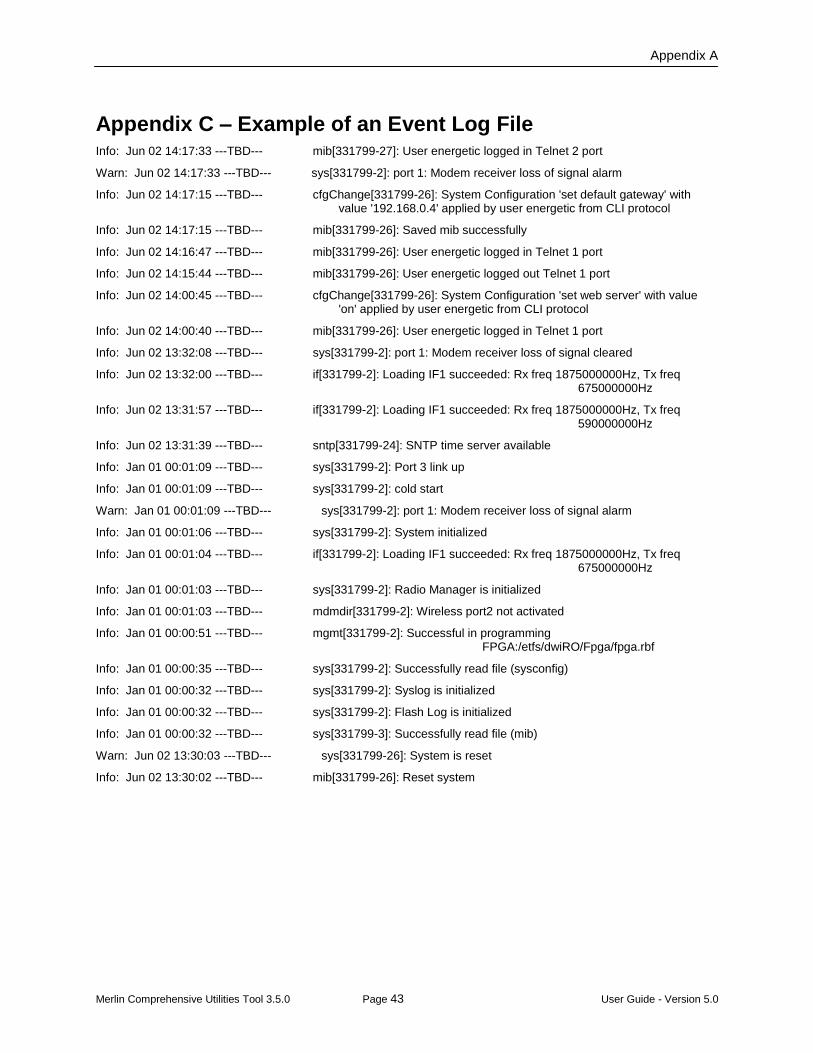
Appendix C – Example of an Event Log File Info: Jun 02 14:17:33 ---TBD--- mib[331799-27]: User energetic logged in Telnet 2 port
Warn: Jun 02 14:17:33 ---TBD--- sys[331799-2]: port 1: Modem receiver loss of signal alarm
Info: Jun 02 14:17:15 ---TBD--- cfgChange[331799-26]: System Configuration 'set default gateway' with value '192.168.0.4' applied by user energetic from CLI protocol
Info: Jun 02 14:17:15 ---TBD--- mib[331799-26]: Saved mib successfully
Info: Jun 02 14:16:47 ---TBD--- mib[331799-26]: User energetic logged in Telnet 1 port
Info: Jun 02 14:15:44 ---TBD--- mib[331799-26]: User energetic logged out Telnet 1 port
Info: Jun 02 14:00:45 ---TBD--- cfgChange[331799-26]: System Configuration 'set web server' with value 'on' applied by user energetic from CLI protocol
Info: Jun 02 14:00:40 ---TBD--- mib[331799-26]: User energetic logged in Telnet 1 port
Info: Jun 02 13:32:08 ---TBD--- sys[331799-2]: port 1: Modem receiver loss of signal cleared
Info: Jun 02 13:32:00 ---TBD--- if[331799-2]: Loading IF1 succeeded: Rx freq 1875000000Hz, Tx freq 675000000Hz
Info: Jun 02 13:31:57 ---TBD--- if[331799-2]: Loading IF1 succeeded: Rx freq 1875000000Hz, Tx freq 590000000Hz
Info: Jun 02 13:31:39 ---TBD--- sntp[331799-24]: SNTP time server available
Info: Jan 01 00:01:09 ---TBD--- sys[331799-2]: Port 3 link up
Info: Jan 01 00:01:09 ---TBD--- sys[331799-2]: cold start
Warn: Jan 01 00:01:09 ---TBD--- sys[331799-2]: port 1: Modem receiver loss of signal alarm
Info: Jan 01 00:01:06 ---TBD--- sys[331799-2]: System initialized
Info: Jan 01 00:01:04 ---TBD--- if[331799-2]: Loading IF1 succeeded: Rx freq 1875000000Hz, Tx freq 675000000Hz
Info: Jan 01 00:01:03 ---TBD--- sys[331799-2]: Radio Manager is initialized
Info: Jan 01 00:01:03 ---TBD--- mdmdir[331799-2]: Wireless port2 not activated
Info: Jan 01 00:00:51 ---TBD--- mgmt[331799-2]: Successful in programming FPGA:/etfs/dwiRO/Fpga/fpga.rbf
Info: Jan 01 00:00:35 ---TBD--- sys[331799-2]: Successfully read file (sysconfig)
Info: Jan 01 00:00:32 ---TBD--- sys[331799-2]: Syslog is initialized
Info: Jan 01 00:00:32 ---TBD--- sys[331799-2]: Flash Log is initialized
Info: Jan 01 00:00:32 ---TBD--- sys[331799-3]: Successfully read file (mib)
Warn: Jun 02 13:30:03 ---TBD--- sys[331799-26]: System is reset
Info: Jun 02 13:30:02 ---TBD--- mib[331799-26]: Reset system
Appendix A
Merlin Comprehensive Utilities Tool 3.5.0 Page 44 User Guide - Version 5.0
Copyright © 2000-2011 DragonWave Inc. Printed in Canada. All rights reserved. Merlin Utilities User Guide, 83-000041-01-05-00 Visit us on the Internet at: http://www.dragonwaveinc.com/ Latest Version of Merlin available at: http://support.dragonwaveinc.com/diagnostics