method of test for sand equivalent...3. water. use distilled or deionized water for the normal...
TRANSCRIPT

- 1 -
California Test 217 June 2008
METHOD OF TEST FOR SAND EQUIVALENT
STATE OF CALIFORNIA — BUSINESS, TRANSPORTATION AND HOUSING AGENCY
DEPARTMENT OF TRANSPORTATIONDIVISION OF ENGINEERING SERVICES Transportation Laboratory 5900 Folsom Boulevard Sacramento, California 95819-4612
CAUTION: Prior to handling test materials, performing equipment setups, and/or conducting this method, testers are required to read “SAFETY AND HEALTH” in Section I of this method. It is the responsibility of the user of this method to consult and use departmental safety and health practices and determine the applicability ofregulatory limitations before any testing is performed.
A. SCOPE
The sand equivalent test provides ameasure of the relative proportions ofdetrimental fine dust or clay-likematerial in soil or fine aggregates.
B. APPARATUS
The following equipment is required toperform this test. Detailed descriptionsand specifications are included asnecessary to assure standardization.Items bearing an Office of Purchasingand Warehousing (OPW) catalog numberare available to California state agenciesfrom the Department of Transportation,Office of Purchasing and Warehousing.Detailed plans are available for theseitems bearing a TransportationLaboratory (TL) drawing number.
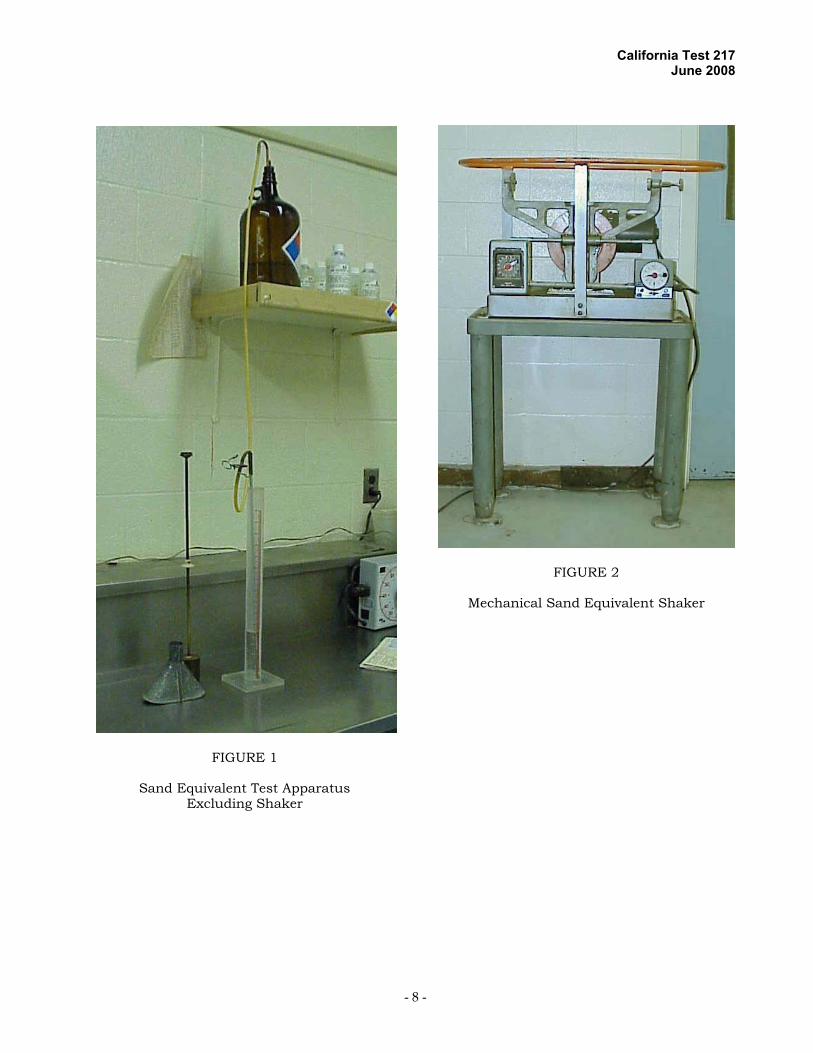
1. Sand Equivalent Test Apparatus(Figure 1).
a. A graduated plastic cylinder,rubber stopper, irrigator tube,weighted foot assembly, andsiphon assembly, all conformingto the specifications anddimensions shown in TL drawingnumber C 218 (Figure 3). A glassor plastic container with cover,having a minimum capacity ofone gallon, and fitted with thesiphon assembly or a discharge
tube near the bottom, shall be used to dispense the workingcalcium chloride solution. Thecontainer shall be placed on a shelf or suspended above the work area in such a manner that the level of the solution ismaintained between 36 and46 inches above the worksurface.
2. Mechanical Sand Equivalent Shaker(Figure 2).
a. A mechanical device designed tohold a graduated plastic cylinderin a horizontal position whilesubjecting it to a reciprocatingmotion parallel to its length.
The motion shall be providedthrough a “scotch-yoke”mechanism, which provides astroke length of 8 ± 0.05 inches.The device shall operate at aspeed of 175 ± 2 complete cyclesper minute. Prior to use, theshaker shall be fastened securelyto a firm and level mount.
b. TL drawing number D-256.
3. (Alternate) Manually-Operated SandEquivalent Shaker (Figure 4).

California Test 217 June 2008
- 2 -
a. A manually actuated devicedesigned to hold a graduatedplastic cylinder in a horizontal position while subjecting it to areciprocating motion parallel to its length. The device shall consist of a carriage mounted on top of two spring steel straps.Motion shall be provided bypushing the carriage in onedirection and allowing the spring action of the straps to move it inthe opposite direction. Theshaker may be held stable byhand, but it is recommended thatit be fastened securely to a firm and level mount if a largenumber of tests are to be run.
4. Measuring tin: A 3 oz. tin
approximately 2¼ inches in diameter having a capacity of 85 ± 5 mL.
5. Rubber stopper: A stopper to fit the
plastic cylinder. 6. Funnel: A wide-mouth funnel
suitable for directing the testspecimen into the plastic cylinder.
7. Oven: A drying oven set to operate at
230˚ ± 9˚F. 8. Timer: A clock or watch reading in
minutes and seconds. C. MATERIALS
1. Stock calcium chloride solution.
a. “Sand Equivalent Stock Solution” OPW catalog number 6810-0090-3.
b. May be prepared from the
following:
454 g (1 lb.) technical gradeanhydrous calcium chloride.
2050 g (1640 mL) USP glycerin (95 %)
Dissolve the calcium chloride in ½ gallon of distilled or deionized
water. Cool the solution to room temperature, then filter itthrough Whatman No. 2V orequivalent filter paper. Add theglycerin to the filtered solution, mix well, and dilute to 1 gallon with distilled or deionized water.
2. Working calcium chloride solution.
a. Prepare the working calcium
chloride solution by diluting85 ± 5 mL of stock solution withwater to obtain 1 gallon ofsolution. Thoroughly mix thesolution.
b. Working solution, which is more
than two weeks old, shall bediscarded.
c. The mixing and storage
container(s) shall be thoroughly rinsed prior to mixing a fresh batch of solution.
d. Fresh solution shall not be added
to old solution regardless of age.
3. Water.
Use distilled or deionized water for the normal performance of this test, including the preparation of the working calcium chloride solution. If it is determined, however, that the local tap water is of such quality that it does not affect the test results, it is permissible to use it in lieu of distilled or deionized water.
D. CONTROL
1. The temperature of the workingsolution should be maintained at72˚ ± 5˚F during the performance of this test. If this is impractical, it willbe necessary to establishtemperature correction factors foreach material being tested.Establish correction factors by thefollowing procedures:

California Test 217 June 2008
- 3 -
a. Prepare a minimum of 12 testspecimens in accordance withSection E of this test procedure.
b. Perform tests in groups of three,
using working solution atdifferent temperatures. Preparesolutions near the upper and lower expected temperaturerange and at approximately 10˚F increments through the range should be used. The temperature of the solution used with at least one group must be 72˚ ± 5˚F.
c. Establish a correction curve by
plotting the temperature of the solution against the average test value at that temperature.
d. This correction curve may be
used to determine the correction that must be applied to obtain a test value corrected to 72˚F.
e. Results for individual specimens
which meet the minimum sand equivalent specification when the temperature of the working solution is below therecommended range do not require correction provided they do not reduce the moving average results below specifiedminimums.
Example:
TestValue
Temperature Rangeof Solution
45°F 55°F 65°F 75°F1 52 55 57 592 50 55 58 603 51 58 59 60
Average 51 56 58 60
A test performed on this material when the temperature of the solution was 50˚F would have to be corrected by +6 points.
2. The workbench or table shall be a
flat level surface and shall be free of vibrations.
E. PREPARATION OF TEST SPECIMENS
1. Prepare sand equivalent testspecimens from the passing No. 4sieve portion of the material to be tested after it has been processed according to the proceduresprescribed in California Test 201,except that reclaimed aggregate containing traces of asphalt or asphalt concrete shall not be oven dried at temperatures greater than 100˚F.
a. Aggregates for use in Sacked
Concrete Slope Protection shall be prepared as prescribed inCalifornia Test 227. Since acleanness test is to be performed on the coarse aggregate portion of this material, do not remove thefines from the material retained on the No. 4 sieve.
2. Split or quarter the passing No. 4
sieve material to provide a testspecimen which fills the 85 mLmeasuring tin to level full. Theaccuracy of splitting or quarteringrepresentative portions of a materialdecreases as the sample size isreduced. To minimize the effects ofadjusting the size of the relatively

California Test 217 June 2008
- 4 -
small sand equivalent test sample,the following procedure should befollowed:
a. Determine the exact amount
required to provide four test specimens by dipping four measuring tins full of the material and determining either the combined volume or mass. When filling the measuring tin,tap the bottom edge of the tin with a hard object or on a hard surface to consolidate thematerial. Fill each measure toslightly rounded above the brim and then strike off to level full using a straightedge. After determining the combinedamount, return the material to the sample.
b. Carefully split or quarter the
predetermined amount ofmaterial necessary to providefour test specimens.
c. Split or quarter the premeasured
material to obtain a testspecimen. Two successive splits will provide a specimen of theproper size. Do not makeadjustments to the specimen size by adding or removing material at this time.
3. Dry the prepared test specimen to
constant mass at 230˚ ± 9˚F and cool to room temperature.
a. When testing reclaimed
aggregates containing traces of asphalt or asphalt concrete, the oven-drying temperature shall not exceed 100˚F.
b. Aggregates, which are sampled
immediately after being dried in an asphalt plant drier may be tested without additional drying provided they are not exposed to dampness prior to testing. Aggregates that are not tested on the same day they are sampled shall be oven-dried prior to
testing unless they have beenstored in moisture-proofcontainers.
c. As a timesaving expedient in
routine work, it is permissible to test materials in an air-dried condition. Air-dried material, which does not meet minimum requirements, shall be retested in an oven-dried condition and the results of the oven-dried sample will control.
F. TEST PROCEDURE
1. Read and record the temperature of the working solution.
a. In a temperature-controlled work
area where the room temperature remains constant within ± 5°F over a 24 hr period, the average room temperature may berecorded in lieu of the solution temperature.
2. Fill the plastic cylinder to 4
± 0.1 inches with working calcium chloride solution.
3. Pour the prepared test specimen into
the plastic cylinder (see Figure 5).
a. Use the funnel to avoid spillage. b. Release air bubbles and promote
thorough wetting by bumping the base of the cylinder against a firm object while the test specimen is being poured into the cylinder or by tapping the cylinder sharply on the heel of the hand several times after the test specimen has been poured in.
c. Allow the wetted material to
stand undisturbed for 10 ± 1 min.
4. Immediately following the 10 minwetting period, agitate the testspecimen to break up clay lumpsand remove coatings.

California Test 217 June 2008
- 5 -
a. At the end of the 10 min soaking period, stopper the cylinder, then loosen the material from the bottom by shaking the cylinder while holding it in a partially inverted position. Shake the cylinder just enough to loosen the material. Excessive agitation may affect the test results.
b. Secure the cylinder in one of the
specified shakers and agitateaccording to (1) or (2) below:
(1) Mechanical Shaker Method
(a) Set the timer and allow the machine to operate for 45 ± 1 s.
(2) Manual Shaker Method
(a) Set the stroke counter to zero.
(b) Stand directly in front of
the shaker and place the right hand against theupper portion of the right hand spring steel strap(see Figure 6).
(c) Use the fingers and wrist
to apply enough force to push the carriage to the left until the pointer lines up with the stroke limit marker painted on the backboard.
(d) Allow the spring action of
the straps to move the carriage in the oppositedirection withoutassistance or hindrance tocomplete the cycle.
(e) Once the shaker is in
motion, maintain asmooth oscillating motion by gently applyingpressure to the right hand strap during the thrust portion of each cycle.
(f) The center of the stroke limit marker is positioned to provide the proper stroke length and its width indicates themaximum allowable limitsof variation. Propershaking action isaccomplished only when the tip of the pointer reverses direction within the marker limits.
(g) Continue the shaking
action for 100 strokes.
c. At the end of the shaking period remove the cylinder from the shaker, and set it upright on the workbench.
5. Immediately irrigate the test
specimen with working calcium chloride solution to flush the clay- size particles from the sand.
a. Insert the irrigator tube in the
cylinder, start the flow of working calcium chloride solution, and rinse the material from the side of the cylinder as the irrigator is lowered.
b. With the cylinder remaining in an
upright position and the solution flowing from the tip of the irrigator, apply a twisting action to the irrigator and force it to the bottom of the cylinder (see Figure 7). The flow of solution will flush the clay-size particles upward and into suspension. Withdraw the irrigator from the sample as necessary to change position and again force it to the bottom. The most effective technique for penetrating the test sample with the irrigator is to hold the irrigator between the palms of both hands and rotate it by rubbing the hands back and forth while applying a downward pressure.

California Test 217 June 2008
- 6 -
c. Continue twisting and forcing the irrigator to the bottom of the cylinder until the fines have been flushed from all areas of the sample. Rotate the cylinder with each penetration of the irrigator and visually inspect the test specimen for pockets of fine material.
d. When the solution reaches the
15 inch mark in the cylinder, slowly withdraw the irrigator without shutting off the flow so that the liquid level is maintained at about 15 inches. Regulate the flow just before the irrigator is entirely withdrawn and adjust the final level to 15 inches.
6. Immediately place the cylinder on a
workbench or table free of vibrations, and allow the cylinder and contentsto stand undisturbed for 20 min± 15 s from the time the irrigation iscompleted.
7. Determine the “clay reading.”
a. At the end of the 20 min period, read and record the level of the top of the sediment column. Thisis the clay reading (see Figure 8).
b. When the clay reading fallsbetween 0.1 inch graduations,record the level of the highergraduation.
c. If a clearly defined line of
demarcation does not formbetween the sediment and the liquid above it in the specified20 min period, allow the cylinder to stand undisturbed until the clear line of demarcation does form. Then immediately read andrecord the time and height of thecolumn. If tap water was used,retest an untested portion of the sample using distilled or deionized water.
d. If the liquid immediately above
the line of demarcation is still darkly clouded at the end of
20 min, and the demarcationline, although distinct, appears to be in the sediment column itself,read and record the level of this line at the end of the specified20 min period. If tap water wasused, retest an untested portion of the sample using distilled or deionized water.
8. Determine the “sand reading.”
a. After the clay reading has been
taken, gently lower the weighted foot assembly into the cylinder until it comes to rest on the sand. Do not allow the sand reading indicator to hit the mouth of the cylinder as the assembly is being lowered.
b. As the weighted foot assembly
comes to rest on the sand, tip theassembly toward the graduationon the cylinder so that theposition of the sand reading indicator is visible. Take care notto press down on the assembly.
c. Read the level of the top edge of
the indicator (see Figure 8). d. Subtract 10 inches from the
observed reading. This is thesand reading.
e. When the sand reading fallsbetween 0.1 inch graduations,record the level of the highergraduation.
G. CALCULATIONS AND REPORTING
1. Calculate the sand equivalent to the nearest 0.1 using the following formula:
SE = (Sand reading/Clay reading) x 100
2. If the calculated sand equivalent is
not a whole number, report it as the next higher whole number.

California Test 217 June 2008
- 7 -
H. PRECAUTIONS
1. Perform the test in a location free of vibrations, because vibrations may cause the suspended material to settle at a greater rate than normal.
2. Do not expose the plastic cylinders to
direct sunlight any more than is necessary.
3. Occasionally a fungus growth may
develop in the working calciumchloride solution. This fungus caneasily be seen as a slimy substance in the solution or as a mold growingon the inside of the container. When this occurs, discard the remaining solution, and clean the growth from the container and from the inside of the flexible tubing and irrigator by the following procedure:
a. Prepare a cleaning solvent by
diluting sodium hypochlorite(household bleach or equivalent) with an equal quantity of water.
b. Fill the solution container with
the prepared cleaning solvent.Allow about a liter of the cleaning solvent to flow through thesiphon assembly, and irrigatortube; then place the pinch clamp on the end of the tubing to cut off the flow of solvent and to hold thesolvent in the tube. Refill thecontainer, and allow it to stand overnight.
c. After soaking, allow the cleaning
solvent to flow out through the siphon assembly and irrigator tube.
d. Remove the siphon assembly
from the solution container, and rinse both with clear water. The irrigator tube and siphonassembly can be rinsed easily by attaching a hose between the tip of the irrigator tube and water faucet and backwashing freshwater through the tube.
4. At the beginning of each test, visually observe the flow of solution from the irrigator to ensure proper discharge. If the solution is discharged from any point other than the drilled holes,immediately replace the irrigator. Ifthe drilled holes become clogged, remove the obstruction by any method that does not damage the irrigator or change the size or shape of the hole. Dislodging an obstruction with a sharp object should be done only as a last resort and with extreme care.
I. SAFETY AND HEALTH
Soils and aggregates may contain bacteria and/or organisms, which can be harmful to one's health. The wearing of dust masks and protective gloves when handling materials is advised. The use of heat resistant gloves/mitts or potholders to remove samples from the ovens is required. When preparing stock solution, protective eyewear, an approved respirator, protective gloves, and apron shall be worn. The requirements listed for preparing stock solution should be considered for use when mixing working solution and performing the Sand Equivalent test. Prior to handling, testing or disposing of any materials, testers are required to read Caltrans Laboratory Safety Manual: Part A, Section 5.0, Hazards and Employee Exposure; Part B, Sections: 5.0, Safe Laboratory Practices; 6.0, Chemical Procurement Distribution and Storage; and 10.0, Personal Protective Apparel and Equipment; and Part C, Section 1.0; Safe Laboratory Practices. Users of this method do so at their own risk.
REFERENCES:
California Tests 201 and 227
End of Text (California Test 217 contains 11 Pages)
California Test 217 June 2008
- 8 -
FIGURE 1
Sand Equivalent Test Apparatus Excluding Shaker
FIGURE 2
Mechanical Sand Equivalent Shaker

California Test 217 June 2008
- 9 -
FIGURE 3

California Test 217 June 2008
- 10 -
FIGURE 4
Manually Operated Sand Equivalent Shaker (Idaho Shaker)
FIGURE 5

California Test 217 June 2008
- 11 -
FIGURE 6
FIGURE 7
FIGURE 8