microsoft exchange server 2013 power shell cookbook 2nd edition
TRANSCRIPT
Microsoft Exchange Server 2013 PowerShell Cookbook Second Edition
Jonas Andersson Mike Pfeiffer
Chapter No. 10 "Exchange Security"
In this package, you will find: A Biography of the authors of the book
A preview chapter from the book, Chapter NO.10 "Exchange Security"
A synopsis of the book’s content
Information on where to buy this book
About the Authors Jonas Andersson is a devoted person who is constantly developing himself and his skills. He started in the IT business in 2004 and worked at first in a support center where he got his basic knowledge. In 2007 he started his career as a Microsoft infrastructure consultant and from 2008 onwards his focus has been on Microsoft Exchange.
Even though his focus is on Microsoft Exchange, his interests include migrations, backup, storage, and archiving. At the start of 2010, he was employed at a large outsourcing company a messaging specialist, specializing in Microsoft Exchange. His work includes designing, implementing, and developing messaging solutions for enterprise customers.
For More Information: www.packtpub.com/microsoft-exchange-server-2013-powershell-
2e-cookbook/book

His unique knowledge makes him a key figure in large and complex migration projects where he works with design and implementation. Examples of these projects include migrations from the IBM Domino mail platform to Microsoft Exchange 2007/2010 and Office 365, using Quest Software with full coexistence between the systems for mail flow, directory synchronization, and free busy lookups.
Apart from his daily job, he was active on TechNet forums, he also writes articles at his blog (http://www.testlabs.se/blog), and Twitter and other social media.
As a reward for the work in the community he was been awarded the Microsoft Community Contributor Award both 2011 and 2012.
Mike Pfeiffer has been in the IT field for 15 years, and has been working on Exchange for the majority of that time. He is a Microsoft Certified Master and a former Microsoft Exchange MVP. These days he works at Microsoft as a Premier Field Engineer where he helps customers deploy and maintain Microsoft Exchange and Lync Server solutions. You can find his writings online at mikepfeiffer.net, where he occasionally blogs about Exchange, Lync, and PowerShell-related topics.
For More Information: www.packtpub.com/microsoft-exchange-server-2013-powershell-
2e-cookbook/book
Microsoft Exchange Server 2013 PowerShell Cookbook Second Edition This book is full of immediately usable task-based recipes for managing and maintaining your Microsoft Exchange 2013 environment with Windows PowerShell 3.0 and the Exchange Management Shell. The focus of this book is to show you how to automate routine tasks and solve common problems. While the Exchange Management Shell literally provides hundreds of cmdlets, we will not cover every single one of them individually. Instead, we'll focus on the common, real world scenarios. You'll be able to leverage these recipes right away, allowing you to get the job done quickly, and the techniques that you'll learn will allow you to write your own amazing one-liners and scripts with ease.
What This Book Covers Chapter 1, PowerShell Key Concepts, introduces several PowerShell core concepts such as command syntax and parameters, working with the pipeline, and flow control with loops and conditional logic. The topics covered in this chapter lay the foundation for the remaining code samples in each chapter.
Chapter 2, Exchange Management Shell Command Tasks, covers day-to-day tasks and general techniques for managing Exchange from the command line. The topics include configuring manual remote shell connections, exporting reports to external files, sending e-mail messages from scripts, and scheduling scripts to run with the Task Scheduler.
Chapter 3, Managing Recipients, demonstrates some of the most common recipient-related management tasks, such as creating mailboxes, distribution groups, and contacts. You'll also learn how to manage server-side inbox rules, out of office settings, and import user photos into the Active Directory.
Chapter 4, Managing Mailboxes, shows you how to perform various mailbox management tasks that include moving mailboxes, importing and exporting mailbox data, and the detection and repair of corrupt mailboxes. In addition, you'll learn how to delete and restore items from a mailbox, manage the new public folders, and generate some basic reports.
Chapter 5, Distribution Groups and Address Lists, takes you deeper into distribution group management. The topics include distribution group reporting, distribution group naming policies, and allowing end users to manage distribution group membership. You'll also learn how to create address lists and hierarchal address books.
For More Information: www.packtpub.com/microsoft-exchange-server-2013-powershell-
2e-cookbook/book
Chapter 6, Mailbox Database Management, shows how to set database settings and limits. Report generation for mailbox database size, average mailbox size per database, and backup status is also covered in this chapter.
Chapter 7, Managing Client Access, covers the managing of ActiveSync, OWA, POP, and IMAP. It also covers the configuration of these components in Exchange 2013. We'll also take a look at controlling connections from various clients, including ActiveSync devices.
Chapter 8, Managing Transport Service, explains the various methods used to control mail flow within your Exchange organization. You'll learn how to create, send, and receive connectors, allow application servers to relay mail, and manage transport queues.
Chapter 9, High Availability, covers the implementation and management tasks related to Database Availability Groups (DAGs). Topics include creating DAGs, adding mailbox database copies, and performing maintenance on DAG members. It also covers the new feature called automatic reseed.
Chapter 10, Exchange Security, introduces the new Role Based Access Control (RBAC) permissions model. You'll learn how to create custom RBAC roles for administrators and end users, and also how to manage mailbox permissions and implement SSL certificates.
Chapter 11, Compliance and Audit Logging, covers the new compliance and auditing features included in Exchange 2013. Topics such as archiving mailboxes and discovery search are covered here, as well as administrator and mailbox audit logging.
Chapter 12, Server Monitoring and Troubleshooting, shows you how to monitor and report on service availability and resource utilization using PowerShell core cmdlets and WMI. Event log monitoring and Exchange server role troubleshooting tactics are also covered.
Chapter 13, Scripting with the Exchange Web Services Managed API, introduces advanced scripting topics that leverage Exchange Web Services. In this chapter, you'll learn how to write scripts and functions that go beyond the capabilities of the Exchange Management Shell cmdlets.
Appendix A, Common Shell Information, is a reference for the variables, scripts, and the filtering functions. These references will help you when writing scripts or running interactive.
Appendix B, Query Syntaxes, is a reference for the Advanced Query Syntax (AQS). Here are lots of different examples that can be used in the real world.
For More Information: www.packtpub.com/microsoft-exchange-server-2013-powershell-
2e-cookbook/book

10Exchange Security
In this chapter, we will cover the following:
Granting users full access permissions to mailboxes
Finding users with full access to mailboxes
Sending e-mail messages as another user or group
Working with Role Based Access Control (RBAC)
Creating a custom RBAC role for administrators
Creating a custom RBAC role for end users
Troubleshooting Role Based Access Control
Generating a certifi cate request
Installing certifi cates and enabling services
Importing certifi cates on multiple exchange servers
IntroductionWhen it comes to managing security in Exchange 2013, you have several options, depending on the resources that you're dealing with. For example, you can allow multiple users to open a mailbox by assigning them full access permissions on a mailbox object, but granting administrators the ability to create recipient objects needs to be done through Role Based Access Control (RBAC). Obviously, since the security for both of these components is handled differently, we have unrelated sets of cmdlets that need to be used to get the job done, and managing each of them through the shell will require a unique approach.
In this chapter, we'll take a look at several solutions implemented through the Exchange Management Shell that address each of the components described previously, as well as some additional techniques that can be used to improve your effi ciency when dealing with Exchange security.
For More Information: www.packtpub.com/microsoft-exchange-server-2013-powershell-
2e-cookbook/book

Exchange Security
320
Performing some basic stepsTo work with the code samples in this chapter, follow these steps to launch the Exchange Management Shell:
1. Log onto a workstation or server with Exchange Management Tools installed.
2. You can connect using a remote PowerShell if you, for some reason, don't have Exchange Management Tools installed. Use the following command to do this:
$Session = New-PSSession -ConfigurationName Microsoft.Exchange `
-ConnectionUri http://tlex01/PowerShell/ `
-Authentication Kerberos
Import-PSSession $Session
3. Open the Exchange Management Shell by navigating to Start | All Programs | Exchange Server 2013.
4. Click on the Exchange Management Shell shortcut.
To launch a standard PowerShell console, navigate to Start | All Programs | Accessories, and then click on the Windows PowerShell folder and then on the Windows PowerShell shortcut.
Unless otherwise specifi ed in the Getting ready section, all of the recipes in this chapter will require the use of the Exchange Management Shell.
Remember to start the Exchange Management Shell using Run As Admin to avoid permission problems.
In this chapter, notice that in the examples of cmdlets, I have used the back tick (`) character for breaking up long commands into multiple lines. The purpose of this is to make it easier to read. The back ticks are not required and should only be used if needed.
Granting users full access permissions to mailboxes
One of the most common administrative tasks that Exchange administrators need to perform is managing the access rights to one or more mailboxes. For example, you may have several users that share access to an individual mailbox, or you may have administrators and help desk staff that need to be able to open end users and mailboxes when troubleshooting a problem or providing technical support. In this recipe, you'll learn how to assign the permissions required to perform these tasks through the Exchange Management Shell.
For More Information: www.packtpub.com/microsoft-exchange-server-2013-powershell-
2e-cookbook/book

Chapter 10
321
How to do it...To assign full access rights for an individual user to a specifi c mailbox, use the Add-MailboxPermission cmdlet :
Add-MailboxPermission -Identity dsmith `
-User hlawson `
-AccessRights FullAccess
After running this command, the user hlawson will be able to open the mailbox belonging to dsmith and read or modify the data within the mailbox.
How it works...When you assign full access rights to a mailbox, you may notice that the change does not take effect immediately, and the user that has been granted permissions to a mailbox still cannot access that resource. This is because the Information Store service uses a cached mailbox confi guration that, by default, is only refreshed every two hours. You can force the cache to refresh by restarting the Information Store service on the mailbox server that is hosting the active database where the mailbox resides. Obviously, this is not something that should be done during business hours on production servers, as it will disrupt mailbox access for end users.
Since we can grant permissions to a mailbox using the Add-MailboxPermission cmdlet, you would be correct when assuming that this change can also be reversed if needed. To remove the permissions assigned in the previous example, use the Remove-MailboxPermission cmdlet:
Remove-MailboxPermission -Identity dsmith `
-User hlawson `
-AccessRights FullAccess `
-Confirm:$false
In addition to assigning full access permissions to individual users, you can also assign this right to a group:
Add-MailboxPermission -Identity dsmith `
-User "IT Help Desk" `
-AccessRights FullAccess
In this example, the IT Help Desk is a mail-enabled universal security group, and it has been granted full access to the dsmith mailbox. All users who are members of this group will be able to open the mailbox and access its contents through Outlook or OWA.
For More Information: www.packtpub.com/microsoft-exchange-server-2013-powershell-
2e-cookbook/book

Exchange Security
322
Of course, you may need to do this for multiple users, and doing so one mailbox at a time is not very effi cient. To make this a little easier, we can make use of a simple pipeline command. For example, let's say that you want to grant full access rights to all mailboxes in the organization:
Get-MailboxDatabase |
Add-ADPermission –User support `
-AccessRights GenericAll
The given command retrieves all user mailboxes in the organization, and sends them down the pipeline to the Add-MailboxPermission cmdlet, where full access rights are assigned to the IT Help Desk group.
There's more...If you need to assign access permissions to all the mailboxes in your organization, you probably should consider doing this at the database level rather than on an individual mailbox basis. In the previous example, we used a pipeline operation to apply the permissions to all mailboxes with a one-liner. The limitation with this is that the command only sets the permissions on the existing mailboxes; any new mailbox created afterwards will not inherit these permissions. You can solve this problem by assigning the GenericAll extended right to a user or group on a particular database.
For example, if all of our mailboxes are located in the DB01 database, we can allow user access to every mailbox in the database using the following command:
Add-ADPermission -Identity DB01 `
-User support `
-AccessRights GenericAll
After running this command, the support account will be able to log on to every mailbox in the DB01 database as well as any mailboxes created in that database in the future.
Of course, you'll likely have more than one database in your organization. If you want to apply this setting to every mailbox database in the organization, pipe the output from the Get-MailboxDatabase cmdlet to the Add-ADPermission cmdlet using the appropriate parameters:
Get-MailboxDatabase |
Add-ADPermission –User support `
-AccessRights GenericAll
Once this command has been run, the user account support will be able to connect to any mailbox in the Exchange organization.
For More Information: www.packtpub.com/microsoft-exchange-server-2013-powershell-
2e-cookbook/book

Chapter 10
323
See also The Sending e-mail messages as another user or group recipe
Finding users with full access to mailboxesOne of the issues with assigning full mailbox access to users and support personnel is that things change over time. People change roles, move to other departments, or even leave the organization. Keeping track of all of this and removing full access permissions when required can be challenging in a fast-paced environment. This recipe will allow you to solve that issue using the Exchange Management Shell to fi nd out exactly who has full access permissions for the mailboxes in your environment.
How to do it...To fi nd all of the users or groups who have been assigned full access rights to a mailbox, use the Get-MailboxPermission cmdlet:
Get-MailboxPermission -Identity administrator |
Where-Object {$_.AccessRights -like "*FullAccess*"}
You can see here that we are limiting the results using a fi lter by piping the output to the Where-Object cmdlet. Only the users with the FullAccess access rights will be returned.
How it works...The previous command is useful for quickly viewing the permissions for a single mailbox while working interactively in the shell. The fi rst problem with this approach is that it also returns a lot of information that we're probably not interested in. Consider the following truncated output from our previous command:
For More Information: www.packtpub.com/microsoft-exchange-server-2013-powershell-
2e-cookbook/book
Exchange Security
324
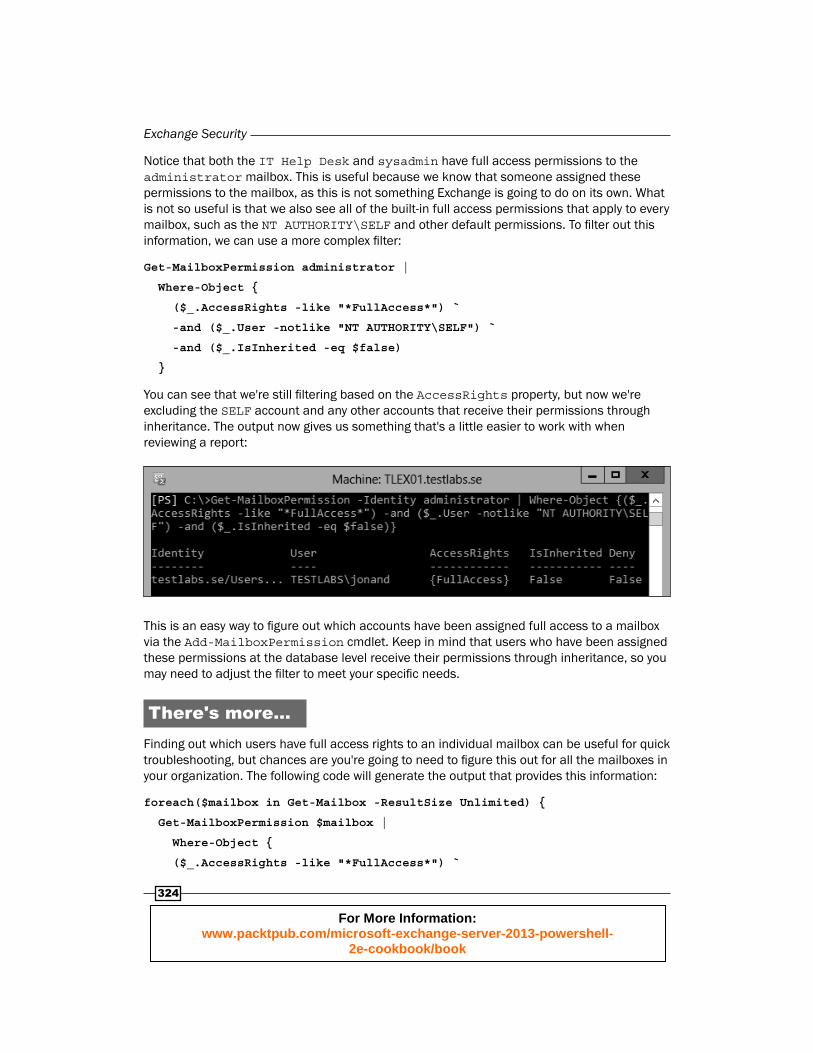
Notice that both the IT Help Desk and sysadmin have full access permissions to the administrator mailbox. This is useful because we know that someone assigned these permissions to the mailbox, as this is not something Exchange is going to do on its own. What is not so useful is that we also see all of the built-in full access permissions that apply to every mailbox, such as the NT AUTHORITY\SELF and other default permissions. To fi lter out this information, we can use a more complex fi lter:
Get-MailboxPermission administrator |
Where-Object {
($_.AccessRights -like "*FullAccess*") `
-and ($_.User -notlike "NT AUTHORITY\SELF") `
-and ($_.IsInherited -eq $false)
}
You can see that we're still fi ltering based on the AccessRights property, but now we're excluding the SELF account and any other accounts that receive their permissions through inheritance. The output now gives us something that's a little easier to work with when reviewing a report:
This is an easy way to fi gure out which accounts have been assigned full access to a mailbox via the Add-MailboxPermission cmdlet. Keep in mind that users who have been assigned these permissions at the database level receive their permissions through inheritance, so you may need to adjust the fi lter to meet your specifi c needs.
There's more...Finding out which users have full access rights to an individual mailbox can be useful for quick troubleshooting, but chances are you're going to need to fi gure this out for all the mailboxes in your organization. The following code will generate the output that provides this information:
foreach($mailbox in Get-Mailbox -ResultSize Unlimited) {
Get-MailboxPermission $mailbox |
Where-Object {
($_.AccessRights -like "*FullAccess*") `
For More Information: www.packtpub.com/microsoft-exchange-server-2013-powershell-
2e-cookbook/book

Chapter 10
325
-and ($_.User -notlike "NT AUTHORITY\SELF") `
-and ($_.IsInherited -eq $false)
}
}
As you can see here, we use a foreach loop to process all of the mailboxes in the organization. Inside the loop, we're using the same fi lter from the previous example to determine which users have full access rights to each mailbox.
Sending e-mail messages as another user or group
In some environments, it may be required to allow users to send e-mail messages from a mailbox as if the owner of that mailbox had actually sent this message. This can be accomplished by granting Send-As permissions to a user on a particular mailbox. In addition, you can also allow a user to send e-mail messages that are sent using the identity of a distribution group. This recipe explains how you can manage these permissions from the Exchange Management Shell.
How to do it...To assign Send-As permissions to a mailbox, we use the Add-ADPermission cmdlet:
Add-ADPermission -Identity "Frank Howe" `
-User "Eric Cook" `
-ExtendedRights Send-As
After running the previous command, Eric Cook can send messages from Frank Howe's mailbox.
How it works...The Add-ADPermission cmdlet uses the -Identity parameter to classify the object to which you will assign the permissions. Unlike many of the Exchange cmdlets, you cannot use the alias of the mailbox when assigning a value to the -Identity parameter. You can use the user's display name, as shown previously, as long as it is unique, or you can use the distinguished name of the object. If you do not know a user's full name, you can use the Get-Mailbox cmdlet and pipe the object to the Add-ADPermission cmdlet:
Get-Mailbox fhowe |
Add-ADPermission -User ecook -ExtendedRights Send -As
For More Information: www.packtpub.com/microsoft-exchange-server-2013-powershell-
2e-cookbook/book

Exchange Security
326
You might fi nd this syntax useful when assigning the Send-As right in bulk. For example, to grant a user Send-As permission for all users in a particular OU, use the following syntax:
Get-Mailbox -OrganizationalUnit contoso.com/Sales |
Add-ADPermission -User ecook -ExtendedRights Send-As
If you ever need to remove these settings, simply use the Remove-ADPermission cmdlet. This command will remove the permissions assigned in the fi rst example:
Remove-ADPermission -Identity "Frank Howe" `
-User ecook `
-ExtendedRights Send-As `
-Confirm:$false
There's more...To assign Send-As permissions to a distribution group, the process is exactly the same as for a mailbox. Use the Add-ADPermission cmdlet:
Add-ADPermission -Identity Marketing `
-User ecook `
-ExtendedRights Send-As
You can also provide the identity of the group to the Add-ADPermission cmdlet via a pipeline command, just as we saw earlier with the Get-Mailbox cmdlet. To do this with a distribution group, use the Get-DistributionGroup cmdlet:
Get-DistributionGroup -ResultSize Unlimited |
Add-ADPermission -User ecook -ExtendedRights Send-As
In the given example, the user ecook is given the Send-As right for all the distribution groups in the organization.
Working with Role Based Access Control (RBAC)
The security model that was introduced in Exchange 2010 is still present in Exchange 2013. With the introduction of the Role Based Access Control (RBAC) permissions model, you can essentially determine which cmdlets administrators and end users are allowed to use in order to change settings within the system. This recipe will show you how to work with the predefi ned RBAC permissions in Exchange 2013.
For More Information: www.packtpub.com/microsoft-exchange-server-2013-powershell-
2e-cookbook/book
Chapter 10
327
How to do it...Let's say that you need to allow a member of your staff to manage the settings of the Exchange servers in your organization. This administrator only needs to manage server settings, and should not be allowed to perform any other tasks, such as recipient management.
Exchange 2013 provides a large set of predefi ned permissions that can be used to address common tasks like this. In this case, we can use the Server Management role group that allows administrators to manage the servers in the organization.
All we need to do to assign the permission is to add the required user account to this role group:
Add-RoleGroupMember -Identity "Server Management" -Member bwelch
At this point, the user can use the Exchange Management Console or the Exchange Management Shell to perform server-related management tasks.
How it works...Exchange 2013 implements RBAC by grouping sets of cmdlets used to perform specifi c tasks into management roles. Think of a management role simply as a list of cmdlets. For example, one of the roles assigned via the Server Management role group is called Exchange Servers. This role allows an assigned user the ability to use over 30 separate cmdlets that are specifi cally related to managing servers, such as Get-ExchangeServer, Set-ExchangeServer, and more.
There are a number of built-in role groups that you can use to delegate typical management tasks to the administrators in your environment. You can view all of the built-in role groups using the Get-RoleGroup cmdlet .
Role groups can assign many different management roles to a user. In the previous example, we were working with the Server Management role group, which assigns a number of different management roles to any user that is added to this group. To view a list of these roles, we can use the Get-ManagementRoleAssignment cmdlet:
Get-ManagementRoleAssignment -RoleAssignee 'Server Management' |
Select-Object Role
For More Information: www.packtpub.com/microsoft-exchange-server-2013-powershell-
2e-cookbook/book

Exchange Security
328
The output from this command is shown in the following screenshot:
As you can see, each management role assigned through this role group is returned. To determine which cmdlets are made available by each of these roles, we can run the Get-ManagementRoleEntry cmdlet against each of them individually. An example of this can be seen in the following screenshot:
Management role entries are listed in the format of <Role Name>\<Cmdlet Name>. The Get-ManagementRoleEntry cmdlet can be used with wildcards, as shown with the previous command. The output from the Get-ManagementRoleEntry command in the previous example is truncated for readability, but as you can see, there are several cmdlets that are part of the Exchange Servers management role, which can be assigned via the Server Management role group. If only this role is assigned to a user, they are given access to these specifi c cmdlets and will not see other cmdlets, such as New-Mailbox, as that is part of another management role.
To view all of the management roles that exist in the organization, use the Get-ManagementRole cmdlet. You can then use the Get-ManagementRoleEntry cmdlet to determine which cmdlets belong to that role.
For More Information: www.packtpub.com/microsoft-exchange-server-2013-powershell-
2e-cookbook/book

Chapter 10
329
There's more...Many of the management roles installed with Exchange 2013 can be assigned to users by adding them to a role group. Role groups are associated with management roles through something called role assignments . Although the recommended method of assigning permissions is through the use of role groups, you can still directly assign a management role to a user with the New-ManagementRoleAssignment cmdlet:
New-ManagementRoleAssignment -Role 'Mailbox Import Export' `
-User administrator
In this example, the administrator is assigned the Mailbox Import Export role, which is not associated with any of the built-in role groups. In this case, we can create a direct assignment as shown previously, or use the –SecurityGroup parameter to assign this role to an existing role group or a custom role group created with the New-RoleGroup cmdlet.
RBAC is for end users tooEverything we've discussed so far is related to RBAC for administrators, but end users need to be able to run cmdlets too. Now, this doesn't mean that they need to fi re up EMS and start executing commands, but other things that they change will require the use of PowerShell cmdlets behind the scenes.
A good example of this is the Exchange Control Panel (ECP) . When a user logs into ECP, the very fi rst thing they see is the Account Information screen that allows them to change various settings that apply to their user account, such as their address, city, state, zip code, and phone numbers. When users change this information in ECP, those changes are carried out in the background with Exchange Management Shell cmdlets.
Here's the confusing part. End users are also assigned permissions from management roles, but not through role groups or role assignments, as they are applied to administrators. Instead, end users are assigned their management roles through something called a role assignment policy .
When you install Exchange, a single role assignment policy is created. Mailboxes that are created or moved over to Exchange 2013 will use the Default Role Assignment Policy role group, which gives users some basic rights, such as modifying their contact information, creating inbox rules through ECP, and more.
To determine which management roles are applied to the default role assignment policy, use the following command:
Get-RoleAssignmentPolicy "Default Role Assignment Policy" |
Format-List AssignedRoles
For More Information: www.packtpub.com/microsoft-exchange-server-2013-powershell-
2e-cookbook/book

Exchange Security
330
See also The Creating a custom RBAC role for administrators recipe
The Creating a custom RBAC role for end users recipe
Troubleshooting Role Based Access Control recipe
Creating a custom RBAC role for administrators
Sometimes, the management roles that are installed by Exchange are not specifi c enough to meet your needs. When you are faced with this issue, the solution is to create a custom RBAC role. The process can be a little tricky, but the level of granular control that you can achieve is quite astounding. This recipe will show you how to create a custom RBAC role that can be assigned to administrators based on a very specifi c set of requirements.
How to do it...Let's say that your company has decided that a group of support personnel should be responsible for the creation of all new Exchange recipients. You want to be very specifi c about what type of access this group will be granted, and you plan on implementing a custom management role based on the following requirements:
Support personnel should be able to create Exchange recipients in the Employees OU in the Active Directory
Support personnel should not be able to create Exchange recipients in any other OU in the Active Directory
Support personnel should not be able to remove recipients in the Employees OU, or any other OU in the Active Directory
Use the following steps to implement a custom RBAC role for the support group based on the previous requirements:
1. First, we need to create a new custom management role:
New-ManagementRole -Name "Employee Recipient Creation" `
-Parent "Mail Recipient Creation"
For More Information: www.packtpub.com/microsoft-exchange-server-2013-powershell-
2e-cookbook/book

Chapter 10
331
2. Next, we need to modify the role so that the support staff cannot remove recipients from the organization:
Get-ManagementRoleEntry "Employee Recipient Creation\*" |
Where-Object {$_.name -like "remove-*"} |
Remove-ManagementRoleEntry -Confirm:$false
3. Now we need to scope this role to a specifi c location in Active Directory:
New-ManagementScope -Name Employees `
-RecipientRoot contoso.com/Employees `
-RecipientRestrictionFilter {
(RecipientType -eq "UserMailbox") -or
(RecipientType -eq "MailUser") -or
(RecipientType -eq "MailContact")
}
4. Finally, we can create a custom role group and add the support staff as members:
New-RoleGroup -Name Support `
-Roles "Employee Recipient Creation" `
-CustomRecipientWriteScope Employees `
-Members bjacobs,dgreen,jgordon
How it works...The built-in management roles cannot be modifi ed, so, when we want to customize an existing role to meet our needs, we need to create a new custom role based on an existing parent role. Since we know that the built-in Mail Recipient Creation role provides the cmdlets that our support group will need, the fi rst thing we must do is create a new role as a child of the Mail Recipient Creation role, called Employee Recipient Creation.
One of the requirements in our scenario was that support personnel should not be able to remove recipients from the organization, so we edited our custom role to get rid of any cmdlets that could be used to remove recipients from the Employees OU, or from any other location in the Active Directory. We used the Remove-ManagementRoleEntry cmdlet to delete all of the Remove-* cmdlets from our custom role, and therefore, this will prevent users assigned to the custom role from removing recipient objects.
Next, we created a management scope that defi nes what the support group can access. We used the New-ManagementScope cmdlet to create the Employee management scope. As you can see from the command, we specifi ed the recipient root as the Employees OU, as per the requirements in our scenario. When specifying a RecipientRoot, we are also required to specify a RecipientRestrictionFilter, which will be limited to the UserMailbox, MailUser, and MailContact recipient types.
For More Information: www.packtpub.com/microsoft-exchange-server-2013-powershell-
2e-cookbook/book
Exchange Security
332
Finally, we created our management role group using the New-RoleGroup cmdlet . The command used created a role group named Support, which created a universal security group in the Microsoft Exchange Security Groups OU in Active Directory. The role group was created using the Employees management scope, limiting access to the Employees OU. Also, notice that we added three users to the group using the -Members parameter. Doing it this way automatically creates the management role assignment for us. You can view management role assignments using the Get-ManagementRoleAssignment cmdlet.
There's more...One of the things making custom RBAC role assignments so powerful is the use of the management scope. When we created the Employees management scope, we used the -RecipientRestrictionFilter parameter to limit the types of recipients that would apply to that scope. When creating the role group, we specifi ed this scope using the -CustomRecipientWriteScope parameter. This locks the administrator down to only writing to recipient objects that match the scope's fi lter and recipient root.
Keep in mind that scopes can be created with a ServerRestrictionFilter, and role groups and role assignments can be confi gured to use these scopes by assigning them to the CustomConfigWriteScope parameter. This can be useful when assigning custom RBAC roles for administrators who will be working on servers, as opposed to recipients. For example, instead of limiting your staff to working with recipient objects in a specifi c OU, you could create a custom role that only applies to specifi c servers in your organization, such as ones that are located in another city or another Active Directory site.
See also The Working with Role Based Access Control (RBAC) recipe
The Creating a custom RBAC role for end users recipe
The Troubleshooting Role Based Access Control recipe
Creating a custom RBAC role for end usersLike custom RBAC roles for administrators, you can also create custom roles that apply to your end users. This may be useful when you need to allow them to modify additional confi guration settings that apply to their own accounts through the Exchange Control Panel (ECP). This recipe will provide a real-world example of how you might implement a custom RBAC role for end users in your Exchange organization.
For More Information: www.packtpub.com/microsoft-exchange-server-2013-powershell-
2e-cookbook/book

Chapter 10
333
How to do it...When users log on to ECP, they have the ability to modify their work phone number, their fax number, their home phone number, and their mobile phone number, among other things. Let's say that we need to limit this so that they can only update their home phone number, as their work, fax, and mobile numbers will be managed by the administrators in your organization.
Since built-in roles cannot be modifi ed, we need to create a custom role based on one of the existing built-in roles. Use the following steps to implement a custom RBAC role for end users based on the previous requirements:
1. The MyContactInformation role allows end users to modify their contact information, so we'll create a new custom role based on this parent role:
New-ManagementRole -Name MyContactInfo `
-Parent MyContactInformation
2. The Set-User cmdlet is what executes in the background when users modify their contact information. This is done using several parameters made available through this cmdlet. We'll create an array that contains all of these parameters so we can modify them later:
$parameters = Get-ManagementRoleEntry "MyContactInfo\Set-User" |
Select-Object -ExpandProperty parameters
3. Next, we'll create a new array that excludes the parameters that allow the end users to change their business related phone numbers:
$parameters = $parameters |
Where-Object{
($_ -ne "Phone") -and `
($_ -ne "MobilePhone") -and `
($_ -ne "Fax")
}
4. Now we'll modify the Set-User cmdlet so that it only provides our custom list of parameters:
Set-ManagementRoleEntry –Identity "MyContactInfo\Set-User" `
-Parameters $parameters
5. The MyContactInformation role is assigned to end users through the default role assignment policy, so we need to remove that assignment from the policy:
Remove-ManagementRoleAssignment -Identity `
"MyContactInformation-Default Role Assignment Policy" `
-Confirm:$false
For More Information: www.packtpub.com/microsoft-exchange-server-2013-powershell-
2e-cookbook/book
Exchange Security
334
6. Finally, we can add our custom RBAC role to the default role assignment policy:
New-ManagementRoleAssignment -Role MyContactInfo `
-Policy "Default Role Assignment Policy"
When users log in to ECP, they'll only be able to modify their home phone numbers.
How it works...As you can see from these steps, not only do management roles provide users with access to cmdlets, but also to specifi c parameters available on those cmdlets. We're able to limit the use of the Set-User cmdlet by removing access to the parameters that allow users to modify properties of their account that we do not want them to change.
End user management roles are assigned through a role assignment policy. By default, only one role assignment policy is created when you deploy Exchange 2013, called the Default Role Assignment Policy. In the fi rst example, we created a custom role based on the existing MyContactInformation role that allows end users to update their personal contact details.
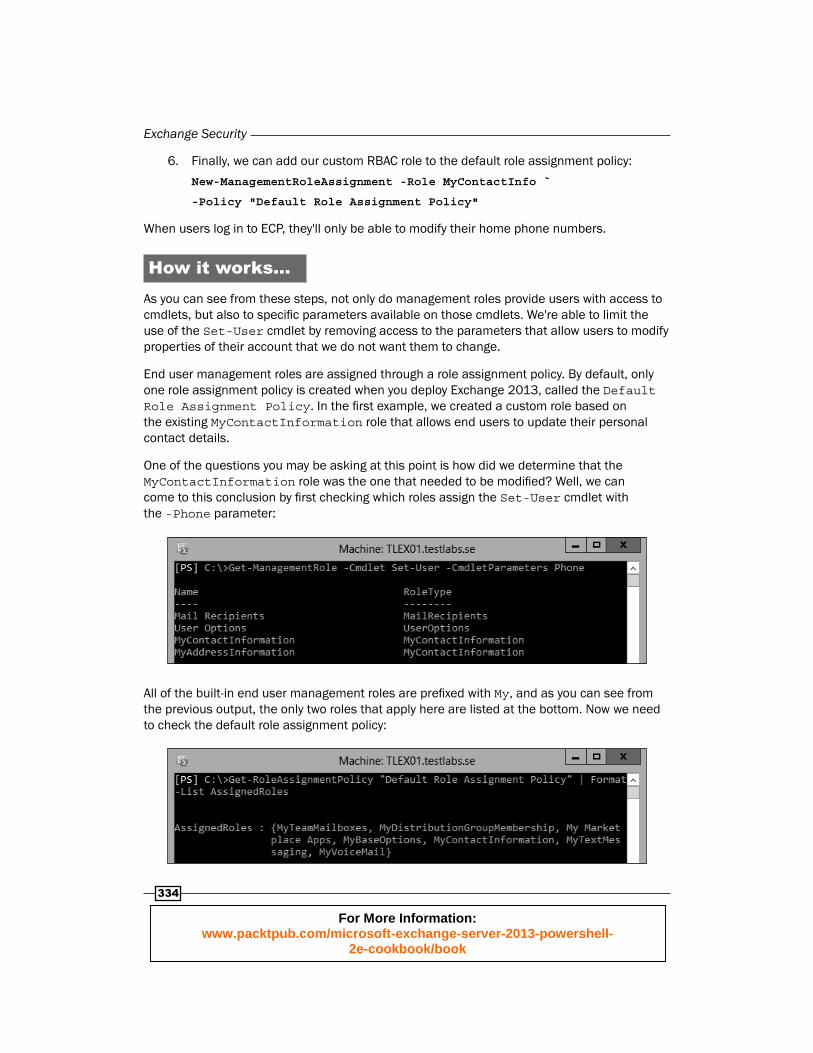
One of the questions you may be asking at this point is how did we determine that the MyContactInformation role was the one that needed to be modifi ed? Well, we can come to this conclusion by fi rst checking which roles assign the Set-User cmdlet with the -Phone parameter:
All of the built-in end user management roles are prefi xed with My, and as you can see from the previous output, the only two roles that apply here are listed at the bottom. Now we need to check the default role assignment policy:
For More Information: www.packtpub.com/microsoft-exchange-server-2013-powershell-
2e-cookbook/book

Chapter 10
335
As you can clearly see from the output, the only roles assigned to the end users that contain the Set-User cmdlet are assigned by the MyContactInformation role, and we know that this is the role that needs to be replaced with a custom role.
There's more...If you don't want to modify the existing role assignment policy, you can create a new role assignment policy that can be applied to individual users. This may be useful if you need to test things without affecting other users. To do this, use the New-RoleAssignmentPolicy cmdlet and specify a name for the policy and all the roles that should be applied via this role assignment policy:
New-RoleAssignmentPolicy -Name MyCustomPolicy `
-Roles MyDistributionGroupMembership,
MyBaseOptions,
MyTeamMailboxes,
MyTextMessaging,
MyVoiceMail,
MyContactInfo
Once this is complete, you can assign the role assignment policy to an individual user with the Set-Mailbox cmdlet:
Set-Mailbox -Identity "Ramon Shaffer" `
-RoleAssignmentPolicy MyCustomPolicy
If you later decide that this new policy should be used for all of your end users, you'll need to do two things. First, you'll need to set this role assignment policy as the default policy for new mailboxes:
Set-RoleAssignmentPolicy MyCustomPolicy -IsDefault
Then you'll need to modify the existing users so that they'll be assigned the new role assignment policy:
Get-Mailbox -ResultSize Unlimited |
Set-Mailbox -RoleAssignmentPolicy MyCustomPolicy
For More Information: www.packtpub.com/microsoft-exchange-server-2013-powershell-
2e-cookbook/book

Exchange Security
336
See also The Working with Role Based Access Control (RBAC) recipe
The Creating a custom RBAC role for administrators recipe
The Troubleshooting Role Based Access Control recipe
Troubleshooting Role Based Access ControlTroubleshooting permission issues can be challenging, especially if you've implemented custom RBAC roles. In this recipe, we'll take a look at some useful troubleshooting techniques that can be used to troubleshoot issues related to RBAC.
How to do it...There are several scenarios in which you can use the Exchange Management Shell cmdlets to solve problems with RBAC, and there are a couple of cmdlets that you'll need to use to do this. The following steps outline the solutions for some common troubleshooting situations:
1. To determine which management roles have been assigned to a user, use the following command syntax:
Get-ManagementRoleAssignment -GetEffectiveUsers |
Where-Object {$_.EffectiveUserName -eq 'sysadmin'}
2. To retrieve a list of users that have been assigned a specifi c management role, run the following command and specify a role name, such as the Legal Hold role, as shown next:
Get-ManagementRoleAssignment -Role 'Legal Hold' -GetEffectiveUsers
3. You can determine if a user has write access to a recipient, server, or database. For example, use the following syntax to determine if the sysadmin account has the ability to modify the Dave Jones mailbox:
Get-ManagementRoleAssignment -WritableRecipient djones `
-GetEffectiveUsers |
Where-Object{$_.EffectiveUserName -eq 'sysadmin'}
After running the previous command, any roles that give the sysadmin write access to the specifi ed recipient will be returned.
For More Information: www.packtpub.com/microsoft-exchange-server-2013-powershell-
2e-cookbook/book

Chapter 10
337
How it works...The Get-ManagementRoleAssignment cmdlet is a useful tool when it comes to troubleshooting RBAC issues. If an administrator is unable to modify a recipient or make a change against a server, it is very possible that the role assignment is either incorrect or it might not exist at all. In each step shown previously, we used the -GetEffectiveUsers parameter with this cmdlet, which provides a quick way to fi nd out if certain roles have been assigned to a specifi c user.
In addition to the -WritableRecipient parameter, you have the option of using either the -WritableServer or -WritableDatabase parameters. These can be used to determine if an administrator has write access to a server or database object. This can be useful in determining if a role assignment has not been made for an administrator that should be able to modify one of these objects. You can also use this as a method of determining if some administrators have been granted too much control in your environment.
There's more...If someone is not receiving the permissions you think they should, they may not be a member of the required role group. The steps outlined previously should help you make this determination, but it may be as simple as making sure the administrator has been added to the right role group that will assign the appropriate roles. You can retrieve the members of a role group in the shell using the Get-RoleGroupMember cmdlet. This command will return all the members of the Organization Management role group:
Get-RoleGroup 'Organization Management' | Get-RoleGroupMember
You can also use these cmdlets to generate a report of all the members of each role group. For example, this will display the member of each role group in the shell:
foreach($rg in Get-RoleGroup) {
Get-RoleGroupMember $rg |
Select-Object Name,@{n="RoleGroup";e={$rg.Name}}
}
See also The Working with Role Based Access Control (RBAC) recipe
The Creating a custom RBAC role for administrators recipe
The Creating a custom RBAC role for end users recipe
For More Information: www.packtpub.com/microsoft-exchange-server-2013-powershell-
2e-cookbook/book

Exchange Security
338
Generating a certifi cate requestIn order to create a new certifi cate, you need to generate a certifi cate request using either the Exchange Admin Center, or through the shell using the New-ExchangeCertificate cmdlet. Once you have a certifi cate request generated, you can obtain a certifi cate from an internal Certifi cate Authority or a third-party external Certifi cate Authority. In this recipe, we'll take a look at the process of generating a certifi cate request from the Exchange Management Shell.
How to do it...1. In this example, we'll generate a request using two Subject Alternative Names (SANs).
This will allow us to support multiple URLs with one certifi cate:
$cert = New-ExchangeCertificate -GenerateRequest `
-SubjectName "c=US, o=Contoso, cn=mail.contoso.com" `
-DomainName autodiscover.contoso.com,mail.contoso.com `
-PrivateKeyExportable $true
2. After the request has been generated, we can export it to a fi le that can be used to submit a request to a certifi cate authority:
$cert | Out-File c:\cert_request.txt
How it works...When you install Exchange 2013, self-signed certifi cates are automatically generated and installed to encrypt data passed between servers. Since these self-signed certifi cates will not be trusted by your client machines when accessing the CAS role, it is recommended that you replace these certifi cates with new certifi cates issued from a trusted certifi cate authority. If you do not replace these certifi cates, clients such as Outlook 2013 and Outlook Web App users will receive certifi cate warnings informing them that the certifi cates are not issued from a trusted source. This can create some confusion for end users and could generate calls to your help desk.
You can get around these certifi cate warnings by installing the server's self-signed certifi cates in the Trusted Root Certifi cate Authority store on the client machines, but even in a small environment, this can become an administrative headache. That's why it is recommended to replace the self-signed certifi cates before placing your Exchange 2013 servers into production.
When using the New-ExchangeCertificate cmdlet to generate a certifi cate request, you can use the -SubjectName parameter to specify the common name of the certifi cate. This value is set using an X.500 distinguished name, and as you saw in step 2, the common name for the certifi cate was set to mail.contoso.com. If you do not provide a value for the -SubjectName parameter, the hostname of the server where the cmdlet is run to generate the request will be used.
For More Information: www.packtpub.com/microsoft-exchange-server-2013-powershell-
2e-cookbook/book

Chapter 10
339
The -DomainName parameter is used to defi ne one or more FQDNs that will be listed in the Subject Alternative Names fi eld of the certifi cate. This allows you to generate certifi cates that support multiple FQDNs that can be installed on multiple Exchange servers. For example, you may have several CAS servers in your environment and instead of generating multiple certifi cates for each one, you can simply add Subject Alternative Names to cover all of the possible FQDNs that users will need to access, and then install a single certifi cate on multiple CAS servers.
The New-ExchangeCertificate cmdlet outputs a certifi cate request in Base64 format. In the previous example, we saved the output of the command in a variable so we could simply output the data to a text fi le. Once the request is generated, you'll need to supply the data from this request to the issuing Certifi cate Authority (CA) . This is usually done through a web form hosted by the CA where you submit the certifi cate request. You can simply open the request fi le in Notepad, copy the data, and paste it into the submission form on the CA website. Once the information is submitted, the CA will generate a certifi cate that can be downloaded and installed on your servers. See the next recipe in this chapter titled Installing certifi cates and enabling services for steps on how to complete this process.
There's more...It's recommended as a best practice that you limit the number of Subject Alternative Names on your certifi cates, so your name space design should be completely defi ned before creating your certifi cates. For example, let's say that you've got four CAS servers in a CAS array and all of your servers are located in a single Active Directory site. Even though you have multiple servers, you only need to include the FQDNs that your end users will use to access these servers. If you confi gure your CAS URLs appropriately, there's no requirement to include the server's FQDN or hostname as a Subject Alternative Name in this scenario.
If you plan on installing a certifi cate on multiple servers, make sure that you mark the certifi cate as exportable by setting the -PrivateKeyExportable parameter to $true. This will allow you to export the certifi cate and install it on the remaining servers in your environment.
See also The Installing certifi cates and enabled services recipe
The Importing certifi cates on multiple exchange servers recipe
For More Information: www.packtpub.com/microsoft-exchange-server-2013-powershell-
2e-cookbook/book

Exchange Security
340
Installing certifi cates and enabling servicesAfter you've generated a certifi cate request and have obtained a certifi cate from a certifi cate authority, you will need to install the certifi cate on your server using the Import-ExchangeCertificate cmdlet. This recipe will show you how to install certifi cates issued from a certifi cate authority and how to assign services to the certifi cate using the Exchange Management Shell.
How to do it...1. Let's say that you have requested and downloaded a certifi cate from an Active
Directory Enterprise CA and downloaded the fi le to the root of C:\. First, read the certifi cate data into a variable in the shell:
$certificate = Get-Content -Path c:\certnew.cer `
-Encoding Byte `
-ReadCount 0
2. Next, we can import the certifi cate and complete the pending request:
Import-ExchangeCertificate -FileData $certificate
3. Now that the certifi cate is installed, we can enable it for specifi c services:
Get-ExchangeCertificate -DomainName mail.contoso.com |
Enable-ExchangeCertificate -Services IIS,SMTP
At this point, the certifi cate has been installed and will now be used for Client Access services, such as Outlook Web App and the Exchange Control Panel, and also for securing SMTP.
How it works...Since the Exchange Management Shell uses remote PowerShell sessions, the Import-ExchangeCertificate cmdlet cannot use a local fi le path to import a certifi cate fi le. This is because the cmdlet could be running on any server within your organization and a local fi le path may not exist. This is why we need to use the -FileData parameter to provide the actual data of the certifi cate. In step 1, we read the certifi cate data into a byte array using the Get-Content cmdlet, which is a PowerShell core cmdlet, and is not run through the remote shell on the Exchange server. The content of the certifi cate is stored as a byte array in the $certificate variable, and we can assign this data to the -FileData parameter of the Import-ExchangeCertificate cmdlet that allows us to import the certifi cate to any Exchange server through the remote shell.
For More Information: www.packtpub.com/microsoft-exchange-server-2013-powershell-
2e-cookbook/book

Chapter 10
341
Use the -Server parameter with the Get-ExchangeCertificate cmdlet to target a specifi c server. Otherwise, the cmdlet will run against the server you are currently connected to.
There's more...As shown previously, once the certifi cate has been imported, it needs to have one or more services assigned before it can be used by an Exchange server. After importing a certifi cate, you can use the Get-ExchangeCertificate cmdlet to view it:
You can see that we have two certifi cates installed. When assigning services to a certifi cate, we need to be specifi c about which one needs to be modifi ed. We can do this either by specifying the thumbprint of the certifi cate when running the Enable-ExchangeCertificate cmdlet, or by using the method shown previously, where we used the Get-ExchangeCertificate cmdlet with the -DomainName parameter to retrieve a particular certifi cate, and send it down the pipeline to the Enable-ExchangeCertificate cmdlet .
Let's say that we're connected to a server named EXCH01. We've imported a certifi cate, and now we need to view all of the installed certifi cates so we can fi gure out which one needs to be enabled and assigned the appropriate services. We can do this by viewing a few key properties of each certifi cate using the Get-ExchangeCertificate cmdlet:
For More Information: www.packtpub.com/microsoft-exchange-server-2013-powershell-
2e-cookbook/book

Exchange Security
342
Here you can see that we've retrieved the Thumbprint, CertificateDomains, and assigned Services for each installed Exchange certifi cate in list format. We've also selected the IsSelfSign ed property that will tell us whether or not the certifi cate was issued from a certifi cate authority or installed by Exchange as a self-signed certifi cate. It's pretty clear from the output that the second certifi cate in the list is the one that was issued from a certifi cate authority, since the IsSelfSigned property is set to $false. At this point, we can use the certifi cate thumbprint to assign services to this certifi cate:
Enable-ExchangeCertificate `
-Thumbprint CF61E66A6BE1A286471B30DFCEA1126F6BC7DCBB `
-Services IIS,SMTP
If you have multiple certifi cates installed, especially with duplicate domain names, use the method shown here to assign services based on the certifi cate thumbprint. Otherwise, you may fi nd it easier to enable certifi cates based on the domain name, as shown in the fi rst example.
See also The Importing certifi cates on multiple exchange servers recipe
The Generating a certifi cate request recipe
Importing certifi cates on multiple exchange servers
If your environment contains multiple Exchange servers, you'll likely want to use the same certifi cate on multiple servers. If you have a large amount of servers, importing certifi cates one at a time, even with the Exchange Management Shell, could end up being quite time-consuming. This recipe will provide a method for automating this process using the Exchange Management Shell.
For More Information: www.packtpub.com/microsoft-exchange-server-2013-powershell-
2e-cookbook/book
Chapter 10
343
How to do it...Once you've gone through the process of generating a certifi cate request, installing a certifi cate, and assigning the services on one server, you can export that certifi cate and deploy it to your remaining servers. The following steps outline the process of exporting an installed certifi cate on a server named CAS1 and importing that certifi cate on a server named CAS2:
1. In order to export a certifi cate, we'll fi rst need to assign a password to secure the private key that will be exported with the certifi cate:
$password = ConvertTo-SecureString -String P@ssword `
-AsPlainText `
-Force
2. Now we can export the certifi cate data with the Export-ExchangeCertificate cmdlet. We'll retrieve the certifi cate from the CAS1 server and export the data to a binary-encoded value stored in a variable:
$cert = Get-ExchangeCertificate `-DomainName mail.contoso.com -Server cas1 | Export-ExchangeCertificate –BinaryEncoded:$true ` -Password $password
3. Next, we can import the certifi cate fi le data into the CAS2 server as a certifi cate:
Import-ExchangeCertificate -FileData $cert.FileData `
-Password $password `
-Server cas2
4. Finally, we can assign the services to the certifi cate that was recently imported on the CAS2 server:
Get-ExchangeCertificate `
-DomainName mail.contoso.com -Server cas2 |
Enable-ExchangeCertificate -Services IIS,SMTP
For More Information: www.packtpub.com/microsoft-exchange-server-2013-powershell-
2e-cookbook/book

Exchange Security
344
How it works...As you can see from these steps, exporting a certifi cate from one server and importing it on an additional server is rather complex, and would be even more so if you want to do this on 5 to 10 servers. If this is a common task that needs to be done frequently, then it makes sense to automate it even further. The following PowerShell function will automate the process of exporting a certifi cate from a source server and will import the certifi cate on one or more target servers:
function Deploy-ExchangeCertificate {
param(
$SourceServer,
$Thumbprint,
$TargetServer,
$Password,
$Services
)
$password = ConvertTo-SecureString -String $Password `
-AsPlainText `
-Force
$cert = Get-ExchangeCertificate -Thumbprint $Thumbprint `
-Server $SourceServer |
Export-ExchangeCertificate –BinaryEncoded:$true `
-Password $Password
foreach($Server in $TargetServer) {
Import-ExchangeCertificate -FileData $cert.FileData `
-Password $Password `
-Server $Server
Enable-ExchangeCertificate -Thumbprint $Thumbprint `
-Server $Server `
-Services $Services `
-Confirm:$false `
-Force
}
For More Information: www.packtpub.com/microsoft-exchange-server-2013-powershell-
2e-cookbook/book
Chapter 10
345
This function allows you to specify a certifi cate that has been properly set up and installed on a source server, and then deploy that certifi cate and enable a specifi ed list of services on one or more servers. The function accepts a number of parameters and requires that you specify the thumbprint of the certifi cate that you want to deploy.
Let's say that you've got a Client Access server array that contains six CAS servers. You've gone through the certifi cate generation process, obtained the certifi cate from a trusted certifi cate authority, and installed the certifi cate on the fi rst CAS server. Now you can add the Deploy-ExchangeCertificate function to your PowerShell session and deploy the certifi cate to the remaining servers in the array.
First, you need to determine the thumbprint on the source server you want to deploy, and you can do this using the Get-ExchangeCertificate cmdlet. The next step is to run the function with the following syntax:
Deploy-ExchangeCertificate -SourceServer cas1 `
-TargetServer cas2,cas3,cas4,cas5,cas6 `
-Thumbprint DE4382508E325D27D2D48033509EE5F9C621A07B `
-Services IIS,SMTP `
-Password P@ssw0rd
The function will export the certifi cate on the CAS1 server with the thumbprint value assigned to the -Thumbprint parameter. The value assigned to the -Password parameter will be used to secure the private key when the certifi cate data is exported. The certifi cate will then be installed on the fi ve remaining CAS servers in the array, and will have the IIS and SMTP services assigned.
There's more...You may want to export your certifi cates to an external fi le that can be used to import the certifi cate on another server at a later time. For example:
$password = ConvertTo-SecureString `
-String P@ssword `
-AsPlainText `
-Force
$file = Get-ExchangeCertificate `
-Thumbprint DE4382508E325D27D2D48033509EE5F9C621A07B `
–Server cas1 |
Export-ExchangeCertificate –BinaryEncoded:$true `
-Password $password
Set-Content -Path c:\cert.pfx -Value $file.FileData -Encoding Byte
For More Information: www.packtpub.com/microsoft-exchange-server-2013-powershell-
2e-cookbook/book
Exchange Security
346
This is similar to the previous examples, except this time we're exporting the certifi cate data to an external .pfx fi le.
You can use the following commands to import this certifi cate at a later time on another server in your environment:
$password = ConvertTo-SecureString `
-String P@ssword `
-AsPlainText `
-Force
$filedata = Get-Content -Path c:\cert.pfx -Encoding Byte -ReadCount 0
Import-ExchangeCertificate -FileData ([Byte[]]$filedata) `
-Password $password `
-Server cas2
This will import the certifi cate from the external .pfx fi le to the CAS2 server. Once this is complete, you can use the Enable-ExchangeCertificate cmdlet to assign the required services to the certifi cate.
See also The Generating a certifi cate request recipe
The Installing certifi cates and enabling services recipe
For More Information: www.packtpub.com/microsoft-exchange-server-2013-powershell-
2e-cookbook/book
Where to buy this book You can buy Microsoft Exchange Server 2013 PowerShell Cookbook Second Edition from the Packt Publishing website: http://www.packtpub.com/microsoft-exchange-server-2013-powershell-2e-cookbook/book. Free shipping to the US, UK, Europe and selected Asian countries. For more information, please read our shipping policy.
Alternatively, you can buy the book from Amazon, BN.com, Computer Manuals and most internet book retailers.
www.PacktPub.com
For More Information: www.packtpub.com/microsoft-exchange-server-2013-powershell-
2e-cookbook/book