microtactix - dcd1002 - dirt cheep dungeons - expansion pack 1
TRANSCRIPT

DISCLAIMERWe have made every effort to make sure that all the partsfit together properly, but sometimes tolerances are tightand mistakes do happen. Test fit all pieces before applyingglue. Some trimming may be required.
Tools RequiredScalpel or sharp-bladed hobby knifeMetal ruler or straight-edgeCutting surface - a self-healing cutting mat is just wonder-ful, but a sheet of corrugated cardboard or even heavyposter board will work as well.Glue - white glue, glue stick or wax stick. Double sidedcellophane tape also works well.
A Note About Using White GlueWhite glue contains a good deal of water. Too much gluewill warp the card stock to a point where it becomesalmost unusable. If you use white glue, put a very thin coaton the glue tabs - the thinnerthe better. You can use a cotton swab or your finger tospread the glue thin. Remember to keep a damp papertowel handy to remove any excess glue.
PLEASE NOTE: Each building has been marked with aseries of Grey Lines that are an indicator that these linesare Fold or Score lines. All Tabs which are to be glued tohold the structures together are marked with a capital letter“G”. Unless otherwise noted, all Glue Tabs foldinwards to the structure.
ASSEMBLING STAND-UPSAll stand-up figures and articles are assembled the sameway. Cut out each figure, then score the center, top andbottom grey lines and fold inwards. Glue the end flap withthe character name on theoutside and the copyright notice on the inside forming atriangle shape. The illustration should be on one side andthe black silhouette on the other.
Most items, unless otherwise noted, are constructed usingthe box method. To begin, cut out the piece and score onall grey lines. Fold down the top of the object and fold inall sides. Fold the glue tabsto the inside and glue to the inside walls of the piece.
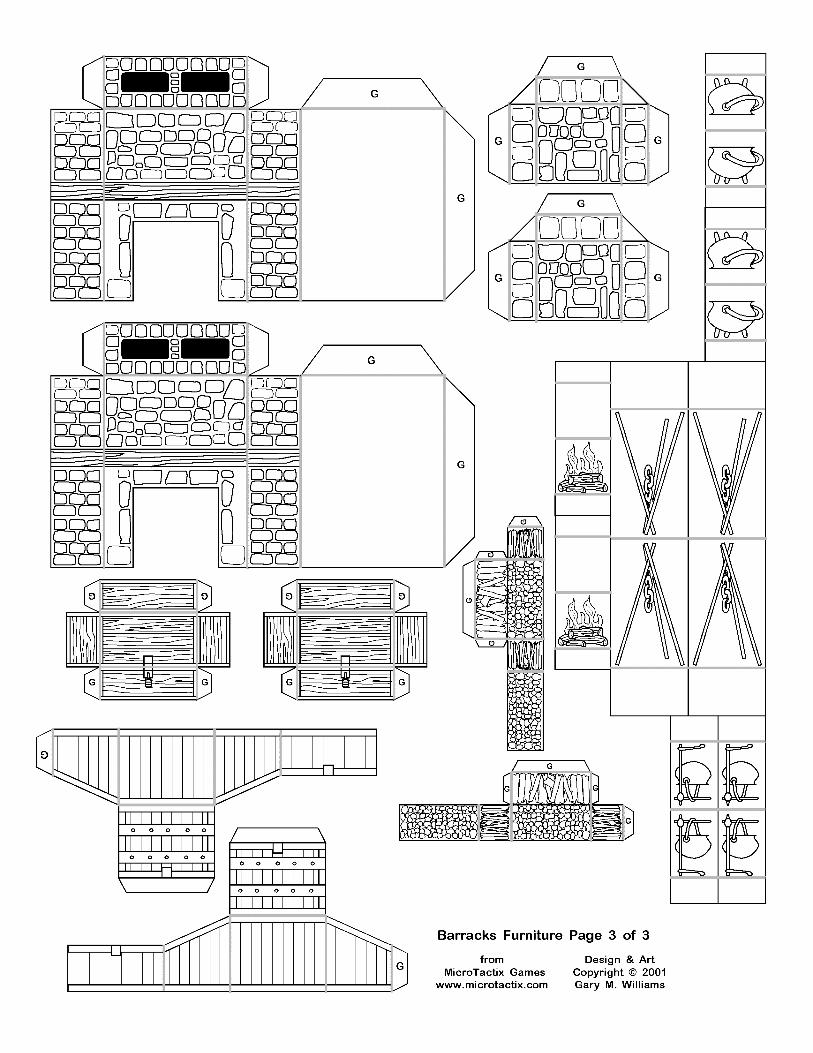
THE BARRACKSEnough furniture had been provided to create two separaterooms, one for officers (with the single beds) and one forenlisted men (with the bunk beds). Two fireplaces, woodboxes and cooking accessories have also been provided.
Most pieces in this set will assemble in one of two ways,like boxes or like stand-ups. To assemble pieces using thebox method, fold down the sides of the piece from the topand fold the glue tabs in and glue to the inside. Pieces suchas the beds, tables, trunks and helmet rack will assembleusing this method. The Weapons Rack, (in the upper rightcorner of Page 1) assembles the same way but used
triangular side pieces. To construct the chairs, fold orscore along all grey lines and fold in half. The side withthe copyright notice at the bottom is the back of the chair.Fold the seat section (the square above the legs) up andglue the chair back to the inside of the piece. Fold the legsdown from the seat and the bottom flap to the inside. Thisflap will glue to the inside of the flap with the copyrightnotice on it.
On Page 2 the tables, trunks, helmet rack , weapons rackand chairs will assemble as given above. The bunk bedswill be constructed in two sections. Begin with the lowersection (the piece without the legs.) Cut out and scorealong all grey lines. Start with the side with the long railingto the left. fold down the first section, just to the left of thefirst bed, and glue to the inside of the railing. Fold up thesecond section to the right of the first bed and the left sideof the second bed. Glue the two sides together Repeat theprocess until you get to the last section of the last bed. Foldup the side and fold down the siderail . Glue the side of thelast bed to the siderail at this time. Fold up all head andfoot boards on each bed. Fold the two long siderails sothat one is running along the head and the other along thebottom. Fold the glue tabs in and attach to the lastsideboard. Don’t worry about any of the glue tabs showingas the legs from the upper bunk will cover them.
The upper bunk will assemble much the same way as thelower bunk, by folding up sides and gluing them together.The head and foot boards will hold the beds in place onthe sideboards as above. Use the glue tab on the last leg tohold the upper bunk together. When both pieces are dryattach the upper bunk to the lower bunk by putting down abead of glue along the corners of the lower bunk andfitting the upper bunk in place over it.
To assemble the fireplaces and cooking accessories givenon Page 3, begin with the fireplace. Cut out and score asindicated. Fold the two sides and top of the fireplace backout from the back of the piece and fold the triangular gluetabs down. Glue these tabs to the unprinted outside of thepiece. When dry, fold the glue tabs out and glue to theunprinted inside of the fireplace, lining up the sides andtop. When dry, the rest of the fireplace will assemble usingthe box method given above.
The trunks, woodbox and stack of wood will all assembleusing the box method. The fire, cookpots and cooking
Expansion Pack #1DIRT CHEEP DUNGEONS™
irons will assemble using the stand-up method. Score andfold along all grey lines and fold the piece in half. Glueone bottom flap on top of the other to create a largetriangle. If desired, a second method can be used by gluingthe two sides together and folding the bottom flaps out tocreate feet.
THE CRYPTPieces that are constructed in the box method are: thecrypts, the crypt bases, the crypt tops and the wooden box.The coffins are constructed much like other box shapesbut have sharper angles. Use the triangular glue tabsattached to the inside to hold the piece together. The flapsalong the sides of the coffin lids arefolded in slightly, but not all the way, to hold the lidsdown. The two flats of the body and the vampire are to becut out and placed inside the coffins. The coffins will fitinto the crypts or into thewooded box as desired. The wall of the Crypt Guardians isto be attached to an existing tile piece from the Dirt CheapDungeon’s Basic Set. Begin by cutting out and scoring allpieces. Pay particular attention to the areas to be cut out onthe wall itself. To construct the alcove, fold the side wallsand top wall in and fold the glue tabs out. Use thetriangular shaped glue tabs to either side of the top andbottom sections to attach to the side walls. When dry,attach the alcove to the cut out in the wall from theunprinted inside of the the wall. When dry the wall isconstructed using the box method. When dry the wall isthen attached to the Dungeon Tile.
THE WIZARD’S CHAMBERSThe pieces that are constructed in the box method are: thetwo tables,the two trunks, the bookcase and the uprightcabinet. The small stand-ups of the bottles and thecandlesticks are to be folded in half and glued together-,folding the feet to the outside. The pieces are then glue toeither table as desired.
The cage for the beast is constructed as a basic box withthe addition of the pull ring attached to the top. The pullring is constructed like the bottles and candlesticksstand-up explained above.
To construct the Wizard’s Chair, fold in the chair sides andfold under the flap with the copyright notice. Fold downthe back to the first fold line. Glue this to the unprintedinside of the piece. Fold out the seat and fold down thetwo glue tabs to the inside. Glue these tabs to the inside ofthe chair sides. Fold down the legs and fold the last flapunder and glue to the flap with the copyright notice.
The wall of the Wizard’s Lair is to be attached to anexisting tile piece from the Dirt Cheap Dungeon’s BasicSet. Begin by cutting out and scoring all pieces. Payparticular attention to the areas to becut out on the wall itself. To construct the doorway, foldthe side walls and top wall in and fold the glue tabs out.Use the triangular shaped glue tabs to either side of the topwall to attach to the side walls. When dry, attach the doorto the cut out in the wall from the unprinted inside of thethe wall. The bay window will construct the same way andwill also attach to the inside of the wall. When drythe wall is constructed using the box method.
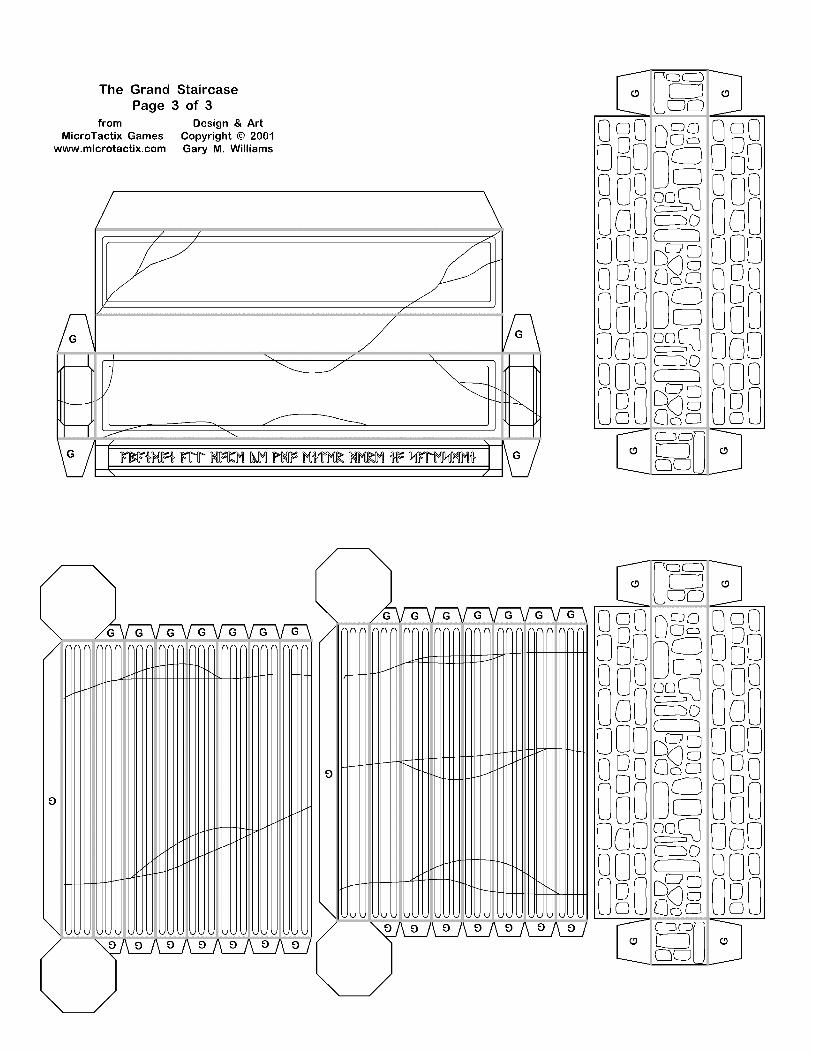
THE GRAND STAIRCASEIn order to construct the Grand Staircase a Wall and FloorTile from the Cheap Dungeons Basic Set will be required.Assemble a wall and floor tile according to the instructionsgiven in the Basic Set. Thiswill be the basis for this set.
Cut out all pieces and score as indicated. Begin with thetwo story wall by cutting out the indicated area in the wall.To construct the door, fold the side walls, top and bottomwalls in and fold the glue tabs out. Use the triangularshaped glue tabs to either side of the top and bottomsections to attach to the side walls. When dry, attach thedoor to the cut out in the wall from the unprinted inside ofthe the wall. When dry the wall is constructed using thebox method. When dry the wall is then attached to the topof the wall from the Basic Set.
The staircase itself will be constructed in three sections, thestairs, the sidewalls and the front pedestals. Begin with thestairs. Cut out and score as indicated, then fold all gluetabs in. Work from one side at a time and fold the stairs tomatch the side angles. When dry, fold over the other side

and apply glue to the tabs to hold the piece together. Setaside to dry. To construct the sidewalls, cut out and scoreas indicated. These pieces construct using the box methodgiven above. When both sides are dry, attach to the side ofthe stairs, making sure to line up the back of the sidewallswith the back of the stairs. Do not line up to the front orthere will be no room left for the front pedestals. The frontpedestals are constructed with the box method. When drythey are attached to the front of the sidewalls on either sideof the stairs. When the entire assembly is dry, attach thestaircase to the wall, centering it beneath the door.
To assemble the columns, cut out and score as indicated.Fold down the top and fold in the glue tabs. Use the gluetabs to attach the column fronts to the top and bottom. It'seasier if you do one endat a time and not try to do the top and bottom at once. Usethe long glue tab to hold the piece closed. After bothcolumns are dry, attach them to either side of the staircaseassembly.
Construct the staircase overhang using the box methodgiven above. When dry, attach to the tops of the columnsand apply glue to the back of the overhang to glue to thewall.
The two stone walls are constructed using the box method.These two pieces were not designed to be integrated intothe staircase itself, but to be placed as needed for a desiredeffect.
Dungeon Accessories 2 PagesThese two pages are some random props to scatter aboutyour dungeon environment for effect. Page One containsan alter, an obelisk, a throw rug, three stone “runners” anda set of double doors leading to a lower level.
The simplest piece to construct is the throw rug. Cut outand place where needed.
To construct the alter and base, cut out and score asindicated. For the alter, fold down all four sides from thetop and place the glue tabs to the inside. Set aside to dry.To assemble the base do exactly the same as for the alter.When both pieces are dry, fold in the glue tabs on thebottom of the alter and glue to the center of the base.
The obelisk will construct nearly the same way. Fold downthe top and fold the glue tabs to the insides (unprintedside) of the side walls and glue. When you get to the lastwall, use the glue tab to the inside to hold the obelisktogether. The base will construct the same way as the basefor the alter. When dry, attach the obelisk to the base byfolding the glue tabs in and gluing to the base.
To construct the stone runners, (to be placed along thebottoms of walls, running out from doorways or justsomewhere on the floor to give your players problems),cut out and score as indicated. Fold the sides down fromthe top and place the glue tabs to the inside. Glue one tabon top of the other and glue the end over the two tabs.
To construct the doors leading to a lower level, cut out andscore as indicated. Fold down the sides from the front (theside with the doors) and fold the glue tabs in. Fold downthe back of the piece and glue the glue tabs to the inside tohold together.
Page TwoTo construct the chests, cut out and score as indicated.Fold down the top and sides and fold the glue tabs to theinside. In the case of the large chest match the angles onthe side walls in order to create a “hump topped” chest.
To assemble the columns, cut out and score as indicated.Both sections will assemble the same way. Fold down thetop and fold in all glue tabs. Glue the tabs to the top (andin the case of the long column, the bottom) matching theangles. When reaching the last wall, use the glue tab to theinside to hold the piece together. When completed they canbe glued together to create one large column or a short andtall one.
To assemble the fountain, cut out both pieces and score asindicated. Assemble the front first. Fold down the pondsection and all glue tabs, then fold down on the secondscore line. Now, fold up on the pond section and tabs.This will created a recessed pond area as if the water isbelow the wall. Glue the unprinted sides of the short wallto the taller base wall. When this has dried, use the gluetabs to attach the walls to the pond section much in thesame way as the columns, following each angle as youcome to it. Use the glue tab on the last wall to close thepiece. Set aside to dry. To assemble the back of thefountain, fold down the top from the front wall, fold in thesides and fold the back to the back. Use all glue tabs to theinside to create a tall, narrow box. When this is dry, attachthe front section to the back wall, lining it up so that the“point” of the five sided pond is facing out.
To assemble the stone corners, cut out and score asindicated. Work with only one side at a time. Fold in theglue tabs and glue to the inside matching the angles on theside wall. Do not glue the top at this time. When dry, workthe other side. To close the piece, use the glue tab alongthe back wall. Fold in the glue tabs on the top and glue tothe inside. These pieces can be used in corners, the sidesof doors or as general character obstacles.
© 2001 MicroTactix Games Pieces Designed and Rendered byGary M. Williams and are copyright © 2001 by the author.