millennium user guide - upside.caupside.ca/millennium/millenniumsmssetupguide.pdf · step 1: enter...
TRANSCRIPT

Millennium SMS Setup Guide
Version 1.01

ii
Copyright Information
© 2013 Millennium by Harms Software Inc. All rights reserved.
Every effort has been made to ensure that the information in this guide is accurate. Millennium by Harms Software Inc assumes no responsibility or liability for any errors or inaccuracies with the informational content in this guide. Millennium by Harms Software Inc releases updates frequently so the images shown in this user guide may be slightly different from what you see in your version of the software.
Other company and product names mentioned herein may be trademarks of their respective companies. Mention of third-party products is for informational purposes only and constitutes neither an endorsement nor a recommendation. Millennium by Harms Software Inc assumes no responsibility with regard to the performance or use of these products. All understandings, agreements, or warranties, if any, take place directly between the vendors and the prospective users.
The example companies, organizations, products, domain names, email addresses, logos, people, places, and events depicted herein are fictitious. No association with any real company, organization, product, domain name, email address, logo, person, place, or event is intended or should be inferred.
Millennium by Harms Software Inc is not responsible for the content of external Internet sites referenced in this guide.
iii
Using This Guide
This guide explains how to set up the Millennium SMS Service and how to use the text messaging features in Millennium.
iv
Contents
Step 1: Enter Text Messaging Account Details ............................................................................................. 1
Step 2: Define Your Confirmation Message .................................................................................................. 3
Step 3: Configure the Millennium SMS Service ............................................................................................ 5
Step 4: Configure Clients to Receive Text Messages .................................................................................... 6
Step 5: Send SMS Confirmations .................................................................................................................. 8
Step 6: Set Up SMS Reminders ................................................................................................................... 10

Step 1: Enter Text Messaging Account Details
1
Step 1: Enter Text Messaging Account Details
1. To begin, you must first enter your UpsideWireless Username and Password into Millennium. To do this, we will be going to our Business Information and Preferences screen, located at the bottom of the Data menu.
2. Once you are in the Business Information Screen, you will go to the Preferences Tab, and then the Millennium.SMS Tab, then press Edit. Here you will enter your Username (ID) and Password for your UpsideWireless account. If you do not know your username or password, you can go to http://harms.upsidewireless.com to either reset your password or contact UpsideWireless for assistance if necessary.
Step 1: Enter Text Messaging Account Details
2
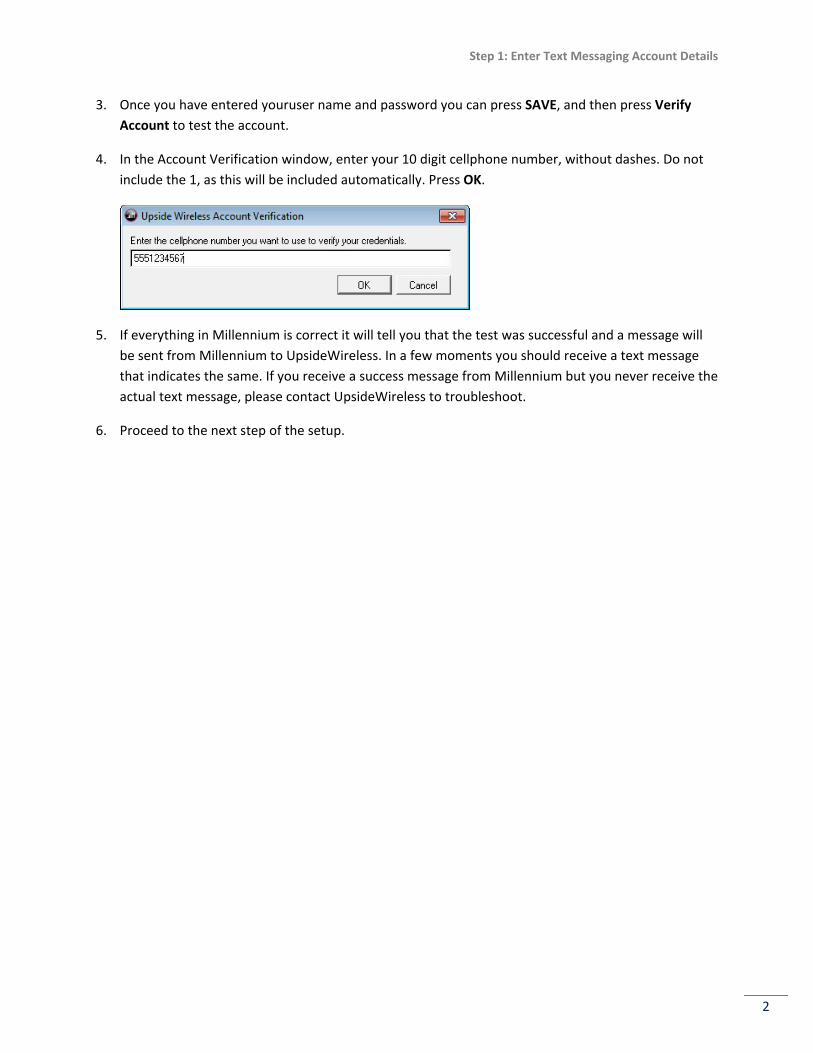
3. Once you have entered youruser name and password you can press SAVE, and then press Verify Account to test the account.
4. In the Account Verification window, enter your 10 digit cellphone number, without dashes. Do not include the 1, as this will be included automatically. Press OK.
5. If everything in Millennium is correct it will tell you that the test was successful and a message will be sent from Millennium to UpsideWireless. In a few moments you should receive a text message that indicates the same. If you receive a success message from Millennium but you never receive the actual text message, please contact UpsideWireless to troubleshoot.
6. Proceed to the next step of the setup.

Step 2: Define Your Confirmation Message
3
Step 2: Define Your Confirmation Message
1. Millennium comes pre-configured with a confirmation message that reads as the example below:
Elysium Salon & Spa is confirming your appointment(s) on Wed. 8/14/2013 starting at 2:00PM. Please reply with a Y/YES to Confirm or a N/NO to Cancel.
2. You can modify the “Please reply with …” portion of the message if you wish. To change this default, press EDIT on the Millennium.SMS tab of your Business Information and Preferences (the same place where we setup your username and password).
3. Once you are in EDIT mode, press Format Message.
Step 2: Define Your Confirmation Message
4
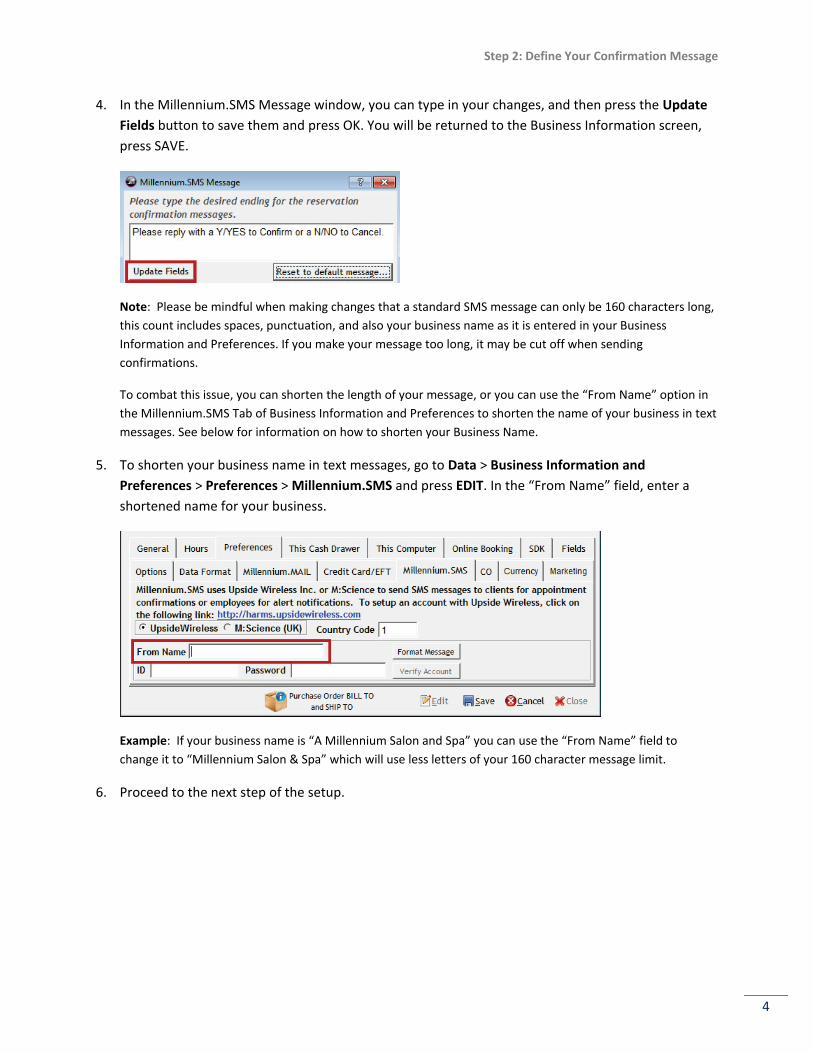
4. In the Millennium.SMS Message window, you can type in your changes, and then press the Update Fields button to save them and press OK. You will be returned to the Business Information screen, press SAVE.
Note: Please be mindful when making changes that a standard SMS message can only be 160 characters long, this count includes spaces, punctuation, and also your business name as it is entered in your Business Information and Preferences. If you make your message too long, it may be cut off when sending confirmations.
To combat this issue, you can shorten the length of your message, or you can use the “From Name” option in the Millennium.SMS Tab of Business Information and Preferences to shorten the name of your business in text messages. See below for information on how to shorten your Business Name.
5. To shorten your business name in text messages, go to Data > Business Information and Preferences > Preferences > Millennium.SMS and press EDIT. In the “From Name” field, enter a shortened name for your business.
Example: If your business name is “A Millennium Salon and Spa” you can use the “From Name” field to change it to “Millennium Salon & Spa” which will use less letters of your 160 character message limit.
6. Proceed to the next step of the setup.

Step 3: Configure the Millennium SMS Service
5
Step 3: Configure the Millennium SMS Service
1. Go to Start > All Programs > Harms Software Inc > Millennium.SMS Service and open the Millennium.SMS Service Configuration. When the configuration screen loads, you should verify that your Millennium data directory is correct, and then enter your UpsideWireless Username and Password into their respective fields. Once you have entered the username and password and verified the database location you can press Apply, and then Yes when asked to start or restart the service.
Note: If you want to receive email notifications whenever there is an error with the Millennium.SMS program, you can enter an email address in the “Send errors to:” field in this configuration. This is not required, but you can enter an email address here if you’d like to be notified of this.
2. Once you have entered all information and applied the changes, you can close this window. If asked to restart the service again, you can choose either Yes or No.
3. Proceed to the next step of the setup.

Step 4: Configure Clients to Receive Text Messages
6
Step 4: Configure Clients to Receive Text Messages
1. Go to Data > Clients > Client Information
2. Press the Magnifying Glass icon to search for the client you are setting SMS confirmations for. Search by first or last name, or any other method to find the client, select them and open their Client Profile.
3. On the client profile, press Edit, and then make sure that the clients cellphone number is entered correctly.

Step 4: Configure Clients to Receive Text Messages
7
4. Once you have entered the cellphone number, you also need to indicate that the client wants SMS/Text Message Confirmations. Next to the “Confirm Appts” checkbox in the client profile is a small icon of a person with a speech bubble over their head. While you are still in Edit mode, click on this button.
5. In the Appointment Confirmations Window, make sure you have SMS/Text Messaging selected, and then press OK.
6. If you would also like to configure this clients setting for receiving SMS Reminders and SMS Marketing, you should click on the Notify button in the client information screen.
7. Once the Notification Preferences screen loads, you can select “SMS Reminder” and “SMS Marketing”. Press Ok, and then save the client’s profile.
8. Proceed to the next step of the setup.

Step 5: Send SMS Confirmations
8
Step 5: Send SMS Confirmations
1. Go to Appointments > Appointment Confirmations
2. In the Appointment Confirmations Screen, choose the day of the appointments you want to confirm next to “Use Appt Date” – this already defaults to the next day. Once you have selected the day you wish to confirm, press Load Clients and it will load all clients that need to be confirmed on the appointment book for that day. After loading the list, press the “SMS Confirmations” button at the bottom of the screen.
Step 5: Send SMS Confirmations
9
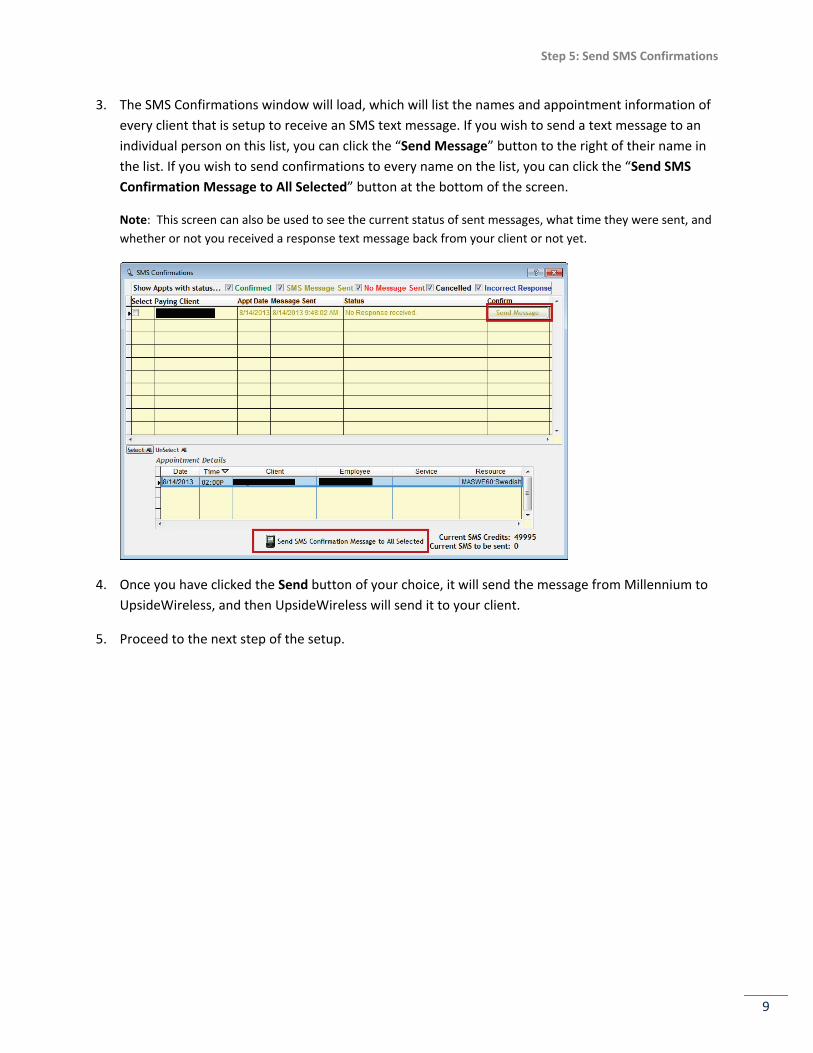
3. The SMS Confirmations window will load, which will list the names and appointment information of every client that is setup to receive an SMS text message. If you wish to send a text message to an individual person on this list, you can click the “Send Message” button to the right of their name in the list. If you wish to send confirmations to every name on the list, you can click the “Send SMS Confirmation Message to All Selected” button at the bottom of the screen.
Note: This screen can also be used to see the current status of sent messages, what time they were sent, and whether or not you received a response text message back from your client or not yet.
4. Once you have clicked the Send button of your choice, it will send the message from Millennium to UpsideWireless, and then UpsideWireless will send it to your client.
5. Proceed to the next step of the setup.
Step 6: Set Up SMS Reminders
10
Step 6: Set Up SMS Reminders
Millennium also has an option to send a Reminder text message immediately after you book an appointment, or make changes to an appointment. Setup of this portion is not required, unless your business has interest in sending these types of instant reminders.
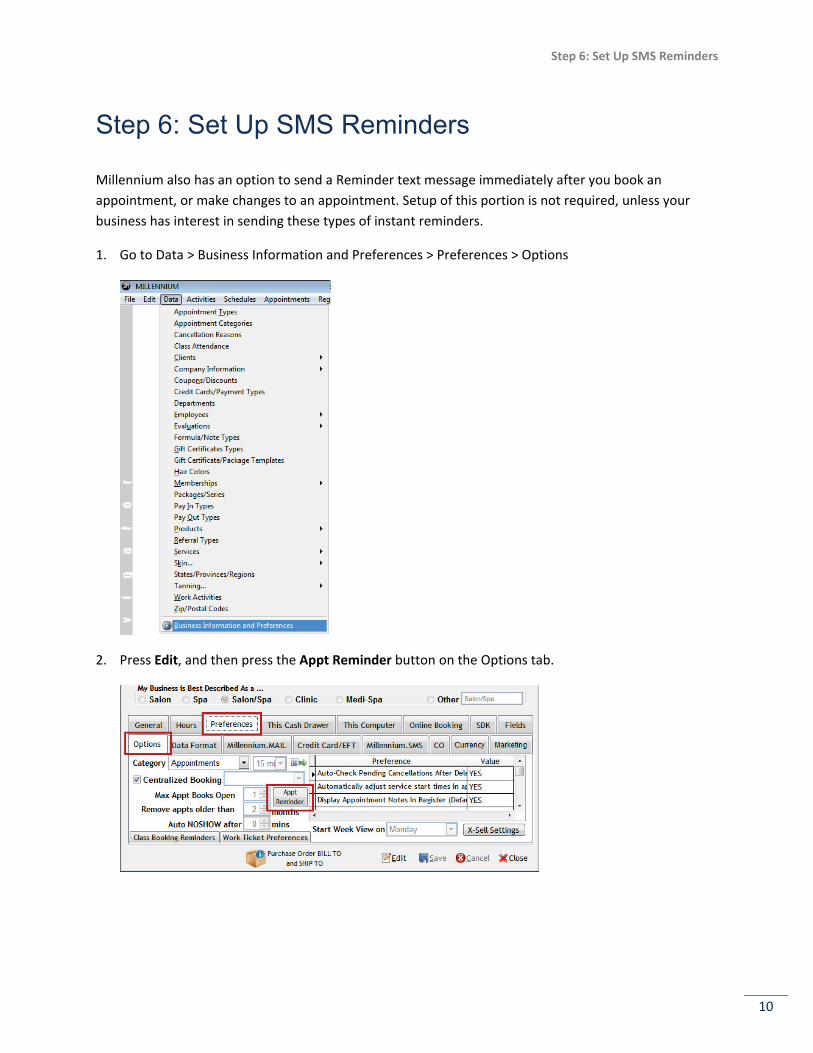
1. Go to Data > Business Information and Preferences > Preferences > Options
2. Press Edit, and then press the Appt Reminder button on the Options tab.
Step 6: Set Up SMS Reminders
11
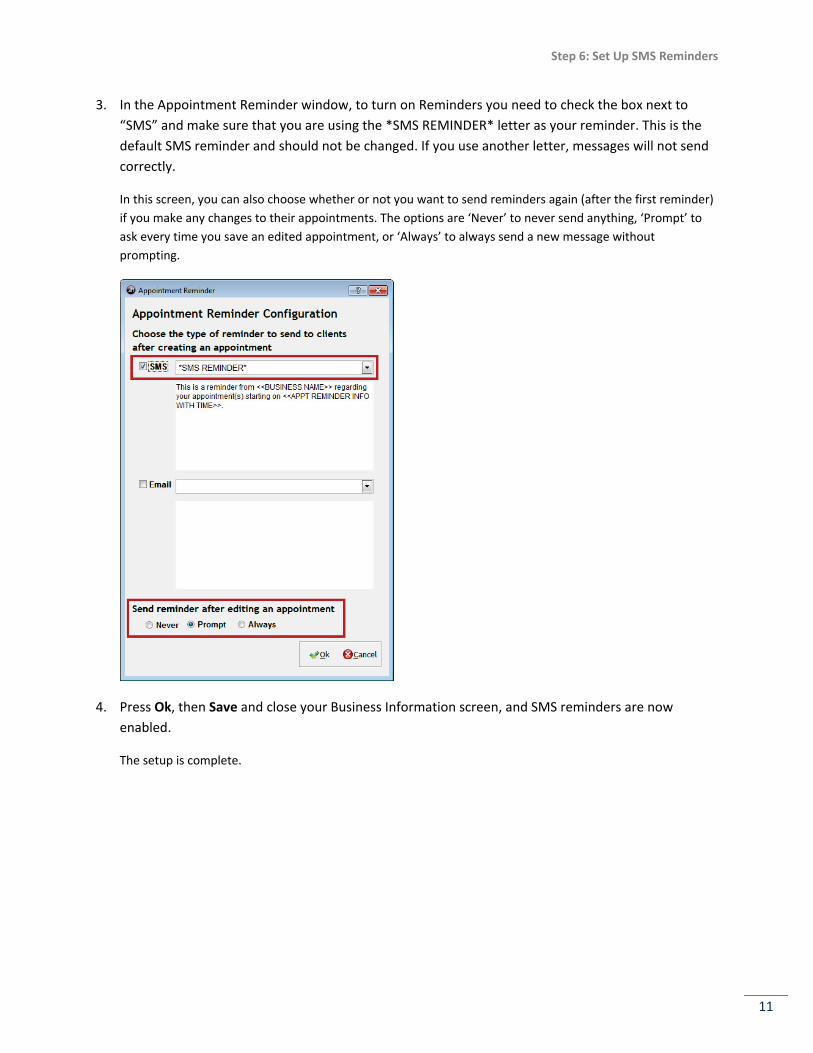
3. In the Appointment Reminder window, to turn on Reminders you need to check the box next to “SMS” and make sure that you are using the *SMS REMINDER* letter as your reminder. This is the default SMS reminder and should not be changed. If you use another letter, messages will not send correctly.
In this screen, you can also choose whether or not you want to send reminders again (after the first reminder) if you make any changes to their appointments. The options are ‘Never’ to never send anything, ‘Prompt’ to ask every time you save an edited appointment, or ‘Always’ to always send a new message without prompting.
4. Press Ok, then Save and close your Business Information screen, and SMS reminders are now enabled.
The setup is complete.