mira 3 manual - hifix
TRANSCRIPT
Contents
Introduction.............................................................................1Design Innovation...................................................................2Installation..............................................................................3Ventilation...............................................................................4DC and Short Circuit Protection.............................................5Pre-amp Output and Power-Amp Input...............................6Input Connections...........................................................7-9In Use..............................................................................10-12Loudspeakers & Cable.........................................................13Bi-amping....................................................................14Specifications...........................................................15Troubleshooting.....................................................16-20Input sensitivity and pre-amp gain level................................21Owners Log...........................................................................22
Mira 3 manual.qxd 10/12/2002 11:24 Page 1
Introduction
Your REGA amplifier has been designed to reproduce musiceffectively and easily. The Mira 3 has been built to Rega’sdiscriminating standards of reliability and quality to ensure manyyears of musical enjoyment.
An amplifiers function is to boost the tiny signal generated by acartridge, CD player, or other source so that it can drive theloudspeakers. It is vital that the amplifier achieves this withoutchanging the signal, which would distort the music. We have avoidedsuperfluous gadgets such as tone controls or a headphone socket asthey obstruct the signal path and degrade the produced soundquality.
The REGA amplifiers incorporate remarkable and innovative designideas. For those interested in the technical details, these innovationsare described more fully in this manual.
Alternatively, you can simply switch on, sit back, and let your amplifierspeak for itself...
Mission Statement
Rega’s philosophy is to make high quality products at sensible prices, as a meansof reproducing music as faithfully as possible. Rega is committed to the design
and development of new and existing products, both in hi-fi and other areas, thatwill perpetuate Rega’s values of quality and value for money.
1
Mira 3 manual.qxd 10/12/2002 11:24 Page 2

2
Design Innovation
In common with all REGA products, the Mira 3 amplifier has beendesigned without compromise. Our time and money has been spenton developing the unique circuit design and using unusually highquality components. However, we have included new useful featuresnot seen on REGA amplifiers of this price before.
The Mira 3 amplifier has digitally controlled analog switchedresistor network volume control.
The Mira 3 features REGA designed circuitry, developed in-house with the aid of CAD circuit simulation, computer modeling andextensive listening.
The Mira 3 has an internal switch to link the pre-amplifierand power amplifier, giving total flexibility within the REGA range;highly uncommon for amplifiers of this price.
The Mira 3 includes extremely high quality components notnormally found in an integrated unit. These include high tolerancepolypropylene capacitors, advanced output transistors, and a largetoroidal transformer.
Mira 3 manual.qxd 10/12/2002 11:24 Page 3

3
Installation
The Mira 3 will work well on most surfaces, such as a shelf or a table,provided there is sufficient air around it to prevent overheating.
To avoid magnetic interference, site the Mira 3 as far away from theturntable as the tonearm lead will allow. If possible, place it to the leftof the turntable.
Keep other equipment, such as tuners, cassette decks or CD playersaway from the amplifier. Never stack other hi-fi components on top ofthe Mira 3.
Due to the layout of Rega's amplifier circuit designs, they are virtuallyinsusceptible to Electro Magnetic interference, and by virtue of theextruded aluminium case, emit practically no Electro Magneticradiation. However, placing any electronic equipment close together mayimpair the performance of one or both of the items.
Mira 3 manual.qxd 10/12/2002 11:24 Page 4
4
Ventilation
The heat produced by the Mira 3 is dispersed to the air via the case,particularly from the extruded heatsink. Ensure that the case has anunobstructed air passage around it.
Never place the amplifier on carpet, rugs, bedding or other hi-fiequipment.
Note: If the Mira 3 is driven at high volume for a long period, it willbecome quite warm. This is entirely acceptable and as long as thereis sufficient ventilation, the amplifier will continue to work quitenormally.
Mira 3 manual.qxd 10/12/2002 11:24 Page 5

5
DC Protection
The Mira 3 has a circuit which protects the speakers from directcurrent in the event of a major failure of the system.
Short Circuit Protection
If in the event that the speaker leads are shorted, the fold back shortcircuit protection will protect the output stage from excessivecurrents. This innovative REGA protection circuit is not placed in theaudio signal path and therefore does not affect sound quality.
Mira 3 manual.qxd 10/12/2002 11:24 Page 6

6
Pre-Amp Output and Power-Amp Input
The Mira 3 has a pre-amplifier output & power-amplifier input, givingtotal flexibility within the REGA range.
The pre-amplifier can drive at least 5 power amplifiers, sub bass unitsetc, and the power amplifier can be used with most pre-amplifiers.
There is an internal link via a DIP switch between the pre-amp outputand power-amp input which can be turned off by moving the DIPswitch to the OFF position. If you are using only the pre-amp stage ofthe Mira 3 in conjunction with a separate power-amplifier you maywant your dealer to move the switch to the off position.
The pre-amp outputs and power-amp input use RCA type (phono)connectors.
Any adjustments made to the power amp link switch and gain mustbe carried out by a authorised Rega dealer. If work is carried out by any person other than a Rega dealer it willinvalidate your warranty.
Mira 3 manual.qxd 10/12/2002 11:24 Page 7

7
Input Connections
All the inputs and the tape outputs are made via RCA (phono) typeconnectors. The sockets on the REGA amplifiers are clearly markedred and white.
Right: always the lower row and marked in RED. Left: always the upper row and marked in WHITE.
IMPORTANT: ALWAYS TURN OFF THE AMPLIFIER WHEN CHANGING LEADS,ESPECIALLY SPEAKER CABLES.
Rear Panel Connections
Right
Left
SPEAKERS
TAPE TAPE TAPE IN OUT LINKLINE2LINE1TUNERCD
Rega Research Limited, England
PHONO
POWERAMP
IN
PREAMPOUT
IEC
Ground screw
Mira 3 manual.qxd 10/12/2002 11:24 Page 8

8
Phono Input
The Mira 3 can be used with moving magnet (MM) or high outputmoving coil (MC) cartridges.
Earthing
Earthing is done via the Phono socket ground for Rega turntables soa separate earth is not necessary. In the unlikely event that yourtonearm needs to be earthed to the amplifier, the grounding tag maybe connected to the case grounding screw above the input sockets.See Rear Panel Connections drawing (page 7).
Compact Disc Input
The compact disc input is suitable for use with any CD source.
Mira 3 manual.qxd 10/12/2002 11:24 Page 9

9
Tuner Input
The tuner input is suitable for use with most types of AM/FM tuners.
Line Inputs
The Line inputs enable the connection of additional sources, such asa second tape machine, tuner, video recorder etc...
Tape Input/Output
Almost any tape machine can be used with your Mira amplifier,including compact cassette, video cassette, reel to reel, DAT, andDCC.
NOTE: ALL INPUTS, OTHER THAN THE PHONO INPUT, ARE AT STANDARD "LINELEVEL" AND CAN THEREFORE BE USED FOR ANY LINE LEVEL INPUT.
Mira 3 manual.qxd 10/12/2002 11:24 Page 10
10
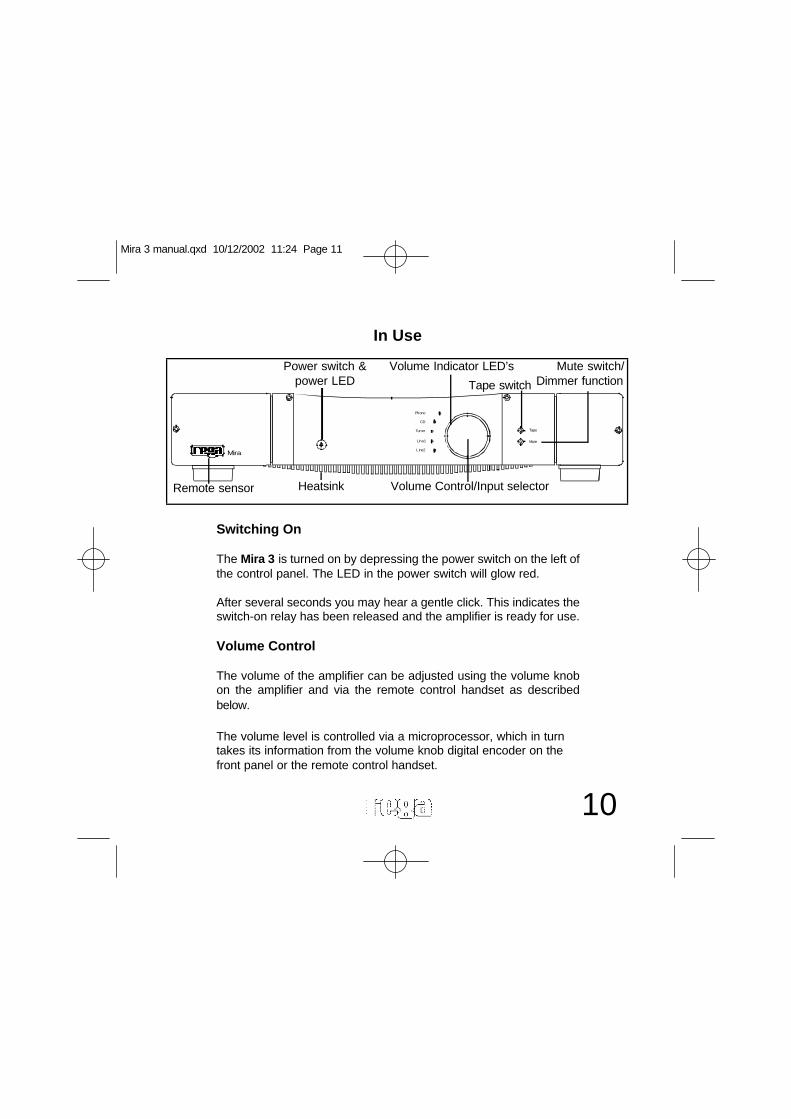
In Use
Switching On
The Mira 3 is turned on by depressing the power switch on the left ofthe control panel. The LED in the power switch will glow red.
After several seconds you may hear a gentle click. This indicates theswitch-on relay has been released and the amplifier is ready for use.
Volume Control
The volume of the amplifier can be adjusted using the volume knobon the amplifier and via the remote control handset as describedbelow.
The volume level is controlled via a microprocessor, which in turntakes its information from the volume knob digital encoder on thefront panel or the remote control handset.
Line2
Line1
Tuner
CD
Phono
Tape
Mute
Mira
Volume Control/Input selector
Power switch &power LED
Volume Indicator LED’s
Remote sensor Heatsink
Tape switch
Mute switch/Dimmer function
Mira 3 manual.qxd 10/12/2002 11:24 Page 11

The volume control has a resolution of 1dB per step, giving a totalrange of 80 steps over the available gain or volume range of 80dB.There is a calibrated LED display comprising of 20 LED's, whichindicates the gain level or relative position of the volume control;this is calibrated in 4dB steps, across the total gain of the volumerange.
The left and right channels are matched and balanced within 0.2dB,ensuring a centrally placed soundstage no matter what the volumeposition or which gain level has been set.
LED Display Dimmer Function
To change the brightness of the volume control LED display, pushthe control knob once. You are now in input selection and dimmermode. Pressing the Dimmer/Mute button three times will stepthrough the three different levels of display brightness, you haveeight seconds to press the Dimmer/Mute button.
11
Mira 3 manual.qxd 10/12/2002 11:24 Page 12

12
Input Selection
The Input selector is combined with the volume control. To select yourinput, push the control knob in once. You are now in Input selectionmode. You have eight seconds to choose your input. (When the eightseconds are up the control knob will return to the volume function).The inputs are selected by turning the knob to the required input.
Input Selector
Always allow the amplifier to fully power down (indicated by thepower LED extinguishing after 2-3 seconds) before switching onagain, so that the self-test circuitry can complete its reset cycle.
Tape: This input provides full tape monitoring facilities if your tapemachine has 3 heads.
Mute: The mute function mutes both the speaker and pre-amplifieroutput.
It is possible to press the control knob within the eight-second periodto resume the volume control mode.
Mira 3 manual.qxd 10/12/2002 11:24 Page 13
13
Loudspeakers
The Mira 3 amplifier is capable of driving all normal hi-filoudspeakers. (Most loudspeakers have a nominal impedance of 8Ohms).If driving loudspeakers of unusually low impedance (4 Ohms or less),ensure that you check with your dealer for compatibility.
Loudspeaker Cable
We recommend using good quality cable such as our own, or similartypes made by other quality hi-fi companies. Very expensive cableclaiming to use special materials and technologies, along with 'solidcore' or OFC types, are not recommended, as they often do notrepresent value for money. Try to keep cable runs to either speakershort and of similar length. Your REGA dealer will be able to make upspecific lengths of cable for you with plugs already fitted. Never joincables together to increase their length.
Damage by shorting: Never short (i.e. touch together), the bareends of speaker cable on any amplifier, however the protection circuitwill prevent damage in the case of accidental shorting.
Mira 3 manual.qxd 10/12/2002 11:24 Page 14

14
Bi-Amping
With the use of additional power amplifiers, the Mira 3 integratedamplifier can be used in a bi-amping system, in conjunction withsuitable speakers. This system can also be made active by the useof a suitable cross-over unit.
Use both pre-amp outputs into a stereo power amplifier, or the rightand left outputs into individual mono power amps, to drivebass/midrange; and the speaker outputs on the integrated amplifierto drive the tweeters.
If you are using a different pre-amplifier or an active cross-over, theamplifier can be used as a stereo power amplifier by putting a linelevel input into the power-amp in connectors, and using the speakeroutputs to drive the appropriate speaker. If you have any doubtsconcerning bi-amping your system, consult your REGA dealer.
Remote Control
The Mira 3 features an optional remote control. This has additionalbuttons not used by the Mira, but all functions offered on the amplifiercan be performed using the remote control.
Mira 3 manual.qxd 10/12/2002 11:24 Page 15

15
Specifications
Input Specification (61W into 8Ω)Note - Factory setting of gain range level 2CD/Tuner/Line 1/Line 2/Tape input sensitivity: 220mV. Load 10KΩ.
Phono input sensitivity (moving magnet): 2.1mV. Load 47KΩ.(in parallel with 100pF)
Power amplifier input sensitivity = 818mV. load 24KΩ.
Pre-Amp Output level (with rated input levels)
818mV @ 470Ω. power amplifier gain = 28.8dB
Volume control LED display and step dataEach step of the volume control = 1dBEach LED represents = 4dBTotal control range = 80dB (20 LED’s @ 4dB/LED)
Power Output (230V or 115V supply voltage)61 Watts both channels driven into 8Ω.70 Watts only one channel driven into 8Ω.91 Watts both channels driven into 4Ω.115 Watts only one channel driven into 4Ω.
Tape Output215mV. Load 560Ω
Power Consumption225 Watts @ 230V or 115V @ 61 Watts both channels driven into 8Ω
Remote Control Phillips RC5 (system no. 16 audio pre-amp)
Recommended operating temperature 10OC - 35OC
Mira 3 manual.qxd 10/12/2002 11:24 Page 16

16
Check the amplifier isconnected to the desired
input and the correct inputselected
Troubleshooting(Power on, power switch LED lit but no output)
Check thespeakers are
connected correctlyto the amplifier
Check thevolume is set to acorrect level and
mute is off
If CD is selected checkthere is a disk in the
machine
If problem persists, contact your Rega dealer
Mira 3 manual.qxd 10/12/2002 11:24 Page 17

17
Troubleshooting(No power, power switch LED does not light up)
Is the mains supplyconnected and the
socket switched on?
Is the front panelon/off switch fully
depressed?
Has the fuse in the mainsplug blown? (plug in another
appliance to check)
Contact your Rega dealer
NO
YES
YES
Contact yourRega Dealer if itappears faulty
Replace fuse in plugYES
YES
NO
Is the mains socketlive? (plug in anotherappliance to check)
NO Check householdfuses or contact an
electrician
NO
Plug in andswitch on
Mira 3 manual.qxd 10/12/2002 11:24 Page 18

18
Troubleshooting(Power on, sound from one speaker only)
Are the connections betweenthe speakers and the amplifier
secure and functioningcorrectly?
Are both channels ofthe speaker connectedand working properly?
Are the cartridgeconnections at the headshell functioning? Check
cartridge tags
The speaker isat fault
Contact your Rega dealer
NO
NO
NO
YES
YES
YES YES
NO
Check the sourcecomponent for faults. Swap
the output leads and check tosee if the fault swaps over
Correct the fault by pluggingthem in. If the wires are loose or
not correctly soldered, contact yourRega dealer
There may be a fault in theamplifier / speaker chain. Swapspeaker cables. Does the fault
swap channels?
Thesource is at
fault
The amplifier or speakercables are at faultYES
Mira 3 manual.qxd 10/12/2002 11:24 Page 19

19
Troubleshooting(Loud hum through both speakers
when ‘Phono’ is selected)
Is the amplifiersituated directly below
the cartridge?
Are there other pieces ofHI-FI equipment close to
turntable or amplifier?
Contact your Rega dealer
NO
Correct the fault
Correct the faultYES
NO
YES
Mira 3 manual.qxd 10/12/2002 11:24 Page 20

20
Troubleshooting(Loud hum through one speaker when
‘Phono’ input is selected)
Is there a faulty earth connectionon the leads from the source
component? (check by swapping theleads and seeing if the hum moves
between channels)
Contact your Rega dealer
YES
NO
To check if the fault is withinthe lead, substitute (if possible)
with a good known lead orcontact your Rega dealer
Mira 3 manual.qxd 10/12/2002 11:24 Page 21

Input sensitivity and pre-amp gain
The Mira 3 amplifier sensitivity or pre-amplifier gain can be set tothree different levels; this is performed by putting the amplifier in toa programming mode on turning on the amplifier. Please note the amplifier is set to normal sensitivity (level 2) in thefactory, this setting being suitable for all normal Hi-fi requirements.
Settings -
Sensitivity's for 61W into 8 Ohms CD, tuner, Line 1, line 2, Tape input sensitivityGain range or level 1 sensitivity = 870mV Gain range or level 2 sensitivity = 220mV (Factory setting)Gain range or level 3 sensitivity = 150mV
Phono input sensitivityGain range or level 1 sensitivity = 8.5mV Gain range or level 2 sensitivity = 2.1mV (Factory setting)Gain range or level 3 sensitivity = 1.4mV
Pre-amplifier gain levels to pre-amplifier output. Gain range or level 1 gain = 0dB (unity gain) Gain range or level 2 gain = 11.5dB (factory setting)Gain range or level 3 gain = 15dB
Any adjustments made to the power amp link switch and gain mustbe carried out by an authorised Rega dealer.
If work is carried out by any person other than a Rega dealer it willinvalidate your warranty.
21
Mira 3 manual.qxd 10/12/2002 11:24 Page 22

22
Owners Log
(1)Owner.......................................................................................Date..........................................................................................Where Purchased.......................................................................................................................................................................
(2)Owner.......................................................................................Date..........................................................................................Where Purchased.......................................................................................................................................................................
(3)Owner.......................................................................................Date..........................................................................................Where Purchased.......................................................................................................................................................................
Mira 3 manual.qxd 10/12/2002 11:24 Page 23