mocha diffusion on paper - cdn.dick-blick.com · mocha diffusion on paper use inks and alcohol to...
TRANSCRIPT

Mocha Diffusionon PaperUse inks and alcohol to createinteractive diffused patterns on paper (art + science)
Mocha Diffusion is known as a traditional ceramics technique that began in England in the 18th century. It begins with a wet clay slip on the surface of a pot. The potter then dribbles a more acidic solution into the slip. The mocha diffusion then spreads out in interesting, fern-like patterns. This process works because of the difference in acidity of the solutions being used. Legend has it that a potter accidentally dripped some tobacco juice onto a slip-covered pot and loved the result!
Mocha Diffusion on paper looks slightly different, but is based on the same principle. A much more colorful result is achieved using bright inks and common rubbing alcohol. Experiment with various tools for beautiful patterning and surprising results.
GRADES 3-8 Note: Instructions and materials are based upon a class size of 24 students. Adjust as needed.
Preparation
1. Supply each student with a piece of watercolor paper.
2. Provide white gesso, inks, alcohol, and brushes.
Process
1. Brush an even coat of white gesso onto watercolor paper using a foam brush. Allow to dry.
2. Sketch a composition onto the paper with light pencil marks, or work spontaneously.
3. Begin by adding washes of diluted ink into areas that require color. Allow to dry.
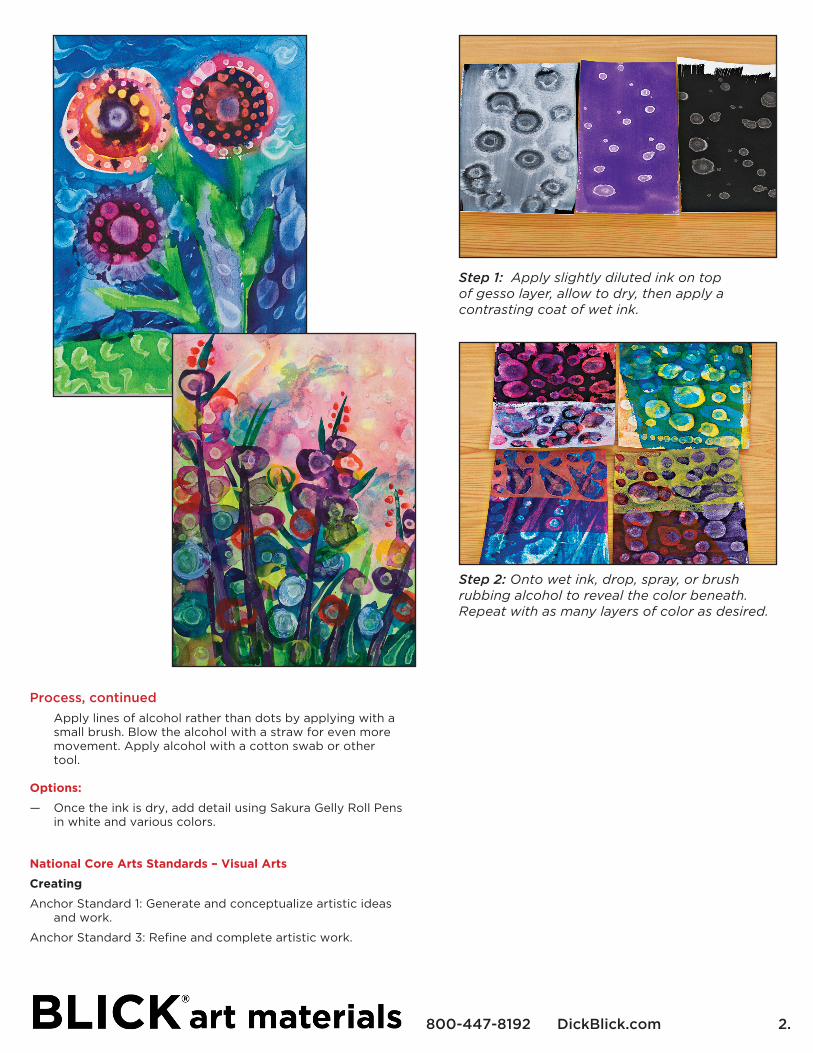
4. On top of the dry base coat of ink, apply a second, wet coat of a contrasting color. While this coat is wet, apply drips of alcohol to the surface. Rubbing alcohol, or isopropyl alcohol, typically is comprised of 70% alcohol and 30% water. The higher the concentration of alcohol, the more effects will be seen. The alcohol will cause the wet layer of ink to move and reveal the color underneath. Often, a “halo” is created around each drip. As many colored layers as desired can be used. It’s a great idea to make some “swatches” of color on scrap paper using this technique if real control is desired.
5. Experiment with dark over light colors, or light over dark. Try applying alcohol in an atomizer or spray bottle for other effects. Use the handle end of the brush for smaller dots, or the brush end for larger dots and halos.
Copyright © 2017Dick Blick Art Materials
All rights reserved
800-447-8192 DickBlick.com
Materials (required)Canson XL Watercolor Pads, 30 Sheets, 9” x 12” (10173-1023); one sheet per student
Liquitex Basics Acrylic Gesso, 16 oz (00716-1006); share one across class
Foam Poly Brushes, 1” (06027-1001); share 6 across class
Dr. Ph. Martin's Bombay India Inks, Set of 12, 1 oz (21122-1009); share one set across class
Blick Scholastic Short Handle Golden Taklon Round, Size 4 (05858-1004); one per student
Rubbing Alcohol, 70%+ preferred; share one bottle across class
Process, continued
Apply lines of alcohol rather than dots by applying with a small brush. Blow the alcohol with a straw for even more movement. Apply alcohol with a cotton swab or other tool.
Options:
— Once the ink is dry, add detail using Sakura Gelly Roll Pens in white and various colors.
National Core Arts Standards – Visual Arts
Creating
Anchor Standard 1: Generate and conceptualize artistic ideas and work.
Anchor Standard 3: Refine and complete artistic work.
Step 1: Apply slightly diluted ink on top of gesso layer, allow to dry, then apply a contrasting coat of wet ink.
Step 2: Onto wet ink, drop, spray, or brush rubbing alcohol to reveal the color beneath. Repeat with as many layers of color as desired.
2.800-447-8192 DickBlick.com