model rx8001 user guide wireless extender - … · † no deben colocarse sobre el equipo elementos...
TRANSCRIPT

Model RX8001 User Guide
Wireless Extender
ENGLISH
FRANÇAIS
ESPAÑOL

Concept and realisation of the Guide:Concept et réalisation du guide :Concepto y realización de la Guía:
Human Interface Group, De Regenboog 11, 2800 Mechelen (Belgium)www.higroup.com
3104 205 3442.1
WARNINGS
• Do not expose the equipment to rain or moisture.• Do not remove the cover from the equipment.• No naked flame sources, such as lighted candles, should be placed on the equipment.• No objects filled with liquids, such as vases, shall be placed on the equipment.
AVERTISSEMENTS
• Ne pas exposer l’appareil à la pluie ni à l’humidité.• Ne pas essayer de retirer le boîtier de l’appareil.• Ne placer aucune source de flamme nue, comme une bougie allumée, sur l'appareil.• Aucun objet rempli de liquide, un vase par exemple, ne doit être placé sur l'appareil.
ADVERTENCIAS
• No exponga el equipo a la lluvia ni a la humedad.• No extraiga la tapa del equipo.• No deben colocarse sobre el equipo elementos con fuego, por ejemplo velas encendidas.• No se deben colocar sobre el aparato recipientes que contengan líquidos, como por ejemplo
jarrones.
EN
FR
ES

ENG
LISH
RX8001 User Guide
FRA
NÇA
ISES
PAÑ
OL
RX8001 User Guide

1
RX8001 User GuideRX8001 User Guide
ContentsBefore You Start . . . . . . . . . . . . . . . . . . . . . . . . . . . . . . . . . . . . . . . . . . . . . . 2
Unpacking the Extender . . . . . . . . . . . . . . . . . . . . . . . . . . . . . . . . . . . 3
Configuring the Extender . . . . . . . . . . . . . . . . . . . . . . . . . . . . . . . . . . 4Stand-alone Connection . . . . . . . . . . . . . . . . . . . . . . . . . . . . . . . 4Network Connection . . . . . . . . . . . . . . . . . . . . . . . . . . . . . . . . . . . . 4
Installing the Extender . . . . . . . . . . . . . . . . . . . . . . . . . . . . . . . . . . . . . 6Connecting the Extender to A/V equipment . . . . . . . 6
Support . . . . . . . . . . . . . . . . . . . . . . . . . . . . . . . . . . . . . . . . . . . . . . . . . . . . . . . . . . 7Troubleshooting. . . . . . . . . . . . . . . . . . . . . . . . . . . . . . . . . . . . . . . . . . 7Firmware Update . . . . . . . . . . . . . . . . . . . . . . . . . . . . . . . . . . . . . . . . 9
Specifications . . . . . . . . . . . . . . . . . . . . . . . . . . . . . . . . . . . . . . . . . . . . . . . 10
IFU Approbation / Safety Content RX8001 . . . . . . . . . . . . iFCC Compliancy . . . . . . . . . . . . . . . . . . . . . . . . . . . . . . . . . . . . . . . . . . iRegulations According to R&TTE. . . . . . . . . . . . . . . . . . . . . ii
Stand-alone Mode
Network Mode

ENG
LISH
2
RX8001 User GuideRX8001 User Guide
Before You Start
The Wireless Extender is an important element of the RC9001 and makes it possible tocontrol A/V equipment via RF in the entire house.In order to use the Extender in a wireless Network:
• Configure the Extender: connect it to the PC and use the Configuration Tool.• Install the Extender: connect it to external A/V equipment, like a TV or receiver.
The Extender can be used in two ways:
Stand-alone ModeThis is the so-called ‘Ad-Hoc Mode’: a router is not required.
Stand-alone Advantages:• The Extender is easily configured and installed.• It operates independently from other networks and network settings.
Refer to the chapter ‘Stand-alone Connection’ on page 4 to configure the Extender in Stand-aloneMode.
Note If you want to use a Multimedia server, like the Escient Fireball, in combination with one ormore Extenders, the Extenders have to be configured in Network Mode.
Network ModeThis is the so-called ‘Infrastructure Mode’: the Extender is used in a network with a router.
Network Advantages:• A network allows the use of repeaters, which enlarges the range of the RC9001 System.• When using a dedicated Network, the Extender can operate independently from settings
in other networks.• The Extender in Network Mode can be given a fixed IP address, which increases reliability.• The network connection can be encrypted.
Refer to the chapter ‘Network Connection’ on page 4 to configure the Extender in Network Mode.
Note An Extender that has been configured in Stand-alone Mode can always be reconfigured for usein Network Mode and vice versa.You can use up to 16 different Extenders in the same Network.
3
RX8001 User Guide
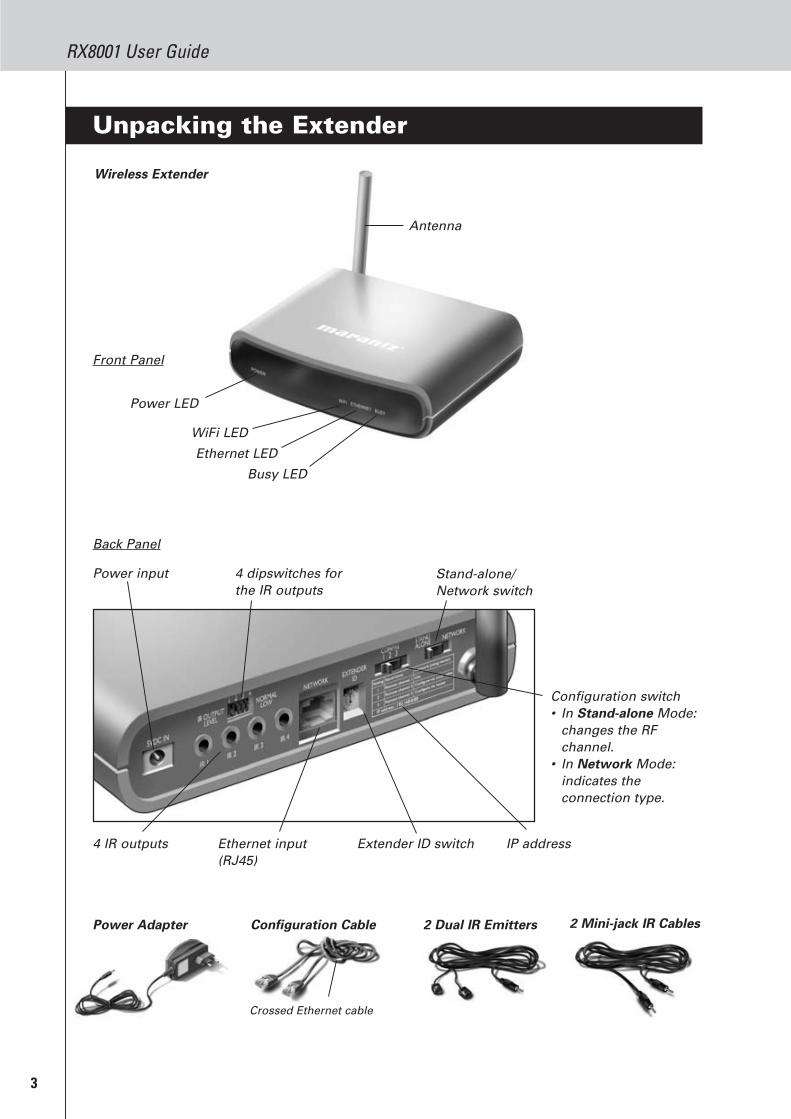
Unpacking the Extender
Wireless Extender
Front Panel
Antenna
Configuration switch
• In Stand-alone Mode:
changes the RF
channel.
• In Network Mode:
indicates the
connection type.
IP address
Power input
4 IR outputs
4 dipswitches for
the IR outputs
Back Panel
Extender ID switchEthernet input
(RJ45)
Stand-alone/
Network switch
2 Dual IR Emitters 2 Mini-jack IR CablesPower Adapter Configuration Cable
Crossed Ethernet cable
WiFi LED
Ethernet LED
Busy LED
Power LED

ENG
LISH
4
RX8001 User Guide
Configuring the Extender
Note Before you start configuring the Extender, check for firmware updates in the Downloads sectionon http://www.marantz.com in the Home Entertainment section of your region.Refer to the chapter ‘Firmware Update’ on page 9 for further details.
Stand-alone ConnectionTo configure the Stand-alone Extender:
1 Plug in the Extender’s power adapter.
The Extender will start up. When start-up has finished, the Power and WiFi LEDs are green.
2 Use the default switch settings of the Extender:
Note • If there is already an Extender with ID 0, set the Extender ID switch to an ID that is notused yet.
• If there is any interference with other products in or around the house, theConfiguration switch can be set to a different RF channel.
• Make sure the same Extender ID and RF channel are used on the Extender and theControl Panel.
3 Configure the Control Panel’s configuration file so that the Control Panel can work
with the Extender. For more details, refer to the Wizz.it Ex Online Help.
Network ConnectionIn the case of a network connection, the Extender is made part of the wireless Network.There are two ways to use the Extender in a network:
• Wired connection
• Wireless connection
Stand-alone/Network Stand-alone
Configuration switch 1
Extender ID 0
Extender
Router
Wireless
Access Point
Straight Ethernet Cable
Extender
Wireless
Access Point
Control Panel
Control Panel
Note When you set up a Wireless Network connection, make sure the Control Panel always shows minimal one bar of WiFi connectivity. If this is not the case, you may need additional Wireless Access points in your network.
5
RX8001 User Guide
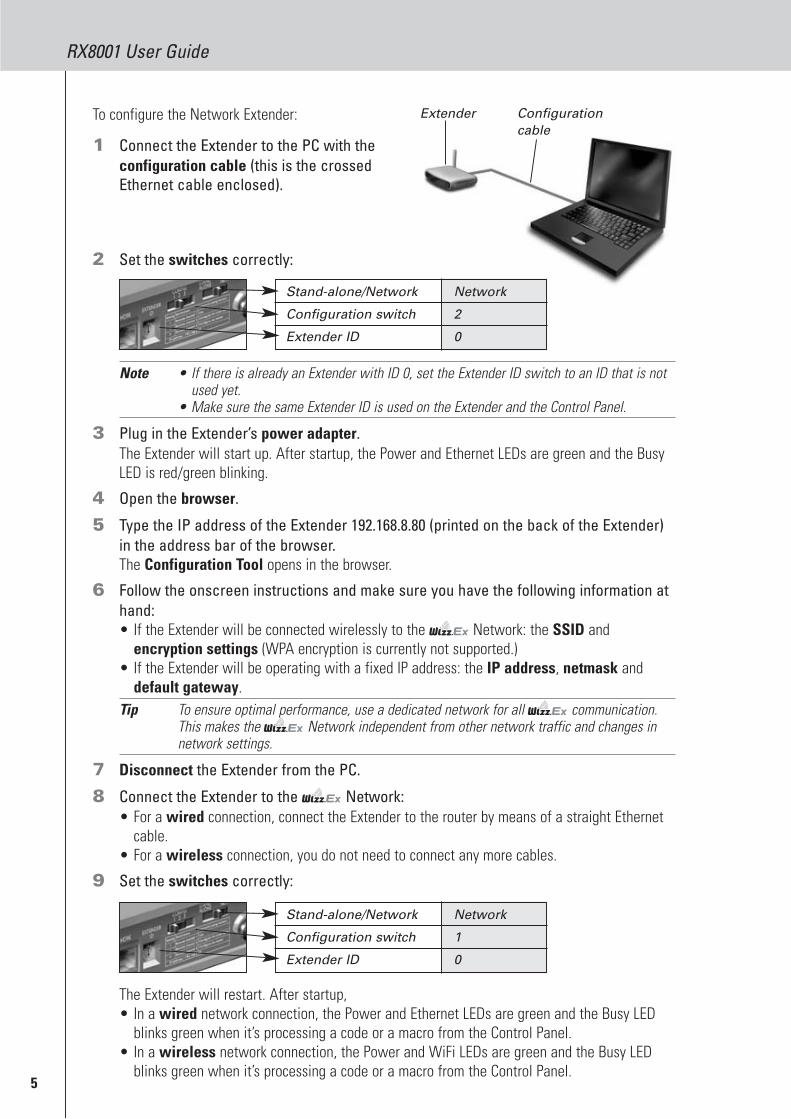
To configure the Network Extender:
1 Connect the Extender to the PC with the
configuration cable (this is the crossed
Ethernet cable enclosed).
2 Set the switches correctly:
Note • If there is already an Extender with ID 0, set the Extender ID switch to an ID that is notused yet.
• Make sure the same Extender ID is used on the Extender and the Control Panel.
3 Plug in the Extender’s power adapter.
The Extender will start up. After startup, the Power and Ethernet LEDs are green and the BusyLED is red/green blinking.
4 Open the browser.
5 Type the IP address of the Extender 192.168.8.80 (printed on the back of the Extender)
in the address bar of the browser.
The Configuration Tool opens in the browser.
6 Follow the onscreen instructions and make sure you have the following information at
hand:
• If the Extender will be connected wirelessly to the Network: the SSID andencryption settings (WPA encryption is currently not supported.)
• If the Extender will be operating with a fixed IP address: the IP address, netmask anddefault gateway.
Tip To ensure optimal performance, use a dedicated network for all communication.This makes the Network independent from other network traffic and changes innetwork settings.
7 Disconnect the Extender from the PC.
8 Connect the Extender to the Network:
• For a wired connection, connect the Extender to the router by means of a straight Ethernetcable.
• For a wireless connection, you do not need to connect any more cables.
9 Set the switches correctly:
The Extender will restart. After startup,• In a wired network connection, the Power and Ethernet LEDs are green and the Busy LED
blinks green when it’s processing a code or a macro from the Control Panel.• In a wireless network connection, the Power and WiFi LEDs are green and the Busy LED
blinks green when it’s processing a code or a macro from the Control Panel.
Extender Configuration
cable
Stand-alone/Network Network
Configuration switch 2
Extender ID 0
Stand-alone/Network Network
Configuration switch 1
Extender ID 0
ENG
LISH
6
RX8001 User Guide
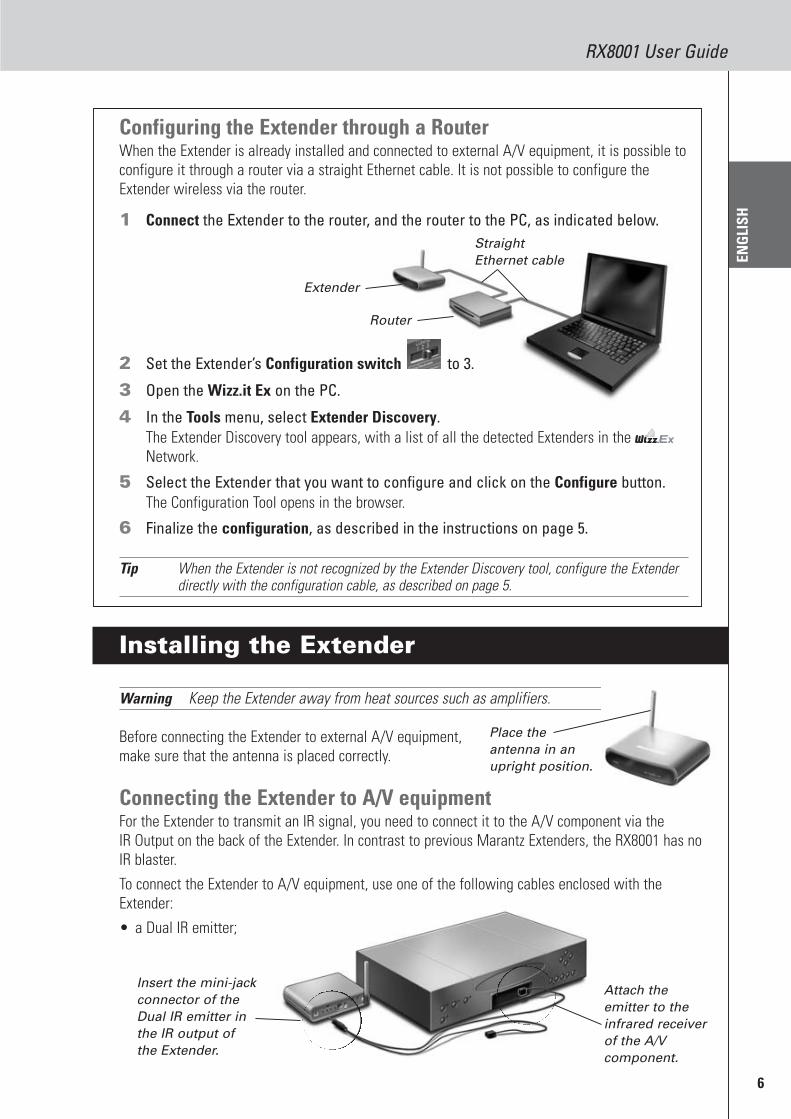
Configuring the Extender through a RouterWhen the Extender is already installed and connected to external A/V equipment, it is possible toconfigure it through a router via a straight Ethernet cable. It is not possible to configure theExtender wireless via the router.
1 Connect the Extender to the router, and the router to the PC, as indicated below.
2 Set the Extender’s Configuration switch to 3.
3 Open the Wizz.it Ex on the PC.
4 In the Tools menu, select Extender Discovery.
The Extender Discovery tool appears, with a list of all the detected Extenders in the Network.
5 Select the Extender that you want to configure and click on the Configure button.
The Configuration Tool opens in the browser.
6 Finalize the configuration, as described in the instructions on page 5.
Installing the Extender
Warning Keep the Extender away from heat sources such as amplifiers.
Before connecting the Extender to external A/V equipment, make sure that the antenna is placed correctly.
Connecting the Extender to A/V equipmentFor the Extender to transmit an IR signal, you need to connect it to the A/V component via the IR Output on the back of the Extender. In contrast to previous Marantz Extenders, the RX8001 has noIR blaster.
To connect the Extender to A/V equipment, use one of the following cables enclosed with theExtender:
• a Dual IR emitter;
Place the
antenna in an
upright position.
Extender
Straight
Ethernet cable
Router
Insert the mini-jack
connector of the
Dual IR emitter in
the IR output of
the Extender.
Attach the
emitter to the
infrared receiver
of the A/V
component.
Tip When the Extender is not recognized by the Extender Discovery tool, configure the Extenderdirectly with the configuration cable, as described on page 5.
7
RX8001 User Guide
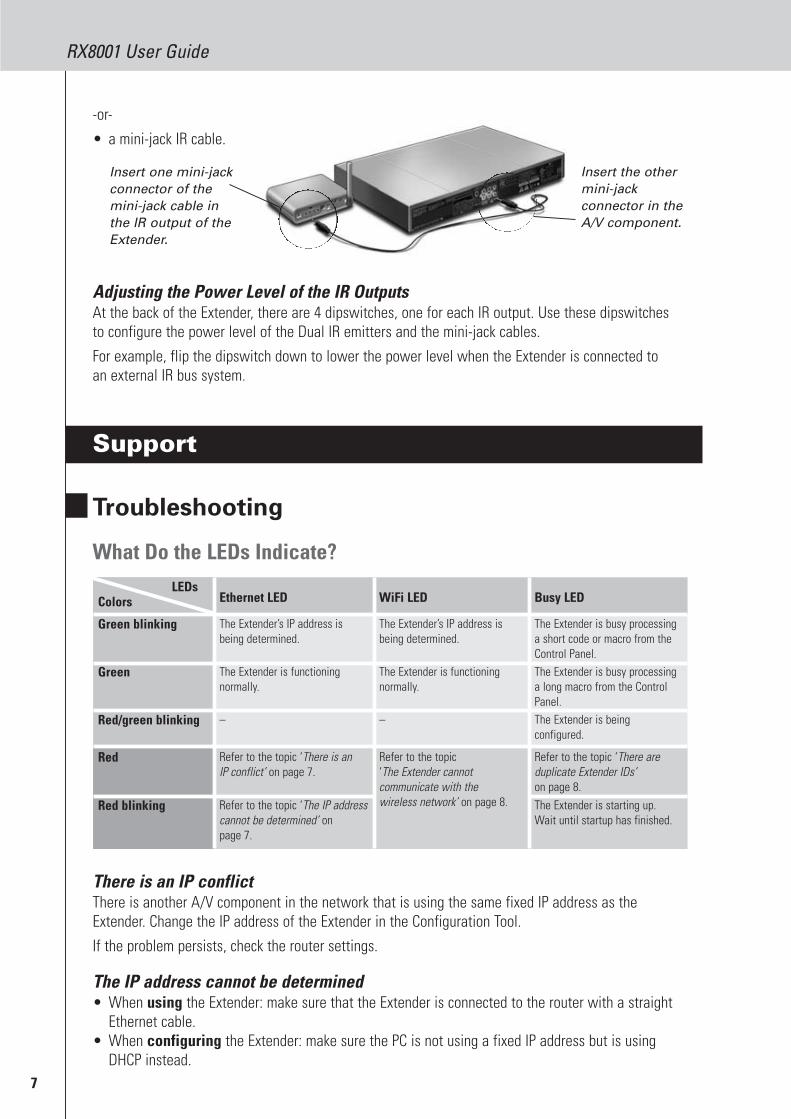
LEDsColors Ethernet LED WiFi LED Busy LED
The Extender’s IP address isbeing determined.
Green blinking The Extender’s IP address isbeing determined.
The Extender is busy processinga short code or macro from theControl Panel.
The Extender is functioningnormally.
Green The Extender is functioningnormally.
The Extender is busy processinga long macro from the ControlPanel.
–Red/green blinking – The Extender is beingconfigured.
Refer to the topic ‘There is an IP conflict’ on page 7.
Red Refer to the topic ‘The Extender cannotcommunicate with thewireless network’ on page 8.
Refer to the topic ‘There areduplicate Extender IDs’on page 8.
Refer to the topic ‘The IP addresscannot be determined’ onpage 7.
Red blinking The Extender is starting up. Wait until startup has finished.
-or-
• a mini-jack IR cable.
Adjusting the Power Level of the IR OutputsAt the back of the Extender, there are 4 dipswitches, one for each IR output. Use these dipswitchesto configure the power level of the Dual IR emitters and the mini-jack cables.
For example, flip the dipswitch down to lower the power level when the Extender is connected toan external IR bus system.
Support
Troubleshooting
What Do the LEDs Indicate?
Insert one mini-jack
connector of the
mini-jack cable in
the IR output of the
Extender.
Insert the other
mini-jack
connector in the
A/V component.
There is an IP conflictThere is another A/V component in the network that is using the same fixed IP address as theExtender. Change the IP address of the Extender in the Configuration Tool.
If the problem persists, check the router settings.
The IP address cannot be determined• When using the Extender: make sure that the Extender is connected to the router with a straight
Ethernet cable.• When configuring the Extender: make sure the PC is not using a fixed IP address but is using
DHCP instead.

ENG
LISH
8
RX8001 User Guide
• Make sure the router is switched on. If the router is using DHCP, the Extender’s IP address cannotbe determined. Make sure to use the correct network settings on the router.
The Extender cannot communicate with the wireless network
The WiFi LED is red• Make sure that the Extender is in range of the Wireless Access Point.• Make sure that you filled in the correct secret in the Configuration Tool.• Add the Extender’s MAC address to the router’s list of accepted MAC addresses.
The WiFi LED is red blinking• Check the router’s network settings and make sure that it can operate with the Extender.• If the LED doesn’t stop blinking, unplug the power adapter, wait a few seconds, and plug it in
again.
Finding the Exact Location of an A/V component’s IR Receiver1 Remove the protective tape of the Dual IR emitters.
2 Set the Dual IR emitters to the minimal power level, and hold the adhesive side of one
of the emitters 0.4 - 0.8 inch / 1 - 2 cm in front of the A/V component.
3 Make sure the Control Panel is configured to operate with the A/V component.
4 Move the emitter across the front panel of the A/V component, and at the same time,
send commands with the Control Panel to the A/V component.
Take note of when the A/V component reacts to the IR signals of the emitter.
5 When the A/V component reacts, position the emitter in that place.
Operating A/V components with the Extender
The A/V components do not respond to commands from the Extender• Check if the Busy LED blinks green when you send a command with the Control Panel. If the Busy
LED does not blink, the Extender is not receiving commands from the Control Panel;• Make sure that the Control Panel is configured correctly in Wizz.it Ex;• Make sure that the Extender is configured correctly in the Configuration Tool and connected
properly to the A/V components;• Make sure that the switches on the Extender are set correctly.• Make sure that the Wireless Access Point is on and configured correctly.• Make sure that the Extender is in range of the Wireless Access Point. If the Wireless Access
Point is placed higher or lower than the Extender, place the Extender’s antenna horizontally foroptimum range.
• Not all Wireless Access Points are working equally well in combination with the Control Panel.Make sure you use a quality access point.
There are duplicate Extender IDsUsing the Extender ID switch, assign a unique ID to each Extender in the same Network.Make sure the Control Panel is configured accordingly in Wizz.it Ex.
You can use up to 16 different Extenders in the same Network.
The Busy LED blinks green when the Control Panel is not in useThis does not mean that something is wrong with the Extender. It merely indicates that the Extenderis being operated by a different Control Panel. When the Busy LED stops blinking, you can use theExtender again.

9
RX8001 User Guide
Resetting the ExtenderThis is only necessary when the Extender displays unusual behavior.To perform a reset, unplug the Extender from the electrical socket. Wait a few seconds, and plug itin again.
Firmware UpdateWhen an update of the Extender firmware is available, this will be announced on the Marantzwebsite: http://www.marantz.com.
Note You can always see the current version of the firmware in the Configuration Tool.
1 Download the new version of the firmware on the PC.
2 Unplug the Extender. The Extender can be updated in the following ways.
Updating the Extender with the configuration cable
1 Connect the Extender to the PC with the configuration cable.
2 Set the switches correctly.
3 Open the browser.
4 Type the IP address of the Extender: 192.168.8.80 (printed on the back of the Extender)
in the address bar of the browser.
The Configuration Tool opens in the browser.
5 Select Firmware Update in the left navigation pane.
The Firmware Update page opens.
6 Follow the onscreen instructions.
When you are asked to browse to the update file, you need to select the ZIP file youdownloaded earlier from the website.
Updating the Extender through a routerIf the Extender is already installed and connected to A/V equipment, it may be more convenient toupdate it through a router via a straight Ethernet cable. It is not possible to configure the Extenderwireless via the router.
1 Connect the Extender to the router, and the router to the PC.
2 Set the switches correctly.
3 Open the Wizz.it Ex on the PC.
4 In the Tools menu, select Extender Discovery.
The Extender Discovery tool appears, with a list of all the detected Extenders in the Network.
Stand-alone/Network Network
Configuration switch 2
Extender ID 0
Stand-alone/Network Network
Configuration switch 3
Extender ID 0
ENG
LISH
10
RX8001 User Guide
5 Select the Extender that you want to configure and click on the Configure button.
The Configuration Tool opens in the browser.
6 Select Firmware Update in the left navigation pane.
The Firmware Update page opens.
7 Follow the onscreen instructions.
When you are asked to browse to the update file, you need to select the ZIP file youdownloaded earlier from the website.
Tip When your Extender is not recognized by the Extender Discovery tool, update the Extenderwith the crossed Ethernet cable, as described on page 9.
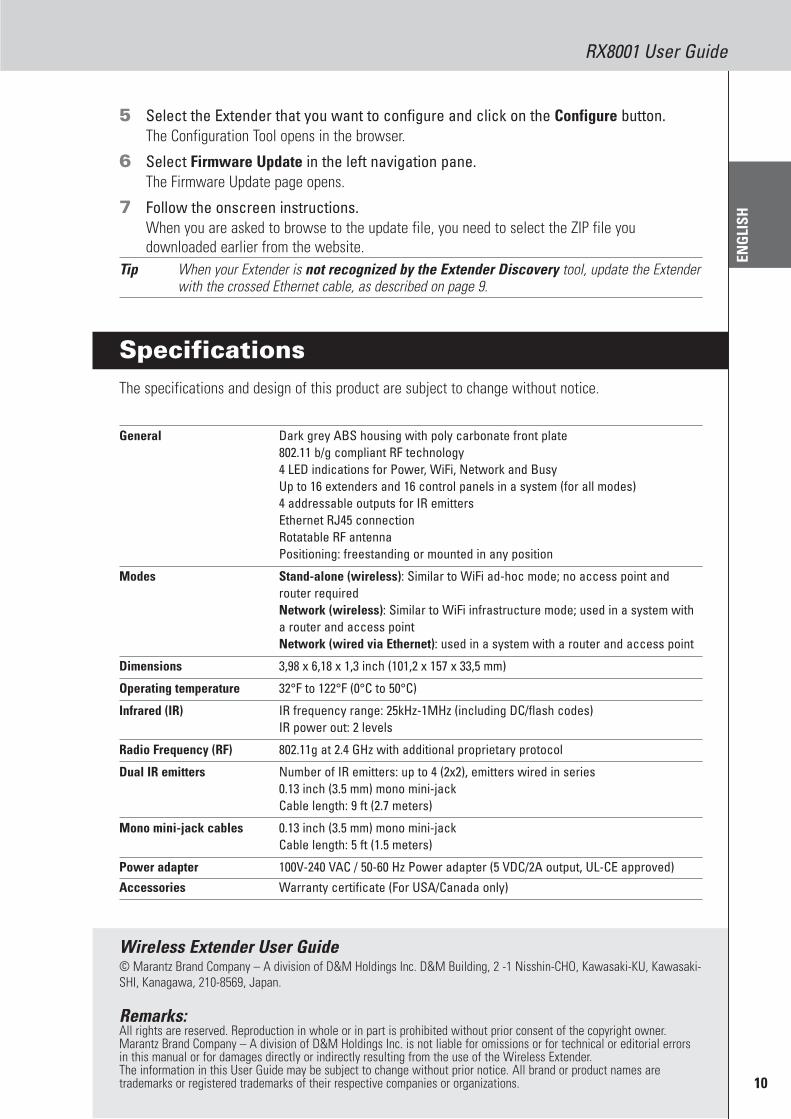
Specifications
The specifications and design of this product are subject to change without notice.
General Dark grey ABS housing with poly carbonate front plate
802.11 b/g compliant RF technology
4 LED indications for Power, WiFi, Network and Busy
Up to 16 extenders and 16 control panels in a system (for all modes)
4 addressable outputs for IR emitters
Ethernet RJ45 connection
Rotatable RF antenna
Positioning: freestanding or mounted in any position
Modes Stand-alone (wireless): Similar to WiFi ad-hoc mode; no access point and
router required
Network (wireless): Similar to WiFi infrastructure mode; used in a system with
a router and access point
Network (wired via Ethernet): used in a system with a router and access point
Dimensions 3,98 x 6,18 x 1,3 inch (101,2 x 157 x 33,5 mm)
Operating temperature 32°F to 122°F (0°C to 50°C)
Infrared (IR) IR frequency range: 25kHz-1MHz (including DC/flash codes)
IR power out: 2 levels
Radio Frequency (RF) 802.11g at 2.4 GHz with additional proprietary protocol
Dual IR emitters Number of IR emitters: up to 4 (2x2), emitters wired in series
0.13 inch (3.5 mm) mono mini-jack
Cable length: 9 ft (2.7 meters)
Mono mini-jack cables 0.13 inch (3.5 mm) mono mini-jack
Cable length: 5 ft (1.5 meters)
Power adapter 100V-240 VAC / 50-60 Hz Power adapter (5 VDC/2A output, UL-CE approved)
Accessories Warranty certificate (For USA/Canada only)
Wireless Extender User Guide© Marantz Brand Company – A division of D&M Holdings Inc. D&M Building, 2 -1 Nisshin-CHO, Kawasaki-KU, Kawasaki-SHI, Kanagawa, 210-8569, Japan.
Remarks:All rights are reserved. Reproduction in whole or in part is prohibited without prior consent of the copyright owner.Marantz Brand Company – A division of D&M Holdings Inc. is not liable for omissions or for technical or editorial errorsin this manual or for damages directly or indirectly resulting from the use of the Wireless Extender.The information in this User Guide may be subject to change without prior notice. All brand or product names aretrademarks or registered trademarks of their respective companies or organizations.
FCC CompliancyThis device complies with Part 15 of the FCC Rules. Operation is subject to the following two conditions:
• This device may not cause harmful interference.• This device must accept any interference received, including interference that may cause undesired
operation.This equipment has been tested and found to comply with the limits for a Class B digital device, pursuant topart 15 of the FCC rule.
These limits are designed to provide reasonable protection against harmful interference in residentialinstallations. This equipment generates, uses, and can radiate radio frequency energy and, if not installed andused in accordance with the instructions, may cause harmful interference to radio communications.
However, there is no guarantee that interference will not occur in a particular installation. If the equipmentdoes cause harmful interference to radio or television reception, which can be determined by turning theequipment off and on, the user is encouraged to try to correct the interference by one or more of the followingmeasures:
• Reorient or relocate the receiving antenna.• Increase the separation between the equipment and receiver.• Connect the equipment into an outlet on a different circuit from the receiver.• Consult the dealer or an experienced radio/TV technician for help.
CAUTION The user changes or modifications not expressly approved by the party responsible forcompliance could void the user’s authority to operate the equipment.
Notice for Canada / Remark pour le CanadaThis class B digital apparatus complies with Canadian ICES-003.
Cet appareil numerique de la Classe B est conforme a la norme NMB-003 du Canada
Regulations According to R&TTE
DeclarationHereby, Marantz Europe, a division of D&M Europe B.V. declares that RX8001 is in compliance with theessential requirements and other relevant provisions of Directive 1999/5/EC:
• Radio: EN 300 328• EMC: ETSI EN 301 489-1, ETSI EN 301 489-17• Safety: EN60950-1
Česky My, Marantz Europe, a division of D&M Europe B.V., prohlašujeme že výrobek RX8001 splňuje základnípožadavky a ostatní příslušná ustanovení Směrnice 1999/5/EC.
Dansk Marantz Europe, a division of D&M Europe B.V., erklærer herved, at følgende udstyr RX8001overholder de væsentlige krav og øvrige relevante krav i direktiv 1999/5/EF.
Deutsch Hiermit erklärt Marantz Europe, a division of D&M Europe B.V., dass sich dieses Gerät (RX8001) inÜbereinstimmung mit den grundlegenden Anforderungen und den anderen relevanten Vorschriften derRichtlinie 1999/5/EG befindet". (BMWi).
Eesti keeles Käesolevaga kinnitab Marantz Europe, a division of D&M Europe B.V. et see RX8001 vastab EuroopaNõukogu direktiivi 1999/5/EC põhinõuetele ja muudele olulistele tingimustele.
Ελληνικά ΜΕ ΤΗΝ ΠΑΡΟΥΣΑ Marantz Europe, a division of D&M Europe B.V. ∆ΗΛΩΝΕΙ ΟΤΙ RX8001ΣΥΜΜΟΡΦΩΝΕΤΑΙ ΠΡΟΣ ΤΙΣ ΟΥΣΙΩ∆ΕΙΣ ΑΠΑΙΤΗΣΕΙΣ ΚΑΙ ΤΙΣ ΛΟΙΠΕΣ ΣΧΕΤΙΚΕΣ ∆ΙΑΤΑΞΕΙΣΤΗΣ Ο∆ΗΛΙΑΣ 1999/5/ΕΚ.
Español Por medio de la presente Marantz Europe, a division of D&M Europe B.V. declara que RX8001 cumplecon los requisitos esenciales y cualesquiera otras disposiciones aplicables o exigibles de la Directiva1999/5/CE.
IFU Approbation / Safety Content
i

Français Par la présente Marantz Europe, a division of D&M Europe B.V., déclare que les appareils du typeRX8001 sont conformes aux exigences essentielles et aux autres dispositions pertinentes de la directive1999/5/CE.
Italiano Con la presente Marantz Europe, a division of D&M Europe B.V., dichiara che questo RX8001 èconforme ai requisiti essenziali ed alle altre disposizioni pertinenti stabilite dalla direttiva 1999/5/CE.
Magyar A gyártó Marantz Europe, a division of D&M Europe B.V., kijelenti, hogy ez a RX8001 megfelel az1999/5/EK irányelv alapkövetelményeinek és a kapcsolódó rendelkezéseknek.
Nederlands Hierbij verklaart Marantz Europe, a division of D&M Europe B.V., dat deze RX8001 inovereenstemming is met de essentiële eisen en de andere relevante bepalingen van richtlijn 1999/5/EG.
Polski Niniejszym firma Marantz Europe, a division of D&M Europe B.V., oświadcza, że RX8001 spełniawszystkie istotne wymogi i klauzule zawarte w dokumencie „Directive 1999/5/EC”.
Português Marantz Europe, a division of D&M Europe B.V., declara que este RX8001 está conforme com osrequisitos essenciais e outras disposições da Directiva 1999/5/CE.
Slovensky Výrobca Marantz Europe, a division of D&M Europe B.V. týmto deklaruje, že táto RX8001 je v súlade sozákladnými požiadavkami a ďalšími relevantnými predpismi smernice 1999/5/EC.
Slovensko Marantz Europe, a division of D&M Europe B.V. s tem potrjuje, da je ta RX8001 skladen/a z osnovnimizahtevami in ustreznimi določili Direktive 1999/5/EC.
Suomi Marantz Europe, a division of D&M Europe B.V., vakuuttaa täten että RX8001 tyyppinen laite ondirektiivin 1999/5/EY oleellisten vaatimusten ja sitä koskevien direktiivin muiden ehtojen mukainen.
Svenska Härmed intygar, Marantz Europe, a division of D&M Europe B.V., att denna RX8001 står iöverensstämmelse med de väsentliga egenskapskrav och övriga relevanta bestämmelser som framgår avdirektiv 1999/5/EG.
Declaration of Conformity(DoC)The Declaration of Conformity of this product can be found at: http://www.marantz.com/download/RX8001.
MarkingIn line with CE marking regulations: the CE mark and the class 2 identifier are added to the equipment:
Czech Likvidace starého výrobku Tento výrobek je navržen a vyroben z materiálů a komponentů nejvyšší kvality, které je možné recyklovat aopětovně použít. Pokud je výrobek označen tímto symbolem přeškrtnutého kontejneru, znamená to, ževýrobek podléhá směrnici EU 2002/96/EC. Informujte se o místním systému sběru tříděného odpaduelektrických a elektronických výrobků. Postupujte podle místních pravidel a neodkládejte takové starévýrobky do běžného komunálního odpadu. Správná likvidace starého výrobku pomůže předcházetpřípadným nepříznivým účinkům na životní prostředí a lidské zdraví.
Danish Bortskaffelse af dit gamle produktDit produkt er konstrueret med og produceret af materialer og komponenter af høj kvalitet, som kangenbruges. Når dette markerede affaldsbøttesymbol er placeret på et produkt betyder det, at produktet eromfattet af det europæiske direktiv 2002/96/EC. Hold dig orienteret om systemet for særskilt indsamling afelektriske og elektroniske produkter i dit lokalområde. Overhold gældende regler, og bortskaf ikke dinegamle produkter sammen med dit almindelige husholdningsaffald. Korrekt bortskaffelse af dine gamleprodukter er med til at skåne miljøet og vores helbred.
This device can be used in the following countries:
AT BE CH DE DK GR ES FI
FR IRE IT LU NL PT SE UK
ii

Dutch Verwijdering van uw oude productUw product is vervaardigd van kwalitatief hoogwaardige materialen en onderdelen, welke gerecycled enopnieuw gebruikt kunnen worden. Als u op uw product een doorstreepte afvalcontainer op wieltjes ziet,betekent dit dat het product valt onder de EU-richtlijn 2002/96/EC. Win inlichtingen in over de manierwaarop elektrische en elektronische producten in uw regio gescheiden worden ingezameld. Neem bij deverwijdering van oude producten de lokale wetgeving in acht en plaats deze producten niet bij het gewonehuishoudelijke afval. Als u oude producten correct verwijdert voorkomt u negatieve gevolgen voor hetmilieu en de volksgezondheid.
Finnish Vanhan tuotteen hävittäminenTuotteesi on suunniteltu ja valmistettu laadukkaista materiaaleista ja komponenteista, jotka voidaankierrättää ja käyttää uudelleen. Tuotteeseen kiinnitetty yliviivatun roskakorin kuva tarkoittaa, että tuotekuuluu Euroopan parlamentin ja neuvoston direktiivin 2002/96/EC soveltamisalaan. Ota selvääsähkölaitteille ja elektronisille laitteille tarkoitetusta kierrätysjärjestelmästä alueellasi. Noudata paikallisiasääntöjä äläkä hävitä vanhoja tuotteita tavallisen talousjätteen mukana. Vanhojen tuotteiden hävittäminenoikealla tavalla auttaa vähentämään ympäristölle ja ihmisille mahdollisesti koituvia haittavaikutuksia
French Mise au rebut des produits en fin de vieCe produit a été conçu et fabriqué avec des matériaux et composants recyclables de haute qualité. Lesymbole d’une poubelle barrée apposé sur un produit signifie que ce dernier répond aux exigences de ladirective européenne 2002/96/EC. Informez-vous auprès des instances locales sur le système de collectedes produits électriques et électroniques en fin de vie. Conformez-vous à la législation en vigueur et nejetez pas vos produits avec les déchets ménagers. Seule une mise au rebut adéquate des produits peutempêcher la contamination de l’environnement et ses effets nocifs sur la santé.
German Entsorgung Ihres alten GerätsIhr Gerät wurde unter Verwendung hochwertiger Materialien und Komponenten entwickelt und hergestellt,die recycelt und wieder verwendet werden können. Befindet sich dieses Symbol (durchgestricheneAbfalltonne auf Rädern) auf dem Gerät, bedeutet dies, dass für dieses Gerät die Europäischen Richtlinie2002/96/EG gilt. Informieren Sie sich über die geltenden Bestimmungen zur getrennten Sammlung vonElektro- und Elektronik-Altgeräten in Ihrem Land. Richten Sie sich bitte nach den geltenden Bestimmungenin Ihrem Land, und entsorgen Sie Altgeräte nicht über Ihren Haushaltsabfall. Durch die korrekte EntsorgungIhrer Altgeräte werden Umwelt und Menschen vor möglichen negativen Folgen geschützt.
Greek Αόρριψη αλιού ρο όντοςΤο ροόν αυτό έχει σχεδιαστεί και κατασκευαστεί µε υψηλής οιότητας υλικά και εξαρτήµαταου µορούν να ανακυκλωθούν και να ξαναχρησιµοοιηθούν. Όταν ένα ροόν φέρει τηνένδειξη ενός διαγραµµένου κάδου µε ρόδες, τότε το ροόν αυτό καλύτεται αό την Οδηγία2002/96/ΕΚ. Παρακαλούµε να ενηµερωθείτε σχετικά µε το τοικό σύστηµα ξεχωριστήςσυλλογής ηλεκτρικών και ηλεκτρονικών ροόντων. Παρακαλούµε να ακολουθείτε την τοικήνοµοθεσία και να µην αορρίτετε τα αλιά σας ροόντα µαζί µε τα οικιακά σαςαορρίµµατα. Η σωστή µέθοδος αόρριψης των αλιών σας ροόντων θα συµβάλει στηναοφυγή αρνητικών ειτώσεων στο εριβάλλον και την ανθρώινη υγεία.
Hungarian Az elhasznált termék hulladékkezelése Ezt a terméket minőségi, újrafeldolgozható és újrahasznosítható anyagok és alkatrészek felhasználásávaltervezték és készítették. A termékhez kapcsolódó áthúzott kerekes kuka szimbólum azt jelenti, hogy atermékre vonatkozik a 2002/96/EK. Európai irányelv. Kérjük, informálódjon az elektromos és elektronikushulladékok szelektív gyűjtésének helyi rendszeréről. Kérjük, a helyi szabályok figyelembe vételével járjonel, és ne dobja az elhasznált terméket a háztartási hulladékgyűjtőbe. Az elhasznált termék megfelelőhulladékkezelése segítséget nyújt a környezettel és az emberi egészséggel kapcsolatos esetleges negatívkövetkezmények megelőzésében.
Italian Smaltimento di vecchi prodottiIl prodotto è stato progettato e assemblato con materiali e componenti di alta qualità che possono esserericiclati e riutilizzati. Se su un prodotto si trova il simbolo di un bidone con ruote, ricoperto da una X, vuoldire che il prodotto soddisfa i requisiti della Direttiva comunitaria 2002/96/CE. Informarsi sulle modalità diraccolta, dei prodotti elettrici ed elettronici, in vigore nella zona in cui si desidera disfarsi del prodotto.Attenersi alle normative locali per lo smaltimento dei rifiuti e non gettare i vecchi prodotti nei normalirifiuti domestici. Uno smaltimento adeguato dei prodotti aiuta a prevenire l’inquinamento ambientale epossibili danni alla salute.
IFU Approbation / Safety Content
iii

Norwegian Avhending av gamle produkterProduktet er utformet og produsert i materialer og komponenter av høy kvalitet, som kan resirkuleres ogbrukes på nytt. Når denne søppelbøtten med kryss på følger med et produkt, betyr det at produktet dekkesav det europeiske direktivet 2002/96/EU. Finn ut hvor du kan levere inn elektriske og elektroniske produktertil gjenvinning i ditt lokalmiljø. Overhold lokale regler, og ikke kast gamle produkter sammen medhusholdningsavfallet. Riktig avhending av de gamle produktene dine vil hjelpe til med å forhindrepotensielle negative konsekvenser for miljøet og menneskers helse.
Polish Usuwanie zużytych produktówNiniejszy produkt został zaprojektowany i wykonany w oparciu o wysokiej jakości materiały i podzespoły,które poddane recyklingowi mogą być ponownie użyte. Jeśli na produkcie znajduje się symbolprzekreślonego pojemnika na śmieci na kółkach, podlega on postanowieniom dyrektywy 2002/96/WE.Należy zapoznać się lokalnymi zasadami zbiórki i segregacji sprzętu elektrycznego i elektronicznego.Należy przestrzegać lokalnych przepisów i nie wyrzucać zużytych produktów elektronicznych wraz znormalnymi odpadami gospodarstwa domowego. Prawidłowe składowanie zużytych produktów pomagaograniczyć ich szkodliwy wpływ na środowisko naturalne i zdrowie ludzi.
Portuguese Eliminação do seu antigo produtoO seu produto foi desenhado e fabricado com matérias-primas e componentes de alta qualidade, quepodem ser reciclados e reutilizados. Quando este símbolo, com um latão traçado, está afixado a umproduto significa que o produto é abrangido pela Directiva Europeia 2002/96/EC. Informe-se acerca dosistema de recolha selectiva local para produtos eléctricos e electrónicos. Aja de acordo com osregulamentos locais e não descarte os seus antigos produtos com o lixo doméstico comum. A correctaeliminação do seu antigo produto ajuda a evitar potenciais consequências negativas para o meio ambientee para a saúde pública.
Slovak Likvidácia tohto produktuVáš produkt bol navrhnutý a vyrobený pomocou vysokokvalitných materiálov a komponentov, ktoré sadajú recyklovať a znova využiť. Keď sa na produkte nachádza symbol prečiarknutého koša s kolieskami,znamená to, že tento produkt pokrýva Európska smernica 2002/96/EC. Informujte sa o miestnom systémeseparovaného zberu elektrických a elektronických výrobkov. Postupujte podľa miestnych pravidiel anevyhadzujte tento produkt do bežného odpadu z domácnosti. Správnou likvidáciou starého produktupomôžete zabrániť možným negatívnym následkom na životné prostredie a ľudské zdravie.
Slovenian Odlaganje starega izdelkaIzdelek je zasnovan in izdelan iz visokokakovostnih materialov in komponent, ki jih je mogoče reciklirati inponovno uporabiti. Če je izdelek označen s prečrtanim košem za smeti, to pomeni, da je v skladu zDirektivo EU 2002/96/ES. Seznanite se z lokalnim sistemom za zbiranje odpadnih električnih inelektronskih komponent. Upoštevajte lokalne predpise in izrabljenega izdelka ne odlagajte z običajnimigospodinjskimi odpadki. S pravilnim odlaganjem izrabljenih izdelkov pomagate preprečevati negativneposledice na okolje in zdravje ljudi.
Spanish Desecho del producto antiguoEl producto se ha diseñado y fabricado con materiales y componentes de alta calidad, que se puedenreciclar y volver a utilizar. Cuando este símbolo de contenedor de ruedas tachado se muestra en unproducto indica que éste cumple la directiva europea 2002/96/EC. Obtenga información sobre la recogidaselectiva local de productos eléctricos y electrónicos. Cumpla con la normativa local y no deseche losproductos antiguos con los desechos domésticos. El desecho correcto del producto antiguo ayudará aevitar consecuencias negativas para el medioambiente y la salud humana.
Swedish Kassering av din gamla produktProdukten är utvecklad och tillverkad av högkvalitativa material och komponenter som kan både återvinnasoch återanvändas. När den här symbolen med en överkryssad papperskorg visas på produkten innebär detatt produkten omfattas av det europeiska direktivet 2002/96/EG. Ta reda på var du kan hitta närmasteåtervinningsstation för elektriska och elektroniska produkter. Följ de lokala reglerna och släng inte dinagamla produkter i det vanliga hushållsavfallet. Genom att kassera dina gamla produkter på rätt sätt kan dubidra till att minska eventuella negativa effekter på miljö och hälsa.
Turkish Eski ürününüzün atılmasıÜrününüz, geri dönüşüme tabi tutulabilen ve yeniden kullanılabilen, yüksek kalitede malzeme veparçalardan tasarlanmış ve üretilmiştir. Bir ürüne, çarpı işaretli tekerlekli çöp arabası işaretli etiketyapıştırılması, söz konusu ürünün 2002/96/EC sayılı Avrupa Yönergesi kapsamına alınması anlamınagelir. Lütfen, elektrikli ve elektronik ürünlerin toplanması ile ilgili bulunduğunuz yerdeki sistemhakkında bilgi edinin. Lütfen, yerel kurallara uygun hareket edin ve eskiyen ürünlerinizi, normal evselatıklarınızla birlikte atmayın. Eskiyen ürününüzün atık işlemlerinin doğru biçimde gerçekleştirilmesi,çevre ve insan sağlığı üzerinde olumsuz etkilere yol açılmasını önlemeye yardımcı olacaktır.
IFU Approbation / Safety Content
ivMarantz America, Inc. 100 Corporate Drive Mahwah, NJ07430
RX8001 User Guide
RX8001 User Guide
Printed in Belgium 05/2007 00M40CW851250 mzh-d
www.marantz.comYou can find your nearest authorized distributor or dealer on our website.
is a registered trademark.