monarch hmw dna extraction kit for cells & blood, t3050
TRANSCRIPT

1
INSTRUCTION MANUAL
Monarch® HMW DNA Extraction Kit for Cells & Blood NEB #T3050S/L 5/50 preps Version 2.1_4/21
Table of Contents Kit Components ...................................................................................................................................................................................2
Introduction ..........................................................................................................................................................................................3
Workflow .............................................................................................................................................................................................4
Workflow for Cell Samples .........................................................................................................................................................4
Workflow for Blood Samples ......................................................................................................................................................5
Principles of the Monarch HMW DNA Extraction Kit for Cells & Blood .........................................................................................5
Lysis .............................................................................................................................................................................................5
Erythrocyte Lysis for Blood Samples ..........................................................................................................................................6
Nuclei Preparation and Lysis .......................................................................................................................................................6
Tunability of DNA Fragment Length ..........................................................................................................................................6
DNA Capture ...............................................................................................................................................................................6
Washing and Elution ....................................................................................................................................................................7
Important Considerations for Starting Materials .................................................................................................................................7
Mammalian Cultured Cells ..........................................................................................................................................................7
Blood ............................................................................................................................................................................................8
Storage and Stabilization of Blood Samples ........................................................................................................................8
Fresh Samples ......................................................................................................................................................................8
Frozen Samples ....................................................................................................................................................................8
Mammalian Blood ...............................................................................................................................................................8
Nucleated Blood (birds, reptiles, fish) .................................................................................................................................8
Choosing Input Amounts .....................................................................................................................................................................8
Cells .............................................................................................................................................................................................9
Blood ............................................................................................................................................................................................9
Mammalian Blood ...............................................................................................................................................................9
Nucleated Blood...................................................................................................................................................................9
Detailed Input Amount Guidance ......................................................................................................................................10
Choosing Agitation Speed During Lysis ...........................................................................................................................................12
Handling HMW DNA ........................................................................................................................................................................12
Protocol: High Molecular Weight DNA Extraction from Cells...................................................................................................13
Part 1: Cell Lysis ........................................................................................................................................................................14
Part 2: Genomic DNA Binding and Elution ..............................................................................................................................15
Protocol: High Molecular Weight DNA Extraction from Blood .................................................................................................17
Part 1: Erythrocyte Lysis ...........................................................................................................................................................18
Part 2: Leukocyte Lysis .............................................................................................................................................................21
Part 3: Genomic DNA Binding and Elution ..............................................................................................................................22
Homogenization of HMW DNA Samples .........................................................................................................................................24

2
General Approaches ...................................................................................................................................................................24
Pipetting with Wide Bore Tips ...........................................................................................................................................24
Heat ....................................................................................................................................................................................24
Time....................................................................................................................................................................................24
Dilution ..............................................................................................................................................................................25
For Samples Agitated at Maximum Speed ................................................................................................................................25
For Samples Agitated at Low Speeds (UHMW DNA) ..............................................................................................................25
Measuring & Analyzing HMW DNA Samples .................................................................................................................................25
Storage of HMW DNA ......................................................................................................................................................................26
Appendices .........................................................................................................................................................................................26
Considerations for Loading Pulsed-Field Gels (PFG) ...............................................................................................................26
Considerations and Performance Data for Nanopore Sequencing .............................................................................................26
Understanding Purity Ratios ......................................................................................................................................................27
Troubleshooting .................................................................................................................................................................................27
Low Yield ..................................................................................................................................................................................27
DNA Degradation ......................................................................................................................................................................28
Eluted DNA Difficult to Dissolve..............................................................................................................................................29
Protein Contamination ...............................................................................................................................................................29
RNA Contamination ..................................................................................................................................................................30
Ratio A260/A230 > 2.5 ..................................................................................................................................................................30
Ordering Information .........................................................................................................................................................................31
Revision History ................................................................................................................................................................................31
How to Recycle Monarch Kit Components .......................................................................................................................................32
Kit Components After opening the kit, RNase A and Proteinase K should be stored at -20°C and RBC Lysis Buffer should be stored at 4°C. The remainder
of the kit should be stored at room temperature. Always keep buffer bottles tightly closed. For information regarding the composition of
buffers, please consult the Safety Data Sheets available on our website (www.neb.com/T3050). Proper laboratory safety practices should
be employed, including the use of lab coats, gloves and eye protection.
NEB #
T3050S
5 preps
T3050L
50 preps
STORAGE
TEMPERATURE
T3005 Monarch DNA Capture Beads 10 beads 100 beads 25°C
T3004 Monarch Bead Retainers 5 retainers 50 retainers 25°C
T3003 Monarch 2 ml Tubes 10 tubes 100 tubes 25°C
T2018 Monarch Collection Tubes II 5 tubes 50 tubes 25°C
T3051 Monarch RBC Lysis Buffer 15 ml 160 ml 4°C after opening
T3052 Monarch gDNA Nuclei Prep Buffer 1.5 ml 10 ml 25°C
T3053 Monarch gDNA Nuclei Lysis Buffer 1.5 ml 10 ml 25°C
T3055 Monarch Precipitation Enhancer 1 ml 5 ml 25°C
T3015 Monarch gDNA Wash Buffer 4.5 ml 18 ml 25°C
T3056 Monarch Elution Buffer II 1.5 ml 12 ml 25°C
T3018 Monarch RNase A 35 µl 2 x 170 µl -20°C after opening
P8107 Proteinase K, Molecular Biology Grade 120 µl 0.6 ml -20°C after opening

3
Introduction The Monarch HMW DNA Extraction Kit for Cells & Blood provides a rapid and reliable process for extracting high molecular weight
(HMW) intact genomic DNA from cultured cells and whole blood. Utilizing an optimized process that combines gentle cell lysis with
tunable fragment length generation followed by precipitation of the extracted DNA onto the surface of large glass beads, the prep proceeds
rapidly and utilizes standard laboratory equipment. DNA size ranges from 50–250 kb for the standard protocol and can be adjusted to
produce longer DNA into the megabase (Mb) range. Purified DNA is recovered in high yield with excellent purity, including nearly
complete removal of RNA. For cells, the process time is only 30 min, while blood samples require erythrocyte lysis and are processed in 60
minutes. Purity ratios of 1.80–1.90 and 2.2–2.54 (A260/A280 and A260/A230, respectively), are easily and reproducibly achievable, and
purified HMW gDNA is suitable for a variety of downstream applications including long-read sequencing
Figure 1: Reproducible Extraction of HMW DNA from Cells and Blood with the Monarch HMW DNA Extraction Kit.
DNA extracted with Monarch HMW DNA Extraction Kit for Cells & Blood. 1 x 10⁶ fresh HEK293 cells and 500 µl fresh human blood were
used as inputs and for preps performed according to the kit instructions using the agitation speed indicated above the gel lanes. 500 ng of
DNA from the replicates was resolved by PFGE (1% agarose gel, 6 V/cm, 13°C for 20 hours, switch times ramped from 0.5–94 seconds on
a BioRad® CHEF-DR® III System). Yield and purity ratios of the individual preps are shown in the accompanying tables. Lambda PFG
Ladder (NEB #N0341) was used as molecular weight standard.
4
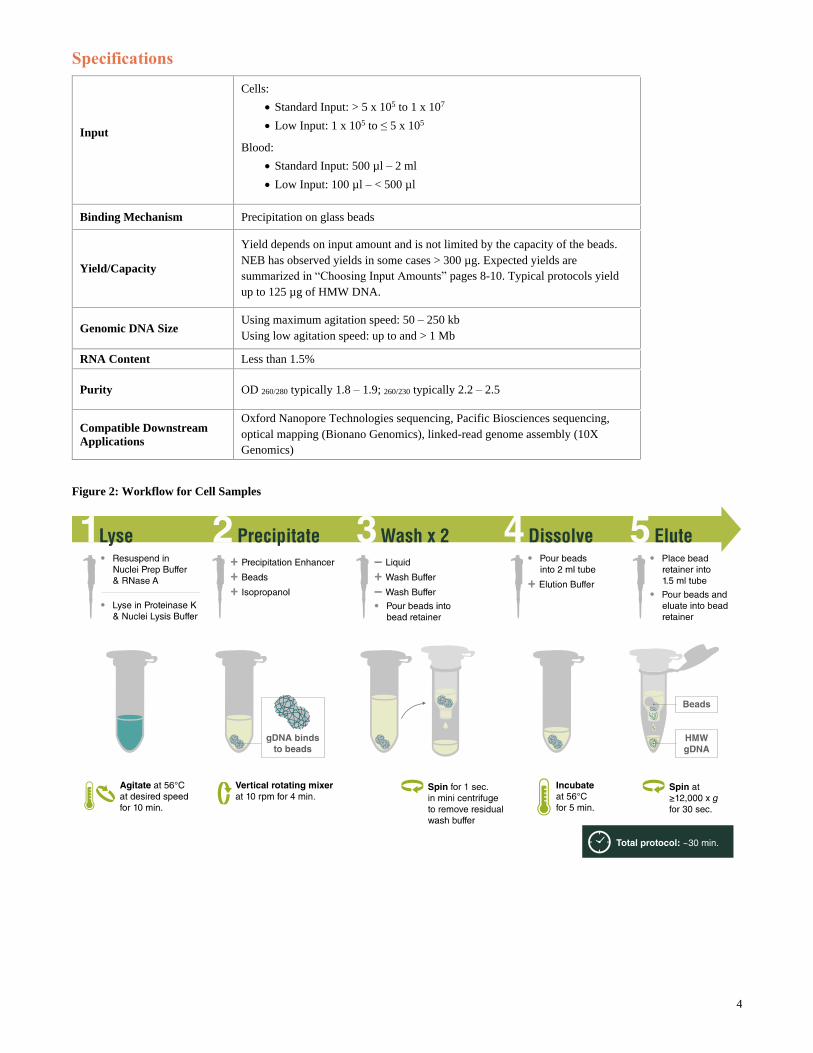
Specifications
Input
Cells:
• Standard Input: > 5 x 10⁵ to 1 x 10⁷
• Low Input: 1 x 10⁵ to ≤ 5 x 10⁵
Blood:
• Standard Input: 500 µl – 2 ml
• Low Input: 100 µl – < 500 µl
Binding Mechanism Precipitation on glass beads
Yield/Capacity
Yield depends on input amount and is not limited by the capacity of the beads.
NEB has observed yields in some cases > 300 µg. Expected yields are
summarized in “Choosing Input Amounts” pages 8-10. Typical protocols yield
up to 125 µg of HMW DNA.
Genomic DNA Size Using maximum agitation speed: 50 – 250 kb
Using low agitation speed: up to and > 1 Mb
RNA Content Less than 1.5%
Purity OD 260/280 typically 1.8 – 1.9; 260/230 typically 2.2 – 2.5
Compatible Downstream
Applications
Oxford Nanopore Technologies sequencing, Pacific Biosciences sequencing,
optical mapping (Bionano Genomics), linked-read genome assembly (10X
Genomics)
Figure 2: Workflow for Cell Samples
5
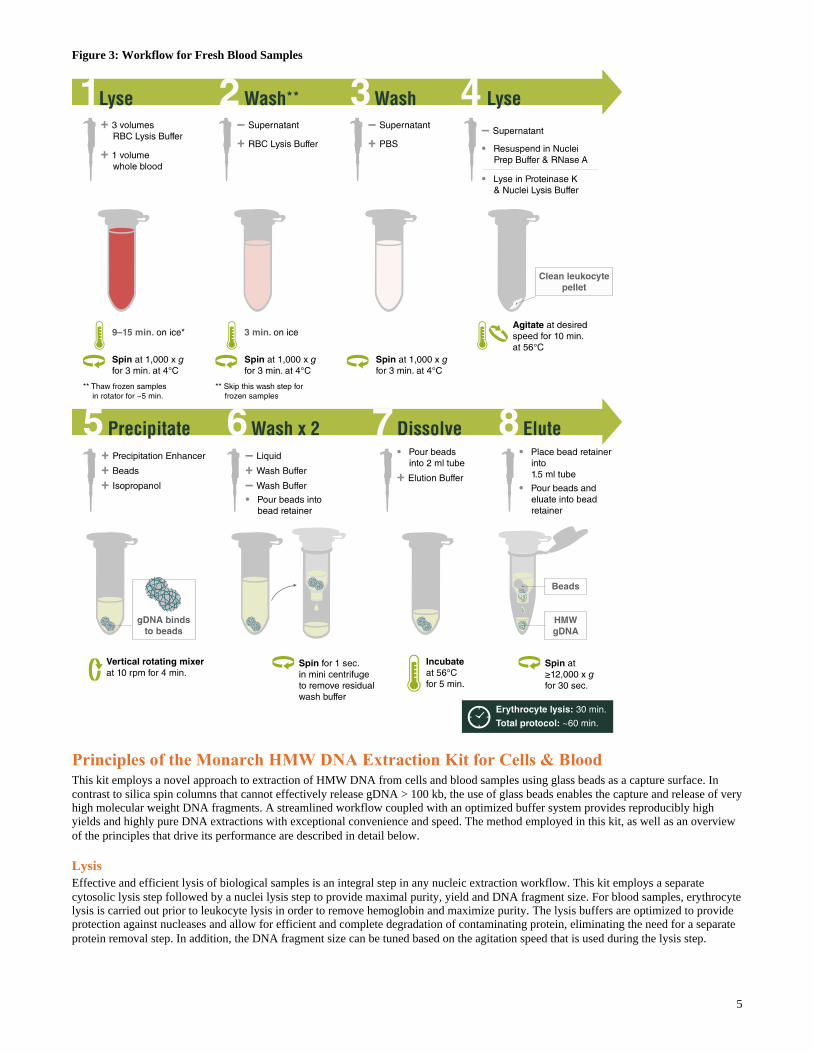
Figure 3: Workflow for Fresh Blood Samples
Principles of the Monarch HMW DNA Extraction Kit for Cells & Blood This kit employs a novel approach to extraction of HMW DNA from cells and blood samples using glass beads as a capture surface. In
contrast to silica spin columns that cannot effectively release gDNA > 100 kb, the use of glass beads enables the capture and release of very
high molecular weight DNA fragments. A streamlined workflow coupled with an optimized buffer system provides reproducibly high
yields and highly pure DNA extractions with exceptional convenience and speed. The method employed in this kit, as well as an overview
of the principles that drive its performance are described in detail below.
Lysis
Effective and efficient lysis of biological samples is an integral step in any nucleic extraction workflow. This kit employs a separate
cytosolic lysis step followed by a nuclei lysis step to provide maximal purity, yield and DNA fragment size. For blood samples, erythrocyte
lysis is carried out prior to leukocyte lysis in order to remove hemoglobin and maximize purity. The lysis buffers are optimized to provide
protection against nucleases and allow for efficient and complete degradation of contaminating protein, eliminating the need for a separate
protein removal step. In addition, the DNA fragment size can be tuned based on the agitation speed that is used during the lysis step.

6
• Erythrocyte Lysis for Blood Samples
For blood samples, erythrocytes are initially lysed, and leukocytes are subsequently isolated with a simple pelleting step.
Effectively, the content of the RBCs (including hemoglobin) and the content of the plasma (including many nucleases) are
removed with the supernatant before the pelleted leukocytes are lysed. Purified leukocytes can then be processed similarly to
cultured cells, and high quality, highly pure HMW DNA can be isolated. An initial erythrocyte lysis step also enables the
scalability of the prep, allowing 100 μl to 2 ml of blood to be processed at one time, significantly increasing the yield of HMW
DNA when compared to approaches that employ direct lysis of whole blood. Erythrocyte lysis works well for fresh and for
frozen whole blood samples, and detailed guidance is provided for both options.
• Nuclei Preparation and Lysis
Cultured cells or leukocytes from blood are gently lysed in two steps. Initially, cell membranes are lysed by the mild Nuclei Prep
Buffer, leaving the nuclei intact and the HMW genomic DNA untouched and compacted inside. Lysis of the cell membranes
enables cytosolic RNA to be digested by RNase A, which has been premixed with the Nuclei Prep Buffer. Subsequently, the
nuclei are lysed by the Nuclei Lysis Buffer + Proteinase K, releasing the HMW gDNA into the lysate, and enabling digestion of
cellular proteins.
For extraction methods that do not employ a separate nuclei lysis step, cell samples can become extremely viscous after lysis,
which poses significant challenges. Highly viscous samples are not only difficult to handle, but the viscosity hinders the ability of
enzymes like RNase A to work, drastically decreasing their efficiency, thus resulting in high levels of RNA contamination. The
two-step lysis approach in this protocol results in nearly complete removal of RNA and establishes conditions for tunable
fragment length generation.
• Tunability of DNA Fragment Length
During lysis in the thermal mixer, the chosen agitation speed determines the fragment length of the purified genomic DNA. Low
speed agitation produces the gentlest conditions and maximizes the intact size of the recovered gDNA (300– ≥ 1000 kb). Faster
agitation rates during processing introduce small amounts of shear force, reducing DNA fragment size to 50–250 kb (ideal for
ligation-based sequencing); see Choosing Agitation Speed During Lysis, page 12).
DNA Capture DNA Extraction methods that employ magnetic beads or spin columns lead to shearing and typically only allow for the purification of
DNA up to 150–200 kb. In the Monarch HMW DNA Extraction Kit, alcohol-based precipitation facilitates attachment of the genomic
DNA to specialized glass beads, which provide a smooth surface to collect precipitated DNA and prevent shearing. During the binding
process, HMW gDNA attaches to the beads and subsequently wraps around the large surface of the beads during inversion. As such, the
binding capacity of the bead itself becomes irrelevant. Additionally, the unique method of capture on the glass bead surface allows all
captured DNA to be completely recovered in a single elution step. The capacity of the kit, which can exceed 100 µg of DNA, is limited by
the working volumes of the reagents and by the potential increases of viscosity that can result with larger input amounts.

7
Washing and Elution Employing glass beads as a capture surface in this workflow enables rapid washing and elution of the HMW gDNA. Following capture on
the bead, the DNA is washed twice with an optimized wash buffer, and the beads (containing the DNA) are transferred to a bead retainer
where a short spin ensures traces of that buffer are rapidly removed. The efficient lysis procedure, coupled with this wash step, effectively
removes lipids, proteins and salts, resulting in a streamlined purification without the need for a separate protein removal step.
The beads containing the bound DNA are then transferred to a 2 ml tube where the elution buffer is added. The sample is heated to 56°C
for 5 minutes to release the DNA from the beads. Beads and eluate are transferred to the bead retainer, which has been inserted into a
collection tube, and the eluate is separated from the glass beads with a short spin. The smooth surface of the beads allows the DNA to be
eluted completely and to go into solution relatively easily. Therefore, there is no need for extensive manipulation during and after elution
(drying of the DNA, long incubations with elution buffer, overnight dissolving etc.). For optimal DNA solubility, avoid letting the bound
DNA dry out on the beads.
Figure 1: The Monarch HMW DNA Extraction Kits enable complete
recovery of input DNA.
NEB #T3050: 10 µg lambda DNA (~20 µl, NEB #N3011) was combined
with Monarch gDNA Nuclei Prep Buffer to bring the total volume to 50 µl.
The Cell Protocol (low input) was carried out from Step 4, omitting
enzymes and enzyme incubation steps. NEB #T3060: 10 µg lambda DNA
(~20 µl, NEB #N3011) was combined with Monarch HMW gDNA
Tissue Lysis Buffer to a total volume of 100 µl. The Tissue Protocol
(for ‘very low input’ samples) was carried out from Step 8, while
omitting enzymes and enzyme incubation steps. DNA concentration
of 100 µl eluates from each kit was measured by OD assessment.
Average recovery rate and standard deviation were calculated based
on 8-fold replicates.
Important Considerations for Starting Materials Mammalian Cultured Cells: HMW gDNA can be extracted from fresh and frozen cultured cells (adherent or suspension). Fresh cells
contain high levels of RNA, but the two-step lysis approach described above ensures that RNA is efficiently degraded before the gDNA is
released into the lysate and before Proteinase K, which degrades the RNase A enzyme, is introduced. Typically, yields from fresh samples
range between 9 and 13 µg for 1 x 10⁶ cells, which is significantly higher (typically ~50%) than yields typically obtained with silica spin
columns.
For storage of cell culture samples, it is recommended to prepare aliquots of the desired cell count, pellet by centrifugation, shock freeze
with liquid nitrogen and store at -80C. Snap freezing, as opposed to slower freezing, ensures that cell structures remain intact and are only
minimally affected by the freezing process. This will lead to maximal DNA integrity and better results (read length) in ligation-based
nanopore sequencing. Yield and purity of frozen cell samples will be comparable to those of fresh cell samples.
Cell samples that are stored in stabilization reagents (e.g., Monarch DNA/RNA Protection Reagent, RNAlater®) can also be processed,
though it is recommended to work with fresh or frozen samples without stabilization reagents for optimal yield, purity and longer, more
uniform DNA fragment size.
For samples stored in RNAlater, the cells are still intact and not yet lysed. Pellet the cells, carefully remove the RNAlater, and then follow
standard protocol. For samples stored in 2X Monarch DNA/RNA Protection Reagent, cells are already lysed. Dilute the reagent to 1X with
nuclease-free water and use this in place of the Nuclei Prep and Lysis Buffer combination for sample lysis. Following the 10-minute
incubation with Proteinase K, add RNase A and incubate the sample at 56°C for 5 minutes. Subsequently, follow the standard protocol.

8
Blood: Blood collected in the presence of common anticoagulants (EDTA, citrate and heparin) can be processed, and both fresh and frozen
blood samples can be used. Blood preps are initiated with an erythrocyte lysis step, which helps obtain high yields, maximal purity, and
high quality HMW DNA. However, during this process, extended exposure of leukocytes to the RBC Lysis Buffer results in a significant
reduction of viability. Therefore, it is important to carry out the RBC lysis steps as quickly as possible and avoid any wait times between
steps. Once the leukocytes are washed with PBS, their condition is stable.
• Storage and Stabilization of Blood Samples
Regardless of the anticoagulant used, blood samples are processed effectively and without any notable differences in the results.
When heparin is used, leukocyte pellets may be more difficult to resuspend, but yield and purity are unaffected. PAXgene® DNA
Blood stabilization tubes provide excellent results for both fresh and frozen blood samples; leukocytes are efficiently stabilized in
these tubes, and slightly higher overall yields have been observed when compared with other anticoagulants.
• Fresh Blood Samples
It is preferable to work with fresh blood whenever possible. Blood sample quality decreases with each day of storage, and
leukocyte stability, DNA yield, and length of the isolated DNA fragments will decline as a result. Additionally, as leukocyte
stability declines, an increase in “stickiness” of the cells may be observed, requiring more effort to resuspend the pellet
completely. Blood samples older than a week should not be used. Before processing, fresh blood samples should always be
inverted several times or vortexed briefly to ensure an even suspension of the cell population.
• Frozen Blood Samples
If blood samples need to be frozen for later processing, samples should be aliquoted immediately after collection in appropriately
sized volumes/containers and should be snap frozen in liquid nitrogen. Frozen aliquots should accommodate the addition of 3
volumes of RBC Lysis Buffer; working in aliquots of 500 µl is recommended for most sample types and allows samples to be
processed in 2 ml tubes. Blood samples should not be thawed completely unless in the presence of RBC Lysis Buffer, as DNA
integrity will be compromised. If working with frozen blood samples aliquoted into volumes/containers that cannot accommodate
the addition of RBC Lysis Buffer (e.g., vacutainers), see the “Important Notes for Frozen Blood” section of the protocol for
specific guidance.
During the freezing process, ice crystals damage the leukocyte cell walls, and upon thawing, cellular DNA becomes vulnerable to
nuclease activity. Snap freezing ensures maximal viability of the leukocytes and will lead to higher yields, maximal DNA
integrity and better results (read lengths) in ligation-based nanopore sequencing. Frozen samples collected in blood tubes with
common anticoagulants (EDTA, citrate, heparin) should, therefore, always be thawed in the presence of cold RBC Lysis Buffer,
which prevents damage to the gDNA. One exception is when working with samples frozen in PAXgene DNA Blood Tubes,
where leukocytes are efficiently protected from nucleases. These samples do not require thawing in the presence of RBC Lysis
Buffer; thawing can be performed according to the manufacturer’s guidance (37C for 15 minutes), and samples can
subsequently be aliquoted and mixed with cold RBC Lysis Buffer as indicated in the protocol.
When processing frozen samples, it is important to use cold RBC Lysis Buffer and to move swiftly through the thawing process
to limit the exposure of the cells to warm temperatures. It is also essential to resuspend any cell clumps that remain at the end of
the thawing process by vortexing; cell clumps that are not resuspended will result in partially insoluble DNA at the end of the
prep. Resuspension of leukocyte pellets from frozen samples is more challenging than with fresh samples, as previously frozen
leukocytes have a stronger tendency to clump.
Leukocytes frozen from freshly collected blood samples are robust and typically survive the freeze and thawing process
quantitatively. However, leukocytes of aging blood samples exhibit decreased stability, which will result in reduced yields and
reduced DNA fragment length. In some cases, using frozen samples instead of fresh samples may result in up to a 35% reduction
in yield; in other cases, the difference may be minimal.
• Mammalian Blood
Human blood samples can vary significantly among donors in terms of their erythrocyte and leukocyte content, as well as their
leukocyte stability. Typically, DNA yields obtained from human samples range from 2.5 µg/100 µl for samples with low
leukocyte counts to 6.5 µg/100 µl for leukocyte-rich samples.
Working with animal blood is usually comparable to working with human blood. However, some animals, like horse, rabbit, and
guinea pig have extremely high hemoglobin content, while others, like cow, have lower hemoglobin content; this is often
noticeable in the dilute appearance of cow blood samples. Leukocyte content can also differ significantly, resulting in variability
in DNA yields among different species. For example, pig and rhesus monkey samples typically yield high amounts of DNA
(~8 µg and 10 µg per 100 µl, respectively), while cow and mouse samples typically yield lower amounts (1–2 µg per 100 µl).
Rabbit blood is extremely rich in erythrocytes, posing a challenge for complete removal of hemoglobin and other proteins. For
optimal purity, a reduced input of 200 µl is recommended. Erythrocyte lysis is not effective for frozen rat samples. Consequently,
for rat blood, only fresh samples should be used. Leukocytes from goat and sheep blood samples are very fragile, making them
unsuitable for erythrocyte lysis from frozen blood; for these, work only with fresh samples.
• Nucleated Blood (birds, reptiles, fish)
Erythrocytes from non-mammalian vertebrates (birds, reptiles, fish) contain nuclei, and therefore have significantly higher DNA
content. As such, input amounts should be reduced by 2 orders of magnitude compared to mammalian blood. Both fresh and
frozen nucleated blood can be processed.
Choosing Input Amounts Recommended input amounts are provided in the accompanying table. It is strongly advised to use these recommended amounts for
optimal results. Due to the unique binding process in this protocol, typically, all of the DNA in the sample will bind to the glass beads
effectively when standard sample input amounts are processed. Within the standard input range, all of the DNA that is bound to the beads

9
will elute completely, providing complete, or nearly complete, recovery of the DNA present in the sample. If working with low sample
inputs, the binding efficiency of system will be somewhat reduced, and the yields will be as well. Reduction of the lysis volume will
improve the binding efficiency and yield in these cases. When working with low amounts, follow the detailed guidance that is provided.
Cells: The sample input range is 1 x 10⁵–1 x 10⁷ cells, but an input amount of 1 x 10⁶ cells is recommended. The upper limit for cell input
amounts is dictated by the viscosity of the lysed sample, which poses a challenge to the efficiency of the enzymes, precipitation onto the
beads, and the dissolving of the purified DNA. If using more than 2 x 10⁶ cells, purified DNA samples will be viscous and may be more
difficult to dissolve and handle. If using an input below 1 x 10⁵ cells, DNA recovery will be significantly less efficient. It is important to
note that if employing a low agitation speed during lysis, inputs should not exceed 5 x 10⁶ cells. When working with samples less than
5 x 10⁵, follow protocol guidance for Low Input to ensure the buffer volumes used reflect the lower cell count.
Blood:
• Mammalian Blood
The sample input range for mammalian blood samples is 100 µl up to 2 ml. Working with a starting sample of 500 µl is
recommended for most sample types; 200 µl is recommended for rabbit samples, which have a high cell content. If working with
starting volumes > 500 µl, samples will need to be initially processed in larger tubes or split into 500 µl aliquots. The container
needs to accommodate the addition of 3 volumes of RBC Lysis Buffer; working with 500 µl enables processing in a 2 ml tube. If
splitting the sample into multiple aliquots, the pellets can be combined into a single 2 ml tube after RBC lysis to facilitate further
processing. If working with sample volumes below the recommended input amount (500 µl for most samples), follow the
protocol guidance for Low Input to ensure the buffer volumes reflect the lower cell count.
• Nucleated Blood
The maximum input for successful DNA extraction from nucleated blood is 20 µl; exceeding this will overload the system. The
recommended input amount is 5 µl.

10
Detailed Input Amount Guidance
Table 1 provides data on minimum, maximum, and recommended input amounts for various cell lines and blood samples using the
Monarch HMW DNA Extraction Kit for Cells & Blood. Data on yield, purity, RNA content and DIN values is also provided. Samples that
were successfully tested in standard ligation-based Oxford Nanopore Technologies sequencing runs are indicated. RNA content was
determined by HPLC analysis of nucleoside content after digestion of 1 µg of eluted nucleic acid with the Nucleoside Digestion Mix (NEB
#M0649). Yields from blood samples vary by donor due to different leukocyte content; yield can vary up to 3-fold by donor. Similar yield
and purity results were obtained with different anticoagulants (e.g., EDTA, citrate, heparin and PAXgene Blood DNA tubes were tested).
Using input amounts below the recommended minimums will reduce yields drastically. Exceeding maximum input amounts will result
in DNA eluates that are highly viscous and difficult to dissolve and will reduce purity of the isolated DNA. Results are shown for
samples that were lysed with agitation at 2,000 rpm.
Table 1: Guidance on sample input amount and expected results

11
Figure 4: Linear correlation between yield and input for cells and blood.
Summarized yield data for HMW DNA preps are shown carried out at 2,000 rpm during lysis,
using HEK293 cultured cells and fresh human blood samples from different donors as input
material in the corresponding protocols. The starting materials were diluted to 5 different
concentrations to cover the entire recommended input range. Cell samples ≤ 5 x 10⁵ cells and
blood samples <500 μl were purified using the recommended volumes for low input samples.
Obtained yields show a high degree of linearity over the displayed input range.

12
Choosing Agitation Speed During Lysis The Monarch HMW DNA Extraction Kit enables users to tune the size of extracted HMW by varying the agitation speed used during lysis.
Higher agitation speeds reduce overall size, as increasing the agitation speed fragments the DNA. In general, fresh samples have more
intact DNA and will require higher agitation rates to shear. At 2,000 rpm, the maximal fragment length obtained will be ~250–300 kb, with
the majority of DNA between 100–200 kb. For the standard ligation-based Oxford Nanopore Technologies (ONT) sequencing protocol,
agitation at 2000 rpm is recommended. At 300 rpm or with no shaking, maximal fragment length, in the Mb range, will be obtained
(UHMW DNA). These samples will be highly viscous and difficult to process.
Figure 5: Use of varying agitation speeds during lysis produces tunable fragment length of extracted HMW genomic DNA from
cells and blood
Preps were performed on duplicate aliquots of 1 x 10⁶ HEK 293 cells and 500 µl fresh human blood. Samples were agitated at the
indicated speed during the lysis step to control the fragmentation of the DNA. Equal amounts of DNA from the replicates (cells: 500 ng;
blood: 650 ng) were resolved by PFGE (1% agarose gel, 6 V/cm, 13°C for 20 hours, switch times ramped from 0.5–94 seconds on a
BioRad® CHEF-DR III System). Yield and purity ratios of the individual preps are shown in the accompanying tables. Lambda PFG
Ladder and Lambda DNA-Hind III Digest (NEB #T3041 and #N3012) were used as molecular weight standards. Yield, purity ratios and
DINs of the individual preps are shown in the accompanying tables.
Handling and Storage of HMW DNA
High molecular weight genomic DNA is viscous, making handling and manipulating challenging. Gentle handling as well as the use of
wide-bore pipette tips will help maintain the integrity of the DNA molecules. Additionally, when working with HMW DNA, tubes and
pipette tips specifically designated as low DNA binding should be used. If an agitation speed of 2,000 rpm was used during lysis, DNA will
be in the range of 50–250 kb and the solution will be less viscous and easier to handle. Following homogenization, these samples do not
require the use of wide bore pipette tips and can even be vortexed briefly without affecting DNA integrity. When working with UHMW
DNA or with DNA purified from large input amounts, DNA will be especially viscous and difficult to handle. These samples should
always be pipetted using appropriate wide-bore pipette tips. Pipetting these samples is challenging, as sticky threads are formed between
pipette tip and the sample as aliquots are taken. Briefly pressing the tip on the bottom of the tube can help to break these threads.
Additionally, heating the sample to 37C or 56C for a short period of time will reduce viscosity and facilitate pipetting.

13
The elution buffer provided with the kit (10 mM Tris-HCl, pH 9.0, 0.5 mM EDTA) was developed as a long-term storage buffer. The
combination of EDTA and high pH provides optimal protection against nucleases. If the sample will be actively used, it is recommended to
store HMW samples at 4°C; for long term storage, store at -20°C. Avoid repeated freeze thawing and always use low bind tubes to prevent
DNA from binding to the tube walls.
Protocol: High Molecular Weight DNA Extraction from Cells
MATERIALS REQUIRED BUT NOT SUPPLIED
• Thermal mixer containing a 2 ml tube block (if not available, use a 1.5 ml block).
• Isopropanol, 275 µl per sample (Low Input: 100 µl/sample).
• Ethanol (≥ 95%)
• 1.5 ml DNase-free, low DNA binding microfuge tubes (e.g., Eppendorf® DNA LoBind®, #0030108051) are recommended for
elution and storage (1 per sample); it is especially important to use low DNA binding tubes if working with UHMW DNA,
which tends to bind to plastic surfaces.
• Recommended: vertical rotating mixer (e.g., Thermo Scientific® HulaMixer® Sample Mixer).
• Wide-bore pipette tips.
IMPORTANT NOTES BEFORE YOU BEGIN
• Review the complete protocol before beginning.
• Add ethanol (≥ 95%) to the gDNA Wash Buffer as indicated on the bottle label.
• Cool the Nuclei Prep Buffer to 4°C.
• Preheat thermal mixer with 2 ml block to 56°C.
STARTING MATERIAL NOTES
• The sample input range is 1 x 10⁵ –1 x 10⁷ cells.
• An input of 1 x 10⁶ cells is recommended.
• If using > 2 x 10⁶ cells, purified DNA will be viscous and more difficult to dissolve and handle.
• If using 300 rpm for agitation, do not exceed 5 x 10⁶ cells.
• Use the table below to determine the designation of your sample type, which will determine various volumes in the protocol.
PROTOCOL DESIGNATION NUMBER OF CELLS
Standard Input > 5 x 10⁵ – 1 x 10⁷; 1 x 10⁶ is recommended.
Do not exceed 5 x 10⁶ cells if using 300 rpm agitation for “UHMW DNA”.
Low Input 1 x 10⁵ – < 5 x 10⁵
Below 1 x 10⁵ cells, DNA recovery is significantly less efficient.

14
HMW gDNA Purification Consists of Two Stages:
PART 1: Cell Lysis
PART 2: HMW gDNA Binding and Elution
PART 1 CELL LYSIS
1. Pellet cells in a Monarch 2 ml Tube by centrifugation for 3 minutes at 1,000 x g. Frozen pellets should be thawed.
2. Prepare Nuclei Prep and Lysis Solutions as indicated below:
A. Nuclei Prep Solution: Combine cold Nuclei Prep Buffer and RNase A according to the table below and vortex to mix.
Keep on ice.
STANDARD INPUT LOW INPUT
# of SAMPLES
VOLUME OF
NUCLEI PREP
BUFFER (µl)
VOLUME OF
RNase A (µl)
VOLUME OF
NUCLEI PREP
BUFFER (µl)
VOLUME OF
RNase A (µl)
1 165 5.5 55 2
2 330 11 110 4
3 495 16.5 165 6
4 660 22 220 8
5 825 27.5 275 10
B. Nuclei Lysis Solution: Combine Nuclei Lysis Buffer and Proteinase K according to the table below and vortex to mix.
Keep at room temperature.
STANDARD INPUT LOW INPUT
# of SAMPLES
VOLUME OF
NUCLEI LYSIS
BUFFER (µl)
VOLUME OF
PROTEINASE K
(µl)
VOLUME OF
NUCLEI LYSIS
BUFFER (µl)
VOLUME OF
PROTEINASE K
(µl)
1 165 11 55 4
2 330 22 110 8
3 495 33 165 12
4 660 44 220 16
5 825 55 275 20
3. Flick to resuspend cell pellet. Add 150 µl (Low Input: 50 µl) of Nuclei Prep Solution and pipette up and down 10 times to mix,
being careful not to introduce air bubbles. Incubate at room temperature for 2 minutes. The sample will become less turbid,
indicating cell lysis; nuclei remain intact.
4. Add 150 µl (Low Input: 50 µl) of Nuclei Lysis Solution to sample and invert 10 times to mix. Avoid introducing air bubbles. Do
not vortex or pipette.
5. Incubate at 56°C for 10 minutes in a thermal mixer with agitation at the desired speed to control the shearing and tune the size
of gDNA. The speed of the thermal mixer influences fragment length; higher speeds reduce overall size. For the standard ligation-
based Oxford Nanopore Technologies (ONT) sequencing protocol, agitation at 2,000 rpm is recommended. At 300 rpm or with no
shaking, maximal fragment length, in the Mb range, will be obtained (UHMW DNA). These samples will be highly viscous and
difficult to process. Optimization may be required depending on the quality of the starting sample. Refer to “Choosing Agitation
Speed During Lysis”, page 12, for guidance. If desired, samples can be stored at 4°C overnight after the incubation.
6. If working with multiple samples, prepare and label the plastics for Part 2: HMW gDNA Binding and Elution.
Each sample will require:
• 1 Monarch Collection Tube II (no need to label).
• 1 Monarch Bead Retainer inserted into the collection tube; this will be used to remove the wash buffer from the gDNA bound
to the beads.
• 1 Monarch 2 ml Tube; this will be used for eluting the gDNA from the beads.
• 1 1.5 ml microfuge tube (DNA low bind is recommended, not provided); this will be used to collect the eluate.
7. Add 75 µl (Low Input: 25 µl) of Precipitation Enhancer after the 10-minute incubation and mix by inverting 8–10 times.

15
PART 2 HMW gDNA BINDING AND ELUTION
1. Using clean forceps, add 2 DNA Capture Beads to each sample, which should be contained in a Monarch 2 ml Tube.
2. Add 275 µl (Low Input: 100 µl) isopropanol, close the cap, and mix on a vertical rotating mixer at 10 rpm for 4 minutes to
attach DNA to the beads. When working with ≥ 5 x 10⁶ cells, double the inversion time to 8 minutes; this is especially important if
low agitation speeds were used during lysis.
If a vertical rotating mixer is not available, invert slowly and gently by hand 30 times. A manual inversion is complete when the tube
returns to the upright position. Slow inversion is critical for the DNA to bind to the beads; each full inversion should take ~5–6
seconds. If necessary, flick the tube to release any beads that stick to the bottom of the tube.
After a few inversions, the solution becomes more viscous and the DNA will wrap loosely around the beads. During the following
inversions, precipitation of gDNA may be visible, especially with sample inputs ≥ 5 x 10⁶ cells. The DNA complex will often contain
small air bubbles. With more inversions, the DNA will completely wrap around the beads, often causing the beads to stick together.
3. Remove and discard liquid by pipetting. Avoid removing any of the gDNA wrapped around the glass beads. For optimal DNA
solubility, avoid letting the bound DNA dry out on the beads during this and the following steps; add the next buffer quickly.
There are two suggested options for carrying out this step:
• Keeping tube upright, insert pipette tip and gently push beads aside to remove liquid.
• Angle tube so that beads remain at the bottom, and liquid reaches toward tube opening. Pipette from the liquid surface and
continue to angle as liquid is removed (tube will be almost horizontal at the end).
4. Add 500 µl gDNA Wash Buffer, close the cap, and mix by inverting the tube 2–3 times. Remove the gDNA Wash Buffer as
described in Step 3. The loose gDNA complex will condense around the beads more tightly.
5. Repeat the wash in Steps 3–4. Remove the gDNA Wash Buffer by pipetting. Alternatively, the buffer can be removed by decanting:
position a pipette tip at the top of the angled tube to prevent the beads from falling out. It is not necessary to remove all the gDNA
Wash Buffer at this point.
6. Place a labeled bead retainer into a Monarch Collection Tube II. Pour the beads into the bead retainer and close the cap. Discard the
used Monarch 2 ml Tube. When working with multiple samples, be sure to close the cap of the bead retainer after each transfer of beads.
7. Pulse spin (1 second or less) the sample in a benchtop minicentrifuge to remove any residual wash buffer from the beads.

16
8. Separate the bead retainer from the collection tube, pour the beads into a new, labeled Monarch 2 ml Tube, and insert the used
bead retainer into the labeled 1.5 ml microfuge tube (DNA low bind recommended, not provided) for later use during elution.
Discard the used collection tube.
9. Immediately add 100 µl (use 200 μl if working with > 2 x 10⁶ cells) Elution Buffer II onto the glass beads and incubate for 5
minutes at 56°C in a thermal mixer with agitation at the lowest speed (300 rpm). Halfway through the incubation, ensure the
beads are not stuck to the bottom of the tube by tilting the tube almost horizontally and gently shaking. This ensures that the beads
can move freely, allowing for optimal release of the DNA from the beads. It also ensures that the lower bead does not stick to the bottom
of the tube during the following transfer step. Elution volume can be reduced to as low as 50 µl without affecting recovery. However, if
using < 100 µl, the gentle shaking of the sample should be done several times during the incubation to ensure complete wetting of the
beads.
10. Ensure the bead retainer is inserted into the 1.5 ml microfuge tube. Pour the eluate and the glass beads into the bead retainer
and close the cap. When working with more than 1 sample, it is important to close the cap after each transfer of beads. Typically, all the
eluate flows into the bead retainer upon pouring. If any volume remains in the 2 ml tube, spin briefly and transfer.
11. Centrifuge for 30 seconds (1 minute if working with ≥ 5 x 10⁶ cells) at 12,000 x g to separate the eluate from the glass beads.
Discard the beads and retainer.
12. Pipette eluate up and down 5–10 times with a wide bore pipette tip and ensure any visible DNA aggregates are dispersed.
Before analysis or downstream use, HMW DNA must be homogeneously dissolved. After pipetting, incubate at 37°C for 30-60
minutes, overnight at room temperature, or for > 24 hours at 4°C. Pipette up and down 5-10 times again before analyzing or using the
HMW DNA. Samples processed using low agitation speeds during lysis will require additional time to fully dissolve. See additional
guidance in “Homogenization of HMW DNA Samples”, page 24. Samples can be stored at 4°C for short term use (weeks), or at -20°C
for long term storage. The elution buffer (10 mM Tris, pH 9.0, 0.5 mM EDTA) is formulated for long term storage of gDNA.

17
Protocol: High Molecular Weight DNA Extraction from Blood
MATERIALS REQUIRED BUT NOT SUPPLIED
• Microcentrifuge capable of being set to 4°C. If working with blood aliquots > 500 µl, a centrifuge that accommodates 15 ml
tubes will be required. Alternatively, split the sample into aliquots of 0.5 ml to use a microcentrifuge.
• Thermal mixer containing a 2 ml tube block (if not available, use a 1.5 ml block).
• Vertical rotating mixer (e.g., Thermo Scientific HulaMixer Sample Mixer) is recommended for all samples and is required for
frozen blood.
• Ice or cooling block
• Ethanol (≥ 95%)
• Cold 1X PBS (1.5 ml per sample)
• Isopropanol, 275 µl per sample (Low Input: 100 µl per sample)
• 1.5 ml DNase-free, low DNA binding microfuge tubes (e.g., Eppendorf DNA LoBind, #0030108051) are recommended for
elution and storage (1 per sample); it is especially important to use low DNA binding tubes if working with UHMW DNA,
which tends to bind to plastic surfaces.
• Wide-bore pipette tips
IMPORTANT NOTES BEFORE YOU BEGIN
• Review the complete protocol before beginning.
• Add ethanol (≥ 95%) to the gDNA Wash Buffer as indicated on the bottle label.
• Cool the Nuclei Prep Buffer, RBC Lysis Buffer and PBS to 4°C.
• Set centrifuge to 4°C.
• Preheat thermal mixer with 2 ml block to 56°C.
• Once RBC Lysis Buffer has been added, proceed quickly through the protocol. Extended exposure of leukocytes
to this buffer will lead to clumping and reduced DNA yield and quality.
• It is essential to resuspend the cell pellet completely wherever indicated. Leukocyte clumping will lead to
difficulty dissolving DNA.
STARTING MATERIAL NOTES
This protocol has been validated on fresh blood samples (human, mouse, rat, rabbit, horse, cow, pig and monkey) and frozen blood samples
(human, mouse, rabbit, horse, cow, pig and monkey). Do not use frozen rat blood samples, as erythrocyte lysis is not effective; consider
using a product employing direct lysis of whole blood (e.g., Monarch Genomic DNA Purification Kit (NEB #T3010). See “Important
Considerations for Starting Materials”, pages 7-8 and “Choosing Input Amounts”, pages 8-10 before beginning, specifically if working
with rabbit samples.
BLOOD SOURCE PROTOCOL DESIGNATION INPUT AMOUNT
Mammalian
Standard Input 500 µl–2 ml
500 µl is recommended*
Low Input 100 µl to < 500 µl
Nucleated
(e.g., bird, fish, reptile)
Standard Input 2–20 µl
5 µl is recommended
* If working with ≥ 500 µl blood, either split sample into 500 µl aliquots or work in a larger tube. If splitting samples into 500 µl
aliquots, combine leukocyte pellets into 1.5 ml of RBC Lysis Buffer and transfer to a Monarch 2 ml Tube in Step 4 for further
processing.
IMPORTANT NOTES FOR FRESH BLOOD
• Fresh samples provide the greatest yield; process blood samples soon after collection
• Leukocyte stability will decline after each day of storage. Cells will become stickier and difficult to resuspend.
• Mix blood sample well by vortexing before starting

18
IMPORTANT NOTES FOR FROZEN BLOOD
• If available, use liquid nitrogen to flash freeze blood samples.
• Freeze blood in aliquots of the desired volume immediately following collection to maintain integrity of leukocytes. Sample container
needs to accommodate 3 volumes of RBC Lysis Buffer.
• Do not thaw the sample before processing, as DNA integrity will be compromised. Thaw in the presence of RBC Lysis Buffer,
per the protocol.
• If samples have been frozen in containers which cannot accommodate 3 volumes of RBC Lysis Buffer (e.g., vacutainers), do
not completely thaw the sample at room temperature or 37°C; samples should not be thawed unless in the presence of RBC
Lysis Buffer. An effective approach is to start thawing the sample in a 37°C water bath just enough to detach it from its current
container and move it to a larger one. Then add 3 volumes of cold RBC Lysis Buffer and continue the thawing process on the
vertical rotator at 20 rpm until the blood has completely thawed (~3 minutes). Place on ice and take the appropriate amount for
the DNA extraction (standard input is 500 µl blood, which equals 2 ml of the thawed blood + RBC Lysis Buffer mix).
HMW gDNA Purification Consists of Three Stages:
PART 1: Erythrocyte Lysis
PART 2: Leukocyte Lysis
PART 3: HMW gDNA Binding and Elution
PART 1 ERYTHROCYTE LYSIS
Fresh Mammalian Blood
1. Add up to 500 µl of blood to a Monarch 2 ml Tube and add 3 volumes of cold RBC Lysis Buffer (e.g., 1.5 ml RBC Lysis Buffer
for 500 µl blood). Close the cap and invert 3–5 times to mix. If working with rabbit blood, consider using an input volume of
200 µl; however, use 1.5 ml of RBC Lysis buffer instead of 3 volumes.
2. Incubate on ice; when sample starts to turn translucent (6–12 minutes for fresh blood, 5–7 min for week-old blood), mix by
inverting a few times, and then wait an additional 3–5 minutes for the RBC lysis to be complete.
RBC lysis is stressful for leukocytes; it is important to process samples quickly; extended exposure of leukocytes to RBC Lysis
Buffer can lead to clumping, lower yields and reduced solubility of the eluted DNA.
3. Pellet leukocytes for 3 minutes at 1,000 x g at 4°C, then carefully remove most of the supernatant by pipetting, leaving
approximately 15-20 µl behind to avoid disturbing the pellet. Close the cap. Do not leave more than 20 μl behind, as this will lead
to protein contamination and may interfere with DNA binding to the beads. Angle the tube, pellet down, and pipette from the upper
side of the tube. Pipetting too close to the pellet will reduce DNA yield, as the pellet structure is loose.
4. Flick the tube or drag along a microtube rack to resuspend the pellet. Briefly vortex sample and add 1.5 ml of cold RBC Lysis
Buffer. Vortex to resuspend cells completely. Incubate on ice for 3 minutes. Use 1.5 ml for all samples regardless of input amount.
If working in a 15 ml tube, move sample to a Monarch 2 ml Tube after resuspension in RBC Lysis Buffer.
If working with multiple samples, resuspend, vortex, add buffer, vortex again and then move on to the next sample; this
prevents clumping of the leukocytes.
5. Pellet leukocytes for 3 minutes at 1,000 x g at 4°C. Remove supernatant by pipetting, leaving approximately 15-20 µl behind to
avoid disturbing the pellet as described in Step 3, and close the cap.

19
6. Flick the tube or drag along a microtube rack to resuspend the pellet. Briefly vortex sample and add 1.5 ml of cold PBS.
Vortex to mix. If sample is not in a Monarch 2 ml Tube, transfer at this step.
If working with multiple samples, resuspend, vortex, add PBS, vortex again and then move on to the next sample;
this prevents clumping of the leukocytes.
7. Pellet leukocytes for 3 minutes at 1,000 x g at 4°C and remove supernatant by pipetting, leaving approximately 15-20 µl
behind as described in Step 3. Close the cap and proceed immediately to Part 2: Leukocyte Lysis. Leukocyte pellets will be off-
white and may contain a small residual amount of red blood cells. If pellet still contains a large fraction of red blood cells, repeat Steps
4-7. In the future, increase the incubation time in Steps 2 and 4 by a few minutes to ensure erythrocyte lysis is complete.
Frozen Mammalian Blood
1. Add 3 volumes of cold RBC Lysis Buffer, close cap and invert a few times, ensuring that the buffer can move freely within the
tube. If samples have been frozen in containers which cannot accommodate 3 volumes of RBC Lysis Buffer (e.g., vacutainers), see
specific guidance in “Important Notes for Frozen Blood”, page 18.
2. Incubate samples at room temperature for 30–90 seconds in a tube rack, shaking a few times to facilitate thawing, until RBC
Lysis Buffer turns more intensely red.
3. Place samples in a vertical rotating mixer at ~10 rpm until pellet is thawed and dissolved. Do not exceed 5 minutes. For 500 µl
aliquots, thawing is usually complete after ~5 minutes. If after 5 minutes, the sample is not thawed, shake it a few times to facilitate
complete thawing. Larger frozen aliquots may take longer to thaw. Remove from rotator as soon as sample is thawed, as extended
exposure to warm temperatures will harm the leukocytes.
Samples from some species, including rabbit, will form a very rigid frozen cell pellet that has a significantly higher cell count than
other species. Support the thawing process by frequently flicking the tube vigorously to loosen the pellet. This ensures that thawing is
complete within 5 minutes.
4. After frozen blood has thawed completely, vortex to resuspend any remaining cell aggregates and keep on ice
5. Pellet leukocytes for 3 minutes at 1,000 x g at 4°C, then carefully remove most of the supernatant by pipetting, leaving
approximately 15-20 µl behind to avoid disturbing the pellet. Close the cap. Do not leave more than 20 μl behind, as this will lead
to protein contamination and may interfere with DNA binding to the beads. Angle the tube, pellet down, and pipette from the upper
side of the tube. Pipetting too close to the pellet will reduce DNA yield, as the pellet structure is loose.
For samples with a low leukocyte content like cow blood or low input samples, there may not be a clearly visible pellet after
centrifugation. However, leukocytes are present and spread more evenly along the tube wall. Process samples by removing the
supernatant carefully while placing the pipette tip at the opposite side of the tube, to ensure the leukocyte layer is not disturbed.
6. Vigorously flick the tube or drag along a microtube rack several times to completely resuspend the pellet. If sample has
splashed along the tube walls, pulse spin in a benchtop minicentrifuge. Briefly vortex sample, add 1.5 ml of cold PBS, and
vortex to mix. If necessary, repeat vortexing to resuspend cells completely. If sample is not in a Monarch 2 ml Tube, transfer at this
step.
If working with multiple samples: resuspend, vortex, add PBS, vortex again, and then move on to the next sample; this
prevents clumping of the leukocytes.

20
7. Pellet leukocytes for 3 minutes at 1,000 x g at 4°C, then remove supernatant by pipetting, leaving approximately 15-20 µl as
described in Step 5. Close the cap, and immediately proceed to Part 2: Leukocyte Lysis. If working with rabbit blood, repeat the
PBS wash to reduce hemoglobin content.
Fresh Nucleated Blood
1. Add 2–20 µl (5–10 µl is recommended) of blood to a Monarch 2 ml Tube and add 1.5 ml cold RBC Lysis Buffer. Close the cap
and invert 3–5 times to mix.
2. Incubate on ice for 10 minutes; mix a few times by inverting during the incubation. Sample will turn slightly translucent, but in
contrast to non-nucleated blood, will not show a complete change from turbid to translucent.
RBC lysis is stressful for leukocytes; it is important to process samples quickly; extended exposure of leukocytes to RBC Lysis
Buffer can lead to clumping, lower yields and reduced solubility of the eluted DNA.
3. Pellet leukocytes for 3 minutes at 1,000 x g at 4°C, then remove most of the supernatant by pipetting; leaving approximately
15-20 µl behind to avoid disturbing the pellet. Close the cap. Angle the tube, pellet down, and pipette from the upper side of the
tube. Pipetting too close to the pellet will reduce DNA yield, as the pellet structure is loose.
4. Flick the tube or drag along a microtube rack to resuspend the pellet. Briefly vortex sample and add 1.5 ml of cold RBC Lysis
Buffer. Vortex to resuspend cells completely and incubate on ice for 3 minutes. Use 1.5 ml for all samples regard less of input
amount. If working in a 15 ml tube, move sample to a Monarch 2 ml Tube after resuspension in RBC Lysis Buffer.
If working with multiple samples, resuspend, vortex, add buffer, vortex again and then move on to the next sample;
this prevents clumping of the leukocytes.
5. Pellet leukocytes for 3 minutes at 1,000 x g at 4°C. Remove supernatant by pipetting, leaving approximately 15-20 µl behind to
avoid disturbing the pellet as described in Step 3, and close the cap.
6. Flick the tube or drag along a microtube rack to resuspend the pellet. Briefly vortex sample and add 1.5 ml of cold PBS.
Vortex to mix. If sample is not in a Monarch 2 ml Tube, transfer at this step.
If working with multiple samples, resuspend, vortex, add PBS, vortex again and then move on to the next sample;
this prevents clumping of the leukocytes.
7. Pellet leukocytes for 3 minutes at 1,000 x g at 4°C and remove supernatant by pipetting, leaving approximately 15-20 µl
behind as described in Step 3. Close the cap, and immediately proceed to Part 2: Leukocyte Lysis. Leukocyte pellets will be off-
white and may contain a small residual amount of red blood cells. If pellet still contains a large fraction of red blood cells, repeat Steps
4–7. In the future, increase the incubation time in Steps 2 and 4 by a few minutes to ensure erythrocyte lysis is complete.

21
Frozen Nucleated Blood
Before beginning, review the "Important Notes” relating to frozen blood samples. There are essential considerations that directly impact
performance of the prep and the integrity of the DNA.
1. Add 1.5 ml of cold RBC Lysis Buffer. Invert a few times until the blood starts to thaw. RBC Lysis Buffer will begin to turn red.
2. Incubate samples on ice 2–3 minutes, flicking periodically to facilitate thawing and resuspension.
3. After thawing is complete, vortex briefly to dissolve any cell aggregates.
4. Pellet leukocytes for 3 minutes at 1,000 x g at 4°C, then remove most of the supernatant by pipetting, leaving approximately
15-20 µl behind to avoid disturbing the pellet. Close the cap. Angle the tube, pellet down, and pipette from the upper side of the
tube. Pipetting too close to the pellet will reduce DNA yield, as the pellet structure is loose.
5. Flick the tube or drag along a microtube rack to completely resuspend the pellet. If sample has splashed along the tube walls,
pulse spin in a benchtop minicentrifuge. Briefly vortex sample, add 1.5 ml of cold PBS, and vortex to mix. If necessary, repeat
vortexing to resuspend cells completely. If sample is not in a Monarch 2 ml Tube, transfer at this step.
If working with multiple samples: resuspend, vortex, add PBS, vortex again, and then move on to the next sample;
this prevents clumping of the leukocytes.
6. Pellet leukocytes for 3 minutes at 1,000 x g at 4°C and remove supernatant by pipetting, leaving approximately 15-20 µl
behind as described in Step 4. Close the cap, and immediately proceed to Part 2: Leukocyte Lysis.
PART 2 LEUKOCYTE LYSIS
1. Prepare Nuclei Prep and Lysis Solutions as indicated below:
A. Nuclei Prep Solution: Combine cold Nuclei Prep Buffer and RNase A according to the table below and vortex to mix.
Keep on ice.
STANDARD INPUT
(500 µl – 2 ml blood)
LOW INPUT
(<500 µl blood)
# of SAMPLES
VOLUME OF
NUCLEI PREP
BUFFER (µl)
VOLUME OF
RNase A (µl)
VOLUME OF
NUCLEI PREP
BUFFER (µl)
VOLUME OF
RNase A (µl)
1 165 5.5 55 2
2 330 11 110 4
3 495 16.5 165 6
4 660 22 220 8
5 825 27.5 275 10

22
B. Nuclei Lysis Solution: Combine Nuclei Lysis Buffer and Proteinase K according to the table below and vortex to mix.
Keep at room temperature.
STANDARD INPUT
(500 µl – 2 ml blood)
LOW INPUT
(<500 µl blood)
# of SAMPLES
VOLUME OF
NUCLEI LYSIS
BUFFER (µl)
VOLUME OF
PROTEINASE K
(µl)
VOLUME OF
NUCLEI LYSIS
BUFFER (µl)
VOLUME OF
PROTEINASE K
(µl)
1 165 11 55 4
2 330 22 110 8
3 495 33 165 12
4 660 44 220 16
5 825 55 275 20
2. Proceed with steps A-C for each sample before moving on to the next sample. Avoid introducing air bubbles when pipetting
and mixing.
A. Flick the tube or drag along a microtube rack to resuspend cell pellet completely. If sample has splashed along the tube
walls, pulse spin in a benchtop minicentrifuge.
B. Add 150 µl (Low Input: 50 µl) of Nuclei Prep Solution and pipette up and down 10 times (20 times for frozen
samples) to mix. The sample will become less turbid, indicating cell lysis; nuclei remain intact. Nuclei from frozen blood
and from fresh blood that has been stored for several days may contain clumps. Pressing the pipette tip to the bottom of the
tube during pipetting facilitates complete resuspension.
C. Add 150 µl (Low Input: 50 µl) of Nuclei Lysis Solution to sample and invert 10 times to mix. Do not vortex or pipette.
Repeat A-C with any remaining samples, leaving finished samples at room temperature.
3. Incubate at 56°C for 10 minutes in a thermal mixer with agitation at the desired speed to control the shearing and tune the size
of gDNA. The speed of the thermal mixer influences fragment length; higher speeds reduce overall size. For the standard ligation-
based Oxford Nanopore Technologies (ONT) sequencing protocol, agitation at 2,000 rpm is recommended. At 300 rpm or with no
shaking, maximal fragment length, in the Mb range, will be obtained (UHMW DNA). These samples will be highly viscous and
difficult to process. Optimization may be required depending on the quality of the starting sample. Refer to “Choosing Agitation
Speed During Lysis, page 12, for guidance. If desired, samples can be stored at 4°C overnight after the incubation.
4. If working with multiple samples, prepare and label the plastics for Part 3: HMW gDNA Binding and Elution.
Each sample will require:
• 1 Monarch Collection Tube II (no label needed).
• 1 Monarch Bead Retainer inserted into the collection tube; this will be used to remove the wash buffer from the gDNA bound
to the beads.
• 1 Monarch 2 ml Tube; this will be used for eluting the gDNA from the beads.
• 1 1.5 ml microfuge tube (DNA low bind is recommended, not provided); this will be used to collect the eluate.
5. Add 75 µl (Low Input: 25 µl) of Precipitation Enhancer after the 10-minute incubation and mix by inverting 8–10 times.
PART 3 HMW gDNA BINDING AND ELUTION
1. Using clean forceps, add 2 DNA Capture Beads to each sample, which should be contained in a Monarch 2 ml Tube.
2. Add 275 µl (Low Input: 100 µl) isopropanol, close the cap, and mix on a vertical rotating mixer at 10 rpm for 4 minutes to
attach DNA to the beads. When working with ≥ 1 ml blood, double the inversion time to 8 minutes; this is especially important if
low agitation speeds were used during lysis.
If a vertical rotating mixer is not available, invert slowly and gently by hand 30 times. A manual inversion is complete when the tube
returns to the upright position. Slow inversion is critical for the DNA to bind to the beads; each full inversion should take ~5–6
seconds. If necessary, flick the tube to release any beads that stick to the bottom of the tube.
After a few inversions, the solution becomes more viscous and the DNA will wrap loosely around the beads. During the following
inversions, precipitation of gDNA may be visible, especially with sample inputs ≥ 500 µl. The DNA complex will often contain small
air bubbles. With more inversions, the DNA will completely wrap around the beads, often causing the beads to stick together.
3. Remove and discard liquid by pipetting. Avoid removing any of the gDNA wrapped around the glass beads. For optimal DNA
solubility, avoid letting the bound DNA dry out on the beads during this and the following steps; add the next buffer quickly.
There are two suggested options for carrying out this step:
• Keeping tube upright, insert pipette tip and gently push beads aside to remove liquid.

23
• Angle tube so that beads remain at the bottom, and liquid reaches toward tube opening. Pipette from the liquid surface and
continue to angle as liquid is removed (tube will be almost horizontal at the end).
4. Add 500 µl gDNA Wash Buffer, close the cap, and mix by inverting the tube 2–3 times. Remove the gDNA Wash Buffer as
described in Step 3. The loose gDNA complex will condense around the beads more tightly.
5. Repeat the wash in Steps 3–4. Remove the gDNA Wash Buffer by pipetting. Alternatively, the buffer can be removed by decanting:
position a pipette tip at the top of the angled tube to prevent the beads from falling out. It is not necessary to remove all the gDNA
Wash Buffer at this point.
6. Place a labeled bead retainer into a Monarch Collection Tube II. Pour the beads into the bead retainer and close the cap. Discard the
used Monarch 2 ml Tube.
7. Pulse spin (1 second or less) the sample in a benchtop minicentrifuge to remove any residual wash buffer from the beads.
8. Separate the bead retainer from the collection tube, pour the beads into a new, labeled Monarch 2 ml Tube, and insert the used
bead retainer into the labeled 1.5 ml microfuge tube (DNA low bind recommended, not provided) for later use during elution.
Discard the used collection tube.
9. Immediately add 100 µl (200 μl if working with ≥ 1 ml of blood or with ≥ 10 µl of nucleated blood) Elution Buffer II onto the glass
beads and incubate for 5 minutes at 56°C in a thermal mixer with agitation at the lowest speed (300 rpm). Halfway through the
incubation, ensure the beads are not stuck to the bottom of the tube by tilting the tube almost horizontally and gently shaking; do
not let the liquid reach the cap. This ensures that the beads can move freely, allowing for optimal release of the DNA from the beads. It

24
also ensures that the lower bead does not stick to the bottom of the tube during the following transfer step. Elution volume can be reduced
to as low as 50 µl without affecting recovery. However, if using < 100 µl, the gentle shaking of the sample should be done several
times during the incubation to ensure complete wetting of the beads.
10. Ensure the bead retainer is inserted into the 1.5 ml microfuge tube. Pour the eluate and the glass beads into the bead retainer
and close the cap. When working with more than 1 sample, it is important to close the cap after each transfer of beads. Typically, all the
eluate flows into the bead retainer upon pouring. If any volume remains in the 2 ml tube, spin briefly and transfer.
11. Centrifuge for 30 seconds (1 minute if working with ≥ 1 ml blood) at 12,000 x g to separate the eluate from the glass beads.
Discard the beads and retainer.
12. Pipette eluate up and down 5–10 times with a wide bore pipette tip and ensure any visible DNA aggregates are dispersed.
Before analysis or downstream use, HMW DNA must be homogeneously dissolved. After pipetting, incubate at 37°C for 30-60
minutes, overnight at room temperature, or for > 24 hours at 4°C. Pipette up and down 5-10 times again before analyzing or using the
HMW DNA. Samples processed using low agitation speeds during lysis will require additional time to fully dissolve. See additional
guidance in “Homogenization of HMW DNA Samples”, page 24. Samples can be stored at 4°C for for short term use (weeks), or
at -20°C for long term storage. The elution buffer (10 mM Tris, pH 9.0, 0.5 mM EDTA) is formulated for long term storage of gDNA.
Homogenization of HMW DNA Samples: After elution, HMW DNA requires further manipulation before use and measurement. Eluted DNA will not be uniformly dispersed and
often clumps in certain areas of the tube; the DNA requires time and effort to disperse and return to its natural conformation in solution.
Spectrophotometric measurements that are carried out immediately following elution will, therefore, not give an accurate indication of the
amount of DNA present. Also, if DNA is not completely dissolved, it may be detected in the OD measurement as turbidity, which will
result in reduced A260/A230 values that may be falsely interpreted as impurity.
General Approaches
Pipetting with Wide Bore Tips
When the DNA is eluted from the beads, the bulk phase retains the wrapped conformation it had when attached to the bead. Pipetting
up and down with a 200 µl wide bore pipette tip breaks this conformation and facilitates dissolving and dispersion.
Heat
Heat will reduce the viscosity of the DNA solution and significantly increase the speed of homogenization of HMW DNA solutions.
Below are some additional guidelines when using heat:
• Temperatures > 60C are generally not recommended as they will lead to DNA denaturation and degradation.
• Incubation at 56C, the temperature used for elution, is appropriate only for short incubation times.
Do not exceed 30 minutes.
• Samples can be incubated at 37C for several hours safely; DNA integrity will not be affected.
• Incubation at room temperature overnight facilitates even homogenization of the DNA.
• Incubation at 4C for days or weeks also facilitated homogenization and relaxation of HMW DNA.
If samples are incubated at 37C for homogenization, mixing the samples at low agitation speed (300 rpm) will increase
homogenization efficiency.
Time
HMW gDNA needs time to relax and homogenize. It is generally not recommended to work with freshly eluted DNA unless
significant effort is made to ensure even DNA resuspension. Letting a sample relax overnight or for several days facilitates
homogenization. If possible, it is recommended that UHMW DNA is extracted several days or a week prior to being needed for
downstream application.

25
Dilution
HMW gDNA should ideally be kept at a concertation of 100–200 ng/ul for easy handling and reliable analysis. As such, using 200 µl
elution buffer is recommended for samples obtained from > 2 x 10⁶ cells, > 500 µl mammalian blood or > 5 µl nucleated blood.
Viscosity of solutions decreases significantly with dilution. After dilution, samples will require additional homogenization by the
procedures described below.
For Samples Agitated at Maximum Speed
When agitation is carried out at 2000 rpm during lysis, purified DNA solutions should be only moderately viscous. In order to homogenize
these samples prior to downstream analysis or use, the following steps are recommended:
1. After elution, pipette up and down 5–10 times using a 200 µl wide bore pipette; ensure any clumps of DNA are dispersed.
2. Incubate DNA samples for 30–60 minutes at 37°C.
3. Pipette up and down 5–10 times again using a wide bore pipette tip.
4. (Optional) Briefly vortex; short vortexing will not affect overall DNA size.
DNA is now ready for use in downstream applications and can now be handled with standard pipette tips. If samples are not immediately
required for downstream use, incubate the sample overnight at room temperature or at 4°C for further homogenization.
For Samples Agitated at Low Speeds (UHMW DNA)
Samples isolated following agitation with low speeds are extremely viscous and require additional effort to relax and homogenize before
analysis and use. When homogenized completely, samples will appear consistent throughout the tube and OD measurements will become
more consistent. The following steps are recommended:
1. After elution, pipette up and down 5–10 times using a 200 µl wide bore pipette; ensure any clumps of DNA are dispersed.
2. Incubate DNA samples for 30–60 minutes at 37°C.
3. Pipette up and down 5–10 times again using the same wide bore pipette tip.
4. Repeat 1–2 times each day for at least 2 days.
If quantitation of UHMW DNA remains challenging following the above steps, needle shearing is recommended prior to
spectrophotometric measurement. Assuming enough sample is available, transfer 30–50 µl to a new tube using a wide bore pipette tip.
Needle shear this aliquot with a 26-gauge (26G) blunt end needle connected to a 1 ml syringe until the viscosity is clearly reduced; up to 20
times may be necessary. Avoid pulling up any air into the needle. If the sample is too viscous to enter a 26G needle, use a larger gauge
blunt end needle (e.g., 20G).
Measuring & Analyzing HMW DNA Samples High molecular weight genomic DNA is often viscous and challenging to handle and transfer volumes with accuracy. Before measurement,
samples should be properly homogenized following the guidelines above. Homogenization prior to quantitation is particularly important if
samples have been frozen for long term storage, where gDNA is unevenly distributed upon thawing. When measuring thawed samples,
allow them to reach room temperature and homogenize to enable consistent measurements.
Samples prepared at high agitation speed are suitable for concentration and purity assessment on microvolume spectrophotometers (MVS)
(e.g., Nanodrop®) after they have been homogenized. These samples should be briefly vortexed to ensure even distribution of the gDNA in
the solution before quantitation; a short vortex will not shear DNA.
Samples obtained with low agitation speeds (UHMW DNA) tend to be less homogeneous and may be more challenging to handle and
apply on MVS systems. For these samples, mix with a wide bore pipette tip to ensure an even distribution of DNA within the sample before
quantitation. UHMW DNA needs to be measured several times, as complete homogenization is challenging. It is recommended to repeat
the measurement ~5 times with different aliquots, then average the results for a better estimation of the sample concentration. Chip-based
systems like Unchained Labs® Lunatic (formerly known as Trinean® Dropsense® 16) are not suitable, as the viscosity of the samples
prevents proper movement in the channels of the chip. In such cases, shear a portion of the sample to reduce viscosity (see
“Homogenization of HMW DNA Samples”, page 24). Alternatively, a fluorescence-based quantitation system (e.g., Qubit®) can be used.
Spectrophotometric analysis of gDNA eluates can be used for assessing the quantity of the isolated gDNA by measuring the absorbance at
260 nm. As the Monarch HMW DNA Extraction Kit protocol efficiently removes RNA using a nuclei prep approach, 260 nm absorbance
values provide an accurate indication of the amount of DNA present. Typically, modern micro volume spectrophotometers (e.g., Nanodrop)
automatically calculate the DNA concentration by multiplying the measured absorbance value with the conversion factor, which is 50 for
DNA. Concentration measurements at 260 nm can be performed on most microvolume systems down to 1 ng/µl with acceptable accuracy.
Below that concentration, the use of fluorescence measurement via Qubit or similar detection systems is recommended. Please note that the
A260/230 and A260/280 ratios are typically not reliable below 20 ng/µl. If DNA is not completely dissolved, it may be detected in the OD
measurement as turbidity, which will result in reduced A260/A230 values that may be falsely interpreted as impurity.
Analysis by standard gel electrophoresis or other electrophoretic methods (Labchip®, Bioanalyzer®, Tape Station®) may not provide
suitable resolution to accurately assess the distribution of fragment sizes in the eluted sample. Typically, more than 80% of the material is
≥ 50 kb in length. Resolution of high molecular weight gDNA is best performed by pulsed-field gel electrophoresis on agarose gels. Faster
methods that have some utility include pulsed-field capillary methods (e.g., FemtoPulse®).

26
Storage of HMW DNA The elution buffer provided with the kit (10 mM Tris-HCl, pH 9.0, 0.5 mM EDTA) was developed as a long-term storage buffer. The
combination of EDTA and high pH provides optimal protection against nucleases. If the sample will be actively used, it is recommended to
store HMW samples at 4°C; for long term storage, store at -20°C. Avoid repeated freeze thawing and always use low bind tubes to prevent
DNA from binding to the tube walls.
Appendices Considerations for Loading Pulsed-Field Gels (PFG)
When samples are prepared for loading on pulsed-field gels, they are mixed with loading dye and water, and are thus diluted. As
described above in “Homogenization of HMW DNA Samples”, samples require time to disperse and relax following dilution. Failure to
allow samples to fully relax before loading onto the gel can result in smearing and trailing of the DNA. As described, samples should be
mixed by pipetting with a wide bore pipette tip and incubated at 37°C for 30 minutes, or several hours to overnight at room temperature,
after diluting with loading dye. Ensure that loading dye does not contain SDS, as SDS can cause the samples to float out of the well by
introducing air bubbles into the sample. It is also recommended to use wide bore pipette tips with hydrophobic coating, especially when
working with UHMW DNA. These coated tips facilitate loading in the PFG wells by preventing the DNA from sticking to the pipette tip,
which could otherwise lead to unintentionally pulling the DNA sample out of the well.
Considerations and Performance Data for Nanopore Sequencing
Successful Nanopore sequencing requires standard molecular biology processing including DNA repair, end-repair, adapter ligation, and
cleanup. As such, the fragment length of material used is an important consideration during experiment design. According to internal
testing, the use of the standard ligation-based Oxford Nanopore Technologies protocol with agitation at 2,000 rpm during lysis produced
the highest N50 values, maximal percent of active pores on the flow cell, and maximal amount of data per run (often exceeding 10 Gb of
data without flushing the flow cell). Using lower agitation speeds for longer DNA may seem logical since longer fragments should
theoretically produce longer contigs. However, library prep of HMW DNA above a certain size has been shown to provide inferior
results. It is recommended to target a DNA size range of 50–250 kb for optimal sequencing results.
Following library prep, consider loading additional DNA library onto the flow cell. Because the size of the DNA molecules extracted
with this method are so long, more input material is needed to maintain the proper molar ratios. Loading 800–1500 ng of HMW gDNA
on the flow cell provides optimal sequencing results in NEB’s internal testing.
Table 2: Single Run Sequencing Results of HEK293 and Human Blood Samples on the Oxford Nanopore Technologies Platform
DNA used for the sequencing libraries was extracted by following the standard protocols for cultured cells and fresh mammalian blood
samples, without further size selection. Libraries were generated using the LSK109 ligation sequencing kit and loaded on a FLO-MIN106D
flow cell. Sequencing was performed on a GridION® Mk1 for up to 48 hours, or shorter if no more data was generated by the flow cell. No
additional treatment of the flow cell (e.g., flushing) was employed. In the samples that resulted in > 10 Gb of data, 800–1,000 ng of DNA
library was loaded onto the flow cell for optimal sequencing performance and effective pore usage. Read lengths are indicated in bases.

27
Understanding Purity Ratios
Purity of the DNA samples can be assessed using A260/A280 and A260/A230 ratios. Samples that have A260/A280 and A260/A230 values > 1.8 are
considered to be pure. However, when working with gDNA that is below 20 ng/µl, these ratios are no longer reliable. There is also great
variation in the ratios depending on the device used to measure them.
A260/A280 Ratio
A260/A280 values can be used as a general guide for overall purity. For sufficiently concentrated samples (> 20 ng/µl), the following
guidelines can be used:
• Mammalian gDNA samples that are very clean will show ratios at or near 1.85–1.87. The range 1.80–1.90 is generally
considered clean.
• Values in the range 1.90 to > 2.0 may indicate potential RNA contamination. The higher the value, the greater the
contamination level.
• Values < 1.80 may indicate potential protein contamination. The lower the value, the greater the contamination. In cases
where the contamination is significant, a shoulder may be observed in the absorbance spectrum around 280 nm. It should
be noted that the A260/A280 ratio is only a rough indicator of protein contamination; low levels will not be detected as they
would if using the A260/A230 ratios.
A260/A230 Ratios
A260/A230 values can be used as a sensitive indicator for overall purity. There are many substances that may influence this ratio,
therefore, analysis of A260/A230 values should be performed with care. Moreover, A260/A230 values show a higher coefficient of
variation than A260 concentration values and A260/A280 ratios, and their accuracy diminishes with decreasing analyte concentrations,
particularly when measuring dilute samples with DNA concentrations below 20 ng/µl.
For DNA samples > 20 ng/µl, the following guidelines can be used:
• Samples that are very clean will show ratios in the range of 2.20–2.50. The range between 1.80–2.50 is generally
considered clean.
• HMW DNA that is not fully dissolves causes sample turbidity, which is detected at 230 nm and will result in a lower
A260
/A230
ratio.
• The A260/A230 ratio is a more sensitive indicator for protein contamination than the A260/A280 ratio. Minor protein
contamination will lead to lower A260/A230 ratios (e.g., 1.60) but may have no significant effects on the A260/A280 ratio.
• The presence of any form of aromatic molecules (like commonly used non-ionic detergents) or molecules with double
bonds, (e.g., EDTA) will lower the A260/A230 ratio.
• Traces of undigested hemoglobin from blood samples will give a specific absorbance peak at 410 nm. However, if
measurable amounts of hemoglobin are available in samples stemming from blood material, the A260/A230 ratio will also
be affected.
Troubleshooting
Low Yield
• DNA did not attach to the beads
– In rare cases, the DNA may not attach to the beads and remains in solution during the binding step. Twist the tube
sideways to create contact between the precipitated DNA and the beads. If DNA still does not attach to the beads,
spin the precipitate down and carefully remove the supernatant. Add 500 μl of Monarch gDNA Wash Buffer,
carefully invert the tube 2-3 times, spin down briefly, and then remove as much wash buffer as possible, without
disturbing the DNA pellet. Pulse-spin in a minicentrifuge and remove residual wash buffer. Next, invert the tube
and air dry at room temperature for 5 minutes. Add elution buffer and incubate for 5-15 minutes at 56°C in a
thermal mixer with agitation at the lowest speed (300 rpm). Pipette up and down with a wide-bore pipette tip to
homogenize. Leave overnight at room temperature for further dissolving or incubate for 30 minutes at 37°C and
mix by pipetting again.
• Incomplete binding to the beads
– When working with high input samples ( 5 x 10⁶ cells or 1 ml blood), especially when low agitation speeds are
used for UHMW DNA, additional inversions are required for the DNA to bind completely and tightly enough to
the beads. Increase the binding time in the rotator to 8 minutes. Insufficient binding can lead to loss of DNA
during the following short spin step (to dry the beads).
• Inaccurate quantitation of UHMW DNA concentration
– Measuring UHMW DNA accurately is challenging, as the large DNA molecules may be unevenly dispersed in
solution. When measured on a spectrophotometer, the samples often show a significantly lower concentration
than what is truly present. Repeated measurements may give a more accurate concentration estimate. Please refer
to “Measuring & Analyzing HMW DNA Samples“ on page 25 for more information. Alternatively, shearing a

28
small portion of the sample to reduce the viscosity and homogenize the solution as described in “Homogenization
of HMW DNA Samples”, page 24 to enable accurate quantitation.
Cells:
• Lysis volume too large
– If working with ≤ 5 x 10⁵ cells in the standard lysis volume, the efficiency of binding to the glass beads will be
reduced as the DNA concentration is too low for efficient attachment. In such cases, a 3X reduction of the sample
volume is needed. Use of the “low input” protocol will establish optimal binding conditions and improve yields.
• Inaccurate cell count
– Some types cultured cells (e.g., HEK293) tend to clump and may be difficult to accurately count. Clumping
usually leads to an underestimation of the cell count and an unexpectedly high yield. If the cell count of dilute
samples is incorrectly estimated to be above 5 x 10⁵, the use of standard input protocols may lead to reduced
efficiency of the prep and lower yield.
• Cells lost in pelleting step at supernatant removal
– While spinning down the cells, be sure to note which side of the tube is pointing outside in the centrifuge, to
identify where the cell pellet is located. The cell pellet may not be visible by eye when working with low cell
numbers. Keep the cell pellet side of the tube facing downward and remove the supernatant from the upper side of
the tube. Leave < 20 μl of supernatant behind so that the pellet is not disturbed.
• Input amount too low
– Working with < 1 x 10⁵ cells is not recommended as recovery drops drastically below this number. Inputs in the
range 1–5 x 10⁵ cells require working with reduced buffer volumes for maximal recovery; follow “low input”
protocol guidance. Blood:
• Low input, small lysis volume needed
– If working with < 500 μl blood (minimum is 100 μl) in the standard lysis volume, the efficiency of binding to the
glass beads will be reduced as the DNA concentration is too low for efficient attachment. In such
cases a 3X reduction of the sample volume is needed. Use the “low input” protocol to establish optimal binding
conditions and improve yields.
• Leukocytes lost with supernatant removal during erythrocyte lysis
– After spinning down the leukocytes during the erythrocyte procedure, be sure to note which side of the tube is
pointing outside in the centrifuge, to identify where the leukocyte pellet is located. The pellet may not be clearly
visible by eye when working with low input amounts or certain frozen blood samples. Keep the pellet side of the
tube facing downward and remove supernatant from the upper side of the tube. Leave < 20 μl of supernatant
behind so that the pellet is not disturbed.
• Blood was thawed before adding RBC Lysis Buffer
– Thawing blood samples before adding RBC Lysis Buffer will result in nuclease activity, leading to a significant
reduction in DNA size and yield. Keep frozen blood samples frozen, add cold RBC Lysis Buffer directly to the
frozen samples, and carefully follow the guidance in the protocol for handling frozen blood samples.
• Blood sample is too old
– Fresh (unfrozen) whole blood should not be older than a week. Older samples will show a progressive amount of
DNA degradation and loss of yield.
• Excess supernatant left behind after erythrocyte lysis
– If there is excess protein in the lysate prior to the addition of isopropanol for the precipitation step, the
contaminating protein inhibits proper binding of the DNA to the beads. The precipitated DNA will float within the
lysate and cannot bind to the beads efficiently. Additionally, the glass beads will tend to get stuck in the bottom of
the 2 ml tubes. It is therefore very important to remove as much of the hemoglobin-containing supernatant as
possible from the erythrocyte pellet during a blood prep; do not leave more than 20 µl behind.
DNA Degradation
• Purified DNA sample kept at elevated temperatures too long
– Although incubation at 56C and 37C helps to resuspend HMW DNA, particularly UHMW DNA, extended
periods of heating HMW samples should be avoided, as this may result in DNA damage and eventually size

29
reduction. Incubation time should not exceed 15–30 minutes for 56C, 1–3 hours for 37C and overnight
incubation at room temperature. Samples are safe for long term storage at 4C.
• Shearing introduced by inappropriate handling
– UHMW DNA should always be pipetted using wide bore pipette tips and vortexing should be avoided. Extended
heating at elevated temperatures will also negatively affect DNA fragment length negatively. DNA samples
purified using maximum agitation speeds have shorter fragment lengths; these can be pipetted with regular pipette
tips and can be vortexed briefly.
Blood:
• Blood sample is too old
– Fresh (unfrozen) whole blood should not be older than a week. Older samples will show a progressive amount of
DNA degradation and loss of yield.
• Blood sample was thawed before adding RBC Lysis Buffer
– Thawing blood samples before adding RBC Lysis Buffer will result in nuclease activity, leading to a significant
reduction in DNA size and yield. Keep frozen blood samples frozen, add cold RBC Lysis Buffer directly to the
frozen samples, and carefully follow the guidance in the protocol for handling frozen blood samples.
Eluted DNA Difficult to Dissolve
• DNA bound to glass beads was allowed to dry out
– During washing and elution, it is important to prevent the bound DNA from drying out. Once a buffer is removed,
add the next buffer quickly to keep the DNA wet. This will lead to optimal DNA solubility.
• Too much input material used
– If the suggested input amounts are exceeded [1 x 10⁷ for cells at max agitation speed, 5 x 10⁶ cells for low
agitation speeds, or 2 ml blood], the optimal relationship between bead surface area and efficient wrapping of the
DNA around the beads is not maintained. This can produce excessive compacting and tangling of the HMW DNA
and inefficient resuspension of the DNA during the elution step. Reduce the input amount per the
recommendations.
• Binding of DNA to the beads was carried out for too long
– Do not exceed the recommended binding time (4 minutes in vertical rotating mixer or 8 minutes when working
with high input amounts), as this will produce excessive compacting and tangling of the HMW DNA and lead to
inefficient resuspension of the DNA during elution.
• Incomplete resuspension or cell pellet at nuclei preparation step
– Clumped cells that are not completely resuspended during the nuclei preparation steps may result in tangled DNA
aggregates that cannot be dissolved completely after elution. Pay special attention to complete resuspension and
lysis of the cells during the nuclei preparation step to obtain best results.
Blood:
• Leukocyte pellets not completely resuspended
– When working with frozen blood or blood that is several days old, leukocytes tend to be sticky and difficult to
resuspend. Clumped cells that are not completely resuspended during the leukocyte pelleting steps and the nuclei
preparation step may result in DNA aggregates that cannot be dissolved completely after elution. Ensure cells are
completely resuspended after all pelleting steps to obtain best results.
• Too much time taken for the erythrocyte lysis
– Proceed through the erythrocyte lysis as rapidly as possible. Extended incubation with the RBC Lysis Buffer
reduces leukocyte viability, causing stickiness and difficulty in resuspension.
Protein Contamination
• Too much input material used, Proteinase K efficiency reduced
– When sample input is exceeding the recommended amounts samples will be too viscous, resulting in reduced
Proteinase K efficiency and incomplete protein removal.
• Undissolved DNA falsely interpreted as protein contamination
– If eluted DNA has not completely dissolved, this will result in some turbidity of the solution, that may be
detectable by eye and will also affect the A260/A230 ratio of DNA samples. Upon complete dissolving of the DNA
the A260/A230 will go back to higher values that are typically > 2.0 if the DNA is clean.
30
Blood:
• Incomplete erythrocyte lysis
– If the erythrocyte lysis steps are carried out too quickly, a substantial amount of hemoglobin will be carried over
into the nuclei lysis (which is when the Proteinase K is added). Due to the larger amount of hemoglobin, the
Proteinase K activity present may not be sufficient to degrade all of it, resulting in protein contamination. Follow
the guidance on erythrocyte lysis times carefully to avoid protein contamination.
• Too much supernatant left on leukocyte pellet
– If too much supernatant is left on the leukocyte pellet during the erythrocyte lysis steps, a substantial amount of
hemoglobin will be carried over into the nuclei lysis (which is when the Proteinase K is added). The amount of
Proteinase K used in the nuclei lysis will be insufficient to handle that level of protein, resulting in protein
contamination. Follow the detailed guidance on supernatant removal to avoid protein contamination.
• Sample is very erythrocyte-rich (e.g., rabbit blood)
– The blood of some animal species, like rabbit, is extremely rich in erythrocytes and these erythrocytes are not fully
depleted during lysis. As a result, there will be significant carryover of protein into the nuclei lysis, and the
capacity of the Proteinase K used during that step will be overwhelmed. Work with reduced input amount (200 µl
instead of 500 μl) to ensure complete protein removal.
RNA Contamination
• RNase incubation step omitted in cell protocol
– Cultured cells typically have high levels of RNA. To allow for complete RNA removal, the protocol includes a 2-
step lysis procedure in which cell walls are lysed while nuclei are kept intact to keep the viscosity low in the
lysate. This allows optimal performance of the RNase A to degrade the RNA that is released from the cytosol. Be
sure to incubate samples with RNase A for at least 2 minutes at room temperature. Incubation is not necessary for
leukocytes, as their RNA content is low following the erythrocyte lysis procedure.
Ratio A260/A230 > 2.5
• Slight variations in EDTA concentration in eluates
— If the EDTA available in the elution buffer complexes with magnesium or calcium cations, which may be
associated with the isolated genomic DNA in small amounts, this will lead to small differences in the free EDTA
concentration in the eluate. At NEB, we have observed EDTA has a strong influence on the 230 nm absorbance
and a minute concentration reduction of free EDTA may lead to a higher than usual A260/A230 ratio. In some cases,
this ratio exceeds a value of 3.0 and is consistent with highly pure samples. In these cases, the elevated value does
not have any negative effect on downstream applications.

31
Ordering Information
PRODUCT NEB # SIZE
Monarch HMW DNA Extraction Kit for Cells & Blood T3050S/L 5/50 preps
Monarch DNA Capture Beads T3005L 200 Beads
Monarch Collection Tubes II T2018L 100 collection tubes
Monarch Bead Retainers T3004L 100 Retainers
Monarch gDNA Nuclei Prep & Lysis Buffer Pack T3059L 1 pack; 20 ml of each buffer
Monarch RBC Lysis Buffer T3051L 160 ml
Monarch gDNA Wash Buffer T3015L 60 ml
Monarch gDNA Elution Buffer II T3056L 20 ml
Monarch RNase A T3018L 1 ml
Proteinase K, Molecular Biology Grade P8107S 2 ml
Revision History
REVISION # DESCRIPTION DATE
1.0 New Document
2.0 Updated protocol text. Updated DNA storage text in final step of the
protocol
Added additional guidance for frozen blood
1/21
2.1 Added guidance about preventing bound DNA from drying out on the
beads
4/21
32
How to Recycle Monarch Kit Components*
This product is intended for research purposes only. This product is not intended to be used for therapeutic or diagnostic purposes in humans or animals.
This product is covered by one or more patents, trademarks and/or copyrights owned or controlled by New England Biolabs, Inc. For more information about commercial
rights, please email us at [email protected]. While NEB develops and validates its products for various applications, the use of this product may require the buyer to obtain
additional third-party intellectual property rights for certain applications.
B CORPORATION™ is a trademark of B Lab, Inc.
BIONANO GENOMICS® is a registered trademark of BioNano Genomics, Inc.
10X GENOMICS® is a registered trademark of 10X Genomics, Inc.
BIO-RAD® and CHEF-DR® are registered trademarks of Bio-Rad Laboratories, Inc.
PAXGENE® is a registered trademark of PreAnalytiX, GmbH.
QUBIT® is a registered trademark of Molecular Probes, Inc.
NANODROP® is a registered trademark of Nanodrop Technologies, Inc.
EPPENDORF® and EPPENDORF LOBIND® are registered trademarks of Eppendorf AG.
THERMO SCIENTIFIC® is a registered trademark of Thermo Scientific, Inc.
PACIFIC BIOSCIENCES® is a registered trademark of Pacific BioSciences of California, Inc.
OXFORD NANOPORE TECHNOLOGIES® and GRIDION® are registered trademarks of Oxford Nanopore Technologies.
RNALATER® is a registered trademark of Ambion, Inc.
UNCHAINED LABS® and LUNATIC® are registered trademarks of Unchained Labs Corporation.
TRINEAN® and DROPSENSE® are registered trademarks of Trinean NV.
LABCHIP® is a registered trademark of Caliper Life Sciences, Inc.
BIOANALYZER®, FEMTO PULSE® and TAPESTATION® are registered trademarks of Agilent Technologies, Inc.
HULAMIXER® is a registered trademark of Life Technologies AS.
© Copyright 2021, New England Biolabs, Inc.; all rights reserved.